by: ms. abeer helwa 1. create a word document 2 blank document templates to create a new blank...
TRANSCRIPT

1
MICROSOFT WORD 2013 By: Ms. Abeer Helwa
2
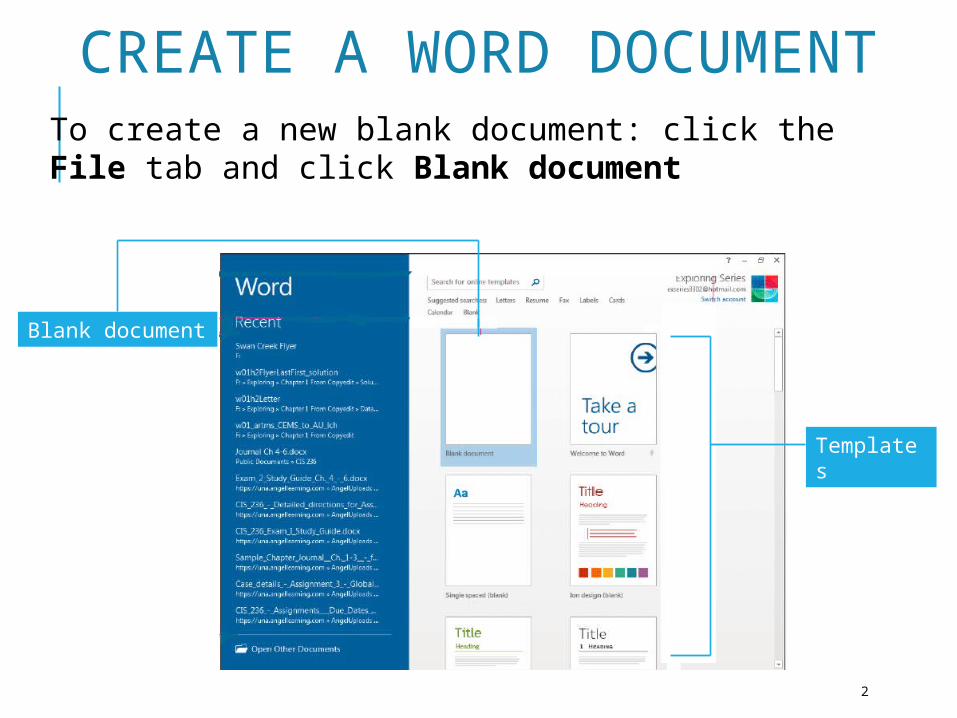
CREATE A WORD DOCUMENT
Blank document
Templates
To create a new blank document: click the File tab and click Blank document

3
THE WORD WINDOW
Quick Access Toolbar
Ribbon
Title bar
Collapse the Ribbon
Vertical scroll bar
Zoom slider
ViewsStatus Bar

4
THE WORD WINDOW
•Status bar: It is a bar At the bottom of the Word window which keeps you apprised of information in your document such as, words and page count, and your current position.
•The Zoom slider allows you to enlarge or reduce the onscreen size of the document.

5
CUSTOMIZE THE QUICK ACCESS TOOLBAR
1. Click the Quick Access Toolbar and select from a list of commands.
2. If the command that you want to include on the toolbar is not on the list, you can right-click the command on the Ribbon and click Add to Quick Access Toolbar.
3. You can remove a command from it by right-clicking the icon on the Quick Access Toolbar and clicking Remove from Quick Access Toolbar.
Customize Quick Access Toolbar
Repeat (or Redo)
Undo

6
CHANGING ZOOM SETTINGS•Changing the size of text onscreen does not actually change the font size of a document.
•To change the document zoom, click the View tab and select Zoom from the Zoom group.
•Or you can drag the Zoom slider in the Status Bar.
Zoom Options
Zoom Out and Zoom In
Zoom Slider

7
REUSE TEXT To reuse text from a previously created document into a new document:1. Position the insertion point to where the text is
to be inserted.2. Click the Insert tab.3. Click the Object arrow.4. Click Text from File5. Navigate to the location of the saved document
and double-click the file name.
Insert text from file
Object arrow

8
SAVE A DOCUMENTTo save a document:1. click the File tab and click Save or Save As.2. Click Computer and click Browse to navigate to
the desired location.3. Provide a file name and either accept the
default type (Word Document) or click the Save as type arrow and select another format.
Select to save to on your computer
Click to navigate to a folder on the selected location

9
SAVE VS. SAVE AS• If you open a document and plan to save it with
the same file name and in the same location from which it was opened, choose Save.
• Otherwise, to change the save location, the file name or type, choose Save as.

10
CLOSE A DOCUMENT To close a Word document: click the File tab and click Close.

SELECTING TEXT IN WORD
11

12
SETTING INDENTSTo apply a paragraph indentation:
1. Select the text2. Click Home tab.3. Click the Paragraph Dialog Box Launcher, to
set paragraph Indentation
Indents
Special indents
Paragraph Dialog Box Launcher

13
SETTING INDENTS• First line indent, in which the first line of each
paragraph is set off from the left margin. • Hanging indent, where the first line of a source
begins at the left margin, but all other lines in the source are indented.
First Line indent
Hanging indent

BORDERS AND SHADING
14
• Border is a line that surrounds a paragraph, a page, a table, or an image.
• Shading is a background color that appears behind text in a paragraph, a page, or a table.

15
APPLYING BORDERS AND SHADING
1. Select the text
2. Click the Borders and Shading arrow in the Paragraph group on the Home tab and select Borders and Shading.
3. When Borders and Shading dialog box displays, select the borders or shades that you want to include in your document.

16
APPLYING BORDERS AND SHADING
Preview
Color
Width
Shading tab
Borders tab
Style

17
RESIZE PICTURESYou can resize a picture by doing the following:
1. Right-click the picture then select Size and Position.
2. Type the Height and the Width in the boxes and pay attention to the measurement unit
3. Click on OK

18
ROTATE PICTURESYou can rotate a picture by doing the following:
1. Select the picture.2. Select the rotation option from Rotate arrow in
the Arrange group on the Format tab.

19
PICTURE LAYOUT OPTIONS• Layout Options simplifies text wrapping around an
object.
• The Layout Options control is located next to a selected object.
• Layout options are: Wrapping In Line with Text, Square, Tight, Through, Top and Bottom, Behind Text, and In Front of Text.
Wrap Text
Layout Options

INSERTING WORD ART
20
• WordArt is a feature that modifies text to include special effects, including colors, shadows, gradients, and 3-D effects.
• To apply WordArt:1. Select text to be formatted.2. Click the Insert tab.3. Click WordArt in the Text group.4. Select a WordArt style.
WordArt

MERGING CELLS IN TABLES To merge multiple cells into one cell:
1. Select the rows or column in which to merge cells.
2. Click the Layout tab and click Merge Cells in the Merge group.
Merge Cells

SPLITTING CELLS IN TABLES To split a single cell into multiple cells :
1. Select a cell to split.
2. Click Split Cells in the Merge group.
3. Respond to selections in the Split Cells dialog box and click OK.
Split Cells

23
CHANGING ROW HEIGHT AND COLUMN WIDTH
To adjust row height and column width:1. Select the column or row that is to be adjusted.2. Click the Cell Size group on the Layout Tab.3. You can then indicate your measurement in
inches.
Height and Width

CELL ALIGNMENT
24
• You can align cell contents both vertically and horizontally within the current cell.
• To align text in a cell:click the cell and select an alignment option in the Alignment group on the Layout tab.
Align text within a cell

APPLYING TABLE STYLES
25
1. Click an empty area of a table cell and then click on the Design tab.
2. Open the Table Styles list and select the style that you want to apply.
Table Styles gallery

26
ALIGNING TABLES• Table alignment refers to the position of a table
between the left and right document margins.• To change table alignment: right-click an empty
area of a table cell and select Table Properties.
Align a table horizontally