by maestro purpose requirements - pc...
TRANSCRIPT

By Maestro
Purpose In this tutorial you will learn how to add particles, glows or sounds to any model (weapon,
armor, monster, prop, or town) in the game using point helpers in 3ds max 7 for use in Fate. For
this tutorial we will be making a sword that flames (much more intensely than the flame damage
applied in the game), smokes and glows.
Requirements You must have 3ds max 7 in order to import your finished models into fate. IF YOU ARE
USING MAX8 OR 9 STOP NOW! MAX 9 FILES ARE NOT BACKWARDS COMPATIBLE
AND YOU WILL LOSE YOUR WORK. (I found out the hard way)
Also you will need the mod kit which can be found in the mod archive. In it are the exporters for
putting files in screwdriver format which the game recognizes. Simple copy all the files in max7
exporters to the plugins folder of 3ds max. When you start the game under file – export the
formats .ams, .mdl .sma .sms .scn will now appear. We also will be using the sword model from
the samples in the mod kit (though any model will do).

1. Preparing the Blade
Navigate to “\fate_modkit\MOD KIT\SAMPLES\SWORD\sword3.max” which we will use for
this tutorial. Maximize the front view so that the point helpers we add will be exactly on the
sword not floating in dead space, necessitating repositioning.
a. freezing the model. You’ll want to freeze the model so that it does not get in the way. Left
click on the model to select it. Then Right click on the model. Select “Freeze Selection”. The
model will turn a lighter grey and be uneditable until you right click and select “Unfreeze All.”
Now you can add and select point helpers on
top of this while using the blade as a guide. Later
we will remove the blade but for now we need it
as a reference.

2. Point Helpers
a. Go to the create panel on the right click on the helpers tab and select point. Or go to create –
helpers – point.
b. Parameters. In the
helpers panel once
you’ve selected pointers
there are parameters
you can change. First
select “cross” and
uncheck any others. The
size of the point helper
has no effect on the
particle emission in the
game that is completely
controlled by the
particles.dat. Therefore,
select a size that doesn’t
overlap your other
pointers and make them
difficult to distinguish.
Pretty much for most
things you will be
selecting a number from
0.1-1.0 unless you’re
modding the town. For
this I selected 0.2 as my
size.
c. Adding the points.
Position your mouse on
the lowest point of the
blade and left click to
add a point helper.
(Now at this point you
can continue to add
points but you have to
name them and so if
you add them all first
you might miss one. If
they are not named they
will do nothing in the
game)
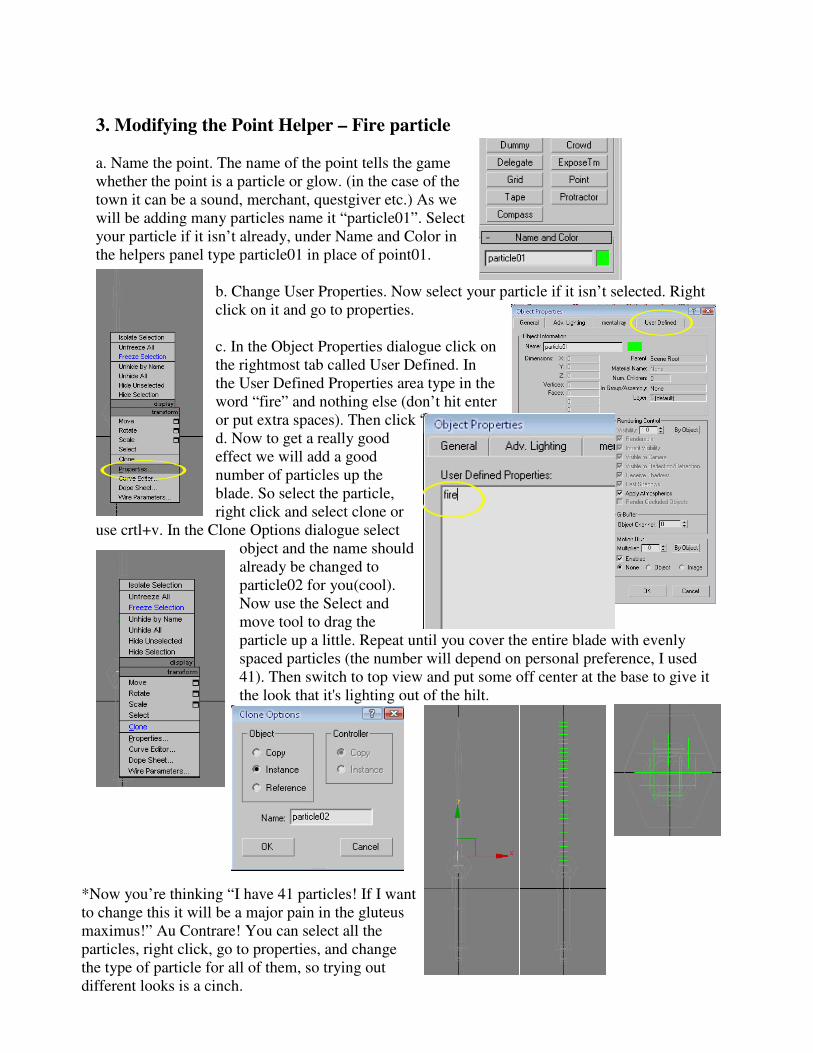
3. Modifying the Point Helper – Fire particle
a. Name the point. The name of the point tells the game
whether the point is a particle or glow. (in the case of the
town it can be a sound, merchant, questgiver etc.) As we
will be adding many particles name it “particle01”. Select
your particle if it isn’t already, under Name and Color in
the helpers panel type particle01 in place of point01.
b. Change User Properties. Now select your particle if it isn’t selected. Right
click on it and go to properties.
c. In the Object Properties dialogue click on
the rightmost tab called User Defined. In
the User Defined Properties area type in the
word “fire” and nothing else (don’t hit enter
or put extra spaces). Then click “OK”.
d. Now to get a really good
effect we will add a good
number of particles up the
blade. So select the particle,
right click and select clone or
use crtl+v. In the Clone Options dialogue select
object and the name should
already be changed to
particle02 for you(cool).
Now use the Select and
move tool to drag the
particle up a little. Repeat until you cover the entire blade with evenly
spaced particles (the number will depend on personal preference, I used
41). Then switch to top view and put some off center at the base to give it
the look that it's lighting out of the hilt.
*Now you’re thinking “I have 41 particles! If I want
to change this it will be a major pain in the gluteus
maximus!” Au Contrare! You can select all the
particles, right click, go to properties, and change
the type of particle for all of them, so trying out
different looks is a cinch.

3a. Modifying the Point Helper – Smoke
a-b. Repeat steps a & b of section 3 (create point, name it particle34, right click, go to properties)
You should put this particle at the top of the sword if you want to see the effect or it will get
swallowed up by the other particles essentially. I would also offset it slightly to the right or left
of the other particles so you can distinguish it.
c. Go to the rightmost tab User Defined. In the User Defined Properties space type “smoke” or
any of the smoke particles from the particles.dat (smoke is a little darker, steam is very light
[looks good for pipe smoke] chimney smoke is large and dark and more intermittent, purple
smoke is well purple).
3b. Modifying the Point Helper – Sparks
a-b. Repeat steps a-b. from 3&3a. create about 4 points concentrated at the top
of the blade to get rising sparks from the flame to make more real.
c. Go to the rightmost tab User Defined. In the User Defined Properties space
type “firespark”
3c. Modifying the Point Helper – Glow
a. Create another point about halfway up the sword and slightly offset to
the right or left. Name this “glow01” naming it glow now makes the game
look in the glows.dat for the type of glow to use.
b. Right click on the glow, go to properties.
c. Go to the rightmost tab User Defined and in the User Defined Properties space type “fireglow”
Finally, right click anywhere and select unfreeze all, to show your model again.
*Now, you could stop here and have a lovely flaming sword. The next section
will show you how to remove the blade and have a true flamesword. The final
section will show you how to create a custom particle to get just the type of fire
you want.

4. Removing the blade. a.First select your model. b.Next go to the modifiers tab c.Expand Editable Mesh
Click on the sword hilt and click polygon.
not the point helpers.
d.Select the blade in the e.Press delete. f.Click on Editable Mesh.
view window by dragging to unselect poly.
a box around just the blade,
what you select will be red

You’re Done! Well not quite… 5. Creating a Custom Fire Particle
Here is the finished sword in game:
Now it looks ok but it doesn’t look convincingly like
a blade of fire and when you start swinging it around
it becomes even more obvious as the flame trails
behind and you’re just waving a hilt around.
Now we could change the kind of particle we’re
using. To do this we could carefully select all the
fire particles—not the smoke, sparks, and glow—
and change it to bigfire, candlefire, spellfire,
dragonfire, or greaterdragonfire. But candlefire is
way to small, bigfire is a little big but I’ll probably
use it for another model; however, spellfire and the
dragonfires present a problem because they flash on
and off. There is also small fire but that is the default
in the game and what fun is that? The spell fire is the
most solid of the fires and therefore most useful for
making a solid looking blade but the flashing is no
good—your blade keeps disappearing and
reappearing, very annoying.
This leaves us with one choice: to create a new
particle.
a. Go into your mod folder create a folder called
flamesword (or whatever you like) then create a
folder in it called particles, then within that create a
particles.dat file (make a notepad file then change it
to particles.dat, when it asks if you want to change
the type of file click yes—if you don’t see the .txt or
.dat extensions on your file you need to go to
folder options – view – unclick hide extensions
for known file types).
b. Then go into your game root directory, go into
the particles folder and open particles.dat. In
there copy the particle fire. You have to be sure
to copy EVERYTHING from [PARTICLE] to
[/PARTICLE]. It should look like this.
Paste this into the particles.dat you created in
MODS/flamesword/PARTICLES/
Now we can begin to edit the particle.

5a. Explanation of the Particle Tags
Now I want to be clear, I don’t profess to know exactly what each tag does but I went ahead and
changed the values and empirically recorded this data which I will share with you, to hopefully
take some of the mystery/busywork out of making your particle.
<NAME>: Change this to SWORDFIRE or whatever you like but DON’T leave it as FIRE or
you will replace every fire in the game with your new animation and it will look strange.
<BLUR>: 1or0. This decides whether the sword leaves a blurred trail behind it when you swing
it. For giving your sword more of an illusion of having a blade this is a must, so put 1.
<FREQUENCY>: 0-1 Changing this to 1 will make your sword only appear once a frame so
your sword will blink on and off. Leaving it at .1 will make it stay consistently visible. I
recommend leaving this one at .1.
<TEXTURE>: This decides which picture to use for the particle’s face. This is important if you
want to create a different color blade. The particles green, blue, purple and redspellfire exist, but
as I said earlier the spellfires blink on and off. So to create a colored fire particle select one of the
other png’s or create your own custom one.
<SIZE>: This will decide the overall size that your particles will take up not the size of the
particles themselves. Increasing this will make your blade very fat. The 1.5 that is there is a good
size but you can play with it. Past 2 looks a little overdone and envelopes your character while he
walks and fights.
<MAXIMUM_PARTICLES>: This decides how many fire particles will be packed into the
space you specified. 200 is the default which gives a more transparent flame but the spellfires
use 500 which I prefer because it gives you a very intense solid flame that really looks like it
would hurt. Beyond 500 there’s not much difference if any.
<FADE_SPEED>: This is 0 or a negative number—positive numbers have no effect and mess up
some lamps (huh?). This decides how fast the particles will fade away. The default for all fire is
0. Now this is useful because when you swing your sword it leaves behind about 5 after images
as it were in the air that give the illusion of a flaming trail, which is cool, though the blade kind
of disappears from the hilt as you swing then catches up to the hilt. But interestingly if you put in
-1000 or higher (lower?) the sword doesn’t leave behind many trails in the air and the flame
blade stays on the sword the whole time, while you fight and while you run. The downside? It
doesn’t look as good in the splash screen but if you go with -1000 it’s not too big a deal. At -
2000 the blade leaves no trail and stays exactly on the hilt. Somewhere between -2000 and -3000
the blade disappears. I really like the look of -1000 but you might like the big trails.

<FRAMES>: This one needs to be 4 for all fire. If you change it to 0 your flame turns into little
beads of fire goes straight up into the sky and never comes back (rofl, its really funny you should
do just to watch once, “hey dude! My swords’ outa gas, when are they gonna invent gas station
in this town?). Ahem, and changing it to 10 makes your flame turn into jagged boxes go up into
the sky and come back in a few seconds. So I say leave it at 4, but that’s just me.
<FRAME_SPEED>: This one is important. This decides how many frames the fire animation
takes. A number closer to 1 will make the animation linger then disappear. The dragonfire uses
.8 so that it can create a big puff of flame and then vanish as it should. But for the sword you
want a consistent animation. Therefore I recommend. .1 and lower. To low (.03 and lower) and
the animation of the particles blossoming into balls of fire doesn’t have enough time and your
flame becomes sporadic and incomplete. I settled on .08. It gives a nice solid robust flame that
doesn’t flicker.
<GRAVITY>: This is also important. The higher the middle number the less your particles will
rise, as they are held down by gravity. This will give your blade a much more compact feel but
takes away the licking flame feel at the top. A low number will let your flames soar up into the
sky. I prefer to leave it at 4 but changing it would give you a longer blade in a way if you didn’t
want to actually make more particles or want to change someone’s mod.
<SCALE_SPEED>: This one is linked to scale min and max. This decides how fast your blade
grows to the scale specified in scale min and max. The scale effects the particle size, unlike size
that effects the space the particles can take up. The default -.01 is so slow that each flame particle
grows a little but never reaches the full size in the scale before it fades. This is what gives the
blossoming fire effect to the flame. But if you raise the scale speed to a positive number it
actually reaches the scale size very quick or instantly if you keep going high enough. So the
blade becomes like a big poofy candle flame. Which you might like, I think it’s over the top. I
say leave this one at -.01.
<MIN_ROTATION_SPEED>, <MAX_ROTATION_SPEED>: This controls how fast the
particles spin around. It creates an interesting affect in the splash screen, in game play it’s
unnoticeable. I wouldn’t bother with this one.
<MIN_STARTING_OFFSET>,<MAX_STARTING_OFFSET>: This will actually offset your
flame from your hilt. I’m thinking there’s a way this would be useful if you had some sort of gas
powered something where at the point the gas is, the flame appears above it? Anyway all the
flames have .18 except for the candle .1, so I would just leave it.
<MIN_STARTING_VELOCITY>, <MAX_STARTING_VELOCITY>: This will give velocity
to your flame while your standing still. In otherwords it makes it look like it does when you’re
running even though you are standing still. Like as if a strong wind were blowing it. So if you
want the illusion of wind, then I say go for it!

<MIN_STARTING_SCALE>, <MAX_STARTING_SCALE>: This is the size of the individual
particles. Decreasing this too much has no effect and makes, the lamps have errors and or makes
your blade disappear (probably because you go smaller than the png for the particle can
display?). Increasing this on the other hand will make your sword envelope your entire character
in a ball of flame at about 5min 10max. This would be a really cool idea for an armor mod or
helm mod. You could assign little flame particles to the surface, then have one particle in the
center that envelopes you and you’d be this total fire ball. Or it would make a really cool
monster: Fireball or Meteor. Or at a smaller scale you could have these blazing gloves. Anyway.
<MIN_STARTING_ZORIENTATION>, <MAX_STARTING_ZORIENTATION>: This has to
do with the rotation of the particles I’m assuming. All the particles have this identical so I would
leave it.
<MIN_STARTING_OPACITY>, <MAX_STARTING_OPACITY>: This changes the opacity
(amount that light cannot go though) the particles. Essentially, it is how much your overall flame
is transparent (see-through). 255 is the max and looks the best. The smokes smaller numbers, so
if you want your blade to be lighter and more translucent, you can turn this down but all the
flames use 255 in the particles.dat.
<MIN_LIFETIME>, <MAX_LIFETIME>: This makes the particles linger but it’s very subtle.
Perhaps if you change the frame speed it would have more effect. In greaterdragonfire this is
higher but so is the frame speed in that one. I would leave it at the default 1.5 and 2.
# the following are for flipbooks only
<MIN_ANIMATION_LIFETIME>:1
<MAX_ANIMATION_LIFETIME>:1
<MIN_STARTING_FRAME>:0
<MAX_STARTING_FRAME>:0
If you change anything in this last section the animation gets off like with the <frame>: tag. So I
would leave this alone and then you are done, my friend!!!!
5b. Assigning your particle
Now that you have created your particle, go back into the max file select all the fire particles not
the smoke, sparks or glow (if you offset them a little like I said, this should be easy). Right click
go to properties - User Defined, and change it to swordfire or whatever you called your particle.

6. Exporting your Sword
Go to File – Export. Now if you copied the exporters into the plugins folder and
restarted max then in the dropdown for filetype should be screwdriver model .MDL.
Navigate to the root directory for Fate, go to the MODS folder, open the flamesword
folder or whatever you called it. Create a folder called “ITEMS”, name your sword
model with no spaces, click Save. The export dialogue will come up and it should
look like the picture below. Hit export and you are ready to try your sword.
7. Making the Flame Sword Item
Go to your game root directory/MODS/flamesword/ITEMS/ and create an items.dat. Go to the
Items folder for you game and open items.dat. Copy the information for one of the swords from
[ITEM] to [/ITEM]. Paste into your items.dat. After model change it to MODS/flamesword/
ITEMS/flamesword.mdl . Now go back to the flamesword folder create Icons folder and create
an icon and an alpha. In your items.dat after <icon>: type MODS/flamesword/ICONS and the
name of your icon. Rename the Sword. I personally added extra firedamage as well.
Create a mod.dat in the flamesword folder and load it up with Modman to try it out. Have fun!!
For more information on how to get this model into your game and/or make it modman
compatible visit the tutorial archive: https://forum.wildgames.com/showthread.php?t=4582
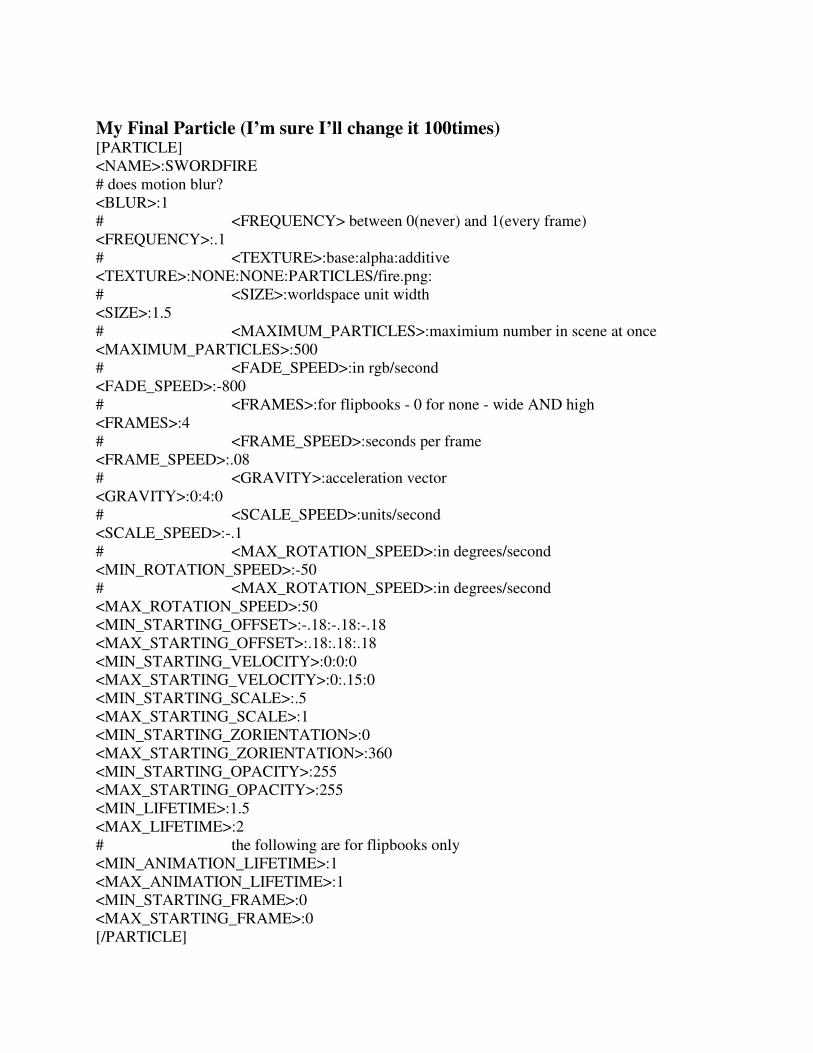
My Final Particle (I’m sure I’ll change it 100times) [PARTICLE]
<NAME>:SWORDFIRE
# does motion blur?
<BLUR>:1
# <FREQUENCY> between 0(never) and 1(every frame)
<FREQUENCY>:.1
# <TEXTURE>:base:alpha:additive
<TEXTURE>:NONE:NONE:PARTICLES/fire.png:
# <SIZE>:worldspace unit width
<SIZE>:1.5
# <MAXIMUM_PARTICLES>:maximium number in scene at once
<MAXIMUM_PARTICLES>:500
# <FADE_SPEED>:in rgb/second
<FADE_SPEED>:-800
# <FRAMES>:for flipbooks - 0 for none - wide AND high
<FRAMES>:4
# <FRAME_SPEED>:seconds per frame
<FRAME_SPEED>:.08
# <GRAVITY>:acceleration vector
<GRAVITY>:0:4:0
# <SCALE_SPEED>:units/second
<SCALE_SPEED>:-.1
# <MAX_ROTATION_SPEED>:in degrees/second
<MIN_ROTATION_SPEED>:-50
# <MAX_ROTATION_SPEED>:in degrees/second
<MAX_ROTATION_SPEED>:50
<MIN_STARTING_OFFSET>:-.18:-.18:-.18
<MAX_STARTING_OFFSET>:.18:.18:.18
<MIN_STARTING_VELOCITY>:0:0:0
<MAX_STARTING_VELOCITY>:0:.15:0
<MIN_STARTING_SCALE>:.5
<MAX_STARTING_SCALE>:1
<MIN_STARTING_ZORIENTATION>:0
<MAX_STARTING_ZORIENTATION>:360
<MIN_STARTING_OPACITY>:255
<MAX_STARTING_OPACITY>:255
<MIN_LIFETIME>:1.5
<MAX_LIFETIME>:2
# the following are for flipbooks only
<MIN_ANIMATION_LIFETIME>:1
<MAX_ANIMATION_LIFETIME>:1
<MIN_STARTING_FRAME>:0
<MAX_STARTING_FRAME>:0
[/PARTICLE]