building information modeling site safety submission guidelines
TRANSCRIPT

Version 1.0
Building Information Modeling
Site Safety Submission
Guidelines and Standards
(BIM MANUAL)

Building Information Modeling (BIM) Site Safety Submission Guidelines and Standards for Applicants
7/9/2013 Version 1.0 Page 2
This Page Intentionally Left Blank
Building Information Modeling (BIM) Site Safety Submission Guidelines and Standards for Applicants
7/9/2013 Version 1.0 Page 3
TABLE OF CONTENTS
1.0 ABOUT THIS DOCUMENT .................................................................................. 5
1.1 BIM SITE SAFETY SUBMISSIONS ................................................................................ 5
1.2 THE PROGRAMS BENEFITS........................................................................................... 5
1.3 GENERAL NOTES ............................................................................................................ 5
2.0 BIM SUBMISSION GUIDELINES ....................................................................... 6
2.1 GENERAL REQUIREMENTS .......................................................................................... 6 2.1.1 Introduction .................................................................................................................................... 6
2.1.1.1 The NYC DOB use of Digital Data ............................................................................ 6 2.1.2 Model Requirements ...................................................................................................................... 6
2.2 PROCESS AND QUALITY OF DELIVERABLES .......................................................... 7 2.2.1 Model Quality ................................................................................................................................. 7 2.2.2 Naming Convention ........................................................................................................................ 7
2.3 MODEL PROGRESSION .................................................................................................. 8 2.3.1 Version Control and Phasing ......................................................................................................... 8 2.3.2 Making Revisions............................................................................................................................ 8
3.0 SECTION 3 – BIM STANDARDS ......................................................................... 9
3.1 GENERAL .......................................................................................................................... 9 3.1.1 Software Requirements .................................................................................................................. 9 3.1.2 Digital Submittal Requirements .................................................................................................... 9 3.1.3 Digital Submittal Expectations / Requirements ........................................................................... 9
3.1.3.1 File Formats and submissions ................................................................................... 10 3.1.4 Naming Conventions .................................................................................................................... 11
3.1.4.1 File Naming Convention ........................................................................................... 11 3.1.4.2 Media and Identification ........................................................................................... 11
3.1.5 Accessing the DOB Revit Support Files ...................................................................................... 11 3.1.5.1 Using the Support Files ............................................................................................. 11
3.1.6 Supplied Revit Content ................................................................................................................ 11 3.1.6.1 Vehicles..................................................................................................................... 11 3.1.6.2 Conveyance ............................................................................................................... 12 3.1.6.3 Safety Barriers........................................................................................................... 12 3.1.6.4 Site Elements ............................................................................................................ 12 3.1.6.5 Street and Sidewalk Information ............................................................................... 13 3.1.6.6 Contacts Figures ........................................................................................................ 13 3.1.6.7 Revit Template .......................................................................................................... 14
3.1.7 Supplied AutoCAD Architecture Content .................................................................................. 14
3.2 CREATING CONTENT FOR SUBMISSIONS ON ALTERNATIVE SOFTWARE ..... 14 3.2.1 What you must include ................................................................................................................ 14
3.3 STEPS REQUIRED TO UTILIZE OR CREATE YOUR OWN REVIT CONTENT ..... 14 3.3.1 Using the correct parameters ...................................................................................................... 14 3.3.2 Note on Content Levels of Detail ................................................................................................. 15
4.0 SECTION 4 – PARAMETERS ............................................................................ 17
4.1 GENERAL ........................................................................................................................ 17 4.1.1 Data usage for Revit and AutoCAD ............................................................................................ 17 4.1.2 Parameters Utilized in the Permit Review Process .................................................................... 17
4.1.2.1 Vehicles..................................................................................................................... 17 4.1.2.2 Conveyance ............................................................................................................... 18 4.1.2.3 Safety Barriers........................................................................................................... 18 4.1.2.4 Site Elements ............................................................................................................ 18 4.1.2.5 Street and Sidewalk Information ............................................................................... 19 4.1.2.6 Contact Figures ......................................................................................................... 19
Building Information Modeling (BIM) Site Safety Submission Guidelines and Standards for Applicants
7/9/2013 Version 1.0 Page 4
5.0 SECTION 5 – NYC DOB BIM SUBMITTAL PROCESS ................................ 20
5.1 GENERATING ACCEPTIBLE FORMAT DOCUMENTS ............................................ 20 5.1.1 Exporting to Navisworks.............................................................................................................. 20 5.1.2 Exporting to Design Review. ........................................................................................................ 21 5.1.3 Creating your ZOHO Account .................................................................................................... 22 5.1.4 Uploading your Site Safety Models ............................................................................................. 24 5.1.5 Sharing your Site Safety Models with the DOB Reviewers ...................................................... 25
5.2 NOTES .............................................................................................................................. 26
5.3 ZOHO TROUBLESHOOTING ........................................................................................ 26
6.0 SECTION 6 – NYC DOB BIM REVIEW PROCESS ........................................ 27
6.1 ONCE MODELS AND DOCUMENTAION ARE RECIEVED...................................... 27 6.1.1 File and Requirements Check ..................................................................................................... 27
6.2 Receiving review results ................................................................................................... 27
6.3 Notifications ...................................................................................................................... 28 6.3.1 Notifications .................................................................................................................................. 28
6.3.1.1 Instruction to request start of work ........................................................................... 28 6.3.1.1 Close out instructions ................................................................................................ 28
7.0 APPENDIX A – APPLYING PARAMETERS ................................................... 29
7.1 GENERAL ........................................................................................................................ 29 7.1.1 Applying Parameters .................................................................................................................... 29
7.2 Linking to External documents with Relative Pathing ...................................................... 31 7.2.1 Setting up Relative Paths for linking to external documentation ............................................. 31
8.0 APPENDIX B – REVIT BEST PRACTICES ..................................................... 32
8.1 GENERAL ........................................................................................................................ 32 8.1.1 How to Use – Revit Standards ..................................................................................................... 32 8.1.2 DOB Revit Standards Version ..................................................................................................... 34
8.1.2.1 Building Elevations ................................................................................................... 34 8.1.3 Environment Setup ....................................................................................................................... 34
8.1.3.1 Import / Export Settings ............................................................................................ 34
8.2 BEST PRACTICES AND PROCEDURES ...................................................................... 34 8.2.1 General Guidelines ....................................................................................................................... 34 8.2.2 Restarting Revit ............................................................................................................................ 35 8.2.3 Compacting Central and Local Files .......................................................................................... 35 8.2.4 AutoCAD Files .............................................................................................................................. 35 8.2.5 Importing and Linking Files ........................................................................................................ 35 8.2.6 Views .............................................................................................................................................. 35 8.2.7 Modeling ........................................................................................................................................ 36 8.2.8 Saving ............................................................................................................................................ 36 8.2.9 Worksets ........................................................................................................................................ 36 8.2.10 Project Template .......................................................................................................................... 36 8.2.11 View Templates ............................................................................................................................. 36 8.2.12 Levels and Plan Views .................................................................................................................. 37 8.2.13 Creating Sheets ............................................................................................................................. 37
8.2.13.1 Project Information ................................................................................................... 37 8.2.13.2 Loading the Cover Sheet and Title Sheets ................................................................ 38 8.2.13.3 Drawing Information ................................................................................................. 38
8.2.14 Updates and Revisions ................................................................................................................. 39
9.0 APPENDIX C GLOSSARY .................................................................................. 40
9.1 GLOSSARY OF TERMS AND ACRONYMS ................................................................ 40

BIM Site Safety Submission User Guide
Building Information Modeling (BIM) Site Safety Submission Guidelines and Standards for Applicants
7/9/2013 Version 1.0 Page 5
1.0 ABOUT THIS DOCUMENT
1.1 BIM SITE SAFETY SUBMISSIONS
The Department’s new 3D Site Safety Plans Program will use Building Information Modeling (BIM) software to allow the
construction industry to create and electronically file site safety plans. The program enables the Department to virtually tour sites,
see step‐by‐step how a building will be built, readily visualize its complexities and challenges, and run tools to check for basic code
compliance prior to manual review. Under this program and initiative, site safety plans will be digitally submitted, amended and
reviewed, improving the compliance review process and accelerating the approval process like never before.
1.2 THE PROGRAMS BENEFITS
This new process will be a benefit to the public, the construction industry, as well as the New York City Department of Buildings
(DOB). The benefits are outlined below.
Increased Site Safety
o Safety risks will be identified early in the process before issues arise in the field;
Faster Approvals
o Three-Dimensional, real-time images and models enhance the communication between field inspectors and office
supervisors to help them resolve issues immediately; and
Better Service and Fewer Office Visits
o Site safety plans submitted through this process will be reviewed, modified and approved all through the online
document management website and tools.
1.3 GENERAL NOTES
Note: while this document focuses on the requirements of BIM submissions, it is important to note that all work will comply with
all applicable sections of Chapter 33 of the NYC Building Code and all OSHA 1926 Standards for construction. For site workflow
and procedure requirements such as the example below please refer to the applicable submission documents.
For all submissions, please include the following general note as a pdf to the Project Board element outlining the Material Handling
Plan which must be followed on all construction sites where applicable. The process of linking the pdf to the board is listed in
Section 7.2
Safety Logistic Plan Requirements:
Material handling Plan as required RS18-7 Section 26.7
This will pertain to all rack and pinion Hoists not just personnel hoists and all Construction Equipment.
1. Before a loaded boom is swung over a hoist, the hoist cage(s) must be brought down to its lowest level, and everyone must
exit the hoist. 2. At no time can any construction equipment come within two feet (24”) of any moving part of the hoist (excluding hoist
setup and jumping of the hoist). 3. At any time, if any construction equipment comes within fifteen feet of the hoist, a protocol must be established. This is a
minimum standard. If any equipment is to be used within the fifteen foot buffer, it must be included in the plan. 4. All crane signal personnel and hoist operator(s) must be in radio communication with each other during operations within
fifteen feet of the hoist. 5. Whenever a piece of construction equipment comes within fifteen feet of the hoist, at least one signal person must be
assigned to that operation. 6. If a loaded boom is swung over a hoist, see option one, and when the load is off the boom, the signal person lets the hoist
operator know that they can precede as normal. 7. If any construction equipment is to be permanently located within 15’ of the hoist it must be listed in this protocol. (State
whether or not this is the case)

BIM Site Safety Submission User Guide
Building Information Modeling (BIM) Site Safety Submission Guidelines and Standards for Applicants
7/9/2013 Version 1.0 Page 6
2.0 BIM SUBMISSION GUIDELINES
2.1 GENERAL REQUIREMENTS
In general, the New York City Department of Buildings’ Building Information Model (BIM) Guidelines and Standards for Site
Safety Submissions, which shall be followed by all those who wish to submit a 3D model for review, describes the processes,
procedures, and requirements that shall be followed for the preparation and submission of BIM Models for DOB reviews, as well as
to produce, release, and receive data in a consistent format. In order to achieve this goal, the DOB has chosen to utilize several
“Autodesk” products. Therefore, terminology and references that are unique to the “Autodesk” based software applications are
utilized throughout these Guidelines and Standards.
2.1.1 Introduction
The purpose of this manual is to provide support to applicants and contractors in the pursuit of permits within New York City.
Secondly, DOB seeks to encourage the use of Building Information Modeling (BIM) and related software products as a tool, which
would, amongst other things, assist in the review process and increase the level of safety on the jobsite and the surrounding area.
Several other benefits:
improve the decision making process reduce requests for information
produce better designs reduce change orders
reduce costs improve overall construction quality and schedule
This manual will be supported by content that is generated in Revit and AutoCAD Architecture to be reviewed in Navisworks
Manage. However if you are not using Revit or AutoCAD to create the model for submission, the requirement will be to provide
DOB with an nwd, nwc (Navisworks) or dwf (design review) file with the required information for review. This information is
detailed in Section 3.
2.1.1.1 DOB use of Digital Data
All BIM Models and other BIM related electronic files and data provided by an applicant shall always be through approved DOB
channels. DOB will provide example BIM electronic files and content for an applicant’s use and benefit but will not provide
building or site models relevant to an applicant’s permit.
2.1.2 Model Requirements
All BIM Models shall be developed in accordance with the most current version of DOB’s BIM Guidelines and Standards and shall
be compatible with the current version of the BIM application currently in use by the DOB and shall be provided to DOB as per the
latest version of “Navisworks” and Design review.

BIM Site Safety Submission User Guide
Building Information Modeling (BIM) Site Safety Submission Guidelines and Standards for Applicants
7/9/2013 Version 1.0 Page 7
2.2 PROCESS AND QUALITY OF DELIVERABLES
2.2.1 Model Quality
In addition to adhering to DOB Standards, the files submitted should follow good BIM practices. These should include, but are not
limited to the:
Maintenance of parametric linkages within the model at all times;
In the absence of DOB standards, use Industry Standard nomenclature for objects and spaces; and
Use appropriate and interoperable viewing, checking, and output file formats
TDOB requires that all Revit Models shall be developed using object-based elements only, such as Columns, Beams, Walls, Doors,
Windows, etc. along with their associated parametric information. This will benefit the review process.
2.2.2 Naming Convention
All models and files to be uploaded shall be named as per the following specified formatting. All names will be based on 4 fields,
each separated by an underscore.
The fields to be utilized are below:
FOLDER DESCRIPTION
Date YYYY-MM-DD
Boro Code MH, BX, BK,QN,SI
Revision Number XX
Address Must fully spell out street names i.e. Avenue, Street, Boulevard, etc.
Once submissions have been reviewed, the files will be appended with an ‘A’ or ‘D’ for approved/disapproved when returning file
to the applicant, for example: i.e. 2013-05-06_MH_01_56 Leonard Street-A
All other relevant documents submitted with the job must follow this same convention
i.e.: 2013-05-06_MH_01_56 Leonard Street_CD5
Note:
It is important that any Zoho Login Coversheets have their date field match the date listed in the name of the uploaded
documentation.
BIM Site Safety Submission User Guide
Building Information Modeling (BIM) Site Safety Submission Guidelines and Standards for Applicants
7/9/2013 Version 1.0 Page 8
2.3 MODEL PROGRESSION
2.3.1 Version Control and Phasing
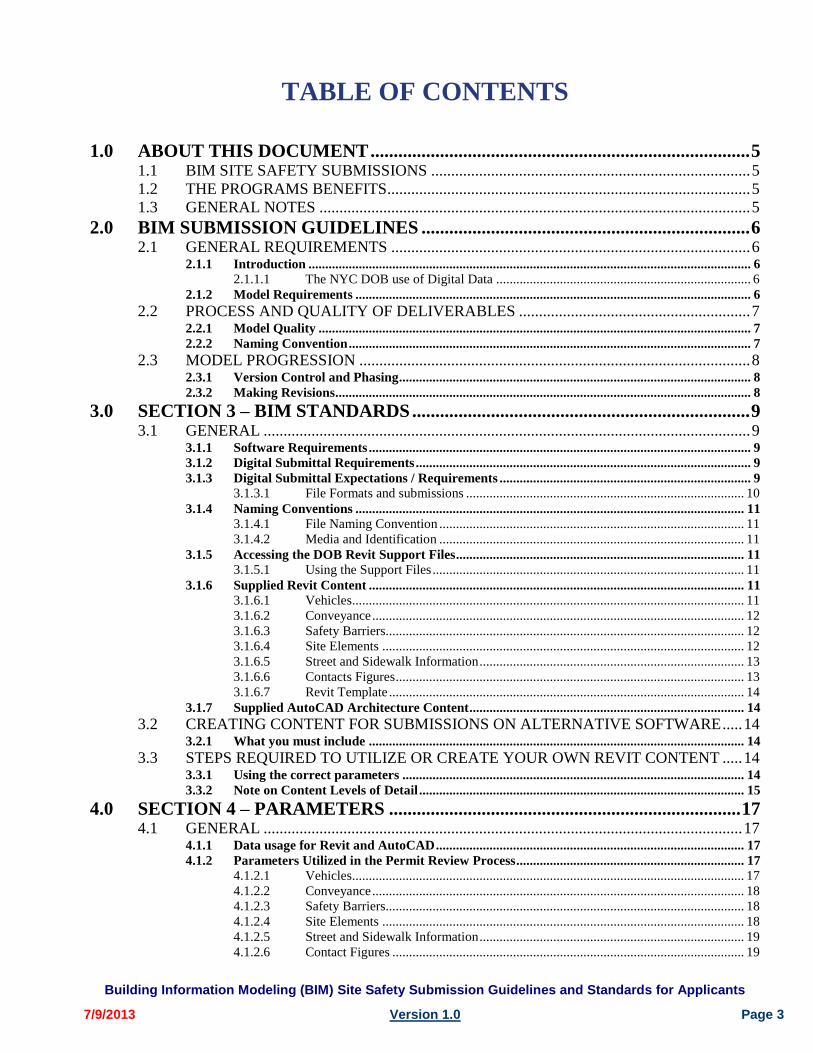
Models submitted showing progression or phasing should portray the project as a cumulative process, including the existing point in
time as a reference. Phasing of the project should allow the DOB Reviewer to easily see where the construction and site safety
precautions and materials will be at each step of the process.
Preferred Phases and naming convention for a submission are shown in the image below.
2.3.2 Making Revisions
Revision tracking is the process of recording changes made to a model after sheets have been issued. In Revit-based applications,
revisions are displayed and tracked using revision clouds, tags, and schedules. These elements are useful if you are submitting
updated or changed 2D documentation in dwf format but will not be useful for the 3D Navisworks model.
BIM Site Safety Submission User Guide
Building Information Modeling (BIM) Site Safety Submission Guidelines and Standards for Applicants
7/9/2013 Version 1.0 Page 9
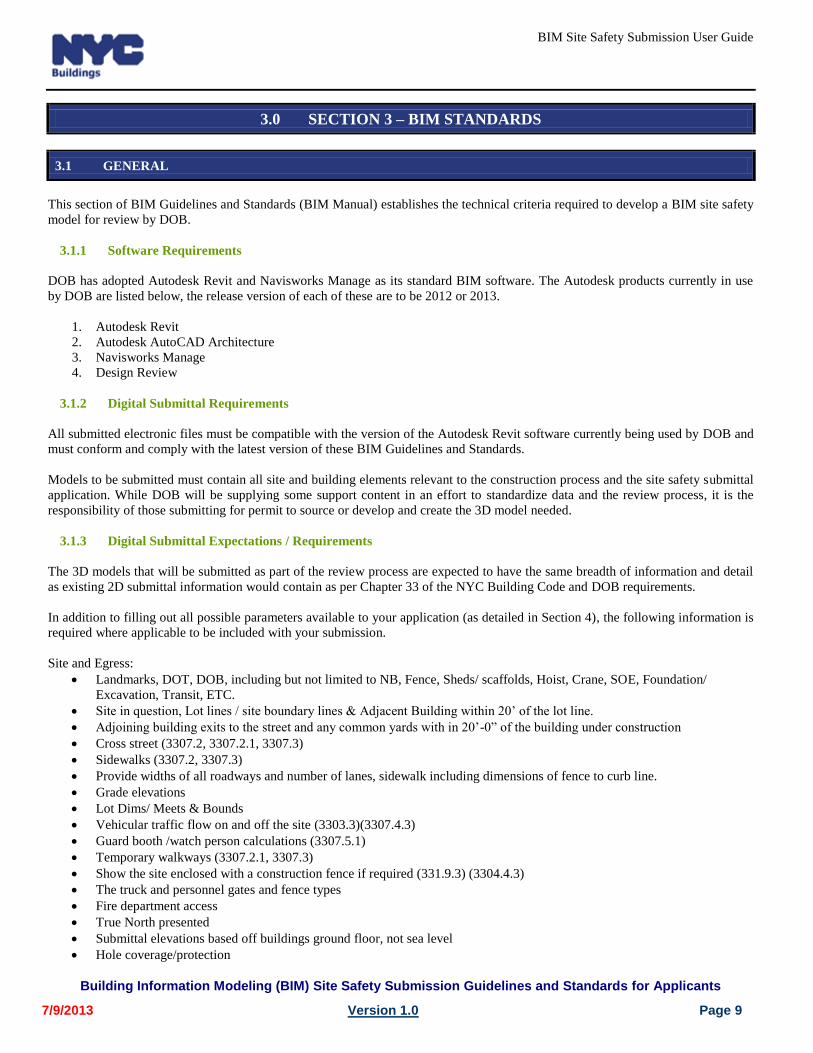
3.0 SECTION 3 – BIM STANDARDS
3.1 GENERAL
This section of BIM Guidelines and Standards (BIM Manual) establishes the technical criteria required to develop a BIM site safety
model for review by DOB.
3.1.1 Software Requirements
DOB has adopted Autodesk Revit and Navisworks Manage as its standard BIM software. The Autodesk products currently in use
by DOB are listed below, the release version of each of these are to be 2012 or 2013.
1. Autodesk Revit
2. Autodesk AutoCAD Architecture
3. Navisworks Manage
4. Design Review
3.1.2 Digital Submittal Requirements
All submitted electronic files must be compatible with the version of the Autodesk Revit software currently being used by DOB and
must conform and comply with the latest version of these BIM Guidelines and Standards.
Models to be submitted must contain all site and building elements relevant to the construction process and the site safety submittal
application. While DOB will be supplying some support content in an effort to standardize data and the review process, it is the
responsibility of those submitting for permit to source or develop and create the 3D model needed.
3.1.3 Digital Submittal Expectations / Requirements
The 3D models that will be submitted as part of the review process are expected to have the same breadth of information and detail
as existing 2D submittal information would contain as per Chapter 33 of the NYC Building Code and DOB requirements.
In addition to filling out all possible parameters available to your application (as detailed in Section 4), the following information is
required where applicable to be included with your submission.
Site and Egress:
Landmarks, DOT, DOB, including but not limited to NB, Fence, Sheds/ scaffolds, Hoist, Crane, SOE, Foundation/
Excavation, Transit, ETC.
Site in question, Lot lines / site boundary lines & Adjacent Building within 20’ of the lot line.
Adjoining building exits to the street and any common yards with in 20’-0” of the building under construction
Cross street (3307.2, 3307.2.1, 3307.3)
Sidewalks (3307.2, 3307.3)
Provide widths of all roadways and number of lanes, sidewalk including dimensions of fence to curb line.
Grade elevations
Lot Dims/ Meets & Bounds
Vehicular traffic flow on and off the site (3303.3)(3307.4.3)
Guard booth /watch person calculations (3307.5.1)
Temporary walkways (3307.2.1, 3307.3)
Show the site enclosed with a construction fence if required (331.9.3) (3304.4.3)
The truck and personnel gates and fence types
Fire department access
True North presented
Submittal elevations based off buildings ground floor, not sea level
Hole coverage/protection
BIM Site Safety Submission User Guide
Building Information Modeling (BIM) Site Safety Submission Guidelines and Standards for Applicants
7/9/2013 Version 1.0 Page 10
Location of ramp with means of egress for the works (3315.1.2, 3315.1.3, 3315.1.4)
All structures on the site
Show protection of pedestrians, egress & adjoining property (3306.2)
Storage of Materials (3303.4)
Temp electrical and water (3303.2)
Sanitary Facilities (3303.2)
Chutes (3303.5.5)
Watch person & Flag persons (3307.5)types of barriers (DOT & controlled access)
Show location of crane and maximum / minimum radius of the boom & the radius of the counter weight. If a tower crane is
to be used provide the weathervane radius.
Street Furniture:
Standpipe (3303.8)
Containers (3303.4.3)
Sidewalk shed if required (3307.3.1)
Show all existing services and street furniture (i.e. waste, gas, electric, sewer, signs, HYD, lights, Muni-meters, etc)
Signs (3307.1.1, 3301.9 & 3301.10)
Fire hydrant and cutouts at construction fence
Signage for the gate scaffolding and sidewalk sheds
Siamese and manual release value with details (3303.8.1 {4.2})
Construction:
Height of your building and its setbacks and all adjoining buildings and their setbacks within 20’ of the lot line, in feet and
stories.
Adjoining Property Protection
Extent, sequence and means of demolition.
All Bracing and Shoring necessary
Horizontal safety on floors
Vertical Safety on floors
Types of roof protection
Typical Adjacent Window Protection
Show protection at all foundation exposures with railings and fences (3304.4.4)
Show pads for cranes, elevator pits, and hoists
Excavation / Foundation
All excavation must have ramps with a ratio of 1:4 to be used as egress: show second means of egress for workers
(3315.1.2, 3315.1.3, 3315.1.4)
Show protection of utility poles, trees, etc. (3309.11)
Show gates with flagmen at each side and project signage.
Show protection at all excavations, including railing and fencing (3304.4.4)
Show extents of shoring, underpinning, auguring, reshores, rakers etc. (3304.4, 3304.5)
3.1.3.1 File Formats and submissions
Applicants are required to submit their files when exchanging information with DOB. The process to do this is outlined in
SECTION 5 – NYC DOB BIM SUBMITTAL PROCESS.
The following formats are required on every submission:
NWC/NWD - Autodesk Navisworks Cache files/ Navisworks Document files
The Navisworks models shall contain all model content and geometry required for submission of site safety permits.
DWF - Autodesk Design WEB Format files
BIM Site Safety Submission User Guide
Building Information Modeling (BIM) Site Safety Submission Guidelines and Standards for Applicants
7/9/2013 Version 1.0 Page 11
The DWF Files shall include all 2D plans and details in addition to any 3D model content relevant to the review process
PDF / DOC – PDF and DOC formats are acceptable for permits and paperwork. All details and model submissions should either be
in Navisworks or Design Review format. Any such documents being referenced by model elements should be connected via a url
link that is linked to the relative location of the document. An explanation of this procedure is listed in Section 7.2
3.1.4 Naming Conventions
All electronic project information should be named following DOB Revit Standards naming conventions.
3.1.4.1 File Naming Convention
All electronic files should be named following the File Naming Convention listed in Section 2.2.2, including Revit files (RVT),
Review files (DWF), AutoCAD files (DWG), NavisWorks files (NWF, NWC).
Ex:
Date_BoroCode_RevisionNumber_Address
3.1.4.2 Media and Identification
All project-related files must be submitted on via Zoho docs, delivered virus free, and according to the methods described in Section
5.
3.1.5 Accessing the DOB Revit Support Files
The DOB Revit Standard Content Library includes a series of support files that are stored in a folder named “Version of
Revit”, i.e. “2013” and are located on DOB’s website at:
http://www.nyc.gov/html/dob/html/development/bim.shtml
The libraries are available for download at:
http://www.nyc.gov/html/dob/downloads/misc/DOB_Revit_Content.zip
and
http://www.nyc.gov/html/dob/downloads/misc/DOB_AutoCAD_Content.zip
3.1.5.1 Using the Support Files
Following is a brief description of the contents of each sub-folder within the DOB folder:
FOLDER DESCRIPTION
Content Contains DOB agency specific content for AutoCAD Architecture and Revit.
Shared Parameters Includes the DOB custom Revit Shared Parameters file.
Template Is a Revit template file that already has DOB specific content loaded.
3.1.6 Supplied Revit Content
The following is the list of Revit content that is available to all those submitting for site safety model review. The provided content
is specific to Site Safety Requirements. Also, DOB will not provide existing conditions models or architectural documentation to
the applicants. It is the responsibility of the applicant to create the model required for review.
3.1.6.1 Vehicles
Construction vehicles
Cement trucks
Delivery Trucks

BIM Site Safety Submission User Guide
Building Information Modeling (BIM) Site Safety Submission Guidelines and Standards for Applicants
7/9/2013 Version 1.0 Page 12
Cranes, Mobile Cranes, earthmovers
Articulating Boom Crane
Commercial Truck Mounted Crane (Boom Truck)
Crawler Crane
Tower Crane
Wheel Mounted Crane
Clamshell Earth Mover
Mast Climber
3.1.6.2 Conveyance
Hoists
Hoisting Machine o Material Hoist
Personnel Hoist
Temporary and Permanent stairs and egress
Stairs
Elevators
Ladders
Ramps
3.1.6.3 Safety Barriers
Netting and Guardrails
Vertical Nets
Horizontal Nets
Guardrails
Cocoon Systems
Roof Protection
Scaffolding
Angle Scaffold
Pipe Scaffold
Suspension Scaffold
Mobile Scaffold
C-hook Scaffolding
Outrigger Scaffolding
Multi-Point Adjustable Suspension Scaffold
3.1.6.4 Site Elements
Areas of Interest – 3D Cube that can designate spaces or objects
Areas of Controlled Access
Tunnels
MTA Entrances
Landmark Designations
Public Owned Plazas
BIM Site Safety Submission User Guide
Building Information Modeling (BIM) Site Safety Submission Guidelines and Standards for Applicants
7/9/2013 Version 1.0 Page 13
Construction Fence and Perimeter Protection/ Enclosure
Materials Storage
Waste dumpsters, debris boxes and skip boxes
Waste Chute
Ladders
Gates
Fire extinguishers
Fire Hydrants/Siamese Connections/ Standpipes - Red Light over Siamese Connection.
Project Board
Permit Board
Flag Person
Porta Johns
Security Booth
Sidewalk Shed
Heavy duty Sidewalk Shed
Light duty Sidewalk Shed
Contractors Shed
3.1.6.5 Street and Sidewalk Information
DOT Barriers and Traffic Guards
Jersey Barrier
Timber
Plastic
Lane Closures
Foot Bridges
Ramps
Temporary Walkways
Hazards to remove
Street furniture (Signs, trees, tree protection, poles, manholes)
3.1.6.6 Contacts Figures
Project Contacts
Property Owner
Contractor
Superintendent
Site Safety Coordinator
Concrete Safety Manager

BIM Site Safety Submission User Guide
Building Information Modeling (BIM) Site Safety Submission Guidelines and Standards for Applicants
7/9/2013 Version 1.0 Page 14
Construction Fire Safety Manager
3.1.6.7 Revit Template
The Revit template is provided as is to be used to promote compatibility and compliance with DOB standards. All Revit projects
that are not created from this will need to ensure compliance with the data and information that is expected.
This file includes all the previous content with associated parameters created.
3.1.7 Supplied AutoCAD Architecture Content
The AutoCAD content that is supplied to those submitting for site safety model review will follow the format given by the Revit
content. The fields of information that are listed as being required in Section 4 are the same but will be fulfilled by Attributes
instead of Parameters. Note that the provided content is specific to Site Safety Requirements for the purposes of permit and review.
Also, DOB will not provide existing conditions models or architectural documentation to applicants. It is the responsibility of the
applicant to create the model required for review.
3.2 CREATING CONTENT FOR SUBMISSIONS ON ALTERNATIVE SOFTWARE
If you would prefer to utilize a software program that is not AutoCAD or Revit based for your model based submission, it can still
be accepted as long as certain data and modeling requirements are met.
3.2.1 What You Must Include
For acceptance via the 3D Model Site Safety submission, you must supply the information contained in the Revit parameters listed
in Section 4 for all relevant entities involved and required in your submission based on type of construction to be done and elements
to be reviewed.
3.3 STEPS REQUIRED TO UTILIZE OR CREATE YOUR OWN REVIT CONTENT
If you would prefer to utilize your own existing or custom Revit / AutoCAD content for your model based Site Safety Permit
Review, you will need to ensure that it meets the minimum needs for the review process. This will typically involve adding relevant
parameters and information and/or flexibility depending on the type of elements
involved.
3.3.1 Using the Correct Parameters
To ensure that data is reviewed consistently, a shared parameter file will be
supplied to all applicants. This file can be accessed and downloaded with all other
DOB supplied content as instructed by Section 3.1.5 and is available at:
http://www.nyc.gov/html/dob/downloads/misc/DOB_Revit_Content.zip
After downloading that content, you will connect and assign the appropriate
parameters to your own Revit files and content with the DOB Shared Parameters
file that is supplied to all applicants.
This file allows Revit-based applications to ensure custom fields are consistently
reviewed. To make the required modifications and add these parameters in Revit,
go to the MANAGE Ribbon Tab and select Shared Parameters. This will open the
EDIT SHARED PARAMETERS Dialog Box as shown in the image to the right.

BIM Site Safety Submission User Guide
Building Information Modeling (BIM) Site Safety Submission Guidelines and Standards for Applicants
7/9/2013 Version 1.0 Page 15
To select the file, click on the “Browse” button and navigate to the folder that you are storing or have downloaded the file to:
Then select “NYCDOB_SSP_Shared_Parameters.txt” and click on the “OK” button.
NOTE:
The Autodesk Revit Products can reference only one shared parameter file at a time, so make sure this is the default file when
working on DOB projects.
This enables the Shared Parameter file to be used when adding parameters to Families or the Project itself in Revit.
An example of this process can be found in Appendix A
3.3.2 Note on Content Levels of Detail
One of the benefits of a 3D model for a reviewer is an understanding of the equipment in use, as well as seeing how they work
spatially. With that in mind, it’s understandable that some may want to make their models as physically accurate as possible. While
having a model of an element that looks exactly like its real world counterpart can be beneficial, it is not needed for site safety
review. Having content that is dimensionally accurate and contains all the required data listed in Section 4 is more functionally
usable at this stage than a picture-perfect model with no data or information.
Example:
Using these crane families as an example, we see two directions for modeling this content. In the above images, figure 2 is
obviously more detailed and physically accurate, but it is missing an important requirement, showing the crane’s swing radius and
area of concern.
While Figure 1 looks exceedingly simple it covers the requirements, it shows the physical space taken up by the crane, its ballast
and clearly gives the reviewer an understanding of its range.
Figure 1 Figure 2

BIM Site Safety Submission User Guide
Building Information Modeling (BIM) Site Safety Submission Guidelines and Standards for Applicants
7/9/2013 Version 1.0 Page 16
The model geomerty however is part of what needs to be submitted, the other part being the information or data, and that is covered
in the next section. Hoewver do not feel that your content’s geometry needs to look exact. As the example above shows basic forms
that convey the needed information is acceptable.

BIM Site Safety Submission User Guide
Building Information Modeling (BIM) Site Safety Submission Guidelines and Standards for Applicants
7/9/2013 Version 1.0 Page 17
4.0 SECTION 4 – PARAMETERS
4.1 GENERAL
This Section of the DOB BIM Site Safety Submission Guidelines establishes and lists the parameters associated to the supplied
content technical criteria required to submit a project using Revit or 3D AutoCAD content for the DOB.
4.1.1 Data usage for Revit and AutoCAD
As Revit Families have the benefit of being able to utilize parameters to store and describe elements, standard parameters for
submissions are being utilized and provided via a shared parameter file. As AutoCAD does not have parameters, blocks supplied by
the NYC DOB, and expected to be received by the NYC DOB will take advantage of Attributes for the same relevant information
as given below. It is important that these standards are followed to insure consistent and speedy reviews.
4.1.2 Parameters Utilized in the Permit Review Process
A safety category instance parameter will be assigned to each element that is relevant to the submittal and review process to ensure
that it is recognized in the Navisworks review process. Acceptable Safety Category usages are below:
Construction Vehicle
Cranes
Hoists
Safety Barriers
Site Elements
Street and Sidewalk
Project Contacts
4.1.2.1 Vehicles
Construction vehicles
Type
Manufacturer
Permit Number
Link to Specifications
Cranes, Mobile Cranes, earthmovers
See overlap and issues between things like a crane and netting or a crane and hoist cars etc.
Information to Include
Type
Manufacturer
Permit Number
Link to Permit
Link to Specifications
Link to Building Tie-In Details
Radius of swing and length of boom
Load Capacity

BIM Site Safety Submission User Guide
Building Information Modeling (BIM) Site Safety Submission Guidelines and Standards for Applicants
7/9/2013 Version 1.0 Page 18
4.1.2.2 Conveyance
Hoists
Type
Manufacturer
Permit Number
Link to Specifications
Link to Building Tie-In Details
Temporary and Permanent stairs and egress
Link to Details/ Shop/ Design Drawings
4.1.2.3 Safety Barriers
Netting and Guardrails
Height
Link to Detail and Design Drawings
Assembly Materials
Cocoon Systems
Permit Number
Copy of approved CCD1
Link to Detail and Design Drawings
Assembly Materials
Roof Protection
Link to Detail and Design Drawings
Scaffolding
Link to Detail and Design Drawings
4.1.2.4 Site Elements
Construction Fence and Perimeter Protection/ Enclosure
Height
Material
Permit Number
Gates
Width
Height
Material
Operation (ex: swing, slide, etc)
Fire extinguishers
Location
Type
Fire Hydrants/Siamese Connections/ Standpipes - Red light over Siamese Connection.
Width
BIM Site Safety Submission User Guide
Building Information Modeling (BIM) Site Safety Submission Guidelines and Standards for Applicants
7/9/2013 Version 1.0 Page 19
Height
Project Board
General Notes
Link to Project Information
Permit Board
Link to all applicable permits
Block and Lot
Zone and Map number
Number of stories and Height
Building use and Construction
BIN#
Name of Company preparing the plan/models
Flag Person
Location
Porta Johns
Location
Security Booth
Location
Sidewalk Shed
Link to Construction Details
Type (ex: heavy duty, light duty, etc.)
Location
4.1.2.5 Street and Sidewalk Information
DOT Barriers and Traffic Guards
Height
Type
Street furniture (Signs, trees, tree protection, poles, manholes)
Type
4.1.2.6 Contact Figures
Project Contacts
Name
Address with City and State
Phone Number
Tracking Number for Contractors
License # for Safety Coordinator/ Managers

BIM Site Safety Submission User Guide
Building Information Modeling (BIM) Site Safety Submission Guidelines and Standards for Applicants
7/9/2013 Version 1.0 Page 20
5.0 SECTION 5 – NYC DOB BIM SUBMITTAL PROCESS
5.1 GENERATING ACCEPTIBLE FORMAT DOCUMENTS
This section will review the process of generating an acceptable Navisworks and Design Review file for submission from Revit.
Some settings referred to in this section exist in the supplied NYC DOB template file for your convenience.
5.1.1 Exporting to Navisworks.
To Export to Navisworks you may need to install the exporter plugin for your chosen modeling tool if you do not have Navisworks
already installed on your computer. If that is the case it can be downloaded for free from this location:
http://www.autodesk.com/products/autodesk-navisworks-family/autodesk-navisworks-nwc-export-utility
When exporting to Navisworks, confirm your settings to ensure that the needed
elements are checked and that the options are correct. Depending on what
program you have used the options may differ.
For example, in Revit ensure that element properties are checked to ensure the
data in them is exported for the reviewer to be able to see them. If you are taking
advantage of the url parameter in Revit for linking to additional materials ensure
the Convert URL’s is checked as well. Additionally, if you are exporting multiple
files for review ensure the coordinates are consistent as showing True north
location is required as part of the submittal process.
When Exporting 3D models from AutoCAD to Navisworks you can access the
Export Settings to confirm they are correct via the command “nwcopt”
To then export your model to Navisworks type the command “nwcout”

BIM Site Safety Submission User Guide
Building Information Modeling (BIM) Site Safety Submission Guidelines and Standards for Applicants
7/9/2013 Version 1.0 Page 21
5.1.2 Exporting to Design Review.
In order to Export Sheets to DWF, go to the APPLICATION
menu and select the “Export” button followed by the “DWF”
option.
This will open the DWF EXPORT SETTINGS Dialog Box
showing the Views/Sheets tab as shown in the image on the
right.
In the “Export” drop-down list, select the “In session view/sheet
set”. This will enable the “Show in List” drop-down list from
which to select the “Sheets in the Model” option to select which
sheets to export.
Switch to the “DWF Properties” tab and select the “print Setup”
button.
This will enable the “Print Setup” Dialog Box as shown in the
image to the right.
This Dialog Box includes two DWF configurations:
DOB – DWF Exporter B&W
DOB – DWF Exporter Color
Pick one and click the “OK” button
This will open the EXPORT DWF Dialog Box as shown in the image on the
right.
Browse to the designated folder as specified by Model Manager/System
Administrator by selecting the drop-down button.
Under the “File name/prefix” option, type the desired name of the DWF file
and under the “Files of type” option, select “DWF Files (*.dwf)”
Under the “Naming” option, select “Automatic - Long (Specify Prefix)”. This
option will append the selected sheet at the end of the file name. Rename this
file or files as describe in Section – 2.2.2 Naming Conventions

BIM Site Safety Submission User Guide
Building Information Modeling (BIM) Site Safety Submission Guidelines and Standards for Applicants
7/9/2013 Version 1.0 Page 22
SUBMISSION PROCESS
The first step to submitting your models and data through this process is to notify the DOB of your intent to do so. Please include
your company’s name, contact information and job application number for the site safety process to correspond to.
Once this step is complete you will need to register for a login to upload your content. This is done by creating a free account with
Zoho Docs. Zoho Docs is a secure online document management service which allows storage and management of electronic files
in one central location. In addition, the features of Zoho Docs are designed to make it simple to upload, create, edit and share
documents with individuals and groups. To register with Zoho Docs, please follow the steps described below
5.1.3 Creating your ZOHO Account
1. Open your desktop web browser and visit https://www.zoho.com/docs
2. Click on “SIGN UP FREE” which appears in red text in the top‐right portion of the web page
3. The “Account Information” window should then display. Complete the information requested in the window and click on
“Sign Up Now” to continue.

BIM Site Safety Submission User Guide
Building Information Modeling (BIM) Site Safety Submission Guidelines and Standards for Applicants
7/9/2013 Version 1.0 Page 23
4. The “Account Confirmation” window should then display. You should now check your e‐mail inbox for an account
confirmation message from Zoho Docs (while this may take several minutes, you may also need to check your spam folder
if you have not received it after a reasonable time). Once the e‐mail arrives, proceed to the next step.
5. Follow the instructions within the Zoho Docs account confirmation e‐mail to verify your e‐mail address and activate your
account.
6. Once you click on a confirmation link, the following page should appear. Provide your account password and click on
“Confirm” to activate your Zoho Docs account.
7. A confirmation message will appear notifying you that your account is now active. To sign‐in, click that “Continue to Sign
In” link.

BIM Site Safety Submission User Guide
Building Information Modeling (BIM) Site Safety Submission Guidelines and Standards for Applicants
7/9/2013 Version 1.0 Page 24
8. After logging into your Zoho Docs account, you should see a web page similar to the image below.
You have now completed your Zoho Account and can submit your 3D Site Safety documents to the Department for Review
5.1.4 Uploading your Site Safety Models
The process for uploading your content is below
1. Visit https://www.zoho.com/docs and click on “SIGN IN” to log into your Zoho Docs account.
2. Enter your Username and Password, and then click on “SIGN IN”. The Department also recommends you check‐on the
“Use Secure Access” checkbox
3. Click the down arrow next to “Upload” and select the Bulk Upload feature.
a. Please note: although Zoho supports file uploads using the Files(s) feature, the Bulk Upload feature supports
larger file sizes and therefore is more suitable for uploading 3D Site Safety Plans

BIM Site Safety Submission User Guide
Building Information Modeling (BIM) Site Safety Submission Guidelines and Standards for Applicants
7/9/2013 Version 1.0 Page 25
4. Click on “Browse” to find the file on your local computer to upload. Then click on “Upload” when you are ready to upload
that file to Zoho Docs.
5. Once the file is successfully uploaded, “File uploaded successfully” will display. Zoho Docs allows you to transmit up to
500 files in a single Bulk Upload session. Zoho Docs allows each individual file to be up to 500 MB in size. If you need to
upload larger files, please read the information in the Technical Considerations section of this document.
5.1.5 Sharing your Site Safety Models with the DOB Reviewers
Once your content has been uploaded, you then need to set it to be shared with the Department reviewers to start the review process.
The process for setting the content to be shared is below.
1. From your Zoho Docs main page, click in the check box next to the file(s) you want to share with/submit to the
Department.
2. Click on either the “Share” tab at the top of the page or on the share icon that displays to the right of the file you want to
share with the Department.
3. On the “Share Document” screen that appears, enter “[email protected]” under “Enter Zoho/Email ID” and select
the “Collaborators” radio button option from “Add as:” on the “Private Share” tab. Once done, click on “Share”

BIM Site Safety Submission User Guide
Building Information Modeling (BIM) Site Safety Submission Guidelines and Standards for Applicants
7/9/2013 Version 1.0 Page 26
4. If your file was shared successfully with the Department, “Shared Successfully” will appear. Congratulations your permit
is now in process.
5.2 NOTES
Please note: only filings for New Buildings (NBs) and Alteration Type‐2 (Alt 2s) for façade renovations that require Site Safety
Plans are eligible to submit plans through this program at this time.
File Size Limitations – 500 MB is the maximum file size supported by the Zoho Docs “Bulk Upload” feature. While the
Department expects the vast majority of industry users to be supported by this limit, there may be instances when files are beyond
this maximum. For these larger files, the Department suggests that industry explore opportunities to compress the files prior to
upload when possible. This may include changing the settings impacting file size or compressing the file (e.g. .ZIP). If you
experience challenges with files over 500 MB, please reach out to [email protected] .
More information for Zoho users can be found on Zoho Doc’s FAQ webpage at
http://www.zoho.com/docs/documents‐faq.html.
5.3 ZOHO TROUBLESHOOTING
For issues related to registering your account on Zoho or with uploading / accessing your 3D Site Safety Plan files to your Zoho
account, contact Zoho Doc support directly at:
https://support.zoho.com/portal/zohocorp/HomePage.do .
For additional information or to ask questions regarding the Department’s 3D Site Safety Plans Program please contact

BIM Site Safety Submission User Guide
Building Information Modeling (BIM) Site Safety Submission Guidelines and Standards for Applicants
7/9/2013 Version 1.0 Page 27
6.0 SECTION 6 – NYC DOB BIM REVIEW PROCESS
6.1 ONCE MODELS AND DOCUMENTAION ARE RECIEVED
Files uploaded to Zoho will start the following process:
6.1.1 File and Requirements Check
Reviewer is notified of content upload and begins checking uploaded data and documentation
An email from the BIM account is sent to the applicant and the GC on the coversheet for notification purposes.
Necessary permits are verified.
Information on approved permits is matched with what is on the SSP submission
Model is run through software “pre-check” to make sure it meets the minimum submission standards.
Once documents have been reviewed they are marked up where applicable to allow those submitting to understand what areas need
to be addressed.
Any deficiencies are tagged in a 3D model to direct applicant to areas of concern.
2D models are also tagged with comments.
Example of view with comments
6.2 Receiving review results
Once the reviewer has completed their review the files will be stamped accordingly and uploaded back to the Zoho project page as
per the naming convention in Section 2.22
Approved models are stamped with plan reviewer’s 3D stamp near the project permit board and saved as a dwf file.
2D models are stamped with dated 2D approval stamp and flattened so plan examiner’s stamp cannot be extracted
Approved/Disapproved files are returned back to the applicant through Zoho.
An email from BIM review account is sent to the applicant and GC informing them of the approval/disapproval result.

BIM Site Safety Submission User Guide
Building Information Modeling (BIM) Site Safety Submission Guidelines and Standards for Applicants
7/9/2013 Version 1.0 Page 28
6.3 Notifications
Once your submission has been accepted you will still be required to notify the NYC DOB prior to certain events, including those
listed below and as may be otherwise required by law.
6.3.1 Notifications
As per 3310.2(7) of the New York City building code, Site Safety Coordinators and Managers must immediately report incidents to
the Building Department. A call must be made to the call center 212-566-3199.
6.3.1.1 Instruction to request start of work
For Demolition only
A call to Call Center (212) 227-4416 24 hours before start of work
For Excavation only;
A call to Call Center (212) 227-4416 24 hours before start of work
Then send the BEST Squad their 24 hours notification.
For all other Site Safety jobs;
24 hours before work starts of work, on company letterhead or E-mail ([email protected] ), send a letter
of notification to the BEST Squad and copy of PW2. (To the attention of Best Chief)
6.3.1.1 Close out instructions
Partial removing Sidewalk sheds requires an amended plan, notification to the BEST Squad and an inspection by the BEST
Squad
Permanently removing Sidewalk sheds requires notification to the BEST Squad and an inspection by the BEST Squad
Removal of Site Safety requires notification to the BEST Squad and an inspection by the BEST Squad

BIM Site Safety Submission User Guide
Building Information Modeling (BIM) Site Safety Submission Guidelines and Standards for Applicants
7/9/2013 Version 1.0 Page 29
7.0 APPENDIX A – APPLYING PARAMETERS
7.1 GENERAL
This Section of the DOB BIM Guidelines and Standards (BIM Manual) gives an example of how to apply the required parameters
to existing or custom Revit content.
7.1.1 Applying Parameters
As stated in Section 3.3.1 we will be providing a shared parameter file to ensure that beneficial information is both consistent and
available to all reviewers. If you are using the supplied content the parameters are already applied for usage. If you are using your
own content or content from another source you will need to apply these yourself.
To apply the parameters you must first connect to the parameter file as laid out in 3.3.1. Once that is done you can start to apply
them to your content. This is done while editing the family file in Revit.
1. When you are in the family you wish to edit, click on the properties button in the upper right hand corner:
2. From here we will look to apply the relevant parameters to our content. What information is required is
defined in Section 4. To apply our parameters click on the Add button on the right side.

BIM Site Safety Submission User Guide
Building Information Modeling (BIM) Site Safety Submission Guidelines and Standards for Applicants
7/9/2013 Version 1.0 Page 30
3. First we will choose the Shared Parameter type on the top, and then press the select button to choose it.
4. Here we will choose which parameter we would like to apply to our current family. In the example below the
Review Category parameter is selected. This parameter will be included in all content to insure the reviewers
can quickly find specific types of elements and thus provide timely reviews.
Note: if you have not yet pointed to the shared parameter file as noted in 3.3.1 you will need to do so.

BIM Site Safety Submission User Guide
Building Information Modeling (BIM) Site Safety Submission Guidelines and Standards for Applicants
7/9/2013 Version 1.0 Page 31
5. Once you have chosen which parameter to add, you will be brought back to the previous screen and can then
choose how you would like the parameter to be applied, as a type or instance as well as where in the
parameter list it will be grouped. These are at your discretion.
6. Now your parameter has been added to this family, you can repeat to add as many parameters as needed and
then load the family to your project file so you can fill in the information needed for your submission.
7.2 Linking to External documents with Relative Pathing
While we are submitting 3D models, there will still be certain 2D files such as permits, and other documentation that still will need
to be submitted. To ensure that they are referenced to appropriate 3D elements we will use relative pathing.
7.2.1 Setting up Relative Paths for linking to external documentation
As links between elements in models and their related documents will need to be maintained during the submission relative pathing
will be employed. This allows a link to be created that stays connected as long as the folder structure of the included documents stay
consistent
For example, a file linked to this location will not work after submitting because the folder structure is completely different.
C:\Users\username\projects\NYC\2013\12345\2013-05-06_MH_01_56 Leonard Street_CranePermit.doc
However, if that doc file is located in the same folder as the Revit model and other related project files that will be submitted, it can
be referenced as such and will maintain its connection:
2013-05-06_MH_01_56 Leonard Street_CranePermit.doc

BIM Site Safety Submission User Guide
Building Information Modeling (BIM) Site Safety Submission Guidelines and Standards for Applicants
7/9/2013 Version 1.0 Page 32
8.0 APPENDIX B – REVIT BEST PRACTICES
8.1 GENERAL
This Section of the DOB BIM Guidelines and Standards (BIM Manual) establishes the technical criteria required to develop a BIM
site safety model for review by the NYC DOB.
8.1.1 How to Use – Revit Standards
To ensure that the DOB Revit Standards are clearly understood, the following nomenclature is used throughout this document:
When referring to tools launched from the Ribbon Tab, BOLD-FACEUPPER CASE text is used to describe the Ribbon Tab,
and Bold-Faced Title Case Italicized text to describe the Ribbon Panel and Title Case Italicized text is used to describe the
Tool.
Example:
To make the required modifications, go to the VIEW Ribbon Tab, Sheet Composition Panel and click on the Sheet tool.
When referring to Dialog Boxes, UPPER CASE text is used. For Tabs within a
Dialog Box, Title Case Italicized text is used. Any references to a Pull-Down Menu,
a Check Box, an Option Button, a Text Box, or a Drop Down list within a Dialog
Box will be marked with a red rectangle. Referenced titles will be identified between
quotes (" ") using “Title Case Italicized” text and followed by a brief explanation.
Example:
Within the OPTIONS Dialog Box, select the Spelling tab and make the necessary
changes as shown in the image to the right
Under “Settings”, ensure that none of the boxes are checked.
Under “Main Dictionary”, ensure that the “American English” option is selected.

BIM Site Safety Submission User Guide
Building Information Modeling (BIM) Site Safety Submission Guidelines and Standards for Applicants
7/9/2013 Version 1.0 Page 33
When referring to tools launched from the Project Browser, UPPER CASE
ITALICIZED text is used to describe the View Type and Title Case Italicized text is
used to describe the command.
Example:
In the Project Browser, right-click on top of SHEETS header and select New Sheet.
When referring to pull-down menus, UPPER CASE ITALICIZED text is used to describe the menu option and Title Case
Italicized text is used to describe the command.
Example:
Go to the ROOF pull-down menu and select Roof By Extrusion
When referring to tools launched from the Application Menu, they will be referred to as buttons and Title Case Italicized text is
used to describe them.
Example:
To export files as DWF go to the APPLICATION Menu in the upper left hand
corner of your screen and select the Export button followed by the DWF/DWFx
button.
When referring to folders, bolded text to is used describe the folder location, and italicized bolded text refers to user/firm
defined folder location.
Example:
The local version of the Revit central file is saved on the user’s workstation under the following folder:
Firm_designated_Local_Path\LOCAL\PID_LOCAL_username.rvt

BIM Site Safety Submission User Guide
Building Information Modeling (BIM) Site Safety Submission Guidelines and Standards for Applicants
7/9/2013 Version 1.0 Page 34
8.1.2 DOB Revit Standards Version
The DOB will be constantly looking for ways to improve their Revit
practice; therefore, the DOB Revit Standards along with the Support
Files may be reviewed on a regular basis.
To that extent, there is included a parameter named DOB – Revit
Standards Release Date as shown in the image to the right that can be
found within the Project Information.
NOTE
We strongly encourage Applicants to check the DOB WEB Site on the
regular basis to see if updates have been posted.
8.1.2.1 Building Elevations
The NYC DOB requests that all building datum’s and elevation callouts
be based on having the buildings ground floor referenced as 0’-0” as
opposed to using sea level elevations. Following this format will ensure
your application is reviewed in a timely manner.
8.1.3 Environment Setup
This section describes the process of setting up the Autodesk Revit products to ensure proper use of the application under the DOB
requirements.
8.1.3.1 Import / Export Settings
The Revit-based applications have the ability to import and export AutoCAD files into and from the 3D Model, respectively.
8.2 BEST PRACTICES AND PROCEDURES
The following sections describe application-specific best practices as well as procedures used on all DOB Revit projects.
8.2.1 General Guidelines
The following characteristics of a Revit Model can affect performance:
Complex Geometry
Multiple Parametric Relations
Multiple Constraints
Linked Files
Figure 1 - FIX
BIM Site Safety Submission User Guide
Building Information Modeling (BIM) Site Safety Submission Guidelines and Standards for Applicants
7/9/2013 Version 1.0 Page 35
8.2.2 Restarting Revit
The Revit-based applications maintain model data in memory and hard disk caches to increase performance against repeated data
access. Revit platform performance may benefit from a workstation restart once or twice a day, and especially before triggering the
following memory-intensive tasks:
Printing
Rendering
Exporting
8.2.3 Compacting Central and Local Files
Compacting the Central and Local files reduces file sizes when saving Workset-enabled files. During a normal save, Revit-based
applications only write new and changed elements to the existing files. This can cause files to become large, but it increases the
speed of the save operation. The compacting process rewrites the entire file and removes obsolete parts to save space. Because it
takes more time than a normal save, use the compact option when the workflow can be interrupted.
8.2.4 AutoCAD Files
Minimize the number of linked or imported DWG files.
Avoid importing unnecessary data like hatching or line-work such as construction lines. Delete unnecessary parts and
layers of the DWG file within AutoCAD and import only the cleaned, smaller DWG.
Avoid exploding the geometry imported from DWG files. The exploding operation within a Revit-based application can
change a DWG from a single-managed element to hundreds or thousands of additional elements depending on the number
of entities in the imported DWG.
Only link essential DWG files into necessary views.
DWG files shall be saved using the World Coordinates System (WCS) before they are linked into Revit in order to be
correctly aligned.
Linked files should not contain External References.
Elements within the DWG cannot be more than 2 miles apart from each other.
In order to control the AutoCAD Lineweight from Revit, the Lineweight column within the Layer Properties Manager
Dialog Box should be set to Default.
8.2.5 Importing and Linking Files
Unload links of all types if not used.
Temporarily unload links if not needed in the view and reload them as required to limit memory resources necessary to
open a project file.
8.2.6 Views
Use “Wireframe” or “Shading” display modes when working in linked file environment. “Wireframe” and “Shading”
modes can be three times faster than “Hidden Line” or “Shading with Edges” modes.
Zoom in to speed up drawing and snapping.
Clear the “Snap to Remote Objects” setting in the snap dialog if you have a very dense view and snap lines appear to be
shooting off in all directions.
Close unnecessary windows.
Turn off shadows in views where they are unnecessary.
BIM Site Safety Submission User Guide
Building Information Modeling (BIM) Site Safety Submission Guidelines and Standards for Applicants
7/9/2013 Version 1.0 Page 36
8.2.7 Modeling
Until component types are determined, use the generic version of elements such as walls, doors, windows, slabs and roofs,
which incorporate less geometry.
Break up large models into 150MB-200MB each.
Regularly review and fix warnings by going to the MODIFY Ribbon Tab and clicking on the Warnings option located
under the INQUIRY Panel.
8.2.8 Saving
Before closing a file, keep only a simple Drafting View open to accelerate saving and subsequent opening of the file.
It is recommended that 3D views should be closed when saving to Central, since the Revit-based applications will
regenerate this complex view as part of the save process.
Save to Central several times a day.
Reload Latest several times a day.
Relinquish your Workset(s) at the end of the day.
8.2.9 Worksets
When working with Worksets, users must follow these steps to ensure changes are saved to both the Local and the Central versions
of the Revit 3D Model file, as well as relinquishing previously owned Worksets.
Synchronize with Central
Save to Local
Relinquish All Mine
8.2.10 Project Template
The Project Template provides initial conditions and predefined settings for a project, such as generic project information, unit
settings and families.
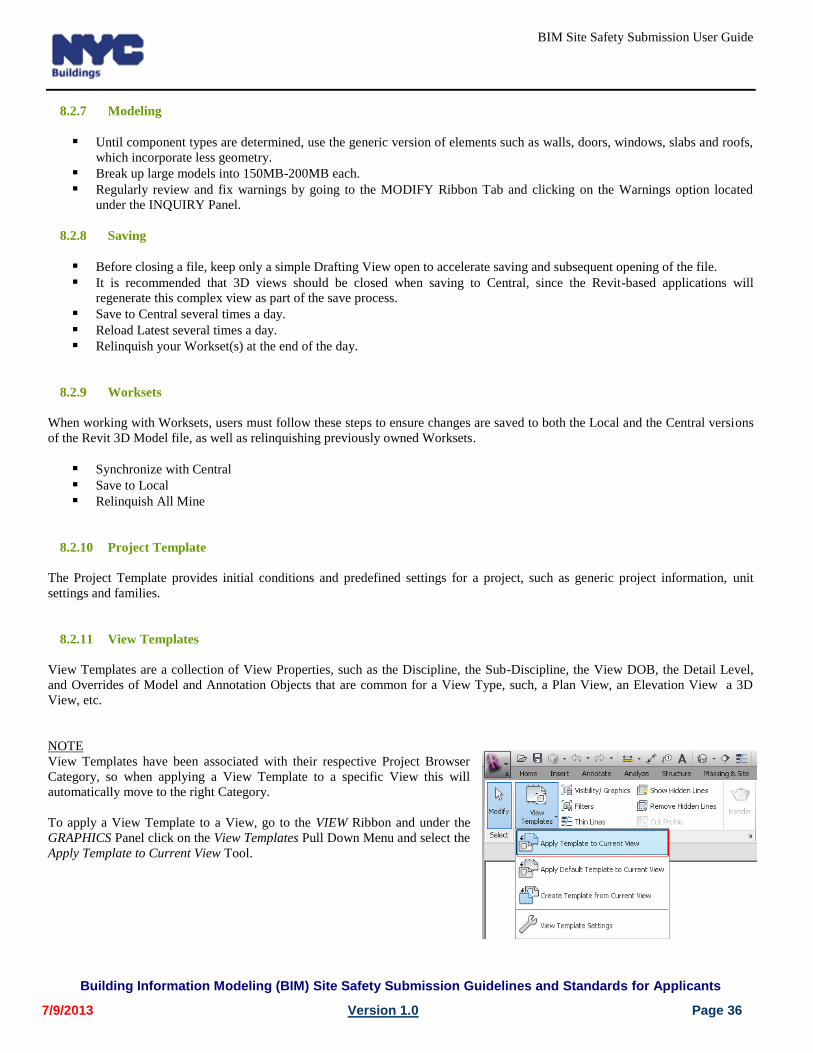
8.2.11 View Templates
View Templates are a collection of View Properties, such as the Discipline, the Sub-Discipline, the View DOB, the Detail Level,
and Overrides of Model and Annotation Objects that are common for a View Type, such, a Plan View, an Elevation View a 3D
View, etc.
NOTE
View Templates have been associated with their respective Project Browser
Category, so when applying a View Template to a specific View this will
automatically move to the right Category.
To apply a View Template to a View, go to the VIEW Ribbon and under the
GRAPHICS Panel click on the View Templates Pull Down Menu and select the
Apply Template to Current View Tool.

BIM Site Safety Submission User Guide
Building Information Modeling (BIM) Site Safety Submission Guidelines and Standards for Applicants
7/9/2013 Version 1.0 Page 37
8.2.12 Levels and Plan Views
The Revit-based applications create a relationship between the Level and the first Floor Plan and Ceiling Plan, so when the Level
Name is changed, the associated name for the Floor Plan and the Ceiling Plan updates automatically.
Users will be giving the option to rename the corresponding Level Views (Floor Plan and Ceiling Plan) if the Level Name is
changed. If so, the relationship between both will be broken. It is crucial to maintain this name relationship between the Level and
the Floor Plans on a multi-disciplinary practice as ours for coordination purposes.
8.2.13 Creating Sheets
Creating Contract Documents in “Revit” is accomplished through sheets, in which Views have been added.
8.2.13.1 Project Information
Project Information is data that remains the same on all sheets of a project, such as the Project Name, DOB Submission Number, ,
Project Address, Project Issue Date, Submission Status, etc.
To make the required modifications, go to the MANAGE Ribbon Tab
and click on the Project Information Tool located under the Project
Settings Panel. The image on the right illustrates the Project
Information Dialog Box.
All the available Project Information fields are listed under the “Other
“parameter category.
Another option to enter the Project Information is by typing it directly
on a sheet by clicking on the text placeholder and updating the text as
desired.
NOTE
The Revit-based applications will update all sheet views based on the
information provided here.

BIM Site Safety Submission User Guide
Building Information Modeling (BIM) Site Safety Submission Guidelines and Standards for Applicants
7/9/2013 Version 1.0 Page 38
8.2.13.2 Loading the Cover Sheet and Title Sheets
The Cover Sheet and Title Sheets can be loaded using one of the following methods:
In the VIEW Ribbon Tab, select the New SheetTool located under the Sheet Composition Panel.
In the Project Browser, right-click on top of SHEETS and then select New Sheet.
Either of these methods will display the SELECT A TITLEBLOCK Dialog Box as
shown in the image on the right.
Click on the “Load” button to import the title blocks provided with the DOB Revit
Standards and then click “OK.”
The titleblocks can be found under:
Firm_designated_Path\”Version of Revit”\Titleblocks\
(Please note that the DOB Revit Standards Library needs to be downloaded,
extracted and placed on the network)
NOTE
Once the Cover Sheet and Title Sheets are loaded, they will get populated with the Project Information provided in Section -8.2.13.1
Project Information.
8.2.13.3 Drawing Information
Drawing Information is data relating to an individual sheet of the Border Sheets in a project. All the available Cover Sheet
Information fields are listed under the Identity Data and Title Text Parameter columns.
To update the Drawing Information of a sheet, use either one of the following methods:
Enter the information directly on a sheet by clicking on the text placeholder within the sheet and update the text as desired.
Click in an empty space in a sheet view and this will open the Sheet INSTANCE PROPERTIES Dialog Box. Change the
values as desired.
BIM Site Safety Submission User Guide
Building Information Modeling (BIM) Site Safety Submission Guidelines and Standards for Applicants
7/9/2013 Version 1.0 Page 39
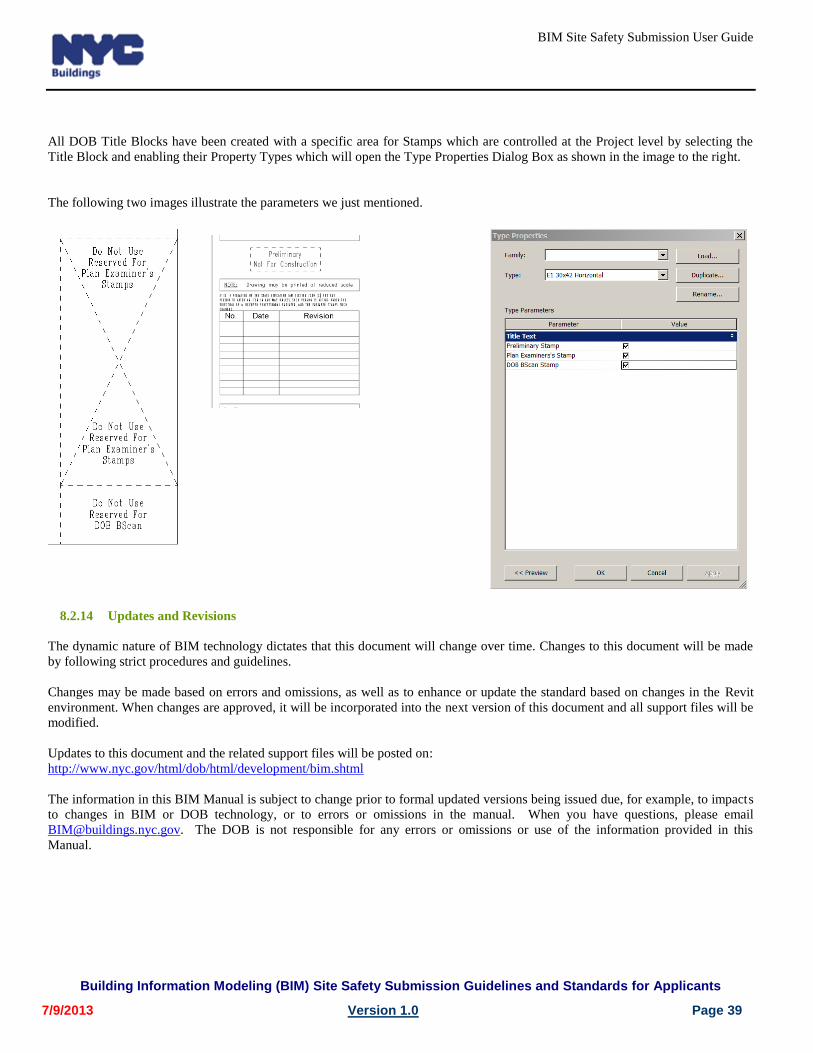
All DOB Title Blocks have been created with a specific area for Stamps which are controlled at the Project level by selecting the
Title Block and enabling their Property Types which will open the Type Properties Dialog Box as shown in the image to the right.
The following two images illustrate the parameters we just mentioned.
8.2.14 Updates and Revisions
The dynamic nature of BIM technology dictates that this document will change over time. Changes to this document will be made
by following strict procedures and guidelines.
Changes may be made based on errors and omissions, as well as to enhance or update the standard based on changes in the Revit
environment. When changes are approved, it will be incorporated into the next version of this document and all support files will be
modified.
Updates to this document and the related support files will be posted on:
http://www.nyc.gov/html/dob/html/development/bim.shtml
The information in this BIM Manual is subject to change prior to formal updated versions being issued due, for example, to impacts
to changes in BIM or DOB technology, or to errors or omissions in the manual. When you have questions, please email
[email protected]. The DOB is not responsible for any errors or omissions or use of the information provided in this
Manual.
BIM Site Safety Submission User Guide
Building Information Modeling (BIM) Site Safety Submission Guidelines and Standards for Applicants
7/9/2013 Version 1.0 Page 40
9.0 Appendix C Glossary
9.1 GLOSSARY OF TERMS AND ACRONYMS FOR THE PURPOSE OF THIS MANUAL
Applicant Contractor or other Party responsible for and active in submitting models and documentation
needed for permit review.
Building Element / System
Individual components and/or systems of a building such as, but not limited to, doors,
windows, walls, partitions, roofs, floor slabs, beams, columns, pipes, ducts, conduits,
equipment and fixtures.
Building Information Model
(BIM)
The digital representation of physical and functional characteristics of a Project.
Central File The Master Project File that is saved to a network drive and acts as the distribution point for
publishing work to the rest of the team. The Central File stores the current ownership
information for all the elements of the project.
Component Element
An individual Building Element whose geometry, size, shape, information, and data may be
provided within another Building Element / System.
Component Model(s)
A single and distinct Model that is a part of the larger complete project model. An example
of this would be an architectural model where there are other disciplines or where there are
separate construction models of the site and different building components.
Composite Model
A Model that is the result of the merging of all Component Models.
C3D
Civil 3D.
Drawings
Amongst other things, plans, details, sections, elevations, schedules, and diagrams as
described herein, and by the NYC DOB.
Design Web Format - DWF A highly compressed non-editable vector file format created out of CAD/BIM applications.
A DWF file can represent sheets for plotting purposes (2D DWF) or the entire 3D Model (3D
DWF) for visualization or estimating purposes.
Element Borrowing The ability to edit an element located in a Workset owned by another user. If no one owns
the Workset, permission to borrow the element is automatically granted.
Entourage Items related to the Site work, such as bike racks, benches, flagpoles, etc.
Extracted / Extraction
A Drawing, information or data that is obtained from a Model.
Level of Detail
Shall mean the degree of information that is provided within a model (building) element at a
given time (Design Phase, Construction Phase, etc.). This "information richness" grows as
the project advances throughout the development of the Models / Drawings.
Local File The copy of the Central File located directly on the user’s workstation. The main purpose of
the Local File is faster data access. The Workset processes establish a link between the
Central File and the Local File for data sharing.

BIM Site Safety Submission User Guide
Building Information Modeling (BIM) Site Safety Submission Guidelines and Standards for Applicants
7/9/2013 Version 1.0 Page 41
Model(s) / 3D Model(s)
The digital representation of physical and functional characteristics of a building element
and/or system within a Project generated from a CAD and/or Revit application.
Point Cloud A set of vertices in a three-dimensional (X, Y, Z) coordinate system.
Project Information Model The finalized Revit-based and Civil 3D-based models as a record of a completed project
Revit Families Groups of elements with a common set of parameters, identical use, and similar graphical
representation
NYC DOB New York City Department of Buildings.
DOB Families
A group of three dimensional (3D) Building Elements, which have a common set of
parameters, identical uses, and similar graphical representation that have been derived from
DOB Design Standards.
Shared Parameters Parameters that can be added to projects and then shared with other families or projects.
They give the ability to add specific data that is not already predefined in the Revit-based
applications.
Site Model (SM) The centralized Revit-based file where all models share coordinates with each other and at
the same time will control true north, project north, and elevations.
Sub-contractor A person, persons, firm, partnership, corporation, joint venture, business association, or any
entity under contract with the Contractor or any Subcontractor of any tier, to perform any
portion of the Work.
WCS World Coordinates System.
Worksets Worksets create the ability to divide the Revit project in functional areas allowing the
propagation and coordination of changes between modelers, enabling multiple members of a
team the ability to simultaneously work on different portions of a project.
CONTACT INFORMATION
Questions regarding the DOB BIM Manual provided within this Manual should be forwarded via email to [email protected]