bristol openenterprise reference guide - emerson€¦ · bristol openenterprise reference guide...
TRANSCRIPT

Reference Guide D5092 16-Jan-2008 Report Plug-in
Remote Automation Solutions Website: www.EmersonProcess.com/Remote
Bristol OpenEnterprise Reference Guide Report Plug-in
Reference Guide D5092 16-Jan-2008 - Page 2 Report Plug-in
Remote Automation Solutions Website: www.EmersonProcess.com/Remote
Contents
1 Report Plug-in ........................................................................................................................ 13 1.1 Configuration..................................................................................................................... 13 1.2 Licensing and Loading ...................................................................................................... 13 1.3 Array Names ..................................................................................................................... 13 1.4 Licensing ........................................................................................................................... 13 1.5 Loading the OpenEnterprise Plug-in................................................................................. 14 1.6 Importing OpenEnterprise Data ........................................................................................ 15
2 Report Properties .................................................................................................................. 16 2.1 Modifying Report Properties ............................................................................................. 16 2.2 Dataservice Page.............................................................................................................. 16
2.2.1 Progress Menu ........................................................................................................... 17 2.2.2 Dataservice................................................................................................................. 18 2.2.3 Test Connection Button .............................................................................................. 18 2.2.4 Advanced.................................................................................................................... 18 2.2.5 Import Data Service Dialog......................................................................................... 18
2.2.5.1 Use different data service for data import ............................................................ 19 2.2.5.2 Data Service......................................................................................................... 19 2.2.5.3 Alias Selection...................................................................................................... 19 2.2.5.4 Test Connection Button ....................................................................................... 20
2.3 Report Period Page........................................................................................................... 20 2.3.1 Progress Menu ........................................................................................................... 21 2.3.2 Calendar Period.......................................................................................................... 22 2.3.3 Interval ........................................................................................................................ 23 2.3.4 Offset from midnight ................................................................................................... 23 2.3.5 Timezone and DST adjustments ................................................................................ 23
2.3.5.1 Local..................................................................................................................... 23 2.3.5.2 Local, non DST adjusted...................................................................................... 23 2.3.5.3 UTC...................................................................................................................... 24
2.3.6 Example Time and Date ............................................................................................. 24 2.3.7 UTC Times.................................................................................................................. 24
2.4 Event Logging Page.......................................................................................................... 24 2.4.1 Progress Menu ........................................................................................................... 25 2.4.2 Enable Logging........................................................................................................... 26 2.4.3 Use Default Log File Name ........................................................................................ 26 2.4.4 Log Filename.............................................................................................................. 26 2.4.5 Log File Folder............................................................................................................ 26 2.4.6 Browse Folder Button ................................................................................................. 26 2.4.7 Create a new file......................................................................................................... 27 2.4.8 Append to existing file ................................................................................................ 27 2.4.9 Rename existing file ................................................................................................... 27
2.5 External Queries Page ...................................................................................................... 27 2.5.1 Progress Menu ........................................................................................................... 28

Reference Guide D5092 16-Jan-2008 - Page 3 Report Plug-in
Remote Automation Solutions Website: www.EmersonProcess.com/Remote
2.5.2 Run all external queries.............................................................................................. 29 2.5.3 Save passwords ......................................................................................................... 29
3 Plug-in Menu .......................................................................................................................... 30 3.1 Import ................................................................................................................................ 30
3.1.1 New Historical Query.................................................................................................. 30 3.1.2 New Real-time Query ................................................................................................. 30 3.1.3 New Real-time SQL Query ......................................................................................... 31 3.1.4 Modify Existing Query................................................................................................. 31 3.1.5 Delete Existing Query................................................................................................. 31 3.1.6 Run Existing Query..................................................................................................... 31
3.2 Query Manager ................................................................................................................. 31 3.3 Run Report ........................................................................................................................ 31 3.4 Run Report As................................................................................................................... 31 3.5 Aliases............................................................................................................................... 32 3.6 Options.............................................................................................................................. 32 3.7 Event Viewer ..................................................................................................................... 32 3.8 Worksheet Formula Functions .......................................................................................... 32 3.9 Login.................................................................................................................................. 34 3.10 Help................................................................................................................................ 34
4 Historical Query Wizard ........................................................................................................ 35 4.1 Query Name...................................................................................................................... 35
4.1.1 Query Name ............................................................................................................... 36 4.1.2 Progress Menu ........................................................................................................... 36
4.2 Data Service...................................................................................................................... 37 4.2.1 Override Default Dataservice ..................................................................................... 38 4.2.2 Dataservice................................................................................................................. 38 4.2.3 Test Connection Button .............................................................................................. 38 4.2.4 Advanced Button ........................................................................................................ 39 4.2.5 Import Data Service Dialog......................................................................................... 39
4.2.5.1 Use different data service for data import ............................................................ 39 4.2.5.2 Data Service......................................................................................................... 39 4.2.5.3 Test Connection Button ....................................................................................... 40 4.2.5.4 Alias Selection...................................................................................................... 40
4.3 Dataset .............................................................................................................................. 40 4.3.1 Available Historical Datasets ...................................................................................... 41 4.3.2 Select Dataset Button................................................................................................. 41 4.3.3 Currently Selected Dataset......................................................................................... 41 4.3.4 Advanced Button ........................................................................................................ 42 4.3.5 Advanced Historical Dataset Settings ........................................................................ 42
4.3.5.1 Use Aliases .......................................................................................................... 42 4.3.5.2 Data Stream Alias ................................................................................................ 42
4.3.5.2.1 What is a Data Stream? ................................................................................. 43 4.3.5.3 Browse Data Stream Alias ................................................................................... 43 4.3.5.4 Data Set Alias ...................................................................................................... 44

Reference Guide D5092 16-Jan-2008 - Page 4 Report Plug-in
Remote Automation Solutions Website: www.EmersonProcess.com/Remote
4.3.5.4.1 What is a Data Set?........................................................................................ 44 4.3.5.5 Browse Dataset Alias ........................................................................................... 45
4.4 Object Selection ................................................................................................................ 46 4.4.1 Signal Selection.......................................................................................................... 46
4.4.1.1 All Signals ............................................................................................................ 47 4.4.1.2 Named Signals Only ............................................................................................ 47 4.4.1.3 Add Signals Button............................................................................................... 47 4.4.1.4 Signal Browse Dialog ........................................................................................... 47
4.4.1.4.1 Applying a Signal Filter ................................................................................... 47 4.4.1.4.2 Adding Specific Signals .................................................................................. 47 4.4.1.4.3 Devicename.................................................................................................... 48 4.4.1.4.4 Name .............................................................................................................. 48 4.4.1.4.5 Description...................................................................................................... 48 4.4.1.4.6 Instance .......................................................................................................... 48 4.4.1.4.7 Base................................................................................................................ 49 4.4.1.4.8 Extension ........................................................................................................ 49 4.4.1.4.9 Attribute .......................................................................................................... 49 4.4.1.4.10 Match Case................................................................................................... 49 4.4.1.4.11 Find Signals Button ...................................................................................... 49 4.4.1.4.12 Signals Found List ........................................................................................ 49 4.4.1.4.13 Add Signals................................................................................................... 49 4.4.1.4.14 Add Filter Button ........................................................................................... 49 4.4.1.4.15 Help .............................................................................................................. 49 4.4.1.4.16 Close............................................................................................................. 50
4.4.1.5 Signals to be added ............................................................................................. 50 4.4.1.6 Up......................................................................................................................... 50 4.4.1.7 Down .................................................................................................................... 50 4.4.1.8 Remove................................................................................................................ 50
4.4.2 Event Selection........................................................................................................... 50 4.4.2.1 All Events ............................................................................................................. 51 4.4.2.2 Filtered Events ..................................................................................................... 51 4.4.2.3 Define Filters... ..................................................................................................... 51 4.4.2.4 Defined Filters List ............................................................................................... 51 4.4.2.5 Event Filter Dialog................................................................................................ 51
4.4.2.5.1 Event Devicename.......................................................................................... 52 4.4.2.5.2 Event Objectname .......................................................................................... 52 4.4.2.5.3 Event Description............................................................................................ 53 4.4.2.5.4 Event Instance ................................................................................................ 53 4.4.2.5.5 Event Base ..................................................................................................... 53 4.4.2.5.6 Event Extension.............................................................................................. 53 4.4.2.5.7 Event Attribute ................................................................................................ 53 4.4.2.5.8 UnAcknowledged Event State ........................................................................ 54 4.4.2.5.9 Acknowledged Event State............................................................................. 54 4.4.2.5.10 Event In Alarm .............................................................................................. 54 4.4.2.5.11 Event Out of Alarm ....................................................................................... 54 4.4.2.5.12 Event Not Suppressed.................................................................................. 54
Reference Guide D5092 16-Jan-2008 - Page 5 Report Plug-in
Remote Automation Solutions Website: www.EmersonProcess.com/Remote
4.4.2.5.13 Event Suppressed ........................................................................................ 54 4.4.2.5.14 Event Priority ................................................................................................ 54 4.4.2.5.15 Priority Selection Form ................................................................................. 54
4.4.2.5.15.1 List of Available Priorities ....................................................................... 55 4.4.2.5.15.2 Add Range ............................................................................................. 56 4.4.2.5.15.3 Add Selection ......................................................................................... 56 4.4.2.5.15.4 Cancel .................................................................................................... 56
4.4.2.5.16 Event Plantarea ............................................................................................ 56 4.4.2.5.17 Event Condition ............................................................................................ 57 4.4.2.5.18 Condition Selection Form ............................................................................. 57
4.4.2.5.18.1 List of Available Conditions .................................................................... 57 4.4.2.5.18.2 Add Range of Conditions ....................................................................... 59 4.4.2.5.18.3 Add Selection of Conditions ................................................................... 59 4.4.2.5.18.4 Cancel .................................................................................................... 59
4.4.2.5.19 Event Accessarea......................................................................................... 59 4.4.2.5.20 Custom Filter ................................................................................................ 59 4.4.2.5.21 Test Filters .................................................................................................... 59 4.4.2.5.22 Event Filter Test Form .................................................................................. 60
4.4.2.5.22.1 Query...................................................................................................... 60 4.4.2.5.22.2 Query Period .......................................................................................... 60 4.4.2.5.22.3 Maximum Records to Display ................................................................ 60 4.4.2.5.22.4 Copy Query ............................................................................................ 60 4.4.2.5.22.5 OK Button............................................................................................... 60 4.4.2.5.22.6 Event Query Results Form..................................................................... 60
4.4.3 Object Selection ......................................................................................................... 61 4.4.3.1 All Objects ............................................................................................................ 62 4.4.3.2 Named Objects Only............................................................................................ 62 4.4.3.3 Add Objects Button .............................................................................................. 62 4.4.3.4 Selected Objects List ........................................................................................... 62 4.4.3.5 Use advanced data set transform........................................................................ 63 4.4.3.6 Up......................................................................................................................... 63 4.4.3.7 Down .................................................................................................................... 63 4.4.3.8 Remove................................................................................................................ 63 4.4.3.9 Object Browse Dialog........................................................................................... 63
4.4.3.9.1 Name .............................................................................................................. 64 4.4.3.9.2 Match Case..................................................................................................... 64 4.4.3.9.3 Find................................................................................................................. 64 4.4.3.9.4 Objects Found List.......................................................................................... 64 4.4.3.9.5 Add.................................................................................................................. 65 4.4.3.9.6 Add Filter Button ............................................................................................. 65 4.4.3.9.7 Help................................................................................................................. 65 4.4.3.9.8 Close............................................................................................................... 66
4.5 Period ................................................................................................................................ 66 4.5.1 Override Default Report Period .................................................................................. 66 4.5.2 Calendar Period.......................................................................................................... 66 4.5.3 Interval ........................................................................................................................ 67
Reference Guide D5092 16-Jan-2008 - Page 6 Report Plug-in
Remote Automation Solutions Website: www.EmersonProcess.com/Remote
4.5.4 Offset from midnight ................................................................................................... 67 4.5.5 Timezone and DST adjustments ................................................................................ 68
4.5.5.1 Local..................................................................................................................... 68 4.5.5.2 Local, non DST adjusted...................................................................................... 68 4.5.5.3 UTC...................................................................................................................... 68
4.5.6 Example Time and Date ............................................................................................. 68 4.5.7 UTC Times.................................................................................................................. 69 4.5.8 Back............................................................................................................................ 69 4.5.9 Next ............................................................................................................................ 69 4.5.10 Finish....................................................................................................................... 69 4.5.11 Cancel ..................................................................................................................... 69 4.5.12 Help ......................................................................................................................... 69 4.5.13 Buttons in Modify Mode........................................................................................... 69
4.6 Data Transformation ......................................................................................................... 69 4.6.1 Transform Timestamp ................................................................................................ 70 4.6.2 Query Timestamp ....................................................................................................... 70 4.6.3 Override Query Timestamp ........................................................................................ 70 4.6.4 Ascending ................................................................................................................... 71 4.6.5 Available Columns...................................................................................................... 71 4.6.6 Move Buttons.............................................................................................................. 71 4.6.7 Display Columns......................................................................................................... 71 4.6.8 Up ............................................................................................................................... 71 4.6.9 Down........................................................................................................................... 71 4.6.10 Enable Timestamp Rounding.................................................................................. 71 4.6.11 Round to nearest..................................................................................................... 71 4.6.12 Insert Missing Records............................................................................................ 71 4.6.13 Advanced ................................................................................................................ 72 4.6.14 Advanced Timestamp Rounding Dialog.................................................................. 72
4.6.14.1 Use Settings........................................................................................................ 72 4.6.14.2 Advanced Round To Nearest ............................................................................. 72 4.6.14.3 Use Origin Time.................................................................................................. 72 4.6.14.4 Origin Time ......................................................................................................... 72 4.6.14.5 UTC..................................................................................................................... 73
4.6.15 Back ........................................................................................................................ 73 4.6.16 Next ......................................................................................................................... 73 4.6.17 Finish....................................................................................................................... 73 4.6.18 Cancel ..................................................................................................................... 73 4.6.19 Help ......................................................................................................................... 73 4.6.20 Buttons in Modify Mode........................................................................................... 73
4.7 Output................................................................................................................................ 73 4.7.1 Signal Output Page .................................................................................................... 74
4.7.1.1 Existing Worksheet Cell Reference ..................................................................... 74 4.7.1.2 Temporary Worksheet.......................................................................................... 75 4.7.1.3 Adjust Column Widths.......................................................................................... 75 4.7.1.4 Show Object Names ............................................................................................ 75 4.7.1.5 Show Column Headers ........................................................................................ 75

Reference Guide D5092 16-Jan-2008 - Page 7 Report Plug-in
Remote Automation Solutions Website: www.EmersonProcess.com/Remote
4.7.1.6 Add Named Range for each Column................................................................... 75 4.7.1.7 Remove Devicenames......................................................................................... 75 4.7.1.8 NULL Text ............................................................................................................ 75 4.7.1.9 Output Timestamp Settings Dialog ...................................................................... 76
4.7.1.9.1 Local Time ...................................................................................................... 76 4.7.1.9.2 UTC................................................................................................................. 76 4.7.1.9.3 Offset Timestamps.......................................................................................... 76 4.7.1.9.4 Offsets ............................................................................................................ 77 4.7.1.9.5 Transform Timestamp Column Only............................................................... 77 4.7.1.9.6 All Timestamp Columns.................................................................................. 77 4.7.1.9.7 Apply Offset Before Local Time Conversion .................................................. 77 4.7.1.9.8 Apply Offset After Local Time Conversion...................................................... 77
4.7.1.10 Questionable Data Formatting............................................................................ 77 4.7.1.11 Questionable Attribute ........................................................................................ 77 4.7.1.12 Questionable Color ............................................................................................. 77
4.7.2 Event Output Page ..................................................................................................... 78 4.7.2.1 Existing Worksheet Cell Reference ..................................................................... 79 4.7.2.2 Temporary Worksheet.......................................................................................... 80 4.7.2.3 Adjust Column Widths.......................................................................................... 80 4.7.2.4 Show Column Headers ........................................................................................ 80 4.7.2.5 Add Named Range for each Column................................................................... 80 4.7.2.6 NULL Text ............................................................................................................ 80 4.7.2.7 Define Timestamp Settings.................................................................................. 80 4.7.2.8 Use Alarm Priority Colors..................................................................................... 80 4.7.2.9 Apply Colors to Timestamp Column .................................................................... 80 4.7.2.10 Display Alarm Condition as Text......................................................................... 80 4.7.2.11 Output Timestamp Settings Dialog ..................................................................... 81
4.7.2.11.1 Local Time .................................................................................................... 81 4.7.2.11.2 UTC .............................................................................................................. 81 4.7.2.11.3 Offset Timestamps........................................................................................ 81 4.7.2.11.4 Offsets .......................................................................................................... 82 4.7.2.11.5 Transform Timestamp Column Only............................................................. 82 4.7.2.11.6 All Timestamp Columns................................................................................ 82 4.7.2.11.7 Apply Offset Before Local Time Conversion ................................................ 82 4.7.2.11.8 Apply Offset After Local Time Conversion ................................................... 82
4.7.3 General Object Output Page ...................................................................................... 82 4.7.3.1 Existing Worksheet Cell Reference ..................................................................... 83 4.7.3.2 Temporary Worksheet.......................................................................................... 84 4.7.3.3 Adjust Column Widths.......................................................................................... 84 4.7.3.4 Show Column Headers ........................................................................................ 84 4.7.3.5 Add Named Range for each Column................................................................... 84 4.7.3.6 NULL Text ............................................................................................................ 84 4.7.3.7 Define Timestamp Settings.................................................................................. 84 4.7.3.8 Output Timestamp Settings Dialog ...................................................................... 84
4.7.3.8.1 Local Time ...................................................................................................... 85 4.7.3.8.2 UTC................................................................................................................. 85
Reference Guide D5092 16-Jan-2008 - Page 8 Report Plug-in
Remote Automation Solutions Website: www.EmersonProcess.com/Remote
4.7.3.8.3 Offset Timestamps.......................................................................................... 85 4.7.3.8.4 Offsets ............................................................................................................ 85 4.7.3.8.5 Transform Timestamp Column Only............................................................... 86 4.7.3.8.6 All Timestamp Columns.................................................................................. 86 4.7.3.8.7 Apply Offset Before Local Time Conversion .................................................. 86 4.7.3.8.8 Apply Offset After Local Time Conversion...................................................... 86
5 Real-time Query Wizard ........................................................................................................ 87 5.1 Query Name...................................................................................................................... 87
5.1.1 Query Name ............................................................................................................... 88 5.1.2 Progress Menu ........................................................................................................... 88
5.2 Data Service...................................................................................................................... 89 5.2.1 Override Default Dataservice ..................................................................................... 90 5.2.2 Dataservice................................................................................................................. 90 5.2.3 Test Connection Button .............................................................................................. 90 5.2.4 Advanced Button ........................................................................................................ 91 5.2.5 Import Data Service Dialog......................................................................................... 91
5.2.5.1 Use different data service for data import ............................................................ 91 5.2.5.2 Test Connection Button ....................................................................................... 91 5.2.5.3 Alias Selection...................................................................................................... 91
5.3 Database Table................................................................................................................. 92 5.3.1 List of Tables/Views.................................................................................................... 93 5.3.2 Show tables ................................................................................................................ 93 5.3.3 Show views................................................................................................................. 93 5.3.4 Show all ...................................................................................................................... 93 5.3.5 Show system tables.................................................................................................... 93 5.3.6 Select.......................................................................................................................... 93 5.3.7 Currently selected table or view ................................................................................. 94
5.4 Column Selection .............................................................................................................. 94 5.4.1 Available Columns...................................................................................................... 94 5.4.2 Add Selected Column................................................................................................. 94 5.4.3 Remove Selected Display Column............................................................................. 94 5.4.4 Display Columns......................................................................................................... 95 5.4.5 Up ............................................................................................................................... 95 5.4.6 Down........................................................................................................................... 95
5.5 Conditions ......................................................................................................................... 95 5.5.1 Available Attributes..................................................................................................... 96 5.5.2 Add ............................................................................................................................. 96 5.5.3 Condition Attribute Field ............................................................................................. 97 5.5.4 Condition List .............................................................................................................. 97
5.5.4.1 Expression List..................................................................................................... 98 5.5.5 Condition Criteria ........................................................................................................ 98 5.5.6 Find............................................................................................................................. 99 5.5.7 Field Value Selection.................................................................................................. 99
5.5.7.1 Selected Attribute................................................................................................. 99 5.5.7.2 Next 100............................................................................................................... 99

Reference Guide D5092 16-Jan-2008 - Page 9 Report Plug-in
Remote Automation Solutions Website: www.EmersonProcess.com/Remote
5.5.7.3 List of Unique Values ......................................................................................... 100 5.5.7.4 Only show values that contain ........................................................................... 100
5.5.8 Alias .......................................................................................................................... 100 5.5.9 Alias Selection .......................................................................................................... 100 5.5.10 Update................................................................................................................... 101 5.5.11 Edit ........................................................................................................................ 101 5.5.12 Remove ................................................................................................................. 102 5.5.13 Configured Conditions List .................................................................................... 103
5.5.13.1 Any of the above............................................................................................... 103 5.5.13.2 All of the above ................................................................................................. 103
5.6 Column Sort .................................................................................................................... 103 5.6.1 Available Columns.................................................................................................... 104 5.6.2 Add ........................................................................................................................... 105 5.6.3 Remove .................................................................................................................... 105 5.6.4 Sort Columns............................................................................................................ 105 5.6.5 Sort Order ................................................................................................................. 105 5.6.6 ASC or DESC Order................................................................................................. 106 5.6.7 Up and Down............................................................................................................ 106
5.7 SQL ................................................................................................................................. 106 5.7.1 SQL Statement ......................................................................................................... 107 5.7.2 Edited........................................................................................................................ 107 5.7.3 Generated................................................................................................................. 109 5.7.4 Test SQL................................................................................................................... 109 5.7.5 Test Query Results................................................................................................... 109
5.7.5.1 Query Results .................................................................................................... 110 5.7.5.2 Next 100............................................................................................................. 110 5.7.5.3 Showing records ................................................................................................ 110
5.8 Output.............................................................................................................................. 110 5.8.1 Existing Worksheet Cell Reference.......................................................................... 111 5.8.2 Temporary Worksheet .............................................................................................. 111 5.8.3 Adjust Column Widths .............................................................................................. 111 5.8.4 Show Column Headers............................................................................................. 111 5.8.5 Add Named Range for each Column ....................................................................... 111 5.8.6 NULL Text................................................................................................................. 112 5.8.7 Output Timestamp Settings Dialog........................................................................... 112
5.8.7.1 Local Time.......................................................................................................... 112 5.8.7.2 UTC.................................................................................................................... 112 5.8.7.3 Offset Timestamps............................................................................................. 113 5.8.7.4 Offsets................................................................................................................ 113 5.8.7.5 Transform Timestamp Column Only.................................................................. 113 5.8.7.6 All Timestamp Columns ..................................................................................... 113 5.8.7.7 Apply Offset Before Local Time Conversion...................................................... 113 5.8.7.8 Apply Offset After Local Time Conversion ......................................................... 113
5.8.8 Questionable Data Formatting.................................................................................. 113 5.8.9 Questionable Attribute .............................................................................................. 113 5.8.10 Questionable Color ............................................................................................... 113
Reference Guide D5092 16-Jan-2008 - Page 10 Report Plug-in
Remote Automation Solutions Website: www.EmersonProcess.com/Remote
6 Real-time SQL Query Wizard.............................................................................................. 115 6.1 Name............................................................................................................................... 115
6.1.1 Query Name ............................................................................................................. 116 6.1.2 Progress Menu ......................................................................................................... 116
6.2 Data Service.................................................................................................................... 116 6.2.1 Override Default Dataservice ................................................................................... 117 6.2.2 Dataservice............................................................................................................... 117 6.2.3 Test Connection Button ............................................................................................ 117 6.2.4 Advanced Button ...................................................................................................... 118 6.2.5 Import Data Service Dialog....................................................................................... 118
6.2.5.1 Use different data service for data import .......................................................... 118 6.2.5.2 Data Service....................................................................................................... 118 6.2.5.3 Test Connection Button ..................................................................................... 119 6.2.5.4 Alias Selection.................................................................................................... 119
6.3 SQL ................................................................................................................................. 119 6.3.1 SQL Statement ......................................................................................................... 120 6.3.2 Test SQL................................................................................................................... 120 6.3.3 Test Query Results................................................................................................... 120
6.3.3.1 Query Results .................................................................................................... 121 6.3.3.2 Next 100............................................................................................................. 121 6.3.3.3 Showing records ................................................................................................ 121
6.4 Output.............................................................................................................................. 121 6.4.1 Existing Worksheet Cell Reference.......................................................................... 122 6.4.2 Temporary Worksheet .............................................................................................. 123 6.4.3 Adjust Column Widths .............................................................................................. 123 6.4.4 Show Column Headers............................................................................................. 123 6.4.5 Add Named Range for each Column ....................................................................... 123 6.4.6 NULL Text................................................................................................................. 123 6.4.7 Output Timestamp Settings Dialog........................................................................... 123
6.4.7.1 Local Time.......................................................................................................... 124 6.4.7.2 UTC.................................................................................................................... 124 6.4.7.3 Offset Timestamps............................................................................................. 124 6.4.7.4 Offsets................................................................................................................ 124 6.4.7.5 Transform Timestamp Column Only.................................................................. 125 6.4.7.6 All Timestamp Columns ..................................................................................... 125 6.4.7.7 Apply Offset Before Local Time Conversion...................................................... 125 6.4.7.8 Apply Offset After Local Time Conversion ......................................................... 125
6.4.8 Questionable Data Formatting.................................................................................. 125
7 Query Manager..................................................................................................................... 126 7.1 Query List ........................................................................................................................ 126 7.2 Query ID .......................................................................................................................... 126 7.3 Query Check Box ............................................................................................................ 126 7.4 Add Query ....................................................................................................................... 126
7.4.1 Select Query Type.................................................................................................... 126 7.4.1.1 Import History..................................................................................................... 127
Reference Guide D5092 16-Jan-2008 - Page 11 Report Plug-in
Remote Automation Solutions Website: www.EmersonProcess.com/Remote
7.4.1.2 Real-time............................................................................................................ 127 7.4.1.3 Real-time SQL.................................................................................................... 127
7.5 Delete Query ................................................................................................................... 127 7.6 Modify Query................................................................................................................... 127 7.7 Run Query....................................................................................................................... 128 7.8 Close ............................................................................................................................... 128 7.9 Help ................................................................................................................................. 128
8 Alias Manager ...................................................................................................................... 129 8.1 Alias List .......................................................................................................................... 129 8.2 Alias Value ...................................................................................................................... 130 8.3 Add Alias ......................................................................................................................... 130 8.4 Add Alias Dialog.............................................................................................................. 130
8.4.1 Alias Name ............................................................................................................... 131 8.4.2 New Alias Value ....................................................................................................... 131 8.4.3 Persistent Value ....................................................................................................... 131 8.4.4 OK button.................................................................................................................. 131 8.4.5 Cancel....................................................................................................................... 131 8.4.6 Help .......................................................................................................................... 131
8.5 Delete Alias ..................................................................................................................... 131 8.6 Import Alias ..................................................................................................................... 132 8.7 Imported Aliases ............................................................................................................. 132
8.7.1 Automatically Imported Aliases ................................................................................ 133 8.7.2 Global Alias File........................................................................................................ 133 8.7.3 Unique Report Alias File........................................................................................... 133
8.8 Export Alias ..................................................................................................................... 133 8.9 Export Aliases Dialog ...................................................................................................... 133
8.9.1 Export to File............................................................................................................. 134 8.9.2 New Alias Filename.................................................................................................. 134 8.9.3 Open Alias File ......................................................................................................... 135 8.9.4 Export Alias Button ................................................................................................... 135 8.9.5 Close Button ............................................................................................................. 135 8.9.6 Help .......................................................................................................................... 135 8.9.7 Aliases to Export List ................................................................................................ 135
8.10 OK Button .................................................................................................................... 136 8.11 Cancel.......................................................................................................................... 136 8.12 Help.............................................................................................................................. 136
9 Event Viewer ........................................................................................................................ 137 9.1 Event Type ...................................................................................................................... 137 9.2 Event Category ............................................................................................................... 138 9.3 Event Object.................................................................................................................... 138 9.4 Event List ........................................................................................................................ 138 9.5 Scroll Bars ....................................................................................................................... 138

Reference Guide D5092 16-Jan-2008 - Page 12 Report Plug-in
Remote Automation Solutions Website: www.EmersonProcess.com/Remote
10 Insert Functions ............................................................................................................... 139 10.1 Worksheet Formula Functions..................................................................................... 139 10.2 GetAliasValue .............................................................................................................. 140 10.3 OEVariable .................................................................................................................. 140 10.4 OEQueryVariable......................................................................................................... 140
11 Report Runtime Utility Functions................................................................................... 141 11.1 GetAliasValues ............................................................................................................ 141 11.2 GetErrorCode .............................................................................................................. 141 11.3 GetErrorText ................................................................................................................ 141 11.4 GetEndtime.................................................................................................................. 141 11.5 GetStarttime................................................................................................................. 141 11.6 ReportState.................................................................................................................. 142 11.7 RemovePlugin ............................................................................................................. 142 11.8 RunReport ................................................................................................................... 142 11.9 SetAlias........................................................................................................................ 142
12 Automatic Array Naming ................................................................................................. 143 12.1 Example Named Array................................................................................................. 143
13 Glossary ............................................................................................................................ 145
14 Index .................................................................................................................................. 146
Reference Guide D5092 16-Jan-2008 - Page 13 Report Plug-in
Remote Automation Solutions Website: www.EmersonProcess.com/Remote
1 Report Plug-in The OpenEnterprise Report Plug-in is an Excel add-in that extends Excel for use with OpenEnterprise. The plug-in can be used to create report templates and bespoke reports. A report template is an Excel Workbook that can be used for creating multiple published reports.
1.1 Configuration The Report Plug-in provides unique configuration dialogs and menu options within Excel to simplify the process of creating an OpenEnterprise report template, including the following:-
1. OpenEnterprise specific menu
2. Report Property Pages
3. Import OpenEnterprise Data Wizards
4. Query Manager
5. Report Alias Manager
6. Report Event Viewer
7. Report Functions
Before continuing, please read the important information on the following pages:-
1.2 Licensing and Loading • Licensing
• Loading the OpenEnterprise Plug-in
1.3 Array Names An additional feature that you should know about is that the Report Plugin automatically tags any range of cells that contain the results of a query with an Excel Array Name. This enables Report results from one Excel worksheet to be pasted to another worksheet automatically when a Report is run by using the Array Name in an Array Formula. Mathematical operations can also be performed on the Named Arrays as they are copied.
1.4 Licensing The OpenEnterprise Report plug-in is a licensed component.
When not licensed, you can continue to edit and test OpenEnterprise Excel reports. However, when importing data from an OpenEnterprise Server, only one row of data will be displayed within Excel. For all remaining rows, the imported data values will be substituted with the following text:
#LIC This indicates that data was successfully imported from the OpenEnterprise Server but was not displayed due to the plug-in being unlicensed.
#LIC(NULL) This indicates that no data was imported from the OpenEnterprise Server (or no data exists).

Reference Guide D5092 16-Jan-2008 - Page 14 Report Plug-in
Remote Automation Solutions Website: www.EmersonProcess.com/Remote
During the demo period the plug-in is fully functional.
1.5 Loading the OpenEnterprise Plug-in In order to create an OpenEnterprise Report, the OpenEnterprise Report plug-in must be loaded into Excel. An Excel file with the OpenEnterprise Plugin loaded becomes an OpenEnterprise Report Template. Use the Report Configuration Tool to create a new Report Template. Below are the instructions to do this:-
1. Select the Windows Start button and follow the All Programs->OpenEnterprise->Toolbox branch.
2. When the Toolbox opens select the Reporting Configuration Tool, outlined in the image below:-
3. When the Reporting Configuration User Interface is open, right Click on the Template Icon, and select the 'New Report Template' menu option which is available, as shown in the image below:-
4. When the 'Template Configuration' dialog appears, type the name of the new Template into the Template name field and then click the [Create] button, highlighted in the image below.

Reference Guide D5092 16-Jan-2008 - Page 15 Report Plug-in
Remote Automation Solutions Website: www.EmersonProcess.com/Remote
5. A Microsoft Excel file will be created in the OpenEnterprise bin directory with the name assigned to the Report Template, and the file will be opened with the Report Plugin installed, and ready to be configured.
1.6 Importing OpenEnterprise Data There are three ways to import OpenEnterprise data into a report template:-
1. Import historical data
2. Import real-time data using extra pages
3. Import real-time data using SQL only

Reference Guide D5092 16-Jan-2008 - Page 16 Report Plug-in
Remote Automation Solutions Website: www.EmersonProcess.com/Remote
2 Report Properties The Report Property dialogs enable you to configure a Report Template's default dataservice, Report Period and the logging of events. A Report Properties wizard will open automatically the first time a Report Template is opened. Thereafter, the OpenEnterprise report properties can be modified at any time. The Report Properties consist of three pages:-
• Data Service Page
• Report Period Page
• Event Logging Page
• External Queries Page
2.1 Modifying Report Properties The Report Properties wizard runs automatically the first time you begin to configure a Report Template, but you can subsequently view and modify the Properties from the OpenEnterprise>Options menu.
2.2 Dataservice Page The Report Properties Dataservice page enables you to specify a default dataservice (OpenEnterprise Database) for the Report Template. This will be the dataservice used for all imports of OpenEnterprise data. However, the dataservice can be overridden for individual imports to allow data from multiple OpenEnterprise servers to be incorporated into the report. .

Reference Guide D5092 16-Jan-2008 - Page 17 Report Plug-in
Remote Automation Solutions Website: www.EmersonProcess.com/Remote
2.2.1 Progress Menu
The side menu lists the property pages that are available for the wizard selected. In wizard mode, as each page is configured and you move on to the next, the pages that have been completed are shown in italic fonts. This helps you to identify how far you have progressed through the Wizard. When modifying a query, clicking on a page name in the list opens up that page for modification.

Reference Guide D5092 16-Jan-2008 - Page 18 Report Plug-in
Remote Automation Solutions Website: www.EmersonProcess.com/Remote
2.2.2 Dataservice
Type the name of the intended default report data service in here. Use the format host:service where host is the computer name of the OpenEnterprise Server and service is the TCP/IP service name of the OpenEnterprise database (typically rtrdb1). For Redundant Servers, separate the data service of each Server with a comma - e.g. hosta:rtrdb1, hostb:rtrdb1. To run a Report that connects to the standby Server append [ro] to the data service.
2.2.3 Test Connection Button
Click this button to attempt a connection to the dataservice that you typed into the Dataservice field. A message will inform you of the success or failure of the connection attempt. If the test fails due to insufficient user credentials, enter your OpenEnterprise credentials using the OpenEnterprise > Logon menu item.
2.2.4 Advanced...
The Advanced... button on the Dataservice page opens the Import Dataservice dialog. This enables a dataservice override to be specified.
2.2.5 Import Data Service Dialog
The 'Import Dataservice' dialog enables you to override the dataservice for the report template or any configured queries in the report template.

Reference Guide D5092 16-Jan-2008 - Page 19 Report Plug-in
Remote Automation Solutions Website: www.EmersonProcess.com/Remote
2.2.5.1 Use different data service for data import
When checked, the configured dataservice will be overridden by the dataservice set here. This dialog can serve to override dataservice options in two ways:-
1. If it is invoked from the Dataservice page of the Report Properties wizard, the Import Dataservice dialog sets up a global Dataservice that will override the Report Dataservice, and also overrides any query that does not specify its own Advanced Dataservice.
2. If invoked from the Dataservice page of any of the import wizards (historical, real-time or real-time SQL), the Import Dataservice dialog applies a local query dataservice override on the standard report dataservice, or on any global dataservice that may have been set for the report as described in point 1 above.
2.2.5.2 Data Service
The overriding dataservice can be defined here using the standard format of <ServerName>:<ServiceName> (for example - MainServer:rtrdb1), or it can be defined with an alias. The alias can be entered directly as text (e.g. <<HISTSERVER>>), or an alias can be selected from those which are available by selecting the [Alias...] button.
2.2.5.3 Alias Selection
Select the appropriate Alias from the list and click the [OK] button. Note, aliases can be configured using the Alias Manager, which is invoked using the OpenEnterprise>Alias Manager menu option.

Reference Guide D5092 16-Jan-2008 - Page 20 Report Plug-in
Remote Automation Solutions Website: www.EmersonProcess.com/Remote
2.2.5.4 Test Connection Button
Click this button to attempt a connection to the dataservice that you typed into the Dataservice field. A message will inform you of the success or failure of the connection attempt. If the test fails due to insufficient user credentials, enter your OpenEnterprise credentials using the OpenEnterprise > Logon menu item.
2.3 Report Period Page The Report Period page enables you to set the period of time that this report will cover. By default, this period will be used for all OpenEnterprise signal history imports. However, the default time period can be overridden for individual imports to allow data for different time periods to be incorporated into the report.

Reference Guide D5092 16-Jan-2008 - Page 21 Report Plug-in
Remote Automation Solutions Website: www.EmersonProcess.com/Remote
2.3.1 Progress Menu
The side menu lists the property pages that are available for the wizard selected. In wizard mode, as each page is configured and you move on to the next, the pages that have been completed are shown in italic fonts. This helps you to identify how far you have progressed through the Wizard. When modifying a query, clicking on a page name in the list opens up that page for modification.

Reference Guide D5092 16-Jan-2008 - Page 22 Report Plug-in
Remote Automation Solutions Website: www.EmersonProcess.com/Remote
2.3.2 Calendar Period
A list of time periods that express a default Calendar Period. View the From and To fields at the bottom of the page to see the exact times that a Query would cover for any selection from the following:-
• Current Hour
• Previous Hour
• Today
• Yesterday
• This Week
• Last Week
• This Month
• Last Month
• This Year
• Last Year

Reference Guide D5092 16-Jan-2008 - Page 23 Report Plug-in
Remote Automation Solutions Website: www.EmersonProcess.com/Remote
2.3.3 Interval
Select an Interval report period when the report period cannot be defined as a calendar period e.g. 8-hours or 5-days. An interval Report Period is expressed by a number of time units. To view the actual time period the Report would use based on your selection, see the To and From fields at the bottom of the Report Period page. The Interval is defined as any number of the following units:-:-
• Minutes
• Hours
• Days
• Weeks
• Months
• Years
2.3.4 Offset from midnight
All report periods, with the exception of This Hour and Pervious Hour, are relative to midnight. An Offset from midnight can be defined by changing the Offset multiplier and Offset Period fields. To view the actual time period the Report would use based on your selection, see the To and From fields at the bottom of the Report Period page. The Offset is defined as any number of the following units:-
• Minutes
• Hours
• Days
• Weeks
• Months
• Years
The offset can be used to move the relative time period forwards or back. A positive offset will move the report period forward in time whilst a negative offset will move the report period back in time.
2.3.5 Timezone and DST adjustments
Provides timezone and DST options which affect the Report results.
2.3.5.1 Local
This option is selected by default. The Report will be run taking into account local daylight saving time (DST) settings.
2.3.5.2 Local, non DST adjusted
The Report will not take into account local daylight saving time (DST) settings.

Reference Guide D5092 16-Jan-2008 - Page 24 Report Plug-in
Remote Automation Solutions Website: www.EmersonProcess.com/Remote
2.3.5.3 UTC
The Report will interpret the Period times as UTC (Coordinated Universal Time) times, not local time. Local time could be up to 12 hours ahead of or behind UTC time. UTC time is equivalent to GMT (Greenwich Mean Time).
2.3.6 Example Time and Date
This section provides examples based on the time when the Report is run, and the time settings selected on the page. The From and To fields show the times that data would be recovered for if the Report was run with the current Period settings:-
The Report run time can be changed by clicking on the Date, which displays a Calendar, from which an alternate date can be selected. The date and time selectors are not part of the report configuration. They are intended to be used for better interpretation of the time period that the report covers based on entered configuration.
The From and To fields will be updated depending on the new date selected.
2.3.7 UTC Times
When checked, the from and to times will be displayed in their UTC equivalent. These are the actual times used to query the OpenEnterprise database.
2.4 Event Logging Page Most events that occur during the execution and configuration of a report can be logged. The Event Logging page enables event logging to be disabled or for custom event logging to be set up.

Reference Guide D5092 16-Jan-2008 - Page 25 Report Plug-in
Remote Automation Solutions Website: www.EmersonProcess.com/Remote
2.4.1 Progress Menu
The side menu lists the property pages that are available for the wizard selected. In wizard mode, as each page is configured and you move on to the next, the pages that have been completed are shown in italic fonts. This helps you to identify how far you have progressed through the Wizard. When modifying a query, clicking on a page name in the list opens up that page for modification.

Reference Guide D5092 16-Jan-2008 - Page 26 Report Plug-in
Remote Automation Solutions Website: www.EmersonProcess.com/Remote
2.4.2 Enable Logging
Logging is enabled by default. By default, most Events relating to Report configuration and running are logged to a file on disk. The file is a comma-separated values (CSV) text file and resides in the same directory as the Report Template. The default name of the file is exactly the same as the Template name, with a .CSV file extension added.
2.4.3 Use Default Log File Name
When selected, the default folder for the Log File will be the same as the Report Template. This can be changed by selecting the [Browse] button to the right of the Folder: field
2.4.4 Log Filename
When the 'Use Default Log File Name' box is unchecked, this field becomes enabled. Type the name of the new file in here. If no file extension is provided, the file will be given the extension of '.CSV'.
2.4.5 Log File Folder
By default, Report Template Log files are saved in the same directory as the default Report Template. To use a different folder, type the new directory here or use the [Browse] button to search for a folder.
2.4.6 Browse Folder Button
A File browse window will open, allowing you to browse the local machine and network for a new folder. You can also use the [Make New Folder] button to create a new folder.

Reference Guide D5092 16-Jan-2008 - Page 27 Report Plug-in
Remote Automation Solutions Website: www.EmersonProcess.com/Remote
2.4.7 Create a new file
The default behaviour for Report Log files. A new file is created each time the Report Template is opened.
2.4.8 Append to existing file
When this option is selected, the Report Log file will be appended each time the Report Template is opened.
2.4.9 Rename existing file
With this option selected, the last Report Log file will be renamed every time the Report Template is opened, and a new Log file will be created. Renamed log files will have a suffix of ‘old’ appended to the log file base name.
2.5 External Queries Page The 'External Queries Page' enables you to also run any configured external queries when the current report template is run. External queries are queries configured using the Data>Import External Data> Excel menu options. From these options you can connect to a database using OLE DB, ODBC or other types of data connection, and bring the results back into a sheet in the report template.

Reference Guide D5092 16-Jan-2008 - Page 28 Report Plug-in
Remote Automation Solutions Website: www.EmersonProcess.com/Remote
2.5.1 Progress Menu
The side menu lists the property pages that are available for the wizard selected. In wizard mode, as each page is configured and you move on to the next, the pages that have been completed are shown in italic fonts. This helps you to identify how far you have progressed through the Wizard. When modifying a query, clicking on a page name in the list opens up that page for modification.

Reference Guide D5092 16-Jan-2008 - Page 29 Report Plug-in
Remote Automation Solutions Website: www.EmersonProcess.com/Remote
2.5.2 Run all external queries
When checked, all configured external queries will also be run when this report is run. This option is unchecked by default.
2.5.3 Save passwords
When checked, passwords used when creating external queries will be remembered, enabling external queries to be run. If this option is unchecked, and an external query cannot be run because the query credentials are not available, an error message will be displayed. If the report is run from Excel, the message will appear in a message box, if the report is run by the Report Scheduler, the error will be reported to the Report Scheduler's event log.
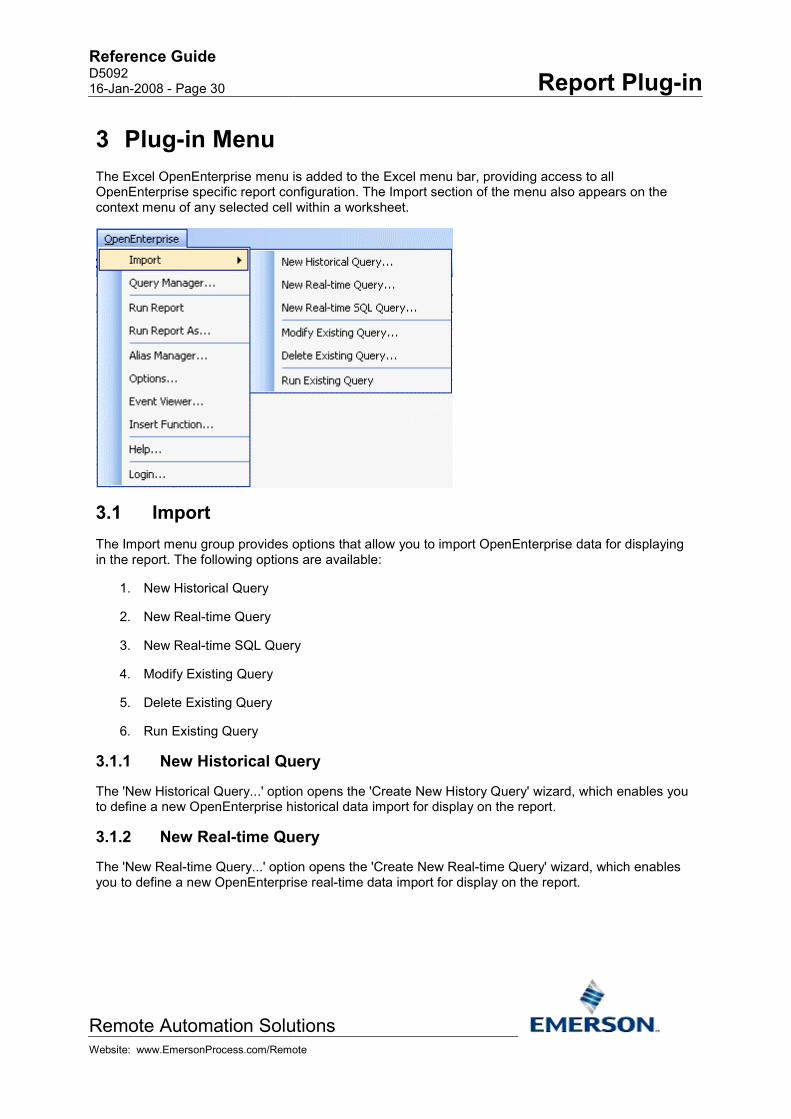
Reference Guide D5092 16-Jan-2008 - Page 30 Report Plug-in
Remote Automation Solutions Website: www.EmersonProcess.com/Remote
3 Plug-in Menu The Excel OpenEnterprise menu is added to the Excel menu bar, providing access to all OpenEnterprise specific report configuration. The Import section of the menu also appears on the context menu of any selected cell within a worksheet.
3.1 Import The Import menu group provides options that allow you to import OpenEnterprise data for displaying in the report. The following options are available:
1. New Historical Query
2. New Real-time Query
3. New Real-time SQL Query
4. Modify Existing Query
5. Delete Existing Query
6. Run Existing Query
3.1.1 New Historical Query
The 'New Historical Query...' option opens the 'Create New History Query' wizard, which enables you to define a new OpenEnterprise historical data import for display on the report.
3.1.2 New Real-time Query
The 'New Real-time Query...' option opens the 'Create New Real-time Query' wizard, which enables you to define a new OpenEnterprise real-time data import for display on the report.
Reference Guide D5092 16-Jan-2008 - Page 31 Report Plug-in
Remote Automation Solutions Website: www.EmersonProcess.com/Remote
3.1.3 New Real-time SQL Query
For advanced users, the 'New Real-time SQL Query...' option opens the 'Create New Real-time SQL Query' wizard, which enables you to define a new OpenEnterprise real-time data import using SQL only for display on the report.
3.1.4 Modify Existing Query
The Modify Existing Query this menu item should be used to view or modify an existing history import that has been configured on the selected cell. If no Query has been configured to run on the selected cell a message explains this.
3.1.5 Delete Existing Query
This option deletes any Query that is on the currently selected cell. If no Query exists on the currently selected cell a message tells you of this. If there is a Query on the currently selected cell, a message asks for confirmation of the deletion.
3.1.6 Run Existing Query
Runs the query that has been configured on the selected cell. If no query has been configured to run on the selected cell a message explains this.
3.2 Query Manager Select this option to add, modify, delete or run queries.
3.3 Run Report When selected, all queries configured within the Report Template will be run.
3.4 Run Report As By default, all reports will be run as the SYSTEM user. However, this option is provided to test the report using the security context of a special report user (e.g. a user who only has read access to signal and history tables). This option ties in with the User Credentials page of the Report Configuration Tool, which enables you to set the Report up to run as a user who is not the SYSTEM user. You can test run the Report Template here to affirm that the user has sufficient privileges to extract the OpenEnterprise data required for the report.
When this menu item is selected, the User Credentials box will be displayed. Type in the name and password of the OpenEnterprise User that will be used to run the Report. When the user name and password are typed in, select the [OK] button. All configured queries on the Report will be run.

Reference Guide D5092 16-Jan-2008 - Page 32 Report Plug-in
Remote Automation Solutions Website: www.EmersonProcess.com/Remote
3.5 Aliases This enables you to view and configure Aliases for this Report Template. When this option is selected, the Alias Manager dialog is displayed.
3.6 Options Select this to modify the Report Properties. When selected, the Report Plug-in Property pages are displayed.
3.7 Event Viewer Select this option to view all the events associated with this reports configuration and running. When selected, the Event Viewer dialog is displayed.
The Report Plug-in has its own functions, some of which can be entered into a cell within an Excel worksheet using the Plug-in's Insert Function dialog. Report Plug-in functions available for insertion into the body of the Report in this way are:-
1. GetAliasValue
2. OEVariable
3. OEQueryVariable
The Report Plug-in provides other functions that can be inserted using the Excel Insert Function dialog, or used directly by the Report Scheduler when running Reports. These functions can also be used by third party clients that run reports.
3.8 Worksheet Formula Functions The formula functions can be inserted into any cell of the Excel worksheet using the Report Plug-in's Insert Function... menu item. This is available from the context menu, as shown in the example below.

Reference Guide D5092 16-Jan-2008 - Page 33 Report Plug-in
Remote Automation Solutions Website: www.EmersonProcess.com/Remote
The same option can be selected from the OpenEnterprise menu, which is appended to the Excel menu bar at the top of the Excel window. When this option is selected the Plug-in's Insert Function dialog is displayed. Click the hotspots on the image below for further help.

Reference Guide D5092 16-Jan-2008 - Page 34 Report Plug-in
Remote Automation Solutions Website: www.EmersonProcess.com/Remote
The available function parameters are entered into the drop-down lists to the right of the list of functions for selection.
3.9 Login... When this menu item is selected, the Login dialog will be displayed. Type in the name and password of the OpenEnterprise User whose credentials will be used to configure and test run the Report. When the user name and password are typed in, select the [OK] button.
3.10 Help... This option opens the Report Plug-in Help file at the first topic.
Reference Guide D5092 16-Jan-2008 - Page 35 Report Plug-in
Remote Automation Solutions Website: www.EmersonProcess.com/Remote
4 Historical Query Wizard The Historical Query wizard enables you to create and modify OpenEnterprise historical imports. Historical queries can be created for Signal, Event or Object historical streams. When creating a new import, the query results will by default be output starting at the currently selected Excel cell. Once configured, the Query wizard pages can be opened in modify mode. There are seven steps required to configure a new history import:-
• Query Name Page
• Data Service Page
• Dataset Page
• Objects Page
• Query Period Page
• Transform Page
• Output Page
4.1 Query Name Each import query is identified by a unique name. A name is automatically generated when this page is first opened. The name can be changed to something more meaningful to the report. The name can be up to 14 characters long. If you do not supply a name, the Report Plug-in will use the unique name which it provided.

Reference Guide D5092 16-Jan-2008 - Page 36 Report Plug-in
Remote Automation Solutions Website: www.EmersonProcess.com/Remote
4.1.1 Query Name
A unique name is automatically created, but you can replace it with your own unique name if required, up to a maximum of 14 characters.
4.1.2 Progress Menu
The side menu lists the property pages that are available for the wizard selected. In wizard mode, as each page is configured and you move on to the next, the pages that have been completed are shown in italic fonts. This helps you to identify how far you have progressed through the Wizard. When modifying a query, clicking on a page name in the list opens up that page for modification.

Reference Guide D5092 16-Jan-2008 - Page 37 Report Plug-in
Remote Automation Solutions Website: www.EmersonProcess.com/Remote
4.2 Data Service This page enables you to define the OpenEnterprise dataservice which will be used to import historical data. The report’s default OpenEnterprise dataservice will be displayed but this can be changed in order to import data from another server.

Reference Guide D5092 16-Jan-2008 - Page 38 Report Plug-in
Remote Automation Solutions Website: www.EmersonProcess.com/Remote
4.2.1 Override Default Dataservice
Check this box to override the Report's default dataservice (set on the Dataservice page of the Report Properties wizard).
4.2.2 Dataservice
When this page is opened, this field is not editable, and displays the default dataservice as defined on the Report Properties Data Service Page.
To override this dataservice, ensure the 'Override Default Dataservice' button is checked, then type the name of the intended query data service in here. Use the format host:service where host is the computer name of the OpenEnterprise Server and service is the TCP/IP service name of the OpenEnterprise database (typically rtrdb1). For Redundant Servers, separate the data service of each Server with a comma - e.g. hosta:rtrdb1, hostb:rtrdb1. To run a Report that connects to the standby Server append [ro] to the data service.
4.2.3 Test Connection Button
Click this button to attempt a connection to the dataservice that you typed into the Dataservice field. A message will inform you of the success or failure of the connection attempt. If the test fails due to insufficient user credentials, enter your OpenEnterprise credentials using the OpenEnterprise > Logon menu item.
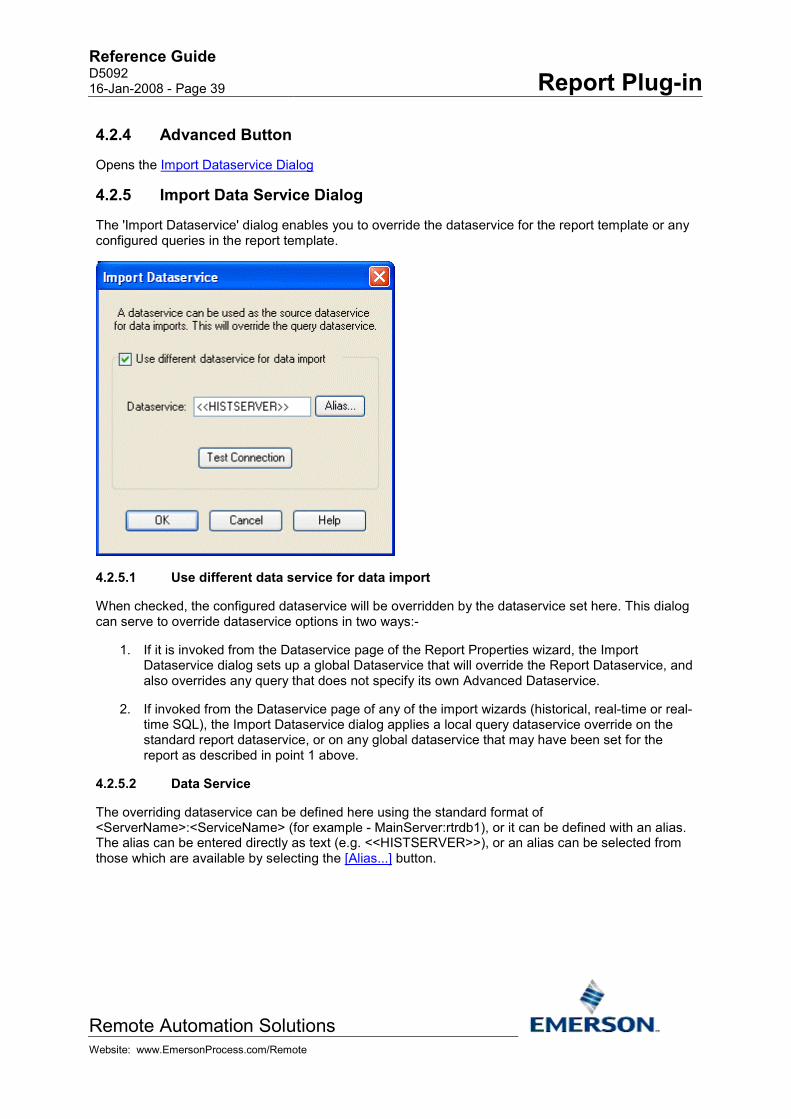
Reference Guide D5092 16-Jan-2008 - Page 39 Report Plug-in
Remote Automation Solutions Website: www.EmersonProcess.com/Remote
4.2.4 Advanced Button
Opens the Import Dataservice Dialog
4.2.5 Import Data Service Dialog
The 'Import Dataservice' dialog enables you to override the dataservice for the report template or any configured queries in the report template.
4.2.5.1 Use different data service for data import
When checked, the configured dataservice will be overridden by the dataservice set here. This dialog can serve to override dataservice options in two ways:-
1. If it is invoked from the Dataservice page of the Report Properties wizard, the Import Dataservice dialog sets up a global Dataservice that will override the Report Dataservice, and also overrides any query that does not specify its own Advanced Dataservice.
2. If invoked from the Dataservice page of any of the import wizards (historical, real-time or real-time SQL), the Import Dataservice dialog applies a local query dataservice override on the standard report dataservice, or on any global dataservice that may have been set for the report as described in point 1 above.
4.2.5.2 Data Service
The overriding dataservice can be defined here using the standard format of <ServerName>:<ServiceName> (for example - MainServer:rtrdb1), or it can be defined with an alias. The alias can be entered directly as text (e.g. <<HISTSERVER>>), or an alias can be selected from those which are available by selecting the [Alias...] button.

Reference Guide D5092 16-Jan-2008 - Page 40 Report Plug-in
Remote Automation Solutions Website: www.EmersonProcess.com/Remote
4.2.5.3 Test Connection Button
Click this button to attempt a connection to the dataservice that you typed into the Dataservice field. A message will inform you of the success or failure of the connection attempt. If the test fails due to insufficient user credentials, enter your OpenEnterprise credentials using the OpenEnterprise > Logon menu item.
4.2.5.4 Alias Selection
Select the appropriate Alias from the list and click the [OK] button. Note, aliases can be configured using the Alias Manager, which is invoked using the OpenEnterprise>Alias Manager menu option.
4.3 Dataset This page displays the historical data sets available in the selected OpenEnterprise database. All historical streams are displayed along with the associated source table and logging rate. Historical streams can be expanded to show the available raw and compressed data sets. Select the data set that contains the data required for your Report.

Reference Guide D5092 16-Jan-2008 - Page 41 Report Plug-in
Remote Automation Solutions Website: www.EmersonProcess.com/Remote
4.3.1 Available Historical Datasets
This is a list of the historical streams and datasets configured in the Database. The streams are listed with a plus sign to the left of them. Each stream is described, showing the source table and historical logging rate. There are three steps to selection of a dataset for the Report:-
1. Click on the plus sign to the left of the stream of interest to reveal the datasets that have been configured for that stream.
2. Then select the dataset you are interested in.
3. Finally, click the [Select] button, and check that the dataset you selected is entered into the 'Currently selected dataset' field at the bottom of the dialog.
4.3.2 Select Dataset Button
When you have selected an actual dataset from the list above, click this button to confirm your selection. The name of the dataset including the stream name should now be automatically entered into the 'Currently selected dataset' field.
4.3.3 Currently Selected Dataset
The name of your selected dataset will be automatically entered into this field when you click on the [Select] button.

Reference Guide D5092 16-Jan-2008 - Page 42 Report Plug-in
Remote Automation Solutions Website: www.EmersonProcess.com/Remote
4.3.4 Advanced Button
Opens the Advanced Historical Dataset Settings page.
4.3.5 Advanced Historical Dataset Settings
The 'Advanced Historical Data Set Settings' dialog enables the selected historical Data Stream and Data Set names to be overridden when importing data for the selected query.
4.3.5.1 Use Aliases
When checked, the alias names specified on this dialog will be checked for values before running the query.
If values are found for the aliases, these values will be used in place of the original Data Stream and Data Set. If no values are found for the aliases, then the original Data Stream and Data Set values of the query will be used.
4.3.5.2 Data Stream Alias
The text in this box is the name of an alias that will be used to define the name of the Data Stream used in the query. It may be desirable to use an alias for the Data Stream name when it is intended to eventually source historical data from a separate historical database. The suggested alias name can be changed if required.
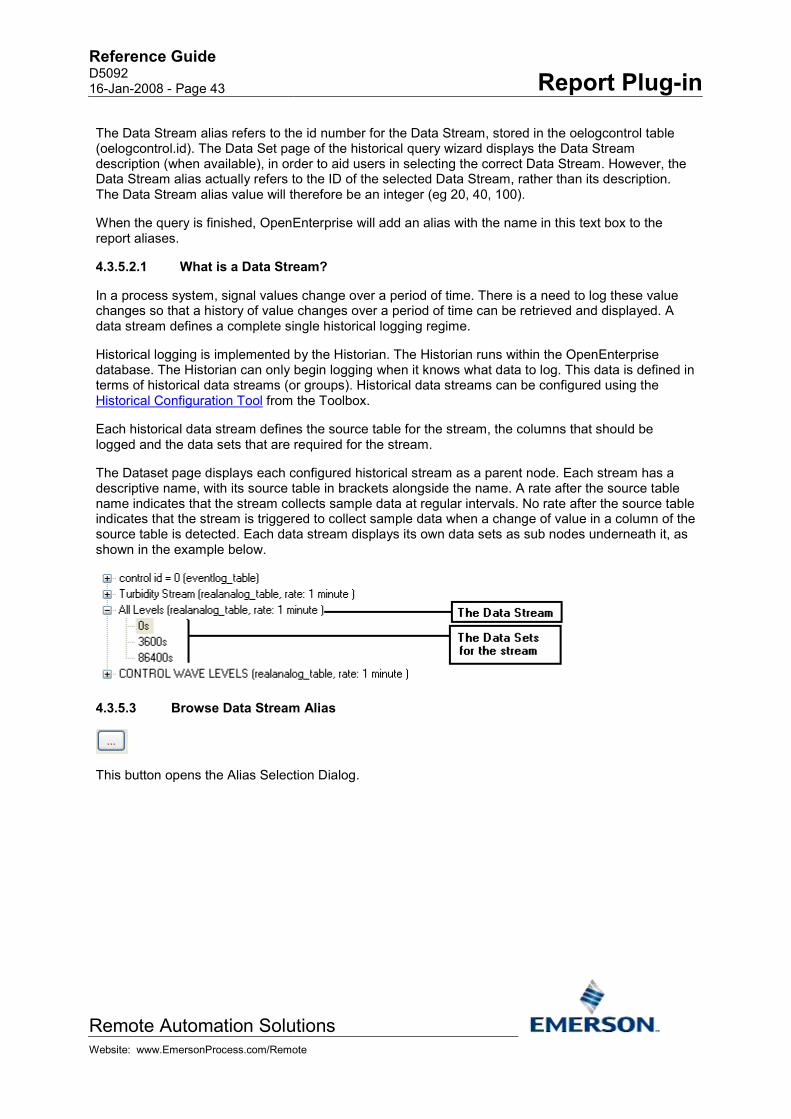
Reference Guide D5092 16-Jan-2008 - Page 43 Report Plug-in
Remote Automation Solutions Website: www.EmersonProcess.com/Remote
The Data Stream alias refers to the id number for the Data Stream, stored in the oelogcontrol table (oelogcontrol.id). The Data Set page of the historical query wizard displays the Data Stream description (when available), in order to aid users in selecting the correct Data Stream. However, the Data Stream alias actually refers to the ID of the selected Data Stream, rather than its description. The Data Stream alias value will therefore be an integer (eg 20, 40, 100).
When the query is finished, OpenEnterprise will add an alias with the name in this text box to the report aliases.
4.3.5.2.1 What is a Data Stream?
In a process system, signal values change over a period of time. There is a need to log these value changes so that a history of value changes over a period of time can be retrieved and displayed. A data stream defines a complete single historical logging regime.
Historical logging is implemented by the Historian. The Historian runs within the OpenEnterprise database. The Historian can only begin logging when it knows what data to log. This data is defined in terms of historical data streams (or groups). Historical data streams can be configured using the Historical Configuration Tool from the Toolbox.
Each historical data stream defines the source table for the stream, the columns that should be logged and the data sets that are required for the stream.
The Dataset page displays each configured historical stream as a parent node. Each stream has a descriptive name, with its source table in brackets alongside the name. A rate after the source table name indicates that the stream collects sample data at regular intervals. No rate after the source table indicates that the stream is triggered to collect sample data when a change of value in a column of the source table is detected. Each data stream displays its own data sets as sub nodes underneath it, as shown in the example below.
4.3.5.3 Browse Data Stream Alias
This button opens the Alias Selection Dialog.
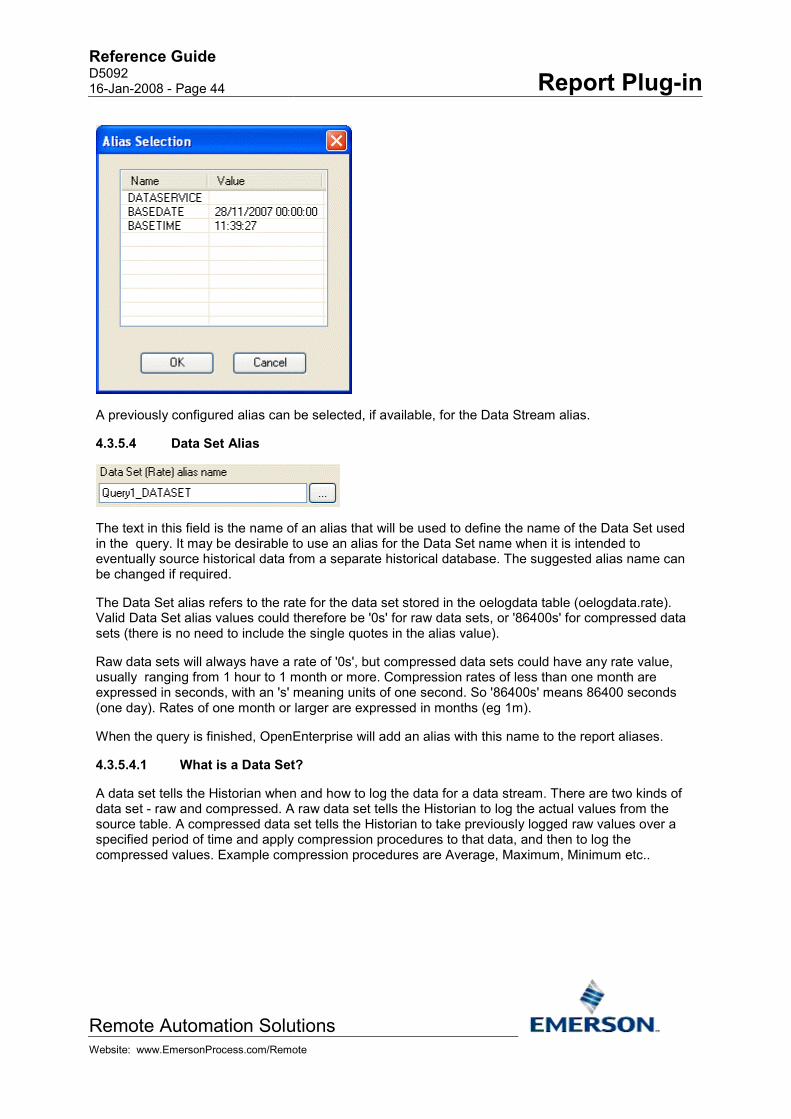
Reference Guide D5092 16-Jan-2008 - Page 44 Report Plug-in
Remote Automation Solutions Website: www.EmersonProcess.com/Remote
A previously configured alias can be selected, if available, for the Data Stream alias.
4.3.5.4 Data Set Alias
The text in this field is the name of an alias that will be used to define the name of the Data Set used in the query. It may be desirable to use an alias for the Data Set name when it is intended to eventually source historical data from a separate historical database. The suggested alias name can be changed if required.
The Data Set alias refers to the rate for the data set stored in the oelogdata table (oelogdata.rate). Valid Data Set alias values could therefore be '0s' for raw data sets, or '86400s' for compressed data sets (there is no need to include the single quotes in the alias value).
Raw data sets will always have a rate of '0s', but compressed data sets could have any rate value, usually ranging from 1 hour to 1 month or more. Compression rates of less than one month are expressed in seconds, with an 's' meaning units of one second. So '86400s' means 86400 seconds (one day). Rates of one month or larger are expressed in months (eg 1m).
When the query is finished, OpenEnterprise will add an alias with this name to the report aliases.
4.3.5.4.1 What is a Data Set?
A data set tells the Historian when and how to log the data for a data stream. There are two kinds of data set - raw and compressed. A raw data set tells the Historian to log the actual values from the source table. A compressed data set tells the Historian to take previously logged raw values over a specified period of time and apply compression procedures to that data, and then to log the compressed values. Example compression procedures are Average, Maximum, Minimum etc..

Reference Guide D5092 16-Jan-2008 - Page 45 Report Plug-in
Remote Automation Solutions Website: www.EmersonProcess.com/Remote
Each historical data stream consists of one raw data set and one or more optional compressed data sets. A raw data set is said to have a rate of zero seconds (0s), although this is not the same as the sample rate. Compressed data sets may be set to log compressed samples after any period of time equal to or greater than the raw sample rate (e.g. 3600s = 3600 seconds, or every hour). Usually, compressed sample rates are much larger than the raw sample rate. The historian takes the raw values over this period of time and applies the requested compression procedures to this data, logging a single value for each requested compression procedure.
For more information on the compression procedures available for each column type see the Historian Configuration document.
The Dataset page displays each configured historical stream as a parent node. Each historical stream has a descriptive name, with its source table in brackets alongside the name. A rate after the source table name indicates that the stream collects sample data at regular intervals. No rate after the source table indicates that the stream is triggered to collect sample data when a change of value in a column of the source table is detected. Each data stream displays its own data sets as sub nodes underneath it, as shown in the example below.
4.3.5.5 Browse Dataset Alias
This button opens the Alias Selection Dialog.
A previously configured alias can be selected, if available, for the Data Set alias.

Reference Guide D5092 16-Jan-2008 - Page 46 Report Plug-in
Remote Automation Solutions Website: www.EmersonProcess.com/Remote
4.4 Object Selection The Objects page allows you to select which objects in the selected dataset should be displayed in the report. The Object Selector page of the wizard is contextual, and varies according to the type of historical stream that was selected from the Dataset page. There are three possible versions of the page, each version providing the appropriate filtering options depending on the selected dataset type:-
1. Signal history selector
2. Event history selector
3. General Object history selector
4.4.1 Signal Selection
The Signal Selector page is displayed if you have chosen a Dataset that is logging signal data. This page enables you to select the actual signals that will appear in the Report. By default, all signals from the historical data set will be displayed. If you want a Report containing a subset of the signals in the Dataset, click the 'Named signals only' button. Then if you click the [Add Signals] button, the Signal Browse dialog enables you to select the signals of interest from the selected Dataset.

Reference Guide D5092 16-Jan-2008 - Page 47 Report Plug-in
Remote Automation Solutions Website: www.EmersonProcess.com/Remote
4.4.1.1 All Signals
This button is selected by default. If you want only a subset of signals from the dataset in the Report click the 'Named signals only' button. This will enable the [Add Signals] button.
4.4.1.2 Named Signals Only
Select this button if you want to filter the signals in the dataset. The [Add Signals] button will then be enabled. This opens the Signal Browse dialog which enables you to find the signals you want in the Report.
4.4.1.3 Add Signals Button
Opens the Signal Browse dialog, which enables you to search for signals of interest from the selected dataset to include in your Report.
4.4.1.4 Signal Browse Dialog
The Signal Browse dialog is used to define the signals that will appear in the final report. Signals can be identified explicitly by name or by search criteria. Each of the text controls at the top of the dialog are used as filters when searching for signals. As well as ordinary text, they can contain aliases (defined using the Alias Manager) and multiple character wildcards ( '*' or '%').
4.4.1.4.1 Applying a Signal Filter
1. Enter your search criteria into the relevant search controls and click [Find Signals]. Then click the [Add Filter] button. This will apply a filter to the Query.
2. If the displayed signals are the signals required for the report then click [Add Filter] to save the search criteria for generating the import query.
3. If the displayed signals are incorrect then redefine the search criteria and repeat the search.
4.4.1.4.2 Adding Specific Signals
1. Click the [Find Signals] button to list the signals in the dataset. The signals returned will be filtered according to any text in the filter fields.
2. Finally, select the signals you require from the list and then the [Add Signals] button. Then close the Signal Browser dialog.

Reference Guide D5092 16-Jan-2008 - Page 48 Report Plug-in
Remote Automation Solutions Website: www.EmersonProcess.com/Remote
4.4.1.4.3 Devicename
Type the name of the Device here. To find a match click the [Find signals] button. The '*' character can be used as a wildcard to match an unlimited number of characters. For instance, NORTH* will find “NORTH WWW” and “NORTH WTW”.
4.4.1.4.4 Name
Type the name of the signal here. The '*' character can be used as a wildcard to match an unlimited number of characters. So 'PUMP*' will find 'PUMP1' and 'PUMP2'.
4.4.1.4.5 Description
Type the description of the signal here. The '*' wildcard character can be used.
4.4.1.4.6 Instance
The instance is the initial part of a ControlWave signal name as seen in OpenEnterprise (e.g. 'CW:@GV'). The '*' character can be used as a wildcard to mean the inclusion of any characters after it.
Reference Guide D5092 16-Jan-2008 - Page 49 Report Plug-in
Remote Automation Solutions Website: www.EmersonProcess.com/Remote
4.4.1.4.7 Base
Type the base part of the signal name here. The '*' character can be used as a wildcard to mean the inclusion of any characters after it. So '*PU*' will find 'PUMP1', 'PUMP10' or 'TANK3 PUMP'.
4.4.1.4.8 Extension
Type the extension part of the signal name here. The '*' character can be used as a wildcard to mean the inclusion of any characters after it. So 'LE*' will find 'LEVEL' and 'LEVEL1'.
4.4.1.4.9 Attribute
Type the attribute part of the signal name here. The '*' character can be used as a wildcard to mean the inclusion of any characters after it. So '0*' will find '01', '001' or '0 (zero)'.
4.4.1.4.10 Match Case
Check this box if you want to use a case sensitive search for signals, objects or events. By default, all searches are case insensitive.
4.4.1.4.11 Find Signals Button
Click this button to begin the signal search. Signals found will be placed in the 'Signals found' list.
4.4.1.4.12 Signals Found List
This list displays the results of the search initiated by clicking the Find Signals button.
4.4.1.4.13 Add Signals
This button is only enabled when one or more signals from the 'Signals Found' list are selected. When this button is used, the signals selected are added to the 'Signals to be added' list on the Signal Selector page (e.g. in the form 'name=CUP:TANK3.LEVEL.').
4.4.1.4.14 Add Filter Button
Click this button to add a filter expression to the Report Query. The filter is entered into the 'Signals' or 'Objects Found list', depending on whether you are configuring a signal or object query. This button will only be enabled when there is text in the filter field(s) above the list.
Please Note: If you use this button, always ensure that the filters you use are in the correct case. When this button is selected, the filter is passed back to the 'Signals' or 'Objects to be added' list on the 'Signal/Object Selection' page in the same case as is typed here. For example, if you are configuring a signal query and the 'Match Case' box is un-ticked, and 'tank3' (note lower case) is typed into the 'Base' filter field, the [Find Signals] button may find a list of signals with a 'TANK3' (note upper case) base. However, if you select the [Add Filter] button without changing the case in the filter field, the filter will be copied to the 'Signals to be Added' list in lower case, and would therefore not find any signals when the Query is run. This applies to objects found on the Object Browse dialog also.
4.4.1.4.15 Help
Provides context sensitive help by opening this Help file at the topic that deals with what you are looking at.

Reference Guide D5092 16-Jan-2008 - Page 50 Report Plug-in
Remote Automation Solutions Website: www.EmersonProcess.com/Remote
4.4.1.4.16 Close
Closes the Signal Browser dialog. Changes are made to the underlying Query only when you select the [Add] or [Add Filter] buttons, so ensure that you have done this before closing the dialog.
4.4.1.5 Signals to be added
A list of signals for the import query, specified by name or search criteria. If the list contains signal names, the order in which the signals will appear on the Report can be changed by selecting signals and using the [Up] and [Down] buttons.
4.4.1.6 Up
Any object selected from the list is moved one position up the list. This will affect where the attribute appears in the final Report. The attribute at the top of the list will appear first in the Report. Others will appear to the right of it in the order in which they are displayed in the list to the left of this button.
4.4.1.7 Down
Any object selected from the list is moved one position down the list. This will affect where the attribute appears in the final Report. The attribute at the top of the list will appear first in the Report. Others will appear to the right of it in the order in which they are displayed in the list to the left of this button.
4.4.1.8 Remove
Will remove any signal or object selected from the list to the left of this button.
4.4.2 Event Selection
The Event Selector page enables you to choose the Events that will be displayed on the Report. It is displayed if you have chosen the EventHistory Dataset for the Query.
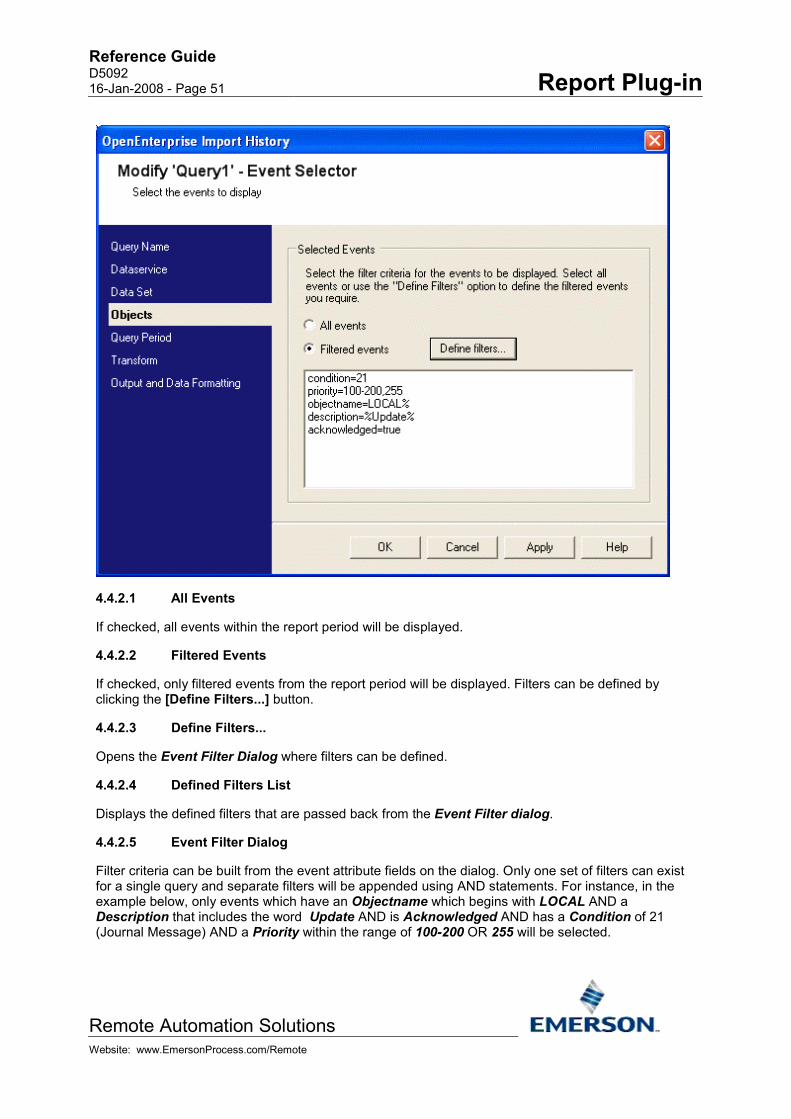
Reference Guide D5092 16-Jan-2008 - Page 51 Report Plug-in
Remote Automation Solutions Website: www.EmersonProcess.com/Remote
4.4.2.1 All Events
If checked, all events within the report period will be displayed.
4.4.2.2 Filtered Events
If checked, only filtered events from the report period will be displayed. Filters can be defined by clicking the [Define Filters...] button.
4.4.2.3 Define Filters...
Opens the Event Filter Dialog where filters can be defined.
4.4.2.4 Defined Filters List
Displays the defined filters that are passed back from the Event Filter dialog.
4.4.2.5 Event Filter Dialog
Filter criteria can be built from the event attribute fields on the dialog. Only one set of filters can exist for a single query and separate filters will be appended using AND statements. For instance, in the example below, only events which have an Objectname which begins with LOCAL AND a Description that includes the word Update AND is Acknowledged AND has a Condition of 21 (Journal Message) AND a Priority within the range of 100-200 OR 255 will be selected.

Reference Guide D5092 16-Jan-2008 - Page 52 Report Plug-in
Remote Automation Solutions Website: www.EmersonProcess.com/Remote
4.4.2.5.1 Event Devicename
The Devicename of the events to display on the report. All text based filters support CSV data entry e.g. Devicename could be set to “NORTH, SOUTH”. This would resolve to an SQL condition of devicename in (‘NORTH’, ‘SOUTH’).
Text based filters also support aliases e.g. Devicename could be set to <<devicename>> where the actual devicename would be set by the Report Scheduler.
All text based filters also support wild cards. A single filter control cannot contain both CSV and wild cards.
4.4.2.5.2 Event Objectname
The Objectname of the events to display on the report. All text based filters support CSV data entry e.g. Objectname could be set to “NORTH:PUMP1.RUN, NORTH:PUMP2.RUN”. This would resolve to an SQL condition of objectname in ('NORTH:PUMP1.RUN', 'NORTH:PUMP2.RUN').
Text based filters also support aliases e.g. Objectname could be set to <<objectname>> where the actual objectname would be set by the Report Scheduler.
All text based filters also support wild cards. A single filter control cannot contain both CSV and wild cards.

Reference Guide D5092 16-Jan-2008 - Page 53 Report Plug-in
Remote Automation Solutions Website: www.EmersonProcess.com/Remote
4.4.2.5.3 Event Description
The Description of the events to display on the report. All text based filters support CSV data entry e.g. Description could be set to “NORTH OUTSTATION PUMP1 RUNNING, NORTH OUTSTATION PUMP 2 RUNNING”. This would resolve to an SQL condition of description in ('NORTH OUTSTATION PUMP1 RUNNING', 'NORTH OUTSTATION PUMP 2 RUNNING').
Text based filters also support aliases e.g. Description could be set to <<description>> where the actual description would be set by the Report Scheduler.
All text based filters also support wild cards. A single filter control cannot contain both CSV and wild cards.
4.4.2.5.4 Event Instance
The Instance of the events to display on the report. Applies to Control Wave signals only. All text based filters support CSV data entry e.g. Instance could be set to “A1, A2”. This would resolve to an SQL condition of instance in ('A1','A2').
Text based filters also support aliases e.g. Instance could be set to <<instance>> where the actual instance would be set by the Report Scheduler.
All text based filters also support wild cards. A single filter control cannot contain both CSV and wild cards.
4.4.2.5.5 Event Base
The Base attribute of the events to display on the report. All text based filters support CSV data entry e.g. Base could be set to “PUMP1, PUMP2”. This would resolve to an SQL condition of base in ('PUMP1','PUMP2').
Text based filters also support aliases e.g. Base could be set to <<base>> where the actual base value would be set by the Report Scheduler.
All text based filters also support wild cards. A single filter control cannot contain both CSV and wild cards.
4.4.2.5.6 Event Extension
The Extension attribute of the events to display on the report. All text based filters support CSV data entry e.g. Extension could be set to “RUN, STOP”. This would resolve to an SQL condition of extension in ('RUN','STOP').
Text based filters also support aliases e.g. Extension could be set to <<extension>> where the actual extension value would be set by the Report Scheduler.
All text based filters also support wild cards. A single filter control cannot contain both CSV and wild cards.
4.4.2.5.7 Event Attribute
The Attribute attribute of the events to display on the report. All text based filters support CSV data entry e.g. Attribute could be set to “001, 002”. This would resolve to an SQL condition of attribute in ('001','002').

Reference Guide D5092 16-Jan-2008 - Page 54 Report Plug-in
Remote Automation Solutions Website: www.EmersonProcess.com/Remote
Text based filters also support aliases e.g. Attribute could be set to <<attribute>> where the actual attribute value would be set by the Report Scheduler.
All text based filters also support wild cards. A single filter control cannot contain both CSV and wild cards.
4.4.2.5.8 UnAcknowledged Event State
This filter would find all unacknowledged events.
4.4.2.5.9 Acknowledged Event State
This filter would find all acknowledged events.
4.4.2.5.10 Event In Alarm
This filter would find all events that were in an alarm condition.
4.4.2.5.11 Event Out of Alarm
This filter would find all events that were not currently in an alarm state.
4.4.2.5.12 Event Not Suppressed
This filter would find all unsuppressed events.
4.4.2.5.13 Event Suppressed
This filter would find all suppressed events.
4.4.2.5.14 Event Priority
The event priority filter can accept ranges and lists of numbers e.g. a Priority of “100-200,255” would result in setting the search criteria to priorities 100 through to 200 and 255. To view and select available priorities, select the browse button ([...]) to the right of this field.
4.4.2.5.15 Priority Selection Form
The Priority Selection Form simplifies the selection of ranges and individual priorities as a filter for an Event Query.
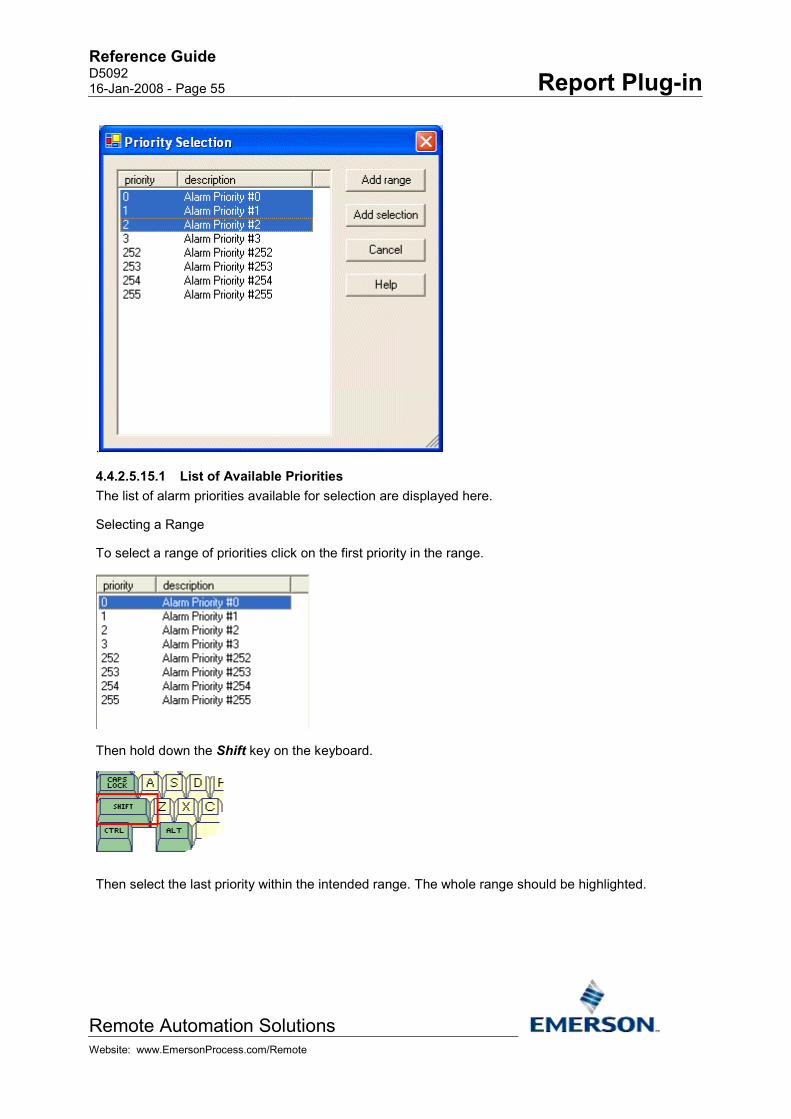
Reference Guide D5092 16-Jan-2008 - Page 55 Report Plug-in
Remote Automation Solutions Website: www.EmersonProcess.com/Remote
.
4.4.2.5.15.1 List of Available Priorities The list of alarm priorities available for selection are displayed here.
Selecting a Range
To select a range of priorities click on the first priority in the range.
Then hold down the Shift key on the keyboard.
Then select the last priority within the intended range. The whole range should be highlighted.
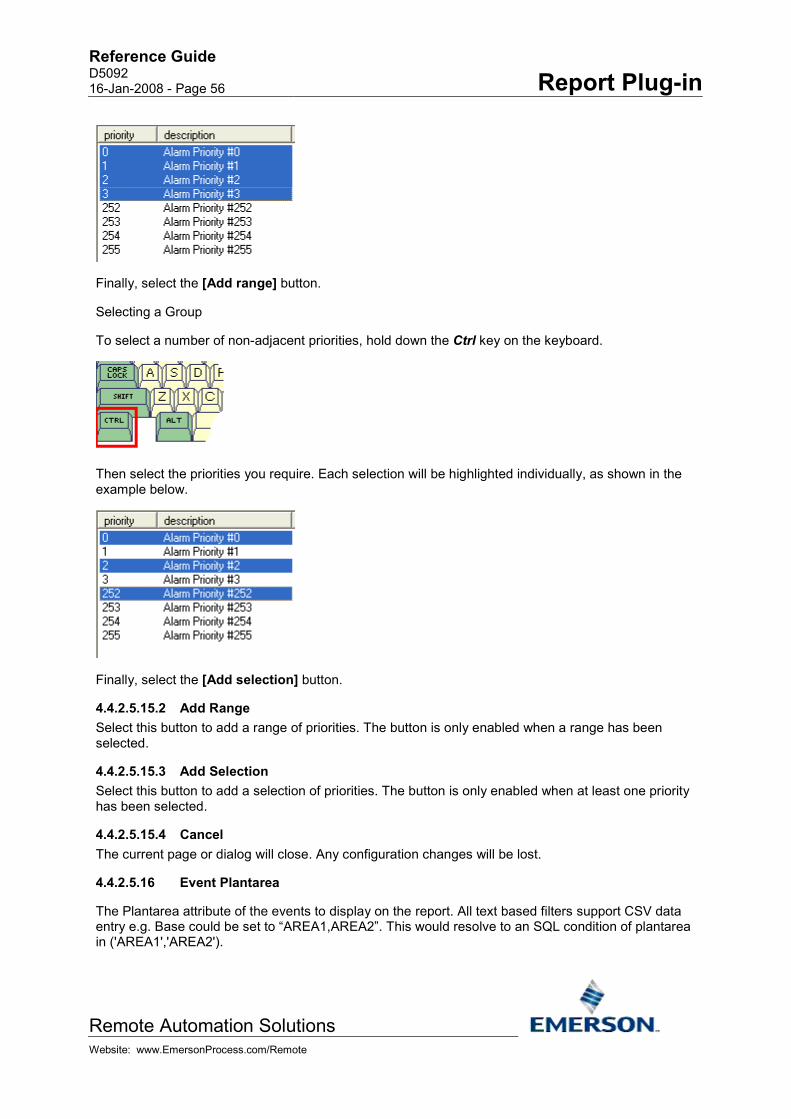
Reference Guide D5092 16-Jan-2008 - Page 56 Report Plug-in
Remote Automation Solutions Website: www.EmersonProcess.com/Remote
Finally, select the [Add range] button.
Selecting a Group
To select a number of non-adjacent priorities, hold down the Ctrl key on the keyboard.
Then select the priorities you require. Each selection will be highlighted individually, as shown in the example below.
Finally, select the [Add selection] button.
4.4.2.5.15.2 Add Range Select this button to add a range of priorities. The button is only enabled when a range has been selected.
4.4.2.5.15.3 Add Selection Select this button to add a selection of priorities. The button is only enabled when at least one priority has been selected.
4.4.2.5.15.4 Cancel The current page or dialog will close. Any configuration changes will be lost.
4.4.2.5.16 Event Plantarea
The Plantarea attribute of the events to display on the report. All text based filters support CSV data entry e.g. Base could be set to “AREA1,AREA2”. This would resolve to an SQL condition of plantarea in ('AREA1','AREA2').

Reference Guide D5092 16-Jan-2008 - Page 57 Report Plug-in
Remote Automation Solutions Website: www.EmersonProcess.com/Remote
Text based filters also support aliases e.g. Plantarea could be set to <<plantarea>> where the actual plantarea value would be set by the Report Scheduler.
All text based filters also support wild cards. A single filter control cannot contain both CSV and wild cards.
4.4.2.5.17 Event Condition
The event condition filter can accept ranges and lists of numbers e.g. a Condition of “1-3,6” would result in setting the search criteria to conditions 1 through to 3 (High Range, High High, High) and 6 (Low Range). To view and select available event conditions, click on the browse ([...]] to the right of this field.
4.4.2.5.18 Condition Selection Form
The Condition Selection Form simplifies the selection of ranges and individual event conditions as a filter for an Event Query.
4.4.2.5.18.1 List of Available Conditions The list of event conditions available for selection are displayed here.
Selecting a Range
To select a range of conditions click on the first condition in the range.

Reference Guide D5092 16-Jan-2008 - Page 58 Report Plug-in
Remote Automation Solutions Website: www.EmersonProcess.com/Remote
Then hold down the Shift key on the keyboard.
Then select the last condition within the intended range. The whole range should be highlighted.
Finally, select the [Add range] button.
Selecting a Group
To select a number of non-adjacent condition, hold down the Ctrl key on the keyboard.
Then select the conditions you require. Each selection will be highlighted individually, as shown in the example below.
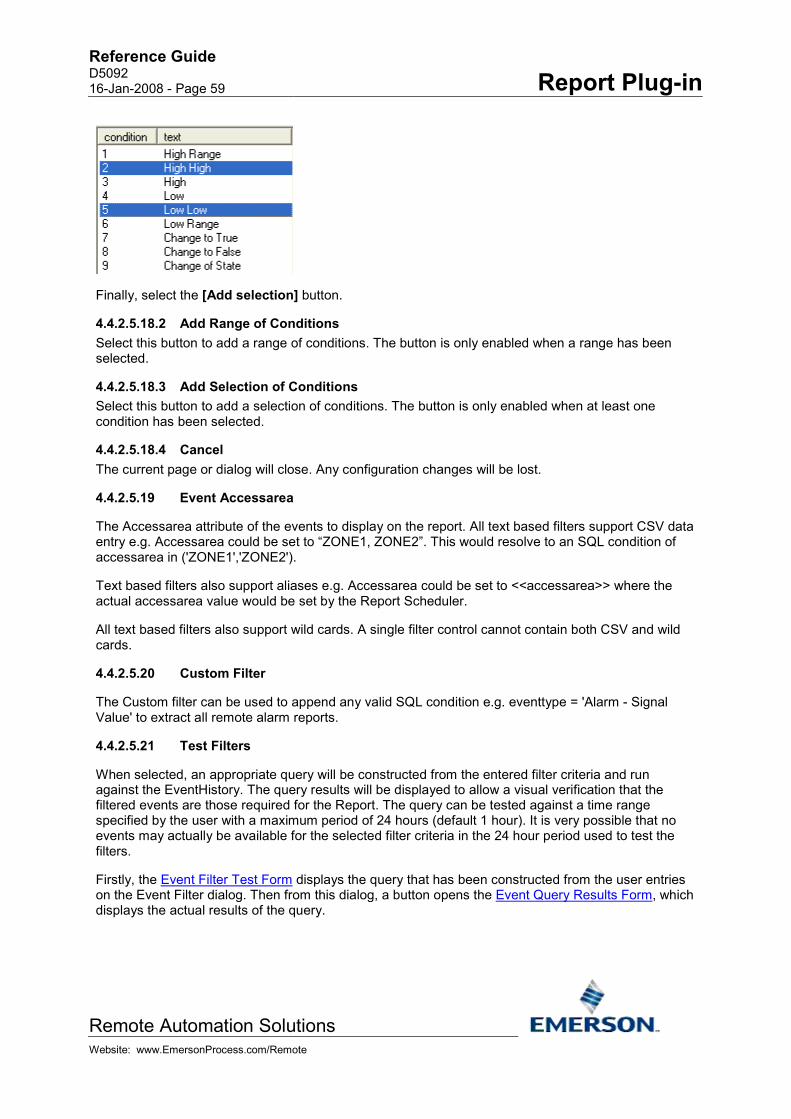
Reference Guide D5092 16-Jan-2008 - Page 59 Report Plug-in
Remote Automation Solutions Website: www.EmersonProcess.com/Remote
Finally, select the [Add selection] button.
4.4.2.5.18.2 Add Range of Conditions Select this button to add a range of conditions. The button is only enabled when a range has been selected.
4.4.2.5.18.3 Add Selection of Conditions Select this button to add a selection of conditions. The button is only enabled when at least one condition has been selected.
4.4.2.5.18.4 Cancel The current page or dialog will close. Any configuration changes will be lost.
4.4.2.5.19 Event Accessarea
The Accessarea attribute of the events to display on the report. All text based filters support CSV data entry e.g. Accessarea could be set to “ZONE1, ZONE2”. This would resolve to an SQL condition of accessarea in ('ZONE1','ZONE2').
Text based filters also support aliases e.g. Accessarea could be set to <<accessarea>> where the actual accessarea value would be set by the Report Scheduler.
All text based filters also support wild cards. A single filter control cannot contain both CSV and wild cards.
4.4.2.5.20 Custom Filter
The Custom filter can be used to append any valid SQL condition e.g. eventtype = 'Alarm - Signal Value' to extract all remote alarm reports.
4.4.2.5.21 Test Filters
When selected, an appropriate query will be constructed from the entered filter criteria and run against the EventHistory. The query results will be displayed to allow a visual verification that the filtered events are those required for the Report. The query can be tested against a time range specified by the user with a maximum period of 24 hours (default 1 hour). It is very possible that no events may actually be available for the selected filter criteria in the 24 hour period used to test the filters.
Firstly, the Event Filter Test Form displays the query that has been constructed from the user entries on the Event Filter dialog. Then from this dialog, a button opens the Event Query Results Form, which displays the actual results of the query.

Reference Guide D5092 16-Jan-2008 - Page 60 Report Plug-in
Remote Automation Solutions Website: www.EmersonProcess.com/Remote
4.4.2.5.22 Event Filter Test Form
The non-editable query that has been constructed from the options entered on the Event Filter dialog is displayed at the top of this dialog. You can scroll down to see the full query text. Click the hotspots for help on the other controls.
4.4.2.5.22.1 Query The non-editable query that has been constructed from the options entered on the Event Filter dialog is displayed here.
4.4.2.5.22.2 Query Period The Default test query period is one hour. You can change this value to test the query criteria for a maximum period of 24 hours.
4.4.2.5.22.3 Maximum Records to Display The maximum records you want displayed in the result.
4.4.2.5.22.4 Copy Query Copies the query to the Windows clipboard for insertion into other applications (i.e. the SQL Client).
4.4.2.5.22.5 OK Button When this button is selected, the actual results of the query are shown in the Event Query Results Form. If no results are returned, a message will inform you.
4.4.2.5.22.6 Event Query Results Form The query results are displayed here. The column widths can be adjusted by clicking and dragging the lines dividing the columns with the mouse, and the whole window can be resized by clicking the bottom right corner of the dialog and dragging it down and to the right.

Reference Guide D5092 16-Jan-2008 - Page 61 Report Plug-in
Remote Automation Solutions Website: www.EmersonProcess.com/Remote
4.4.3 Object Selection
The Object Selector page is displayed if you have chosen a historical stream whose source table is not a Signal table or the EventHistory.
Specific objects can be selected for display. Alternatively, all objects can be displayed.

Reference Guide D5092 16-Jan-2008 - Page 62 Report Plug-in
Remote Automation Solutions Website: www.EmersonProcess.com/Remote
4.4.3.1 All Objects
All Objects is selected by default. This will include all objects from the selected dataset in the report.
4.4.3.2 Named Objects Only
Select this radio button if a specific subset of objects from the dataset is required in the report. You will need to select the [Add Objects Button] to open the Object Browse dialog. This will enable you to create a filter to find the objects required.
4.4.3.3 Add Objects Button
Opens the Object Browse dialog, which enables you to create a filter to identify the objects from the dataset that will appear in the report.
4.4.3.4 Selected Objects List
The list of objects currently selected. If the [All Objects] radio button is selected, no objects will be displayed here, since it is assumed that all objects are selected.
There will only be objects in the list if the [Named Objects Only] radio button is selected and the objects have actually been selected using the Object Browse dialog. To do this, click on the [Add Objects] button.

Reference Guide D5092 16-Jan-2008 - Page 63 Report Plug-in
Remote Automation Solutions Website: www.EmersonProcess.com/Remote
4.4.3.5 Use advanced data set transform
When checked the historical dataset will be transformed into columns of objects (as for Signal History transform). When not selected objects are displayed as rows in the report.
4.4.3.6 Up
Any object selected from the list is moved one position up the list. This will affect where the attribute appears in the final Report. The attribute at the top of the list will appear first in the Report. Others will appear to the right of it in the order in which they are displayed in the list to the left of this button.
4.4.3.7 Down
Any object selected from the list is moved one position down the list. This will affect where the attribute appears in the final Report. The attribute at the top of the list will appear first in the Report. Others will appear to the right of it in the order in which they are displayed in the list to the left of this button.
4.4.3.8 Remove
Will remove any signal or object selected from the list to the left of this button.
4.4.3.9 Object Browse Dialog
This dialog enables the filtering of specific objects from the selected dataset. Objects are filtered by name.

Reference Guide D5092 16-Jan-2008 - Page 64 Report Plug-in
Remote Automation Solutions Website: www.EmersonProcess.com/Remote
4.4.3.9.1 Name
Enter the exact name of the object, or use a wildcard character (* or %), or an alias to apply a filter to the objects. In the example shown, objects having the uppercase character 'I' in their name will be found, as demonstrated in the Objects List.
Note that the 'Match Case' box has been checked. This will ensure that the search is case sensitive, an important consideration if the [Add Filter] button is to be used, rather than the [Add Signals] button.
4.4.3.9.2 Match Case
Check this box if you want to use a case sensitive search for signals, objects or events. By default, all searches are case insensitive.
4.4.3.9.3 Find
Click here to initiate the search for objects which match the search criteria in the Name field.
4.4.3.9.4 Objects Found List
All objects matching the search criteria within the Name field will be placed here. By holding the Shift key on the keyboard as you select objects from the list, you will be able to select multiple objects that are adjacent.
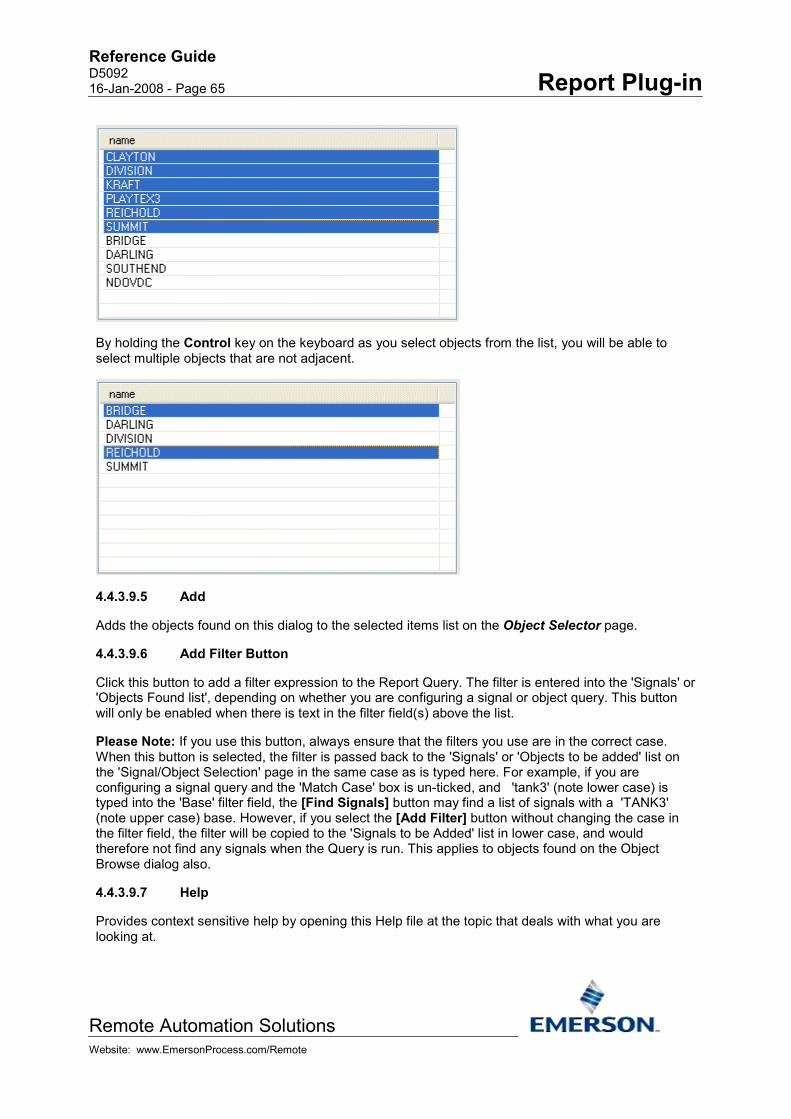
Reference Guide D5092 16-Jan-2008 - Page 65 Report Plug-in
Remote Automation Solutions Website: www.EmersonProcess.com/Remote
By holding the Control key on the keyboard as you select objects from the list, you will be able to select multiple objects that are not adjacent.
4.4.3.9.5 Add
Adds the objects found on this dialog to the selected items list on the Object Selector page.
4.4.3.9.6 Add Filter Button
Click this button to add a filter expression to the Report Query. The filter is entered into the 'Signals' or 'Objects Found list', depending on whether you are configuring a signal or object query. This button will only be enabled when there is text in the filter field(s) above the list.
Please Note: If you use this button, always ensure that the filters you use are in the correct case. When this button is selected, the filter is passed back to the 'Signals' or 'Objects to be added' list on the 'Signal/Object Selection' page in the same case as is typed here. For example, if you are configuring a signal query and the 'Match Case' box is un-ticked, and 'tank3' (note lower case) is typed into the 'Base' filter field, the [Find Signals] button may find a list of signals with a 'TANK3' (note upper case) base. However, if you select the [Add Filter] button without changing the case in the filter field, the filter will be copied to the 'Signals to be Added' list in lower case, and would therefore not find any signals when the Query is run. This applies to objects found on the Object Browse dialog also.
4.4.3.9.7 Help
Provides context sensitive help by opening this Help file at the topic that deals with what you are looking at.

Reference Guide D5092 16-Jan-2008 - Page 66 Report Plug-in
Remote Automation Solutions Website: www.EmersonProcess.com/Remote
4.4.3.9.8 Close
Closes the Object Browser Dialog. Items selected from the dialog will be placed in the list of selected objects on the Selector page.
4.5 Period The Query Period page defines the time span of data imported by this import query. By default, the time span will be set to the report’s default query period. A different query period can be defined by checking the 'Override default report period' checkbox and entering the required time span.
4.5.1 Override Default Report Period
Check this box if you want to override the default Report Query Period setting, which was set on the Report Properties pages. The changes will only apply to this Query.
4.5.2 Calendar Period
A list of time periods that express a default Calendar Period. View the From and To fields at the bottom of the page to see the exact times that a Query would cover for any selection from the following:-
• Current Hour

Reference Guide D5092 16-Jan-2008 - Page 67 Report Plug-in
Remote Automation Solutions Website: www.EmersonProcess.com/Remote
• Previous Hour
• Today
• Yesterday
• This Week
• Last Week
• This Month
• Last Month
• This Year
• Last Year
4.5.3 Interval
Select an Interval report period when the report period cannot be defined as a calendar period e.g. 8-hours or 5-days. An interval Report Period is expressed by a number of time units. To view the actual time period the Report would use based on your selection, see the To and From fields at the bottom of the Report Period page. The Interval is defined as any number of the following units:-:-
• Minutes
• Hours
• Days
• Weeks
• Months
• Years
4.5.4 Offset from midnight
All report periods, with the exception of This Hour and Pervious Hour, are relative to midnight. An Offset from midnight can be defined by changing the Offset multiplier and Offset Period fields. To view the actual time period the Report would use based on your selection, see the To and From fields at the bottom of the Report Period page. The Offset is defined as any number of the following units:-
• Minutes
• Hours
• Days
• Weeks
• Months
• Years

Reference Guide D5092 16-Jan-2008 - Page 68 Report Plug-in
Remote Automation Solutions Website: www.EmersonProcess.com/Remote
The offset can be used to move the relative time period forwards or back. A positive offset will move the report period forward in time whilst a negative offset will move the report period back in time.
4.5.5 Timezone and DST adjustments
Provides timezone and DST options which affect the Report results.
4.5.5.1 Local
This option is selected by default. The Report will be run taking into account local daylight saving time (DST) settings.
4.5.5.2 Local, non DST adjusted
The Report will not take into account local daylight saving time (DST) settings.
4.5.5.3 UTC
The Report will interpret the Period times as UTC (Coordinated Universal Time) times, not local time. Local time could be up to 12 hours ahead of or behind UTC time. UTC time is equivalent to GMT (Greenwich Mean Time).
4.5.6 Example Time and Date
This section provides examples based on the time when the Report is run, and the time settings selected on the page. The From and To fields show the times that data would be recovered for if the Report was run with the current Period settings:-
The Report run time can be changed by clicking on the Date, which displays a Calendar, from which an alternate date can be selected. The date and time selectors are not part of the report configuration. They are intended to be used for better interpretation of the time period that the report covers based on entered configuration.
The From and To fields will be updated depending on the new date selected.

Reference Guide D5092 16-Jan-2008 - Page 69 Report Plug-in
Remote Automation Solutions Website: www.EmersonProcess.com/Remote
4.5.7 UTC Times
When checked, the from and to times will be displayed in their UTC equivalent. These are the actual times used to query the OpenEnterprise database.
4.5.8 Back
When enabled, this button will take you to the previous page of the wizard.
4.5.9 Next
This button will move you to the next page of the wizard. When you get to the end of the wizard, it will become disabled and the [Finish] button will become enabled.
4.5.10 Finish
When you get to the last page of the wizard, this button becomes enabled, and the [Next] button is disabled.
4.5.11 Cancel
The current page or dialog will close. Any configuration changes will be lost.
4.5.12 Help
Provides context sensitive help by opening this Help file at the topic that deals with what you are looking at.
4.5.13 Buttons in Modify Mode
When viewing this page to modify the settings, the button array is slightly different, as shown below.
When a change is made on a page, the [Apply] button becomes enabled. [OK] saves the changes and closes the configuration pages, whilst [Apply] saves the current changes without closing the configuration pages, allowing more changes to be made.
4.6 Data Transformation This page enables you to define how the imported OpenEnterprise query data is processed prior to output into Excel.

Reference Guide D5092 16-Jan-2008 - Page 70 Report Plug-in
Remote Automation Solutions Website: www.EmersonProcess.com/Remote
4.6.1 Transform Timestamp
Select the Date/Time field that the Report Template will use as the Timestamp column. This will normally be the actual Timestamp attribute.
4.6.2 Query Timestamp
A standard historical query uses the timestamp attribute to define the time period of the query (e.g. "SELECT timestamp, name, value, questionable FROM raw6_table WHERE timestamp > '28-JUL-2006 06:59:59' AND timestamp < '28-JUL-2006 08:00:00'").
If other Date/Time attributes are available (e.g. occurrencetime), the list will be enabled for the selection of the alternative Date/Time attribute that will be used to define the time period for the query. The above query would become "SELECT occurrencetime, name, value, questionable FROM raw6_table WHERE occurrencetime > '28-JUL-2006 06:59:59' AND occurrencetime< '28-JUL-2006 08:00:00'".
4.6.3 Override Query Timestamp
If checked, the selected alternative Date/Time attribute will be used in place of the timestamp values in the query.

Reference Guide D5092 16-Jan-2008 - Page 71 Report Plug-in
Remote Automation Solutions Website: www.EmersonProcess.com/Remote
4.6.4 Ascending
When checked, timestamps will be displayed in ascending order. Un-check this box to display timestamps in descending order (most recent first).
4.6.5 Available Columns
This is the list of columns available for inclusion in the query.
4.6.6 Move Buttons
Use these buttons to move attributes from the Available to the Display list, or vice versa.
4.6.7 Display Columns
These are the columns that have been selected for inclusion in the query. They will be displayed in the report when it is run.
4.6.8 Up
Any object selected from the list is moved one position up the list. This will affect where the attribute appears in the final Report. The attribute at the top of the list will appear first in the Report. Others will appear to the right of it in the order in which they are displayed in the list to the left of this button.
4.6.9 Down
Any object selected from the list is moved one position down the list. This will affect where the attribute appears in the final Report. The attribute at the top of the list will appear first in the Report. Others will appear to the right of it in the order in which they are displayed in the list to the left of this button.
4.6.10 Enable Timestamp Rounding
Check this box to enable timestamp rounding in the Report.
4.6.11 Round to nearest
Round the timestamp values to the nearest unit chosen from this list. The options are:-
• Second
• Minute
• Hour
• Day
4.6.12 Insert Missing Records
Imported OpenEnterprise query data can potentially be incomplete. To indicate missing records, check this box to insert timestamps where there are gaps in the Query results. If the box is un-checked, only timestamps for which there is a corresponding value in the Query results will be displayed on the Report.

Reference Guide D5092 16-Jan-2008 - Page 72 Report Plug-in
Remote Automation Solutions Website: www.EmersonProcess.com/Remote
4.6.13 Advanced
This button opens the Advanced Timestamp Rounding Dialog. When a historical stream does not have a defined rate (trigger collected raw data), the Advanced Timestamp Rounding option can be used to define a rounding interval that can also be used when checking for missing records e.g. when rounding is configured for 4-hour rounding, when insert missing records is checked, it will be assumed that there should be 1 record for every 4 hours i.e. a pseudo rate of 14400 seconds.
4.6.14 Advanced Timestamp Rounding Dialog
The Advanced Timestamp Rounding dialog enables you specify timestamp rounding for streams which are triggered by value changes, rather than sampled at a timed rate.
4.6.14.1 Use Settings
When checked, the settings configured on the Advanced Timestamp Rounding Dialog will override any Round to nearest settings on the main Transform page.
4.6.14.2 Advanced Round To Nearest
Select the required timestamp rounding interval using these controls. If multiple records for a single object round to the same timestamp, the last record processed will be displayed on the report. This will most likely be the most recent value but this cannot be guaranteed.
4.6.14.3 Use Origin Time
When ‘Use origin time’ is not selected, there will be no explicit origin time.
4.6.14.4 Origin Time
The Origin Time that will be used to create the timestamp rounding.
Reference Guide D5092 16-Jan-2008 - Page 73 Report Plug-in
Remote Automation Solutions Website: www.EmersonProcess.com/Remote
4.6.14.5 UTC
By default, the entered origin time will be treated as local time. However, checking the UTC checkbox will result in timestamp rounding to a UTC origin time i.e the UTC checkbox determines whether the database timestamp is converted to local time before the advanced rounding occurs
4.6.15 Back
When enabled, this button will take you to the previous page of the wizard.
4.6.16 Next
This button will move you to the next page of the wizard. When you get to the end of the wizard, it will become disabled and the [Finish] button will become enabled.
4.6.17 Finish
When you get to the last page of the wizard, this button becomes enabled, and the [Next] button is disabled.
4.6.18 Cancel
The current page or dialog will close. Any configuration changes will be lost.
4.6.19 Help
Provides context sensitive help by opening this Help file at the topic that deals with what you are looking at.
4.6.20 Buttons in Modify Mode
When viewing this page to modify the settings, the button array is slightly different, as shown below.
When a change is made on a page, the [Apply] button becomes enabled. [OK] saves the changes and closes the configuration pages, whilst [Apply] saves the current changes without closing the configuration pages, allowing more changes to be made.
4.7 Output This page enables you to define where the Report data will appear, and to control some aspects of formatting in the Report. It is contextual, and has a slightly different appearance depending on the type of data objects that are being displayed within the Report. There are three versions of the Output Page, listed below.
1. Signal Output Page
2. Event Output Page
3. General Object Output Page

Reference Guide D5092 16-Jan-2008 - Page 74 Report Plug-in
Remote Automation Solutions Website: www.EmersonProcess.com/Remote
4.7.1 Signal Output Page
The Signal Output page provides options that specifically apply to signal report output.
4.7.1.1 Existing Worksheet Cell Reference
Used to define the Excel sheet and cell where imported query data will be output. The currently active cell is selected by default as the starting position for the placement of the Report data. The actual Cell and Worksheet can be changed by doing the following:-
1. Type the new Sheet name (e.g. Sheet2!A1). If the sheet does not exist a new one will be created.
2. Click on the [...] button. This displays the 'Please select a cell' dialog (shown below). If you click on another cell or another sheet in the Report Template workbook now, the Sheet and Cell name (here shown as Sheet!A1) will change in the user disabled text field on this dialog. When you select the [OK] button, the Sheet and Cell reference is passed to the 'Existing Worksheet Cell Reference' field on the Output page of the Query wizard.

Reference Guide D5092 16-Jan-2008 - Page 75 Report Plug-in
Remote Automation Solutions Website: www.EmersonProcess.com/Remote
4.7.1.2 Temporary Worksheet
Type the name of a temporary query output sheet here (e.g. Results). When the report is run, the query results will be placed into a temporary worksheet with the given name. If you copy the name and cell reference of the sheet on which you are configuring the query into the 'Temporary Worksheet' field, then that sheet will be deemed a temporary worksheet.
Temporary sheets will be deleted when a report is published, therefore the data should be referenced from another worksheet. This can be done using any Excel referencing method, including array formulas, if named arrays have been enabled on the query. Note that whilst temporary sheets are deleted from published reports, they are not deleted from the original report template file. For more details on using named arrays in reports, see the Reporting Overview documentation.
4.7.1.3 Adjust Column Widths
Check this box if you want the Report to automatically adjust column widths to accommodate the longest value returned.
4.7.1.4 Show Object Names
Check if you want the signal or event names to be displayed at the top of the page. Uncheck if you do not want the names to be displayed. For real-time queries, this option will be disabled.
4.7.1.5 Show Column Headers
Ensure this box is checked if you want the attribute header to appear at the top of each column of data.
4.7.1.6 Add Named Range for each Column
Un-check this box if you do not want OpenEnterprise to create Named Ranges for each column of data when the Report is output.
Creation of named ranges is on by default, since they are a way of accessing outputted data for use in array formulas. However, if named arrays are not being used, or the query is returning a large number of attributes, it may be advisable to turn them off by un-checking this box.
4.7.1.7 Remove Devicenames
Check this box if you want the Devicename removed from the beginning of each signal name. For real-time queries, this option is disabled.
4.7.1.8 NULL Text
When a database value is NULL, the associated output cell on the report will be empty. If a specific value is required to represent NULL data, e.g. “NO-DATA”, then enter the value here.

Reference Guide D5092 16-Jan-2008 - Page 76 Report Plug-in
Remote Automation Solutions Website: www.EmersonProcess.com/Remote
4.7.1.9 Output Timestamp Settings Dialog
Output Timestamp Settings can be modified here.
4.7.1.9.1 Local Time
Timestamps will be converted to Local time and adjusted to for Daylight saving before being written to the report.
4.7.1.9.2 UTC
Timestamps will be displayed as UTC (Coordinated Universal Time), rather than in Local Time. The OpenEnterprise database stores timestamps by default in UTC.
4.7.1.9.3 Offset Timestamps
When checked, you can select an offset to apply to the Query result timestamps.

Reference Guide D5092 16-Jan-2008 - Page 77 Report Plug-in
Remote Automation Solutions Website: www.EmersonProcess.com/Remote
4.7.1.9.4 Offsets
Timestamps can be given an offset value here. Possible offset units range from Years to Seconds. Any combination of offset units is possible. This example shows an offset of 1 hour being applied. This will add one hour to the timestamps on the Report.
4.7.1.9.5 Transform Timestamp Column Only
Selecting this option causes the selected offset on this dialog to apply only to the timestamp column used for the data set transform.
4.7.1.9.6 All Timestamp Columns
This option causes the Timestamp offset configured on this dialog to apply to all Date/Time attributes selected for output to the Report.
4.7.1.9.7 Apply Offset Before Local Time Conversion
Applies the offset before timestamps are converted to Local time.
4.7.1.9.8 Apply Offset After Local Time Conversion
Applies the offset after timestamps are converted to Local time.
4.7.1.10 Questionable Data Formatting
Check this box if you want to assign a different background colour to cells having questionable data.
All the columns for a given signal and timestamp will be assigned the questionable color if the value for the questionable attribute for that signal and timestamp is non-zero or null.
Note that questionable data formatting is not available when using the Real-time SQL Query wizard.
4.7.1.11 Questionable Attribute
Select the attribute that will be used to flag questionable data. A non-zero value will indicate questionable data. A value of zero will indicate good quality data.
4.7.1.12 Questionable Color
Click the [...] button to the right of the 'Color:' field to display a Color selection dialog:-
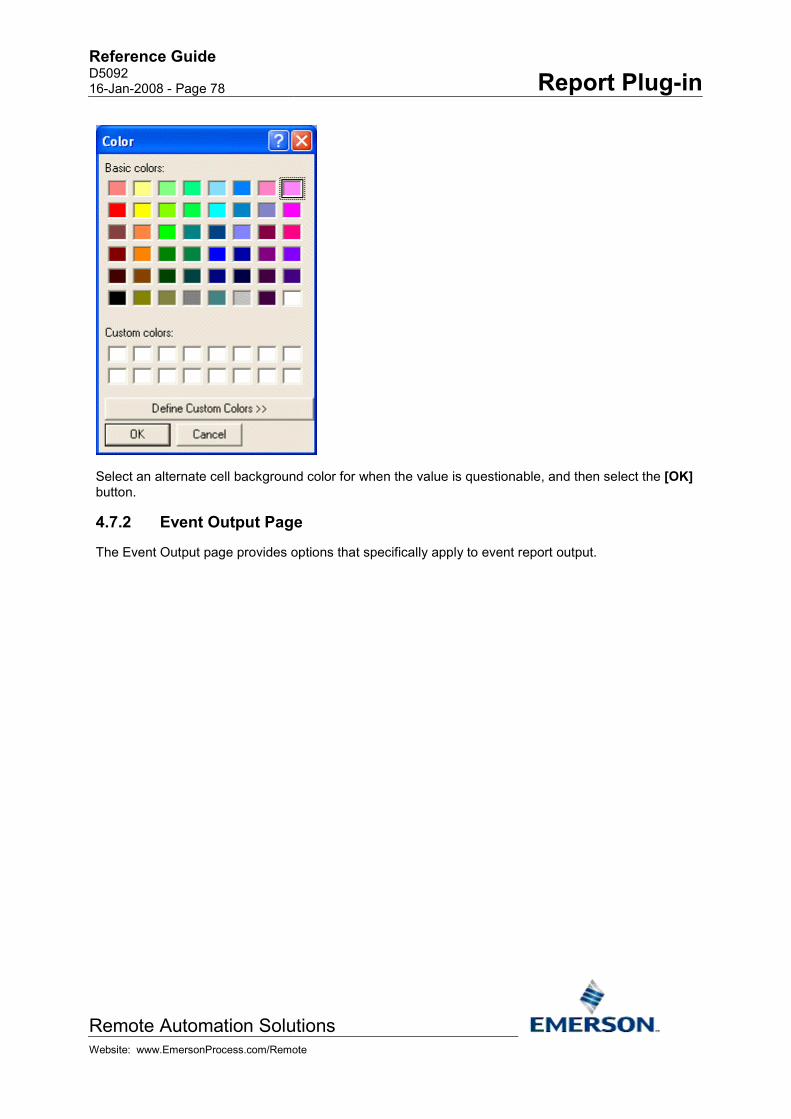
Reference Guide D5092 16-Jan-2008 - Page 78 Report Plug-in
Remote Automation Solutions Website: www.EmersonProcess.com/Remote
Select an alternate cell background color for when the value is questionable, and then select the [OK] button.
4.7.2 Event Output Page
The Event Output page provides options that specifically apply to event report output.

Reference Guide D5092 16-Jan-2008 - Page 79 Report Plug-in
Remote Automation Solutions Website: www.EmersonProcess.com/Remote
4.7.2.1 Existing Worksheet Cell Reference
Used to define the Excel sheet and cell where imported query data will be output. The currently active cell is selected by default as the starting position for the placement of the Report data. The actual Cell and Worksheet can be changed by doing the following:-
1. Type the new Sheet name (e.g. Sheet2!A1). If the sheet does not exist a new one will be created.
2. Click on the [...] button. This displays the 'Please select a cell' dialog (shown below). If you click on another cell or another sheet in the Report Template workbook now, the Sheet and Cell name (here shown as Sheet!A1) will change in the user disabled text field on this dialog. When you select the [OK] button, the Sheet and Cell reference is passed to the 'Existing Worksheet Cell Reference' field on the Output page of the Query wizard.
Reference Guide D5092 16-Jan-2008 - Page 80 Report Plug-in
Remote Automation Solutions Website: www.EmersonProcess.com/Remote
4.7.2.2 Temporary Worksheet
Type the name of a temporary query output sheet here (e.g. Results). When the report is run, the query results will be placed into a temporary worksheet with the given name. If you copy the name and cell reference of the sheet on which you are configuring the query into the 'Temporary Worksheet' field, then that sheet will be deemed a temporary worksheet.
Temporary sheets will be deleted when a report is published, therefore the data should be referenced from another worksheet. This can be done using any Excel referencing method, including array formulas, if named arrays have been enabled on the query. Note that whilst temporary sheets are deleted from published reports, they are not deleted from the original report template file. For more details on using named arrays in reports, see the Reporting Overview documentation.
4.7.2.3 Adjust Column Widths
Check this box if you want the Report to automatically adjust column widths to accommodate the longest value returned.
4.7.2.4 Show Column Headers
Ensure this box is checked if you want the attribute header to appear at the top of each column of data.
4.7.2.5 Add Named Range for each Column
Un-check this box if you do not want OpenEnterprise to create Named Ranges for each column of data when the Report is output.
Creation of named ranges is on by default, since they are a way of accessing outputted data for use in array formulas. However, if named arrays are not being used, or the query is returning a large number of attributes, it may be advisable to turn them off by un-checking this box.
4.7.2.6 NULL Text
When a database value is NULL, the associated output cell on the report will be empty. If a specific value is required to represent NULL data, e.g. “NO-DATA”, then enter the value here.
4.7.2.7 Define Timestamp Settings
Opens the Output Timestamp Settings dialog, which enables you to output timestamps in local or UTC, and to apply an offset to the timestamps.
4.7.2.8 Use Alarm Priority Colors
Enables you to display alarms and events in the colors configured in the database for each priority.
4.7.2.9 Apply Colors to Timestamp Column
Used in conjunction with the Use Alarm Priority Colors option to apply the configured alarm priority colors to the Timestamp column as well as the other columns.
4.7.2.10 Display Alarm Condition as Text
If the Condition attribute has been selected for the Report, this option displays the condition as text, rather than as an integer.
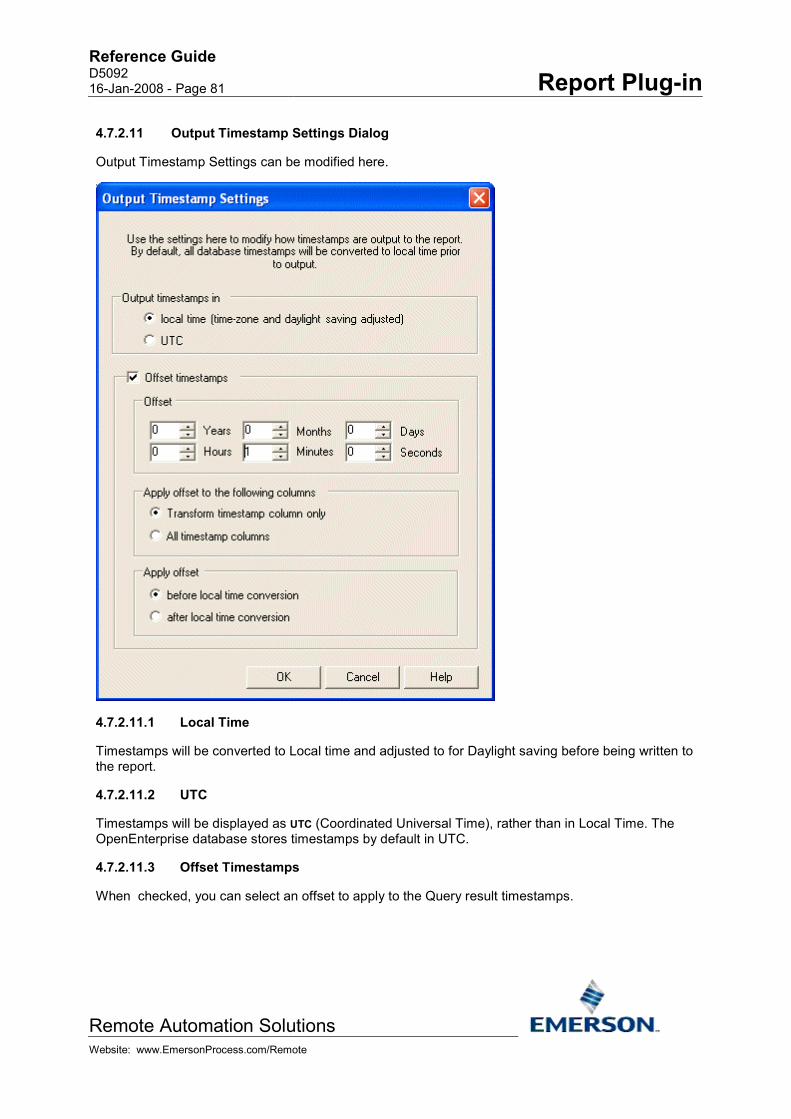
Reference Guide D5092 16-Jan-2008 - Page 81 Report Plug-in
Remote Automation Solutions Website: www.EmersonProcess.com/Remote
4.7.2.11 Output Timestamp Settings Dialog
Output Timestamp Settings can be modified here.
4.7.2.11.1 Local Time
Timestamps will be converted to Local time and adjusted to for Daylight saving before being written to the report.
4.7.2.11.2 UTC
Timestamps will be displayed as UTC (Coordinated Universal Time), rather than in Local Time. The OpenEnterprise database stores timestamps by default in UTC.
4.7.2.11.3 Offset Timestamps
When checked, you can select an offset to apply to the Query result timestamps.

Reference Guide D5092 16-Jan-2008 - Page 82 Report Plug-in
Remote Automation Solutions Website: www.EmersonProcess.com/Remote
4.7.2.11.4 Offsets
Timestamps can be given an offset value here. Possible offset units range from Years to Seconds. Any combination of offset units is possible. This example shows an offset of 1 hour being applied. This will add one hour to the timestamps on the Report.
4.7.2.11.5 Transform Timestamp Column Only
Selecting this option causes the selected offset on this dialog to apply only to the timestamp column used for the data set transform.
4.7.2.11.6 All Timestamp Columns
This option causes the Timestamp offset configured on this dialog to apply to all Date/Time attributes selected for output to the Report.
4.7.2.11.7 Apply Offset Before Local Time Conversion
Applies the offset before timestamps are converted to Local time.
4.7.2.11.8 Apply Offset After Local Time Conversion
Applies the offset after timestamps are converted to Local time.
4.7.3 General Object Output Page
The General Object Output page provides options that specifically apply to general object report output.

Reference Guide D5092 16-Jan-2008 - Page 83 Report Plug-in
Remote Automation Solutions Website: www.EmersonProcess.com/Remote
4.7.3.1 Existing Worksheet Cell Reference
Used to define the Excel sheet and cell where imported query data will be output. The currently active cell is selected by default as the starting position for the placement of the Report data. The actual Cell and Worksheet can be changed by doing the following:-
1. Type the new Sheet name (e.g. Sheet2!A1). If the sheet does not exist a new one will be created.
2. Click on the [...] button. This displays the 'Please select a cell' dialog (shown below). If you click on another cell or another sheet in the Report Template workbook now, the Sheet and Cell name (here shown as Sheet!A1) will change in the user disabled text field on this dialog. When you select the [OK] button, the Sheet and Cell reference is passed to the 'Existing Worksheet Cell Reference' field on the Output page of the Query wizard.

Reference Guide D5092 16-Jan-2008 - Page 84 Report Plug-in
Remote Automation Solutions Website: www.EmersonProcess.com/Remote
4.7.3.2 Temporary Worksheet
Type the name of a temporary query output sheet here (e.g. Results). When the report is run, the query results will be placed into a temporary worksheet with the given name. If you copy the name and cell reference of the sheet on which you are configuring the query into the 'Temporary Worksheet' field, then that sheet will be deemed a temporary worksheet.
Temporary sheets will be deleted when a report is published, therefore the data should be referenced from another worksheet. This can be done using any Excel referencing method, including array formulas, if named arrays have been enabled on the query. Note that whilst temporary sheets are deleted from published reports, they are not deleted from the original report template file. For more details on using named arrays in reports, see the Reporting Overview documentation.
4.7.3.3 Adjust Column Widths
Check this box if you want the Report to automatically adjust column widths to accommodate the longest value returned.
4.7.3.4 Show Column Headers
Ensure this box is checked if you want the attribute header to appear at the top of each column of data.
4.7.3.5 Add Named Range for each Column
Un-check this box if you do not want OpenEnterprise to create Named Ranges for each column of data when the Report is output.
Creation of named ranges is on by default, since they are a way of accessing outputted data for use in array formulas. However, if named arrays are not being used, or the query is returning a large number of attributes, it may be advisable to turn them off by un-checking this box.
4.7.3.6 NULL Text
When a database value is NULL, the associated output cell on the report will be empty. If a specific value is required to represent NULL data, e.g. “NO-DATA”, then enter the value here.
4.7.3.7 Define Timestamp Settings
Opens the Output Timestamp Settings dialog, which enables you to output timestamps in local or UTC, and to apply an offset to the timestamps.
4.7.3.8 Output Timestamp Settings Dialog
Output Timestamp Settings can be modified here.

Reference Guide D5092 16-Jan-2008 - Page 85 Report Plug-in
Remote Automation Solutions Website: www.EmersonProcess.com/Remote
4.7.3.8.1 Local Time
Timestamps will be converted to Local time and adjusted to for Daylight saving before being written to the report.
4.7.3.8.2 UTC
Timestamps will be displayed as UTC (Coordinated Universal Time), rather than in Local Time. The OpenEnterprise database stores timestamps by default in UTC.
4.7.3.8.3 Offset Timestamps
When checked, you can select an offset to apply to the Query result timestamps.
4.7.3.8.4 Offsets
Timestamps can be given an offset value here. Possible offset units range from Years to Seconds. Any combination of offset units is possible. This example shows an offset of 1 hour being applied. This will add one hour to the timestamps on the Report.

Reference Guide D5092 16-Jan-2008 - Page 86 Report Plug-in
Remote Automation Solutions Website: www.EmersonProcess.com/Remote
4.7.3.8.5 Transform Timestamp Column Only
Selecting this option causes the selected offset on this dialog to apply only to the timestamp column used for the data set transform.
4.7.3.8.6 All Timestamp Columns
This option causes the Timestamp offset configured on this dialog to apply to all Date/Time attributes selected for output to the Report.
4.7.3.8.7 Apply Offset Before Local Time Conversion
Applies the offset before timestamps are converted to Local time.
4.7.3.8.8 Apply Offset After Local Time Conversion
Applies the offset after timestamps are converted to Local time.

Reference Guide D5092 16-Jan-2008 - Page 87 Report Plug-in
Remote Automation Solutions Website: www.EmersonProcess.com/Remote
5 Real-time Query Wizard The standard Real-time Query wizard enables you to create and modify OpenEnterprise real-time data imports using the Table Selection, Column Selection, Conditions and Column Sort pages. It makes the creation of real-time import queries easier for those not versed in SQL, or with little or no knowledge of the database schema. Real-time queries can be created for any non-historical table or view. When creating a new import, the query results will by default be output starting at the currently selected Excel cell. Once configured, the Query wizard pages can be opened in modify mode. There are eight steps required to configure a new real-time import:-
1. Query Name Page
2. Data Service Page
3. Database Table Page
4. Column Selection Page
5. Conditions Page
6. Column Sort Page
7. SQL Page
8. Output Page
5.1 Query Name Each import query is identified by a unique name. A name is automatically generated when this page is first opened. The name can be changed to something more meaningful to the report. The name can be up to 14 characters long. If you do not supply a name, the Report Plug-in will use the unique name which it provided.

Reference Guide D5092 16-Jan-2008 - Page 88 Report Plug-in
Remote Automation Solutions Website: www.EmersonProcess.com/Remote
5.1.1 Query Name
A unique name is automatically created, but you can replace it with your own unique name if required, up to a maximum of 14 characters.
5.1.2 Progress Menu
The side menu lists the property pages that are available for the wizard selected. In wizard mode, as each page is configured and you move on to the next, the pages that have been completed are shown in italic fonts. This helps you to identify how far you have progressed through the Wizard. When modifying a query, clicking on a page name in the list opens up that page for modification.
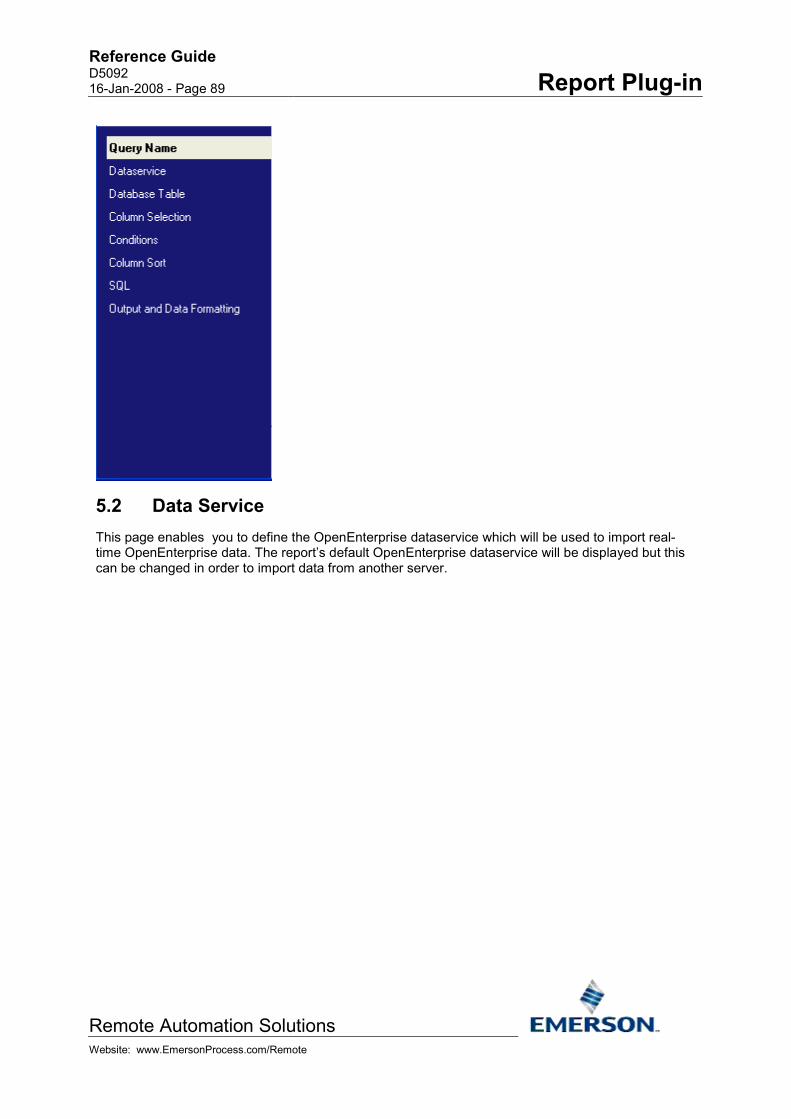
Reference Guide D5092 16-Jan-2008 - Page 89 Report Plug-in
Remote Automation Solutions Website: www.EmersonProcess.com/Remote
5.2 Data Service This page enables you to define the OpenEnterprise dataservice which will be used to import real-time OpenEnterprise data. The report’s default OpenEnterprise dataservice will be displayed but this can be changed in order to import data from another server.

Reference Guide D5092 16-Jan-2008 - Page 90 Report Plug-in
Remote Automation Solutions Website: www.EmersonProcess.com/Remote
5.2.1 Override Default Dataservice
Check this box to override the Report's default dataservice (set on the Dataservice page of the Report Properties wizard).
5.2.2 Dataservice
When this page is opened, this field is not editable, and displays the default dataservice as defined on the Report Properties Data Service Page.
To override this dataservice, ensure the 'Override Default Dataservice' button is checked, then type the name of the intended query data service in here. Use the format host:service where host is the computer name of the OpenEnterprise Server and service is the TCP/IP service name of the OpenEnterprise database (typically rtrdb1). For Redundant Servers, separate the data service of each Server with a comma - e.g. hosta:rtrdb1, hostb:rtrdb1. To run a Report that connects to the standby Server append [ro] to the data service.
5.2.3 Test Connection Button
Click this button to attempt a connection to the dataservice that you typed into the Dataservice field. A message will inform you of the success or failure of the connection attempt. If the test fails due to insufficient user credentials, enter your OpenEnterprise credentials using the OpenEnterprise > Logon menu item.

Reference Guide D5092 16-Jan-2008 - Page 91 Report Plug-in
Remote Automation Solutions Website: www.EmersonProcess.com/Remote
5.2.4 Advanced Button
Opens the Import Dataservice Dialog
5.2.5 Import Data Service Dialog
The 'Import Dataservice' dialog enables you to override the dataservice for the report template or any configured queries in the report template.
5.2.5.1 Use different data service for data import
When checked, the configured dataservice will be overridden by the dataservice set here. This dialog can serve to override dataservice options in two ways:-
1. If it is invoked from the Dataservice page of the Report Properties wizard, the Import Dataservice dialog sets up a global Dataservice that will override the Report Dataservice, and also overrides any query that does not specify its own Advanced Dataservice.
2. If invoked from the Dataservice page of any of the import wizards (historical, real-time or real-time SQL), the Import Dataservice dialog applies a local query dataservice override on the standard report dataservice, or on any global dataservice that may have been set for the report as described in point 1 above.
5.2.5.2 Test Connection Button
Click this button to attempt a connection to the dataservice that you typed into the Dataservice field. A message will inform you of the success or failure of the connection attempt. If the test fails due to insufficient user credentials, enter your OpenEnterprise credentials using the OpenEnterprise > Logon menu item.
5.2.5.3 Alias Selection
Select the appropriate Alias from the list and click the [OK] button. Note, aliases can be configured using the Alias Manager, which is invoked using the OpenEnterprise>Alias Manager menu option.

Reference Guide D5092 16-Jan-2008 - Page 92 Report Plug-in
Remote Automation Solutions Website: www.EmersonProcess.com/Remote
5.3 Database Table The Database Table page enables a real-time table or view to be selected for import into the report template.

Reference Guide D5092 16-Jan-2008 - Page 93 Report Plug-in
Remote Automation Solutions Website: www.EmersonProcess.com/Remote
5.3.1 List of Tables/Views
This is a list of real-time tables in the database. Select the table that is required for the query.
By default, the list will display the available tables. Most tables have '_table' appended to the table name. Tables are not subject to access area security. If the 'Show Views' radio button is selected, the list will display all views. Views do not have '_table' appended to their name. Views are subject to access area security. If the 'All' radio button selected, the list will display both tables and views.
If the 'system tables' box is checked, the list will also include tables that are used to store and expose the database schema (i.e. tables, views, attributes, indexes, indexattrs).
Note, joins are not supported. You can only select one table for the query.
5.3.2 Show tables
By default, the list will display the available tables. Most tables have '_table' appended to the table name. Tables are not subject to access area security.
5.3.3 Show views
If selected, the list will display all views. Views do not have '_table' appended to their name. Views are subject to access area security.
5.3.4 Show all
If selected, the list will display both tables and views.
5.3.5 Show system tables
If checked, the list will also include tables that are used to store and expose the database schema (i.e. tables, views, attributes, indexes, indexattrs).
5.3.6 Select
When you have selected a table from the available tables list, you must click this button to finally select that table for the query.
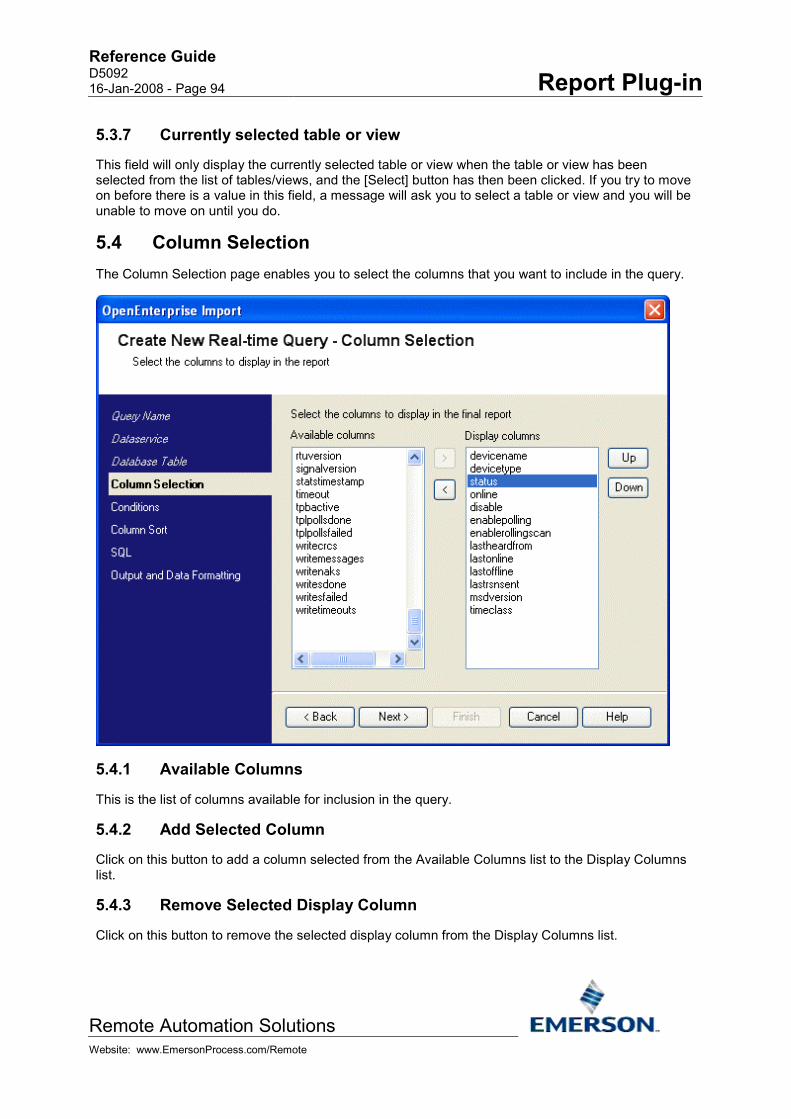
Reference Guide D5092 16-Jan-2008 - Page 94 Report Plug-in
Remote Automation Solutions Website: www.EmersonProcess.com/Remote
5.3.7 Currently selected table or view
This field will only display the currently selected table or view when the table or view has been selected from the list of tables/views, and the [Select] button has then been clicked. If you try to move on before there is a value in this field, a message will ask you to select a table or view and you will be unable to move on until you do.
5.4 Column Selection The Column Selection page enables you to select the columns that you want to include in the query.
5.4.1 Available Columns
This is the list of columns available for inclusion in the query.
5.4.2 Add Selected Column
Click on this button to add a column selected from the Available Columns list to the Display Columns list.
5.4.3 Remove Selected Display Column
Click on this button to remove the selected display column from the Display Columns list.

Reference Guide D5092 16-Jan-2008 - Page 95 Report Plug-in
Remote Automation Solutions Website: www.EmersonProcess.com/Remote
5.4.4 Display Columns
These are the columns that have been selected for inclusion in the query. They will be displayed in the report when it is run.
5.4.5 Up
Select an attribute from the Display Columns list, then click this button to move it up the list. This will affect where the attribute appears in the final report. The attribute at the top of the list will appear first in the report. Others will appear to the right of it in the order in which they are displayed in the list to the left of this button.
5.4.6 Down
Select an attribute from the Display Columns list, then click this button to move it down the list. This will affect where the attribute appears in the final report. The attribute at the top of the list will appear first in the report. Others will appear to the right of it in the order in which they are displayed in the list to the left of this button.
5.5 Conditions The Conditions page enables you to define what conditions will apply to the query. The procedure is to select an attribute, add it to the Condition field, apply a specific condition to it, and then use the [Update] button to add the condition to the query. You can configure multiple conditions for one query or you can move on without creating any conditions.

Reference Guide D5092 16-Jan-2008 - Page 96 Report Plug-in
Remote Automation Solutions Website: www.EmersonProcess.com/Remote
5.5.1 Available Attributes
This is a list of all attributes from the selected table. To create a condition for the query, first select the attribute from this list that the condition will apply to.
5.5.2 Add
The [Add] button becomes enabled only when an attribute has been selected from the Available Attributes list on the Conditions page. When the button is clicked, the attribute is copied to the Condition Attribute field.

Reference Guide D5092 16-Jan-2008 - Page 97 Report Plug-in
Remote Automation Solutions Website: www.EmersonProcess.com/Remote
5.5.3 Condition Attribute Field
The attribute that has been selected from the list of available attributes is copied here when the [Add] button is selected. The Condition Expression list will become enabled, and populated with a list of possible condition criteria.
5.5.4 Condition List
When the [Add] button is selected, the Condition List is automatically populated with expressions, and the selected attribute is added to the Condition Attribute field. For an explanation of these expressions, see the Expression List topic.

Reference Guide D5092 16-Jan-2008 - Page 98 Report Plug-in
Remote Automation Solutions Website: www.EmersonProcess.com/Remote
5.5.4.1 Expression List
There are the expressions that fill the Condition List when an attribute has been selected, showing their SQL representation and the data types that each expression applies to.
Condition name SQL representation Data type that condition applies to
equals = {0} or = ‘{0}’ ALL FIELD TYPES does not equal <> {0} or <> ‘{0}’ ALL FIELD TYPES is greater than > {0} DateTime, Integer, Float is greater than or equal to >= {0} DateTime, Integer, Float is less than < {0} DateTime, Integer, Float is less than or equal to <= {0} DateTime, Integer, Float begins with like ‘{0}%’ String does not begin with not like ‘{0}%’ String ends with like ‘%{0}’ String does not end with not like ‘%{0}’ String contains like ‘%{0}%’ String does not contain not like ‘%{0}%’ String IN IN (‘{0}’, ‘{0}’, …) String, Float, Integer like like ‘{0}%’ String not like not like ‘{0}%’ String is null is null ALL FIELD TYPES is not null is not null ALL FIELD TYPES
5.5.5 Condition Criteria This field contains the values that will be used as criteria against the attribute and the expression used for the condition. The values can be typed directly in or you can use the [Find] or [Alias] button to add the values.
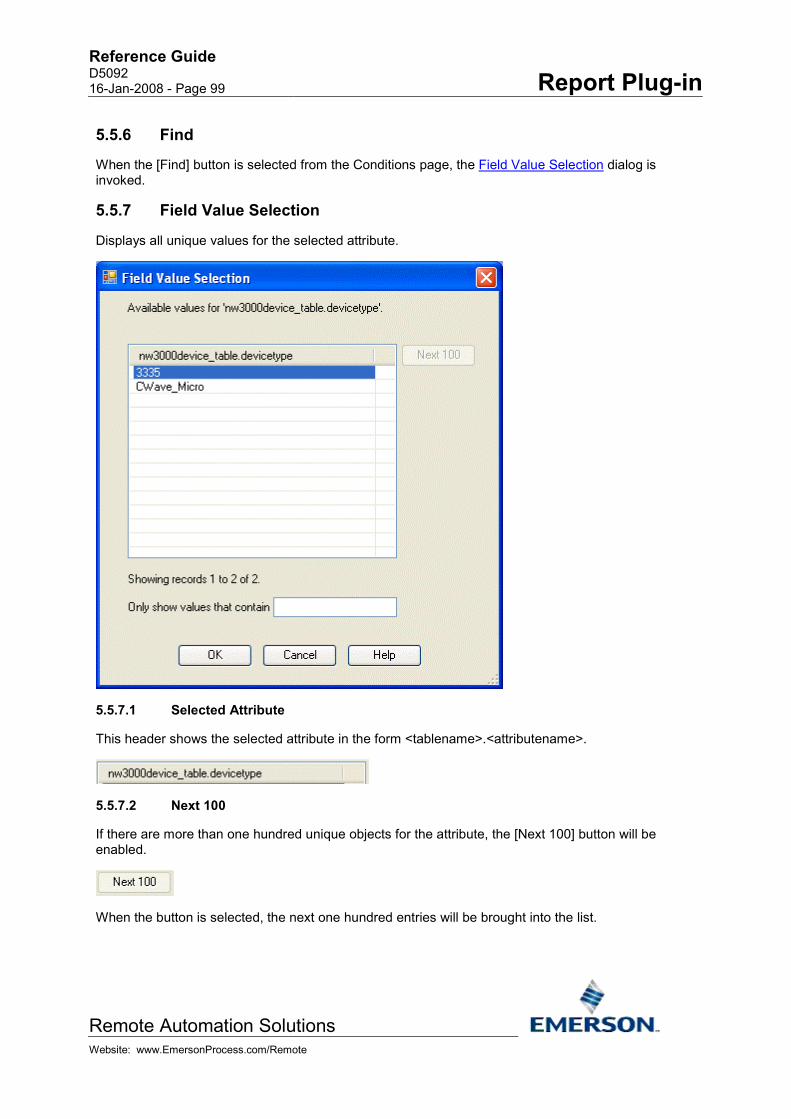
Reference Guide D5092 16-Jan-2008 - Page 99 Report Plug-in
Remote Automation Solutions Website: www.EmersonProcess.com/Remote
5.5.6 Find
When the [Find] button is selected from the Conditions page, the Field Value Selection dialog is invoked.
5.5.7 Field Value Selection
Displays all unique values for the selected attribute.
5.5.7.1 Selected Attribute
This header shows the selected attribute in the form <tablename>.<attributename>.
5.5.7.2 Next 100
If there are more than one hundred unique objects for the attribute, the [Next 100] button will be enabled.
When the button is selected, the next one hundred entries will be brought into the list.

Reference Guide D5092 16-Jan-2008 - Page 100 Report Plug-in
Remote Automation Solutions Website: www.EmersonProcess.com/Remote
5.5.7.3 List of Unique Values
The list of unique values for the selected field. Selected values will be returned to the Condition Criteria field when the [OK] button is selected.
5.5.7.4 Only show values that contain
If there are many objects in the list of unique values, you can filter the list by typing a sequence of characters or a single character in here, then pressing the Enter button on the keyboard.
5.5.8 Alias
When the [Alias] button is selected from the Conditions page, the Alias Selection dialog is invoked. The selected alias will be returned to the condition criteria field. The value of the alias will be determined when the report is run.
5.5.9 Alias Selection
Select the appropriate Alias from the list and click the [OK] button. Note, aliases can be configured using the Alias Manager, which is invoked using the OpenEnterprise>Alias Manager menu option.
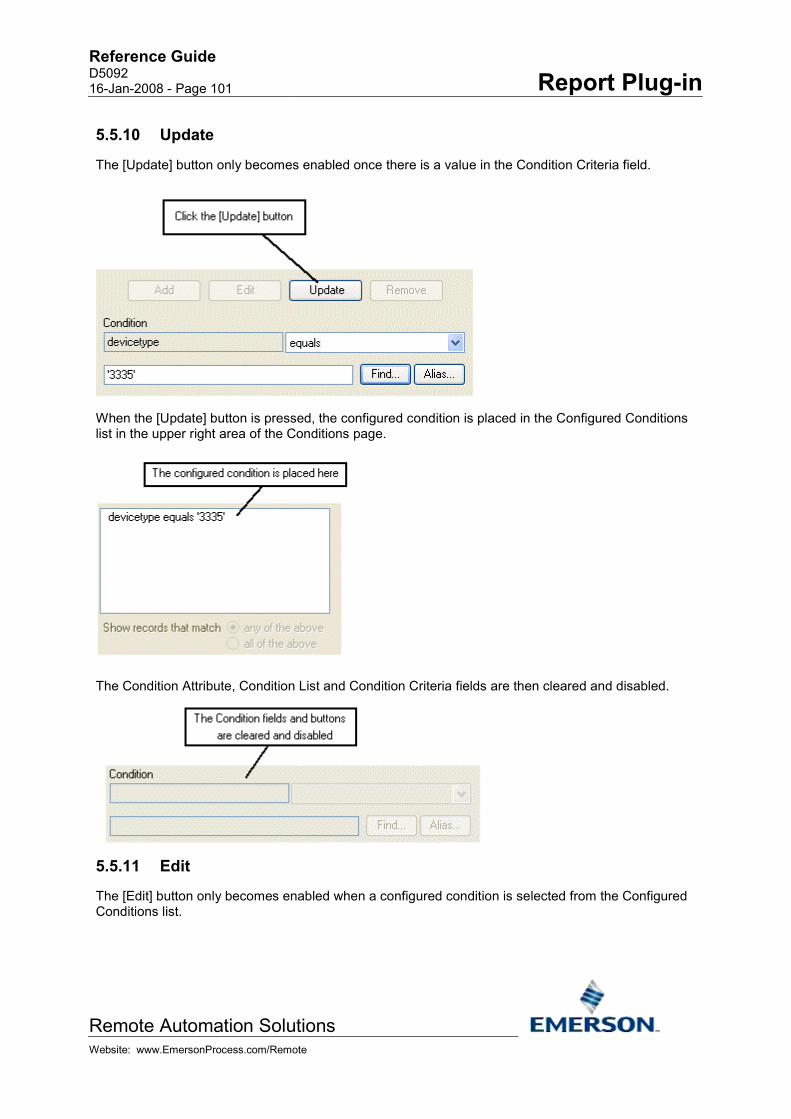
Reference Guide D5092 16-Jan-2008 - Page 101 Report Plug-in
Remote Automation Solutions Website: www.EmersonProcess.com/Remote
5.5.10 Update
The [Update] button only becomes enabled once there is a value in the Condition Criteria field.
When the [Update] button is pressed, the configured condition is placed in the Configured Conditions list in the upper right area of the Conditions page.
The Condition Attribute, Condition List and Condition Criteria fields are then cleared and disabled.
5.5.11 Edit
The [Edit] button only becomes enabled when a configured condition is selected from the Configured Conditions list.
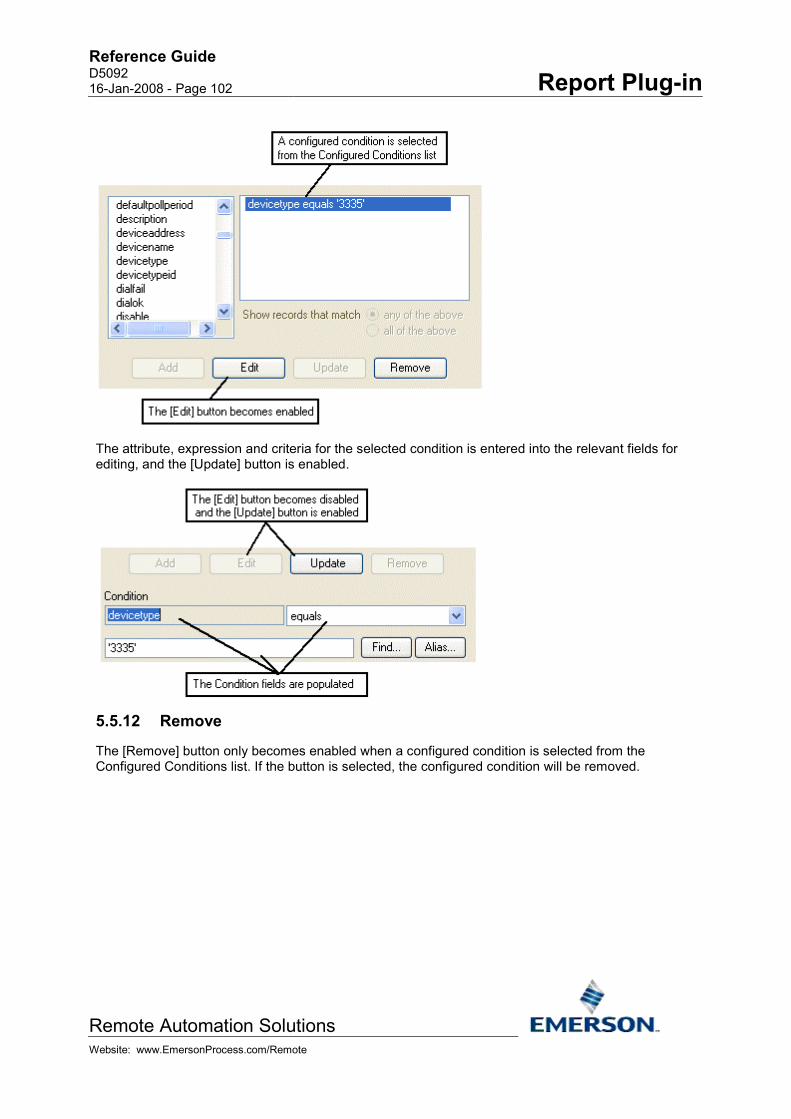
Reference Guide D5092 16-Jan-2008 - Page 102 Report Plug-in
Remote Automation Solutions Website: www.EmersonProcess.com/Remote
The attribute, expression and criteria for the selected condition is entered into the relevant fields for editing, and the [Update] button is enabled.
5.5.12 Remove
The [Remove] button only becomes enabled when a configured condition is selected from the Configured Conditions list. If the button is selected, the configured condition will be removed.

Reference Guide D5092 16-Jan-2008 - Page 103 Report Plug-in
Remote Automation Solutions Website: www.EmersonProcess.com/Remote
5.5.13 Configured Conditions List
This list is populated only when an attribute has been added to the Condition Attribute field, conditions have been applied using the Condition Expression List, and the [Update] button has been selected. If more than one condition appears here, the 'Show records that match' controls will be enabled.
5.5.13.1 Any of the above
If this option remains selected, then the conditions will be separated by an OR statement. Note, to effectively apply an OR statement to a single attribute (i.e. Name = 'JSMITH' OR Name = 'DJONES'), you can also use the IN statement (i.e. Name IN ('JSMITH','DJONES')).
5.5.13.2 All of the above
If this option is selected, then the conditions will be separated by an AND statement.
5.6 Column Sort The Column Sort page allows you to define the sort order for a real-time query.
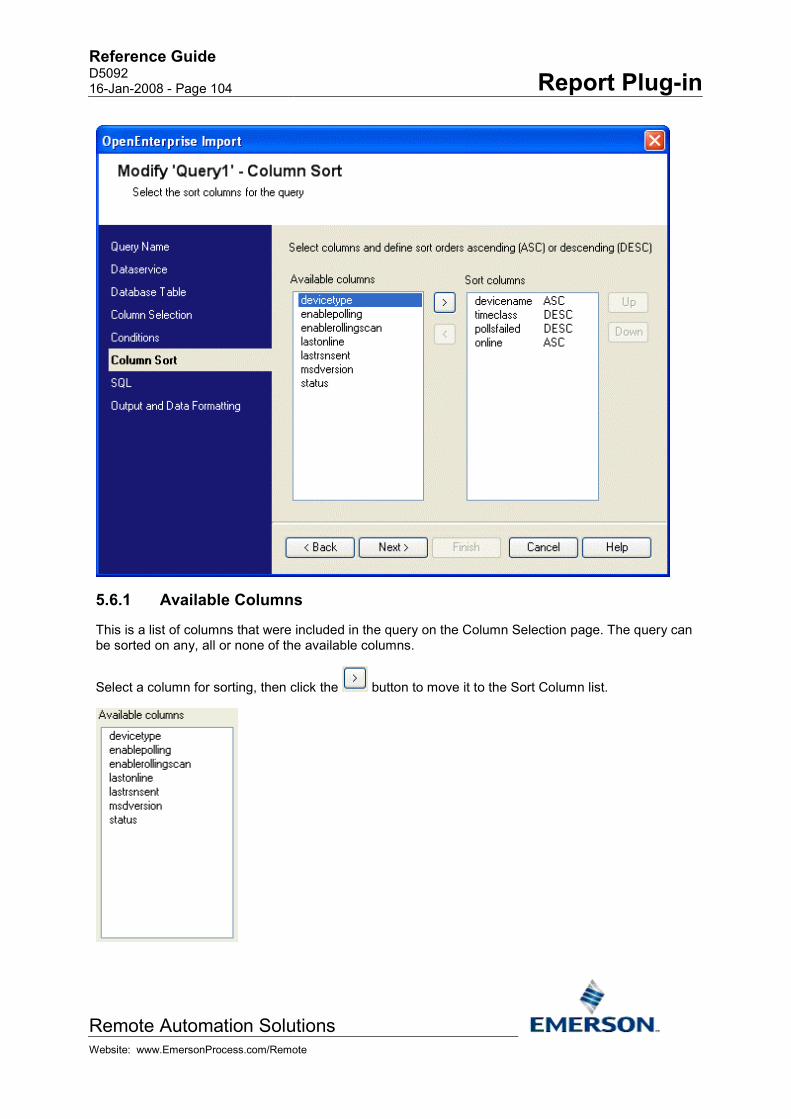
Reference Guide D5092 16-Jan-2008 - Page 104 Report Plug-in
Remote Automation Solutions Website: www.EmersonProcess.com/Remote
5.6.1 Available Columns
This is a list of columns that were included in the query on the Column Selection page. The query can be sorted on any, all or none of the available columns.
Select a column for sorting, then click the button to move it to the Sort Column list.

Reference Guide D5092 16-Jan-2008 - Page 105 Report Plug-in
Remote Automation Solutions Website: www.EmersonProcess.com/Remote
5.6.2 Add
Select this button to add a column from the Available Columns to the Sort Columns list. The column will appear in the Sort Column list and will be removed from the Available Columns list.
5.6.3 Remove
Select this button to remove a column from the Sort Columns to the Available Columns list. The column will appear in the Available Columns list and will be removed from the Sort Column list.
5.6.4 Sort Columns
This is a list of columns on which a sort will be made for the query. Each column can be sorted in ascending or descending order. Sort precedence occurs from the top of the list down.
5.6.5 Sort Order
This is the list of columns that have been selected for sorting the query. The sort order is determined in the order in which the columns appear here. For instance, in the image below, sorting is first done in ascending order on the devicename attribute, then in descending order on the timeclass attribute etc..

Reference Guide D5092 16-Jan-2008 - Page 106 Report Plug-in
Remote Automation Solutions Website: www.EmersonProcess.com/Remote
5.6.6 ASC or DESC Order
When you click on the ASC or DESC part of the Sort Order list, a list becomes available. You can select the ASC or DESC option for each attribute. ASC indicates ascending order and DESC, descending order.
5.6.7 Up and Down
A Sort column can be demoted or promoted by selecting it and clicking the [Up] or [Down] button. The final sort depends in part on the order of the columns in this list.
5.7 SQL The SQL page enables you to view or even change the SQL that has been generated for your query.

Reference Guide D5092 16-Jan-2008 - Page 107 Report Plug-in
Remote Automation Solutions Website: www.EmersonProcess.com/Remote
5.7.1 SQL Statement
The SQL statement that has been generated for your query is displayed here. In the default 'Generated' mode, the statement is not editable. You can, however, edit the query by clicking the 'Edited' radio button.
5.7.2 Edited
Clicking this button makes the SQL statement editable. You can then change the SQL Query and test it using the [Test SQL] button.
1. In the image below, we have made the SQL statement editable.
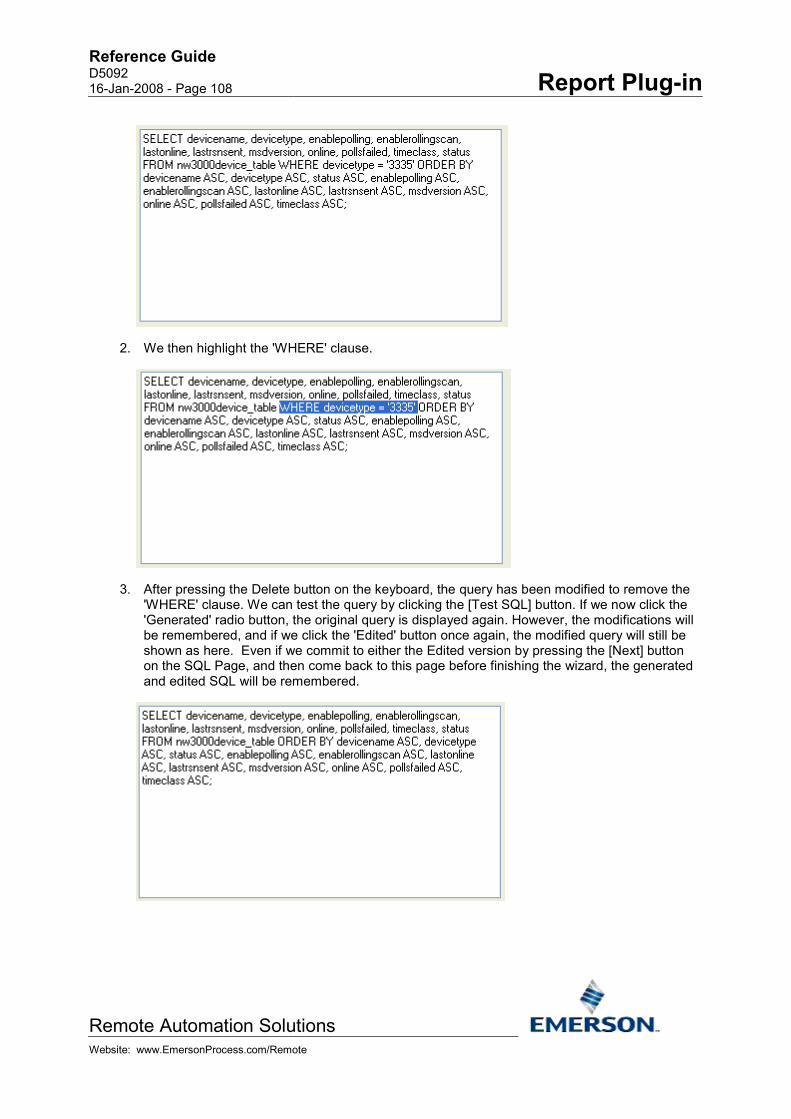
Reference Guide D5092 16-Jan-2008 - Page 108 Report Plug-in
Remote Automation Solutions Website: www.EmersonProcess.com/Remote
2. We then highlight the 'WHERE' clause.
3. After pressing the Delete button on the keyboard, the query has been modified to remove the 'WHERE' clause. We can test the query by clicking the [Test SQL] button. If we now click the 'Generated' radio button, the original query is displayed again. However, the modifications will be remembered, and if we click the 'Edited' button once again, the modified query will still be shown as here. Even if we commit to either the Edited version by pressing the [Next] button on the SQL Page, and then come back to this page before finishing the wizard, the generated and edited SQL will be remembered.
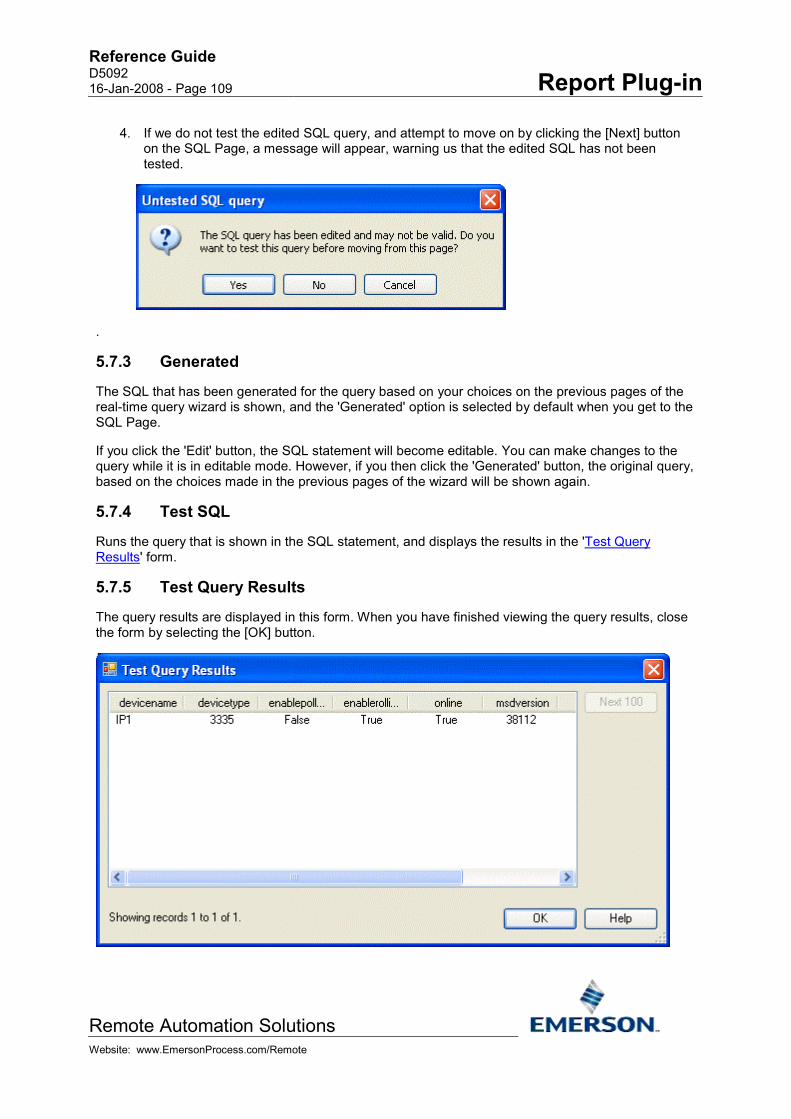
Reference Guide D5092 16-Jan-2008 - Page 109 Report Plug-in
Remote Automation Solutions Website: www.EmersonProcess.com/Remote
4. If we do not test the edited SQL query, and attempt to move on by clicking the [Next] button on the SQL Page, a message will appear, warning us that the edited SQL has not been tested.
.
5.7.3 Generated
The SQL that has been generated for the query based on your choices on the previous pages of the real-time query wizard is shown, and the 'Generated' option is selected by default when you get to the SQL Page.
If you click the 'Edit' button, the SQL statement will become editable. You can make changes to the query while it is in editable mode. However, if you then click the 'Generated' button, the original query, based on the choices made in the previous pages of the wizard will be shown again.
5.7.4 Test SQL
Runs the query that is shown in the SQL statement, and displays the results in the 'Test Query Results' form.
5.7.5 Test Query Results
The query results are displayed in this form. When you have finished viewing the query results, close the form by selecting the [OK] button.

Reference Guide D5092 16-Jan-2008 - Page 110 Report Plug-in
Remote Automation Solutions Website: www.EmersonProcess.com/Remote
5.7.5.1 Query Results
The query results are displayed here. Use the scroll bar to see any attributes that do not fit into the display area.
5.7.5.2 Next 100
If there are more than 100 objects returned by the query, the Query Results list will only display the first hundred objects, and this button will become enabled. To view the next 100 objects, click this button. The next 100 objects will be appended to the Query Results display.
5.7.5.3 Showing records
The number of records returned to the display area and the total number of records returned by the query are shown here.
5.8 Output The Output page is the final page of the real-time query wizard. It enables you to define where the Report data will appear, and to control some aspects of formatting in the Report.

Reference Guide D5092 16-Jan-2008 - Page 111 Report Plug-in
Remote Automation Solutions Website: www.EmersonProcess.com/Remote
5.8.1 Existing Worksheet Cell Reference
Used to define the Excel sheet and cell where imported query data will be output. The currently active cell is selected by default as the starting position for the placement of the Report data. The actual Cell and Worksheet can be changed by doing the following:-
1. Type the new Sheet name (e.g. Sheet2!A1). If the sheet does not exist a new one will be created.
2. Click on the [...] button. This displays the 'Please select a cell' dialog (shown below). If you click on another cell or another sheet in the Report Template workbook now, the Sheet and Cell name (here shown as Sheet!A1) will change in the user disabled text field on this dialog. When you select the [OK] button, the Sheet and Cell reference is passed to the 'Existing Worksheet Cell Reference' field on the Output page of the Query wizard.
5.8.2 Temporary Worksheet
Type the name of a temporary query output sheet here (e.g. Results). When the report is run, the query results will be placed into a temporary worksheet with the given name. If you copy the name and cell reference of the sheet on which you are configuring the query into the 'Temporary Worksheet' field, then that sheet will be deemed a temporary worksheet.
Temporary sheets will be deleted when a report is published, therefore the data should be referenced from another worksheet. This can be done using any Excel referencing method, including array formulas, if named arrays have been enabled on the query. Note that whilst temporary sheets are deleted from published reports, they are not deleted from the original report template file. For more details on using named arrays in reports, see the Reporting Overview documentation.
5.8.3 Adjust Column Widths
Check this box if you want the Report to automatically adjust column widths to accommodate the longest value returned.
5.8.4 Show Column Headers
Ensure this box is checked if you want the attribute header to appear at the top of each column of data.
5.8.5 Add Named Range for each Column
Un-check this box if you do not want OpenEnterprise to create Named Ranges for each column of data when the Report is output.
Creation of named ranges is on by default, since they are a way of accessing outputted data for use in array formulas. However, if named arrays are not being used, or the query is returning a large number of attributes, it may be advisable to turn them off by un-checking this box.
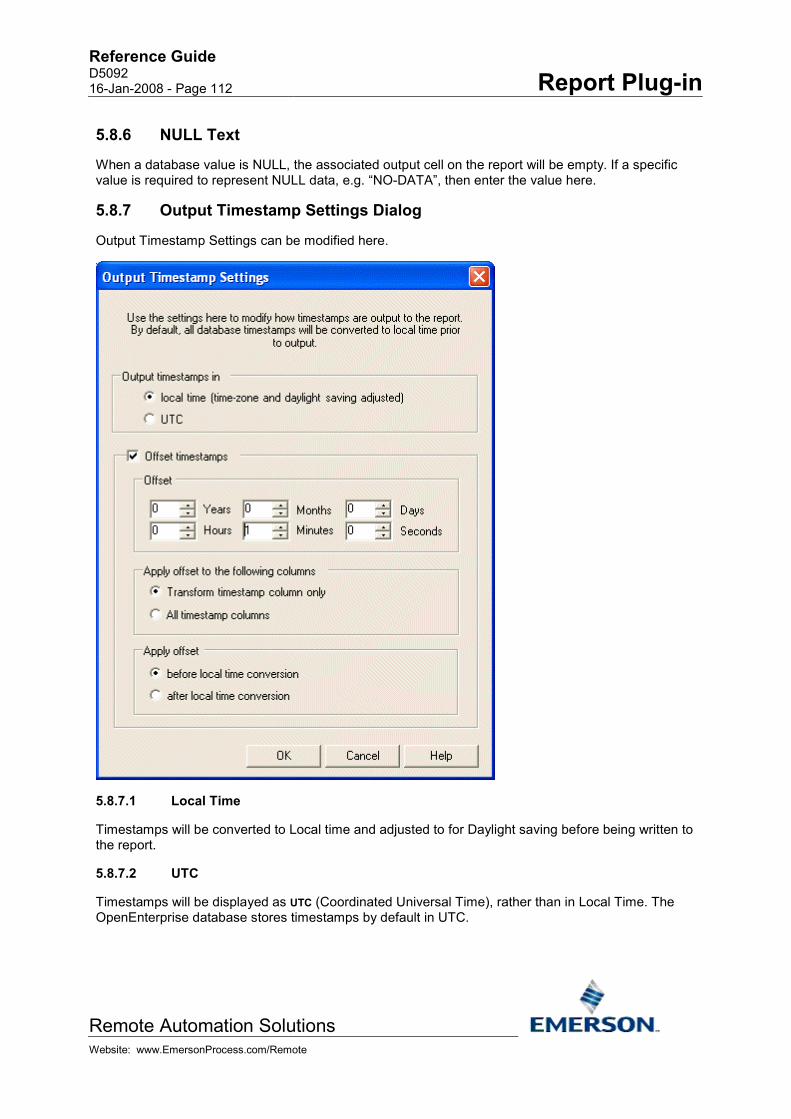
Reference Guide D5092 16-Jan-2008 - Page 112 Report Plug-in
Remote Automation Solutions Website: www.EmersonProcess.com/Remote
5.8.6 NULL Text
When a database value is NULL, the associated output cell on the report will be empty. If a specific value is required to represent NULL data, e.g. “NO-DATA”, then enter the value here.
5.8.7 Output Timestamp Settings Dialog
Output Timestamp Settings can be modified here.
5.8.7.1 Local Time
Timestamps will be converted to Local time and adjusted to for Daylight saving before being written to the report.
5.8.7.2 UTC
Timestamps will be displayed as UTC (Coordinated Universal Time), rather than in Local Time. The OpenEnterprise database stores timestamps by default in UTC.

Reference Guide D5092 16-Jan-2008 - Page 113 Report Plug-in
Remote Automation Solutions Website: www.EmersonProcess.com/Remote
5.8.7.3 Offset Timestamps
When checked, you can select an offset to apply to the Query result timestamps.
5.8.7.4 Offsets
Timestamps can be given an offset value here. Possible offset units range from Years to Seconds. Any combination of offset units is possible. This example shows an offset of 1 hour being applied. This will add one hour to the timestamps on the Report.
5.8.7.5 Transform Timestamp Column Only
Selecting this option causes the selected offset on this dialog to apply only to the timestamp column used for the data set transform.
5.8.7.6 All Timestamp Columns
This option causes the Timestamp offset configured on this dialog to apply to all Date/Time attributes selected for output to the Report.
5.8.7.7 Apply Offset Before Local Time Conversion
Applies the offset before timestamps are converted to Local time.
5.8.7.8 Apply Offset After Local Time Conversion
Applies the offset after timestamps are converted to Local time.
5.8.8 Questionable Data Formatting
Check this box if you want to assign a different background colour to cells having questionable data.
All the columns for a given signal and timestamp will be assigned the questionable color if the value for the questionable attribute for that signal and timestamp is non-zero or null.
Note that questionable data formatting is not available when using the Real-time SQL Query wizard.
5.8.9 Questionable Attribute
Select the attribute that will be used to flag questionable data. A non-zero value will indicate questionable data. A value of zero will indicate good quality data.
5.8.10 Questionable Color
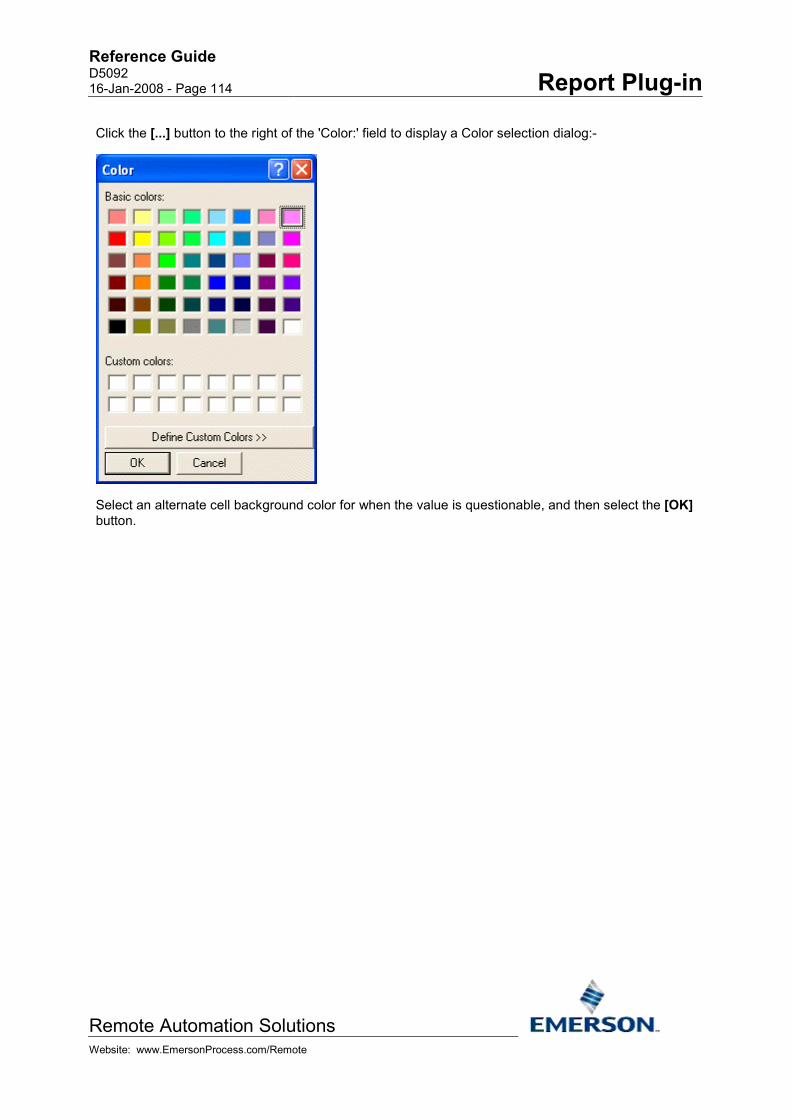
Reference Guide D5092 16-Jan-2008 - Page 114 Report Plug-in
Remote Automation Solutions Website: www.EmersonProcess.com/Remote
Click the [...] button to the right of the 'Color:' field to display a Color selection dialog:-
Select an alternate cell background color for when the value is questionable, and then select the [OK] button.

Reference Guide D5092 16-Jan-2008 - Page 115 Report Plug-in
Remote Automation Solutions Website: www.EmersonProcess.com/Remote
6 Real-time SQL Query Wizard The SQL Real-time Query wizard enables you to create and modify OpenEnterprise real-time data imports using only the SQL Page. This wizard is for those having a good knowledge of SQL and the database schema. Real-time queries can be created for any non-historical table or view. When creating a new import, the query results will by default be output starting at the currently selected Excel cell. Once configured, the Query wizard pages can be opened in modify mode. There are four steps required to configure a new SQL real-time import:-
1. Query Name Page
2. Data Service Page
3. SQL Page
4. Output Page
6.1 Name Each import query is identified by a unique name. A name is automatically generated when this page is first opened. The name can be changed to something more meaningful to the report. The name can be up to 14 characters long. If you do not supply a name, the Report Plug-in will use the unique name which it provided.
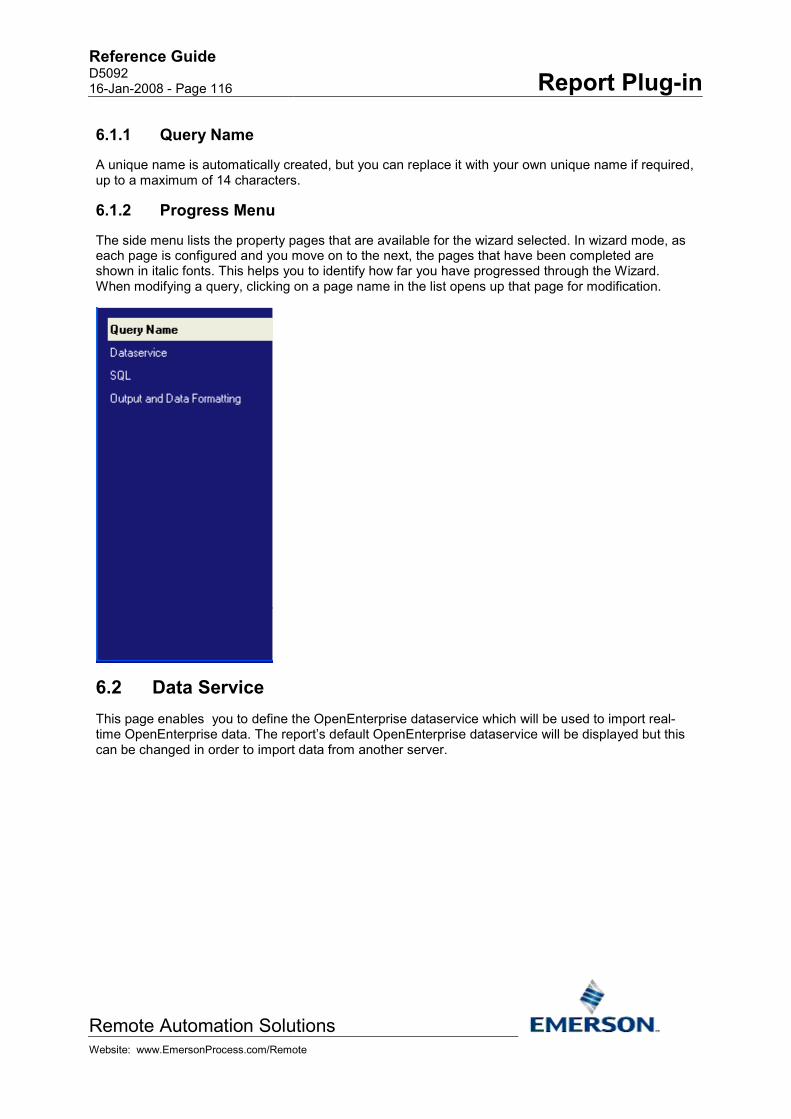
Reference Guide D5092 16-Jan-2008 - Page 116 Report Plug-in
Remote Automation Solutions Website: www.EmersonProcess.com/Remote
6.1.1 Query Name
A unique name is automatically created, but you can replace it with your own unique name if required, up to a maximum of 14 characters.
6.1.2 Progress Menu
The side menu lists the property pages that are available for the wizard selected. In wizard mode, as each page is configured and you move on to the next, the pages that have been completed are shown in italic fonts. This helps you to identify how far you have progressed through the Wizard. When modifying a query, clicking on a page name in the list opens up that page for modification.
6.2 Data Service This page enables you to define the OpenEnterprise dataservice which will be used to import real-time OpenEnterprise data. The report’s default OpenEnterprise dataservice will be displayed but this can be changed in order to import data from another server.

Reference Guide D5092 16-Jan-2008 - Page 117 Report Plug-in
Remote Automation Solutions Website: www.EmersonProcess.com/Remote
6.2.1 Override Default Dataservice
Check this box to override the Report's default dataservice (set on the Dataservice page of the Report Properties wizard).
6.2.2 Dataservice
When this page is opened, this field is not editable, and displays the default dataservice as defined on the Report Properties Data Service Page.
To override this dataservice, ensure the 'Override Default Dataservice' button is checked, then type the name of the intended query data service in here. Use the format host:service where host is the computer name of the OpenEnterprise Server and service is the TCP/IP service name of the OpenEnterprise database (typically rtrdb1). For Redundant Servers, separate the data service of each Server with a comma - e.g. hosta:rtrdb1, hostb:rtrdb1. To run a Report that connects to the standby Server append [ro] to the data service.
6.2.3 Test Connection Button
Click this button to attempt a connection to the dataservice that you typed into the Dataservice field. A message will inform you of the success or failure of the connection attempt. If the test fails due to insufficient user credentials, enter your OpenEnterprise credentials using the OpenEnterprise > Logon menu item.

Reference Guide D5092 16-Jan-2008 - Page 118 Report Plug-in
Remote Automation Solutions Website: www.EmersonProcess.com/Remote
6.2.4 Advanced Button
Opens the Import Dataservice Dialog
6.2.5 Import Data Service Dialog
The 'Import Dataservice' dialog enables you to override the dataservice for the report template or any configured queries in the report template.
6.2.5.1 Use different data service for data import
When checked, the configured dataservice will be overridden by the dataservice set here. This dialog can serve to override dataservice options in two ways:-
1. If it is invoked from the Dataservice page of the Report Properties wizard, the Import Dataservice dialog sets up a global Dataservice that will override the Report Dataservice, and also overrides any query that does not specify its own Advanced Dataservice.
2. If invoked from the Dataservice page of any of the import wizards (historical, real-time or real-time SQL), the Import Dataservice dialog applies a local query dataservice override on the standard report dataservice, or on any global dataservice that may have been set for the report as described in point 1 above.
6.2.5.2 Data Service
The overriding dataservice can be defined here using the standard format of <ServerName>:<ServiceName> (for example - MainServer:rtrdb1), or it can be defined with an alias. The alias can be entered directly as text (e.g. <<HISTSERVER>>), or an alias can be selected from those which are available by selecting the [Alias...] button.

Reference Guide D5092 16-Jan-2008 - Page 119 Report Plug-in
Remote Automation Solutions Website: www.EmersonProcess.com/Remote
6.2.5.3 Test Connection Button
Click this button to attempt a connection to the dataservice that you typed into the Dataservice field. A message will inform you of the success or failure of the connection attempt. If the test fails due to insufficient user credentials, enter your OpenEnterprise credentials using the OpenEnterprise > Logon menu item.
6.2.5.4 Alias Selection
Select the appropriate Alias from the list and click the [OK] button. Note, aliases can be configured using the Alias Manager, which is invoked using the OpenEnterprise>Alias Manager menu option.
6.3 SQL The SQL page of the 'Real-time SQL Query Wizard' is an editable window into which you can enter the SQL statement that you wish to execute for the query. To create a query in this way, you must have extensive knowledge of SQL syntax and the OpenEnterprise project database schema.

Reference Guide D5092 16-Jan-2008 - Page 120 Report Plug-in
Remote Automation Solutions Website: www.EmersonProcess.com/Remote
6.3.1 SQL Statement
The SQL statement box is fully editable for the 'Real-time SQL Query Wizard'. Type the query into the box. There is no need to type the semi-colon at the end of the query.
6.3.2 Test SQL
Runs the query that is shown in the SQL statement, and displays the results in the 'Test Query Results' form.
6.3.3 Test Query Results
The query results are displayed in this form. When you have finished viewing the query results, close the form by selecting the [OK] button.
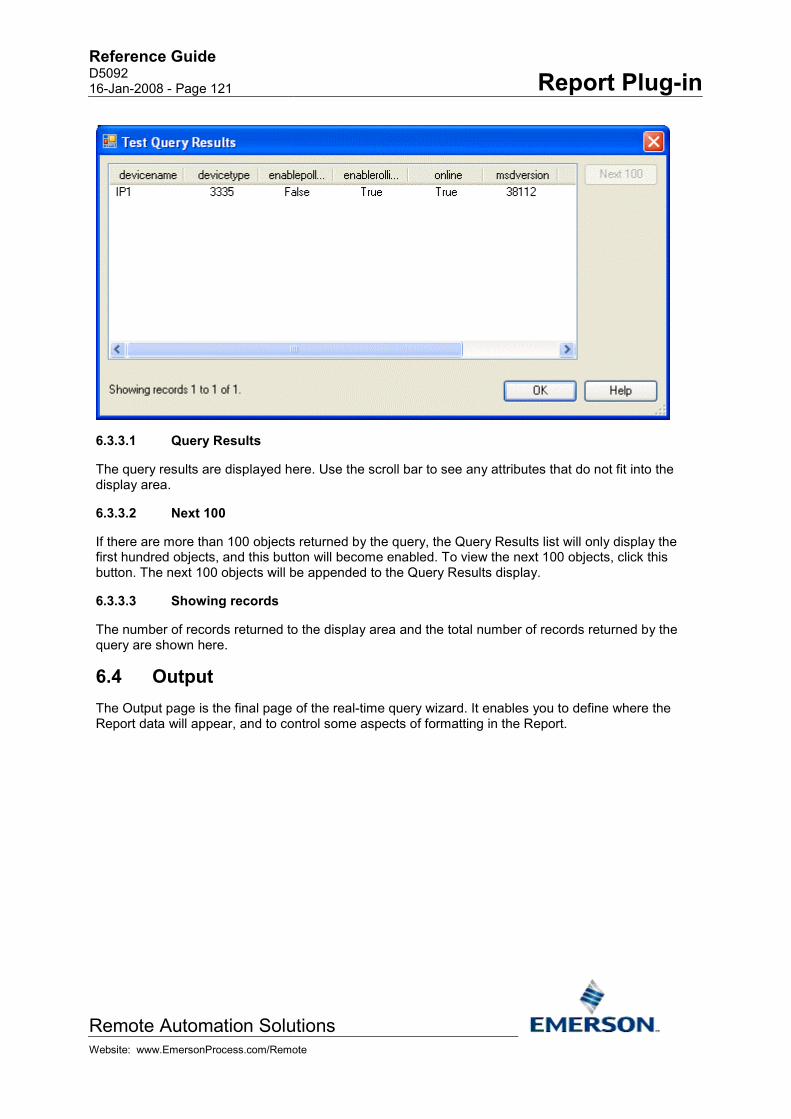
Reference Guide D5092 16-Jan-2008 - Page 121 Report Plug-in
Remote Automation Solutions Website: www.EmersonProcess.com/Remote
6.3.3.1 Query Results
The query results are displayed here. Use the scroll bar to see any attributes that do not fit into the display area.
6.3.3.2 Next 100
If there are more than 100 objects returned by the query, the Query Results list will only display the first hundred objects, and this button will become enabled. To view the next 100 objects, click this button. The next 100 objects will be appended to the Query Results display.
6.3.3.3 Showing records
The number of records returned to the display area and the total number of records returned by the query are shown here.
6.4 Output The Output page is the final page of the real-time query wizard. It enables you to define where the Report data will appear, and to control some aspects of formatting in the Report.
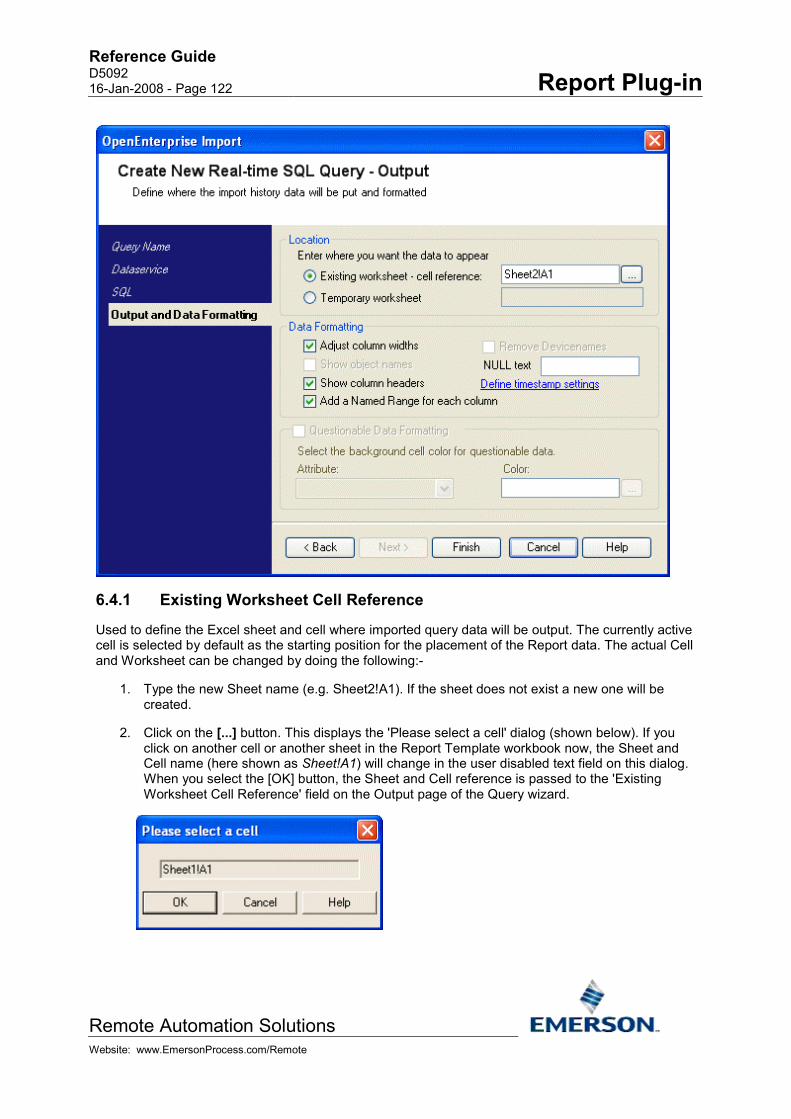
Reference Guide D5092 16-Jan-2008 - Page 122 Report Plug-in
Remote Automation Solutions Website: www.EmersonProcess.com/Remote
6.4.1 Existing Worksheet Cell Reference
Used to define the Excel sheet and cell where imported query data will be output. The currently active cell is selected by default as the starting position for the placement of the Report data. The actual Cell and Worksheet can be changed by doing the following:-
1. Type the new Sheet name (e.g. Sheet2!A1). If the sheet does not exist a new one will be created.
2. Click on the [...] button. This displays the 'Please select a cell' dialog (shown below). If you click on another cell or another sheet in the Report Template workbook now, the Sheet and Cell name (here shown as Sheet!A1) will change in the user disabled text field on this dialog. When you select the [OK] button, the Sheet and Cell reference is passed to the 'Existing Worksheet Cell Reference' field on the Output page of the Query wizard.

Reference Guide D5092 16-Jan-2008 - Page 123 Report Plug-in
Remote Automation Solutions Website: www.EmersonProcess.com/Remote
6.4.2 Temporary Worksheet
Type the name of a temporary query output sheet here (e.g. Results). When the report is run, the query results will be placed into a temporary worksheet with the given name. If you copy the name and cell reference of the sheet on which you are configuring the query into the 'Temporary Worksheet' field, then that sheet will be deemed a temporary worksheet.
Temporary sheets will be deleted when a report is published, therefore the data should be referenced from another worksheet. This can be done using any Excel referencing method, including array formulas, if named arrays have been enabled on the query. Note that whilst temporary sheets are deleted from published reports, they are not deleted from the original report template file. For more details on using named arrays in reports, see the Reporting Overview documentation.
6.4.3 Adjust Column Widths
Check this box if you want the Report to automatically adjust column widths to accommodate the longest value returned.
6.4.4 Show Column Headers
Ensure this box is checked if you want the attribute header to appear at the top of each column of data.
6.4.5 Add Named Range for each Column
Un-check this box if you do not want OpenEnterprise to create Named Ranges for each column of data when the Report is output.
Creation of named ranges is on by default, since they are a way of accessing outputted data for use in array formulas. However, if named arrays are not being used, or the query is returning a large number of attributes, it may be advisable to turn them off by un-checking this box.
6.4.6 NULL Text
When a database value is NULL, the associated output cell on the report will be empty. If a specific value is required to represent NULL data, e.g. “NO-DATA”, then enter the value here.
6.4.7 Output Timestamp Settings Dialog
Output Timestamp Settings can be modified here.

Reference Guide D5092 16-Jan-2008 - Page 124 Report Plug-in
Remote Automation Solutions Website: www.EmersonProcess.com/Remote
6.4.7.1 Local Time
Timestamps will be converted to Local time and adjusted to for Daylight saving before being written to the report.
6.4.7.2 UTC
Timestamps will be displayed as UTC (Coordinated Universal Time), rather than in Local Time. The OpenEnterprise database stores timestamps by default in UTC.
6.4.7.3 Offset Timestamps
When checked, you can select an offset to apply to the Query result timestamps.
6.4.7.4 Offsets
Timestamps can be given an offset value here. Possible offset units range from Years to Seconds. Any combination of offset units is possible. This example shows an offset of 1 hour being applied. This will add one hour to the timestamps on the Report.

Reference Guide D5092 16-Jan-2008 - Page 125 Report Plug-in
Remote Automation Solutions Website: www.EmersonProcess.com/Remote
6.4.7.5 Transform Timestamp Column Only
Selecting this option causes the selected offset on this dialog to apply only to the timestamp column used for the data set transform.
6.4.7.6 All Timestamp Columns
This option causes the Timestamp offset configured on this dialog to apply to all Date/Time attributes selected for output to the Report.
6.4.7.7 Apply Offset Before Local Time Conversion
Applies the offset before timestamps are converted to Local time.
6.4.7.8 Apply Offset After Local Time Conversion
Applies the offset after timestamps are converted to Local time.
6.4.8 Questionable Data Formatting
Check this box if you want to assign a different background colour to cells having questionable data.
All the columns for a given signal and timestamp will be assigned the questionable color if the value for the questionable attribute for that signal and timestamp is non-zero or null.
Note that questionable data formatting is not available when using the Real-time SQL Query wizard.

Reference Guide D5092 16-Jan-2008 - Page 126 Report Plug-in
Remote Automation Solutions Website: www.EmersonProcess.com/Remote
7 Query Manager The Query Manager dialog is opened from the OpenEnterprise>Query Manager... menu item. It enables you to create, modify, delete and run Queries.
7.1 Query List This is a list of the Queries that have been configured on this Report Template.
7.2 Query ID The name of each Query. Each Query must have a unique name.
7.3 Query Check Box In order to run a Query, you must ensure that this box is checked before selecting the [Run] button.
7.4 Add Query When this button is selected, the Select Query Type dialog is opened.
7.4.1 Select Query Type
The 'Select Query Type' dialog allows you to select the type of query that you want to import into the report template.
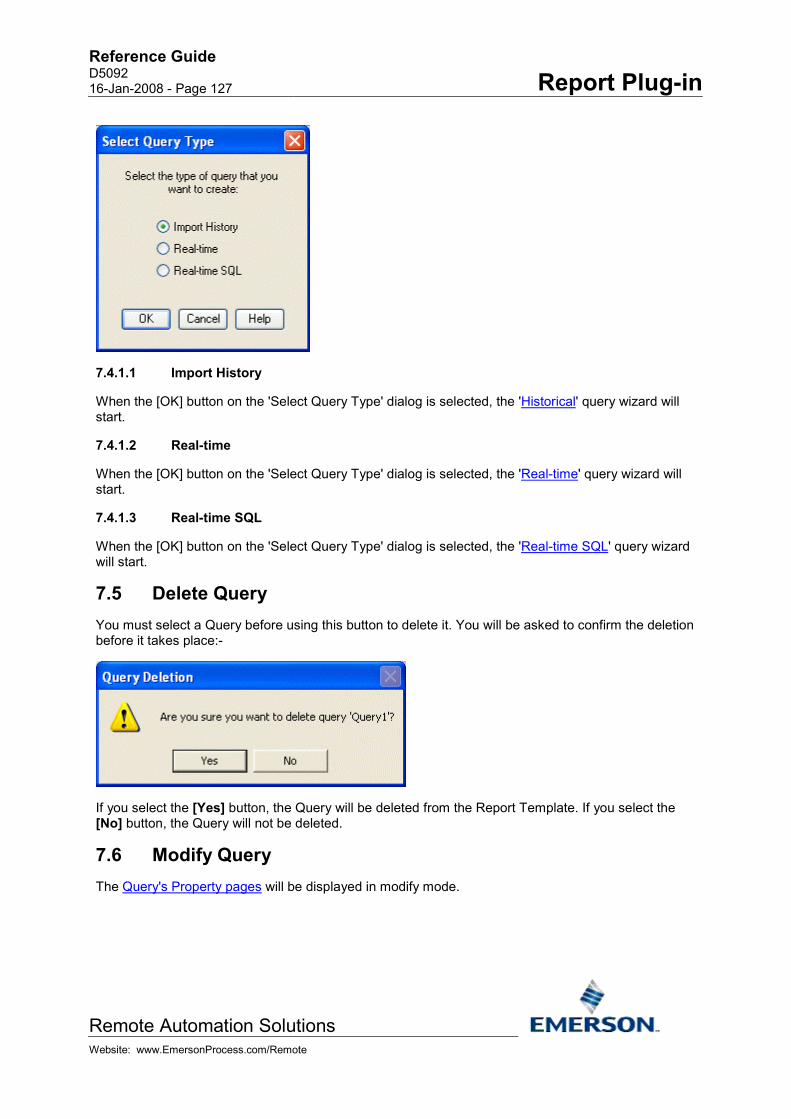
Reference Guide D5092 16-Jan-2008 - Page 127 Report Plug-in
Remote Automation Solutions Website: www.EmersonProcess.com/Remote
7.4.1.1 Import History
When the [OK] button on the 'Select Query Type' dialog is selected, the 'Historical' query wizard will start.
7.4.1.2 Real-time
When the [OK] button on the 'Select Query Type' dialog is selected, the 'Real-time' query wizard will start.
7.4.1.3 Real-time SQL
When the [OK] button on the 'Select Query Type' dialog is selected, the 'Real-time SQL' query wizard will start.
7.5 Delete Query You must select a Query before using this button to delete it. You will be asked to confirm the deletion before it takes place:-
If you select the [Yes] button, the Query will be deleted from the Report Template. If you select the [No] button, the Query will not be deleted.
7.6 Modify Query The Query's Property pages will be displayed in modify mode.

Reference Guide D5092 16-Jan-2008 - Page 128 Report Plug-in
Remote Automation Solutions Website: www.EmersonProcess.com/Remote
7.7 Run Query Runs the selected Query. You must check the box to the left of the Query that you want to run before selection.
7.8 Close Use this or the close button at the top right corner to close the Query Manager.
7.9 Help Provides context sensitive help by opening this Help file at the topic that deals with what you are looking at.

Reference Guide D5092 16-Jan-2008 - Page 129 Report Plug-in
Remote Automation Solutions Website: www.EmersonProcess.com/Remote
8 Alias Manager Aliases are mainly used for creating template reports i.e. a single report template that can be used for multiple reports instances, where the data displayed in each report differs. Aliases can also be used to affect the relative time of the data contained within a published report. An Alias is a placeholder whose value is assigned when the report is run. For instance, the BASEDATE Alias can be given a new value to test the results of a Report if it were run on a different day to the current day. Custom Aliases can be created which, for instance, can be used as filters in the Signal Browse, Object Browse or Event Filter dialogs. The value of the filter Alias can be changed directly in the Alias Manager dialog, or a new value can be imported from a text file. You can then use the same Report to view data for a different set of signals in the Query's Dataset.
The Alias Manager dialog enables you to add, import, export and delete Aliases for the Report.
8.1 Alias List The list of Aliases configured for this Report Template. There are three default Aliases which are already configured for each Report Template. They are:-
• DATASERVICE - the default Dataservice of the Report Template.
• BASEDATE - the Date on which the report is run.
• BASETIME - the Time at which the report is run.
The BASEDATE and BASETIME default to the current system date and time at which the report is run. They can be set manually to run the report on a specific date and time.
Other Aliases can be Imported from a text file. Custom Aliases can be used as signal filters. Aliases and their values can be Exported to a file and Imported from a file. Alias Imports can be used to change the value of an Alias.

Reference Guide D5092 16-Jan-2008 - Page 130 Report Plug-in
Remote Automation Solutions Website: www.EmersonProcess.com/Remote
8.2 Alias Value Click on any individual Alias value field to change it. For Date and Time fields you can click on each element of the Date/Time separately to change it, as shown in the example below.
Alternatively, you can click on the down arrow to the right of the Date, which will open a Calendar, from which you can select a new date.
For text fields, just select the field and type the new value directly in like so:-
8.3 Add Alias The Add Alias dialog is opened, enabling you to add an Alias to the Report Template.
8.4 Add Alias Dialog This dialog enables you to add new Aliases to the Report Template.
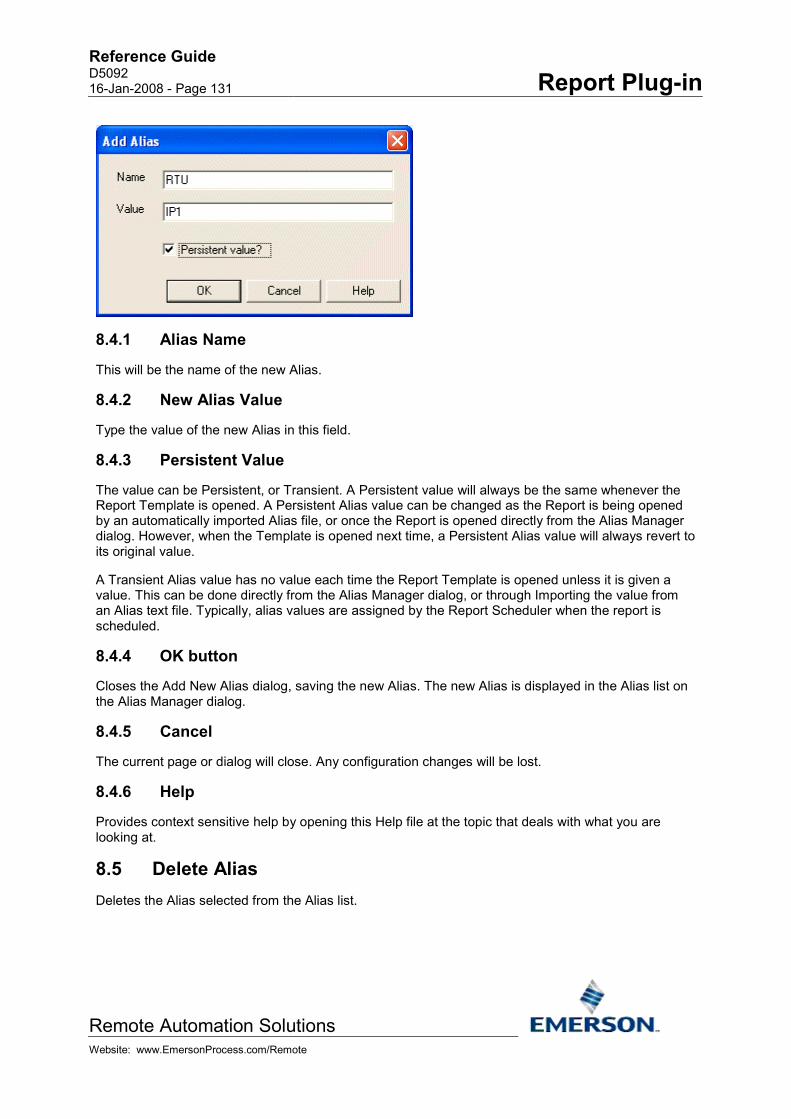
Reference Guide D5092 16-Jan-2008 - Page 131 Report Plug-in
Remote Automation Solutions Website: www.EmersonProcess.com/Remote
8.4.1 Alias Name
This will be the name of the new Alias.
8.4.2 New Alias Value
Type the value of the new Alias in this field.
8.4.3 Persistent Value
The value can be Persistent, or Transient. A Persistent value will always be the same whenever the Report Template is opened. A Persistent Alias value can be changed as the Report is being opened by an automatically imported Alias file, or once the Report is opened directly from the Alias Manager dialog. However, when the Template is opened next time, a Persistent Alias value will always revert to its original value.
A Transient Alias value has no value each time the Report Template is opened unless it is given a value. This can be done directly from the Alias Manager dialog, or through Importing the value from an Alias text file. Typically, alias values are assigned by the Report Scheduler when the report is scheduled.
8.4.4 OK button
Closes the Add New Alias dialog, saving the new Alias. The new Alias is displayed in the Alias list on the Alias Manager dialog.
8.4.5 Cancel
The current page or dialog will close. Any configuration changes will be lost.
8.4.6 Help
Provides context sensitive help by opening this Help file at the topic that deals with what you are looking at.
8.5 Delete Alias Deletes the Alias selected from the Alias list.
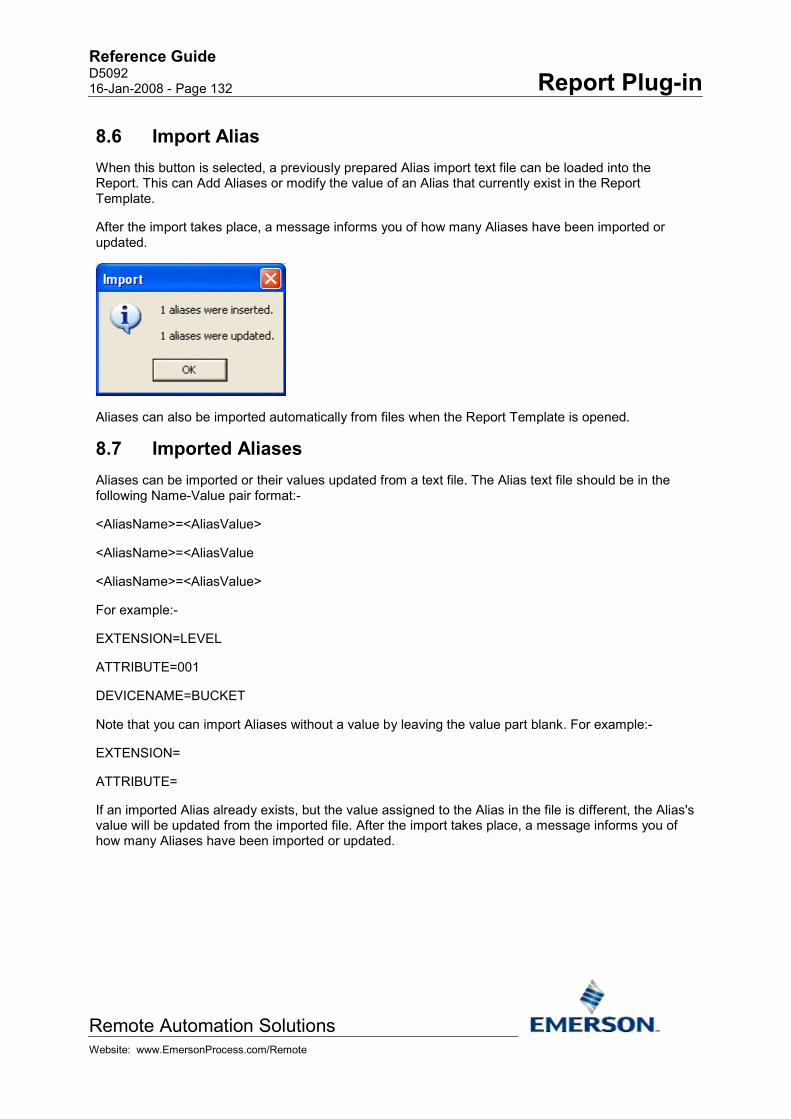
Reference Guide D5092 16-Jan-2008 - Page 132 Report Plug-in
Remote Automation Solutions Website: www.EmersonProcess.com/Remote
8.6 Import Alias When this button is selected, a previously prepared Alias import text file can be loaded into the Report. This can Add Aliases or modify the value of an Alias that currently exist in the Report Template.
After the import takes place, a message informs you of how many Aliases have been imported or updated.
Aliases can also be imported automatically from files when the Report Template is opened.
8.7 Imported Aliases Aliases can be imported or their values updated from a text file. The Alias text file should be in the following Name-Value pair format:-
<AliasName>=<AliasValue>
<AliasName>=<AliasValue
<AliasName>=<AliasValue>
For example:-
EXTENSION=LEVEL
ATTRIBUTE=001
DEVICENAME=BUCKET
Note that you can import Aliases without a value by leaving the value part blank. For example:-
EXTENSION=
ATTRIBUTE=
If an imported Alias already exists, but the value assigned to the Alias in the file is different, the Alias's value will be updated from the imported file. After the import takes place, a message informs you of how many Aliases have been imported or updated.

Reference Guide D5092 16-Jan-2008 - Page 133 Report Plug-in
Remote Automation Solutions Website: www.EmersonProcess.com/Remote
Aliases can be imported from the Alias Manager dialog, or they can be imported automatically when the Report Template opens.
8.7.1 Automatically Imported Aliases
Aliases can be automatically imported to a Report Template when it is opened by creating a special Alias text file. The Alias text file can be unique to a Report or can be a global Alias file.
8.7.2 Global Alias File
A Global Alias file can be prepared that imports the same Aliases to each Report as it is opened. The file must be named ReportAliases.txt, and it must reside in the OpenEnterprise Bin folder, typically C:\Program…….\Bin.
For an explanation of how the file should be prepared, see the Imported Aliases topic.
8.7.3 Unique Report Alias File
An Alias import file can be prepared that is imported into a specific Report Template each time it is opened. The name of this file should be as follows:-
<NameOfReport>_Aliases.txt
For instance, if the Report file was named Tank Levels.xls, the automatic Alias import file should be named Tank Levels_Aliases.txt.
The file should be saved into the same irectory as the actual report. For an explanation of how the file should be written, see the Imported Aliases topic.
8.8 Export Alias You can export the Aliases from the Report Template to a text file. When this button is selected the Export Aliases dialog is displayed.
8.9 Export Aliases Dialog The Export Aliases dialog enables you to choose the Aliases currently belonging to the Report Template for Export to a text file.
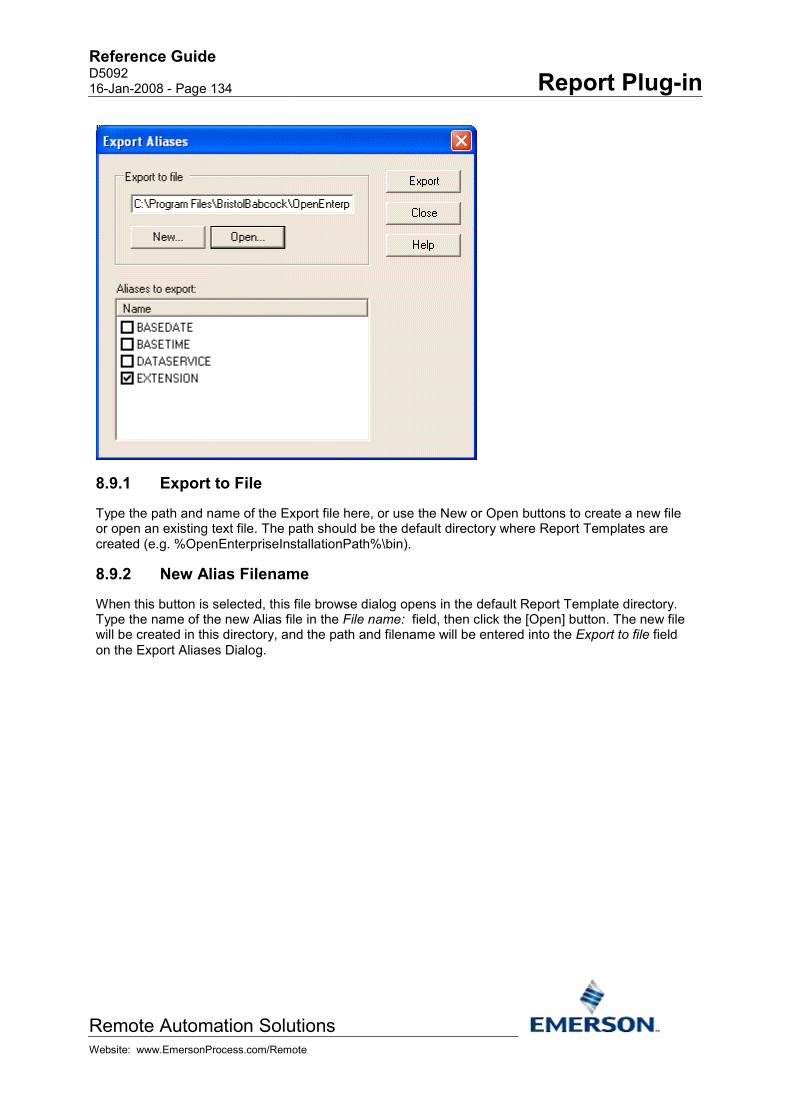
Reference Guide D5092 16-Jan-2008 - Page 134 Report Plug-in
Remote Automation Solutions Website: www.EmersonProcess.com/Remote
8.9.1 Export to File
Type the path and name of the Export file here, or use the New or Open buttons to create a new file or open an existing text file. The path should be the default directory where Report Templates are created (e.g. %OpenEnterpriseInstallationPath%\bin).
8.9.2 New Alias Filename
When this button is selected, this file browse dialog opens in the default Report Template directory. Type the name of the new Alias file in the File name: field, then click the [Open] button. The new file will be created in this directory, and the path and filename will be entered into the Export to file field on the Export Aliases Dialog.

Reference Guide D5092 16-Jan-2008 - Page 135 Report Plug-in
Remote Automation Solutions Website: www.EmersonProcess.com/Remote
8.9.3 Open Alias File
A file browse dialog will open in the default Report Template directory. Select the text file that you want to export the Aliases to then click the [Open] button. The path and filename will be entered into the Export to file field on the Export Aliases Dialog.
8.9.4 Export Alias Button
The selected Aliases will be exported to the Alias export text file in the Export to file field. If any Alias is marked as persistent, its value will also be exported. If an Alias is marked as transient, its name is exported, but not the value.
8.9.5 Close Button
The Export Aliases dialog will be closed without further action.
8.9.6 Help
Provides context sensitive help by opening this Help file at the topic that deals with what you are looking at.
8.9.7 Aliases to Export List
A list of the Aliases currently configured in the Report Template. To ensure that an Alias is exported, check the box to the left of the Alias name. If there is an Alias that you do not want to export, un-check the box.

Reference Guide D5092 16-Jan-2008 - Page 136 Report Plug-in
Remote Automation Solutions Website: www.EmersonProcess.com/Remote
8.10 OK Button Closes the Alias Manager Dialog and saves any changes made to the values of Aliases in the Alias list.
8.11 Cancel The current page or dialog will close. Any configuration changes will be lost.
8.12 Help Provides context sensitive help by opening this Help file at the topic that deals with what you are looking at.

Reference Guide D5092 16-Jan-2008 - Page 137 Report Plug-in
Remote Automation Solutions Website: www.EmersonProcess.com/Remote
9 Event Viewer The Event Viewer dialog displays events that occur during the time that the Report Template has been open. These Events are also recorded in a .CSV file created in the same directory, and having the same name as the Report Template with a .CSV extension.
9.1 Event Type A drop-down list of the types of events that are recorded. Select any of the following options from this list to filter the list by Event Type.
• All
• Error
• Information
• Warning
Reference Guide D5092 16-Jan-2008 - Page 138 Report Plug-in
Remote Automation Solutions Website: www.EmersonProcess.com/Remote
9.2 Event Category A drop-down list of the categories of events that are recorded. Select any of the options from this list to filter the list by Event Category, for example:-
• Aliases
• All
• Licensing
• None
• Queries
• VB
9.3 Event Object A drop-down list of the Objects for which Events are recorded. Select any of the following options from this list to filter the list by Object. For example:-
• All
• BASEDATE
• BASETIME
• DATASERVICE
• OEExcelPlug-in
• QueryManager
9.4 Event List The list of Events recorded by the OpenEnterprise Excel Plug-in since it was loaded. The list can be filtered according to Event Type, Category or Object reference.
9.5 Scroll Bars The scroll bars are enabled as the list extends.

Reference Guide D5092 16-Jan-2008 - Page 139 Report Plug-in
Remote Automation Solutions Website: www.EmersonProcess.com/Remote
10 Insert Functions The Report Plug-in has its own functions, some of which can be entered into a cell within an Excel worksheet using the Plug-in's Insert Function dialog. Report Plug-in functions available for insertion into the body of the Report in this way are:-
1. GetAliasValue
2. OEVariable
3. OEQueryVariable
The Report Plug-in provides other functions that can be inserted using the Excel Insert Function dialog, or used directly by the Report Scheduler when running Reports. These functions can also be used by third party clients that run reports.
10.1 Worksheet Formula Functions The formula functions can be inserted into any cell of the Excel worksheet using the Report Plug-in's Insert Function... menu item. This is available from the context menu, as shown in the example below.
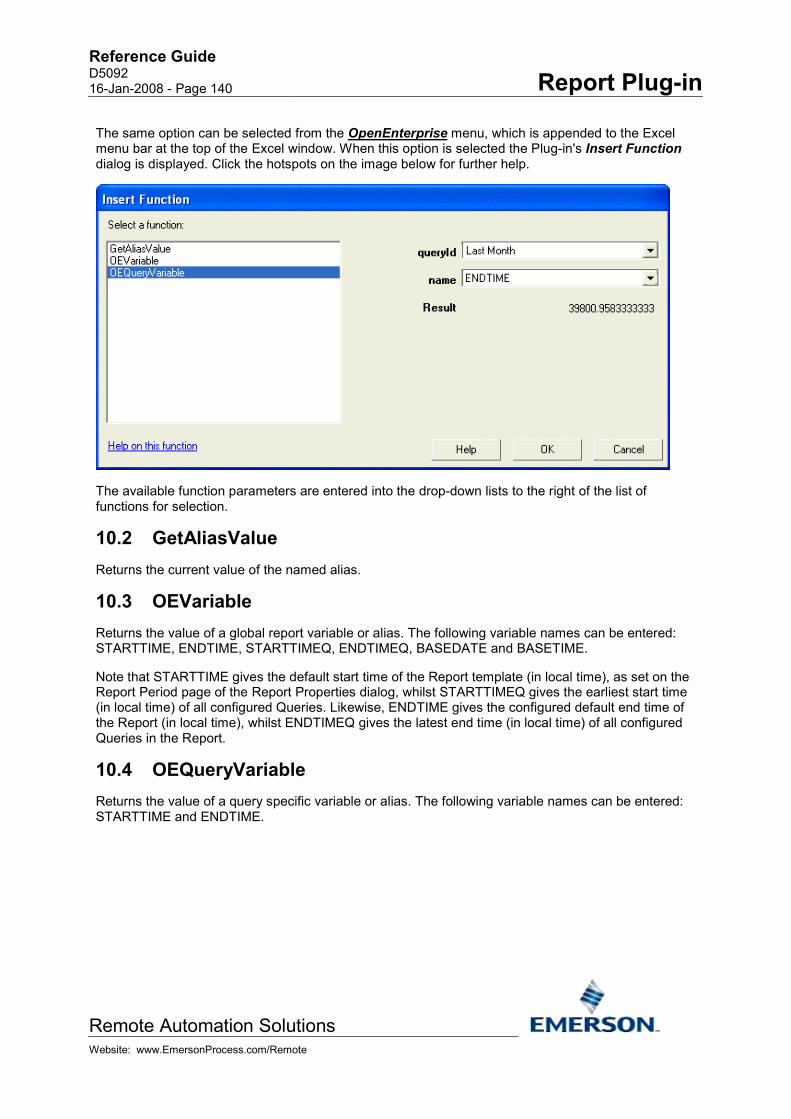
Reference Guide D5092 16-Jan-2008 - Page 140 Report Plug-in
Remote Automation Solutions Website: www.EmersonProcess.com/Remote
The same option can be selected from the OpenEnterprise menu, which is appended to the Excel menu bar at the top of the Excel window. When this option is selected the Plug-in's Insert Function dialog is displayed. Click the hotspots on the image below for further help.
The available function parameters are entered into the drop-down lists to the right of the list of functions for selection.
10.2 GetAliasValue Returns the current value of the named alias.
10.3 OEVariable Returns the value of a global report variable or alias. The following variable names can be entered: STARTTIME, ENDTIME, STARTTIMEQ, ENDTIMEQ, BASEDATE and BASETIME.
Note that STARTTIME gives the default start time of the Report template (in local time), as set on the Report Period page of the Report Properties dialog, whilst STARTTIMEQ gives the earliest start time (in local time) of all configured Queries. Likewise, ENDTIME gives the configured default end time of the Report (in local time), whilst ENDTIMEQ gives the latest end time (in local time) of all configured Queries in the Report.
10.4 OEQueryVariable Returns the value of a query specific variable or alias. The following variable names can be entered: STARTTIME and ENDTIME.
Reference Guide D5092 16-Jan-2008 - Page 141 Report Plug-in
Remote Automation Solutions Website: www.EmersonProcess.com/Remote
11 Report Runtime Utility Functions These functions are used by the Report Scheduler when running Reports. They can also be called from third party clients that run reports.
1. GetAliasValue
2. GetAliasValues
3. GetErrorCode
4. GetErrorText
5. GetEndtime
6. GetStarttime
7. ReportState
8. RemovePlugin
9. RunReport
10. SetAlias
11.1 GetAliasValues Function GetAliasValues() As String
Gets all Alias values in the current Report. Aliases and values are returned as a CSV list.
11.2 GetErrorCode Function GetErrorCode() As Integer
Returns the error code associated with the last running of the report. A value of zero indicates success, a value of -1 indicates an error. When an error occurs, call GetErrorText to determine the exact cause of the error.
11.3 GetErrorText Function GetErrorText() As String
Gets the error text associated with the Report. Returns error string or null when no error exists.
11.4 GetEndtime Function GetEndtime() as DateTime
Returns the latest end time of all Queries configured in the Report in UTC.
11.5 GetStarttime Function GetStarttime() as DateTime
Reference Guide D5092 16-Jan-2008 - Page 142 Report Plug-in
Remote Automation Solutions Website: www.EmersonProcess.com/Remote
Returns the earliest start time of all Queries configured in the Report in UTC.
11.6 ReportState Function ReportState() As Integer
Current Report state, returns:-
0 == idle
1 == running (report is currently running)
2 == completed successfully
3 == completed with one or more errors
11.7 RemovePlugin Function RemovePlugin() As Integer
Removes the Plug-in (prior to publishing Reports). Converts all cells to data values only. Deletes all non Plug-in specific VBA. Deletes all OpenEnterprise configuration and temporary sheets. Deletes Excel custom properties that load the OpenEnterprise Report Plugin. Returns zero for success.
11.8 RunReport Function RunReport (username As String, password As String)
Runs the current Report. The function returns immediately, need to call ReportState for completion. Returns zero for success.
11.9 SetAlias Function SetAlias(aliasname As String)
Sets the named Alias.

Reference Guide D5092 16-Jan-2008 - Page 143 Report Plug-in
Remote Automation Solutions Website: www.EmersonProcess.com/Remote
12 Automatic Array Naming When the Report Plugin returns data from a query to a worksheet, it automatically names that range of data from the first to the last value as an Excel named array. The basic naming convention it uses is <SheetName>.<ObjectName>.<ColumnName> for an array of attribute values other than the timestamp, or <Sheetname>.<ColumnName> for the Query's timestamp array.
Using an Excel array formula, this named array can then be copied from one sheet to another every time the report is run. The array formula can also be configured to perform mathematical operations on each of the values in the named array as it is copied.
12.1 Example Named Array The image below is taken from the page which contains the query data for Last Months Tank levels. This first image shows what happens when a group of cells is selected that belongs to a Named Array, but does not include all of the members of that named array. As you can see, the selected cell becomes the first cell, and its name is entered into the cell name field in the box outlined in red on the image below...
However, when the same group of cells is extended to include the whole of the named array, you can now see that instead of a single cell name in the highlighted field, there is the array name that was given to the range of data output by the Report Plug-in query...

Reference Guide D5092 16-Jan-2008 - Page 144 Report Plug-in
Remote Automation Solutions Website: www.EmersonProcess.com/Remote
We can't read the full name here, so we have to open the Define Name dialog using the Insert>Name>Define item from the Excel menu bar.
The full name of the named array is LastMonth_data.NORTH_TANK3_LEVEL..average. We can see by looking at the Refers to: field that this named array refers to the range of cells from B3 to B32 on the worksheet named "LastMonth_data". This makes it easy to refer to any range of values resulting from a query. The results from different queries can be combined on one worksheet using array names. For more details on using named arrays in reports, see the Reporting Overview documentation.

Reference Guide D5092 16-Jan-2008 - Page 145 Report Plug-in
Remote Automation Solutions Website: www.EmersonProcess.com/Remote
13 Glossary
U UTC: Coordinated Universal Time (UTC) is sometimes referred to as "Greenwich Mean Time"
(abbreviated GMT) or "Zulu Time" (Z). Often used loosely to refer to time kept on the Greenwich meridian (longitude zero), five hours ahead of Eastern Standard Time. UTC defines a reference time base that is internationally recognized and supported.
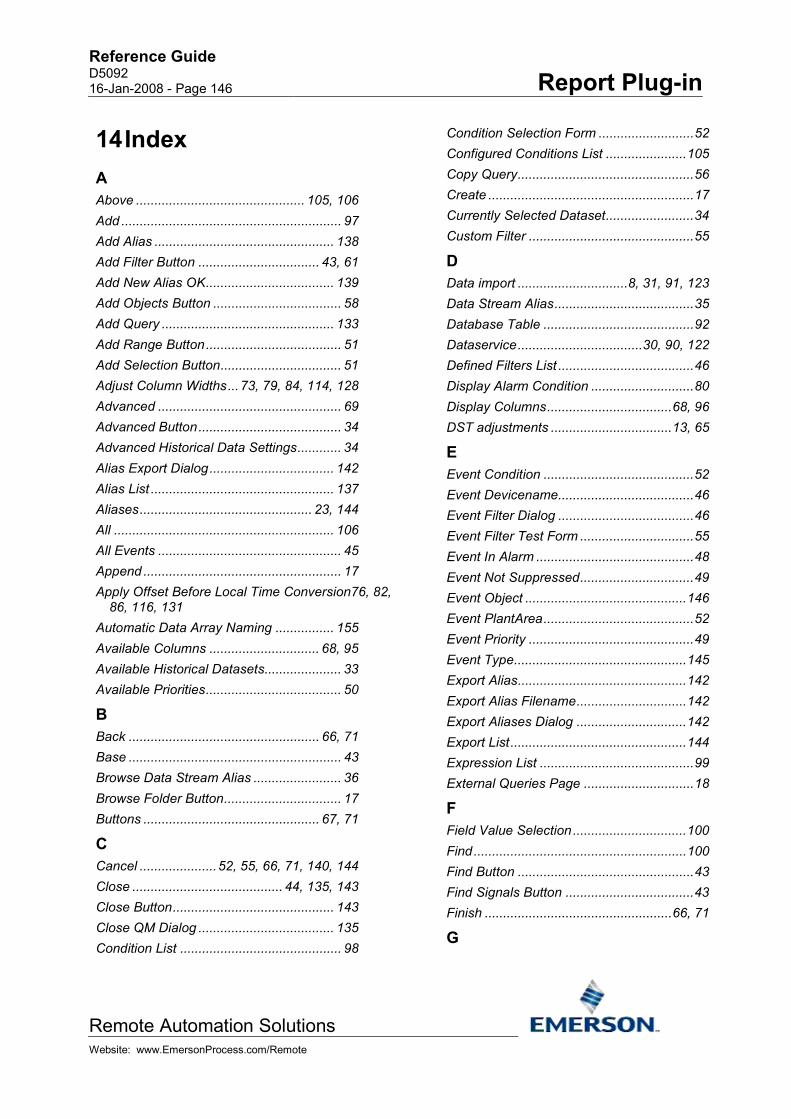
Reference Guide D5092 16-Jan-2008 - Page 146 Report Plug-in
Remote Automation Solutions Website: www.EmersonProcess.com/Remote
14 Index A Above .............................................. 105, 106 Add ............................................................ 97 Add Alias ................................................. 138 Add Filter Button ................................. 43, 61 Add New Alias OK................................... 139 Add Objects Button ................................... 58 Add Query ............................................... 133 Add Range Button..................................... 51 Add Selection Button................................. 51 Adjust Column Widths... 73, 79, 84, 114, 128 Advanced .................................................. 69 Advanced Button....................................... 34 Advanced Historical Data Settings............ 34 Alias Export Dialog.................................. 142 Alias List .................................................. 137 Aliases............................................... 23, 144 All ............................................................ 106 All Events .................................................. 45 Append ...................................................... 17 Apply Offset Before Local Time Conversion76, 82,
86, 116, 131 Automatic Data Array Naming ................ 155 Available Columns .............................. 68, 95 Available Historical Datasets..................... 33 Available Priorities..................................... 50
B Back .................................................... 66, 71 Base .......................................................... 43 Browse Data Stream Alias ........................ 36 Browse Folder Button................................ 17 Buttons ................................................ 67, 71
C Cancel .....................52, 55, 66, 71, 140, 144 Close ......................................... 44, 135, 143 Close Button............................................ 143 Close QM Dialog ..................................... 135 Condition List ............................................ 98
Condition Selection Form ..........................52 Configured Conditions List ......................105 Copy Query................................................56 Create ........................................................17 Currently Selected Dataset........................34 Custom Filter .............................................55
D Data import ..............................8, 31, 91, 123 Data Stream Alias......................................35 Database Table .........................................92 Dataservice..................................30, 90, 122 Defined Filters List .....................................46 Display Alarm Condition ............................80 Display Columns..................................68, 96 DST adjustments .................................13, 65
E Event Condition .........................................52 Event Devicename.....................................46 Event Filter Dialog .....................................46 Event Filter Test Form ...............................55 Event In Alarm ...........................................48 Event Not Suppressed...............................49 Event Object ............................................146 Event PlantArea.........................................52 Event Priority .............................................49 Event Type...............................................145 Export Alias..............................................142 Export Alias Filename..............................142 Export Aliases Dialog ..............................142 Export List................................................144 Expression List ..........................................99 External Queries Page ..............................18
F Field Value Selection...............................100 Find..........................................................100 Find Button ................................................43 Find Signals Button ...................................43 Finish ...................................................66, 71
G

Reference Guide D5092 16-Jan-2008 - Page 147 Report Plug-in
Remote Automation Solutions Website: www.EmersonProcess.com/Remote
General Object Output Page..................... 82 GetAliasValue ......................................... 148 GetAliasValues........................................ 151 GetErrorCode.......................................... 151
H Help .................44, 62, 66, 71, 135, 140, 144
I Import DataService Dialog ...... 8, 31, 91, 123 Import History .......................................... 134 Imported Aliases ..................................... 140 Include Column Headers73, 79, 84, 114, 128 Insert Function .................................. 23, 147 Insert Missing Records.............................. 69 Instance..................................................... 42
L Local75, 76, 81, 82, 85, 86, 115, 116, 130, 131 Local Time..................... 75, 81, 85, 115, 130 Login.......................................................... 25
M Modify Existing Query ............................... 22 Modify Mode........................................ 67, 71 Modify Query ........................................... 135 Move Buttons ............................................ 68
N Name Page ............................................. 119 Nearest...................................................... 69 New Alias Filename ................................ 142 New file...................................................... 17 New Query ................................................ 21 New Real-time SQL Query........................ 22 Next ..................................................... 66, 71 NULL Text ..................... 74, 79, 84, 114, 129
O Object Browse Dialog................................ 59 Object Name ............................................. 60 Object Selector Page ................................ 57 Objects Found List .................................... 61 OEQueryVariable .................................... 149
OEVariable ..............................................148 Offset Timestamps.........75, 81, 86, 116, 130 Offsets ...........................75, 81, 86, 116, 130 Open Alias File ........................................143 Origin Time ................................................70 Output ......................................................127 Output Timestamp Settings Dialog74, 80, 85, 115, 129 Override Default Dataservice ......30, 90, 122 Override Default Report Period .................63
P Persistent Value.......................................139 Progress Menu ..........................................88
Q Query .........................................................56 Query Check Box.....................................133 Query ID ..................................................133 Query Manager Dialog ............................133 Query Name Page.....................................87 Query Wizard Data Service Page..............29 Query Wizard Query Name Page..............27 Query Wizard Query Period Page .............62 Query Wizard Signal Selector Page..........39 Questionable Data Formatting...76, 116, 131
R Real-time .................................................134 Real-time Query Wizard ............................87 Real-time SQL .........................................134 Real-time SQL Query Wizard ..................119 Remove ...............................................45, 59 Remove Selected Display Column............95 RemovePlugin .........................................152 Report Properties Wizard ............................5 Report Properties Wizard Data Service
Page.........................................................5 Round ........................................................69 Rounding Dialog ........................................69 Run all external queries.............................19 Run Report ................................................22 Run Report As ...........................................22 RunReport ...............................................152

Reference Guide D5092 16-Jan-2008 - Page 148 Report Plug-in
Remote Automation Solutions Website: www.EmersonProcess.com/Remote
Runtime Utility Functions ........................ 151
S Select ........................................................ 94 Select Dataset Button ............................... 34 Select Query Type .................................. 134 Selected Attribute.................................... 101 Selected Objects List ................................ 58 SetAlias ................................................... 152 Show all..................................................... 94 Show Object Names ................................. 73 Show Results ............................................ 56 Show system tables .................................. 94 Show views ............................................... 94 Showing records ............................. 112, 127 Signal Browse Dialog ................................ 41 Signal Output Page ................................... 72 Sort Columns .......................................... 107 Sort Order................................................ 108 SQL ......................................................... 109 SQL Query Wizard Realtime SQL Page . 125 SQL Statement........................................ 125
T Test SQL ......................................... 111, 126 Text ........................................................... 80 Timestamp.........67, 69, 74, 80, 85, 115, 129 Timezone............................................. 13, 65
U UnAcknowledged Event State .................. 48 Unique Values......................................... 101 Update..................................................... 103 Use Alarm Priority Colors.......................... 80 Use Default Log File Name....................... 16 Use different data service ....... 8, 31, 91, 123 Use Origin Time ........................................ 70 Use Settings.............................................. 70
Reference Guide D5092 16-Jan-2008 Report Plug-in
Emerson Process Management Remote Automation Solutions 1100 Buckingham St Watertown, CT 06795 T 1 (860) 945 2200 F 1 (860) 945 2278 www.EmersonProcess.com/Remote [email protected]
Emerson Process Management Remote Automation Solutions Blackpole Road Worcester, WR3 8YB T 44 (0) 1905 856848 F 44 (0) 1905 856930 www.EmersonProcess.com/Remote [email protected]
© 2007 Remote Automation Solutions, division of Emerson Process Management. All rights reserved.
NOTICE Remote Automation Solutions (“RAS”), division of Emerson Process Management shall not be liable for technical or editorial errors in this manual or omissions from this manual. RAS MAKES NO WARRANTIES, EXPRESSED OR IMPLIED, INCLUDING THE IMPLIED WARRANTIES OF MERCHANTABILITY AND FITNESS FOR A PARTICULAR PURPOSE WITH RESPECT TO THIS MANUAL AND, IN NO EVENT SHALL RAS BE LIABLE FOR ANY INCIDENTAL, PUNITIVE, SPECIAL OR CONSEQUENTIAL DAMAGES INCLUDING, BUT NOT LIMITED TO, LOSS OF PRODUCTION, LOSS OF PROFITS, LOSS OF REVENUE OR USE AND COSTS INCURRED INLCUDING WITHOUT LIMITATION FOR CAPITAL, FUEL AND POWER, AND CLAIMS OF THIRD PARTIES. Bristol, Inc., Bristol Babcock Ltd, Bristol Canada, BBI SA de CV and the Flow Computer Division are wholly owned subsidiaries of Emerson Electric Co. doing business as Remote Automation Solutions (“RAS”), a division of Emerson Process Management. ROC, FloBoss, ROCLINK, Bristol, Bristol Babcock, ControlWave, TeleFlow and Helicoid are trademarks of RAS. AMS, PlantWeb and the PlantWeb logo are marks of Emerson Electric Co. The Emerson logo is a trademark and service mark of the Emerson Electric Co. All other trademarks are property of their respective owners. The contents of this publication are presented for informational purposes only. While every effort has been made to ensure informational accuracy, they are not to be construed as warranties or guarantees, express or implied, regarding the products or services described herein or their use or applicability. RAS reserves the right to modify or improve the designs or specifications of such products at any time without notice. All sales are governed by RAS’ terms and conditions which are available upon request. RAS does not assume responsibility for the selection, use or maintenance of any product. Responsibility for proper selection, use and maintenance of any RAS product remains solely with the purchaser and end-user. Engineered and supported by:
Remote Automation Solutions, Bristol Babcock Ltd. Blackpole Road, Worcester, WR3 8YB, UK Reg office: 2nd Floor, Accurist House, 44 Baker Street, London, W1U 7AL Registered in England and Wales, Reg No. 2580226 VAT Reg No. GB 880 9839 67