box office user guide 19 - ticketreturn april 27, 2004 box office user guide 2. issued: april 27,...
TRANSCRIPT
Box Office User Guide
Copyright 2002-2004 TicketReturn, Inc. This document contains proprietary information that is the exclusive property of TicketReturn. All rights are reserved. No part of this document may be reproduced in any manner without the express written permission of TicketReturn, Inc. TicketReturn, Inc. P.O. Box 241632 Charlotte, NC 28224-1632 This document was published by TicketReturn, Inc. It was produced by Ghost Writers, Inc. under contract to TicketReturn.
© TicketReturn, Inc. Table of Contents • i Issued: April 27, 2004 Box Office User Guide
Table of Contents
Getting Started ......................................................................................................................................... 1 What is Box Office? ......................................................................................................................1 Signing In ......................................................................................................................................1
Sales........................................................................................................................................................... 2 Selling Single Tickets ....................................................................................................................2 Selling Season Tickets .................................................................................................................10 Selling Non-Ticket Items.............................................................................................................17
Refunds/Exchanges................................................................................................................................. 20 Refunding Tickets by Event.........................................................................................................20 Refunding Tickets by Customer ..................................................................................................22 Exchanging Tickets .....................................................................................................................24
Finding/Updating Information .............................................................................................................. 29 Finding Customers.......................................................................................................................29 Finding Students ..........................................................................................................................31 Updating Customer/Student Information .....................................................................................32
Transactions............................................................................................................................................ 34 Adjusting Transactions ................................................................................................................34 Transferring Transactions ............................................................................................................36
Reseating ................................................................................................................................................. 37 Reseating Season Tickets.............................................................................................................37 Reseating Single Game Tickets ...................................................................................................39
Ticket Views............................................................................................................................................ 40 Viewing Will Call Tickets ...........................................................................................................40 Viewing On Hold Tickets and Completing Sales.........................................................................41 Viewing Ticket History ...............................................................................................................43 Viewing Seating Layout ..............................................................................................................44
Reports .................................................................................................................................................... 45 Overview of Reports....................................................................................................................45 Generating the Daily Transaction Report.....................................................................................47 Generating the Daily Ticket Sales Report ....................................................................................48 Generating the Total Tickets Sold Report ....................................................................................48 Generating the Web Sales Report ................................................................................................49 Generating the Season Ticket Utilization Report .........................................................................50 Generating the Group Sales Report 1...........................................................................................51 Generating the Event Revenue Report .........................................................................................52 Generating the Event Audit Report ..............................................................................................53 Generating the Group Sales Report 2...........................................................................................54 Generating the Event Attendance Report .....................................................................................55 Generating the Event Ticket Prices Report ..................................................................................56 Generating the Donation Report ..................................................................................................57 Generating the Transaction Detail Report....................................................................................57 Generating the Outstanding Balances Report and Outstanding Balances Aged Report................59 Generating the Show Seating Layout Report ...............................................................................60 Generating the Ticket History Report ..........................................................................................61
© TicketReturn, Inc. Table of Contents • ii Issued: April 27, 2004 Box Office User Guide
Generating the Student Ticket Allocation Report ........................................................................61 Generating the Event Phase Report..............................................................................................62 Generating the Student Tickets Report ........................................................................................62 Generating the Unused Barcodes Report .....................................................................................63
Printing ................................................................................................................................................... 64 Selecting/Testing Printers ............................................................................................................64 Previewing Printing .....................................................................................................................64 Viewing the Print Queue..............................................................................................................65 Printing Ticket Headers ...............................................................................................................65
Services.................................................................................................................................................... 66 Sending Bulk Emails ...................................................................................................................66 Bulk Printing ...............................................................................................................................68 Managing Scanners......................................................................................................................70 Player Comps ..............................................................................................................................73 PC Charge ...................................................................................................................................76
Index........................................................................................................................................................ 77
© TicketReturn, Inc. 1 Issued: April 27, 2004 Box Office User Guide
Getting Started
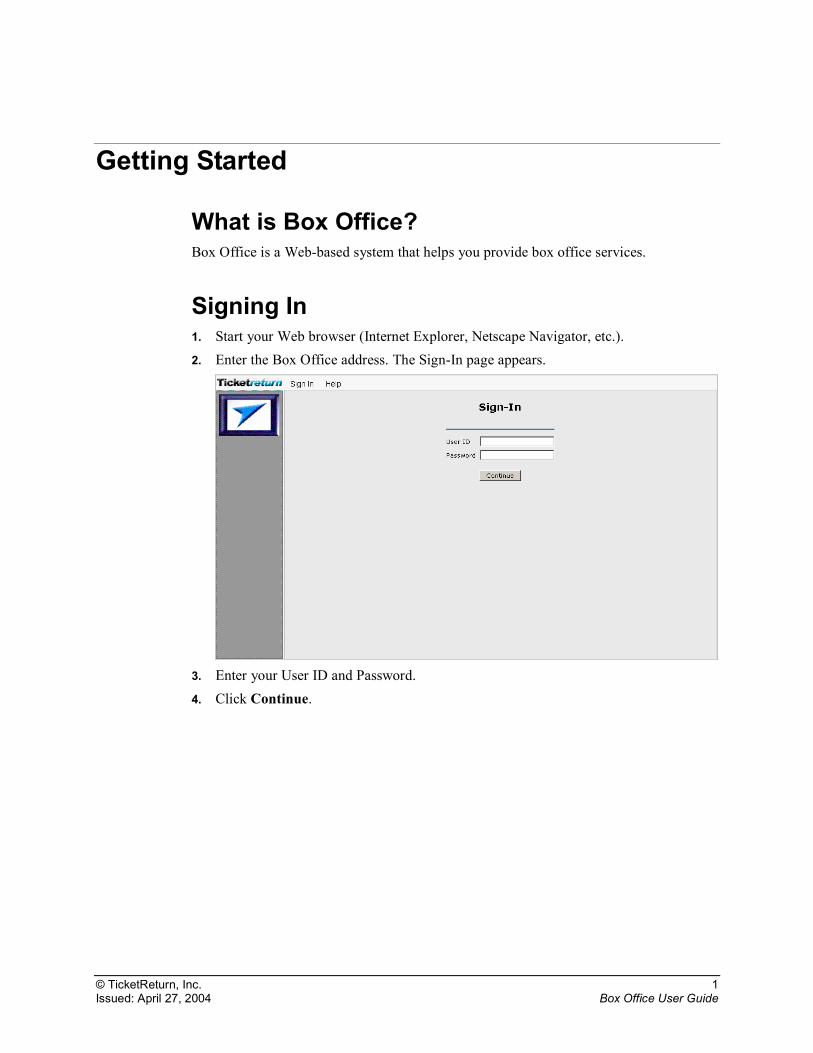
What is Box Office? Box Office is a Web-based system that helps you provide box office services.
Signing In 1. Start your Web browser (Internet Explorer, Netscape Navigator, etc.). 2. Enter the Box Office address. The Sign-In page appears.
3. Enter your User ID and Password. 4. Click Continue.
© TicketReturn, Inc. 2 Issued: April 27, 2004 Box Office User Guide
Sales
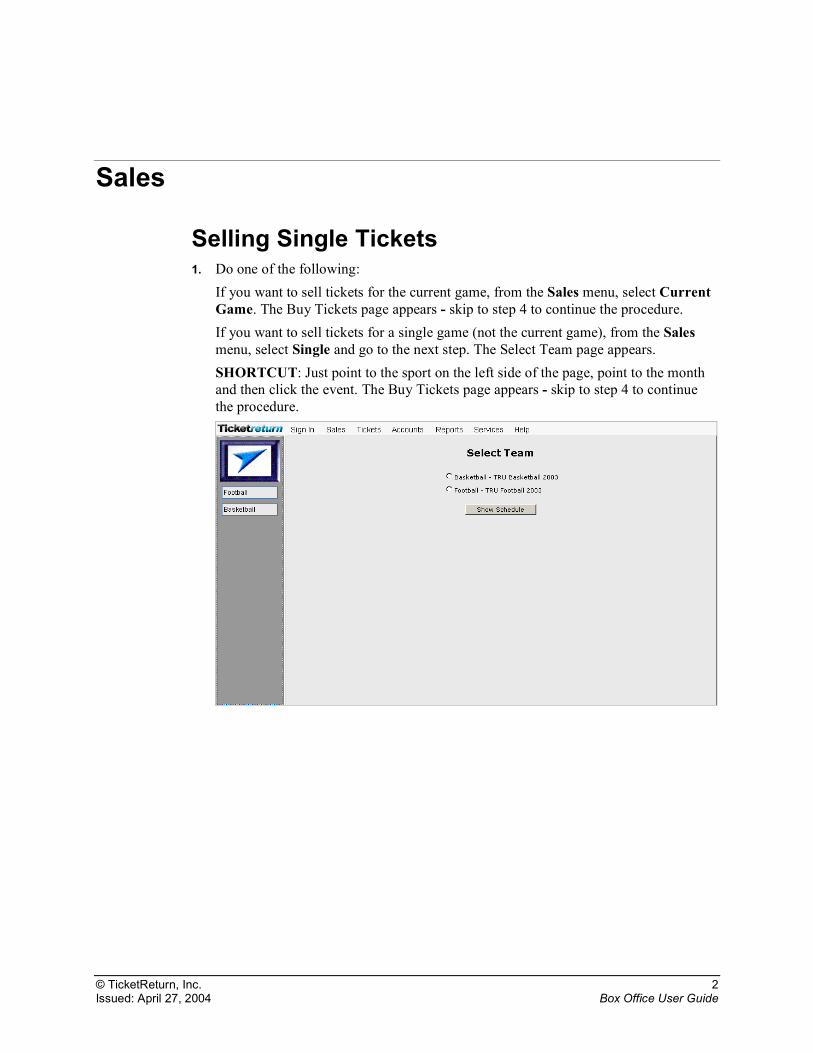
Selling Single Tickets 1. Do one of the following:
If you want to sell tickets for the current game, from the Sales menu, select Current Game. The Buy Tickets page appears - skip to step 4 to continue the procedure. If you want to sell tickets for a single game (not the current game), from the Sales menu, select Single and go to the next step. The Select Team page appears. SHORTCUT: Just point to the sport on the left side of the page, point to the month and then click the event. The Buy Tickets page appears - skip to step 4 to continue the procedure.
© TicketReturn, Inc. 3 Issued: April 27, 2004 Box Office User Guide
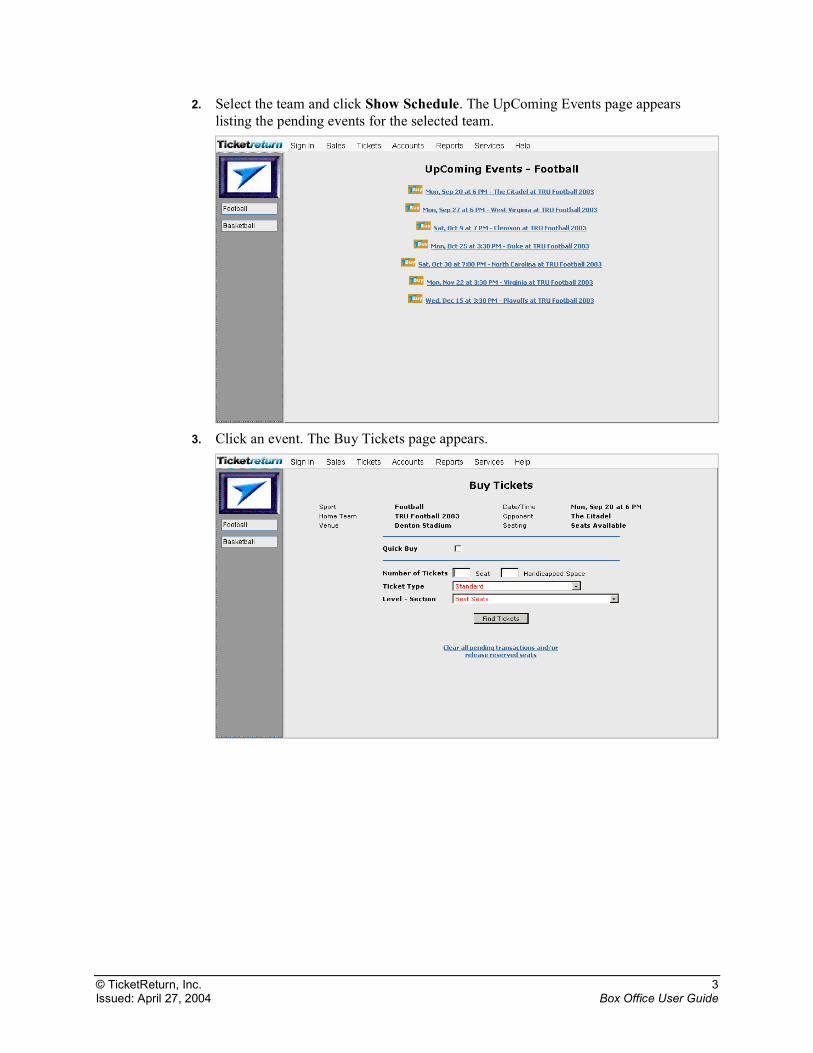
2. Select the team and click Show Schedule. The UpComing Events page appears listing the pending events for the selected team.
3. Click an event. The Buy Tickets page appears.
© TicketReturn, Inc. 4 Issued: April 27, 2004 Box Office User Guide
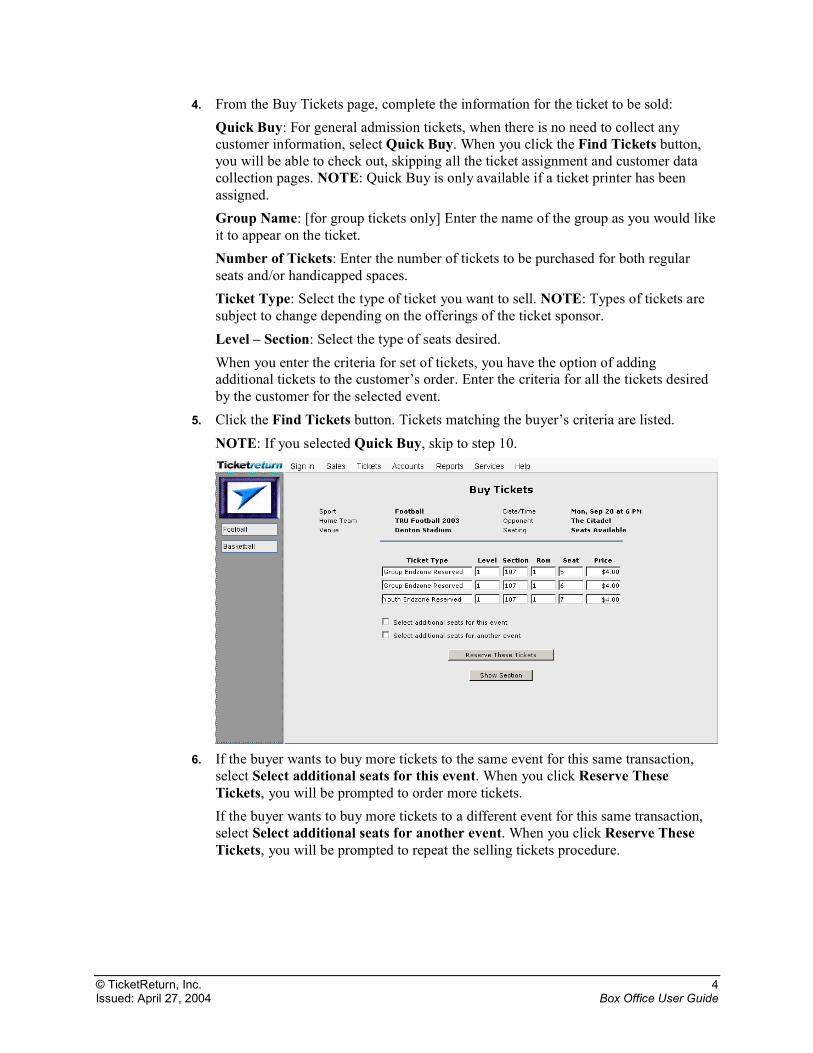
4. From the Buy Tickets page, complete the information for the ticket to be sold: Quick Buy: For general admission tickets, when there is no need to collect any customer information, select Quick Buy. When you click the Find Tickets button, you will be able to check out, skipping all the ticket assignment and customer data collection pages. NOTE: Quick Buy is only available if a ticket printer has been assigned. Group Name: [for group tickets only] Enter the name of the group as you would like it to appear on the ticket. Number of Tickets: Enter the number of tickets to be purchased for both regular seats and/or handicapped spaces. Ticket Type: Select the type of ticket you want to sell. NOTE: Types of tickets are subject to change depending on the offerings of the ticket sponsor. Level – Section: Select the type of seats desired. When you enter the criteria for set of tickets, you have the option of adding additional tickets to the customer’s order. Enter the criteria for all the tickets desired by the customer for the selected event.
5. Click the Find Tickets button. Tickets matching the buyer’s criteria are listed. NOTE: If you selected Quick Buy, skip to step 10.
6. If the buyer wants to buy more tickets to the same event for this same transaction,
select Select additional seats for this event. When you click Reserve These Tickets, you will be prompted to order more tickets. If the buyer wants to buy more tickets to a different event for this same transaction, select Select additional seats for another event. When you click Reserve These Tickets, you will be prompted to repeat the selling tickets procedure.

© TicketReturn, Inc. 5 Issued: April 27, 2004 Box Office User Guide
If you want to see where the tickets are located within the section or if you want to change the seats, click the Show Section button. A window opens showing you the seats in the section.
To change the seating arrangement click the person icon to remove it and click the seat that is preferred. If you need to clear or select a group of seats, hold down the left mouse button and drag it over the group of seats. A menu appears and you can choose to either clear seats or select seats. NOTE: Solid colored boxes represent seats that are not available. When you are finished, click Continue.
© TicketReturn, Inc. 6 Issued: April 27, 2004 Box Office User Guide
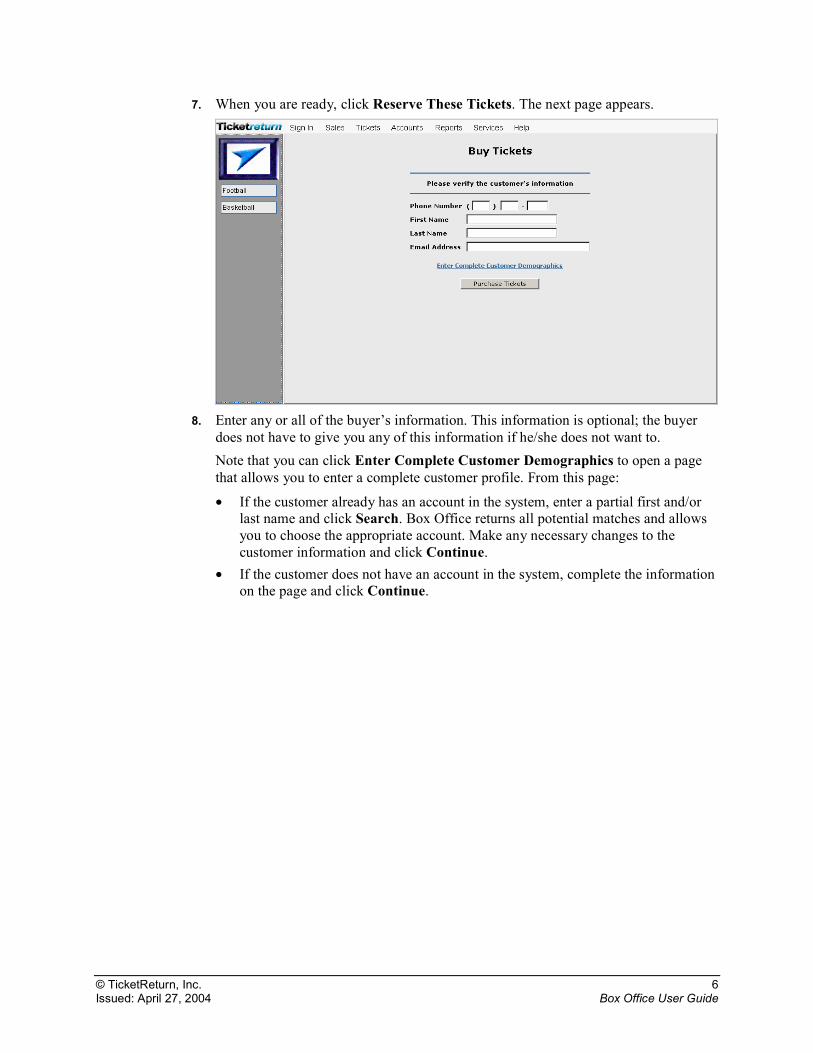
7. When you are ready, click Reserve These Tickets. The next page appears.
8. Enter any or all of the buyer’s information. This information is optional; the buyer
does not have to give you any of this information if he/she does not want to. Note that you can click Enter Complete Customer Demographics to open a page that allows you to enter a complete customer profile. From this page:
• If the customer already has an account in the system, enter a partial first and/or last name and click Search. Box Office returns all potential matches and allows you to choose the appropriate account. Make any necessary changes to the customer information and click Continue.
• If the customer does not have an account in the system, complete the information on the page and click Continue.
© TicketReturn, Inc. 7 Issued: April 27, 2004 Box Office User Guide
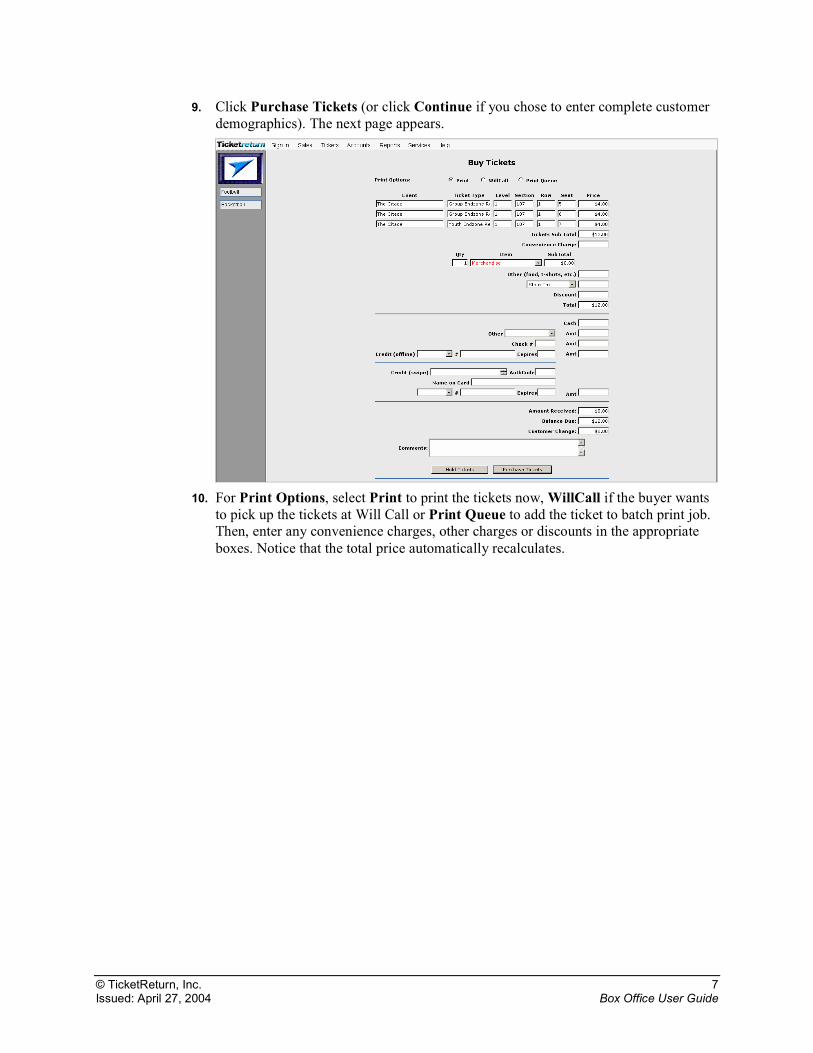
9. Click Purchase Tickets (or click Continue if you chose to enter complete customer demographics). The next page appears.
10. For Print Options, select Print to print the tickets now, WillCall if the buyer wants
to pick up the tickets at Will Call or Print Queue to add the ticket to batch print job. Then, enter any convenience charges, other charges or discounts in the appropriate boxes. Notice that the total price automatically recalculates.
© TicketReturn, Inc. 8 Issued: April 27, 2004 Box Office User Guide
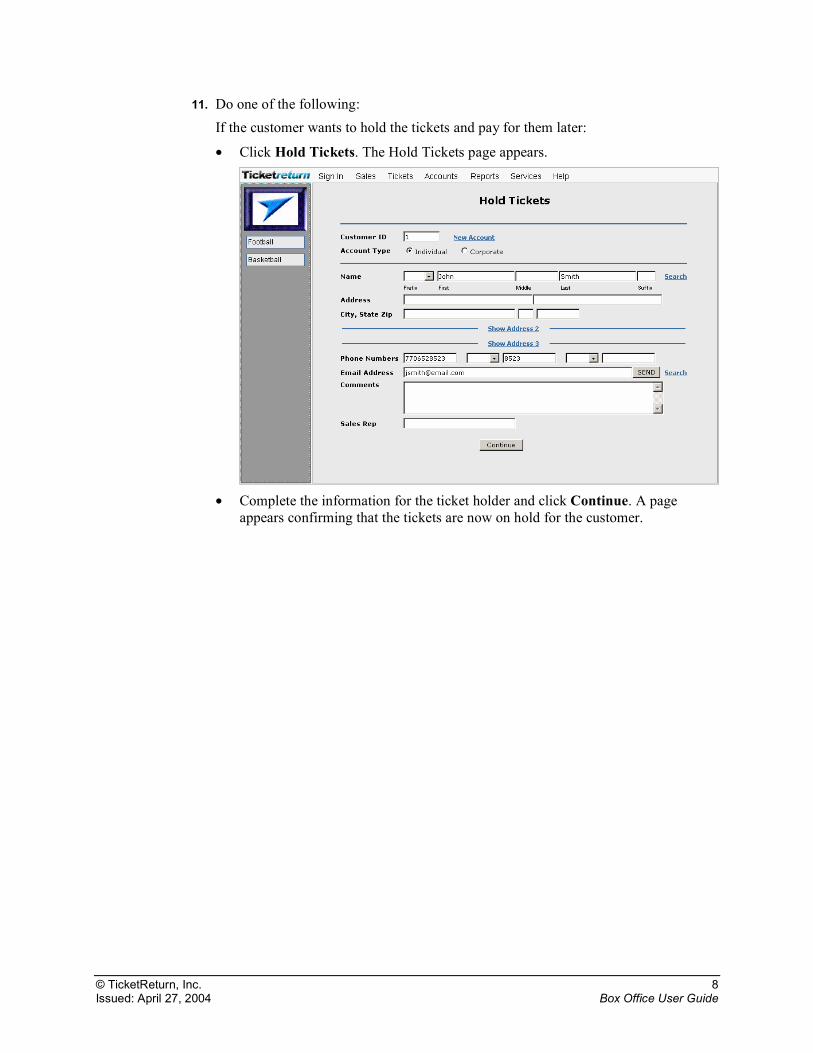
11. Do one of the following: If the customer wants to hold the tickets and pay for them later:
• Click Hold Tickets. The Hold Tickets page appears.
• Complete the information for the ticket holder and click Continue. A page
appears confirming that the tickets are now on hold for the customer.
© TicketReturn, Inc. 9 Issued: April 27, 2004 Box Office User Guide
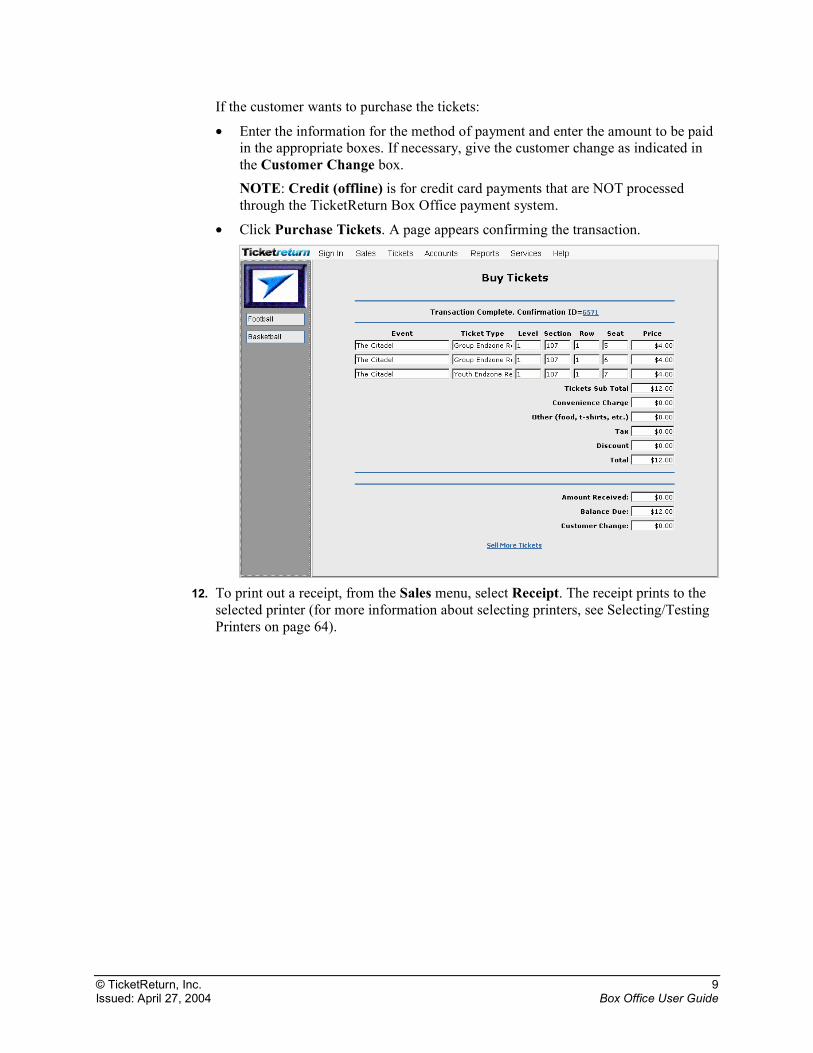
If the customer wants to purchase the tickets:
• Enter the information for the method of payment and enter the amount to be paid in the appropriate boxes. If necessary, give the customer change as indicated in the Customer Change box. NOTE: Credit (offline) is for credit card payments that are NOT processed through the TicketReturn Box Office payment system.
• Click Purchase Tickets. A page appears confirming the transaction.
12. To print out a receipt, from the Sales menu, select Receipt. The receipt prints to the
selected printer (for more information about selecting printers, see Selecting/Testing Printers on page 64).
© TicketReturn, Inc. 10 Issued: April 27, 2004 Box Office User Guide
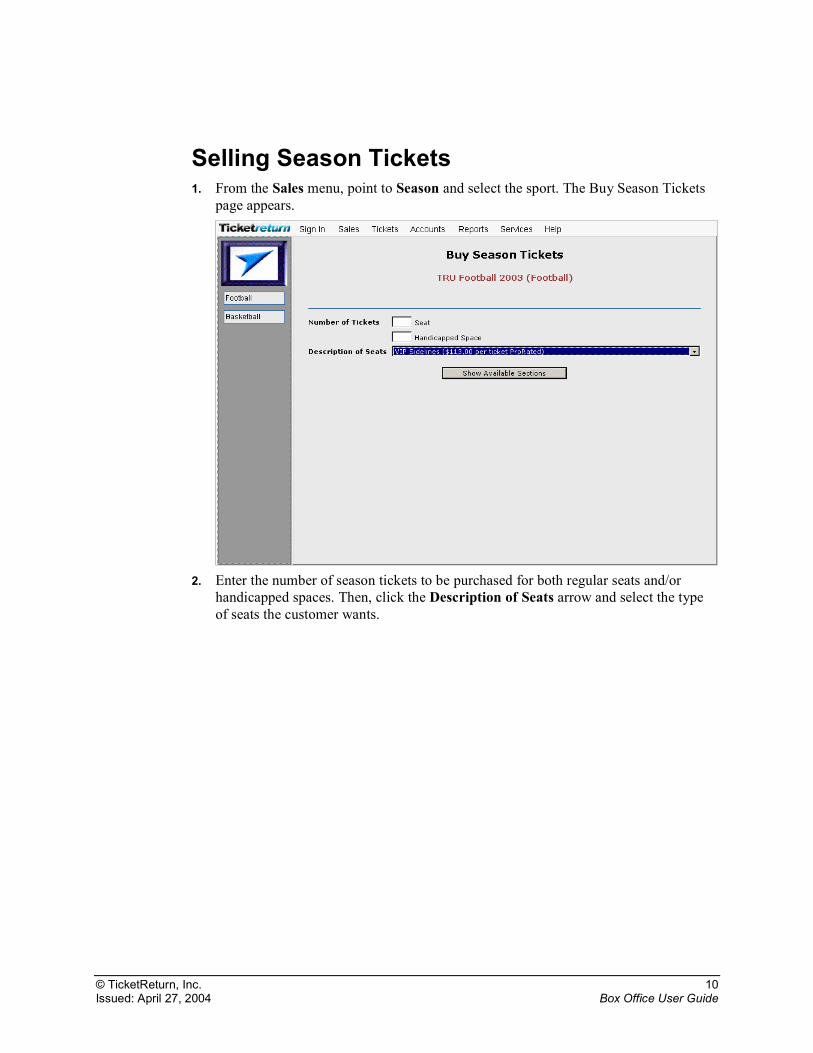
Selling Season Tickets 1. From the Sales menu, point to Season and select the sport. The Buy Season Tickets
page appears.
2. Enter the number of season tickets to be purchased for both regular seats and/or
handicapped spaces. Then, click the Description of Seats arrow and select the type of seats the customer wants.
© TicketReturn, Inc. 11 Issued: April 27, 2004 Box Office User Guide
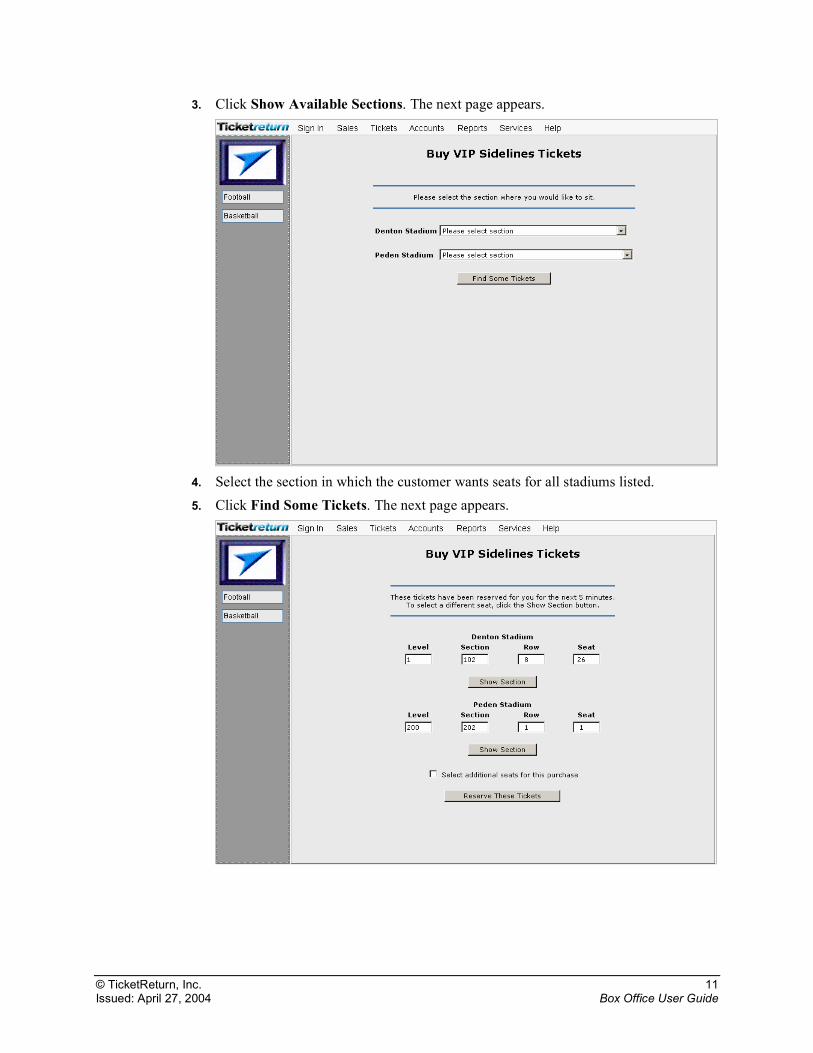
3. Click Show Available Sections. The next page appears.
4. Select the section in which the customer wants seats for all stadiums listed. 5. Click Find Some Tickets. The next page appears.
© TicketReturn, Inc. 12 Issued: April 27, 2004 Box Office User Guide
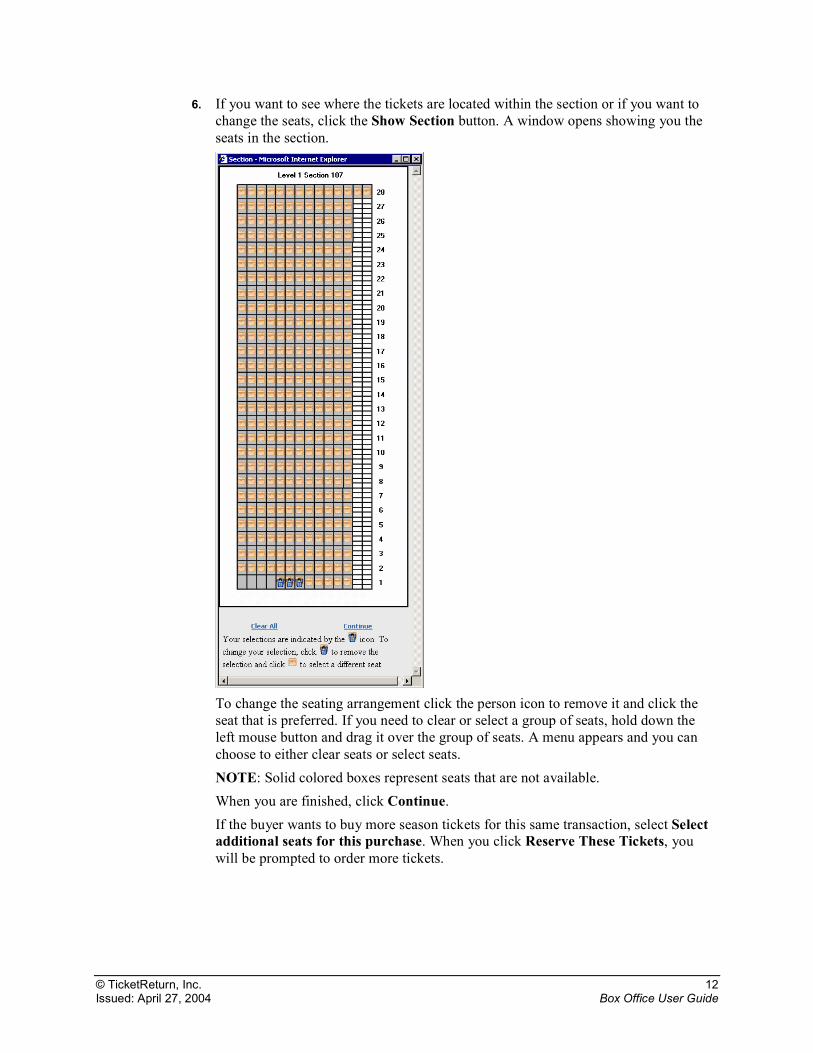
6. If you want to see where the tickets are located within the section or if you want to change the seats, click the Show Section button. A window opens showing you the seats in the section.
To change the seating arrangement click the person icon to remove it and click the seat that is preferred. If you need to clear or select a group of seats, hold down the left mouse button and drag it over the group of seats. A menu appears and you can choose to either clear seats or select seats. NOTE: Solid colored boxes represent seats that are not available. When you are finished, click Continue. If the buyer wants to buy more season tickets for this same transaction, select Select additional seats for this purchase. When you click Reserve These Tickets, you will be prompted to order more tickets.
© TicketReturn, Inc. 13 Issued: April 27, 2004 Box Office User Guide
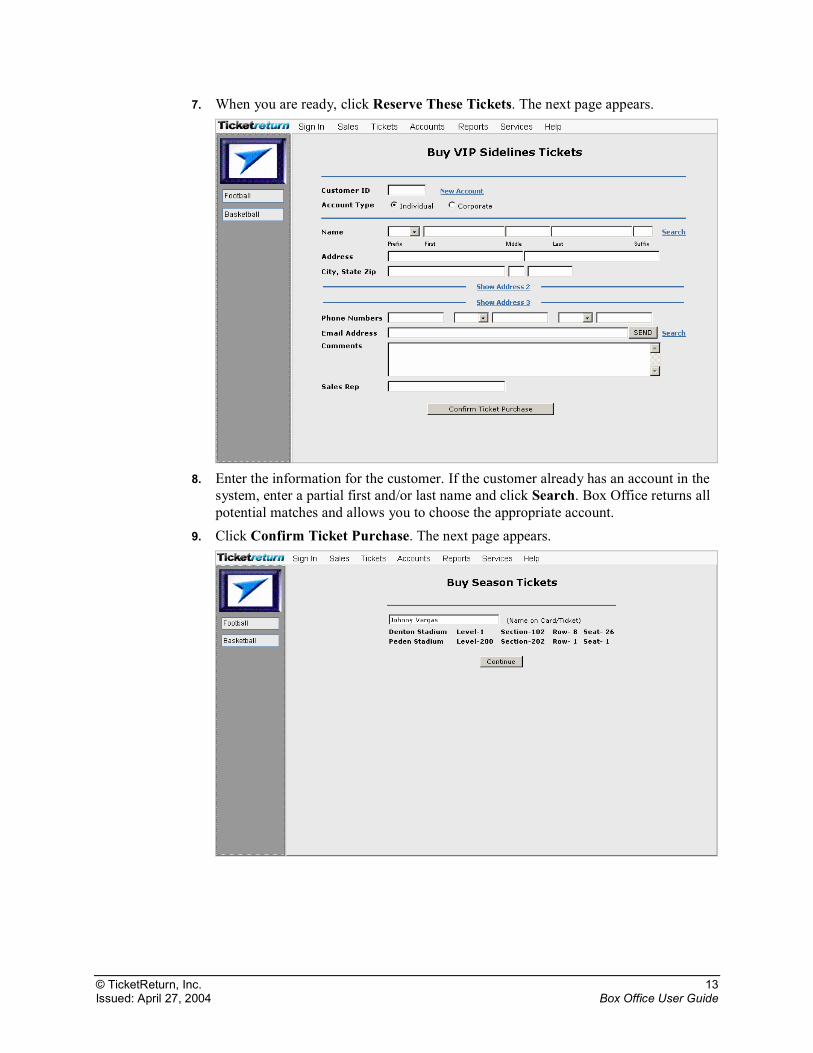
7. When you are ready, click Reserve These Tickets. The next page appears.
8. Enter the information for the customer. If the customer already has an account in the
system, enter a partial first and/or last name and click Search. Box Office returns all potential matches and allows you to choose the appropriate account.
9. Click Confirm Ticket Purchase. The next page appears.
© TicketReturn, Inc. 14 Issued: April 27, 2004 Box Office User Guide
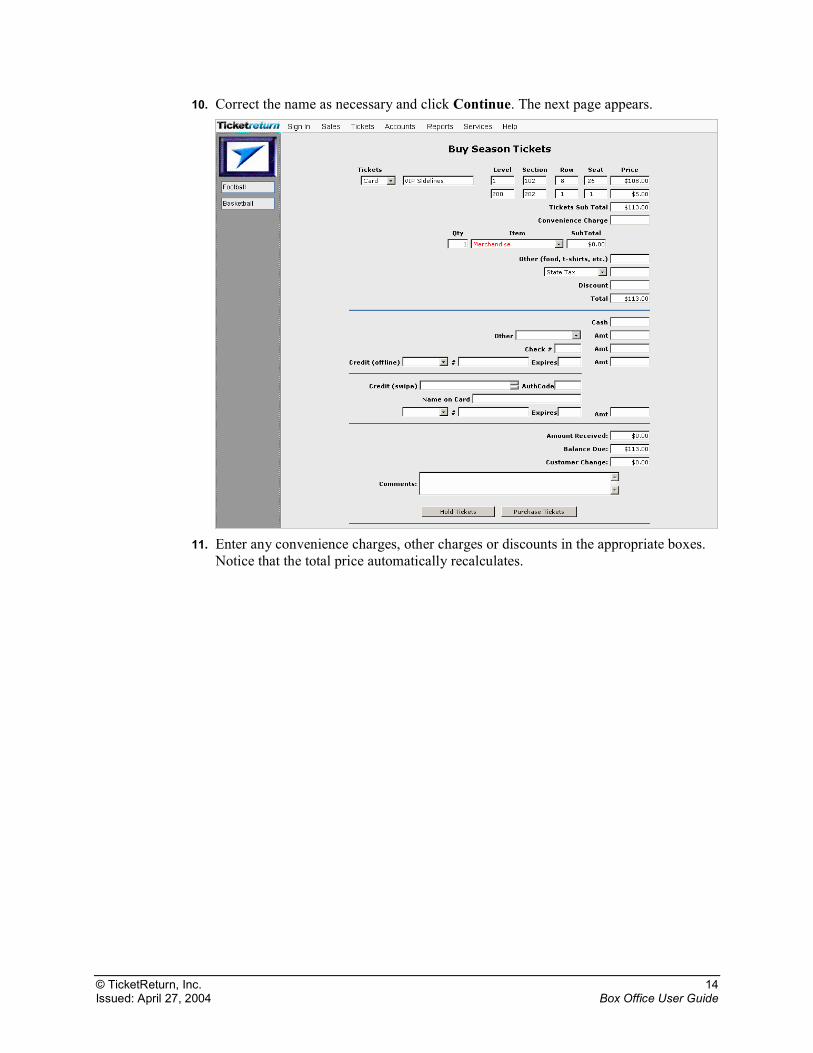
10. Correct the name as necessary and click Continue. The next page appears.
11. Enter any convenience charges, other charges or discounts in the appropriate boxes.
Notice that the total price automatically recalculates.
© TicketReturn, Inc. 15 Issued: April 27, 2004 Box Office User Guide
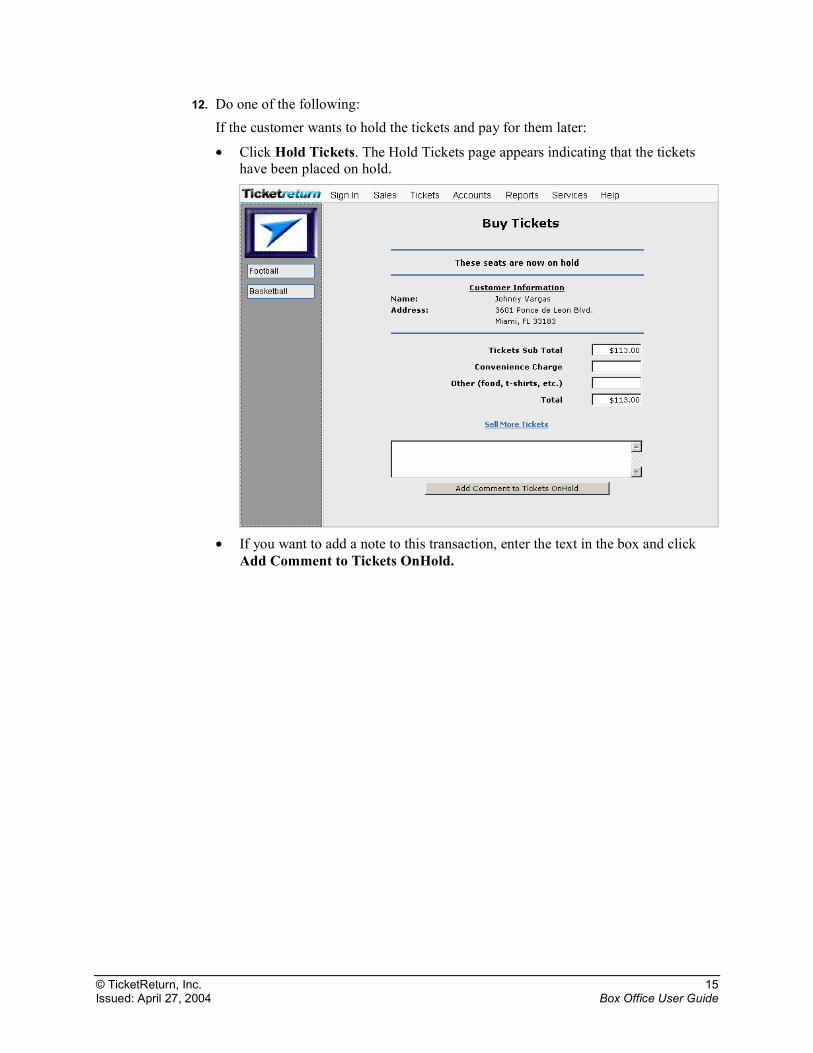
12. Do one of the following: If the customer wants to hold the tickets and pay for them later:
• Click Hold Tickets. The Hold Tickets page appears indicating that the tickets have been placed on hold.
• If you want to add a note to this transaction, enter the text in the box and click
Add Comment to Tickets OnHold.
© TicketReturn, Inc. 16 Issued: April 27, 2004 Box Office User Guide
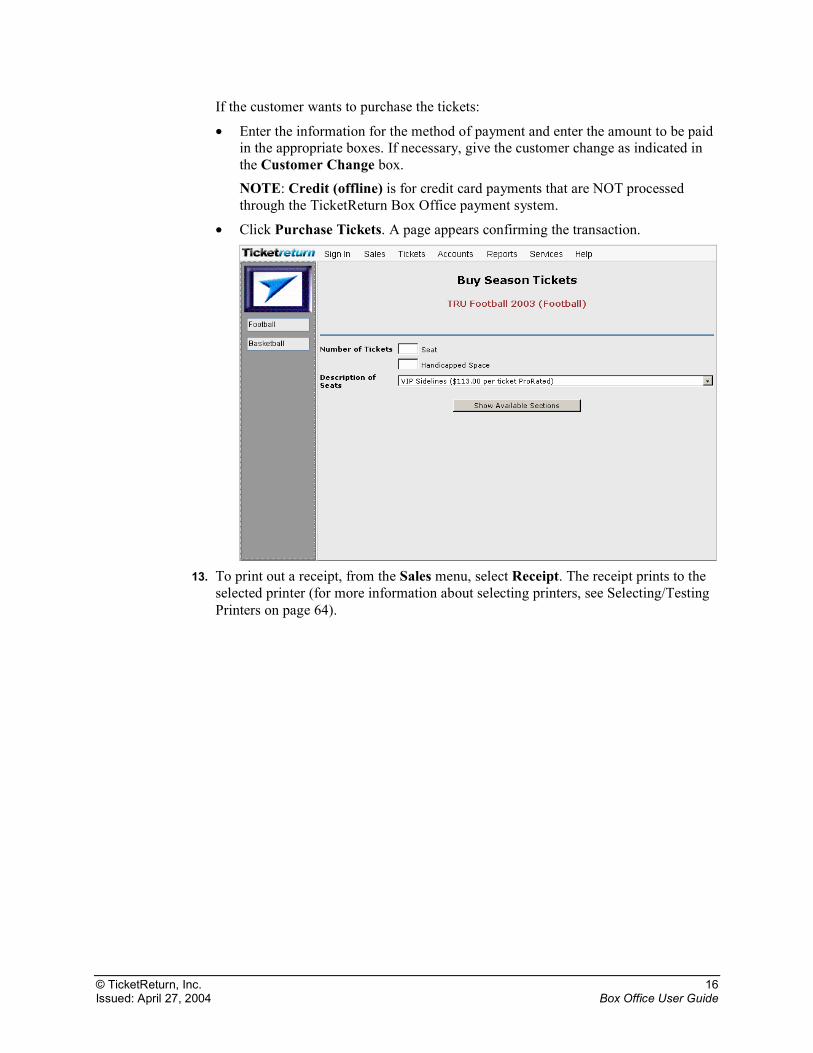
If the customer wants to purchase the tickets:
• Enter the information for the method of payment and enter the amount to be paid in the appropriate boxes. If necessary, give the customer change as indicated in the Customer Change box. NOTE: Credit (offline) is for credit card payments that are NOT processed through the TicketReturn Box Office payment system.
• Click Purchase Tickets. A page appears confirming the transaction.
13. To print out a receipt, from the Sales menu, select Receipt. The receipt prints to the
selected printer (for more information about selecting printers, see Selecting/Testing Printers on page 64).

© TicketReturn, Inc. 17 Issued: April 27, 2004 Box Office User Guide
Selling Non-Ticket Items 1. From the Sales menu, point to Non-Ticket Items and select the sport. The Non-
Ticket Items page appears.
2. Enter the information for the customer. If the customer already has an account in the
system, enter a partial first and/or last name and click Search. Box Office returns all potential matches and allows you to choose the appropriate account.
© TicketReturn, Inc. 18 Issued: April 27, 2004 Box Office User Guide
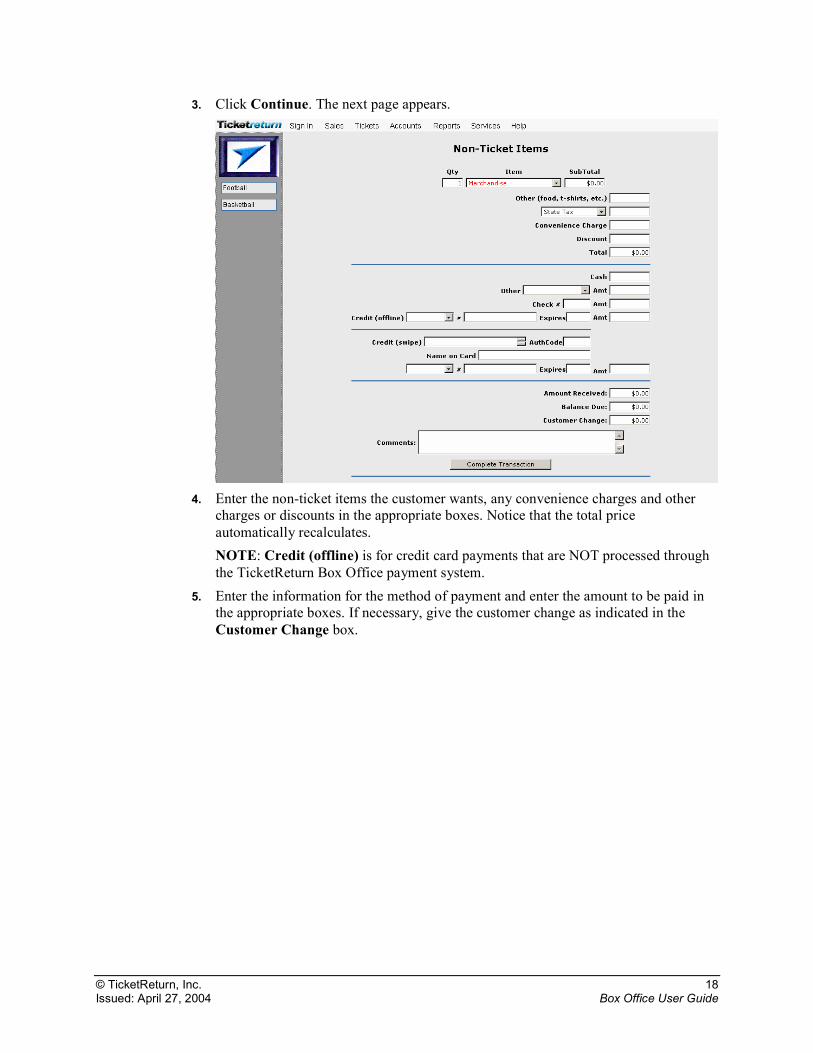
3. Click Continue. The next page appears.
4. Enter the non-ticket items the customer wants, any convenience charges and other
charges or discounts in the appropriate boxes. Notice that the total price automatically recalculates. NOTE: Credit (offline) is for credit card payments that are NOT processed through the TicketReturn Box Office payment system.
5. Enter the information for the method of payment and enter the amount to be paid in the appropriate boxes. If necessary, give the customer change as indicated in the Customer Change box.
© TicketReturn, Inc. 19 Issued: April 27, 2004 Box Office User Guide
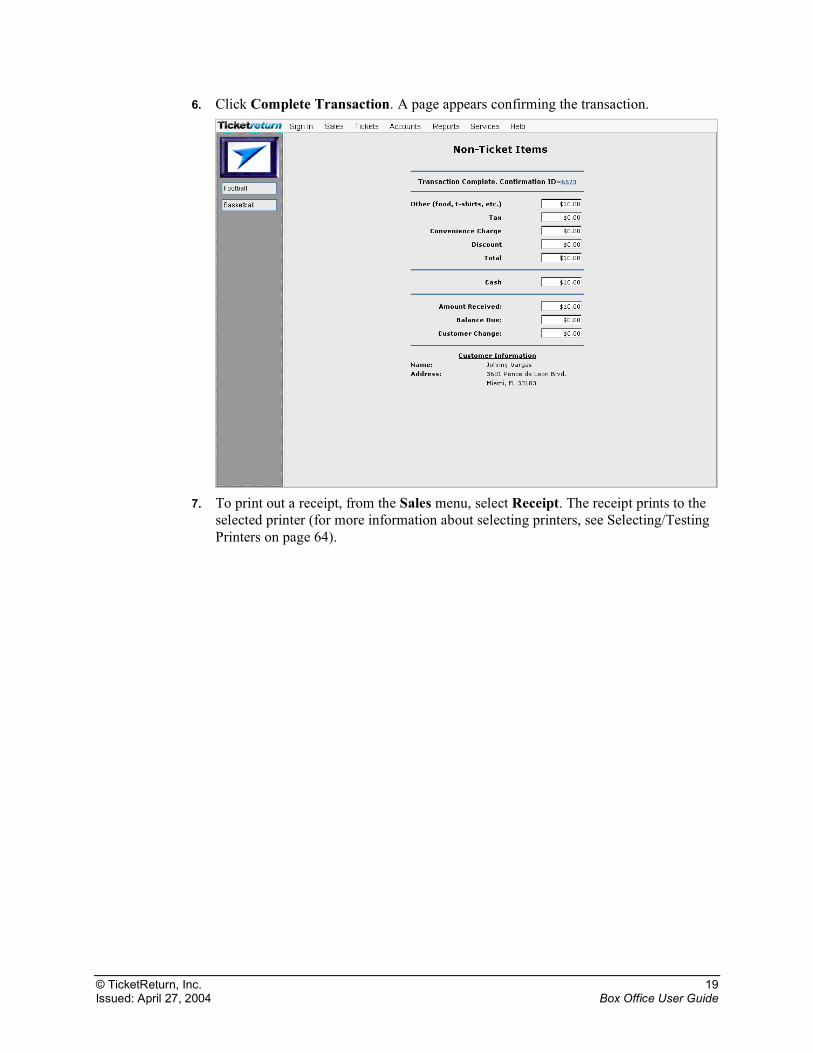
6. Click Complete Transaction. A page appears confirming the transaction.
7. To print out a receipt, from the Sales menu, select Receipt. The receipt prints to the
selected printer (for more information about selecting printers, see Selecting/Testing Printers on page 64).
© TicketReturn, Inc. 20 Issued: April 27, 2004 Box Office User Guide
Refunds/Exchanges
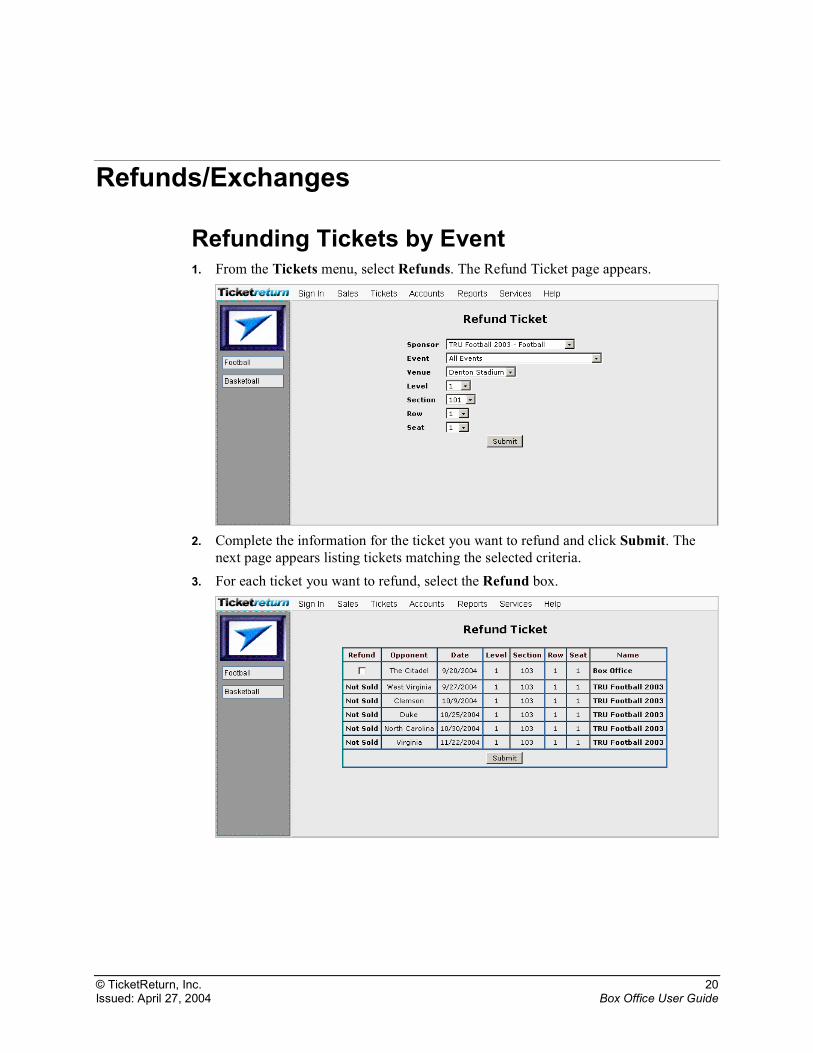
Refunding Tickets by Event 1. From the Tickets menu, select Refunds. The Refund Ticket page appears.
2. Complete the information for the ticket you want to refund and click Submit. The
next page appears listing tickets matching the selected criteria. 3. For each ticket you want to refund, select the Refund box.
© TicketReturn, Inc. 21 Issued: April 27, 2004 Box Office User Guide
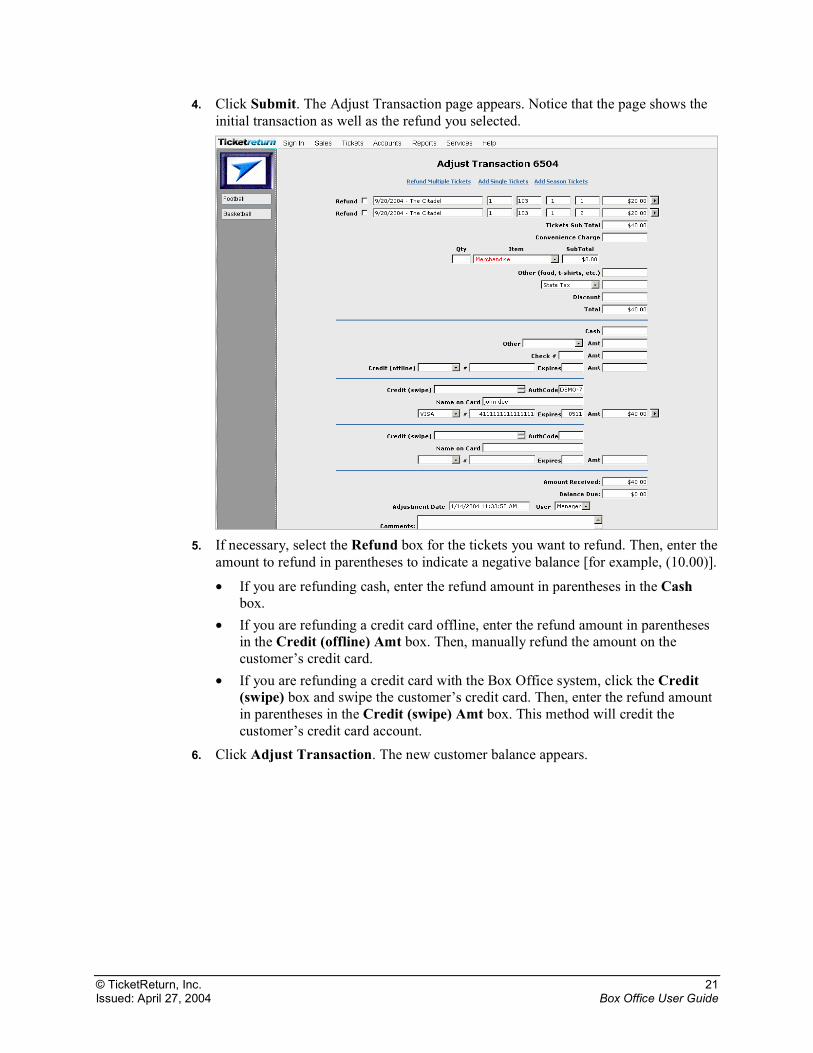
4. Click Submit. The Adjust Transaction page appears. Notice that the page shows the initial transaction as well as the refund you selected.
5. If necessary, select the Refund box for the tickets you want to refund. Then, enter the
amount to refund in parentheses to indicate a negative balance [for example, (10.00)].
• If you are refunding cash, enter the refund amount in parentheses in the Cash box.
• If you are refunding a credit card offline, enter the refund amount in parentheses in the Credit (offline) Amt box. Then, manually refund the amount on the customer’s credit card.
• If you are refunding a credit card with the Box Office system, click the Credit (swipe) box and swipe the customer’s credit card. Then, enter the refund amount in parentheses in the Credit (swipe) Amt box. This method will credit the customer’s credit card account.
6. Click Adjust Transaction. The new customer balance appears.
© TicketReturn, Inc. 22 Issued: April 27, 2004 Box Office User Guide
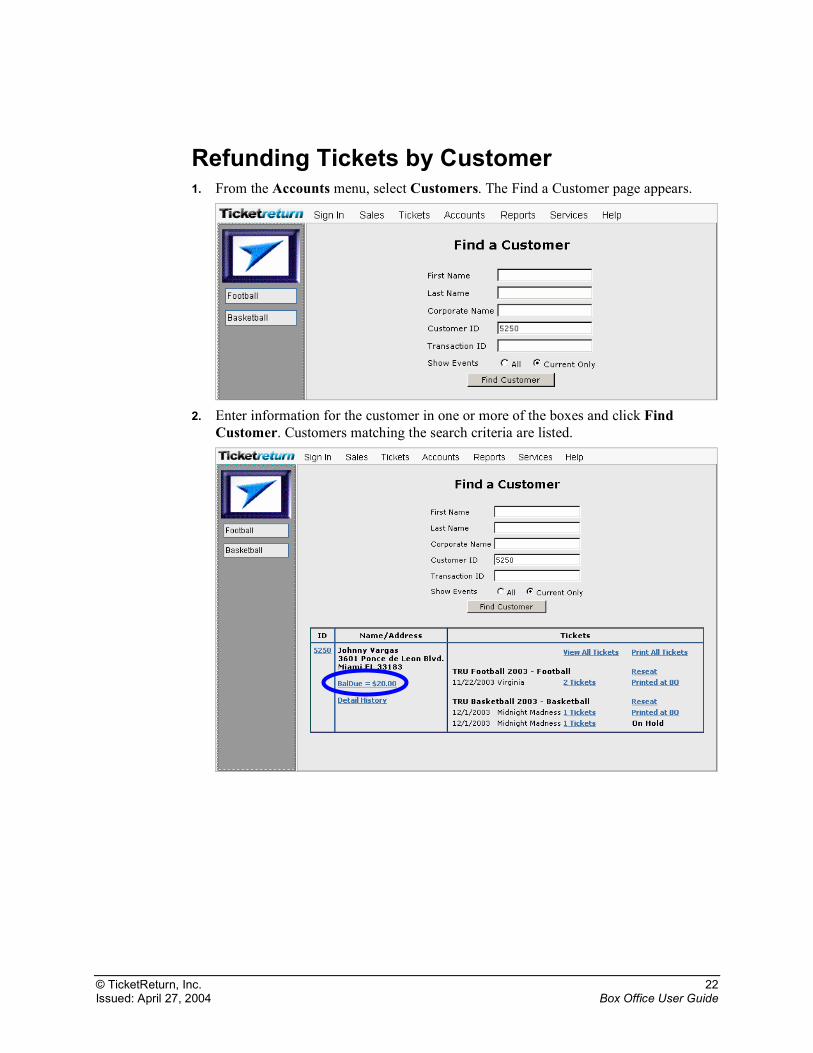
Refunding Tickets by Customer 1. From the Accounts menu, select Customers. The Find a Customer page appears.
2. Enter information for the customer in one or more of the boxes and click Find
Customer. Customers matching the search criteria are listed.

© TicketReturn, Inc. 23 Issued: April 27, 2004 Box Office User Guide
3. Click the BalDue link for the customer you want to refund. The Customer Balances page appears.
4. Click the transaction number link. The Adjust Transaction page appears.
© TicketReturn, Inc. 24 Issued: April 27, 2004 Box Office User Guide
5. If necessary, select the Refund box for the tickets you want to refund. Then, enter the amount to refund in parentheses to indicate a negative balance [for example, (10.00)].
• If you are refunding cash, enter the refund amount in parentheses in the Cash box.
• If you are refunding a credit card offline, enter the refund amount in parentheses in the Credit (offline) Amt box. Then, manually refund the amount on the customer’s credit card.
• If you are refunding a credit card with the Box Office system, click the Credit (swipe) box and swipe the customer’s credit card. Then, enter the refund amount in parentheses in the Credit (swipe) Amt box. This method will credit the customer’s credit card account.
6. Click Adjust Transaction. The new customer balance appears.
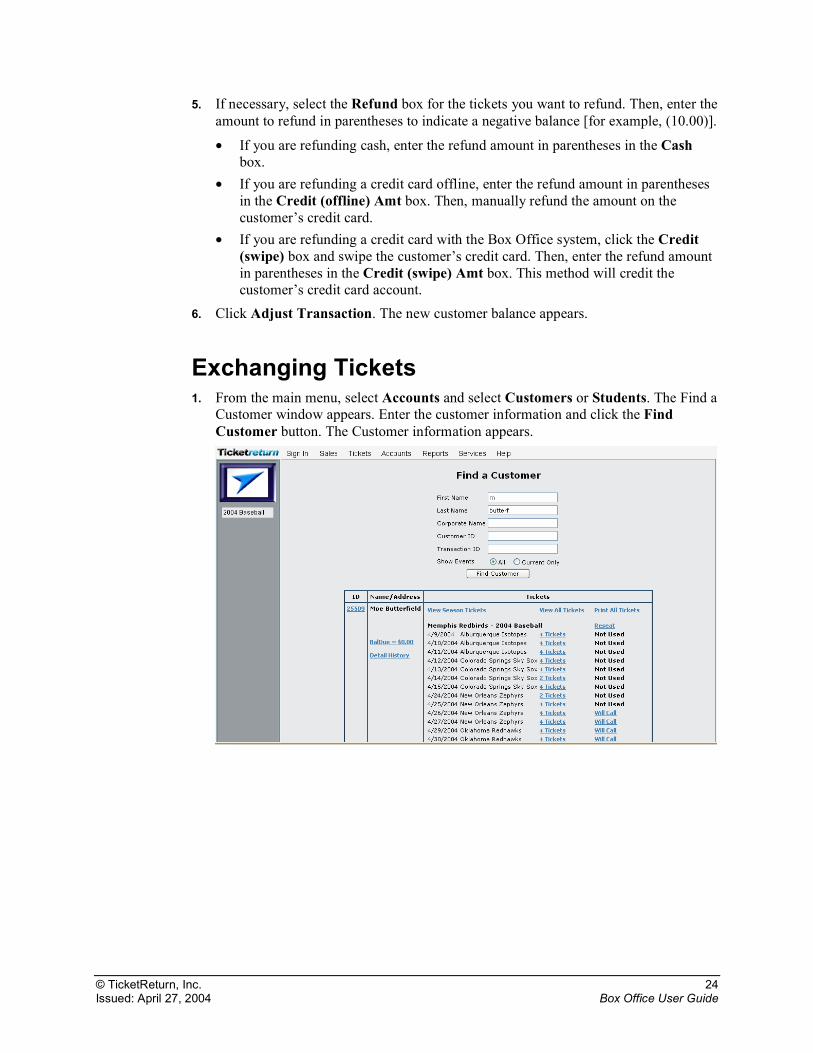
Exchanging Tickets 1. From the main menu, select Accounts and select Customers or Students. The Find a
Customer window appears. Enter the customer information and click the Find Customer button. The Customer information appears.
© TicketReturn, Inc. 25 Issued: April 27, 2004 Box Office User Guide
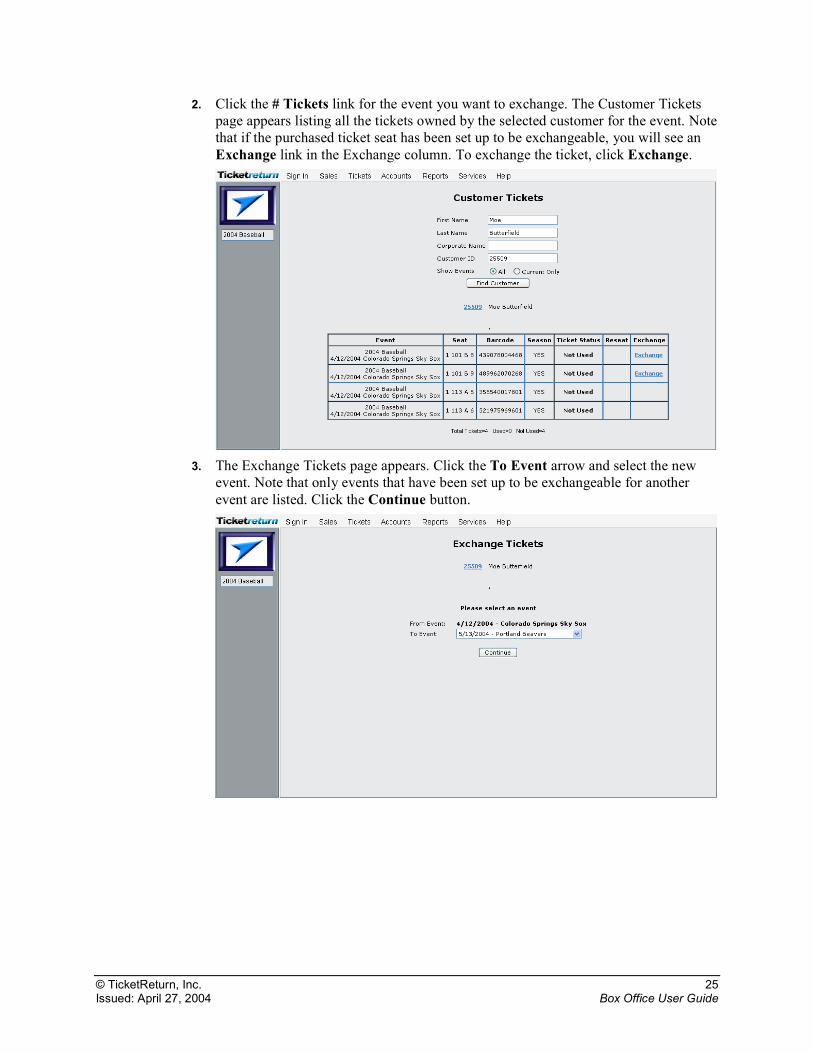
2. Click the # Tickets link for the event you want to exchange. The Customer Tickets page appears listing all the tickets owned by the selected customer for the event. Note that if the purchased ticket seat has been set up to be exchangeable, you will see an Exchange link in the Exchange column. To exchange the ticket, click Exchange.
3. The Exchange Tickets page appears. Click the To Event arrow and select the new
event. Note that only events that have been set up to be exchangeable for another event are listed. Click the Continue button.
© TicketReturn, Inc. 26 Issued: April 27, 2004 Box Office User Guide
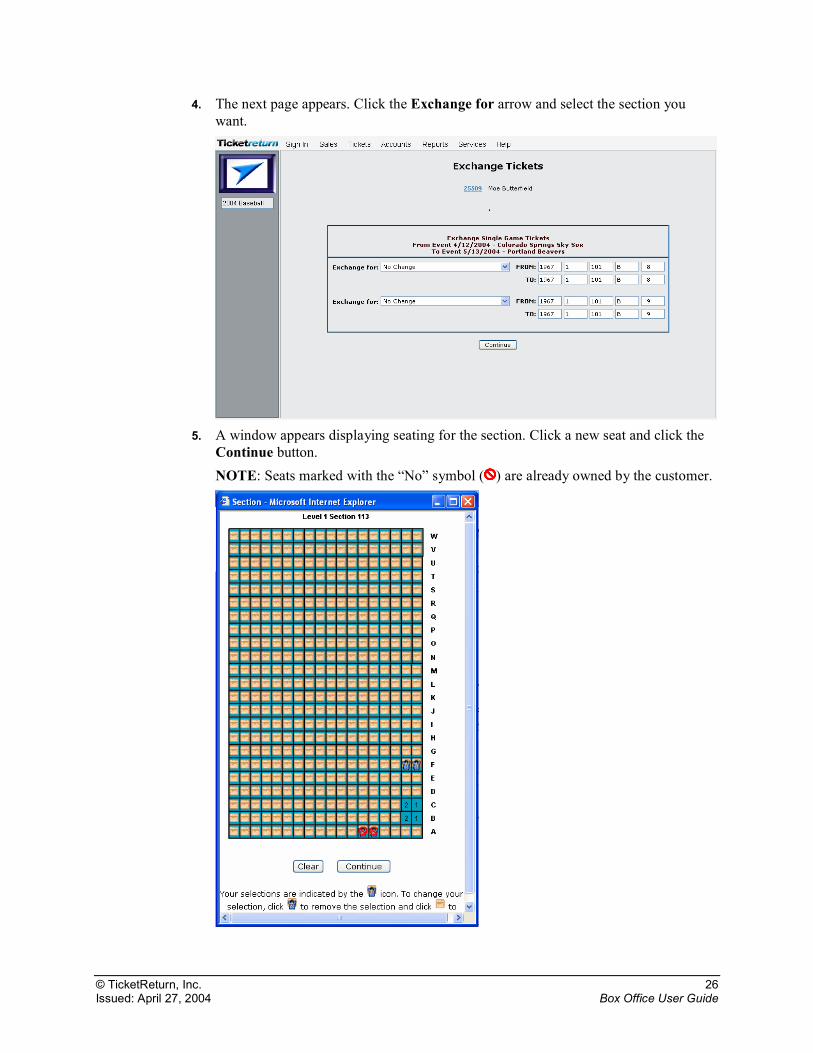
4. The next page appears. Click the Exchange for arrow and select the section you want.
5. A window appears displaying seating for the section. Click a new seat and click the
Continue button. NOTE: Seats marked with the “No” symbol ( ) are already owned by the customer.
© TicketReturn, Inc. 27 Issued: April 27, 2004 Box Office User Guide
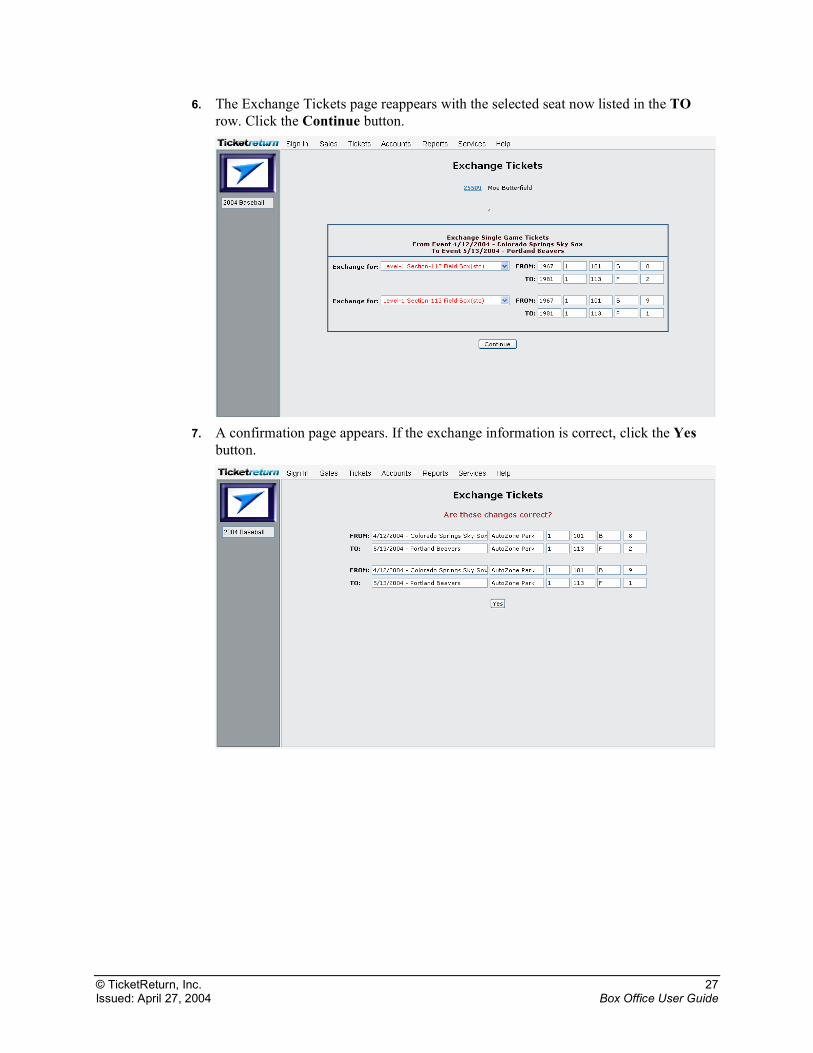
6. The Exchange Tickets page reappears with the selected seat now listed in the TO row. Click the Continue button.
7. A confirmation page appears. If the exchange information is correct, click the Yes
button.
© TicketReturn, Inc. 28 Issued: April 27, 2004 Box Office User Guide
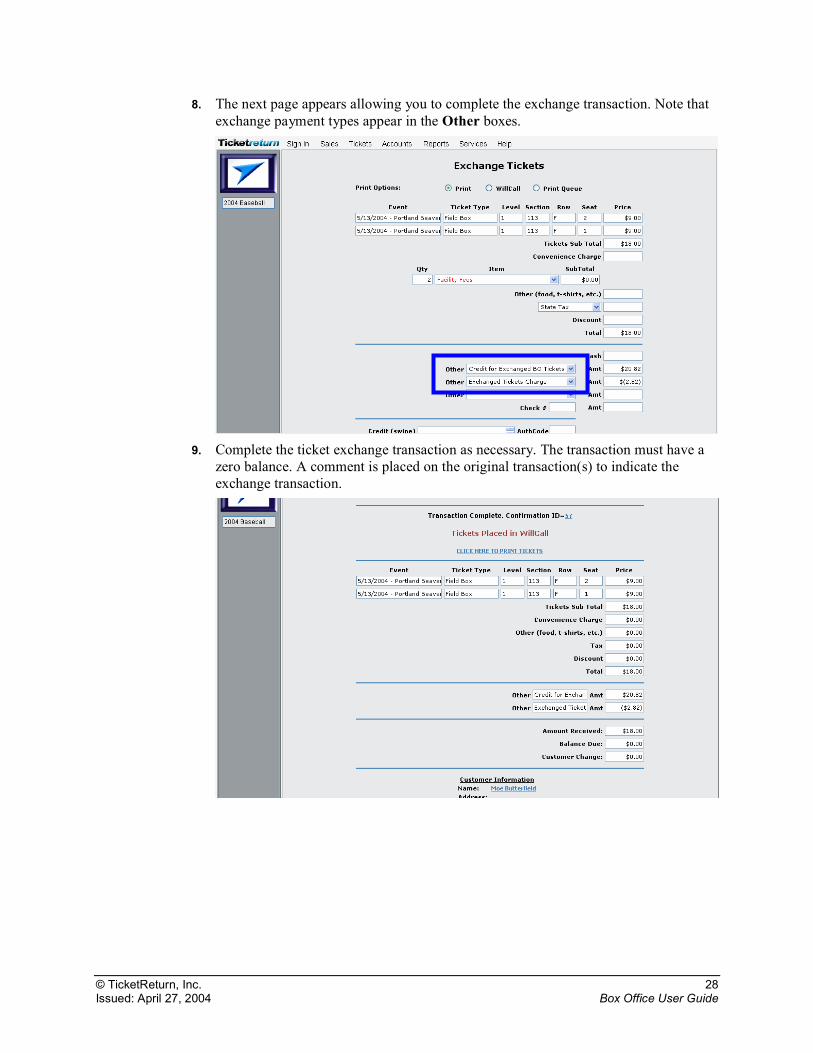
8. The next page appears allowing you to complete the exchange transaction. Note that exchange payment types appear in the Other boxes.
9. Complete the ticket exchange transaction as necessary. The transaction must have a
zero balance. A comment is placed on the original transaction(s) to indicate the exchange transaction.
© TicketReturn, Inc. 29 Issued: April 27, 2004 Box Office User Guide
Finding/Updating Information
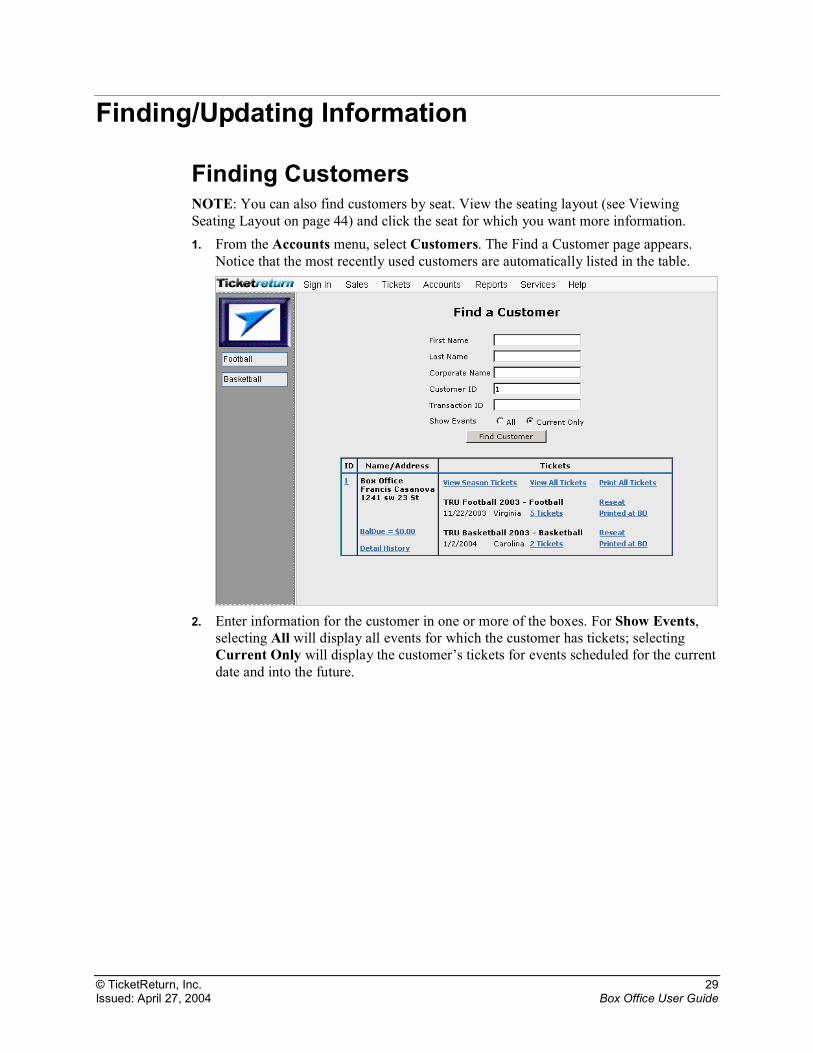
Finding Customers NOTE: You can also find customers by seat. View the seating layout (see Viewing Seating Layout on page 44) and click the seat for which you want more information. 1. From the Accounts menu, select Customers. The Find a Customer page appears.
Notice that the most recently used customers are automatically listed in the table.
2. Enter information for the customer in one or more of the boxes. For Show Events,
selecting All will display all events for which the customer has tickets; selecting Current Only will display the customer’s tickets for events scheduled for the current date and into the future.
© TicketReturn, Inc. 30 Issued: April 27, 2004 Box Office User Guide
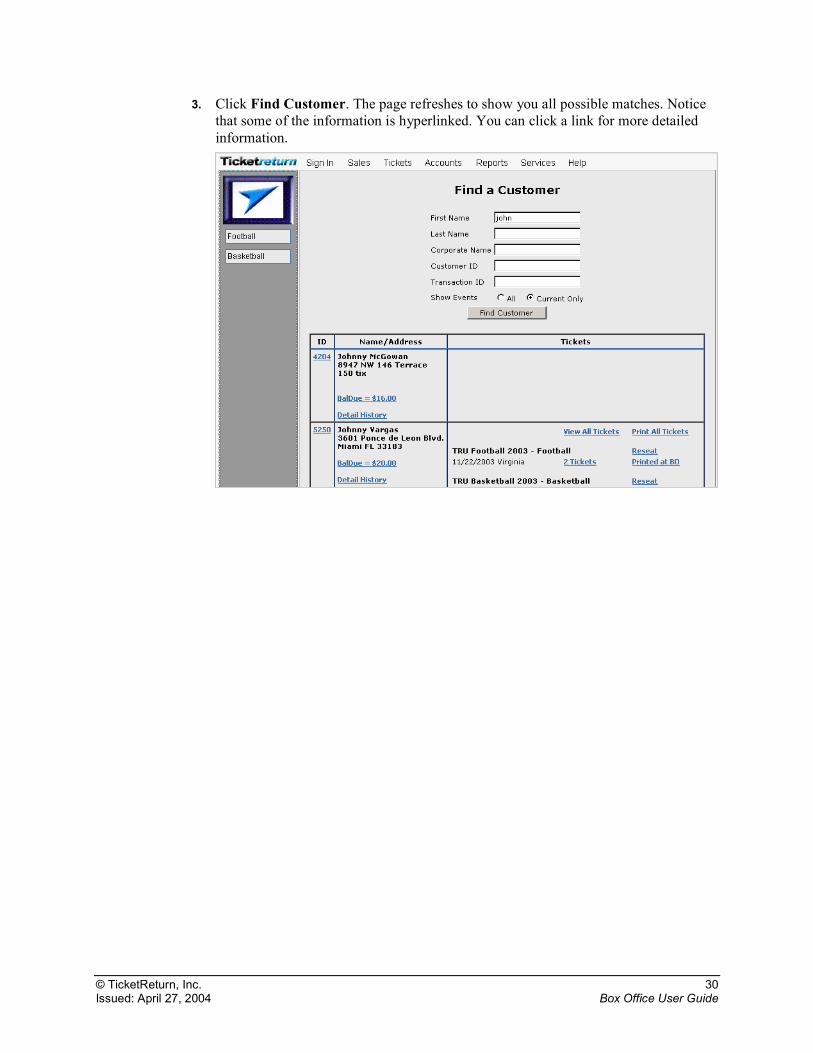
3. Click Find Customer. The page refreshes to show you all possible matches. Notice that some of the information is hyperlinked. You can click a link for more detailed information.
© TicketReturn, Inc. 31 Issued: April 27, 2004 Box Office User Guide
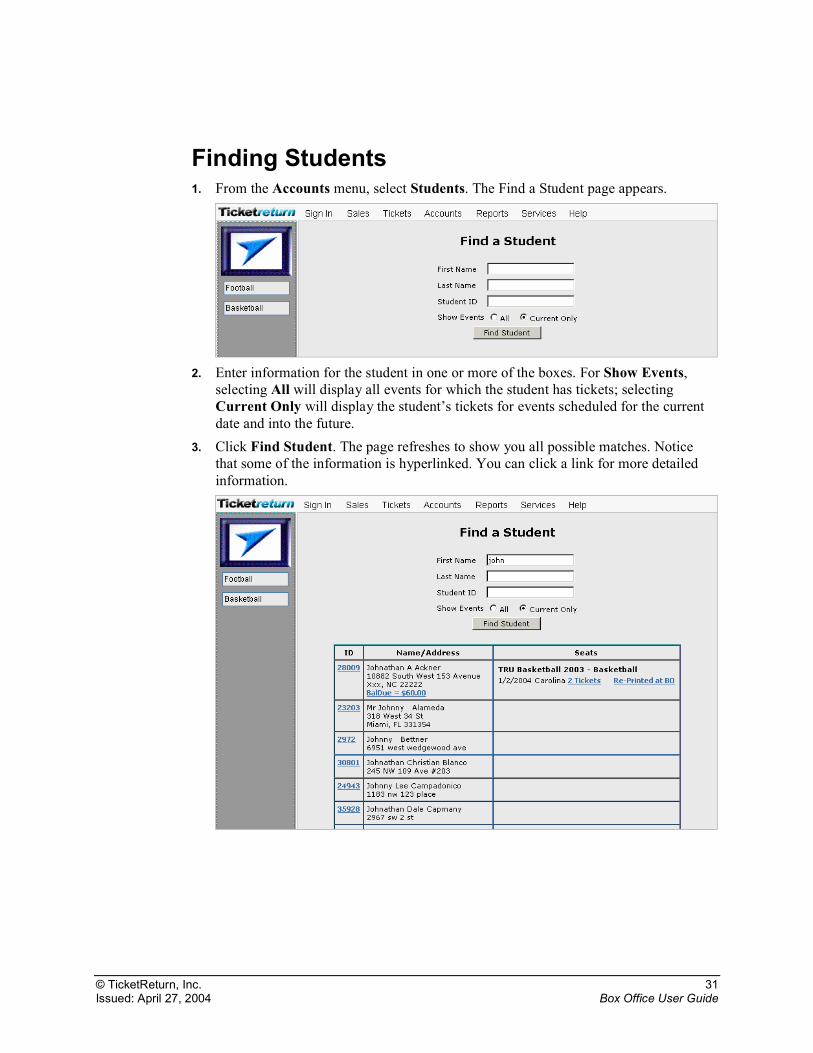
Finding Students 1. From the Accounts menu, select Students. The Find a Student page appears.
2. Enter information for the student in one or more of the boxes. For Show Events,
selecting All will display all events for which the student has tickets; selecting Current Only will display the student’s tickets for events scheduled for the current date and into the future.
3. Click Find Student. The page refreshes to show you all possible matches. Notice that some of the information is hyperlinked. You can click a link for more detailed information.
© TicketReturn, Inc. 32 Issued: April 27, 2004 Box Office User Guide
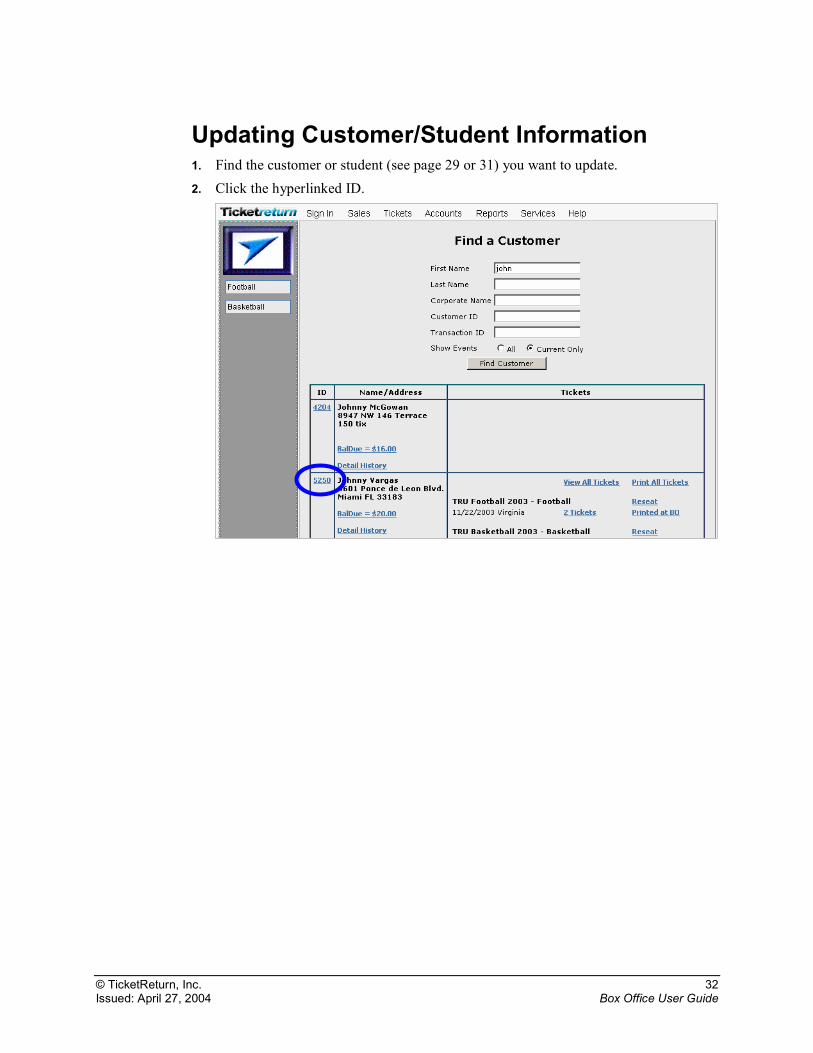
Updating Customer/Student Information 1. Find the customer or student (see page 29 or 31) you want to update. 2. Click the hyperlinked ID.
© TicketReturn, Inc. 33 Issued: April 27, 2004 Box Office User Guide
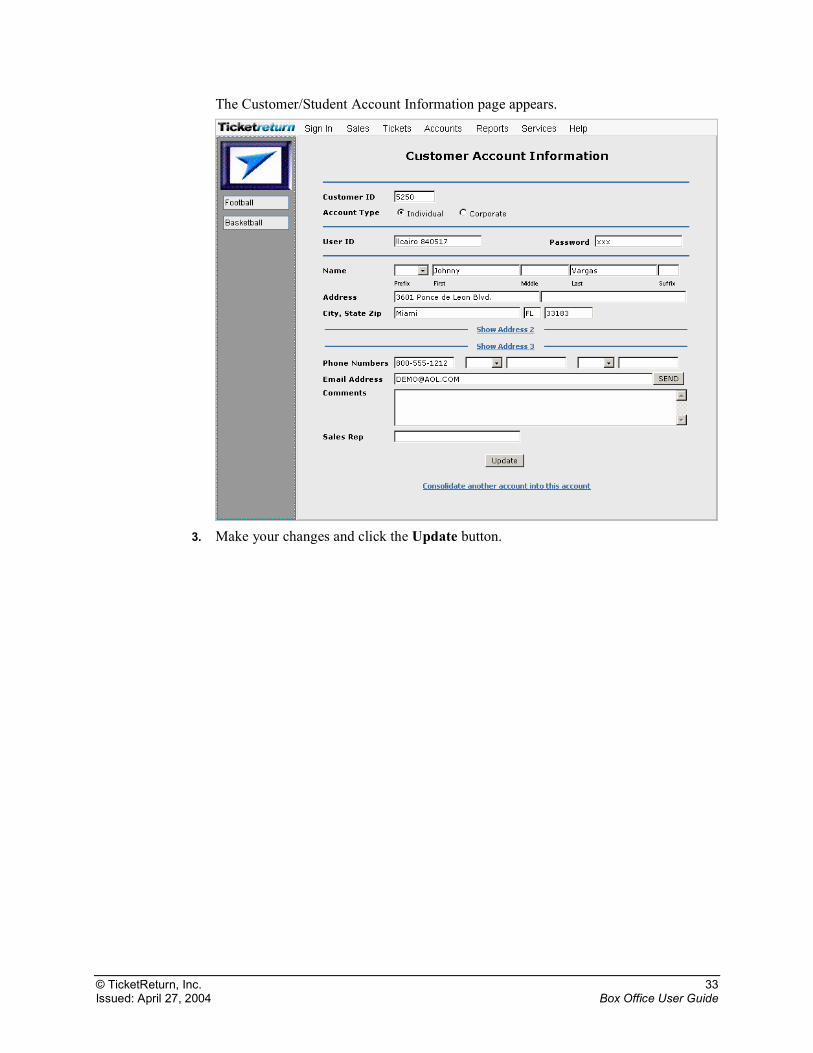
The Customer/Student Account Information page appears.
3. Make your changes and click the Update button.
© TicketReturn, Inc. 34 Issued: April 27, 2004 Box Office User Guide
Transactions
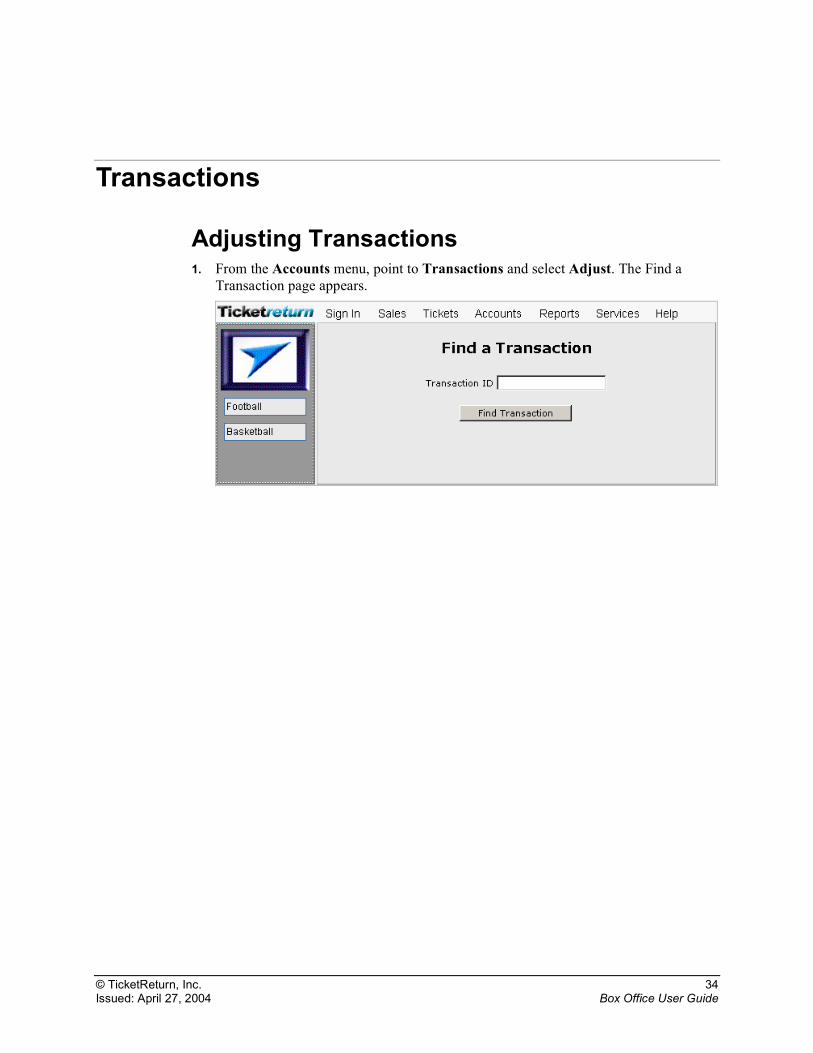
Adjusting Transactions 1. From the Accounts menu, point to Transactions and select Adjust. The Find a
Transaction page appears.
© TicketReturn, Inc. 35 Issued: April 27, 2004 Box Office User Guide
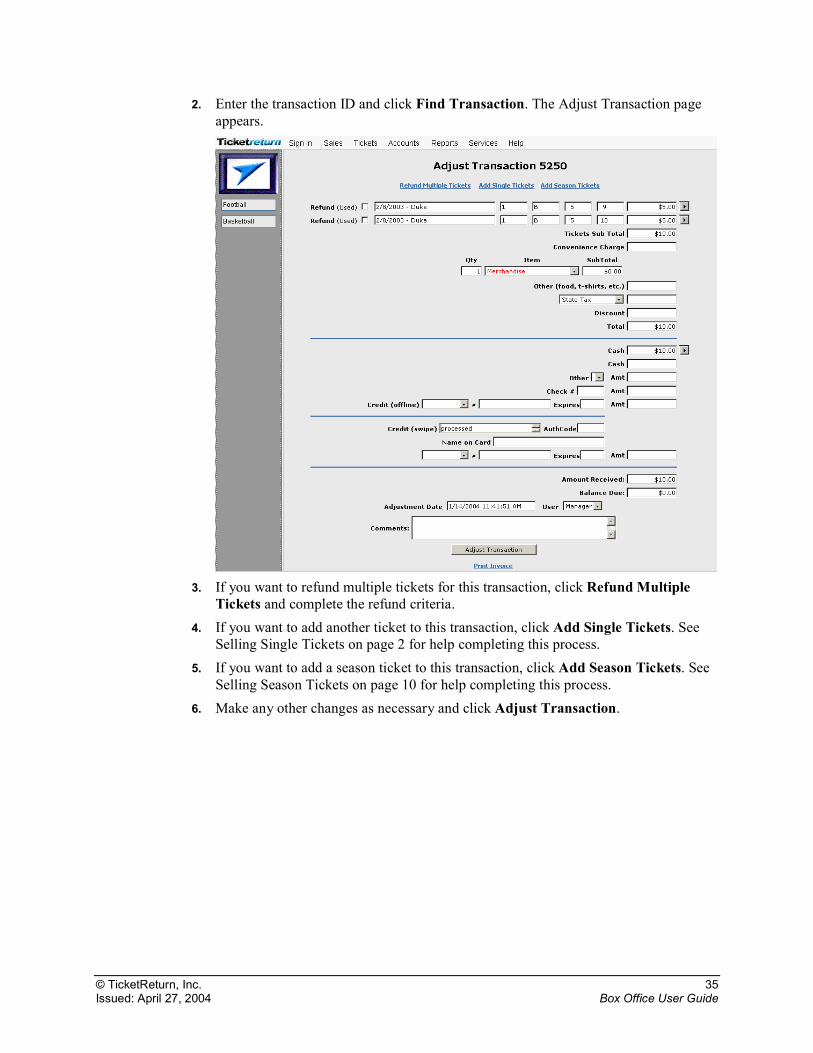
2. Enter the transaction ID and click Find Transaction. The Adjust Transaction page appears.
3. If you want to refund multiple tickets for this transaction, click Refund Multiple
Tickets and complete the refund criteria. 4. If you want to add another ticket to this transaction, click Add Single Tickets. See
Selling Single Tickets on page 2 for help completing this process. 5. If you want to add a season ticket to this transaction, click Add Season Tickets. See
Selling Season Tickets on page 10 for help completing this process. 6. Make any other changes as necessary and click Adjust Transaction.
© TicketReturn, Inc. 36 Issued: April 27, 2004 Box Office User Guide
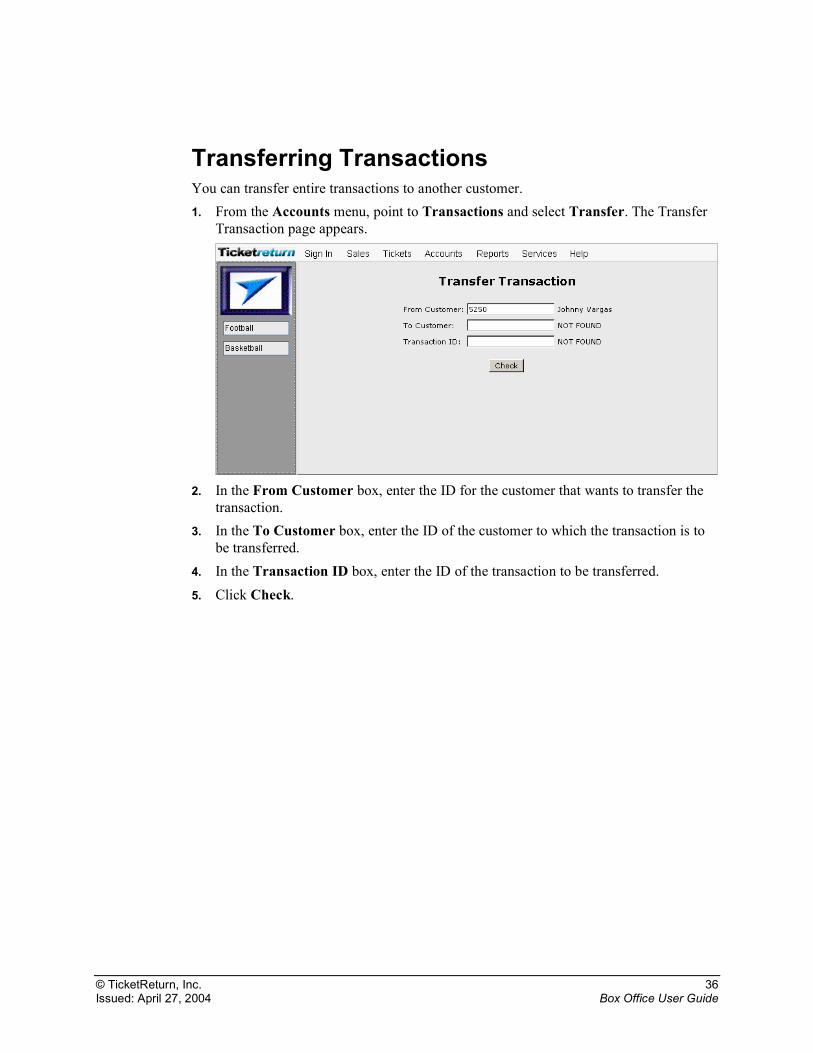
Transferring Transactions You can transfer entire transactions to another customer. 1. From the Accounts menu, point to Transactions and select Transfer. The Transfer
Transaction page appears.
2. In the From Customer box, enter the ID for the customer that wants to transfer the
transaction. 3. In the To Customer box, enter the ID of the customer to which the transaction is to
be transferred. 4. In the Transaction ID box, enter the ID of the transaction to be transferred. 5. Click Check.
© TicketReturn, Inc. 37 Issued: April 27, 2004 Box Office User Guide
Reseating
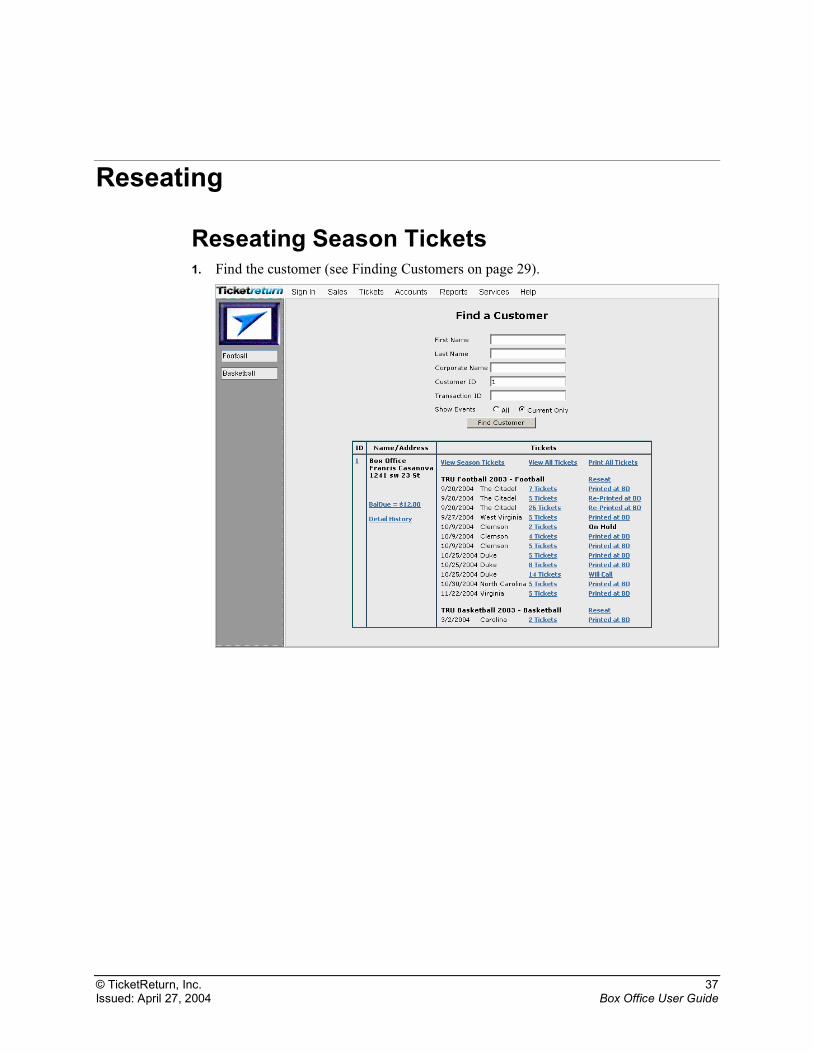
Reseating Season Tickets 1. Find the customer (see Finding Customers on page 29).
© TicketReturn, Inc. 38 Issued: April 27, 2004 Box Office User Guide
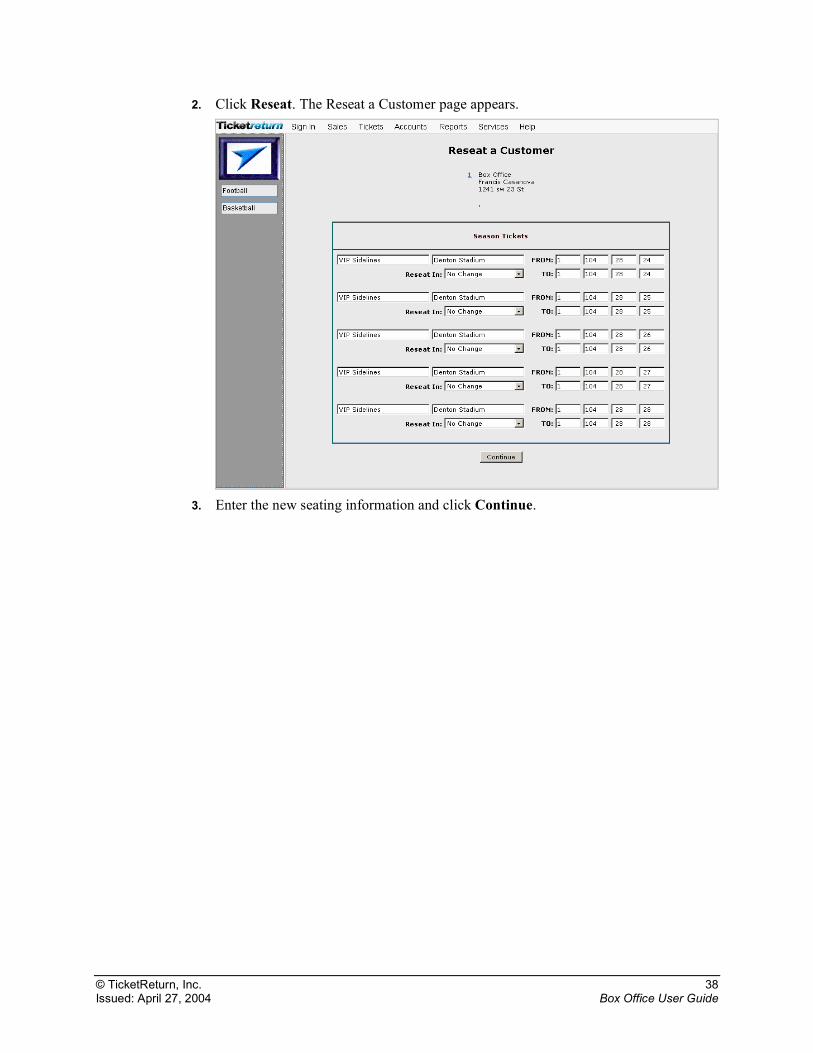
2. Click Reseat. The Reseat a Customer page appears.
3. Enter the new seating information and click Continue.
© TicketReturn, Inc. 39 Issued: April 27, 2004 Box Office User Guide
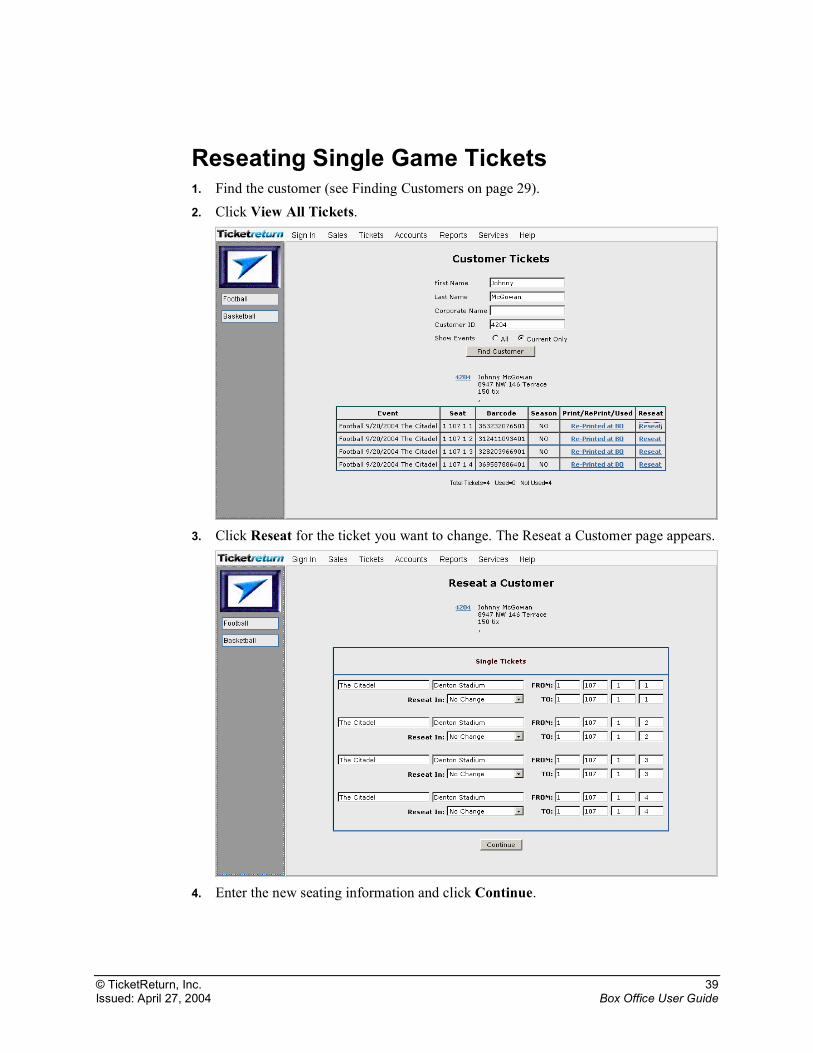
Reseating Single Game Tickets 1. Find the customer (see Finding Customers on page 29). 2. Click View All Tickets.
3. Click Reseat for the ticket you want to change. The Reseat a Customer page appears.
4. Enter the new seating information and click Continue.
© TicketReturn, Inc. 40 Issued: April 27, 2004 Box Office User Guide
Ticket Views
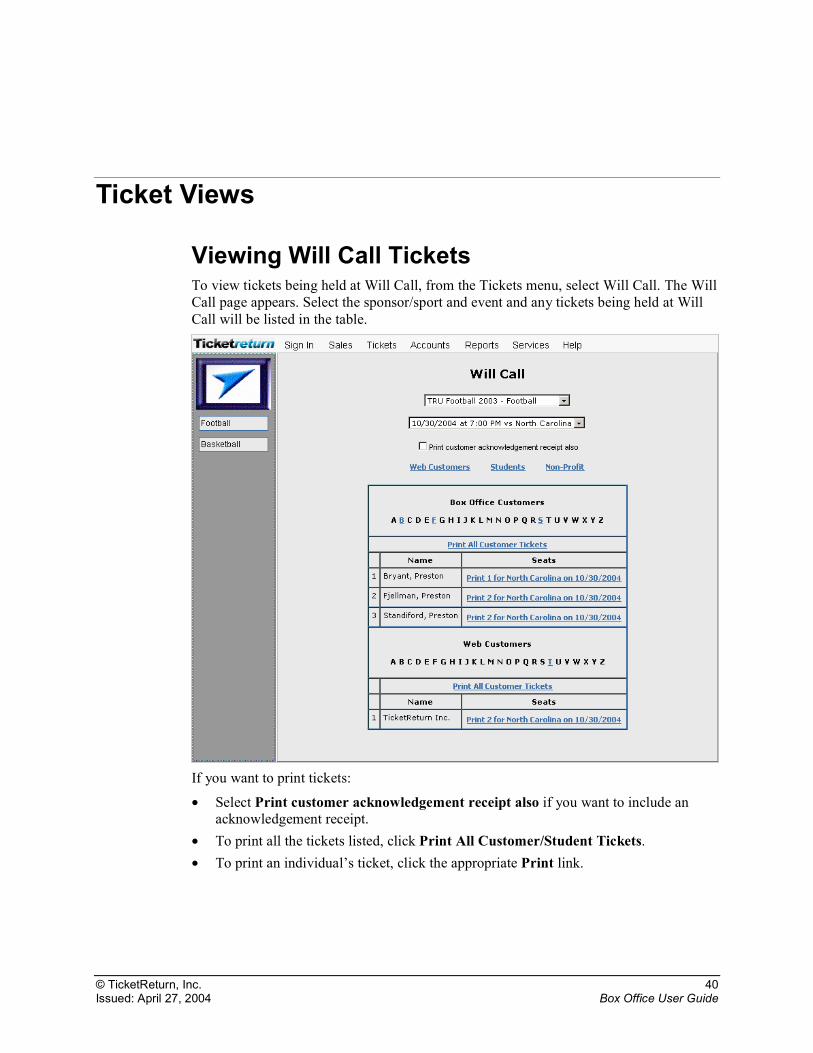
Viewing Will Call Tickets To view tickets being held at Will Call, from the Tickets menu, select Will Call. The Will Call page appears. Select the sponsor/sport and event and any tickets being held at Will Call will be listed in the table.
If you want to print tickets:
• Select Print customer acknowledgement receipt also if you want to include an acknowledgement receipt.
• To print all the tickets listed, click Print All Customer/Student Tickets. • To print an individual’s ticket, click the appropriate Print link.
© TicketReturn, Inc. 41 Issued: April 27, 2004 Box Office User Guide
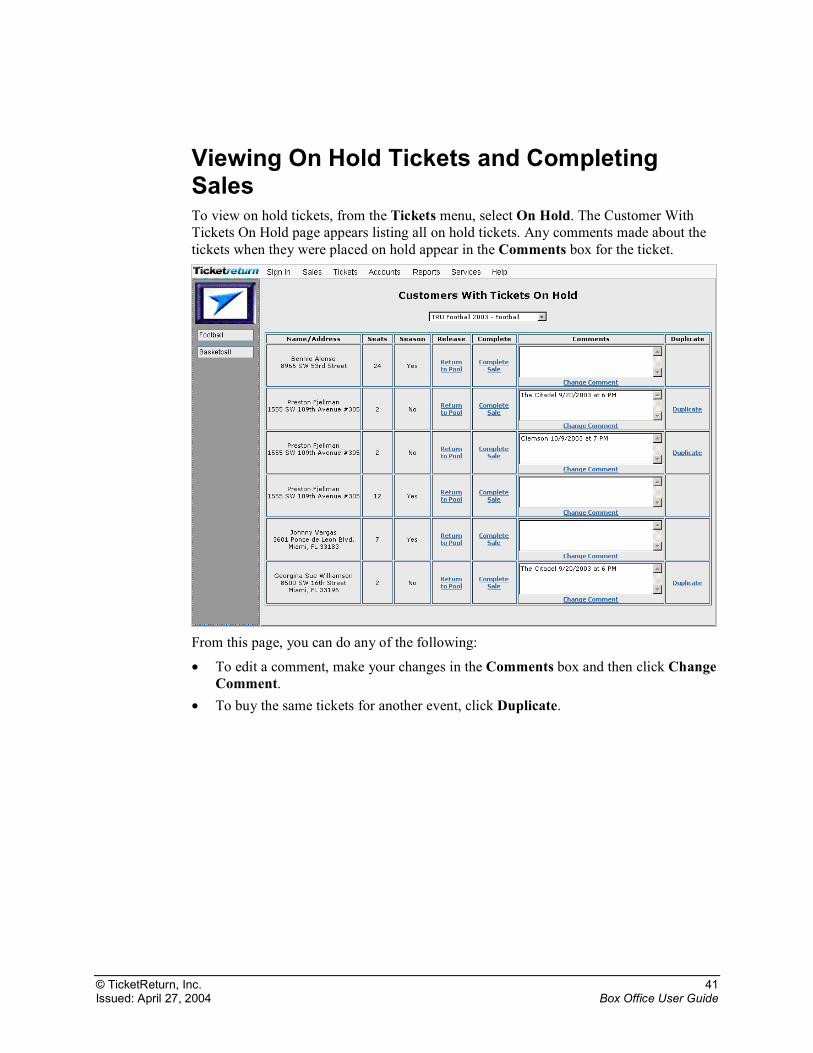
Viewing On Hold Tickets and Completing Sales To view on hold tickets, from the Tickets menu, select On Hold. The Customer With Tickets On Hold page appears listing all on hold tickets. Any comments made about the tickets when they were placed on hold appear in the Comments box for the ticket.
From this page, you can do any of the following:
• To edit a comment, make your changes in the Comments box and then click Change Comment.
• To buy the same tickets for another event, click Duplicate.
© TicketReturn, Inc. 42 Issued: April 27, 2004 Box Office User Guide
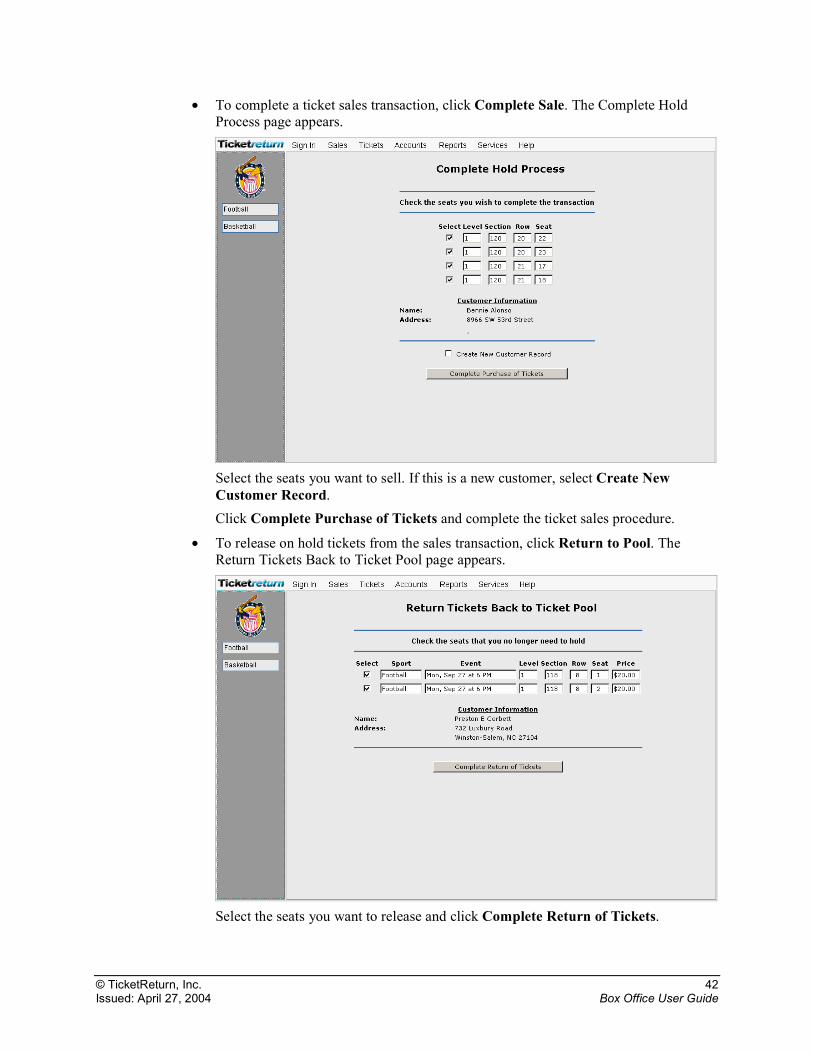
• To complete a ticket sales transaction, click Complete Sale. The Complete Hold Process page appears.
Select the seats you want to sell. If this is a new customer, select Create New Customer Record. Click Complete Purchase of Tickets and complete the ticket sales procedure.
• To release on hold tickets from the sales transaction, click Return to Pool. The Return Tickets Back to Ticket Pool page appears.
Select the seats you want to release and click Complete Return of Tickets.
© TicketReturn, Inc. 43 Issued: April 27, 2004 Box Office User Guide
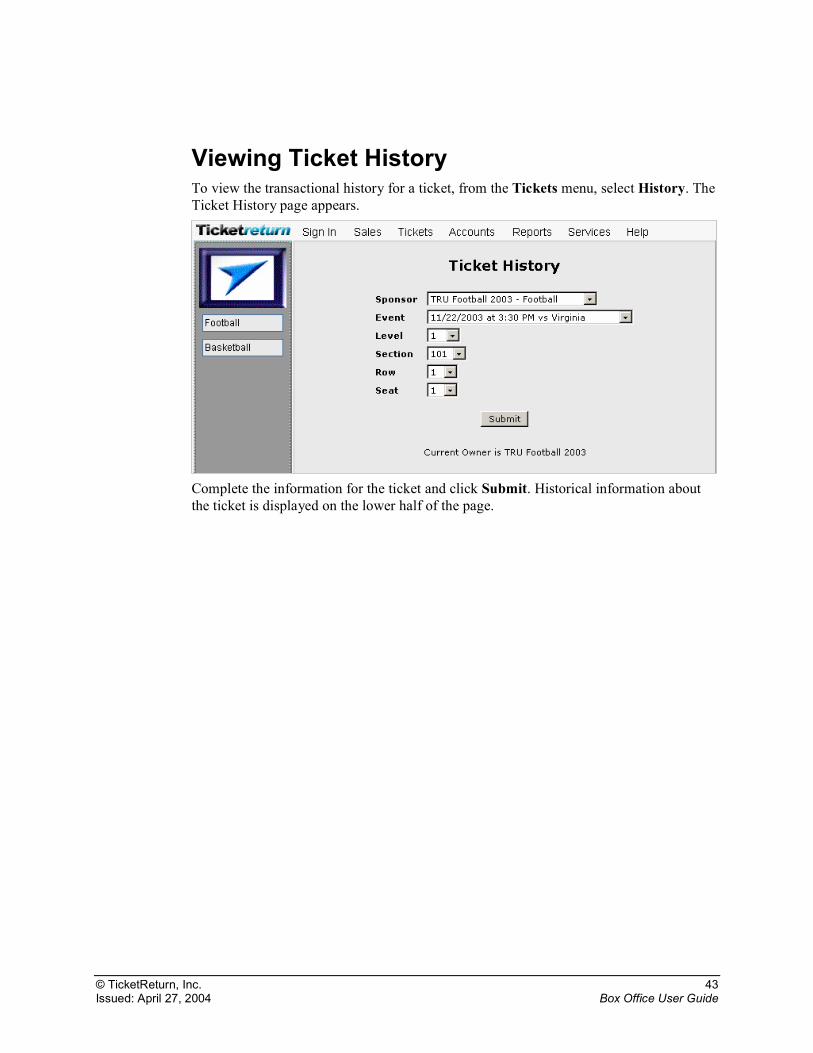
Viewing Ticket History To view the transactional history for a ticket, from the Tickets menu, select History. The Ticket History page appears.
Complete the information for the ticket and click Submit. Historical information about the ticket is displayed on the lower half of the page.
© TicketReturn, Inc. 44 Issued: April 27, 2004 Box Office User Guide
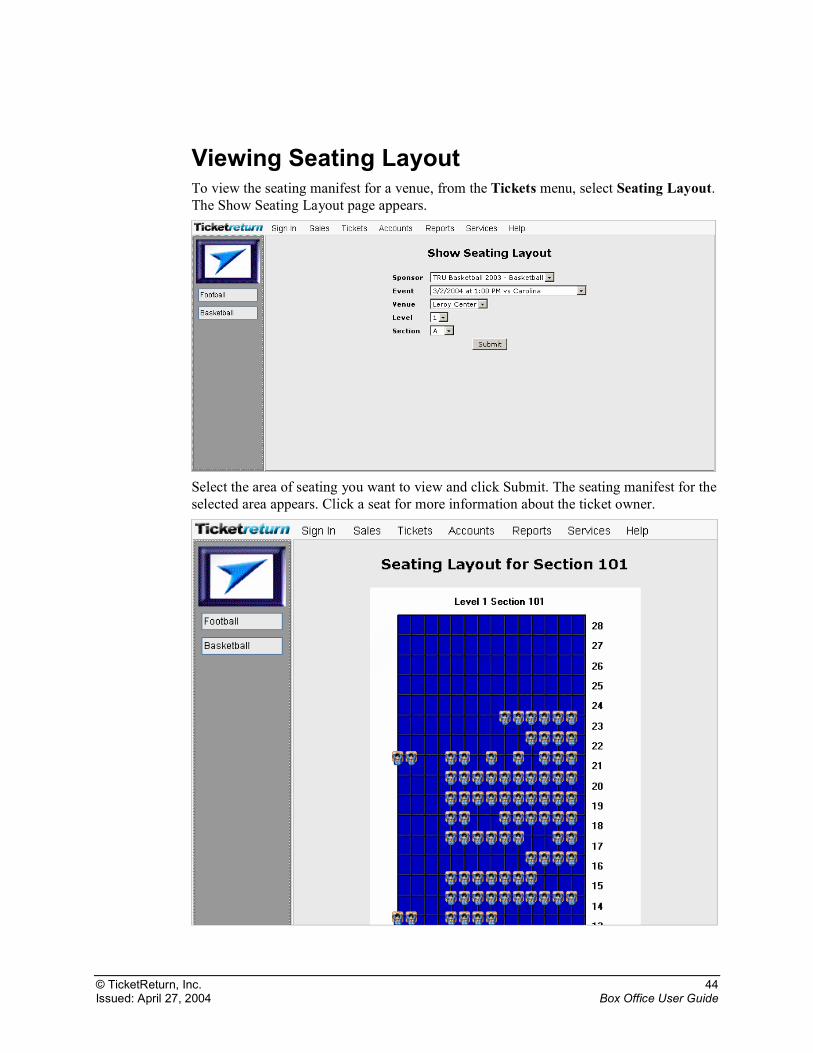
Viewing Seating Layout To view the seating manifest for a venue, from the Tickets menu, select Seating Layout. The Show Seating Layout page appears.
Select the area of seating you want to view and click Submit. The seating manifest for the selected area appears. Click a seat for more information about the ticket owner.
© TicketReturn, Inc. 45 Issued: April 27, 2004 Box Office User Guide
Reports
Overview of Reports You can generate the following reports in Box Office:
Daily Reports
• Daily Transaction Report (regular and expanded versions): Provides summary information about all transactions for the selected day for the signed in user.
• Daily Ticket Sales Report: Provides summary information about all tickets sold (regardless of paid or unpaid status) for the selected day for the signed in user.
Sponsor/Event Reports
• Total Tickets Sold Report: Lists the total number of tickets sold by sponsor. • Web Sales Report: Lists transactions generated only through the TicketReturn
website by sponsor or by event. • Season Ticket Utilization Report: Lists season ticket usage statistics for a sponsor. • Group Sales Report 1: Lists revenue generated from group sales (ticket and non-
ticket sales) for a sponsor. • Event Revenue Report: Lists the revenue generated by an event. • Event Audit Report: Lists the transactions related to an event. • Group Sales Report 2: Lists non-ticket revenue generated from group sales for an
event. • Event Attendance Report: Lists the number of tickets used for an event. • Event Ticket Prices: Lists the ticket prices still available for an event. • Donation Report: Lists the tickets that have been donated to non-profit
organizations.
Accounting Reports
• Transaction Detail Report: Lists all transactions matching selection criteria for the signed in user.
• Outstanding Balances Report: Lists the financial transactions that need to be completed.
• Outstanding Balances Aged Report: Lists the financial transactions that need to be completed and breaks down the totals by age.
Non-Financial Reports
• Show Seating Layout: Graphically displays a seating layout for a section of an event venue.
• Ticket History: Provides transactional history for a specific ticket.
© TicketReturn, Inc. 46 Issued: April 27, 2004 Box Office User Guide
Student Ticketing Reports
• Student Ticket Allocation Report: Breaks down the allocation of student tickets. • Event Phase Report: Provides information about the student ticketing phases for an
event. • Student Tickets Report: Lists student tickets and student points by sponsor and by
event. • Unused Barcodes Report: Lists students that did not use their tickets for an event.
© TicketReturn, Inc. 47 Issued: April 27, 2004 Box Office User Guide
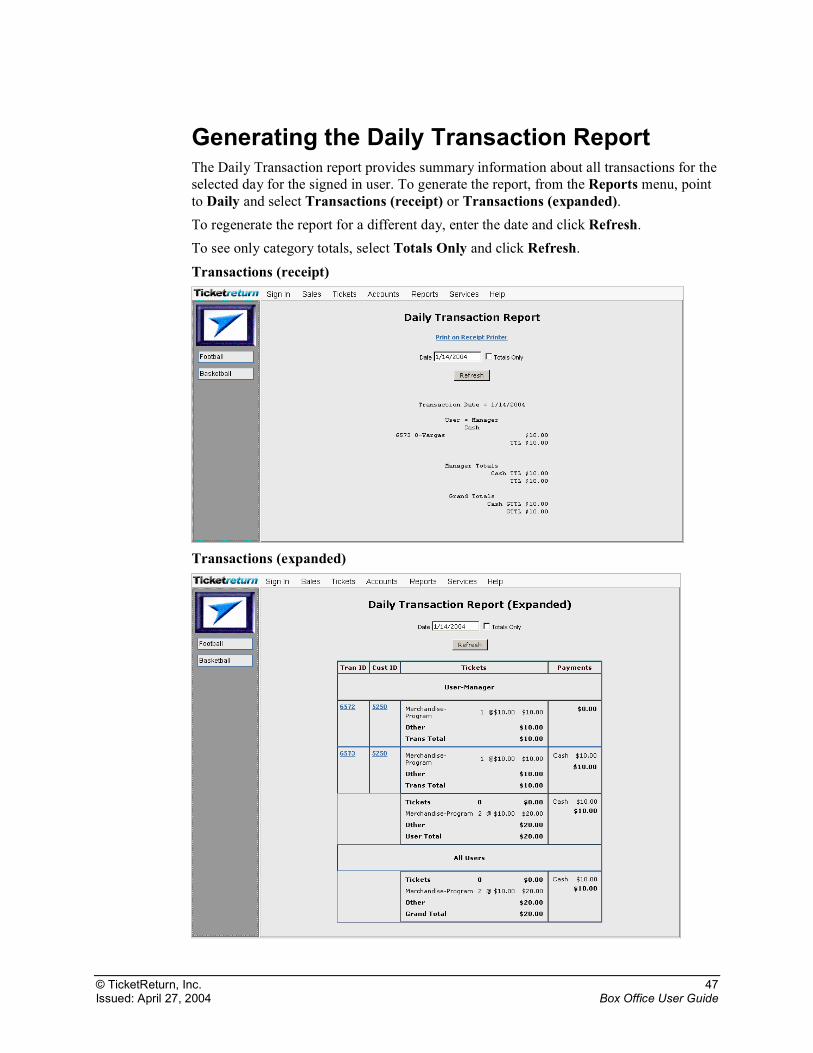
Generating the Daily Transaction Report The Daily Transaction report provides summary information about all transactions for the selected day for the signed in user. To generate the report, from the Reports menu, point to Daily and select Transactions (receipt) or Transactions (expanded). To regenerate the report for a different day, enter the date and click Refresh. To see only category totals, select Totals Only and click Refresh.
Transactions (receipt)
Transactions (expanded)
© TicketReturn, Inc. 48 Issued: April 27, 2004 Box Office User Guide
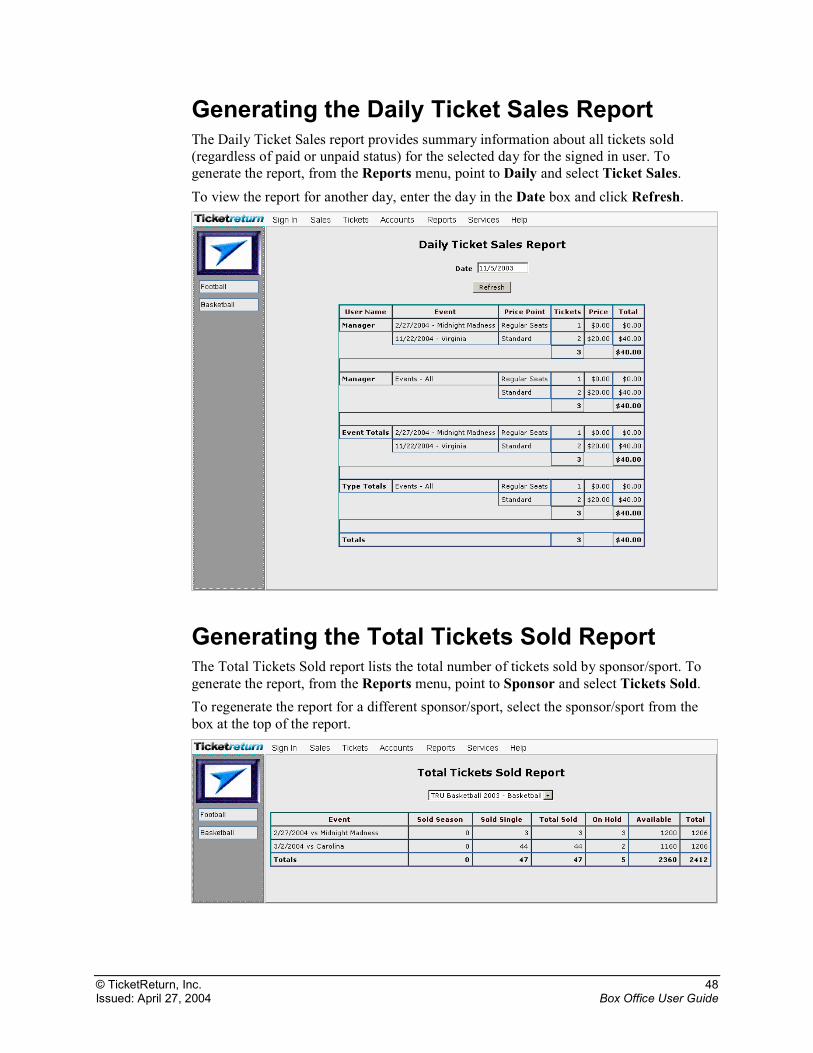
Generating the Daily Ticket Sales Report The Daily Ticket Sales report provides summary information about all tickets sold (regardless of paid or unpaid status) for the selected day for the signed in user. To generate the report, from the Reports menu, point to Daily and select Ticket Sales. To view the report for another day, enter the day in the Date box and click Refresh.
Generating the Total Tickets Sold Report The Total Tickets Sold report lists the total number of tickets sold by sponsor/sport. To generate the report, from the Reports menu, point to Sponsor and select Tickets Sold. To regenerate the report for a different sponsor/sport, select the sponsor/sport from the box at the top of the report.
© TicketReturn, Inc. 49 Issued: April 27, 2004 Box Office User Guide
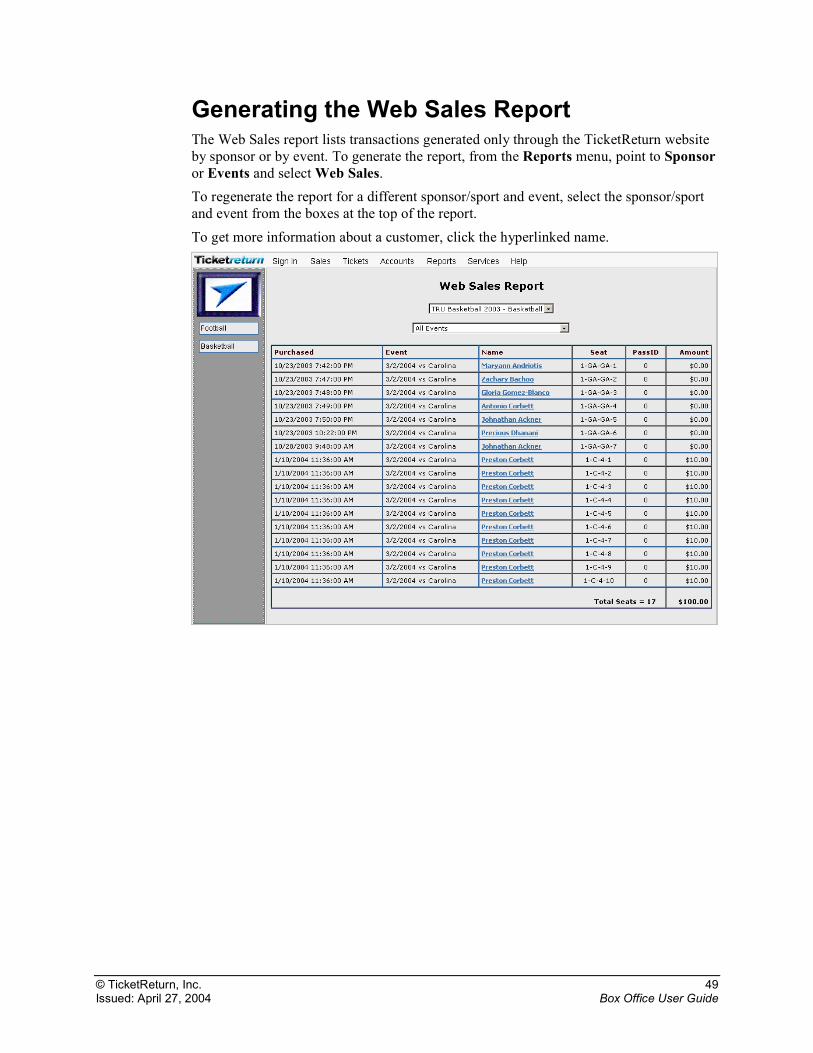
Generating the Web Sales Report The Web Sales report lists transactions generated only through the TicketReturn website by sponsor or by event. To generate the report, from the Reports menu, point to Sponsor or Events and select Web Sales. To regenerate the report for a different sponsor/sport and event, select the sponsor/sport and event from the boxes at the top of the report. To get more information about a customer, click the hyperlinked name.
© TicketReturn, Inc. 50 Issued: April 27, 2004 Box Office User Guide
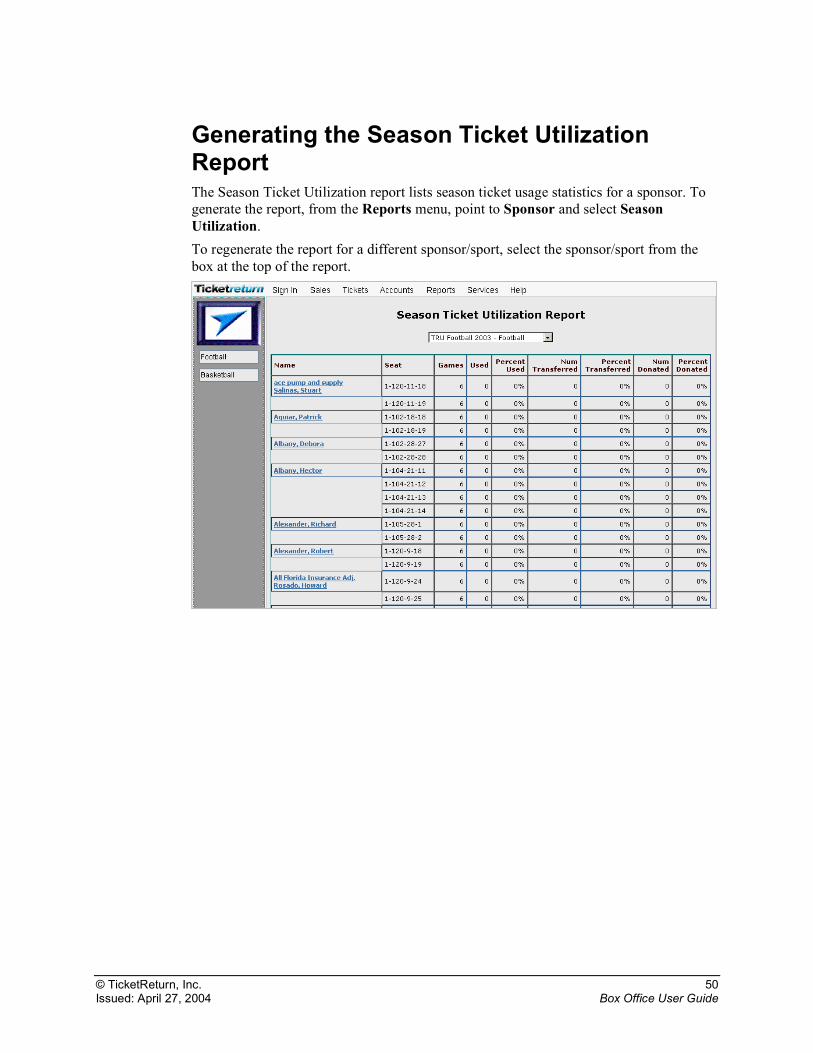
Generating the Season Ticket Utilization Report The Season Ticket Utilization report lists season ticket usage statistics for a sponsor. To generate the report, from the Reports menu, point to Sponsor and select Season Utilization. To regenerate the report for a different sponsor/sport, select the sponsor/sport from the box at the top of the report.
© TicketReturn, Inc. 51 Issued: April 27, 2004 Box Office User Guide
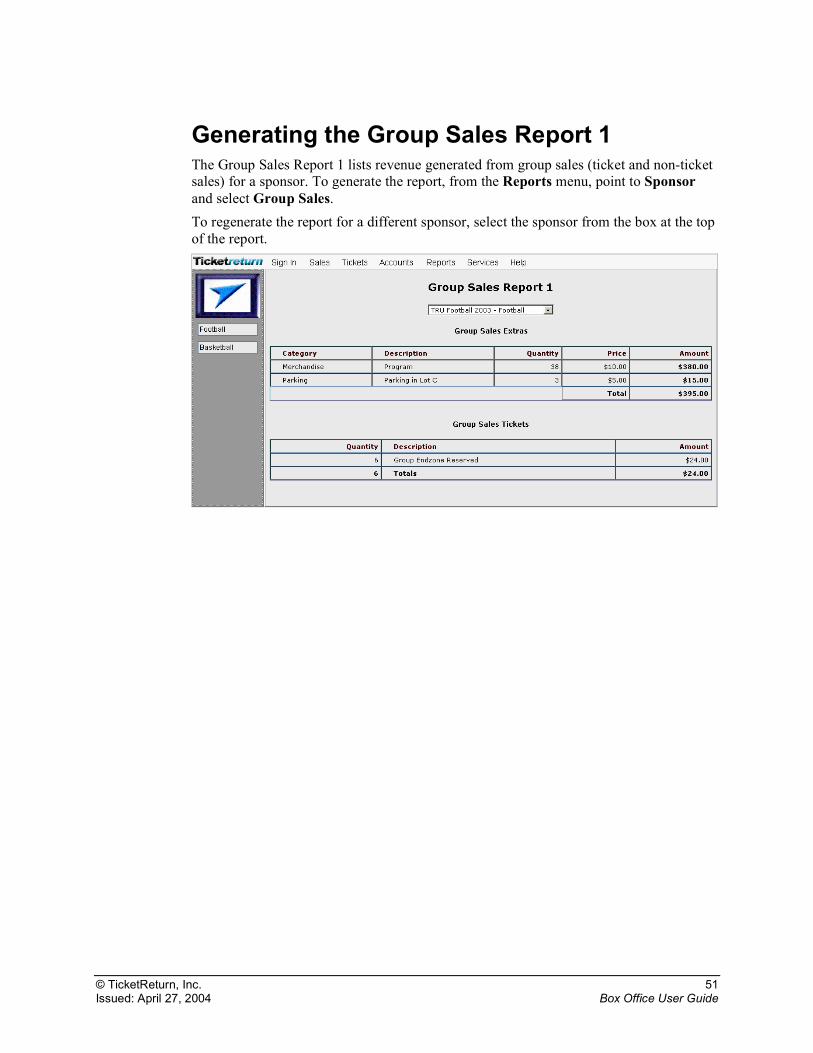
Generating the Group Sales Report 1 The Group Sales Report 1 lists revenue generated from group sales (ticket and non-ticket sales) for a sponsor. To generate the report, from the Reports menu, point to Sponsor and select Group Sales. To regenerate the report for a different sponsor, select the sponsor from the box at the top of the report.
© TicketReturn, Inc. 52 Issued: April 27, 2004 Box Office User Guide
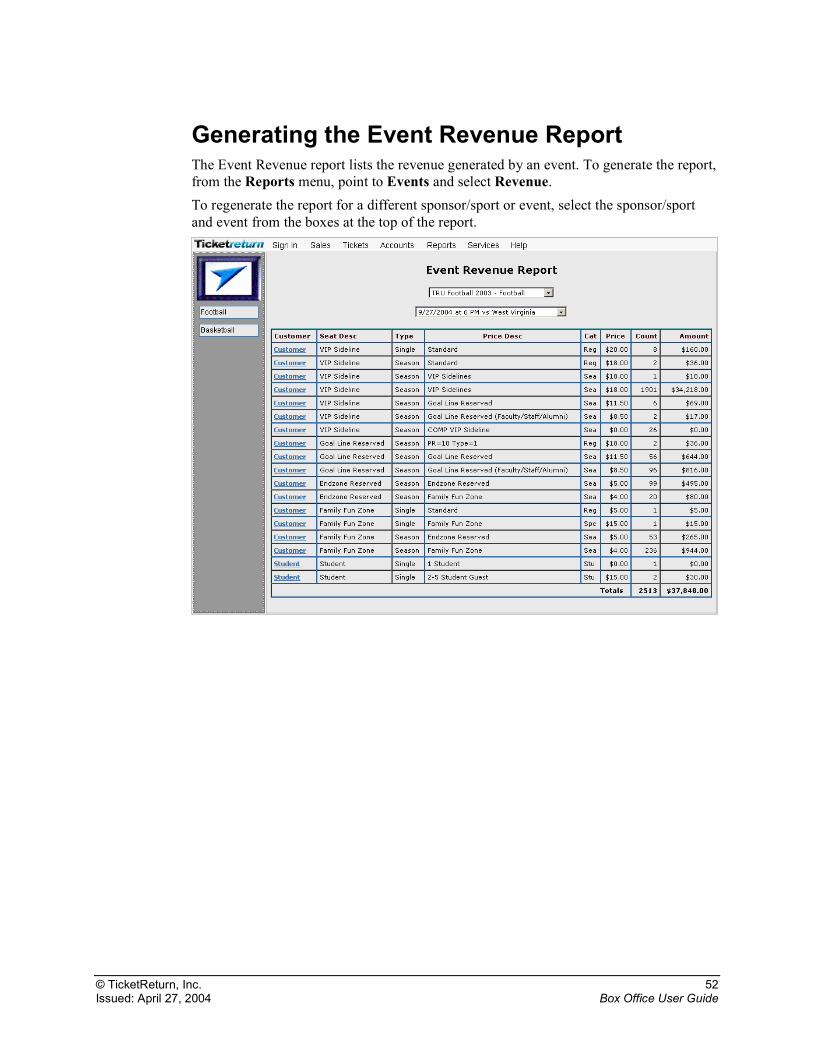
Generating the Event Revenue Report The Event Revenue report lists the revenue generated by an event. To generate the report, from the Reports menu, point to Events and select Revenue. To regenerate the report for a different sponsor/sport or event, select the sponsor/sport and event from the boxes at the top of the report.
© TicketReturn, Inc. 53 Issued: April 27, 2004 Box Office User Guide
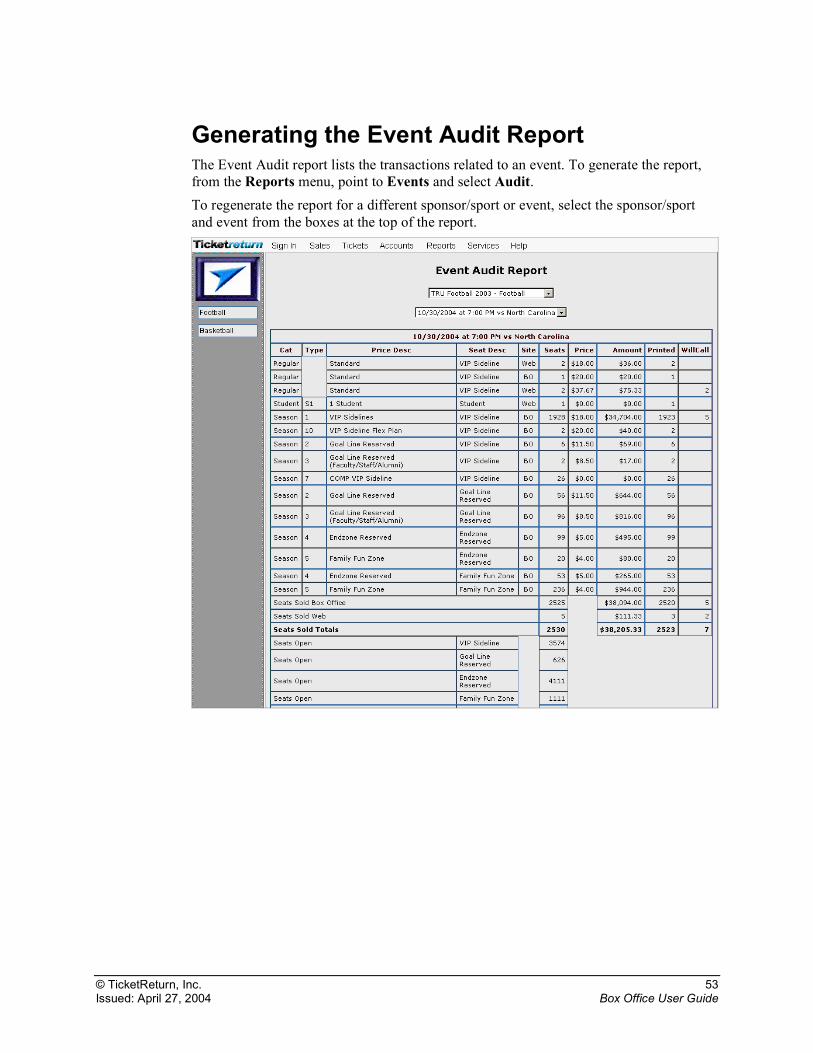
Generating the Event Audit Report The Event Audit report lists the transactions related to an event. To generate the report, from the Reports menu, point to Events and select Audit. To regenerate the report for a different sponsor/sport or event, select the sponsor/sport and event from the boxes at the top of the report.
© TicketReturn, Inc. 54 Issued: April 27, 2004 Box Office User Guide
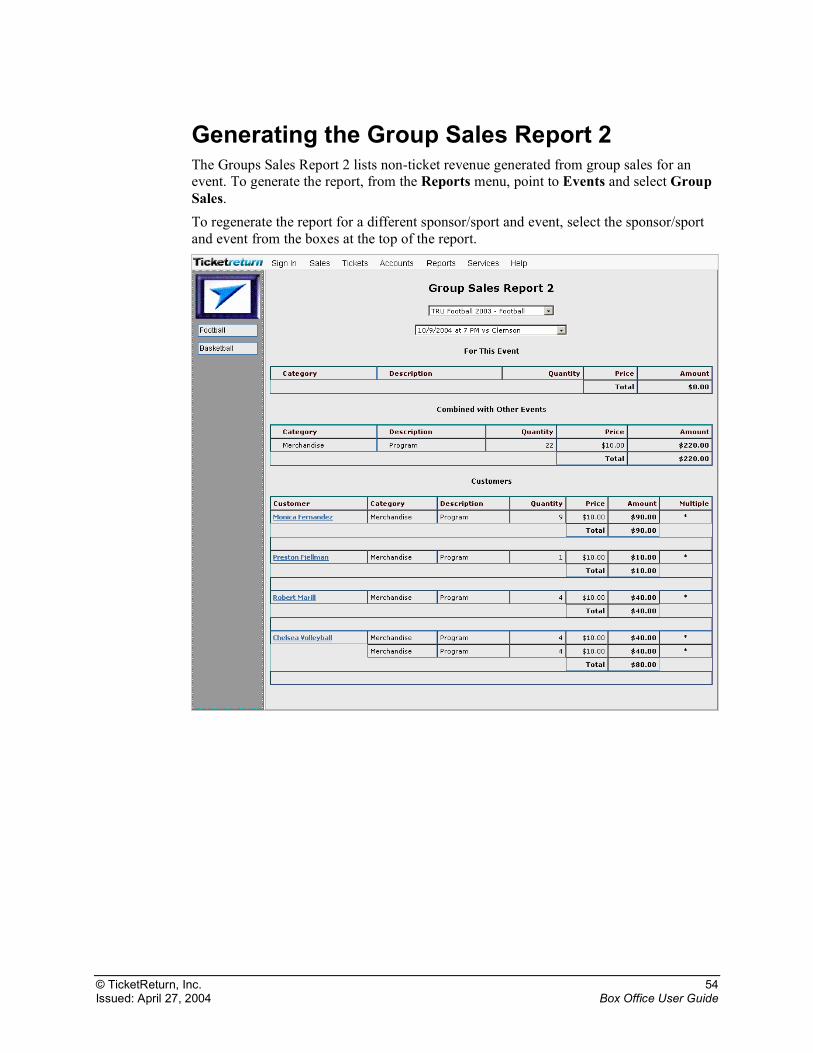
Generating the Group Sales Report 2 The Groups Sales Report 2 lists non-ticket revenue generated from group sales for an event. To generate the report, from the Reports menu, point to Events and select Group Sales. To regenerate the report for a different sponsor/sport and event, select the sponsor/sport and event from the boxes at the top of the report.
© TicketReturn, Inc. 55 Issued: April 27, 2004 Box Office User Guide
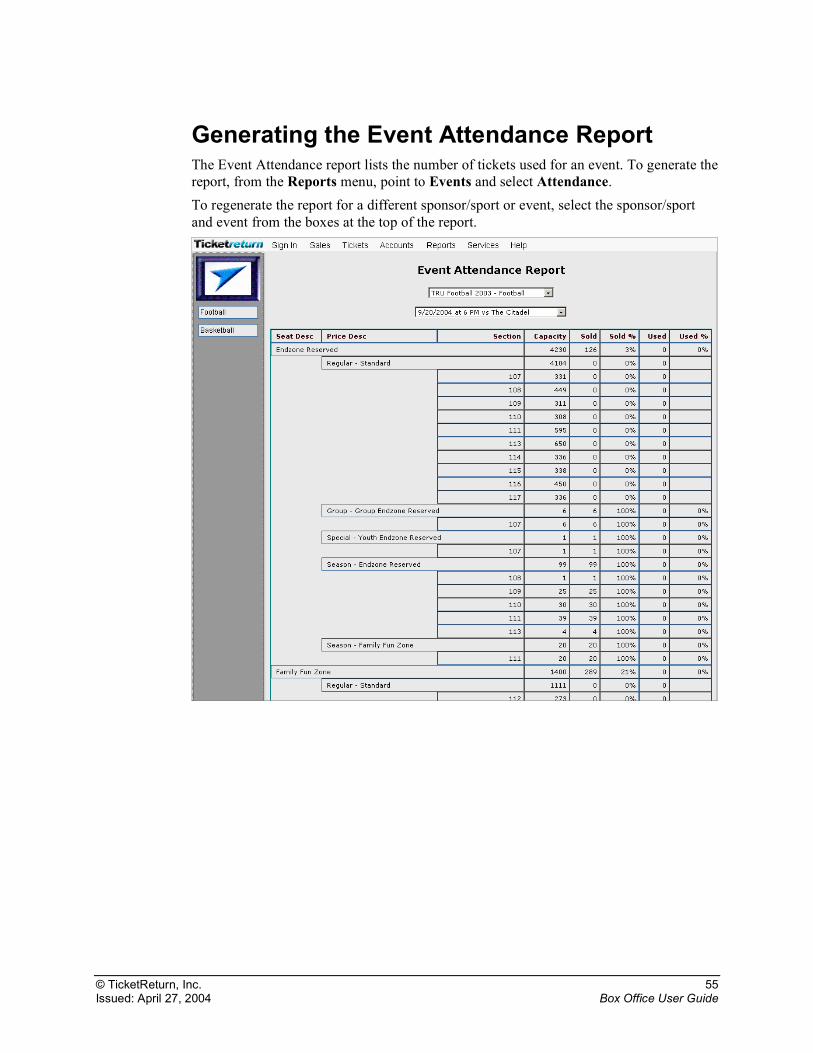
Generating the Event Attendance Report The Event Attendance report lists the number of tickets used for an event. To generate the report, from the Reports menu, point to Events and select Attendance. To regenerate the report for a different sponsor/sport or event, select the sponsor/sport and event from the boxes at the top of the report.
© TicketReturn, Inc. 56 Issued: April 27, 2004 Box Office User Guide
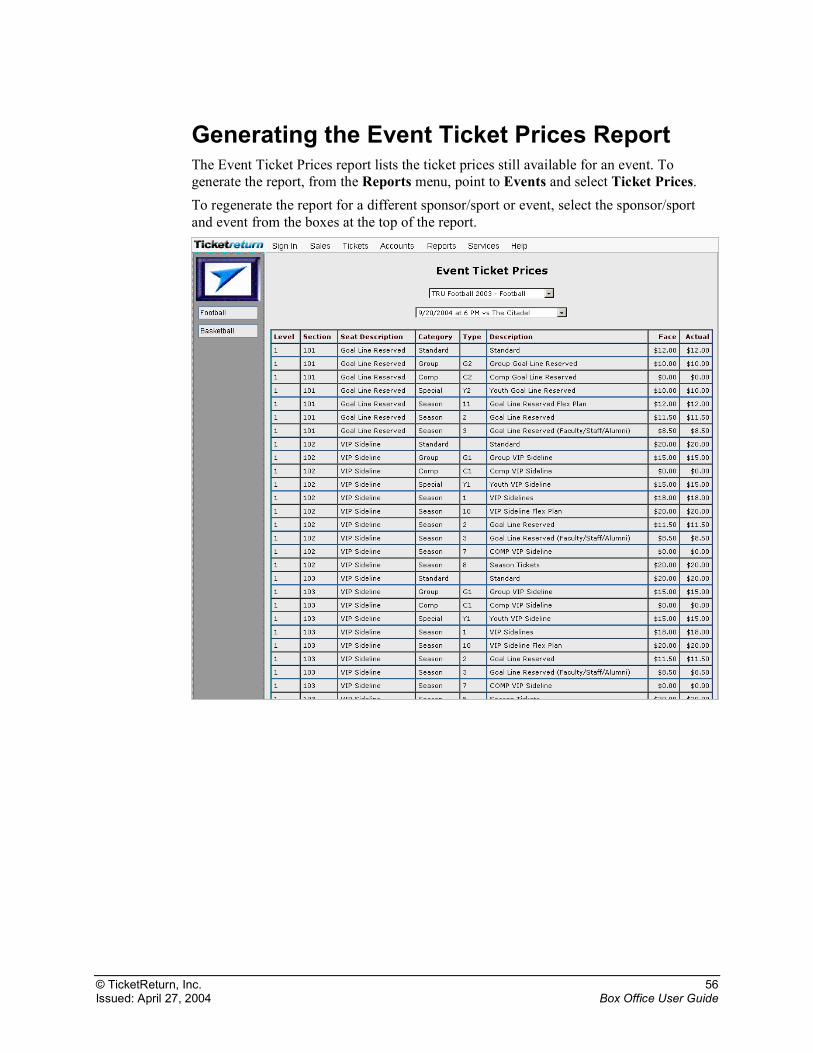
Generating the Event Ticket Prices Report The Event Ticket Prices report lists the ticket prices still available for an event. To generate the report, from the Reports menu, point to Events and select Ticket Prices. To regenerate the report for a different sponsor/sport or event, select the sponsor/sport and event from the boxes at the top of the report.

© TicketReturn, Inc. 57 Issued: April 27, 2004 Box Office User Guide
Generating the Donation Report The Donation report lists the tickets that have been donated to non-profit organizations. To generate the report, from the Reports menu, point to Events and select Donations. To regenerate the report for a different sponsor/sport or event, select the sponsor/sport and event from the boxes at the top of the report.
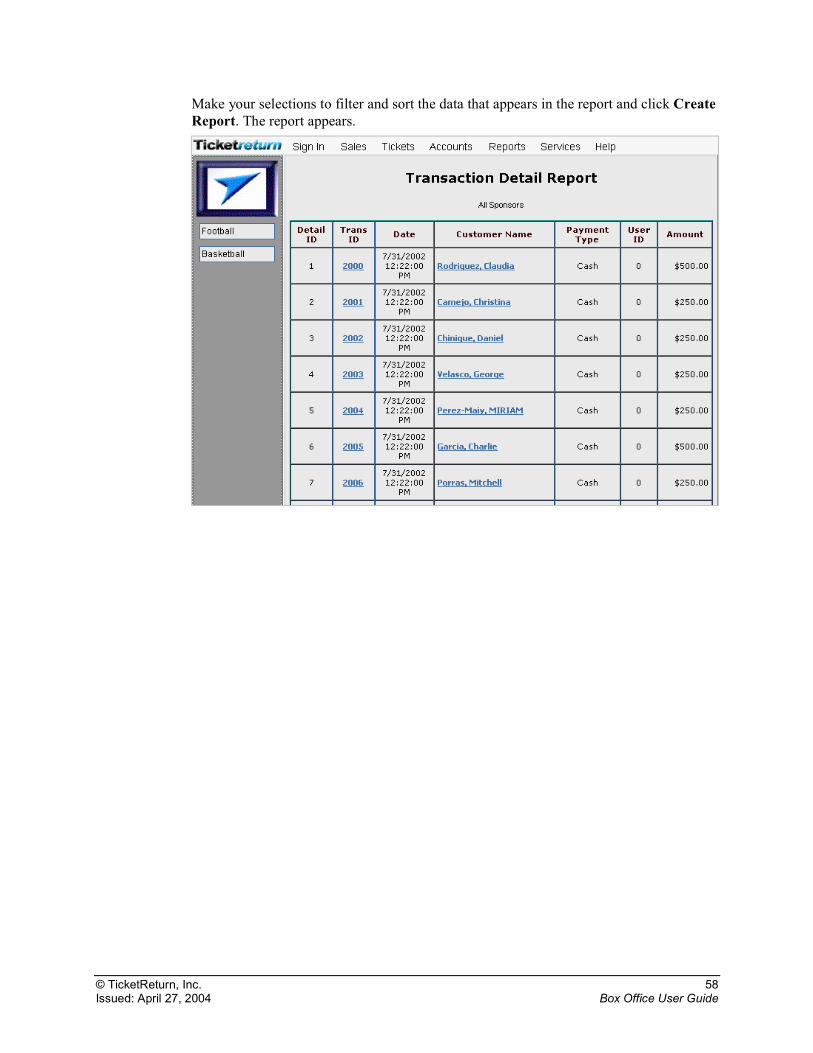
Generating the Transaction Detail Report The Transaction Detail report lists all transactions matching selection criteria for the signed in user. To generate the report, from the Reports menu, point to Accounting and select Transaction Detail. The Transaction Detail Report Selection page appears.
© TicketReturn, Inc. 58 Issued: April 27, 2004 Box Office User Guide
Make your selections to filter and sort the data that appears in the report and click Create Report. The report appears.
© TicketReturn, Inc. 59 Issued: April 27, 2004 Box Office User Guide
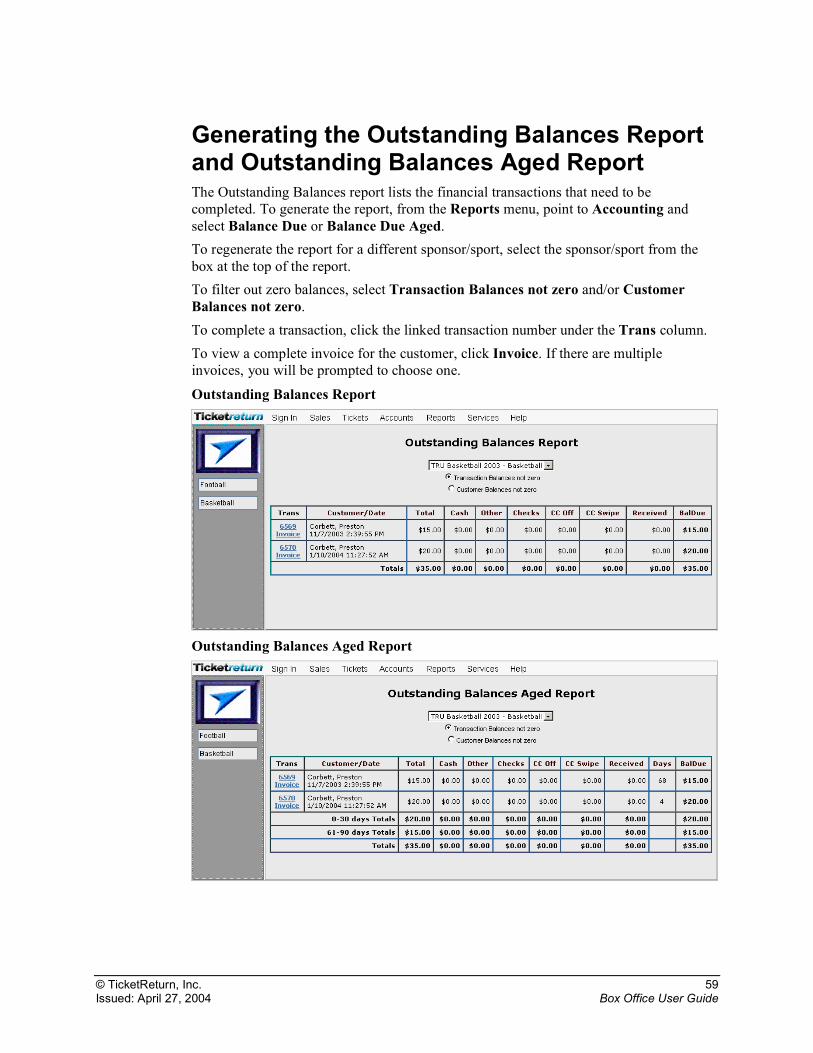
Generating the Outstanding Balances Report and Outstanding Balances Aged Report The Outstanding Balances report lists the financial transactions that need to be completed. To generate the report, from the Reports menu, point to Accounting and select Balance Due or Balance Due Aged. To regenerate the report for a different sponsor/sport, select the sponsor/sport from the box at the top of the report. To filter out zero balances, select Transaction Balances not zero and/or Customer Balances not zero. To complete a transaction, click the linked transaction number under the Trans column. To view a complete invoice for the customer, click Invoice. If there are multiple invoices, you will be prompted to choose one.
Outstanding Balances Report
Outstanding Balances Aged Report
© TicketReturn, Inc. 60 Issued: April 27, 2004 Box Office User Guide
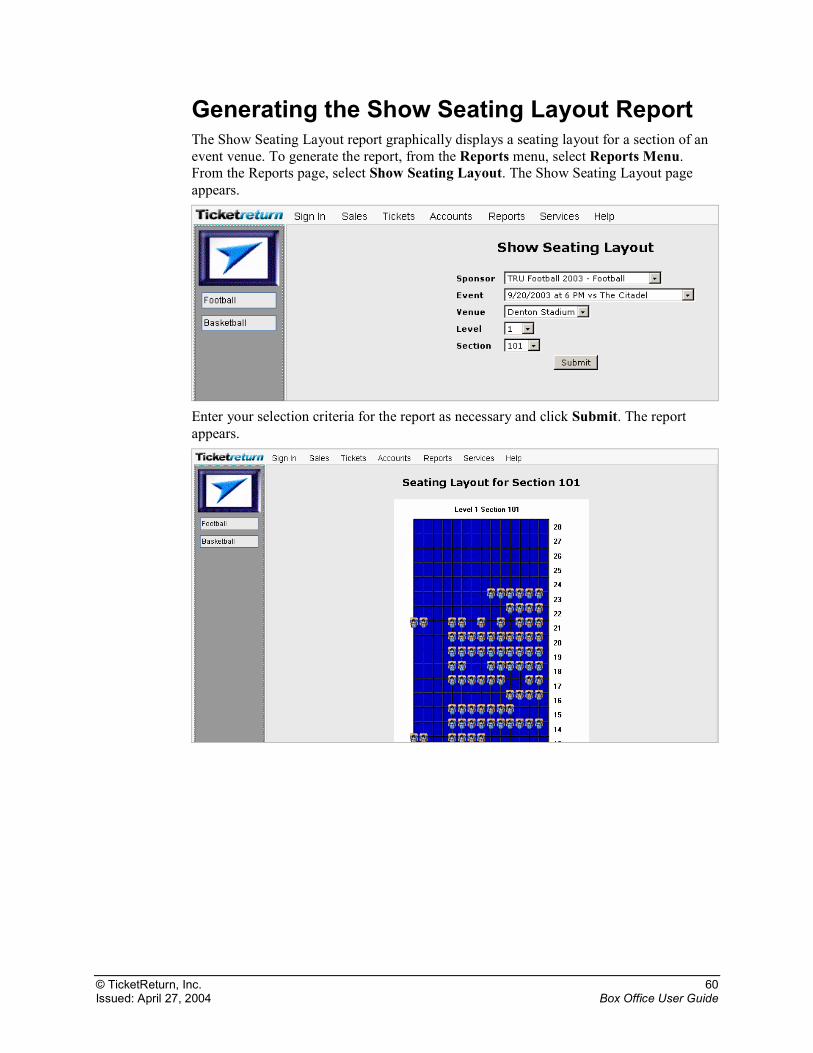
Generating the Show Seating Layout Report The Show Seating Layout report graphically displays a seating layout for a section of an event venue. To generate the report, from the Reports menu, select Reports Menu. From the Reports page, select Show Seating Layout. The Show Seating Layout page appears.
Enter your selection criteria for the report as necessary and click Submit. The report appears.
© TicketReturn, Inc. 61 Issued: April 27, 2004 Box Office User Guide
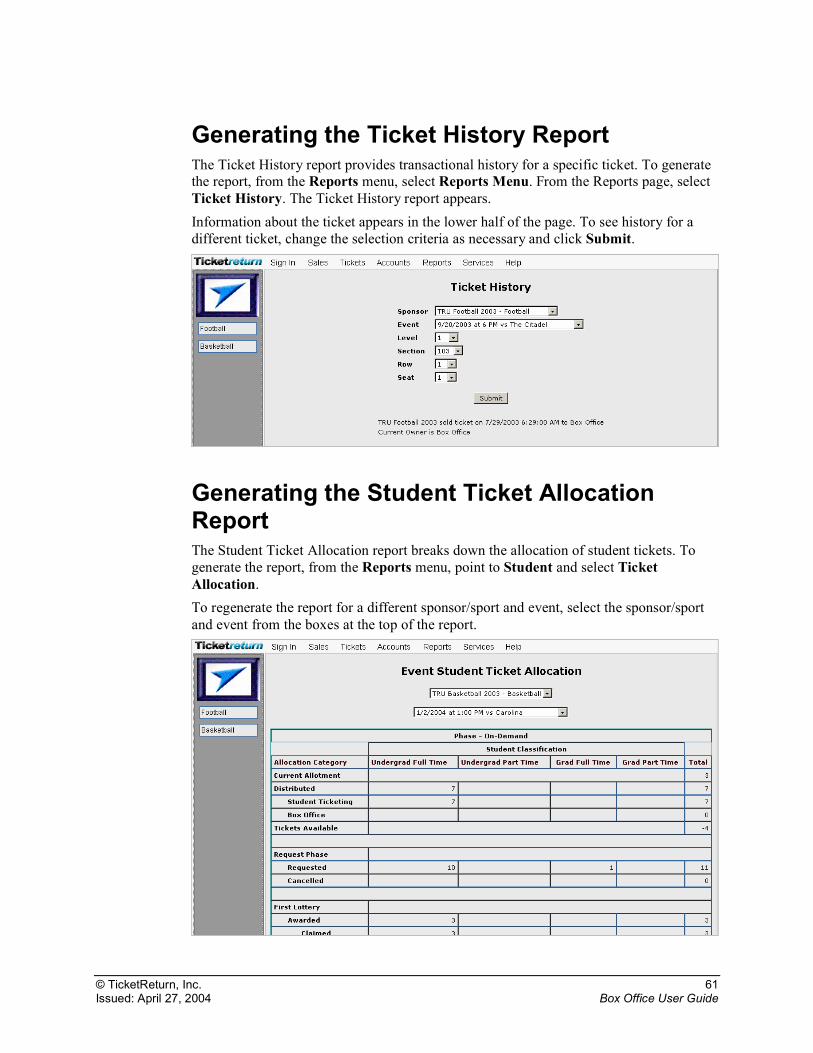
Generating the Ticket History Report The Ticket History report provides transactional history for a specific ticket. To generate the report, from the Reports menu, select Reports Menu. From the Reports page, select Ticket History. The Ticket History report appears. Information about the ticket appears in the lower half of the page. To see history for a different ticket, change the selection criteria as necessary and click Submit.
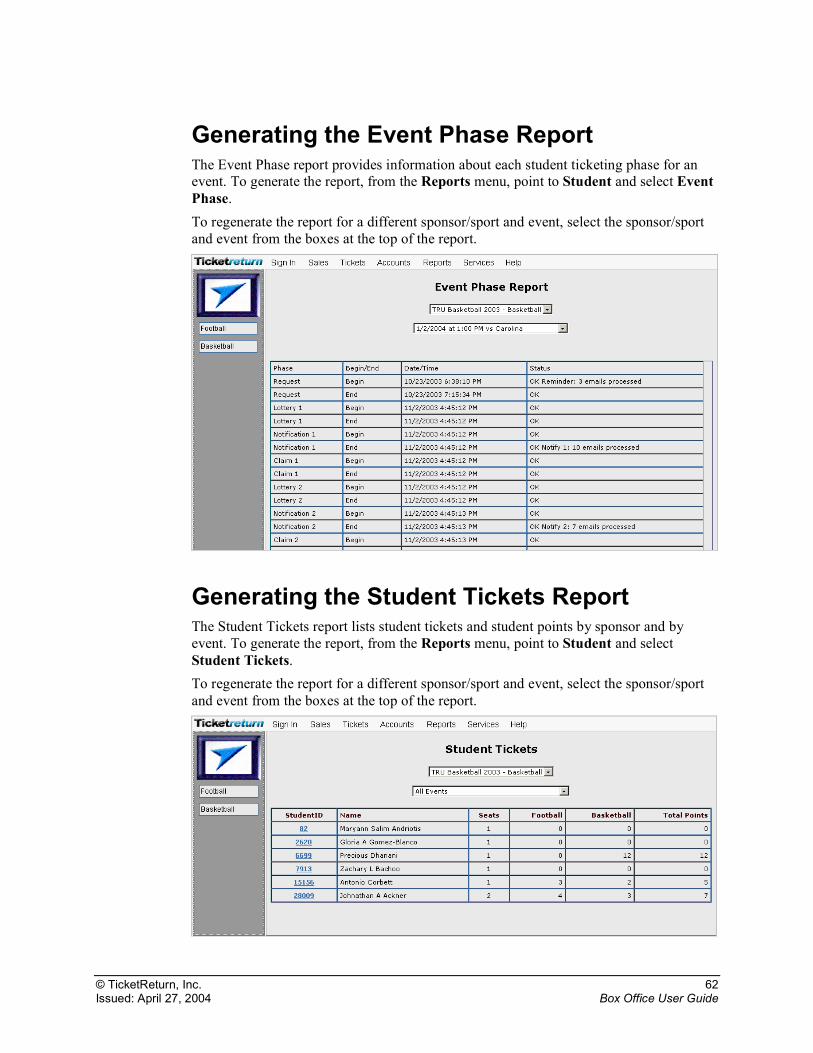
Generating the Student Ticket Allocation Report The Student Ticket Allocation report breaks down the allocation of student tickets. To generate the report, from the Reports menu, point to Student and select Ticket Allocation. To regenerate the report for a different sponsor/sport and event, select the sponsor/sport and event from the boxes at the top of the report.
© TicketReturn, Inc. 62 Issued: April 27, 2004 Box Office User Guide
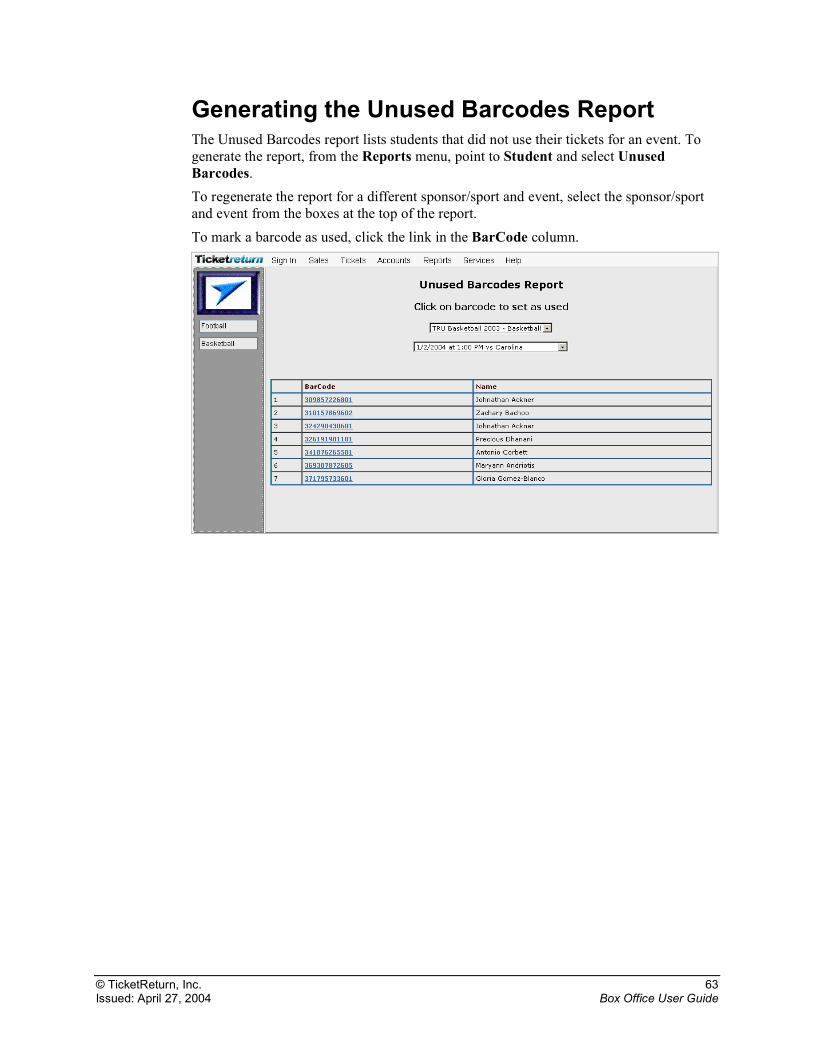
Generating the Event Phase Report The Event Phase report provides information about each student ticketing phase for an event. To generate the report, from the Reports menu, point to Student and select Event Phase. To regenerate the report for a different sponsor/sport and event, select the sponsor/sport and event from the boxes at the top of the report.
Generating the Student Tickets Report The Student Tickets report lists student tickets and student points by sponsor and by event. To generate the report, from the Reports menu, point to Student and select Student Tickets. To regenerate the report for a different sponsor/sport and event, select the sponsor/sport and event from the boxes at the top of the report.
© TicketReturn, Inc. 63 Issued: April 27, 2004 Box Office User Guide
Generating the Unused Barcodes Report The Unused Barcodes report lists students that did not use their tickets for an event. To generate the report, from the Reports menu, point to Student and select Unused Barcodes. To regenerate the report for a different sponsor/sport and event, select the sponsor/sport and event from the boxes at the top of the report. To mark a barcode as used, click the link in the BarCode column.
© TicketReturn, Inc. 64 Issued: April 27, 2004 Box Office User Guide
Printing
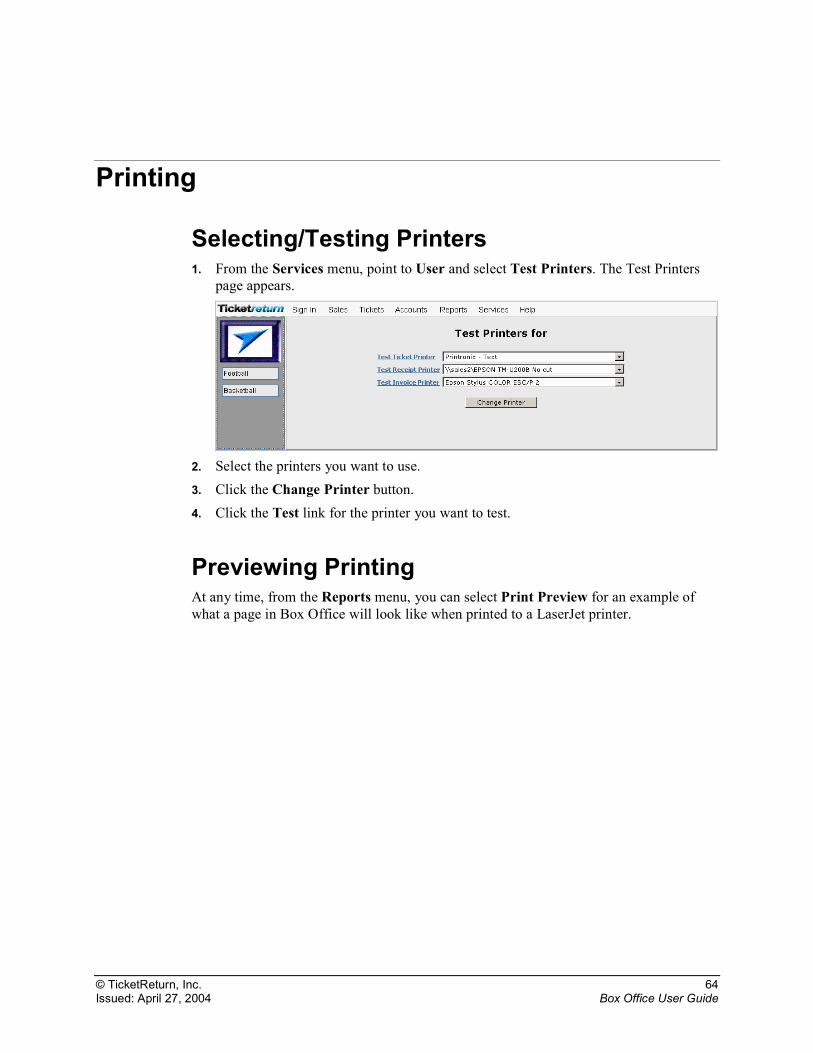
Selecting/Testing Printers 1. From the Services menu, point to User and select Test Printers. The Test Printers
page appears.
2. Select the printers you want to use. 3. Click the Change Printer button. 4. Click the Test link for the printer you want to test.
Previewing Printing At any time, from the Reports menu, you can select Print Preview for an example of what a page in Box Office will look like when printed to a LaserJet printer.
© TicketReturn, Inc. 65 Issued: April 27, 2004 Box Office User Guide
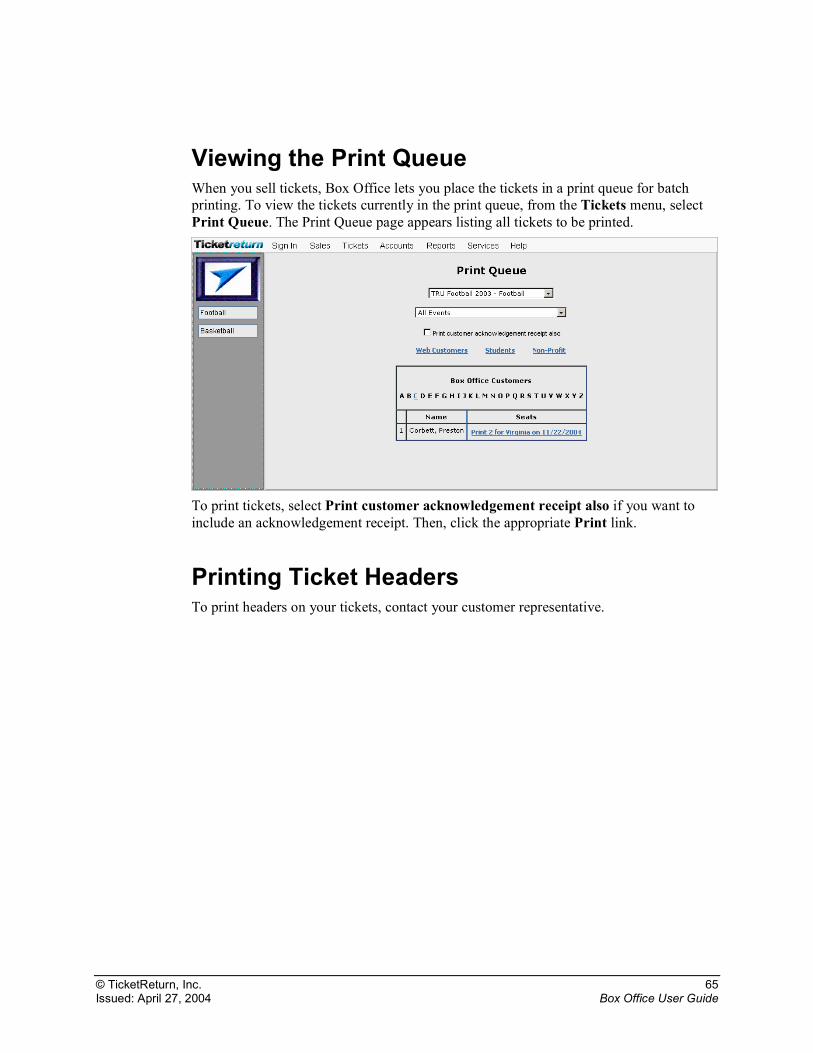
Viewing the Print Queue When you sell tickets, Box Office lets you place the tickets in a print queue for batch printing. To view the tickets currently in the print queue, from the Tickets menu, select Print Queue. The Print Queue page appears listing all tickets to be printed.
To print tickets, select Print customer acknowledgement receipt also if you want to include an acknowledgement receipt. Then, click the appropriate Print link.
Printing Ticket Headers To print headers on your tickets, contact your customer representative.
© TicketReturn, Inc. 66 Issued: April 27, 2004 Box Office User Guide
Services
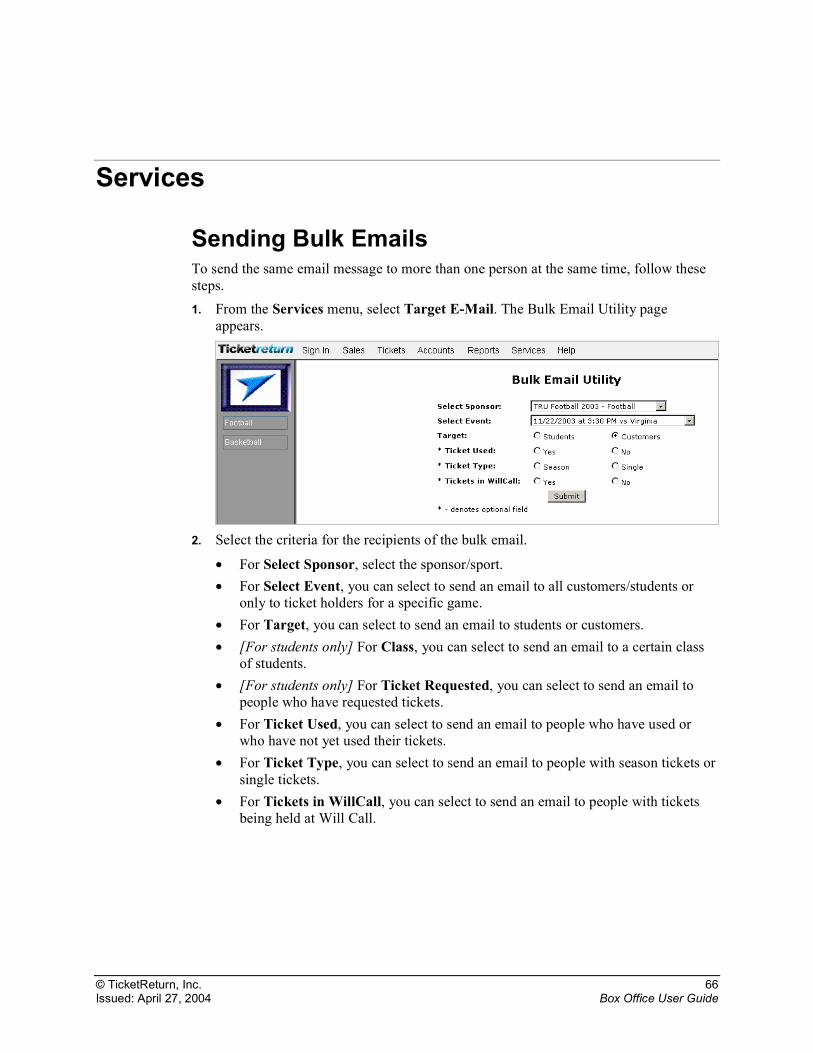
Sending Bulk Emails To send the same email message to more than one person at the same time, follow these steps. 1. From the Services menu, select Target E-Mail. The Bulk Email Utility page
appears.
2. Select the criteria for the recipients of the bulk email.
• For Select Sponsor, select the sponsor/sport. • For Select Event, you can select to send an email to all customers/students or
only to ticket holders for a specific game. • For Target, you can select to send an email to students or customers. • [For students only] For Class, you can select to send an email to a certain class
of students. • [For students only] For Ticket Requested, you can select to send an email to
people who have requested tickets. • For Ticket Used, you can select to send an email to people who have used or
who have not yet used their tickets. • For Ticket Type, you can select to send an email to people with season tickets or
single tickets. • For Tickets in WillCall, you can select to send an email to people with tickets
being held at Will Call.
© TicketReturn, Inc. 67 Issued: April 27, 2004 Box Office User Guide
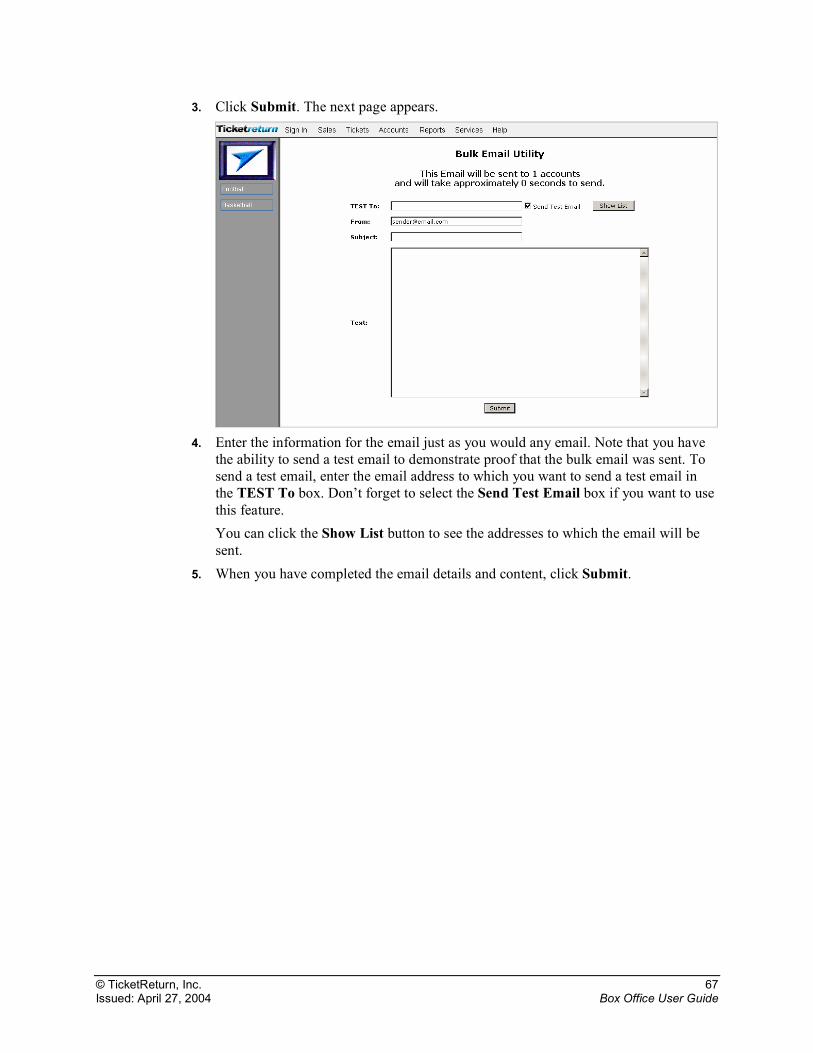
3. Click Submit. The next page appears.
4. Enter the information for the email just as you would any email. Note that you have
the ability to send a test email to demonstrate proof that the bulk email was sent. To send a test email, enter the email address to which you want to send a test email in the TEST To box. Don’t forget to select the Send Test Email box if you want to use this feature. You can click the Show List button to see the addresses to which the email will be sent.
5. When you have completed the email details and content, click Submit.
© TicketReturn, Inc. 68 Issued: April 27, 2004 Box Office User Guide
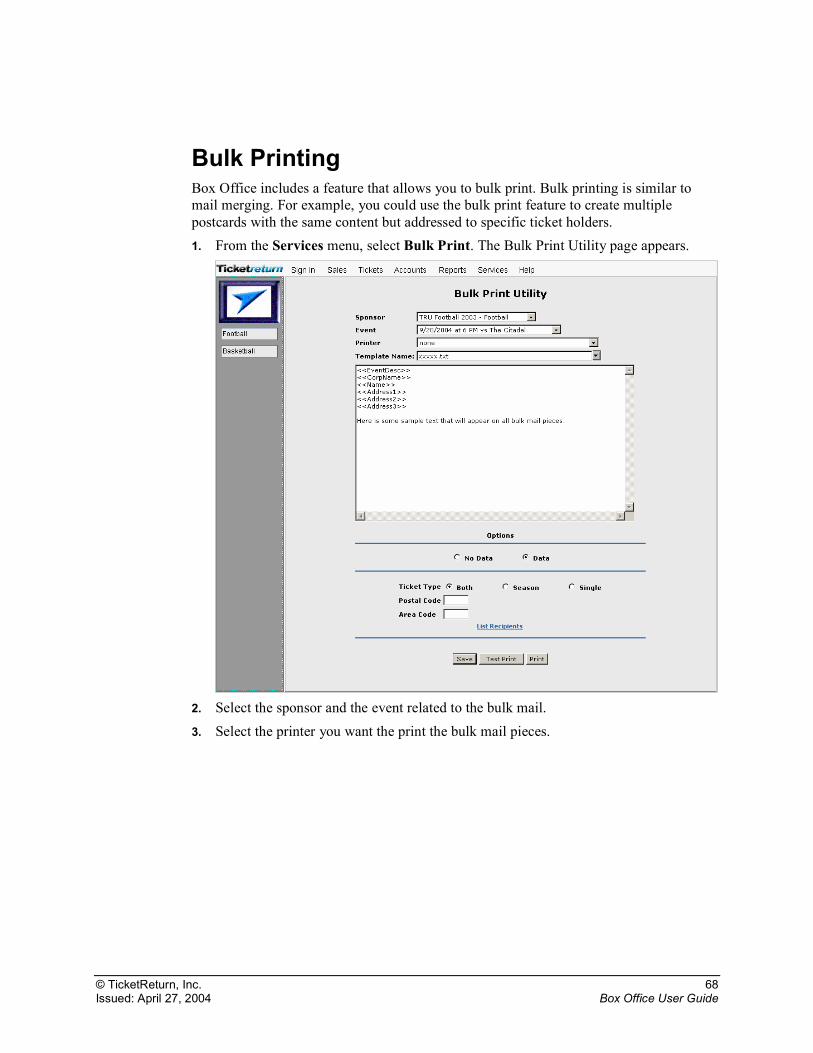
Bulk Printing Box Office includes a feature that allows you to bulk print. Bulk printing is similar to mail merging. For example, you could use the bulk print feature to create multiple postcards with the same content but addressed to specific ticket holders. 1. From the Services menu, select Bulk Print. The Bulk Print Utility page appears.
2. Select the sponsor and the event related to the bulk mail. 3. Select the printer you want the print the bulk mail pieces.

© TicketReturn, Inc. 69 Issued: April 27, 2004 Box Office User Guide
4. If you want to use a template, click the Template Name arrow and select a template. You can change the template if you like. To create your own template, enter the content of the bulk mail in the box. You can enter text and substitution variables that will pull information from the database based on your criteria. For example, if you use the substitution variable <<Name>>, a bulk mail piece will be printed for every ticket holder for the selected sponsor and event. The ticket holder’s name will be substituted in place of the substitution variable. You can use the following substitution variables: <<EventDesc>>: Description of the selected event. <<CorpName>>: The name of the selected sponsor. <<Name>>: The ticket holder’s name. <<Address1>>, <<Address2>> and <<Address3>>: The ticket holder’s address.
5. To save your new template or to save any changes you made to an existing template, click the Save button.
6. Under Options, select Data if you used substitution variables. Select No Data if you did not use substitution variables.
7. If you selected Data, you have the option of entering more criteria for the bulk mail recipients. For example, if you only wanted a bulk mail piece for ticket holders in the 12345 zip code, you would enter 12345 in the Postal Code box. If the bulk mail only applied to season ticket holders, you would select Season for Ticket Type.
8. To see the ticket holders selected to receive the bulk mail, click List Recipients. A separate window appears listing the ticket holders meeting your bulk mail criteria.
9. To print just one bulk mail piece, click the Test Print button. When you are satisfied with your results, click the Print button to generate the bulk mail pieces.
© TicketReturn, Inc. 70 Issued: April 27, 2004 Box Office User Guide
Managing Scanners Pre-Game Procedure for Scanners Follow this procedure for the handheld scanners before every game. 1. Turn all scanners off by pressing the red button on the face of each device. Place
and leave the scanners in the charging cradle for the remainder of this process. 2. In Box Office, from the Services menu, select Scanner Setup. The Scanner
Management page appears. (Note that this page appears in its own window so you can minimize the window at any time to continue using Box Office.)
3. From this page do the following:
• Click the Event(s) for Scanners arrow and select the event you are about to use the scanners for.
• Select Start Scanner Software. • Click Submit.
4. On the next page that appears, select Create Download Files for Scanners and click Submit. Wait until the message Build Successful appears on the screen before proceeding to the next step.
5. Turn all the scanners on. The Gate Control program automatically starts and tries to connect to the host. When the scanner’s message box displays “Connected to Host,” go to the next step. NOTE: It may take several minutes for scanners to connect to the host. Do not start the download process before all scanners are connected to the host. If the download process starts prior to a scanner connecting, the download will fail for that scanner.
6. For each scanner, when Close GateControl and begin AutoUpdater? appears on the handheld screen, touch Yes. The Autoloader screen appears. Leave or replace the scanner in the cradle.
© TicketReturn, Inc. 71 Issued: April 27, 2004 Box Office User Guide
7. Select Download Event Files to Scanners and click Submit. You will see messages on the scanners indicating files being downloaded. When the import process is complete, the red Stop sign will change to a green Go sign, indicating that the scanner is set up for the event. If a scanner does not begin to download files, you have two options:
• [Do not use this method if some scanners are in the process of downloading files, or wait until those scanners are fully downloaded before repeating this process.] Again, select Download Event Files to Scanners and click Submit from the desktop application.
• Manually invoke the download from the scanner by touching the Receive Data Files button (located on the bottom center of the screen) on the scanner.
NOTE: This process can take 15 or more minutes for an 18,000-seat stadium. After the scanner displays the green Go sign in the AutoUpdater program, close the AutoUpdater program by touching the Close button on the scanner. The scanner will perform a soft reset, which will restart the scanner and open the GateControl program. When the scanner reconnects to the network server, verify the event name on the scanner and then go to the next step.
8. Turn the scanners off and distribute them to the entrance gates. 9. Turn the scanners on. 10. Wait for the scanners to re-connect prior to scanning tickets.
NOTE: The scanner only connects when there is a network access point in the vicinity. If there is no network access point, then the scanner will not re-connect. As a general rule, expect the scanners to be connected. If the scanner does not connect after 2-5 minutes, then there is a problem with the access point or the network. Check the access point for power; verify that the antenna is connected to back left receptacle on the access point; check the Ethernet cable connection on the back of the access point. If all connections are secure and power is present, and scanner connections fail, then a network engineer must fix the network connections.
© TicketReturn, Inc. 72 Issued: April 27, 2004 Box Office User Guide
Post-Game Procedure for Scanners Follow this procedure for the handheld scanners after every game. 1. Turn all the scanners on. Once they are turned on, the scanners automatically search
for an IP address, which they must have in order to connect to the host. Once a scanner is connected to the host, the scanner’s message box will display “Connected to Host.”
2. Once the scanners are connected to the host, place them in the multi-port charging cradle. NOTE: It can take several minutes for scanners to connect to the host. If the upload process starts prior to the scanner connecting, the upload will fail for that scanner.
3. For each scanner, when Close GateControl and begin AutoUpdater? appears on the handheld screen, select Yes. The Autoloader screen appears. Leave or replace the scanner in the cradle.
4. In Box Office, from the Services menu, select Scanner Setup. The Scanner Management page appears.
5. From this page, select Upload Files from Scanners and click Submit. If a scanner does not begin to upload files, you have two options:
• [Do not use this method if some scanners are in the process of uploading files.] Again, select Upload Event Files From Scanners and click Submit from the desktop application.
• Manually invoke the upload from the scanner by clicking the Send Log File button (located on the bottom left side of the screen) on the scanner.
NOTE: This process can take 15 or more minutes for an 18,000-seat stadium. You can track the progress of each scanner; wait until each one has the GO symbol before continuing.
6. Select Stop Scanner Software and click Submit.
© TicketReturn, Inc. 73 Issued: April 27, 2004 Box Office User Guide
Player Comps Player Comps is feature within Box Office that allows you to track complimentary tickets given to players (student athletes) as well as manage player accounts.
Viewing/Managing Player Accounts From the Box Office Services menu, click Player Comps. The Player Comps feature opens in a separate window. If the Player Comps Roster page is not open, click Roster. The Player Comps Roster page appears.
From this page, you can do any of the following:
• To add a player account, click Add Player. The Player page appears. Enter the information for the new player and click the Add button.
© TicketReturn, Inc. 74 Issued: April 27, 2004 Box Office User Guide
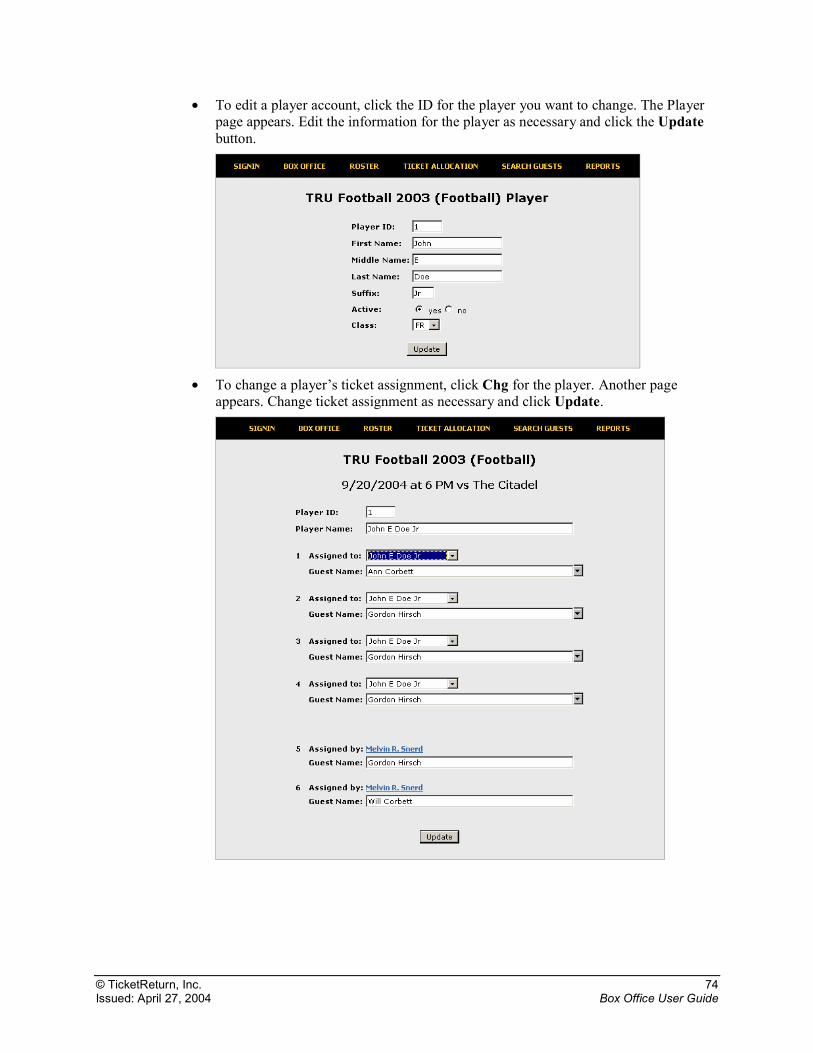
• To edit a player account, click the ID for the player you want to change. The Player page appears. Edit the information for the player as necessary and click the Update button.
• To change a player’s ticket assignment, click Chg for the player. Another page
appears. Change ticket assignment as necessary and click Update.
© TicketReturn, Inc. 75 Issued: April 27, 2004 Box Office User Guide
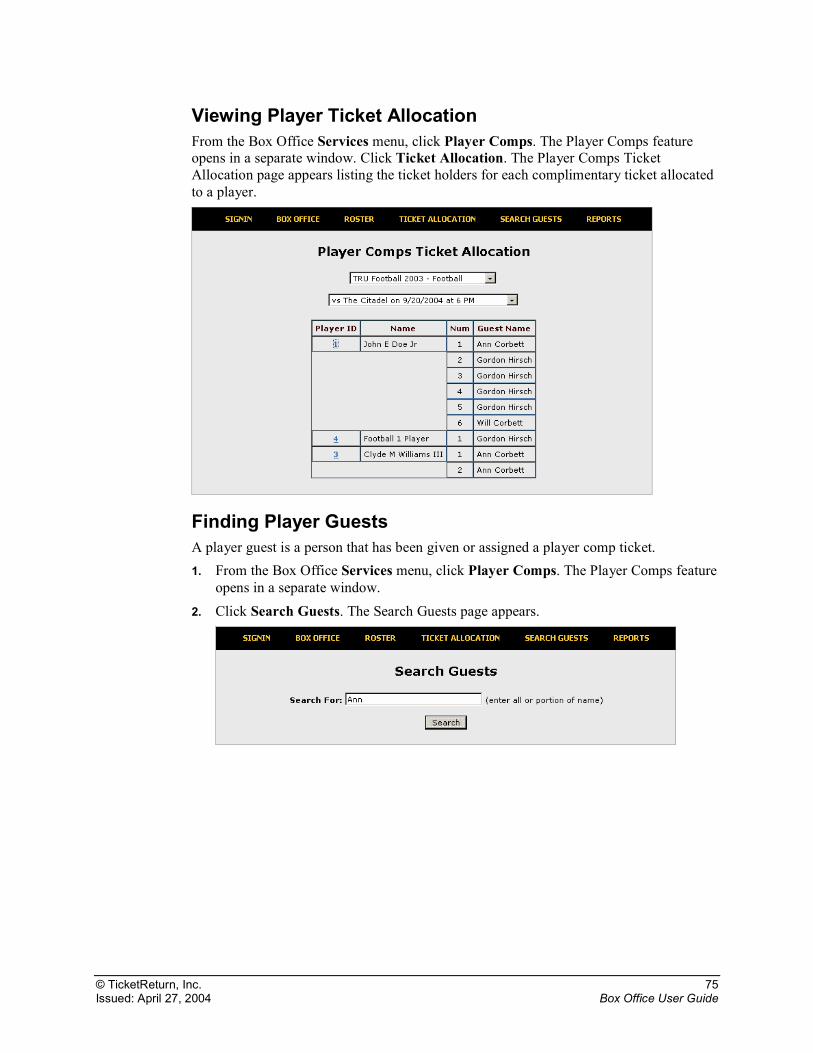
Viewing Player Ticket Allocation From the Box Office Services menu, click Player Comps. The Player Comps feature opens in a separate window. Click Ticket Allocation. The Player Comps Ticket Allocation page appears listing the ticket holders for each complimentary ticket allocated to a player.
Finding Player Guests A player guest is a person that has been given or assigned a player comp ticket. 1. From the Box Office Services menu, click Player Comps. The Player Comps feature
opens in a separate window. 2. Click Search Guests. The Search Guests page appears.
© TicketReturn, Inc. 76 Issued: April 27, 2004 Box Office User Guide
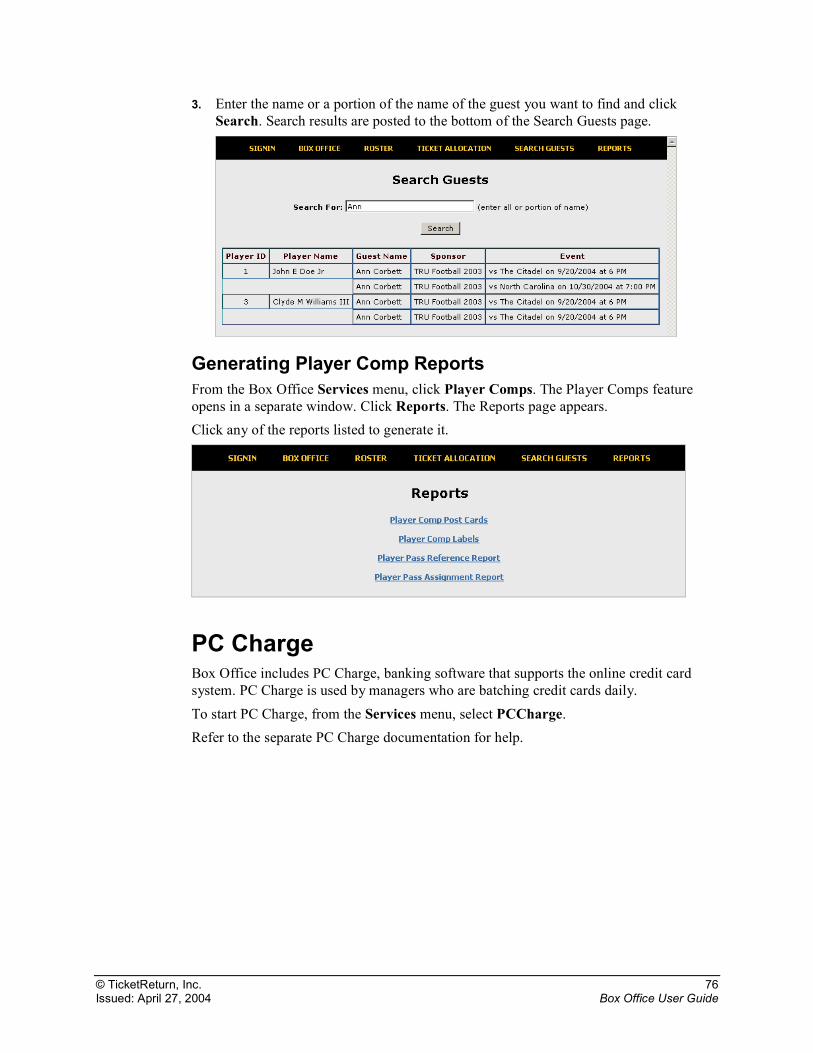
3. Enter the name or a portion of the name of the guest you want to find and click Search. Search results are posted to the bottom of the Search Guests page.
Generating Player Comp Reports From the Box Office Services menu, click Player Comps. The Player Comps feature opens in a separate window. Click Reports. The Reports page appears. Click any of the reports listed to generate it.
PC Charge Box Office includes PC Charge, banking software that supports the online credit card system. PC Charge is used by managers who are batching credit cards daily. To start PC Charge, from the Services menu, select PCCharge. Refer to the separate PC Charge documentation for help.

© TicketReturn, Inc. 77 Issued: April 27, 2004 Box Office User Guide
Index adjust, 34
Box Office, 1
bulk emails, 66
bulk printing, 68
current game tickets, 2
customer information, 32
customers, 29
Daily Ticket Sales report, 48
Daily Transaction report, 47
Donation report, 57
email, 66
Event Attendance report, 55
Event Audit report, 53
Event Phase report, 62
Event Revenue report, 52
Event Ticket Prices report, 56
exchanging tickets, 24
finding customers, 29 students, 31
Group Sales Report 1, 51
Group Sales Report 2, 54
guests for player comps, 75
handheld scanners, 70, 72
headers for tickets, 65
history of tickets, 43
hold tickets, 41
non-ticket items, 17
on hold tickets, 41
Outstanding Balances Aged report, 59
Outstanding Balances report, 59
PC Charge, 76
player accounts managing, 73
player comp reports, 76
Player Comps definition, 73
player ticket allocation, 75
print preview, 64
print queue, 65
printers, 64
printing in bulk, 68
refunding tickets by customer, 22 by event, 20
reports for Box Office, 45 for player comps, 76
reseating season tickets, 37 single game tickets, 39
scanners, 70, 72
searching customers, 29 students, 31
Season Ticket Utilization report, 50
season tickets reseating, 37 selling, 10
seating layout, 44
selling non-ticket items, 17 season tickets, 10 single tickets, 2
Show Seating Layout report, 60
signing in, 1
© TicketReturn, Inc. 2 Issued: April 27, 2004 Box Office User Guide
single game tickets reseating, 39 selling, 2
Student Allocation report, 61
student information, 32
Student Tickets report, 62
students, 31
substitution variables, 69
target email, 66
Ticket History report, 61
tickets at Will Call, 40 exchanging, 24 history, 43 on hold, 41
printing headers, 65 refunding by customer, 22 refunding by event, 20 selling season, 10 selling single, 2
Total Tickets Sold report, 48
Transaction Detail report, 57
transactions adjusting, 34 transferring, 36
transfer, 36
Unused Barcodes report, 63
Web Sales report, 49
Will Call tickets, 40