bowling coaching guide - special olympics georgia
TRANSCRIPT

BOWLING COACHING GUIDE

Special Olympics Bowling Coaching Guide Created: February 2004
Special Olympics Bowling Coaching Guide Benefits of Bowling
2
The Benefits of Bowling Bowling is one of the most popular sports in the world. One of the reasons for its popularity is its adaptability: children and adults of nearly every ability level can participate, and it can be enjoyed as a leisure, recreational and social activity or as a competitive opportunity. Children too young to execute a full approach can stand near the foul line and, using two hands, gleefully shove the ball down the lane. Teenagers, middle-aged people, even octogenarians frequent the lanes. Bowling leagues abound. No other sport in the world has such a diversity of participants. Why? Bowling is fun, good, clean, laugh-it-up fun. Other major benefits of bowling include its easy accessibility to facilities, equipment and instruction, as well as practice, league and competitive play.
Bowling is a lifetime fitness sport which contributes to balance, coordination and motor skills. Bowling is able to fill the needs of so many people because it is, above all, a simple game. The rules are not complex and the basics of how to roll the ball are quickly learned. The modern game of bowling is played on an indoor wooden or urethane lane. Ten pins are arranged in a triangular formation 30 centimeters apart. The game is played by rolling a ball down the lane in an effort to knock down all the pins stationed at the end of the lane. Each individual is allowed two attempts per frame to knock down the pins. One game consists of 10 frames. The individual who has the highest score (i.e., the one who has knocked down the most pins) is the winner.
Bowling is an excellent recreational activity for all ages and ability levels. Because of the relatively small expenditure of energy required for participation in the game, an athlete can participate in bowling for many more years than other sports. Bowling is considered one of the largest participant sports and has emerged as a sport for the entire family to play and enjoy.

Special Olympics Bowling Coaching Guide Created: February 2004
Special Olympics Bowling Coaching Guide
Acknowledgements
3
Acknowledgements
Special Olympics wishes to thank the professionals, volunteers, coaches and athletes who helped in the production of the Bowling Coaching Guide. They have helped fulfill the mission of Special Olympics: to provide year round sports training and athletic competition in a variety of Olympic-type sports for people eight years of age and older with intellectual disabilities, giving them continuing opportunities to develop physical fitness, demonstrate courage, experience joy and participate in a sharing of gifts, skills and friendship with their families, other Special Olympics athletes and the community.
Special Olympics welcomes your ideas and comments for future revisions of this guide. We apologize if, for any reason, an acknowledgement has been inadvertently omitted.
Contributing Authors Fred Borden, Former Head Coach of Team USA Bowling
Venisha Bowler, Special Olympics, Inc.
Patricia J. Chinn, Special Olympics North Carolina
Wanda S. Durden, Special Olympics, Inc.
Bobbi Hoven, Special Olympics Nevada, 1999 & 2003 World Games Technical Delegate
Jerry Koenig, Former CEO/Executive Director of USA Bowling
Dave Lenox, Special Olympics, Inc.
Bob Maki, Director of Coaching, USA Bowling
Susie Minshew, Strikeability, Inc.
Ryan Murphy, Special Olympics, Inc.
Phillip (Phil) A. Parson, Special Olympics Australia
Cary Pon, Manager, Coach Development & Certification, USA Bowling Coaching
Paul Whichard, Special Olympics, Inc.
Margaret (Marge) Wilkes, Special Olympics Nevada, 1999 & 2003 World Games Official
Special Thanks to the Following for All of Your Help and Support Special Olympics Nevada
Starring Athletes from Special Olympics Nevada
Special Olympics North America

BOWLING COACHING GUIDE
Planning a Bowling Training and Competition Season

Special Olympics Bowling Coaching Guide Created: February 2004
Planning a Bowling Training and Competition Season
Table of Contents
5
Table of Contents
Goals and Objectives Setting Goals Assessing Goals Checklist
Planning a Bowling Training and Competition Season Preseason Planning In-Season Planning Confirmation of Practice Schedule
Essential Components of Planning a Bowling Training Session Principles of Effective Training Sessions Tips for Conducting Successful Training Sessions Tips for Conducting Safe Training Sessions Bowling Practice Competitions
Selecting Team Members Ability and Age Grouping Creating Meaningful Involvement in Special Olympics Unified Sports®
Athlete Skills Assessment Bowling Skills Assessment Card
Daily Performance Record Using the Daily Performance Record Conditions and Criteria for Mastering
Bowling Attire Bowling Equipment
Equipment Selection Coaches’ Tips for Equipment Selection – At-A-Glance

Special Olympics Bowling Coaching Guide Created: February 2004
Planning a Bowling Training and Competition Season Goals and Objectives
6
Goals
Realistic, yet challenging goals for each athlete are important to the motivation of the athlete at training and during competition. Goals establish and drive the action of both training and competition plans. Sport confidence in athletes helps to make participation fun and is critical to the athlete's motivation. Please see the Principles of Coaching section for additional information and exercises on goal setting.
Benefits
Increases athlete's level of physical fitness
Teaches self-discipline
Teaches the athlete sports skills that are essential to a variety of other activities
Provides the athlete with a means for self-expression and social interaction
Goal Setting Setting goals is a joint effort between the athlete and coach. Following are the main features of goal setting.
Structured into short-term, intermediate and long-term
Stepping stones to success
Must be accepted by the athlete
Vary in difficulty - easily attainable to challenging
Must be measurable
Long Term Goal The athlete will acquire basic bowling skills, appropriate social behavior and functional knowledge of the rules necessary to participate successfully in bowling competitions.
Assessing Goals Checklist
1. Write a goal statement.
2. Does the goal sufficiently meet the athlete’s needs?
3. Is the goal positively stated? If not, rewrite it.
4. Is the goal under the athlete’s control and does it focus on his/her goals and no one else’s?
5. Is the goal a goal and not a result?
6. Is the goal important enough to the athlete that he/she will want to work toward achieving it? Have the time and energy to do it?
7. How will this goal make the athlete’s life different?
8. What barriers might the athlete encounter in working toward this goal?
9. What does the athlete need to learn how to do?
10. What risks does the athlete need to take?

Special Olympics Bowling Coaching Guide Created: February 2004
Planning a Bowling Training and Competition Season
Season Planning
7
Planning a Bowling Training and Competition Season
As with all sports, the Special Olympics bowling coach develops a coaching philosophy. The coach’s philosophy needs to be consistent with the Special Olympics philosophy, which is that quality training and opportunities for fair and equitable competition are guaranteed for each athlete. However, successful coaches include having fun along with an athlete’s acquiring sport-specific skills and knowledge of the program’s objectives.
A season plan provides the road map to aid you in meeting your program’s goal and objectives as well as goals for individual athletes. Although the minimum training requirement is eight weeks, serious consideration should be given to establishing a longer program; for example, a yearlong bowling program divided into fall, summer, spring and winter seasons. Using the bowling handicap system, it is simple to form teams that provide fair competition.
Preseason Planning
Improve your knowledge of bowling and of coaching athletes with intellectual disabilities by attending a Special Olympics training school.
Arrange for a bowling facility that will accommodate your needs throughout season.
Arrange for equipment and include adapted equipment if necessary.
Recruit, orient and train volunteer assistant coaches.
Coordinate transportation needs.
Ensure that all athletes have been medically approved before the first practice.
Obtain copies of medical and parental releases.
Establish goals and develop a plan for the season.
Consider establishing a bowling league sanctioned by your national bowling association or federation with the season lasting longer than eight weeks.
Establish and coordinate a seasonal schedule, including league play, training practices, clinics and demonstrations, and confirm any planned dates for local, area, sectional, state, national and Special Olympics Unified Sports® bowling competitions.
Hold orientation for families, teachers and friends of athletes and include information about the Home Training Program.
Establish procedures for recognizing each athlete’s progress.
Establish a seasonal budget.
In-Season Planning
Use skills assessments to identify each athlete’s skill level and to record each athlete’s progress throughout the season.
Design an eight-week training program
Plan and modify each session according to what needs to be accomplished.
Emphasize conditioning as skill is learned.
Develop skills by progressively increasing difficulty.
Special Olympics Bowling Coaching Guide Created: February 2004
Planning a Bowling Training and Competition Season Season Planning
8
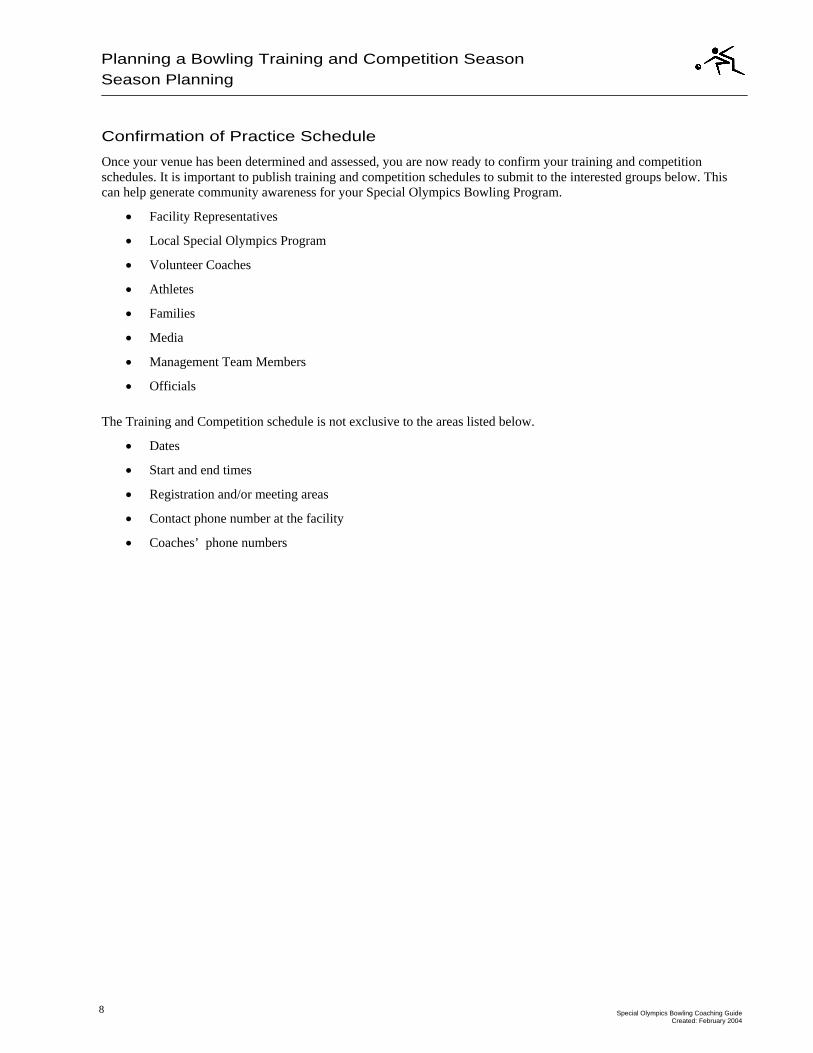
Confirmation of Practice Schedule
Once your venue has been determined and assessed, you are now ready to confirm your training and competition schedules. It is important to publish training and competition schedules to submit to the interested groups below. This can help generate community awareness for your Special Olympics Bowling Program.
Facility Representatives
Local Special Olympics Program
Volunteer Coaches
Athletes
Families
Media
Management Team Members
Officials
The Training and Competition schedule is not exclusive to the areas listed below.
Dates
Start and end times
Registration and/or meeting areas
Contact phone number at the facility
Coaches’ phone numbers

Special Olympics Bowling Coaching Guide Created: February 2004
Planning a Bowling Training and Competition Season
Planning a Training Session
9
Essential Components of Planning a Bowling Training Session
Special Olympics athletes respond favorably to a simple, well-structured training outline with which they can become familiar. An organized plan, prepared before you get to the bowling center, will help establish such a routine and help make the best use of your limited time. Every practice session needs to contain the following elements. The amount of time spent on each element will vary because of several factors.
Warm-ups
Previously taught skills
New skills
Competition experience
Feedback on performance
1. Time of the season: More skills practice is provided earlier in the season. In comparison, more competition experience is provided later in the season.
2. Skill level: More practice of previously taught skills is needed for lower ability athletes.
3. Number of coaches: The more coaches present and the more quality individual instruction offered, the more improvement seen.
4. Total amount of training time available: More time is spent on new skills in a two-hour session than in a 90-minute session.
If you have decided to establish a bowling league, much of your training will revolve around each week’s bowling session. Training can take place before, during and after league play. Before league play, you can work on teaching about equipment needed for bowling and have a warm-up period. During league play, you can observe the athlete bowling and make comments regarding what they are not doing correctly, or praise them when they do something correctly; i.e., “Way to follow through” or “Great strike.” Instructions in scoring, bowling etiquette and sportsmanship can also be accomplished. After league play, you can work on new skills or work with athletes on improving previously learned skills. A recommended training plan is outlined below.
Warm Up and Stretch (10-15 minutes) Every player participates in a warm-up period on the lanes (i.e., shadow bowling). Stretch each muscle group while waiting to practice bowling.
Skills Instruction (15-20 minutes) 1. Quickly review previously taught skills.
2. Introduce the theme of the skills activity.
3. Demonstrate the skills simply and dramatically.
4. Physically assist and prompt lower ability players when necessary.
5. Introduce and practice new skills early in the practice session.
Competition Experience (1, 2, or 3 games) Players learn a lot by simply bowling. The game is a great teacher.

Special Olympics Bowling Coaching Guide Created: February 2004
Planning a Bowling Training and Competition Season Planning a Training Session
10
Principles of Effective Training Sessions
Keep all active Athlete needs to be an active listener.
Create clear, concise goals Learning improves when athletes know what is expected of them.
Give clear, concise instructions Demonstrate – increase accuracy of instruction.
Record progress You and your athletes chart progress together.
Give positive feedback Emphasize and reward things the athlete is doing well.
Provide variety Vary exercises – prevent boredom.
Encourage enjoyment Training and competition is fun; help keep it this way for you and your athletes.
Create progressions Learning is increased when information progresses from:
Known to unknown – discovering new things successfully
Simple to complex – seeing that “I” can do it
General to specific – this is why “I” am working so hard
Plan maximum use of resources Use what you have, and improvise for equipment that you do not have – think creatively.
Allow for individual differences Different athletes, different learning rates, different capacities.

Special Olympics Bowling Coaching Guide Created: February 2004
Planning a Bowling Training and Competition Season
Planning a Training Session
11
Tips for Conducting Successful Training Sessions
Assign assistant coaches their roles and responsibilities in accordance to your training plan.
When possible, have all equipment and stations prepared before the athletes arrive.
Introduce and acknowledge coaches and athletes.
Review intended program with everyone. Keep athletes informed of changes in schedule or activities.
Alter the plan according to weather; and the facility, in order to accommodate the needs of the athletes.
Change activities before the athletes become bored and lose interest.
Keep drills and activities brief so athletes do not get bored. Keep everyone busy with an exercise, even if it is rest.
Devote the end of the practice to a fun, group activity that can incorporate challenge and fun, always giving them something to look forward to at the end of practice.
If an activity is going well, it is often useful to stop the activity while interest is high.
Summarize the session and announce arrangements for next session.
Keep the fun in fundamentals.

Special Olympics Bowling Coaching Guide Created: February 2004
Planning a Bowling Training and Competition Season Planning a Training Session
12
Tips for Conducting Safe Training Sessions Though the risks can be few, coaches have a responsibility to ensure that athletes know, understand and appreciate the risks of bowling. The safety and well-being of athletes are the coaches’ primary concerns. Bowling is not a dangerous sport, but accidents (smashed thumbs, toes, etc.) do occur when coaches forget to take safety precautions. It is the head coach’s responsibility to minimize the occurrence of injuries by providing safe conditions and proper instruction. Work with the bowling center management to insure safe conditions and make necessary adjustments.
The Facility
The seating/scorekeeping area should be clean and free of any food or drinks. Street shoes, outdoor clothing, bowling bags, etc., should be placed in an appropriate location. The floor should be especially clean and dry.
The approach area should be clean, dry and free from any debris. Lanes, foul lights, ball return and scorekeeping equipment should all be turned on.
There is easy access to bathrooms, telephone, water and first-aid kits. Ensure wheelchair accessibility if needed.
First-aid kit is available and restocked with supplies as necessary.
Supervision
There is at least a 1-3 coach/assistant to athlete ratio present at all times; preferably, coaches with bowling coach’s certification; and at least one person with basic first-aid knowledge.
Up-to-date copies of the athletes’ medical forms are on-site.
Provide emergency procedures. Train all athletes and coaches in these procedures.
Equipment and Clothing
Bowlers are properly fit with appropriate bowling attire and shoes. No hats, combs, portable tape players, sunglasses, etc., need to be worn or carried on to the approach.
If using a house ball, ensure the ball is properly fit according to weight and grip.
Any adaptive equipment, such as ramps, “push sticks” or other types of devices, is clean and in working condition.
Before Entering Bowling Area
Establish clear rules for behavior at your first practice and enforce them.
1. Keep your hands to yourself.
2. Listen to the coach.
3. Ask the coach before you leave the bowling lane.
Bowlers are well trained on bowler’s etiquette and safety. For example, bowler to the right lane has right of way; wait until bowler on each side has completed roll and returned to ball-return area before stepping on to approach; be prompt and ready to bowl on your turn, etc.
Street shoes and outdoor clothing are kept in the appropriate place, away from the scorekeeping/bowlers’ seating area. No food or drinks are allowed in the pit area.
Athletes have properly warmed-up and completed a stretching routine.
Special Olympics Bowling Coaching Guide Created: February 2004
Planning a Bowling Training and Competition Season
Planning a Training Session
13
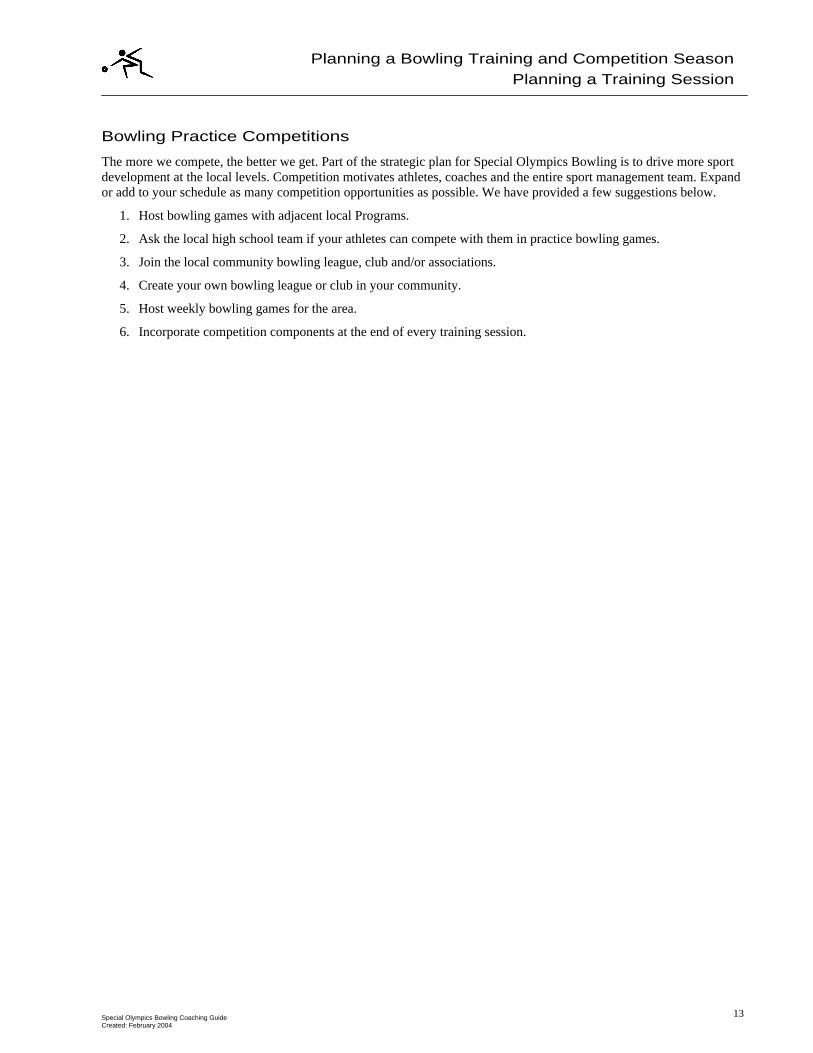
Bowling Practice Competitions
The more we compete, the better we get. Part of the strategic plan for Special Olympics Bowling is to drive more sport development at the local levels. Competition motivates athletes, coaches and the entire sport management team. Expand or add to your schedule as many competition opportunities as possible. We have provided a few suggestions below.
1. Host bowling games with adjacent local Programs.
2. Ask the local high school team if your athletes can compete with them in practice bowling games.
3. Join the local community bowling league, club and/or associations.
4. Create your own bowling league or club in your community.
5. Host weekly bowling games for the area.
6. Incorporate competition components at the end of every training session.

Special Olympics Bowling Coaching Guide Created: February 2004
Planning a Bowling Training and Competition Season Selecting Team Members
14
Selecting Team Members
The key to the successful development of a traditional Special Olympics or Unified Sports team is the proper selection of team members. We have provided some primary considerations below.
Ability Grouping Unified Sports bowling teams work best when all team members have similar sports skills. Partners with abilities that are far superior to other teammates will either control competition or accommodate others by not competing to their potential. In both situations, the goals of interaction and teamwork are diminished and a true competitive experience is not achieved. For example, in bowling, an 8-year-old should not be competing against or with a 30-year-old athlete.
Age Grouping All team members should be closely matched in age.
Within 3-5 years of age for athletes 21 years of age and under.
Within 10-15 years for athletes 22 years of age and over.
Creating Meaningful Involvement in Special Olympics Unified Sports Unified Sports embraces the philosophy and principles of Special Olympics. When selecting your Unified Sports team, you want to achieve meaningful involvement at the beginning, during and end of your sport season. Unified Sports teams are organized to provide meaningful involvement for all athletes and partners. Every teammate should play a role and have the opportunity to contribute to the team. Meaningful involvement also refers to the quality of interaction and competition within a Unified Sports team. Achieving meaningful involvement by all teammates on the team ensures a positive and rewarding experience for everyone.
Indicators of Meaningful Involvement
Teammates compete without causing undue risk of injury to themselves or others.
Teammates compete according to the rules of competition.
Teammates have the ability and opportunity to contribute to the performance of the team.
Teammates understand how to blend their skills with those of other athletes, resulting in improved performance by athletes with lesser ability.
Meaningful Involvement Is Not Achieved When Team Members
Have superior sports skills in comparison to their fellow team members.
Act as on-field coaches rather than teammates.
Control most aspects of the competition during critical periods of the game.
Do not train or practice regularly and only show up on the day of competition.
Lower their level of ability dramatically, so that they do not hurt others or control the entire game.

Special Olympics Bowling Coaching Guide Created: February 2004
Planning a Bowling Training and Competition Season
Bowling Skills Assessment
15
Bowling Skills Assessment The sport skills assessment chart is a systematic method that is useful in determining the skill ability of an athlete. The Bowling Skills Assessment Card is designed to assist coaches in determining athletes’ ability levels in bowling before they begin participation. Coaches will find this assessment a useful tool for several reasons.
1. Help coach to determine with the athlete which events they will compete in.
2. Establish the baseline training areas of athlete.
3. Assist coaches to group athletes of similar ability on training teams.
4. Measure the athlete’s progression.
5. Help determine athlete’s daily training schedule.
Before administering the assessment, coaches need to perform the following analysis when observing the athlete.
Become familiar with each of the tasks listed under the major skills.
Have an accurate visual picture of each task.
Have observed a skilled performer executing the skill.
When administering the assessment, coaches will have a better opportunity in getting the best analysis from their athletes. Always begin by explaining the skill you would like to observe. When possible, demonstrate the skill.
Remember
The bowler’s average score is the ultimate determining factor in how well the bowler is bowling. Record the scores of each game, and determine an average for the number of games bowled. Appropriate skill level is determined by average. What you are looking for is an increase in the bowler’s average from the start of training to the end of training. Remember, changes made to the way a bowler bowls, or to their equipment, will often result in lower scores at first, as the bowler makes the necessary adjustments and becomes familiar with them.

Special Olympics Bowling Coaching Guide Created: February 2004
Planning a Bowling Training and Competition Season Bowling Skills Assessment
16
Special Olympics Bowling Skills Assessment Card
Athlete’s Name Date
Coach’s Name Date
Instructions
1. Use tool at the beginning of the training/competition season to establish a basis of the athlete’s starting skill level.
2. Have the athlete perform the skill several times. 3. If the athlete performs the skill correctly three out of five times, check the box next to the skill to indicate that
the skill has been accomplished. 4. Program assessment sessions into your program. 5. Bowlers may accomplish skills in any order. Athletes have accomplished this list when all possible items have
been achieved.
Layout of the Bowling Area Knows where the control counter, lounge area and bowling area are located.
Can identify the pit area.
Can identify the approach area.
Can identify the foul line/foul light and understand their functions.
Can identify the ball return.
Can identify the automatic scoring equipment.
Understands how the balls are returned and the operation of the ball return equipment.
Equipment Selection Understands where to locate shoes and ball.
Asks appropriate person for correct bowling shoe size.
Selects appropriate weight for a ball.
Wears clothing that is comfortable and provides freedom of movement.
Returns bowling ball and shoes to appropriate place after game.
Scoring Understands to count pins knocked down.
Recognizes strikes and spares.
Understands basic terminology (i.e., open, split, strike, spare).
Understands method of scoring.

Special Olympics Bowling Coaching Guide Created: February 2004
Planning a Bowling Training and Competition Season
Bowling Skills Assessment
17
Rules of the Game Shows an understanding of the game.
Understands that the game consists of 10 frames.
Knows which lane to bowl on when alternate lanes are being used.
Knows not to cross the foul line when bowling.
Knows that pins knocked down when a foul is committed do not count.
Knows to bowl only one ball in a frame when a strike is scored.
Knows to bowl no more than two balls per frame, unless in the 10th frame where three balls may be permitted.
Knows to bowl only when pins are standing.
Adheres to the rules of the bowling area.
Follows official Special Olympics and ABC bowling rules.
Sportsmanship/Etiquette Exhibit sportsmanship and etiquette at all times.
Demonstrate competitive effort at all times.
Takes turns with other team members.
Selects and uses the same ball throughout the game.
Waits for bowlers on adjacent lanes (one lane right or left of athlete) to finish before bowling.
Bowls cooperatively and competitively; cheers fellow teammates.
Maintains knowledge of own score.
Helps teammates with their scores.
Retrieving the Ball Observes lane courtesy.
Approaches ball return from correct side.
Identifies own ball.
Picks up ball correctly from ball return.
Cradles the ball in one arm and moves to the starting position on the approach.
Grip Places fingers and thumb in the ball properly.
Supports the ball by placing the nonbowling hand under the ball with elbows in.

Special Olympics Bowling Coaching Guide Created: February 2004
Planning a Bowling Training and Competition Season Bowling Skills Assessment
18
Stance Locates starting position on approach.
Stands appropriately for making spares.
Demonstrates proper foot placement - left foot forward, if right-handed.
Assumes correct stance with eyes focused on bowling pins or target arrows/dots.
Holds ball under control with two hands.
Holds ball at proper height relative to body position.
Approach Performs pendulum swing without push away.
Performs pendulum swing with push away.
Performs, without consistent rhythm three-, four-, five-step approach with push away and pendulum swing.
Performs smooth three-, four-, five-step approach with push away and pendulum swing.
Delivers ball without going over the foul line.
Delivery Last step is a slide forward toward the foul line.
Ball is delivered over the foul line toward the pins or target mark.
Performs two-handed pendulum swing in straddle-standing position.
Executes proper follow-through with arm swing.
Special Olympics Bowling Coaching Guide Created: February 2004
Planning a Bowling Training and Competition Season
Daily Performance Record
19
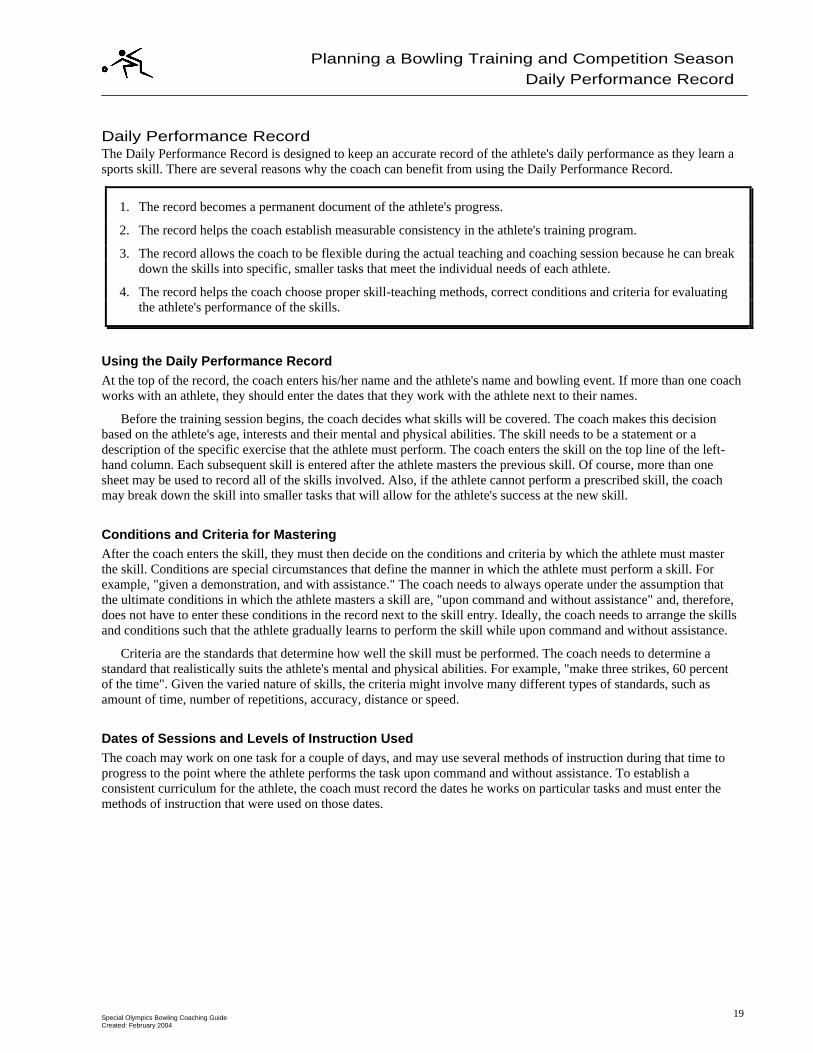
Daily Performance Record The Daily Performance Record is designed to keep an accurate record of the athlete's daily performance as they learn a sports skill. There are several reasons why the coach can benefit from using the Daily Performance Record.
1. The record becomes a permanent document of the athlete's progress.
2. The record helps the coach establish measurable consistency in the athlete's training program.
3. The record allows the coach to be flexible during the actual teaching and coaching session because he can break down the skills into specific, smaller tasks that meet the individual needs of each athlete.
4. The record helps the coach choose proper skill-teaching methods, correct conditions and criteria for evaluating the athlete's performance of the skills.
Using the Daily Performance Record At the top of the record, the coach enters his/her name and the athlete's name and bowling event. If more than one coach works with an athlete, they should enter the dates that they work with the athlete next to their names.
Before the training session begins, the coach decides what skills will be covered. The coach makes this decision based on the athlete's age, interests and their mental and physical abilities. The skill needs to be a statement or a description of the specific exercise that the athlete must perform. The coach enters the skill on the top line of the left-hand column. Each subsequent skill is entered after the athlete masters the previous skill. Of course, more than one sheet may be used to record all of the skills involved. Also, if the athlete cannot perform a prescribed skill, the coach may break down the skill into smaller tasks that will allow for the athlete's success at the new skill.
Conditions and Criteria for Mastering After the coach enters the skill, they must then decide on the conditions and criteria by which the athlete must master the skill. Conditions are special circumstances that define the manner in which the athlete must perform a skill. For example, "given a demonstration, and with assistance." The coach needs to always operate under the assumption that the ultimate conditions in which the athlete masters a skill are, "upon command and without assistance" and, therefore, does not have to enter these conditions in the record next to the skill entry. Ideally, the coach needs to arrange the skills and conditions such that the athlete gradually learns to perform the skill while upon command and without assistance.
Criteria are the standards that determine how well the skill must be performed. The coach needs to determine a standard that realistically suits the athlete's mental and physical abilities. For example, "make three strikes, 60 percent of the time". Given the varied nature of skills, the criteria might involve many different types of standards, such as amount of time, number of repetitions, accuracy, distance or speed.
Dates of Sessions and Levels of Instruction Used The coach may work on one task for a couple of days, and may use several methods of instruction during that time to progress to the point where the athlete performs the task upon command and without assistance. To establish a consistent curriculum for the athlete, the coach must record the dates he works on particular tasks and must enter the methods of instruction that were used on those dates.
Special Olympics Bowling Coaching Guide Created: February 2004
Planning a Bowling Training and Competition Season Daily Performance Record
20
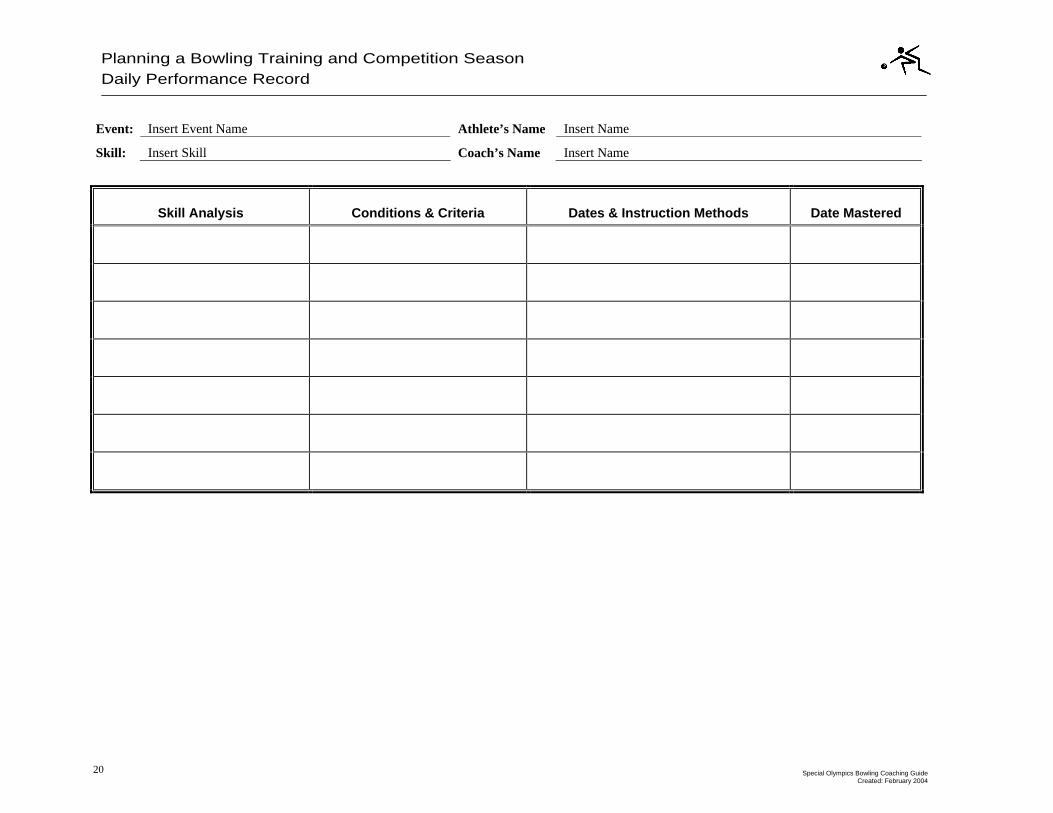
Event: Insert Event Name Athlete’s Name Insert Name
Skill: Insert Skill Coach’s Name Insert Name
Skill Analysis Conditions & Criteria Dates & Instruction Methods Date Mastered
Special Olympics Bowling Coaching Guide Created: February 2004
21
Planning a Bowling Training and Competition Season
Bowling Attire
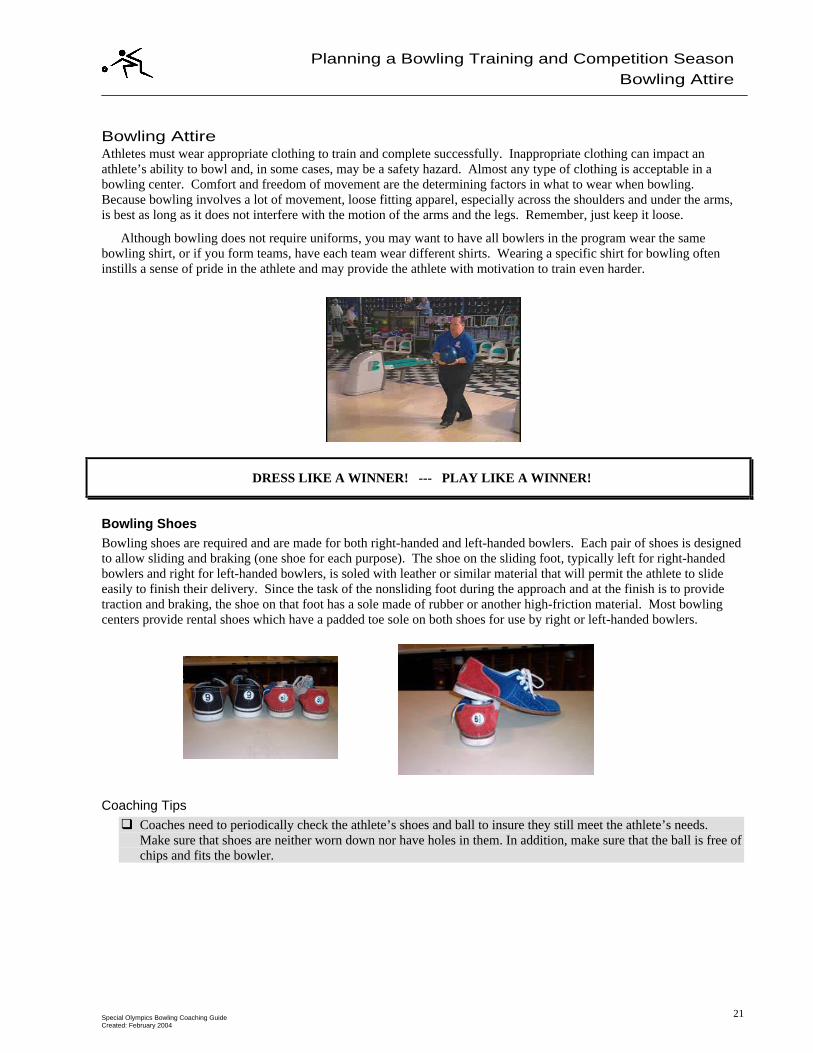
Bowling Attire Athletes must wear appropriate clothing to train and complete successfully. Inappropriate clothing can impact an athlete’s ability to bowl and, in some cases, may be a safety hazard. Almost any type of clothing is acceptable in a bowling center. Comfort and freedom of movement are the determining factors in what to wear when bowling. Because bowling involves a lot of movement, loose fitting apparel, especially across the shoulders and under the arms, is best as long as it does not interfere with the motion of the arms and the legs. Remember, just keep it loose.
Although bowling does not require uniforms, you may want to have all bowlers in the program wear the same bowling shirt, or if you form teams, have each team wear different shirts. Wearing a specific shirt for bowling often instills a sense of pride in the athlete and may provide the athlete with motivation to train even harder.
DRESS LIKE A WINNER! --- PLAY LIKE A WINNER!
Bowling Shoes Bowling shoes are required and are made for both right-handed and left-handed bowlers. Each pair of shoes is designed to allow sliding and braking (one shoe for each purpose). The shoe on the sliding foot, typically left for right-handed bowlers and right for left-handed bowlers, is soled with leather or similar material that will permit the athlete to slide easily to finish their delivery. Since the task of the nonsliding foot during the approach and at the finish is to provide traction and braking, the shoe on that foot has a sole made of rubber or another high-friction material. Most bowling centers provide rental shoes which have a padded toe sole on both shoes for use by right or left-handed bowlers.
Coaching Tips
Coaches need to periodically check the athlete’s shoes and ball to insure they still meet the athlete’s needs. Make sure that shoes are neither worn down nor have holes in them. In addition, make sure that the ball is free of chips and fits the bowler.

Special Olympics Bowling Coaching Guide Created: February 2004
Planning a Bowling Training and Competition Season Bowling Equipment
22
Bowling Equipment It is important for athletes to be able to recognize and understand how equipment works and impacts their performance for the specific events. Have your athletes name each piece of equipment as you show it, and give the use for each. To reinforce this, have athletes select the equipment used for their events as well.
Athlete Readiness Understands where to locate shoes and ball.
Asks appropriate person for correct bowling shoe size.
Selects appropriate weight for a ball.
Wears clothing that is comfortable and provides freedom of movement.
Returns bowling ball and shoes to appropriate place after game.
Bowling Ball A properly fitted bowling ball is essential. The most important factors in finding the right ball are appropriate fit and proper weight. The fit or the grip of the ball is determined by the size of the finger and thumbholes and the span between them. The most common grip is called the conventional grip and will be used by most athletes. This grip allows the bowler to insert the two middle fingers up to the second joint, and the thumb completely.
The fingers and thumb should fit relaxed and loose inside the holes and also touch the inside of the ball all the way around. The athlete should test the fit by lightly swinging the ball at arms length. The “span” between the finger holes and the thumbhole allows full extension of the hand between the second joint of the fingers and the thumb when placed in the holes. This conventional grip is found in most “house balls”- balls that can be used for free at most bowling centers. Although this is the least expensive means of bowling, house balls are very generic so that both right- and left- handed bowlers can use them. Intermediate and advanced bowlers need to seek out their own equipment.

Special Olympics Bowling Coaching Guide Created: February 2004
Planning a Bowling Training and Competition Season
Bowling Equipment
23
Semi-fingertip and fingertip grips can also be used for more advanced bowlers. Both grips allow the thumb to be inserted completely and the fingers to either the first joints, fingertip or between the first and second joints (semi-fingertip). Adaptations, such as allowing holes to be drilled for all four fingers and the thumb for a better grip, can be made for physically challenged (i.e., those with weak hands, wrists or fingers). Inserts, normally made of rubber, can also be used to provide additional gripping.
The weight of the ball will be determined by the bowler’s physical makeup. A very generalized gauge is that adult males often choose 14- to 16-pound balls; adult females, 10- to 14-pound balls; and youth, a wide range of 6- to 14-pound balls. A well-balanced swing is a good indication that ball weight is correct. For example, during the back swing, if the ball is too heavy, it will cause the shoulder to dip and pull the body off balance. If the bowler consistently drops the ball at the foul line or lofts the ball onto the lane, the ball is not properly fitted.
Ball speed can be an indication of proper weight. Decrease of speed toward the end of a session may mean the ball is too heavy. Often, when scores begin to decrease toward the end of a session, this is a sign that the ball is too heavy. The material and degree of hardness of the ball determine proper use on different lane conditions, the type of roll a bowler throws, and the way the ball impacts the pins. The ball cannot weigh more than 16 pounds. There are no minimum weight restrictions; however, some ball return machines have difficulty returning lighter balls. Balls generally range from 6- to 16-pounds. Some bowling centers have a “pro shop” staff, which can offer further advice and assistance.
It is recommended that athletes have their own ball if possible. This will provide the athlete with a ball that is the proper weight and fit for their hand. For many Special Olympics athletes, the most important consideration for bowling properly is having enough strength to hold the ball. Selecting a properly weighted house ball often results in the finger holes and span being too small for the athlete. Having their own equipment—bag, ball and shoes? is also a great source of pride for the athletes. Work with your local bowling center or pro shop to accomplish the goal of all athletes having their own balls. For little or no charge, they will often take donated balls and plug and re-drill them to fit your athletes.
Bowling Bag
Bowling bag is used for storage of own ball.
Rosin Bag
Rosin bag is used to provide athlete with dry hands.
Bowling Towel
Bowling towel is used to wipe dirt or oil off of the ball to keep it clean.
Coaching Tips
Coaches need to periodically check the athlete’s shoes and ball to ensure they still meet the athlete’s needs. Make sure that shoes are neither worn down nor have holes. In addition, make sure that the ball is free of chips and properly fits the bowler.

Special Olympics Bowling Coaching Guide Created: February 2004
Planning a Bowling Training and Competition Season Bowling Equipment
24
Equipment Selection
The equipment required for bowling consists of a ball, a pair of bowling shoes and access to a bowling center. With that, you are ready.
Proper Equipment Selection If you are not professionally trained, it is advisable to check with the pro shop at the lanes. It is best for athletes to have their own bowling equipment if possible.
Teaching Equipment Selection
Bowling Shoes Bowling shoes allow bowlers to slide their feet properly. House shoes are designed so that the sole of both shoes allow the bowler to slide with either foot. The sole of the left shoe is the sliding shoe for a right-handed bowler using a four- or five-step approach. The sole of the right shoe is the sliding shoe for the left-handed bowler using a four- or five-step approach.
Bowling Balls
Weight The correct weight and fit of a bowling ball are very important. Bowling balls weigh from 6-16 pounds. A rule of thumb in selecting the correct weight of a bowling ball is taking approximately one-tenth of the bowler’s weight. This will not necessarily apply to all bowlers, but it is a good approximation to start with. It is necessary that the bowler be able to pick up the bowling ball with two hands and swing it back and forth with one hand with ease. If the bowler rolls the ball and tends to drop it, it is probably too heavy. However, if the bowler lofts it down the lane, it may be too light. House balls usually have the weight stamped on the ball, and the various weights are usually in different colors.
Key factors to help the athlete acquire the proper equipment
Assist the athlete in obtaining correct size shoes from control counter personnel.
Have the athlete get the correct size shoes from the control counter without assistance.
Assist the athlete in selecting his/her ball from available house balls; and show him/her how to identify his/her ball by a number (weight) and/or the color of ball.
Help athletes obtain their own ball.
Discuss with all athletes the wearing of appropriate clothing.
Key Words
What size shoe do you wear?
Where do you get your shoes?
What weight/color ball do you use?
Remember to wear loose fitting clothes.

Special Olympics Bowling Coaching Guide Created: February 2004
Planning a Bowling Training and Competition Season
Bowling Equipment
25
Coaches’ Tips for Equipment Selection – At-A-Glance
Tips for Practice
1. Make arrangements for each athlete to have his/her own bowling equipment if possible.
2. Athletes who have their own ball ensure the proper weight and hand fit. With many Special Olympics athletes, the problem of having enough strength to hold the ball becomes the most critical problem in bowling properly. Selecting a lightweight house ball often results in the finger holes and span being too small for the athlete.
3. Having their own equipment—bag, ball and shoes—is also a great source of pride for athletes. You can often get equipment donated.
4. Even though the athlete may have his/her own equipment, still teach the above information. There may be an occasion when an athlete wants to bowl, and he/she does not have his/her own bowling equipment.

BOWLING COACHING GUIDE
Teaching Bowling Skills

Special Olympics Bowling Coaching Guide Created: February 2004
Teaching Bowling Skills
Table of Contents
27
Table of Contents
The Warm-Up and Cool-Down Stretching
Upper Body Low Back & Glutes Lower Body Stretching - Quick Reference Guidelines
The Grip Teaching the Grip Coaches’ Tips for the Grip – At-A-Glance
Retrieving the Bowling Ball Skill Progression Teaching Bowling Ball Retrieval Coaches’ Tips for Retrieving the Bowling Ball – At-A-Glance
The Stance - The Athletic Pose Skill Progression The Athletic Pose Teaching the Proper Stance Coaches’ Tips for Proper Stance – At-A-Glance
The Approach-Delivery Skill Progression Teaching the Approach-Delivery Teaching Pendulum Swing Teaching the Swing and Slide Teaching the Four-Step Approach Teaching the Five-Step Approach Coaches’ Tips for Approach-Delivery – At-A-Glance
Scoring Teaching Scoring Coaches’ Tips for Scoring – At-A-Glance
Bowling Concepts & Strategies Spare Making Four Basic Shots
The Bowling Center Teaching Areas of the Bowling Center
Modifications & Adaptations Modifying Equipment Assisted Ramp Bowling Unassisted Ramp Bowling Bumper Bowling Specific Bowling Hints for Adapted Bowling Wheelchair Bowling - Without a Ramp
Mental Preparation & Training

Special Olympics Bowling Coaching Guide Created: February 2004
Teaching Bowling Skills The Warm Up and Cool Down
28
The Warm-Up A warm-up period is the first part of every training session or preparation for competition. The warm-up starts slowly and systematically and gradually involves all muscles and body parts that prepare the athlete for training and competition. In addition to preparing the athlete mentally, warming up also has several physiological benefits.
The importance of a warm-up prior to exercise cannot be overstressed. This is true even for a sport like bowling. Warm-up raises the body temperature and prepares the muscles, nervous system, tendons, ligaments and the cardiovascular system for upcoming stretches and exercises. The chances of injury are greatly reduced by increasing muscle elasticity.
The basic physical fitness needs for developing bowling skills are strength in the upper arms and shoulders and endurance in the upper arm, shoulder and legs. Upper arm and shoulder strength will help the athlete develop the smooth and coordinated approach and delivery. Endurance allows the athlete to be able to bowl without undue fatigue when bowling a number of games (i.e. league play and tournament play).
The warm-up is tailored for the activity to follow. Warm-ups consist of active motion leading up to more vigorous motion to elevate heart, respiratory and metabolic rates. The total warm-up period takes at least 25 minutes and immediately precedes the training or competition. A warm-up period will include the following basic sequence and components.
Activity Purpose Time (minimum)
Slow aerobic jog Heat muscles 5 minutes Stretching Increase range of movement 10 minutes Event-Specific Drills Coordination preparation for training/competition 10 minutes
Jogging Jogging is the first exercise of an athlete’s routine. Athletes begin warming the muscles by jogging slowly for 3-5 minutes. This circulates the blood through all the muscles, thus providing them greater flexibility for stretching. A jog should start out slowly, and then gradually increase in speed to its completion; however, the athlete should never reach even 50 percent of his maximum effort by the end of the jog. Remember, the sole objective of this phase of the warm-up is circulating the blood.
Stretching Stretching is one of the most critical parts of the warm-up and an athlete’s performance. A more flexible muscle is a stronger and healthier muscle. A stronger and healthier muscle responds better to exercise and activities, and helps prevent athlete injury. Please refer to the “Stretching” within this section for more in-depth information.

Special Olympics Bowling Coaching Guide Created: February 2004
Teaching Bowling Skills
The Warm Up and Cool Down
29
Event-Specific Drills
Drills are progressions of learning that start at a low ability level, advance to an intermediate level and, finally, reach a high ability level. Encourage each athlete to advance to his/her highest possible level.
Kinesthetic movements are reinforced through repetitions of a small segment of the skill to be performed. Many times, the actions are exaggerated in order to strengthen the muscles that perform the skill. Each coaching session should take the athlete through the entire progression so that he/she is exposed to the total of all of the skills that make up an event.
Specific Warm-Up Activities
Swing arms back and forth, simulating the pendulum swing.
Walk through the approach and delivery without the ball.
Use 10-15 minutes as a warm-up period on the lane, bowling the ball.
The Cool-Down
The cool-down is as important as the warm-up, however it is often ignored. Abruptly stopping an activity may cause pooling of the blood and slow the removal of waste products in the athlete's body. It may also cause cramps, soreness and other problems for athletes. The cool-down gradually reduces the body temperature and heart rate, and speeds the recovery process before the next training session or competitive experience. The cool-down is also a good time for the coach and athlete to talk about the session or competition.
Activity Purpose Time (minimum)
Slow aerobic jog Gradually reduces heart rate and body temperature
5 minutes
Light stretching Removes waste from muscles 5 minutes

Special Olympics Bowling Coaching Guide Created: February 2004
Teaching Bowling Skills Stretching
30
Stretching Flexibility is a major element in an athlete’s optimal performance in both training and competing. Flexibility is achieved through stretching, a critical component in warming up. Stretching follows an easy aerobic jog at the start of a training session or competition.
Begin with an easy stretch to the point of tension, and hold this position for 15-30 seconds until the pull lessens. When the tension eases, slowly move further into the stretch (developmental stretching) until tension is again felt. Hold this new position for an additional 15 seconds. Each stretch should be repeated four to five times on each side of the body.
It is also important to continue to breathe while stretching. As you lean into the stretch, exhale. Once the stretching point is reached, keep inhaling and exhaling while holding the stretch. Stretching should be a part of everyone’s daily life. Regular, consistent daily stretching has been demonstrated to have the following effects:
1. Increase the length of the muscle-tendon unit
2. Increase joint range of motion
3. Reduce muscle tension
4. Develop body awareness
5. Promote increased circulation
6. Make you feel good
Some athletes, like those with Down syndrome, may have low muscle tone that makes them appear more flexible. Be careful to not allow these athletes to stretch beyond a normal, safe range. Several stretches are dangerous to perform for all athletes and should never be part of a safe stretching program. These unsafe stretches include the following:
Neck Backward Bending
Trunk Backward Bending
Spinal Roll
Calf Stretch Stretching is effective only if the stretch is performed accurately. Athletes need to focus on correct body positioning
and alignment; take the calf stretch, for example. Many athletes do not keep the feet forward in the direction that they are moving.
Incorrect Correct

Special Olympics Bowling Coaching Guide Created: February 2004
Teaching Bowling Skills
Stretching
31
Another common fault in stretching is bending the back in an attempt to get a better stretch from the hips. An example is a simple sitting forward leg stretch.
Incorrect Correct
As you can imagine, there are a host of stretches and variations to them to achieve your goals. However, we will focus on some basic stretches, highlighting major muscle groups. Along the way, we will also point out some common faults, illustrate corrections and identify stretches that are more event specific. In addition, we will also have some reminders to keep breathing while stretching. We will start at the top of the body and work our way to the legs and feet.
Coaching Tips
Try to have a low player/coach ratio.
It is important that coaches and assistants make sure that stretches are being done effectively and are not harmful to the athlete. To do this may require direct, individual physical assistance, particularly with lower ability players.
Some stretches require a good sense of balance. If balance is a problem, use stretches that can be done while in a sitting or lying position.
Coaches should attend to athletes doing the exercises improperly, as well as provide personal attention and reinforcement to those doing them effectively.
Use stretching as a “teachable moment” with athletes. Explain the importance of each stretching exercise and which muscle group is being stretched. Later, ask the athletes why each stretching exercise is important

Special Olympics Bowling Coaching Guide Created: February 2004
Teaching Bowling Skills Stretching
32
The following stretches are designed to specifically loosen and limber those muscles that are used most during bowling. An ideal routine includes three sets of five, with at least three exercises in each major muscle group.
Upper Body
Neck/Shoulder Stretch - Side Neck/Shoulder Stretch - Front
Stand/sit in comfortable position, shoulders and arms relaxed at sides Slowly turn head to left, back to center, turn to right Slowly tilt head to back, back to center, bend forward, chin to chest
Wrist Stretch Chest Opener
Clasp wrist of opposite hand Pull gently to loosen wrist
Clasp hands behind back Palms facing in Push hands up, towards sky

Special Olympics Bowling Coaching Guide Created: February 2004
Teaching Bowling Skills
Stretching
33
Upper Body
Side Arm Stretch Side Arm Stretch
Raise arms over head Clasp wrist of opposite hand and pull gently to the opposite side Push up toward sky with opposite arm Bend torso slightly to the opposite side
Triceps Stretch (Back) Triceps Stretch (Front)
Raise both arms over head Bend right arm, bring hand to back Grasp elbow of bent arm and pull gently toward the middle of the back Repeat with other arm

Special Olympics Bowling Coaching Guide Created: February 2004
Teaching Bowling Skills Stretching
34
Upper Body
Forearm Flexors
Clasp hands together in front, palms facing out Point fingers up, wrist bent Grasp fingers with other hand Gently pull fingers toward body Repeat with other hand
Side Stretch Side Stretch
Raise left arm over head, keep other arm at side Bend sideways to the right Repeat with other arm to left side
This exercise can also be done with assistance; the athlete above is using his cane. Athletes can also use a stable assistive device to aid them in completing their stretching routine.

Special Olympics Bowling Coaching Guide Created: February 2004
Teaching Bowling Skills
Stretching
35
Low Back & Glutes
Quadriceps
Balance on one leg while bringing the heel of opposite foot up to buttock Grasp the heel of the foot and gently push back with the quadricep muscle, not the knee Repeat with other leg If your athletes have trouble keeping their balance, let them hold on to your shoulder or a teammate’s
Lower Body
Ankle Rotations Forward Bend with Crossed Legs
Balance on both feet, standing tall Shift weight to left leg Point toe of right foot downward Rotate foot around ankle clockwise three to five times Rotate foot around ankle counterclockwise three to five times Shift weight to left leg and repeat
Stand, arms outstretched overhead Cross one ankle over the other ankle Slowly bend at waist Bring hands to ankle level without strain

Special Olympics Bowling Coaching Guide Created: February 2004
Teaching Bowling Skills Stretching
36
Lower Body
Forward Lunge Forward Lunge with Assistance
Step out with left leg Bend left knee, extend leg and shift weight forward and hold Repeat with opposite leg
This exercise can also be done with assistance; the athlete above is using his cane. Athletes can also use a stable assistive device to aid them in completing their stretching routine.
Calf/Achilles Stretch
Place palms against wall Step back with left leg Bend right knee and extend as in the forward lunge until slight tension is felt and hold Repeat with opposite leg
Special Olympics Bowling Coaching Guide Created: February 2004
Teaching Bowling Skills
Stretching
37
Stretching - Quick Reference Guidelines
Start Relaxed
Do not begin until relaxed and muscles are warm
Be Systematic
Start at the top of body and work your way down
Progress from General to Specific
Start general then move into event-specific exercises
Easy Stretching before Developmental Stretching
Make slow, progressive stretches
Do not bounce or jerk to stretch farther
Use Variety
Make it fun; work same muscle with different exercises
Breathe Naturally
Do not hold breath, stay calm and relaxed
Allow for Individual Differences
Athletes start and progress at different levels
Stretch Regularly
Always include in warm-up and cool-down
Stretch while at home too

Special Olympics Bowling Coaching Guide Created: February 2004
Teaching Bowling Skills The Grip
38
The Grip
There are two basic types of grips used in bowling: conventional grip and fingertip grip.
Conventional Grip Most Special Olympics bowlers use the conventional grip because it provides a firmer hold with the fingers. It also gives the bowler a more secure feeling about having full control of the ball. The conventional grip also allows the athlete to hold more of the ball, thus providing the feeling of a secure release. The finger hole depths are deep enough to allow the fingers to enter the ball up to the second knuckle. The thumbhole is drilled to allow the whole thumb to be inserted into the ball. The thumbhole is drilled the same for both the conventional and fingertip grip.
Fingertip Grip The fingertip grip is recommended for the advanced bowler. The finger holes are drilled to allow only the tips of the fingers to be inserted into the bowling ball. This grip will spread the hand across more of the surface area of the ball, known as the span (distance between the thumb and finger holes). The thumbhole is drilled the same as the conventional grip. The fingertip grip allows for more lift on the ball during the release.
Athlete Readiness Places his/her fingers and thumb in the ball properly
Supports the ball by placing the non-bowling hand under the ball with elbows in, close to the body
Teaching the Grip
Key Words
Fingers first - then thumb
Non-bowling hand under the ball
Faults & Fixes Chart
Error Correction
Thumb in first Demonstrate to athlete, placing fingers in first
Thumb falling out of ball before release Insert bowlers’ tape in thumbhole to secure grip
Finger holes are sticky Make sure hands are clean and dry
1. Athlete places his/her fingers in the ball, the ring and middle fingers in first, then the thumb.
2. Fingers always go in to the same depth. 3. The grip needs to feel natural and comfortable. Do not place any
strain on the thumb, fingers or wrist. 4. Fingers not in the hole may be spread out from or held close to
the fingers in the ball.

Special Olympics Bowling Coaching Guide Created: February 2004
Teaching Bowling Skills
The Grip
39
Coaches’ Tips for the Grip – At-A-Glance
Tips for Practice
1. If the athlete is having difficulty with proper finger placement, try marking those fingers (stars, fingernail polish, magic marker, etc.) to further remind him/her.
2. Have the athlete pick the ball up from the ball return with both hands. While holding the ball with both hands, rotate the ball so that the holes of the ball are on top.
3. The non-bowling hand is under the ball, providing support, while the bowler places his/her fingers and thumb in the holes.

Special Olympics Bowling Coaching Guide Created: February 2004
Teaching Bowling Skills Retrieving the Bowling Ball
40
Skill Progression – Retrieving the Bowling Ball
Your Athlete Can: Never Sometimes Often
Observe lane courtesy
Approach ball return from correct side
Identify his/her ball
Pick up ball correctly from ball return
Cradle the ball in one arm and move to his/her starting position on the approach
Totals

Special Olympics Bowling Coaching Guide Created: February 2004
Teaching Bowling Skills
Retrieving the Bowling Ball
41
Retrieving the Bowling Ball
When retrieving the ball from the ball return, it is very important that it is picked up properly with both hands.
Teaching the Bowling Ball Retrieval 1. Make sure the athlete knows the correct lane that he/she is to bowl on before stepping on the approach.
2. Ensure that there are no bowlers on the adjacent lanes, one lane right or left of the athlete, before stepping onto the approach.
3. Athlete reaches for his/her own ball. Bowlers always use the same ball.
4. Athlete grasps the ball with both hands, placing the hands on opposite sides of the ball, away from incoming balls. This prevents the fingers from getting crushed.
5. Athlete cradles the ball in one arm and moves to his/her starting position on the approach. For a right-handed athlete the ball rests in his/her left arm and is supported on the side by the right hand and body.
Key Words
Use your own ball
Remember lane courtesy—look left - look right
Watch your fingers

Special Olympics Bowling Coaching Guide Created: February 2004
Teaching Bowling Skills Retrieving the Bowling Ball
42
Coaches’ Tips for Retrieving the Ball – At-A-Glance
Tips for Practice
1. To aid the bowler in identifying the correct lane, have the bowler look at the overhead automated scoring display which identifies the bowler to bowl next and identifies the lane to bowl on. If there is no such equipment, you may want to identify the person the bowler is to follow.
2. Explain to the athlete what could happen if his/her fingers are between the ball when another ball rolls onto the ball return rack. Although it does not enter the rack with much speed, a ball does not stop until it bangs against another ball or against someone’s fingers.
3. Explain to the athlete why the use of two hands is better than one hand when picking up the ball from the return rack. It puts less stress on the fingers and wrist, saves energy needed to bowl for a long time and helps prevent the ball from falling to the floor or, worse yet, on his/her toes.
4. Do not pick up the ball with the fingers in the holes. Fingers are not inserted until the stance has been taken and the approach is ready to be made. Athlete cradles the ball in one arm and moves to his/her starting position.

Special Olympics Bowling Coaching Guide Created: February 2004
Teaching Bowling Skills
Proper Stance
43
Skill Progression – Proper Stance
Your Athlete Can: Never Sometimes Often
Locate starting position on approach for first ball.
Stand appropriately for making spares.
Demonstrate proper foot placement - Left foot forward, if right-handed.
Assume correct stance with eyes focused on bowling pins or target arrows/dots.
Hold ball under control with two hands.
Hold ball at proper height relative to body position.
Totals

Special Olympics Bowling Coaching Guide Created: February 2004
Teaching Bowling Skills Proper Stance
44
Athletic Pose The athletic pose is also referred to as the “coach’s eye”. This concept is used to analyze a bowler’s delivery into four points.
1. Waist Down - Foot placement, knees and hips
2. Waist Up - Spine, shoulders, head and eyes
3. Ball Position - Height and position side to side
4. Hand Position - Grip, position of the fingers and thumb
Waist Up Waist Down
Ball/Hand Position – Bowling Hand Ball/Hand Position – Non-Bowling Hand

Special Olympics Bowling Coaching Guide Created: February 2004
Teaching Bowling Skills
Proper Stance
45
Teaching the Proper Stance It is important for the athlete to establish a stance that is comfortable and natural. Use the following suggestions as guidelines only. Remember, what may work for one athlete, may not work for another. There are five basic stances and deliveries.
Staggered Stance without a Push away The staggered stance is the first phase of one-handed bowling for beginners. The bowler takes the starting position at the foul line and takes no steps.
Waist Down: The toe of the foot opposite the ball arm is about three inches behind the center dot. The ball side foot is 4-18 inches back to create balance. The knees are slightly bent.
Waist Up: The back is slightly bent forward. The bowler’s eyes focus straight ahead at the target.
Ball Position: The arm hangs straight down by the side.
Hand Position: The thumb is on top of the ball with the thumb at a 10 o’clock position for right-handers and a 2 o’clock position for left-handers.
Ball Position
Foot Placement
Coaching Tips
Remember, this is the first phase of learning to bowl for some athletes. This is also the preferred method of bowling for athletes who do not take a four-step delivery.
The bowler starts with the ball low, begins a ball swing and releases the ball when ready.
Coaching Tips
This is the perfect time to begin teaching foot placement. Correct positioning of the feet will help develop a smooth swing.
Sometimes you will have to demonstrate to the athlete how and where the feet need to be positioned.
Special Olympics Bowling Coaching Guide Created: February 2004
Teaching Bowling Skills Proper Stance
46
Staggered Stance with a Push away The bowler takes the starting position at the foul line and takes no steps. However, the bowler holds the ball at a higher position to create an arm swing and a push away.
Waist Down: The position is the same as without a push away.
Waist Up: The position is the same as without a push away.
Ball Position: The ball is held at the side of the body at a comfortable place between waist and chest high. The opposite hand is placed under the ball to support the weight of the ball.
Hand Position: The hand is now behind the ball with the thumb at a 10 o’clock position for right-handers and a 2 o’clock position for left-handers, and the fingers at a 4 o’clock position for right-handers and an 8 o’clock position for left-handers. The wrist is firm and straight.
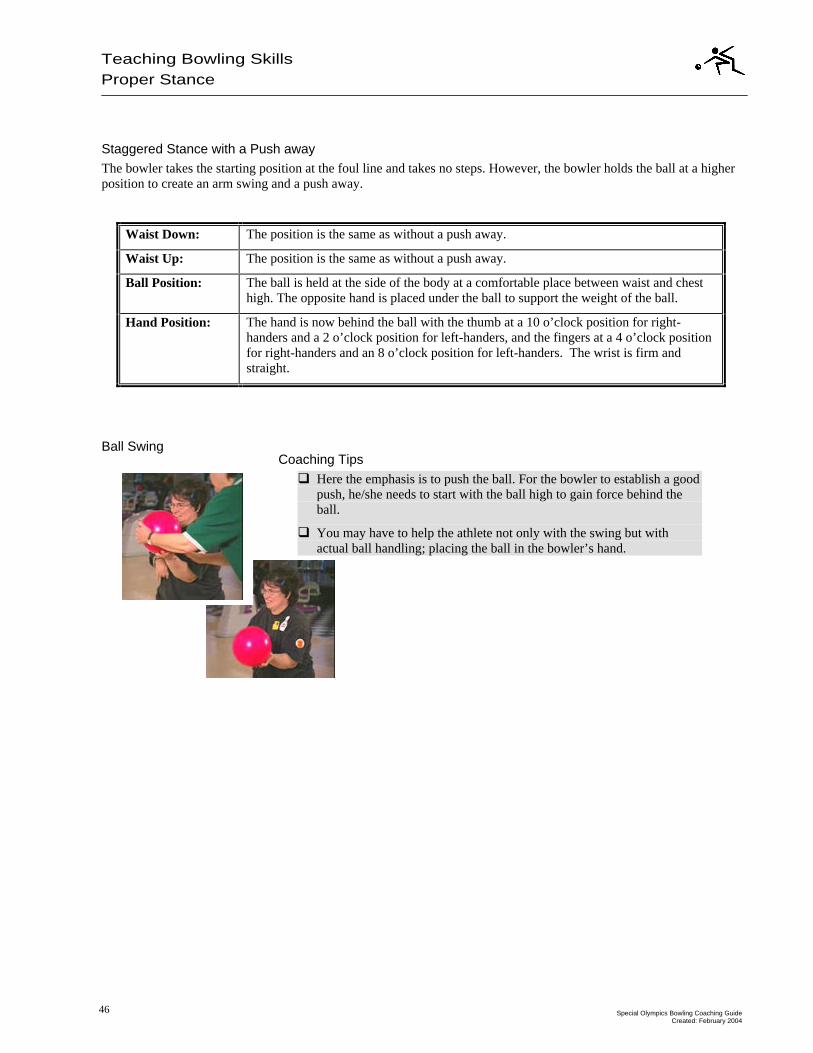
Ball Swing Coaching Tips
Here the emphasis is to push the ball. For the bowler to establish a good push, he/she needs to start with the ball high to gain force behind the ball.
You may have to help the athlete not only with the swing but with actual ball handling; placing the ball in the bowler’s hand.
Special Olympics Bowling Coaching Guide Created: February 2004
Teaching Bowling Skills
Proper Stance
47
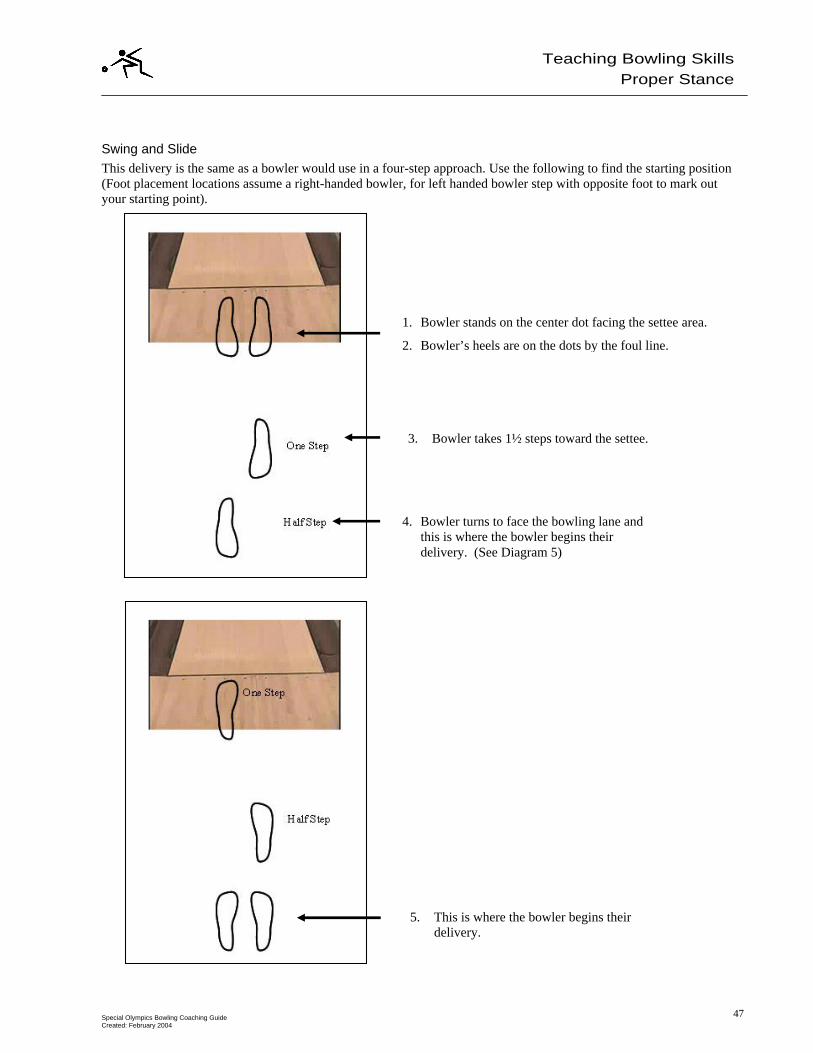
Swing and Slide This delivery is the same as a bowler would use in a four-step approach. Use the following to find the starting position (Foot placement locations assume a right-handed bowler, for left handed bowler step with opposite foot to mark out your starting point).
5.
1. Bowler stands on the center dot facing the settee area.
2.
Bowler’s heels are on the dots by the foul line.
3. Bowler takes 1½ steps toward the settee.
4. Bowler turns to face the bowling lane and this is where the bowler begins their delivery. (See Diagram 5)
5. This is where the bowler begins their delivery.

Special Olympics Bowling Coaching Guide Created: February 2004
Teaching Bowling Skills Proper Stance
48
Waist Down: The ball foot is only 2-5 inches behind the toe of the other foot, with the weight mostly on the ball -side foot. The knees are slightly bent.
Waist Up: The back is bent slightly forward. The eyes are focused on the target straight ahead.
Ball Position: The same as in the staggered stance with a push away.
Hand Position: The same as in the staggered stance with a push away.
Incorrect Pose Correct Pose
The Four-Step Delivery This stance is the same as the swing and slide. To find the starting position, the bowler stands at the center dot facing the settee area with his/her heels on the dots by the foul line and takes 4½ steps toward the settee. The half step is to accommodate the slide.
Waist Down: The ball foot is only 2-5 inches behind the toe of the other foot, with the weight mostly on the ball-side foot. The knees are slightly bent.
Waist Up: The back is bent slightly forward. The eyes are focused on the target straight ahead.
Ball Position: The same as in the staggered stance with a push away.
Hand Position: The same as in the staggered stance with a push away.
The Five-Step Delivery This stance is the same as the four-step delivery. To find the starting position, the bowler stands at the center dot facing the settee area with his/her heels on the dots by the foul line. The athlete takes five steps toward the settee.
Key Words
Feet position
Relax, bend your knees a little
Eyes on your target
Ball position

Special Olympics Bowling Coaching Guide Created: February 2004
Teaching Bowling Skills
Proper Stance
49
Coaches’ Tips for the Proper Stance – At-A-Glance
Tips for Practice
1. To encourage proper foot placement for athletes standing at the foul line, use a mat with footprints for the beginning bowler. Remove the mat when the athletes get used to the proper position.
2. A helpful hint in determining the athlete’s starting point for the four- or five-step approach is to have him/her stand at the foul line, facing the seating area. Have the athlete take 4½ or five steps toward the seating area. This is close to where the athlete’s starting point is located.
3. Insure that the ball is between waist and chest high and to the side of the body so as to not block his/her view of the pins or target arrows. Have the athlete pick a target—either the pins or targeting arrows/dots. Tell the athlete to keep his/her eyes on the mark as they bowl.
4. The athlete’s shoulders are at a slight angle because of the weight of the ball. The body is square to target.
5. Not all of these suggestions will work for everyone. Try them, modify them and use what works best for the athlete. Variations are acceptable provided they are comfortable and help the athlete bowl well.
Special Olympics Bowling Coaching Guide Created: February 2004
Teaching Bowling Skills Approach-Delivery
50
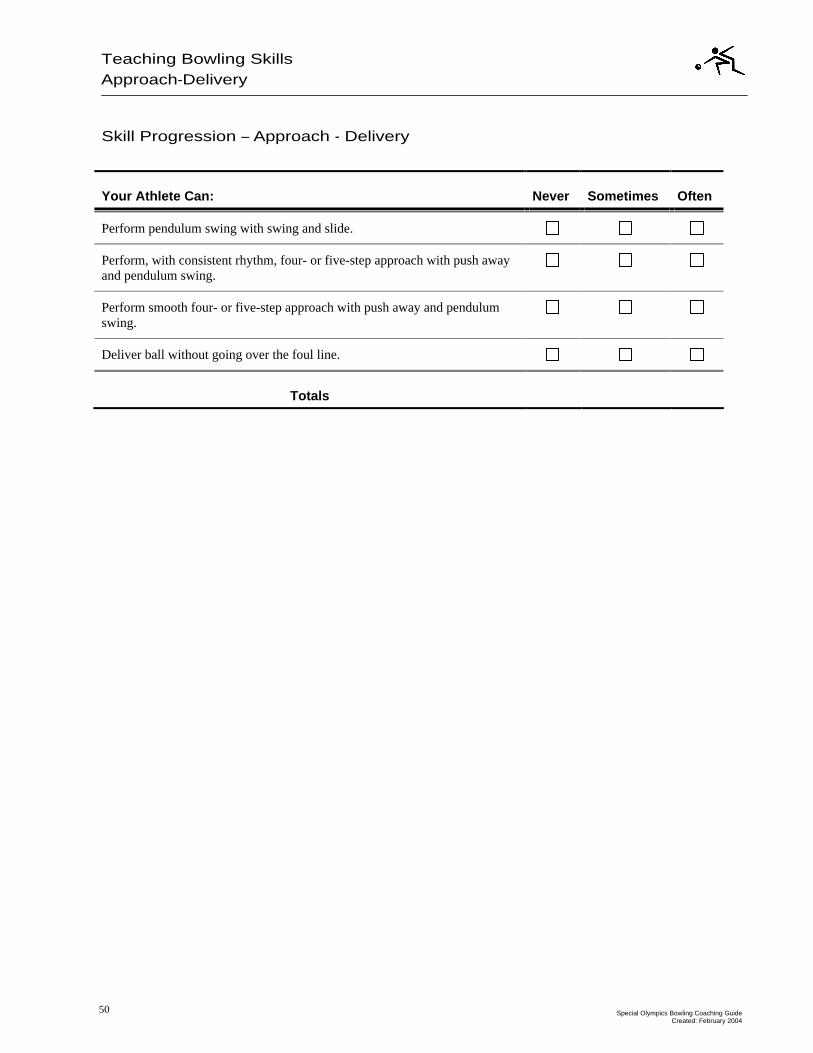
Skill Progression – Approach - Delivery
Your Athlete Can: Never Sometimes Often
Perform pendulum swing with swing and slide.
Perform, with consistent rhythm, four- or five-step approach with push away and pendulum swing.
Perform smooth four- or five-step approach with push away and pendulum swing.
Deliver ball without going over the foul line.
Totals

Special Olympics Bowling Coaching Guide Created: February 2004
Teaching Bowling Skills
Approach-Delivery
51
Teaching the Approach – Delivery
The proper approach involves the movement of the bowler and ball at the same time toward the goal of delivering the ball down the lane. There are three basic approaches:
1. Step and slide
2. Four-step approach
3. Five-step approach
Each of these includes the push away, the pendulum swing and delivery. Although not called an approach, the one-step delivery is included here to provide a transition from standing at the foul line to a full four-or five-step approach.
Beginning bowlers have a hard time putting all the components of the approach together at first. Start bowlers at the foul line using the pendulum swing, then move to a swing-and-slide approach, and ultimately a full approach. At first, the full approach will probably be nothing more than the athlete trying to take the proper steps up to the foul line and then performing the pendulum swing and delivery.
Have the athlete master each part before proceeding to the next part. Evaluation of the athlete during the first two training sessions will provide you an idea of a starting point for training.
Approach Push Away Pendulum Swing DeliveryApproach Push Away Pendulum Swing Delivery

Special Olympics Bowling Coaching Guide Created: February 2004
Teaching Bowling Skills Approach-Delivery
52
Teaching the Pendulum Swing 1. Athlete assumes the proper stance at the foul line.
2. Hold ball at side with bowling arm extended, thumb faces the pins.
3. Keep arm relaxed and wrist straight.
4. Have the athlete swing the ball forward at waist level and then backward in a natural arc to a position no higher than the hips. At this point, the body is leaning forward, the knees are slightly bent.
5. Keep shoulders parallel to foul line.
6. Keep ball, arms and elbows close to the body throughout swing.
7. Keep looking at target arrows/dots or pins.
8. Follow through with the arm continuing upward on its straight course.
Key Words
Look at your target
One, two, roll the ball
Let the ball swing back
Follow through
Teaching the Swing and Slide 1. Athlete assumes the proper stance at the foul line.
2. Have the bowler push the ball out toward the target and bring the arm back.
3. As the ball moves forward from the back swing, the opposite foot starts to slide forward.
4. The bowler’s front knee is slightly bent, as the ball goes past the ankle.
5. In the finishing position, the shoulders are slightly forward so they are above the front knee while the arm follows through straight toward the target and upward.
Key Words
Ball out and down
Look at the target
Slide
Knee slightly bent
Shoulders slightly forward
Follow through toward target and upward

Special Olympics Bowling Coaching Guide Created: February 2004
Teaching Bowling Skills
Approach-Delivery
53
Teaching the Four-Step Approach The four-step approach allows for the most natural rhythmic body movement during the delivery. This approach increases accuracy and reduces fatigue. The four-step approach is described below and is the recommended method to teach athletes. Instructions are for right-handed bowlers. Use opposite foot if teaching left-handed bowlers.
First Step with Coach Assistance
Second Step
Third Step
Third Step with Coach Assistance
Push the ball forward as the right foot steps straight ahead. This may be a short slide step. The ball is over the forward foot at the end of this step.
Your coaching assistance can take many forms. Sometimes, you may have to physically place the ball in the proper position. Other times, you may have to walk through the first step with your bowler to help him/her see and get the feel of this first step.
In the second step, the ball arm begins the swing down and back while the opposite arm extends to the side for balance. At the end of this step, the ball is on its way back and even with the calf of the ball-side leg.
You may have to demonstrate the skill to give the athlete a visual on how the skill is correctly achieved.
The ball-side foot steps forward. At the end of the third step, the ball is at the height of the back swing.
As the athletes’ skills progress, you may find it easier to demonstrate proper technique first, and then let the athletes practice by themselves.

Special Olympics Bowling Coaching Guide Created: February 2004
Teaching Bowling Skills Approach-Delivery
54
Fourth Step
Fourth Step with Follow Through
Key Words
Push ball forward
Arm follows through straight – Upward toward target
Back swing
Swing ball down and back
Shoulders are slightly forward
Opposite arm extends to the side for balance
Ball over the foul line
Teaching the Five-Step Approach The five-step approach is basically the same as the four-step approach. The difference is that the first step is with the left foot in the five-step approach. The ball is not pushed away until the start of the forward movement of the right foot, as in the four-step approach. This extra step prior to the push away can be a relaxing motion for the athlete.
As the opposite foot slides forward, the ball descends from the back swing and is released over the foul line.
In the finishing position, the shoulders are slightly forward. They are above the front knee while the arm follows straight toward the target and upward.

Special Olympics Bowling Coaching Guide Created: February 2004
Teaching Bowling Skills
Approach-Delivery
55
Coaches’ Tips for Approach/Delivery – At-A-Glance
Tips for Practice
1. When holding the ball at side, have athlete count his/her movements. This will help prepare the athlete for learning the four-step delivery.
If the athlete has too much back swing, a handkerchief placed under the armpit of the bowling arm may help correct the problem. On a proper back swing, the handkerchief remains in place, and does not falls out.
“One” - ball swing forward
“Two” - ball swings back,
“Three” or “Roll the ball” forward and release down the lane.
2. Tell the athlete not to apply any muscle to the swing; just let the weight of the ball carry it back and then straight ahead.
3. Talk the athlete through the approach. “Let’s begin: right foot, left foot, right foot, slide.”
4. Once the athlete begins to use the proper movement, have the athlete get into an approach rhythm and count their steps. Count “One” for first step, “Two” for second step, “Three” for third step, “Slide” or “Roll the ball” for fourth step. Do this without a ball a few times, increasing the speed of action each time. Repeat after a few times, using a ball.
5. Stand behind the athlete, counting the steps while the athlete performs the steps. After a few times, let the athlete practice on his/her own. Remember, have them count the steps out loud.
6. To get the athlete to release the ball over the foul line, place a bowling towel or small piece of rope on the foul line, and tell the athlete to throw the ball out over the towel/rope.
7. Position of arm and hand on the follow through can be demonstrated by taking a bowling towel and putting a knot in it. Give the towel to the athlete and then back away. Have the athlete do a one-step delivery throwing the towel to you, using your stomach as the target. Watch the follow through, the athlete should have his/her right arm extended with the right hand pointing at your stomach with the thumb pointing up. Explain that this is the same motion they use when bowling.
8. A home training method is to have the athlete and a friend practice pitching a softball underhanded back and forth to each other. The same motion is used to deliver the bowling ball. After the pitch, look at the position of the arm, hand, and thumb.
9. Correct the athlete if bowling hand finishes across and in front of the body.
10. Hand, arm and shoulder follow through in a straight line with target. After the ball has left the athlete’s hand, have them make a motion as if shaking hands with someone.

Special Olympics Bowling Coaching Guide Created: February 2004
Teaching Bowling Skills Scoring
56
Skill Progression – Teaching Scoring
Your Athlete Can: Never Sometimes Often
Understand to count pins knocked down
Recognize strikes and spares
Understand basic terminology (i.e., open, split, strike, spare)
Understand basic scoring procedure
Totals
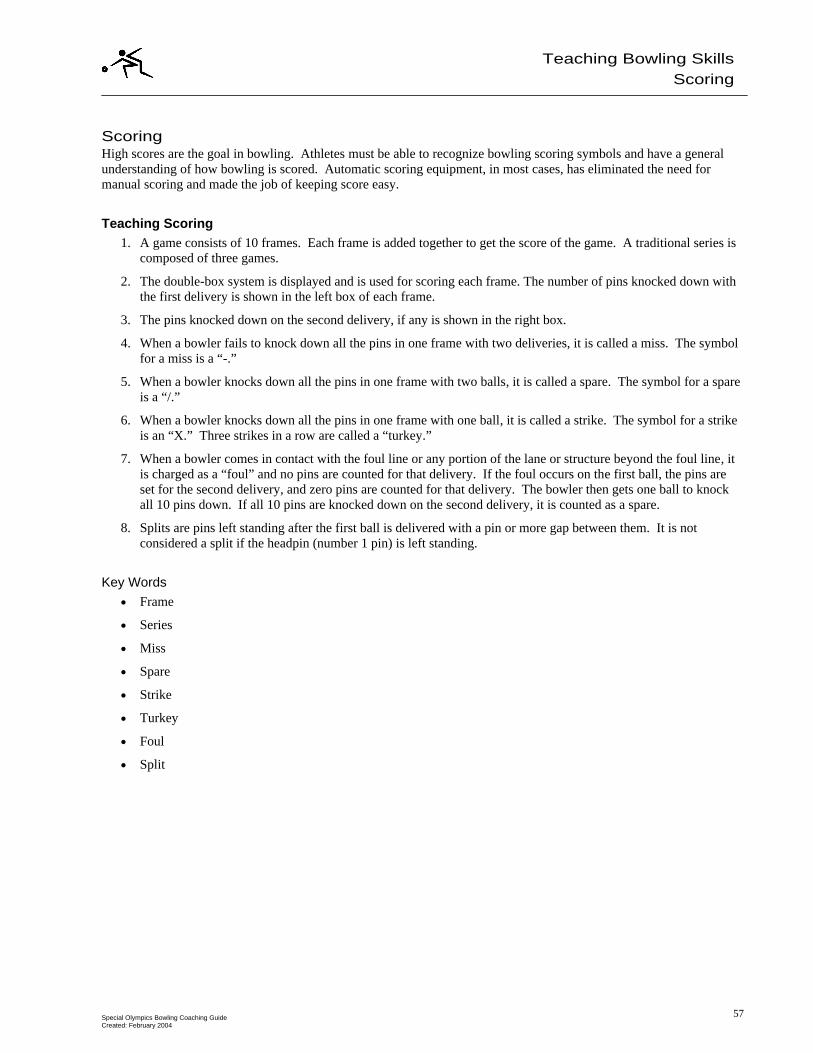
Special Olympics Bowling Coaching Guide Created: February 2004
Teaching Bowling Skills
Scoring
57
Scoring High scores are the goal in bowling. Athletes must be able to recognize bowling scoring symbols and have a general understanding of how bowling is scored. Automatic scoring equipment, in most cases, has eliminated the need for manual scoring and made the job of keeping score easy.
Teaching Scoring 1. A game consists of 10 frames. Each frame is added together to get the score of the game. A traditional series is
composed of three games.
2. The double-box system is displayed and is used for scoring each frame. The number of pins knocked down with the first delivery is shown in the left box of each frame.
3. The pins knocked down on the second delivery, if any is shown in the right box.
4. When a bowler fails to knock down all the pins in one frame with two deliveries, it is called a miss. The symbol for a miss is a “-.”
5. When a bowler knocks down all the pins in one frame with two balls, it is called a spare. The symbol for a spare is a “/.”
6. When a bowler knocks down all the pins in one frame with one ball, it is called a strike. The symbol for a strike is an “X.” Three strikes in a row are called a “turkey.”
7. When a bowler comes in contact with the foul line or any portion of the lane or structure beyond the foul line, it is charged as a “foul” and no pins are counted for that delivery. If the foul occurs on the first ball, the pins are set for the second delivery, and zero pins are counted for that delivery. The bowler then gets one ball to knock all 10 pins down. If all 10 pins are knocked down on the second delivery, it is counted as a spare.
8. Splits are pins left standing after the first ball is delivered with a pin or more gap between them. It is not considered a split if the headpin (number 1 pin) is left standing.
Key Words
Frame
Series
Miss
Spare
Strike
Turkey
Foul
Split

Special Olympics Bowling Coaching Guide Created: February 2004
Teaching Bowling Skills Scoring
58
Coaches’ Tips for Teaching Scoring – At-A-Glance
Tips for Practice
1. For most of your athletes, a general understanding of how scoring is done is all that is needed. For those athletes whose ability will permit them to learn to keep score, you can refer them to your national or international rulebook or one of many books on bowling available in bookstores or libraries.

Special Olympics Bowling Coaching Guide Created: February 2004
Teaching Bowling Skills
Bowling Concepts and Strategies
59
Spare Making Spare shooting is the key to achieving good scores. Spares are easier to convert than they appear. An old bowling saying is, “If you cannot strike, spare them to death.” To pick up a spare, move to the side of the approach opposite the location of the standing pins. When multiple pins are left standing, the spare adjustment is based on the pin closest to the bowler. Three keys to spare shooting are:
1. Consistent delivery
2. Consistent arm swing
3. Rolling the ball over the target
Team Play Bowling is an individual sport. However, bowlers are often paired together to form teams to compete in bowling leagues. Pairing is also done to permit tournament competition in doubles events (two bowlers) or team events (three to five bowlers). Each bowler’s score is added together to arrive at doubles or team score. Special Olympics recognizes these groupings and has competition levels for both types.
Targeting Techniques Most bowlers use one of two basic targeting techniques to aim their delivery at the pocket: pin bowling or spot bowling.
Pin Bowling Bowlers using this technique fix their eyes on the pins from start of the approach to the follow through. The athlete proceeds, selecting the 1-3 pocket for right-handed bowlers or the 1-2 pocket for left-handed bowlers as their objective for the first ball. If all 10 pins do not go down on the first ball, then they fix their eyes on the remaining pins when bowling their second ball.
Spot Bowling Athletes, instead of aiming for the strike pocket 60 feet down the lane, use either of two sets of seven markings placed on the lanes. There are lane dots 6-8 feet beyond the foul line, or arrows approximately 15 feet down the lane. These serve as aiming aids: bowlers can figure out which board their ball lands on and what boards it rolls over on the way to the pins. The athlete must draw an imaginary line from the point of release to the target spot to have a precise idea of the path the ball will take.
Locator Dots Athletic Pose & Feet Placement

Special Olympics Bowling Coaching Guide Created: February 2004
Teaching Bowling Skills Bowling Concepts and Strategies
60
Four Basic Shots
Straight Ball The straight ball travels in a relatively straight line and will be subject to considerable deflection, since it will tend to shove its way through the pins. Therefore, a straight ball that enters the pocket at anything other than the precisely perfect spot—the right side of the headpin—is not likely to result in a strike. Therefore, the straight shot is not a high-percentage shot. The ball needs to roll close to the second arrow, rather than down the center of the lane, where the ball will have a better chance of entering the strike pocket and getting good mixing action among the pins.
Hook Ball Most beginning bowlers will have a tendency to bowl the hook ball or the curve ball. If the athlete has a natural hook, do not try to change it, let the athlete work with it. The hook ball is a very effective shot, since it allows for more margin of error than the straight ball. The hook of the ball comes from the lifting motion of the middle and ring fingers during the release. The primary reason it is so effective is the mysterious mixing action it generates among the pins.
Curve Ball In throwing the curve, an exaggerated hook, the arm and wrist will be turned to the left, and the thumb will generally come out of the ball at about the 9 o’clock position. Its wide circling path makes it hard to control. However, if the ball crashes into the strike pocket just right, it can sweep away all 10 pins.
Backup Ball Instead of breaking into the 1-3 pocket, the backup ball will break away from it. If it is the bowler’s natural shot and you find that you are unable to have the athlete adapt to another one, have the athlete move to the left side of the approach and aim the ball over the second arrow from the left, the same as a left-handed bowler. That way, it will break into the 1-2 strike area normally used by left-handers.

Special Olympics Bowling Coaching Guide Created: February 2004
Teaching Bowling Skills
The Bowling Center
61
Skill Progression – Learning the Bowling Center
Your Athlete Can: Never Sometimes Often
Identify the location of the control counter, concourse area, bowling area
Identify the settee area (bowling area)
Identify the approach area
Identify the foul line/foul light and understand their functions
Identify the ball return
Identify the automatic scoring equipment
Understand how the balls are returned and the operation of the ball return equipment
Totals

Special Olympics Bowling Coaching Guide Created: February 2004
Teaching Bowling Skills The Bowling Center
62
The Bowling Center The bowling facility or center is comprised of an even number of lanes on which the game is played. The lane is between 41 and 42 inches wide and is made up of 39 boards across. The bowling ball is rolled or delivered 60 feet down the lane lengthwise from the foul line to the rack of 10 pins. On each side of the lane is a 9-inch wide channel. The bowler begins the delivery on the approach. The approach consists of the area where the wood starts, from the settee area to the foul line. There is one person on the approach at a time.
There are guide dots, also called locator dots, along the approach that are also in line with dots at the foul line and out on the lane that are used for accuracy in steps and delivery of the ball. There also are target arrows out on the lane used for this same purpose. Lanes are normally oiled daily to prevent friction and to allow better tracking for the ball.
The rack of pins is located in the pit and is arranged in a triangular formation, 12 inches apart from the center of another. A bowling pin is 15 inches tall and each pin weighs between 3 pounds, 6 ounces and 3 pounds, 10 ounces. The pins are numerically identified 1-10, 1 being the headpin.
Facing the pins, the number 2 pin is in the second row to the left of the number 1 pin.
The number 3 pin is in the second row to the right of the number 1 pin.
The third row consists of the number 4 pin to the left, number 5 pin in the middle and the number 6 pin to the right.
The fourth row consists of the number 7 pin to the left, number 8 pin next, number 9 pin next and the number 10 pin on the right.
Coaching Tips
Discuss the general layout of the bowling center with the athlete, identifying the major components - control counter, lanes, approach area, pit area, etc.
If permitted, you may want to take the athlete behind the pit area to see the pin-setting equipment in action.

Special Olympics Bowling Coaching Guide Created: February 2004
Teaching Bowling Skills
The Bowling Center
63
Teaching the Areas of the Bowling Center
At the beginning of each training season and at regular intervals, each athlete needs to be assessed to determine what knowledge and skills have been mastered and which areas require further work.
Control Counter This is the hub of the bowling center. Lane assignments are made here, and house shoes are distributed from this location. This is also where athletes go if there are any problems with their lanes and there is not an intercom.
Concourse Area This usually is the area behind the lanes where spectators watch bowlers and where the bowling racks holding house balls are located. A restaurant is often located in this area.
Bowling Area This area consists of a number of lanes, normally set apart in pairs by the seating area. It is here that the athlete bowls. Explain to the athlete that the lanes are set apart in pairs because during competition bowlers are expected to alternate between the two lanes.
Competition requires that alternate lanes be used. Therefore, when bowling games, athletes alternate lanes.
Settee Area It is here the athlete will wait until it is his/her turn to bowl. In many bowling centers, space is provided here for coats, street shoes, bowling bags, etc. If a specific area is not provided, then the area under the seating area is where ball bags and street shoes will be placed.
Ball Return Equipment The reset button is located here. Teach your athletes the purpose of the reset, when to use it and who may use it (e.g., athletes, coaches, lane assistance, etc.). In addition, teach athletes the correct way to pick up the bowling ball from the ball return, so they will not hurt themselves.
Coaching Tip
This area is the hub of activity for the bowlers, therefore, it is important to maintain order and keep this area clear of non-bowlers or coaches.
Coaching Tip
It is important that bowlers pay close attention to oncoming balls to the return. Remind athletes to take a moment and watch for balls before picking up their ball.

Special Olympics Bowling Coaching Guide Created: February 2004
Teaching Bowling Skills The Bowling Center
64
Approach Area Have the athlete observe the dark “locator” dots or arrows on the approaches and lanes; discuss the purpose of these markings. They provide very visible reference points for the athletes to use when they take their stance. The locator dots help athletes line up their approach and aim the ball.
Foul Line and Foul Lights Explain the purpose of the foul line. Just as court lines function as boundary lines for basketball, the foul line serves as the boundary line for bowling. What happens if an athlete crosses the foul line? The foul light comes on and usually a loud buzzer or horn sound will also ring out.
Foul lights are a requirement for competition. Therefore, all training is best conducted with the foul lights on. With foul lights turned on, show athletes what happens if a bowler steps over the foul line. If your athletes find themselves stepping on the foul line, adjust their starting mark further away from the foul line. You can also assess their approach to make sure they are not overreaching in their steps.
Bowling Lanes and Channels Point out the dots and arrows/darts located out on the lanes. Explain that these become targeting points when they begin to bowl. Point out the channels and what happens when the ball is bowled into the channel.
Step on the foul line and the buzzer will sound. The athlete will not receive any credit for pins knocked down which will impact his/her overall score.

Special Olympics Bowling Coaching Guide Created: February 2004
Teaching Bowling Skills
The Bowling Center
65
Pin Deck The pin deck is where the pins are located. There are 10 pins arranged in a triangle with the number 1 pin being the “headpin.”
When facing the pins, the number 2 pin is to the left of the headpin; the number 3 pin is to the right of the headpin. This is the second row.
In the third row, the number 4 pin is the left pin; the number 5 pin is the middle pin; and the number 6 pin is the right pin.
In the fourth row, the number 7 pin is the left pin, followed by the number 8, 9 and 10 pin. The number 10 pin is the right pin in the fourth row. The athlete needs to be able to identify the pin number to report to the control counter if a pin needs to be reset.
Automatic Scoring Equipment
Explain that the scoring equipment is used to keep score for each bowler. The overhead display is also a valuable tool that highlights the name of the person whose turn it is to bowl next.
Key Words
What shape are the pins set up in?
Remember: no food or drinks in the settee area (bowling area)
When do we and who presses the reset button?
Head Pin

Special Olympics Bowling Coaching Guide Created: February 2004
Teaching Bowling Skills Modifications and Adaptations
66
Modifications & Adaptations
In competition, it is important that the rules not be changed to suit athletes’ special needs. There are, however, approved bowling aids that do accommodate athletes’ special needs and are permitted in the rules. However, coaches can modify the training exercises, sport equipment and ways of communicating to meet athletes’ special needs to better help them to achieve success.
Modifying Equipment Successful participation for some athletes requires equipment modifications to suit their particular need.
Ramp Bowling Procedures Bowlers unable to throw a bowling ball may use a bowling ramp. This is a two-piece unit which assists wheelchair users and/or those with limited strength or mobility. A light push by the bowler pushes the ball down the ramp and onto the lanes. There are two types of ramp bowling: assisted and unassisted.
Coaching Tip
Remember, that the bowling ramp functions as the bowler’s foot and cannot cross the foul line.
Assisted Ramp Bowling Another alternative for wheelchair athletes, who do not have the strength or desire to bowl traditionally, is the bowling ramp. It is a metal or aluminum frame with a 30-degree slope. The ramp is placed on the approach and the direction in which it aims is controlled by the athlete through small movements of the ramp. The ball (preferred ball weight is 16 pounds) is placed atop the ramp by an attendant after the athlete has aligned the ramp properly and requested the ball. The bowler ensures that the ball is placed properly and, if not, rotates it as needed. When the athlete is ready to roll the ball, one hand is placed on the ramp to help hold it steady as the ball comes off the ramp at the bottom.
Ramp Bowl Release It’s a Strike
Ramp bowling serves as a viable method for all athletes who need a little more assistance to enjoy the game of bowling with family and friends.

Special Olympics Bowling Coaching Guide Created: February 2004
Teaching Bowling Skills
Modifications and Adaptations
67
For making spares, only a small adjustment in the ramp’s position is needed. The rear of the ramp is moved slightly left for right-side spares, and slightly right for left-side spares. For center spares, use the strike alignment. Only a small push is needed to get the ball rolling. Positioning of the ball with regard to thumb and finger holes will have an effect on the direction the ball will roll. Experiment with the ball to determine the proper place of the ball on the ramp.
Once the proper placement of the ball had been determined have the athlete note a feature on the ball to use as an alignment mark. This can be thumb or finger hole, or a name or number on the ball. Remember a criterion for advancement to competition is that the athlete must do his or her own alignment without assistance.
At the end of the frame, the ramp is then placed back over the ball return until the next frame.
Unassisted Ramp Bowling 1. The bowler moves the ramp to the position he/she wants it.
2. Next, the ball is taken from the ball return and put on the ramp.
3. The bowler then pushes the ball down the ramp toward the pins. This is repeated as needed for each of the 10 frames.
4. At the end of the frame, the ramp is then placed back over the ball return until the next frame.
Bumper Bowling The sport of bowling has begun using devices (often referred to as bumpers) placed in the gutters most of the way down the lane to prevent the ball from going in the gutter. These bumpers almost eliminate the gutter ball entirely and thus permit a bowler to get some pin fall. Bumpers are normally used when instructing beginning bowlers (normally young bowlers). They permit the coach to teach the skills and at the same time allow the bowler to get some pin fall, thus achieving a measure of success. These can only be used for instructional purposes. Scores bowled using the bumper cannot be used to determine a bowling average for advancement to any competition. Athletes who only bowl using bumpers are not to be considered for competition.
An assistant moves the ramp to the foul line and places it in the position requested by the bowler, by either voice or sign. When possible, please allow the athlete to adjust and direct where he/she wants the ramp to go. The assistant may not arbitrarily place the ramp. The ramp may not go over the foul line or the throw will be marked as a foul for the bowler.
Whether using a ramp with a wheelchair or when standing, it is important to let the athlete adjust his/her ramp. You can always give guidance; however, let the athlete have the final say whenever possible.
Next, the ball is placed on the ramp and the assistant holds the leg of the ramp with one hand. This is done while the assistant’s back is turned to the pins, so as not to direct the ball or see the path the ball is going. The assistant then removes his/her hand from the ball. The athlete must hold the ball on the ramp and then push it down the ramp towards the pins. This is repeated as needed for each of the 10 frames.

Special Olympics Bowling Coaching Guide Created: February 2004
Teaching Bowling Skills Modifications and Adaptations
68
Modifying Your Communication Method Different athletes require different communications systems. For example, some athletes learn and respond better to demonstrated exercises, whereas others require greater verbal communication. Some athletes may need a combination – to see, hear and even read a description of the exercise or skill.
Modified Bowling Equipment
Bowling ramps for athletes who are unable to lift the ball or for those in wheelchairs.
Adapter-Pusher device to aid in pushing the ball down the lane.
Handlebar Extension Accessory used with the Adapter-Pusher device by ambulatory bowlers unable to lift the ball.
Handle-grip bowling ball where the handle snaps back in the ball instantly upon release.
Stable guide rail for athlete who can lift and deliver the ball but has balance problems.
Use of chair or wheelchair to deliver the ball for those with upper body strength but unable to stand or walk.
Specific Bowling Hints for Adapted Bowling
Bowling for the Blind It is very difficult, if not impossible, for blind persons to visualize angles. Therefore, it is imperative to develop a system whereby all shots will be in a straight line. The following systems are being used successfully:
Bowling with the Rail 1. Strike Ball: Hook the elbow of the guiding arm over the rail and adjust the rail position so the ball is lined up
with the center of the lane when hanging at the slide of the bowler in their delivery hand. The rail will now remain in this position for all succeeding shots.
2. Left-Side Spares: 4, 7 and 8 pins. Hook rail under the armpit of the guiding arm. This will line up the delivery arm with the above pins.
3. Right-Side Spares: 6, 9 and 10 pins. Hold rail in the hand of the guiding arm with the arm extended straight out to the side, parallel to the floor. This will line up the delivery arm with the above pins.
4. Center Spares: Return to the Strike position (number 1). This will cover the 1, 2, 3 and 5 pins.
Bowling without the Rail Many blind bowlers prefer not to use the rail. These people utilize the ball return as a starting position from which to adjust. This is accomplished by resting the leg against the side of the ball return and then side stepping to gain the proper position for various shots. Since the ball return is between the two lanes used in a match, this will mean using the left leg on the right lane and the right leg on the left lane. It is necessary to develop a uniform side step. The moves in this method are usually as follows:
1. Right Lane: Rest left leg against the ball return. Strike ball and/or center spares; two side steps to the right. Right-side spares; three side steps to the right. Left-side spares; one side step to the right.
2. Left Lane: Right leg will rest against the ball return. The strike ball or center spare move will remain the same, two side steps to the left. Left-hand spares; three side steps to the left. Right-hand spares; one side step to the left.

Special Olympics Bowling Coaching Guide Created: February 2004
Teaching Bowling Skills
Modifications and Adaptations
69
Assistance must be given the bowler in establishing the proper length of a side step. After this, the only assistance necessary is to guide the bowler to the lane and call out the pins remaining. The bowler generally develops a sense of hearing which can tell him/her approximately how many pins have been knocked down. Some blind bowlers roll a hook ball, which creates an almost impossible problem in picking up the number 6 or 10 pins. Try to have the bowler develop a straight ball with the thumb of the bowling hand at about 12 o’clock at the time of delivery.
When teaching beginners, it is advisable to have them stand at the foul line in the proper position and deliver the ball with just a pendulum swing and no steps. This later can be developed into one, two or three steps for an approach. The shorter the length of the step, the easier it is to maintain a straight line. Rolling the ball smoothly and slowly in the beginning is of the utmost importance, for as soon as the ball is thrown or rolled too hard, the person has a tendency to pull the arm across the body and angle the ball.
For those not totally blind, have them stand about two feet in front of the foul line with the delivery arm in line with the center or “big” dot on the floor at the foul line. Make sure their shoulders are square to the foul line and then let them roll over the center dot for the strike ball and center spares and the dot to the right of center for the 3-6 or 6-9 combination. The athlete can move to the second dot to the right of center for the 6 pin or the 6-10 combination. Use the dot to the left of center for the 2-4 combination or the 8 pin, and second dot to the left of center for the 4 pin or the 4-7 combination.
Wheelchair Bowling - Without a Bowling Ramp The basic concept of rolling the ball is the same, minus the approach. Centers can aid bowlers by furnishing ramps down into the bowling areas and up to approaches. A wheelchair with a wheel-locking device is required. The chair should also be equipped with an extra seat cushion to raise the bowler up so that the forearm is parallel to the floor when resting on the chair arm. A wedge cushion is also to be used between the non-throwing side of the bowler and the side of the chair so he/she does not slide when delivering the ball.
Most bowlers, when able, prefer to pick up the ball from the ball return by themselves. They then roll the chair up to the foul line, position themselves so that when their arm hangs over the side of the chair it is aligned with their “spot” on the lanes; then set their wheelchair brake. Rest the throwing arm on the arm of the wheelchair, palm up, ball in hand. Then push the ball out to the front and side away from the wheel of the chair.
The best results are gained by rotating the wrist one turn, so the back of the hand is next to the wheel on the back swing and continue this hand position forward until the ball has passed “bottom dead center.” For the remainder of the swing, rotate the wrist until the thumb is at about the 9 or 10 o’clock position (right-hand bowler). This will produce a hook but is the easiest method to ensure the ball does not hit the chair wheel. Spare shooting here, as in the “blind system,” should be restricted to direct-line shooting where possible, no cross lane, especially where it would be necessary for the ball to cross in front of the chair.
In some cases, wheelchair bowlers are unable to handle the ball well enough to bowl using the above method. In such instances, a good method is to get a wooden, straight-back chair, attach a rubber covering to each leg and improvise a seat belt on the chair. Place the chair at the foul line, pick up or aid the bowler to the chair and strap the seat belt across the bowler’s lap. The chair should be low enough so that by leaning a bit the bowler can pick the ball up off the floor. The bowler then straightens up so the ball clears the floor and can then go into a pendulum swing. It is necessary for an attendant to hold the back of the chair down. In most cases of league or tournament bowling, special exceptions as to the rules are requested so a bowler may roll three frames without moving since it is a major effort to get them strapped into the chair.

Special Olympics Bowling Coaching Guide Created: February 2004
70
Teaching Bowling Skills Mental Preparation and Training
Mental Preparation and Training
Mental training is important for the athlete, whether striving to do his/her personal best or competing against others. Mental imagery, what Bruce D. Hale of Penn State calls ”No Sweat Practice,” is very effective. The mind cannot tell the difference between what is real and what is imagined. Practice is practice, regardless of whether it is mental or physical.
Ask the athlete to sit in a relaxed position, in a quiet place with few distractions. Tell the athlete to close his/her eyes and picture performing a particular skill. Each is seeing himself/herself on a large movie screen on a bowling lane. Walk them through the skill step by step. Use as much detail as possible, using words to elicit all the senses - sight, hearing, touch and smell. Ask the athlete to repeat the image, picture rehearsing the skill successfully - even to the point of seeing the ball going down the lane and making a strike.
Some athletes need help to start the process. Others will learn to practice this way on their own. The link between performing the skills in the mind and performing bowling skills on the lane may be hard to explain. However, the athlete who repeatedly imagines correctly completing a skill and believing it to be true is more likely to make it happen. Whatever goes into one’s mind and one’s heart comes out in his/her actions.

BOWLING COACHING GUIDE
Bowling Rules, Protocol & Etiquette

Bowling Rules, Protocol and Etiquette Table of Contents
Table of Contents
Teaching Bowling Rules Rules for Bowling Competition Special Olympics Unified Sports® Rules Protest Procedures
Bowling Protocol & Etiquette Who Bowls First Be Ready to Bowl Demonstrates Etiquette
Sportsmanship Bowling Glossary

Special Olympics Bowling Coaching Guide Created: February 2004
Bowling Rules, Protocol and Etiquette
The Rules of Bowling
73
Teaching the Rules of Bowling
The best time to teach the rules of bowling is during practice. Please refer to the Official Special Olympics Sports Rules Book for the complete listing of bowling rules.
Athlete Readiness Shows an understanding of the game.
Understands that game consist of 10 frames.
Knows which lane to bowl on when alternate lanes are being used.
Knows not to cross the foul line when bowling.
Knows that pins knocked down when a foul is committed do not count.
Knows to bowl only one ball in a frame when a strike is scored.
Knows to bowl no more than two balls per frame, unless in the 10th frame where three ball may be permitted.
Knows to bowl, only when pins are standing.
Adheres to the rules of the bowling area.
Follows official Special Olympics and international bowling federation rules.
Rules for Bowling Competition 1. Explain to athletes that contesting teams or individuals in league or tournament play successively alternate two
lanes every frame until each has bowled five (5) times on each lane and the game is completed. Bowling requires that bowlers alternate lanes.
2. Explain to athletes that every sport has its boundary lines, and the foul line and gutters are the boundary lines of bowling.
3. Explain that when a part of the athlete’s body steps on or goes beyond the foul line, a foul is committed and if any pins were knocked down they do not count. Demonstrate how the foul light and bell will work when crossing the foul line.
4. Explain to athletes that the only exception to bowling two balls per frame is the 10th frame, when three balls may be bowled if a strike or spare is recorded.
5. Make copies of the bowling area’s rules and hand them out to athletes before going to bowl.
6. Read the rules to non-readers and/or show pictures of “do’s” and “do not’s.”
7. Carefully explain the consequences of not adhering to the rules. Emphasize the fact that the whole group may have to leave because of one person’s actions.
Key Words
No food or drink in the bowling area
Remember to alternate lanes
Do not cross the foul line
Coaching Tips
Rules of the bowling area are the rules you make for your program. These would include such things as the following.
o Bowlers will remain in the pit area ready to bowl. o No food or drink in the bowling area. o Who can press the reset button.

Special Olympics Bowling Coaching Guide Created: February 2004
Bowling Rules, Protocol and Etiquette The Rules of Bowling
74
Special Olympics Unified Sports® Rules
There are few differences in the rules for Unified Sports competition and the rules as stipulated in the official Special Olympics Sports Rules and modifications outlined in the rules book. The additions are highlighted below.
1. A roster consists of a proportionate numbers of athletes and partners. Although the exact distribution of roster spots is not specified, a basketball roster containing eight athletes and two partners does not meet the goals of a Special Olympics Unified Sports program.
2. A line up during the competition consists of half athletes and half partners. Teams that have an odd number of players (e.g. 11-A-Side Football) have one more athlete than partner in the game at all times.
3. Bowling teams are divisioned for competition based primarily on ability. In team sports, division assignment is based on the best players on the roster, not the average ability of all players.
4. Team sports must have an adult, non-playing coach. Player-coaches are not allowed in team sports.
Protest Procedures
Protest procedures are governed by the rules of competition. The role of the competition management team is to enforce the rules. As coach, your duty to your athletes and team is to protest any action or events while your athlete is competing that you think violated Official Bowling Rules. It is extremely important that you do not make protests because you and your athlete did not get your desired outcome of an event. Making protest are serious matters that impact a competition’s schedule. Check with the competition team prior to competition to learn the protest procedures for that competition.

Special Olympics Bowling Coaching Guide Created: February 2004
Bowling Rules, Protocol and Etiquette
Bowling Protocol and Etiquette
75
Bowling Protocol & Etiquette
The rules of bowling etiquette are simple and can be easily understood. The most important points of bowling etiquette are who bowls first and be ready to bowl.
Who Bowls First When there are two people in the lanes on either side of your bowler, the general rule is the first bowler up bowls first. If there are any questions as to who bowls first, the bowler to the right bowls first.
Be Ready to Bowl Once a bowler is lined up in his/her stance and ready to bowl –he/she needs to bowl. Bowlers cannot knock down the pins by staring at them. They have to throw the ball down the lane at them. It is easy for bowlers to get into their stance and take too much time in getting their feet, hands, knees and body in the exact position. Teach your bowlers not to rush into their stance, approach and delivery. However, it is important to teach them to get into their stance and deliver the ball as efficiently as possible. This will keep the game moving and not annoy other bowlers and teammates.
Be Considerate Keep it simple. Teach your bowlers to always be considerate toward their teammates and other bowlers in the lanes on either side and of them and in the bowling area. Once your athletes understand this concept, they will learn to respect their teammates, other bowlers and adapt an attitude of good sportsmanship that will remain with them throughout their bowling days.
Athlete Readiness While participating in bowling, the athlete will exhibit sportsmanship and etiquette at all times.
Demonstrates competitive effort while bowling at all times.
Takes turns with other team members.
Selects and uses the same ball throughout the game.
Waits for bowlers on adjacent lanes (one lane right or left of athlete) to finish before bowling.
Bowls cooperatively and competitively; cheers fellow teammates.
Maintains knowledge of own score.
Helps teammates with their scores.
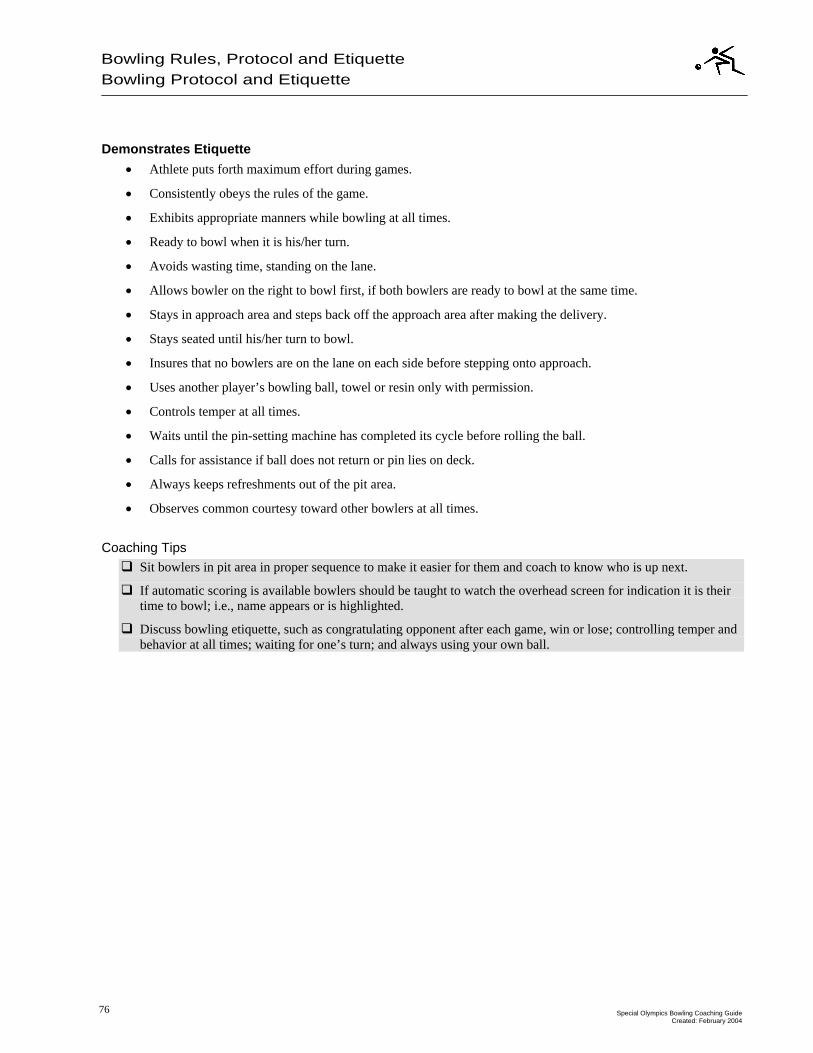
Special Olympics Bowling Coaching Guide Created: February 2004
Bowling Rules, Protocol and Etiquette Bowling Protocol and Etiquette
76
Demonstrates Etiquette
Athlete puts forth maximum effort during games.
Consistently obeys the rules of the game.
Exhibits appropriate manners while bowling at all times.
Ready to bowl when it is his/her turn.
Avoids wasting time, standing on the lane.
Allows bowler on the right to bowl first, if both bowlers are ready to bowl at the same time.
Stays in approach area and steps back off the approach area after making the delivery.
Stays seated until his/her turn to bowl.
Insures that no bowlers are on the lane on each side before stepping onto approach.
Uses another player’s bowling ball, towel or resin only with permission.
Controls temper at all times.
Waits until the pin-setting machine has completed its cycle before rolling the ball.
Calls for assistance if ball does not return or pin lies on deck.
Always keeps refreshments out of the pit area.
Observes common courtesy toward other bowlers at all times.
Coaching Tips
Sit bowlers in pit area in proper sequence to make it easier for them and coach to know who is up next.
If automatic scoring is available bowlers should be taught to watch the overhead screen for indication it is their time to bowl; i.e., name appears or is highlighted.
Discuss bowling etiquette, such as congratulating opponent after each game, win or lose; controlling temper and behavior at all times; waiting for one’s turn; and always using your own ball.

Special Olympics Bowling Coaching Guide Created: February 2004
Bowling Rules, Protocol and Etiquette
Sportsmanship
77
Sportsmanship
Good sportsmanship is both the coaches’ and athletes’ commitment to fair play, ethical behavior and integrity. In perception and practice, sportsmanship is defined as those qualities which are characterized by generosity and genuine concern for others. Below we highlight a few focus points and ideas on how to teach and coach sportsmanship to your athletes. Lead by example.
Competitive Effort
Put forth maximum effort during each event.
Practice the skills with the same intensity as you would perform them in competition.
Always finish a race or event—never quit.
Fair Play at All Times
Always comply with the rules.
Demonstrate sportsmanship and fair play at all times.
Respect the decision of the officials at all times.
Expectations of Coaches 1. Always set a good example for participants and fans to follow.
2. Instruct participants in proper sportsmanship responsibilities and demand that they make sportsmanship and ethics the top priorities.
3. Respect judgment of contest officials, abide by rules of the event and display no behavior that could incite fans.
4. Treat opposing coaches, directors, participants and fans with respect.
5. Shake hands with officials and the opposing coach in public.
6. Develop and enforce penalties for participants who do not abide by sportsmanship standards.
Expectations of Athletes & Partners in Special Olympics Unified Sports®
1. Treat teammates with respect.
2. Encourage teammates when they make a mistake.
3. Treat opponents with respect: shake hands prior to and after contests.
4. Respect judgment of contest officials, abide by rules of the contest and display no behavior that could incite fans.
5. Cooperate with officials, coaches or directors and fellow participants to conduct a fair contest.
6. Do not retaliate (verbally or physically) if the other team demonstrates poor behavior.
7. Accept seriously the responsibility and privilege of representing Special Olympics.
8. Define winning as doing your personal best.
9. Live up to the high standard of sportsmanship established by your coach.
Coaching Tips
Discuss bowling etiquette, such as congratulating opponent after all events, win or lose; controlling temper and behavior at all times.
Give sportsmanship awards or recognition after each meet or practice.
Always commend athletes when they demonstrate sportsmanship.

Special Olympics Bowling Coaching Guide Created: February 2004
Bowling Rules, Protocol and Etiquette Sportsmanship
78
Remember
Sportsmanship is an attitude that is shown in how you and your athletes act on and off the field of play.
Be positive about competing.
Respect your opponents and yourself.
Always stay under control even if you are feeling mad or angry.

Special Olympics Bowling Coaching Guide Created: February 2004
79
Bowling Rules, Protocol and Etiquette
Bowling Glossary
Bowling Glossary
Term Definition
Alley, or Bowling Lane Playing surface on which the ball is rolled and where the pins are located. Also known as a lane. In its plural form, can mean a bowling center.
Anchor Last bowler in a team’s lineup.
Approach Area behind the foul line on which the bowler takes his/her steps prior to delivering the ball. Known, too, as the runway. Also, the entire delivery process, from push away to release.
Back End The two-part, rearmost part of a lane – the hook area and the pin deck.
Back swing Path of the arm behind the body during the next to last step in the delivery.
Backup A ball that curves left to right for a right-hander and right to left for a left-hander.
Ball Rack Equipment used to store house balls.
Ball Return Usually an under-the-lane track on which the ball is returned to the bowler from the pit. Also, where the ball rests before and after all shots.
Blind Score given to a team when a member is absent. Although based on the missing player’s past performances, the score given is usually lower than the average for that bowler, thus penalizing him for the absence.
Boards Strips of wood that make up a lane.
Bowling Area The area behind the lane where bowlers wait to bowl. This is sometimes referred to as the settee area.
Bowling Center A bowling establishment.
Bridge Distance between finger holes on the ball.
Concourse Area behind the lane where spectators sit.
Control Desk The bowling center area where you make the arrangements and receive the equipment needed to bowl.
Convert When you successfully make your spare.
Count Number of pins knocked down on the first ball.
Curve A ball that is rolled toward the outside of the lane and then curves back toward the center of the lane.
Delivery Rolling of the ball.
Double Two consecutive strikes.
Error Failure to convert a spare. Also called a blow, miss or open.
Fill Number of pins knocked down by the first ball after a spare. So called because those pins finish the scoring for the previous frame.
Foul Touching or going beyond the foul line when delivering the ball.
Foul Line A black line on the alley which separates the approach from the lane.
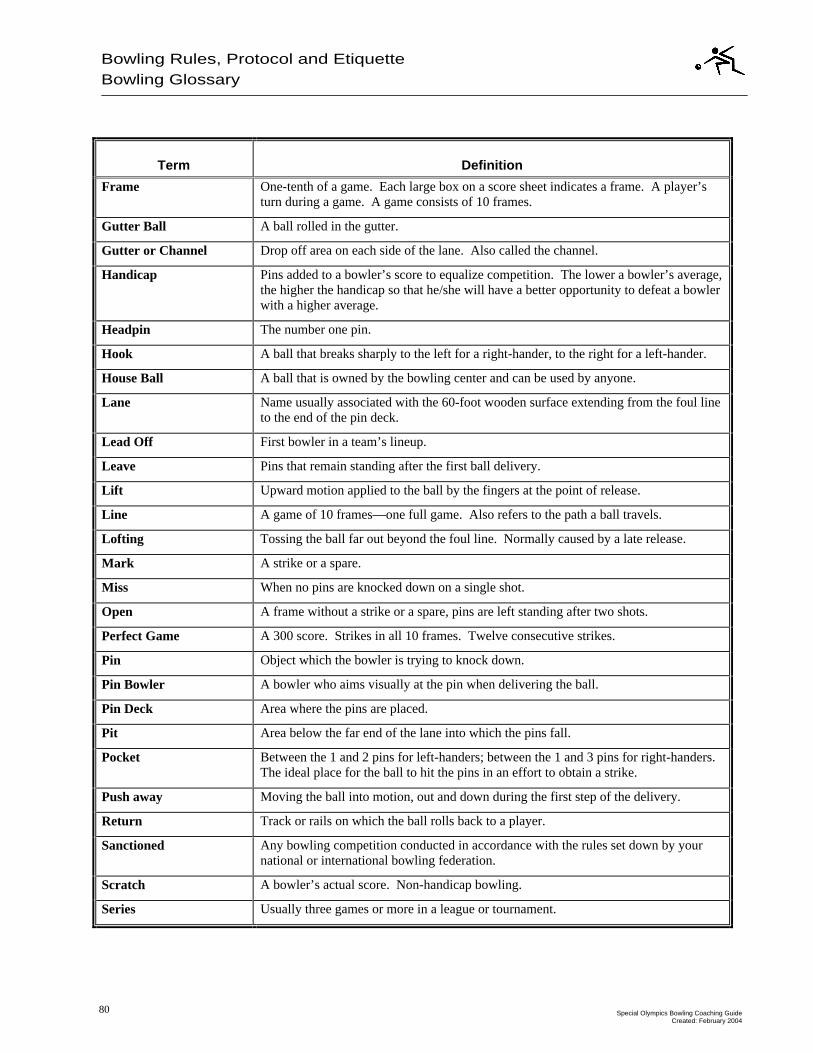
Special Olympics Bowling Coaching Guide Created: February 2004
80
Bowling Rules, Protocol and Etiquette Bowling Glossary
Term Definition
Frame One-tenth of a game. Each large box on a score sheet indicates a frame. A player’s turn during a game. A game consists of 10 frames.
Gutter Ball A ball rolled in the gutter.
Gutter or Channel Drop off area on each side of the lane. Also called the channel.
Handicap Pins added to a bowler’s score to equalize competition. The lower a bowler’s average, the higher the handicap so that he/she will have a better opportunity to defeat a bowler with a higher average.
Headpin The number one pin.
Hook A ball that breaks sharply to the left for a right-hander, to the right for a left-hander.
House Ball A ball that is owned by the bowling center and can be used by anyone.
Lane Name usually associated with the 60-foot wooden surface extending from the foul line to the end of the pin deck.
Lead Off First bowler in a team’s lineup.
Leave Pins that remain standing after the first ball delivery.
Lift Upward motion applied to the ball by the fingers at the point of release.
Line A game of 10 frames—one full game. Also refers to the path a ball travels.
Lofting Tossing the ball far out beyond the foul line. Normally caused by a late release.
Mark A strike or a spare.
Miss When no pins are knocked down on a single shot.
Open A frame without a strike or a spare, pins are left standing after two shots.
Perfect Game A 300 score. Strikes in all 10 frames. Twelve consecutive strikes.
Pin Object which the bowler is trying to knock down.
Pin Bowler A bowler who aims visually at the pin when delivering the ball.
Pin Deck Area where the pins are placed.
Pit Area below the far end of the lane into which the pins fall.
Pocket Between the 1 and 2 pins for left-handers; between the 1 and 3 pins for right-handers. The ideal place for the ball to hit the pins in an effort to obtain a strike.
Push away Moving the ball into motion, out and down during the first step of the delivery.
Return Track or rails on which the ball rolls back to a player.
Sanctioned Any bowling competition conducted in accordance with the rules set down by your national or international bowling federation.
Scratch A bowler’s actual score. Non-handicap bowling.
Series Usually three games or more in a league or tournament.

Special Olympics Bowling Coaching Guide Created: February 2004
81
Bowling Rules, Protocol and Etiquette
Bowling Glossary
Term Definition
Settee Area Also referred to as bowling area.
Soft Pocket Hit The action a ball makes as it enters the pin triangle when its rotation has reduced because the ball is too slow.
Span The distance between the thumbhole and the finger holes on a ball.
Spare Knocking down all 10 pins with two shots within the same frame. Indicated on the score sheet with an ( / ).
Split A spare leave in which the headpin is down and the remaining pins have another pin down immediately ahead of or between them so that the gap is greater than the width of the ball.
Spot Target on the lane at which a bowler aims.
Spot Bowler A bowler who uses the finders or spots as their primary target. Opposite of pin bowler.
Steps Number of steps bowler takes when delivering the ball.
Strike Knocking down all 10 pins with the first shot of a frame. Indicated on the score sheet with an (X).
Target Arrows A series of seven triangular darts (spots) placed in front of the foul line out on the lane. Used as sighting targets to help a player align the starting position on the approach with the ball path to the pocket.
Turkey Three consecutive strikes.

This document was created with Win2PDF available at http://www.daneprairie.com.The unregistered version of Win2PDF is for evaluation or non-commercial use only.