bounded taskflow - oracle adf 11g - doag.org · bounded taskflow - oracle adf 11g - mai10 3 back...
TRANSCRIPT

bounded taskflow - Oracle ADF 11g
http://www.oracle.com/technology/obe/obe11jdev/ps1/boundedtaskflow/bounded_task_flow.html - Mai10 1
Working with Bounded Task Flows, Regions and Routers in JDeveloper 11g
Purpose
In this tutorial, you use Oracle JDeveloper 11g to create 2 task flows. One that includes views, and
return components, the other one including views and a router. Then after creating each of the
components in the first task flow, you bind data controls to the views. In the second task flow, you
define the router rules. Finally you create a JSF Page and bind the task flow as a region in the page.
The data model uses Business Components, and for the web client, Java Server Faces (JSF) is used.
Time to Complete
50 minutes
Topics
The tutorial covers the following topics:
Overview
Scenario
Prerequisites
Create a New Fusion Application and Business Components
Create a Bounded Task Flow
Build the Task Flow Pages
Bind the Task Flow Pages to Data Controls
Set the Transaction Control for the Task Flow
Define a Second Task Flow
Define the Task Flow Components and the Router Rules
Create the JSF Page and Bind the Task Flow as a Region to the
Page
Run the master Page
Summary
Overview
The model is provided by business components, while the view and controller are provided by Java
Server Faces. You create bounded task flow diagrams using views, returns and a router and also you
create a managed bean.
Back to Topic List
Scenario
You create two bounded task flows with various components in it. Using a router, views, and
returns, you design the task flows to be able to support search and update functionalities. You bind
the view components with data controls. You define a managed bean to handle a typed password .
You define the rules for the router where the password is verified allowing you to login to the
application. You create a JSF Page and bind the task flow as a region in the JSF page, creating a
parameter value for the username.
Back to Topic List
Prerequisites
Before starting the tutorial, you should set up your environment. To install JDeveloper, perform the
following steps:
1. Have access to or have installed Oracle JDeveloper 11g Version 11.1.1.2.0. You can download it
from Oracle Technology Network.
2. Have access to or have installed the Oracle Sample Schemas, included with the Oracle 10g or Oracle
11g database.
The tutorial uses the HR schema. Specifically, the pages work with the DEPARTMENT and
EMPLOYEES tables.
Instructions for installing the HR schema and creating a connection to it in JDeveloper are available
online at:

bounded taskflow - Oracle ADF 11g
http://www.oracle.com/technology/obe/obe11jdev/ps1/boundedtaskflow/bounded_task_flow.html - Mai10 2
http://www.oracle.com/technology/obe/obe11jdev/11/common/connection11g.htm
3. Start JDeveloper by selecting Start > All Programs > Oracle Fusion Middleware 11.1.1.2.0 >
JDeveloper Studio 11.1.1.2.0
4. If the Migrate User Settings dialog box opens, click NO.
If prompted for a User Role, choose Default.
Close the Tip of the Day window.
5. The JDeveloper IDE should now be displayed.

bounded taskflow - Oracle ADF 11g
http://www.oracle.com/technology/obe/obe11jdev/ps1/boundedtaskflow/bounded_task_flow.html - Mai10 3
Back to Topic List
Creating a New Fusion Application and Business Components
When you work in JDeveloper, you organize your work in projects within an application.
JDeveloper provides several templates that you can use to create an Application and projects. The
templates are pre configured with a basic set of technologies that are needed for developing various
types of applications, and you create your working environment by selecting the template that fits
your needs. You can then configure it to add any other technologies you plan to use.
In the first section you are going to create a new Application using the Fusion technology and build
reusable business components that will access the database. To create the application and the model
components, perform the following steps:
1. In the Applications Navigator, click New Application. Another option is to use the File->New...
menu option to create a new application.

bounded taskflow - Oracle ADF 11g
http://www.oracle.com/technology/obe/obe11jdev/ps1/boundedtaskflow/bounded_task_flow.html - Mai10 4
2. In the Create Application dialog box, specify the Application Name to be TaskFlow. Notice that
the directory changes to match the new name. You can change the C:\JDeveloper\mywork part of
the path to create your files in another location.
In the Application Package Prefix field set the value to be demo. In the Application Templates
choose the Fusion Web Application (ADF) and click Finish.
The Overview pane displays a Checklist you can refer to as a guide for developing a Fusion Web
Application.
The Checklist is displayed by default when a Fusion Web application is created.

bounded taskflow - Oracle ADF 11g
http://www.oracle.com/technology/obe/obe11jdev/ps1/boundedtaskflow/bounded_task_flow.html - Mai10 5
3. In the Application Navigator you'll see two new projects now. The default naming rules for these
projects are Model for one and ViewController for the other.
4. We start creating the model components using the CheckList Overview. Click the Connect to a
Database step.
5. The step expands showing useful information such as prerequisites required for performing this task.
Click the Create a Database Connection button.

bounded taskflow - Oracle ADF 11g
http://www.oracle.com/technology/obe/obe11jdev/ps1/boundedtaskflow/bounded_task_flow.html - Mai10 6
6. Specify the following properties for the new connection you are creating:
Connection Name HRConn
Username hr
Password hr
Enter the Oracle JDBC Settings properly to point to the right host, port and SID for your database.
Click the Test Connection button and verify that you got success.
Once done click the OK button.
7. In the Checklist pane, set the status of the Connect to a Database step to Done.
8. Click the Build Business Services step to expand it, then click the Go to Substeps button.

bounded taskflow - Oracle ADF 11g
http://www.oracle.com/technology/obe/obe11jdev/ps1/boundedtaskflow/bounded_task_flow.html - Mai10 7
9. In the subtask list, click the Create Entity Objects and Associations subtask.
Then click the Create Entity Objects and Associations button.
10. In the Select Project for Action dialog, select the Model project.
11. In the Initialize Business Components Project dialog the HRConn connection should be selected.

bounded taskflow - Oracle ADF 11g
http://www.oracle.com/technology/obe/obe11jdev/ps1/boundedtaskflow/bounded_task_flow.html - Mai10 8
Click OK.
12. In the Entity Objects page, click the Query button to examine the data dictionary and see available
tables.
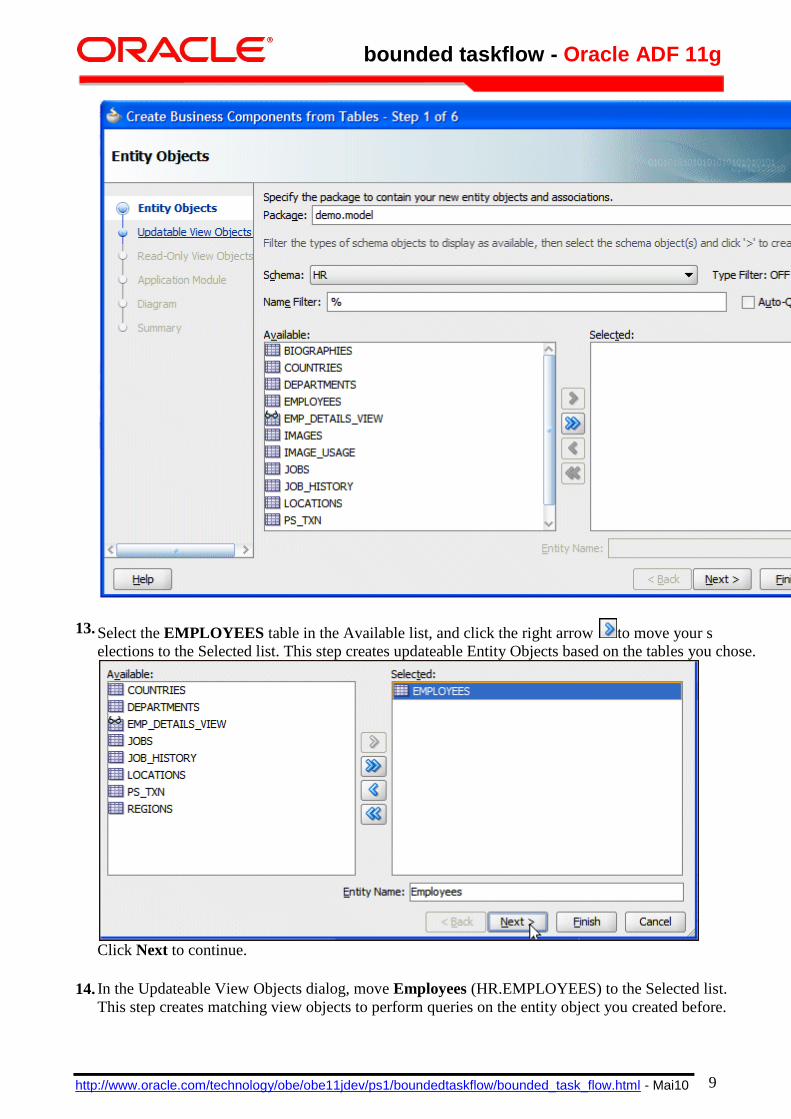
bounded taskflow - Oracle ADF 11g
http://www.oracle.com/technology/obe/obe11jdev/ps1/boundedtaskflow/bounded_task_flow.html - Mai10 9
13. Select the EMPLOYEES table in the Available list, and click the right arrow to move your s
elections to the Selected list. This step creates updateable Entity Objects based on the tables you chose.
Click Next to continue.
14. In the Updateable View Objects dialog, move Employees (HR.EMPLOYEES) to the Selected list.
This step creates matching view objects to perform queries on the entity object you created before.

bounded taskflow - Oracle ADF 11g
http://www.oracle.com/technology/obe/obe11jdev/ps1/boundedtaskflow/bounded_task_flow.html - Mai10 10
Click Next to continue.
15. In the Read Only View Objects dialog, Click Next to continue.
16. In the Application Module dialog, click Finish to create the business components in the Model project.

bounded taskflow - Oracle ADF 11g
http://www.oracle.com/technology/obe/obe11jdev/ps1/boundedtaskflow/bounded_task_flow.html - Mai10 11
17. In the Checklist, set the status of the Create Entity Objects and Associations step to Done. Then click
the Close Step 3 button.
Note: Since steps 3.2, 3.3 and 3.4 have also been completed, we could as well set their status to done,
but we'll do it at a higher level.
18. Set the status of the Build Business Services step to Done.

bounded taskflow - Oracle ADF 11g
http://www.oracle.com/technology/obe/obe11jdev/ps1/boundedtaskflow/bounded_task_flow.html - Mai10 12
19. The work on the model project is performed. Expanding the Model project, the Application Navigator
should look like the following:
20. Click the Save All icon on the JDeveloper menu bar, or select File | Save All from the menu.
Next we'll work on the ViewController project.
Back to Topic List
Creating a Bounded Task Flow
With the TaskFlow application loaded in JDeveloper, you create a bounded task flow diagram
including views, and returns. To do this, perform the following steps:
1. In the Application Navigator, right click the ViewController node and select New from context.
2. In the New Gallery, click the Web Tier | JSF node and select ADF Task Flow.

bounded taskflow - Oracle ADF 11g
http://www.oracle.com/technology/obe/obe11jdev/ps1/boundedtaskflow/bounded_task_flow.html - Mai10 13
Click OK.
3. In the Create Task Flow dialog, type emp-update-flow as the File Name. Select the following checkboxes:
Create as Bounded Task Flow Checked
Create with Page Fragments Checked
Create Train Checked

bounded taskflow - Oracle ADF 11g
http://www.oracle.com/technology/obe/obe11jdev/ps1/boundedtaskflow/bounded_task_flow.html - Mai10 14
Click OK.
4. A new empty task flow diagram displays and a new entry is created in the Application Navigator.
5. Select the View component from the Component Palette and drag and drop it onto the diagram
surface.

bounded taskflow - Oracle ADF 11g
http://www.oracle.com/technology/obe/obe11jdev/ps1/boundedtaskflow/bounded_task_flow.html - Mai10 15
6. Change the default name to intro.
7. Create a new view on the diagram next to the intro one.
Rename it search.

bounded taskflow - Oracle ADF 11g
http://www.oracle.com/technology/obe/obe11jdev/ps1/boundedtaskflow/bounded_task_flow.html - Mai10 16
8. Create a third view on the diagram.
Rename it update. Your diagram should look similar to that:
Back to Topic List
Building the Task Flow Pages
The intro page is the entry point of this task flow and you'll see how to create a train within the
pages. To do this, perform the following steps:
1. On the emp-update-flow diagram, double click the intro view component to create the page.
2. In the Create New JSF Page Fragment dialog, click OK to accept default values.

bounded taskflow - Oracle ADF 11g
http://www.oracle.com/technology/obe/obe11jdev/ps1/boundedtaskflow/bounded_task_flow.html - Mai10 17
3. The page design pane opens up. From the Component Palette, in the ADF Faces Common
Components group, select the Train component and drop it onto the page design
surface.
In the Bind Train dialog, click OK to accept the default value.
4. Select the Train Button Bar component and drop it underneath the Train
component.

bounded taskflow - Oracle ADF 11g
http://www.oracle.com/technology/obe/obe11jdev/ps1/boundedtaskflow/bounded_task_flow.html - Mai10 18
In the Bind trainButtonBar dialog, click OK to accept the default value.
5. From the Component Palette, in the ADF Faces Common Components group, select the Output
Text component and drop it underneath the Train Button Bar.
Open the Property Inspector if not already there (View | Property Inspector or use the key
combination [Ctrl] + [Shift] + [I]), and enter Welcome to the Employee updater in the value
field
The page should look like this:
6. Click the emp-update-flow tab to reopen the task flow diagram.

bounded taskflow - Oracle ADF 11g
http://www.oracle.com/technology/obe/obe11jdev/ps1/boundedtaskflow/bounded_task_flow.html - Mai10 19
7. Double click the search view component to create the search page.
8. In the Create New JSF Page Fragment dialog, click OK to accept default values.
9. The page design pane opens up. From the Component Palette, in the ADF Faces Common
Components group, select the Train component and drop it onto the page design
surface.
In the Bind Train dialog, click OK to accept the default value.

bounded taskflow - Oracle ADF 11g
http://www.oracle.com/technology/obe/obe11jdev/ps1/boundedtaskflow/bounded_task_flow.html - Mai10 20
10. Select the Train Button Bar component and drop it underneath the Train
component.
In the Bind trainButtonBar dialog, click OK to accept the default value.
11. Click the emp-update-flow tab to reopen the task flow diagram.
12. Double click the update view component to create the update page.
13. In the Create New JSF Page Fragment dialog, click OK to accept default values.

bounded taskflow - Oracle ADF 11g
http://www.oracle.com/technology/obe/obe11jdev/ps1/boundedtaskflow/bounded_task_flow.html - Mai10 21
14. The page design pane opens up. From the Component Palette, in the ADF Faces Common
Components group, select the Train component and drop it onto the page design
surface.
In the Bind Train dialog, click OK to accept the default value.
15. Select the Train Button Bar component and drop it underneath the Train
component.

bounded taskflow - Oracle ADF 11g
http://www.oracle.com/technology/obe/obe11jdev/ps1/boundedtaskflow/bounded_task_flow.html - Mai10 22
In the Bind trainButtonBar dialog, click OK to accept the default value.
16. Click the save all icon to save the application.
Back to Topic List
Binding the Task Flow Pages to Data Controls
The search and update pages need to bind data control components. The search page for querying
employees on any column criteria and the update page for displaying and updating an employee's
salary. To do so, perform the following steps:
1. Click the search tab to reopen the page.
2. Open the Data Controls accordion and expand the following nodes AppModuleDataControl |
EmployeesView1 | Named Criteria and drag and drop the All Queriable Attributes on the
page.
3. From the pop up menu, select Create | Quick Query --> ADF Quick Query with Table option.

bounded taskflow - Oracle ADF 11g
http://www.oracle.com/technology/obe/obe11jdev/ps1/boundedtaskflow/bounded_task_flow.html - Mai10 23
4. In the Edit Table Columns dialog, select the Row Selection and Sorting check boxes.
Click OK.
5. The page should look like the following:
6. Click the update tab to open the page.

bounded taskflow - Oracle ADF 11g
http://www.oracle.com/technology/obe/obe11jdev/ps1/boundedtaskflow/bounded_task_flow.html - Mai10 24
7. From the Data Controls pane, select AppModuleDataControl | EmployeesView1 then drag and
drop it onto the update page.
8. From the pop up menu select Create | Form --> ADF Form option.
9. In the Edit Form Fields select the last 3 rows (CommissionPct, ManagerID and
DepartmentId) and click the Delete button to discard the fields. Then select the Include
Submit Button option and click OK.

bounded taskflow - Oracle ADF 11g
http://www.oracle.com/technology/obe/obe11jdev/ps1/boundedtaskflow/bounded_task_flow.html - Mai10 25
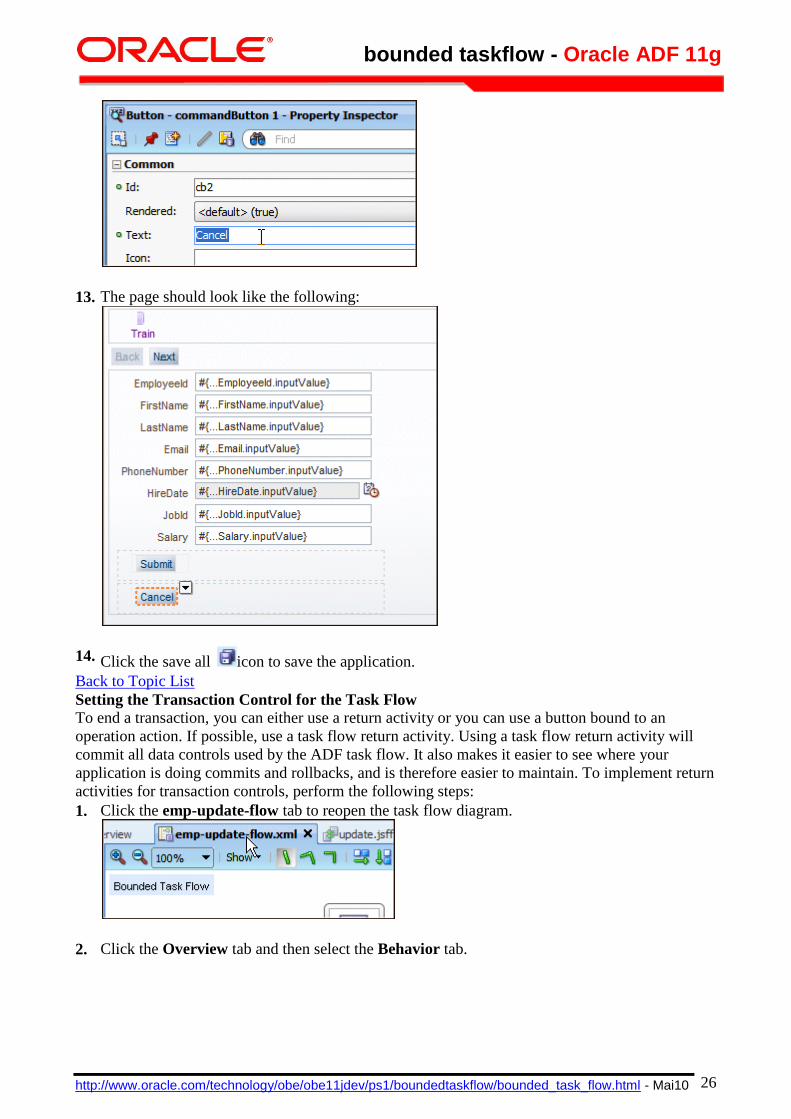
10. In the Component Palette, select the Button icon and drag and drop it next to the
Submit button.
11. In the Property Inspector, type Cancel in the Text field for the button.
bounded taskflow - Oracle ADF 11g
http://www.oracle.com/technology/obe/obe11jdev/ps1/boundedtaskflow/bounded_task_flow.html - Mai10 26
13. The page should look like the following:
14. Click the save all icon to save the application.
Back to Topic List
Setting the Transaction Control for the Task Flow
To end a transaction, you can either use a return activity or you can use a button bound to an
operation action. If possible, use a task flow return activity. Using a task flow return activity will
commit all data controls used by the ADF task flow. It also makes it easier to see where your
application is doing commits and rollbacks, and is therefore easier to maintain. To implement return
activities for transaction controls, perform the following steps:
1. Click the emp-update-flow tab to reopen the task flow diagram.
2. Click the Overview tab and then select the Behavior tab.

bounded taskflow - Oracle ADF 11g
http://www.oracle.com/technology/obe/obe11jdev/ps1/boundedtaskflow/bounded_task_flow.html - Mai10 27
3. In the Transaction group, set the following properties from the list: Always Begin New
Transaction.
This way, each individual employee update is seen as a single row granularity transaction.
4. Select the Task Flow Return component and drop it underneath the update
view.
Rename it commit.

bounded taskflow - Oracle ADF 11g
http://www.oracle.com/technology/obe/obe11jdev/ps1/boundedtaskflow/bounded_task_flow.html - Mai10 28
5. Select again the Task Flow Return component and drop it underneath the
update view. Rename it rollback.
6. Select the Control Flow Case component from the Component Palette and
clicking in the update view, drag and drop it into the commit return.
Rename it commit.

bounded taskflow - Oracle ADF 11g
http://www.oracle.com/technology/obe/obe11jdev/ps1/boundedtaskflow/bounded_task_flow.html - Mai10 29
7. Select the Control Flow Case component from the Component Palette and
clicking in the update view, drag and drop it into the rollback return. Rename it rollback.
8. The task flow diagram should look like the following:
9. Select the commit return component and in the property inspector, in the Behavior tab, for the
End Transaction field, select commit, from the list of values.
10. Repeat the same operation selecting the rollback return and select rollback from the list for the
End Transaction field.

bounded taskflow - Oracle ADF 11g
http://www.oracle.com/technology/obe/obe11jdev/ps1/boundedtaskflow/bounded_task_flow.html - Mai10 30
11. Click the save all icon to save the application.
12. Click the update tab to open the update page design, and select the Submit button.
In the Property Inspector, in the Action field, select commit from the list.
13. Select the Cancel button.
In the Property Inspector, in the Action field, select rollback from the list.
14. Click the save all icon to save the application.
Back to Topic List

bounded taskflow - Oracle ADF 11g
http://www.oracle.com/technology/obe/obe11jdev/ps1/boundedtaskflow/bounded_task_flow.html - Mai10 31
Defining a Second Task Flow
We want to restrict the access to the application through a login process. We create a login page, a
router, an error page and the previously created task flow. To create this task flow, perform the
following steps:
1. In the Application Navigator, right click the ViewController node and select New from context.
2. In the New Gallery, click the Web Tier | JSF node and select ADF Task Flow.
Click OK.
3. In the Create Task Flow dialog, type security-flow as the File Name. Select the following checkboxes:
Create as Bounded Task Flow Checked
Create with Page Fragments Checked

bounded taskflow - Oracle ADF 11g
http://www.oracle.com/technology/obe/obe11jdev/ps1/boundedtaskflow/bounded_task_flow.html - Mai10 32
Click OK.
4. A new empty task flow diagram displays and a new entry is created in the Application Navigator.
5. Select the View component from the Component Palette and drag and drop it onto the diagram
surface.

bounded taskflow - Oracle ADF 11g
http://www.oracle.com/technology/obe/obe11jdev/ps1/boundedtaskflow/bounded_task_flow.html - Mai10 33
Rename the view login.
6. Select the Router component and drop it next to the login view.
7. Select the emp-update-flow in the Application Navigator then drag and drop it on the diagram
below the router.

bounded taskflow - Oracle ADF 11g
http://www.oracle.com/technology/obe/obe11jdev/ps1/boundedtaskflow/bounded_task_flow.html - Mai10 34
8. Select the View icon from the component palette then drag and drop it on the diagram surface.
Rename the view error.
9. Select the Control Flow Case icon and clicking in the login view, drag the flow
into the router.

bounded taskflow - Oracle ADF 11g
http://www.oracle.com/technology/obe/obe11jdev/ps1/boundedtaskflow/bounded_task_flow.html - Mai10 35
10. Repeat the previous operation to draw a Control Flow Case from the router to the
error view.
Rename the flow bad.
11. Repeat the previous operation to draw a Control Flow Case from the router to the
emp-update-flow flow. Rename the flow good.

bounded taskflow - Oracle ADF 11g
http://www.oracle.com/technology/obe/obe11jdev/ps1/boundedtaskflow/bounded_task_flow.html - Mai10 36
12. Repeat the previous operation to draw a Control Flow Case from the error view
to the login view. Rename the flow login. Your diagram should look like the following:
13. The task flow is now defined.
14. Click the save all icon to save the application.
Back to Topic List
Defining the Task Flow Components and the Router Rules
We create a login page with a password field, then we create a backing bean for the password value.
Then the router depending on the password value leads to an error page or to the emp-update flow.
To create the pages and implement the router rules, perform the following steps:
1. In the diagram, double click the login view icon to create the page. In the Create New JSF Page
Fragment, click OK to accept default values.

bounded taskflow - Oracle ADF 11g
http://www.oracle.com/technology/obe/obe11jdev/ps1/boundedtaskflow/bounded_task_flow.html - Mai10 37
2. In the Component Palette, drag and drop the Input Text icon onto the login page.
Enter password as the label.
3. In the Advanced tab, next to the Binding field, select Edit from the drop down list.
In the Edit Property dialog, click the New button to create a Managed Bean to hold the password
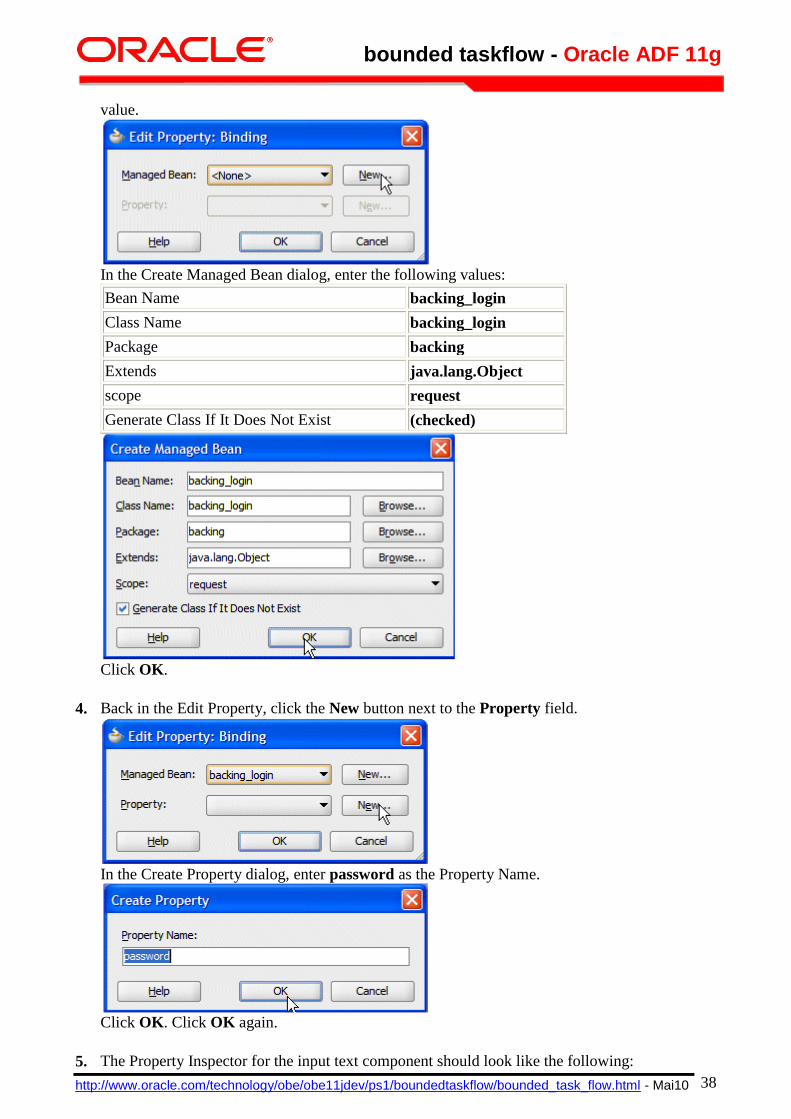
bounded taskflow - Oracle ADF 11g
http://www.oracle.com/technology/obe/obe11jdev/ps1/boundedtaskflow/bounded_task_flow.html - Mai10 38
value.
In the Create Managed Bean dialog, enter the following values:
Bean Name backing_login
Class Name backing_login
Package backing
Extends java.lang.Object
scope request
Generate Class If It Does Not Exist (checked)
Click OK.
4. Back in the Edit Property, click the New button next to the Property field.
In the Create Property dialog, enter password as the Property Name.
Click OK. Click OK again.
5. The Property Inspector for the input text component should look like the following:
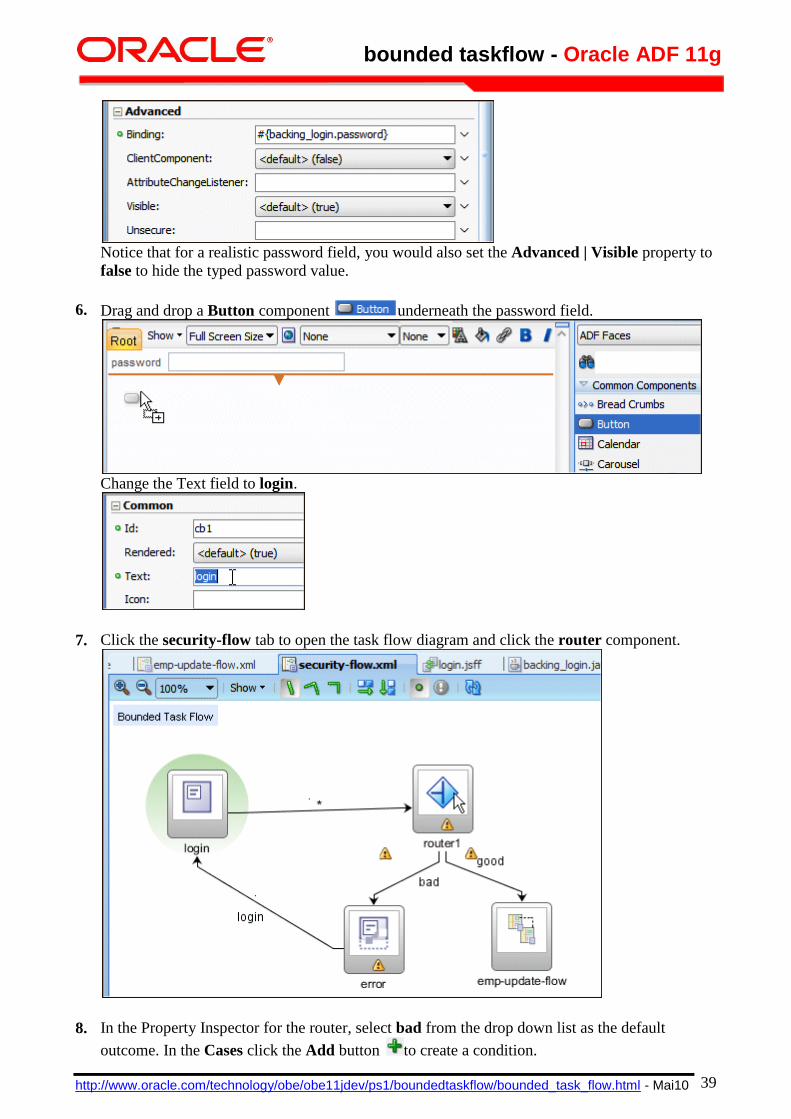
bounded taskflow - Oracle ADF 11g
http://www.oracle.com/technology/obe/obe11jdev/ps1/boundedtaskflow/bounded_task_flow.html - Mai10 39
Notice that for a realistic password field, you would also set the Advanced | Visible property to
false to hide the typed password value.
6. Drag and drop a Button component underneath the password field.
Change the Text field to login.
7. Click the security-flow tab to open the task flow diagram and click the router component.
8. In the Property Inspector for the router, select bad from the drop down list as the default
outcome. In the Cases click the Add button to create a condition.

bounded taskflow - Oracle ADF 11g
http://www.oracle.com/technology/obe/obe11jdev/ps1/boundedtaskflow/bounded_task_flow.html - Mai10 40
9. In the Expression field select the Expression Builder option from the list.
Expand the following nodes ADF Managed Beans | backing_login | password and select the
value variable, then select the '==' operand and type 'oracle'.
Click OK.
In this example we have coded oracle as a hard coded value for the password.
10. Back in the Property Inspector, select good as the outcome, so that if the password entered is
equal to oracle, the flow takes you through the 'good' flow to the emp-update flow, otherwise to
the error page.
11. In the security-flow diagram, click the Overview tab and then the Parameters tab.

bounded taskflow - Oracle ADF 11g
http://www.oracle.com/technology/obe/obe11jdev/ps1/boundedtaskflow/bounded_task_flow.html - Mai10 41
12. In the Input Parameter Definitions, click the Add button .
13. Type the following values:
Name username
Class java.lang.String
Value (auto populated)
Required (Checked)
14. Click the login.jsff tab to open the page, and drag and drop an Output Text component above
the password input text.
15. In the Property Inspector, select the Expression Builder option from the Value field list.

bounded taskflow - Oracle ADF 11g
http://www.oracle.com/technology/obe/obe11jdev/ps1/boundedtaskflow/bounded_task_flow.html - Mai10 42
16. In the Expression Builder make sure to clear out the expression field, then expand ADF
Managed Beans | pageFlowScope and select username.
Click OK.
17. Click the security-flow tab to open the task flow diagram and double click the error view to
create the page.
In the Create New JSF Page Fragment dialog, click OK to accept default values.

bounded taskflow - Oracle ADF 11g
http://www.oracle.com/technology/obe/obe11jdev/ps1/boundedtaskflow/bounded_task_flow.html - Mai10 43
18. From the Component Palette, drag and drop an Output Text onto the page.
In the Property Inspector, enter Error, wrong password in the Value field.
19. In the Design, press Enter to add a new row and drag and drop a button component
underneath the error text.
In the Property Inspector, change the Text field to Retry, and from the list, select login as the
action.

bounded taskflow - Oracle ADF 11g
http://www.oracle.com/technology/obe/obe11jdev/ps1/boundedtaskflow/bounded_task_flow.html - Mai10 44
20. Click the save all icon to save the application.
Back to Topic List
Creating the JSP Page and Binding the Task Flow as a Region to the Page
To create JSF Page that uses the task flow, perform the following steps:
1. Right click the ViewController node in the Application Navigator and select New from context.
2. In the New Gallery, select Web Tier JSF as the Category and JSF Page as the Item.
Click OK.

bounded taskflow - Oracle ADF 11g
http://www.oracle.com/technology/obe/obe11jdev/ps1/boundedtaskflow/bounded_task_flow.html - Mai10 45
3. In the Create JSF Page dialog, enter master as the File Name and checking the Page Template option,
select the Oracle Three Column Layout.
Click OK.
4. The page is displayed in the editor.

bounded taskflow - Oracle ADF 11g
http://www.oracle.com/technology/obe/obe11jdev/ps1/boundedtaskflow/bounded_task_flow.html - Mai10 46
5. From the Component Palette, drag and drop an Output Text component onto the start
facet.
Change the Value field to Welcome in the Property Inspector.
6. In the ViewController | Web Content | WEB-INF node, drag and drop security-flow.xml onto the Facet
center.
Choose Region from the menu.
In the Edit Task Flow Binding, in the Value field, enter #{'Scott'}.

bounded taskflow - Oracle ADF 11g
http://www.oracle.com/technology/obe/obe11jdev/ps1/boundedtaskflow/bounded_task_flow.html - Mai10 47
7. The master page should now look like the following:
8. Click the save all icon to save the application.
Back to Topic List
Running the Master Page
Now that the task flow is integrated as a region to the master page you can run it. To do this,
perform the following steps:
1. In the editor for the master page, right click and select Run from context.
2. The page loads up in your browser displaying the username variable (Scott) and waiting for a
password to be typed in.
bounded taskflow - Oracle ADF 11g
http://www.oracle.com/technology/obe/obe11jdev/ps1/boundedtaskflow/bounded_task_flow.html - Mai10 48
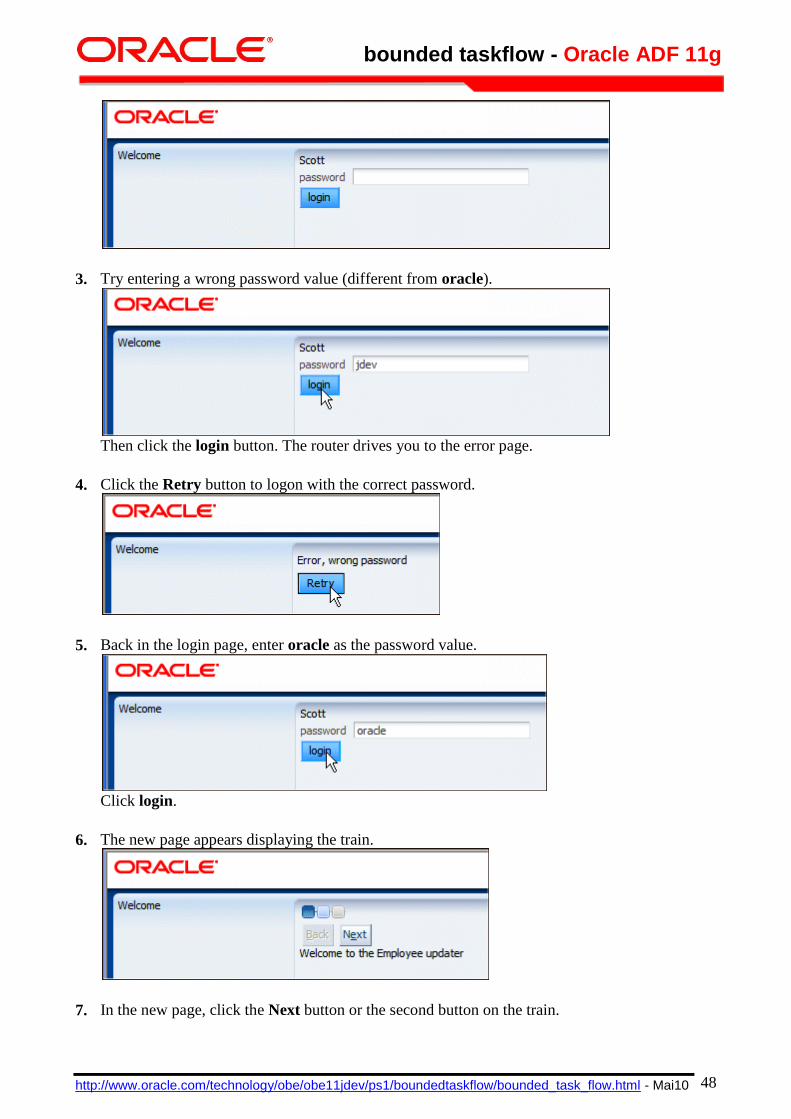
3. Try entering a wrong password value (different from oracle).
Then click the login button. The router drives you to the error page.
4. Click the Retry button to logon with the correct password.
5. Back in the login page, enter oracle as the password value.
Click login.
6. The new page appears displaying the train.
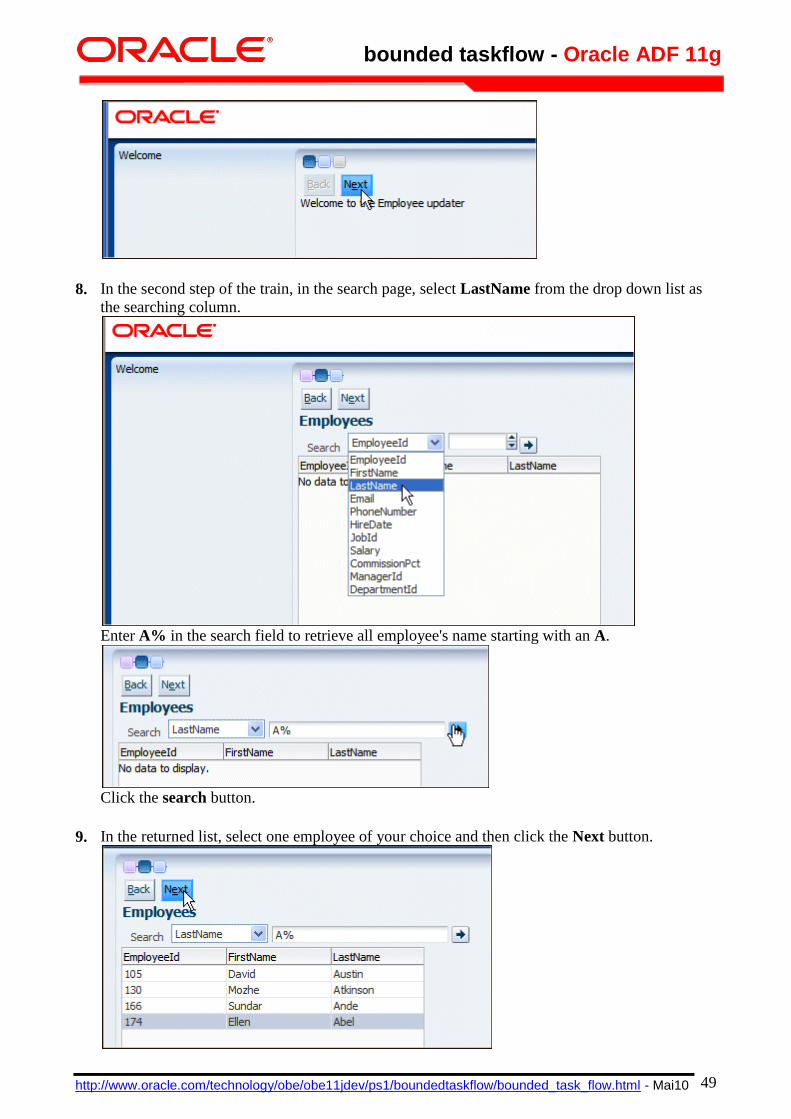
7. In the new page, click the Next button or the second button on the train.
bounded taskflow - Oracle ADF 11g
http://www.oracle.com/technology/obe/obe11jdev/ps1/boundedtaskflow/bounded_task_flow.html - Mai10 49
8. In the second step of the train, in the search page, select LastName from the drop down list as
the searching column.
Enter A% in the search field to retrieve all employee's name starting with an A.
Click the search button.
9. In the returned list, select one employee of your choice and then click the Next button.

bounded taskflow - Oracle ADF 11g
http://www.oracle.com/technology/obe/obe11jdev/ps1/boundedtaskflow/bounded_task_flow.html - Mai10 50
10. In the Edit page for the selected employee, update the salary to the value of your choice, then
click Submit.
11. The application takes you back to the login page.
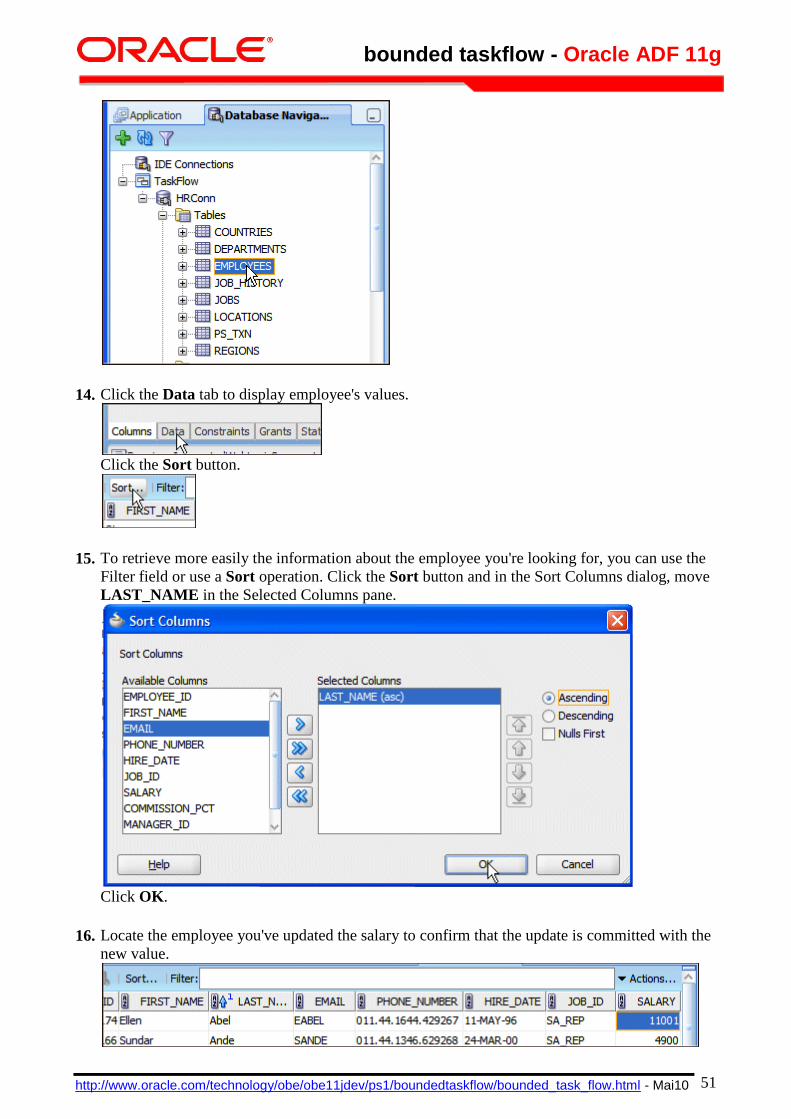
12. Switch back to JDeveloper and open the Database Navigator. (if not visible, use View |
Database | Database Navigator)
13. Expand the TaskFlow | HRConn | Tables nodes and double click the Employees table to open
it.
bounded taskflow - Oracle ADF 11g
http://www.oracle.com/technology/obe/obe11jdev/ps1/boundedtaskflow/bounded_task_flow.html - Mai10 51
14. Click the Data tab to display employee's values.
Click the Sort button.
15. To retrieve more easily the information about the employee you're looking for, you can use the
Filter field or use a Sort operation. Click the Sort button and in the Sort Columns dialog, move
LAST_NAME in the Selected Columns pane.
Click OK.
16. Locate the employee you've updated the salary to confirm that the update is committed with the
new value.

bounded taskflow - Oracle ADF 11g
http://www.oracle.com/technology/obe/obe11jdev/ps1/boundedtaskflow/bounded_task_flow.html - Mai10 52
17. You can reiterate this last process to test the Cancel (rollback) action.
You've successfully completed this tutorial.
Back to Topic List
Summary
In this tutorial, you created a task flow and included views, router, operations into it and added it as
a region to a JSF page. You learned how to:
Create the Model Components
Create a bounded task flow diagram
Build the task flow pages
Bind the task flow pages to data controls
Set the transaction control to the task flow
Define a second task flow
Define the task flow components and the router rules
Create the JSF Page and Bind the Task Flow as a Region to
the page