body fluid identification procedures index (listed by section)
TRANSCRIPT
NC SBI: Molecular Genetics Section
Technical Procedures Manual: Body Fluid Identification
Revision 03
Page 1 of 20
Body Fluid Identification Procedures Index
(Listed by Section)
1. Phenolphthalein Procedures
2. Anti-Human Hemoglobin Testing
3. Takayama Procedure
4. Species Origin Determination
5. Ouchterlony Procedure
6. Acid Phosphatase Test
7. Sperm Identification: Christmas Tree Stain
8. P30 Test
9. Amylase Test
10. Luminol Test
11. CrimeScope

NC SBI: Molecular Genetics Section
Technical Procedures Manual: Body Fluid Identification
Revision 03
Page 2 of 20
1. PHENOLPHTHALIN PROCEDURES
a. Reagents
Preparation of Stock Solution
Phenolphthalein 4 grams
Sodium Hydroxide pellets 40 grams
Zinc dust 20 grams
Distilled water 1000 ml
Absolute Ethyl Alcohol Bring up to 1200 ml
Add each reagent of the stock solution to a 5000 ml round bottom refluxing flask.
Attach the condensing column to the flask and turn on cold water to column.
Heat the flask with an electric heating mantle. Reflux the solution for
approximately three hours, until the solution is colorless. After allowing the
solution to cool down; decant the liquid into a measured container and use
absolute ethyl alcohol to bring the total volume to 1200 ml. Add enough zinc dust
to cover the bottom of a dark bottle and pour the phenolphthalein solution into the
bottle. Label, date the bottle and store it in the refrigerator at 4oC.
Phenolphthalin solution shelf life is 6 months.
An aliquot of phenolphthalin solution is kept at each analyst's bench. A fresh
aliquot is prepared the first working day of each month.
Additional reagents needed for the test include:
Absolute Ethanol and 3% Hydrogen Peroxide {prepared from stock 30% H2O2}.
b. Sample description
The blood stain may or may not be visible to the naked eye.
c. Standards and controls
Standards should include a known blood stain (positive control) and a known
blood-free sample (negative control). These controls will be run prior to analysis
and recorded in the laboratory notes.
d. Procedure
To conduct this test, either rub the suspected stain with a folded piece of filter
paper or a clean cotton swab. Add the following reagents in order; one drop of
NC SBI: Molecular Genetics Section
Technical Procedures Manual: Body Fluid Identification
Revision 03
Page 3 of 20
ethanol, one drop of phenolphthalein, and one drop of 3% H2O2 onto the sample
rubbing. A positive reaction is indicated by the development of a pink color
within 5 seconds. Reactions occurring after 5 seconds, or before the addition of
the hydrogen peroxide are inconclusive.
NOTE - Phenolphthalein is a only a presumptive test for blood and can give
reactions for substances other than blood.
e. References
Blake ET, Dillon DJ (1973) Microorganisms and the presumptive tests for blood.
J Police Science and Administration 1: 395-400
Higaki RS, Philp WMS (1976) A study of the sensitivity, stability and specificity
of phenolphthalin as an indicator test for blood. Can Soc Forensic Sciences 9:
97-102
Gaensslen RE (1983) Sourcebook in forensic serology, immunology and
biochemistry. The National Institute of Justice, Washington, DC p 103-105
f. Safety Precautions
Use care during refluxing of phenolphthalein solution.
2. ANTI-HUMAN HEMOGLOBIN TESTING
1. Reagents
-ABA Card Hemetrace Kit
-ABA Card Icon
-Hematrace Extraction buffer solution
2. Sample description
A sample with a reddish brown stain that has given a positive phenolphthalin
reaction. Sample size is about 1/4 inch fiber.
3. Standards and controls
Each new lot number must be QC'd before being placed into current usage.
4. Procedure
NC SBI: Molecular Genetics Section
Technical Procedures Manual: Body Fluid Identification
Revision 03
Page 4 of 20
1. Pipette 5 drops (250 l) of Hema Trace Extraction Buffer into 1.5ml
centrifuge tube.
1. Using sterile scissors, cut at least a 1/4 in. fiber from your sample and
place into the centrifuge tube using sterile forceps.
2. Then allow the sample to extract for a minimum of 5 min.
3. For weak or older samples, analysts may desire to use a larger quantity of
material and a longer extraction time.
4. After completing the extraction process, pipette 3 drops (150 l) of sample
in liquid buffer into the well marked "S" on the OneStep ABAcard.
5. When there is a positive reaction, two lines will appear, one line in the
area marked "C" for control and one in the area marked "T" for test. If the
reaction is negative then only one line appears in the area marked "C". In
order to determine that the test is negative a full ten minutes must pass
after the liquid is added to the card. If no line appears at the area marked
"C" the test must be repeated.
6. Beware of a high dose hook effect. If a sample gives a negative or
extremely weak positive reaction, and your preliminary (phenolphthalein)
testing indicates you would expect a strongly positive result, repeat the
testing in the following manner. Add 3 drops of Hema Trace Extraction
Buffer to the prior extract tube, pipette the fluid up and down a couple of
times to mix the fluid thoroughly, and re-run the test. If necessary, one
could repeat the dilutions again in this manner, or do a serial dilution of a
new extract.
7. Since validation studies have shown that anti-human hemoglobin reactions
were obtained from body fluids other than blood (e.g. urine), then in order
for one to identify human blood, both the phenolphthalin and anti-human
hemoglobin test must be positive.
3. TAKAYAMA TEST
1. Reagents
Distilled water
Sodium Hydroxide pellets (Sigma S-5881)
Glucose (Sigma S-5000
Pyridine (Fisher P-368)
NC SBI: Molecular Genetics Section
Technical Procedures Manual: Body Fluid Identification
Revision 03
Page 5 of 20
Preparation of stock solutions:
Dissolve 10 grams of the sodium hydroxide pellets 100 ml of distilled water to
prepare a 10% sodium hydroxide solution.
To make a saturated glucose solution add glucose to distilled water in a flask with
a magnetic stirrer (on a stir plate) until the glucose precipitates out as a solid.
The 10% sodium hydroxide and saturated glucose stock solutions have a shelf life
of 6 months at 4 C.
Preparation of Working solution:
In a clean test tube add:
Saturated glucose solution 5 drops
10% NaOH solution 5 drops
Distilled water 10 drops
Pyridine 6 drops
Note: The amount of the above solution can be increased by doubling the amount
of each chemical added. The working solution will be made up fresh each day it
is in use.
2. Sample Description
A visible dried blood stain.
3. Standards and Controls
A known dried blood stain should be used as the positive control. A piece of
clean cotton cloth should be used as a negative control. These controls will be run
each day the test is in use and recorded in the laboratory notes.
4. Procedure
1. Remove a small sample of the stain and place it on a clean microscope
slide.
2. Place a small (18 X 18 mm) coverslip over the sample.
NC SBI: Molecular Genetics Section
Technical Procedures Manual: Body Fluid Identification
Revision 03
Page 6 of 20
3. The working solution of the Takayama reagent is added to the slide at one
edge of the coverslip. The reagent will be drawn under the coverslip by
capillary action. Add the working solution until all the area under the
coverslip is covered.
4. Let the slide sit at room temperature for a short period of time and then
read the slide under the microscope at 40x to 125x magnification via a
compound light microscope.
5. If no crystal formation has occurred, heat the slide on a hot plate on a low
temperature setting. Be careful not to overheat the slide and dry out the
working solution under the coverslip.
6. Once again, read the slide microscopically to see if crystals have formed.
7. A positive reaction will be indicated by pinkish-red rhomboid-shaped
crystals.
5. References
Blake ET, Dillon DJ (1973) Microorganisms and the presumptive tests for blood.
J of Police Science 1:397
Gaensslen RE (1983) Sourcebook in forensic serology, immunology and
biochemistry. The National Institute of Justice, Washington, DC p85-87
Spaulding RP, Cronin WF Technical and legal aspects of forensic serology: a
laboratory manual. p 14-15, 22-24
6. Safety Precautions
Sodium hydroxide pellets are caustic and corrosive.
4. SPECIES ORIGIN DETERMINATION-TUBE TEST
1. Reagents
Anti-human serum from rabbit (Cappel 5101-1382) or respective antiserum
Normal rabbit whole serum (Cappel 5012-1380) or respective whole serum
Whole human serum diluted 1:1000 (Cappel 5001-1380) or respective species
serum
NC SBI: Molecular Genetics Section
Technical Procedures Manual: Body Fluid Identification
Revision 03
Page 7 of 20
2. Sample Description
The sample is an eluate of the suspected blood stain. Elute the blood stain in
distilled water. For best results, try and obtain a slight straw color to give a
1:1000 dilution; however, the reaction may still occur even if no color is noted.
3. Standards and Controls
The unknown sample will be tested against the species normal serum from which
the antisera was produced in, to verify that no non-specific precipitation is
occurring. When determining human origin for example, the unknown stain
should be checked against rabbit whole serum as well as against anti-human
serum. This will assure that there are no false reactions between the unknown
sample and the rabbit antigens. For a positive control, test the anit-sera against
normal human serum (or the respective animal) which has been diluted to yield a
straw color, and look for the line of precipitation.
A substrate control will also be run against anti-human serum. The substrate
control is from an apparently "unstained" area of the substrate and is run to ensure
that material which might react with the anti-serum is not present outside the
stained area.
4. Procedure
1. Using a Pasteur pipette, introduce a small portion of antisera into a clean 6
x 50 mm test tube.
2. Using a separate clean pipette introduce a small amount of the whole
serum (from the animal species that the antisera was made in) into a
separate 6 x 50 mm test tube.
3. Using a third Pasteur pipette, add the unknown eluate into both test tubes
layering it carefully to avoid mixing. This will form two layers so that the
reaction can occur at the interface.
4. Place the tubes in a holder and let stand for about 10-20 minutes.
5. Read the test tubes and observe the interface. If a sharp line appears
between the unknown and the antisera and no line appears between the
whole serum control and the unknown and both the known human and
substrate controls are correct, then a positive reaction is recorded. If a
reaction is noted in the whole serum control and the unknown tube, then

NC SBI: Molecular Genetics Section
Technical Procedures Manual: Body Fluid Identification
Revision 03
Page 8 of 20
the test must be repeated. If the reactions are still noted in both tubes, an
inconclusive result is reported.
5. References
Spaulding RP, Cronin WF Technical and legal aspects of forensic serology: a
laboratory manual. DOJ/FBI
Tamaki Y, Kishida T (1983) A simple method for the preparation of species-
specific anti-human Igg serum. Act Crim Japan 49: 9-12
5. SPECIES ORIGIN - OUCHTERLONY (gel diffusion)
1. Reagents
Normal saline (0.9 g Sodium Chloride + 100 mls of
water)
Agarose Type I (Sigma A6013)
Anti-human sera (Cappel 5101-1382) or respective
antisera
Normal rabbit serum (Cappel 5012-1380) or respective
whole serum
Normal human serum diluted 1:1000 (Cappel 5001-1380) or respective
species serum
Preparation of Agarose Plates:
Add 0.5 g of agar to 100 ml of normal saline and bring the solution to a boil 3
times, then cool. Aliquot 10 mls to the 16 x 125 mm test tubes, place parafilm
over the test tubes (or test tubes in a ziplock bag) and store at 4oC. When samples
need to be tested, melt the agar in the 10 ml tube and then aliquot out 3 ml of agar
into 50 x 9 petri dishes or add the 10 ml of agar to a large square petri dish if
numerous samples need to be run.
2. Sample Description
The sample is an eluate of the suspected blood stain. Soak the blood stain in
distilled water. For best results, try and obtain a slight straw color to give a
1:1000 dilution; however, the reaction may still occur even if no color is noted.
3. Standards and Controls

NC SBI: Molecular Genetics Section
Technical Procedures Manual: Body Fluid Identification
Revision 03
Page 9 of 20
The unknown sample will be tested against the whole serum of the animal that the
antisera was produced in to detect any non-specific reactions that might occur in
the "host" serum, which could lead to a false positive reaction as well as against
the species anti-serum of interest. A known blood eluate should be used as a
positive control.
A blank extract is prepared from an unstained area of the substrate and tested
against the species antiserum of interest, to ensure that material which might react
with the anti-serum is not present.
4. Procedure
After the agar has hardened, cut six holes in a circular fashion and one hole in the
center with a cork borer and suction out the agar to form a well.
Use clean Pasteur pipettes and aliquot a small amount of unknown sample eluate,
proper antisera, and controls to the appropriate wells. Incubate in a moisture box
at 37 C for a minimum of 7 hours, or until standards work. Read the results using
a direct light source. If a sharp line appears between the unknown and the antisera
and no line appears between the whole serum control and the unknown and both
the known human and substrate controls are correct, then a positive reaction is
recorded.
An example of how this test may be set-up is as follows:
5. References
NC SBI: Molecular Genetics Section
Technical Procedures Manual: Body Fluid Identification
Revision 03
Page 10 of 20
Gaensslen RE (1983) Sourcebook in forensic serology, immunology and
biochemistry National Institute of Justice, Washington, DC pp 224-225
Spaulding RP, Cronin WF Technical and legal aspects of forensic serology: a
laboratory manual. DOJ/FBI
Tamaki Y, Kishida T (1983) A simple method for the preparation of species-
specific anti-human Igg serum. Act Crim Japan 49: 9-12
6. ACID PHOSPHATASE TEST (Walker Test)
1. Reagents:
Alpha-Naphthyl acid phosphate hemicalcium salt (Sigma N-7250)
Fast Blue Salt B (Sigma D-9805)
Sodium acetate (Fisher S-209)
Distilled water
Preparation of stock solution:
Sodium Acetate Buffer:
Add 40 g of sodium acetate (CH3 COONa) to two liters of distilled water. Stir the
mixture with a magnetic stirrer. Use acetic acid to adjust the pH to 5.0 and store
the mixture in a two liter container at 4� C. Shelf life is 2 months.
An aliquot of Sodium Acetate Buffer is kept at each analyst’s bench. A fresh
aliquot is prepared the first working day of each month.
Fast Blue Working Solution:
Place approximately 5 ml of distilled water in a 13x100 mm tube. Place a small
amount of the Fast Blue salt in the water until an opaque yellow color develops.
This working solution will be made up fresh at least once a week.
2. Sample Description
The sample is a cutting of the suspected stain.
3. Standards and Controls
NC SBI: Molecular Genetics Section
Technical Procedures Manual: Body Fluid Identification
Revision 03
Page 11 of 20
A known seminal stain is used as a positive control. A reagent control is set up
where the buffer, alpha-naphyl acid phosphate calcium salt, and Fast Blue Salt B
are used to ensure that the reagents are not giving a false positive result. A
substrate control is set up using a control cutting from an apparently “unstained”
area of the same material that the suspected stain is cut from to ensure that
something in the material is not causing the test to show a false positive result.
4. Procedure:
Remove a small portion of the suspected stain area. If the item tested is a pair of
panties, at least three cuttings from the crotch area are required. Place each
sample into a separately labeled well on a spot plate. Place the positive control,
reagent control and cloth controls in their respective wells. Fill the wells about
half full with the sodium acetete buffer. Add a small portion of alpha naphthyl
acid phosphate calcium salt to each well (a few grains will be sufficient). Mix
each well with a separate wooden applicator stick and rotate the plate between 5-
15 minutes. After the plate has rotated, add a drop of fast blue B solution to each
well and look for a color change. A positive reaction will usually turn purple but
lighter shades have been noted.
Grade the color change as follows:
Dark Purple 4+
Purple 3+
Purple/Pink 2+
Pink 1+
Pale Pink +/-
Yellow negative (-)
Remember that the AP test is only a preliminary test for semen and that a seminal
stain can give a negative AP.
5. References
American Jurisprudence Proof of Facts (1962) Identification of seminal fluids.
Jurisprudence Publishers 12:319-348.
Kind SS (1964) Methods in Forensic Science. A. S. Curry (editor) Interscience
Publishers New York 3:267-287.
Schiff Af (1978) Reliability of the acid phosphatase test for the identification of
seminal fluid. J Forensic Sciences 23:833-843.

NC SBI: Molecular Genetics Section
Technical Procedures Manual: Body Fluid Identification
Revision 03
Page 12 of 20
Sensabaugh GF (1975) Genetic and non-genetic variation of human acid
phosphatases. Isozymes: Molecular Structure Academic Press New York pp.
367.
6. Safety Precautions
Fast Blue B Salt is an irritant.
Alpha-Naphthyl Acid Phosphate Hemicalcium Salt is an irritant.
7. SPERM IDENTIFICATION - CHRISTMAS TREE STAIN
1. Reagents
Methanol
Kernochtrot stain
Picroindigocarmine stain
Preparation of stock Kernechtrot Stain:
Aluminum Sulfate [Al2 (SO4)3 18H20] 150 g (Fisher A613)
Nuclear Fast Red 3g (Sigma N 8002)
Distilled water 3000 ml
In a 4 liter flask, add the Al2 (SO4)3 and water. Stir with a magnetic stirrer until
dissolved. Add the Nuclear Fast Red and stir until it appears well dissolved.
(Slight warming will enhance the dissolving of the reagent). Filter the solution
using a Whatman #1 filter paper and store in a 4 liter container. Shelf life is 1
year at room temperature.
Preparation of stock Picroindigocarmine Stain:
Picric Acid 40g (Fisher A-253)
Indigo Carmine 10g (Sigma I-8130)
Distilled water (3000 ml)
Using great caution, slowly add the picric acid to the distilled water in a 4 liter
beaker or flask. Apply low heat and use a magnetic stirrer to get the acid into
solution. Make sure the picric acid doesn't get too warm as it may explode under
heat. Once the acid has dissolved, add the indigo carmine and stir.
Once the solution cools, filter it with Whatman #1 filter paper and store it in a
separate 4 liter container. Shelf life is 1 year at room temperature.
NC SBI: Molecular Genetics Section
Technical Procedures Manual: Body Fluid Identification
Revision 03
Page 13 of 20
2. Sample Description
The sample is an air dried smear on a microscope slide which may have
originated from two sources.
1. The air dried smear may have been prepared by a nurse or doctor during
the sexual assault exam.
2. May be an extract from a suspected semen stain that has been dried onto
the slide
3. Standards and Controls
A known sperm slide should be made after the stains have been freshly prepared
to ensure that both stains are working correctly. Results of this QC check will be
documented in the QC Manual.
4. Procedure
1. Flame the slide ( or place on heat block) briefly before staining it to ensure
that the sample is fixed to the slide.
2. Place the slides on a rack and apply the Kernechtrot stain to the slides.
Leave the stain on between 15 and 20 minutes.
3. Wash the stain off after this time with methanol.
4. Apply the Picroindigocarmine stain to each slide. Leave this stain on only
a brief time (no more than 15 seconds).
5. Wash off the stain with methanol. Let the slides air dry.
6. Once dry, apply a small amount (a couple of drops) of permount onto the
slide and add a 22x50 mm cover slip over the slide.
7. Observe the slide under the microscope at 200x to 600x and confirm the
microscopic characteristics of the sperm head at 400x.
8. Record the results.
1. Spermatozoa have a clear acrosomal cap, a red head and a green
tail.
ii Spermatozoa may be identified without the presence of a tail; but
the clear acrosomal cap must be present and clearly visible.
NC SBI: Molecular Genetics Section
Technical Procedures Manual: Body Fluid Identification
Revision 03
Page 14 of 20
5. References
Gaensslen RE (1983) Ch 10 in Sourcebook in forensic serology, immunology and
biochemistry. National Institute of Justice, Washington DC pp 149-182
American Jurisprudence Proof of Facts (1962) Identification of seminal fluids
Jurisprudence Publishers 12: 319-348
Kaye S (1947) Identification of seminal stains J Criminal Law and Criminology
of Northwestern University 38: 79-83
1. Safety Precautions
Picric Acid is an explosive if allowed to dry out.
8. ABA Card p30 Test
1. Reagents
ABA Card P30 kits
- Onestep ABA Card icons
-distilled water
2. Sample description
The sample is a cutting at least 0.25 cm2 from an item that has a positive Acid
Phosphatase reaction and no spermatozoa observed under the microscope.
3. Standards and Controls
Each new lot number must be QC's before placing into current use.
4. Procedure
A. Pipette 5 drops (250 l) of distilled water into 1.5 ml centrifuge tube
B. Cut at least a 0.25 cm2 cutting from your sample and place into the
centrifuge tube.
C. Allow the sample to extract for a minimum of 30 minutes at room
temperature or overnight at 4o C.
NC SBI: Molecular Genetics Section
Technical Procedures Manual: Body Fluid Identification
Revision 03
Page 15 of 20
D. For weak or older samples, analysts may desire to use a larger quantity of
material.
E. After completing the extraction process, centrifuge the samples for 3
minutes at full speed.
F. After centrifugation, pipette 4 drops (~200 l) of liquid buffer into the
well marked "S" on the OneStep ABAcard.
G. When there is a positive reaction, two lines will appear, one line in the
area marked "C" for control and one in the area marked "T" for test. If the
reaction is negative, then only one line appears in the area marked "C". In
order to determine that the test is negative a full ten minutes must pass
after the liquid is added to the card. If no line appears in the area marked
"C", the test must be repeated.
H. Beware of a high dose hook effect. If a sample gives a negative or
extremely weak positive reaction, and your preliminary (acid phosphatase
testing) testing indicates you would expect a strongly positive p30 result,
repeat the testing in the following manner. Add 4 drops of distilled water
to the prior extract tube, pipette the fluid up and down a couple of times to
mix the fluid thoroughly, and re-run the test. If necessary, one could repeat
the dilutions again in this manner, or do a serial dilution of a new extract.
9. IDENTIFICATION OF AMYLASE
1. Reagents
Phadebas test tablets (Pharmacia Diagnostics 63105)
Distilled water
0.5 N Sodium Hydroxide solution (Sigma S-5880)
Preparation of stock solution .5 N Sodium Hydroxide Solution (NaOH):
Add 2.0 g of NaOH pellets to 100 ml of distilled water. Stir with a magnetic
stirrer until all of the NaOH pellets are in solution. Store at 4o C. Shelf life is 3
months.
2. Sample Description
The sample is a small cutting from the suspected stain.
3. Standards and Controls
NC SBI: Molecular Genetics Section
Technical Procedures Manual: Body Fluid Identification
Revision 03
Page 16 of 20
A known saliva sample and reagent blank should be set up as positive and
negative controls respectively. A small cutting from an apparently unstained area
should also be run as a substrate control to ensure nothing in the material is
causing a false reaction.
1. Procedure:
a. Make a small cutting of the suspected stain along with your controls and
place each cutting in a separate 13x100mm labeled test tube.
b. Add one Phadebas tablet to each tube. Then add 4 ml distilled water to
each test tube and vortex the mixture for a few seconds or until the
materials are well mixed.
c. Incubate at 37oC for thirty minutes.
d. Remove the test tubes and place 1 ml of 0.5N NaOH in each tube.
e. Vortex each tube for approximately five seconds, then centrifuge each
tube for five minutes. This stops the reaction.
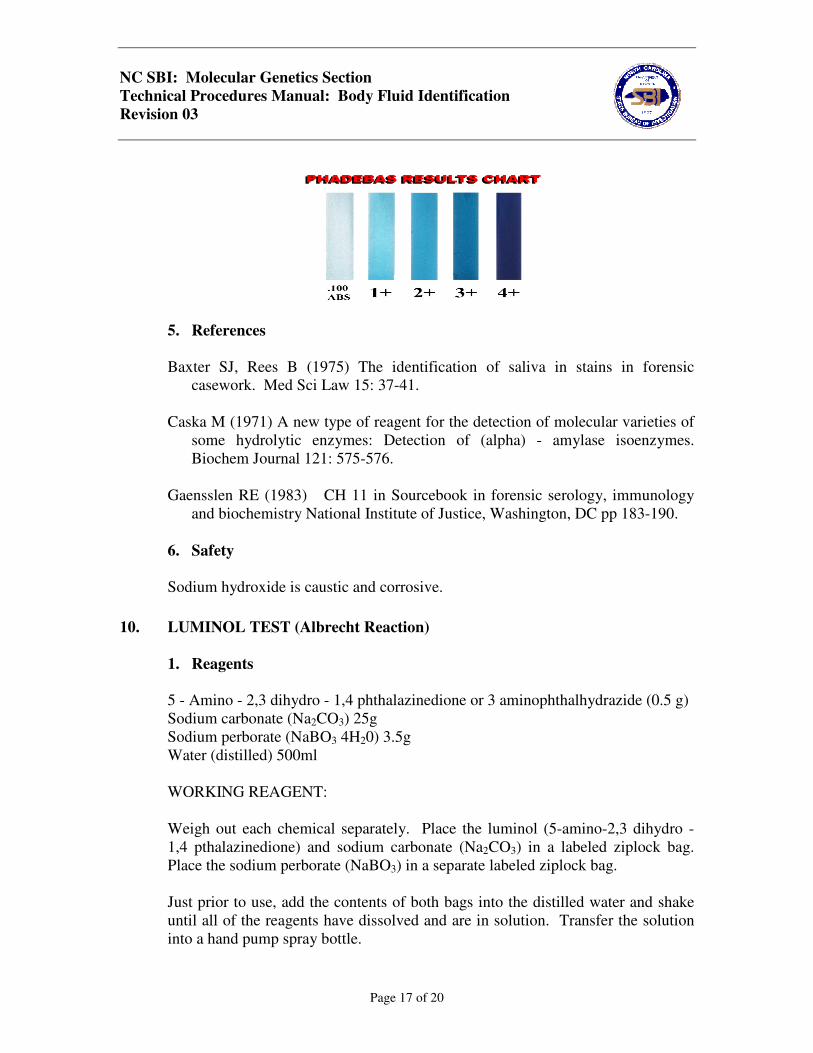
f. Results are recorded using a grading system of negative thru 4+, with 4+
being the darkest color. Refer to the color chart below. If area is positive
and is going to be analyzed for DNA, a sperm search is still required.
Note: The PCR-STR methods used in the DNA Unit are extremely sensitive
and detect as little as 500 picograms of DNA. Analysts are reminded that
protein markers used to screen for semen (acid phosphatase and P-30) are
more easily degraded than sperm cells, can be affected by various disease
states, and are extremely water soluable. For this reason, it is not unexpected
that occasionally one will find a sample which yields a negative acid
phosphatase result, but is positive for sperm cells.
g. If a result is borderline, it should be confirmed using a spectrophotometer
(Spectronic 20). The spectrophotometer should be turned on five minutes
prior to the readings. After the five minute warm up, set the
spectrophotometer to zero using the left knob on the machine. The wave
length should be set to 620nm. Use the reagent blank as your solution
blank. Pipet the liquid off the top of the tube into a cuvette, being careful
not to get any of the blue solid material with it. Set the full scale using the
knob on the right. Discard the fluid in the cuvette, rinse the cuvette with
distilled water. Then sample the unknown and record the result. Be sure
to rinse the cuvette between samplings with distilled water. If the
absorbance is 0.1 or higher and blue in color, then a positive reaction is
recorded.
NC SBI: Molecular Genetics Section
Technical Procedures Manual: Body Fluid Identification
Revision 03
Page 17 of 20
5. References
Baxter SJ, Rees B (1975) The identification of saliva in stains in forensic
casework. Med Sci Law 15: 37-41.
Caska M (1971) A new type of reagent for the detection of molecular varieties of
some hydrolytic enzymes: Detection of (alpha) - amylase isoenzymes.
Biochem Journal 121: 575-576.
Gaensslen RE (1983) CH 11 in Sourcebook in forensic serology, immunology
and biochemistry National Institute of Justice, Washington, DC pp 183-190.
6. Safety
Sodium hydroxide is caustic and corrosive.
10. LUMINOL TEST (Albrecht Reaction)
1. Reagents
5 - Amino - 2,3 dihydro - 1,4 phthalazinedione or 3 aminophthalhydrazide (0.5 g)
Sodium carbonate (Na2CO3) 25g
Sodium perborate (NaBO3 4H20) 3.5g
Water (distilled) 500ml
WORKING REAGENT:
Weigh out each chemical separately. Place the luminol (5-amino-2,3 dihydro -
1,4 pthalazinedione) and sodium carbonate (Na2CO3) in a labeled ziplock bag.
Place the sodium perborate (NaBO3) in a separate labeled ziplock bag.
Just prior to use, add the contents of both bags into the distilled water and shake
until all of the reagents have dissolved and are in solution. Transfer the solution
into a hand pump spray bottle.
NC SBI: Molecular Genetics Section
Technical Procedures Manual: Body Fluid Identification
Revision 03
Page 18 of 20
2. Sample Description
The sample size may vary from trace amounts which cannot be seen all the way
up to large quantities of blood which could be present as well as smears, wipes
and other patterns which may be left.
3. Standards and Controls
A penny or bloodstain is sprayed to ensure that the chemicals are working
properly. Note: Luminol is only a presumptive test and can give a reaction for
things other than blood.
4. Procedure
1. Before proceeding make sure permission has been given via consent or a
search warrant.
2. Check the spray bottle to ensure a fine mist is being expelled.
3. Usually one starts at a place where the assault has occurred. Note: Avoid
walking over an area that has already been sprayed. Taking this precaution
will eliminate unnecessary tracking up of the crime scene.
4. Always spray in front of you and walk backwards while spraying, keeping
others behind you. Look for areas where a brightly lit reaction occurs for
5 to 20 seconds.
5. Test these areas by taking a filter paper rubbing of the area and doing a
phenolphthalein test on the rubbing.
6. Record only the results that give a positive reaction to both the
phenolphthalein test and the luminol test.
7. The luminol reactions obtained may be photographed with a fluorescent
ruler present for later comparison if necessary.
5. References
Zweidinger RA, Lytle LT, Pitt, CG (1973) Photography of bloodstains
visualized by luminol. J. Of Forensic Sciences 18: 296-302.
NC SBI: Molecular Genetics Section
Technical Procedures Manual: Body Fluid Identification
Revision 03
Page 19 of 20
Proescher F, Moody Am (1939) Detection of blood by means of
chemiluminescence. The Journal of Laboratory and Clinical Medicine
1183-1189.
Blake ET, Dillon DJ (1973) Microorganisms and the presumptive tests for
blood. J Police Science and Administration 1: 395-400
6. Safety Precautions
Use gloves when handling powder and liquid solutions.
11. CRIMESCOPE
1. Suggested Uses
This procedure is used to examine items of evidence for the presence of biological
evidence which may not be visible to the naked eye.
2. Operating Instructions
1. Start up procedures:
Set the wheel to “ White light “ as a default when not using the unit.
a. Turn on the main switch (in the back). Check with your hands that
there is air circulation on both exhaust top holes and on the fan located
above the light guide connection.
b. Aim the wheel towards a wall and turn on the lamp switch (on the
front of the unit). Within 1 - 2 minutes you should see a bright spot.
Do not look at the spot for too long as it is extremely intense. If the
spot is weak, verify that the intensity knob on the front of the unit
(located below the light guide connection ) is open all the way.
c. Scan your filters for the different colors available. Do not look into the
light source.
d. Start using protective goggles after checking colors.
e. Turn out lights and get room as dark as possible.
2. Examination procedures
a. Scan the item of evidence with the light beam.
b. Collect and/or make notes as appropriate.
c. Refer to the information below for wave length and goggle use:
NC SBI: Molecular Genetics Section
Technical Procedures Manual: Body Fluid Identification
Revision 03
Page 20 of 20
Body Fluid Detection
Semen, Saliva, Urine, Sweat, Vaginal fluids, Feces...
Blood does not fluoresce: it absorbs at 415 nm and reflects at 254 nm.
Body Fluid Detection
For dark surfaces and for saliva use “UV” and Clear/Yellow goggles.
On most clothes and rugs use “445/455/CSS/515" and Orange goggles. Use 515 on white
clothes .
Refer to operators manual for further applications.
3. Shut down procedures:
a) Turn off lamp (front switch) and let the fans run for 3 - 5
minutes.
b) Turn off main switch (back switch).
c) Do not restart the lamp when the bulb is still hot. An arcing
noise may be heard when re-starting too early.
d) If power is lost in the building, turn the lamp off but leave the fan
switch on so the lamp can continue to cool when the power is
restored.
4. Safety Precautions:
Always wear protective goggles when operating the Mini-Crimescope.
Revision History
Effective Date Revision Number Reason
Unknown 00 Original Document
November 22,
2001
01
1. Procedure Updates
2. Collation of all Body Fluid Procedures into one
protocol
August 7, 2003 02
Clarification on the preparation of Phenolphthalin Stock
Solution
December 9, 2004 03 Sperm ID christmas tree stain, chance in QC; Safety issue
on NaOH; use of water for P30 testing; add reagents,
sample description, standards and controls to ABA card
testing, change phenolphthalin preparation, change
extraction volume for heme ABA card.