bmc patrol for virtual server
TRANSCRIPT

www.bmc.com
BMC PATROL for Virtual ServersGetting Started Guide
Supporting
BMC PATROL for Virtual Servers 2.9.00
December 2009

Contacting BMC Software
You can access the BMC Software website at http://www.bmc.com. From this website, you can obtain information about the company, its products, corporate offices, special events, and career opportunities.
United States and Canada
Address BMC SOFTWARE INC2101 CITYWEST BLVDHOUSTON TX 77042-2827 USA
Telephone 713 918 8800 or800 841 2031
Fax 713 918 8000
Outside United States and Canada
Telephone (01) 713 918 8800 Fax (01) 713 918 8000
© Copyright 2005, 2007-2009 BMC Software, Inc.
BMC, BMC Software, and the BMC Software logo are the exclusive properties of BMC Software, Inc., are registered with the U.S. Patent and Trademark Office, and may be registered or pending registration in other countries. All other BMC trademarks, service marks, and logos may be registered or pending registration in the U.S. or in other countries. All other trademarks or registered trademarks are the property of their respective owners.
Linux is the registered trademark of Linus Torvalds.
Java is the trademark or registered trademark of Sun Microsystems, Inc., in the U.S. and other countries.
UNIX is the registered trademark of The Open Group in the US and other countries.
The information included in this documentation is the proprietary and confidential information of BMC Software, Inc., its affiliates, or licensors. Your use of this information is subject to the terms and conditions of the applicable End User License agreement for the product and to the proprietary and restricted rights notices included in the product documentation.
Restricted rights legendU.S. Government Restricted Rights to Computer Software. UNPUBLISHED -- RIGHTS RESERVED UNDER THE COPYRIGHT LAWS OF THE UNITED STATES. Use, duplication, or disclosure of any data and computer software by the U.S. Government is subject to restrictions, as applicable, set forth in FAR Section 52.227-14, DFARS 252.227-7013, DFARS 252.227-7014, DFARS 252.227-7015, and DFARS 252.227-7025, as amended from time to time. Contractor/Manufacturer is BMC SOFTWARE INC, 2101 CITYWEST BLVD, HOUSTON TX 77042-2827, USA. Any contract notices should be sent to this address.
Customer support
You can obtain technical support by using the BMC Software Customer Support website or by contacting Customer Support by telephone or e-mail. To expedite your inquiry, see “Before contacting BMC.”

Support website
You can obtain technical support from BMC 24 hours a day, 7 days a week at http://www.bmc.com/support. From this website, you can
■ read overviews about support services and programs that BMC offers■ find the most current information about BMC products■ search a database for issues similar to yours and possible solutions■ order or download product documentation■ download products and maintenance■ report an issue or ask a question■ subscribe to receive proactive e-mail alerts when new product notices are released■ find worldwide BMC support center locations and contact information, including e-mail addresses, fax numbers, and
telephone numbers
Support by telephone or e-mail
In the United States and Canada, if you need technical support and do not have access to the web, call 800 537 1813 or send an e-mail message to [email protected]. (In the subject line, enter SupID:<yourSupportContractID>, such as SupID:12345). Outside the United States and Canada, contact your local support center for assistance.
Before contacting BMC
Have the following information available so that Customer Support can begin working on your issue immediately:
■ product information
— product name— product version (release number)— license number and password (trial or permanent)
■ operating system and environment information
— machine type— operating system type, version, and service pack or other maintenance level such as PUT or PTF— system hardware configuration— serial numbers— related software (database, application, and communication) including type, version, and service pack or
maintenance level
■ sequence of events leading to the issue
■ commands and options that you used
■ messages received (and the time and date that you received them)
— product error messages— messages from the operating system, such as file system full— messages from related software
3

License key and password information
If you have questions about your license key or password, contact BMC as follows:
■ (USA or Canada) Contact the Order Services Password Team at 800 841 2031, or send an e-mail message to [email protected].
■ (Europe, the Middle East, and Africa) Fax your questions to EMEA Contracts Administration at +31 20 354 8702, or send an e-mail message to [email protected].
■ (Asia-Pacific) Contact your BMC sales representative or your local BMC office.
4 BMC PATROL for Virtual Servers Getting Started Guide

ContentsChapter 1 Product components and capabilities 13
PATROL for Virtual Servers features . . . . . . . . . . . . . . . . . . . . . . . . . . . . . . . . . . . . . . . . 13PATROL for Virtual Server features for VMware environment. . . . . . . . . . . . . . . . . . 14
Mapping virtual resources to physical hosts. . . . . . . . . . . . . . . . . . . . . . . . . . . . . . . 15Switching between a physical and logical view . . . . . . . . . . . . . . . . . . . . . . . . . . . . 15Accessing memory and CPU resource utilization data . . . . . . . . . . . . . . . . . . . . . . 17Viewing inventory and performance reports . . . . . . . . . . . . . . . . . . . . . . . . . . . . . . 18VMware vSphere 4.0 features . . . . . . . . . . . . . . . . . . . . . . . . . . . . . . . . . . . . . . . . . . . 22
PATROL for Virtual Servers features for the Citrix XenServer environment. . . . . . . 23Mapping virtual resources to physical hosts. . . . . . . . . . . . . . . . . . . . . . . . . . . . . . . 25Accessing memory and CPU resource utilization data . . . . . . . . . . . . . . . . . . . . . . 26Pool master failover . . . . . . . . . . . . . . . . . . . . . . . . . . . . . . . . . . . . . . . . . . . . . . . . . . . 27Viewing XenServer Configuration report . . . . . . . . . . . . . . . . . . . . . . . . . . . . . . . . . 27
Chapter 2 Installing PATROL for Virtual Servers 29
Verifying installation requirements . . . . . . . . . . . . . . . . . . . . . . . . . . . . . . . . . . . . . . . . . 30Preparing for installation . . . . . . . . . . . . . . . . . . . . . . . . . . . . . . . . . . . . . . . . . . . . . . . . . . 31
Determining how to install products . . . . . . . . . . . . . . . . . . . . . . . . . . . . . . . . . . . . . 31Determining the version of the installation utility . . . . . . . . . . . . . . . . . . . . . . . . . . 32Target computers and their roles . . . . . . . . . . . . . . . . . . . . . . . . . . . . . . . . . . . . . . . . 33Determining where to install KMs . . . . . . . . . . . . . . . . . . . . . . . . . . . . . . . . . . . . . . . 34
PATROL security levels . . . . . . . . . . . . . . . . . . . . . . . . . . . . . . . . . . . . . . . . . . . . . . . . . . . 35Installing PATROL for Virtual Servers . . . . . . . . . . . . . . . . . . . . . . . . . . . . . . . . . . . . . . . 35
Installing locally on the host computer . . . . . . . . . . . . . . . . . . . . . . . . . . . . . . . . . . . 35Setting PATROL Agent configuration variables. . . . . . . . . . . . . . . . . . . . . . . . . . . . 38Installing the product by using Distribution Server . . . . . . . . . . . . . . . . . . . . . . . . 38Distribution Server features . . . . . . . . . . . . . . . . . . . . . . . . . . . . . . . . . . . . . . . . . . . . . 39Importing a CD or customized installation package into Distribution Server. . . 39Installing with the Distribution Server. . . . . . . . . . . . . . . . . . . . . . . . . . . . . . . . . . . . 40Determining the location of PATROL files . . . . . . . . . . . . . . . . . . . . . . . . . . . . . . . . 41
Upgrading KMs in PATROL environments . . . . . . . . . . . . . . . . . . . . . . . . . . . . . . . . . . 43Considerations for using online help . . . . . . . . . . . . . . . . . . . . . . . . . . . . . . . . . . . . . . . . 44
Supported browser versions . . . . . . . . . . . . . . . . . . . . . . . . . . . . . . . . . . . . . . . . . . . . 44Additional considerations for using online help for UNIX. . . . . . . . . . . . . . . . . . . 45
Uninstalling PATROL for Virtual Servers . . . . . . . . . . . . . . . . . . . . . . . . . . . . . . . . . . . . 47Determining the version of the installation utility . . . . . . . . . . . . . . . . . . . . . . . . . . 47Uninstalling PATROL for Virtual Servers on Windows . . . . . . . . . . . . . . . . . . . . . 47Uninstalling PATROL for Virtual Servers on UNIX . . . . . . . . . . . . . . . . . . . . . . . . 48Uninstalling all products while retaining log files . . . . . . . . . . . . . . . . . . . . . . . . . . 49
Contents 5

Uninstalling all products and log files . . . . . . . . . . . . . . . . . . . . . . . . . . . . . . . . . . . . 52
Chapter 3 Loading and configuring PATROL for Virtual Servers 55
Preparing to use PATROL for Virtual Servers . . . . . . . . . . . . . . . . . . . . . . . . . . . . . . . . . 56PATROL for Virtual Servers KM files . . . . . . . . . . . . . . . . . . . . . . . . . . . . . . . . . . . . . . . . 56
KM files for the VMware environment. . . . . . . . . . . . . . . . . . . . . . . . . . . . . . . . . . . . 57KM files for the Citrix XenServer environment. . . . . . . . . . . . . . . . . . . . . . . . . . . . . 58
Loading KMs from PATROL consoles . . . . . . . . . . . . . . . . . . . . . . . . . . . . . . . . . . . . . . . 59Verifying what you have loaded . . . . . . . . . . . . . . . . . . . . . . . . . . . . . . . . . . . . . . . . . 61
Preloading KMs on the PATROL Agent . . . . . . . . . . . . . . . . . . . . . . . . . . . . . . . . . . . . . . 62Removing KMs from your console and agent . . . . . . . . . . . . . . . . . . . . . . . . . . . . . . . . . 64
Unloading KMs from a PATROL Console . . . . . . . . . . . . . . . . . . . . . . . . . . . . . . . . . 65Removing KMs from the agent preload list . . . . . . . . . . . . . . . . . . . . . . . . . . . . . . . . 67
Configuring VMware vCenter . . . . . . . . . . . . . . . . . . . . . . . . . . . . . . . . . . . . . . . . . . . . . . 69vCenter Web Service installation and settings . . . . . . . . . . . . . . . . . . . . . . . . . . . . . 69vCenter settings . . . . . . . . . . . . . . . . . . . . . . . . . . . . . . . . . . . . . . . . . . . . . . . . . . . . . . . 70
Configuring PATROL for Virtual Servers in VMware environment . . . . . . . . . . . . . . 71Creating a vCenter connection. . . . . . . . . . . . . . . . . . . . . . . . . . . . . . . . . . . . . . . . . . . 72Removing a vCenter connection . . . . . . . . . . . . . . . . . . . . . . . . . . . . . . . . . . . . . . . . . 74
Creating host and virtual machine reports in VMware environment . . . . . . . . . . . . . 74Creating the List all Virtual Machines report . . . . . . . . . . . . . . . . . . . . . . . . . . . . . . 75Creating the Top 10 ESX Hosts report . . . . . . . . . . . . . . . . . . . . . . . . . . . . . . . . . . . . 75Creating the Enterprise Inventory report . . . . . . . . . . . . . . . . . . . . . . . . . . . . . . . . . . 75
Managing ESX servers for distributed or failover data collection in VMware environment . . . . . . . . . . . . . . . . . . . . . . . . . . . . . . . . . . . . . . . . . . . . . . . . . . . . . . . . . . . 75Configuring the ESX servers for failover or distributed data collection . . . . . . . . 76Removing ESX servers for failover or distributed data collection . . . . . . . . . . . . . 76Modifying regular expressions of ESX servers . . . . . . . . . . . . . . . . . . . . . . . . . . . . . 76Creating ESX servers configuration report . . . . . . . . . . . . . . . . . . . . . . . . . . . . . . . . 77
Filtering clusters, hosts, and virtual machines in VMware environment . . . . . . . . . . 77Creating filters for clusters, hosts, and virtual machines. . . . . . . . . . . . . . . . . . . . . 77Modifying filters for clusters, hosts, and virtual machines . . . . . . . . . . . . . . . . . . . 78
Configuring event monitoring in VMware environment. . . . . . . . . . . . . . . . . . . . . . . . 78Creating event filters . . . . . . . . . . . . . . . . . . . . . . . . . . . . . . . . . . . . . . . . . . . . . . . . . . . 78Modifying event filters . . . . . . . . . . . . . . . . . . . . . . . . . . . . . . . . . . . . . . . . . . . . . . . . . 79Deleting event filters . . . . . . . . . . . . . . . . . . . . . . . . . . . . . . . . . . . . . . . . . . . . . . . . . . . 79Acknowledging events . . . . . . . . . . . . . . . . . . . . . . . . . . . . . . . . . . . . . . . . . . . . . . . . . 80Turning annotations on or off for event filtering parameters . . . . . . . . . . . . . . . . . 80
Configuring PATROL for Virtual Servers in Citrix XenServer environment . . . . . . . 80Configuring a XenServer . . . . . . . . . . . . . . . . . . . . . . . . . . . . . . . . . . . . . . . . . . . . . . . . . . . 81
Adding a XenServer. . . . . . . . . . . . . . . . . . . . . . . . . . . . . . . . . . . . . . . . . . . . . . . . . . . . 81Removing a XenServer . . . . . . . . . . . . . . . . . . . . . . . . . . . . . . . . . . . . . . . . . . . . . . . . . 82
Managing performance data collection accounts . . . . . . . . . . . . . . . . . . . . . . . . . . . . . . 82Configuring performance data collection accounts . . . . . . . . . . . . . . . . . . . . . . . . . 82Modifying performance data collection account details . . . . . . . . . . . . . . . . . . . . . 83Modifying XenServer regular expressions . . . . . . . . . . . . . . . . . . . . . . . . . . . . . . . . . 83Creating XenServer Configuration report . . . . . . . . . . . . . . . . . . . . . . . . . . . . . . . . . 83
Handling pool master failover . . . . . . . . . . . . . . . . . . . . . . . . . . . . . . . . . . . . . . . . . . . . . . 83
6 BMC PATROL for Virtual Servers Getting Started Guide

Appendix A Accessing Menu Commands, InfoBoxes, and Online Help 85
Accessing KM commands and InfoBoxes . . . . . . . . . . . . . . . . . . . . . . . . . . . . . . . . . . . . 86Accessing online Help . . . . . . . . . . . . . . . . . . . . . . . . . . . . . . . . . . . . . . . . . . . . . . . . . . . . . 87
Appendix B Agent configuration variables 89
Agent configuration variables for VMware environment . . . . . . . . . . . . . . . . . . . . . . . 90Agent configuration variables for Citrix XenServer environment . . . . . . . . . . . . . . . . 92
Index 95
Contents 7

8 BMC PATROL for Virtual Servers Getting Started Guide

FiguresPATROL for Virtual Servers physical view (VMware environment) . . . . . . . . . . . . . 16PATROL for Virtual Servers logical view (VMware environment) . . . . . . . . . . . . . . 17Top 10 ESX Hosts report . . . . . . . . . . . . . . . . . . . . . . . . . . . . . . . . . . . . . . . . . . . . . . . . . . 19Enterprise Inventory report . . . . . . . . . . . . . . . . . . . . . . . . . . . . . . . . . . . . . . . . . . . . . . . . 20List All Virtual Machines report . . . . . . . . . . . . . . . . . . . . . . . . . . . . . . . . . . . . . . . . . . . . 21ESX Servers Configuration report . . . . . . . . . . . . . . . . . . . . . . . . . . . . . . . . . . . . . . . . . . 22PATROL for Virtual Servers view (Citrix XenServer environment) . . . . . . . . . . . . . . 26XenServer configuration report . . . . . . . . . . . . . . . . . . . . . . . . . . . . . . . . . . . . . . . . . . . . 28
Figures 9

10 BMC PATROL for Virtual Servers Getting Started Guide
TablesRequirements for installing PATROL for Virtual Servers . . . . . . . . . . . . . . . . . . . . . 30Default values for PATROL location variables for Windows . . . . . . . . . . . . . . . . . . . 41Default values for PATROL location variables for UNIX . . . . . . . . . . . . . . . . . . . . . . . 42PATROL for Virtual Servers KM files for the VMware environment . . . . . . . . . . . . . 57PATROL for Virtual Servers KM files for the XenServer environment . . . . . . . . . . . 58Accessing KM commands and InfoBoxes . . . . . . . . . . . . . . . . . . . . . . . . . . . . . . . . . . . . 86Accessing Online Help . . . . . . . . . . . . . . . . . . . . . . . . . . . . . . . . . . . . . . . . . . . . . . . . . . . . 87Agent configuration variables (VMware environment) . . . . . . . . . . . . . . . . . . . . . . . . 90Agent configuration variables (Citrix XenServer environment) . . . . . . . . . . . . . . . . . 93
Tables 11

12 BMC PATROL for Virtual Servers Getting Started Guide

C h a p t e r 1
1 Product components and capabilitiesThe chapter provides a brief overview of the features and functions available in PATROL for Virtual Servers.
PATROL for Virtual Servers features . . . . . . . . . . . . . . . . . . . . . . . . . . . . . . . . . . . . . . . . 13PATROL for Virtual Server features for VMware environment. . . . . . . . . . . . . . . . . . 14
Mapping virtual resources to physical hosts. . . . . . . . . . . . . . . . . . . . . . . . . . . . . . . 15Switching between a physical and logical view . . . . . . . . . . . . . . . . . . . . . . . . . . . . 15Accessing memory and CPU resource utilization data . . . . . . . . . . . . . . . . . . . . . . 17Viewing inventory and performance reports . . . . . . . . . . . . . . . . . . . . . . . . . . . . . . 18VMware vSphere 4.0 features . . . . . . . . . . . . . . . . . . . . . . . . . . . . . . . . . . . . . . . . . . . 22
PATROL for Virtual Servers features for the Citrix XenServer environment. . . . . . . 23Mapping virtual resources to physical hosts. . . . . . . . . . . . . . . . . . . . . . . . . . . . . . . 25Accessing memory and CPU resource utilization data . . . . . . . . . . . . . . . . . . . . . . 26Pool master failover . . . . . . . . . . . . . . . . . . . . . . . . . . . . . . . . . . . . . . . . . . . . . . . . . . . 27Viewing XenServer Configuration report . . . . . . . . . . . . . . . . . . . . . . . . . . . . . . . . . 27
PATROL for Virtual Servers featuresPATROL for Virtual Servers enables you to monitor your virtual environment and resources in the VMware and Citrix XenServer environments. PATROL for Virtual Servers enables you to determine how to effectively use those virtual resources.
Chapter 1 Product components and capabilities 13
PATROL for Virtual Server features for VMware environment
PATROL for Virtual Server features for VMware environment
PATROL for Virtual Servers provides the following features to monitor the VMware environment:
■ discover your virtual machines
After you create a vCenter connection, PATROL for Virtual Servers automatically discovers the hosts (ESX servers) and their associated virtual machines.
■ map virtual resources to physical resources
After discovery, PATROL for Virtual Servers creates a mapping of the hierarchical connections between a physical host (ESX server) and associated virtual machines.
■ switch between a physical and logical view
You can organize a virtual environment by either physical host (ESX server) connections or cluster group connections that you create in vCenter.
■ assess how your virtual and physical resources are being utilized in your virtual environment
PATROL for Virtual Servers application classes and parameters enable you to determine the impact that resources assigned to your virtual machines have on your physical resources.
■ access inventory and performance reports
PATROL for Virtual Servers includes an enterprise performance report as well as inventory reports for the enterprise, and host of the virtual environment.
■ collect performance data for configured ESX servers
PATROL for Virtual Servers collects performance and inventory data of the configured ESX servers and their virtual machines from the respective ESX servers for distributed or failover data.
■ create filters for monitoring
You can create filters to include or exclude clusters, hosts, and virtual machines from monitoring.
14 BMC PATROL for Virtual Servers Getting Started Guide
Mapping virtual resources to physical hosts
■ configure event monitoring
You can filter events by managed object type, event severity, event type, and by the user who triggered the events.
■ monitor the migration of virtual machines from one host to another
VMware environment supports live migration of a virtual machine from one host (ESX server) to another. PATROL for Virtual Servers enables you to monitor these migrations for analysis by using various parameters that display the following information:
— the number of times that a virtual machine is migrated since the most recent Agent start
— the number of incoming and outgoing dynamic migrations for the past one hour one day, and one week
Mapping virtual resources to physical hosts
After you create a connection to a VMware vCenter, PATROL for Virtual Servers automatically discovers its physical host (ESX server) connections. During this discovery process, virtual machines are mapped to individual hosts.
Switching between a physical and logical view
In PATROL for Virtual Servers, you can view your virtual environment in either a physical or logical view. In the physical view, PATROL for Virtual Servers organizes a virtual environment by each host (ESX server) connection contained in the vCenter connection. Information for each host connection includes performance data for the host and its associated virtual machines.
Chapter 1 Product components and capabilities 15

Switching between a physical and logical view
In Figure 1, the virtual environment is shown in the physical view, organized by the individual host connections contained in the vCenter.
Figure 1 PATROL for Virtual Servers physical view (VMware environment)
In the logical view, PATROL for Virtual Servers organizes all virtual resources by data centers, clusters, resource pools, and folders defined in the vCenter.
16 BMC PATROL for Virtual Servers Getting Started Guide

Accessing memory and CPU resource utilization data
Figure 2 illustrates how individual hosts and virtual machines are organized using the logical view.
Figure 2 PATROL for Virtual Servers logical view (VMware environment)
Accessing memory and CPU resource utilization data
Using PATROL for Virtual Servers, you can access performance data for hosts and virtual machines, measuring how virtual resources affect your physical resources. The types of performance data that you can measure include the following:
■ the allocation of resources—what CPU or memory resources have been assigned to a host (ESX server) or virtual machine
■ the amount of resources used—how the assigned resources have been used by the host or virtual machine
■ the rate of resource utilization—percentage of resources used versus the amount of resources allotted
Chapter 1 Product components and capabilities 17

Viewing inventory and performance reports
Viewing inventory and performance reports
In PATROL for Virtual Servers, you can access several reports that enable you to inventory and assess the performance of the hosts (ESX servers) and virtual machines contained in your virtual environment.
The following reports are available in PATROL for Virtual Servers:
■ Top 10 ESX Hosts■ Enterprise Inventory■ List All Virtual Machines■ ESX Servers Configuration
Top 10 ESX Hosts report
The Top 10 ESX Hosts report lists the following information:
■ the hosts (ESX server) that are consuming the largest amount of CPU resources
■ the top ten virtual machines that are connected to these hosts
In the report, data is organized first by each host connection, with that host’s top ten virtual machines listed underneath. The virtual machines listed for a host are the ones that are using the most CPU resources.
18 BMC PATROL for Virtual Servers Getting Started Guide

Viewing inventory and performance reports
Figure 3 shows a sample Top 10 ESX Hosts report:
Figure 3 Top 10 ESX Hosts report
Enterprise Inventory report
The Enterprise Inventory report summarizes all physical hosts (ESX servers) and their associated virtual machines for each vCenter connection. In the summary section, each individual host and its virtual machines are listed.
Chapter 1 Product components and capabilities 19

Viewing inventory and performance reports
Figure 4 shows a sample enterprise inventory report:
Figure 4 Enterprise Inventory report
List All Virtual Machines report
The List all Virtual Machines report lists all the virtual machines associated to a host (ESX server) and provides the following information:
■ host name ■ name of the virtual machine ■ type of operating system ■ IP address ■ status ■ amount of memory allocated ■ amount of disk space allocated ■ CPU resources used ■ memory resources used
20 BMC PATROL for Virtual Servers Getting Started Guide

Viewing inventory and performance reports
Figure 5 shows a sample List All Virtual Machines report for a host connection:
Figure 5 List All Virtual Machines report
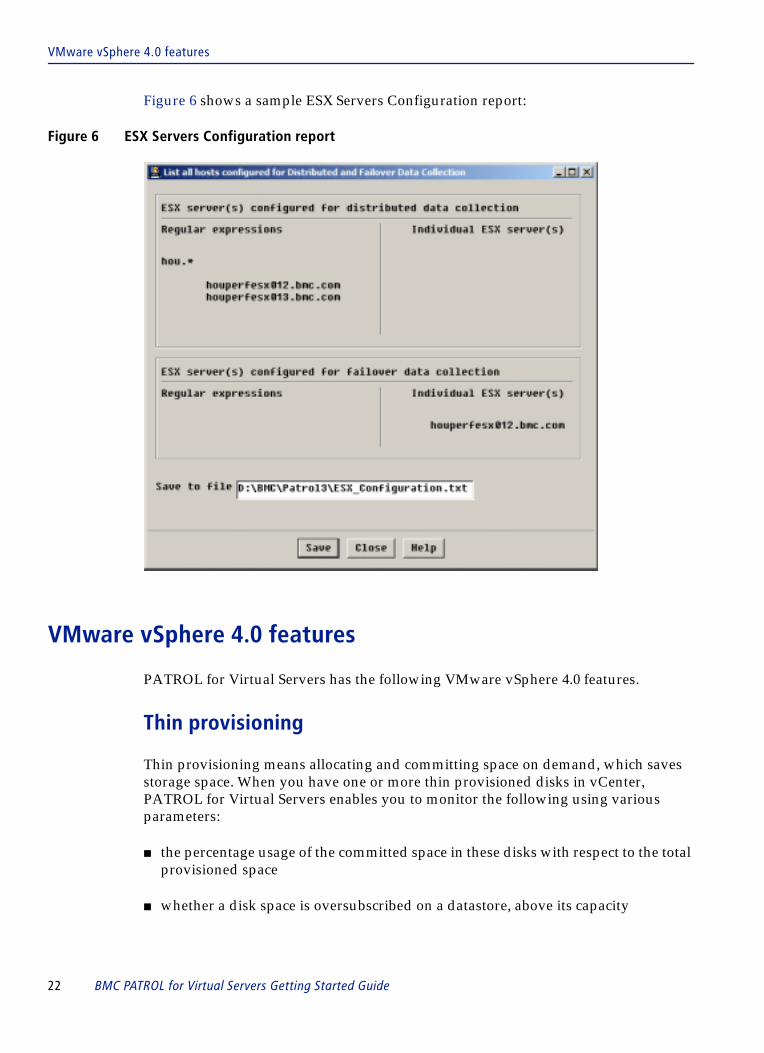
ESX Servers Configuration report
The ESX Servers Configuration report lists the following information:
■ names of ESX servers that are configured using a regular expression for distributed data collection
■ names of ESX servers that are configured individually for distributed data collection
■ names of ESX servers that are configured using a regular expression for failover data collection
■ names of ESX servers that are configured individually for failover data collection
Chapter 1 Product components and capabilities 21
VMware vSphere 4.0 features
Figure 6 shows a sample ESX Servers Configuration report:
Figure 6 ESX Servers Configuration report
VMware vSphere 4.0 features
PATROL for Virtual Servers has the following VMware vSphere 4.0 features.
Thin provisioning
Thin provisioning means allocating and committing space on demand, which saves storage space. When you have one or more thin provisioned disks in vCenter, PATROL for Virtual Servers enables you to monitor the following using various parameters:
■ the percentage usage of the committed space in these disks with respect to the total provisioned space
■ whether a disk space is oversubscribed on a datastore, above its capacity
22 BMC PATROL for Virtual Servers Getting Started Guide

PATROL for Virtual Servers features for the Citrix XenServer environment
For information about the thin provisioning parameters, see the PATROL for Virtual Servers online Help.
Distributed Resource Scheduler power management
Distributed Resource Scheduler (DRS) power management saves power consumed by the hosts (ESX servers) when the hosts are not operating at maximum capacity. In PATROL for Virtual Servers, the DRS Powered Off state indicates that DRS has powered off the host. The DRS Powered On Failed state indicates that DRS failed to power on the host.
Hot plug support for virtual devices
Hot plug supports virtual devices, memory, and virtual CPUs. An information event is generated whenever you change the device configuration in vCenter.
PATROL for Virtual Servers features for the Citrix XenServer environment
PATROL for Virtual Servers provides the following features to monitor the XenServer environment:
■ discover virtual machines, storage repositories, and resource pools
To monitor the Citrix XenServer environment, you can add either a resource pool master or a standalone host. When you add a resource pool master for monitoring, PATROL for Virtual Servers discovers the inventory (hosts, virtual machines, and storage repository) of that resource pool. It also fetches performance data such as memory, network, processor, and disk details for all the hosts and virtual machines that are part of the resource pool. A resource pool comprises of multiple hosts, bound together into a single managed entity that can host virtual machines. Shared repositories are discovered at the resource pool level and local repositories are discovered at each host level.
For a standalone host (one that is not part of a resource pool), PATROL for Virtual Servers discovers all the virtual machines and storage repository associated with the host. It also fetches the performance data such as memory, network, processor, and disk details for the standalone host and the associated virtual machines.
■ map virtual resources to physical resources
After discovery, PATROL for Virtual Servers creates a mapping of the hierarchical connections between a physical host (XenServer) and associated virtual machines.
Chapter 1 Product components and capabilities 23

PATROL for Virtual Servers features for the Citrix XenServer environment
■ assess how your virtual and physical resources are being utilized in your virtual environment
Application classes and parameters enable you to determine the impact that resources assigned to your virtual machines have on your physical resources.
■ collect inventory data
PATROL for Virtual Servers collects inventory data for the hosts, virtual machines, and storage repositories in the Citrix XenServer environment.
■ collect performance data
BMC Performance Manager for Virtual Servers collects performance data for the configured hosts and their virtual machines. After you add a host to the Citrix XenServer environment and if the host is part of a resource pool, you need to configure performance data collection account for all the hosts in that resource pool to collect performance data. If that host is not part of any resource pool, you do not need to configure performance data collection for that host.
■ monitor the migration of virtual machines from one host to another
Citrix XenServer environment supports live migration of a virtual machine from one XenServer to another. You can migrate virtual machines from one host to another manually depending on your requirement. In addition, the workload balancing server recommends virtual machine optimization depending on the availability of the resources. Depending on your requirement, you can apply the recommendation.
PATROL for Virtual Servers monitors both types of migrations and displays the number of virtual machines that are migrated to and from a host during the last hour in the Host_VMInMigrations and Host_VMOutMigrations parameters for the host. For a virtual machine, it also displays the number of times that machine was migrated during the last hour. When a virtual machine is migrated, annotation of the VM_MigrationCount parameter displays the following information:
— name of the host from where that virtual machine is migrated
— name of the host to which that virtual machine is migrated
— type of migration (manual or recommended by the workload balancing server)
In addition, a custom event is generated every time a virtual machine is migrated. The event contains the same information as displayed by the annotation of the VM_MigrationCount parameter.
24 BMC PATROL for Virtual Servers Getting Started Guide
Mapping virtual resources to physical hosts
■ handle pool master failover
Citrix XenServer environment continuously monitors all the hosts (XenServers) in a resource pool. If the pool master fails, another host is selected as a pool master so that the resource pool is managed without downtime. In case of pool master failover, PATROL for Virtual Servers detects the failover and takes the necessary actions to detect the new pool master and keeps the monitoring uninterrupted.
■ access report
PATROL for Virtual Servers includes the XenServer configuration report.
Mapping virtual resources to physical hosts
PATROL for Virtual Servers automatically discovers all the virtual machines associated with a host. During the discovery process, virtual machines are mapped to individual hosts.
Chapter 1 Product components and capabilities 25

Accessing memory and CPU resource utilization data
Figure 7 shows the Citrix XenServer environment hierarchy:
Figure 7 PATROL for Virtual Servers view (Citrix XenServer environment)
Accessing memory and CPU resource utilization data
Using PATROL for Virtual Servers, you can access performance data for hosts and virtual machines, measuring how virtual resources affect your physical resources.
The performance data that you can measure includes the following:
■ allocation of CPU or memory resources that have been assigned to a host (XenServer) or a virtual machine
■ how the resources are being used by the hosts or virtual machines
■ the rate of resource utilization, which is percentage of resources used versus the amount of resources allotted
26 BMC PATROL for Virtual Servers Getting Started Guide

Pool master failover
Pool master failover
PATROL for Virtual Servers handles the following pool master failover scenarios:
■ PATROL Agent is running and the performance data collection account is configured for the hosts in the resource pool: In this case, the KM tries to the get the IP address of the new pool master. If IP address is found, the KM tries to find the host name corresponding to the IP address. If KM is able to find the host name, it connects to the new pool master and keeps the monitoring uninterrupted. If the KM is not able to find the IP address, the annotation report of the Pool_CollectionStatus parameter (under the VSM_XEN_RESOURCEPOOL application class) displays an appropriate error message. You need to modify the pool master details to start the monitoring.
■ If the PATROL Agent is running and the performance data collection account is not configured for the hosts in the resource pool: In this case, the KM is not able to find the credentials for the new pool master. Therefore, you need to configure the performance data collection account for the new pool master.
■ PATROL Agent is not running: In this case, at the startup of the PATROL Agent, inventory is not discovered and the new pool master IP address and DNS mapping is not done. Therefore, the KM is not able to find the IP address of the new pool master. You need to modify the pool master details to start the monitoring.
Viewing XenServer Configuration report
In PATROL for Virtual Servers, you can view the XenServer configuration report, which lists the following information:
— list of XenServers for which performance data collection account is configured using a regular expression
— list of XenServers for which performance data collection account is configured individually
Chapter 1 Product components and capabilities 27

Viewing XenServer Configuration report
Figure 8 shows a sample XenServer configuration report:
Figure 8 XenServer configuration report
28 BMC PATROL for Virtual Servers Getting Started Guide

C h a p t e r 2
2 Installing PATROL for Virtual ServersThis chapter provides the information that you need to install PATROL for Virtual Servers. For information about the PATROL installation process, see the PATROL Installation Reference Manual. The following topics are discussed in this chapter:
Verifying installation requirements . . . . . . . . . . . . . . . . . . . . . . . . . . . . . . . . . . . . . . . . . 30Preparing for installation . . . . . . . . . . . . . . . . . . . . . . . . . . . . . . . . . . . . . . . . . . . . . . . . . . 31
Determining how to install products . . . . . . . . . . . . . . . . . . . . . . . . . . . . . . . . . . . . . 31Determining the version of the installation utility . . . . . . . . . . . . . . . . . . . . . . . . . . 32Target computers and their roles . . . . . . . . . . . . . . . . . . . . . . . . . . . . . . . . . . . . . . . . 33Determining where to install KMs . . . . . . . . . . . . . . . . . . . . . . . . . . . . . . . . . . . . . . . 34
PATROL security levels . . . . . . . . . . . . . . . . . . . . . . . . . . . . . . . . . . . . . . . . . . . . . . . . . . . 35Installing PATROL for Virtual Servers . . . . . . . . . . . . . . . . . . . . . . . . . . . . . . . . . . . . . . . 35
Installing locally on the host computer . . . . . . . . . . . . . . . . . . . . . . . . . . . . . . . . . . . 35Setting PATROL Agent configuration variables. . . . . . . . . . . . . . . . . . . . . . . . . . . . 38Installing the product by using Distribution Server . . . . . . . . . . . . . . . . . . . . . . . . 38Distribution Server features . . . . . . . . . . . . . . . . . . . . . . . . . . . . . . . . . . . . . . . . . . . . . 39Importing a CD or customized installation package into Distribution Server. . . 39Installing with the Distribution Server. . . . . . . . . . . . . . . . . . . . . . . . . . . . . . . . . . . . 40Determining the location of PATROL files . . . . . . . . . . . . . . . . . . . . . . . . . . . . . . . . 41
Upgrading KMs in PATROL environments . . . . . . . . . . . . . . . . . . . . . . . . . . . . . . . . . . 43Considerations for using online help . . . . . . . . . . . . . . . . . . . . . . . . . . . . . . . . . . . . . . . . 44
Supported browser versions . . . . . . . . . . . . . . . . . . . . . . . . . . . . . . . . . . . . . . . . . . . . 44Additional considerations for using online help for UNIX. . . . . . . . . . . . . . . . . . . 45
Uninstalling PATROL for Virtual Servers . . . . . . . . . . . . . . . . . . . . . . . . . . . . . . . . . . . . 47Determining the version of the installation utility . . . . . . . . . . . . . . . . . . . . . . . . . . 47Uninstalling PATROL for Virtual Servers on Windows . . . . . . . . . . . . . . . . . . . . . 47Uninstalling PATROL for Virtual Servers on UNIX . . . . . . . . . . . . . . . . . . . . . . . . 48Uninstalling all products while retaining log files . . . . . . . . . . . . . . . . . . . . . . . . . . 49Uninstalling all products and log files . . . . . . . . . . . . . . . . . . . . . . . . . . . . . . . . . . . . 52
Chapter 2 Installing PATROL for Virtual Servers 29

Verifying installation requirements
Verifying installation requirementsVerify that the target computer meets the installation requirements listed in Table 1.
Table 1 Requirements for installing PATROL for Virtual Servers (part 1 of 2) Resource Requirements Comments
operating systems (for PATROL Agent only)
Any of the following operating systems:
■ Microsoft Windows Server 2003a, SP 2, x86■ Microsoft Windows Server 2003a, SP 2, x86-64b
■ Microsoft Windows Server 2003a, SP 2, Itanium 2■ Microsoft Windows Server 2000c, SP 4, x86■ Microsoft Windows Server 2008a, x86 and x86-
64b, Itanium 2
Windows Server 2008 requires PATROL Agent 3.7.20 or later.
For more information on the supported operating systems for other PATROL components, please see the applicable documentation listed in the Release Notes.
applications managed by PATROL for Virtual Servers
To monitor the VMware environment, any of the following applications:
■ VMware vCenter 2.5.x■ VMware vCenter 4.0■ VMware ESX Server 3.5.x■ VMware ESX Server 4.0
To monitor the XenServer environment:
■ Citrix XenServer 5.5
PATROL products ■ PATROL Agent version 3.6 or later (Windows only)
■ Any of the following consoles:— PATROL Console for UNIX® 3.5.2x or later— PATROL Console for Windows version 3.5.2x
or later— PATROL Central Operator – Microsoft
Windows Edition 7.5.x or later— PATROL Central Operator – Web
Edition 7.5.x or later
disk space ■ PATROL Agent components: 68 MB■ PATROL console components: 41 MB■ Console Server components: 40 MB
browser This product uses Common Installer 7.5.x, which requires a browser. For a list of supported browsers, see the PATROL Installation Reference Manual.
browser to support online Help for PATROL for UNIX Console
Use Netscape Navigator version 3.01– 4.78 to use online Help with PATROL for UNIX.
See “Supported browser versions” on page 44.
30 BMC PATROL for Virtual Servers Getting Started Guide

Preparing for installation
Preparing for installationBMC recommends that you first install PATROL for Virtual Servers on a limited number of development or test computers and then configure and test PATROL for Virtual Servers before installing it on production computers.
Before you install, you must
■ determine how to install products (see page 31)■ ensure you are using the appropriate version of the installation utility (see page 32)■ understand target computers and their roles (see page 33)■ understand PATROL security options (page 35)■ understand how to install and configure VMware vCenter (page 69)
Determining how to install products
You can install products on the computer on which you are running the installation utility (local installation), or you can create an installable image of products so that you can install them at a later time using the Distribution Server (remote installation functionality).
license You must have a valid demonstration license (typically good for 30 days) or a permanent license to run your PATROL products. If you do not have a permanent license, contact your BMC Software sales representative or the BMC Software Contract Administration department for licensing information.
ports If you are installing an agent or console with PATROL for Virtual Servers, you must specify the port number to connect to all the agent computers.
The default port number is 3181 for agents.
a References to Microsoft Windows Server 2003 (which includes Windows Server 2003 R2) and Microsoft Windows Server 2008 include all editions of these platform families and their service packs, except where service packs are specifically listed in the table.
b References to x86-64 include AMD64 (which includes Opteron) and Intel 64 architecture (formerly known as Intel Extended Memory 64 Technology, or Intel EM64T).
c Microsoft provides an extended Support Period until 13 July 2010 for Microsoft Windows Server 2000, SP 4, x86. BMC Software will continue to verify PATROL for Windows on these platforms and will be providing best effort support during this period.
Table 1 Requirements for installing PATROL for Virtual Servers (part 2 of 2) Resource Requirements Comments
Chapter 2 Installing PATROL for Virtual Servers 31

Determining the version of the installation utility
Local installation
If you install locally, you must install PATROL for Virtual Servers and a PATROL Agent on the computer used to monitor VMware vCenter. In the PATROL 3.x environment, you must also install PATROL for Virtual Servers and a PATROL Console for Windows or UNIX on each computer from which you want to view results.
If you install locally in a PATROL 7.x environment, you must install PATROL for Virtual Servers on the computer that hosts the PATROL Console Server.
Remote installation
If you create an installable image, the product configuration information that you enter, such as the BMC Software products installation directory, account names, passwords, PATROL Agent port number, and security options, must be the same for all computers on which the image is to be installed. If you want to specify different settings for different computers, you must either create a separate image for each set of values that you want to implement or edit the variables in the image’s control file by using the ctltool utility.
For more information about creating, distributing, and installing installable images, and about using the ctltool utility, see the PATROL Installation Reference Manual.
Determining the version of the installation utility
The installation instructions contained in this guide pertain to version 7.5.55 and later of the installation utility. If you use a version of the installation utility other than these, the instructions in this guide may not accurately describe what you see on your screen.
To determine the installation utility version
1 Open a command prompt.
2 Navigate to the directory where the installation utility is located.
3 Enter the following command: setup.exe -v
A message box displays the version of the installation utility.
32 BMC PATROL for Virtual Servers Getting Started Guide

Target computers and their roles
Target computers and their roles
The installation utility prompts you to select the roles performed by the computer on which you are installing BMC Software products (the target computer). Before beginning the installation process, review the following definitions of the roles that are presented in the installation utility and decide which of these roles is performed by each computer in your environment.
Roles performed by computers in the PATROL architecture
The roles performed by computers in the PATROL architecture are:
■ Console Systems (also referred to as console computers) host user desktop applications such as consoles, user interfaces, viewers, and browsers. Select this option if the computer to which you are installing will perform any of the following roles:
— monitor and manage on Windows by using a PATROL Central Operator – Microsoft Windows Edition console (PATROL 7.x architecture)
— monitor, manage, and develop KMs on UNIX by using a PATROL Console for UNIX (PATROL 3.x architecture)
— monitor, manage, and develop KMs on Windows by using a PATROL Console for Windows (PATROL 3.x architecture)
■ Managed Systems (also referred to as agent computers) host software that manages the resources on the computer, such as a PATROL Agent or PATROL Knowledge Modules (KMs). Select this option if the computer to which you are installing will perform any of the following roles:
— host a PATROL Agent 3.5 (works with both the PATROL 3.x and PATROL 7.x architecture)
— host KMs and components that contain the knowledge that PATROL uses to monitor the resources on this computer
■ A Common Services (in only PATROL 7.x architecture) computer hosts services that are shared among managed systems and console systems. You can install each of these common services on any computer in the network. Select this option if the computer to which you are installing will perform any of the following roles:
— host the PATROL Central Operator – Web Edition (PATROL 7.x architecture) Web server
— host the PATROL Console Servers— host the RTservers
Chapter 2 Installing PATROL for Virtual Servers 33
Determining where to install KMs
Determining where to install KMs
Where KMs are installed depends on which system roles you have assigned to a computer and which PATROL infrastructure components are installed on that computer.
PATROL 3.x
In a PATROL 3.x environment, you must install KMs on the following computers:
■ Computers hosting the PATROL Agent—Select Managed Systems as the System Role in the installation utility when installing KMs. This selection installs KM files that run on the PATROL Agent.
■ Computers hosting the PATROL Console for Windows or PATROL Console for UNIX—Select Console Systems as the System Role in the installation utility when installing KMs on computers hosting the PATROL Console for Windows or PATROL Console for UNIX. This selection installs KM files for use by the console.
PATROL 7.x
In a PATROL 7.x environment, you must install KMs on the following computers:
■ Computers hosting the PATROL Console Server—For PATROL Central Operator – Microsoft Windows Edition, you must install the KM on the Console Server location. On Web Edition you must install it where the Web Console install resides. Web Edition does not pull help from Console Server but from the server where the Web Console was installed.
■ Computers hosting the PATROL Agent—Select Managed Systems as the System Role in the installation utility. This selection installs KM files that run on the PATROL Agent.
When using PATROL Central Operator – Web Edition, install KMs on computers hosting the PATROL Console Server using the Common Services Systems role and computers hosting the PATROL Agent using the Managed Systems role.
NOTE If you do not install each KM on the computer hosting the PATROL Console Server and select Common Services Systems as the System Role in the installation utility, no KM icons or KM Help files will be available in either PATROL Central Operator – Microsoft Windows Edition or PATROL Central Operator – Web Edition.
34 BMC PATROL for Virtual Servers Getting Started Guide
PATROL security levels
If you are using older versions of the following components:
■ PATROL Console Server prior to version 7.2.36■ PATROL Central Operator – Web Edition prior to version 7.1.10
For more information about the PATROL 7.x architecture, see the PATROL Infrastructure Planning Guide.
PATROL security levelsYou can secure the data passed between PATROL components and restrict unauthorized users from accessing your data by implementing PATROL security. PATROL security is installed as part of the agent, console server, and consoles. KMs inherit the security policy from the agent, console server, and console on which they are installed.
For more information about implementing and using PATROL security, see the following documentation:
■ PATROL Security User Guide■ PATROL Security Release Notes
Installing PATROL for Virtual Servers This section explains various methods to install PATROL for Virtual Servers.
Installing locally on the host computer
Use this method to install PATROL for Virtual Servers on a PATROL Agent, Console, PATROL Central console (console server), or PATROL Central Operator – Web Edition host computer where the KM will be used.
NOTE By default, the installation process configures the PATROL Agent to connect to a Classic console through port 3181. This is the default port the Classic Console will use to attempt to connect to the Agent. It is the port number that the Agent is bound to for outside communications, and should not be confused with the port number that is used to communicate with the RT Server.
Chapter 2 Installing PATROL for Virtual Servers 35

Installing locally on the host computer
Before you begin
■ You first should install on a limited number of computers in the test environment, test the installation thoroughly, and then install in your production environment.
■ You must have created the PATROL default account.
■ (UNIX only) If you want to install PATROL for Virtual Servers on a computer running UNIX Classic console, UNIX Console Server, or UNIX Web Edition that does not have a browser installed, you must have access to a second computer that runs a browser that is supported by the installation utility. You can also install without a browser if you build an image and run a silent install.
To install PATROL for Virtual Servers locally
1 From an installation image that has been electronically downloaded from an EPD site, run
■ setup.exe (Windows)■ setup.sh (UNIX)
(UNIX only) If you are installing into a UNIX environment without a browser, perform the following steps to launch the installation utility:
A From a command line, change to the directory to where the installation utility is located and enter the following command to start the installation web server:
./setup.sh -serveronly
B On the other computer with a browser, start the browser.
C Connect to the installation Web server from the browser to start the installation utility by using the URL that is displayed in the message box on the computer in which you are installing the product.
2 On the Welcome to the Installation Utility page, click Next to begin installation.
3 Review the license agreement, select Accept, and click Next to continue.
4 On the Select Installation Option page, select Install products on this computer now, and click Next to continue.
5 On the Specify Installation Directory page, accept the default directory and click Next to continue.
36 BMC PATROL for Virtual Servers Getting Started Guide
Installing locally on the host computer
6 On the Select System Roles page, select any or all of the following roles to indicate the components that you want to install and click Next.
■ If you are installing to a computer that hosts or will host a PATROL Console for Windows or PATROL Console for UNIX, select Console Systems.
■ If you are installing to a computer that hosts or will host a PATROL Agent, select Managed Systems.
■ If you are installing to a computer that hosts or will host the PATROL Central Operator – Web Edition Web server, the PATROL Console Server, or the RTserver, select Common Services.
7 On the Select Products and Components to Install page, select PATROL for Virtual Servers, and click Next.
8 On the Provide the PATROL 3.x Product Directory page, enter the directory in which you want to install PATROL for Virtual Servers.
This directory is appended to the base directory path that is shown in the BMC Products Installation Directory field. The installation directory was entered in step 5 on page 36.
9 (Windows only) On the Confirm BMC Product Startup Information page, perform the following steps:
A In the Specify the Current Agent Port field, enter the port number that you want the PATROL Agent to use. The default port number is 3181.
B In the Restart the PATROL Agent automatically? field, select the appropriate option:
■ Select Yes if you want the installation utility to restart the PATROL Agent after the installation is complete.
■ Select No if you want to restart the PATROL Agent manually after the installation is complete.
NOTE PATROL for Virtual Servers is supported only on a managed system that hosts or will host a PATROL Agent on a supported Windows operating system.
NOTE If your previous installation used a different port number, change the default to the current port number for the PATROL Agent.
Chapter 2 Installing PATROL for Virtual Servers 37
Setting PATROL Agent configuration variables
10 On the Review Selections and Install page, review the selections carefully to ensure that they are correct.
■ Click Back if you want to change your selections. ■ Click Start Install to start installing if the selections are correct.
11 When the status window reports that the installation is 100% complete, click Next to view the results window to verify that the PATROL for Virtual Servers installed successfully.
12 (optional) In the results window, click View Log to review the details of the installation.
13 Click Exit to close the installation utility.
Setting PATROL Agent configuration variables
After installing PATROL for Virtual Servers on an agent host computer, you must enter the following commands in the system output window of a Developer Console or use the PATROL Configuration Manager, pconfig, wpconfig, or xpconfig to set the variables:
set(“/AgentSetup/AgentTuning/runqSchedPolicy”, “2”); set(“/AgentSetup/AgentTuning/pslInstructionMax”, “5000000”);
Installing the product by using Distribution Server
You can install PATROL for Virtual Servers locally on a single computer or you can create an installable image that you can install using the Distribution Server. An installable image is a product image that you can use to install products to multiple computers. With an installable image, you can create one product image with one pass through the installation utility and then use that image to install to remote computers in your environment.
NOTE
This window will not be displayed if you are not installing into a managed system.
38 BMC PATROL for Virtual Servers Getting Started Guide
Distribution Server features
The details of how to install a product across an enterprise to multiple machines by using Distribution Server are beyond the scope of this book. However, this section does describe how to import the PATROL for Virtual Servers product into the Distribution Server. It also provides a high-level overview of the enterprise installation process.
Distribution Server features
Using Distribution Server, you can perform the following tasks:
■ install, uninstall, upgrade, and reinstall products on remote systems from one central location.
■ create collections of products and system groups to distribute multiple products to multiple systems in one distribution.
■ schedule a distribution for a specific date and time.
■ maintain multiple product versions to be distributed.
■ view reports to check distribution status, gather distribution data, and diagnose problems.
Importing a CD or customized installation package into Distribution Server
This task describes how to import components into the Distribution Server for deployment to multiple locations.
Before you begin
Ensure that you use the Distribution Server version 7.1.01 or later and apply any available patches.
To import components in to the Distribution Server
1 Using the Distribution Server Manager, start the Distribution Server and connect to it.
2 In the Distribution Server tab area, click the Components tab.
3 In the list area, click the Import button.
Chapter 2 Installing PATROL for Virtual Servers 39

Installing with the Distribution Server
4 Navigate to the location where the components are located and select the directory that contains the Products directory (do not select the Products directory itself), and click Next.
If the components are not accessible on a local drive, you can specify a path on the network.
5 Select the check boxes for the components that you want to import, and click OK.
6 Click Import to import the selected components.
Installing with the Distribution Server
Once you have imported the PATROL for Virtual Servers into the Distribution Server, you must perform the following tasks within the tool.
To set up products
1 Import components into the Distribution Server repository on the Components tab of the Distribution Manager.
2 Arrange components in collections on the Collections tab of the Distribution Manager.
3 Configure the collections on the Configurations tab of the Distribution Manager.
To set up systems
1 Create accounts in the operating system of the computers to which you want to distribute PATROL for Virtual Servers.
2 Add accounts and create profiles for the systems on the Systems tab of the Distribution Manager.
3 Add the systems and install the Distribution Client on the Systems tab of the Distribution Manager.
4 Arrange systems in system groups on the Systems tab of the Distribution Manager.
40 BMC PATROL for Virtual Servers Getting Started Guide
Determining the location of PATROL files
To distribute products
1 Distribute configurations of collections to system groups on the Distributions tab of the Distribution Manager.
2 Run reports to review distributions on the Reports tab of the Distribution Manager.
For detailed instructions about how to perform remote installations with the Distribution Server, see the Distribution Server Getting Started Guide.
Determining the location of PATROL files
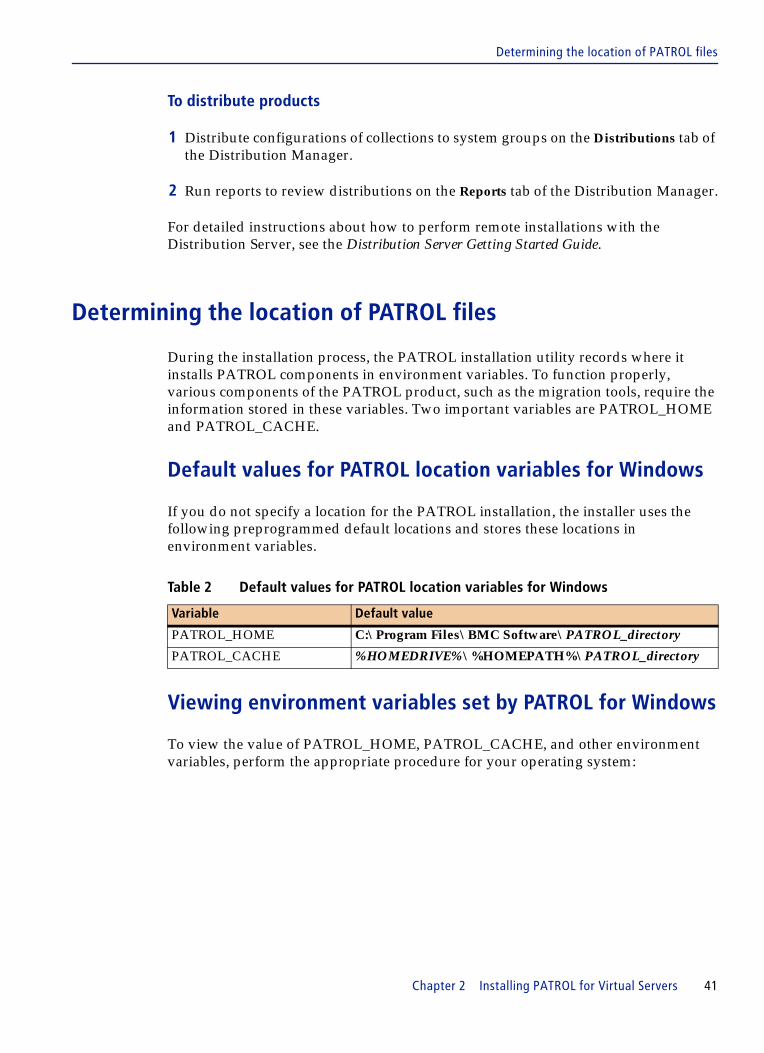
During the installation process, the PATROL installation utility records where it installs PATROL components in environment variables. To function properly, various components of the PATROL product, such as the migration tools, require the information stored in these variables. Two important variables are PATROL_HOME and PATROL_CACHE.
Default values for PATROL location variables for Windows
If you do not specify a location for the PATROL installation, the installer uses the following preprogrammed default locations and stores these locations in environment variables.
Viewing environment variables set by PATROL for Windows
To view the value of PATROL_HOME, PATROL_CACHE, and other environment variables, perform the appropriate procedure for your operating system:
Table 2 Default values for PATROL location variables for Windows
Variable Default value
PATROL_HOME C:\Program Files\BMC Software\PATROL_directory
PATROL_CACHE %HOMEDRIVE%\%HOMEPATH%\PATROL_directory
Chapter 2 Installing PATROL for Virtual Servers 41

Determining the location of PATROL files
Default values for PATROL location variables for UNIX
If you do not specify a location for the PATROL installation, the installer uses the following preprogrammed default locations and stores these locations in environment variables.
Viewing environment variables set by PATROL for UNIX
To view the value of PATROL_HOME, PATROL_CACHE, and other environment variables, perform the appropriate procedure for your shell type:
Operating system Procedure
Microsoft Windows 2000 Using the Control Panel tools
1. From the Start Menu, select Start => Settings => Control Panel.
2. Open the System application.
3. Select the Environment tab.
4. Scroll through the System Variable list box to view the variables.
Note: The System application displays PATROL_CACHE only if it is set to a value other than its default value.
Using the PATROL Environment Probe
1. From the Start Menu, select Start => Programs => BMC PATROL => PATROL Environment Probe.
2. Scroll to the variables that you want to view.
Table 3 Default values for PATROL location variables for UNIX
Variable Default value
PATROL_HOME /opt/bmc/PATROL_directory
PATROL_CACHE $HOME/PATROL_directory
42 BMC PATROL for Virtual Servers Getting Started Guide

Upgrading KMs in PATROL environments
Upgrading KMs in PATROL environments
To upgrade the PATROL for Virtual Servers KM in the PATROL Central environment
1 Stop the PATROL Central console.
2 Install or upgrade the KM to version 2.9.00 on the PATROL Agent machine.
3 Install or upgrade the KM to version 2.9.00 on the Console Server machine.
4 Stop and start the PATROL Console Server service.
5 Start the PATROL Central console and connect to the PATROL Agent.
To upgrade the PATROL for Virtual Servers KM in the PATROL Classic console environment
1 Stop the PATROL Classic console.
2 Backup the PATROL Classic console cache and then delete the cache.
3 Install or upgrade the KM to version 2.9.00 on the PATROL Agent machine.
Type of shell Procedure
Bourne and Korn At the shell command prompt, type export and press ENTER.
The shell displays a list of environment variables and their values.
Note: If PATROL_HOME is not set, run PATROLrc.sh.
C At the shell command prompt, type setenv and press ENTER.
The shell displays a list of environment variables and their values.
Note: If PATROL_HOME is not set, run PATROLrc.sh.
NOTE If the KM was pre-loaded, pre-load the VSM.kml again after the upgrade. If the KM was not pre-loaded, then load the VSM.kml or VSM_XEN.kml depending upon the environment you want to monitor.
Chapter 2 Installing PATROL for Virtual Servers 43

Considerations for using online help
4 Install or upgrade the KM to version 2.9.00 on the PATROL Classic console machine.
5 Start the PATROL Classic console and connect to the PATROL Agent.
Considerations for using online helpIf you plan to install the UNIX version of PATROL for Virtual Servers on a PATROL Console for UNIX, you must install the supported version of the Help browser separately if it is not already installed.
Supported browser versions
One of the following browsers is required to view PATROL Help in the PATROL Console for UNIX version 3.x:
■ UNIX: Netscape Navigator version 4.78 through 4.80
■ Red Hat Linux®: Netscape Navigator version 4.x
Installation requirement
You must install Netscape Navigator on the computer where the PATROL console resides. You can install Netscape anywhere on your UNIX computer as long as the binary is in the path.
Download location
At the time of publication, you can download UNIX versions of Netscape Navigator from ftp://ftp.netscape.com/pub/communicator/.
NOTE If the KM was pre-loaded, pre-load the VSM.kml again after the upgrade. If the KM was not pre-loaded, then load the VSM.kml or VSM_XEN.kml depending upon the environment you want to monitor.
NOTE
PATROL Help does not support later versions of Netscape Navigator.
44 BMC PATROL for Virtual Servers Getting Started Guide

Additional considerations for using online help for UNIX
Additional considerations for using online help for UNIX
When you select Help from the PATROL Console for UNIX, it may take a few seconds for the Help browser to launch. Two windows will be displayed. First, the Netscape Navigator window is displayed as an icon, and then a browser window that contains the Help is displayed.
In addition, you must be aware of the following restrictions:
■ Netscape Navigator displays warning messages when it is invoked multiple times within the same user account because of its file-locking mechanism. It will, however, continue functioning.
■ By default, when Netscape Navigator starts, it uses a private color map. As a result, you might experience color flashing on your workstation. If so, you can set the value of PATROL_BROWSER so that the colormap option is not specified. However, some subsequent color requests might fail and the online Help will be improperly displayed.
■ The Exceed for Windows NT X Window Server product by Hummingbird Communication Ltd. may not always display the Help files properly.
Consult your Netscape Navigator documentation for specific platform requirements and restrictions.
Required environment variables settings for the browser
The LANG, PATH, and PATROL_BROWSER environment variables must be set for the Help browser to run properly. The following sections describe these variables.
LANG variable
The UNIX LANG environment variable must be set to C so that Netscape Navigator will work properly. Otherwise, you might experience product failures.
Type of shell Export command for LANG variable
Bourne LANG=Cexport LANG
Korn export LANG=C
C setenv LANG=C
Chapter 2 Installing PATROL for Virtual Servers 45
Additional considerations for using online help for UNIX
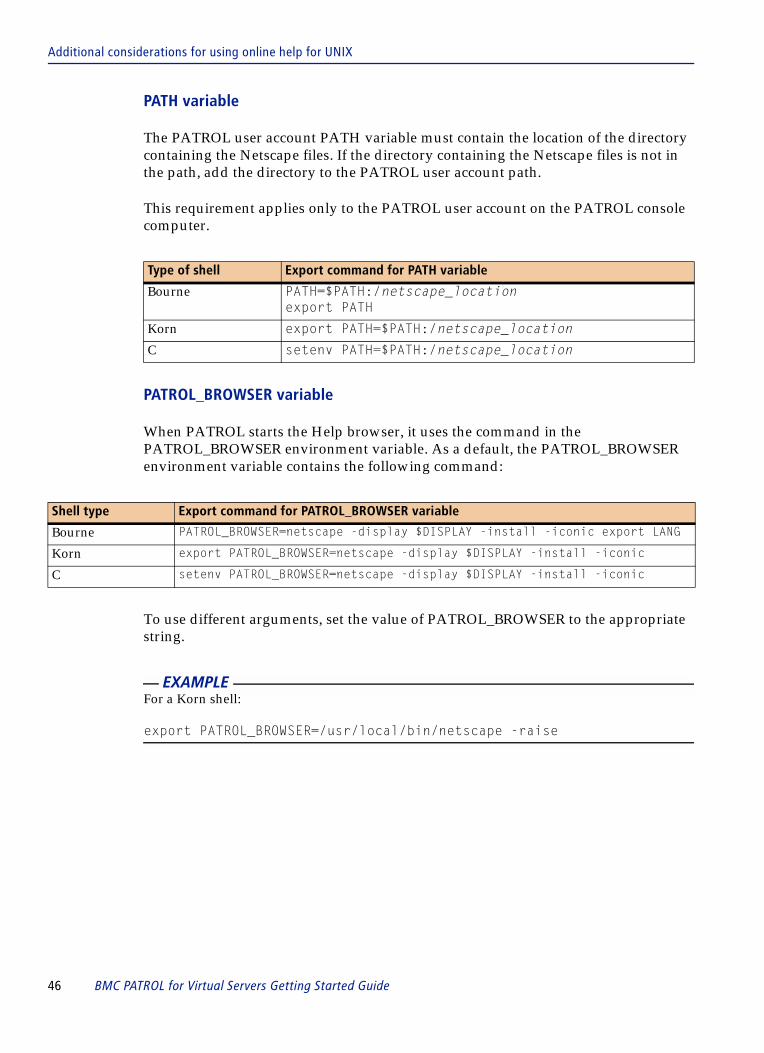
PATH variable
The PATROL user account PATH variable must contain the location of the directory containing the Netscape files. If the directory containing the Netscape files is not in the path, add the directory to the PATROL user account path.
This requirement applies only to the PATROL user account on the PATROL console computer.
PATROL_BROWSER variable
When PATROL starts the Help browser, it uses the command in the PATROL_BROWSER environment variable. As a default, the PATROL_BROWSER environment variable contains the following command:
To use different arguments, set the value of PATROL_BROWSER to the appropriate string.
Type of shell Export command for PATH variable
Bourne PATH=$PATH:/netscape_location export PATH
Korn export PATH=$PATH:/netscape_location
C setenv PATH=$PATH:/netscape_location
Shell type Export command for PATROL_BROWSER variable
Bourne PATROL_BROWSER=netscape -display $DISPLAY -install -iconic export LANG
Korn export PATROL_BROWSER=netscape -display $DISPLAY -install -iconic
C setenv PATROL_BROWSER=netscape -display $DISPLAY -install -iconic
EXAMPLE For a Korn shell:
export PATROL_BROWSER=/usr/local/bin/netscape -raise
46 BMC PATROL for Virtual Servers Getting Started Guide
Uninstalling PATROL for Virtual Servers
Uninstalling PATROL for Virtual ServersTo uninstall PATROL for Virtual Servers, you must use the same version of the installation utility that you used to install the product. Run the installation utility in uninstall mode to uninstall PATROL for Virtual Servers from your system.
Determining the version of the installation utility
To determine the version of the installation utility
1 At a command prompt, navigate to the following directory:
BMC_ROOT\Uninstall
2 Enter the following command and press ENTER.
uninstall.exe -v
Uninstalling PATROL for Virtual Servers on Windows
The following section provides procedures that describe how to uninstall PATROL for Virtual Servers and all related log files from Windows.
Before you begin
If you want to retain log and configuration files, record the installation directory where the products that you want to remove reside.
WARNING If you use a different version of the installation program to uninstall, you might remove files needed to perform uninstallation of other BMC Software products.
Chapter 2 Installing PATROL for Virtual Servers 47

Uninstalling PATROL for Virtual Servers on UNIX
To uninstall individual products
1 From the Uninstall directory in your BMC Software product installation directory, double-click uninstall.exe to launch the installation utility in uninstall mode.
2 On the Welcome page, click Next.
3 Select the installation directory from which you want to remove a product, and click Next.
4 Select the product or products that you want to uninstall, and click Next.
5 Review your selections, and click Uninstall.
After the uninstallation is complete, a window is displayed that tells you whether the uninstallation was successful.
Uninstalling PATROL for Virtual Servers on UNIX
The following procedures describe how to uninstall PATROL for Virtual Servers from a UNIX environment with or without a browser installed.
To uninstall individual products by using the installation utility
1 Change to the Uninstall directory in your BMC Software product installation directory and enter the following command to launch the installation utility in uninstall mode:
./uninstall.sh
2 The Welcome window is displayed, and click Next.
3 Select the installation directory from which you want to remove a product, and click Next.
4 Select the product or products that you want to uninstall, and click Next.
5 Review your selections and click Uninstall.
NOTE As an option, you can launch the installation utility in uninstall mode by choosing Start => Settings => Control Panel => Add/Remove Programs and double-clicking BMC Software Tools in the Add/Remove Programs Properties dialog box.
48 BMC PATROL for Virtual Servers Getting Started Guide

Uninstalling all products while retaining log files
After the uninstallation is complete, a window is displayed that tells you whether the uninstallation was successful.
To uninstall individual products in a UNIX environment without a browser
1 If you are uninstalling from a UNIX environment without a browser, perform the following steps to launch the installation utility:
A From a command line, change to the Uninstall directory and enter the following command to start the installation Web server:
./uninstall.sh -serveronly
B A message box is displayed that shows the URL to use to connect to the installation Web server.
C On another machine with a browser, start the browser.
D Connect to the installation Web server from the browser to start the installation utility by using the URL that is displayed in the message box.
2 The Welcome window is displayed, and click Next.
3 Select the installation directory from which you want to remove a product, and click Next.
4 Select the product or products that you want to uninstall, and click Next.
5 Review your selections and click Uninstall.
After the uninstallation is complete, a window is displayed that tells you whether the uninstallation was successful.
Uninstalling all products while retaining log files
This task describes how to uninstall the PATROL product but retain log files, which contain history for future analysis, and configuration files for redeployment for Windows and UNIX.
To uninstall all products on Windows
1 Uninstall all products as described in “Uninstalling PATROL for Virtual Servers on Windows” on page 47.
2 Locate the uninstall.ctl file in the following directory:
Chapter 2 Installing PATROL for Virtual Servers 49
Uninstalling all products while retaining log files
BMCProductsInstallationDirectory\Uninstall\Install\instdata
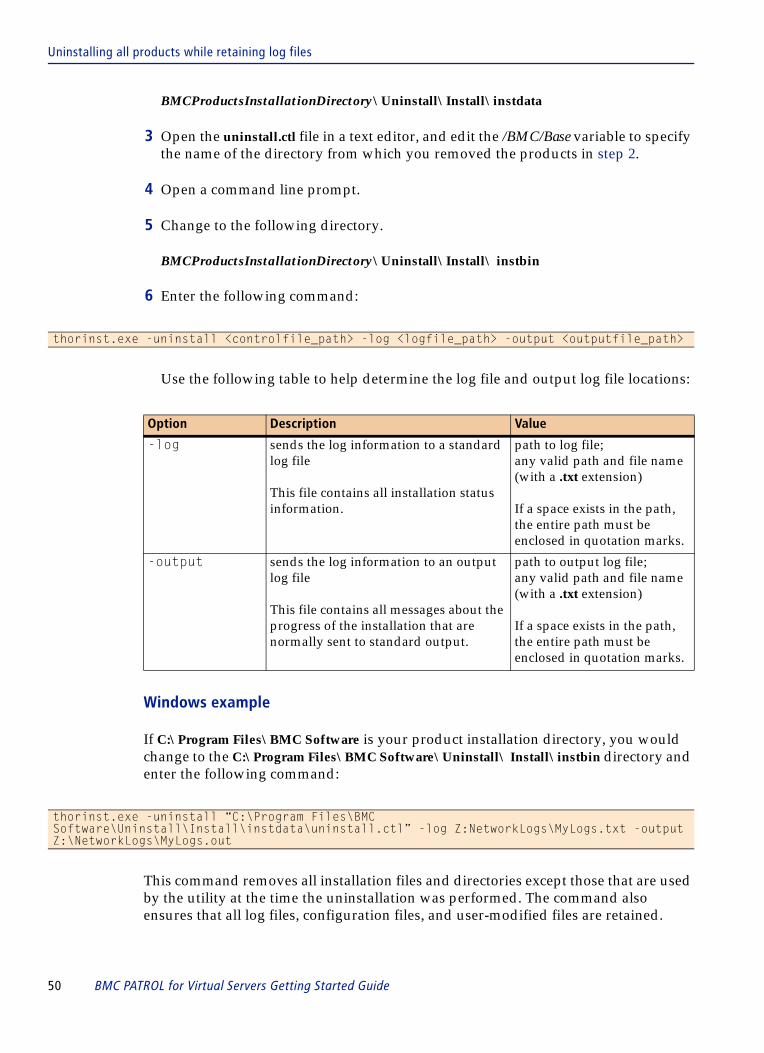
3 Open the uninstall.ctl file in a text editor, and edit the /BMC/Base variable to specify the name of the directory from which you removed the products in step 2.
4 Open a command line prompt.
5 Change to the following directory.
BMCProductsInstallationDirectory\Uninstall\Install\ instbin
6 Enter the following command:
Use the following table to help determine the log file and output log file locations:
Windows example
If C:\Program Files\BMC Software is your product installation directory, you would change to the C:\Program Files\BMC Software\Uninstall\ Install\instbin directory and enter the following command:
This command removes all installation files and directories except those that are used by the utility at the time the uninstallation was performed. The command also ensures that all log files, configuration files, and user-modified files are retained.
thorinst.exe -uninstall <controlfile_path> -log <logfile_path> -output <outputfile_path>
Option Description Value
-log sends the log information to a standard log file
This file contains all installation status information.
path to log file;any valid path and file name (with a .txt extension)
If a space exists in the path, the entire path must be enclosed in quotation marks.
-output sends the log information to an output log file
This file contains all messages about the progress of the installation that are normally sent to standard output.
path to output log file;any valid path and file name (with a .txt extension)
If a space exists in the path, the entire path must be enclosed in quotation marks.
thorinst.exe -uninstall “C:\Program Files\BMC Software\Uninstall\Install\instdata\uninstall.ctl” -log Z:NetworkLogs\MyLogs.txt -output Z:\NetworkLogs\MyLogs.out
50 BMC PATROL for Virtual Servers Getting Started Guide

Uninstalling all products while retaining log files
To uninstall all products on UNIX
1 Uninstall all products as described in “To uninstall individual products by using the installation utility” on page 48.
2 Locate the uninstall.ctl file in the following directory.
BMCProductsInstallationDirectory/Uninstall/Install/instdata
3 Open the uninstall.ctl file in a text editor, and edit the /BMC/Base variable to specify the name of the directory from which you removed the products in step 1.
4 Open a command line prompt.
5 Change to the following directory.
BMCProductsInstallationDirectory/Uninstall/Install/ instbin
6 Enter the following commands:
thorinst.sh -uninstall path_to_control_file -log path_to_log_file -output path_to_output_log_file
Use the following table to help determine the log file and output log file locations:
UNIX example
If /opt/bmc is your product installation directory, you would change to /opt/bmc/Uninstall/Install/instbin directory and enter the following command:
Option Description Value
-log sends the log information to a standard log file
This file contains all installation status information.
path to log file;any valid path and file name (with a .txt extension)
If a space exists in the path, the entire path must be enclosed in quotation marks.
-output sends the log information to an output log file
This file contains all messages about the progress of the installation that are normally sent to standard output.
path to output log file;any valid path and file name (with a .txt extension)
If a space exists in the path, the entire path must be enclosed in quotation marks.
thorinst.sh -uninstall “/opt/bmc/Uninstall/Install/instdata/uninstall.ctl” -log /var/logs/NetworkLogs/MyLogs.txt -output /var/adm/NetworkLogs/MyLogs.out
Chapter 2 Installing PATROL for Virtual Servers 51
Uninstalling all products and log files
This command removes all installation files and directories except those that are used by the utility at the time the uinstallation is performed. Log files, configuration files, and user-modified files, are also retained.
Uninstalling all products and log files
This task describes how to remove all PATROL products and related log files and configuration files from your computer on Windows and UNIX. Once these files have been removed, you cannot recover them unless you have made a backup copy of the installation.
To uninstall all product and log files on Windows
1 Uninstall all products as described in “Uninstalling PATROL for Virtual Servers on Windows” on page 47.
2 Locate the uninstall-all.ctl file in the following directory:
BMCProductsInstallationDirectory\Uninstall\Install\instdata
3 Open the uninstall-all.ctl file in a text editor, and edit the /BMC/Base variable to specify the name of the directory from which you removed the products in step 2.
4 Open a command line prompt.
5 Change to the following directory:
BMCProductsInstallationDirectory\Uninstall\Install\instbin
6 Enter the following command.
thorinst.exe -uninstall path_to_control_file -log path_to_log_file -output path_to_output_log_file
Use the following table to help determine the log file and output log file locations:
52 BMC PATROL for Virtual Servers Getting Started Guide

Uninstalling all products and log files
Windows example
If C:\Program Files\BMC Software is your product installation directory, you would change to the C:\Program Files\BMC Software\Uninstall\ Install\instbin directory and enter the following command:
This command removes all installation files and directories. The files used to perform the installation are marked for deletion and are removed when the computer on which the products were uninstalled is rebooted.
To uninstall all product and log files on UNIX
1 Uninstall all products as described in “To uninstall individual products by using the installation utility” on page 48.
2 Locate the uninstall-all.ctl file in the following directory:
BMCProductsInstallationDirectory/Uninstall/Install/instdata
3 Open the uninstall-all.ctl file in a text editor, and edit the /BMC/Base variable to specify the name of the directory from which you removed the products in step 1.
4 Open a command line prompt.
5 Change to the following directory:
BMCProductsInstallationDirectory/Uninstall/Install/instbin
Option Description Value
-log sends the log information to a standard log file
This file contains all installation status information.
path to log file;any valid path and file name (with a .txt extension)
If a space exists in the path, the entire path must be enclosed in quotation marks.
-output sends the log information to an output log file
This file contains all messages about the progress of the installation that are normally sent to standard output.
path to log file;any valid path and file name (with a .txt extension)
If a space exists in the path, the entire path must be enclosed in quotation marks.
thorinst.exe -uninstall “C:\Program Files\BMC Software\Uninstall\Install\instdata\uninstall-all.ctl” -log Z:\NetworkedLogs\MyLogs.txt -output Z:\NetworkLogs\MyLogs.out
Chapter 2 Installing PATROL for Virtual Servers 53

Uninstalling all products and log files
6 Enter the following command:
(UNIX only) thorinst.sh -uninstall path_to_control_file -log path_to_log_file -output path_to_output_log_file
Use the following table to help determine the log file and output log file locations:
UNIX example
If /opt/bmc is your product installation directory, you would change to /opt/bmc/Uninstall/Install/instbin directory and enter the following command:
This command removes all installation files and directories. The files used to perform the installation are marked for deletion and are removed when the computer on which the products were uninstalled is rebooted.
Option Description Value
-log sends the log information to a standard log file
This file contains all installation status information.
path to log file;any valid path and file name (with a .txt extension)
If a space exists in the path, the entire path must be enclosed in quotation marks.
-output sends the log information to an output log file
This file contains all messages about the progress of the installation that are normally sent to standard output.
path to log file;any valid path and file name (with a .txt extension)
If a space exists in the path, the entire path must be enclosed in quotation marks.
thorinst.sh -uninstall “/opt/bmc/Uninstall/Install/instdata/uninstall-all.ctl” -log /var/logs/NetworkLogs/MyLogs.txt -output /var/adm/NetworkLogs/MyLogs.out
54 BMC PATROL for Virtual Servers Getting Started Guide

C h a p t e r 3
3 Loading and configuring PATROL for Virtual ServersThis chapter provides information about how to configure and use PATROL for Virtual Servers. In this chapter, the term Knowledge Module (KM) is usually equivalent to a .kml file. A .km file is equivalent to an application class, which is a subset of a KM or .kml file.
The following topics are discussed in this chapter:
Preparing to use PATROL for Virtual Servers. . . . . . . . . . . . . . . . . . . . . . . . . . . . . . . . . 56PATROL for Virtual Servers KM files. . . . . . . . . . . . . . . . . . . . . . . . . . . . . . . . . . . . . . . . 56
KM files for the VMware environment . . . . . . . . . . . . . . . . . . . . . . . . . . . . . . . . . . . 57KM files for the Citrix XenServer environment . . . . . . . . . . . . . . . . . . . . . . . . . . . . 58
Loading KMs from PATROL consoles . . . . . . . . . . . . . . . . . . . . . . . . . . . . . . . . . . . . . . . 59Verifying what you have loaded. . . . . . . . . . . . . . . . . . . . . . . . . . . . . . . . . . . . . . . . . 61
Preloading KMs on the PATROL Agent. . . . . . . . . . . . . . . . . . . . . . . . . . . . . . . . . . . . . . 62Removing KMs from your console and agent . . . . . . . . . . . . . . . . . . . . . . . . . . . . . . . . . 64
Unloading KMs from a PATROL Console. . . . . . . . . . . . . . . . . . . . . . . . . . . . . . . . . 65Removing KMs from the agent preload list . . . . . . . . . . . . . . . . . . . . . . . . . . . . . . . 67
Configuring VMware vCenter . . . . . . . . . . . . . . . . . . . . . . . . . . . . . . . . . . . . . . . . . . . . . . 69vCenter Web Service installation and settings . . . . . . . . . . . . . . . . . . . . . . . . . . . . . 69vCenter settings . . . . . . . . . . . . . . . . . . . . . . . . . . . . . . . . . . . . . . . . . . . . . . . . . . . . . . . 70
Configuring PATROL for Virtual Servers in VMware environment . . . . . . . . . . . . . . 71Creating a vCenter connection . . . . . . . . . . . . . . . . . . . . . . . . . . . . . . . . . . . . . . . . . . 72Removing a vCenter connection . . . . . . . . . . . . . . . . . . . . . . . . . . . . . . . . . . . . . . . . . 74
Creating host and virtual machine reports in VMware environment . . . . . . . . . . . . . 74Creating the List all Virtual Machines report . . . . . . . . . . . . . . . . . . . . . . . . . . . . . . 75Creating the Top 10 ESX Hosts report . . . . . . . . . . . . . . . . . . . . . . . . . . . . . . . . . . . . 75Creating the Enterprise Inventory report . . . . . . . . . . . . . . . . . . . . . . . . . . . . . . . . . 75
Managing ESX servers for distributed or failover data collection in VMware environment . . . . . . . . . . . . . . . . . . . . . . . . . . . . . . . . . . . . . . . . . . . . . . . . . . . . . . . . . . . 75Configuring the ESX servers for failover or distributed data collection . . . . . . . . 76Removing ESX servers for failover or distributed data collection . . . . . . . . . . . . . 76Removing ESX servers for failover or distributed data collection . . . . . . . . . . . . . 76Modifying regular expressions of ESX servers . . . . . . . . . . . . . . . . . . . . . . . . . . . . . 76
Chapter 3 Loading and configuring PATROL for Virtual Servers 55
Preparing to use PATROL for Virtual Servers
Creating ESX servers configuration report . . . . . . . . . . . . . . . . . . . . . . . . . . . . . . . . 77Filtering clusters, hosts, and virtual machines in VMware environment . . . . . . . . . . 77
Creating filters for clusters, hosts, and virtual machines. . . . . . . . . . . . . . . . . . . . . 77Modifying filters for clusters, hosts, and virtual machines . . . . . . . . . . . . . . . . . . . 78
Configuring event monitoring in VMware environment. . . . . . . . . . . . . . . . . . . . . . . . 78Creating event filters . . . . . . . . . . . . . . . . . . . . . . . . . . . . . . . . . . . . . . . . . . . . . . . . . . . 78Modifying event filters . . . . . . . . . . . . . . . . . . . . . . . . . . . . . . . . . . . . . . . . . . . . . . . . . 79Deleting event filters . . . . . . . . . . . . . . . . . . . . . . . . . . . . . . . . . . . . . . . . . . . . . . . . . . . 79Acknowledging events . . . . . . . . . . . . . . . . . . . . . . . . . . . . . . . . . . . . . . . . . . . . . . . . . 80Turning annotations on or off for event filtering parameters . . . . . . . . . . . . . . . . . 80
Configuring PATROL for Virtual Servers in Citrix XenServer environment . . . . . . . 80Configuring a XenServer . . . . . . . . . . . . . . . . . . . . . . . . . . . . . . . . . . . . . . . . . . . . . . . . . . . 81
Adding a XenServer. . . . . . . . . . . . . . . . . . . . . . . . . . . . . . . . . . . . . . . . . . . . . . . . . . . . 81Removing a XenServer . . . . . . . . . . . . . . . . . . . . . . . . . . . . . . . . . . . . . . . . . . . . . . . . . 82
Managing performance data collection accounts . . . . . . . . . . . . . . . . . . . . . . . . . . . . . . 82Configuring performance data collection accounts . . . . . . . . . . . . . . . . . . . . . . . . . 82Modifying performance data collection account details . . . . . . . . . . . . . . . . . . . . . 83Modifying XenServer regular expressions . . . . . . . . . . . . . . . . . . . . . . . . . . . . . . . . . 83Creating XenServer Configuration report . . . . . . . . . . . . . . . . . . . . . . . . . . . . . . . . . 83
Handling pool master failover . . . . . . . . . . . . . . . . . . . . . . . . . . . . . . . . . . . . . . . . . . . . . . 83
Preparing to use PATROL for Virtual ServersBefore configuring BMC PATROL for Virtual Servers, verify that the following software requirements are met:
■ The PATROL console version 3.5.2x or later and PATROL for Virtual Servers are installed on the computer that you want to use for the PATROL console.
■ The PATROL Agent version 3.6.x or later and PATROL for Virtual Servers are installed on the computer that you want to monitor and manage.
■ If you are using PATROL Central Operator – Microsoft Windows Edition, PATROL for Virtual Servers is installed on the PATROL Console Server.
■ If you are using PATROL Central Operator – Web Edition, PATROL for Virtual Servers is installed on the PATROL Console Server and PATROL Web Server.
PATROL for Virtual Servers KM filesThe following section lists the KM files for the VMware and XenServer environments.
56 BMC PATROL for Virtual Servers Getting Started Guide

KM files for the VMware environment
KM files for the VMware environment
Table 4 lists and describes the .km and .kml files used in the VMware environment:
Table 4 PATROL for Virtual Servers KM files for the VMware environment (part 1 of 2)
File Description
VSM.kml loads all the application classes required to monitor the VMware vCenter environment
VSM.km monitors hosts (ESX servers)
VSM_CLUSTER.km monitors the clusters used in vCenterVSM_CNTR.km serves as a container for other application classes
VSM_CPU.km monitors CPU performance and utilization for hosts
VSM_CPU_CNTR.km serves as a container for application classes that monitor CPU use and utilization for hosts and virtual machines
VSM_CPU_VM.km monitors CPU performance and utilization for virtual machines
VSM_DATACENTER.km serves as a container for application classes that monitor hosts and virtual machines
VSM_DATASTORE.km represents a datastore that is a storage location for all files constituting a virtual machine configuration and disks
VSM_DISK.km serves as a container for application classes that monitor the disks used by virtual machines
VSM_DISK_CNTR.km serves as a container class for all the disk instances of a virtual machine
VSM_DISK_PERF.km contains the parameters used to indicate the disk performance of a physical host (ESX server) and virtual machine
VSM_EVENTS.km contains the parameters that describe the status of an event filter and the type and number of events monitored by the event filter
VSM_EVENTS_CNTR.km serves as a container for all the event filters that are configured for vCenter
VSM_FOLDER.km serves as a container for storing inventory objects
VSM_GUEST_DISKS.km discovers the virtual disks configured for the guest operating system
VSM_HBA.km discovers storage adapters of an ESX server
VSM_HOST.km monitors ESX servers
VSM_MEMORY_V2.km monitors memory utilization by hosts and virtual machines
VSM_RESOURCE_POOL.km represents a pool of physical resources indicating the amount of computing power available to a host or cluster of hosts
Chapter 3 Loading and configuring PATROL for Virtual Servers 57

KM files for the Citrix XenServer environment
KM files for the Citrix XenServer environment
Table 5 lists and describes the .km and .kml files used in the Citrix XenServer environment:
VSM_SCSI_LUN.km discovers disk SCSI LUNs of an ESX server
VSM_VC.km monitors a vCenter
VSM_VM.km monitors a virtual machine
VSM_VMOTION_CLUSTER.km monitors automatic migrations for a cluster
VSM_VMOTION_HOST.km monitors automatic migrations for a host
VSM_VMOTION_VM.km monitors automatic migrations for a virtual machine
VSM_VNET_PERF.km contains the parameters used to indicate the network performance of a physical host (ESX server) and virtual machine
Table 5 PATROL for Virtual Servers KM files for the XenServer environment (part 1 of 2)
File Description
VSM_XEN.kml loads all the application classes required to monitor the Citrix XenServer environment
VSM_XEN.km serves as a container for all XenServer monitoring application classes
VSM_XEN_HOST.km represents the instances of individual hosts (XenServers)
VSM_XEN_HOST_CNTR.km serves as a container for all host instances
VSM_XEN_HOST_MEMORY.km contains parameters that indicate how memory is being used by a host (XenServer)
VSM_XEN_PCPU.km represents the CPU instances of the host and contains parameters used to indicate the CPU details and CPU utilization by a host
VSM_XEN_PCPU_CNTR.km serves as a container for the CPU instances of a host
VSM_XEN_PNET.km represents the physical network instances of a host and contains parameters that indicate the network performance
VSM_XEN_PNET_CNTR.km serves as a container for the physical network instances
Table 4 PATROL for Virtual Servers KM files for the VMware environment (part 2 of 2)
File Description
58 BMC PATROL for Virtual Servers Getting Started Guide

Loading KMs from PATROL consoles
Loading KMs from PATROL consolesBefore you can configure and use PATROL for Virtual Servers, you must load its KM files into a PATROL console so that the product’s applications, commands, and parameters appear in the PATROL console. Table 4 on page 57 and Table 5 on page 58 list the KM files in this product that you can load.
VSM_XEN_RESOURCEPOOL.km represents a XenServer resource pool
This class serves as a container for all the instances in the resource pool.
VSM_XEN_STORAGE.km represents the storage repository instances. The storage can be a local storage or shared storage
VSM_XEN_STORAGE_CNTR.km serves as a container for all storage repository instances
VSM_XEN_VCPU.km represents the CPU instances of a virtual machine and contains a parameter used to indicate the CPU utilization for the virtual machine
VSM_XEN_VCPU_CNTR.km serves as a container for all CPU instances of a virtual machine
VSM_XEN_VDISK.km represents the disk instances of a virtual machine and contains a parameter used to indicate the disk I/O read and write rate.
VSM_XEN_VDISK_CNTR.km serves as a container for the disk instances of a virtual machine
VSM_XEN_VM.km represents the virtual machines instances
VSM_XEN_VM_CNTR.km serves as a container for all virtual machine instances
VSM_XEN_VM_MEMORY.km contains parameters that indicate the memory utilization for a virtual machine
VSM_XEN_VNET.km represents the virtual network instances and contains parameters that indicate network performance
VSM_XEN_VNET_CNTR.km serves as a container for the virtual network instances of virtual machines
VSM_XENMOTION_HOST.km servers as a container for parameters that display the cumulative number of virtual machine migrations. This class is instantiated once per host.
VSM_XENMOTION_VM.km servers as a container for parameters that display the cumulative number of virtual machine migrations. This class is instantiated once per virtual machine.
Table 5 PATROL for Virtual Servers KM files for the XenServer environment (part 2 of 2)
File Description
Chapter 3 Loading and configuring PATROL for Virtual Servers 59

Loading KMs from PATROL consoles
To load KMs from PATROL Central Operator – Microsoft Windows Edition
1 In the Common Tasks tab of PATROL Central Operator Taskpad, click the Load Knowledge Modules icon.
The Load Knowledge Modules Wizard is displayed.
2 Click Next to start the wizard.
The wizard lists each computer on which a PATROL Agent has been installed.
3 Select the check boxes for the managed systems on which you want to load KMs, and then click Next.
The wizard displays a list of available .kml files for each selected computer. Each .kml file is listed once for each computer. You can display .km files instead (equivalent to application classes) by changing the filter. The KMs available in this product are listed in Table 4 on page 57 and Table 5 on page 58.
4 Click the Knowledge Module Lists tab, select the check box for the VSM.kml and VSM_XEN.kml files to load PATROL for Virtual Servers, and then click Next.
You can load a .kml file on only a specific managed system by expanding the tree for that KML and selecting the check box for just that managed system. You can also load individual Knowledge Modules (.km files) on the Individual Knowledge Modules tab.
5 Click Finish.
PATROL loads the selected KMs on the selected computers.
To load KMs from PATROL Central Operator – Web Edition
1 On the Monitored Systems page, click Load/Unload KMs.
The Load KMs page appears, listing each computer on which a PATROL Agent has been installed.
2 Select each computer on which you want to load the same KMs, and click Next.
The Load KMs page displays a list of available .km and .kml files.
NOTE If you selected more than one computer, the Load KMs page displays only the .km and .kml files that have been installed on all of the selected computers. If you want to load a particular .km or .kml file on a particular computer, select that computer by itself to load the file.
60 BMC PATROL for Virtual Servers Getting Started Guide

Verifying what you have loaded
3 Select the VSM.kml and VSM_XEN.kml files to load PATROL for Virtual Servers.
4 Click Finish.
PATROL loads the selected KMs on the selected computers.
To load KMs from the PATROL Console for Microsoft Windows
1 From the PATROL Console for Microsoft Windows menu bar, choose File => Load KM.
The Load KMs dialog box displays a list of available .kml files. You can display .km files instead (equivalent to application classes) by selecting KM Files (*.km) from the list.
2 Select the VSM.kml and VSM_XEN.kml files to load PATROL for Virtual Servers, and click Open.
PATROL loads the selected KMs on all of the computers listed under PATROLMainMap in the tree view.
To load KMs from the PATROL Console for UNIX
1 From the PATROL Console for UNIX menu bar, choose File => Load KM.
The Load KMs dialog box displays a list of available .kml files. You can display .km files instead (equivalent to application classes) by changing the filter.
2 Select the VSM.kml and VSM_XEN.kml files to load PATROL for Virtual Servers, and click Open.
PATROL loads the selected KMs on all of the computers to which your console is connected.
Verifying what you have loaded
After you load a KM file, the application classes for PATROL for Virtual Servers will appear in your console after application discovery is completed. However, some application classes appear only after you configure the KM.
Chapter 3 Loading and configuring PATROL for Virtual Servers 61

Preloading KMs on the PATROL Agent
Preloading KMs on the PATROL AgentIf you want your KMs to be loaded at startup and continue collecting data even when there is no console running, preload the .km files or .kml file on the appropriate PATROL Agents as described in “Loading KMs from PATROL consoles” on page 59. A preloaded KM is a KM that is loaded by the PATROL Agent at startup and runs as long as the PATROL Agent runs.
To preload a KM, add it to the agent preload list by using the wpconfig or xpconfig utility, as described in this section. For information about the wpconfig or xpconfig utility, see the PATROL Agent Reference Manual.
Before you begin
■ The PATROL Agent must be running.
■ You must be running a PATROL developer console (PATROL Console for Windows or UNIX).
■ You must have permission to modify the configuration change file (.cfg).
To preload a KM from the PATROL Console for Microsoft Windows
1 Access the pop-up menu for a PATROL Agent and choose Development => Agent Configuration.
The console starts the wpconfig utility and displays the wpconfig window.
2 In the left pane, click the AgentSetup folder.
The variables in the AgentSetup folder are displayed in the right pane.
3 Scroll down the variable list and double-click the preloadedKMs variable.
The Modify Variable dialog box is displayed.
4 In the Change Entries field, double-click the highlighted REPLACE line.
The Change Entry dialog box is displayed.
5 In the Type field, leave REPLACE.
6 In the Value field, use the comma-separated format without spaces to type the names of the .kml files that you want to preload (for example, VSM.kml for PATROL for Virtual Servers).
62 BMC PATROL for Virtual Servers Getting Started Guide

Preloading KMs on the PATROL Agent
See Table 4 on page 57 and Table 5 on page 58 for a list of the KMs that are available in this product.
7 Click OK.
8 In the Modify Variable dialog box, click OK to close the box.
9 Choose Tools => Apply Configuration.
The Apply Configuration dialog box is displayed, listing the PATROL Agent host name to which you are connected.
10 Click OK to apply your updated configuration to the PATROL Agent.
11 Save your changes to the configuration change file by clicking the Save button.
12 Close the wpconfig window.
13 Restart the PATROL Agent.
To preload a KM from the PATROL Console for UNIX
1 Access the pop-up menu for a PATROL Agent and choose Development => Agent Configuration.
The console starts the xpconfig utility and displays the xpconfig window.
2 From the Host column in the left pane of the xpconfig window, click a PATROL Agent computer name to highlight it.
3 Click Get Configuration.
The configuration variables for the selected computer are displayed in the Variables column in the right pane.
4 In the Filter field, type the following string:
/AgentSetup/pre*
The filter displays all the variables that begin with this character string.
5 Double-click the preloadedKMs variable.
The Edit Variable dialog box is displayed.
6 Click Change.
Chapter 3 Loading and configuring PATROL for Virtual Servers 63

Removing KMs from your console and agent
An Edit window is displayed.
7 Use the comma-separated format without spaces to type the names of the .kml files that you want to preload (for example, VSM.kml for PATROL for Virtual Servers).
See Table 4 on page 57 and Table 5 on page 58 for a list of the KMs that are available in this product.
8 Choose File => Exit to close the Edit window and save your changes.
9 In the Edit Variable dialog box, click OK to close the box.
10 Click Apply Configuration and close the xpconfig window.
The xpconfig utility sends the updated configuration to the selected PATROL Agent.
11 Restart the PATROL Agent.
Removing KMs from your console and agentIf you want to remove a KM from being displayed in your PATROL console, you can unload its corresponding application classes (.km files) as described in “Unloading KMs from a PATROL Console” on page 65.
When you unload a .km file, its corresponding application class no longer appears in your console. Unloading a .km file does not delete the file from the lib\knowledge or psl directories on the PATROL console or PATROL Agent computer. If you want to delete a KM completely from your system, you must uninstall the KM.
If a .km file was preloaded, unloading it does not stop the PATROL Agent from collecting data for that .km file. However, if the .km file was not preloaded, then unloading it does stop the file from running and collecting data on the PATROL Agent.
If you no longer want the PATROL Agent to run a KM that was preloaded, you can remove its corresponding .kml file or .km files from the PATROL Agent preload list as described in “Removing KMs from the agent preload list” on page 67.
When you remove a KM from the PATROL Agent preload list, the agent does not run the KM unless you load it with a running console. KMs that are not preloaded do not run when no console is running.
64 BMC PATROL for Virtual Servers Getting Started Guide

Unloading KMs from a PATROL Console
Unloading KMs from a PATROL Console
If you no longer want to view a KM that currently appears in your console, you can unload the corresponding application classes (.km files) that make up the KM. The following procedures provide the steps required to unload a KM onto each of the respective PATROL consoles.
To unload KMs from PATROL Central Operator – Microsoft Windows Edition
1 On the Common Tasks tab of the taskpad, click the Unload Knowledge Modules icon.
PATROL Central Operator – Microsoft Windows Edition displays the wizard.
2 Click Next to start the wizard.
The wizard lists each computer on which a PATROL Agent has been installed.
3 Select the check boxes for the computers from which you want to unload .km files, and click Next.
The wizard displays a list of application class names (that correspond to .km file names) for each computer selected. Each application class name is listed once for each computer.
4 Select the check boxes for the .km and computer pair that you want to unload, and click Next. To unload an entire KM, select all the .km files that make up the KM.
See Table 4 on page 57 and Table 5 on page 58 for a list of the .km files in each KM.
5 Click Finish.
The console removes the selected .km files from the current management profile.
To unload KMs from PATROL Central Operator – Web Edition
1 From the Managed Systems page, click the Load/Unload KMs button.
The Load KMs page opens, listing each computer on which a PATROL Agent has been installed.
2 Select the computers from which you want to unload .km files, and click Next.
NOTE Unloading a KM is also referred to as deleting a KM in the PATROL Console for Windows and the PATROL Console for UNIX. However, the files are actually unloaded from the memory of a console rather than deleted from your hard drive.
Chapter 3 Loading and configuring PATROL for Virtual Servers 65

Unloading KMs from a PATROL Console
The Load KMs page displays a list of .km files. Currently loaded .km files are highlighted (selected) in the list.
3 Cancel the selection of the .km files that you want to unload by clicking them in the list.
4 To unload an entire KM, cancel the selection of all the .km files that make up the KM.
See Table 4 on page 57 and Table 5 on page 58 for a list of the .km files in each KM.
5 Click Finish.
The console removes the .km files that you specified from the current management profile.
To unload KMs from the PATROL Console for Microsoft Windows
Unloading a KM is also referred to as deleting a KM in the PATROL Console for Microsoft Windows. However, the files are actually unloaded from the console’s memory rather than deleted from your hard drive.
1 From the KM tab of the tree view, right-click the application class name that you want to delete and choose Delete from the pop-up menu.
The console displays a dialog box that asks if you want to delete the selected application.
2 Click Yes to delete the application class.
The application class is removed from your console, and its corresponding .km file is removed from your console session file when you save your changes.
3 Repeat Step 1 and Step 2 until you have deleted all of the application classes (.km files) associated with the KM that you want to delete.
4 From the console menu bar, choose File => Save KM to save your changes.
To unload KMs from the PATROL Console for UNIX
1 From the PATROL Main window, choose Attributes => Application Classes.
The console displays the List of Application Classes window.
2 Click the name of the application class that you want to delete.
The console highlights the application class name.
66 BMC PATROL for Virtual Servers Getting Started Guide

Removing KMs from the agent preload list
3 From the List of Application Classes menu bar, choose Edit => Delete.
The application class is removed from your console, and its corresponding .km file is removed from your console session file when you save your changes.
4 Repeat Step 2 and Step 3 until you have deleted all of the application classes associated with the KM that you want to delete.
5 From the List of Application Classes menu bar, choose File => Save KM to save your changes.
Removing KMs from the agent preload list
If you want to remove a KM or application class so that it no longer runs on the PATROL Agent, remove the corresponding .kml or .km file from the agent preload list, as described in this task.
Before you begin
■ The PATROL Agent must be running.
■ You must be running a PATROL developer console (PATROL Console for Windows or UNIX).
■ You must have permission to modify the configuration change file (.cfg).
To remove a KM from the preload list in the PATROL Console for Microsoft Windows
1 Access the pop-up menu for a PATROL Agent and choose Development => Agent Configuration.
The console starts the wpconfig utility and displays the wpconfig window.
2 In the left pane, click the AgentSetup folder.
The variables in the AgentSetup folder are displayed in the right pane.
3 Scroll down the variable list and double-click the preloadedKMs variable.
The Modify Variable dialog box is displayed.
4 In the Change Entries field, double-click the highlighted REPLACE line.
The Change Entry dialog box is displayed.
Chapter 3 Loading and configuring PATROL for Virtual Servers 67

Removing KMs from the agent preload list
5 In the Type field, leave REPLACE.
6 In the Value field, delete the .kml file names that you want to remove from the preload list.
See Table 4 on page 57 and Table 5 on page 58 for a list of the KMs that are available in this product.
7 Click OK to close the Change Entry dialog box.
8 Click OK to close the Modify Variable dialog box.
9 From the Tools menu, choose Apply Configuration.
The Apply Configuration dialog box is displayed, listing the PATROL Agent host name to which you are connected.
10 Click OK to apply your updated configuration to the PATROL Agent.
11 Save your changes to the configuration change file by clicking the Save button.
12 Close the wpconfig window.
13 Restart the PATROL Agent.
To remove a KM from the Preload List in the PATROL Console for UNIX
1 Access the pop-up menu for a PATROL Agent and choose Development => Agent Configuration.
The console starts the xpconfig utility and displays the xpconfig window.
2 From the Host column in the left pane of the xpconfig window, click a PATROL Agent computer name to highlight it.
3 Click the Get Configuration button.
The configuration variables for the selected computer are displayed in the Variables column in the right pane.
4 In the Filter field, type the following string:
/AgentSetup/pre*
The filter displays all the variables that begin with that character string.
5 Double-click the preloadedKMs variable.
68 BMC PATROL for Virtual Servers Getting Started Guide
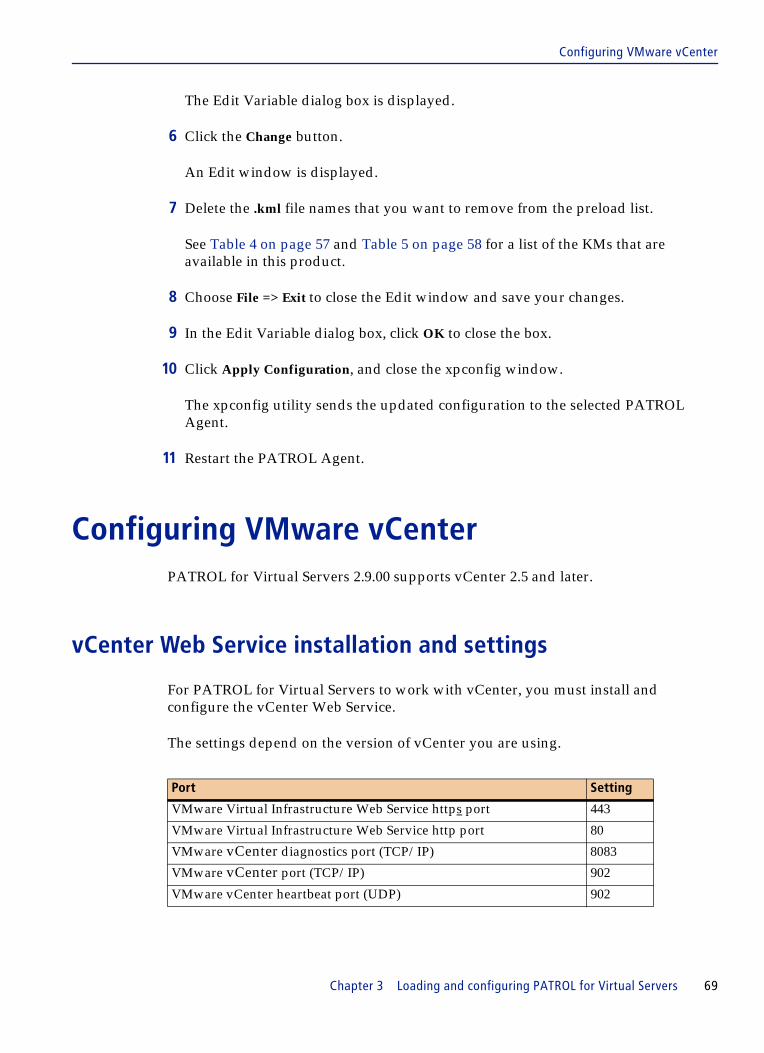
Configuring VMware vCenter
The Edit Variable dialog box is displayed.
6 Click the Change button.
An Edit window is displayed.
7 Delete the .kml file names that you want to remove from the preload list.
See Table 4 on page 57 and Table 5 on page 58 for a list of the KMs that are available in this product.
8 Choose File => Exit to close the Edit window and save your changes.
9 In the Edit Variable dialog box, click OK to close the box.
10 Click Apply Configuration, and close the xpconfig window.
The xpconfig utility sends the updated configuration to the selected PATROL Agent.
11 Restart the PATROL Agent.
Configuring VMware vCenterPATROL for Virtual Servers 2.9.00 supports vCenter 2.5 and later.
vCenter Web Service installation and settings
For PATROL for Virtual Servers to work with vCenter, you must install and configure the vCenter Web Service.
The settings depend on the version of vCenter you are using.
Port Setting
VMware Virtual Infrastructure Web Service https port 443
VMware Virtual Infrastructure Web Service http port 80
VMware vCenter diagnostics port (TCP/IP) 8083
VMware vCenter port (TCP/IP) 902
VMware vCenter heartbeat port (UDP) 902
Chapter 3 Loading and configuring PATROL for Virtual Servers 69

vCenter settings
After you have installed the vCenter Web Service, confirm that the account given to the KM can access the interface.
To confirm the web server account
1 Open a browser and enter the name of the ESX server in the address line.
2 Click Browse objects managed by this host, located on the bottom right of the page.
3 Enter your user name and password.
4 Click OK.
The vCenter Web Service opens. If it does not, check with the vCenter administrator to verify account settings.
Troubleshooting port number issues
By default, the vCenter port number should appear in the Port text box. Do not modify the default port number displayed unless the port number that you are using for vCenter is different from the default. For vCenter version 2.5 and later, the default port number is 443. However, if the port number for the vCenter Web Service is not the same in vCenter and PATROL for Virtual Servers, you cannot connect to the web service. If you are having trouble connecting to the web service, check the port number settings. If necessary, change the port settings on the KM.
To check the port number in vCenter version 2.5
1 Click Administration => Virtual Center Management Server Configuration.
2 On the left side of the dialog box, select Web Service.
The HTTPS port number displays on the right.
vCenter settings
The user must have at least read permission to highest level of the vCenter tree.
NOTE Changes to port settings require a manual restart of vCenter.
70 BMC PATROL for Virtual Servers Getting Started Guide

Configuring PATROL for Virtual Servers in VMware environment
To set user account settings in vCenter Web Service
1 Select the highest object in the left hand treeview of vCenter so, as the account is added, you will have access to all the objects below.
2 On the Permissions tab, right-click the user name and select Properties.
3 Select Read Only.
4 Click OK.
To set user account settings in Virtual Infrastructure Client
1 Select the highest object in the left hand treeview of vCenter so, as the account is added, you will have access to all the objects below.
2 On the Permissions tab, right-click the user name and select Properties.
3 Select Read Only from the drop-down list.
4 Click OK.
Configuring PATROL for Virtual Servers in VMware environment
After you install PATROL for Virtual Servers, you must create a connection between it and VMware vCenter. Using the PATROL for Virtual Servers on host hostName dialog box, you can create or remove vCenter connections. In addition to the existing option of using vCenter to monitor ESX hosts, ESX 3.5 and later is supported. This feature is useful if you do not have vCenter installed; you can still collect ESX 3.5 and later host data through the KM.
NOTE After you make changes to account settings in vCenter, you must restart the application.
NOTE If you connect to the same ESX 3.5 and later host through vCenter and directly through the host, you will collect redundant data. Be sure to choose one option or the other when collecting data from ESX 3.5 and later hosts.
Chapter 3 Loading and configuring PATROL for Virtual Servers 71

Creating a vCenter connection
Creating a vCenter connection
While creating a vCenter connection, you can configure ESX servers in the vCenter for distributed or failover data collection.
You can configure ESX servers for distributed or failover data collection at a later stage also. For more information about distributed and failover data collection, see “Managing ESX servers for distributed or failover data collection in VMware environment” on page 75.
To create a vCenter connection
1 In the PATROLMainMap tree, right-click the VMware vSphere node and choose KM Commands = > Configure Service URL.
2 In the PATROL for Virtual Servers on host hostName dialog box, in the Host text box, enter the host name or IP address of the vCenter to which you want to connect.
3 In the Port text box, enter the port number for the vCenter.
See “Troubleshooting port number issues” on page 70 for more information about port settings in vCenter.
4 In the Username and Password text boxes, enter the user name and password required to connect to the vCenter.
5 (Optional) In the Filter Clusters text box, specify one of the following and select Include or Exclude to include or exclude the clusters from the inventory:
■ a pipe-separated (|-separated) list of clusters that you want to include or exclude from inventory
■ a regular expression to filter clusters that you want to include or exclude from inventory
NOTE By default, the vCenter port number should appear in the Port text box. Do not modify the default port number, unless the port number that you are using for vCenter is different from the default. For vCenter version 2.5, the default port number is 443.
NOTE If you enter a regular expression to include or exclude a cluster, all the hosts and virtual machines under that cluster are included or excluded from the inventory.
72 BMC PATROL for Virtual Servers Getting Started Guide

Creating a vCenter connection
6 (Optional) In the Filter Hosts text box, specify one of the following and select Include or Exclude to include or exclude the hosts from the inventory:
■ a pipe-separated (|-separated) list of hosts that you want to include or exclude from inventory
■ a regular expression to filter hosts that you want to include or exclude from inventory
7 (Optional) In the Filter VMs text box, specify one of the following and select Include or Exclude to include or exclude the virtual machines from the inventory:
■ a pipe-separated (|-separated) list of virtual machines that you want to include or exclude from inventory
■ a regular expression to filter virtual machines that you want to include or exclude from inventory
8 Select the Add option.
9 Click Apply to save the vCenter connection settings.
The vCenter connection appears in the Select vCenter/ESX Server to remove list.
10 In the Configure Data Collection message box, click Yes to confirm that you want to configure ESX servers, or click No to configure the ESX servers later.
11 In the Configure Data Collection dialog box, select Distributed or Failover to configure the ESX servers for distributed or failover data collection.
12 To configure one ESX server, enter the name of ESX server in the ESX severs (s) text box.
13 To configure multiple ESX servers, do one of the following:
■ Enter a comma-separated list of ESX servers you want to configure.
■ Select the Use regular expression check box, and enter a regular expression. All the ESX servers that satisfy the regular expression will be configured.
NOTE ■ if you specify a pipe-separated (|-separated) list of host names, those names must be
fully qualified domain names of the ESX servers.
■ If you enter a regular expression to include or exclude a host, all the virtual machines under that host are included or excluded from the inventory.
Chapter 3 Loading and configuring PATROL for Virtual Servers 73

Removing a vCenter connection
14 Select the Use vCenter credentials check box to use vCenter credentials.
15 Click Add, and then click Done.
Removing a vCenter connection
Use the following task to remove a vCenter or an ESX server from the VMware environment.
To remove a vCenter connection
1 Right-click the VMware vSphere node, and choose Configure Service URL.
2 In the PATROL for Virtual Servers on host hostName dialog box, from the Select vCenter/ESX Server to Remove list, select the vCenter connection or ESX server to be removed.
3 Select the Remove option.
4 Click Apply.
5 In the Confirm Removal dialog box, click Apply to remove the vCenter or ESX server connection.
The vCenter or ESX server connection is removed from the Select vCenter/ESX Server to Remove list.
Creating host and virtual machine reports in VMware environment
In PATROL for Virtual Servers, you can access several reports that enable you to access inventory data and performance data of the hosts (ESX servers) and virtual machines contained in the VMware environment.
NOTE If you want to configure multiple ESX servers simultaneously, a common user with the same password needs to be created on each of the ESX servers.
74 BMC PATROL for Virtual Servers Getting Started Guide

Creating the List all Virtual Machines report
Creating the List all Virtual Machines report
You can create and save a report that lists all of the virtual machines for a host (ESX server). To create a list of virtual machines, access the VSM_HOST application class menu depending on whether you are using the logical or physical view and then, choose the List all Virtual Machines menu command.
For more information about creating a list of virtual machines, see the PATROL for Virtual Servers online Help.
Creating the Top 10 ESX Hosts report
You can create and save a report that lists the top ten hosts (ESX servers) and their associated virtual machines that are using the most CPU resources. To create a list of top ten hosts, access the VSM application class menu and choose the Top 10 ESX Host menu command.
For more information about creating this report, see the PATROL for Virtual Servers online Help.
Creating the Enterprise Inventory report
You can create and save a report that summarizes all physical hosts (ESX servers) and their associated virtual machines for each vCenter connection. To create an enterprise inventory report, access the VSM application class menu, and choose the Enterprise Inventory Report menu command.
For more information about creating this report, see the PATROL for Virtual Servers online Help.
Managing ESX servers for distributed or failover data collection in VMware environment
You can configure ESX servers for distributed or failover data collection.
Chapter 3 Loading and configuring PATROL for Virtual Servers 75

Configuring the ESX servers for failover or distributed data collection
In distributed data collection, PATROL for Virtual Servers collects performance data of the configured ESX servers and their virtual machines from the respective ESX servers and inventory data from vCenter.
In failover data collection, PATROL for Virtual Servers collects performance and inventory data of configured ESX Servers and their virtual machines from the respective ESX servers only when vCenter is down.
Configuring the ESX servers for failover or distributed data collection
You can configure an ESX server for failover or distributed data collection either while adding the ESX server for monitoring or at a later stage.
To configure the ESX server while adding it for monitoring, right-click the VMware vSphere node and choose KM Commands => Configure Service URL. For more information, see “Creating a vCenter connection” on page 72.
To configure the ESX servers at a later stage, right- click the VMware vSphere node and choose KM Commands => Configure Data Collection - Distributed or Failover => Configure ESX Server(s) List.
For more information about configuring ESX servers, see the PATROL for Virtual Servers online Help.
Removing ESX servers for failover or distributed data collection
You can remove an ESX server from the list of configured servers for distributed or failover data collection. To remove an ESX server, right-click the host (ESX server) node, and choose KM Commands => Modify ESX Server Details.
For more information about removing ESX servers, see the PATROL for Virtual Servers online Help.
Modifying regular expressions of ESX servers
You can modify the regular expressions that you have added while configuring ESX servers for distributed or failover data collection, to configure a different set of ESX servers or to modify specified credentials.
76 BMC PATROL for Virtual Servers Getting Started Guide

Creating ESX servers configuration report
To modify the regular expressions of ESX servers, right-click the VMware vSphere node and choose KM Commands => Configure Data Collection - Distributed or Failover => Modify Regular Expressions.
For more information about modifying regular expressions, see the PATROL for Virtual Servers online Help.
Creating ESX servers configuration report
You can create and save a report that displays the names of ESX servers that are configured for distributed or failover data collection. To generate a list of all the configured ESX servers, right- click the vCenter node, and choose KM Commands => Configure Data Collection - Distributed or Failover => ESX Servers Configuration Report.
For more information about generating a configuration report, see the PATROL for Virtual Servers online Help.
Filtering clusters, hosts, and virtual machines in VMware environment
You can filter clusters, hosts, and virtual machines, to include or exclude them from monitoring. You can create a filter using Java™ regular expressions.
Creating filters for clusters, hosts, and virtual machines
While creating a filter, if you specify a regular expression to include or exclude a cluster, all the hosts and virtual machines under that cluster are included or excluded from the inventory. If you enter a regular expression to include or exclude a host, all the virtual machines under that host are included or excluded from the inventory.
To configure an element for filtering, right- click the VMware vSphere node and choose KM Commands => Configure Service URL.
For more information about configuring an element for filtering, see the PATROL for Virtual Servers online Help.
Chapter 3 Loading and configuring PATROL for Virtual Servers 77

Modifying filters for clusters, hosts, and virtual machines
Modifying filters for clusters, hosts, and virtual machines
You can modify the existing filters to include or exclude elements from the existing filters. To modify the existing filters, right- click the VMware vSphere node, and choose KM Commands => Configure Monitored Objects.
For more information about modifying existing filters, see the PATROL for Virtual Servers online Help.
Configuring event monitoring in VMware environment
PATROL for Virtual Servers enables you to create filters that monitor events in the vCenter server based on event properties. You can filter events by:
■ Managed object - You can monitor events for a specific managed object (such as Datacenter, ESX server, virtual machine, and cluster etc.) as well as their child objects (if any).
■ Event severity - You can monitor the events with the following types of severity:
— Information - displays the number of information events matched for a managed object
— Error - displays the number of error events matched for a managed object— User - displays the number of user events matched for a managed object— Warning - displays the number of warning events matched for a managed object
By default, events are monitored for all the severity types.
■ Event type - You can monitor various types of events such as VmConnectedEvent and VmPoweredOffEvent. By default, all event types are monitored. For more information about types of events, see VMware documentation.
■ User - You can monitor events for a specific user who triggered those events. By default, events for all the users are monitored.
Creating event filters
To create an event filter, right-click the vCenter node and then, choose KM Commands => Configure Event Monitoring => Create Filter.
78 BMC PATROL for Virtual Servers Getting Started Guide

Modifying event filters
Whenever you create a filter, a node with the filter name is created under the Events node in the PATROLMainMap tree.
For more information about creating filters, see the PATROL for Virtual Servers online Help.
Modifying event filters
After you create an event filter, you can modify that filter to perform the following:
■ monitor a new managed object using that filter
■ monitor new event types for the existing managed object by using that filter
■ monitor new event severity types for the existing managed object by using that filter
■ monitor events for different users for the existing managed object
To modify an event filter, right-click the vCenter node and then, choose KM Commands => Configure Event Monitoring => Modify Filter.
For more information about deleting filters, see the PATROL for Virtual Servers online Help.
Deleting event filters
To delete an event filter, right-click the vCenter node and then, choose KM Commands => Configure Event Monitoring => Delete Filter.
For more information about deleting filters, see the PATROL for Virtual Servers online Help.
Chapter 3 Loading and configuring PATROL for Virtual Servers 79

Acknowledging events
Acknowledging events
When you create filters for event monitoring, depending on the filter criteria you have specified, following parameters are created under the Events folder of the managed object:
■ Error■ User■ Warning■ Information
You can acknowledge these parameters whenever they go into warning or alarm state. After you acknowledge these parameters, they go into OK state. To acknowledge event filtering parameters, right-click the created filter under the managed object for which you have created event filters, and choose KM Commands => Acknowledge.
Turning annotations on or off for event filtering parameters
You can turn the annotation on or off for the event filtering parameters. When you turn the annotations off for these parameters, annotation report is not available for these parameters.
To turn the annotations on or off for the event filtering parameters, right-click the Events folder for the managed object and then, choose KM Commands => Annotations => On, or KM Commands => Annotations => Off.
Configuring PATROL for Virtual Servers in Citrix XenServer environment
After you install PATROL for Virtual Servers, you must perform the following tasks:
1. Create a connection between PATROL for Virtual Servers and the Citrix XenServer environment. To do this, you need to add hosts (XenServers) to the Citrix XenServer environment. For more information, see “Configuring a XenServer” on page 81.
2. Configure hosts (XenServers) for performance data collection. For more information, see “Configuring performance data collection accounts” on page 82.
80 BMC PATROL for Virtual Servers Getting Started Guide

Configuring a XenServer
Configuring a XenServerTo monitor the Citrix XenServer environment, you can either add either a resource pool master or a standalone host. When you add a resource pool master for monitoring, PATROL for Virtual Servers discovers the inventory (hosts, virtual machines and storage repository) of that resource pool. It also fetches performance data such as memory, network, processor, and disk details for all the hosts and virtual machines that are part of the resource pool.
For a standalone host (that is not part of a resource pool), PATROL for Virtual Servers discovers all the virtual machines and storage repository associated with the host. It also fetches the performance data such as memory, network, processor and disk details for the standalone host and the associated virtual machines.
When you remove a pool master from monitoring, all the hosts under that resource pool are also removed from monitoring.
Using Active Directory integration with Citrix XenServer version 5.5, you can provide access to multiple users to access each resource pool. Because every user account is given the same set of permissions as the local root account, every user can download performance and inventory data for the resource pool. If the user account has been added in the subject list of resource pool, the user can access performance and inventory data of respective resource pool.
If external authentication has not been enabled for a user account, then the local root account is required for connecting and collecting inventory and performance data from XenServers.
Adding a XenServer
To add a host (XenServer) to the Citrix XenServer environment, right-click the Citrix XenServers node, and choose KM Commands => Configure Citrix XenServer. For more information about adding a XenServer, see the PATROL for Virtual Servers online Help.
Chapter 3 Loading and configuring PATROL for Virtual Servers 81
Removing a XenServer
Removing a XenServer
To remove a XenServer
1 Right-click the Citrix XenServers node and choose KM Commands => Configure Citrix XenServer.
2 In the Configure Citrix XenServer dialog box, select the pool master or host from the Select element to remove list.
3 Select the Remove option.
4 Click Apply.
Managing performance data collection accounts
To start collecting performance data for hosts (XenServers) that are part of a resource pool, you need to configure performance data collection accounts for those hosts.
You can configure performance data collection account for multiple hosts (XenServers) simultaneously. You can either provide a comma-separated list of hosts or specify a regular expression. All the hosts that satisfy the regular expression are configured for performance data collection.
You can also modify the regular expression later to configure performance data collection account for a different set of hosts or to modify the specified credentials.
After you configure a performance data collection account, you can modify the account details.
Configuring performance data collection accounts
To configure performance data collection account for a Xenserver (s), right-click the resource pool node and choose KM Commands => Configure Performance Data Collection Account. For more information about configuring the performance data collection account, see the PATROL for Virtual Servers online Help.
82 BMC PATROL for Virtual Servers Getting Started Guide

Modifying performance data collection account details
Modifying performance data collection account details
You can modify user name and password for a performance data collection account. To modify the account details for a host (XenServer), right-click the host (XenServer) node, choose Modify Account Details. For more information, see the PATROL for Virtual Servers online Help.
Modifying XenServer regular expressions
You can modify the regular expression that you have provided while configuring performance data collection account for XenServer (s). In addition, you can modify the credentials for XenServers.
To modify XenServer regular expression, right-click the resource pool node and choose KM Commands => Modify Regular Expression. For more information, see the PATROL for Virtual Servers online Help.
Creating XenServer Configuration report
You can create and save a report that displays the names of XenServers for which performance data collection account is configured either using a regular expression or individually. To generate XenServer configuration report, right-click the resource pool node and choose KM Commands => XenServer Configuration Report. or more information, see the PATROL for Virtual Servers online Help.
Handling pool master failoverUse the Modify Pool Master menu command to modify pool master details in the following pool master failover scenarios:
■ the KM is monitoring the resource pool and the KM fails to find the host name corresponding to the new pool master IP address
■ the KM is not monitoring any resource pool (PATROL Agent is offline)
Use the Configure Performance Data Collection Account menu command to configure the performance data collection account for the new pool master in the following pool master failover scenario:
Chapter 3 Loading and configuring PATROL for Virtual Servers 83
Handling pool master failover
When the KM is monitoring the resource pool and the KM is not able to find the credentials of the new pool master (because the performance data collection account is not configured for the new pool master.)
For more information, see the BMC Performance Manager for Virtual Servers online Help.
84 BMC PATROL for Virtual Servers Getting Started Guide

A p p e n d i x A
A Accessing Menu Commands, InfoBoxes, and Online HelpBMC Software offers several PATROL consoles from which you can view a PATROL Knowledge Module (KM). Because of the different environments in which these consoles run, each one uses a different method to display and access information in the KM. This appendix provides instructions for accessing the KM menu commands, InfoBoxes, and online Help on each of the PATROL consoles.
See the BMC Performance Manager for Virtual Servers Help for more detailed information about navigation in the PATROL consoles.
Accessing KM commands and InfoBoxes . . . . . . . . . . . . . . . . . . . . . . . . . . . . . . . . . . . . 86Accessing online Help . . . . . . . . . . . . . . . . . . . . . . . . . . . . . . . . . . . . . . . . . . . . . . . . . . . . . 87
Appendix A Accessing Menu Commands, InfoBoxes, and Online Help 85
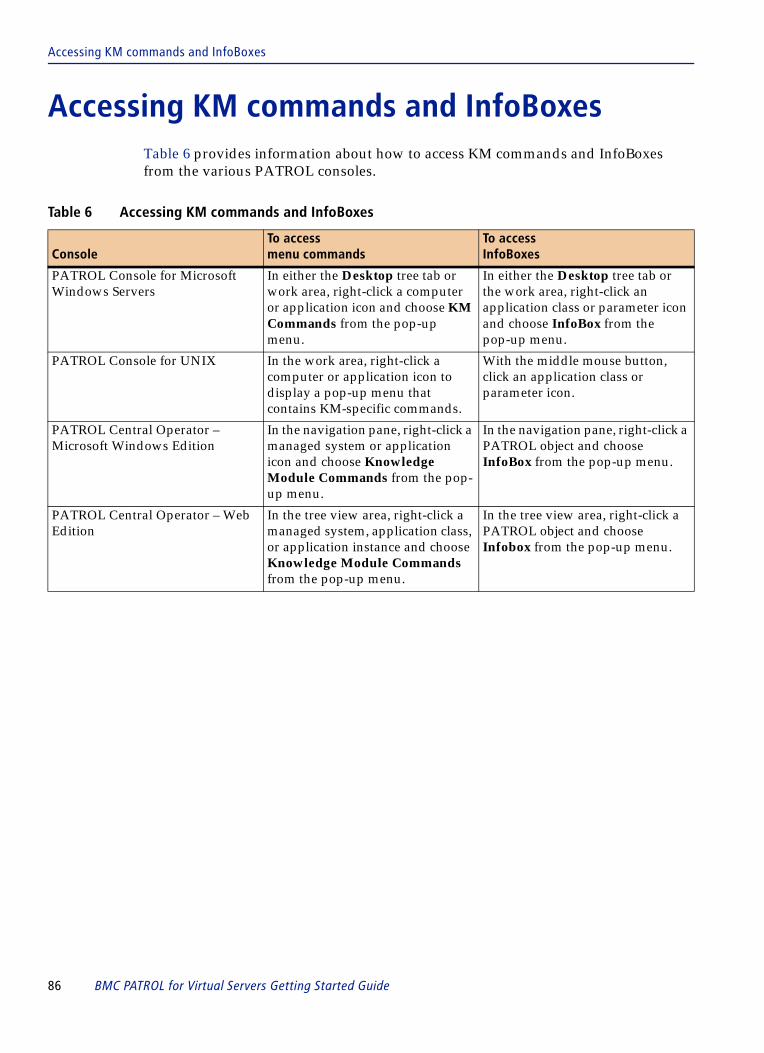
Accessing KM commands and InfoBoxes
Accessing KM commands and InfoBoxesTable 6 provides information about how to access KM commands and InfoBoxes from the various PATROL consoles.
Table 6 Accessing KM commands and InfoBoxes
ConsoleTo access menu commands
To accessInfoBoxes
PATROL Console for Microsoft Windows Servers
In either the Desktop tree tab or work area, right-click a computer or application icon and choose KM Commands from the pop-up menu.
In either the Desktop tree tab or the work area, right-click an application class or parameter icon and choose InfoBox from the pop-up menu.
PATROL Console for UNIX In the work area, right-click a computer or application icon to display a pop-up menu that contains KM-specific commands.
With the middle mouse button, click an application class or parameter icon.
PATROL Central Operator – Microsoft Windows Edition
In the navigation pane, right-click a managed system or application icon and choose Knowledge Module Commands from the pop-up menu.
In the navigation pane, right-click a PATROL object and choose InfoBox from the pop-up menu.
PATROL Central Operator – Web Edition
In the tree view area, right-click a managed system, application class, or application instance and choose Knowledge Module Commands from the pop-up menu.
In the tree view area, right-click a PATROL object and choose Infobox from the pop-up menu.
86 BMC PATROL for Virtual Servers Getting Started Guide

Accessing online Help
Accessing online HelpTable 7 provides information about how to access Help from each console.
Table 7 Accessing Online Help
ConsoleTo access product help
To access application class help To access parameter help
PATROL Console for Microsoft Windows Servers
From the console menu bar, choose Help => Help Topics. In the Help Topics window, double-click PATROL Knowledge Modules. In the submenu, double-click BMC Performance Manager for Virtual Servers.
If you have a developer connection to the agent, double-click an application class in the KM tab of the console. From the Application Properties dialog box, click the Help tab. Then click Show Help.
■ Right-click a parameter icon and choose Help On from the pop-up menu.
■ Double-click a parameter icon; click the ? icon or Help button in the parameter display window.
■ Double-click a parameter in the KM tab of the console; from the properties dialog box, click the Help tab and then click Show Help.
PATROL Central Operator – Microsoft Windows Edition
From the console menu bar, choose Help => Help Topics. In the Contents tab, click PATROL for Virtual Servers.
■ In the Operator tab of the navigation pane, select an application icon and press F1.
■ In the Operator tab of the navigation pane, right-click an application icon and choose Help.
■ In the Operator tab of the navigation pane, select a parameter icon and press F1.
■ In the Operator tab of the navigation pane, right-click a parameter icon and choose Help.
PATROL Central Operator – Web Edition
In the upper right corner of PATROL Central, click Help and choose PATROL KM Help. In the PATROL Central Operator – Web Edition KM Help window, click PATROL for Virtual Servers.
In the tree view, right-click an application class and choose Help.
In the tree view, right-click a parameter and choose Help.
Appendix A Accessing Menu Commands, InfoBoxes, and Online Help 87

Accessing online Help
88 BMC PATROL for Virtual Servers Getting Started Guide

A p p e n d i x B
B Agent configuration variablesThis appendix contains the information about the pconfig variables for PATROL for Virtual Servers that you can set in the PATROL Agent.
Agent configuration variables for VMware environment . . . . . . . . . . . . . . . . . . . . . . . 90Agent configuration variables for Citrix XenServer environment . . . . . . . . . . . . . . . . 92
Appendix B Agent configuration variables 89
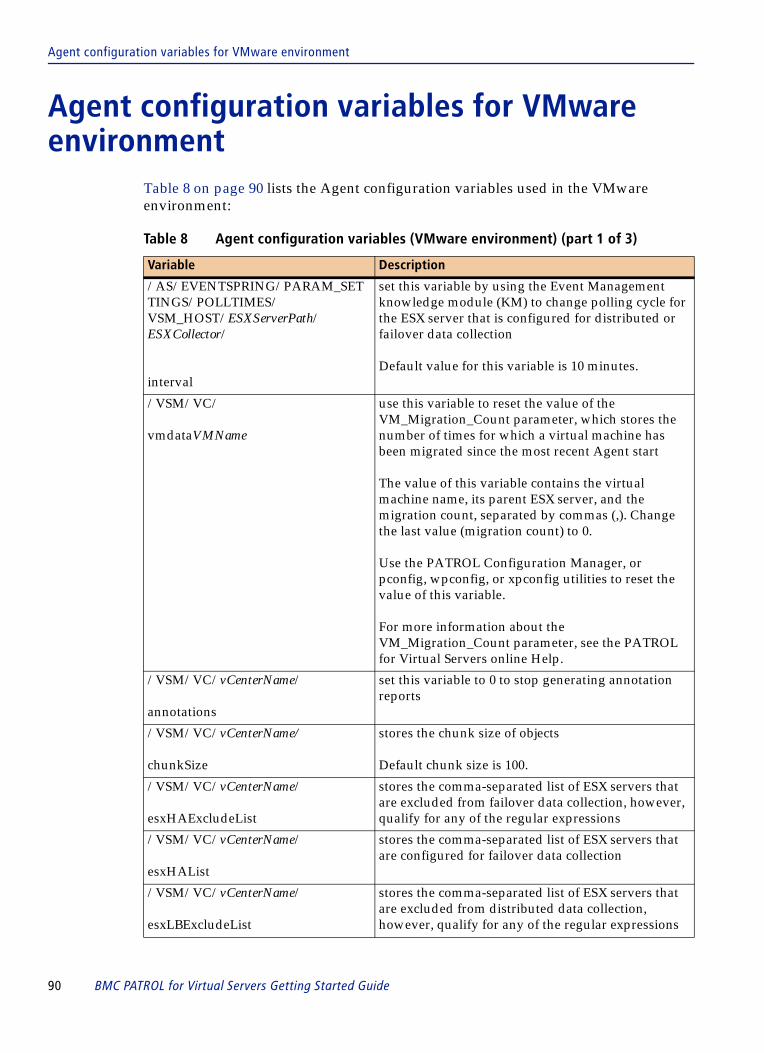
Agent configuration variables for VMware environment
Agent configuration variables for VMware environment
Table 8 on page 90 lists the Agent configuration variables used in the VMware environment:
Table 8 Agent configuration variables (VMware environment) (part 1 of 3)
Variable Description
/AS/EVENTSPRING/PARAM_SETTINGS/POLLTIMES/VSM_HOST/ESXServerPath/ESXCollector/
interval
set this variable by using the Event Management knowledge module (KM) to change polling cycle for the ESX server that is configured for distributed or failover data collection
Default value for this variable is 10 minutes.
/VSM/VC/
vmdataVMName
use this variable to reset the value of the VM_Migration_Count parameter, which stores the number of times for which a virtual machine has been migrated since the most recent Agent start
The value of this variable contains the virtual machine name, its parent ESX server, and the migration count, separated by commas (,). Change the last value (migration count) to 0.
Use the PATROL Configuration Manager, or pconfig, wpconfig, or xpconfig utilities to reset the value of this variable.
For more information about the VM_Migration_Count parameter, see the PATROL for Virtual Servers online Help.
/VSM/VC/vCenterName/
annotations
set this variable to 0 to stop generating annotation reports
/VSM/VC/vCenterName/
chunkSize
stores the chunk size of objects
Default chunk size is 100.
/VSM/VC/vCenterName/
esxHAExcludeList
stores the comma-separated list of ESX servers that are excluded from failover data collection, however, qualify for any of the regular expressions
/VSM/VC/vCenterName/
esxHAList
stores the comma-separated list of ESX servers that are configured for failover data collection
/VSM/VC/vCenterName/
esxLBExcludeList
stores the comma-separated list of ESX servers that are excluded from distributed data collection, however, qualify for any of the regular expressions
90 BMC PATROL for Virtual Servers Getting Started Guide

Agent configuration variables for VMware environment
/VSM/VC/vCenterName/
esxLBList
stores the comma-separated list of ESX servers that are configured for distributed data collection
/VSM/VC/vCenterName/
esxRegExHAList
stores the comma-separated list of regular expressions of ESX servers that are configured for failover data collection
/VSM/VC/vCenterName/
esxRegExLBList
stores the comma-separated list of regular expressions of ESX servers that are configured for distributed data collection
/VSM/VC/vCenterName/
ESXserverNameOrRegEx.userAccount
stores the user name provided for an individual ESX server or ESX servers that satisfy the regular expression used to configure them for distributed or failover data collection
/VSM/VC/vCenterName/
NEWEVENTFORMAT
set this variable to 1 to generate migration events in the new format
If the value of this variable is set to 0, then the events will be generated in the old format.
/VSM/VC/vCenterName/
StopHotPlugEvents
set this variable to 1 if you do not want to generate any configuration events
/VSM/VC/vCenterName/
TurnOffEvents
set this variable to 1 to stop generating custom events
/VSM/VC/vCenterName/filters/
childList
stores the names of the filters that are configured for event monitoring
/VSM/VC/vCenterName/filters/
eventAnnotation
a flag indicating whether annotation report will be visible for the event filtering parameters
/VSM/VC/vCenterName/filters/filterName
objectName
stores the name of the managed object that you want to monitor through an event filter
/VSM/VC/vCenterName/filters/filterName
objectType
stores the type of the managed object that you want to monitor through an event filter
/VSM/VC/vCenterName/filters/filterName
eventSeverity
stores the severity of the event that you want to monitor through an event filter
/VSM/VC/vCenterName/filters/filterName
eventType
stores the types of the events that you want to monitor through an event filter
Table 8 Agent configuration variables (VMware environment) (part 2 of 3)
Variable Description
Appendix B Agent configuration variables 91
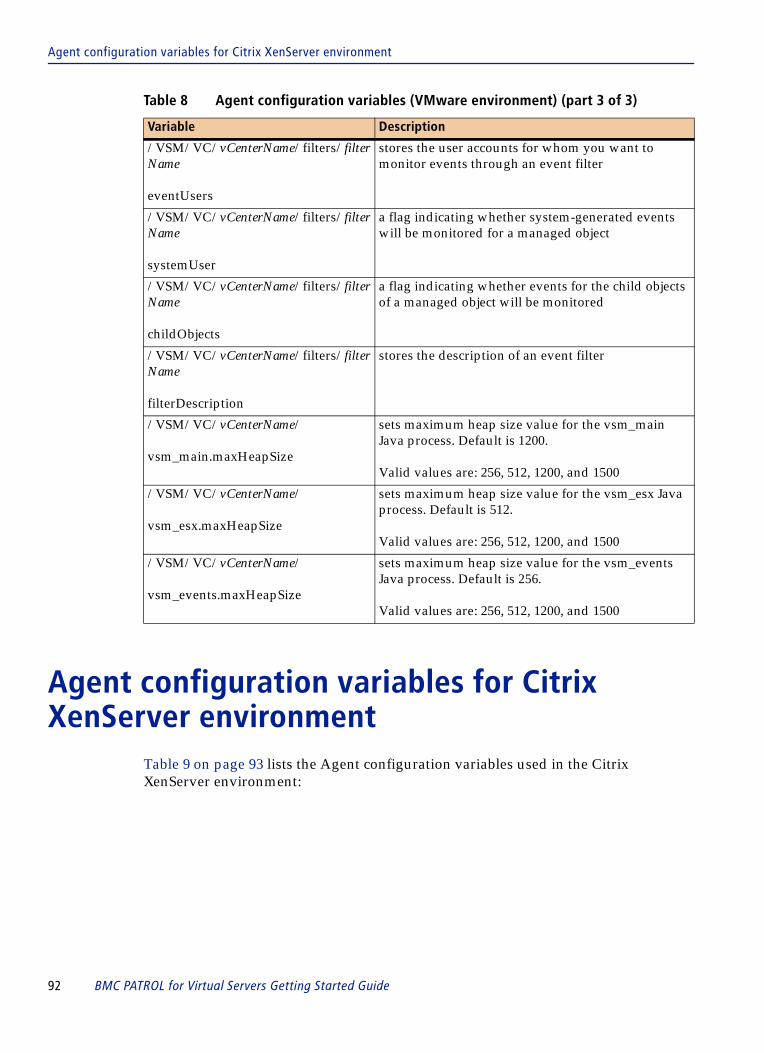
Agent configuration variables for Citrix XenServer environment
Agent configuration variables for Citrix XenServer environment
Table 9 on page 93 lists the Agent configuration variables used in the Citrix XenServer environment:
/VSM/VC/vCenterName/filters/filterName
eventUsers
stores the user accounts for whom you want to monitor events through an event filter
/VSM/VC/vCenterName/filters/filterName
systemUser
a flag indicating whether system-generated events will be monitored for a managed object
/VSM/VC/vCenterName/filters/filterName
childObjects
a flag indicating whether events for the child objects of a managed object will be monitored
/VSM/VC/vCenterName/filters/filterName
filterDescription
stores the description of an event filter
/VSM/VC/vCenterName/
vsm_main.maxHeapSize
sets maximum heap size value for the vsm_main Java process. Default is 1200.
Valid values are: 256, 512, 1200, and 1500
/VSM/VC/vCenterName/
vsm_esx.maxHeapSize
sets maximum heap size value for the vsm_esx Java process. Default is 512.
Valid values are: 256, 512, 1200, and 1500
/VSM/VC/vCenterName/
vsm_events.maxHeapSize
sets maximum heap size value for the vsm_events Java process. Default is 256.
Valid values are: 256, 512, 1200, and 1500
Table 8 Agent configuration variables (VMware environment) (part 3 of 3)
Variable Description
92 BMC PATROL for Virtual Servers Getting Started Guide
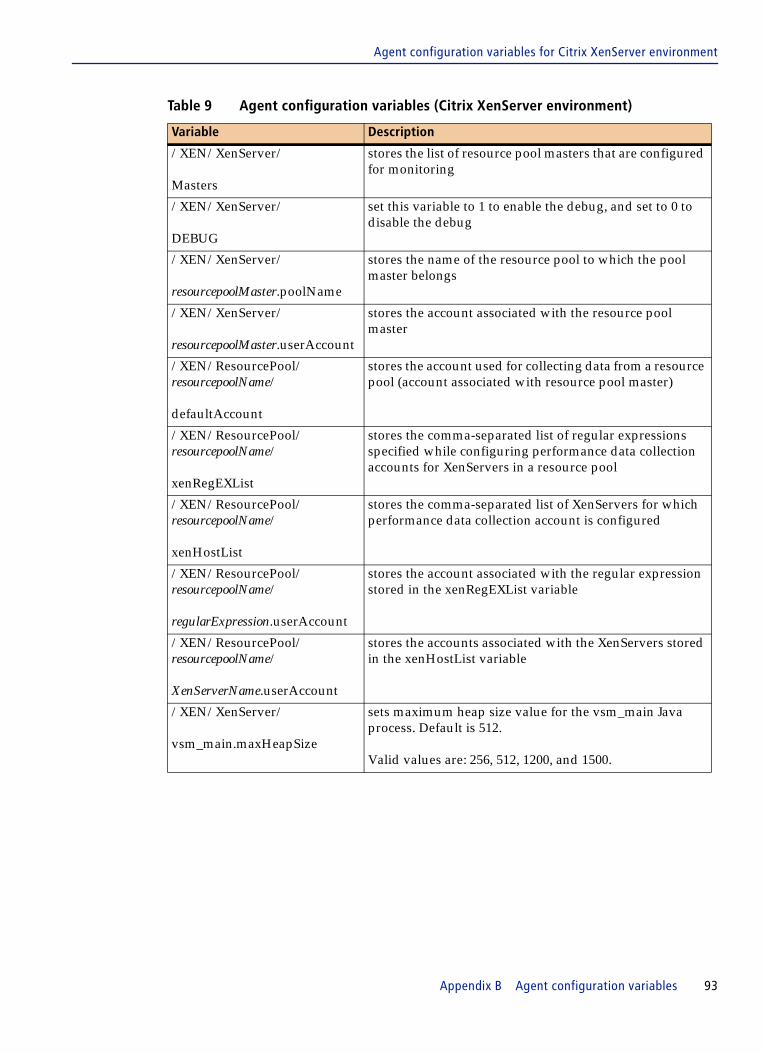
Agent configuration variables for Citrix XenServer environment
Table 9 Agent configuration variables (Citrix XenServer environment)
Variable Description
/XEN/XenServer/
Masters
stores the list of resource pool masters that are configured for monitoring
/XEN/XenServer/
DEBUG
set this variable to 1 to enable the debug, and set to 0 to disable the debug
/XEN/XenServer/
resourcepoolMaster.poolName
stores the name of the resource pool to which the pool master belongs
/XEN/XenServer/
resourcepoolMaster.userAccount
stores the account associated with the resource pool master
/XEN/ResourcePool/resourcepoolName/
defaultAccount
stores the account used for collecting data from a resource pool (account associated with resource pool master)
/XEN/ResourcePool/resourcepoolName/
xenRegEXList
stores the comma-separated list of regular expressions specified while configuring performance data collection accounts for XenServers in a resource pool
/XEN/ResourcePool/resourcepoolName/
xenHostList
stores the comma-separated list of XenServers for which performance data collection account is configured
/XEN/ResourcePool/resourcepoolName/
regularExpression.userAccount
stores the account associated with the regular expression stored in the xenRegEXList variable
/XEN/ResourcePool/resourcepoolName/
XenServerName.userAccount
stores the accounts associated with the XenServers stored in the xenHostList variable
/XEN/XenServer/
vsm_main.maxHeapSize
sets maximum heap size value for the vsm_main Java process. Default is 512.
Valid values are: 256, 512, 1200, and 1500.
Appendix B Agent configuration variables 93

Agent configuration variables for Citrix XenServer environment
94 BMC PATROL for Virtual Servers Getting Started Guide

A B C D E F G H I J K L M N O P Q R S T U V W X Y Z
Index
Aacknowledging events 80agent
installing a KM to 33
BBMC Software, contacting 2Bourne shell 45
CC shell 45Citrix XenServer environment hierarchy 26colormap option 45common services
overview 33configuring
ESX servers, for distributed or failover data collection 76
performance data collection accounts, for XenServers 82
VMware VirtualCenter 69configuring PATROL for Virtual Servers
VMware environment 71XenServer environment 80
configuring VMware VirtualCenter 69console
installing a KM to 33console systems overview 33creating Enterprise Inventory report 75creating ESX Servers Configuration report 77creating List all Virtual Machines report 75creating Top 10 ESX Hosts report 75creating XenServer Configuration report 83customer support 2
Ddistributed or failover data collection
configuring, for ESX servers 76removing, for ESX servers 76
Distributed Resource Scheduler 23
distribution serverfeatures 39importing a CD 39importing an installation package 39installation process 38installing with 39
Eenvironment variables
LANG 45PATH 45, 46setting for Help browser 45setting for the browser 45
ESX serversconfiguring, for distributed or failover data collection
76removing, from distributed or failover data collection
76eXceed 45
Ffilters
for clusters, hosts, and virtual machines, creating 77for clusters, hosts, and virtual machines, modifying 78for events, creating 78for events, deleting 79for events, modifying 79
HHot Plug support 23
Iinstallation
choosing a target machine 33preparing for 31system requirements 30verifying requirements 30
installation utility version 47
Index 95

A B C D E F G H I J K L M N O P Q R S T U V W X Y Z
installingwith the distribution server 39
KKM files
Citrix XenServer environment 58VMware environment 57
Korn shell 45
LLANG environment variable 45loading KMs
from PATROL Central – Microsoft Windows Edition 60
from PATROL Central – Web Edition 60from PATROL Console for Unix 61overview of 59PATROL Console for Microsoft Windows 61
location of PATROL 41logical view, VMware environment hierarchy 17
Mmanaged systems, overview 33mapping virtual machines 15modifying
event filters 79performance data collection accounts 83
NNetscape Navigator 44
Oonline Help
installing 33overview
Enterprise Inventory report 19ESX Servers Configuration 21List All Virtual Machines report 20Top 10 ESX Hosts report 18XenServer Configuration report 27
PPATH environment variable 46PATROL Agent
installing a KM to 33
96 BMC PATROL for Virtual Servers Getting Started Gu
PATROL Central Operator - Web Editioninstalling 33
PATROL Consoleand Netscape Navigator 44installing a KM to 33
PATROL for Virtual Serversconfiguring 71, 80installation requirements 30KM files, Citrix XenServer environment 58KM files, VMware environment 57uninstalling on Unix 48uninstalling on Windows 47
PATROL for Virtual Servers featuresinventory and performance reports 18, 74mapping virtual resources to physical hosts 15memory and CPU resource utilization data 17physical host and virtual machine discovery 14
PATROL security levels 35PATROL_BROWSER variable 46PATROL_CACHE variable 41PATROL_HOME variable 41pconfig variables
VMware environment 90XenServer environment 92
performance data collection accountsconfiguring 82modifying 83
performance resourcesallocation of 17amount used 17utilization rate 17
physical view, VMware environment hierarchy 16planning for PATROL for Virtual Servers installation 31pool master failover
handling 83overview 27
preloading KMsfrom PATROL Console for Microsoft Windows 62from PATROL Console for Unix 63overview 62
preparing PATROL for Virtual Servers for installation 31product support 2products
uninstalling, UNIX environment 48uninstalling, Windows environment 48
Rregular expressions
ESX Servers, modifying 76XenServers, modifying 83
removing ESX servers from distributed or failover data collection 76
ide

A B C D E F G H I J K L M N O P Q R S T U V W X Y Z
removing KMsfrom a PATROL Console 65from agent preload list 67overview 64
reportsEnterprise Inventory, creating 75Enterprise Inventory, overview 19ESX Servers Configuration, creating 77ESX Servers Configuration, overview 21List all Virtual Machines, creating 75List All Virtual Machines, overview 20Top 10 ESX Hosts, creating 75Top 10 ESX Hosts, overview 18XenServer Configuration, creating 83XenServer Configuration, overview 27
requirementsoverview 30system 30
Ssecurity levels for PATROL 35setting environment variables for Help browser 45shells
Bourne 45C 45Korn 45
support, customer 2system
requirements 30system requirements 30system roles
common services 33console systems 33managed systems 33overview of target machines 33
Ttarget machines, overview 33technical support 2Thin provisioning 22turning annotations on or off for event filtering
parameters 80
Uuninstallation
on Unix 48on Windows 47
uninstalling productsin UNIX environment 48in Windows environment 48
upgrading KMs in PATROL environments 43user account 46
Vvariables
PATROL_BROWSER 46PATROL_CACHE 41PATROL_HOME 41
vCenterconfirm the web server account 70Troubleshooting port number issues 70user account settings in vCenter Web Service 71user account settings in Virtual Infrastructure Client
71vCenter connection
adding 72removing 74
version of the installation utility 47VMware environment
switching between a logical and physical view 15VMware environment hierarchy
logical view 17physical view 16
XXenServers
adding 81removing 82
Index 97

A B C D E F G H I J K L M N O P Q R S T U V W X Y Z
98 BMC PATROL for Virtual Servers Getting Started Gu
ide
Third-Party Product TermsThe following terms apply to third-party products that are included with or in a BMC Software product as described in the BMC Software, Inc., LicenseAgreement that is applicable to the product.
Apache Software License, Version 2.0This product includes the Apache software product found at http:/ /apache.org, and the Apache software product is distributed to use pursuant to the followingterms and conditions:
Copyright (c) 2000-2004 The Apache Software Foundation. All rights reserved.
TERMS AND CONDITIONS FOR USE, REPRODUCTION, AND DISTRIBUTION
1. Definitions.
“License” shall mean the terms and conditions for use, reproduction, and distribution as defined by Sections 1 through 9 of this document.
“Licensor” shall mean the copyright owner or entity authorized by the copyright owner that is granting the License.
“Legal Entity” shall mean the union of the acting entity and all other entities that control, are controlled by, or are under common control with that entity.For the purposes of this definition, “control” means (i) the power, direct or indirect, to cause the direction or management of such entity, whether by contractor otherwise, or (ii) ownership of fifty percent (50%) or more of the outstanding shares, or (iii) beneficial ownership of such entity.
“You” (or “Your”) shall mean an individual or Legal Entity exercising permissions granted by this License.
“Source” form shall mean the preferred form for making modifications, including but not limited to software source code, documentation source, andconfiguration files.
“Object” form shall mean any form resulting from mechanical transformation or translation of a Source form, including but not limited to compiled objectcode, generated documentation, and conversions to other media types.
“Work” shall mean the work of authorship, whether in Source or Object form, made available under the License, as indicated by a copyright notice that isincluded in or attached to the work (an example is provided in the Appendix below).
“Derivative Works” shall mean any work, whether in Source or Object form, that is based on (or derived from) the Work and for which the editorialrevisions, annotations, elaborations, or other modifications represent, as a whole, an original work of authorship. For the purposes of this License, DerivativeWorks shall not include works that remain separable from, or merely link (or bind by name) to the interfaces of, the Work and Derivative Works thereof.
“Contribution” shall mean any work of authorship, including the original version of the Work and any modifications or additions to that Work orDerivative Works thereof, that is intentionally submitted to Licensor for inclusion in the Work by the copyright owner or by an individual or Legal Entityauthorized to submit on behalf of the copyright owner. For the purposes of this definition, “submitted” means any form of electronic, verbal, or writtencommunication sent to the Licensor or its representatives, including but not limited to communication on electronic mailing lists, source code control systems,and issue tracking systems that are managed by, or on behalf of, the Licensor for the purpose of discussing and improving the Work, but excludingcommunication that is conspicuously marked or otherwise designated in writing by the copyright owner as “Not a Contribution.”
“Contributor” shall mean Licensor and any individual or Legal Entity on behalf of whom a Contribution has been received by Licensor and subsequentlyincorporated within the Work.
2. Grant of Copyright License. Subject to the terms and conditions of this License, each Contributor hereby grants to You a perpetual, worldwide, non-exclusive, no-charge, royalty-free, irrevocable copyright license to reproduce, prepare Derivative Works of, publicly display, publicly perform, sublicense, anddistribute the Work and such Derivative Works in Source or Object form.
3. Grant of Patent License. Subject to the terms and conditions of this License, each Contributor hereby grants to You a perpetual, worldwide, non-exclusive,no-charge, royalty-free, irrevocable (except as stated in this section) patent license to make, have made, use, offer to sell, sell, import, and otherwise transferthe Work, where such license applies only to those patent claims licensable by such Contributor that are necessarily infringed by their Contribution(s) alone orby combination of their Contribution(s) with the Work to which such Contribution(s) was submitted. If You institute patent litigation against any entity(including a cross-claim or counterclaim in a lawsuit) alleging that the Work or a Contribution incorporated within the Work constitutes direct or contributorypatent infringement, then any patent licenses granted to You under this License for that Work shall terminate as of the date such litigation is filed.
4. Redistribution. You may reproduce and distribute copies of the Work or Derivative Works thereof in any medium, with or without modifications, and inSource or Object form, provided that You meet the following conditions:
(a) You must give any other recipients of the Work or Derivative Works a copy of this License; and
(b) You must cause any modified files to carry prominent notices stating that You changed the files; and
(c) You must retain, in the Source form of any Derivative Works that You distribute, all copyright, patent, trademark, and attribution notices from the Sourceform of the Work, excluding those notices that do not pertain to any part of the Derivative Works; and
(d) If the Work includes a “NOTICE” text file as part of its distribution, then any Derivative Works that You distribute must include a readable copy of theattribution notices contained within such NOTICE file, excluding those notices that do not pertain to any part of the Derivative Works, in at least one of thefollowing places: within a NOTICE text file distributed as part of the Derivative Works; within the Source form or documentation, if provided along with theDerivative Works; or, within a display generated by the Derivative Works, if and wherever such third-party notices normally appear. The contents of theNOTICE file are for informational purposes only and do not modify the License. You may add Your own attribution notices within Derivative Works that Youdistribute, alongside or as an addendum to the NOTICE text from the Work, provided that such additional attribution notices cannot be construed asmodifying the License.
You may add Your own copyright statement to Your modifications and may provide additional or different license terms and conditions for use,reproduction, or distribution of Your modifications, or for any such Derivative Works as a whole, provided Your use, reproduction, and distribution of theWork otherwise complies with the conditions stated in this License.
5. Submission of Contributions. Unless You explicitly state otherwise, any Contribution intentionally submitted for inclusion in the Work by You to theLicensor shall be under the terms and conditions of this License, without any additional terms or conditions. Notwithstanding the above, nothing herein shallsupersede or modify the terms of any separate license agreement you may have executed with Licensor regarding such Contributions.
6. Trademarks. This License does not grant permission to use the trade names, trademarks, service marks, or product names of the Licensor, except as

required for reasonable and customary use in describing the origin of the Work and reproducing the content of the NOTICE file.
7. Disclaimer of Warranty. Unless required by applicable law or agreed to in writing, Licensor provides the Work (and each Contributor provides itsContributions) on an “AS IS” BASIS,
WITHOUT WARRANTIES OR CONDITIONS OF ANY KIND, either express or implied, including, without limitation, any warranties or conditions of TITLE,NON-INFRINGEMENT, MERCHANTABILITY, or FITNESS FOR A PARTICULAR PURPOSE. You are solely responsible for determining theappropriateness of using or redistributing the Work and assume any risks associated with Your exercise of permissions under this License.
8. Limitation of Liability. In no event and under no legal theory, whether in tort (including negligence), contract, or otherwise, unless required by applicablelaw (such as deliberate and grossly negligent acts) or agreed to in writing, shall any Contributor be liable to You for damages, including any direct, indirect,special, incidental, or consequential damages of any character arising as a result of this License or out of the use or inability to use the Work (including but notlimited to damages for loss of goodwill, work stoppage, computer failure or malfunction, or any and all other commercial damages or losses), even if suchContributor has been advised of the possibility of such damages.
9. Accepting Warranty or Additional Liability. While redistributing the Work or Derivative Works thereof, You may choose to offer, and charge a fee for,acceptance of support, warranty, indemnity, or other liability obligations and/or rights consistent with this License. However, in accepting such obligations,You may act only on Your own behalf and on Your sole responsibility, not on behalf of any other Contributor, and only if You agree to indemnify, defend, andhold each Contributor harmless for any liability incurred by, or claims asserted against, such Contributor by reason of your accepting any such warranty oradditional liability.
OpenSSL LicenseThis product includes software developed by the OpenSSL Project for use in the OpenSSL Toolkit. (http://www.openssl.org/ ).
Copyright (c) 1998-2003 The OpenSSL Project. All rights reserved.
Redistribution and use in source and binary forms, with or without modification, are permitted provided that the following conditions are met:
1. Redistributions of source code must retain the above copyright notice, this list of conditions and the following disclaimer.
2. Redistributions in binary form must reproduce the above copyright notice, this list of conditions and the following disclaimer in the documentation and/orother materials provided with the distribution.
3. All advertising materials mentioning features or use of this software must display the following acknowledgment:
“This product includes software developed by the OpenSSL Project for use in the OpenSSL Toolkit. (http://www.openssl.org/)”
4. The names “OpenSSL Toolkit” and “OpenSSL Project” must not be used to endorse or promote products derived from this software without prior writtenpermission. For written permission, please contact [email protected].
5. Products derived from this software may not be called “OpenSSL” nor may “OpenSSL” appear in their names without prior written permission of theOpenSSL Project.
6. Redistributions of any form whatsoever must retain the following acknowledgment: “This product includes software developed by the OpenSSL Project foruse in the OpenSSL Toolkit (http://www.openssl.org/)”
THIS SOFTWARE IS PROVIDED BY THE OpenSSL PROJECT ``AS IS'' AND ANY EXPRESSED OR IMPLIED WARRANTIES, INCLUDING, BUT NOTLIMITED TO, THE IMPLIED WARRANTIES OF MERCHANTABILITY AND FITNESS FOR A PARTICULAR PURPOSE ARE DISCLAIMED. IN NO EVENTSHALL THE OpenSSL PROJECT OR ITS CONTRIBUTORS BE LIABLE FOR ANY DIRECT, INDIRECT, INCIDENTAL, SPECIAL, EXEMPLARY, ORCONSEQUENTIAL DAMAGES (INCLUDING, BUT NOT LIMITED TO, PROCUREMENT OF SUBSTITUTE GOODS OR SERVICES; LOSS OF USE, DATA,OR PROFITS; OR BUSINESS INTERRUPTION) HOWEVER CAUSED AND ON ANY THEORY OF LIABILITY, WHETHER IN CONTRACT, STRICTLIABILITY, OR TORT (INCLUDING NEGLIGENCE OR OTHERWISE) ARISING IN ANY WAY OUT OF THE USE OF THIS SOFTWARE, EVEN IFADVISED OF THE POSSIBILITY OF SUCH DAMAGE.
====================================================================
Original SSLeay LicenseThis product includes cryptographic software written by Eric Young ([email protected]). This product includes software written by Tim Hudson([email protected]).
Copyright (C) 1995-1998 Eric Young (eay@ cryptsoft.com) All rights reserved.
This package is an SSL implementation written by Eric Young ([email protected]).
The implementation was written so as to conform with Netscape’s SSL.
This library is free for commercial and non-commercial use as long as the following conditions are adhered to. The following conditions apply to all codefound in this distribution, be it the RC4, RSA, lhash, DES, etc., code; not just the SSL code. The SSL documentation included with this distribution is coveredby the same copyright terms except that the holder is Tim Hudson ([email protected]).
Copyright remains Eric Young's, and as such any Copyright notices in the code are not to be removed. If this package is used in a product, Eric Young shouldbe given attribution as the author of the parts of the library used. This can be in the form of a textual message at program startup or in documentation (onlineor textual) provided with the package.
Redistribution and use in source and binary forms, with or without modification, are permitted provided that the following conditions are met:
1. Redistributions of source code must retain the copyright notice, this list of conditions and the following disclaimer.
2. Redistributions in binary form must reproduce the above copyright notice, this list of conditions and the following disclaimer in the documentation and/orother materials provided with the distribution.
3. All advertising materials mentioning features or use of this software must display the following acknowledgement:
“This product includes cryptographic software written by Eric Young ([email protected])” The word 'cryptographic' can be left out if the rouines from thelibrary being used are not cryptographic related :-).

4. If you include any Windows specific code (or a derivative thereof) from the apps directory (application code) you must include an acknowledgement: “Thisproduct includes software written by Tim Hudson ([email protected])”
THIS SOFTWARE IS PROVIDED BY ERIC YOUNG ``AS IS'' AND ANY EXPRESS OR IMPLIED WARRANTIES, INCLUDING, BUT NOT LIMITED TO, THEIMPLIED WARRANTIES OF MERCHANTABILITY AND FITNESS FOR A PARTICULAR PURPOSE ARE DISCLAIMED. IN NO EVENT SHALL THEAUTHOR OR CONTRIBUTORS BE LIABLE FOR ANY DIRECT, INDIRECT, INCIDENTAL, SPECIAL, EXEMPLARY, OR CONSEQUENTIAL DAMAGES(INCLUDING, BUT NOT LIMITED TO, PROCUREMENT OF SUBSTITUTE GOODS OR SERVICES; LOSS OF USE, DATA, OR PROFITS; OR BUSINESSINTERRUPTION) HOWEVER CAUSED AND ON ANY THEORY OF LIABILITY, WHETHER IN CONTRACT, STRICT LIABILITY, OR TORT (INCLUDINGNEGLIGENCE OR OTHERWISE) ARISING IN ANY WAY OUT OF THE USE OF THIS SOFTWARE, EVEN IF ADVISED OF THE POSSIBILITY OF SUCHDAMAGE.
GNU General Public LicenseCopyright © 2007 Free Software Foundation, Inc. http://fsf.org/
Everyone is permitted to copy and distribute verbatim copies of this license document, but changing it is not allowed.
Preamble
The GNU General Public License is a free, copyleft license for software and other kinds of works.
The licenses for most software and other practical works are designed to take away your freedom to share and change the works. By contrast, the GNUGeneral Public License is intended to guarantee your freedom to share and change all versions of a program--to make sure it remains free software for all itsusers. We, the Free Software Foundation, use the GNU General Public License for most of our software; it applies also to any other work released this way byits authors. You can apply it to your programs, too.
When we speak of free software, we are referring to freedom, not price. Our General Public Licenses are designed to make sure that you have the freedom todistribute copies of free software (and charge for them if you wish), that you receive source code or can get it if you want it, that you can change the softwareor use pieces of it in new free programs, and that you know you can do these things.
To protect your rights, we need to prevent others from denying you these rights or asking you to surrender the rights. Therefore, you have certainresponsibilities if you distribute copies of the software, or if you modify it: responsibilities to respect the freedom of others.
For example, if you distribute copies of such a program, whether gratis or for a fee, you must pass on to the recipients the same freedoms that you received.You must make sure that they, too, receive or can get the source code. And you must show them these terms so they know their rights.
Developers that use the GNU GPL protect your rights with two steps: (1) assert copyright on the software, and (2) offer you this License giving you legalpermission to copy, distribute and/or modify it.
For the developers' and authors' protection, the GPL clearly explains that there is no warranty for this free software. For both users' and authors' sake, the GPLrequires that modified versions be marked as changed, so that their problems will not be attributed erroneously to authors of previous versions.
Some devices are designed to deny users access to install or run modified versions of the software inside them, although the manufacturer can do so. This isfundamentally incompatible with the aim of protecting users' freedom to change the software. The systematic pattern of such abuse occurs in the area ofproducts for individuals to use, which is precisely where it is most unacceptable. Therefore, we have designed this version of the GPL to prohibit the practicefor those products. If such problems arise substantially in other domains, we stand ready to extend this provision to those domains in future versions of theGPL, as needed to protect the freedom of users.
Finally, every program is threatened constantly by software patents. States should not allow patents to restrict development and use of software on general-purpose computers, but in those that do, we wish to avoid the special danger that patents applied to a free program could make it effectively proprietary. Toprevent this, the GPL assures that patents cannot be used to render the program non-free.
The precise terms and conditions for copying, distribution and modification follow.
TERMS AND CONDITIONS
0. Definitions.
“This License” refers to version 3 of the GNU General Public License.
“Copyright” also means copyright-like laws that apply to other kinds of works, such as semiconductor masks.
“The Program” refers to any copyrightable work licensed under this License. Each licensee is addressed as “you”. “Licensees” and “recipients” may beindividuals or organizations.
To “modify” a work means to copy from or adapt all or part of the work in a fashion requiring copyright permission, other than the making of an exact copy.The resulting work is called a “modified version” of the earlier work or a work “based on” the earlier work.
A “covered work” means either the unmodified Program or a work based on the Program.
To “propagate” a work means to do anything with it that, without permission, would make you directly or secondarily liable for infringement underapplicable copyright law, except executing it on a computer or modifying a private copy. Propagation includes copying, distribution (with or withoutmodification), making available to the public, and in some countries other activities as well.
To “convey” a work means any kind of propagation that enables other parties to make or receive copies. Mere interaction with a user through a computernetwork, with no transfer of a copy, is not conveying.
An interactive user interface displays “Appropriate Legal Notices” to the extent that it includes a convenient and prominently visible feature that (1) displaysan appropriate copyright notice, and (2) tells the user that there is no warranty for the work (except to the extent that warranties are provided), that licenseesmay convey the work under this License, and how to view a copy of this License. If the interface presents a list of user commands or options, such as a menu,a prominent item in the list meets this criterion.
1. Source Code.
The “source code” for a work means the preferred form of the work for making modifications to it. “Object code” means any non-source form of a work.
A “Standard Interface” means an interface that either is an official standard defined by a recognized standards body, or, in the case of interfaces specified fora particular programming language, one that is widely used among developers working in that language.

The “System Libraries” of an executable work include anything, other than the work as a whole, that (a) is included in the normal form of packaging a MajorComponent, but which is not part of that Major Component, and (b) serves only to enable use of the work with that Major Component, or to implement aStandard Interface for which an implementation is available to the public in source code form. A “Major Component”, in this context, means a major essentialcomponent (kernel, window system, and so on) of the specific operating system (if any) on which the executable work runs, or a compiler used to produce thework, or an object code interpreter used to run it.
The “Corresponding Source” for a work in object code form means all the source code needed to generate, install, and (for an executable work) run the objectcode and to modify the work, including scripts to control those activities. However, it does not include the work's System Libraries, or general-purpose toolsor generally available free programs which are used unmodified in performing those activities but which are not part of the work. For example,Corresponding Source includes interface definition files associated with source files for the work, and the source code for shared libraries and dynamicallylinked subprograms that the work is specifically designed to require, such as by intimate data communication or control flow between those subprograms andother parts of the work.
The Corresponding Source need not include anything that users can regenerate automatically from other parts of the Corresponding Source.
The Corresponding Source for a work in source code form is that same work.
2. Basic Permissions.
All rights granted under this License are granted for the term of copyright on the Program, and are irrevocable provided the stated conditions are met. ThisLicense explicitly affirms your unlimited permission to run the unmodified Program. The output from running a covered work is covered by this License onlyif the output, given its content, constitutes a covered work. This License acknowledges your rights of fair use or other equivalent, as provided by copyrightlaw.
You may make, run and propagate covered works that you do not convey, without conditions so long as your license otherwise remains in force. You mayconvey covered works to others for the sole purpose of having them make modifications exclusively for you, or provide you with facilities for running thoseworks, provided that you comply with the terms of this License in conveying all material for which you do not control copyright. Those thus making orrunning the covered works for you must do so exclusively on your behalf, under your direction and control, on terms that prohibit them from making anycopies of your copyrighted material outside their relationship with you.
Conveying under any other circumstances is permitted solely under the conditions stated below. Sublicensing is not allowed; section 10 makes it unnecessary.
3. Protecting Users' Legal Rights From Anti-Circumvention Law.
No covered work shall be deemed part of an effective technological measure under any applicable law fulfilling obligations under article 11 of the WIPOcopyright treaty adopted on 20 December 1996, or similar laws prohibiting or restricting circumvention of such measures.
When you convey a covered work, you waive any legal power to forbid circumvention of technological measures to the extent such circumvention is effectedby exercising rights under this License with respect to the covered work, and you disclaim any intention to limit operation or modification of the work as ameans of enforcing, against the work's users, your or third parties' legal rights to forbid circumvention of technological measures.
4. Conveying Verbatim Copies.
You may convey verbatim copies of the Program's source code as you receive it, in any medium, provided that you conspicuously and appropriately publishon each copy an appropriate copyright notice; keep intact all notices stating that this License and any non-permissive terms added in accord with section 7apply to the code; keep intact all notices of the absence of any warranty; and give all recipients a copy of this License along with the Program.
You may charge any price or no price for each copy that you convey, and you may offer support or warranty protection for a fee.
5. Conveying Modified Source Versions.
You may convey a work based on the Program, or the modifications to produce it from the Program, in the form of source code under the terms of section 4,provided that you also meet all of these conditions:
a) The work must carry prominent notices stating that you modified it, and giving a relevant date.
b) The work must carry prominent notices stating that it is released under this License and any conditions added under section 7. This requirement modifiesthe requirement in section 4 to “keep intact all notices”.
c) You must license the entire work, as a whole, under this License to anyone who comes into possession of a copy. This License will therefore apply, alongwith any applicable section 7 additional terms, to the whole of the work, and all its parts, regardless of how they are packaged. This License gives nopermission to license the work in any other way, but it does not invalidate such permission if you have separately received it.
d) If the work has interactive user interfaces, each must display Appropriate Legal Notices; however, if the Program has interactive interfaces that do notdisplay Appropriate Legal Notices, your work need not make them do so.
A compilation of a covered work with other separate and independent works, which are not by their nature extensions of the covered work, and which are notcombined with it such as to form a larger program, in or on a volume of a storage or distribution medium, is called an “aggregate” if the compilation and itsresulting copyright are not used to limit the access or legal rights of the compilation's users beyond what the individual works permit. Inclusion of a coveredwork in an aggregate does not cause this License to apply to the other parts of the aggregate.
6. Conveying Non-Source Forms.
You may convey a covered work in object code form under the terms of sections 4 and 5, provided that you also convey the machine-readable CorrespondingSource under the terms of this License, in one of these ways:
a) Convey the object code in, or embodied in, a physical product (including a physical distribution medium), accompanied by the Corresponding Source fixedon a durable physical medium customarily used for software interchange.
b) Convey the object code in, or embodied in, a physical product (including a physical distribution medium), accompanied by a written offer, valid for at leastthree years and valid for as long as you offer spare parts or customer support for that product model, to give anyone who possesses the object code either (1)a copy of the Corresponding Source for all the software in the product that is covered by this License, on a durable physical medium customarily used forsoftware interchange, for a price no more than your reasonable cost of physically performing this conveying of source, or (2) access to copy the CorrespondingSource from a network server at no charge.
c) Convey individual copies of the object code with a copy of the written offer to provide the Corresponding Source. This alternative is allowed onlyoccasionally and noncommercially, and only if you received the object code with such an offer, in accord with subsection 6b.
d) Convey the object code by offering access from a designated place (gratis or for a charge), and offer equivalent access to the Corresponding Source in thesame way through the same place at no further charge. You need not require recipients to copy the Corresponding Source along with the object code. If the

place to copy the object code is a network server, the Corresponding Source may be on a different server (operated by you or a third party) that supportsequivalent copying facilities, provided you maintain clear directions next to the object code saying where to find the Corresponding Source. Regardless ofwhat server hosts the Corresponding Source, you remain obligated to ensure that it is available for as long as needed to satisfy these requirements.
e) Convey the object code using peer-to-peer transmission, provided you inform other peers where the object code and Corresponding Source of the work arebeing offered to the general public at no charge under subsection 6d.
A separable portion of the object code, whose source code is excluded from the Corresponding Source as a System Library, need not be included in conveyingthe object code work.
A “User Product” is either (1) a “consumer product”, which means any tangible personal property which is normally used for personal, family, or householdpurposes, or (2) anything designed or sold for incorporation into a dwelling. In determining whether a product is a consumer product, doubtful cases shall beresolved in favor of coverage. For a particular product received by a particular user, “normally used” refers to a typical or common use of that class ofproduct, regardless of the status of the particular user or of the way in which the particular user actually uses, or expects or is expected to use, the product. Aproduct is a consumer product regardless of whether the product has substantial commercial, industrial or non-consumer uses, unless such uses represent theonly significant mode of use of the product.
“Installation Information” for a User Product means any methods, procedures, authorization keys, or other information required to install and executemodified versions of a covered work in that User Product from a modified version of its Corresponding Source. The information must suffice to ensure thatthe continued functioning of the modified object code is in no case prevented or interfered with solely because modification has been made.
If you convey an object code work under this section in, or with, or specifically for use in, a User Product, and the conveying occurs as part of a transaction inwhich the right of possession and use of the User Product is transferred to the recipient in perpetuity or for a fixed term (regardless of how the transaction ischaracterized), the Corresponding Source conveyed under this section must be accompanied by the Installation Information. But this requirement does notapply if neither you nor any third party retains the ability to install modified object code on the User Product (for example, the work has been installed inROM).
The requirement to provide Installation Information does not include a requirement to continue to provide support service, warranty, or updates for a workthat has been modified or installed by the recipient, or for the User Product in which it has been modified or installed. Access to a network may be deniedwhen the modification itself materially and adversely affects the operation of the network or violates the rules and protocols for communication across thenetwork.
Corresponding Source conveyed, and Installation Information provided, in accord with this section must be in a format that is publicly documented (and withan implementation available to the public in source code form), and must require no special password or key for unpacking, reading or copying.
7. Additional Terms.
“Additional permissions” are terms that supplement the terms of this License by making exceptions from one or more of its conditions. Additionalpermissions that are applicable to the entire Program shall be treated as though they were included in this License, to the extent that they are valid underapplicable law. If additional permissions apply only to part of the Program, that part may be used separately under those permissions, but the entire Programremains governed by this License without regard to the additional permissions.
When you convey a copy of a covered work, you may at your option remove any additional permissions from that copy, or from any part of it. (Additionalpermissions may be written to require their own removal in certain cases when you modify the work.) You may place additional permissions on material,added by you to a covered work, for which you have or can give appropriate copyright permission.
Notwithstanding any other provision of this License, for material you add to a covered work, you may (if authorized by the copyright holders of that material)supplement the terms of this License with terms:
a) Disclaiming warranty or limiting liability differently from the terms of sections 15 and 16 of this License; or
b) Requiring preservation of specified reasonable legal notices or author attributions in that material or in the Appropriate Legal Notices displayed by workscontaining it; or
c) Prohibiting misrepresentation of the origin of that material, or requiring that modified versions of such material be marked in reasonable ways as differentfrom the original version; or
d) Limiting the use for publicity purposes of names of licensors or authors of the material; or
e) Declining to grant rights under trademark law for use of some trade names, trademarks, or service marks; or
f) Requiring indemnification of licensors and authors of that material by anyone who conveys the material (or modified versions of it) with contractualassumptions of liability to the recipient, for any liability that these contractual assumptions directly impose on those licensors and authors.
All other non-permissive additional terms are considered “further restrictions” within the meaning of section 10. If the Program as you received it, or any partof it, contains a notice stating that it is governed by this License along with a term that is a further restriction, you may remove that term. If a license documentcontains a further restriction but permits relicensing or conveying under this License, you may add to a covered work material governed by the terms of thatlicense document, provided that the further restriction does not survive such relicensing or conveying.
If you add terms to a covered work in accord with this section, you must place, in the relevant source files, a statement of the additional terms that apply tothose files, or a notice indicating where to find the applicable terms.
Additional terms, permissive or non-permissive, may be stated in the form of a separately written license, or stated as exceptions; the above requirementsapply either way.
8. Termination.
You may not propagate or modify a covered work except as expressly provided under this License. Any attempt otherwise to propagate or modify it is void,and will automatically terminate your rights under this License (including any patent licenses granted under the third paragraph of section 11).
However, if you cease all violation of this License, then your license from a particular copyright holder is reinstated (a) provisionally, unless and until thecopyright holder explicitly and finally terminates your license, and (b) permanently, if the copyright holder fails to notify you of the violation by somereasonable means prior to 60 days after the cessation.
Moreover, your license from a particular copyright holder is reinstated permanently if the copyright holder notifies you of the violation by some reasonablemeans, this is the first time you have received notice of violation of this License (for any work) from that copyright holder, and you cure the violation prior to30 days after your receipt of the notice.
Termination of your rights under this section does not terminate the licenses of parties who have received copies or rights from you under this License. If yourrights have been terminated and not permanently reinstated, you do not qualify to receive new licenses for the same material under section 10.

9. Acceptance Not Required for Having Copies.
You are not required to accept this License in order to receive or run a copy of the Program. Ancillary propagation of a covered work occurring solely as aconsequence of using peer-to-peer transmission to receive a copy likewise does not require acceptance. However, nothing other than this License grants youpermission to propagate or modify any covered work. These actions infringe copyright if you do not accept this License. Therefore, by modifying orpropagating a covered work, you indicate your acceptance of this License to do so.
10. Automatic Licensing of Downstream Recipients.
Each time you convey a covered work, the recipient automatically receives a license from the original licensors, to run, modify and propagate that work,subject to this License. You are not responsible for enforcing compliance by third parties with this License.
An “entity transaction” is a transaction transferring control of an organization, or substantially all assets of one, or subdividing an organization, or mergingorganizations. If propagation of a covered work results from an entity transaction, each party to that transaction who receives a copy of the work also receiveswhatever licenses to the work the party's predecessor in interest had or could give under the previous paragraph, plus a right to possession of theCorresponding Source of the work from the predecessor in interest, if the predecessor has it or can get it with reasonable efforts.
You may not impose any further restrictions on the exercise of the rights granted or affirmed under this License. For example, you may not impose a licensefee, royalty, or other charge for exercise of rights granted under this License, and you may not initiate litigation (including a cross-claim or counterclaim in alawsuit) alleging that any patent claim is infringed by making, using, selling, offering for sale, or importing the Program or any portion of it.
11. Patents.
A “contributor” is a copyright holder who authorizes use under this License of the Program or a work on which the Program is based. The work thus licensedis called the contributor's “contributor version”.
A contributor's “essential patent claims” are all patent claims owned or controlled by the contributor, whether already acquired or hereafter acquired, thatwould be infringed by some manner, permitted by this License, of making, using, or selling its contributor version, but do not include claims that would beinfringed only as a consequence of further modification of the contributor version. For purposes of this definition, “control” includes the right to grant patentsublicenses in a manner consistent with the requirements of this License.
Each contributor grants you a non-exclusive, worldwide, royalty-free patent license under the contributor's essential patent claims, to make, use, sell, offer forsale, import and otherwise run, modify and propagate the contents of its contributor version.
In the following three paragraphs, a “patent license” is any express agreement or commitment, however denominated, not to enforce a patent (such as anexpress permission to practice a patent or covenant not to sue for patent infringement). To “grant” such a patent license to a party means to make such anagreement or commitment not to enforce a patent against the party.
If you convey a covered work, knowingly relying on a patent license, and the Corresponding Source of the work is not available for anyone to copy, free ofcharge and under the terms of this License, through a publicly available network server or other readily accessible means, then you must either (1) cause theCorresponding Source to be so available, or (2) arrange to deprive yourself of the benefit of the patent license for this particular work, or (3) arrange, in amanner consistent with the requirements of this License, to extend the patent license to downstream recipients. “Knowingly relying” means you have actualknowledge that, but for the patent license, your conveying the covered work in a country, or your recipient's use of the covered work in a country, wouldinfringe one or more identifiable patents in that country that you have reason to believe are valid.
If, pursuant to or in connection with a single transaction or arrangement, you convey, or propagate by procuring conveyance of, a covered work, and grant apatent license to some of the parties receiving the covered work authorizing them to use, propagate, modify or convey a specific copy of the covered work,then the patent license you grant is automatically extended to all recipients of the covered work and works based on it.
A patent license is “discriminatory” if it does not include within the scope of its coverage, prohibits the exercise of, or is conditioned on the non-exercise of oneor more of the rights that are specifically granted under this License. You may not convey a covered work if you are a party to an arrangement with a thirdparty that is in the business of distributing software, under which you make payment to the third party based on the extent of your activity of conveying thework, and under which the third party grants, to any of the parties who would receive the covered work from you, a discriminatory patent license (a) inconnection with copies of the covered work conveyed by you (or copies made from those copies), or (b) primarily for and in connection with specific productsor compilations that contain the covered work, unless you entered into that arrangement, or that patent license was granted, prior to 28 March 2007.
Nothing in this License shall be construed as excluding or limiting any implied license or other defenses to infringement that may otherwise be available toyou under applicable patent law.
12. No Surrender of Others' Freedom.
If conditions are imposed on you (whether by court order, agreement or otherwise) that contradict the conditions of this License, they do not excuse you fromthe conditions of this License. If you cannot convey a covered work so as to satisfy simultaneously your obligations under this License and any other pertinentobligations, then as a consequence you may not convey it at all. For example, if you agree to terms that obligate you to collect a royalty for further conveyingfrom those to whom you convey the Program, the only way you could satisfy both those terms and this License would be to refrain entirely from conveyingthe Program.
13. Use with the GNU Affero General Public License.
Notwithstanding any other provision of this License, you have permission to link or combine any covered work with a work licensed under version 3 of theGNU Affero General Public License into a single combined work, and to convey the resulting work. The terms of this License will continue to apply to the partwhich is the covered work, but the special requirements of the GNU Affero General Public License, section 13, concerning interaction through a network willapply to the combination as such.
14. Revised Versions of this License.
The Free Software Foundation may publish revised and/or new versions of the GNU General Public License from time to time. Such new versions will besimilar in spirit to the present version, but may differ in detail to address new problems or concerns.
Each version is given a distinguishing version number. If the Program specifies that a certain numbered version of the GNU General Public License “or anylater version” applies to it, you have the option of following the terms and conditions either of that numbered version or of any later version published by theFree Software Foundation. If the Program does not specify a version number of the GNU General Public License, you may choose any version ever publishedby the Free Software Foundation.
If the Program specifies that a proxy can decide which future versions of the GNU General Public License can be used, that proxy's public statement ofacceptance of a version permanently authorizes you to choose that version for the Program.
Later license versions may give you additional or different permissions. However, no additional obligations are imposed on any author or copyright holder asa result of your choosing to follow a later version.

15. Disclaimer of Warranty.
THERE IS NO WARRANTY FOR THE PROGRAM, TO THE EXTENT PERMITTED BY APPLICABLE LAW. EXCEPT WHEN OTHERWISE STATED INWRITING THE COPYRIGHT HOLDERS AND/OR OTHER PARTIES PROVIDE THE PROGRAM “AS IS” WITHOUT WARRANTY OF ANY KIND, EITHEREXPRESSED OR IMPLIED, INCLUDING, BUT NOT LIMITED TO, THE IMPLIED WARRANTIES OF MERCHANTABILITY AND FITNESS FOR APARTICULAR PURPOSE. THE ENTIRE RISK AS TO THE QUALITY AND PERFORMANCE OF THE PROGRAM IS WITH YOU. SHOULD THE PROGRAMPROVE DEFECTIVE, YOU ASSUME THE COST OF ALL NECESSARY SERVICING, REPAIR OR CORRECTION.
16. Limitation of Liability.
IN NO EVENT UNLESS REQUIRED BY APPLICABLE LAW OR AGREED TO IN WRITING WILL ANY COPYRIGHT HOLDER, OR ANY OTHER PARTYWHO MODIFIES AND/OR CONVEYS THE PROGRAM AS PERMITTED ABOVE, BE LIABLE TO YOU FOR DAMAGES, INCLUDING ANY GENERAL,SPECIAL, INCIDENTAL OR CONSEQUENTIAL DAMAGES ARISING OUT OF THE USE OR INABILITY TO USE THE PROGRAM (INCLUDING BUTNOT LIMITED TO LOSS OF DATA OR DATA BEING RENDERED INACCURATE OR LOSSES SUSTAINED BY YOU OR THIRD PARTIES OR A FAILUREOF THE PROGRAM TO OPERATE WITH ANY OTHER PROGRAMS), EVEN IF SUCH HOLDER OR OTHER PARTY HAS BEEN ADVISED OF THEPOSSIBILITY OF SUCH DAMAGES.
17. Interpretation of Sections 15 and 16.
If the disclaimer of warranty and limitation of liability provided above cannot be given local legal effect according to their terms, reviewing courts shall applylocal law that most closely approximates an absolute waiver of all civil liability in connection with the Program, unless a warranty or assumption of liabilityaccompanies a copy of the Program in return for a fee.
END OF TERMS AND CONDITIONS

Notes

*116493**116493**116493**116493*
*116493*
