blancco lun eraser for windows - kroll ontrack · blancco lun eraser for windows ... diskpart...
TRANSCRIPT
www.blancco.com
Blancco LUN Eraser for Windows User manual for Version 2.1
2 Blancco LUN Eraser User Manual
Abstract
This is the official Blancco LUN Eraser for Windows User Manual. Blancco is the proven data erasure
solution for millions of users around the world. As the pioneer and global leader in data sanitization and end-
of-lifecycle solutions, the company offers the most certified data erasure within the industry.
Blancco LUN Eraser allows data storage administrators to securely erase individual drives, as well as logical
drives (such as LUNs), in an active storage environment.
3 Blancco LUN Eraser User Manual
Definitions
Item Explanation
Administrator rights To execute some actions on a computer administrator rights may be required. This means that only the person with permission and unrestricted access, or the administrator, has the rights to implement said act.
Command line The line on the display screen where a command is expected. Generally, the command line is the line that contains the most recently displayed command prompt.
Console A console based program uses a text based interface. Many console applications are command line tools.
Diskpart Diskpart is a command line utility that supports the use of scripts to automate its procedure.
DWORD DWORD is one of the terms used to describe a variety of sizes of data. A DWORD consists of two WORDs which is equal to 32 bits.
HASP key HASP key is inserted in a USB port and contains the Blancco licensing data.
HTML
HTML, which stands for Hyper Text Markup Language, is the predominant markup language for web pages. It provides a possibility to create structured documents by denoting structural semantics for text such as headings, paragraphs, lists etc. as well as for links, quotes, and other items.
IDE, SCSI, FC and iSCSI IDE, SCSI, FC and iSCSI are all types of drives with different capacities and traits. They differ in everything from cable amount, drives per bus, and transmitting capacity.
LUN Logical Unit Number is a unique number, from 0 to 7, used to identify a logical unit (or) SCSI devices (e.g. external hard drives).
Shred A legacy term for erasing data securely. Means the same thing than “erase”.
String String is a data type consisting of a sequence of characters. A string is often carried out as a word (byte).
XML eXtensible Markup Language is a markup language that defines a set of rules for interpreting documents.
4 Blancco LUN Eraser User Manual
Table of Content
1 About the solution ..................................................................................................................................... 6
2 Features and Requirements ...................................................................................................................... 7
2.1 Key Features ........................................................................................................................................ 7
2.2 System Requirements ......................................................................................................................... 7
2.3 System Overview ................................................................................................................................. 7
2.4 Licensing .............................................................................................................................................. 7
2.5 Administrator Rights Required............................................................................................................ 8
3 Install/Uninstall ......................................................................................................................................... 9
3.1 Evaluation............................................................................................................................................ 9
3.2 Install ................................................................................................................................................... 9
3.3 Uninstall .............................................................................................................................................. 9
4 User Guidelines ........................................................................................................................................ 10
4.1 Usage ................................................................................................................................................. 10
4.2 List attached drives ........................................................................................................................... 10
4.3 Diskpart ............................................................................................................................................. 11
4.4 Erase a drive ...................................................................................................................................... 12
4.5 Erase multiple drives simultaneously ............................................................................................... 13
4.6 Erase a partition ................................................................................................................................ 14
4.7 Erase all fixed drives .......................................................................................................................... 15
4.8 Fusion-io ioMemory erasure ............................................................................................................. 15
4.8.1 Requirements .......................................................................................................................... 15
4.8.2 Normal erasure ........................................................................................................................ 15
4.8.3 NIST Purge erasure .................................................................................................................. 15
4.9 Erasure standards ............................................................................................................................. 16
5 Reporting ................................................................................................................................................. 18
6 Configuration ........................................................................................................................................... 19
6.1 License management ........................................................................................................................ 19
6.2 Custom fields in erasure reports ....................................................................................................... 21
6.3 Automatically connect to the Management Console ....................................................................... 22
6.4 Importing the reports manually to Blancco Management Console.................................................. 23
6.5 Changing the local erasure report path ............................................................................................ 23
6.6 Generating reports in PDF format .................................................................................................... 24
5 Blancco LUN Eraser User Manual
6.7 Buffer size.......................................................................................................................................... 24
6.8 Data verification level ....................................................................................................................... 25
6.9 Limit the erasure speed - advanced option ...................................................................................... 26
6.10 Enable extended hardware reporting - advanced option ........................................................... 26
6.11 Email the report automatically - advanced option ...................................................................... 27
6.12 Short Message Service (SMS) ...................................................................................................... 27
7 Troubleshooting ...................................................................................................................................... 29
8 Contact information ................................................................................................................................ 30
6 Blancco LUN Eraser User Manual
1 About the solution
Blancco LUN Eraser is created for demanding enterprise environments where secure data erasure of
individual disks or logical disk units, such as LUNs, needs to be performed in active data storage
environments and systems.
7 Blancco LUN Eraser User Manual
2 Features and Requirements
2.1 Key Features
Erase any type of disk drive supported by Microsoft Windows, including IDE, SCSI, FC and
iSCSI.
Easy to use administrative interface based on command line.
Multiple drives can be erased concurrently and/or simultaneously.
Supports all leading data erasure standards which enable compliance with different policies
and regulations referring to erasure standards.
Detailed secure reporting based on XML format compliant with Blancco Management
Console for centralized reporting.
2.2 System Requirements
Windows Server: 2012 R2, 2012, 2008 R2, 2008, 2003 R2, 2003 all versions.
Windows 10, 8.1, 8, 7, Vista and XP all versions.
The Windows OS installed on suitable hardware with:
A minimum of 15 MB of free disk space
10 MB of free RAM
Mouse or keyboard
Appropriate drivers for the drives to be erased
.NET 2.0 or later required to be able to use full reporting functionality.
32-bit and 64-bit systems both supported.
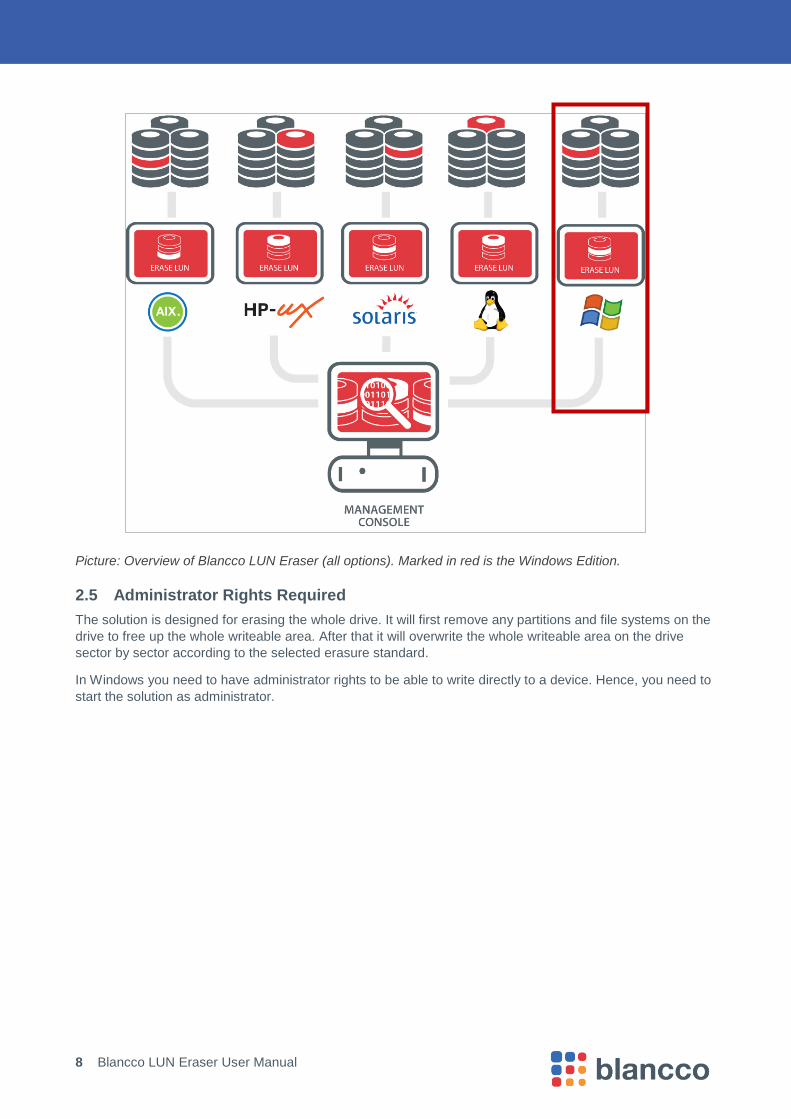
2.3 System Overview
Blancco LUN Eraser is a Windows based solution. That means it has the ability to erase all units that a
Windows system can detect and use. If any unique drivers need to be installed in order to make the drive
work in Windows, these have to be installed before the erasure is performed. Any logical disk unit or
individual disk correctly attached to a Windows system with the solution installed can be securely erased on
the logical level.
The solution is optimized for individual disks or logical disk units such as LUNs and does not try to dissolve
any raid configuration or access the hardware without using the BIOS. The solution erases the mounted user
accessible part of functional drives and assemblies of drives.
2.4 Licensing
The license system is connected to the Blancco Management Console and the Blancco HASP system. The
HASP key used must be activated with the solution ID, the number of gigabytes possible to erase, as well as
the agreed end date in a contract. There are also options to license the solution per system or under a site
license. Please contact your sales representative to go through these licensing options.
8 Blancco LUN Eraser User Manual
Picture: Overview of Blancco LUN Eraser (all options). Marked in red is the Windows Edition.
2.5 Administrator Rights Required
The solution is designed for erasing the whole drive. It will first remove any partitions and file systems on the
drive to free up the whole writeable area. After that it will overwrite the whole writeable area on the drive
sector by sector according to the selected erasure standard.
In Windows you need to have administrator rights to be able to write directly to a device. Hence, you need to
start the solution as administrator.
9 Blancco LUN Eraser User Manual
3 Install/Uninstall
3.1 Evaluation
Blancco LUN Eraser is available through your local Blancco representative. Contact us to receive an
evaluation version of the software or for licensing information.
3.2 Install
Install the solution with the self-extracting compressed executable.
This opens an installation wizard that will guide you through the necessary installation steps.
The installation package can also be delivered as an MSI package upon request.
3.3 Uninstall
Use “Add/Remove Programs” in the Control Panel to remove Blancco LUN Eraser.
10 Blancco LUN Eraser User Manual
4 User Guidelines
The solution consists of a console based program running on a Windows system and is started from a
console that is running with administrator user rights.
4.1 Usage
When installing the software, a program folder is chosen. When starting a program from the Windows
command line you need to be in the program folder to begin with.
A normal installation will give the following path for starting the program:
C:\Program Files\Blancco\Blancco LUN Eraser>BlanccoLUNEraser.exe
As seen above, you start the actual program by using the actual .exe name: BlanccoLUNEraser.exe
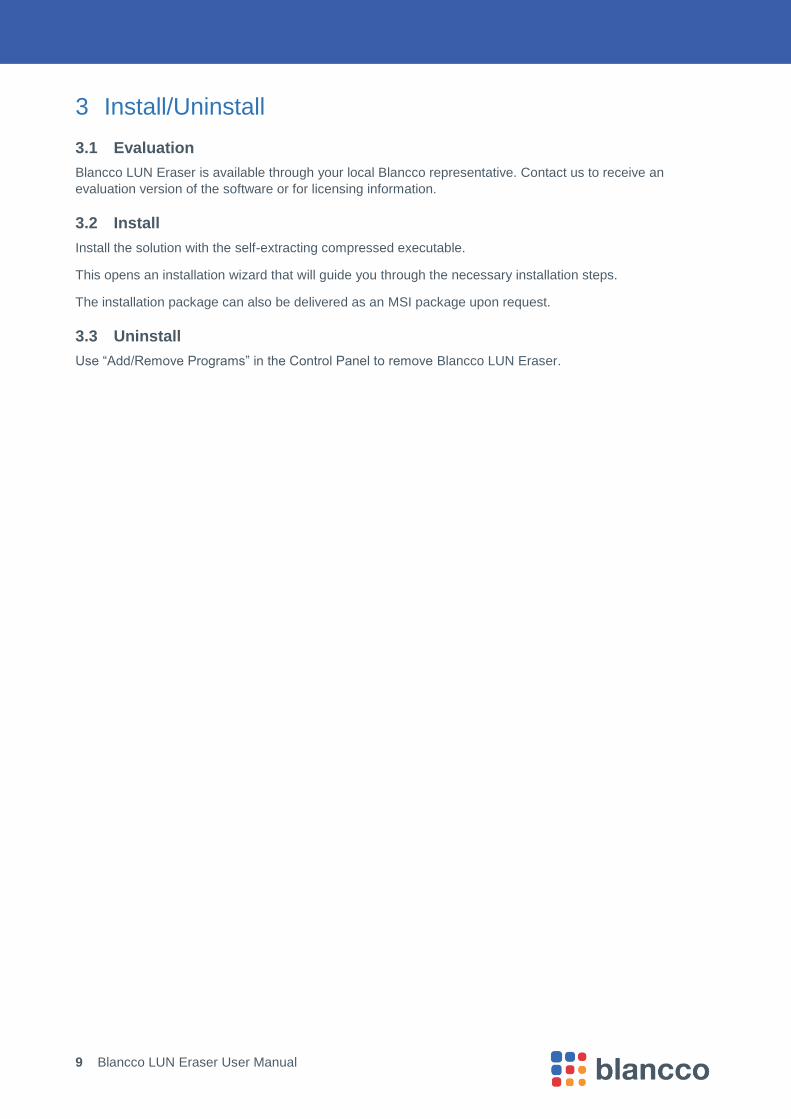
This starts the program and "Blancco LUN Eraser" is displayed. When you start the program from the
console without any parameters or with /?, the program will print out a short help instruction as seen below.
4.2 List attached drives
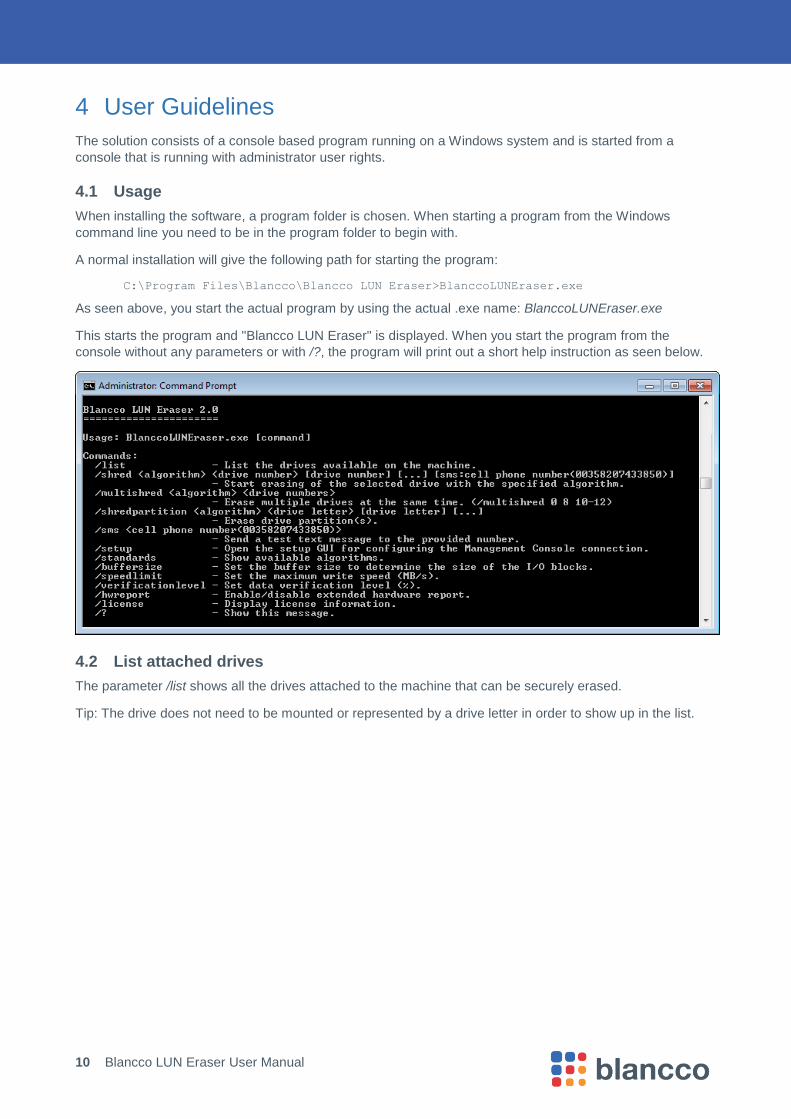
The parameter /list shows all the drives attached to the machine that can be securely erased.
Tip: The drive does not need to be mounted or represented by a drive letter in order to show up in the list.
11 Blancco LUN Eraser User Manual
As seen in the example picture Blancco LUN Eraser lists information per drive. This information includes the
actual path as well as the unique ID for a listed disk or a listed logical unit. This ID is called Device disk id in
the list.
4.3 Diskpart
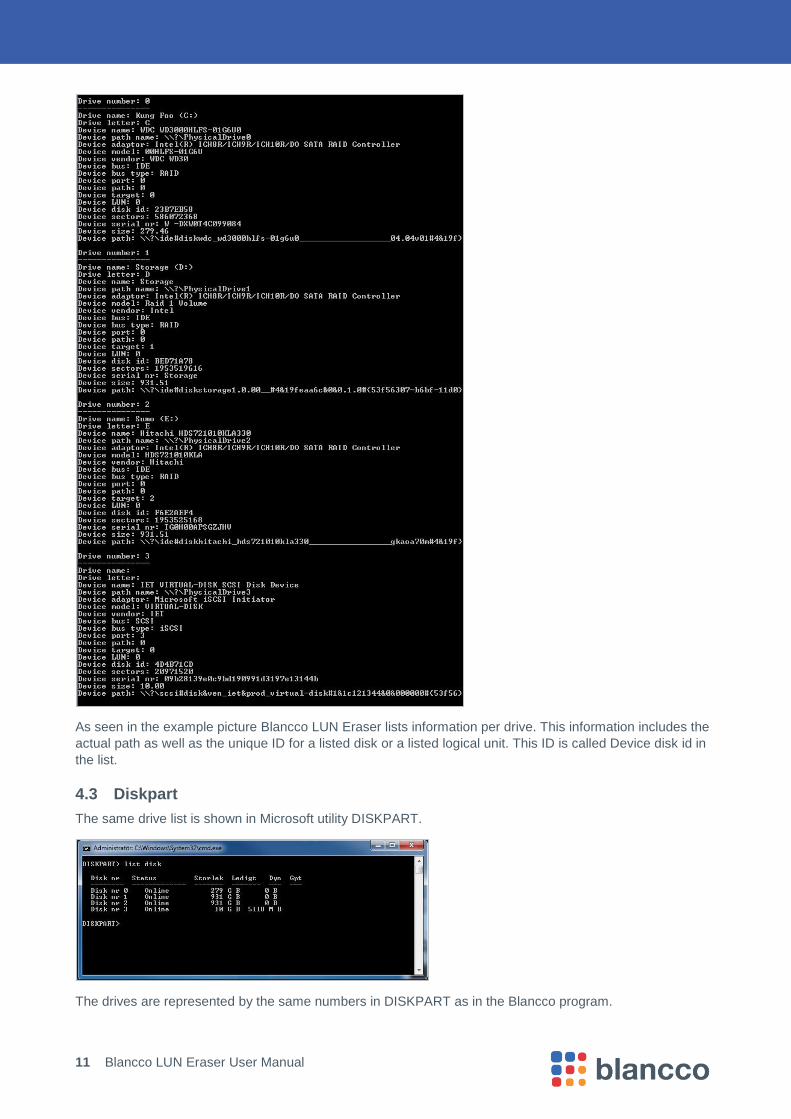
The same drive list is shown in Microsoft utility DISKPART.
The drives are represented by the same numbers in DISKPART as in the Blancco program.
12 Blancco LUN Eraser User Manual
Tip: If the user is more familiar working with DISKPART, DISKPART can be used to identify the correct
drives and then use Disk nr to start the erasure process.
4.4 Erase a drive
To start an erasure, use the parameter /shred followed by the algorithm of choice and which drive or drives
to erase (with space in between each new input value).
Example:
BlanccoLUNEraser.exe /shred 0 3 5
This example will erase the drive number three using HMG Infosec, Lower Standard. After the completion of
the drive number three, the drive number five will be erased with the same algorithm.
The algorithm is selected by the number in the table below and the drive by the number presented in the list
produced by the parameter /list.
Each erasure has to be confirmed by a Yes before the operation starts. If you are sure that you have
selected the correct drive, you can add /y into the command line to skip the confirmation question.
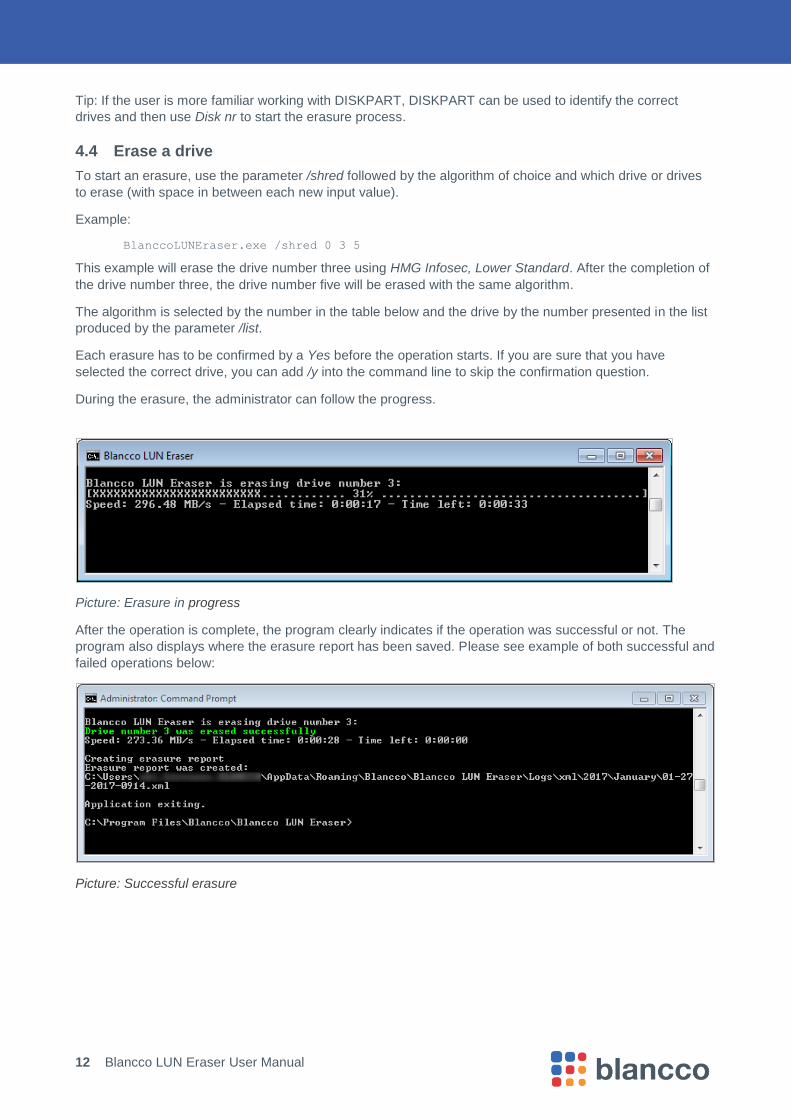
During the erasure, the administrator can follow the progress.
Picture: Erasure in progress
After the operation is complete, the program clearly indicates if the operation was successful or not. The
program also displays where the erasure report has been saved. Please see example of both successful and
failed operations below:
Picture: Successful erasure
13 Blancco LUN Eraser User Manual
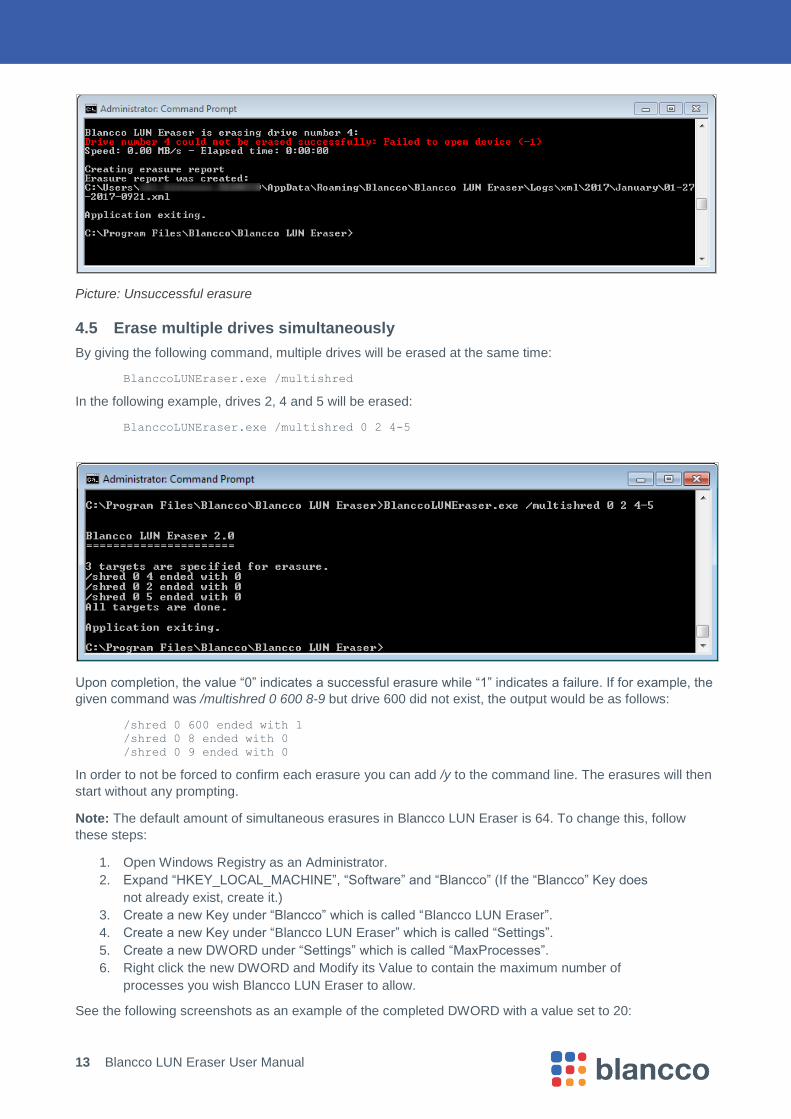
Picture: Unsuccessful erasure
4.5 Erase multiple drives simultaneously
By giving the following command, multiple drives will be erased at the same time:
BlanccoLUNEraser.exe /multishred
In the following example, drives 2, 4 and 5 will be erased:
BlanccoLUNEraser.exe /multishred 0 2 4-5
Upon completion, the value “0” indicates a successful erasure while “1” indicates a failure. If for example, the
given command was /multishred 0 600 8-9 but drive 600 did not exist, the output would be as follows:
/shred 0 600 ended with 1
/shred 0 8 ended with 0
/shred 0 9 ended with 0
In order to not be forced to confirm each erasure you can add /y to the command line. The erasures will then
start without any prompting.
Note: The default amount of simultaneous erasures in Blancco LUN Eraser is 64. To change this, follow
these steps:
1. Open Windows Registry as an Administrator.
2. Expand “HKEY_LOCAL_MACHINE”, “Software” and “Blancco” (If the “Blancco” Key does
not already exist, create it.)
3. Create a new Key under “Blancco” which is called “Blancco LUN Eraser”.
4. Create a new Key under “Blancco LUN Eraser” which is called “Settings”.
5. Create a new DWORD under “Settings” which is called “MaxProcesses”.
6. Right click the new DWORD and Modify its Value to contain the maximum number of
processes you wish Blancco LUN Eraser to allow.
See the following screenshots as an example of the completed DWORD with a value set to 20:

14 Blancco LUN Eraser User Manual
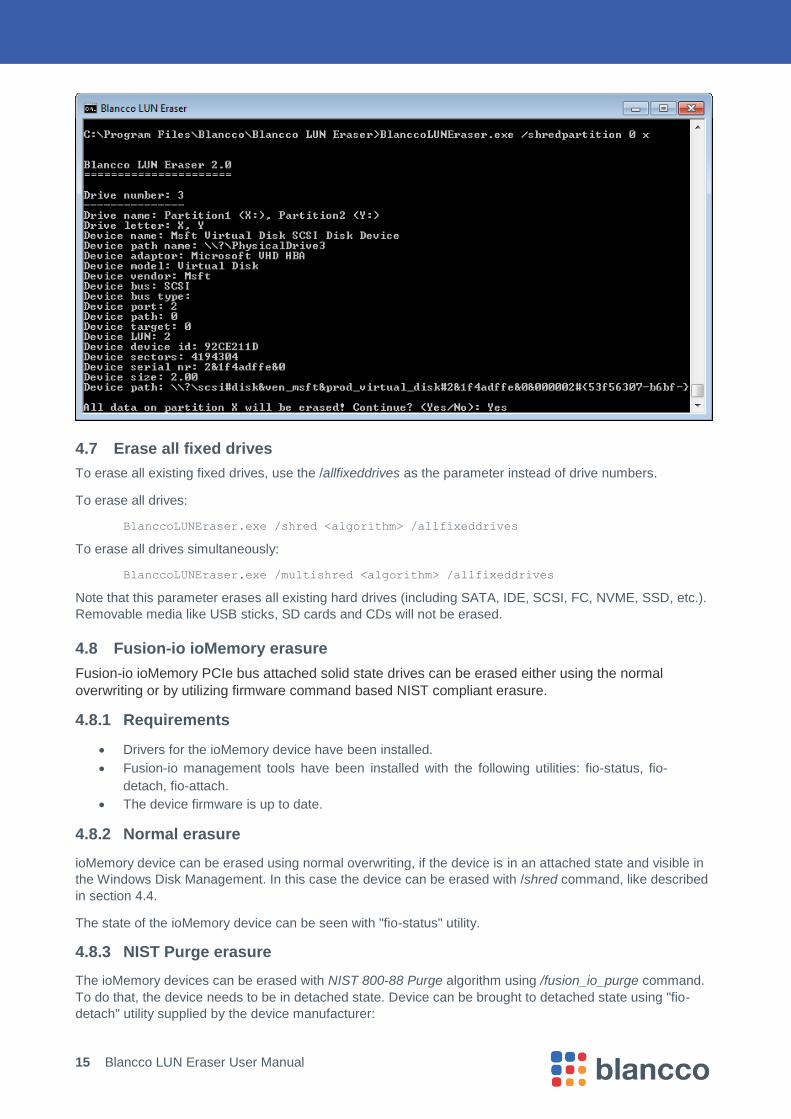
Here is an example of four drives being simultaneously erased:
4.6 Erase a partition
Blancco LUN Eraser has the ability to target and erase partitions on disks which have an MBR partition style.
To start the erasure, use the parameter /shredpartition followed by the overwriting algorithm of choice and
the partition letter to be erased.
Example:
BlanccoLUNEraser.exe /shredpartition 0 x
This example will erase the partition which has the drive letter x assigned to it and will use the HMG Infosec,
Lower Standard.
15 Blancco LUN Eraser User Manual
4.7 Erase all fixed drives
To erase all existing fixed drives, use the /allfixeddrives as the parameter instead of drive numbers.
To erase all drives:
BlanccoLUNEraser.exe /shred <algorithm> /allfixeddrives
To erase all drives simultaneously:
BlanccoLUNEraser.exe /multishred <algorithm> /allfixeddrives
Note that this parameter erases all existing hard drives (including SATA, IDE, SCSI, FC, NVME, SSD, etc.).
Removable media like USB sticks, SD cards and CDs will not be erased.
4.8 Fusion-io ioMemory erasure
Fusion-io ioMemory PCIe bus attached solid state drives can be erased either using the normal
overwriting or by utilizing firmware command based NIST compliant erasure.
4.8.1 Requirements
Drivers for the ioMemory device have been installed.
Fusion-io management tools have been installed with the following utilities: fio-status, fio-
detach, fio-attach.
The device firmware is up to date.
4.8.2 Normal erasure
ioMemory device can be erased using normal overwriting, if the device is in an attached state and visible in
the Windows Disk Management. In this case the device can be erased with /shred command, like described
in section 4.4.
The state of the ioMemory device can be seen with "fio-status" utility.
4.8.3 NIST Purge erasure
The ioMemory devices can be erased with NIST 800-88 Purge algorithm using /fusion_io_purge command.
To do that, the device needs to be in detached state. Device can be brought to detached state using "fio-
detach" utility supplied by the device manufacturer:
16 Blancco LUN Eraser User Manual
fio-detach <path to device>
BlanccoLUNEraser.exe /fusion_io_purge <path to device>
Device path can be seen either in the output of "fio-status" utility, or in the output of
BlanccoLUNEraser.exe /list
command if the device is in detached state. The device path is usually of the style "\\.\fct<number>" or
"/dev/fct<number>".
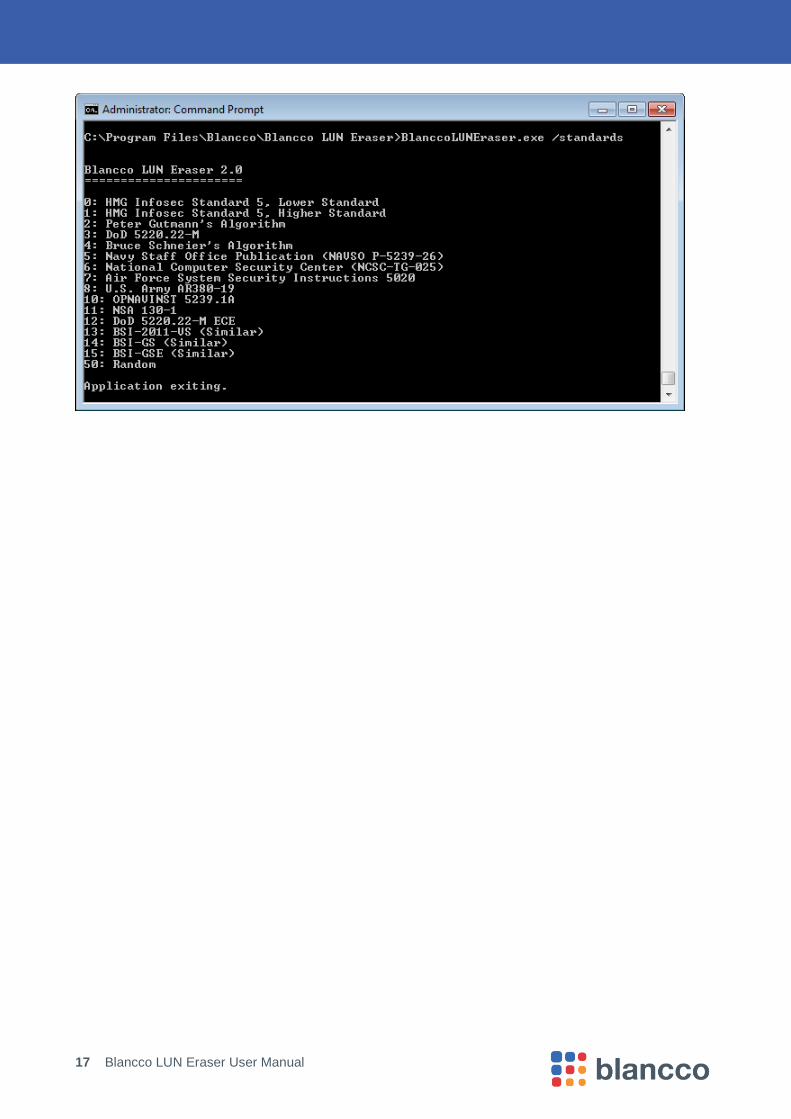
4.9 Erasure standards
The following erasure standards are available by default. Others can be requested and implemented as part
of a contracted solution.
Identifier Name Number of overwriting rounds
0 HMG Infosec Standard 5, Lower Standard (DEFAULT ALGORITHM) 1
1 HMG Infosec Standard 5, Higher Standard 3
2 Peter Gutmann's Algorithm 35
3 U.S Department of Defense Sanitizing (DoD 5220.22-M) 3
4 Bruce Schneier's Algorithm 7
5 Navy Staff Office Publication (NAVSO P-5239-26) 3
6 National Computer Security Center (NCSC-TG-025) 4
7 Air Force System Security Instructions 5020 4
8 U.S. Army AR380-19 3
10 OPNAVINST 5239.1A 3
11 NSA 130-1 3
12 DoD 5220.22-M ECE 7
13 BSI-2011-VS (Similar) 3
14 BSI-GS (Similar) 2
15 BSI-GSE (Similar) 3
50 Random* 1
* Random: 1 round of overwriting with aperiodic pseudo random data.
You also have the option to view the available erasure standards with the command /standards as seen
below:
17 Blancco LUN Eraser User Manual
18 Blancco LUN Eraser User Manual
5 Reporting
The software saves information about each erasure operation into an erasure report. These reports can be
handled by an administrator. The report includes time, date and the serial number of the unit being erased as
well as information about the user and erasure standard. Also optional custom fields can be included to the
report.
19 Blancco LUN Eraser User Manual
6 Configuration
All the settings for the reporting are done through registry values that can be set by using the Blancco Setup
Tool.
The Blancco Setup Tool allows you to configure license management, include custom fields in the report
process and also enable automatic connection to the Blancco Management Console.
Start the tool with the following command:
BlanccoLUNEraser.exe /setup
Or use the Windows start menu: Blancco Blancco LUN Eraser Setup Tool.
See the following sections for how to use the Blancco Setup Tool.
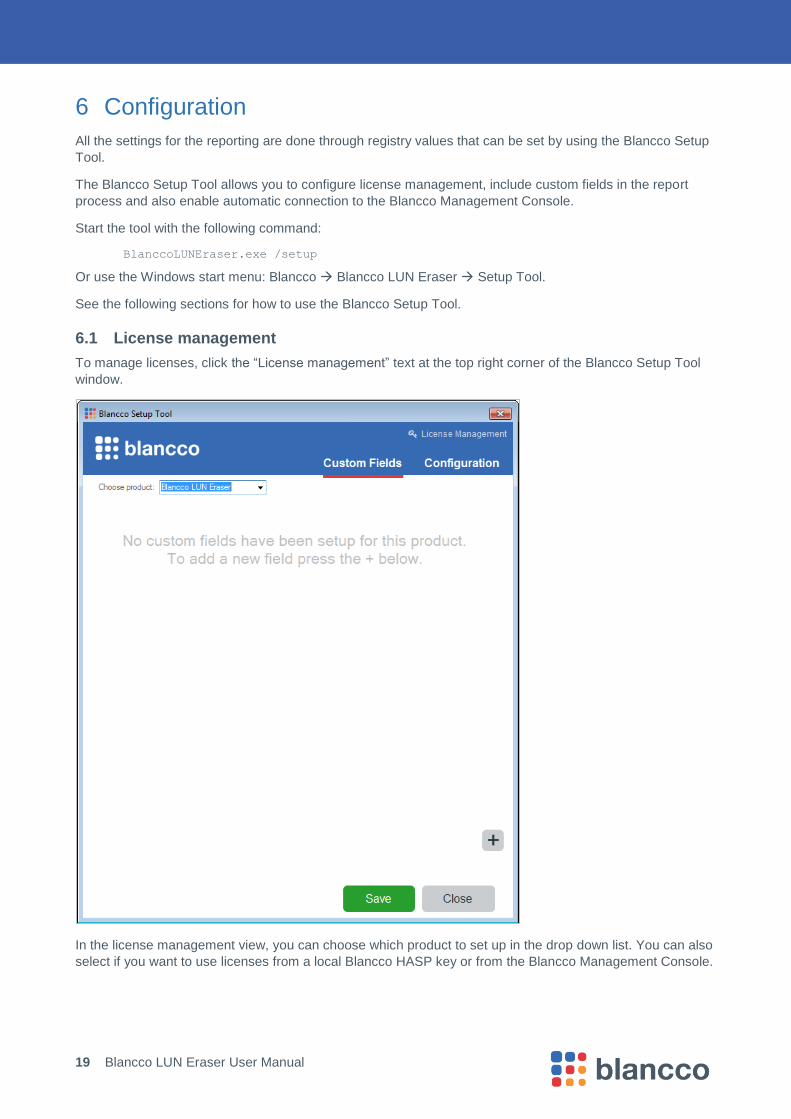
6.1 License management
To manage licenses, click the “License management” text at the top right corner of the Blancco Setup Tool
window.
In the license management view, you can choose which product to set up in the drop down list. You can also
select if you want to use licenses from a local Blancco HASP key or from the Blancco Management Console.
20 Blancco LUN Eraser User Manual
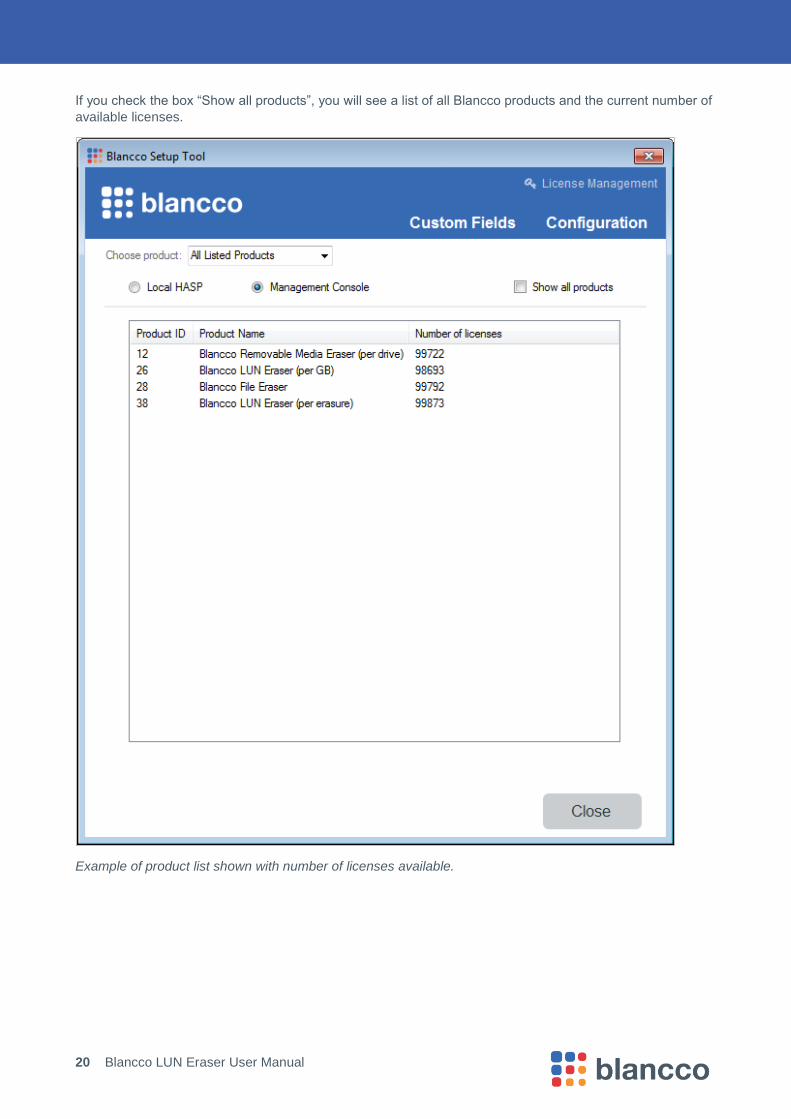
If you check the box “Show all products”, you will see a list of all Blancco products and the current number of
available licenses.
Example of product list shown with number of licenses available.
21 Blancco LUN Eraser User Manual
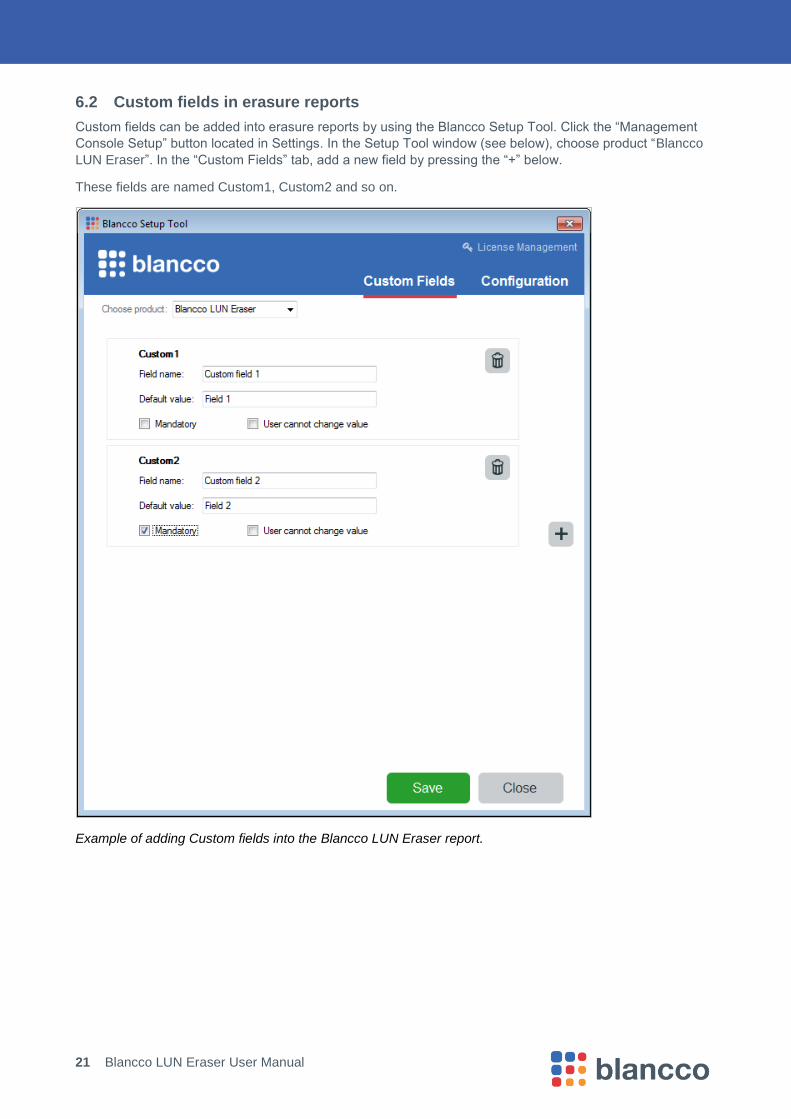
6.2 Custom fields in erasure reports
Custom fields can be added into erasure reports by using the Blancco Setup Tool. Click the “Management
Console Setup” button located in Settings. In the Setup Tool window (see below), choose product “Blancco
LUN Eraser”. In the “Custom Fields” tab, add a new field by pressing the “+” below.
These fields are named Custom1, Custom2 and so on.
Example of adding Custom fields into the Blancco LUN Eraser report.
22 Blancco LUN Eraser User Manual
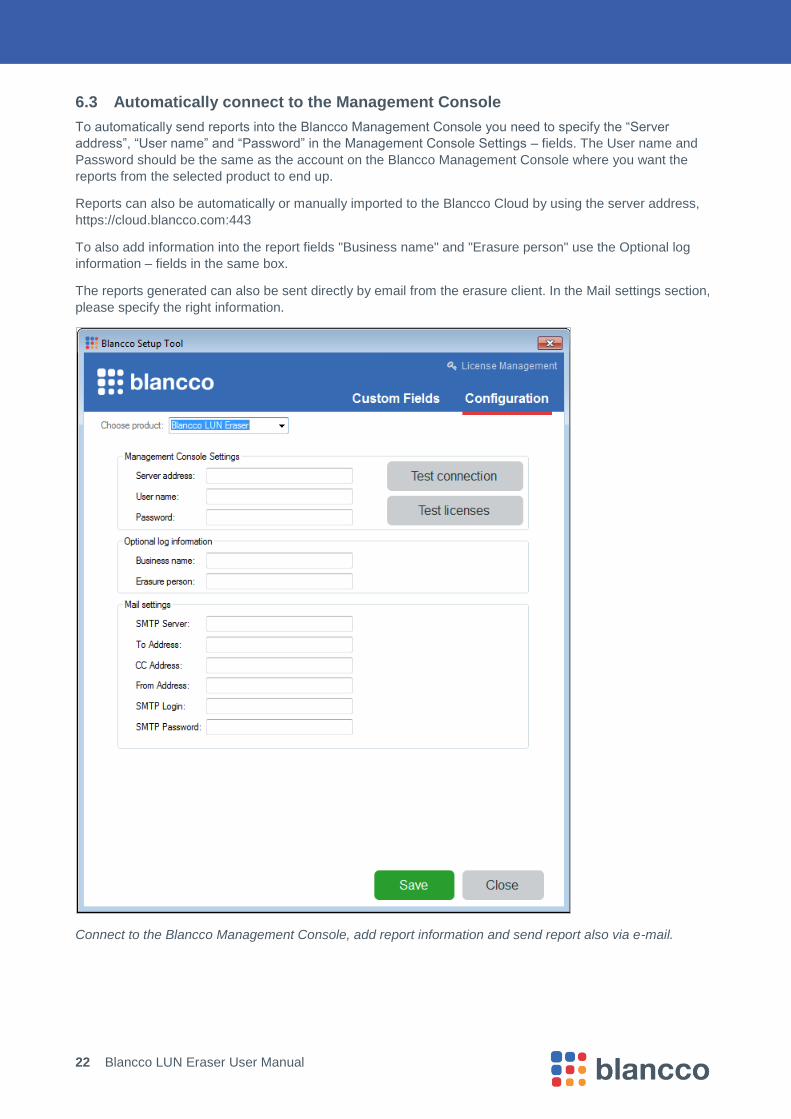
6.3 Automatically connect to the Management Console
To automatically send reports into the Blancco Management Console you need to specify the “Server
address”, “User name” and “Password” in the Management Console Settings – fields. The User name and
Password should be the same as the account on the Blancco Management Console where you want the
reports from the selected product to end up.
Reports can also be automatically or manually imported to the Blancco Cloud by using the server address,
https://cloud.blancco.com:443
To also add information into the report fields "Business name" and "Erasure person" use the Optional log
information – fields in the same box.
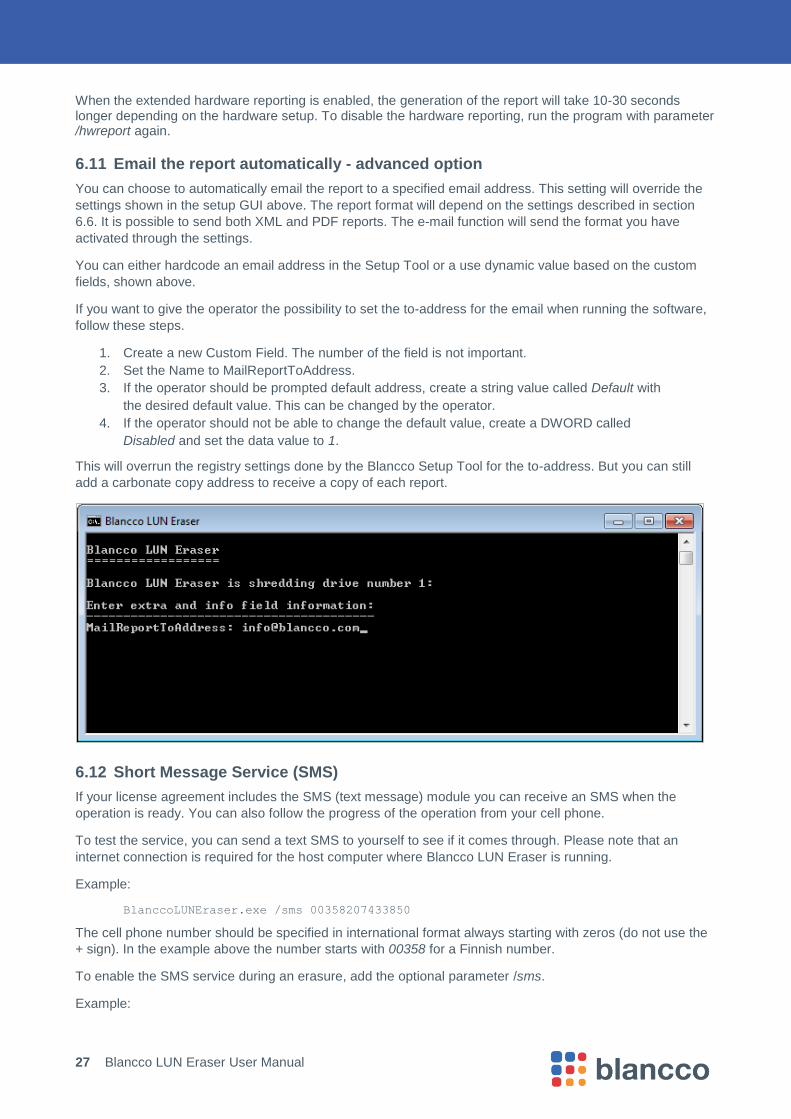
The reports generated can also be sent directly by email from the erasure client. In the Mail settings section,
please specify the right information.
Connect to the Blancco Management Console, add report information and send report also via e-mail.
23 Blancco LUN Eraser User Manual
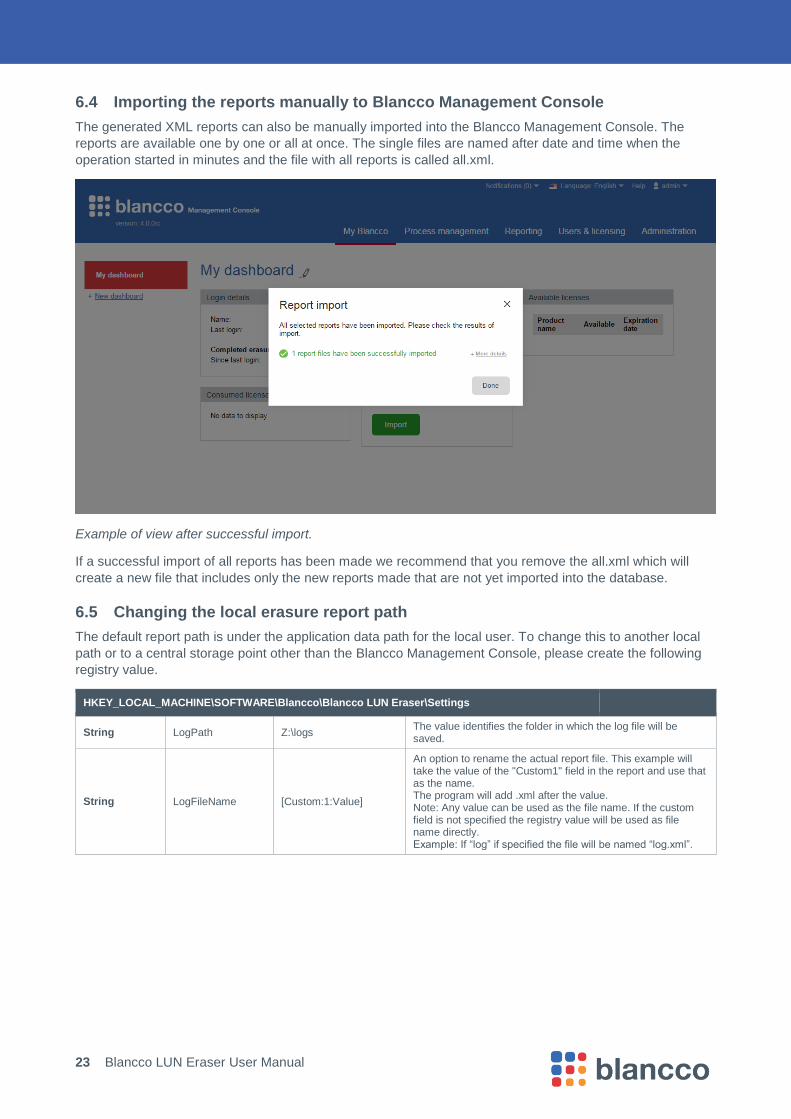
6.4 Importing the reports manually to Blancco Management Console
The generated XML reports can also be manually imported into the Blancco Management Console. The
reports are available one by one or all at once. The single files are named after date and time when the
operation started in minutes and the file with all reports is called all.xml.
Example of view after successful import.
If a successful import of all reports has been made we recommend that you remove the all.xml which will
create a new file that includes only the new reports made that are not yet imported into the database.
6.5 Changing the local erasure report path
The default report path is under the application data path for the local user. To change this to another local
path or to a central storage point other than the Blancco Management Console, please create the following
registry value.
HKEY_LOCAL_MACHINE\SOFTWARE\Blancco\Blancco LUN Eraser\Settings
String LogPath Z:\logs The value identifies the folder in which the log file will be saved.
String LogFileName [Custom:1:Value]
An option to rename the actual report file. This example will take the value of the "Custom1" field in the report and use that as the name. The program will add .xml after the value. Note: Any value can be used as the file name. If the custom field is not specified the registry value will be used as file name directly. Example: If “log” if specified the file will be named “log.xml”.
24 Blancco LUN Eraser User Manual
6.6 Generating reports in PDF format
By default, an erasure report is generated in XML and PDF format. To disable the PDF report generation,
change the registry setting described below.
HKEY_LOCAL_MACHINE\SOFTWARE\Blancco\Blancco XML Reports
DWORD MakeLogIntoPdf
Possible values are 0 and 1. 0 = Do not create PDF report 1 = Create PDF report
Defines if a PDF report should be generated. If emailing of the report is activated, the PDF file is sent.
6.7 Buffer size
Blancco LUN Eraser supports a variety of different storage equipment. Depending of the type of storage the
amount of I/O sent at one time can affect the performance of the erasure. The user can affect this amount by
changing the parameter BufferSize.
If the BufferSize parameter is not set the software will try to use the preferred size specified by the hardware
and the operating system. Especially in high-end storage systems this size is normally too small to get the
optimal erasure performance.
Note that Blancco LUN Eraser requires double the amount of RAM based off of the buffer size. For example,
if the buffer size is 512MB, then 1024MB of RAM will be used.
If you want the software to automatically change the buffer depending on the current performance and are
defining this value in Command Line Interface, the value -1 can be used.
The buffer size then changes each minute depending on the current performance.
If the same storage is erased over and over again the most efficient is to manually specify a buffer size that
is believed to optimize performance. The software will then run the entire operation with the specified buffer
size.
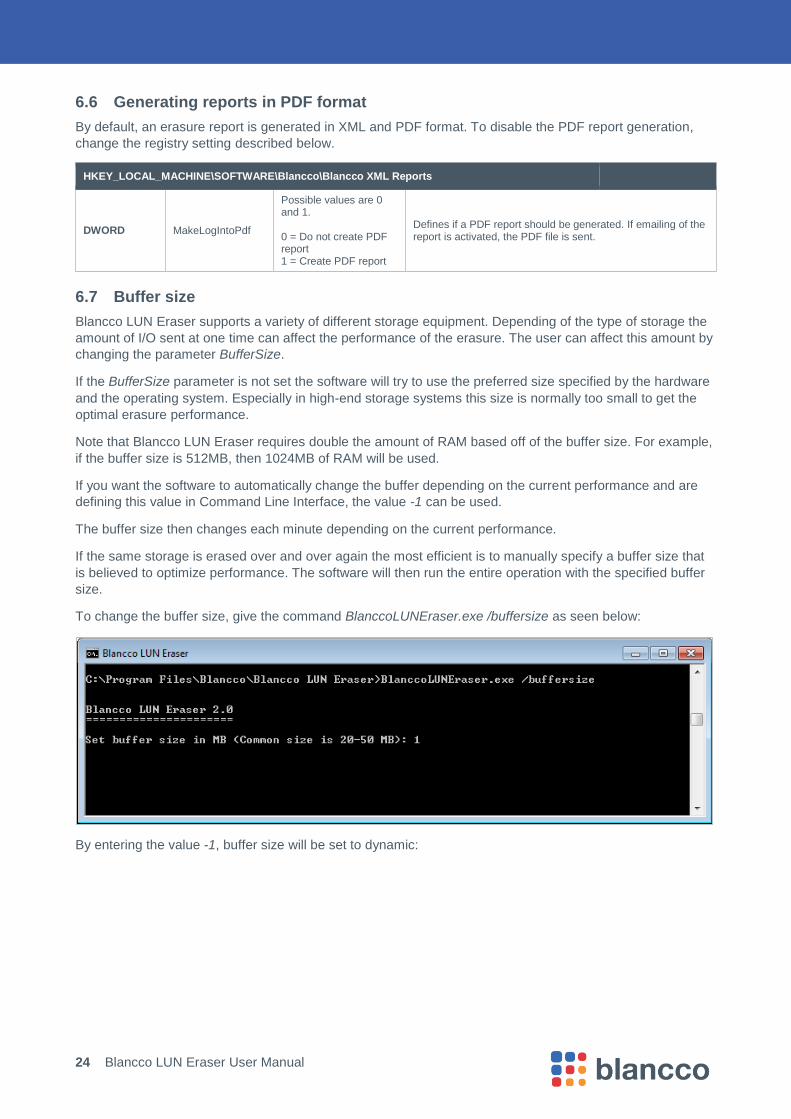
To change the buffer size, give the command BlanccoLUNEraser.exe /buffersize as seen below:
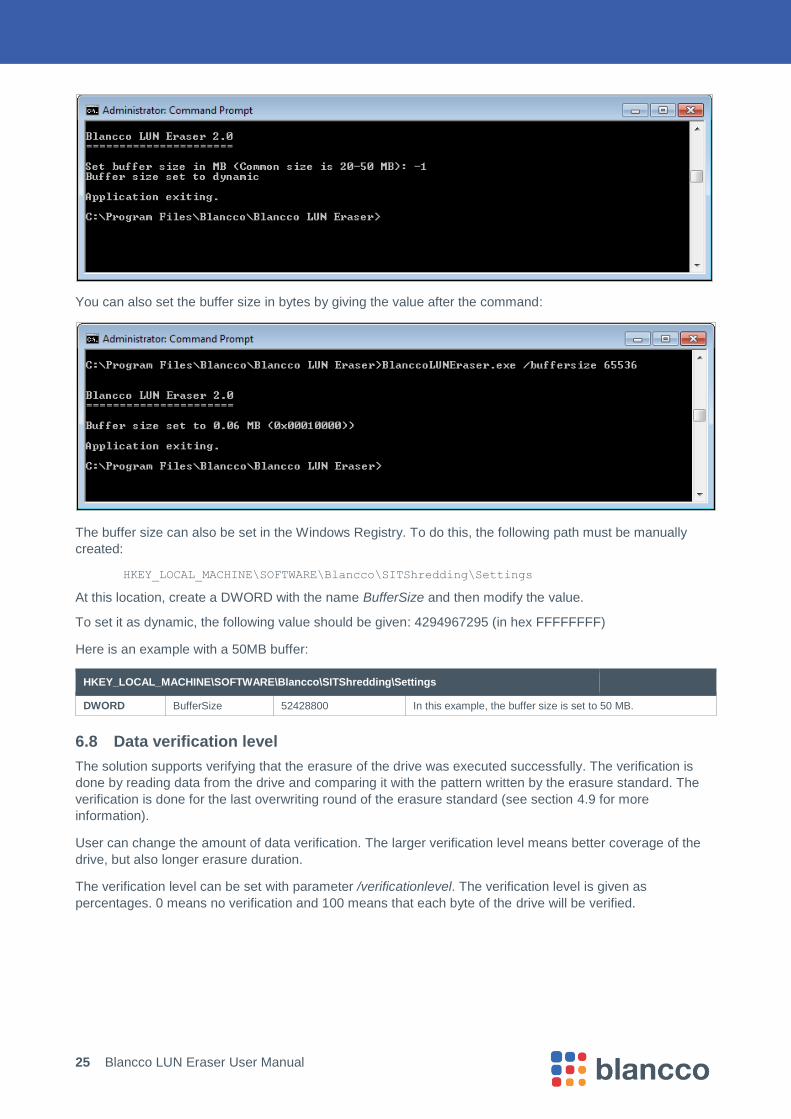
By entering the value -1, buffer size will be set to dynamic:
25 Blancco LUN Eraser User Manual
You can also set the buffer size in bytes by giving the value after the command:
The buffer size can also be set in the Windows Registry. To do this, the following path must be manually
created:
HKEY_LOCAL_MACHINE\SOFTWARE\Blancco\SITShredding\Settings
At this location, create a DWORD with the name BufferSize and then modify the value.
To set it as dynamic, the following value should be given: 4294967295 (in hex FFFFFFFF)
Here is an example with a 50MB buffer:
HKEY_LOCAL_MACHINE\SOFTWARE\Blancco\SITShredding\Settings
DWORD BufferSize 52428800 In this example, the buffer size is set to 50 MB.
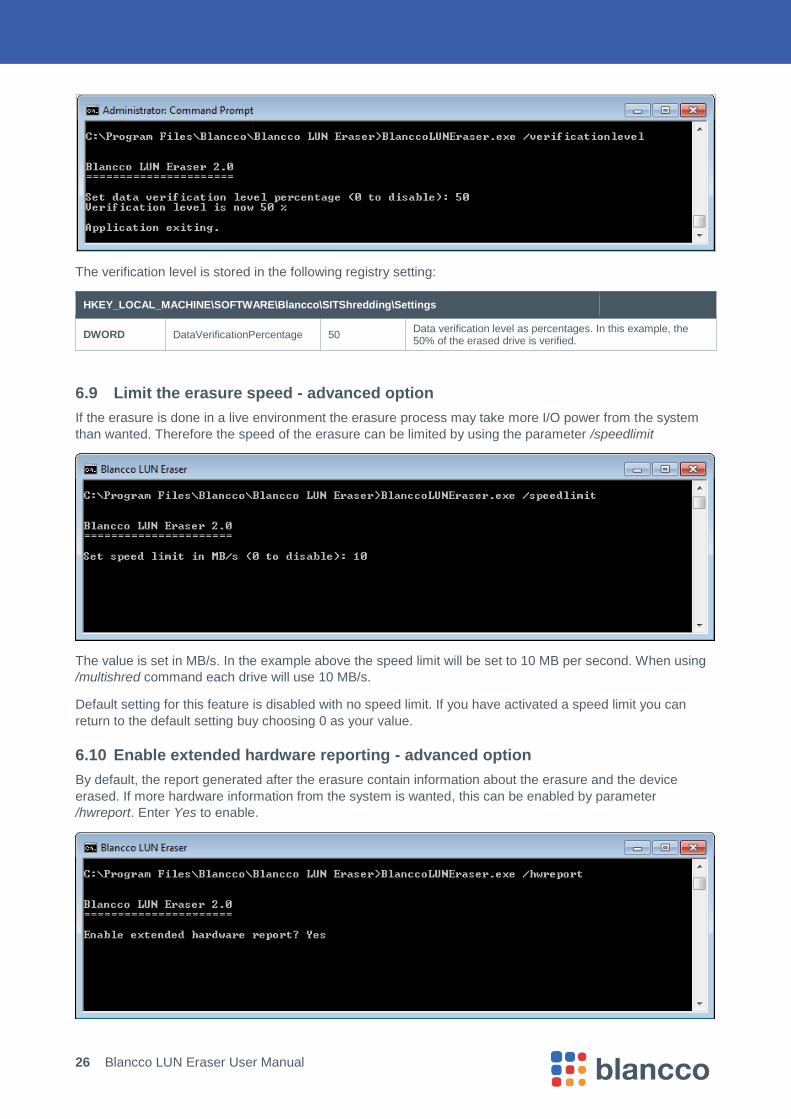
6.8 Data verification level
The solution supports verifying that the erasure of the drive was executed successfully. The verification is
done by reading data from the drive and comparing it with the pattern written by the erasure standard. The
verification is done for the last overwriting round of the erasure standard (see section 4.9 for more
information).
User can change the amount of data verification. The larger verification level means better coverage of the
drive, but also longer erasure duration.
The verification level can be set with parameter /verificationlevel. The verification level is given as
percentages. 0 means no verification and 100 means that each byte of the drive will be verified.
26 Blancco LUN Eraser User Manual
The verification level is stored in the following registry setting:
HKEY_LOCAL_MACHINE\SOFTWARE\Blancco\SITShredding\Settings
DWORD DataVerificationPercentage 50 Data verification level as percentages. In this example, the 50% of the erased drive is verified.
6.9 Limit the erasure speed - advanced option
If the erasure is done in a live environment the erasure process may take more I/O power from the system
than wanted. Therefore the speed of the erasure can be limited by using the parameter /speedlimit
The value is set in MB/s. In the example above the speed limit will be set to 10 MB per second. When using
/multishred command each drive will use 10 MB/s.
Default setting for this feature is disabled with no speed limit. If you have activated a speed limit you can
return to the default setting buy choosing 0 as your value.
6.10 Enable extended hardware reporting - advanced option
By default, the report generated after the erasure contain information about the erasure and the device
erased. If more hardware information from the system is wanted, this can be enabled by parameter
/hwreport. Enter Yes to enable.
27 Blancco LUN Eraser User Manual
When the extended hardware reporting is enabled, the generation of the report will take 10-30 seconds longer depending on the hardware setup. To disable the hardware reporting, run the program with parameter /hwreport again.
6.11 Email the report automatically - advanced option
You can choose to automatically email the report to a specified email address. This setting will override the
settings shown in the setup GUI above. The report format will depend on the settings described in section
6.6. It is possible to send both XML and PDF reports. The e-mail function will send the format you have
activated through the settings.
You can either hardcode an email address in the Setup Tool or a use dynamic value based on the custom
fields, shown above.
If you want to give the operator the possibility to set the to-address for the email when running the software,
follow these steps.
1. Create a new Custom Field. The number of the field is not important.
2. Set the Name to MailReportToAddress.
3. If the operator should be prompted default address, create a string value called Default with
the desired default value. This can be changed by the operator.
4. If the operator should not be able to change the default value, create a DWORD called
Disabled and set the data value to 1.
This will overrun the registry settings done by the Blancco Setup Tool for the to-address. But you can still
add a carbonate copy address to receive a copy of each report.
6.12 Short Message Service (SMS)
If your license agreement includes the SMS (text message) module you can receive an SMS when the
operation is ready. You can also follow the progress of the operation from your cell phone.
To test the service, you can send a text SMS to yourself to see if it comes through. Please note that an
internet connection is required for the host computer where Blancco LUN Eraser is running.
Example:
BlanccoLUNEraser.exe /sms 00358207433850
The cell phone number should be specified in international format always starting with zeros (do not use the
+ sign). In the example above the number starts with 00358 for a Finnish number.
To enable the SMS service during an erasure, add the optional parameter /sms.
Example:
28 Blancco LUN Eraser User Manual
BlanccoLUNEraser.exe /shred 0 3 5 /sms:00358207433850
In this example HMG Infosec, Lower Standard (0) will be used to erase LUN 3 and 5 and SMS messages will
be sent to number 00358207433850 every two hours with progress reports.
An SMS will be sent to the specified cell phone number when the operation is performed. The SMS will
contain information about the outcome of the operation and duration time.
An SMS progress report will look like this:
Blancco LUN Eraser has completed x% of the drive (drive number/LUN specified in job combined with
manufacturer and model) on (computer name). Speed xy MB/s – Elapsed time: hh:mm:ss – Time left:
hh:mm:ss.
During the operation, the service will send an SMS every second hour, updating the operator about the
progress.
The SMS service has no understanding of office hours. Therefore an SMS can be sent to the receiving cell
phone during night time as well.
29 Blancco LUN Eraser User Manual
7 Troubleshooting
No PDF report file is generated. Make sure that NET 2.0 is installed.
Remote erasure. Verify that you have a stable connection and avoid using modem connection for erasure
purposes.
Sufficient user rights. Make sure that the account you are using has full access to the unit/units where the
erasure will be executed.
Failed erasure, clean up and rebooting. When erasing LUN’s connected to clustered servers it is
necessary to power down all other servers in the cluster except the one to be used to perform the erasure.
This is to ensure that the other servers in the cluster don’t reserve the hard drives thus preventing access to
the hard drives and causing the erasure to fail. In some circumstances it may be necessary to also force a
cleanup on the server you are using to perform the erasure. In the case of Wintel servers this can be done
by accessing the Command prompt and typing the following command: cluster node servername
/forcecleanup. It may also be necessary to then reboot the server after running this command if the hard
drives are still not accessible.
30 Blancco LUN Eraser User Manual
8 Contact information
Visit the technical knowledgebase (FAQ) and contact Blancco Technical Support by submitting a technical
support ticket at:
http://support.blancco.com/
See the instructional videos for Blancco products at:
http://www.blancco.com/en/videos
For contact information and the latest information about secure data erasure solutions, visit the Blancco
website at:
http://www.blancco.com/
We are always looking for ways to improve our products. Please let us know if you have any suggestions!