bladerider x8 – high performance racing - west coast · pdf filebladerider x8 –...
TRANSCRIPT

Bladerider X8 – High Performance Racing Last Update - May 14, 2008
© Bladerider International Pty Ltd
IMPORTANT NOTE: Any modification done to the supplied equipment will void your warranty. However if you wish to try some of
these changes, it is important that you do any of them until you have sailed the boat a number of times, and understand any problems or issues that you are experiencing. If you are unsure of the problem, issue or solution, please contact your reseller, ambassador or our Melbourne support office for more assistance.
6.1 Rake & Rig Tension
You can best determine the rake by putting
the mast up with the sail (but no downhaul tension) using rig tension of 15 on the Loos Guage (around
85ks of tension with 2.5mm wire).
Measure from the top of the foredeck next
to the front of the mast stump, 3600mm up the to the back of the mast (just behind the hounds) and
place a mark using a white pen or similar. Now measure from the lowest point on the deck at the
transom, up to this mark on the mast. This distance
should be between: 4350mm.
Any variation of this (+/- 40mm) is okay
and will not effect performance much, however it
will make it easier to tack and gybe by having the
rig forward. Having the rig back will provide a small improvement upwind, but small speed decrease
downwind.
In order to best maximize the performance
with rake upwind and downwind, it is possible to
use a lower rig tension (around 13 on the Loos
Guage) as this will allow the mast to come back and bend a bit more upwind, while allowing the rig
to go forward and straighten downwind. However there is also a risk with a lower rig tension that the mast can jump out of the mast step if you are not careful.
6.2 Wand & Push Rod Settings
6.2.1 Adding Extra lift on your Front Foil
Depending on your abilities, you might want to either add more angle of attack (using packers in
the back of the centerboard) or wind out the socket joint head out 2-3 turns on the deck, to push more
flap down on the main foil and give the front half of the boat more lift and ride higher out of the water.
The more lift at the bow can be compensated by moving body weight further forward and using
more lift on the rudder. However it is not recommended to use these settings in anything over 18 knots as the boat speed will be so fast downwind, that there will more than enough lift produced by the angle
of attack.
Bladerider X8 – High Performance Racing Last Update - May 14, 2008
© Bladerider International Pty Ltd
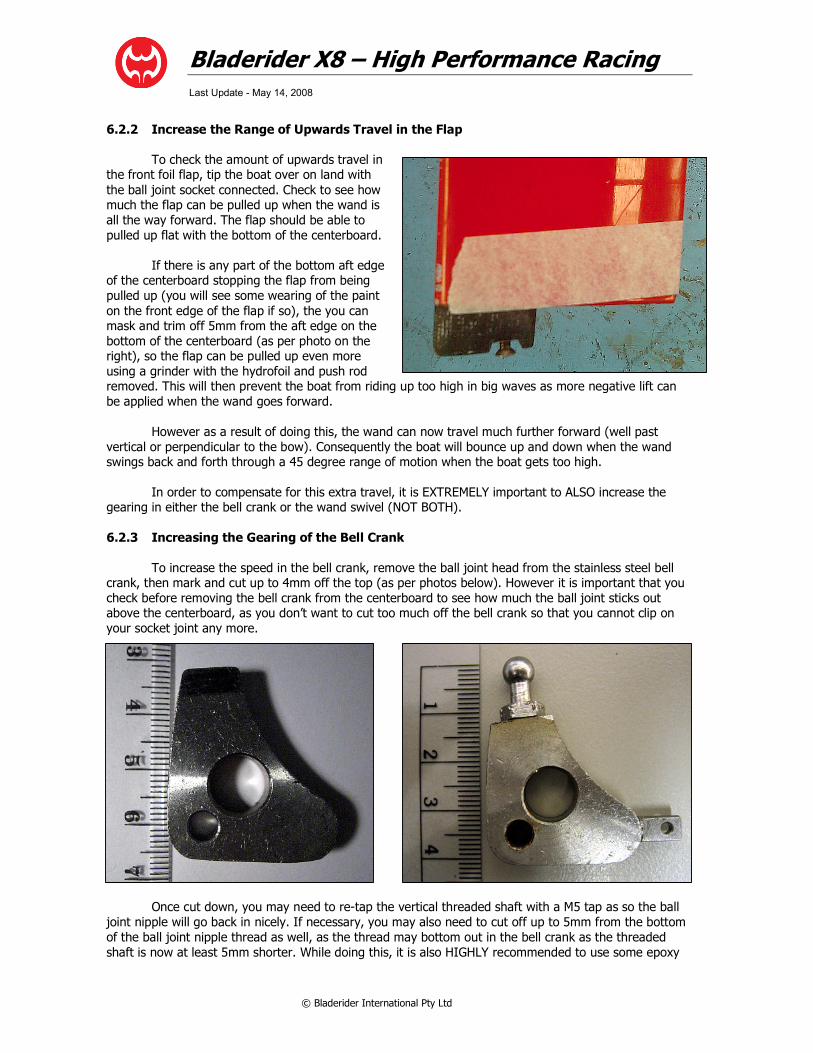
6.2.2 Increase the Range of Upwards Travel in the Flap
To check the amount of upwards travel in the front foil flap, tip the boat over on land with
the ball joint socket connected. Check to see how much the flap can be pulled up when the wand is
all the way forward. The flap should be able to
pulled up flat with the bottom of the centerboard.
If there is any part of the bottom aft edge of the centerboard stopping the flap from being
pulled up (you will see some wearing of the paint
on the front edge of the flap if so), the you can mask and trim off 5mm from the aft edge on the
bottom of the centerboard (as per photo on the right), so the flap can be pulled up even more
using a grinder with the hydrofoil and push rod removed. This will then prevent the boat from riding up too high in big waves as more negative lift can
be applied when the wand goes forward.
However as a result of doing this, the wand can now travel much further forward (well past
vertical or perpendicular to the bow). Consequently the boat will bounce up and down when the wand swings back and forth through a 45 degree range of motion when the boat gets too high.
In order to compensate for this extra travel, it is EXTREMELY important to ALSO increase the gearing in either the bell crank or the wand swivel (NOT BOTH).
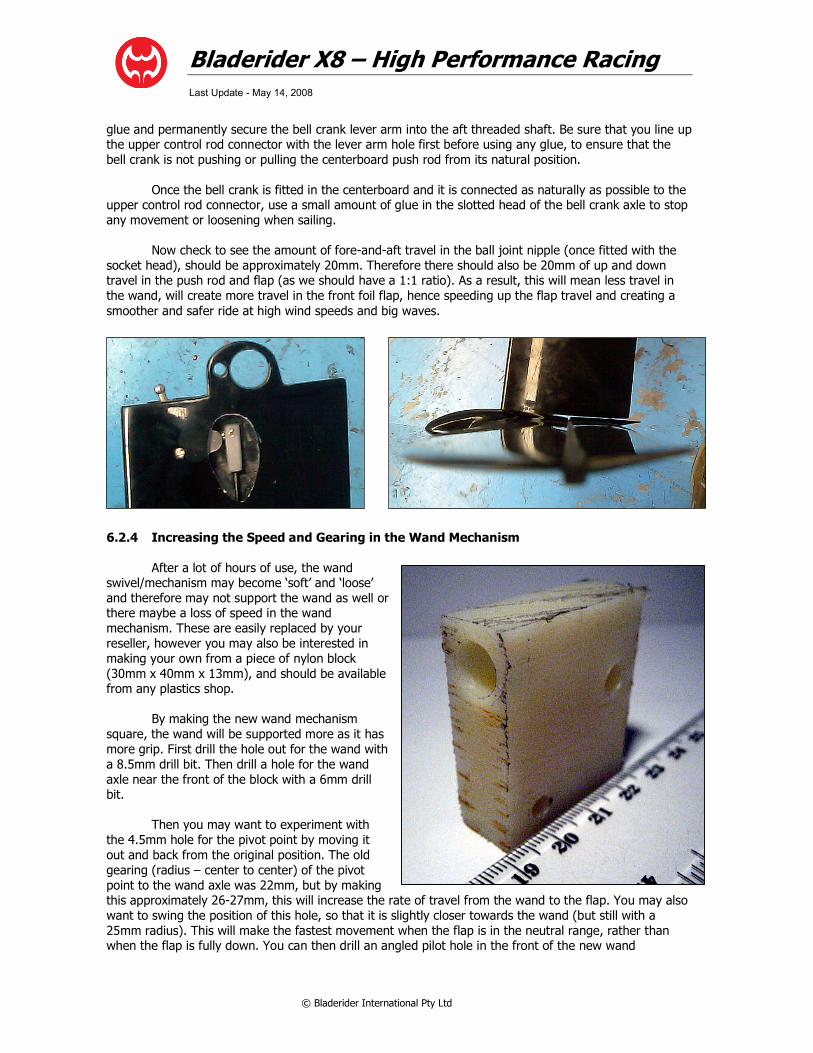
6.2.3 Increasing the Gearing of the Bell Crank
To increase the speed in the bell crank, remove the ball joint head from the stainless steel bell crank, then mark and cut up to 4mm off the top (as per photos below). However it is important that you
check before removing the bell crank from the centerboard to see how much the ball joint sticks out above the centerboard, as you don’t want to cut too much off the bell crank so that you cannot clip on
your socket joint any more.
Once cut down, you may need to re-tap the vertical threaded shaft with a M5 tap as so the ball
joint nipple will go back in nicely. If necessary, you may also need to cut off up to 5mm from the bottom
of the ball joint nipple thread as well, as the thread may bottom out in the bell crank as the threaded
shaft is now at least 5mm shorter. While doing this, it is also HIGHLY recommended to use some epoxy
Bladerider X8 – High Performance Racing Last Update - May 14, 2008
© Bladerider International Pty Ltd
glue and permanently secure the bell crank lever arm into the aft threaded shaft. Be sure that you line up the upper control rod connector with the lever arm hole first before using any glue, to ensure that the
bell crank is not pushing or pulling the centerboard push rod from its natural position.
Once the bell crank is fitted in the centerboard and it is connected as naturally as possible to the upper control rod connector, use a small amount of glue in the slotted head of the bell crank axle to stop
any movement or loosening when sailing.
Now check to see the amount of fore-and-aft travel in the ball joint nipple (once fitted with the
socket head), should be approximately 20mm. Therefore there should also be 20mm of up and down travel in the push rod and flap (as we should have a 1:1 ratio). As a result, this will mean less travel in
the wand, will create more travel in the front foil flap, hence speeding up the flap travel and creating a
smoother and safer ride at high wind speeds and big waves.
6.2.4 Increasing the Speed and Gearing in the Wand Mechanism
After a lot of hours of use, the wand swivel/mechanism may become ‘soft’ and ‘loose’
and therefore may not support the wand as well or there maybe a loss of speed in the wand
mechanism. These are easily replaced by your
reseller, however you may also be interested in
making your own from a piece of nylon block
(30mm x 40mm x 13mm), and should be available from any plastics shop.
By making the new wand mechanism
square, the wand will be supported more as it has
more grip. First drill the hole out for the wand with
a 8.5mm drill bit. Then drill a hole for the wand
axle near the front of the block with a 6mm drill bit.
Then you may want to experiment with
the 4.5mm hole for the pivot point by moving it
out and back from the original position. The old
gearing (radius – center to center) of the pivot
point to the wand axle was 22mm, but by making this approximately 26-27mm, this will increase the rate of travel from the wand to the flap. You may also
want to swing the position of this hole, so that it is slightly closer towards the wand (but still with a
25mm radius). This will make the fastest movement when the flap is in the neutral range, rather than when the flap is fully down. You can then drill an angled pilot hole in the front of the new wand

Bladerider X8 – High Performance Racing Last Update - May 14, 2008
© Bladerider International Pty Ltd
mechanism with a 4.5mm drill bit, however, if you at the stage where you are making your own wands, you might want to make a slightly longer version and slide the wand right through so that you can tie the
wand elastic on to the forward end of the wand now.
6.3 Sail Settings
6.3.1 Upwind
The Vang setting is critical to obtain a good VMG upwind. It is hard to describe how much is
enough in certain wind conditions, but generally you would need more than most people think is enough. The idea is that the leech is as straight as possible, and there is no twist in the top part of the sail. The
windier it gets, the more vang you need to use. In order to pull on enough vang, it is suggested that you
wrap the rope around your hand to get a better grip and use your whole body to pull on more tension.
The Downhaul is only set once the vang tension is correct. As per the vang, the windier it gets, the more downhaul you need. But how much is enough? Generally you need to pull on more than you
think is enough.
To measure this tension, you can stick on a Ronstan tension guage on the bottom of your mast
at 5185mm from the top of the mast (so the maximum reading ‘12’ is 5185mm from the top of the mast). The International Moth Class rules specify that there must be a white band on the mast below this
point (15mm thick), and therefore the sail cannot be stretched below this point.
The following is a table of downhaul tension required for wind speed:
6 knots of wind = downhaul tension of 3-4
9 knots of wind = downhaul tension of 4 12 knots of wind = downhaul tension of 4.5
15 knots of wind = downhaul tension of 5
18 knots of wind = downhaul tension of 6 21 knots of wind = downhaul tension of 7
Downhaul set right for maximum upwind boat speed in around 18 knots of wind.

Bladerider X8 – High Performance Racing Last Update - May 14, 2008
© Bladerider International Pty Ltd
The Outhaul is adjusted last, and really there are only four settings, very loose foot, loose foot, moderate foot tension and flat foot. You will only use the last three settings for upwind performance, and
you would normally only use a loose foot in light winds if low riding and you want to foil. Once foiling, you should only use moderate foot tension for winds under 10 knots or tight foot tension for any
conditions over 11 knots. The tight foot tension will give you better pointing ability if desired.
Once foiling in light wind conditions, the sail should be very flat up top and slightly full down low.
6.3.2 Reaching
Generally the reach is the fastest leg of the course and it is unlikely that you will be doing less
than 15 knots of boat speed in any winds over 6 knots. Therefore, a fairly flat sail is required with good vang tension to keep height to windward (as the apparent wind is a lot further around past the true
wind).
The downhaul tension on reach is set similar very similar to upwind mode, however, you might use slightly less tension (ie ½ a setting) in lighter wind conditions, as the apparent wind is further
forward.
6.3.3 Downwind
Vang tension should always be released first in conditions up to 20 knots. Beyond this, it
probably won’t make much difference if you let any vang off, as you are moving so fast and it will probably only make the boat more unstable. The lighter the winds, the more vang you should be letting
off downwind.
Downhaul settings are very important for downwind VMG. In flat water conditions, it is more comfortable to go faster, and therefore less downhaul can be used to obtain a better VMG. In bigger sea
conditions, it is safer to keep the downhaul on a bit more to kill power up the top of the rig as to give
you better control. In light wind conditions regardless of the seas, you really want to power up the sail, to get the best VMG possible, but ensure that there are NEVER any creases in the luff as this is drag!
Bladerider X8 – High Performance Racing Last Update - May 14, 2008
© Bladerider International Pty Ltd
As a basic rule of thumb, you should be using slightly less tension (ie ½ a setting) compared to when on a reach, in all wind conditions.
Outhaul should always be let off as much as possible in light airs, but use moderate tension once
the wind gets over 10 knots.
6.4 Manouvers
6.4.1 Airborne Tacking
It seems that only a few have claimed to have done an airborne tack, but rarely (ie ever) are
they ever witnessed by anyone. The main reason is that it is difficult to keep the hull airborne for the
whole way around through the tack, but it is possible in flat water and winds around 10-15 knots.
The boat needs to spin very fast and very flat through the whole tack as so you can get it through the eye of the wind as fast as possible. The back of the hull might just touch briefly but it will
pop out right away once the boat picks up speed on the new tack. It is important that you need flat
water and constant wind to do this however, otherwise it can throw the boat off balance.
6.4.2 Airbourne Gybing
It is important to keep the boat going fast into the gybe with no angle of heel, but a slight
amount of pitch up on the bow. This is because when you go through the gybe, the boat will slow down and you will need more lift by angle of attack to keep the boat altitude up.
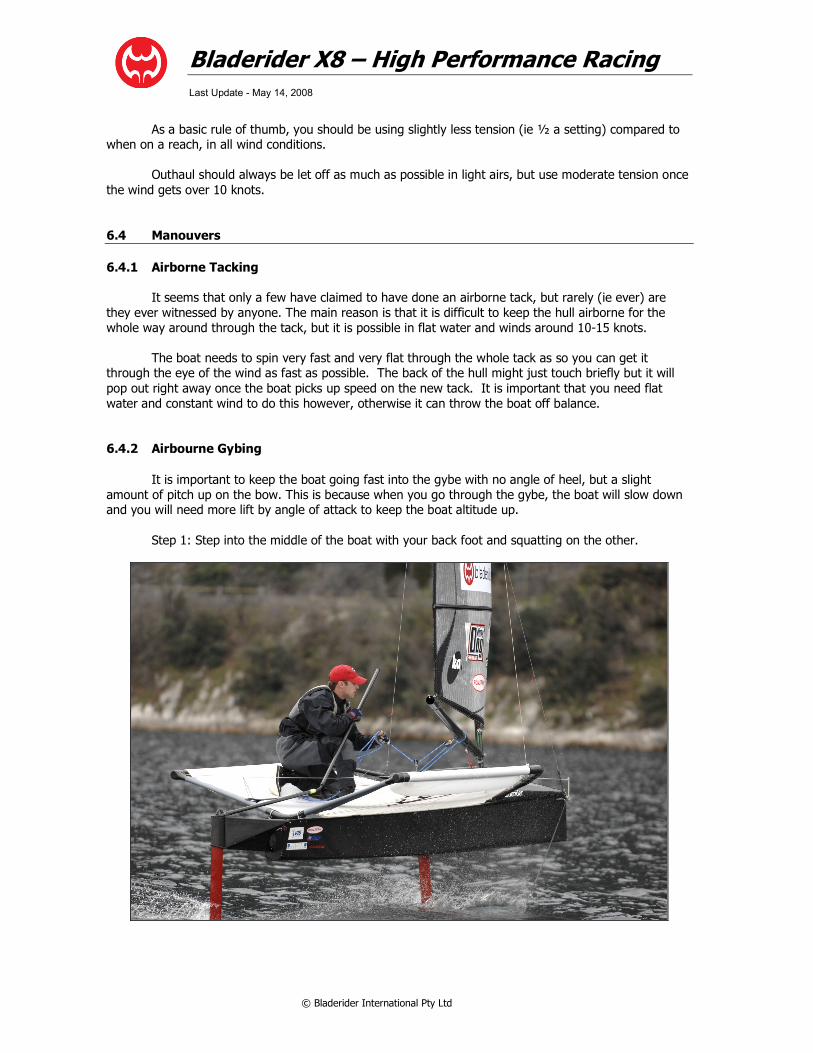
Step 1: Step into the middle of the boat with your back foot and squatting on the other.

Bladerider X8 – High Performance Racing Last Update - May 14, 2008
© Bladerider International Pty Ltd
Step 2: Pull the tiller towards you and point the tiller extension to the leeward wing bar. At the same time, grab the all ropes of the mainsheet.
Step 3: Pull the boom over and duck under the boom reaching out onto the new windward wing.
Step 4: Keep turning until the apparent wind is on the new side then flip the battens.

Bladerider X8 – High Performance Racing Last Update - May 14, 2008
© Bladerider International Pty Ltd
Step 5: Sit back into the wing bar towards the back whilst keeping good balance on the boat.
Step 6: Swap hands with the tiller and mainsheet once the boat has picked up speed and
balance.
Bladerider X8 – High Performance Racing Last Update - May 14, 2008
© Bladerider International Pty Ltd
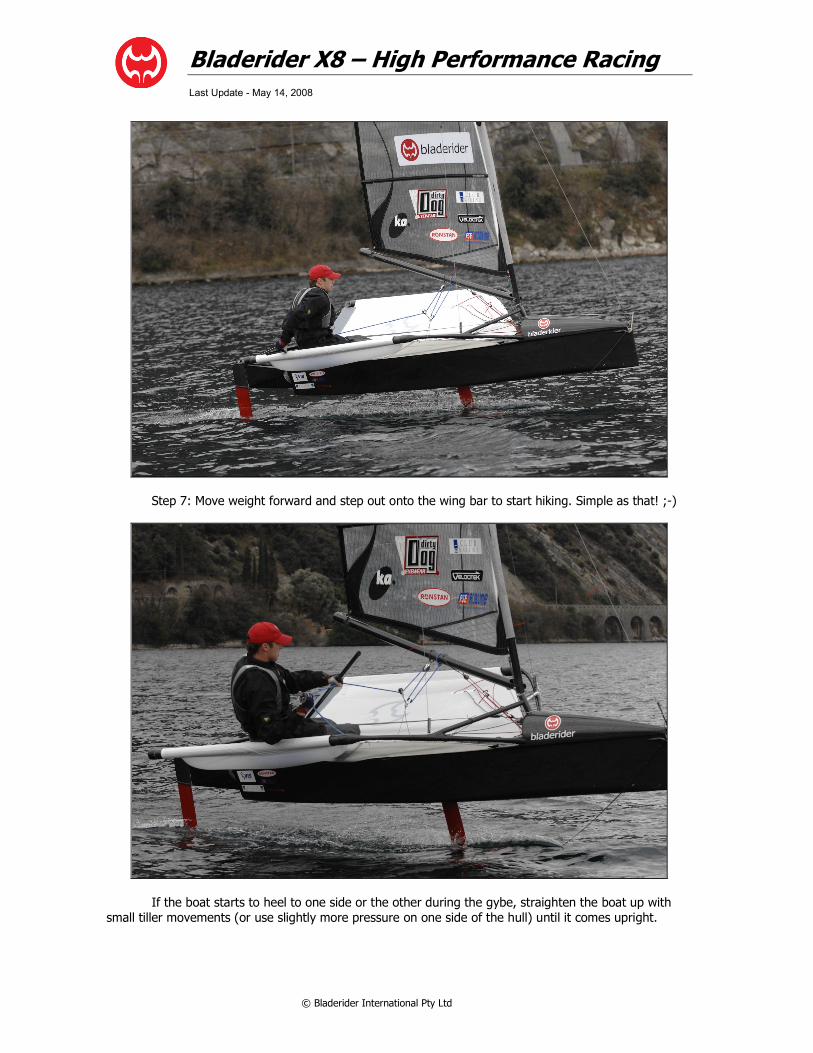
Step 7: Move weight forward and step out onto the wing bar to start hiking. Simple as that! ;-)
If the boat starts to heel to one side or the other during the gybe, straighten the boat up with
small tiller movements (or use slightly more pressure on one side of the hull) until it comes upright.

Bladerider X8 – High Performance Racing Last Update - May 14, 2008
© Bladerider International Pty Ltd
If the bow feels like it is going to nose dive or launch up into the air, you can use fore and aft body movement or rudder foil trim to correct the pitch of the boat.
During the whole time during the gybe, the boat cannot heel to any side, otherwise it will easily
lose balance, the wings hit the water, kill speed instantly and potentially tip you over.
6.4.3 Gyacking
When sailing to windward it is possible to keep foiling fast in winds as light as 4 knots, but it is
not normally possible to take off on any point of sailing in winds lighter than 6 knots. So when you are foiling upwind through a lull of less than 5 knots and you must tack, it may be wiser to do a fast gybe to
keep up on foils and moving fast, rather than risk tacking, and potentially drop to displacement speed
during the tack and not be able to start foiling again. This is called a Gyack or Gack.
6.5 Ropes & Pulleys
There are many different options to sailors on using different ropes and pulleys to enhance the
ease of use on the Bladerider X8.
6.5.1 Vang Cascade
The Bladerider comes standard with two RF468's in the upper an lower part of the vang cascade,
but we can now offer an upgrade on these pulleys to a special 40mm stainless steel pulley with a safe working load well over 500 kg. These have a much smoother and easier pull.
The Bladerider also comes standard with a 5mm FSE Robline Dinghy Control which is extremely
durable and stiff, but this effects how 'flat' the rope can spread over the pulley and distribute the load. Therefore you might want to try a 'softer' 5mm dynemma/polyester blend called Racing Sheet made by
FSE Robline in Austria, that seems to stretch a bit more initially, but seems to make the load easier to
pull on. It is suggested to use this rope at the final part of the cascade (and where you cleat) and then use 5mm Dinghy Control or 4mm dynemma/vectran in the two top parts of the cascade with some nice
splicing.
Finally if you are still struggling to pull on the vang, you can always add more purchase in the
system. The easiest way to do that is to use a becket pulley on the top and bottom of the cascade and run a longer main-load line starting from the becket on the upper pulley then down through a 20mm
pulley at the becket of the bottom pulley and then back up and around the 40mm upper most pulley, then attach the end to a single 20mm pulley. If that makes no sense, you'll have to work out something
out yourself.
6.5.2 Mainsheet
Possible the best upgrade you can have on your Bladerider is a 9mm dynmmea/polyester
mainsheet made by FSE Robline's called Racing Sheet. This stuff is not cheap and is very hard to find, but there are other alternatives out there if you cannot get any. If you can get your hands on some
8mm, it is okay, but the 9mm is just that little bit more confortable in your hands, even though it is a
tight fit through any 30mm b/b pulley.
6.6 Centerboard and Rudder Case Packing
To ensure that your centerboard and rudder blades fit perfectly into your cases, it is
recommended to replace any black nylon webbing and use some Teflon tape to fit around the inside of

Bladerider X8 – High Performance Racing Last Update - May 14, 2008
© Bladerider International Pty Ltd
the cases instead (but no need to replace the black plastic cassette in the bottom of the centerboard case).
You can order this teflon tape from http://www.ludoplas.com. You will only need the 25mm wide
tape and .25 or .76mm thick.
6.7 Fitness Training
Sailing a Bladerider is not difficult, but racing at the top international level requires a high level of
fitness. Strength is not vitally important, but flexibility and endurance is paramount.
Core stability, general fitness, balance and flexibility is much more important than strength.
Suggest off-water fitness training can include:
• Weight Training
• Bike riding
• Running
• Swimming
• Wall Sits