biropette: 3d printed, customizable high precision pipette€¦ · biropette: 3d printed,...
TRANSCRIPT

Biropette: 3D printed, customizable high precision pipette
2014 Feb 23, pipette v15
Tom Baden Centre for Integrative Neuroscience (CIN) University of Tübingen, Germany [email protected] Thingiverse ID: tbaden Personal website: http://tombaden.wordpress.com/
Science in Africa NGO TReND in Africa gUG: http://trendinafrica.org/
Help us design cheap, good lab equipment! http://trendinafrica.org/activities/open-source/open-source-main/
We want your brain! (in a completely non-zombie fashion)
*inspired by the “Straw pipette“ (http://www.thingiverse.com/thing:64977) by Konrad Walus (kwalus), University of British Columbia, Vancouver, CA
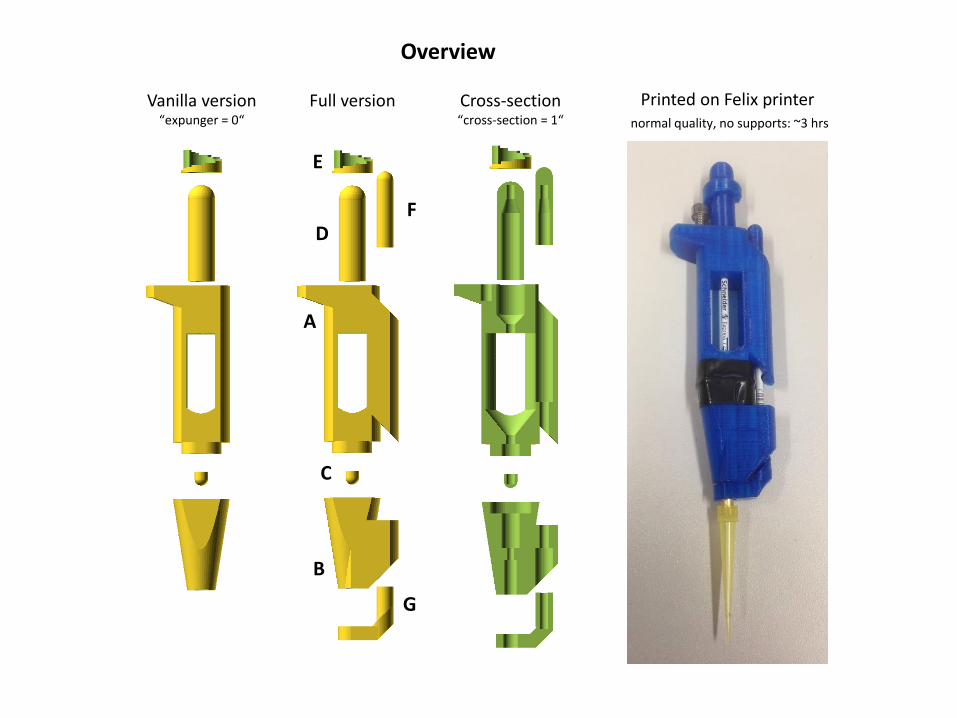
Overview
Vanilla version “expunger = 0“
Full version Cross-section “cross-section = 1“
Printed on Felix printer normal quality, no supports: ~3 hrs
B
A
G
C
D
E
F
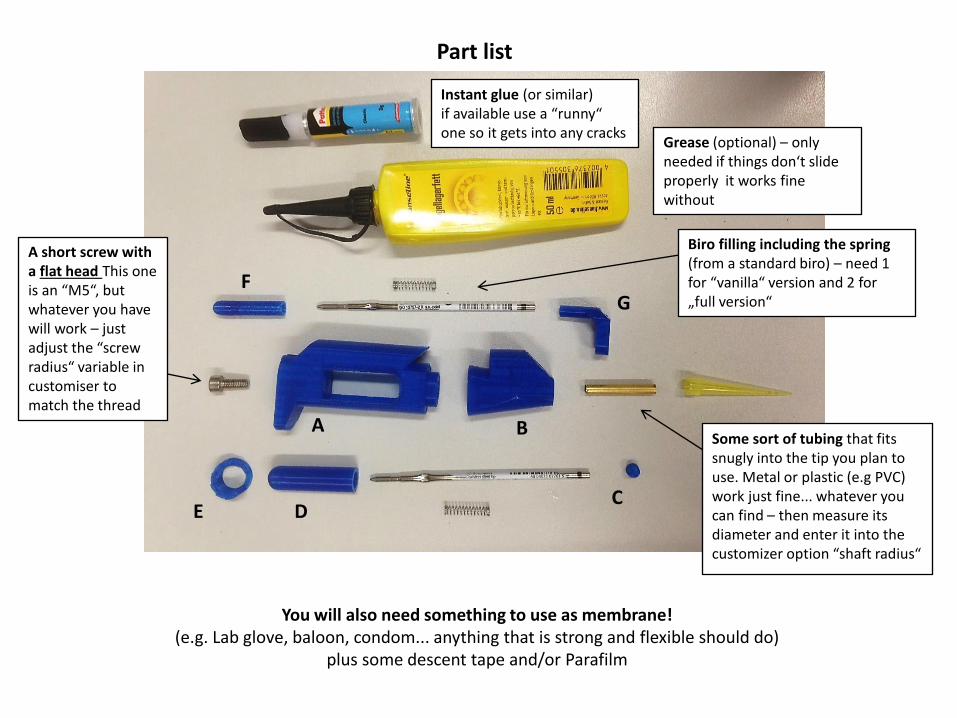
Part list
You will also need something to use as membrane! (e.g. Lab glove, baloon, condom... anything that is strong and flexible should do)
plus some descent tape and/or Parafilm
B A
G
C D E
F
Instant glue (or similar) if available use a “runny“ one so it gets into any cracks
Grease (optional) – only needed if things don‘t slide properly it works fine without
Biro filling including the spring (from a standard biro) – need 1 for “vanilla“ version and 2 for „full version“
Some sort of tubing that fits snugly into the tip you plan to use. Metal or plastic (e.g PVC) work just fine... whatever you can find – then measure its diameter and enter it into the customizer option “shaft radius“
A short screw with a flat head This one is an “M5“, but whatever you have will work – just adjust the “screw radius“ variable in customiser to match the thread

Some quick and dirty calculations
C E
Volume stepper By default it is 10 mm tall and has 10 steps, so 1 mm displacement per step. This is customizable under “Range Z“ and “Range Steps“
This tiny thing is key to determine the volume range of the system. It sits on the bottom of the main axis and displaces the membrane. A bigger radius part here will displace the membrane more for an equal displacement in Z (customizer variable “range membrane pin“). You can calculate the total range of the pipette (approximately) as follows.
Total volume: VT
Radius of “C“: r Button Range: Z (RangeZ)
VT = Z * π * r2
and the Volume per step (Vs), Number of Steps: S
VS = Z * π * r2 / S
So in default settings: r = 3 mm = 3 * 10-3 m Z = 10 mm = 10-2 m S = 10 steps
VT = 10-2 m * 3.141 * 9. 10-6 m2
= ~2.83 * 10-4 m3
= ~283 μl and VS = 28.3 μl Note that this is an overestimate – really you only have 8 steps as the last is used as a stopper, and the 1st is the base. Plus this calculation ignores that the semi-sphere of part C (i.e. its head) may not perfectly protrude into the membrane at rest (Volume of a sphere = 4/3 π * r3 ). So multiply all by 0.8 and subtract a bit for the sphere thing... Finally, the membrane forms a bit of a tent... Overall, this gives roughly 200 μl. You can calibrate your pipette quickly when done (e.g. by using high precision scales and distilled water; 1 mg = 1 μl ). If you don‘t have high precision scales, use low precision ones and pipette everything e.g. 10 or 100 times to get into range and rescale accordingly... Note that the “steps“ are going to be quite linear so no need to properly calibrate them all... Just divide VT by (nSteps-2)
VT (actual) = ~200 μl
Tip: Just type it into google! “10mm * pi * (3mm)^2“
It conveniently gives the answer in milliliters, so you dont have to worry about making log unit errors!
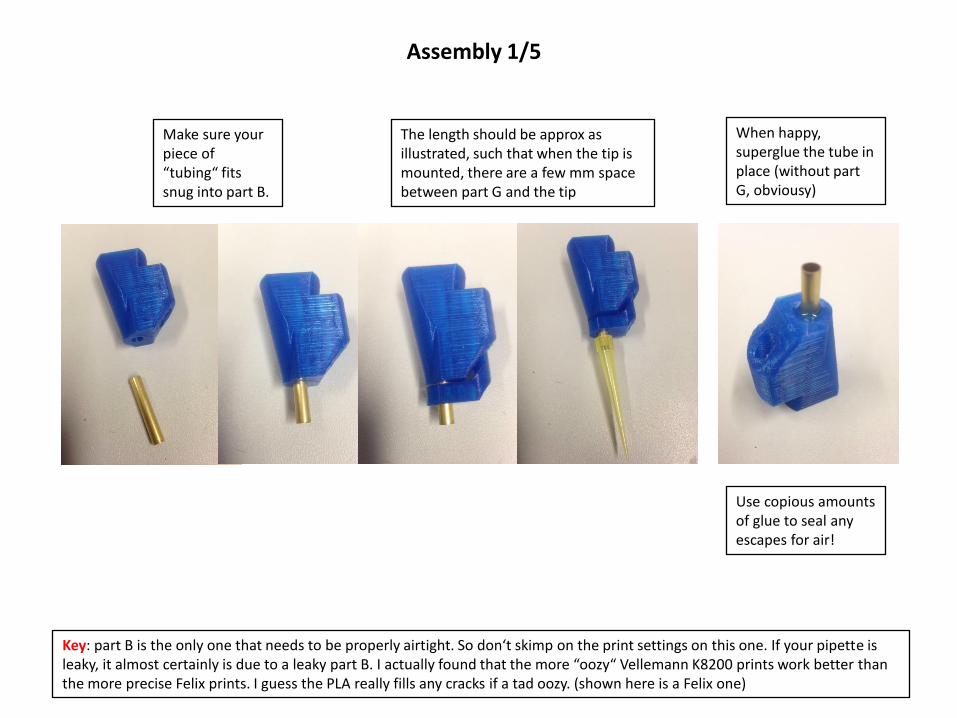
Assembly 1/5
Make sure your piece of “tubing“ fits snug into part B.
The length should be approx as illustrated, such that when the tip is mounted, there are a few mm space between part G and the tip
When happy, superglue the tube in place (without part G, obviousy)
Use copious amounts of glue to seal any escapes for air!
Key: part B is the only one that needs to be properly airtight. So don‘t skimp on the print settings on this one. If your pipette is leaky, it almost certainly is due to a leaky part B. I actually found that the more “oozy“ Vellemann K8200 prints work better than the more precise Felix prints. I guess the PLA really fills any cracks if a tad oozy. (shown here is a Felix one)
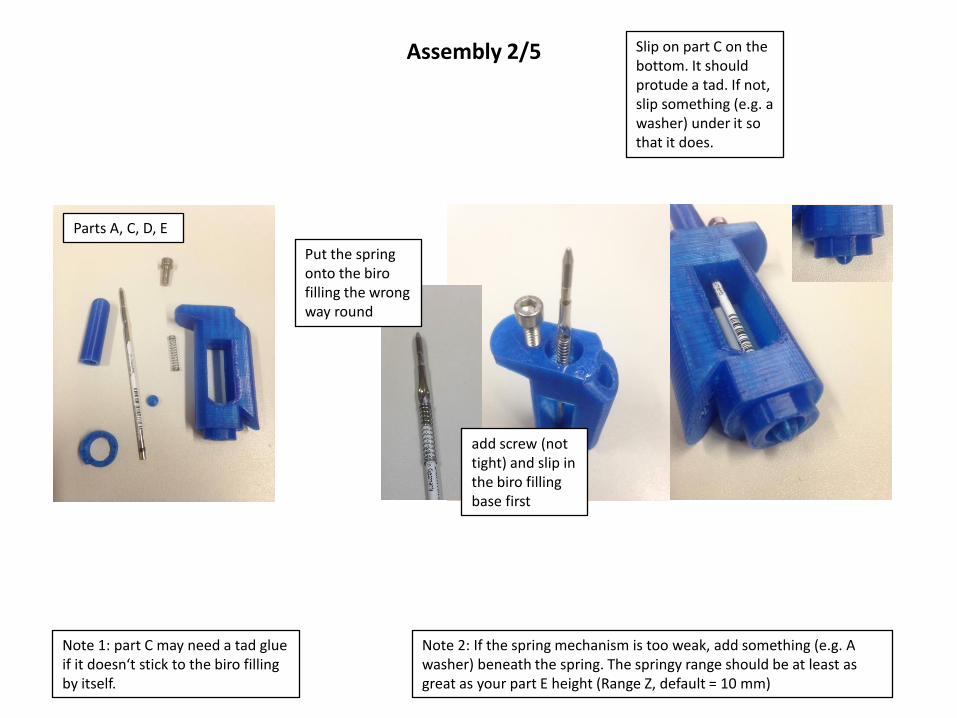
Assembly 2/5
Parts A, C, D, E
Put the spring onto the biro filling the wrong way round
Slip on part C on the bottom. It should protude a tad. If not, slip something (e.g. a washer) under it so that it does.
add screw (not tight) and slip in the biro filling base first
Note 1: part C may need a tad glue if it doesn‘t stick to the biro filling by itself.
Note 2: If the spring mechanism is too weak, add something (e.g. A washer) beneath the spring. The springy range should be at least as great as your part E height (Range Z, default = 10 mm)

Assembly 3/5
Parts D and E combine as shown Slide over top Adjust screw and D/E as shown. Make sure it is straight. Superglue D/E.
Note: part D may need a tad glue if it doesn‘t stick to the biro filling by itself
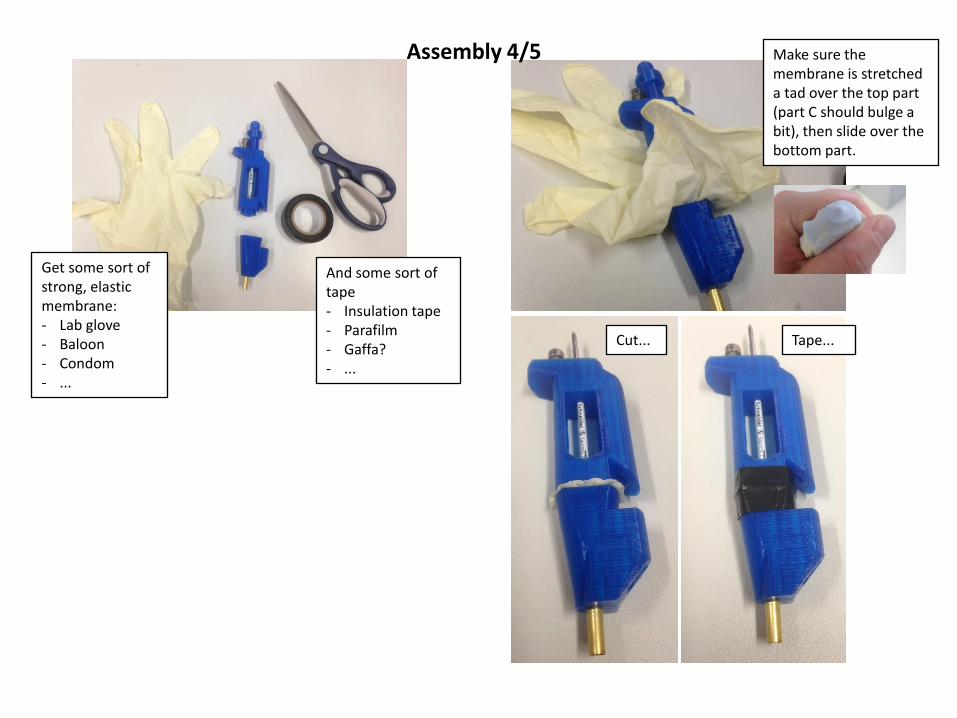
Assembly 4/5
Get some sort of strong, elastic membrane: - Lab glove - Baloon - Condom - ...
And some sort of tape - Insulation tape - Parafilm - Gaffa? - ...
Make sure the membrane is stretched a tad over the top part (part C should bulge a bit), then slide over the bottom part.
Cut... Tape...
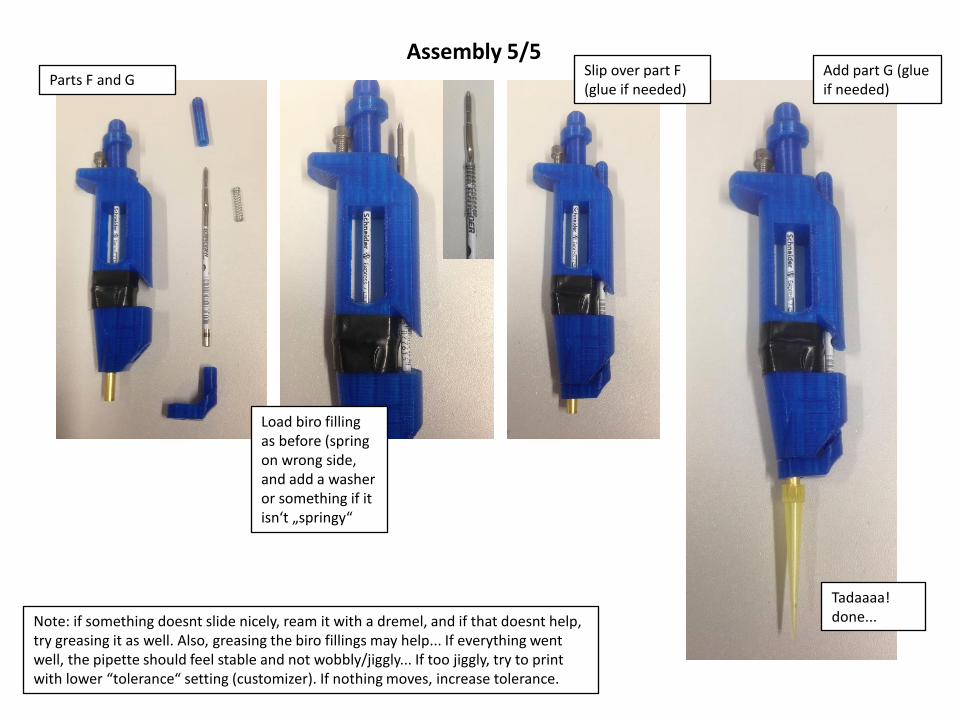
Assembly 5/5 Parts F and G
Load biro filling as before (spring on wrong side, and add a washer or something if it isn‘t „springy“
Slip over part F (glue if needed)
Add part G (glue if needed)
Tadaaaa! done... Note: if something doesnt slide nicely, ream it with a dremel, and if that doesnt help,
try greasing it as well. Also, greasing the biro fillings may help... If everything went well, the pipette should feel stable and not wobbly/jiggly... If too jiggly, try to print with lower “tolerance“ setting (customizer). If nothing moves, increase tolerance.
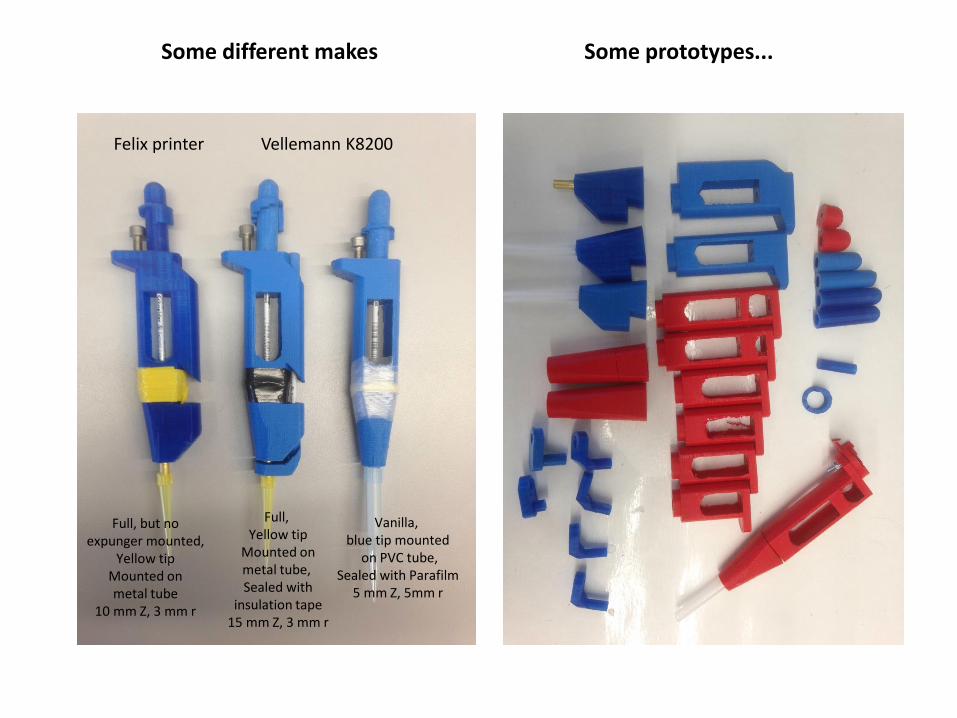
Some different makes
Felix printer Vellemann K8200
Full, but no expunger mounted,
Yellow tip Mounted on metal tube
10 mm Z, 3 mm r
Full, Yellow tip
Mounted on metal tube, Sealed with
insulation tape 15 mm Z, 3 mm r
Vanilla, blue tip mounted
on PVC tube, Sealed with Parafilm
5 mm Z, 5mm r
Some prototypes...

Quick and dirty “weight“ calibration of 2 different makes...
both roughly equate a P200 and are quite linear
Science in Africa NGO TReND in Africa gUG: http://trendinafrica.org/
Help us design cheap, good lab equipment! http://trendinafrica.org/activities/open-source/open-source-main/