biotechnology explorer - bio-rad · pcr amplification requires the presence of at least one dna...
TRANSCRIPT

Biotechnology Explorer™
Gene AmplificationAlu-TPA PCR Kit
Catalog Number166-0009-EDU
www.explorer.bio-rad.com
Note: Kit contains temperature sensitivereagents. Open immediately upon arrival and
store components at 4 °C or -20 °C as indicated.
For Technical Service Call Your Local Bio-Rad Off ice or in the U.S. Call 1-800-4BIORAD (1-800-424-6723)

Welcome Biotechnology Explorer
Technical advances over the past several decades have created a new branch of science, biotechnolo-gy, which has transformed and revolutionized life science research. Powerful methods to isolate, ana-lyze and manipulate DNA, the basic building block of life, have already allowed many breakthroughsin understanding biological processes, human disease states and therapeutic methodologies. For thesereasons, it is becoming increasingly important to expose students to these concepts. In the comingdecades, where a routine visit to a family doctor might include a battery of DNA diagnostic tests–andDNA fingerprints will become the definitive form of personal identification–an understanding of theseprinciples will be as important as learning about hygiene and nutrition.
In order to provide students at the high school, junior college and college levels with exposure to thetechnologies and applications of biotechnology, Bio-Rad has developed a series of easy-to-use instruc-tional classroom kits supported by inquiry-based-curricula, equipment and supplies. The BiotechnologyExplorer has become the program of choice for both beginning and expert teachers seeking to bridgethe gap between science in their classrooms and science in the real world.
Because of the increasing use of the polymerase chain reaction, or PCR1, in modern medicine and sci-ence, and the potential impact on every member of society, it is important to provide students with anunderstanding of the basic principles and applications of PCR. In this kit, students perform PCR toamplify a segment of their own DNA. The segment of DNA they will amplify is present in the genesof many, but not all individuals. Analysis of the data generated in the laboratory will open the door toteaching basic principles of molecular biology, population genetics, and DNA fingerprinting and willillustrate how PCR is being used in many other areas of biology.
The Biotechnology Explorer program is totally unique and extremely innovative. Our laboratory-basedactivities capture the imagination while enhancing students awareness and understanding of the appli-cations of biotechnology which will increasingly influence their lives and affect their personal andcommunity decisions.
Developed over five years in collaboration with the San Francisco Bay Area Biotechnology EducationalConsortium, Rutgers University, Maxygen Inc., and The Stanford Human Genome Center EducationProgram, our curricula and kits were created by teachers and scientists working together. We strive tocontinually improve our curriculum and products. Your input is extremely important to us. We welcomeyour stories, comments and suggestions!
Ron MardigianBiotechnology Explorer ProgramBio-Rad [email protected]

Table of Contents
Instructor's Guide Page
Kit Inventory Checklist ........................................................................................................1
Background for Teachers......................................................................................................3
Introduction to PCR ..............................................................................................3
Suggested Lesson Flow ......................................................................................................11
Guide to Planning Your PCR Week ..................................................................................11
Workstation Checklist ........................................................................................................12
Instructor's Advance Preparation........................................................................................14
Lesson Highlights................................................................................................................22
Important Concepts for Each Lab Session ..........................................................22
Quick Guide ........................................................................................................................30
Graphic Laboratory Protocol ..............................................................................30
Student ManualLesson 1 DNA Template Preparation........................................................................36
Isolating Genomic DNA from Human Cheek Cells (Lab)........................38
Focus Questions..........................................................................................40
Lesson 2 PCR Amplification ....................................................................................41
Amplification of Specific DNA SequencesUsing the Technique of PCR (Lab)............................................................45
Focus Questions..........................................................................................47
Lesson 3 Gel Electrophoresis ....................................................................................48
Electrophoresis of Amplified PCR Samples (Lab)....................................52
Focus Questions..........................................................................................54
Lesson 4 Analysis and Interpretation of Results ......................................................55
Use of the Hardy-Weinberg Equation to Analyze PCR Results (Lab) ....56
Focus Questions..........................................................................................58
Appendices
Appendix A Review of Molecular Biology....................................................................60
Appendix B Glossary of Terms ......................................................................................66
Appendix C PCR Amplification and Sterile Technique ................................................69
Appendix D Teacher Answer Guide ..............................................................................70
Appendix E Typical classroom results ..........................................................................77
Appendix F References ..................................................................................................78
Appendix G Gel Loading Template................................................................................79
Appendix H Programming Instructions for the Gene Cycler ........................................80

Kit Inventory Check ( ✔✔) ListThis section lists the components provided in the PCR Amplification Kit. It also lists
required accessories. Each kit contains sufficient materials to outfit eight student worksta-tions. Please use this checklist to make an inventory of your supplies before beginning this lab.
Kit Components Class Kit (✔✔)
1. Homozygous (+/+) control, lyophilized 1 vial ❐
2. Homozygous (-/-) control, lyophilized 1 vial ❐
3. Heterozygous (+/-) control, lyophilized 1 vial ❐
4. PCR master mix (dNTPs, buffer, primers), lyophilized 2 vials ❐
5. Taq DNA polymerase, 16 µl (store at -20 °C) 1 vial ❐
6. InstaGene matrix, 8 mls 1 ea ❐
7. Loading dye, 600 µl 1 vial ❐
8. Deionized sterile water (2 mls) 1 vial ❐
9. PCR tubes 45 ea ❐
10. Screw cap tubes (1.5 ml size) 45 ea ❐
11. Microtubes, capless (1.5 ml) 45 ea ❐
12. Microtubes (with attached caps-1.5 ml) 30 ea ❐
13. Pipette tips, 20–200 µl (filter type) 1 box ❐
14. DNA staining solution (500x) (1.0 ml) 1 vial ❐
15. Foam test tube racks 16 ea ❐
16. Gel staining trays 10 ea ❐
17. Manual 1 ea ❐
Required Accessories - Not included in this kit
Micropipets (1–20 µl and 20–200 µl)(catalog number 166-0506-EDU) 1 ❐
Pipette tips (PCR filter type, 20–200 µl) - 1 box(catalog number 211-2016-EDU) 1 ❐
Pipette tips (PCR filter type, 1–20 µl) - 1 box(catalog number 211-2006-EDU) 1 ❐
Gel tray, 8 well comb, electrophoresis chamber(catalog number 170-44006-EDU) 8 ❐
Power supply(catalog number 170-5050-EDU) 1 ❐
Gene Cycler (catalog number 170-6700-EDU) 1 ❐
50x TAE buffer (catalog number 161-0743-EDU) 1 ❐
Agarose powder (catalog number 162-0125-EDU) 1 ❐
Permanent markers 1 ❐
Microwave oven 1 ❐
Water bath (56 and 100 °C) (catalog number 166-0508-EDU) 1 ❐
1

Required Accessories - Not included in this kit Class Kit (✔✔)
Distilled water 3 liters ❐
1000 ml Erlenmeyer flask for microwaving agarose 1 ❐
500 ml flask or beaker for DNA stain 1 ❐
Ice bucket with ice 1 ❐
Lab tape 1 ❐
Centrifuge (catalog number 166-0502-EDU) 1 ❐
Optional Accessories
Gel support membrane (catalog number 170-2984-EDU) 1 ❐
Shaking platform (catalog number 166-0509-EDU) 1 ❐
Precision molecular mass standard (catalog number 170-8207) 1 ❐
Acetate sheets for tracing gels 8 ❐
Storage and Stability. The components in the kit are guaranteed for 1 year from thedate of purchase when stored under the appropriate conditions. The reagents in theenzyme module are shipped separately on dry ice and should be immediately stored at-20 °C. The components that are packaged in the sealed bag (Bio-Safe stain, InstaGeneMatrix, Loading Dye, and Sterile water) should be stored at 4 °C upon receipt.
2

Background for Teachers
Introduction to PCR–Set the StageIn 1983, Kary Mullis2 at Cetus Corporation developed the molecular biology technique
that has since revolutionized genetic research and earned him the Nobel prize in 1985. Thistechnique, termed the Polymerase Chain Reaction (PCR), transformed molecular biology intoa multidisciplinary research tool within 5 years of its invention. Many of the molecularbiology techniques used before PCR were labor intensive, time consuming and required ahigh level of technical expertise. Additionally, working with only trace amounts of DNAmade it difficult for researchers in other biological fields (pathology, botany, zoology, phar-macy, etc.) to incorporate molecular biology into their research schemes.
PCR had an impact on four main areas of biotechnology: gene mapping, cloning, DNAsequencing and gene detection. PCR is now used as a medical diagnostic tool to detectspecific mutations which may cause genetic disease3, is used in criminal investigations andcourts of law to identify suspects on a molecular level4, and is a powerful tool in the sequencingof the human genome5. Prior to PCR the use of molecular biology techniques for therapeutic,forensic, pharmaceutical or medical diagnostic purposes was not practical nor cost effective.The development of PCR technology changed these aspects of molecular biology from a dif-ficult science to one of the most accessible and widely used tools in genetic and medicalresearch.
PCR and Biotechnology—What Is It, and Why Did It Revolutionize An EntireResearch Community?
The objective of PCR is to produce a relatively large amount of a specific piece of DNAin a test tube from a very small amount. Technically speaking, this means the controlled enzy-matic amplification of a template DNA molecule containing a specific DNA sequence ofinterest. The template can be any form of double-stranded DNA such as genomic DNA. Aresearcher can take trace amounts of DNA from a drop of blood, a single hair follicle or cheekcell and use the technique of PCR to generate millions of copies of a desired DNA fragment.In theory, only one single template strand is needed to generate millions of new DNAmolecules. Prior to PCR it would have been impossible to do forensic or genetic studies withthis small amount of DNA. The ability to amplify the precise sequence of DNA that aresearcher wishes to study or manipulate is the true power of PCR.
PCR amplification requires the presence of at least one DNA template strand. In this kit,human genomic DNA isolated from students own cheek cells will be the source of the DNAtemplate strands. One of the main reasons PCR is such a powerful tool is because of its sim-plicity and specificity. All that is required are inexpensive reaction buffers, four DNA bases(deoxynucleotide triphosphates; adenine, guanine, thymine and cytosine), a DNA polymerase,two DNA primers, and minute quantities of the template strand that one wants to amplify.Specificity comes from the ability to target and amplify one specific segment of DNA (orgene) out of a complete genome.
PCR Makes Use of Two of the Most Basic Principles in Genetics
1. Complementary DNA strand hybridization
2. DNA strand synthesis via DNA polymerase
In the case of PCR, complementary strand hybridization takes place when two differentoligonucleotide primersanneal to each of their respective complementary base pair sequenceson the template. The two primers are designed and synthesized in the laboratory with a spe-
3

cific sequence of nucleotides such that they can anneal at the opposite ends and on the oppositestrands of the stretch of double stranded DNA (template strand) to be amplified.
Before a region of DNA can be amplified, one must identify and determine the sequenceof a piece of DNA upstream and downstream of the region of interest. These areas are then usedto make the oligonucleotide primers that will serve as starting points for DNA replication.Again, primers are needed because DNA polymerasesrequire double-stranded DNA -(asopposed to single stranded DNA) to initiate replication of DNA or synthesize new copies oftemplate DNA. The two strands of the fragment of interest will be melted apart into singlestrands before synthesis begins. Therefore, primers are required to provide a double-strandedstart point for the DNA polymerase.
The DNA polymerase used in PCR, however, must be a thermal stable polymerasebecause the polymerase chain reaction cycles between temperatures of 64 and 94 °C. Thethermostable DNA polymerase (Taq) that performs the polymerization was isolated from athermophilic bacterium, Thermus aquaticus, which lives in high temperature steam ventssuch as those found in Yellowstone National Park6.
Two template strands are created from the original template on each complete cycle of thestrand synthesis reaction. This creates a situation of exponential growth of the number of templatemolecules, i.e., the number doubles at each cycle. Therefore, after 30 cycles there will be2 x 1030 times more copies than at the beginning. Once the DNA of interest has been suffi-ciently amplified it can be visualized using gel electrophoresis. This allows researchers todetermine the presence or absence of the desired PCR products and determine the similaritiesand differences between the genes of individuals. Depending upon the gene, differencesamong individuals can be as great as hundreds of base pairs or as little as a single base pairor single point mutation. As mentioned, PCR amplification requires the presence of at leastone DNA template strand. In this kit, human genomic DNA isolated from students own cheekcells will be the source of the DNA template strands.
Genes and DNA
It is estimated that the 23 pairs of chromosomes (46 total chromosomes) which comprisehuman genomic DNA contain a total of 100,000 genes. Each gene holds the code for a par-ticular protein. Interestingly, these 100,000 genes comprise only about 5% of the chromoso-mal DNA. The other 95% is non-codingDNA. This non-coding DNA is not only foundbetween but within genes, splitting them into segments. In eukaryotes, the non-codingsequences or regions of DNA within genes that are transcribed into RNA but in the end do notcode or make a particular protein sequence are called introns. The sequences or regions ofDNA that do code for proteins are calledexons. Both introns and exons are initially tran-scribed, then introns are spliced out to create the completed messenger RNA.
In eukaryotes, genomic DNA is transcribed into a messenger RNA molecule containingboth introns and exons for a particular gene. While the mRNA is still in the nucleus (beforebeing transported out of the nucleus) the intervening non-coding sequences, or introns (in =stay within the nucleus), must be removed from the messenger RNA while the exons(ex = exit the nucleus) are spliced together to form the complete coding sequence for theprotein (see Figure 1). This process is called RNA splicing. Some genes may contain a fewintrons, others may contain dozens.
4

Fig. 1. Splicing of introns from genes.
As we have discussed, functional segments of genes (exons) code for proteins—proteinsthat all humans need to survive and thrive. Exon sequences are therefore similar among indi-viduals. Surprisingly, introns often vary in size and number among individuals. Intronsequences are thought to be the result of the differential accumulation of mutations through-out evolution which are silently passed to descendants through the hereditary code. It is thisdifference in intron sequences that allows us to determine human genetic diversity. The iden-tification of these distinctive characteristics in the DNA represent the molecular basis forhuman identification and population genetics.
Throughout evolution, intron sequences have been the target of random insertions byshort repetitive interspersed elements, also known as SINES7. SINES have become randomlyinserted within our introns over millions of years. One such repetitive element is called the Alusequence7 (see Figure 2 below). This is a DNA sequence about 300 base pairs long which isrepeated, one copy at a time, almost 500,000 times within the human genome8. The originand function of such randomly repeated sequences is not yet known. The Alu name comesfrom the Alu 1 restriction enzymesite that is common to this sequence.
Fig. 2. Location of an Alu repetitive element within intron 8 of the TPA gene.
Some of these Alu elements have characteristics that make them very useful to geneticists.If present within introns of genes associated with particular pathologies, they can thereby beassociated with that disease. When present within the introns of genes, Alu repeats can alsobe used to estimate relatedness among individuals. In this activity, analysis of Alu repeats isused to estimate the frequency of an insert in a population and is a simple measure of molec-ular genetic variation—with no reference to disease or relatedness among individuals.
There is one such Alu element present within the 8th intron of a gene located on chro-mosome 8 which codes for a protein known as Tissue Plasminogen Activator or TPA7,9,10. Thisprotein aids in the breakdown of bloodclots and has recently been genetically engineered as
5
Intron 1
Exon 15'
5'
5'
3'
3'
3'Exon 2 Exon 3 Genomic DNA
Genotype
Phenotype
Pre mRNA
mRNA
Protein
Exon 3Exon 2Exon 1
Exon 1
Exon 8 ALU
Intron 8
(Amplified Region)
Exon 9 Exon 10
Exon 2 Exon 3
Intron 2
Transcription
Splicing
Translation

a pharmaceutical product by the biotechnology company, Genentech, Inc. The TPA gene iscomposed of 14 exons separated by 13 introns. The entire gene contains 28 Alu repeats ran-domly scattered throughout the introns.
This kit provides a simple PCR based screen for a single Alu sequence within the 8thintron of the TPA gene. This particular Alu intron is dimorphic. That is, the element ispresent in some individuals but not others (see Figure 3 below). Some people have the insertin the 8th intron of TPA on one copy of their chromosome 8 (one allele), others may have theinsert in both homologous chromosomes (two alleles), while some do not have the insert inthe intron on either chromosome. The presence or absence of this insert can be detected usingthe polymerase chain reaction followed by agarose gel electrophoresis.
In this activity, students use primers, which flank both the entire Alu insertion (300 basepairs in length) and 660 base pairs of the functional TPA gene to amplify a 960 base pair frag-ment if the element is present or a 660 base pair fragment if the Alu element is absent. Agarosegel electrophoresis of the PCR products is sufficient to distinguish among homozygotes (+/+)for the presence of the Alu repeat (960 base pair product only), among homozygotes (-/-) forthe absence of the Alu repeat (660 base pair product only), and heterozygotes (+/-) having boththe 660 and the 960 base pair products.
Fig. 3. The presence or absence of the Alu insert within intron 8 of the TPA gene.
6
ALU
Intron 8 Genotype DNA Size of PCR Products
Homozygous (+/+) 960 base pairs
660 base pairs
960 + 660 base pairs
Homozygous (-/-)
Heterozygous (+/-)
ALU
ALU

PCR—Step By Step
The technique of PCR involves a repetitive series of cycles, each of which consists oftemplate denaturation, primer annealing, and extension of the annealed primer by Taq DNApolymerase. Before beginning the DNA amplification, genomic DNA is prepared from stu-dents' cheek cells.
Following sample preparation (see page 30), the template DNA, oligonucleotide primers,thermo-stable DNA polymerase (Taq), the four deoxynucleotides (A, T, G, C), and reactionbuffer are mixed in a single micro test tube. The tube is placed into the Gene Cycler. TheGene Cycler contains an aluminum block that holds the samples and can be rapidly heated andcooled across extreme temperature differences. The rapid heating and cooling of this thermalblock is defined as "temperature cycling" or "thermal cycling".
The first step of the PCR temperature cycling procedure involves heating the sample to94 °C. At this high temperature the template strands separate (denature). This is called the"denaturing step".
The thermal cycler then rapidly drops the temperature to 64 °C to allow the primers toanneal to the separated template strands. This is called the "annealing step". There is thepossibility that the two original template strands will reanneal to each other or compete withthe primers for the primers complementary binding site. However, the oligonucleotide primersare added in excess such that the primers actually out compete the original DNA strand for theprimers' complementary binding sites.
Lastly, the Gene Cycler heats the sample to 72 °C for Taq DNA polymerase to extend theprimers and make complete copies of each template DNA strand. This is called the "exten-sion step". Taq polymerase works most efficiently at this temperature. Two new copies of eachcomplementary strand are created. There are now two sets of template strands. These twosets of template strands can now be used for another temperature/thermal cycle and subsequentstrand synthesis.
At this stage, a complete temperature cycle (thermal cycle) has been completed (see Figure 4).
Temperature cycle = denaturation step + annealing step + extension step
7

Fig. 4. A complete cycle of PCR.
Thermal cycling continues for 40 cycles. After each thermal cycle the number of templatestrands doubles resulting in an exponential increase in the number of template DNA strands.After 40 cycles there will be 1.1 x 10¹² more copies of the original number of template DNAmolecules.
The most unique feature of PCR is the generation of a precise length and sequence of DNA.On the first cycle the two different oligonucleotide primers anneal to the original genomictemplate DNA strands at opposite ends and on opposite strands. After the first completetemperature cycle, two new strands are generated that are shorter than the original templatestrands but still longer than the length of the DNA that the researcher wants to amplify. It isn’tuntil the third thermal cycle that fragments of the precise length are generated (see Figure 5).
8
Denature Strands 95 °C
Anneal Primers 64°(Taq Polymerase recognizesdouble stranded substrate)
Extend 72°(Synthesize New Strand)
Repeat Cycle 40 Times
5'
5'
5'
5'
5'
5'
5'
5'
5'
5'
5'
5'
3'
3'
3'
3'
3'
3'
3'
3'
3'
3'
3'
3'

Fig. 5. Generation of Precise Length Fragments.
It is the template strands of the precise length that are amplified exponentially (Xn, whereX = the number of original template strands and n = the number of cycles). There is alwaysone set of original long-template DNA molecules which is never fully duplicated. After eachthermal cycle, two intermediate length strands are produced, but because they can only begenerated from the original template strands, the intermediate strands are not exponentiallyamplified. It is the precise length strands generated from the intermediate strands that amplifyexponentially at each cycle. Therefore, if 20 thermal cycles were conducted from one doublestranded DNA molecule, there would be 1 set of original genomic template DNA strands, 20sets of intermediate template strands and 1,048,555 sets of precise length template strands.After 40 cycles there would 1 set of original genomic template DNA strands, 40 sets of inter-mediate template strands and 1.1 x 10¹² sets of precise length template strands (see Figure 6).
9
Total 40 Cycles
Extend New Strands 72 °C
Anneal Primers 64 °C
Denature 94 °C
Extend New Strands 72 °C
Anneal Primers 64 °C
Denature 94 °C
3'
3'
3'
3'
3'
3'
3'
3'
3'
3'
3'
3'
3'
3'
3'
3'
3'
3'
3'
3'
3'
5'
5'
5'
5'
5'
5'
5'
5'
5'
5'
5'
5'
5'
5'
5'
5'
5'5'
5'
5'
5'
5'
Extension Step Cycle 1
New Intermediate Templates
Precise Length Fragments
CYCLE1
CYCLE2
CYCLE3

Fig. 6.
Extra Curriculum Idea: The Relevance of Alu to Hardy-Weinberg EquilibriumTheory
The value of this Alu insert residing in a non-coding region of the TPA gene is that itdoes not code for any protein sequence and is not related to a particular disease. Because Alurepeats have inserted into the genome of the human population at random, the Alu insert inthe TPA gene can be very useful in studies of gene frequencies in the human population. Inthe lab exercise (Lesson 4), the principals of the Hardy-Weinberg equilibrium theory can beapplied to examine and study genotypic and allelic frequencies of the Alu insert. The Hardy-Weinberg equation, p2 + 2pq + q2 = 1, describes the frequencies of alleles in the genotypes ofan entire population. In this lab, p2 represents the frequency of an individual homozygous(+/+) for the Alu insert, q2 represents the frequency of an individual homozygous (-/-) for thelack of an Alu insert, and 2pq represents the frequency of an individual heterozygous (+/-) forthe insert. By determining the genotypic frequencies of the Alu genotype within your studentpopulation, the corresponding allelic frequencies can also be calculated. Additionally, thegenotypic frequencies of your class population can be compared to published results of larg-er population sizes9.
This activity opens the door to teaching the principles of the Hardy-Weinberg equilibri-um theory. Use the student data generated in tables 1 and 2 (pages 58–59) to demonstratethat human populations are not in Hardy-Weinberg equilibrium. Now let’s get on with thelab.
10
Start
1
201,048,555
Final Count After 20 Cycles
Template DNA
Intermediate DNA
Precise Length DNA
Cycle 1 Cycle 2 Cycle 3 Cycle 4 Cycle 5 Cycle 6

Suggested Lesson FlowThere are four student lessons in this PCR curriculum. All lessons are designed to be car-
ried out in consecutive 50 minute periods. Lesson 1 and 2 have labs with convenient stoppoints. The samples can be stored for several days to accommodate weekends or labs thatmeet every other day.
Student Schedule
Lesson 1 DNA Template Preparation
Activity Isolate cheek cells Prepare genomic DNA from cheek cell samples(Stop point)
Lesson 2 PCR Amplification
Activity Set up and perform PCR reactionsPour agarose gels(Stop point)
Lesson 3 Electrophoresis of PCR Samples
Activity Load and run gelsStain gels overnight
Lesson 4 Analysis and Interpretation of Results
Activity Destain gelsAnalyze and discuss results
Instructor's Advance Preparation OverviewThis section outlines the recommended schedule for advanced preparation on the part of
the instructor. A detailed Advance Preparation Guide is provided on pages 14–21.
Activity When Time requiredRead PCR manual Immediately 2 hours
Aliquot InstaGene Matrix Prior to Lesson 1 30 minSet up student workstations
Rehydrate and aliquot Reagents Prior to Lesson 2 1–1.5 hoursSet up positive control PCR reactionsPrepare TAE bufferPrepare molten agaroseProgram Gene CyclerSet up student workstations
Prepare Bio-Safe DNA stain Prior to Lesson 3 20 minSet up student workstations
Set up student workstations Prior to Lesson 4 10 min
11

Workstation Daily Inventory Checklist ( ✔✔)Student Workstations: Materials and supplies that should be present at each student
workstation prior to beginning each lab experiment are listed below. The components providedin this kit are sufficient for 8 student workstations.
Instructor's (Common) Workstation: A list of materials, supplies, and equipment thatshould be present at a common location that can be accessed by all student groups is also list-ed below. It is up to the discretion of the teacher as to whether students should access com-mon buffer solutions/equipment, or whether the teacher should aliquot solutions and operateequipment.
Lesson 1 DNA Template PreparationStudent workstations Number/Station (✔✔)Screw cap tubes 4 ❐
Styrofoam microtube rack 2 ❐
P-200 micropipet 1 ❐
Lab marker 1 ❐
Copy of Quick Guide or protocol 1 ❐
InstaGene Matrix 1 tube ❐
Waste container 1 ❐
Instructor's workstationPipette tips (filter type), 20–200 µl 1 box ❐
Water baths (56 and 100 °C) 1 ❐Centrifuge 1 ❐
Lesson 2 PCR AmplificationStudent workstations Number/Station (✔✔)PCR tubes 4 ❐
Microtubes, capless 4 ❐
P-200 micropipet 1 ❐
Pipette tips (filter type), 20-200 µl 8 tips ❐
Styrofoam microtube rack 2 ❐
Lab marker 1 ❐
Ice bucket with ice 1 ❐
Copy of Quick Guide or protocol 1 ❐
Master Mix 1 ❐
Waste container 1 ❐
Instructor's workstationGel trays 1/station ❐
Molten agarose (see advance prep) 40 ml/gel ❐
Lab tape for gel trays 1/station ❐
Gene Cycler 1 ❐
12

Lesson 3 Electrophoresis of PCR SamplesStudent workstations Number/Station (✔✔)Agarose gel 1 ❐
PCR samples 1/student ❐
P-10 or P-20 micropipet 1 ❐
Pipette tips (filter type), 0-20 µl 11 tips ❐
Lab marker 1 ❐
Styrofoam microtube rack 2 ❐
Gel box and power supply 1 ❐
Gel staining tray 1 ❐
Loading dye 1 ❐
Copy of Quick Guide or protocol 1 ❐
Waster container 1 ❐
Instructor's workstation1X TAE electrophoresis buffer 275 ml/gel box ❐
Bio-Safe DNA stain—1x solution 500 ml ❐
Positive control samples 3 ❐
Homozygous (+/+)Homozygous (-/-)Heterozygous (+/-)
Centrifuge (optional equipment) 1 ❐
Precision Mass ruler DNA standards (optional) 1 ❐
Shaking platform (optional) 1 ❐
Lesson 4 Analysis and Interpretation of ResultsStudent workstations Number/Station (✔✔)Gel support membrane (optional) 1 ❐
Water for destaining gels 60 ml ❐
Copy of Quick Guide or protocol 1 ❐
Clear acetate sheets for tracing gels 1 ❐
Instructor's workstationNone required
13

Instructor's Advanced Preparation for LabsThis section describes the preparation that needs to be performed by the instructor before
each laboratory. An estimation of preparation time is included in each section.
Lesson 1 DNA Template Preparation
Advance Preparation
Objectives Aliquot InstaGene MatrixSet up student and instructor workstationsSet waterbaths to 56 and 100 °C
Time required 30 minutes
Materials required 8 microtubes
Procedures
1. Aliquot InstaGene Matrix.
A. Thoroughly mix the bottle of InstaGene Matrix by gently shaking the bottle severaltimes to resuspend the matrix. You must be sure that the matrix is well mixed whenyou aliquot the reagent. The beads settle out of solution quickly, so gently remix thebottle several times during aliquotting.
B. Pipette 900 µl of Matrix into 8 microtubes (mix thoroughly between each pipetting)and label the tubes "InstaGene". Distribute one tube to each student team. For a time-saving tip, the instructor may wish to prealiquot 200 µl of InstaGene Matrix tubes foreach student of the team.
Lesson 2 Gene Amplification
Advance Preparation
Objectives Rehydrate positive controls, and Master MixAliquot Master Mix (primers, buffer, nucleotides, magnesium)Set up positive control PCR reactionsProgram Gene CyclerPour agarose gels, or, if you have your students pour their own gelsduring the lab, prepare the agarose ahead of time. Agarose, onceprepared, may be kept in a water bath set at 45–50 °C until used bythe students.Set up student and instructor workstations
Time required 1–1.5 hours (depending on how you choose to prepare agarose gels)
Materials required 8 microtubes (with attached caps)Master MixTaq polymerase6 positive control tubes:
homozygous (+/+)homozygous (-/-)heterozygous (+/-)
6 PCR tubesElectrophoresis gel boxes, casting trays, and combsElectrophoresis buffer (50x TAE)Agarose powderMicropipets (P-20 and P-200) and filter tips
14

15
Procedures
Note: Before opening any of the reagent tubes, pulse-spin the contents (~3 seconds) in amicrocentrifuge to bring contents to the bottom of the tubes. Contents often become lodgedunderneath the caps during shipping. This is extremely important for the lyophilized vials ofMaster Mix and control plasmids.
If you choose to amplify only 20 samples or less, rehydrate only one tube of Master Mix.The remaining tube can be rehydrated and used at a later time. Taq polymerase is supplied asa concentrated solution in a glycerol buffer. The enzyme is very temperature sensitive and ismuch more stable in a concentrated form. Therefore, it is imperative that the enzyme beadded to the Master Mix just prior to beginning the laboratory exercise–not more than 15–30minutes prior to beginning the PCR amplification.
1. Rehydrate solutions.
A. Label 8 microtubes "Master" and place tubes on ice.
B. Rehydrate reagents.
• Add 550 µl of sterile water to each lyophilized tube of Master Mix.
• Add 55 µl of sterile water to each of the control tubes (+/+), (-/-) and (+/-).
C. Mix Taq and Master Mix. Add 8 µl of Taq polymerase to the vial of Master Mixand mix by gently pipetting up and down several times with the 550 µl setting ofyour micropipet. It is imperative that the Master Mix is evenly mixed after theaddition of Taq. Aliquot 110 µl of Master Mix into the 8 microtubes and keep onice. Distribute one tube to each team. For best results, these reagents should be usedin a PCR reaction within 15–30 minutes.
Taq Master Mix

2. Set up control PCR reactions, and label the control PCR tubes: (+/+), (-/-), and (+/-). If youwill be using the entire kit with a single lab period set up two of each control or six tubestotal. If you will be splitting the kit between two lab periods set up one of each control orthree tubes total. The unused rehydrated control solutions should be stored in the freezeruntil used.
• pipette 25 µl of the (+/+) template into the (+/+) PCR tube.
• pipette 25 µl of the (-/-) template into the (-/-) PCR tube.
• pipette 25 µl of the (+/-) template into the (+/-) PCR tube.
A. Pipette 25 µl of Master Mix into each of the positive control tubes.Use a fresh tip for each tube.
B. Place the tubes on ice until ready to load into the Gene Cycler.
16

3. Prepare agarose gels (this can be done by the teacher or by individual student teams).
A. Prepare electrophoresis buffer. Electrophoresis buffer is available as a 50x concen-trated solution. In addition to the 1x TAE buffer needed to make the agarose gel,approximately 275 ml is also required for each electrophoresis chamber. Three litersof 1X TAE buffer will be sufficient to run 8 electrophoresis chambers and pour 8agarose gels. To make 3 liters of 1x TAE from a 50x TAE concentrate add 60 ml ofconcentrate to 2.94 liters of distilled water.
B. Prepare agarose. These procedures may be carried out 1 to 2 days ahead of time bythe teacher or done during class by individual student teams.
1. Agarose preparation: The recommend gel concentration for this classroomapplication is 1% agarose. This concentration of agarose provides excellent res-olution and minimizes run time required for electrophoretic separation of PCRfragments. To make a 1% solution, simply add 1 gram of agarose to 100 ml of1x TAE electrophoresis buffer. For 8 gels, you will need approximately 350ml of molten agarose (3.5 g agarose per 350 ml 1x TAE buffer). The agarosemust be made using electrophoresis buffer, not water.
2. Add the agarose powder to a suitable container (e.g., 1000-ml Erlenmeyer flask,Wheaton bottle, etc.). Add the appropriate amount of 1x TAE electrophoresisbuffer and swirl to suspend the agarose powder in the buffer. If using anErlenmeyer flask, invert a 50-ml Erlenmeyer flask into the open end of the 500-mlErlenmeyer flask containing the agarose. The small flask acts as a reflux cham-ber, thus allowing long or vigorous boiling without much evaporation. Theagarose can be melted for gel casting by boiling on a magnetic hot plate or ina microwave oven. Heat the mixture to boiling using a microwave oven or hotwater bath until the agarose powder has melted completely.
Caution: Always wear protective gloves, goggles, and lab coat while preparing and castingagarose gels. Boiling molten agarose or the vessels containing hot agarose can cause severeburns if allowed to contact skin.
Magnetic Hot Plate Method. Add a stir bar to the undissolved agarose solution. Heat thesolution to boiling while stirring on a magnetic hot plate. Bubbles or foam should disruptbefore rising to the neck of the flask. Boil the solution until all of the small translucent agaroseparticles are dissolved. With the small flask still in place, set aside to cool to 60 °C beforepouring gels.
Microwave Oven Method. Place the gel solution into the microwave. Loosen the cap. Usea medium setting and set to 3 minutes. Stop the microwave oven every 30 seconds and swirlthe flask to suspend any undissolved agarose. This technique is the fastest and safest way todissolve agarose. Boil and swirl the solution until all of the small translucent agarose particlesare dissolved. With the small flask still in place, set aside to cool to 60 °C before pouring.
17

Procedure for Casting GelsUsing Bio-Rad’s Mini Sub-Cell GT system, gels can be cast directly in the gel box by usingthe casting gates with the gel tray. If casting gates are unavailable, use the Tape-the-Traymethod for casting gels, as outlined below. Other methods are detailed in the Bio-Rad Sub-Cell GT instruction manual.
Step 1. Seal the ends of the gel tray securely with strips of standard laboratory tape. Pressthe tape firmly to the edges of the gel tray to form a fluid-tight seal.
Step 2. Level the gel tray on a leveling table or workbench using the leveling bubble pro-vided with the instrument.
Step 3. Prepare the desired concentration and amount of agarose in 1x TAE electrophoresisbuffer.
Step 4. Cool the agarose to at least 60 °C before pouring.
Step 5. While the agarose is cooling to 60 °C, place the comb into the appropriate slot of thegel tray. Gel Combs should be placed within 3/4 of an inch of the end of the gelcasting tray (not in the middle of the gel).
Step 6. Allow the gel to solidify at room temperature for 10 to 20 minutes—it will appearcloudy (or opaque) when ready to use.
Step 7. Carefully remove the comb from the solidified gel. Remove the tape from the edgesof the gel tray.
Step 8. Place the tray onto the leveled DNA electrophoresis cell so that the sample wells areat the cathode (black) end of the base. DNA samples will migrate towards the anode(red) end of the base during electrophoresis.
4. Program Gene Cycler
The Gene Cycler should be programmed for 3 steps in cycle 1, which will repeat 40 times. Thefinal Cycle 2insures that the final extension reaction has gone to completion and all possiblePCR products are made.
Cycle Step Function Temperature Time
1 Step 1 Denature 94 °C 1 minute
Step 2 Anneal 64 °C 1 minute
Step 3 Extend 72 °C 2 minutes
Repeat 40 times
2 Step 1 Final Extension 72 °C 10 minutes
Repeat 1 time
Refer to the Gene Cycler instruction manual for specific programming instructions or to theinstructions in Appendix H.
18

Lesson 3 Electrophoresis of DNA Samples
Advance Preparation
Objectives Aliquot DNA loading dyePrepare positive control samplesPrepare 1x Bio-Safe DNA staining solutionSet up student and instructor workstations
Time required 20 minutes
Materials required 8 microtubes (with attached caps)DNA loading dyeBio-Safe DNA staining solutionMicropipets (P-20 and P-200) and filter tips
Procedures
1. Aliquot Loading Dye. Label 8 clear microtubes "LD". Aliquot 50 µl of loading dye intoclear microtubes that are labeled "LD", and distribute one tube to each student workstation.
2. Prepare Positive Control Samples. Add 50 microliters of sterile water and 20 microlitersof loading dye to each control sample (+/+), (-/-), (+/-). This dilution will make the con-centration of the DNA in the controls equal to the concentration of DNA in the studentsamples. Place the tubes at the teachers workstation.
3. Prepare Bio-Safe DNA staining solution. Prepare 1x DNA-gel staining solution bydiluting 1 ml of 500x DNA stain in 499 ml of distilled water in an appropriate sized flask.Cover the flask and store it at room temperature until ready to use.
The volume of 1x Bio-Safe solution needed to stain one 7 x 7 cm gel is 60 milliliters.Gel staining should be done in individual staining trays, one per lab station, or multiple gelscan be stained together in a large staining dish. The gels need to be removed from their geltrays in order to be placed in the staining solution. This is easily accomplished using a non-metallic spatula. Special attention must be given to supporting the well portion of the gelsince it will crack along the well line. Pour enough stain into the tray to cover the gel(s) com-pletely (~60 mls).
Stain the gels overnight in 1x Bio-Safe stain (if a shaking tray is available, you may gentlyrock the gels overnight for more efficient staining). The next day, rinse the stained gel withdistilled water and destain ~5 minutes. This stain is non-toxic; however, you may prefer to uselatex/vinyl gloves while handling stained gels to keep your hands from being stained.
4. Including DNA size standards. If you wish to include DNA standards on your agarosegel, you should run 10 µl of the Precision Molecular Mass Ruler (catalog number 170-8207-EDU) in lane 8 of each of the gels. Please note that if you do include standards onthe gel, the gel will be dried down as an 8 well gel, which causes slightly more bendingof the dried gel on the Gel Support membrane.
19
Lesson 4 Drying Gels and Analyzing the DNA Patterns
Advance Preparation
Objectives Set up student and instructor workstations
Time required 10 minutes
Materials required Water for destaining gelsGel Support FilmAcetate to trace gels
Procedures
There are no reagents to make or aliquot for this laboratory.
Dry the Agarose Gel as a Permanent Record of the Experiment
Note: Drying agarose gels requires the use of Bio-Rad’s specially formulated high strengthanalytical grade agarose (catalog number 162-0125-EDU). Other gel media may not be suf-ficiently formulated for this purpose.
There are two methods that can be used to dry destained agarose gels.
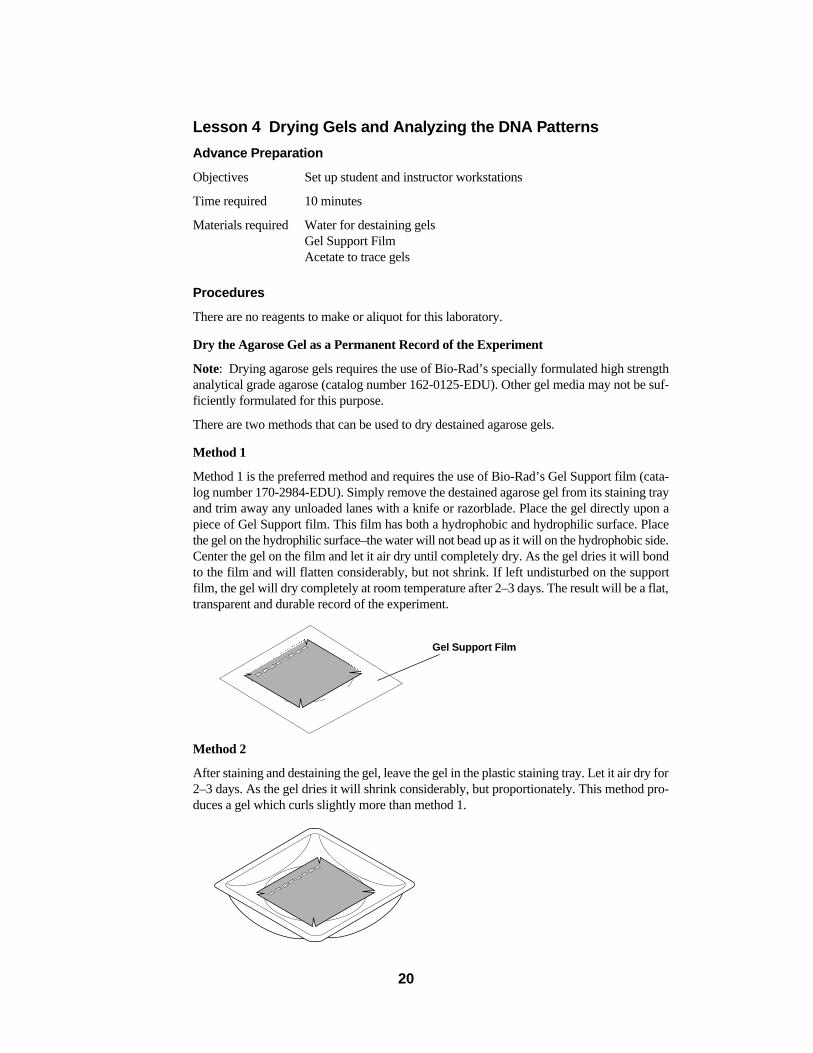
Method 1
Method 1 is the preferred method and requires the use of Bio-Rad’s Gel Support film (cata-log number 170-2984-EDU). Simply remove the destained agarose gel from its staining trayand trim away any unloaded lanes with a knife or razorblade. Place the gel directly upon apiece of Gel Support film. This film has both a hydrophobic and hydrophilic surface. Placethe gel on the hydrophilic surface–the water will not bead up as it will on the hydrophobic side.Center the gel on the film and let it air dry until completely dry. As the gel dries it will bondto the film and will flatten considerably, but not shrink. If left undisturbed on the supportfilm, the gel will dry completely at room temperature after 2–3 days. The result will be a flat,transparent and durable record of the experiment.
Method 2
After staining and destaining the gel, leave the gel in the plastic staining tray. Let it air dry for2–3 days. As the gel dries it will shrink considerably, but proportionately. This method pro-duces a gel which curls slightly more than method 1.
20
Gel Support Film

Obtaining a Permanent Record of the Gel Before Drying
It is recommended that each student group should make a permanent record of the gel beforeit is dried. Faint bands which have not amplified well will fade during drying. Therefore, ana-lyzing the gels before they are completely dried is strongly recommended. To do so, simplytrace the gel outline, including wells and DNA bands on a piece of paper or acetate, or takea photograph using standard cameras and film (Bio-Rad’s standard Polaroid GelDocumentation System).
21

Lesson Points to Highlight—(FAQ’s–FrequentlyAsked Questions)
This section describes steps in the experimental protocols which may be technically chal-lenging or which are extremely important to the overall outcome and understanding of theexperiments. Instructor's should alert their students attention to these points, and when pos-sible, demonstrate the technique before the students attempt the procedure.
The Student Manual and Quick Guide contain the detailed descriptions and drawings ofall laboratory steps and the techniques employed in each of the Lessons. Refer to them forquestions about the experimental protocols used in the labs.
Lesson 1 Sample Preparation
Processing the Cheek Cell Samples to Obtain a Genomic DNA Template forPCR
A. InstaGene Matrix. What function does it perform?
InstaGene Matrix consists of a solution of negatively-charged microscopic beads(Chelex™) which bind divalent cations like magnesium (Mg2+). It is important to remove thedivalent cations from solution because the cations inhibit PCR reactions and act as enzyme cat-alysts in the degradation of the DNA template. When cheek cells are lysed and boiled in thepresence of InstaGene Matrix the divalent cations released from within the cells bind to thebeads. After the lyaste is heated to inactivate any DNA-degrading enzymes, the beads arethen pelleted and removed by centrifugation. The supernatant which contains clean intactgenomic DNA can be used as the template in the PCR reactions.
The beads in the InstaGene Matrix quickly settle out of solution. It is extremely impor-tant that the vial of matrix is thoroughly mixed before pipetting aliquots for each studentworkstation and before each student member of a team removes an aliquot.
If the DNA samples are not going to be amplified the next day, they can be stored in therefrigerator in the InstaGene Matrix for up to 1 week. Before the samples are processed forPCR, the samples should be thoroughly mixed, the beads should be pelleted by centrifugation,and then used in PCR reactions. However, processing the samples within 24 hours is recom-mended. See the next steps for processing tips.
B. Incubation. What are the functions of each incubation step?
The pre-incubation step is carried out at 56 °C and performs two functions.
1. Heating the cell suspension aids in the breakup of connective tissue which holds the cheekcells together. Breaking up the tissue makes the cells easier to lyse during the subsequent100 °C incubation step.
2. Preincubation at 56 °C inactivates DNases, proteins which are naturally present in thecheek cell suspensions, and which could possibly degrade the genomic DNA and inhibitsubsequent PCR reactions.
Heating the cheek cell preparation to 100 °C ruptures the cheek cell membranes, therebyreleasing the cellular contents, which includes genomic DNA. It is the genomic DNA whichwill be used as the DNA template in the PCR reactions.
22

C. Do I have to remove the InstaGene Matrix before PCR?
It is extremely important to completely pellet the InstaGene Matrix into the bottom ofthe tube before an aliquot of the lysate is removed for the PCR reaction. The beads in theMatrix contain divalent cations which can inhibit PCR reactions. Thus, if any beads are car-ried over into the PCR reaction, the reaction will be inhibited. The InstaGene Matrix can beremoved from the lysate by centrifugation (8000 x g for 5 minutes). If a centrifuge with alower g-force is the only option (i.e.~2000 x g), increase the spin time to 10 minutes.
Twenty five microliters of supernatant above the beads (which contains the denaturedgenomic DNA) is then collected for the PCR reaction. Transfer the DNA template into thePCR tube after removing InstaGene Matrix.
Lesson 2 PCR Amplification of Genomic DNA Samples
Master Mix. What is it?
The Master Mix contains a mixture of nucleotides, or dNTP's (dATP, dTTP, dCTP,dGTP), buffer, and primers which are required elements of the PCR reaction. Taq DNA poly-merase is added to the Master Mix just prior to the laboratory period. Thus, when a 25 µlaliquot of the cheek cell lysate (which provides the DNA template) is added to a 25 µl aliquotof Master Mix, all of the necessary components for a 50 µl PCR reaction are present. The 2XMaster Mix contains 100 mM KCl, 20 mM Tris-HCl, 4 mM MgCl2, 2 mM dNTP and 1 uMeach of primer (pH 8.3). The final 1x or working concentration of all reagents in the PCRtube after Taq and Master Mix are combined will be one half of those values.
Note: Once the Master Mix and Taq are mixed, they should be used within 15–30 minutes.The reagents are extremely sensitive.
23
DNA Template
Supernatant
Matrix

PCR Amplification
The PCR amplification takes place in a Gene Cycler which performs alternating cyclesof heating and cooling necessary for gene replication. This lab utilizes three-cycle PCR; thereaction undergoes a denaturation step of 94 °C for 1 minute, an annealing step of 64 °C for1 minute, followed by an extension step of 72 °C for 2 minutes. These cycles are repeated 40times during the course of PCR amplification. During the denaturation, the two strands of theDNA template are melted apart to provide access for the PCR primers. During the annealingstep, the PCR primers recognize and bind to the DNA template. Once the primers are bound,Taq DNA polymerase extends the primers to replicate the segment of DNA.
The PCR vials are very small and require care when handling. It is important to carefullyand completely cap the vials before placing the tubes into the Gene Cycler. If the vials are notclosed completely, substantial evaporation can take place, and PCR amplification will beinhibited.
Manual Amplification
It is possible to perform the PCR amplification manually without an automated GeneCycler, although the PCR will not be as efficient. If manual PCR amplification is to be per-formed, the reaction should be performed in a screwcap tube and the components should betopped off with a drop of mineral oil to prevent evaporation (the Gene Cycler has a heated lidwhich prevents condensation and evaporation, thus no mineral oil is required). The tubes aremanually placed in a heat block or water bath set at 95 °C for 1 minute, then transferred to aheat block or water bath set at 64 °C for 1 minute, and finally transferred to a heat block orwater bath set at 72 °C for 2 minutes. Forty cycles of manual PCR should take ~160 min-utes. It really works but is a little tedious. Good luck.
24

Lesson 3 Gel Electrophoresis
What Volume of PCR Samples is Best Loaded Onto Gels?
For optimum visibility, each group of students will load 20 microliters of each positivecontrol into lanes 1–3, followed by 20 microliters each of student samples into lanes 4–7. Seethe template gel in Figure 7 below.
Fig. 7.
DNA Size Markers
The instructor may wish to run DNA size markers on the gels to provide a more detailedsize reference. Appropriate markers to include would be the DNA Precision Molecular MassRuler (catalog number 170-8207-EDU). If a lane of DNA size standards is included on the gel,the resulting 8 lane gel will curl more during the drying procedure than a 7 lane gel withoutmarkers. Note that the three positive controls provided with the kit will provide the minimumnumber of size references required for analysis of the gel.
Staining the Gels
The gels can be stained with BioSafe™ stain individually in the staining trays, or multi-ple gels can be stained together in a large staining dish. Because of the thickness of the gels,gentle rocking of the gels on a shaking table produces slightly more efficient staining.
The gels can also be stained and visualized with ethidium bromide (not included in the kit).If ethidium bromide is used as a stain, the gels should contain 0.05 µg/ml ethidium bromidein the agarose. This concentration of ethidium bromide produces maximum contrast of theamplified bands.
25
Controls Student Samples
1
(+/+
)
(-/-)
(+/-)
2 3 4 5 6 7 8

Lesson 4 Analysis and Interpretation of Results
Destaining the Gel
Five minutes of destaining is the minimum amount of time required to produce adequatecontrast for the analysis of the DNA bands. If time allows, destaining times of one to sixhours (four hours is ideal) provide greater contrast in bands as compared to background stain-ing.
Because the bands fade slightly upon drying, it is best to analyze the stained gels beforedrying. The gels can be illuminated from below to enhance visualization of the bands. Placethe gels on top of a light box, and trace the pattern of the bands onto clear, acetate sheetsusing a permanent marker. One the results are analyzed on the wet gels, proceed to drying thegels on Gel Support sheets.
Trim Away Excess Lanes
The width of a gel affects the way an agarose gel dries. Narrow gels tend to curl less upondrying, whereas wider gels curl more. The gels in the PCR lab use 7 of the 8 lanes, and so theempty lane of the gel should be trimmed away with a knife or razor blade. Removing thisempty lane will prevent excessive curling upon drying.
26

Interpretation of Results and Troubleshooting Guide
Explanations for "Empty Lanes" or Unamplified SamplesThere are multiple explanations which could account for student samples which were not
amplified in the PCR reactions.
1. Inadequate scraping of cheek cells. Firm pressure must be applied to the pipet tip inorder to transfer an adequate number of cheek cells for the preparation of the DNA tem-plate. If the scrapings were not firm enough, insufficient numbers of cheek cells will betransferred to the tube of InstaGene Matrix, resulting in little or no amplification. Scrapingshould not cause any pain or discomfort- if it does, scraping is too hard.
2. InstaGene Matrix not transferred. Each workstation is supplied with a vial of InstaGeneMatrix that was aliquotted by the instructor and placed on ice. This vial of matrix must bemixed prior to each pipetting to bring the beads up into solution. If no beads were trans-ferred into the students vial, the divalent cations will not be removed and the PCR reac-tion, and subsequent amplification, will be inhibited.
3. Carry-over of matrix into PCR reaction. Although the beads in the InstaGene Matrixare required for the DNA template preparation, it is imperative that none of theInstaGene Matrix is carried over into the PCR reaction. If some of the beads were trans-ferred over into the PCR tube, the divalent cations will be released into the reaction mix-ture and the PCR reaction, and subsequent amplification, will be inhibited.
27
DNA Template
Supernatant(contains DNA template)
Matrix
PCR Tube

Interpretation of Heterozygous Samples1. Competition During Amplification . Amplification of heterozygous samples is more
difficult than both homozygous amplifications because of competition between the small-er (660 bp) and larger (960 bp) bands. Because the smaller 660 bp band is amplified moreefficiently than the 960 bp band, visualization of heterozygous samples on agarose gelswill show the smaller band being more intense than the larger band (see the band markedby an asterisk in the gel below). For this reason, heterozygous samples can often be inter-preted as homozygous (-/-) because of a faint upper band. Careful examination of thegels is required to distinguish between heterozygous (+/-) and homozygous (-/-) individ-uals. Alternatively, the use of ethidium bromide and photodocumentation equipment (theBioRad Gel Documentation system) will increase the sensitivity and allow easier visual-ization of faint heterozygous samples.
2. Larger band in (+/-) samples. The heterozygous samples will often contain larger bandswhich migrate at ~1100 bp and 1700 bp in the gel (see the bands marked by arrows in thegel below). These bands are the result of heteroduplexes which form between the660 and 960 bp bands and contain secondary structure which results in the DNA bandsmigrating at a slower rate in the gel (see Figure 8 below).
Fig. 8. Heteroduplex formed between 960 & 660 bp bands.
28
660 base pairs960 base pairs
ALU insert (300 base pairs)
(+/+) (-/-) (+/-) S1 S2 S3 S4
*

3. Primer-Dimer Formation . Some PCR reactions may show primer-dimer formation.Primer dimers are bands which are seen at the bottom of the gels and which correspondto the combined molecular weight of both primers. Primer-dimer formation is more intensein reactions which show little or no amplified product. Thus, primer-dimer formation ismore likely to occur in reaction tubes with little or no template, InstaGene contamina-tion, or in samples which were prepared well in advance of placing into the Gene Cycler.The arrow in the gel below show primer–dimers.
4. My Bands appear to be fading. The blue dye in the Bio-Safe DNA stain is subject toreversible bleaching when exposed to bright room lights. When the dried gels are exam-ined 3–5 days after drying, the bands may appear faint. Placing the gels in a dark location(in a box or taped in a closed notebook) and examining several hours later will providethe most intense bands. It is most convenient to let the gels dry on the lab bench for 3–5days, tape them into a lab notebook, and examine the gels the following day.
29
(+/+) (-/-) (+/-) S1 S2 S3 S4 S5 S6 S7 S8

Lesson 1 DNA Template Preparation
1. Obtain a screwcap vial and label with your initials.Thoroughly mix the contents of the Matrix tube,then pipet 200 µl of InstaGene matrix into thelabeled screwcap tube.
2. Using a sterile 20–200 µl filter pipet tip, gentlyscrape the inside of your cheek 8 times with the tip.
3. Place the tip which contains your cheek cells intothe screwcap tube which contains the matrix. Whena micropipet becomes available, place the tip on theend of a P200 micropipet which is set on a 100 µlsetting. Pipet up and down 5 times into theInstaGene matrix to transfer your cheek cells intothe matrix.
4. Screw the lid tightly on the tube, place the tube inthe styrofoam rack, and incubate at 56 °C for 10minutes in a waterbath. At the halfway point(5 min), remix the contents of the tube by shakinggently, then place back in the 56 °C bath for theremaining 5 minutes.
5. Remove the tube, remix the contents by gently shak-ing, and place the tube in a boiling water bath(100 °C). Incubate at 100 °C for 6 minutes.
6. Remove the tube from the boiling water bath andshake the contents gently to resuspend. Pellet thematrix by spinning for 5 minutes in a centrifuge.
7. Store the tube in the refrigerator until the next laboratory period.
30
Centrifuge
56 °C 10 min
InstaGene Matrix
100 °C 6 min
Waterbath
Waterbath
Quick Guide for PCR Kit

Lesson 2 PCR Amplification
1. Label a PCR tube and a capless adaptor with yourinitials, place the PCR tube in the adaptor and placeboth in the foam rack. Obtain the screwcap tubewith your cheek cell DNA template from the refrig-erator and place in the rack.
2. Transfer 25 µl of the DNA template (the uppersupernatant phase) from the screwcap tube into thebottom of the PCR tube. Be very careful not totransfer any of the matrix beads into the PCR tube.PCR reactions are inhibited by the matrix.
3. Locate the tube of Master Mix on ice and transfer25 µl of the Master Mix into the PCR tube. Cap thePCR tube.
4. Place the PCR tube into the Gene Cycler. The reac-tion will undergo 40 cycles of PCR amplification.
31
PCR Tube
DNA Template
Master Mix
Adaptor
Supernatant
Matrix

Lesson 3 Electrophoresis of PCR Samples
1. Obtain the PCR tube from the GeneCycler andplace in the microtube rack. Add 10 µl of loadingdye (“LD”) to the sample. Mix the contents by gen-tly flicking the tubes with your finger. If a centrifugeis available, pulse spin the tube and adaptor to bringthe contents to the bottom.
2. Place an agarose gel in the electrophoresis appara-tus. Fill the electrophoresis chamber and cover thegel with 1x TAE buffer. This will require 275 ml of1x buffer.
3. Check that the wells of the agarose gels are near theblack (-) electrode and the base of the gel is near thered (+) electrode.
4. Using a separate tip for each sample, load the sam-ples into the first seven wells of the gel in the fol-lowing order (the controls should be located at theinstructor's workstation):
Lane Sample Volume Loaded1 Homozygous (+/+) control 20 µl2 Homozygous (-/-) control 20 µl3 Heterozygous (+/-) control 20 µl4 Student 1 20 µl5 Student 2 20 µl6 Student 3 20 µl7 Student 4 20 µl
5. Secure the lid on the gel box. The lid will attach tothe base in only one orientation: red to red andblack to black. Connect the electrical leads to thepower supply.
6. Turn on the power supply and electrophorese yoursamples at 100 volts for 35 minutes.
7. When the electrophoresis is complete, turn off thepower and remove the lid from the gel box.Carefully remove the gel tray and the gel from thegel box. Be careful,the gel is very slippery. Nudgethe gel off the gel tray with your thumb and care-fully slide it into your plastic staining tray.
8. Add 60 ml of Bio-Safe DNA stain to the tray. Coverthe tray with Saran Wrap and let the gel stainovernight.
32
+-
+
-
CentrifugeLoading Dye

Lesson 4 Analysis of the Gel
1. Pour off the Bio-Safe DNA stain into a waste con-tainer and destain the gel with 60 ml of water for 5minutes.
2. Pour the water out of the staining tray and disposeof according to the teachers' instructions.
3. Trim away any empty lanes of the gel with a knifeor razorblade. Let the gel dry on Gel Support film orin your staining tray on your lab bench for 3–5 days.
4. When the gel is dry, tape it into your lab notebookfor a permanent record.
5. With the help of your instructor, determine whetheryou are homozygous or heterozygous for the Aluinsertion.
33

Student Manual
Introduction to PCR—The Polymerase Chain ReactionYou are about to perform a procedure known as PCR1—the amplification of a specific
sequence of your own DNA in a test tube. This particular piece of DNA is present in thegenes of many but not all people. Analysis of the data generated in this laboratory will enableyou to determine whether your genomic DNA carries this piece of DNA, or not.
The genome, composed of DNA, is our hereditary code. This is the so called "hard-wiring", the blueprint that controls much of why we look like we do, why we act like we do,and how we do the things we do. Molecular Biology is the study of genes and the molecu-lar details which regulate the flow of genetic information from DNA, to RNA and proteins,from generation to generation. Biotechnologyuses this knowledge to manipulate organisms'(microbes, plants or animals) DNA to help solve human problems.
Within the molecular framework of biology, DNA, RNA and proteins are closely tied toeach other. Because proteins and enzymes ultimately play such a critical role in the life pro-cess, scientists have spent many lifetimes studying proteins in an attempt to understand howthey work. With this understanding it was believed we could cure, prevent and overcome dis-ease and physical handicaps as well as explain exactly how and why organisms exist, prop-agate and die. However, the complete answer to how and why does not lie solely in theknowledge of how enzymes function, we must learn how they are made. If each enzyme is dif-ferent, then what controls these differences and what is the blueprint for this difference? Thatanswer lies within our genome, or genetic code.
Thus, you may realize why researchers today, in an attempt to understand the mecha-nisms behind the various biological processes, study nucleic acids as well as proteins in orderto get a complete picture. In the last 20 years, many advances in the areas of nucleic acidtechniques have allowed researchers the means to study the roles that nucleic acids play in biol-ogy. It took the imagination and hard work of many scientists to reveal the answers to one ofthe most mysterious puzzles of life - understanding the mechanisms that control how DNA istranslated into proteins within living cells.
Before Beginning this Lab, See If You Can Answer the FollowingQuestions
How is DNA faithfully passed on from generation to generation? What causes geneticdisease in some people but not others? How do scientists obtain DNA to study? What secretscan DNA tell us about our origins? What human problems can an understanding of DNAhelp us solve? Should we unlock the secrets held in this most basic building block of life?
PCR Set the Stage for a Scientific RevolutionIn 1983, Kary Mullis2 at Cetus Corporation developed the molecular biology technique
that has since revolutionized genetic research. This technique, termed the Polymerase ChainReaction(PCR), transformed molecular biology into a multidisciplinary research field within5 years of its invention. Before PCR, the molecular biology techniques used to study DNArequired such a high level of expertise that relatively few scientists could use them.
The objective of PCR is to produce a large amount of DNA in a test tube (in vitro), start-ing from only a trace amount. Technically speaking, this means the controlled enzymaticamplification of a DNA sequence, or gene, of interest. The template strands can be any formof double-stranded DNA such as genomic DNA. A researcher can take trace amounts ofgenomic DNA from a drop of blood, a single hair follicle or cheek cell (in theory, only a sin-
34

gle template strand is needed to copy and generate millions of new identical DNA molecules)and make enough to study. Prior to PCR, this would have been impossible. It is the ability toamplify the precise sequence of DNA of interest that is the true power of PCR.
PCR has made an impact on four main areas of genetic research: gene mapping, cloning,DNA sequencing and gene detection. PCR is now used as a medical diagnostic tool to detectspecific mutations which may cause genetic disease3, is used in criminal investigations andcourts of law to identify suspects on the molecular level4, and has been a powerful tool in thesequencing of the human genome5. Prior to PCR the use of molecular biology techniques fortherapeutic, forensic, pharmaceutical, agricultural or medical diagnostic purposes was notpractical nor cost effective. The development of PCR technology transformed molecular biol-ogy from a difficult science to one of the most accessible and widely used disciplines ofbiotechnology.
Now, let’s extract some of your own DNA.
35

Lesson 1 Procedure for DNA Extraction and TemplatePreparation
To obtain DNA for use in the polymerase chain reaction you will extract the DNA fromyour own living cells. It is interesting to note that DNA can be also extracted from mummiesand fossilized dinosaur bones. In this lab activity, you will be isolating DNA from epithelialcells that line the inside of your cheek. This is accomplished by using a sterile pipet tip togently scrape the inside of your cheek about 8 times to scoop up the cells lining the surface.You will then boil the cells to rupture them and release the DNA they contain. To obtain pureDNA for PCR you will use the following procedure.
The cheek cells in the pipet tip are transferred into a micro test tube containing 200 µl ofInstaGene Matrix. This particulate matrix is made up of negatively charged microcopicbeads that "chelate", or grab metal ions out of solution. It acts to trap metal ions, such as Mg2+,which are required as catalysts or cofactors in enzymatic reactions. Your cheek cells willthen be lysed or ruptured by heating to release all of their cellular constituents, includingenzymes that were once contained in the cheek cell lysosomes. Lysosomes are sacs within thecells cytoplasm which contain powerful enzymes, such as DNases,which are used by cells todigest the DNA of invading viruses. When you rupture the cells, these DNases can digest thereleased DNA of interest. However, when the cells are lysed in the presence of the chelatingbeads, the cofactors are adsorbed and are not available to the enzymes. This virtually blocksall enzyme degradation of the extracted DNA and results in a population of intact genomicDNA molecules that will be used as the template in your PCR reaction.
Your isolated cheek cells are first suspended in the InstaGene Matrix and incubated at56 °C for 10 minutes. This "preincubation" step helps to soften the plasma membranes andrelease clumps of cells from each other. The increased temperature also acts to inactivateenzymes such as DNases, which will degrade the DNA template. After this 10 minute incu-bation period, the cells are then placed into a boiling (100 °C) water bath for 6 minutes. Theboiling ruptures the cells and releases the DNA from the cell nucleus. Your extracted genom-ic DNA will then be used as the target template for PCR amplification.
36

Lesson 1 LAB—DNA Extraction and Template Preparation
Workstation Checklist
Your workstation . Materials and supplies that should be present at your workstationprior to beginning this lab are listed below.
Student workstations Number (✔✔)Screw cap tubes 4 ❐
InstaGene Matrix 1 tube ❐
Styrofoam microtube rack 2 ❐
P-200 micropipet 1 ❐
Lab marker 1 ❐
Waste Container 1 ❐
Copy of Quick Guide or protocol 1 ❐
Instructor's (common) workstation. A list of materials, supplies, and equipment that shouldbe present at a common location to be accessed by your team is also listed below.
Pipette tips (filter type), 20–200 µl 1 box ❐
Water baths (56 and 100 °C) 2 ❐
Centrifuge 1 ❐
37

Lab Protocol for Lesson 11. Each member of your team should label a screwcap vial with their initials. Locate the
stock tube labeled "InstaGene" and thoroughly mix the contents of the tube by flickingwith your index finger, or by vortexing the tube (the beads must be evenly mixed, or thefollowing steps will not work correctly). Pipette 200 µl of InstaGene Matrix into yourscrewcap vial. Label the tube on the cap and on the side with your initials. Each personshould wash their hands before beginning step 2.
2. Using a sterile 20–200 µl filter pipette tip, gently scrape the inside of your cheek 8 timeswith the tip. This is most easily done by pinching and extending the corner of your mouthwith one hand, and scraping the cheek with the tip in the other hand. Use firm, but gentlepressure. The goal is to remove the surface layer of epithelial cells from your cheek lining.
3. Place the pipette tip on the end of a P200 micropipet which is set on a 100 µl setting.
4. Pipette up and down 5 times into the InstaGene Matrix—the action of pipetting up anddown mixes and transfers your cheek cells into the InstaGene Matrix.
38

5. Screw the lid tightly on your vial and place in the foam microtube rack. When all mem-bers of your team have collected their samples, float the rack and tubes in a 56 °C waterbath for 10 min. At the halfway point (5 min), remix the contents of the tube by shakingseveral times and place back in the water bath for the remaining 5 minutes.
6. Remove the tubes from the waterbath and remix by shaking the tube several times. Nowfloat the rack of tubes in a 100 °C waterbath for 6 minutes.
7. After 6 minutes, remove the tubes from the 100 °C waterbath and shake gently severaltimes to resuspend the sample. Place the four tubes in a balanced arrangement in the cen-trifuge. Pellet the Matrix by spinning for 5 minutes in the centrifuge (8000 x g).
8. Store the samples in the refrigerator until the next laboratory period.
39
56 °C 10 minWaterbath
100 °C 6 minWaterbath
Centrifuge

Lesson 1 DNA Extraction and Template Preparation
Focus Questions
1. Why is it necessary to trap the metal ions in the cheek cell solution before the boiling/lysisstep at 100 °C? What would happen if you did not put in the InstaGene Matrix?
2. What is needed from the cheek cells in order to conduct the Polymerase Chain Reaction?
3. What structures must be broken in order to release the DNA from a cell?
4. After boiling the samples, why do you think the extracted cheek cell DNA is stored coldin the InstaGene Matrix?
40

Lesson 2 PCR AmplificationIt is estimated that there are 100,000 individual genes in the human genome. The true
power of PCR is the ability to target and amplify a specific piece of DNA (or gene) out of acomplete genome.
The recipe for a PCR amplification of DNA requires a simple mixture of ingredients. Toreplicate a given piece of DNA, the reaction mixture requires the following components.
1. Intact DNA template—containing the sequence of DNA to be amplified.
2. Individual deoxynucleotide bases (A, T, G and C)—raw material of DNA.
3. DNA polymerase—an enzyme that assembles the nucleotides into a new DNA chain.
4. Magnesium ions—a cofactor (catalyst) required by DNA polymerase to create the DNAchain.
5. Oligonucleotide primers—pieces of DNA complementary to the template that tell DNApolymerase exactly where to start making copies.
6. Salt buffer—provides the optimum ionic environment and pH for the PCR reaction.
The template DNA in this exercise is genomic DNA that was extracted from your cheekcells. When all the other components are combined under the right conditions a copy of theoriginal double stranded template DNA molecule is made—doubling the number of templatestrands. Each time this cycle is repeated, copies are made from copies and the number of tem-plate strands doubles—from 2 to 4 to 8 to 16 and so on—until after 20 cycles there are1,048,554 exact copies of the original strand.
PCR makes use of the same basic principles in genetics that cells use to duplicatetheir DNA.
1. Complementary DNA strand hybridization
2. DNA strand synthesis via DNA polymerase
The two DNA primers provided in this kit are designed to flank, or bracket, a DNAsequence within your genome and thus provide the exact start signal for the DNA polymeraseto "zero-in on" and begin synthesizing (replicating) copies of that target DNA. Complementarystrand hybridization takes place when the two different primers anneal, or hybridize, to eachof their respective complementary base pair sequences on the template DNA molecule.
The primers are two short single-stranded DNA molecules (23 bases long), one that iscomplementary to a portion of the 5'–3' strand, and another that is complementary to the por-tion of the 3'–5' strand of your DNA. These primers hybridize to the separated template strandsand serve as starting points for DNA amplification.
The enzyme, called Taq DNA polymerase, extends the annealed primers' sequence by"reading" the strand and synthesizing the complementary sequence. In this way, Taq replicatesthe template DNA strand(s). This polymerase has been isolated from a heat stable bacterium(Thermus aquaticus) which in nature lives within the steam vents in the Yellowstone NationalPark.6 For this reason the enzymes within these bacteria have evolved to withstand high tem-peratures (94 °C) also used in each cycle of the PCR reaction.
41

PCR—Step by StepPCR amplification includes three main steps, a denaturation step, an annealing step
and an extension step (these steps are summarized in Figure 9). During denaturation, the reac-tion mixture is heated to 94 °C for 1 minute, which results in the melting out or separation ofthe double-stranded DNA template into two single stranded molecules. In PCR amplifica-tion, DNA templates must be converted into single strands before the polymerase can gener-ate a new copy. The harsh temperature required to melt the DNA strands normally woulddestroy the activity of most enzymes, but because Taq polymerase has been isolated frombacteria which thrive in the high temperatures of hot springs, it remains active.
Fig. 9. A complete cycle of PCR.
During the annealing step, the oligonucleotide primers "anneal to" or find their comple-mentary sequences on the two single stranded template strands of DNA. In these annealedpositions, they can act as "primers" for Taq DNA polymerase. They are called primers becausethey "prime" the single stranded DNA molecules by providing a short sequence of doublestranded DNA for Taq polymerase to extend and build a new complementary strand. Bindingof the primers to their template sequences is also highly dependent on temperature. In thislab exercise, a 64 °C annealing temperature is optimum for primer binding.
During the extension step, the job of Taq DNA polymerase is to add nucleotides (A, T,G or C) one at a time to the primer to create a complementary copy of the DNA template.During polymerization, the reaction temperature is increased to 72 °C, the temperature which
42
Denature Strands 95 °C
Anneal Primers 64°(Taq Polymerase recognizesdouble stranded substrate)
Extend 72°(Synthesize New Strand)
Repeat Cycle 40 Times
5'
5'
5'
5'
5'
5'
5'
5'
5'
5'
5'
5'
3'
3'
3'
3'
3'
3'
3'
3'
3'
3'
3'
3'

produces optimal Taq polymerase activity. The three steps of denaturation, annealing, andextension, combine to form one "cycle" of PCR, and a complete PCR amplification undergoes40 cycles.
The entire 40 cycle reaction is carried out in a test tube which is placed into the thermalcycler (also called a Gene Cycler). The Gene Cycler contains an aluminum block that holdsthe samples and can be rapidly heated and cooled across extreme temperature differences.The rapid heating and cooling of this thermal block is defined as "temperature cycling" or"thermal cycling".
Temperature Cycle=Denaturation Step (94 °C)+Annealing Step (64 °C)+Extension Step (72 °C)
43

Lesson 2 Lab–PCR Amplification
Workstation Checklist
Your workstation . Materials and supplies that should be present at your workstationprior to beginning this lab are listed below.
Student workstations Number (✔✔)PCR tubes 4 ❐
Microtubes, capless 4 ❐
Master Mix 1 ❐
P-200 micropipet 1 ❐
Pipette tips (filter type), 20-200 µl 8 tips ❐
Styrofoam microtube rack 2 ❐
Lab marker 1 ❐
Ice bucket with ice 1 ❐
Waste Container 1 ❐
Copy of Quick Guide or protocol 1 ❐
Instructor's (common) workstationGel trays 1/station ❐
Molten agarose (see advance prep) 40 ml/gel ❐
Lab tape for gel trays 1/station ❐
Centrifuge 1 ❐
Gene Cycler 1 ❐
44

Lab Protocol for Lesson 2
1. Obtain your screwcap tube which contains your genomic DNA template from the refrig-erator and place on your lab bench.
2. Each member of the team should obtain a PCR tube and capless microtube adaptor. Labeleach tube with your initials and place the PCR tube into the capless adaptor (which actsas a convenient holder for the small PCR tube). Place the PCR tube in its holder in thefoam rack.
3. Transfer 25 µl of your DNA template from your screwcap tube into the bottom of thePCR tube. Do not transfer any of your matrix beads into the PCR reaction—thereaction will be inhibited.
4. Locate the tube of PCR Master Mix (labeled "Master") in your ice bucket. Transfer 25 µlof the Master Mix into your PCR tube.
45
PCR Tube Adaptor
DNA Template
Supernatant
Matrix
PCR Tube
Master Mix

5. Remove your PCR tube from its holder and place the tube in the Gene Cycler.
6. When all of the PCR samples are in the Gene Cycler, the teacher will begin the PCRreaction. The reaction will undergo 40 cycles of amplification, which will take approxi-mately 3 hours.
7. If your teacher instructs you to do so, you will now pour your agarose gels (the gels mayhave been prepared ahead of time by the teacher).
46

Lesson 2 PCR Amplification
Focus Questions
1. Why is it necessary to have a primer on each side of the DNA segment to be amplified?
2. How did Taq polymerase acquire its name?
3. Why are there nucleotide bases (A, T, G, and C) in the Master Mix? What are the othercomponents of the Master Mix and what are their functions?
4. Describe the three main steps of each cycle of PCR amplification and what reactionsoccur at each temperature.
5. Explain why the precise length target DNA sequence doesn’t get amplified until the thirdcycle. You may need to use additional paper and a drawing to explain your answer.
47

Lesson 3 Analyzing Your DNA Using Gel Electrophoresis
What Are You Looking At?
Before you analyze your PCR products, it is important to review the details of the targetsequence being explored.
What Can Genes and DNA Tell Us?
It is estimated that the 23 pairs, or 46 chromosomes, which comprise human genomicDNA (23 chromosomes come from the mother and the other 23 come from the father) con-tain approximately 100,000 genes. Each chromosome contains a series of specific genes. Thelarger chromosomes contain more DNA, therefore more genes, as compared to the smallerchromosomes. Each one of the homologous chromosomes (pairs) contains similar genes.
Each gene holds the code for a particular protein. Interestingly, the 100,000 genes onlycomprise 5% of the total chromosomal DNA. The other 95% is non-coding DNA. This non-coding DNA is interspersed in blocks between functional segments of genes and within genes,splitting them into segments. The exact function of the non-coding (intergenic) DNA is notyet known, although it is thought that non-coding DNA allows for the accumulation of muta-tions and variations within organisms.
When DNA is first transcribed into RNA, exons are separated from each other by introns.While the RNA is still in the nucleus intergenic sequences, or introns (in = stay within thenucleus), are removed from the RNA while the exons (ex = exit the nucleus) are splicedtogether to form the complete messenger RNA coding sequence for the protein (see Figure 10).This process is called RNA splicingand is carried out by specialized enzymes called spliceo-somes.
Fig. 10. Splicing of Introns from Genes.
Surprisingly, introns often vary in their size and sequence among individuals while exonsdo not. This variation is thought to be the result of the differential accumulation of mutationsin DNA throughout evolution. These mutations are silently passed on to our descendants. Wedo not notice mutations in our non-coding DNA because they do not affect our phenotypes.However, these differences in our DNA represent the molecular basis of DNA fingerprintingused in human identification and studies in population genetics.
48
Intron 1
Exon 15'
5' 3'
3'Exon 2 Exon 3 Genomic DNA
Genotype
Phenotype
Pre mRNA
mRNA
Protein
Exon 3Exon 2Exon 1
Exon 1 Exon 2 Exon 3
Intron 2
Transcription
Splicing
Translation

The Target Sequence–Can You Say "Alu"?
Introns contain small repetitive DNA elements that have become randomly inserted intothe human genome over millions of years. One such repetitive element is called the "Alusequence"7 (see Figure 11). This is a DNA sequence about 300 base pairs long which is repeat-ed, one copy at a time, almost 500,000 times throughout the human genome8. The origin andfunction of these randomly repeated sequences is not yet known.
Fig. 11. Location of an Alu repetitive element within intron 8 of the TPA gene.
Some of these Alu sequences have characteristics that make them very useful to geneti-cists. When present within introns of certain genes, they can either be associated with a dis-ease or merely used to estimate relatedness among individuals. In this exercise, analysis of asingle Alu repeat is used to estimate its' frequency in the population and as a simple measureof molecular genetic variation—with no reference to disease or relatedness among indi-viduals.
There is one such Alu element present in the 8th intron of a particular gene located onchromosome 89. This gene codes for a protein known as Tissue Plasminogen Activator orTPA. This protein is an enzyme that aids in the breakdown of blood clots and has recently beengenetically engineered for production as a pharmaceutical product by the biotechnology com-pany, Genentech, Inc. The gene for TPA is composed of 14 exons separated by 13 introns.
In this lab you will be hunting for an Alu element in the 8th intron of the TPA gene ofchromosome 8. This particular Alu element is dimorphic, meaning that the element is pre-sent in some individuals and not others. Some people have the insert in one copy of their 8thchromosomes (one allele), others may have the insert in both copies of chromosome 8 (two alle-les), while some may not have the insert on either copy of the chromosome (see Figure 12).The presence or absence of this insert can be detected using the polymerase chain reaction fol-lowed by agarose gel electrophoresis.
Since you are amplifying a region of DNA contained within an intron, the region of DNAis never really used in your body. So if you don’t have it, don’t worry.
The primers in this kit are designed to bracket the region within the 8th intron of the TPAgene that is 660 base pairs in length if the intron does not contain the Alu insertion or 960 basepairs in length if Alu is present. This increase in size is due to the 300 base pair sequencecontributed by the Alu insert. When your PCR products are electrophoresed on an agarose gel,there are three distinct outcomes which can be visualized in the gel.
If both chromosomes contain Alu inserts, then each amplified PCR product will be 960base pairs long. On a gel they will migrate at the same speed so there will be one band that cor-responds to 960 base pairs. If neither chromosome contains the insert then each amplifiedPCR product will be 660 base pairs and they will migrate as one band that corresponds to660 base pairs. If you have an Alu insert on one chromosome but not the other, then therewill be one PCR product of 660 base pairs and one of 960 base pairs. The resulting gel willreveal two bands.
49
5' 3'Exon 8 ALU
Intron 8
(Amplified Region)
Exon 9 Exon 10

Fig. 12. The presence or absence of the Alu insert within intron 8 of the TPA gene.
Electrophoresis separates DNA fragments according to their relative size (molecularweight). DNA fragments are loaded into an agarose gel slab, which is placed into a chamberfilled with a conductive liquid buffer solution. A direct current is passed between wire elec-trodes at each end of the chamber. DNA fragments are negatively charged, and when placedin an electric field will be drawn toward the positive pole and repelled by the negative pole.The matrix of the agarose gel acts as a molecular sieve through which smaller DNA frag-ments can move more easily than larger ones. Over a period of time smaller fragments willtravel farther than larger ones. Fragments of the same size stay together and migrate in whatappear as single "bands" of DNA in the gel.
50
ALU
Intron 8 Genotype DNA size of PCR Products
Homozygous (+/+) 960 base pairs
660 base pairs
960 + 660 base pairs
Homozygous (-/-)
Heterozygous (+/-)
ALU
ALU
(+/+) (-/-) (+/-) S1 S2 S3 S4

Lesson 3 Lab–Analyzing Your DNA Using Gel Electrophoresis
Workstation Checklist
Your workstation . Materials and supplies that should be present at your workstationprior to beginning this lab are listed below.
Student workstations Number/Station (✔✔)Agarose gel 1 ❐
PCR samples 1/student ❐
P-10 or P-20 micropipet 1 ❐
Pipette tips (filter type), 0–20 µl 11 tips ❐
Lab marker 1 ❐
Styrofoam microtube rack 1 ❐
Gel box and power supply 1 ❐
Gel staining tray 1 ❐
Loading dye 1 ❐
Waste container 1 ❐
Copy of Quick Guide or protocol 1 ❐
Instructor's workstation1x TAE electrophoresis buffer 275 ml/gel box ❐
Bio-Safe DNA stain—1x solution 500 ml ❐
Positive control samples 3 ❐
Homozygous (+/+)
Homozygous (-/-)
Heterozygous (+/-)
Centrifuge (optional equipment) 1 ❐
Shaking platform (optional equipment) 1 ❐
DNA standard (optional) 1 ❐
51
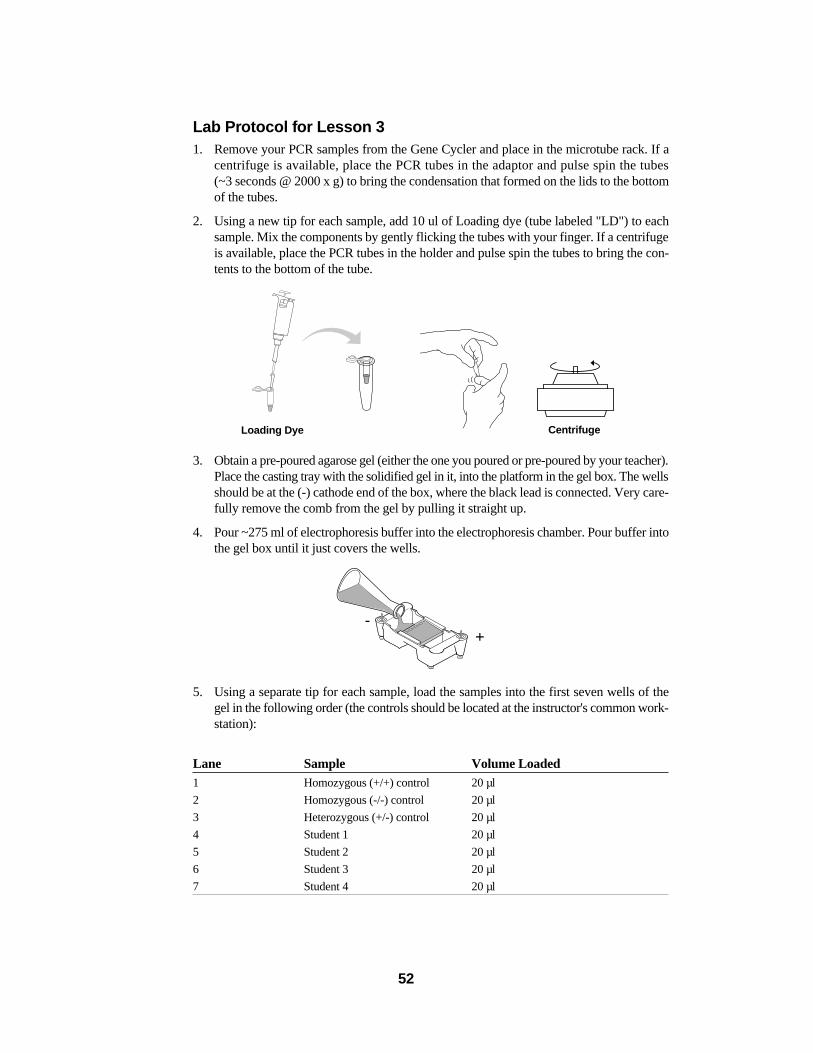
Lab Protocol for Lesson 31. Remove your PCR samples from the Gene Cycler and place in the microtube rack. If a
centrifuge is available, place the PCR tubes in the adaptor and pulse spin the tubes(~3 seconds @ 2000 x g) to bring the condensation that formed on the lids to the bottomof the tubes.
2. Using a new tip for each sample, add 10 ul of Loading dye (tube labeled "LD") to eachsample. Mix the components by gently flicking the tubes with your finger. If a centrifugeis available, place the PCR tubes in the holder and pulse spin the tubes to bring the con-tents to the bottom of the tube.
3. Obtain a pre-poured agarose gel (either the one you poured or pre-poured by your teacher).Place the casting tray with the solidified gel in it, into the platform in the gel box. The wellsshould be at the (-) cathode end of the box, where the black lead is connected. Very care-fully remove the comb from the gel by pulling it straight up.
4. Pour ~275 ml of electrophoresis buffer into the electrophoresis chamber. Pour buffer intothe gel box until it just covers the wells.
5. Using a separate tip for each sample, load the samples into the first seven wells of thegel in the following order (the controls should be located at the instructor's common work-station):
Lane Sample Volume Loaded1 Homozygous (+/+) control 20 µl
2 Homozygous (-/-) control 20 µl
3 Heterozygous (+/-) control 20 µl
4 Student 1 20 µl
5 Student 2 20 µl
6 Student 3 20 µl
7 Student 4 20 µl
52
CentrifugeLoading Dye
+-

6. Secure the lid on the gel box. The lid will attach to the base in only one orientation: redto red and black to black. Connect electrical leads to the power supply.
7. Turn on the power supply. Set it to 100 V and electrophorese the samples for 35 minutes.
8. When the electrophoresis is complete, turn off the power and remove the lid from the gelbox. Carefully remove the gel tray and the gel from the gel box. Be careful, the gel isvery slippery. Nudge the gel off the gel tray with your thumb and carefully slide it intoyour plastic staining tray.
9. Pour 60 ml of Bio-Safe DNA stain into your plastic staining tray, cover with Saran wrap,and let the gel sit in the stain overnight. If a shaking table is available, gently shake thegels in the stain overnight.
53
+
-

54
Lesson 3 Analyzing Your DNA Using Gel Electrophoresis
Focus Questions
1. Explain the difference between an intron and an exon.
2. Why do the two possible PCR products differ in size by 300 base pairs?
3. Explain how agarose electrophoresis separates DNA fragments of interest. Why does asmaller DNA fragment move faster than a larger one?
4. What kind of controls are run in this experiment? Why are they important? Could therebe others used?

Lesson 4 Lab–Final Analysis and Interpretation of ResultsThe moment of truth has arrived. What is your genotype? Are you a homozygote or a
heterozygote? To find out you will have to destain your agarose gel. After 5–10 minutes, theexcess blue stain will begin to diffuse out of the agarose leaving the remaining dye bound tothe DNA in the gel. Destaining increases the contrast and will allow you to visualize the DNAfragments you generated using PCR. To increase the contrast between the blue backgroundof the gel and DNA bands, gels can be destained for an additional 1–6 hours.
To make detailed observations of your gel, lay the gel on a white background or you maywish to view your gel with a light box (a light bulb under a piece of white plexiglass). The lightbox will provide a brighter background to view your stained gel. You may also trace the DNAbands in your gel by placing a clear sheet of acetate over the gel. Trace the outline of the gel,the sample wells and the DNA bands with a permanent marker.
Lesson 4 Analysis and Interpretation of Results
Workstation Checklist
Your workstation . Materials and supplies that should be present at your workstationprior to beginning this lab are listed below.
Student workstations Number/Station (✔✔)Water for destaining gels 60 ml ❐
Gel Support membrane (optional) 1 ❐
Copy of Quick Guide or protocol 1 ❐
Acetate for tracing gels 1 ❐
Instructors workstationNone required
55

Lab Protocol for Lesson 4
Protocol
1. Pour off the Bio-Safe DNA stain into a bottle or another appropriate container and destainthe gel with 60 ml of water for ~5 minutes.
2. Pour the water out of the staining tray. Ask the instructor how to properly dispose of thestain.
3. Trim away any empty lanes of the gel with a knife or razor blade. Let the gel dry on GelSupport film or in your staining tray on your lab bench for 3–5 days. When the gel is dry,tape it into your lab notebook for a permanent record.
4. With the help of your instructor, determine whether you are homozygous or heterozy-gous for the Alu insertion. First look at the three control lanes and note the migration pat-tern of the homozygous (+/+), the homozygous (-/-), and the heterozygous (+/-) samples(also check the example on page 50). You may notice that in the heterozygous sample thesmaller 660 base pair fragment is more intense than the larger 960 bp fragment. This dif-ference is due to the fact that the smaller piece is amplified more efficiently than the larg-er fragment. Copies of the shorter piece can be made at a faster rate than the bigger pieceso more fragments of the shorter piece are created per cycle.
56

Analysis
Compare your sample lanes with the controls in lanes one, two, and three. Mark the loca-tion and size of your fragment, or fragments. By comparing your DNA migration pattern tothe controls, determine whether you are homozygous (+/+), homozygous (-/-), or heterozygous(+/-). If your sample lane is blank, discuss with your classmates and teacher the possible rea-sons for lack of amplification.
Remember that the interpretation of the gel itself allows you to determine your geneticmakeup only at the site, or gene locus (location), being studied. There are three possible geno-types for the Alu insert at the location you have amplified. Use the information gathered fromyour gel to determine the number of sub-populations in your class: homozygous (+/+),homozygous (-/-), or heterozygous (+/-). Tally the class results in the table on page 58.
A major factor affecting the reliability of DNA fingerprinting evidence in forensics ispopulation genetics and genetic statistics. In humans there are hundreds of loci or DNA seg-ments, like Alu, that can be selected and used for fingerprinting analysis. Depending on demo-graphic factors such as ethnicity or geographic isolation, some populations show much lessvariation in particular DNA segments than others. The degree of variation will affect the sta-tistical odds of more than one individual having the same sequence. If 33% (1 out of three indi-viduals) of a given population has the same frequency in its DNA fingerprinting pattern fora certain DNA segment, then little information will be obtained from using that segment aloneto identify an individual.
When performing a DNA fingerprint for identifying a suspect in a criminal case or pater-nity suit what you want is not a 1 out of 3 (1/3) chance of a match in a population. What youwant is 1 in 10 million (1/107) chance of a match. The frequency of a particular DNA patternturning up in a population becomes extremely low when a series of DNA segments is select-ed and amplified, rather than just one segment alone. Amplifying multiple DNA segmentsfrom a single sample of genomic DNA can serve as a powerful tool to discriminate betweenindividuals in a population. For DNA fingerprinting to be admissible as evidence in a courtof law it is necessary for 30 to 40 different DNA segments on multiple chromosomes to beselectively amplified and analyzed. Therefore in analyzing how incriminating the DNA evi-dence is, one needs to ask the question:
Statistically, how many people in a population may have the same DNA pattern as takenfrom a crime scene: 1 in 1,000,000? 1 in 10,000? Or 1 in 10?
In actuality, the Alu insert such as the one you have "fingerprinted" in this lab has beenused to study the geographic migration patterns of different human populations over the courseof human evolution8. The data from these studies have been published and your samples canbe compared to the data collected from much larger populations.
57

Lesson 4 Analysis and Interpretation of Results
Focus Questions
Remember that the value of this Alu insert being in a non-coding region of the TPA geneis that it is not related to a particular disease, nor does it code for any protein sequence. It’sjust non-coding DNA that can be used as a tool to study human genotypic frequencies.
Because Alu repeats have become integrated into the general population at random, theAlu insert in the TPA gene is very useful in the study of the gene frequencies in localizedhuman populations. Theoretically, in some geographically isolated populations all individu-als may be homozygous (+/+), in others the individuals may all be homozygous (-/-) while ina ("melting-pot") population the three genotypes (polymorphisms) may exist in equilibrium.The results you obtain in this lab provide a real life opportunity to use the Hardy-Weinbergequation to examine and study genotypic and allelic frequencies of the Alu insert in yourclass.
The Hardy-Weinberg equation,p2 + 2pq + q2 = 1, describes the frequencies of alleles inthe gene pool of an entire population. In this case the entire population is your class:
p2 = the frequency of an individual homozygous (+/+) for the Alu insert
q2 = the frequency of an individual homozygous (-/-) for the lack of an Alu insert
2pq = the frequency of an individual heterozygous (+/-) for the Alu insert
By determining frequencies of the Alu genotype within your class population, the allel-ic frequencies can also be calculated. Additionally, the genotypic frequencies of your class pop-ulation can be compared to published results of larger population sizes9.
1. What is your genotype for the Alu insert in intron 8 of the TPA gene?
2. What are the observed (actual) genotypic frequencies of (+/+), (+/-), or (-/-) in your classpopulation? Fill in the table below with your class data.
Table 1. Observed Class Genotypic Frequencies
Category Number of genotypes Frequency (# of genotypes/Total)Homozygous (+/+) p2 =Heterozygous (+/-) pq =Homozygous (-/-) q2 =
Total = = 1
58
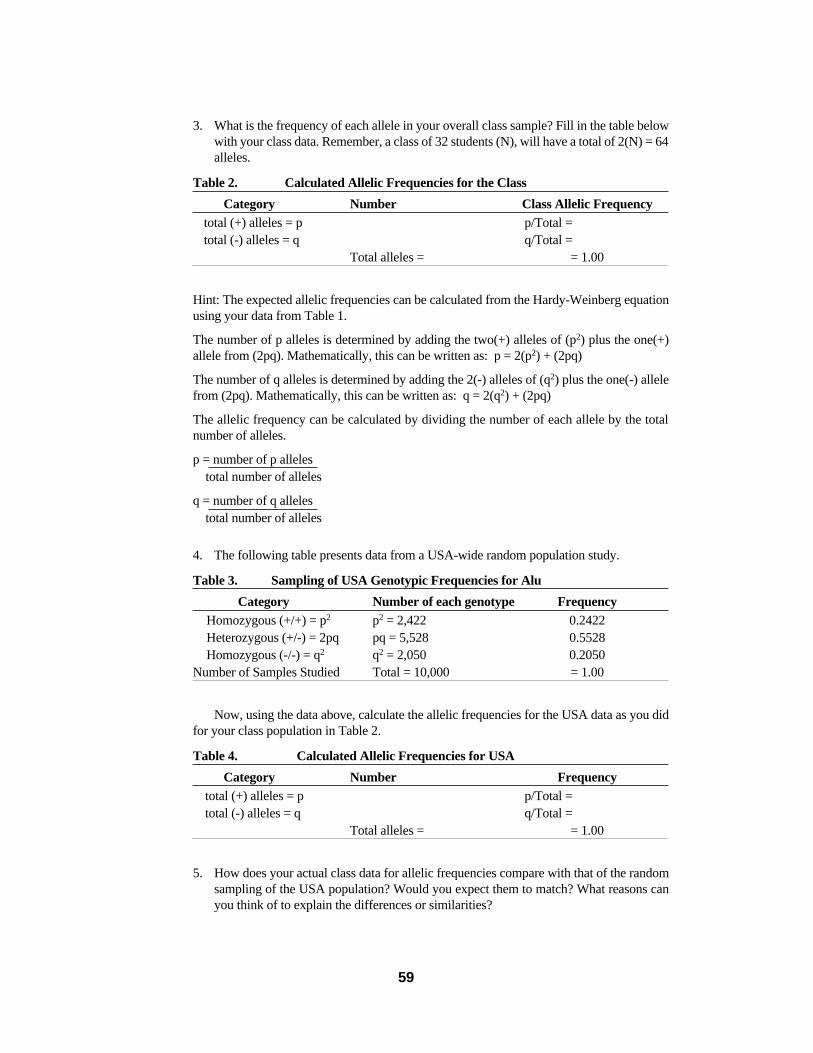
3. What is the frequency of each allele in your overall class sample? Fill in the table belowwith your class data. Remember, a class of 32 students (N), will have a total of 2(N) = 64alleles.
Table 2. Calculated Allelic Frequencies for the Class
Category Number Class Allelic Frequencytotal (+) alleles = p p/Total =total (-) alleles = q q/Total =
Total alleles = = 1.00
Hint: The expected allelic frequencies can be calculated from the Hardy-Weinberg equationusing your data from Table 1.
The number of p alleles is determined by adding the two(+) alleles of (p2) plus the one(+)allele from (2pq). Mathematically, this can be written as: p = 2(p2) + (2pq)
The number of q alleles is determined by adding the 2(-) alleles of (q2) plus the one(-) allelefrom (2pq). Mathematically, this can be written as: q = 2(q2) + (2pq)
The allelic frequency can be calculated by dividing the number of each allele by the totalnumber of alleles.
p = number of p alleles total number of alleles
q = number of q allelestotal number of alleles
4. The following table presents data from a USA-wide random population study.
Table 3. Sampling of USA Genotypic Frequencies for Alu
Category Number of each genotype FrequencyHomozygous (+/+) = p2 p2 = 2,422 0.2422Heterozygous (+/-) = 2pq pq = 5,528 0.5528Homozygous (-/-) = q2 q2 = 2,050 0.2050
Number of Samples Studied Total = 10,000 = 1.00
Now, using the data above, calculate the allelic frequencies for the USA data as you didfor your class population in Table 2.
Table 4. Calculated Allelic Frequencies for USA
Category Number Frequencytotal (+) alleles = p p/Total =total (-) alleles = q q/Total =
Total alleles = = 1.00
5. How does your actual class data for allelic frequencies compare with that of the randomsampling of the USA population? Would you expect them to match? What reasons canyou think of to explain the differences or similarities?
59

Appendix AReview of Molecular Biology
This section provides an overview of terms and concepts with which students should befamiliar in order to get the most out of this lab.
Genome—The sequence of DNA molecules within the nucleus which code for all proteinsfor a given species. Each segment of DNA which encodes a given protein is called a gene. Theinformation contained in the genome comprises the organisms hereditary code.
Molecular Biology—The study of genes and the molecular details which regulate the flowof genetic information from DNA, to RNA and proteins, and from generation to generation.
Biotechnology—The manipulation of organisms (microbes, plants or animals) DNA to helpsolve human problems.
Any living organism functions based on the complicated interactions between nucleicacids, proteins, lipids (fat) and carbohydrates. In nearly all cases, certain proteins termedenzymes control the almost infinite number of interactions and life processes in living crea-tures. Think of enzymes and proteins as all the different people on earth. Each person performsa different role, function or job on this planet and although people are not the actual physicalmake-up of buildings, documents, food and roads it is the people that make these buildingsand roads and write the documents and plant and nurture the crops. In the same way, enzymesand proteins do not comprise bones, lipids, sex hormones and sugars, but enzymes controlthese structures, their interactions and processes.
Because proteins and enzymes ultimately play such a critical role in the life process, sci-entists have spent many lifetimes studying proteins in an attempt to understand how theywork and how they can be controlled. With a complete understanding we could cure, preventand overcome many diseases and physical handicaps as well as explain exactly how and whyorganisms exist, propagate and die. However, the complete answers do not lie solely in theknowledge of how enzymes function, we must learn how they are made. Before we can con-trol enzymes, we must understand where they come from and what is the basis of the molec-ular information that encodes proteins. That answer lies within our genetic code.
Each living organism has its own blueprint for life. This blueprint defines how an organ-ism will look and function (using enzymes as a means to form the look and control the func-tions). The blueprint codes for all the different enzymes. With amazing precision this blueprintgets passed on from generation to generation of each species for as long as that species con-tinues to propagate.
The transfer of this blueprint from generation to generation is called heredity. Theblueprint for any organism is called its genome. The hereditary code is encrypted within thesequence of the DNA molecules that make up the genome. The molecule that comprises thegenome and thus the hereditary code is DNA (deoxyribonucleic acid).
The genome consists of very long DNA/protein complexes called chromosomes.Prokaryotes, organisms lacking a true nucleus, have only one chromosome. All other species,eukaryotes, have a defined cell nucleus which contains multiple chromosomes. The numberof chromosomes varies with the organism- from 2 or 3 in some yeasts up to 100 or so in somefish. Humans have 46. The nucleus is a defined membrane-enclosed region of the cell whichcontains the chromosomes.
In most cases chromosomes come in nearly identical pairs (one member of the chromo-some pair from each parent). In general, the members of a pair differ in small details from eachother, since they come from different parents, but are otherwise identical or homologous.
60
Cells with homologous pairs of chromosomes are called diploid. Nearly all cells of an organ-ism are diploid. Cells that have only one pair of the chromosome pair are called haploid. Allsperm and ova are haploid.
The process of forming sperm and ova is called meiosis. Meiosisstarts with a diploidcell that divides into two haploid cells. When the sperm fertilizes the ovum the two nucleifuse and thus the new nucleus contains pairs of each chromosome, one partner from each par-ent. The result is called a zygote. The zygote is diploid.
All cells of diploid organisms duplicate chromosomal pairs when they divide (exceptwhen sperm and ova are formed) so that all body cells (called somatic cells) of an organismare diploid. The process of cell division in which the chromosomes are duplicated and eachdaughter cell gets pairs of chromosomes is called mitosis. It is through the processes of mito-sis and meiosis that the hereditary code is passed from cell to cell and generation to genera-tion. Now that we know where the code is and how that code is passed on, we need to knowhow the code produces the enzymes that control life. The actual DNA code for a protein is con-tained within a segment of a chromosome called a gene. In nearly all cases, diploid organismswill have the same gene on a specific chromosome pair. The gene on each chromosome of aspecific chromosome pair is also called an allele.
To clarify, a gene encodes a particular protein that performs a particular function. Anallele refers to the same gene existing on each chromosome of a specific chromosome pair.Thus, there are genes for hair color and there is an allele for the hair color gene on each chro-mosome pair. The gene or allele DNA code can also be called the genotype.
When the protein is made from this code and performs its function, the physical trait orresult that is seen is called the phenotype. In many cases the two alleles on the specific chro-mosome pair coding for a protein differ slightly in their respective DNA code (genotype).Any slight difference in code between the two alleles can result in two different proteins thatalthough intended to perform basically the same function, actually carry out that functionslightly differently, causing different results and thus different phenotypes.
Therefore, it is not only the various combinations of chromosomes a parent contributesto each offspring but also the various combinations of alleles and how each of the enzymescoded from the alleles work together that decide how we look and allow us to function. Thevarious combinations are nearly infinite and that is why we are all different. The study ofgenotypes and phenotypes is often referred to as Mendelian Genetics(after Mendel, the indi-vidual who pioneered the study of heredity and genetics).
DNA—What is it?A DNA molecule is a long polymer consisting of four different components called bases.
The four bases are also called nucleotides. It is the various combinations of these four basesor nucleotides that create a unique DNA code or sequence (also genotype, gene, and allele).Nucleotides are comprised of three different components:
1. nitrogen base
2. ribose sugar
3. phosphate group
Each nucleotide contains the same ribose sugar and the phosphate group. What makeseach nucleotide unique is its nitrogen base. There are four nitrogen bases.
61

Adenine (A)
Thymine (T)
Guanine (G)
Cytosine (C)
A long DNA nucleotide "chain" or sequence is created by the connection of the phos-phate group to the ribose sugar of the next nucleotide. A long strand of nucleotides can be cre-ated by the connection of phosphates and ribose sugars. This connection or chain creates the"backbone" of the DNA molecule.
To designate the different ends of this single-stranded chain we must make use of sometypical biochemistry terminology. The carbons on any sugar are numbered. The ribose sugarof a nucleotide contains 5 carbons. The phosphate group (P04) of a given nucleotide is con-nected to the 5' carbon of its ribose sugar. This phosphate group is connected to the 3' carbonon the ribose sugar of the next nucleotide.
Thus, the end of a single-strand DNA molecule that has a free phosphate group (i.e., notattached to another nucleotide's ribose sugar) is called the 5' end and the end of the single-strand chain that has an open hydroxyl group (OH) on the 3' carbon of the ribose sugar(because no subsequent phosphate of another nucleotide is attached) is called the 3' end. (SeeFigure 13.)
Fig. 13. Structure of Deoxyribonucleic acid.
It has become standard that single-stranded DNA molecules are viewed with the 5' endon the left and the 3' end on the right. Therefore, a single-stranded DNA chain's sequence isaligned from left to right starting on the left with the 5' nucleotide and moving to the rightuntil the 3' nucleotide is last. Most DNA sequences are read 5' to 3'.
However, the long DNA molecules or chains that comprise the chromosomes are not single-stranded molecules. From X-ray crystallography patterns of DNA, and some imagi-native molecular model building, Watson and Crick (along with some help from Messelsonand Stahl) deduced that DNA is in fact a double-strandedmolecule with the two single-strands of DNA held together by hydrogen bondsbetween the nitrogen bases (A, T, G, and C).This double-stranded molecule is often called a duplex. There are several important proper-ties of double-stranded DNA molecules.
62
5'-phosphate
Ribose sugar
3'-hydroxyl
Thymine
Nitrogen Base
O O
O
O
O N
N H
OH
O
CH2
CH3
O P

• Chromosomal (also called genomic) DNA is double-stranded.
• The overall structure is that of a helix with two strands intertwined.
• The structure can be viewed as a twisted ladder.
• The ribose-phosphate backbones are the sides of the ladder.
• The nitrogen bases (A, T, G, and C) hydrogen bonded to each other are the rungs.
• Only the nitrogen bases A and T and C and G can form hydrogen bonds to each other.When A binds to T or C binds to G this is considered base pairingC and T, and A andG do not form hydrogen bonds.
• The orientation of the two strands is anti-parallel i.e., construction of the strands is inopposite directions. This means that the ladder runs 5' to 3' in a left to right direction forone strand and 3' to 5' in the left to right direction for the other strand.
Fig. 14. Molecular structure of the DNA backbone.
63
5'-phosphate
3'-hydroxylO
O
O
CH2
CH2
CH2
CH2
CH2
CH2
CH2
CH2
CH3
CH3
P O
O
O H
H
H
H
H
H
H
H
H
HH
HHH
H
H
HN
NN
N
N
N
N
N
N
N
N
N
N
N
N N
N
N
N
O
O
O
O
O
O
O
O
OO
O
O
O
O
O
O
O
OO
O
5'-phosphate
3'-hydroxyl
Adenine
Guanine
Cytosine
Thymine Adenine
Guanine
Cytosine
Thymine
Hydrogen-bondedbase pairs
Phosphate-deoxyribosebackbone
Phosphate-deoxyribosebackbone
O
O
O
O
P
P
P
P
O
O
O O
O
O
O O
O
O
O
O
O
O
O
O
O
O
P
P
O
P
N
N
N
N
N
N
N
N
N
N
OH

64
It follows From This Structure That
• Because A only binds to T and G only binds to C, the two strands will have exactly theopposite, or complementary sequence running in opposite directions (one strand 5' to 3',the other 3' to 5').
• One strand is called the sense strand and the other is antisense.
• These two complementary strands anneal or hybridize to each other through hydrogenbonds between the bases.
• A new single-strand can be synthesized using its complement as the template for newstrand synthesis.
• Each strand, then, carries the potential to deliver and code for the same information.
The length of any double-stranded DNA molecule is given in terms of base pairs (bp). Ifa DNA strand contains over a thousand base pairs, the unit of measure is kilobases (kb). If thereare over one million base pairs in a strand the unit of measure is megabases (mb).
Fig. 15. DNA (Deoxyribonucleic acid)— A long chainlike molecule that stores genetic information. DNAis graphically represented in a number of different ways, depending on the amount of detail desired.
DNA Replication—Strand Synthesis
New strands are synthesized by enzymes called DNA polymerases. New strands arealways synthesized in a 5' to 3' direction. For a new single strand of DNA to be synthesized,

another single strand is necessary. The single strand of DNA that will be used to synthesizeits complementary strand is called thetemplate strand.
However, in order for the DNA polymerase to start synthesizing a new complementarystrand, a section of double-stranded DNA must be present for the DNA polymerase to initi-ate synthesis. A short strand (20–50 base pairs) used to anneal to the template strand to cre-ate the double-stranded start site for the DNA polymerase is called an oligonucleotide primer.This primer is almost always a short strand of nucleotides complementary to a part of thetemplate where the researcher wants synthesis to begin. It must have a free 3' hydroxyl group(OH) for the DNA polymerase to attach the 5' phosphate of the next nucleotide.
The DNA polymerase grabs free (single) nucleotides from the surrounding environmentand joins the 5' phosphate of the new nucleotide to the 3' hydroxyl group (OH) of the new com-plementary strand. This 5' to 3' joining process creates the backbone of the new DNA strand.
The newly synthesized strand maintains its complementarity with the template strandbecause the DNA polymerase only joins two nucleotides during new strand synthesis if thenew nucleotide has its complement on the template strand. For example, the DNA polymerasewill only join a G to the 3' end of the newly synthesized strand if there is the C counterpart onthe template strand to form a hydrogen bond. Guanine will not be joined to the new strand ifadenine, thymine or guanine is the opposite nucleotide on the template strand.
DNA polymerase and strand synthesis allow DNA to replicate during mitosis.Interestingly, both new DNA strands are synthesized simultaneously from the two originalDNA template strands during mitotic DNA replication.
As you can see DNA, RNA and proteins are closely tied to each other. Thus you can real-ize why researchers today, in an attempt to understand the mechanisms behind the variouslife processes, must study the nucleic acids as well as the proteins to get complete answersabout the flow of information carried in the genetic code. In the last 20 years, many gains inthe areas of nucleic acid techniques have finally allowed researchers the means to study theroles of nucleic acids in life processes.
Individual discoveries by many scientists have contributed the pieces that have begun tosolve one of the most mysterious puzzles of life—understanding the hereditary code. In 1985,enough pieces of the puzzle were in place for a major breakthrough to occur. This elucidationof how the necessary molecular components interact to faithfully replicate DNA within liv-ing cells led to the development of a technique for creating DNA in a test tube. This tech-nique is called the Polymerase Chain Reaction, or PCR.
65

Appendix BGlossary of Terms
Aliquot The division of a quantity of material into smaller, equalparts.
Alu A small piece of repetitive DNA which contains the Alu-1 restriction enzyme site, from which the sequenceobtained its name.
Annealing Binding of oligonucleotide primers to complementarysequences on the template DNA strands.
Chelation To bind metal ions in solution. An example of a com-mon chelating agent is EDTA or EthyleneDiamineTetraacetic Acid.
ChelexTM Microscopic beads which chelate divalent cations andcomprise the InstaGene Matrix.
Cofactors Ions or small molecules needed by an enzyme to func-tion properly. For example, Taq polymerase needs Mg++
in order to function properly. Mg++ would therefore beconsidered a cofactor.
Denature The process of melting apart two complementary DNAstrands. In vivo denaturation is accomplished byenzymes; in the PCR reaction denaturation is accom-plished by heat.
DNases Digestive enzymes which degrade DNA.
dNTP’s Commonly used abbreviation for all four deoxynu-cleotide triphospates (dATP, dTTP, dGTP, dCTP) usedin synthesizing DNA.
Ethidium bromide A fluorescent dye molecule which intercalates betweenDNA base pairs and fluoresces when exposed to ultra-violet light.
Eukaryotes Organisms which are made up of cells containing amembrane-bound nucleus which contains the geneticmaterial (DNA).
Exon The region of a transcribed messenger RNA moleculethat gets spliced together and leaves the nucleus fortranslation into protein sequence.
Extension This refers to the process of Taq polymerase addingdNTP’s (deoxynucleotide triphosphates-dATP, dTTP,dCTP, or dGTP) onto the ends of the oligonucleotideprimers. Extension follows the base pairing rule and pro-ceeds in the 5'–3' direction.
Genomic DNA The sum total of the DNA which is found within thenucleus of a cell.
66
Hardy-Weinberg Equilibrium The conditions that enable a population to maintain it’sgenetic frequencies. These conditions are: large popu-lation, random mating, no immigration or emigration,no mutations, and no natural selection.
Homologous chromosomes A pair of complementary chromosomes which containthe same genetic sequences, or genes, with one chro-mosome inherited from the mother and one chromo-some inherited from the father.
InstaGene Matrix A collection of beads that bind divalent cations in solu-tion. The binding or sequestering of divalent cations pre-vents their availability to enzymes that can degrade theDNA template.
Intron The region of a transcribed messenger RNA that isspliced out of the mRNA and is not translated into pro-tein sequence.
Lysis The process of rupturing a cell to release its constituents.In this exercise, human cheek cells are lysed to releasegenomic DNA for PCR reactions.
Master Mix The main solution of a PCR reaction which contains allof the necessary components (dNTP’s, primer, buffer,salts, polymerase, magnesium) of the reaction exceptthe template DNA.
Mendelian inheritance For each inherited characteristic, an organism containstwo genes, or alleles, one inherited from each parent.There can be two forms of alleles, dominant and reces-sive, and dominant alleles mask the expression of reces-sive alleles.
Messenger RNA A type of RNA which is synthesized from the geneticmaterial (DNA) and which attaches to ribosomes and istranslated into protein.
Nucleotides The fundamental unit of DNA or RNA. They consist ofa sugar (deoxyribose or ribose), phosphate, and nitroge-nous base (adenine, thymine, cytosine, or guanine anduracil in place of thymine in RNA).
PCR Polymerase chain reaction. The process of amplifyingor synthesizing DNA within a test-tube.
Primers A small series of nucleotides (usually 16–24 bases inlength) that recognize a particular sequence ofnucleotides on the target DNA sequence. In thePolymerase Chain Reaction primers are synthesized inthe laboratory.
Reagents Materials needed to conduct an experiment. They areusually solutions or mixtures of various solutions.
67

Taq polymerase Heat stable DNA polymerase which was iso-lated from the heat stable bacteria Thermusaquaticus. This DNA polymerase is common-ly used in PCR reactions.
Template The strand of DNA which contains the targetsequences of the oligonucleotide primers andwhich will be copied into its complementarystrand.
TPA gene Tissue plasminogen activator gene which islocated on chromosome 8 in humans. Theexons which make up the TPA gene encode aprotein which is involved in the enzymaticdegradation of connective tissue.
68

Appendix CPCR Amplification and Sterile Technique
PCR is a powerful and sensitivetechnique which enables researchers to produce largequantities of DNA from very small amounts of starting material. Because of this sensitivity,contamination of PCR reactions with unwanted, extraneous DNA is always a possibility.Therefore, utmost care must be taken to prevent cross-contamination of samples. Steps to betaken to prevent contamination and failed experiments include:
1. Filter-type pipet tips. The end of the barrel of micropipets can easily become contami-nated with DNA molecules that are aerosolized. Pipet tips which contain a filter at the endcan prevent aerosol contamination from micropipets. DNA molecules which are foundwithin the micropipet can not pass through the filter and can not contaminate PCR reac-tions. Xcluda aerosol barrier pipet tips (catalog number 211-2006-EDU and 211-2016-EDU) are the ideal pipet tip to use in PCR reactions.
2. Aliquot reagents. Sharing of reagents and multiple pipettings into the same reagent tubewill most likely introduce contaminants into your PCR reactions. When at all possible,aliquot reagents into small portions for each team, or if possible, for each student. If analiquotted reagent tube does become contaminated, then only a minimal number of PCRreactions will become contaminated and fail.
3. Change pipet tips. Always change pipet tips when entering a reagent for the first time.If a pipet tip is used repeatedly, contaminating DNA molecules on the outside of the tipwill be passed into other solutions, resulting in contaminated PCR reactions. If you are atall unsure if your pipet tip is clean, use the safe rule of thumb and discard the tip and geta new one. The price of a few extra tips is a lot smaller than the price of failed reactions.
4. Use good sterile technique. When opening, aliquotting, or pipetting reagents, leave thetube open for as little time as possible. Tubes which are open and exposed to the air caneasily become contaminated by DNA molecules which are aerosolized or which are pre-sent in your mouth/breath, etc. Go into reagent tubes efficiently, and close them whenyou are finished pipetting. Also, try not to pick tubes up by the rim or cap as you can eas-ily introduce contaminating DNA molecules from your fingertips.
69

Appendix DTeacher Answer Guide
Lesson 1 DNA Template Preparation
1. Why is it necessary to trap the metal ions in the cheek cell solution before the boiling/lysisstep at 100 °C? What would happen if you did not put in the InstaGene Matrix?
Metal ions, such as magnesium, act as cofactors for DNases and must be removedfrom the cheek cell solution. Removing the metal ions inactivates the DNases, whichthen in turn keeps the DNA template intact.
If the InstaGene Matrix was not present, DNases would remain active, and woulddegrade the DNA template, resulting in no PCR amplification.
2. What is needed from the cheek cells in order to conduct the Polymerase Chain Reaction?
The genomic DNA released from the nuclei of the cheek cells is needed for the PCRreaction.
3. What structures must be broken in order to release the DNA from a cell?
The cell and nuclear membranes must be broken to release the template DNA intothe solution.
4. After boiling the samples, why do you think the extracted cheek cell DNA is stored in theInstaGene Matrix?
If any residual DNases remain in solution, then keeping the cheek cell DNA storedin the InstaGene Matrix will keep the necessary metal cofactors (magnesium) bound,thus keeping the DNases in an inactive state. Without the InstaGene present, theseresidual DNases could degrade the DNA, resulting in loss of template DNA in thePCR reactions.
70

Lesson 2 PCR Amplification
1. Why is it necessary to have a primer on each side of the DNA sequence to be amplified?
Two primers are needed so that both sides of the double helix are used as a tem-plate. The 5' to 3' primer allows the sense strand to be replicated, whereas the 3' to5' primer allows the antisense strand to be replicated.
2. How did Taq polymerase acquire its name?
Taq polymerase was isolated from thermostable bacteria, Thermus aquaticus, whichlives in steam vents. Taq polymerase has been a valuable PCR tool because theenzyme can withstand the high temperature extremes of the denaturation cycle ofPCR.
3. Why are there nucleotide bases (A, T, G, and C) in the Master Mix? What are the othercomponents of the Master Mix and what are their functions?
The four dNTPs are the nucleotides that are incorporated by Taq polymerase intothe complementary DNA strands.
The other components are oligonucleotide primers, Taq polymerase, salt buffer,and magnesium. The primers bind to the template strands and act as starting pointsof replication for Taq polymerase. Taq polymerase incorporates dNTPs into thecomplementary DNA strand. The salt buffer is required to provide the necessaryconcentration of salt ions and pH to provide optimal conditions for Taq polymerase.Magnesium is a necessary cofactor for Taq DNA polymerase.
4. Describe the three main steps of each cycle of PCR amplification and what reactionsoccur at each temperature.
The three main steps of PCR amplification are denaturation, annealing, and exten-sion. During denaturation, the two strands of double stranded DNA are melted outto create two single stranded templates. During annealing, the oligonucleotideprimers find their complementary sequences on the template strands and anneal tothe DNA template. During extension, Taq polymerase incorporates dNTPs andextends the primers, resulting in the production of the complementary DNA strand.
71

5. Explain why the precise length target DNA sequence doesn’t get amplified until the thirdcycle. You may need to use additional paper and a drawing to explain your answer.
In the first polymerization step, a new DNA strand is synthesized onto each primer.Taq polymerase extends this new strand well beyond the target sequence, produc-ing a new DNA strand which contains the downstream/upstream primer and islonger than the target.
In the second cycle, the DNA is denatured and primers anneal to the original targetDNA, and to the new DNA strands produced in the first cycle. A mixture of smalltarget sequences, and larger hybrid DNA sequences are produced at the end of thesecond cycle.
In the third cycle, the target DNA of defined length is reprimed with both upstreamand downstream primers. Taq polymerase then synthesizes two copies of targetDNA of defined length. The number of these defined target sequences are doubledwith each subsequent round of PCR, thereby increasing logarithmically. Thus, a 40cycle PCR would amplify a given template 240, thus potentially producing 1.0 x 10¹²
DNA molecules.
72

Lesson 3 Gel Electrophoresis
1. Explain the difference between an intron and an exon.
Introns, or intervening sequences, do not code for protein sequences and are splicedout of mRNA molecules before the mRNA leaves the nucleus. Exons code for theprotein sequence and remain in the mRNA, are transported out of the nucleus,where they are finally translated into protein on ribosomes.
2. Why do the two possible PCR amplification fragments differ in size by 300 base pairs?
The PCR primers amplify a 660 bp region of the TPA gene. Certain individuals con-tain a 300 bp Alu repeat within this region of the TPA gene, and amplification fromthese individuals produces a 960 bp fragment. Thus, the 300 bp difference in size isdue to an insertion of a 300 bp Alu repeat.
3. Explain how agarose electrophoresis separates DNA fragments of interest. Why does asmaller DNA fragment move faster than a larger one?
PCR fragments separate in an electrophoretic field because DNA is a negativelycharged molecule which moves when an electric field is applied to it. Since DNA isnegatively charged it migrates toward the positive (red) electrode.
The agarose acts as a sieve to separate the charged DNA molecules according tosize. Large molecules of DNA move slowly through the agarose, while smallermolecules of DNA are less obstructed and move faster through the matrix of agarose.
4. What kind of controls are run in this experiment? Why are they important? Could othersbe used?
The controls that are run in this experiment are the homozygous (+/+), homozygous(-/-), and heterozygous (+/-) known results. These bands are known base pair lengthsand can be used in comparison to unknown student samples. Other types of con-trols which provide DNA size information include DNA size standards such asLambda Hind III or a 100-1000 bp DNA ladder.
73

Lesson 4 Analysis and Interpretation of Results
Focus Questions
1. What is your genotype for the Alu insert in the TPA gene on intron 8?
If there are two bands that match the (+/-) control the person is heterozygous (+/-).If there is one band that matches the (-/-) control then the person is homozygous(-/-), and if there is one band that matches the (+/+) control then the person ishomozygous (+/+).
2. What are the observed (actual) genotypic frequencies of (+/+), (+/-), or (-/-) in your classpopulation? Fill in the table below with your class data.
Assuming a class size of 32 students data may look something like this.
Table 1. Observed Class Genotypic Frequencies
Category Number of genotypes class Frequency - (genotype/total)Homozygous (+/+) p2 = 8 0.25Heterozygous (+/-) 2pq = 8 0.25Homozygous (-/-) q2 = 16 0.50
Total =32 = 1
The frequencies are calculated by dividing the number of each genotype by the totalnumber of samples taken.
Homozygous (+/+) = 8/32 = 0.25Heterozygous (+/-) = 8/32 = 0.25Homozygous (-/-) = 16/32 = 0.50
3. What are the expected allelic frequencies in your class sample? Fill in the table belowwith your class data.
Table 2. Calculated Allelic Frequencies for the Class
Category Number Frequency+ = p 24 0.375- = q 40 0.625Total 64 1.00
The expected allelic frequencies can be calculated from the Hardy-Weinberg equation.For a class of 32 students, there are a total of 2N = 64 alleles.
The number of p alleles is determined by adding the 2 alleles of p2 plus the one allele from2pq. Mathematically, this can be written as:
p = 2(p2) + 2pq= 2(8) + 8= 16 + 8 = 24
The number of q alleles is determined by adding the 2 alleles of q2 plus the one allele from2 pq. Mathematically, this can be written as:
q = 2(q2) + 2pq= 2(16) + 8= 32 + 8= 40
74

The allelic frequency can be calculated by dividing the number of each allele by the totalnumber of student samples taken.
p = number of p allelestotal number of alleles
= 24/64 = 0.375
q = number of q allelestotal number of alleles
= 40/64 = 0.625
4. The following table presents data from a USA-wide random population study.
Table 3. Sampling of USA Genotypic Frequencies for Alu
Category Number of genotypes FrequencyHomozygous (+/+) = p2 p2 = 2,422 0.2422
Heterozygous (+/-) = 2pq 2pq = 5,528 0.5528
Homozygous (-/-) = q2 q2 = 2,050 0.2050
Number of Samples Studied Total = 10,000 = 1.00
Now, using the data above, calculate the allelic frequencies for the USA data as you did foryour class population in Table 2.
Table 4. Calculated Allelic Frequencies for the USA
Category Number FrequencyTotal (+) alleles = p 10,372 p/Total = 0.5186
Total (-) alleles = q 9,628 q/Total = 0.4814
2(N) Total Alleles = 20,000 = 1.00
p = 2(p2) + 2pq= 2(2422) + 5528= 10,372
The number of q alleles is determined by adding the 2 alleles of q2 plus the one allele from2pq. Mathematically, this can be written as:
q = 2(q2) + 2pq= 2(2050) + 5528= 9,628
The allelic frequency can be calculated by dividing the number of each allele by the totalnumber of student samples taken.
p = number of p allelestotal number of alleles
= 10,372/10,000 = 0.5186
q = number of q allelestotal number of alleles
= 9,628/10,000 = 0.4814
75

5. How does your actual class data for allelic frequencies compare with that of the randomsampling of the USA population? Would you expect them to match? What reasons canyou think of to explain the differences or similarities?
The student population in all probability will not match the data for the USA pop-ulation. The data for the USA population has a much larger sample size and givesa better representation of frequencies expected for a large heterogeneous population.Because your class data represents a much smaller sample size, the allelic frequen-cies in all likelihood will be different.
76

Appendix ETypical Classroom Results
These gels show results obtained in two actual classroom settings. The upper gel showsresults generated from Kirk Brown's class at Tracy Joint Union High School. The controls(+/+), (-/-), and (+/-) are seen in the first three lanes, and 15 independent student samples (S1to S16) are seen in lanes 4–19. The DNA Precision Mass Ruler Standard (M) is seen in lane20. The lower gel shows results generated from Skip Lovelady's class at Redwood HighSchool. The controls (+/+), (-/-), and (+/-) are seen in the first three lanes, and 16 independentstudents samples (S1 to S17) are seen in lanes 4–20.
77
(+/+) (-/-) (+/-) S1 S2 S3 S4 S5 S6 S7 S8 S9 S10 S11 S12 S13 S14 S15 S16 M
(+/+) (-/-) (+/-) S1 S2 S3 S4 S5 S6 S7 S8 S9 S10 S11 S12 S13 S14 S15 S16 S17
1000700500200

Appendix FReferences
1. The PCR process is covered by U.S. patent numbers 4,683,195, 4,683,202, and 4,899,818 which areowned by Hoffmann-La Roche, Inc. and F. Hoffmann-La Roche, Ltd.
2. Mullis, K.B., Faloona, F., Scharf, S.J., Saiki, R.K., Horn, G.T., and Erlich, H.A. (1986) Specificenzymatic amplification of DNA in vitro: the polymerase chain reaction. Cold Spring HarborSymp. Quant. Biol. 51:263-73.
3. Hollstein, M.C., Sidrausky, D., Vogelstein, R., and Harris, C.C. (1991) p53 mutations in human can-cers. Science 253:49-53.
4. Walsh, P.S., Fildes, N., Louie, A., and Higuchi, R. (1991) Report of the blind trial of the CetusAmpliType™ HLA DQa forensic DNA amplification and typing kit. J. Forensic Sci. 36: 1551–56.
5. Olson, M., Hood, L., Cantor, C., and Botstein, D. (1989) A common language for physical map-ping of the human genome. Science 245:1434-1435.
6. Saiki, R.K., Gelfand, D.H., Stoffel, S., Scharf, S., Higuchi, R.H., Horn, G.T., Mullis, K.B., andErlich, H.A. (1988) Primer-directed enzymatic amplification of DNA with a thermo-stable DNApolymerase. Science 239:487-91.
7. Deininger, P.L. (1989) SINEs, short interspersed repeated DNA elements in higher eukaryotes.In:Howe, M., and Berg, D. (eds) Mobile DNA. Washington DC, ASM Press, pp 619-636.
8. Batzer, M.A., Gudi, V.A., Mena, J.C., Foltz, D.W., Herrera, R.J., and Deininger, P.L. (1991)Amplification dynamics of human-specific (HS) Alu family members. Nucleic Acids Res. 19:3619-3623.
9. Tishkoff, S.A., Ruano, G., Kidd, J.R., and Kidd, K.K. (1996) Distribution and frequency of a poly-morphic Alu insertion at the plasminogen activator locus in humans. Hum. Genet. 97:759-64.
10. Degen, S.J., Fajput, B., and Reich, E. (1986) The human tissue plasminogen activator gene. J.Biol. Chem. 261:6972-6985.
78

Appendix GGel Loading Template
Use the template for entering the students name into the appropriate gel and well numbers.
\
79
Controls Student Samples
1
(+/+
)
(-/-)
(+/-)
2 3 4 5 6 7 8

Appendix HProgramming Instructions for the Gene Cycler
Abbreviated instructions for programming your Gene Cycler for the proper amplifica-tion cycles and temperatures used in this lab are provided below. Refer to the Gene Cyclerinstruction manual for more detailed instructions and troubleshooting.
Turn the machine on
Select "program", then "enter"
Select "new", then "enter"
Select "001" (or desired program number), then "enter"
Select cycle repeats "040", then "enter"
Select "edit" for step 1, then "enter"
Select "94 degrees, 1 min", then "enter"
Select "edit" for step 2, then "enter"
Select "64 degrees, 1 min", then "enter"
Select "edit" for step 3, then "enter"
Select "72 degrees, 2 min", then "enter"
Skip step 4 by selecting the up arrow
Skip step 5 by selecting the up arrow
Select "no" for auto inc/dec
Select "yes" for next cycle
Select cycle repeats "001", then "enter"
Select "edit" for step 1, then "enter"
Select "72 degrees, 10 min", then "enter"
Skip step 2 by selecting the up arrow
Skip step 3 by selecting the up arrow
Skip step 4 by selecting the up arrow
Skip step 5 by selecting the up arrow
Select "no" for auto inc/dec
Select "no" for next cycle
Select "yes" for return to menu
To Insure That You Programmed Your Gene Cycler Correctly
Select "program", then "enter"
Select "edit", then "enter"
Select "001" (or desired program number), then "enter"
Select enter three times to get through cycle 40
Scroll through steps in cycle 1 with up arrows
Select "no" on auto inc/dec, then "enter"
On next cycle, select "yes", then "enter"
Select enter three times to get through cycle 001
Scroll through steps in cycle 2 with up arrows
Select "no" on auto inc/dec, then "enter"
On next cycle, select "no", then "enter"
Select "yes" on return to menu
80

You Are Now Ready To "Run" Program 001
Select "run", then "enter"
Select "program", then "enter"
Select "001", then "enter"
Select "050 µl", then "enter"
Program will now flash "run". You should monitor the first several cycles to insure thatthe Gene Cycler is running the program according to your specifications.
81

Life ScienceGroup
Website www.bio-rad.com Bio-Rad Laboratories Main Office 2000 Alfred Nobel Drive, Hercules, CA 94547, Ph. (510) 741-1000, Fx. (510)741-5800Also in: Australia Ph. 02 9914 2800, Fx. 02 9914 2889 Austria Ph. (01) 877 89 01, Fx. (01) 876 56 29 Belgium Ph. 09-385 55 11, Fx. 09-385 65 54Canada Ph. (905) 712-2771, Fx. (905) 712-2990 China Ph. 86-10-62051850, Fx. 86-10-62051876 Denmark Ph. 45 39 17 99 47, Fx. 45 39 27 16 98Finland Ph. 358 (0)9 804 2200, Fx. 358 (0)9 804 1100 France Ph. (01) 43 90 46 90, Fx. (01) 46 71 24 67 Germany Ph. 089 318 84-0, Fx. 089 318 84-100Hong Kong Ph. 852-2789-3300, Fx. 852-2789-1257 India Ph. (91-11) 461-0103, Fx. (91-11) 461-0765 Israel Ph. 03 951 4127, Fx. 03 951 4129Italy Ph. 02 21609.1, Fx. 02 21609.399 Japan Ph. 03-5811-6270, Fx. 03-5811-6272 Korea Ph. 82-2-3473-4460, Fx. 82-2-3472-7003 The Netherlands Ph. 31 318-540666, Fx. 31 318-542216 New Zealand Ph. 64-9-4152280, Fx. 64-9-4152284 Singapore Ph. 65-2729877, Fx. 65-2734835 Spain Ph. (91) 661 70 85, Fx. (91) 661 96 98 Sweden Ph. 46 (0)8 627 50 00, Fx. 46 (0)8 627 54 00 Switzerland Ph. 01-809 55 55, Fx. 01-809 55 00 United Kingdom Ph. 0800-181134, Fx. 01442-259118
000097 Sig 120197
Bio-RadLaboratories
4006141 Rev A