biomass briquette mold - leehite.orgleehite.org/biomass/documents/easy_biomold_your_choice.pdf ·...
TRANSCRIPT
Easy DIY Biomass Briquette Molds
By Lee Hite and Dr. Zan Smith ─ Published March 2012 ─ Updated 8/3/2017 ─ All Rights Reserved ─ www.leehite.org ─ Page 1 of 31
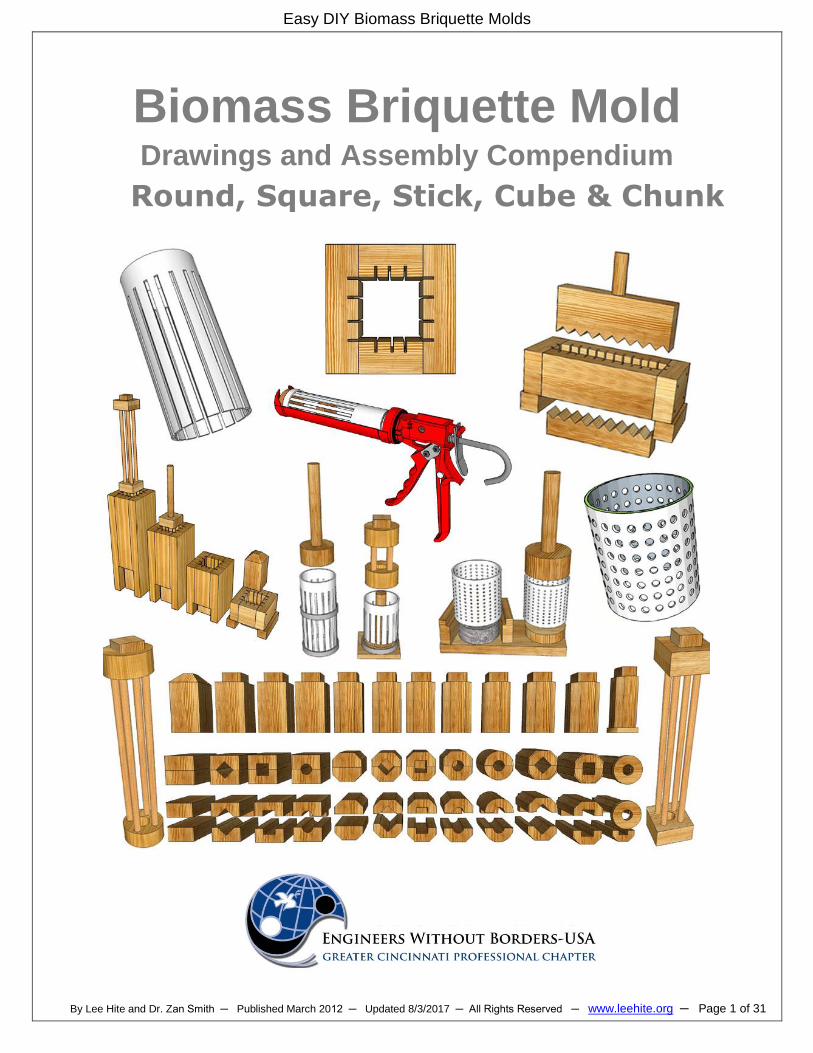
Biomass Briquette Mold Drawings and Assembly Compendium
Round, Square, Stick, Cube & Chunk
Easy DIY Biomass Briquette Molds
By Lee Hite and Dr. Zan Smith ─ Published March 2012 ─ Updated 8/3/2017 ─ All Rights Reserved ─ www.leehite.org ─ Page 2 of 31
Table of Contents
INTRODUCTION ................................................................................................................................ 3
Scope of Design ........................................................................................................................... 3 Choice of Material ......................................................................................................................... 3 Size & Shape ................................................................................................................................. 3 Mold Maintenance ........................................................................................................................ 3
PVC MOLD SECTION ........................................................................................................................ 4
Crafting Jig for PVC Molds .......................................................................................................... 4 Vertical Slotted PVC Mold ............................................................................................................ 6 Cutting PVC Slots ......................................................................................................................... 7 Drilled PVC Mold ........................................................................................................................... 9 Large PVC Molds ........................................................................................................................ 10 Caulking Gun Press & Mold (Open Frame) .............................................................................. 11 Caulking Gun Briquette Press (Metal Construction, Bulk Loading) ...................................... 15 Split PVC Mold ............................................................................................................................ 16
SLOTTED WOOD MOLD SECTION ................................................................................................ 16
Stick & Cube Slotted Wood Mold .............................................................................................. 17 Stick & Cube Plungers ............................................................................................................... 18 Square Slotted Wood Mold ........................................................................................................ 21 Quasi Round Slotted Wood Mold .............................................................................................. 26
PLUNGER PISTON & ROD SECTION............................................................................................. 27
Square Dowel Rod Plunger Piston ............................................................................................ 28 Square Post & Plunger Piston ................................................................................................... 28 Round Dowel Rod Plunger Piston ............................................................................................ 29 Round Post & Plunger Piston .................................................................................................... 29 Cast Iron Floor Flange Plunger ................................................................................................. 30
DRAINAGE BASES ......................................................................................................................... 30
Drainage Base Generic .............................................................................................................. 30 Drainage Base Perforated PVC ................................................................................................. 31
Easy DIY Biomass Briquette Molds
By Lee Hite and Dr. Zan Smith ─ Published March 2012 ─ Updated 8/3/2017 ─ All Rights Reserved ─ www.leehite.org ─ Page 3 of 31
Introduction
Scope of Design
This document is about “Choices”. Briquetting for any operation requires a biomass mold of one type or another, whether it’s a small village, single family, or classroom operation. You have “choices” and there are no wrong or right, best or worst, good or bad molds for making biomass briquettes. A variety of molds will work equally well and one type may be best suited for you depending on the availability of construction materials and tools, cost, skill level, and briquetting requirements. This document provides choices to consider when selecting a biomass mold design.
Choice of Material
We have focused the design effort using USA schedule 40 PVC plastic pipe or dimensioned wood lumber, 1½ inch 38mm thick x 3½ inch 89mm wide. While PVC is a good choice of material to use as a mold, it can be expensive or unavailable in some locations. With that in mind, we present designs using wood as an alternative to PVC. Metal is certainly an option under some circumstances. However, we do not present designs using metal in the document. You may be able to apply some of the designs to metal construction.
We do not recommend using plastic pipe with a wall thickness less than ¼ inch 6mm. Based on a typical biomass pressing requirement of 145 lb/in2 (65 kg/in2, 1N/mm2) of force, the required pressure on a 3 inch (75mm) briquette with a 1 inch (25mm) hole would be 900 lb ( 400kg). A 6 inch (150mm) diameter briquette with no hole requires about 4,000 lb (1,800kg) of force. The Easy BioPress Micro Compound Lever Press can easily exceed these force requirements. A wall thickness less than ¼ inch 6mm does not hold up well under this pressure.
The plastic pipe dimensions used in this document refer to 3 inch schedule 40 PVC, ID = 3 inches (75mm), OD = 3½ inches (89mm), maximum working pressure from 130 to 260 p.s.i., and 4 inch schedule 40 PVC, ID = 4 inches (100mm), OD = 4½ inches (114mm) , maximum working pressure from 130 to 220 p.s.i.
Plastic pipe sizes and wall thicknesses vary around the world and you may need to make dimension adjustments to those specified in this document. In addition, make necessary adjustments to accommodate the standard dimensioned lumber found in your local area.
Size & Shape
Often the briquette is round and occasionally square in shape, three to six inches in size, and with or without a center hole. With the introduction of the “Gasifier Stoves” small chunks or cubes of biomass material are desirable to allow for a better performance from the stove. We offer the “Stick & Cube Briquette Mold” as a do it yourself solution. The “stick” measures one inch thick (25mm), one and one half inches wide (38mm) and nine inches long (225mm), and can be segmented for breaking into chunks one inch wide. Without indentations the nine inch long stick can be inserted directly into a rocket stove built for wood, or used as is in a regular stove.
Mold Maintenance
Coating the wood mold with a water repellent substance helps to prevent the wood from becoming water logged and helps to reduce the force required to eject the briquette. Good sanding of the groves prior to applying a protective coating is important to assure easy ejection. Suggested coating are any synthetic finish like polyurethane, water based acrylic, linseed oil, new or used motor oil, grease or lard.
After use clean both the wood mold and the PVC mold with water to remove residual biomass.
Easy DIY Biomass Briquette Molds
By Lee Hite and Dr. Zan Smith ─ Published March 2012 ─ Updated 8/3/2017 ─ All Rights Reserved ─ www.leehite.org ─ Page 4 of 31
PVC Mold Section
Crafting Jig for PVC Molds
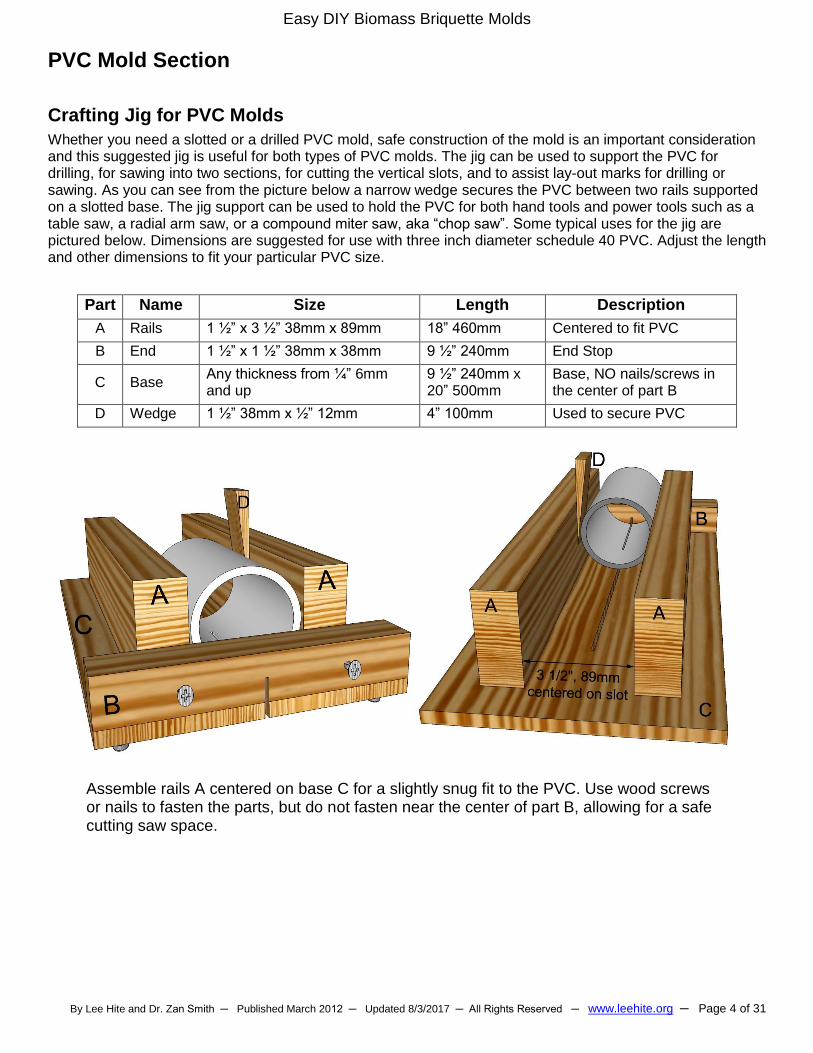
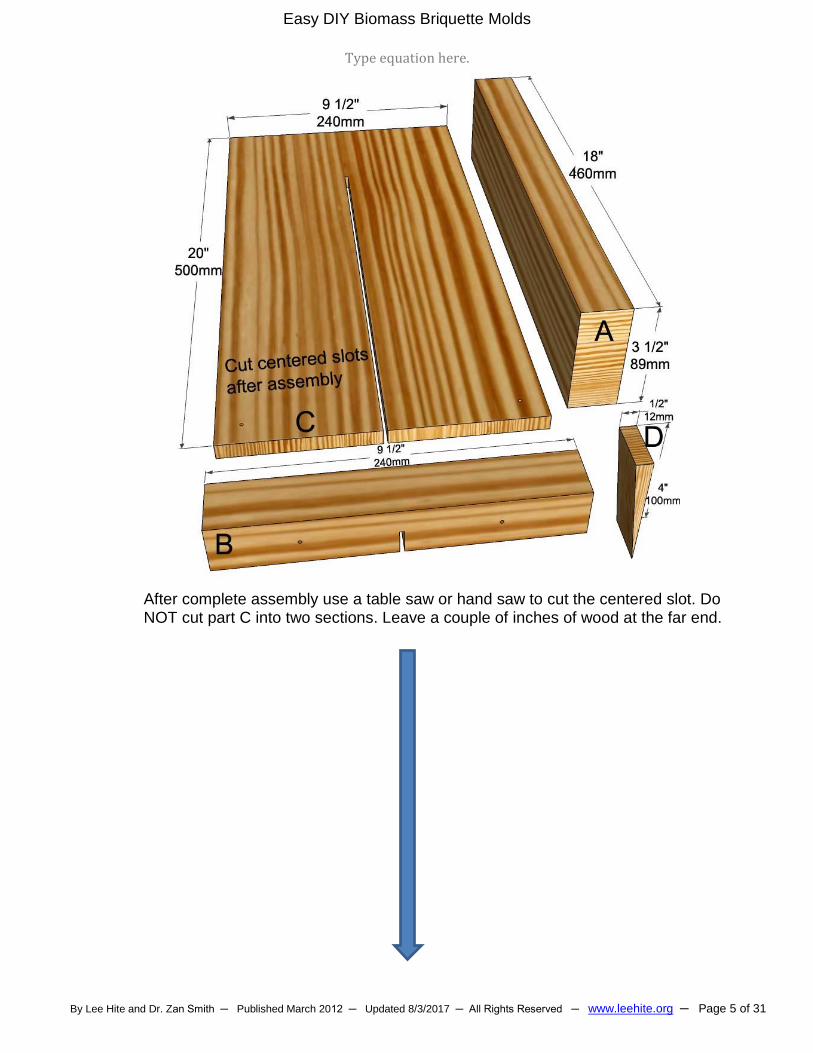
Whether you need a slotted or a drilled PVC mold, safe construction of the mold is an important consideration and this suggested jig is useful for both types of PVC molds. The jig can be used to support the PVC for drilling, for sawing into two sections, for cutting the vertical slots, and to assist lay-out marks for drilling or sawing. As you can see from the picture below a narrow wedge secures the PVC between two rails supported on a slotted base. The jig support can be used to hold the PVC for both hand tools and power tools such as a table saw, a radial arm saw, or a compound miter saw, aka “chop saw”. Some typical uses for the jig are pictured below. Dimensions are suggested for use with three inch diameter schedule 40 PVC. Adjust the length and other dimensions to fit your particular PVC size.
Part Name Size Length Description
A Rails 1 ½” x 3 ½” 38mm x 89mm 18” 460mm Centered to fit PVC
B End 1 ½” x 1 ½” 38mm x 38mm 9 ½” 240mm End Stop
C Base Any thickness from ¼” 6mm and up
9 ½” 240mm x 20” 500mm
Base, NO nails/screws in the center of part B
D Wedge 1 ½” 38mm x ½” 12mm 4” 100mm Used to secure PVC
Assemble rails A centered on base C for a slightly snug fit to the PVC. Use wood screws or nails to fasten the parts, but do not fasten near the center of part B, allowing for a safe cutting saw space.
Easy DIY Biomass Briquette Molds
By Lee Hite and Dr. Zan Smith ─ Published March 2012 ─ Updated 8/3/2017 ─ All Rights Reserved ─ www.leehite.org ─ Page 5 of 31
Type equation here.
After complete assembly use a table saw or hand saw to cut the centered slot. Do NOT cut part C into two sections. Leave a couple of inches of wood at the far end.
Easy DIY Biomass Briquette Molds
By Lee Hite and Dr. Zan Smith ─ Published March 2012 ─ Updated 8/3/2017 ─ All Rights Reserved ─ www.leehite.org ─ Page 6 of 31
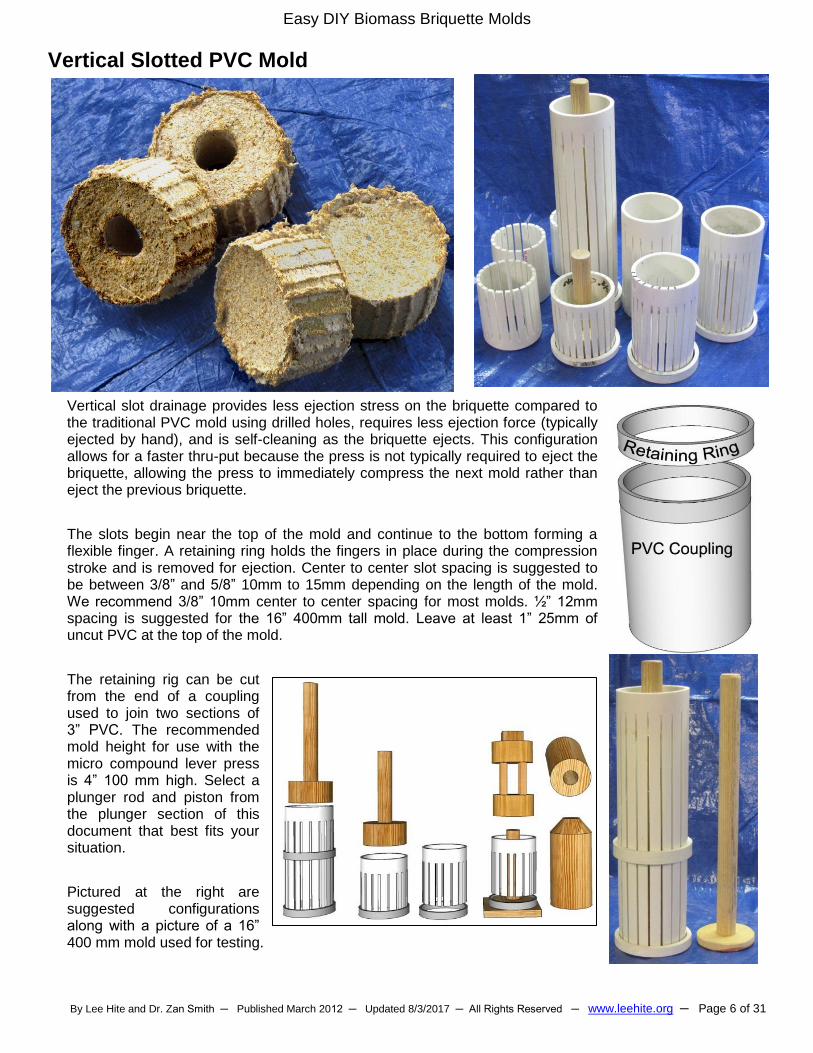
Vertical Slotted PVC Mold
Vertical slot drainage provides less ejection stress on the briquette compared to the traditional PVC mold using drilled holes, requires less ejection force (typically ejected by hand), and is self-cleaning as the briquette ejects. This configuration allows for a faster thru-put because the press is not typically required to eject the briquette, allowing the press to immediately compress the next mold rather than eject the previous briquette.
The slots begin near the top of the mold and continue to the bottom forming a flexible finger. A retaining ring holds the fingers in place during the compression stroke and is removed for ejection. Center to center slot spacing is suggested to be between 3/8” and 5/8” 10mm to 15mm depending on the length of the mold. We recommend 3/8” 10mm center to center spacing for most molds. ½” 12mm spacing is suggested for the 16” 400mm tall mold. Leave at least 1” 25mm of uncut PVC at the top of the mold.
The retaining rig can be cut from the end of a coupling used to join two sections of 3” PVC. The recommended mold height for use with the micro compound lever press is 4” 100 mm high. Select a plunger rod and piston from the plunger section of this document that best fits your situation.
Pictured at the right are suggested configurations along with a picture of a 16” 400 mm mold used for testing.
Easy DIY Biomass Briquette Molds
By Lee Hite and Dr. Zan Smith ─ Published March 2012 ─ Updated 8/3/2017 ─ All Rights Reserved ─ www.leehite.org ─ Page 7 of 31
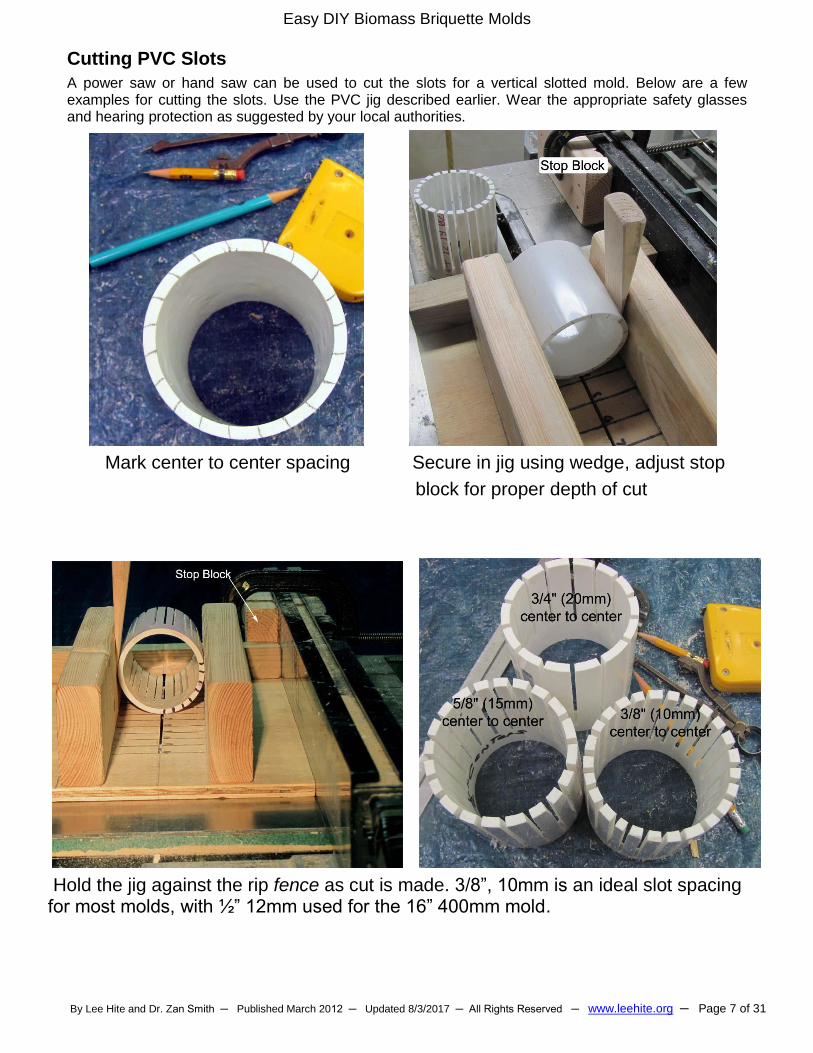
Cutting PVC Slots
A power saw or hand saw can be used to cut the slots for a vertical slotted mold. Below are a few examples for cutting the slots. Use the PVC jig described earlier. Wear the appropriate safety glasses and hearing protection as suggested by your local authorities.
Mark center to center spacing Secure in jig using wedge, adjust stop
block for proper depth of cut
Hold the jig against the rip fence as cut is made. 3/8”, 10mm is an ideal slot spacing for most molds, with ½” 12mm used for the 16” 400mm mold.
Easy DIY Biomass Briquette Molds
By Lee Hite and Dr. Zan Smith ─ Published March 2012 ─ Updated 8/3/2017 ─ All Rights Reserved ─ www.leehite.org ─ Page 8 of 31
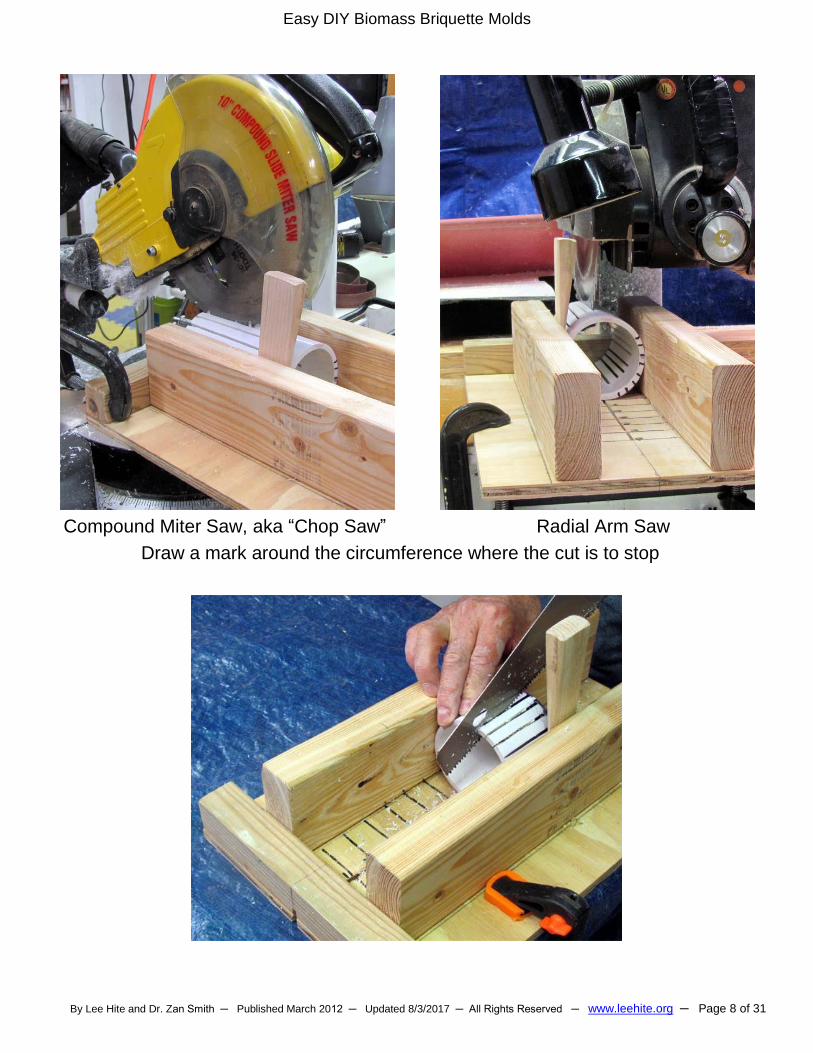
Compound Miter Saw, aka “Chop Saw” Radial Arm Saw
Draw a mark around the circumference where the cut is to stop
Easy DIY Biomass Briquette Molds
By Lee Hite and Dr. Zan Smith ─ Published March 2012 ─ Updated 8/3/2017 ─ All Rights Reserved ─ www.leehite.org ─ Page 9 of 31
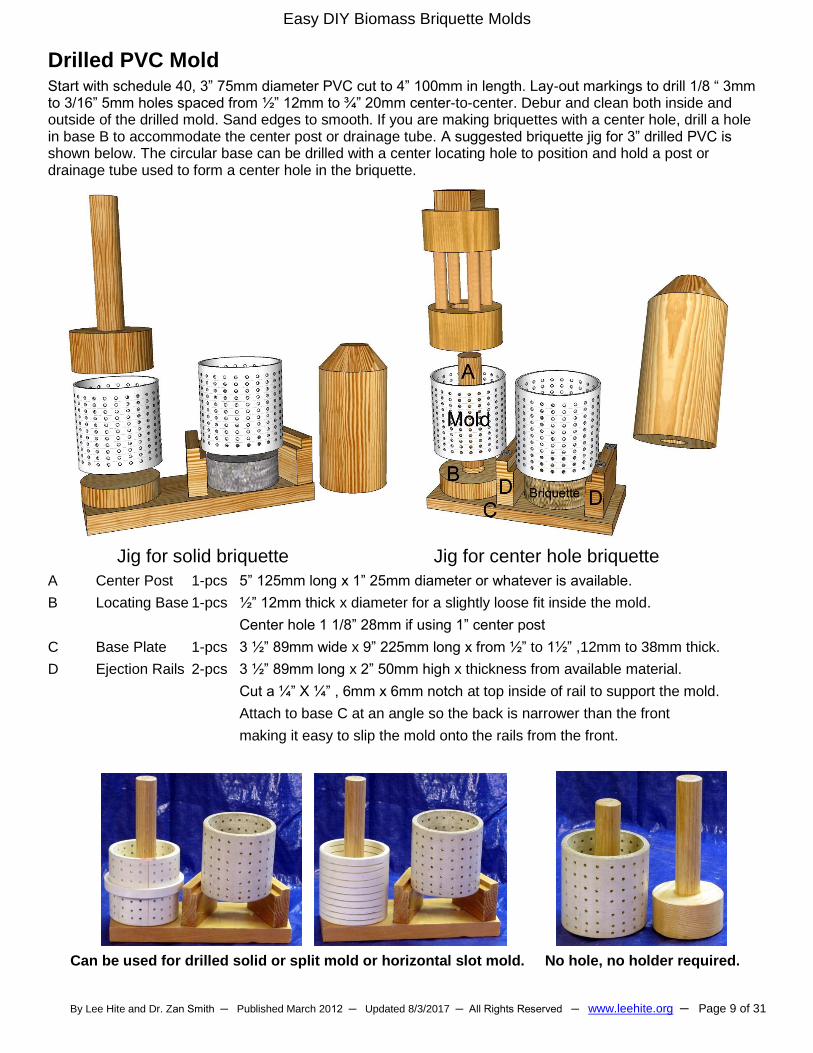
Drilled PVC Mold Start with schedule 40, 3” 75mm diameter PVC cut to 4” 100mm in length. Lay-out markings to drill 1/8 “ 3mm to 3/16” 5mm holes spaced from ½” 12mm to ¾” 20mm center-to-center. Debur and clean both inside and outside of the drilled mold. Sand edges to smooth. If you are making briquettes with a center hole, drill a hole in base B to accommodate the center post or drainage tube. A suggested briquette jig for 3” drilled PVC is shown below. The circular base can be drilled with a center locating hole to position and hold a post or drainage tube used to form a center hole in the briquette.
Jig for solid briquette Jig for center hole briquette
A Center Post 1-pcs 5” 125mm long x 1” 25mm diameter or whatever is available.
B Locating Base 1-pcs ½” 12mm thick x diameter for a slightly loose fit inside the mold.
Center hole 1 1/8” 28mm if using 1” center post
C Base Plate 1-pcs 3 ½” 89mm wide x 9” 225mm long x from ½” to 1½” ,12mm to 38mm thick.
D Ejection Rails 2-pcs 3 ½” 89mm long x 2” 50mm high x thickness from available material.
Cut a ¼” X ¼” , 6mm x 6mm notch at top inside of rail to support the mold.
Attach to base C at an angle so the back is narrower than the front
making it easy to slip the mold onto the rails from the front.
Can be used for drilled solid or split mold or horizontal slot mold. No hole, no holder required.
Easy DIY Biomass Briquette Molds
By Lee Hite and Dr. Zan Smith ─ Published March 2012 ─ Updated 8/3/2017 ─ All Rights Reserved ─ www.leehite.org ─ Page 10 of 31
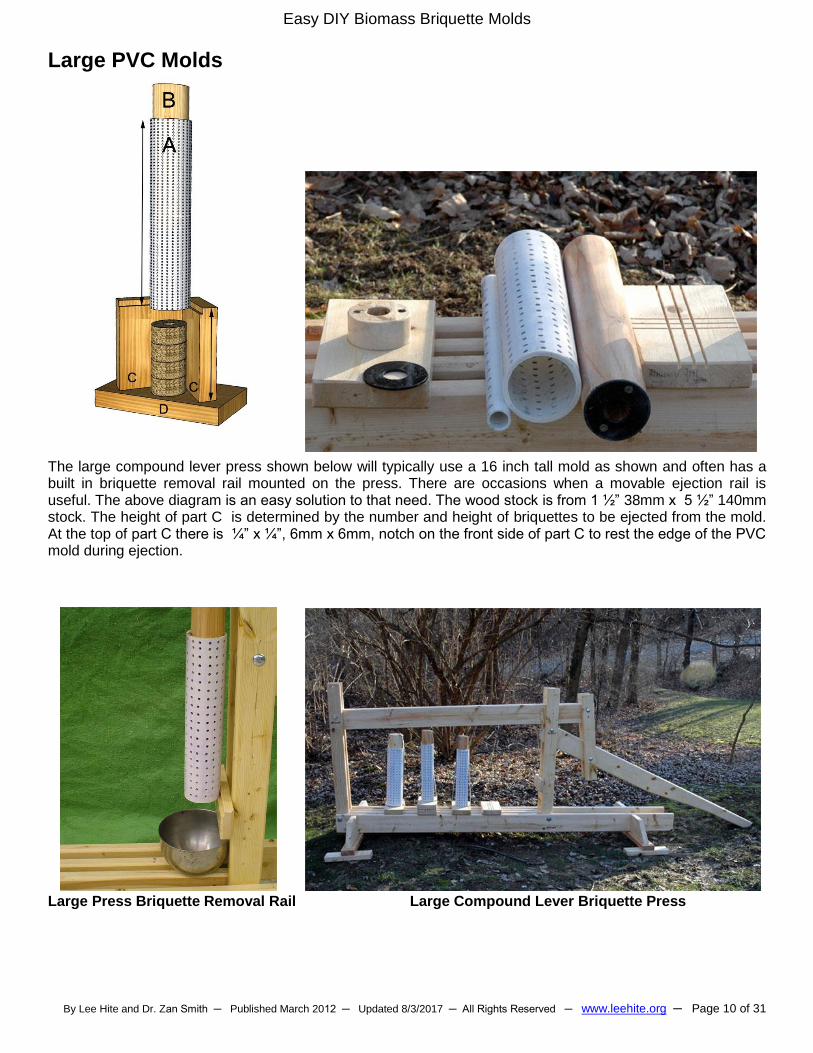
Large PVC Molds
The large compound lever press shown below will typically use a 16 inch tall mold as shown and often has a built in briquette removal rail mounted on the press. There are occasions when a movable ejection rail is useful. The above diagram is an easy solution to that need. The wood stock is from 1 ½” 38mm x 5 ½” 140mm stock. The height of part C is determined by the number and height of briquettes to be ejected from the mold. At the top of part C there is ¼” x ¼”, 6mm x 6mm, notch on the front side of part C to rest the edge of the PVC mold during ejection.
Large Press Briquette Removal Rail Large Compound Lever Briquette Press
Easy DIY Biomass Briquette Molds
By Lee Hite and Dr. Zan Smith ─ Published March 2012 ─ Updated 8/3/2017 ─ All Rights Reserved ─ www.leehite.org ─ Page 11 of 31
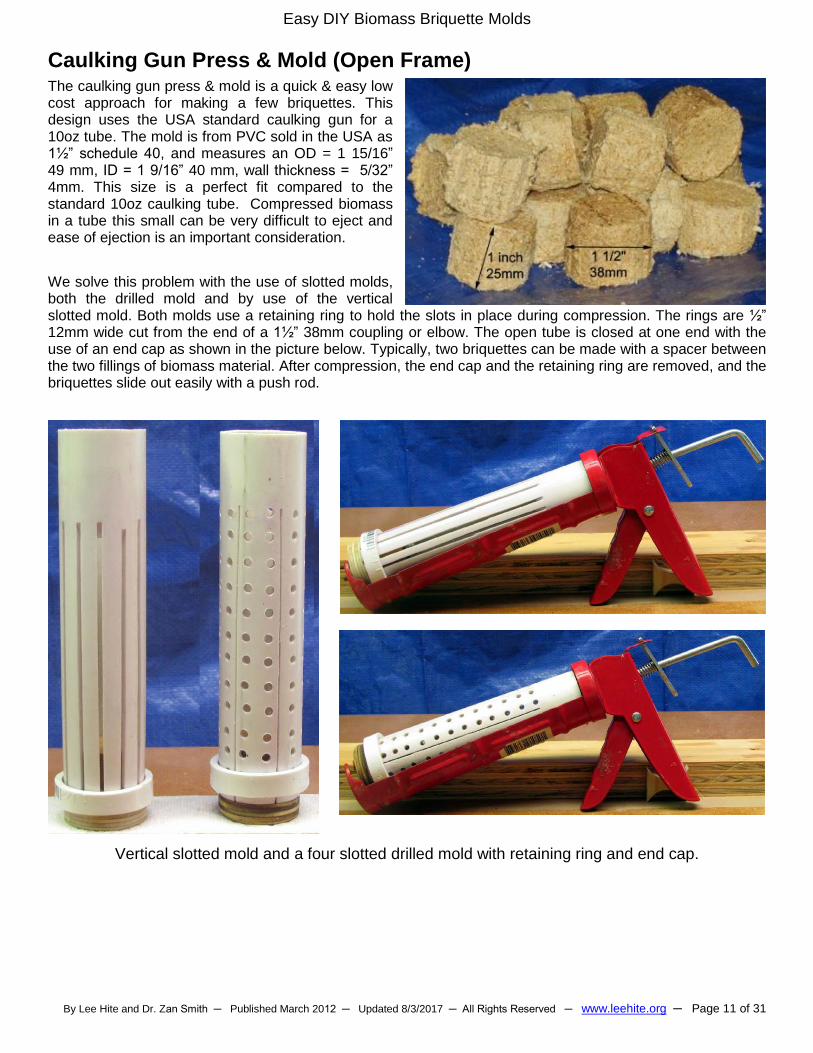
Caulking Gun Press & Mold (Open Frame) The caulking gun press & mold is a quick & easy low cost approach for making a few briquettes. This design uses the USA standard caulking gun for a 10oz tube. The mold is from PVC sold in the USA as 1½” schedule 40, and measures an OD = 1 15/16” 49 mm, ID = 1 9/16” 40 mm, wall thickness = 5/32” 4mm. This size is a perfect fit compared to the standard 10oz caulking tube. Compressed biomass in a tube this small can be very difficult to eject and ease of ejection is an important consideration.
We solve this problem with the use of slotted molds, both the drilled mold and by use of the vertical slotted mold. Both molds use a retaining ring to hold the slots in place during compression. The rings are ½” 12mm wide cut from the end of a 1½” 38mm coupling or elbow. The open tube is closed at one end with the use of an end cap as shown in the picture below. Typically, two briquettes can be made with a spacer between the two fillings of biomass material. After compression, the end cap and the retaining ring are removed, and the briquettes slide out easily with a push rod.
Vertical slotted mold and a four slotted drilled mold with retaining ring and end cap.
Easy DIY Biomass Briquette Molds
By Lee Hite and Dr. Zan Smith ─ Published March 2012 ─ Updated 8/3/2017 ─ All Rights Reserved ─ www.leehite.org ─ Page 12 of 31
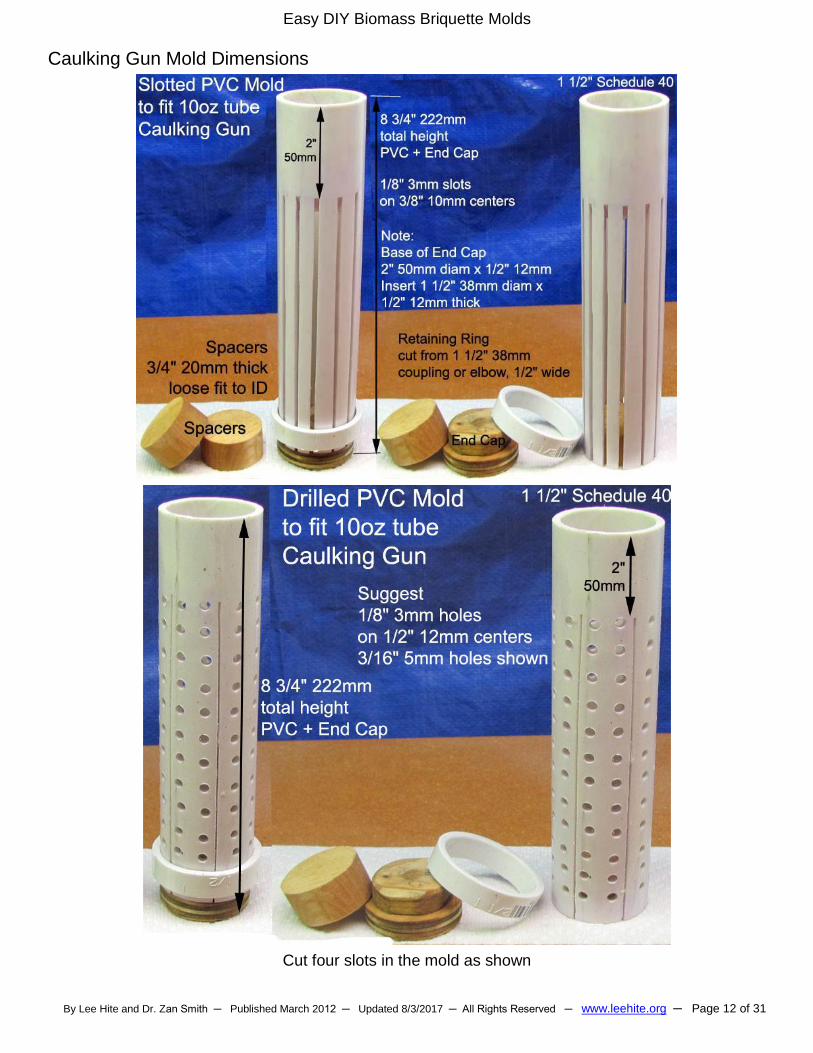
Caulking Gun Mold Dimensions
Cut four slots in the mold as shown
Easy DIY Biomass Briquette Molds
By Lee Hite and Dr. Zan Smith ─ Published March 2012 ─ Updated 8/3/2017 ─ All Rights Reserved ─ www.leehite.org ─ Page 13 of 31
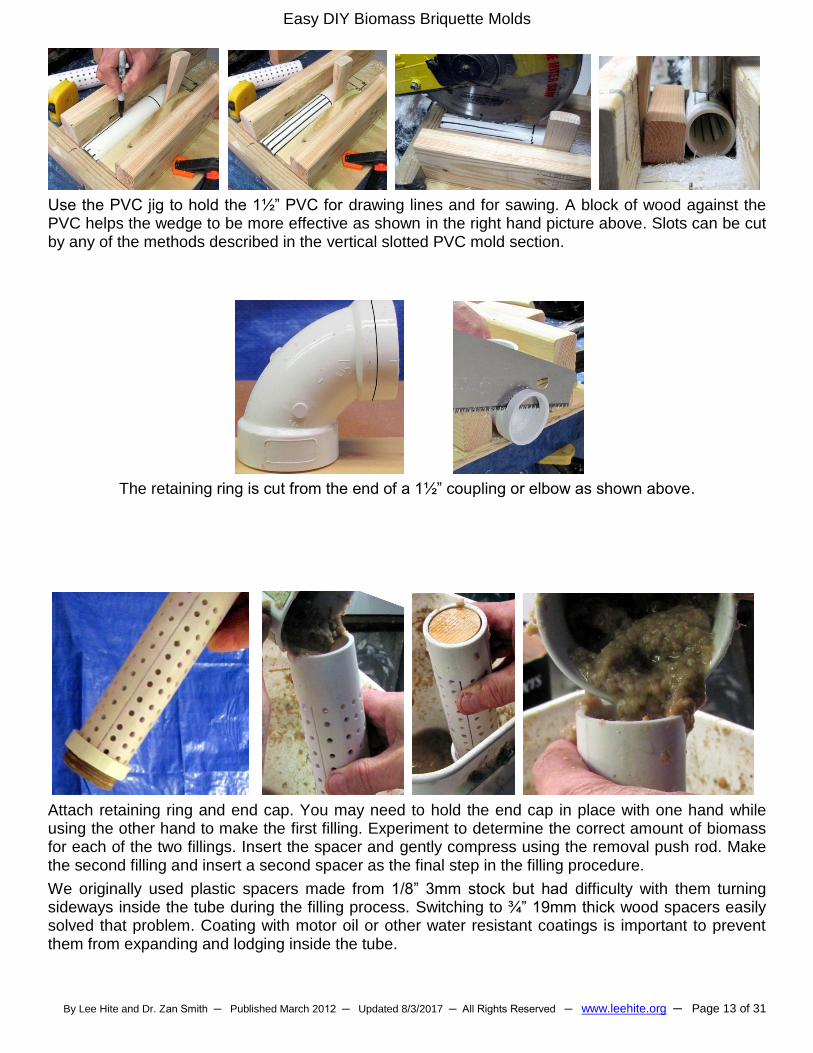
Use the PVC jig to hold the 1½” PVC for drawing lines and for sawing. A block of wood against the PVC helps the wedge to be more effective as shown in the right hand picture above. Slots can be cut by any of the methods described in the vertical slotted PVC mold section.
The retaining ring is cut from the end of a 1½” coupling or elbow as shown above.
Attach retaining ring and end cap. You may need to hold the end cap in place with one hand while using the other hand to make the first filling. Experiment to determine the correct amount of biomass for each of the two fillings. Insert the spacer and gently compress using the removal push rod. Make the second filling and insert a second spacer as the final step in the filling procedure.
We originally used plastic spacers made from 1/8” 3mm stock but had difficulty with them turning sideways inside the tube during the filling process. Switching to ¾” 19mm thick wood spacers easily solved that problem. Coating with motor oil or other water resistant coatings is important to prevent them from expanding and lodging inside the tube.
Easy DIY Biomass Briquette Molds
By Lee Hite and Dr. Zan Smith ─ Published March 2012 ─ Updated 8/3/2017 ─ All Rights Reserved ─ www.leehite.org ─ Page 14 of 31
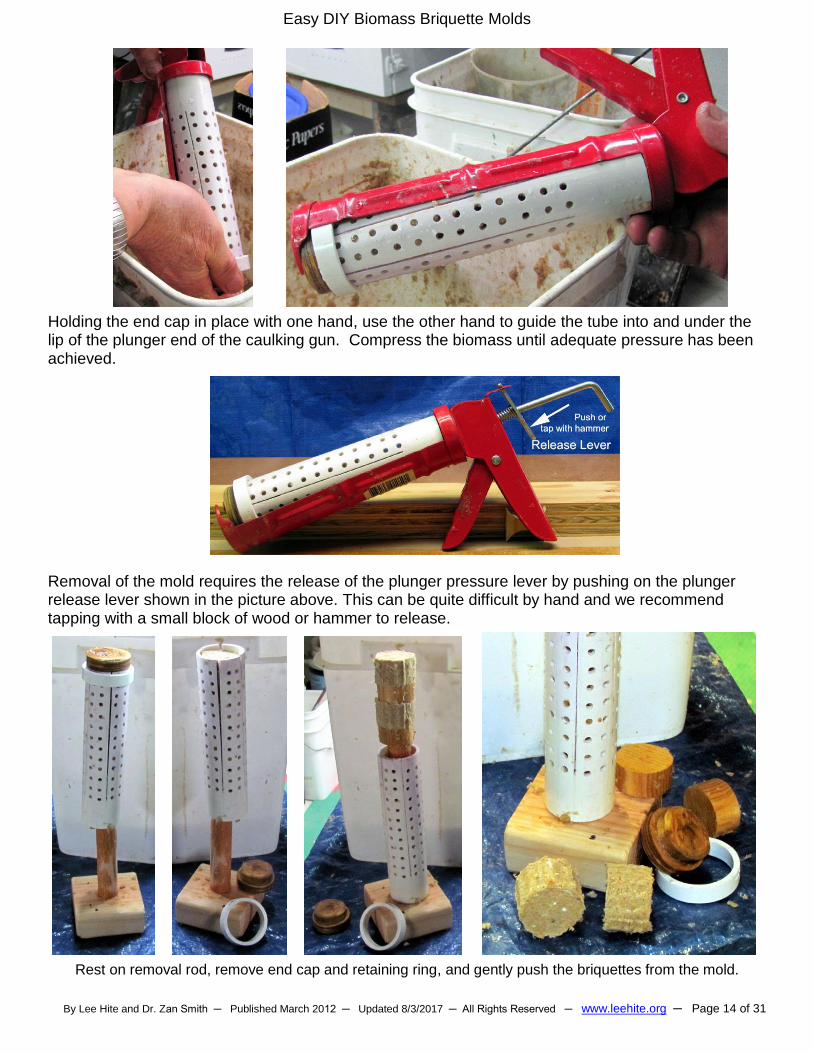
Holding the end cap in place with one hand, use the other hand to guide the tube into and under the lip of the plunger end of the caulking gun. Compress the biomass until adequate pressure has been achieved.
Removal of the mold requires the release of the plunger pressure lever by pushing on the plunger release lever shown in the picture above. This can be quite difficult by hand and we recommend tapping with a small block of wood or hammer to release.
Rest on removal rod, remove end cap and retaining ring, and gently push the briquettes from the mold.
Easy DIY Biomass Briquette Molds
By Lee Hite and Dr. Zan Smith ─ Published March 2012 ─ Updated 8/3/2017 ─ All Rights Reserved ─ www.leehite.org ─ Page 15 of 31
Caulking Gun Briquette Press (Bulk Load)
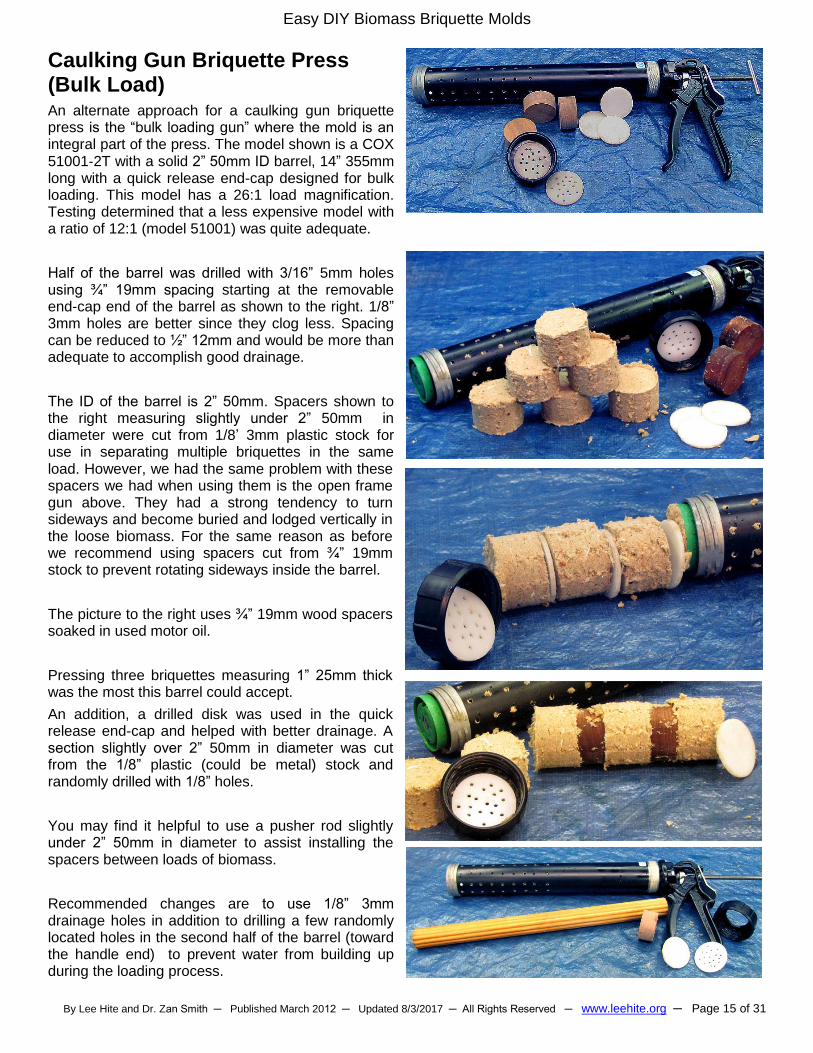
An alternate approach for a caulking gun briquette press is the “bulk loading gun” where the mold is an integral part of the press. The model shown is a COX 51001‐2T with a solid 2” 50mm ID barrel, 14” 355mm long with a quick release end-cap designed for bulk loading. This model has a 26:1 load magnification. Testing determined that a less expensive model with a ratio of 12:1 (model 51001) was quite adequate.
Half of the barrel was drilled with 3/16” 5mm holes using ¾” 19mm spacing starting at the removable end-cap end of the barrel as shown to the right. 1/8” 3mm holes are better since they clog less. Spacing can be reduced to ½” 12mm and would be more than adequate to accomplish good drainage.
The ID of the barrel is 2” 50mm. Spacers shown to the right measuring slightly under 2” 50mm in diameter were cut from 1/8’ 3mm plastic stock for use in separating multiple briquettes in the same load. However, we had the same problem with these spacers we had when using them is the open frame gun above. They had a strong tendency to turn sideways and become buried and lodged vertically in the loose biomass. For the same reason as before we recommend using spacers cut from ¾” 19mm stock to prevent rotating sideways inside the barrel.
The picture to the right uses ¾” 19mm wood spacers soaked in used motor oil.
Pressing three briquettes measuring 1” 25mm thick was the most this barrel could accept.
An addition, a drilled disk was used in the quick release end-cap and helped with better drainage. A section slightly over 2” 50mm in diameter was cut from the 1/8” plastic (could be metal) stock and randomly drilled with 1/8” holes.
You may find it helpful to use a pusher rod slightly under 2” 50mm in diameter to assist installing the spacers between loads of biomass.
Recommended changes are to use 1/8” 3mm drainage holes in addition to drilling a few randomly located holes in the second half of the barrel (toward the handle end) to prevent water from building up during the loading process.

Easy DIY Biomass Briquette Molds
By Lee Hite and Dr. Zan Smith ─ Published March 2012 ─ Updated 8/3/2017 ─ All Rights Reserved ─ www.leehite.org ─ Page 16 of 31
Split PVC Mold
Use of the split mold is suggested where less ejection stress on the briquette or where ejection away from the press is desired.
A drilled or horizontal slot mold can be cut in half vertically and held together by a ring ½” 12mm wide cut from the end of a coupler used to join two sections of PVC together. Typically, the material removed by the saw blade is sufficient to allow the mold to fit snuggly inside the retaining ring. A retaining ring can also be cut from wood or other available material.
After the biomass has been compressed, remove the ring from either the top or bottom of the mold, whichever is easier, and open using one of the methods shown below.
Book Open Tilt Open Slide Open
Slotted Wood Mold Section Vertical slotted wood as an alternative to drilled PVC molds is suggested for use where PVC is difficult to acquire, expensive, or an alternative construction method is desired.
Vertical slot drainage provides less ejection stress on the briquette compared to the traditional round PVC mold using drilled holes. The molds are designed for quick and easy ejection of the briquette allowing for a faster thru-put.
If you change dimensions it is important to consider maintaining an expansion space after the briquette is ejected from the mold. In general, biomass is elastic in nature and under considerable compression inside the mold. As the briquette ejects from the mold it expands requiring an increased ejection space. The off-set from foot “C” allows for that expansion.
Easy DIY Biomass Briquette Molds
By Lee Hite and Dr. Zan Smith ─ Published March 2012 ─ Updated 8/3/2017 ─ All Rights Reserved ─ www.leehite.org ─ Page 17 of 31
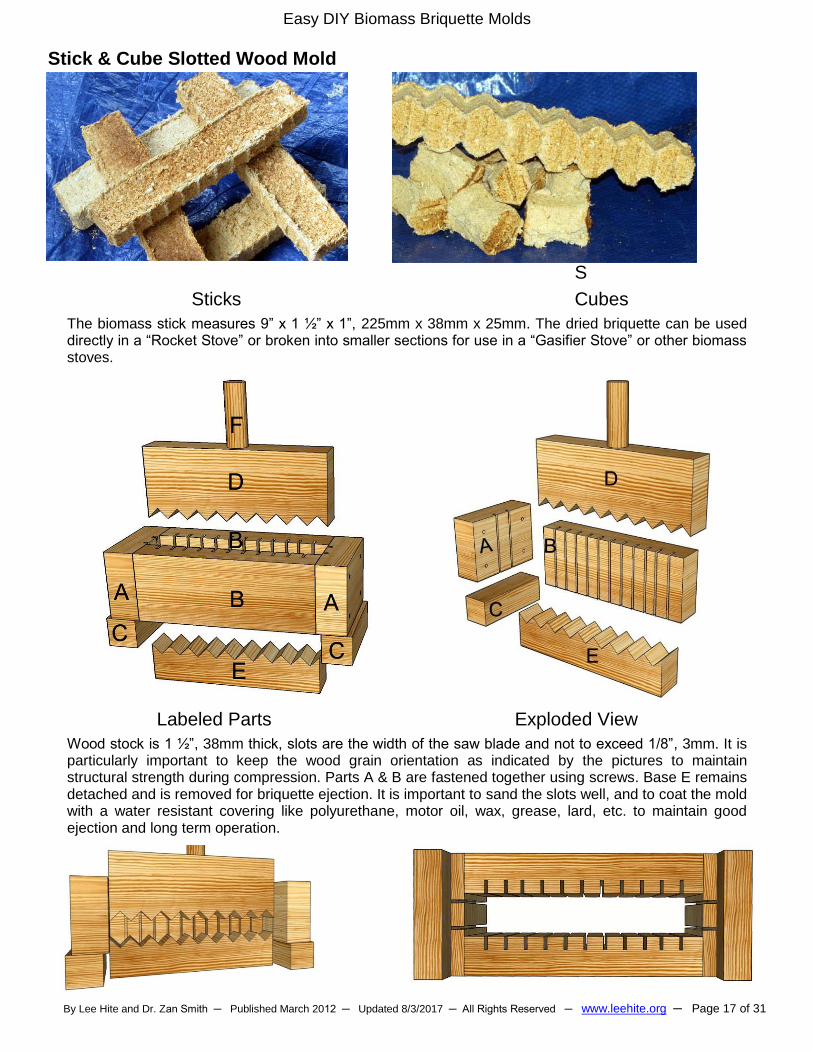
Stick & Cube Slotted Wood Mold
S
Sticks Cubes
The biomass stick measures 9” x 1 ½” x 1”, 225mm x 38mm x 25mm. The dried briquette can be used directly in a “Rocket Stove” or broken into smaller sections for use in a “Gasifier Stove” or other biomass stoves.
Labeled Parts Exploded View
Wood stock is 1 ½”, 38mm thick, slots are the width of the saw blade and not to exceed 1/8”, 3mm. It is particularly important to keep the wood grain orientation as indicated by the pictures to maintain structural strength during compression. Parts A & B are fastened together using screws. Base E remains detached and is removed for briquette ejection. It is important to sand the slots well, and to coat the mold with a water resistant covering like polyurethane, motor oil, wax, grease, lard, etc. to maintain good ejection and long term operation.
Easy DIY Biomass Briquette Molds
By Lee Hite and Dr. Zan Smith ─ Published March 2012 ─ Updated 8/3/2017 ─ All Rights Reserved ─ www.leehite.org ─ Page 18 of 31
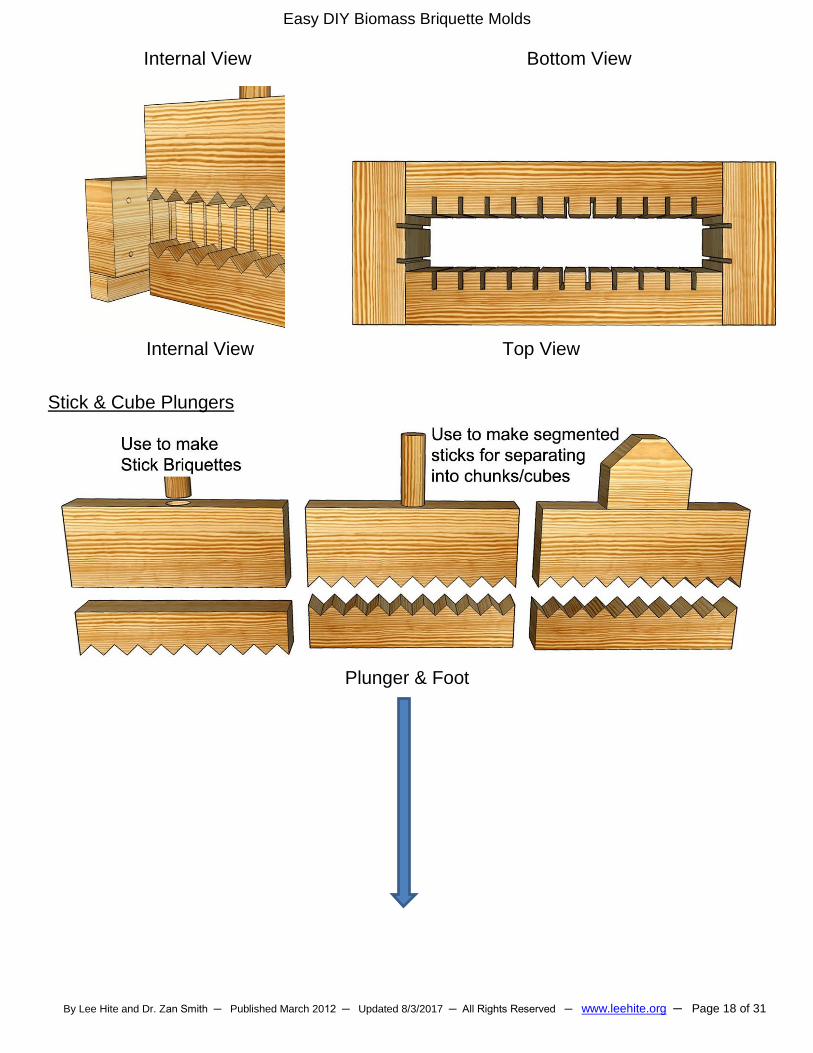
Internal View Bottom View
Internal View Top View
Stick & Cube Plungers
Plunger & Foot
Easy DIY Biomass Briquette Molds
By Lee Hite and Dr. Zan Smith ─ Published March 2012 ─ Updated 8/3/2017 ─ All Rights Reserved ─ www.leehite.org ─ Page 19 of 31
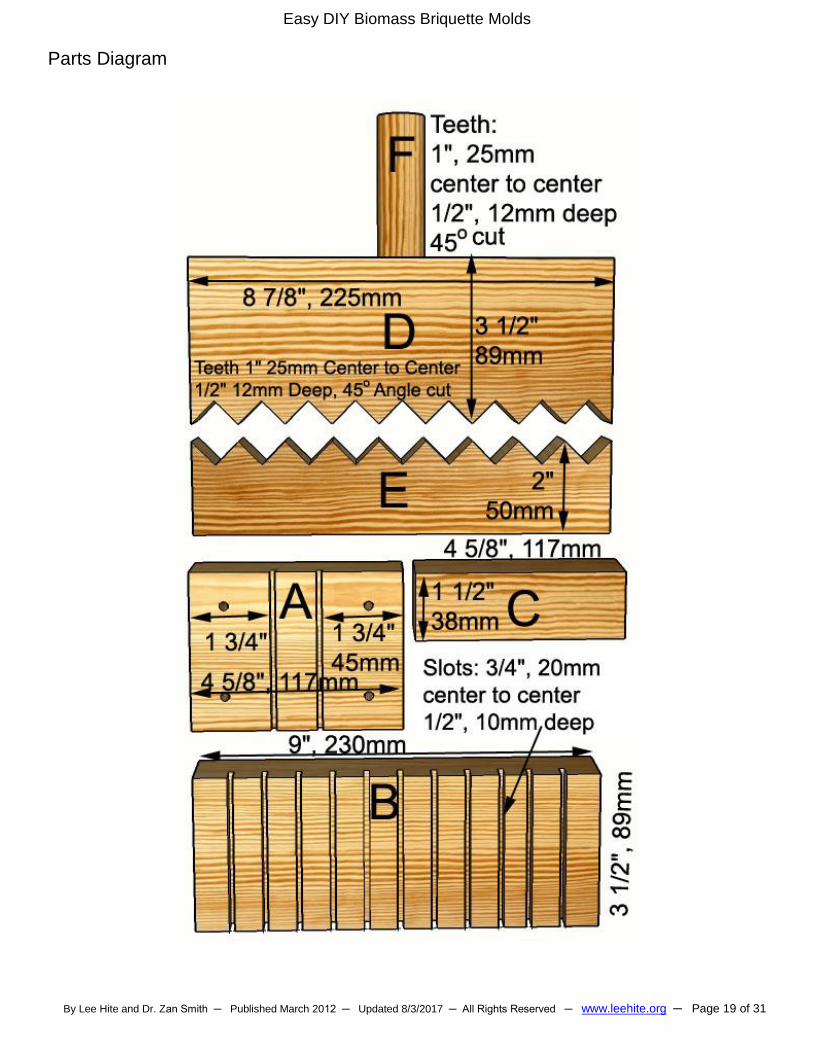
Parts Diagram
Easy DIY Biomass Briquette Molds
By Lee Hite and Dr. Zan Smith ─ Published March 2012 ─ Updated 8/3/2017 ─ All Rights Reserved ─ www.leehite.org ─ Page 20 of 31
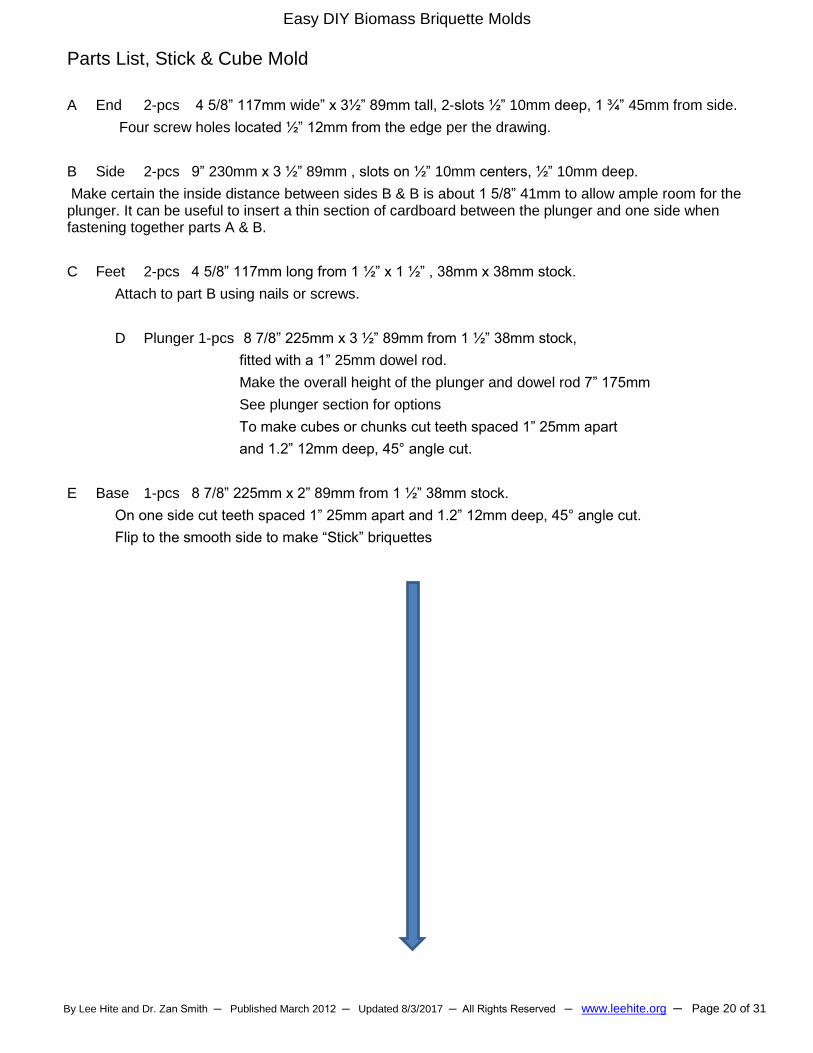
Parts List, Stick & Cube Mold
A End 2-pcs 4 5/8” 117mm wide” x 3½” 89mm tall, 2-slots ½” 10mm deep, 1 ¾” 45mm from side.
Four screw holes located ½” 12mm from the edge per the drawing.
B Side 2-pcs 9” 230mm x 3 ½” 89mm , slots on ½” 10mm centers, ½” 10mm deep.
Make certain the inside distance between sides B & B is about 1 5/8” 41mm to allow ample room for the plunger. It can be useful to insert a thin section of cardboard between the plunger and one side when fastening together parts A & B.
C Feet 2-pcs 4 5/8” 117mm long from 1 ½” x 1 ½” , 38mm x 38mm stock.
Attach to part B using nails or screws.
D Plunger 1-pcs 8 7/8” 225mm x 3 ½” 89mm from 1 ½” 38mm stock,
fitted with a 1” 25mm dowel rod.
Make the overall height of the plunger and dowel rod 7” 175mm
See plunger section for options
To make cubes or chunks cut teeth spaced 1” 25mm apart
and 1.2” 12mm deep, 45° angle cut.
E Base 1-pcs 8 7/8” 225mm x 2” 89mm from 1 ½” 38mm stock.
On one side cut teeth spaced 1” 25mm apart and 1.2” 12mm deep, 45° angle cut.
Flip to the smooth side to make “Stick” briquettes
Easy DIY Biomass Briquette Molds
By Lee Hite and Dr. Zan Smith ─ Published March 2012 ─ Updated 8/3/2017 ─ All Rights Reserved ─ www.leehite.org ─ Page 21 of 31
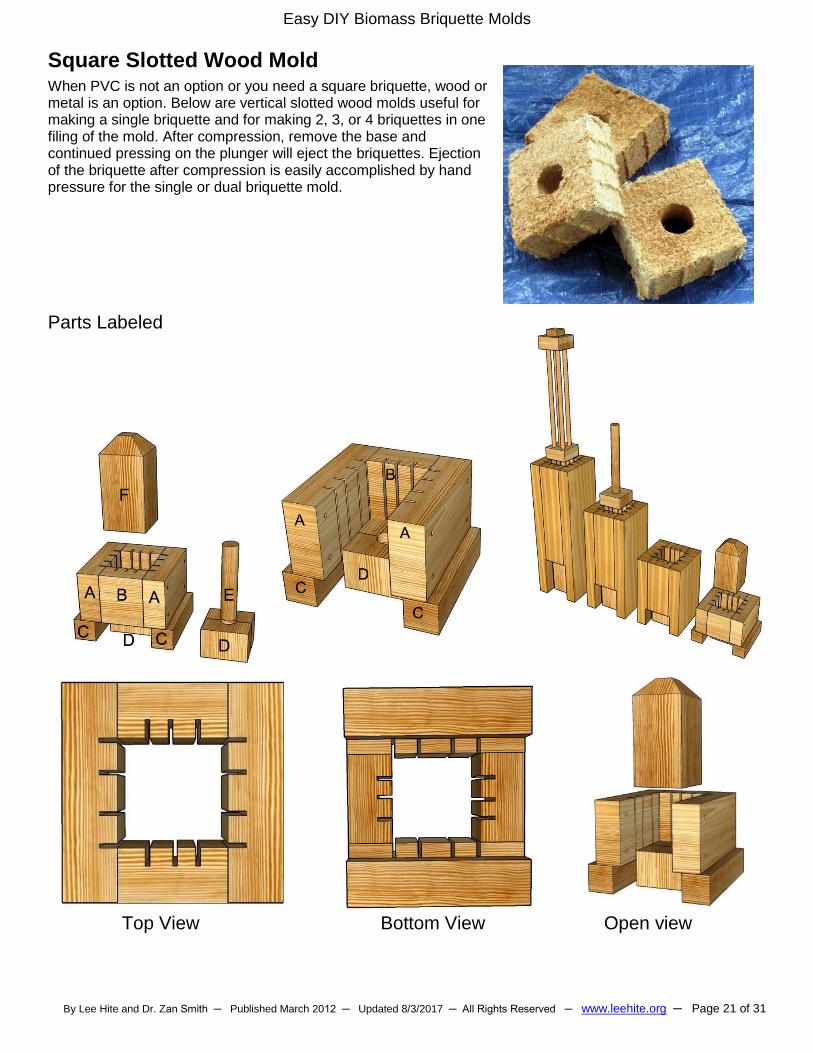
Square Slotted Wood Mold When PVC is not an option or you need a square briquette, wood or metal is an option. Below are vertical slotted wood molds useful for making a single briquette and for making 2, 3, or 4 briquettes in one filing of the mold. After compression, remove the base and continued pressing on the plunger will eject the briquettes. Ejection of the briquette after compression is easily accomplished by hand pressure for the single or dual briquette mold.
Parts Labeled
Top View Bottom View Open view
Easy DIY Biomass Briquette Molds
By Lee Hite and Dr. Zan Smith ─ Published March 2012 ─ Updated 8/3/2017 ─ All Rights Reserved ─ www.leehite.org ─ Page 22 of 31
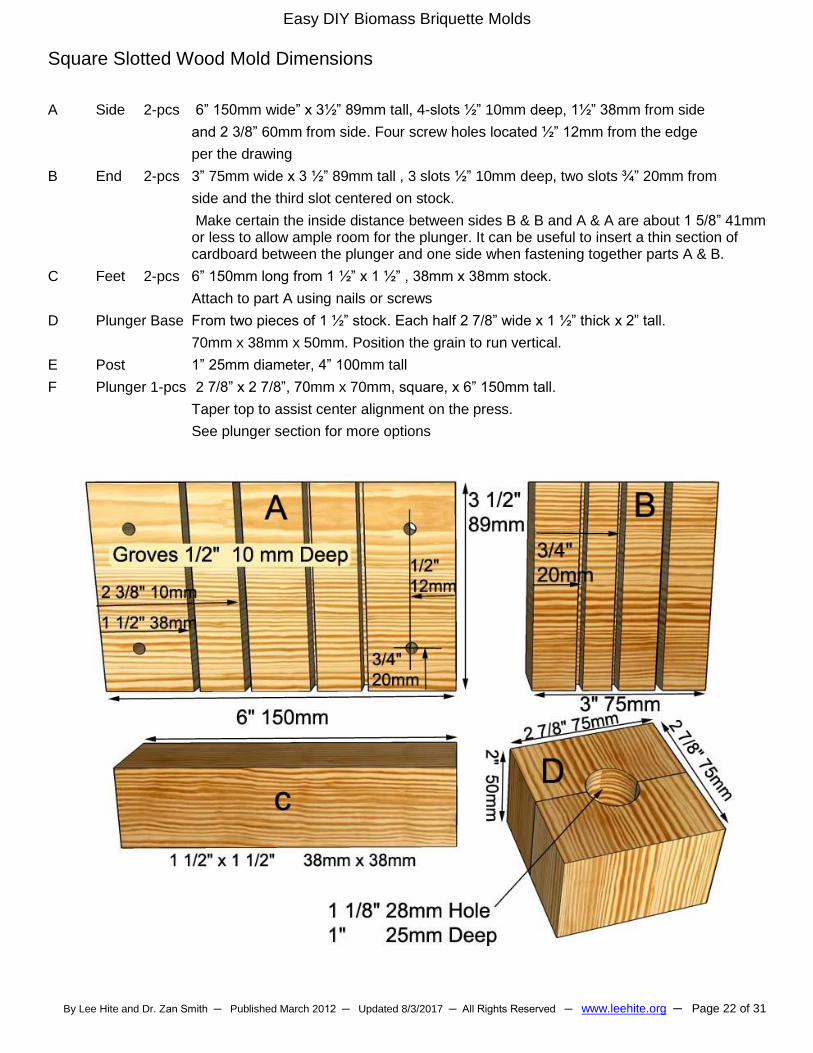
Square Slotted Wood Mold Dimensions
A Side 2-pcs 6” 150mm wide” x 3½” 89mm tall, 4-slots ½” 10mm deep, 1½” 38mm from side
and 2 3/8” 60mm from side. Four screw holes located ½” 12mm from the edge
per the drawing
B End 2-pcs 3” 75mm wide x 3 ½” 89mm tall , 3 slots ½” 10mm deep, two slots ¾” 20mm from
side and the third slot centered on stock.
Make certain the inside distance between sides B & B and A & A are about 1 5/8” 41mm or less to allow ample room for the plunger. It can be useful to insert a thin section of cardboard between the plunger and one side when fastening together parts A & B.
C Feet 2-pcs 6” 150mm long from 1 ½” x 1 ½” , 38mm x 38mm stock.
Attach to part A using nails or screws
D Plunger Base From two pieces of 1 ½” stock. Each half 2 7/8” wide x 1 ½” thick x 2” tall.
70mm x 38mm x 50mm. Position the grain to run vertical.
E Post 1” 25mm diameter, 4” 100mm tall
F Plunger 1-pcs 2 7/8” x 2 7/8”, 70mm x 70mm, square, x 6” 150mm tall.
Taper top to assist center alignment on the press.
See plunger section for more options

Easy DIY Biomass Briquette Molds
By Lee Hite and Dr. Zan Smith ─ Published March 2012 ─ Updated 8/3/2017 ─ All Rights Reserved ─ www.leehite.org ─ Page 23 of 31
Multiple Briquettes Square Mold Dimensions
Briquettes
Per Mold
A
6” 150mm wide
A1
B
3” 75mm
wide
C
Height
D
2 7/8” x 2 7/8”
E
1” 25mm
Post
F
Total Height
1 3½”
89mm
5” 125mm
Tall
3 ½” 89mm
Tall
1 ½” 89mm Tall
2” 50mm
Tall
4” 100mm
6” 150mm
2 7” 175mm 9 ½” 7” 175mm 2 ½” 3” 75mm 7 ½” 7” 175mm
3 10 ½” 14 ½” 10 ½” 4” 100mm 4 ½” 11” 10 ½”
4 14” 19 ½” 14” 5 ½” 6” 15 14
Briquettes Per Mold Post Holder & Post
Easy DIY Biomass Briquette Molds
By Lee Hite and Dr. Zan Smith ─ Published March 2012 ─ Updated 8/3/2017 ─ All Rights Reserved ─ www.leehite.org ─ Page 24 of 31
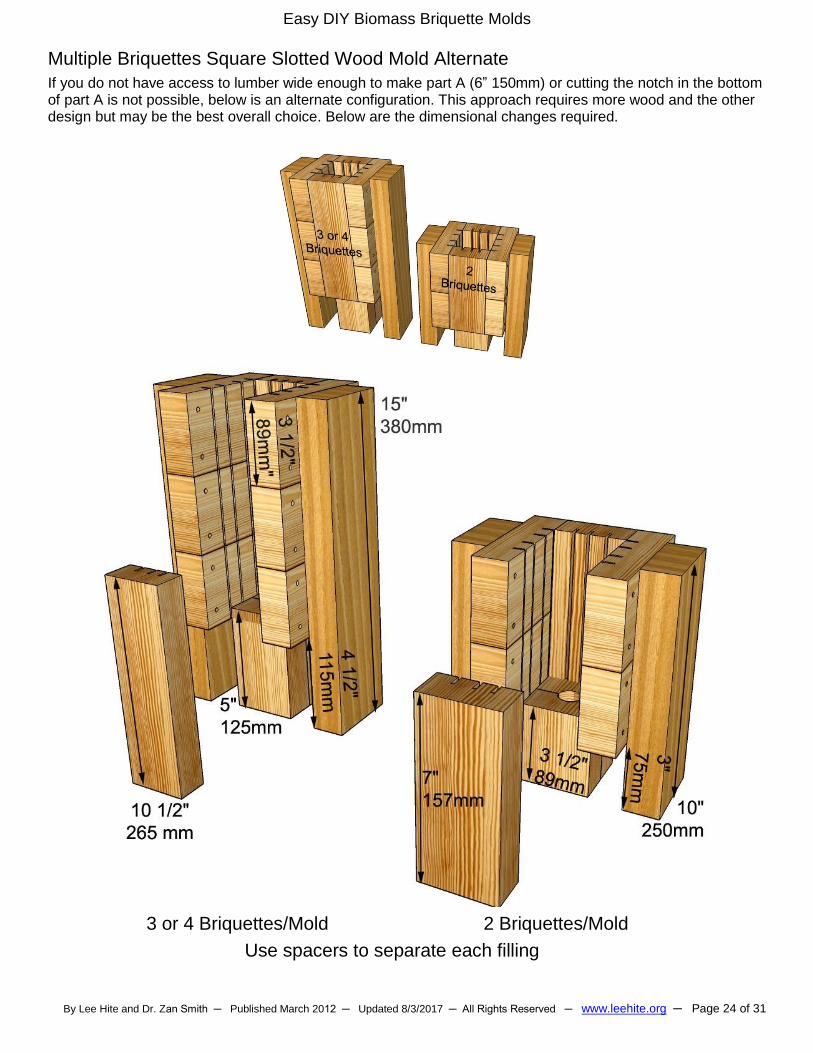
Multiple Briquettes Square Slotted Wood Mold Alternate
If you do not have access to lumber wide enough to make part A (6” 150mm) or cutting the notch in the bottom of part A is not possible, below is an alternate configuration. This approach requires more wood and the other design but may be the best overall choice. Below are the dimensional changes required.
3 or 4 Briquettes/Mold 2 Briquettes/Mold
Use spacers to separate each filling
Easy DIY Biomass Briquette Molds
By Lee Hite and Dr. Zan Smith ─ Published March 2012 ─ Updated 8/3/2017 ─ All Rights Reserved ─ www.leehite.org ─ Page 25 of 31
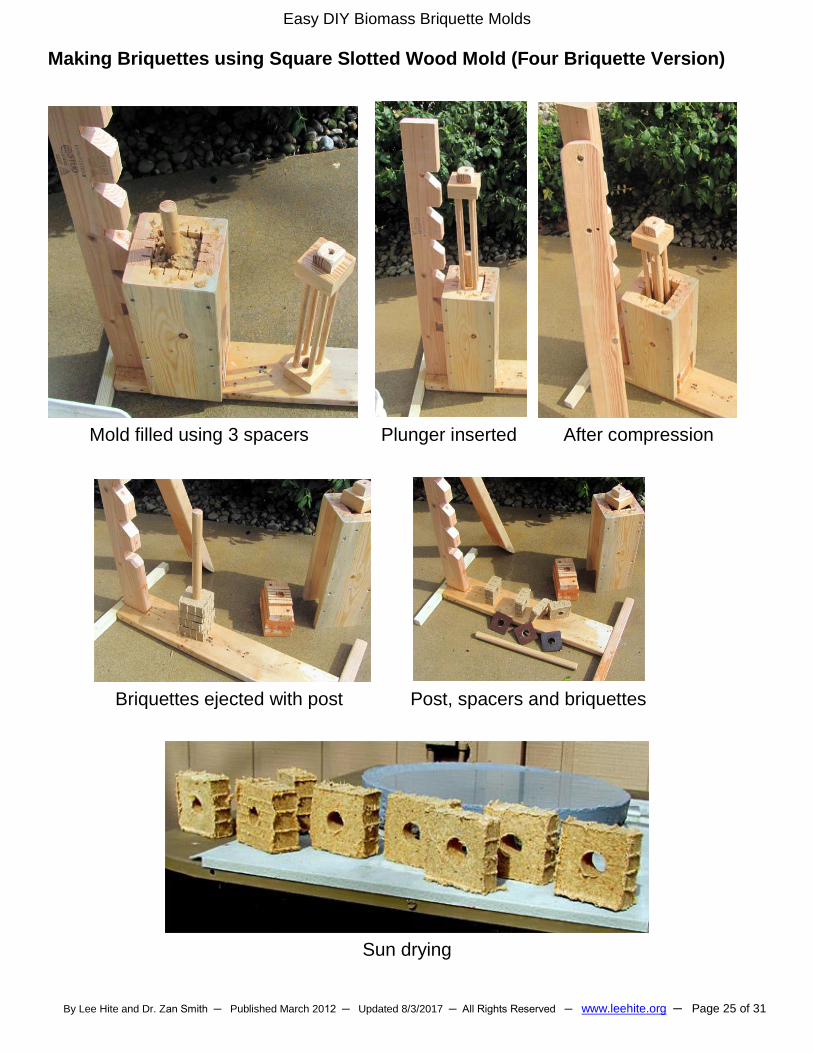
Making Briquettes using Square Slotted Wood Mold (Four Briquette Version)
Mold filled using 3 spacers Plunger inserted After compression
Briquettes ejected with post Post, spacers and briquettes
Sun drying
Easy DIY Biomass Briquette Molds
By Lee Hite and Dr. Zan Smith ─ Published March 2012 ─ Updated 8/3/2017 ─ All Rights Reserved ─ www.leehite.org ─ Page 26 of 31
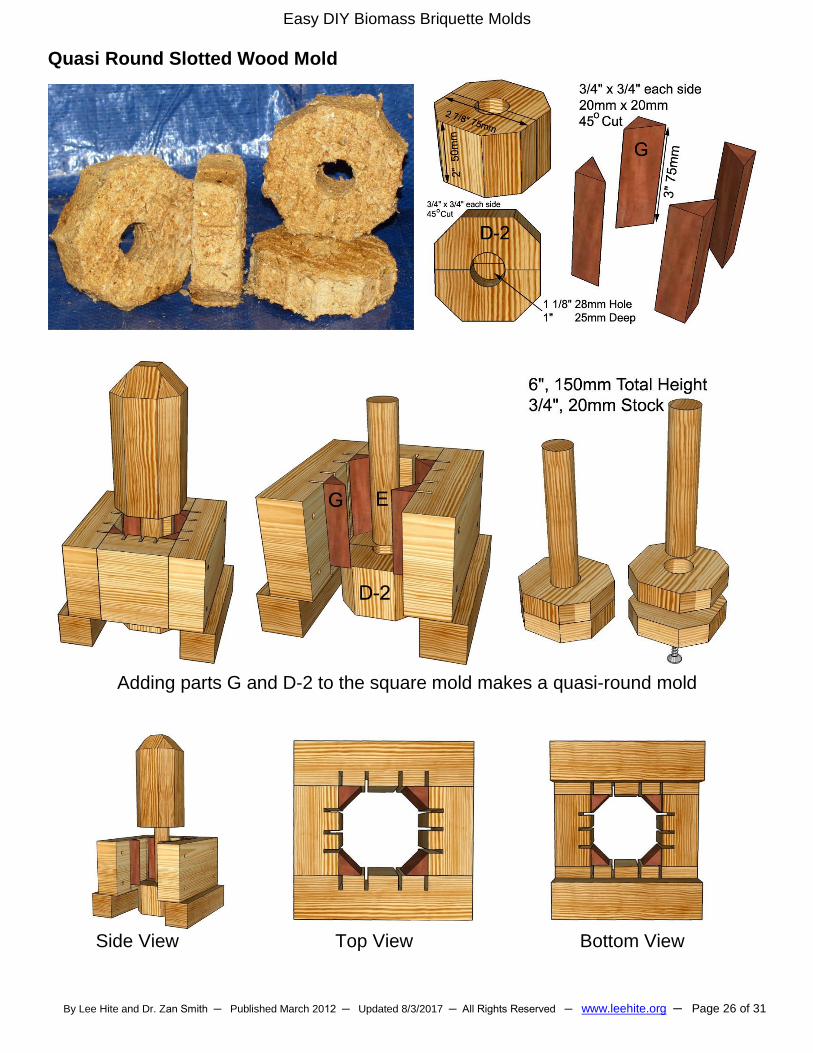
Quasi Round Slotted Wood Mold
Adding parts G and D-2 to the square mold makes a quasi-round mold
Side View Top View Bottom View
Easy DIY Biomass Briquette Molds
By Lee Hite and Dr. Zan Smith ─ Published March 2012 ─ Updated 8/3/2017 ─ All Rights Reserved ─ www.leehite.org ─ Page 27 of 31
Plunger Piston & Rod Section
Crafting a plunger piston & rod can be done any number of ways using your local resources and materials. The use of solid wood may or may not be possible in your area. If not, consider making the piston using the split piston method described below.
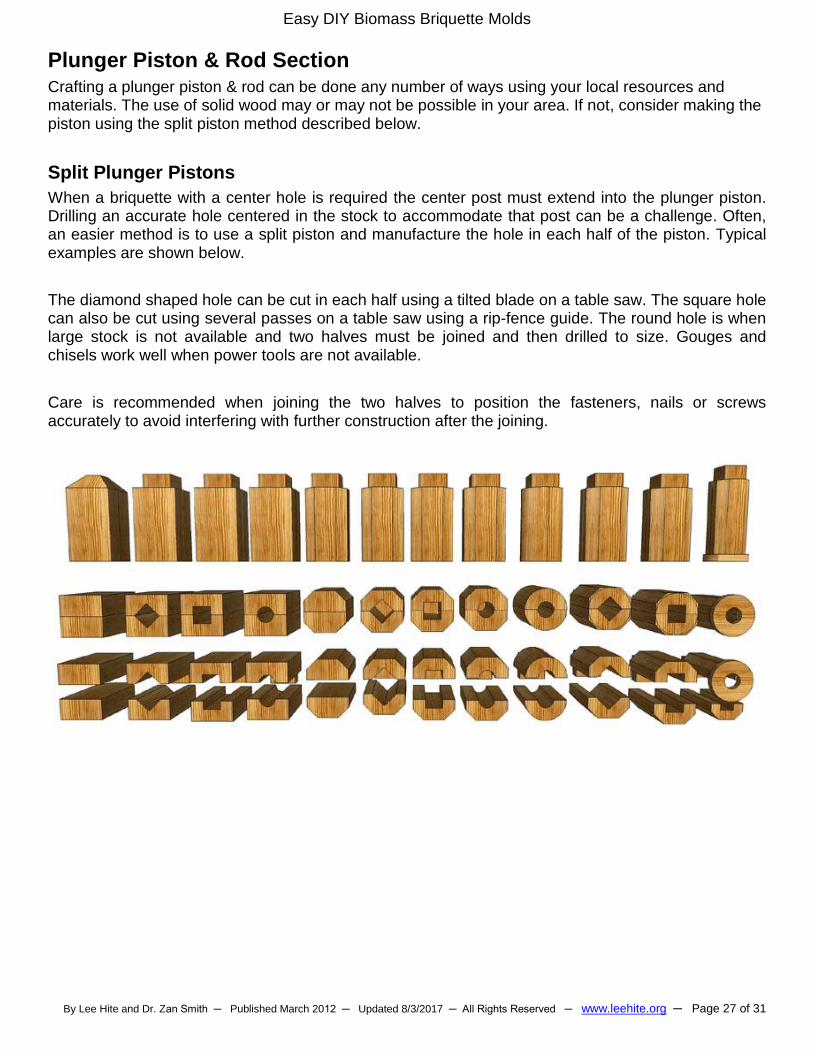
Split Plunger Pistons
When a briquette with a center hole is required the center post must extend into the plunger piston. Drilling an accurate hole centered in the stock to accommodate that post can be a challenge. Often, an easier method is to use a split piston and manufacture the hole in each half of the piston. Typical examples are shown below.
The diamond shaped hole can be cut in each half using a tilted blade on a table saw. The square hole can also be cut using several passes on a table saw using a rip-fence guide. The round hole is when large stock is not available and two halves must be joined and then drilled to size. Gouges and chisels work well when power tools are not available.
Care is recommended when joining the two halves to position the fasteners, nails or screws accurately to avoid interfering with further construction after the joining.
Easy DIY Biomass Briquette Molds
By Lee Hite and Dr. Zan Smith ─ Published March 2012 ─ Updated 8/3/2017 ─ All Rights Reserved ─ www.leehite.org ─ Page 28 of 31
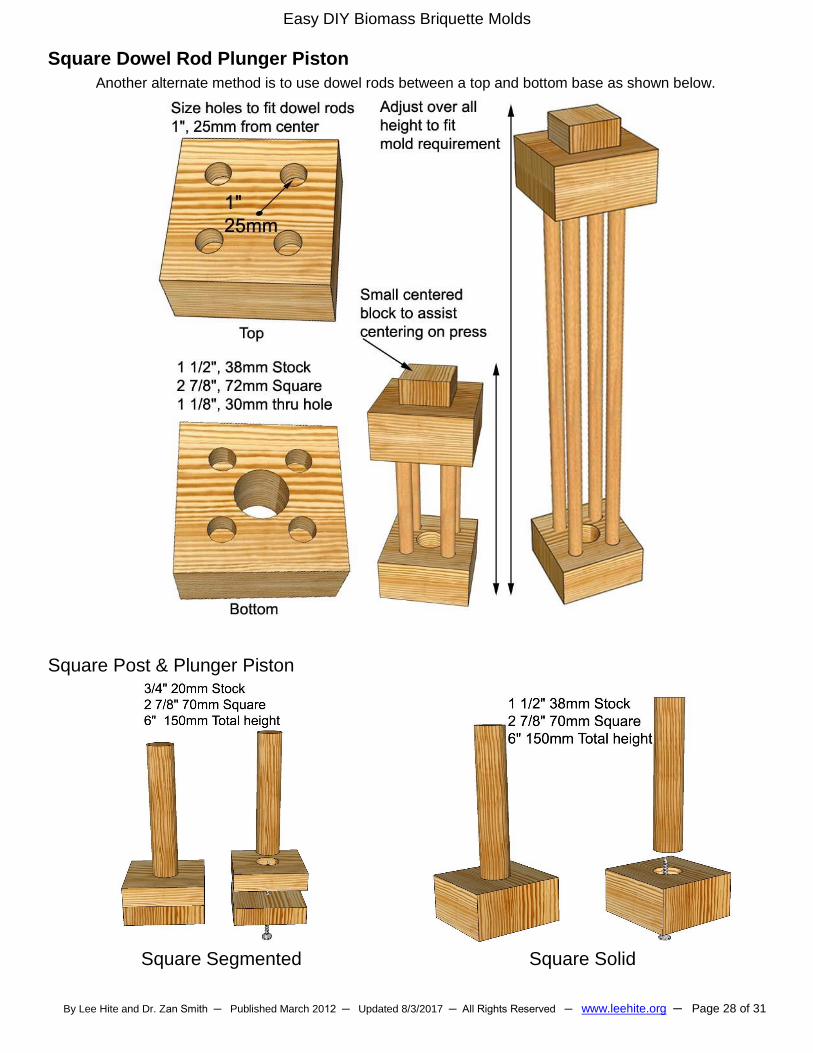
Square Dowel Rod Plunger Piston
Another alternate method is to use dowel rods between a top and bottom base as shown below.
Square Post & Plunger Piston
Square Segmented Square Solid
Easy DIY Biomass Briquette Molds
By Lee Hite and Dr. Zan Smith ─ Published March 2012 ─ Updated 8/3/2017 ─ All Rights Reserved ─ www.leehite.org ─ Page 29 of 31
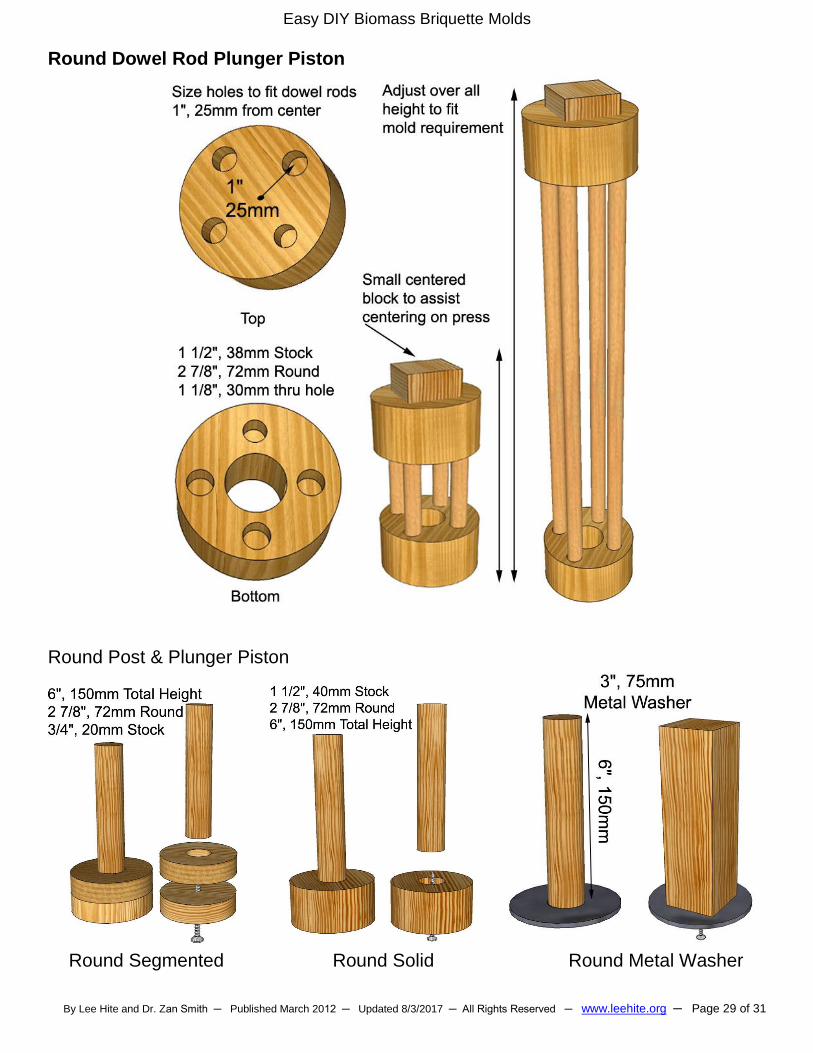
Round Dowel Rod Plunger Piston
Round Post & Plunger Piston
Round Segmented Round Solid Round Metal Washer
Easy DIY Biomass Briquette Molds
By Lee Hite and Dr. Zan Smith ─ Published March 2012 ─ Updated 8/3/2017 ─ All Rights Reserved ─ www.leehite.org ─ Page 30 of 31
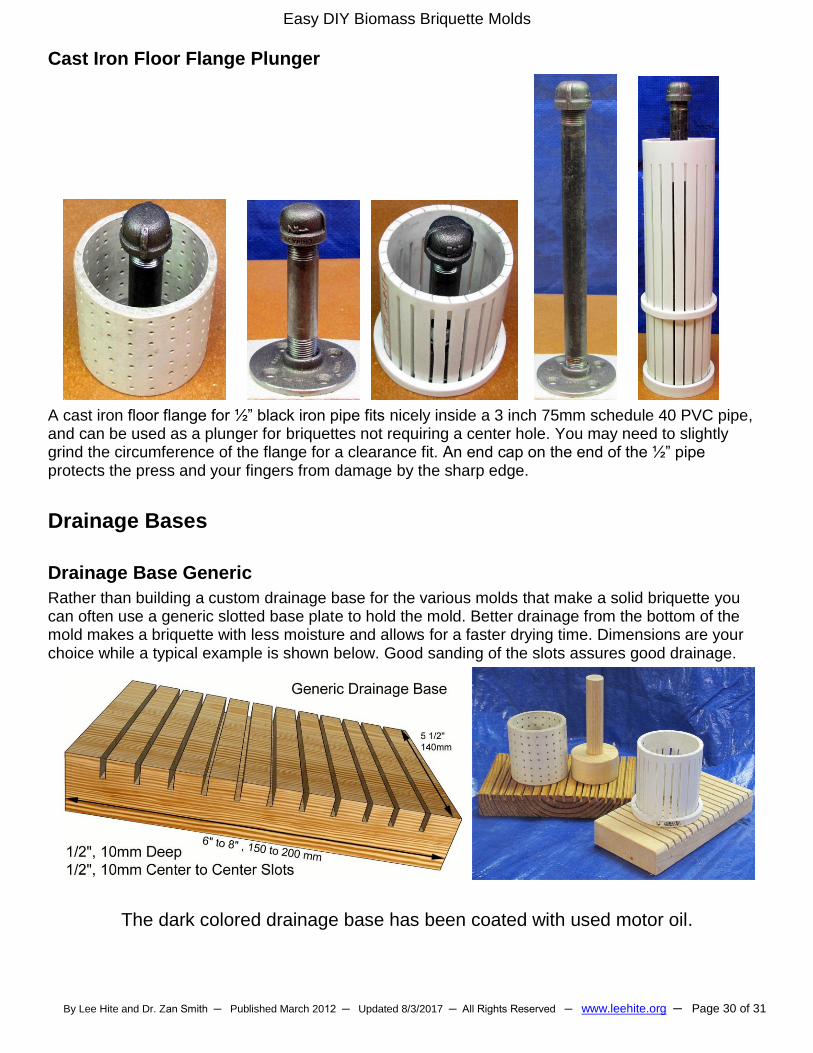
Cast Iron Floor Flange Plunger
A cast iron floor flange for ½” black iron pipe fits nicely inside a 3 inch 75mm schedule 40 PVC pipe, and can be used as a plunger for briquettes not requiring a center hole. You may need to slightly grind the circumference of the flange for a clearance fit. An end cap on the end of the ½” pipe protects the press and your fingers from damage by the sharp edge.
Drainage Bases
Drainage Base Generic
Rather than building a custom drainage base for the various molds that make a solid briquette you can often use a generic slotted base plate to hold the mold. Better drainage from the bottom of the mold makes a briquette with less moisture and allows for a faster drying time. Dimensions are your choice while a typical example is shown below. Good sanding of the slots assures good drainage.
The dark colored drainage base has been coated with used motor oil.
Easy DIY Biomass Briquette Molds
By Lee Hite and Dr. Zan Smith ─ Published March 2012 ─ Updated 8/3/2017 ─ All Rights Reserved ─ www.leehite.org ─ Page 31 of 31
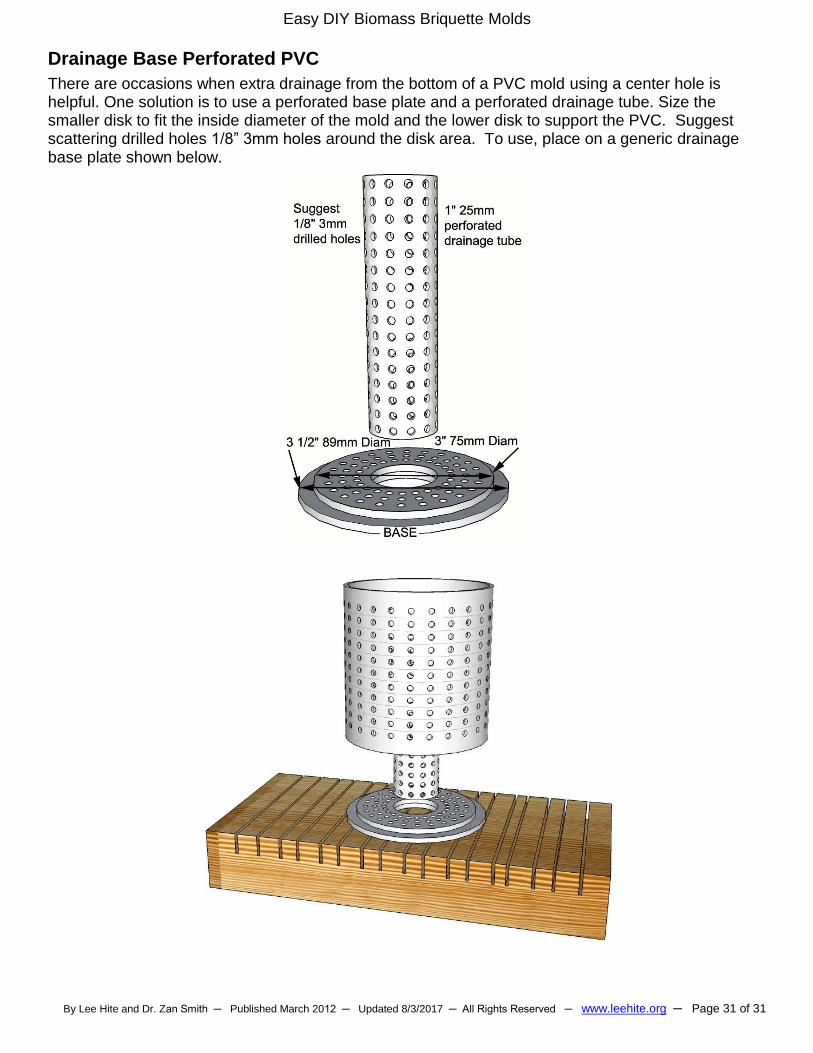
Drainage Base Perforated PVC
There are occasions when extra drainage from the bottom of a PVC mold using a center hole is helpful. One solution is to use a perforated base plate and a perforated drainage tube. Size the smaller disk to fit the inside diameter of the mold and the lower disk to support the PVC. Suggest scattering drilled holes 1/8” 3mm holes around the disk area. To use, place on a generic drainage base plate shown below.