biochemistry ld the building blocks of life chemistry c6.1.4 · ld chemistry leaflets c6.1.4.1 3...
TRANSCRIPT

1
LD
Chemistry
Leaflets
Biochemistry The building blocks of life Fats and oils
Determination of the calorific value of olive oil with a demonstration calorimeter
MS
-20
14
-10
C6.1.4.1
Principles
Fats and oils are members of the lipids class of natural sub-stance and are chemically esters. These esters are formed out of three fatty acids molecules and glycerol, and are also referred to as triglycerides. The individual fatty acids are subdivided into saturated and unsaturated. The saturated fatty acids possess only single bonds in the hydrocarbon chain, whereas unsaturated fatty acids also contain double bonds. If a fat contains a particularly high number of polyun-saturated fatty acids, it is referred to as being essential, as the human organism cannot produce these fatty acids itself.
Fats help to resorb fat-soluble vitamins, deliver essential fatty acids and serve as nutrients in the human organism. They are combustible. In order to burn them, a certain amount of energy must be supplied in the form of heat, as it is the fat vapours and their decomposition products that are combus-tible. The following general formula applies to organic com-pounds:
Alongside carbohydrates, fats cells are the most important
storers of energy. They have a high physiological calorific value, which is up to 3900 kJ/100 g of fat. The physiological calorific value represents the specific energy of foodstuffs, which can be made available in the body during metabolisa-tion. However, the physiological calorific value is also some-what lower than the physical calorific value measured in the laboratory. On measuring the physical calorific value, the individual substance is completely burned in an open flame. In an ideal case, this is exactly the same for the metabolisa-tion of carbohydrates and fats. They can be completely con-verted to CO2 and H2O in the body. The physiological calorific value of proteins is somewhat lower than the physical value, as proteins are converted into completely degradable carbon acids and ammonia. In turn, ammonia is converted into urea and excreted. It is therefore not available as an energy source.
The calorific value is expressed in J/g, or for food in kJ/100 g or kJ/100 ml. The calorific value can be determined using a calorimeter. In most cases, the outdated unit calorie (cal) or kilocalorie (kcal) is still stated on food. This is the energy required to heat of 1 g of water by 1 °C. One calorie corre-sponds to around 4.187 joules.
In this experiment, the calorific value of olive oil is to be de-
Aims of the experiment
Aims of the experiment
To determine the calorific content of olive oil as a food, by way of example
To learn about calorimetry as a measurement method
To determine the calorific value by measuring temperature differences
Fig. 1: Set-up of the experiment.

C6.1.4.1 LD Chemistry Leaflets
2
termined. A double-walled glass apparatus is used for this, which is filled with water and into which a stirrer and ther-mometer are immersed. The heat exchange between sample and water is effected by a glass coil, so that the energy re-leased from the combustion can be almost completely trans-ferred. The calorific value is calculated from the resulting temperature increase and the mass of the burned sample.
Risk assessment
Sodium hydroxide solution and sulphuric acid are corrosive substances. Wear protective clothing (lab coat, protective goggles). Fill the gas scrubber bottles carefully and wear gloves to do this.
The experiment does not need to be performed in the fume cupboard as the combustion is controlled and the waste gas-es are also filtered out.
Please observe the instructions for use!
Sodium hydroxide solution, 1 mol/L
Signal word: Hazard
Hazard statements
H314 Causes severe skin burns and eye damage.
Precautionary statements
P280 Wear protective gloves/protective clothing/eye protec-tion/face protection.
P301+ P330 + P331 IF SWALLOWED: Rinse mouth. Do NOT induce vomiting.
P305+P351+P338 IF IN EYES: Rinse continuously with water for several minutes. Remove contact lenses if pre-sent and easy to do. Continue rinsing.
Sulphuric acid, conc.
Signal word: Hazard
Hazard statements
H314 Causes severe skin burns and eye damage. H290 May be corrosive to metals.
Precautionary statements
P280 Wear protective gloves/ protec-tive clothing/eye protection/face protec-tion.
P301+P3330+P331 If swallowed: Rinse mouth. Do not induce vomiting.
P309 If exposed or you feel unwell:
P310 Immediately call a POISON CEN-TER or doctor/physician.
P305+P351+P338 If in eyes: Rinse continuously with water for several minutes. Remove contact lenses if pre-sent and easy to do. Continue rinsing.
Oxygen
Signal word: Hazard
Hazard statements
H270 May cause or intensify fire; oxi-dizer.
H280 Contains gas under pressure; may explode if heated.
Precautionary statements
P244 Keep reduction valves free from grease and oil.
P220 Store away from combustible materials.
P370+P376 In case of fire: Stop a leak if this can be done safely.
P403 Store in a well ventilated place.
Equipment and chemicals
1 Calorimeter for solids and liquids ...............667 325 1 Sensor-CASSY ..........................................524 013 1 CASSY Lab 2 .............................................524 220 1 Temperature probe NiCr-Ni, 1.5 mm ..........529 676 1 NiCr-Ni adapter S .......................................524 0673 1 Base rail 95 cm ..........................................666 603 4 Universal bosshead ....................................666 615 4 Stand rod 50 cm, 10 mm diam. ..................301 27 5 Universal clamp 0...80 mm .........................666 555 2 Universal clamp 0...120 mm .......................301 72 8 Bosshead S ................................................301 09 4 Gas scrubber bottle, lower section .............664 800 4 Glass tube insert with straight handle 29/32…664 805 4 Joint clip NS28/32, from set of 10 ..............665 392ET10 1 DC power supply 0...16 V/0...5 A ...............521 546 1 Low-voltage variable power supply ............521 231 1 Stirring top with Gl. 32 thread .....................666 819 8 Connecting leads 19 A, 50 cm, pair ...........501 45 1 Rubber tubing 8 mm diam. .........................667 183 1 Silicone tubing 4 mm diam. ........................667 197 1 Connector, straight, 4 ... 15 mm diam. .......604 510 1 Round filter 589, 90 mm diam. ...................609 072 1 Compact balance, 3000 g : 0.1 g ...............ADAHCB3001 1 Compact balance, 200 g : 0.01 g ...............667 7977 1 Minican gas can, oxygen ............................660 998 1 Fine regulating valve for Minican cans .......660 980 1 Sodium hydroxide solution 1 mol/L/, 500 mL…673 8420 1 Sulphuric acid, 95-98 %, 250 mL ...............674 7850 1 Stopcock grease ........................................661 082 Also required: PC with Windows XP/Vista/7/8 Olive oil Small screwdriver (crosshead)
Set-up and preparation of the experiment
Set up the apparatus in accordance with Figure 1. Attach two gas scrubber bottles before and two after the calorimeter. Each of the bottles on the left serves empty as a safety bottle. Each of the bottles on the right is filled with liquids for scrub-bing the gases. The oxygen is passed through conc. sul-phuric acid to remove the water. The waste gases are passed through sodium hydroxide solution to absorb the resulting CO2.

LD Chemistry Leaflets C6.1.4.1
3
Set-up of the apparatus
1. Attach the stand rods at an interval of approximately 20 cm to the base rail with four universal bossheads.
2. Attach each of the two gas scrubber bottles to the second and fourth stand rod, each with two bossheads and two small universal clamps. Secure the gas scrubber bottle lower part to the glass tube insert with a joint clip.
3. Attach the base plate of the calorimeter to the third rod with a bosshead. Equip this with a stand ring to hold it in place.
4. The glass vessel of the calorimeter fits exactly onto the base plate and is sealed with a rubber sponge seal. Addition-ally, fix the calorimeter with a further bosshead and a large universal clamp. Locate the calorimeter so that the gas outlet points to the right (see Fig. 1).
Note: Apply a little stopcock grease to the rubber sponge seal. This prevents any gas exchange between the internal space and the atmosphere, also in the case of larger pres-sure fluctuations.
5. Secure the oxygen gas bottle to the first stand rod (left-most) with a bosshead and a large universal clamp.
Preparation of the gas line
1. Screw the fine regulating valve onto the oxygen gas bottle. Connect the valve to narrower tubing connected to wider tubing using a tube connector, then connect the wider tubing to the first gas scrubber bottle. Here, the glass tube of the gas scrubber bottle must point in the direction of the second gas scrubber bottle.
2. Connect the first gas scrubber bottle to the second gas scrubber bottle using a piece of tubing.
3. Pour sulphuric acid into the second gas scrubbing bottle to a depth of about 3 cm. The sulphuric acid is used to dry the oxygen gas. Connect this to the tube connector on the base plate of the calorimeter.
Caution: Take care when pouring in the sulphuric acid. Wear gloves! Make sure in all events that the gas scrubber bottle is correctly connected, so that the wash fluid is not drawn up-wards into the gas stream.
4. The third gas scrubber bottle however remains empty. Pour sodium hydroxide solution into the fourth gas scrubber bottle up to a depth of about 3 cm. Connect this to the tube connector on top of the calorimeter. Here, the glass tube of the gas scrubber bottle must point in the direction of the fourth gas scrubber bottle.
Caution: Take care when pouring in the sodium hydroxide solution. Wear gloves! In addition, make sure in all events that the gas scrubber bottle is correctly connected, so that the wash liquid is not drawn upwards into the gas stream.
5. Connect together the third and fourth scrubber bottles using a piece of tubing.
6. Connect the calorimeter to the power supply using cables (see Fig. 1).
7. Connect the calorimeter to Input A1 on the Sensor-CASSY to measure current and voltage.
Preparation of the calorimeter
1. Weigh the glass vessel of the calorimeter whilst empty. Enter the value m (calorimeter vessel empty) into the table
(see below). Pour water into the glass vessel and weigh again. Enter the value m (calorimeter vessel filled) into the table.
2. Place the glass vessel onto the base plate.
3. Insert the NiCr-Ni temperature probe into the calorimeter and connect it to the NiCr-Ni adapter. Plug this into the Sen-sor-CASSY (Input A).
4. Screw the stirrer onto the thread of the calorimeter and connect to the low-voltage power supply with connecting leads (observe colour coding).
5. Bring the thermometer into a position with the help of a bosshead and universal clamp so that it is clear of the glass wall and there is a sufficient separation to the stirrer.
Preparation of the sample
1. Pour around 40 drops of olive oil into the crucible. Weigh the filled crucible and enter the value into the table (m (cruci-ble before the experiment)).
2. For ignition, form a wick out of a piece of filter paper. For this, cut out a rectangle of about 40 x 50 mm and roll it up.
3. Place the wick into the crucible so that it is 3 - 4 mm out of the olive oil and is moistened with olive oil.
4. Unscrew the coiled filament and insert the crucible into the holder.
5. Insert the coiled filament again so that it sits around 3 - 4 mm above the wick.
Performing the experiment
1. Load CASSY Lab settings.
2. For ignition, set a voltage of around 9 V and a current of 5 mA on the power supply 521 546 and switch off the power supply again until ignition.
Note: The power supply must not be connected to the calo-rimeter when setting the values.
3. Set the oxygen flow somewhat higher at the start, so that the entire apparatus is well filled. After about 30 seconds, set to a flow rate of 2 bubbles per second.
4. Now start recording the values in CASSY Lab 2 and switch on the stirrer.
5. Take the average value of the starting temperature after about 4 to 5 minutes as the starting value for the later calcula-tions and enter it into the table (T1). For this, in CASSY Lab
choose Plot average in the context menu.
6. The substance to be burned is ignited electrically. To do this, connect the calorimeter to the power supply with the cables (see Fig. 1) and switch on the power supply.
7. The ignition time should be 5 - 10 seconds. Note the val-ues for current I and voltage U. Afterwards, turn off the power
supply. Obtain the time of ignition from the voltage diagram in CASSY Lab 2 and enter all values into the table.
8. Switch off the oxygen flow after 5 minutes and stop record-ing the values after a further 5 minutes. Determine the end temperature T2 again as an average over the last few minutes and enter this into the table.
As soon as the crucible has cooled down, remove it from the calorimeter vessel, weigh it and enter the value m (crucible after the experiment) in the table.
Observation
The coiled filament starts to glow orange on electrical ignition and the filter paper wick starts to burn. The flame extin-guishes after the oxygen flow has been turned off. When the flame is extinguished, stir the liquid in the calorimeter for at least a further 5 minutes until no further temperature increase is observed.
Only a small amount of the olive oil has burned.
C6.1.4.1 LD Chemistry Leaflets
4
Evaluation
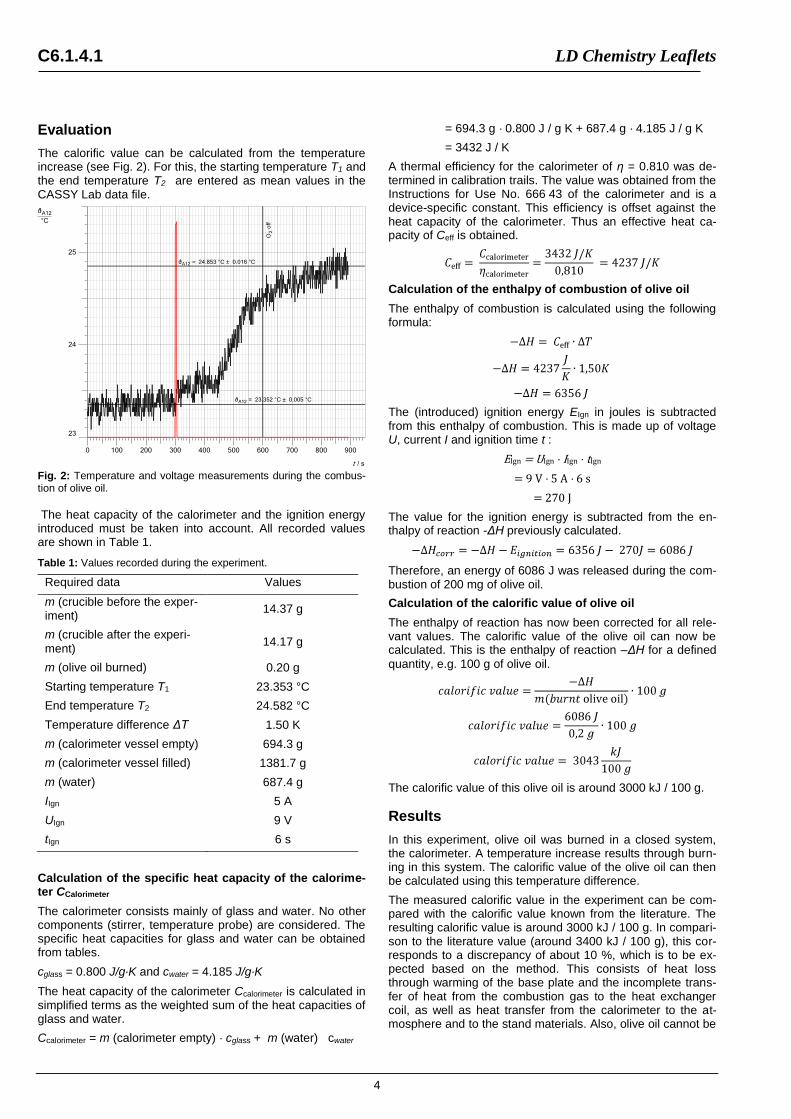
The calorific value can be calculated from the temperature increase (see Fig. 2). For this, the starting temperature T1 and the end temperature T2 are entered as mean values in the CASSY Lab data file.
Fig. 2: Temperature and voltage measurements during the combus-tion of olive oil.
The heat capacity of the calorimeter and the ignition energy introduced must be taken into account. All recorded values are shown in Table 1.
Table 1: Values recorded during the experiment.
Required data Values
m (crucible before the exper-iment)
14.37 g
m (crucible after the experi-
ment) 14.17 g
m (olive oil burned) 0.20 g
Starting temperature T1 23.353 °C
End temperature T2 24.582 °C
Temperature difference ΔT 1.50 K
m (calorimeter vessel empty) 694.3 g
m (calorimeter vessel filled) 1381.7 g
m (water) 687.4 g
IIgn 5 A
UIgn 9 V
tIgn 6 s
Calculation of the specific heat capacity of the calorime-ter CCalorimeter
The calorimeter consists mainly of glass and water. No other components (stirrer, temperature probe) are considered. The specific heat capacities for glass and water can be obtained from tables.
cglass = 0.800 J/g∙K and cwater = 4.185 J/g∙K
The heat capacity of the calorimeter Ccalorimeter is calculated in simplified terms as the weighted sum of the heat capacities of glass and water.
Ccalorimeter = m (calorimeter empty) · cglass + m (water) · cwater
= 694.3 g · 0.800 J / g K + 687.4 g · 4.185 J / g K
= 3432 J / K
A thermal efficiency for the calorimeter of η = 0.810 was de-termined in calibration trails. The value was obtained from the Instructions for Use No. 666 43 of the calorimeter and is a device-specific constant. This efficiency is offset against the heat capacity of the calorimeter. Thus an effective heat ca-pacity of Ceff is obtained.
Calculation of the enthalpy of combustion of olive oil
The enthalpy of combustion is calculated using the following formula:
The (introduced) ignition energy EIgn in joules is subtracted from this enthalpy of combustion. This is made up of voltage U, current I and ignition time t :
EIgn = UIgn · IIgn · tIgn
= 9 V · 5 A · 6 s
= 270 J
The value for the ignition energy is subtracted from the en-thalpy of reaction -ΔH previously calculated.
Therefore, an energy of 6086 J was released during the com-bustion of 200 mg of olive oil.
Calculation of the calorific value of olive oil
The enthalpy of reaction has now been corrected for all rele-vant values. The calorific value of the olive oil can now be calculated. This is the enthalpy of reaction –ΔH for a defined
quantity, e.g. 100 g of olive oil.
The calorific value of this olive oil is around 3000 kJ / 100 g.
Results
In this experiment, olive oil was burned in a closed system, the calorimeter. A temperature increase results through burn-ing in this system. The calorific value of the olive oil can then be calculated using this temperature difference.
The measured calorific value in the experiment can be com-pared with the calorific value known from the literature. The resulting calorific value is around 3000 kJ / 100 g. In compari-son to the literature value (around 3400 kJ / 100 g), this cor-responds to a discrepancy of about 10 %, which is to be ex-pected based on the method. This consists of heat loss through warming of the base plate and the incomplete trans-fer of heat from the combustion gas to the heat exchanger coil, as well as heat transfer from the calorimeter to the at-mosphere and to the stand materials. Also, olive oil cannot be
LD Chemistry Leaflets C6.1.4.1
© by LD DIDACTIC GmbH · Leyboldstr. 1 · D-50354 Hürth · Telefon: +49-2233-604-0 · Fax: +49-2233-604-222 · E-Mail: [email protected] www.ld-didactic.com Technical alterations reserved
ignited itself directly, but rather it must be ignited using a wick.
The calorific value of other foodstuffs can also be determined with this method.
Cleaning and disposal
The remaining olive oil in the crucible can be washed away in the wash basin with washing-up liquid and disposed of down the drain.
Sulphuric acid and sodium hydroxide solution can be stored in appropriately labelled vessels. If they are to be disposed of, neutralise if necessary and pour down the drain with plenty of water.