bio-engineering techniques - gov.bc.ca · bio-engineering techniques . bio-engineering is a...
TRANSCRIPT

Page 1 of 10
Figure 1 Wattle Placement on a Slope
Constructed Ditch Drainage Management Guide - No. 13 in series Order No. 533.431-1 December 2004
BIO-ENGINEERING TECHNIQUES Bio-engineering is a technique for bank stabilization that incorporations the use of vegetation and engineering structures to increase slope stability. The vegetation increases the soil strength through their root structure while the bio-engineered structure provides additional support. These are most often applied to streams, rather than constructed ditches. However, the techniques can be useful depending on the nature of the constructed ditch. Bioengineering techniques are used to enhance slope stability, control sediment runoff and maintain bio-diversity. There are numerous bio-engineering techniques, most use dormant cuttings of local plant material in construction. A brief description and construction information for some of these techniques is given in this factsheet. Additional information on related techniques can be found in Rock Revetments for Constructed Ditches, Factsheet No. 12 and Bank Re-vegetation for Agricultural Land, Factsheet No. 11 in this series. A qualified profession may be required to assist in the construction of some of these techniques. A higher survival rate of live vegetation is achieved if construction occurs when the plant is dormant and
freshly cut. Plants will survive at other times if adequate moisture is provided and the material is not damaged by construction activities. Fall or spring is the best times for installation. Fall is better in areas that have high water flow and water tables and are inaccessible in the spring. Planting in the spring is advantageous because soil moisture is usually high and the plants do not have to survive the rigors of winter. Regular monitoring and maintenance is needed, especially during the first year after construction to ensure plant survival. Water elevation is a critical element in a successful installation. Be sure to know the normal, high and low water elevations and how rapidly these changes occur. Trampling of the site by people or livestock will reduce the survival rate of vegetation and the effectiveness of the project. Access to the banks should be restricted with temporary or permanent fencing if there is a potential problem. Limitations to using bio-engineering techniques include soils that are too wet or too droughty for rooting. Shaded banks may not receive enough sunlight for vigorous plant growth.
Wattles ( Fascines ) Wattles (or fascines) are bundles of live cuttings that are staked into trenches. On dry slopes the bundles are placed horizontally along the slope contour to create a terraced slope. On wet slopes (slopes with seepage) the wattles are placed on an angle to facilitate drainage of water from the slope, see Figure 1. Initially, the wattles physically hold the soil in place. The wattle placement breaks up the slope by creating terraces with shallower slopes than the original bank. The wattles stabilize eroding banks and provide a stable growing surface for riparian vegetation. As the cuttings take root the root system binds the soil together helping to stabilize the bank. A ‘living fence’
Page 2 of 10
of plants cuttings will take root, and grow upwards. The ‘living fence’ along with a grass cover, will also act as a living sediment trap along the bank. Adding a mulch or other cover between the wattles will increase the erosion protection while the vegetation is becoming established. Wattles are useful in areas of general scour and for protection of overbank runoff. They provide slope stabilization and sediment control. They are not appropriate for areas undergoing mass movement. Wattles can be installed on slopes up to 1.5H:1V (1.5 horizontal lengths for 1 vertical length) with ditch water velocities up to 2 m/s. Water velocities over 2m/s may require additional erosion protection. Wattles are used from the normal water level to the top of the bank. Wattles planted below the water level may still provide some erosion protection of the toe of the slope, but the plants will not grow. For wattles to be successful it is important that the soil moisture conditions at the site are sufficient for the cuttings to grow. The difference between wattles and fascines is very slight. In fascines, all the buds on the wattle bundles are pointing in one direction. In wattles the buds are pointing in random directions. Advantages Wattles provide good erosion and sediment control protection once established. The vegetation provides fish habitat and food and may improve water quality. Large equipment is not necessary except to slope the bank if necessary. This technique causes relatively little site disturbance. Disadvantages The work is time consuming and time dependent. A crew of 3-4 people is required to assemble and install wattles before the materials dry out. Runoff from long or steep slopes may undermine wattles. Because reinforcement does not penetrate the bank as deeply a other techniques, it is not as immediately effective. Construction / Installation The wattle is constructed by typing long live dormant cuttings into bundles that are typically 15-25 cm in diameter. The bundles are held together with untreated twine tied every 30-40 cm along the bundle. The bundles should ideally be assemble on site and not be allowed to dry out before placement.
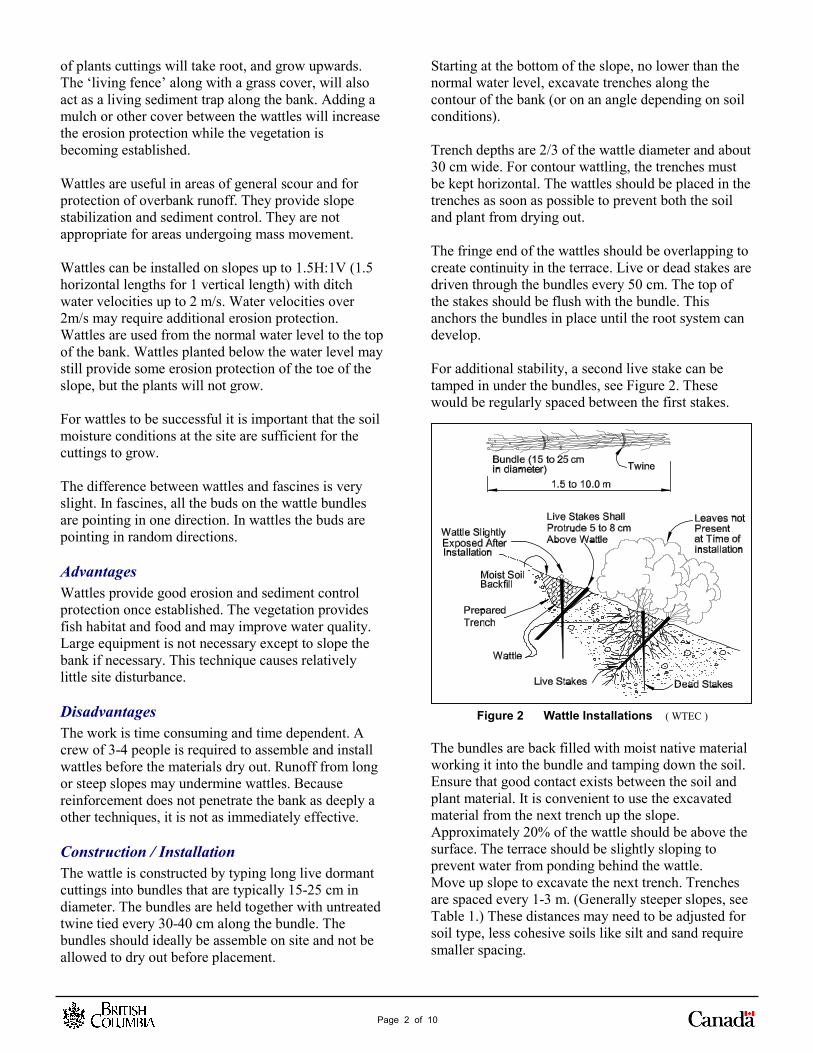
Starting at the bottom of the slope, no lower than the normal water level, excavate trenches along the contour of the bank (or on an angle depending on soil conditions). Trench depths are 2/3 of the wattle diameter and about 30 cm wide. For contour wattling, the trenches must be kept horizontal. The wattles should be placed in the trenches as soon as possible to prevent both the soil and plant from drying out. The fringe end of the wattles should be overlapping to create continuity in the terrace. Live or dead stakes are driven through the bundles every 50 cm. The top of the stakes should be flush with the bundle. This anchors the bundles in place until the root system can develop. For additional stability, a second live stake can be tamped in under the bundles, see Figure 2. These would be regularly spaced between the first stakes.
Figure 2 Wattle Installations ( WTEC ) The bundles are back filled with moist native material working it into the bundle and tamping down the soil. Ensure that good contact exists between the soil and plant material. It is convenient to use the excavated material from the next trench up the slope. Approximately 20% of the wattle should be above the surface. The terrace should be slightly sloping to prevent water from ponding behind the wattle. Move up slope to excavate the next trench. Trenches are spaced every 1-3 m. (Generally steeper slopes, see Table 1.) These distances may need to be adjusted for soil type, less cohesive soils like silt and sand require smaller spacing.
Page 3 of 10
Table 1 General Recommended Spacing
Slope Slope distance between wattles
meters (ft)
Recommended maximum slope
length meters (ft)
1:1 to 1.5:1 1-1.2 (3.4) 4.6 (15) 1.5:1 to 2:1 1.3-1.5 (4-5) 6.1 (20) 2:1 to 2.5:1 1.5-2 (5-6) 9.1 (30) 2.5:1 to 4:1 1.8-2.4 (6-8) 12.2 (40)
Seeding and mulching of the slope should take place immediately after installation. Watering may be necessary in dry conditions. see Bank Re-vegetation for Agricultural Land, Factsheet No. 11 in this series for more information on live stakes and seeding.
Brush Mattress A brush mattress is an interlaced layer of live branches laid on the bank and held in place with untreated twine and live or dead stakes. Brush mattresses are often used in conjunction with techniques that protect the toe of the slope from undercutting, such as wattles, tree or rock revetments. This will provide better long-term bank stabilization. This techniques is useful for providing immediate stream bank protection from scouring and slows water velocities. However it is not useful alone on sites experiencing mass wasting or undercutting. Once the vegetation is established, it can provide shade and fish habitat and intercept sediments from overland flow. The mattresses are limited to slopes 3H:1V or shallower. Non-cohesive materials such as sand or silt may limit anchoring heavy brush mats. (It is important that the bottom of the branches are kept moist or wet to allow the branches to sprout roots.) The mattress should be installed when plants are dormant and always above the normal water level. Pre-vegetated mats are a similar specialty product. Live plants are grown on movable mats of organic material 1.2-2.4 m2 in size. Mats are placed on the bank and staked into place. The mat material degrades while the plant material takes root in the banks. Advantages Brush mattresses provide immediate protection to the exposed bank. Except for slope regarding there is little disturbance to banks. The vegetation provides fish habitat and food and may improve water quality. Disadvantages Brush mattresses are only effective on upper slopes and a large amount of live material is required to cover the bank.
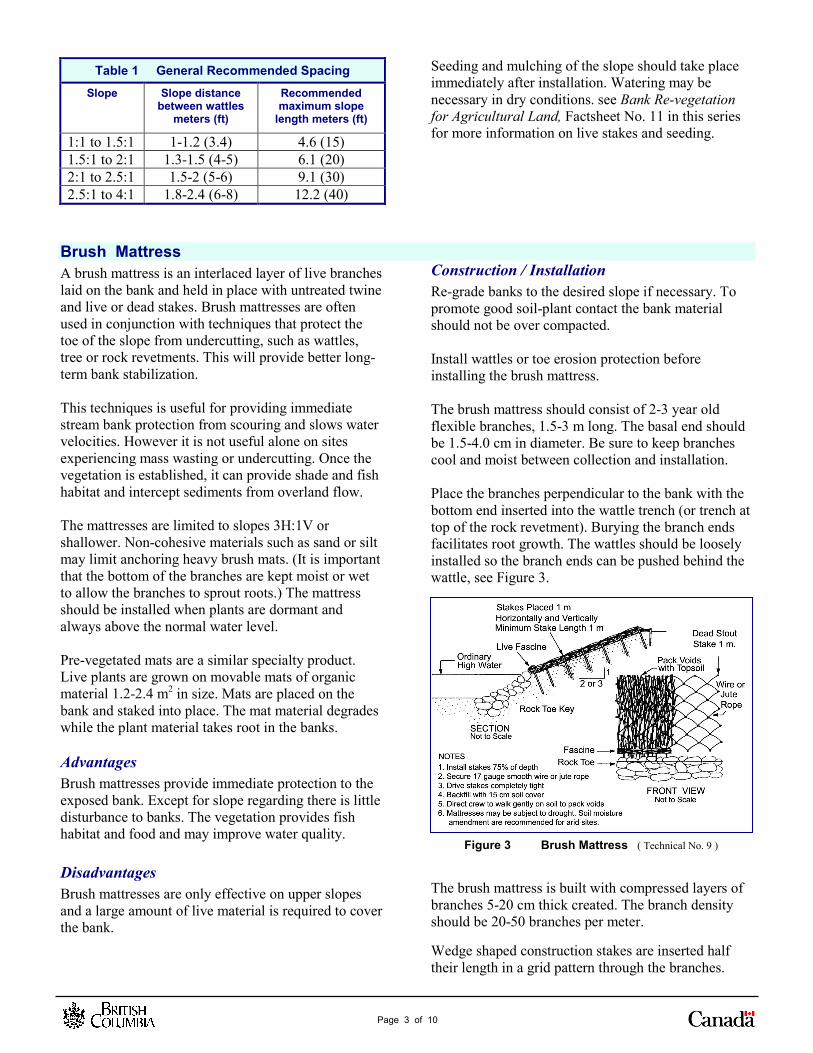
Construction / Installation Re-grade banks to the desired slope if necessary. To promote good soil-plant contact the bank material should not be over compacted. Install wattles or toe erosion protection before installing the brush mattress. The brush mattress should consist of 2-3 year old flexible branches, 1.5-3 m long. The basal end should be 1.5-4.0 cm in diameter. Be sure to keep branches cool and moist between collection and installation. Place the branches perpendicular to the bank with the bottom end inserted into the wattle trench (or trench at top of the rock revetment). Burying the branch ends facilitates root growth. The wattles should be loosely installed so the branch ends can be pushed behind the wattle, see Figure 3. Figure 3 Brush Mattress ( Technical No. 9 ) The brush mattress is built with compressed layers of branches 5-20 cm thick created. The branch density should be 20-50 branches per meter. Wedge shaped construction stakes are inserted half their length in a grid pattern through the branches.

Page 4 of 10
Heavy (breaking strength 70-100 lb) untreated twine is tied 15 cm from the top of the stake holding the branches in place. The twine is layered perpendicular to the branches along the contour of the slope. Tie wire can also be used, a No. 10 to 12 galvanized wire is recommended. After the twine has been secured over the branches, the stakes are driven into the ground to further compress the branches to the slope face. Lightly cover with soil and work it into the branch mattress. Water if necessary to ensure enough moisture in the soil to promote root growth.
Finally finish installing the wattle at the base of the mattress. Live stakes can also be inserted throughout the mattress for deeper rooting or can be used for securing the branches if twine is used. However, the live stakes may be damaged if used for securing branches and may not have the strength of the construction stakes when compressing the branches.
Brush Layers Brush layers are horizontal alternating layers of soil and live branches that create a continuous reinforced bench within the bank. The vegetated end of the brush layers acts as ‘live fences’ that can catch material moving down the slope. As the root system develops, the roots bind the soil together which strengthens the bank.
Figure 4 Brush Layers ( Watershed Science Institute, NRCS )
This technique is useful in projects where cut and fill is required, there are large quantities of loosened soil on the slope, or where slumping or imported soil material is to be used in eroded areas. The trench technique of brush layering is used for bank stabilization and overland flow protection. Alternating layers of branches and fill material is used where bank reconstruction is required. See Figure 4 for illustrations of both these methods. Brush layers are typically not effective in slump areas greater than 1.2 m deep of 1.2 m wide. This technique is most useful on banks that will not have erosive forces working, such as high velocity water flow, eroding the bank before the vegetation is established. Vegetated goegrids are another option for fill areas and provide greater protection. Brush layering can be used on slopes up to 1.5H:1V in areas of seriously eroded and slumping banks. The brush layers should be positioned above the normal water level and installation is best during low flow conditions. Erosion matting should be placed between layers to protect exposed soil or the area should be immediately seeded. Brush layers should be done in conjunction with techniques that protect the toe of the slope from undercutting such as wattles, tree or rock revetments. This will provide better long-term bank stabilization. Advantages Brush layering provides good immediate soil reinforcement and slope de-watering. This technique is more effective than wattles in terms of mass stability. The vegetation provides fish habitat and food and may improve water quality.
Page 5 of 10
Disadvantages The installation for bank reconstruction is very labour intensive and requires a large amount of plant material. Large equipment may be necessary for cut and fill. This technique can be very disruptive to native soil. It is important to install in phases and not excavate more material than necessary. Construction / Installation Filling a slump A bench is excavated at the base of the fill area above the normal water level. The bench should be sloping back slightly (10-20 degrees) and between 1-2 m in depth. Be careful not to over excavate. The plant material used in the brush layer should be longer than the depth of the trench. The branches are placed in an overlapping pattern with the top facing outward and overhanging the bench by 15 cm. Soil is placed on top to the brush layer, compacted and watered to ensure good plant to soil connection. The brush layer should be 15-20 cm high. Install the next brush layer 1-2 m above the first layer. The material between the brush layers should be laid down in 15-20 cm lifts and compacted. Layers are continued until the slump areas is filled. The new bank
should have a slope to 1.5H:1V or shallower, depending on the soil type. Less cohesive material such as sand and silt require shallow slopes and more frequent brush layers. Since the exposed soil material has been disturbed during the filling process it is more susceptible to erosion. This technique would only be used during low flows. The exposed soil should be seeded to provide additional protection from overland flow. For slopes 3H:1V or flatter mulches can be used. For steeper slopes a fabric or geotextile anchored to the slope is more appropriate. Brush layers in trenches If the brush layers are to be placed in trenches, excavate the first trench at the bottom of the slope above the normal water level. The trench should be sloping back into the bank. Place branches in the trench with the butts inserted into the undisturbed soil. Pack soil into the trench ensuring good soil-plant contact. Move up slope to the next trench and repeat the process.
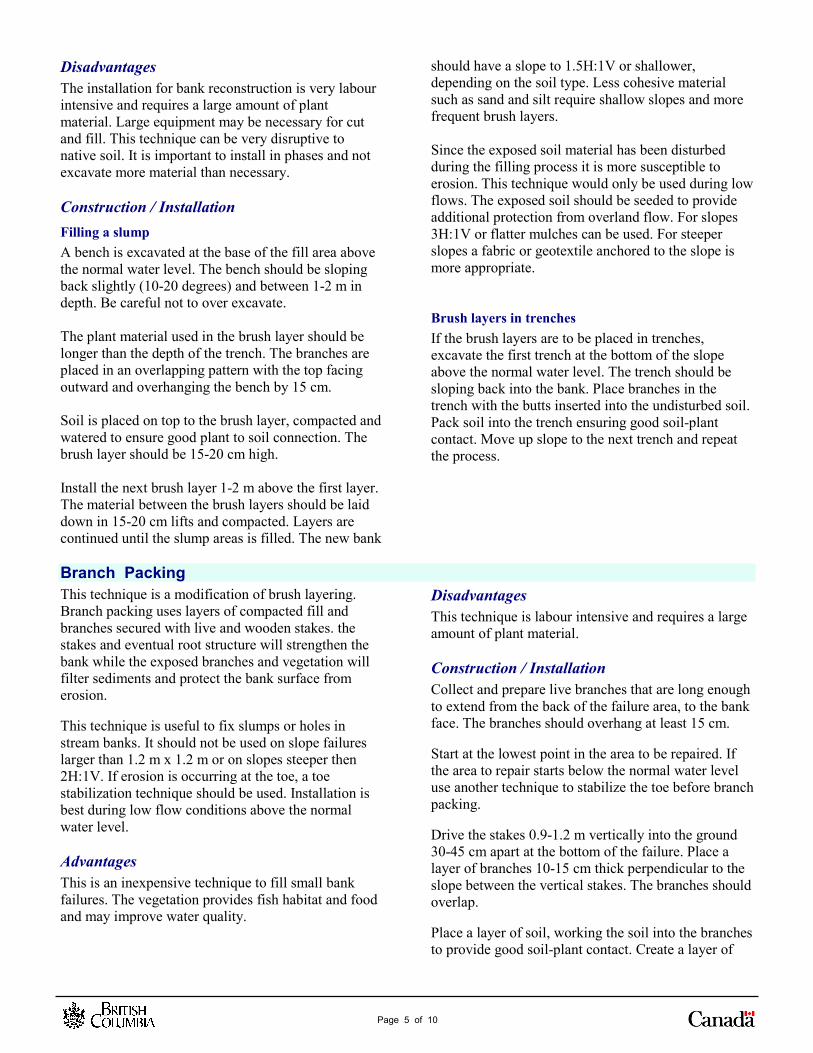
Branch Packing This technique is a modification of brush layering. Branch packing uses layers of compacted fill and branches secured with live and wooden stakes. the stakes and eventual root structure will strengthen the bank while the exposed branches and vegetation will filter sediments and protect the bank surface from erosion. This technique is useful to fix slumps or holes in stream banks. It should not be used on slope failures larger than 1.2 m x 1.2 m or on slopes steeper then 2H:1V. If erosion is occurring at the toe, a toe stabilization technique should be used. Installation is best during low flow conditions above the normal water level. Advantages This is an inexpensive technique to fill small bank failures. The vegetation provides fish habitat and food and may improve water quality.
Disadvantages This technique is labour intensive and requires a large amount of plant material. Construction / Installation Collect and prepare live branches that are long enough to extend from the back of the failure area, to the bank face. The branches should overhang at least 15 cm. Start at the lowest point in the area to be repaired. If the area to repair starts below the normal water level use another technique to stabilize the toe before branch packing. Drive the stakes 0.9-1.2 m vertically into the ground 30-45 cm apart at the bottom of the failure. Place a layer of branches 10-15 cm thick perpendicular to the slope between the vertical stakes. The branches should overlap. Place a layer of soil, working the soil into the branches to provide good soil-plant contact. Create a layer of

Page 6 of 10
soil that is no more than 30-45 cm thick. The actual thickness is determined by the slope. Less cohesive material such as sand and silt require shallow slopes and more frequent layers of branches. Also if there is a lot of seepage from the bank the lifts should be thinner. Compact the soil well before starting the next layer. Repeat the layers. After each soil layer drive in another set of wooden stakes staggered between the first set. The wooden stakes should penetrate into the undisturbed soil of the bank on each layer, see Figure 5. If the slumping is created by seepage, install a relief drain at the back of the trench and along the bottom with an outlet at or above the normal water level. The drain may be a perforated pipe or wattle relief drain. Be careful not to damage the pipe when inserting branches. See Vegetated Geogrids for an explanation of a wattle relief drain.
Figure 5 Branch Packing
Vegetated Geogrids Vegetated geogrids are similar to brush layers except natural or synthetic geotextiles are wrapped around the exposed soil between the layers, anchoring the ends of the geotextile in the fill material. The geotextile material protects the exposed soil. This technique is used instead of brush layering in areas where the water velocities are relatively high. Vegetated geogrids can be used on steep slopes that have limited room for bank shaping. This technique is useful in projects that require filling or rehabilitation of seriously eroded and slumping banks. Vegetated geogrids provide more protection than other vegetative techniques but less protection than structural techniques.
Figure 6 Vegetated Geogrid With Rock Toe Key ( Watershed Science Institute, NRCS )
When used in conjunction with toe protection this is a good technique for repairing bank failure. Installation is best when the plants are dormant and during low flow conditions. The vegetated geogrid should only be installed above the normal water level. Advantages Vegetated geogrids can be used in bank reconstruction and have a better tolerance of high water velocities. The vegetation provides fish habitat and food and may improve water quality. Disadvantage This technique requires intensive labour and heavy equipment to install and is relatively expensive. Construction / Installation Excavate a trench below the bottom of the streambed. The trench should be at least 0.9 m wide and slope slightly back towards the bank, see Figure 6. The toe of the bank should be stabilized using gabions of rock toe keys, see Rock Revetments for Constructed Ditches, Factsheet No. 12 in this series. Crib walls or tree revetments could also be used to protect the bank below the normal water level.
Lay geotextile over the toe protection material. Back fill with a layer of soil and rocks to anchor the geotextile and fold it back over the fill material.
Page 7 of 10
Place a layer of branches 10-15 cm thick over the geotextile. The branches should be long enough to penetrate the undisturbed bank with the tips protruding at least 10 cm from the new slope face. Repeat layers of compacted soil wrapped in geotextile and branches until the desired height is reached. The lift thickness should be 30-75 cm, depending on the finished slope. Steeper slopes should have smaller lifts. The potential exists for a build up of pressure behind the compact soil layers and geotextile wraps. A drain
should be installed at the back of the trench with an outlet just above the normal water level in the ditch. The drains can be a perforated pipe or wattles that are laid at the back of the trench on an angle to direct flow to the bottom of the fill area. Wattles are also placed on the bottom of the trench to connect with the wattles at the back. These wattles should slope slightly downward towards the bank face. The outlet should be just above the normal water level. The top of the bank should be seeded and vegetated to provide protection to the exposed soil.
Live Cribwall A cribwall is a live log wall, built crib-style, to protect eroding banks. Vegetation is planted between the logs used to build the wall. The vegetation reduces stream velocities as well as providing cover and shelter for fish. The root structure of the vegetation strengthens the material within the crib. This technique is useful when slopes are too steep for other techniques of stabilization and there is no room to cut back the slope. Cribwalls are also effective to prevent toe erosion by scouring. Cribwalls do not need to be built up the entire bank. Another bio-engineering technique can be installed on the upper bank. Cribwalls should be used for walls 2 m high or less and not longer than 6 m. For successful vegetation establishment ensure that the cuttings are dormant and are installed soon after harvest. The branches should not be allowed to dry out. The cribwall must be constructed during low water period. Advantages Cribwalls provide both banks and toe protection. The vegetation provides fish habitat and food and may improve water quality. Disadvantages The structure is labour intensive to install and is relatively expensive. Construction / Installation Prepare the area where the cribwall is to be installed. The area should be excavated below the streambed. The side closest to the bank should be 15-30 cm lower than the stream side of the excavation. The cribwall should lean back into the bank.
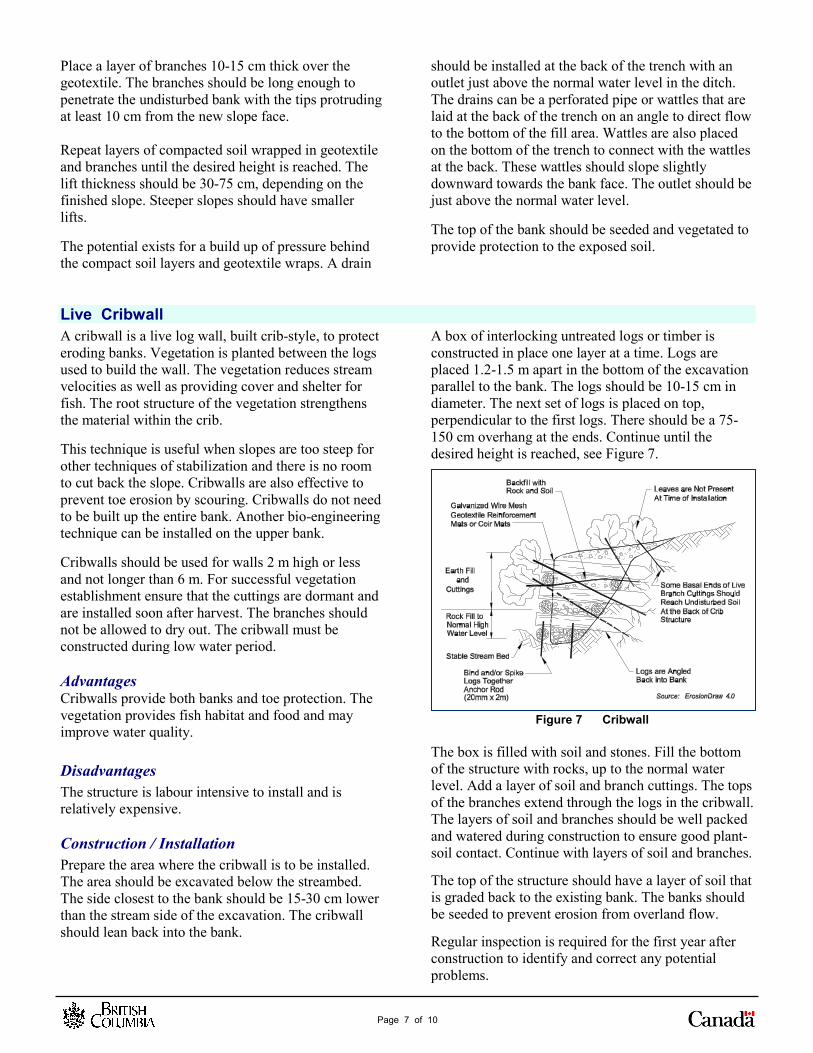
A box of interlocking untreated logs or timber is constructed in place one layer at a time. Logs are placed 1.2-1.5 m apart in the bottom of the excavation parallel to the bank. The logs should be 10-15 cm in diameter. The next set of logs is placed on top, perpendicular to the first logs. There should be a 75-150 cm overhang at the ends. Continue until the desired height is reached, see Figure 7.
Figure 7 Cribwall The box is filled with soil and stones. Fill the bottom of the structure with rocks, up to the normal water level. Add a layer of soil and branch cuttings. The tops of the branches extend through the logs in the cribwall. The layers of soil and branches should be well packed and watered during construction to ensure good plant-soil contact. Continue with layers of soil and branches.
The top of the structure should have a layer of soil that is graded back to the existing bank. The banks should be seeded to prevent erosion from overland flow.
Regular inspection is required for the first year after construction to identify and correct any potential problems.
Page 8 of 10
Tree Revetment Tree revetment involves cabling and anchoring trees into the toe of the bank. This protects the bank from erosion while the branches on the trees trap sediment. The branches of the trees will dissipate the water’s velocity. Sediment settles out behind the branches and can help rebuild an eroded bank. The techniques is most effective when used in locations where ditch banks are rapidly eroding and require protection from toe erosion and bank scouring. The anchoring system must be chosen according to the bank material and the weight of the object to be anchored. Other bio-engineering techniques or planting is recommended to protect the upper bank. For ditches and small streams, smaller trees with diameters of 50-100 mm can be used. The tree diameter should match the ditch size. The tree should not be too large and block the flow. The diameter of the tree’s crown should be about 2/3 the height of the bank. The trees should be durable green coniferous trees, such as cedar and pines. Tree revetments can be installed at anytime in-stream work is permitted. Low flow conditions are not necessary.
Advantages Tree revetments are relatively inexpensive. They provide scour protection for the bank and protection for the toe. Disadvantages This technique does not address upper bank erosion. Tree revetments have a limited life and must be periodically replaced. There is no vegetation growth for fish habitat. Construction / Installation The banks should be graded to a maximum of 2H:1V slope and made ready for planting. Trees are placed along the toe of the slope, the tops pointing down stream and overlapping by 30%. The trees must be anchored to the bank and cabled together to prevent movement downstream.
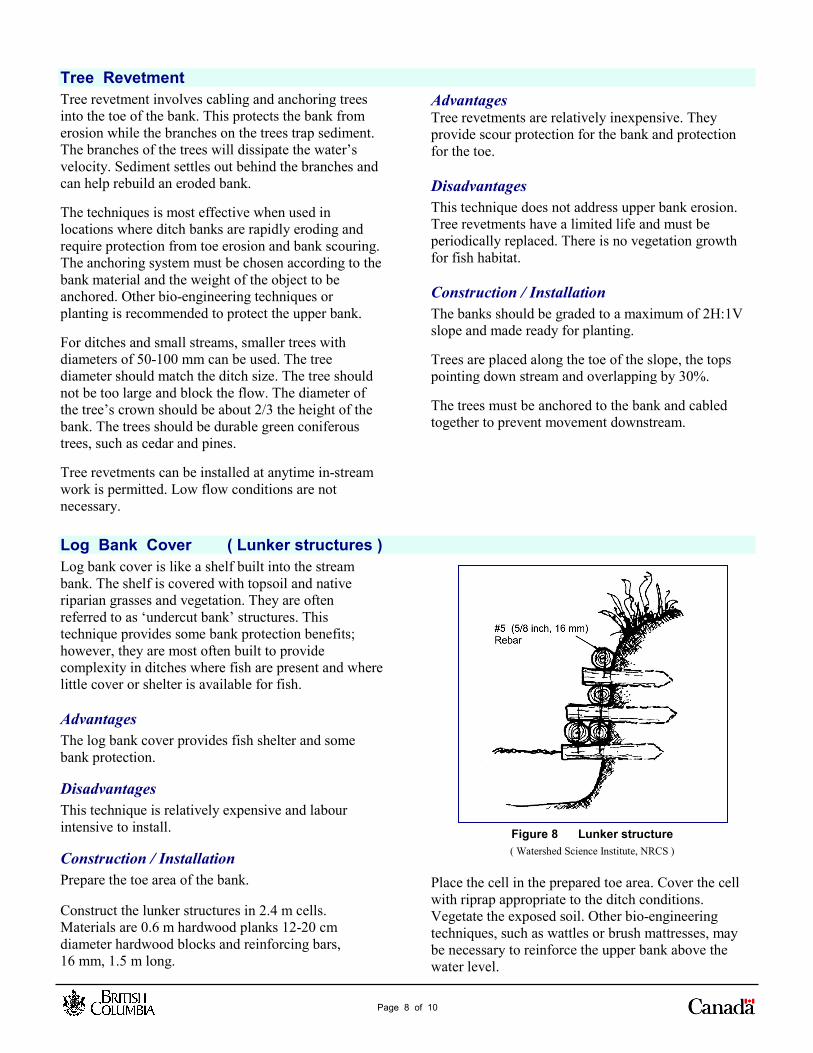
Log Bank Cover ( Lunker structures ) Log bank cover is like a shelf built into the stream bank. The shelf is covered with topsoil and native riparian grasses and vegetation. They are often referred to as ‘undercut bank’ structures. This technique provides some bank protection benefits; however, they are most often built to provide complexity in ditches where fish are present and where little cover or shelter is available for fish. Advantages The log bank cover provides fish shelter and some bank protection. Disadvantages This technique is relatively expensive and labour intensive to install. Construction / Installation Prepare the toe area of the bank. Construct the lunker structures in 2.4 m cells. Materials are 0.6 m hardwood planks 12-20 cm diameter hardwood blocks and reinforcing bars, 16 mm, 1.5 m long.
Figure 8 Lunker structure ( Watershed Science Institute, NRCS )
Place the cell in the prepared toe area. Cover the cell with riprap appropriate to the ditch conditions. Vegetate the exposed soil. Other bio-engineering techniques, such as wattles or brush mattresses, may be necessary to reinforce the upper bank above the water level.
Page 9 of 10
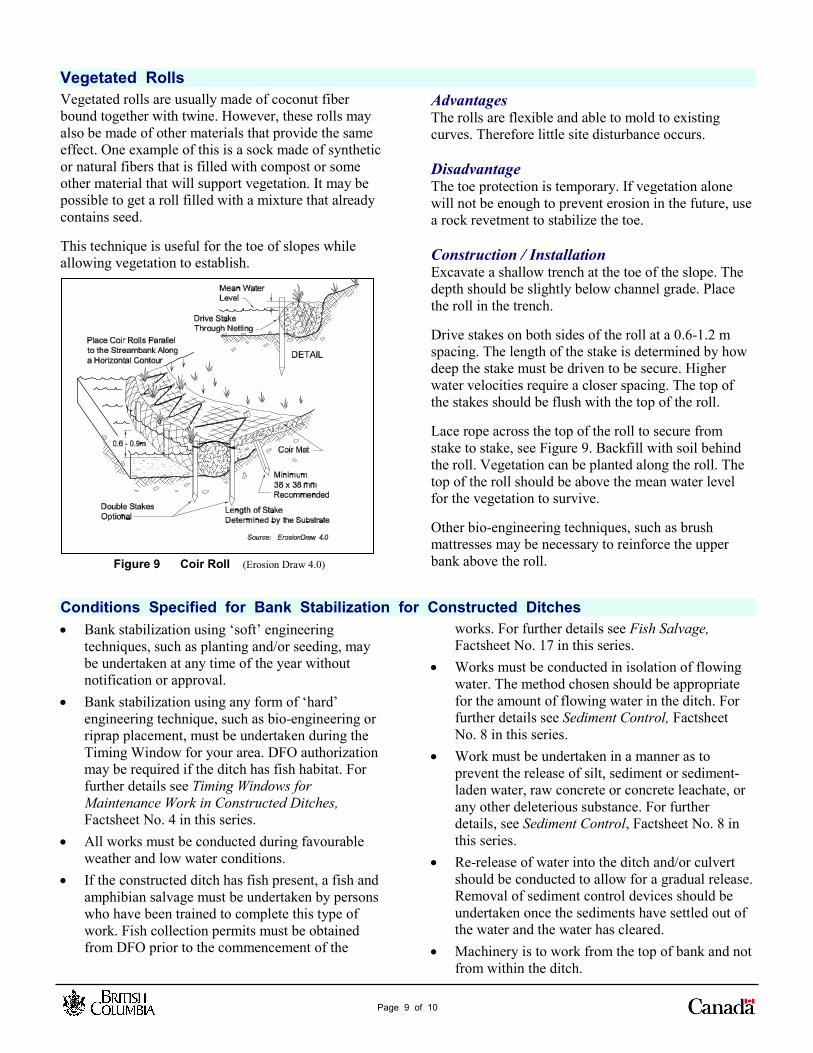
Vegetated Rolls Vegetated rolls are usually made of coconut fiber bound together with twine. However, these rolls may also be made of other materials that provide the same effect. One example of this is a sock made of synthetic or natural fibers that is filled with compost or some other material that will support vegetation. It may be possible to get a roll filled with a mixture that already contains seed. This technique is useful for the toe of slopes while allowing vegetation to establish. Figure 9 Coir Roll (Erosion Draw 4.0)
Advantages The rolls are flexible and able to mold to existing curves. Therefore little site disturbance occurs. Disadvantage The toe protection is temporary. If vegetation alone will not be enough to prevent erosion in the future, use a rock revetment to stabilize the toe. Construction / Installation Excavate a shallow trench at the toe of the slope. The depth should be slightly below channel grade. Place the roll in the trench. Drive stakes on both sides of the roll at a 0.6-1.2 m spacing. The length of the stake is determined by how deep the stake must be driven to be secure. Higher water velocities require a closer spacing. The top of the stakes should be flush with the top of the roll. Lace rope across the top of the roll to secure from stake to stake, see Figure 9. Backfill with soil behind the roll. Vegetation can be planted along the roll. The top of the roll should be above the mean water level for the vegetation to survive. Other bio-engineering techniques, such as brush mattresses may be necessary to reinforce the upper bank above the roll.
Conditions Specified for Bank Stabilization for Constructed Ditches • Bank stabilization using ‘soft’ engineering
techniques, such as planting and/or seeding, may be undertaken at any time of the year without notification or approval.
• Bank stabilization using any form of ‘hard’ engineering technique, such as bio-engineering or riprap placement, must be undertaken during the Timing Window for your area. DFO authorization may be required if the ditch has fish habitat. For further details see Timing Windows for Maintenance Work in Constructed Ditches, Factsheet No. 4 in this series.
• All works must be conducted during favourable weather and low water conditions.
• If the constructed ditch has fish present, a fish and amphibian salvage must be undertaken by persons who have been trained to complete this type of work. Fish collection permits must be obtained from DFO prior to the commencement of the
works. For further details see Fish Salvage, Factsheet No. 17 in this series.
• Works must be conducted in isolation of flowing water. The method chosen should be appropriate for the amount of flowing water in the ditch. For further details see Sediment Control, Factsheet No. 8 in this series.
• Work must be undertaken in a manner as to prevent the release of silt, sediment or sediment-laden water, raw concrete or concrete leachate, or any other deleterious substance. For further details, see Sediment Control, Factsheet No. 8 in this series.
• Re-release of water into the ditch and/or culvert should be conducted to allow for a gradual release. Removal of sediment control devices should be undertaken once the sediments have settled out of the water and the water has cleared.
• Machinery is to work from the top of bank and not from within the ditch.
Page 10 of 10
Contact Information Agency Contact Requirements for Constructed Ditch Maintenance, Factsheet No. 3 in this series contains a list of local agency contacts and other organizations that may be able to provide some assistance.
Conversions
5 cm
=
2 inches
0.9 m
=
3 feet 10 cm = 4 inches 1.2 m = 4 feet 15 cm = 6 inches 1.5 m = 5 feet 20 cm = 8 inches 2.0 m = 7 feet 25 cm = 10 inches 2.4 m = 8 feet 30 cm = 12 inches 3.0 m = 10 feet 45 cm = 18 inches 6.0 m = 20 feet 50 cm = 20 inches
References Streambank Stabilization Environmental Stewardship Standards and Recommended Best Practices, BC Ministry of Water, Land and Air Protection. Februrary 2002 Fish Habitat Rehabilitation Procedures, Watershed Technical Circular No. 9. BC Ministry of Water, Land and Air Protection and BC Ministry of Forests. 1997. The Federal Interagency Stream Restoration Working Group. 1993. Stream Corridor Restoration: Principles, Processes and Practices. Revised 2000. Johnson, A.W.and J.M Stypula. Eds. 1993. Guidelines for Bank Stabilization Projects in the Riverine Environments of King County, King County Department of Public Works, Surface Water Management Division, Seattle WA. Palone, Roxanne S. and Albert H. Todd. 1998. Chesapeake Bay Riparian Handbook: A Guide for Establishing and Maintaining Riparian Forest Buffers. USDA Forest Service Allen, Hollis H. and Craig Fischenich. 2001. Brush Mattresses for Streambank Erosion Control. US Army Corps of Engineers Ecosystem Management and Restoration Program Sotir, Robbin B. and Craig Fischenich. 2001. Live and Inert Fascines Streambank Erosion Control. EMRRP US Army Corps of Engineers Exosystem Management and Restoration Program Stream System Protection, Restoration and Reestablishment. Website by the Watershed Science Institute, Natural Resource Conservation Service, USDA Wells, Gary W. 1994. Soil Bioengineering: the use of Dormant Woody Plantings For Slope Protection. Agroforestry and Sustainable systems Symposium Proceedings. Fort Collins. Co. Watershed Technology Electronic Catalog (WTEC). Website by the USDA Natural Resources Conservation Service.