best practices and getting started guide for oracle on ibm
TRANSCRIPT

Redpaper
Front cover
Best practices and Getting Started Guide for Oracle on IBM LinuxONE
Susan Adamovich
Sam Amsavelu
Srujan Jagarlamudi
Raghu Malige
Michael Morgan
Paul Novak
David J Simpson


International Technical Support Organization
Best practices and Getting Started Guide for Oracle on IBM LinuxONE
June 2020
REDP-5499-00

© Copyright International Business Machines Corporation 2020. All rights reserved.Note to U.S. Government Users Restricted Rights -- Use, duplication or disclosure restricted by GSA ADP ScheduleContract with IBM Corp.
First Edition (June 2020)
This edition applies to Oracle 12c, Release 2.
This document was created or updated on June 2, 2020.
Note: Before using this information and the product it supports, read the information in “Notices” on page vii.

Contents
Notices . . . . . . . . . . . . . . . . . . . . . . . . . . . . . . . . . . . . . . . . . . . . . . . . . . . . . . . . . . . . . . . . . viiTrademarks . . . . . . . . . . . . . . . . . . . . . . . . . . . . . . . . . . . . . . . . . . . . . . . . . . . . . . . . . . . . . viii
Preface . . . . . . . . . . . . . . . . . . . . . . . . . . . . . . . . . . . . . . . . . . . . . . . . . . . . . . . . . . . . . . . . . 1Authors. . . . . . . . . . . . . . . . . . . . . . . . . . . . . . . . . . . . . . . . . . . . . . . . . . . . . . . . . . . . . . . . . . 1Now you can become a published author, too! . . . . . . . . . . . . . . . . . . . . . . . . . . . . . . . . . . . 2Comments welcome. . . . . . . . . . . . . . . . . . . . . . . . . . . . . . . . . . . . . . . . . . . . . . . . . . . . . . . . 3Stay connected to IBM Redbooks . . . . . . . . . . . . . . . . . . . . . . . . . . . . . . . . . . . . . . . . . . . . . 3
Chapter 1. Running Linux virtual servers under IBM z/VM . . . . . . . . . . . . . . . . . . . . . . . 51.1 z/VM fundamentals . . . . . . . . . . . . . . . . . . . . . . . . . . . . . . . . . . . . . . . . . . . . . . . . . . . . . 61.2 Pre-requisites and assumptions . . . . . . . . . . . . . . . . . . . . . . . . . . . . . . . . . . . . . . . . . . . 6
1.2.1 Pre-requisites . . . . . . . . . . . . . . . . . . . . . . . . . . . . . . . . . . . . . . . . . . . . . . . . . . . . . 61.2.2 Assumptions . . . . . . . . . . . . . . . . . . . . . . . . . . . . . . . . . . . . . . . . . . . . . . . . . . . . . . 6
1.3 Configuring a workstation for mainframe access . . . . . . . . . . . . . . . . . . . . . . . . . . . . . . 71.3.1 3270 emulators . . . . . . . . . . . . . . . . . . . . . . . . . . . . . . . . . . . . . . . . . . . . . . . . . . . . 71.3.2 Virtual Network Computing client . . . . . . . . . . . . . . . . . . . . . . . . . . . . . . . . . . . . . . 71.3.3 Connecting from a Linux workstation . . . . . . . . . . . . . . . . . . . . . . . . . . . . . . . . . . . 81.3.4 Connecting from a MacOS workstation. . . . . . . . . . . . . . . . . . . . . . . . . . . . . . . . . . 81.3.5 Connecting from a Windows workstation . . . . . . . . . . . . . . . . . . . . . . . . . . . . . . . . 9
1.4 Service validation and notice subscription . . . . . . . . . . . . . . . . . . . . . . . . . . . . . . . . . . 101.4.1 RSU validation . . . . . . . . . . . . . . . . . . . . . . . . . . . . . . . . . . . . . . . . . . . . . . . . . . . 101.4.2 Subscribing to service notifications. . . . . . . . . . . . . . . . . . . . . . . . . . . . . . . . . . . . 10
1.5 Tailoring z/VM for Linux workloads . . . . . . . . . . . . . . . . . . . . . . . . . . . . . . . . . . . . . . . . 111.5.1 Configure the XEDIT PROFILE. . . . . . . . . . . . . . . . . . . . . . . . . . . . . . . . . . . . . . . 111.5.2 Modify the z/VM SYSTEM CONFIG settings . . . . . . . . . . . . . . . . . . . . . . . . . . . . 15
Chapter 2. Setting up Linux guests to install the Oracle 12cR2 Grid Infrastructure and Database . . . . . . . . . . . . . . . . . . . . . . . . . . . . . . . . . . . . . . . . . . . . . . . . . . . . . 21
2.1 Obtaining Oracle documentation, Oracle code, and My Oracle Support notes. . . . . . . 222.1.1 Master Note of Linux OS Requirements for Database Server . . . . . . . . . . . . . . . 222.1.2 Obtaining the Oracle 12c Software for IBM LinuxONE . . . . . . . . . . . . . . . . . . . . . 22
2.2 Linux large pages and Oracle Databases . . . . . . . . . . . . . . . . . . . . . . . . . . . . . . . . . . . 242.2.1 Disable Transparent HugePages . . . . . . . . . . . . . . . . . . . . . . . . . . . . . . . . . . . . . 24
2.3 Setting up Red Hat Enterprise Linux and SUSE Enterprise Linux Server. . . . . . . . . . . 262.3.1 Pre-installation verification information . . . . . . . . . . . . . . . . . . . . . . . . . . . . . . . . . 262.3.2 Pre-installation checking . . . . . . . . . . . . . . . . . . . . . . . . . . . . . . . . . . . . . . . . . . . . 272.3.3 Creating the database installation owner user . . . . . . . . . . . . . . . . . . . . . . . . . . . 302.3.4 User login security and limits configuration. . . . . . . . . . . . . . . . . . . . . . . . . . . . . . 312.3.5 Shared memory file system. . . . . . . . . . . . . . . . . . . . . . . . . . . . . . . . . . . . . . . . . . 322.3.6 Host name. . . . . . . . . . . . . . . . . . . . . . . . . . . . . . . . . . . . . . . . . . . . . . . . . . . . . . . 322.3.7 Storage options for Oracle database . . . . . . . . . . . . . . . . . . . . . . . . . . . . . . . . . . 332.3.8 Required software directories . . . . . . . . . . . . . . . . . . . . . . . . . . . . . . . . . . . . . . . . 362.3.9 Setting the disk I/O scheduler . . . . . . . . . . . . . . . . . . . . . . . . . . . . . . . . . . . . . . . . 37
2.4 Enable Linux Random Number Generation (Entropy) . . . . . . . . . . . . . . . . . . . . . . . . . 372.4.1 Hardware crypto card . . . . . . . . . . . . . . . . . . . . . . . . . . . . . . . . . . . . . . . . . . . . . . 37
2.5 Red Hat Enterprise Linux 7 and SUSE Linux Enterprise Server set up . . . . . . . . . . . . 392.5.1 Security-Enhanced Linux . . . . . . . . . . . . . . . . . . . . . . . . . . . . . . . . . . . . . . . . . . . 392.5.2 Pre-installation checking . . . . . . . . . . . . . . . . . . . . . . . . . . . . . . . . . . . . . . . . . . . . 39
© Copyright IBM Corp. 2020. All rights reserved. iii

2.6 SUSE Linux Enterprise Server specific setup . . . . . . . . . . . . . . . . . . . . . . . . . . . . . . . . 412.6.1 Important information . . . . . . . . . . . . . . . . . . . . . . . . . . . . . . . . . . . . . . . . . . . . . . 412.6.2 Pre-installation checking . . . . . . . . . . . . . . . . . . . . . . . . . . . . . . . . . . . . . . . . . . . . 41
Chapter 3. Installing and configuring Oracle Grid Infrastructure for Oracle 12c Release 245
3.1 Grid Infrastructure for an Oracle Standalone database to use ASM . . . . . . . . . . . . . . 463.2 Grid Infrastructure for an Oracle RAC Database environment . . . . . . . . . . . . . . . . . . . 473.3 Installation of Single instance Oracle Database binary . . . . . . . . . . . . . . . . . . . . . . . . . 49
3.3.1 Silent installation . . . . . . . . . . . . . . . . . . . . . . . . . . . . . . . . . . . . . . . . . . . . . . . . . . 493.3.2 Interactive installation . . . . . . . . . . . . . . . . . . . . . . . . . . . . . . . . . . . . . . . . . . . . . . 503.3.3 Updating the Oracle user profile . . . . . . . . . . . . . . . . . . . . . . . . . . . . . . . . . . . . . . 51
3.4 Creating a database by using file system . . . . . . . . . . . . . . . . . . . . . . . . . . . . . . . . . . . 523.4.1 Validating the created Oracle Database . . . . . . . . . . . . . . . . . . . . . . . . . . . . . . . . 53
3.5 Creating a database by using ASM . . . . . . . . . . . . . . . . . . . . . . . . . . . . . . . . . . . . . . . 543.5.1 Important Oracle Database initialization parameters . . . . . . . . . . . . . . . . . . . . . . 56
Chapter 4. Using Oracle Enterprise Manager Cloud Control Agent to manage Oracle Database 12c Release 2 . . . . . . . . . . . . . . . . . . . . . . . . . . . . . . . . . . . . . . . . . 57
4.1 Updating the agent at the Enterprise Manager Cloud Control to monitor Oracle Databases on LinuxONE (online) . . . . . . . . . . . . . . . . . . . . . . . . . . . . . . . . . . . . . . . . . . . . . . . . . . 59
4.1.1 Configuring the Software Library storage space. . . . . . . . . . . . . . . . . . . . . . . . . . 594.1.2 Acquiring the LinuxONE agent in online mode . . . . . . . . . . . . . . . . . . . . . . . . . . . 59
4.2 Updating the agent at the Enterprise Manager Cloud Control to monitor Oracle Databases on LinuxONE (offline) . . . . . . . . . . . . . . . . . . . . . . . . . . . . . . . . . . . . . . . . . . . . . . . . . . 61
4.2.1 Acquiring the LinuxONE agent in offline mode . . . . . . . . . . . . . . . . . . . . . . . . . . . 614.3 Deploying the agents from the Cloud Control console . . . . . . . . . . . . . . . . . . . . . . . . . 644.4 Deploying the agents in silent mode . . . . . . . . . . . . . . . . . . . . . . . . . . . . . . . . . . . . . . . 67. . . . . . . . . . . . . . . . . . . . . . . . . . . . . . . . . . . . . . . . . . . . . . . . . . . . . . . . . . . . . . . . . . . . . . . 684.5 Adding the databases for monitoring . . . . . . . . . . . . . . . . . . . . . . . . . . . . . . . . . . . . . . 694.6 Summary. . . . . . . . . . . . . . . . . . . . . . . . . . . . . . . . . . . . . . . . . . . . . . . . . . . . . . . . . . . . 70
Chapter 5. Installing and configuring Spectrum Scale . . . . . . . . . . . . . . . . . . . . . . . . . 715.1 Overview . . . . . . . . . . . . . . . . . . . . . . . . . . . . . . . . . . . . . . . . . . . . . . . . . . . . . . . . . . . . 725.2 Verifying initial configuration . . . . . . . . . . . . . . . . . . . . . . . . . . . . . . . . . . . . . . . . . . . . . 735.3 Installing Spectrum Scale . . . . . . . . . . . . . . . . . . . . . . . . . . . . . . . . . . . . . . . . . . . . . . . 755.4 Building Spectrum Scale . . . . . . . . . . . . . . . . . . . . . . . . . . . . . . . . . . . . . . . . . . . . . . . . 775.5 Examples . . . . . . . . . . . . . . . . . . . . . . . . . . . . . . . . . . . . . . . . . . . . . . . . . . . . . . . . . . . 82
5.5.1 Adding disks to a Spectrum Scale file system . . . . . . . . . . . . . . . . . . . . . . . . . . . 835.5.2 Migrating a database from ASM to Spectrum Scale . . . . . . . . . . . . . . . . . . . . . . . 845.5.3 Creating an Oracle password file for the target database. . . . . . . . . . . . . . . . . . . 855.5.4 Updating tnsnames.ora to add target database NEWDB service . . . . . . . . . . . . . 85
5.6 References . . . . . . . . . . . . . . . . . . . . . . . . . . . . . . . . . . . . . . . . . . . . . . . . . . . . . . . . . . 88
Chapter 6. Integrating IBM Spectrum Scale snapshots with Oracle Recovery Manager incremental backups . . . . . . . . . . . . . . . . . . . . . . . . . . . . . . . . . . . . . . . . . . . 89
6.1 Introduction . . . . . . . . . . . . . . . . . . . . . . . . . . . . . . . . . . . . . . . . . . . . . . . . . . . . . . . . . . 906.1.1 Spectrum Scale snapshots . . . . . . . . . . . . . . . . . . . . . . . . . . . . . . . . . . . . . . . . . . 916.1.2 Oracle Database backup by using snapshots. . . . . . . . . . . . . . . . . . . . . . . . . . . . 926.1.3 Use case example . . . . . . . . . . . . . . . . . . . . . . . . . . . . . . . . . . . . . . . . . . . . . . . . 92
6.2 integrating snapshot technology with RMAN backup and restore. . . . . . . . . . . . . . . . . 946.2.1 Test results . . . . . . . . . . . . . . . . . . . . . . . . . . . . . . . . . . . . . . . . . . . . . . . . . . . . . . 976.2.2 Observations. . . . . . . . . . . . . . . . . . . . . . . . . . . . . . . . . . . . . . . . . . . . . . . . . . . . . 986.2.3 Other snapshot use cases . . . . . . . . . . . . . . . . . . . . . . . . . . . . . . . . . . . . . . . . . . 98
iv Best practices and Getting Started Guide for Oracle on IBM LinuxONE

6.3 Summary. . . . . . . . . . . . . . . . . . . . . . . . . . . . . . . . . . . . . . . . . . . . . . . . . . . . . . . . . . . . 99
Appendix A. Reference sheets, cheat sheets, and blank worksheets . . . . . . . . . . . . 101Important z/VM files . . . . . . . . . . . . . . . . . . . . . . . . . . . . . . . . . . . . . . . . . . . . . . . . . . . . . . 101Cheat sheets . . . . . . . . . . . . . . . . . . . . . . . . . . . . . . . . . . . . . . . . . . . . . . . . . . . . . . . . . . . 102
XEDIT cheat sheet . . . . . . . . . . . . . . . . . . . . . . . . . . . . . . . . . . . . . . . . . . . . . . . . . . . . 102A vi cheat sheet . . . . . . . . . . . . . . . . . . . . . . . . . . . . . . . . . . . . . . . . . . . . . . . . . . . . . . 103DirMaint cheat sheet . . . . . . . . . . . . . . . . . . . . . . . . . . . . . . . . . . . . . . . . . . . . . . . . . . . 104
Blank planning worksheet . . . . . . . . . . . . . . . . . . . . . . . . . . . . . . . . . . . . . . . . . . . . . . . . . 104IBM Shopz . . . . . . . . . . . . . . . . . . . . . . . . . . . . . . . . . . . . . . . . . . . . . . . . . . . . . . . . . . 104Hardware Management Console . . . . . . . . . . . . . . . . . . . . . . . . . . . . . . . . . . . . . . . . . 105z/VM Installation Planning Panels (INSTPLAN) . . . . . . . . . . . . . . . . . . . . . . . . . . . . . . 105z/VM Networking resources . . . . . . . . . . . . . . . . . . . . . . . . . . . . . . . . . . . . . . . . . . . . . 108z/VM DASD worksheet . . . . . . . . . . . . . . . . . . . . . . . . . . . . . . . . . . . . . . . . . . . . . . . . . 108Linux resources worksheet . . . . . . . . . . . . . . . . . . . . . . . . . . . . . . . . . . . . . . . . . . . . . . 1096.3.1 Host names and IP addresses worksheet. . . . . . . . . . . . . . . . . . . . . . . . . . . . . . 109
Contents v

vi Best practices and Getting Started Guide for Oracle on IBM LinuxONE

Notices
This information was developed for products and services offered in the US. This material might be available from IBM in other languages. However, you may be required to own a copy of the product or product version in that language in order to access it.
IBM may not offer the products, services, or features discussed in this document in other countries. Consult your local IBM representative for information on the products and services currently available in your area. Any reference to an IBM product, program, or service is not intended to state or imply that only that IBM product, program, or service may be used. Any functionally equivalent product, program, or service that does not infringe any IBM intellectual property right may be used instead. However, it is the user’s responsibility to evaluate and verify the operation of any non-IBM product, program, or service.
IBM may have patents or pending patent applications covering subject matter described in this document. The furnishing of this document does not grant you any license to these patents. You can send license inquiries, in writing, to:IBM Director of Licensing, IBM Corporation, North Castle Drive, MD-NC119, Armonk, NY 10504-1785, US
INTERNATIONAL BUSINESS MACHINES CORPORATION PROVIDES THIS PUBLICATION “AS IS” WITHOUT WARRANTY OF ANY KIND, EITHER EXPRESS OR IMPLIED, INCLUDING, BUT NOT LIMITED TO, THE IMPLIED WARRANTIES OF NON-INFRINGEMENT, MERCHANTABILITY OR FITNESS FOR A PARTICULAR PURPOSE. Some jurisdictions do not allow disclaimer of express or implied warranties in certain transactions, therefore, this statement may not apply to you.
This information could include technical inaccuracies or typographical errors. Changes are periodically made to the information herein; these changes will be incorporated in new editions of the publication. IBM may make improvements and/or changes in the product(s) and/or the program(s) described in this publication at any time without notice.
Any references in this information to non-IBM websites are provided for convenience only and do not in any manner serve as an endorsement of those websites. The materials at those websites are not part of the materials for this IBM product and use of those websites is at your own risk.
IBM may use or distribute any of the information you provide in any way it believes appropriate without incurring any obligation to you.
The performance data and client examples cited are presented for illustrative purposes only. Actual performance results may vary depending on specific configurations and operating conditions.
Information concerning non-IBM products was obtained from the suppliers of those products, their published announcements or other publicly available sources. IBM has not tested those products and cannot confirm the accuracy of performance, compatibility or any other claims related to non-IBM products. Questions on the capabilities of non-IBM products should be addressed to the suppliers of those products.
Statements regarding IBM’s future direction or intent are subject to change or withdrawal without notice, and represent goals and objectives only.
This information contains examples of data and reports used in daily business operations. To illustrate them as completely as possible, the examples include the names of individuals, companies, brands, and products. All of these names are fictitious and any similarity to actual people or business enterprises is entirely coincidental.
COPYRIGHT LICENSE:
This information contains sample application programs in source language, which illustrate programming techniques on various operating platforms. You may copy, modify, and distribute these sample programs in any form without payment to IBM, for the purposes of developing, using, marketing or distributing application programs conforming to the application programming interface for the operating platform for which the sample programs are written. These examples have not been thoroughly tested under all conditions. IBM, therefore, cannot guarantee or imply reliability, serviceability, or function of these programs. The sample programs are provided “AS IS”, without warranty of any kind. IBM shall not be liable for any damages arising out of your use of the sample programs.
© Copyright IBM Corp. 2020. All rights reserved. vii

Trademarks
IBM, the IBM logo, and ibm.com are trademarks or registered trademarks of International Business Machines Corporation, registered in many jurisdictions worldwide. Other product and service names might be trademarks of IBM or other companies. A current list of IBM trademarks is available on the web at “Copyright and trademark information” at http://www.ibm.com/legal/copytrade.shtml
The following terms are trademarks or registered trademarks of International Business Machines Corporation, and might also be trademarks or registered trademarks in other countries.
IBM®IBM Spectrum®IBM Z®IBM z Systems®
Redbooks®Redbooks (logo) ®System z®WebSphere®
z Systems®z/OS®z/VM®
The following terms are trademarks of other companies:
The registered trademark Linux® is used pursuant to a sublicense from the Linux Foundation, the exclusive licensee of Linus Torvalds, owner of the mark on a worldwide basis.
Microsoft, Windows, and the Windows logo are trademarks of Microsoft Corporation in the United States, other countries, or both.
Java, and all Java-based trademarks and logos are trademarks or registered trademarks of Oracle and/or its affiliates.
Red Hat, are trademarks or registered trademarks of Red Hat, Inc. or its subsidiaries in the United States and other countries.
UNIX is a registered trademark of The Open Group in the United States and other countries.
Other company, product, or service names may be trademarks or service marks of others.
viii Best practices and Getting Started Guide for Oracle on IBM LinuxONE
Preface
IBM® is a Platinum level Partner in the Oracle Partner Network, which delivers the proven combination of industry insight, extensive real-world Oracle applications experience, deep technical skills, and high-performance servers and storage to create a complete business solution with a defined return on investment. From application selection, purchase, and implementation to upgrade and maintenance, we help organizations reduce the total cost of ownership and the complexity of managing their current and future applications environment while building a solid base for business growth.
Oracle Database running on Linux is available for deployment on IBM LinuxONE by using Redhat Enterprise Linux (RHEL) or SUSE Linux Enterprise Server (SLES). This enterprise-grade solution is designed to add value to Oracle Database solutions.
This IBM Redpaper® publication focuses on accepted good practices for installing and getting started by using Oracle Database, which provides you with an environment that is optimized for performance, scalability, flexibility, and ease-of-management.
Authors
This paper was produced by a team of specialists from around the world working at the International Technical Support Organization, Poughkeepsie Center.
Susan Adamovich is a business development executive bringing over 25 years of high tech experience and covering many disciplines, including alliance management, technical enablement, sales, and marketing. Today, Susan brings over a decade of experience as the Oracle LinuxONE and Z server lead and global business development focal point for the IBM and Oracle technology partnership within IBM Systems.
Sam Amsavelu is an IBM certified consulting IT architect, providing technical support for Oracle solutions on IBM platforms. During the last 22 years with IBM, he worked with many customers in developing solutions to resolve their business problems with IBM technology and products.
Srujan Jagarlamudi is a Senior Oracle Consultant currently working with Linux running on IBM LinuxONE and Z servers certifications in the Oracle Redwood Shores office. Before joining IBM as a consultant in 2015, he worked in several IT companies as a Senior Oracle Applications DBA and played a major role in upgrade projects and migration to Oracle databases and applications. He participated in several Go-Live events and also has extensive experience as a DBA for day-to-day technical support specialist for customers and clients who use Oracle Applications in a Production environment.
Note: Oracle references to Linux on Z and Linux on IBM z Systems® in this publication are also applicable to Linux running on LinuxONE servers.
© Copyright IBM Corp. 2020. All rights reserved. 1

Raghu Malige is a Senior Oracle Consultant currently working with Linux running on IBM LinuxONE and Z servers certifications in the Oracle Redwood Shores office. Before joining IBM as a consultant in 2016, he worked at VERITAS/Symantec in the areas of Storage NAS and NAS performance; Cluster file system, application HA, and database performance; Backup recovery of Databases; Database storage optimization by way of snapshots, and storage reclamation
Michael Morgan is a Senior Oracle Consultant currently working on certifications of the Oracle Databases running Linux on IBM LinuxONE and Z servers in the Oracle Redwood Shores office. Before joining IBM as a consultant in 2015, he worked at Oracle Corporation in various system administration, management, and development roles.
Paul Novak is a Senior Certified IT Specialist working for the IBM Washington Systems Center z/VM® and Linux Solutions team in Endicott, New York (former ATS Endicott). Paul has experience in field services, user support, software development, enterprise hosting, and enterprise architecture. His areas of expertise are z/VM, Linux, web middleware, and web IAM solutions. Paul holds a BSBA in Management Information Systems, and has more than 20 years of Linux and open source technology experience.
David J. Simpson is part of the IBM North America Channels and ISV Solutions technical sales team with almost 30 years of experience in the IT Industry. He is an Oracle certified Oracle specialist working with Oracle Database since version 5 of this product.
Thanks to the following people for their contributions to this project:
Lydia ParzialeIBM Redbooks®, Poughkeepsie Center
Wayne T. MartinIBM US
Now you can become a published author, too!
Here’s an opportunity to spotlight your skills, grow your career, and become a published author—all at the same time! Join an ITSO residency project and help write a book in your area of expertise, while honing your experience using leading-edge technologies. Your efforts will help to increase product acceptance and customer satisfaction, as you expand your network of technical contacts and relationships. Residencies run from two to six weeks in length, and you can participate either in person or as a remote resident working from your home base.
Find out more about the residency program, browse the residency index, and apply online at:
ibm.com/redbooks/residencies.html
2 Best practices and Getting Started Guide for Oracle on IBM LinuxONE

Comments welcome
Your comments are important to us!
We want our papers to be as helpful as possible. Send us your comments about this paper or other IBM Redbooks publications in one of the following ways:
� Use the online Contact us review Redbooks form found at:
ibm.com/redbooks
� Send your comments in an email to:
� Mail your comments to:
IBM Corporation, International Technical Support OrganizationDept. HYTD Mail Station P0992455 South RoadPoughkeepsie, NY 12601-5400
Stay connected to IBM Redbooks
� Find us on Facebook:
http://www.facebook.com/IBMRedbooks
� Follow us on Twitter:
http://twitter.com/ibmredbooks
� Look for us on LinkedIn:
http://www.linkedin.com/groups?home=&gid=2130806
� Explore new Redbooks publications, residencies, and workshops with the IBM Redbooks weekly newsletter:
https://www.redbooks.ibm.com/Redbooks.nsf/subscribe?OpenForm
� Stay current on recent Redbooks publications with RSS Feeds:
http://www.redbooks.ibm.com/rss.html
Preface 3

4 Best practices and Getting Started Guide for Oracle on IBM LinuxONE
Chapter 1. Running Linux virtual servers under IBM z/VM
This chapter provides a concise how-to guide for using the z/VM platform as an enterprise Linux infrastructure on IBM Z® and IBM LinuxONE systems. It includes the following topics:
� 1.1, “z/VM fundamentals” on page 6� 1.2, “Pre-requisites and assumptions” on page 6� 1.3, “Configuring a workstation for mainframe access” on page 7� 1.4, “Service validation and notice subscription” on page 10� 1.5, “Tailoring z/VM for Linux workloads” on page 11
1
© Copyright IBM Corp. 2020. All rights reserved. 5

1.1 z/VM fundamentals
The authors recommend that you review Chapter 1 of the IBM Redbooks publication The Virtualization Cookbook for IBM z Systems Volume 1: IBM z/VM 6.3, SG24-8147 because it covers virtualization, benefits, and terminology, and provides a brief summary of z/VM components and capabilities.
Although authored by using z/VM 6.3, the information that is covered in Volume 1 of the series is still pertinent for z/VM 6.4 and z/VM 7.1.
It is our belief that awareness and understanding of the fundamentals for the hypervisor helps speed your learning process because this knowledge makes interacting with z/VM more understandable. When you understand what you are doing, the actions you perform become more meaningful and are more quickly absorbed.
1.2 Pre-requisites and assumptions
It is important to know that the information that is presented in this chapter was created by using the following prerequisites and assumptions. Be sure to review all of the information to ensure that your environment aligns with all the prerequisites and assumptions made so that you mitigate the chances of encountering any roadblocks or problems.
1.2.1 Pre-requisites
The following prerequisites must be met:
� z/VM Version 6, Release 4 Modification 0 (V6.4.0):
– Service Level 1801 (RSU 1801) or higher– Program products installed to default locations in SFS
� IBM Directory Maintenance Facility (DirMaint) for z/VM1
� Performance Toolkit for z/VM2
� External Security Manager (ESM) such as IBM RACF/VM3
1.2.2 Assumptions
For this purpose of this publication, the following assumptions were made:
� The base installation of z/VM 6.4 is completed.
� The VMSSI Feature is enabled and at least two members are in the cluster.
� The initial setup of the following components is completed:
– TCPI/P that uses redundant VSWITCHes– DirMaint
� The newest Recommended Service Upgrade was ordered and installed.
� z/VM is not yet tailored to support Linux virtual servers.
1 Or, a similar or equivalent supported product from an independent software vendor.2 Or, a similar or equivalent supported product from an independent software vendor.3 Or, a similar or equivalent supported ESM from an independent software vendor.
6 Best practices and Getting Started Guide for Oracle on IBM LinuxONE

1.3 Configuring a workstation for mainframe access
This section addresses the configuration of a workstation that is running Linux, MacOS, or Microsoft Windows to access the mainframe.
The following list of programs, tools, or utilities are required for you to successfully access z/VM and Linux from your workstation to complete the tasks that are described in this book.
1.3.1 3270 emulators
To access a logon session with z/VM, it is common to use a 3270 emulator. Many commercial products are available.
It is beyond the scope of this book to explain the details of configuring all the various emulators. However, it is recommended that you investigate the following settings for your emulator:
� Support for encryption. Ensure that your emulator can establish a secure connection by using TLS.
� Set the Enter and Clear function keys to be where you expect them. On some emulators, the default Enter key action is set to the right Ctrl key of modern keyboards. Likewise, the Clear key action is sometimes set to the Esc key in the upper left corner of modern keyboards or the Pause key in the upper right.
� Set a larger screen. Often, the default number of lines in an emulator session is 24. You probably are more productive with a 43 line screen (or more) if they can easily fit in a window given your desktop display size and resolution.
� Have the session automatically reconnect after logoff. Having a new logon window return immediately after you log off can also save you time. This behavior is often not the default behavior.
� Save your connection sessions. Rather than continually entering the IP address or DNS name of the z/VM system to which you want to connect, spend a few minutes to define and save a session for each system to which you can connect so you can double-click the saved connection to quickly access a new 3270 session.
Customizing your 3270 emulator on the front end can save much time later.
1.3.2 Virtual Network Computing client
To access to the graphical installation environment that is used during the initial build of your Linux virtual servers, you must have a Virtual Network Computing (VNC) client.
Because pre-compiled installers for Linux, MacOS, and Microsoft Windows are available for TigerVNC, which was used by the authors of this book. For more information about TigerVNC, see this website.
Important: Before downloading any open source program from a website for use on your business workstation, consult with your IT service desk (Help Desk), your manager, procurement department, or legal department to ensure that you do not violate any legal agreements, such as the program’s terms of use, or any of your company’s policies.
Chapter 1. Running Linux virtual servers under IBM z/VM 7
1.3.3 Connecting from a Linux workstation
In general, it is best to select from programs, tools, and utilities that are available in the software installation repository for your Linux distribution. This process ensures you can easily install and update them.
The recommendations that are described in this section are typically available in most major distributions. These recommendations are examples of what worked well for the authors of this book and are not intended to be an exhaustive list of the possible choices.
If you use a Linux desktop, you should have access to the following tools:
� An SSH client, named ssh. It is part of the OpenSSH package.
Any Linux terminal typically works to perform this function. Depending on your distribution and preference. The SSH client can be any of the following examples:
– Xterm– Gnome terminal– Terminator– Byobu terminal– Kterm– PuTTY is also available for Linux if you are most comfortable with it
� A VNC client, named vncviewer or gvncviewer. It is part of the tightvnc package. Any of the following VNC clients are all equally recommended:
– TigerVNC
TigerVNC often is available in the software installation repository for all supported Linux distributions for IBM Z or IBM LinuxONE; therefore, downloading the installer often is not necessary. Install it by using the package manager.
– Remmina– KRDC– Vncviewer
� A 3270 emulator, named either x3270 or c3270. It is part of the x3270 package. Any of the following emulators are equally recommended:
– x3270– c3270– IBM Host OnDemand
1.3.4 Connecting from a MacOS workstation
In general, it is best to select from programs, tools, and utilities that are available in the official Apple Mac AppStore or your company’s official AppStore. This availability ensures that you can easily install and update them.
However, limited choices are available for MacOS VNC and 3270 clients. The following recommendations are examples of what worked well for the authors of this book and are not exhaustive lists of the possible choices:
� A Secure Shell (SSH) client. The native MacOS terminal is recommended.
� A Virtual Network Computing (VNC) client. TigerVNC is recommended.
The installer for TigerVNC can be found at this website.
8 Best practices and Getting Started Guide for Oracle on IBM LinuxONE

At the website:
a. Look for a heading called Downloads, which displays the available installers for the most recent version (version 1.9.0 at the time this writing).
b. Select the .dmg file, which is for MacOS (for example, TigerVNC-1.9.0.dmg).
� A 3270 emulator. Any of the following emulators are all equally recommended:
– x3270– tn3270 (www.mac-tn3270.org)– IBM Host OnDemand
1.3.5 Connecting from a Windows workstation
The following tools are recommended:
� A Secure Shell (SSH) client. PuTTY is recommended.
� A Virtual Network Computing (VNC) client. Any of the following VNCs are equally recommended:
– TigerVNC
The installer for TigerVNC is available at this website.
At the website:
i. Look for a heading that is called Downloads, which displays the available installers for the most recent version (version 1.9.0 at the time of this writing).
ii. Because most users are running 64-bit versions of Windows now, you want to select the vncviewer64-....exe file, which is for 64-bit Windows (for example, vncviewer64-1.9.0.exe).
If you are not sure, see this Microsoft support web page for more information.
– TightVNC– UltraVNC– RealVNC
� A 3270 emulator. Any of the following emulators are equally recommended:
– IBM Personal Communications– x3270– c3270– IBM Host OnDemand– Attachmate Extra!– Hummingbird Host Explorer– Rumba– Quick3270
Note: Several free 3270 emulators are available in the App Store that are “light”, “limited”, or “trial” versions. These emulators are available for “test drive” or “try before you buy” purposes. Therefore, they often feature major limitations, such as restrictions on session duration or use of only certain PF keys.
We do not recommend attempting to perform any of the steps in this publication by using one of these trial 3270 emulators.
Chapter 1. Running Linux virtual servers under IBM z/VM 9
1.4 Service validation and notice subscription
In this section, we discuss the processes that are involved in validating service and subscribing to updates and new functionality announcements that pertain to your z/VM systems.
1.4.1 RSU validation
Complete the following steps to ensure that the initial RSU was installed and to be automatically notified of high priority service that is released by IBM:
1. Log on to z/VM as MAINT or MAINT640 with your 3270 emulator.
2. Issue the QUERY CPLEVEL command to see the RSU level. In this example, it is 1801:
===> query cplevelz/VM Version 6 Release 4.0, service level 1801 (64-bit)...
3. Visit the RSU web page for z/VM on IBM.com to determine the latest available RSU. At the page:
a. Under the column that is labeled RSU Content, click ZVM640 to see more information about of the latest RSU.
b. At the top of the page, look for the following text:
This page contains APAR/PTFs included on the:z/VM Version 6, Release 4 Modification 0, 1801RSU envelope.
In this example, 1801RSU is the newest RSU that is available for z/VM 6.4.0.
4. If your RSU is not the latest RSU, download and apply the latest RSU before you proceed. For more information, see The Virtualization Cookbook for IBM z Systems Volume 1: IBM z/VM 6.3, SG24-8147 under 5.3, “How to apply a recommended service upgrade” on page 137.
1.4.2 Subscribing to service notifications
Complete the following steps to subscribe to the Service News and Red Alerts pages so that you can be aware of updates and new functionality for your z/VM systems. These alerts are the best way to ensure that you are informed about any critical updates that you must install:
1. Browse to the Service News web page.
a. At the page, click Notify me in the left navigation menu.
b. Complete the notification form to enable automatic email notification when new Service News is available, such as when a new RSU is available.
2. Browse to the Red Alerts web page.
a. At the page, click Notify me in the left navigation menu.b. Complete the form to enable automatic email notification when a critical fix is available.
10 Best practices and Getting Started Guide for Oracle on IBM LinuxONE
1.5 Tailoring z/VM for Linux workloads
You can tailor certain functions of z/VM to suit your requirements and fulfill company requirements. In this section, we discuss how to configure XEDIT in the PROFILE EXEC to maintain consistency of use across the enterprise. We also discuss changing the SYSTEM CONFIG file, which contains the primary system definitions that are used when the control program (CP) is started (IPLed).
1.5.1 Configure the XEDIT PROFILE
z/VM uses a program called XEDIT as the text editor for the system. It is similar in function to vi / vim, EMACS, nano, or pico on Linux. When XEDIT is started, it looks for the configuration file XEDIT PROFILE. Not all CMS virtual machines always have a copy of this file, so XEDIT sessions can look and behave differently, which can be problematic. The steps that are described in this section resolve this issue for you.
If you never used XEDIT before, see the cheat sheet in Appendix A, “Reference sheets, cheat sheets, and blank worksheets” on page 101. Appendix A also includes a link to the z/VM Library where you can find more information. This section guides you in the configuration of the XEDIT profile for system-wide usage and (more importantly), the steps that are shown here also provide you with the understanding of how to use XEDIT by using functions to add, move, and change text.
You also use XEDIT substantially through the rest of this book and in the administration of your z/VM environment. The efforts that are spent here to customize XEDIT result in a much higher level of usability, and make any editing tasks easier and faster.
The 191 (A) disks for MAINT and MAINT640 include a basic version of PROFILE XEDIT so when you are editing files while logged in as either of these user IDs, the values in the profile often are in effect. An example of how to view this basic profile is shown in Example 1-1.
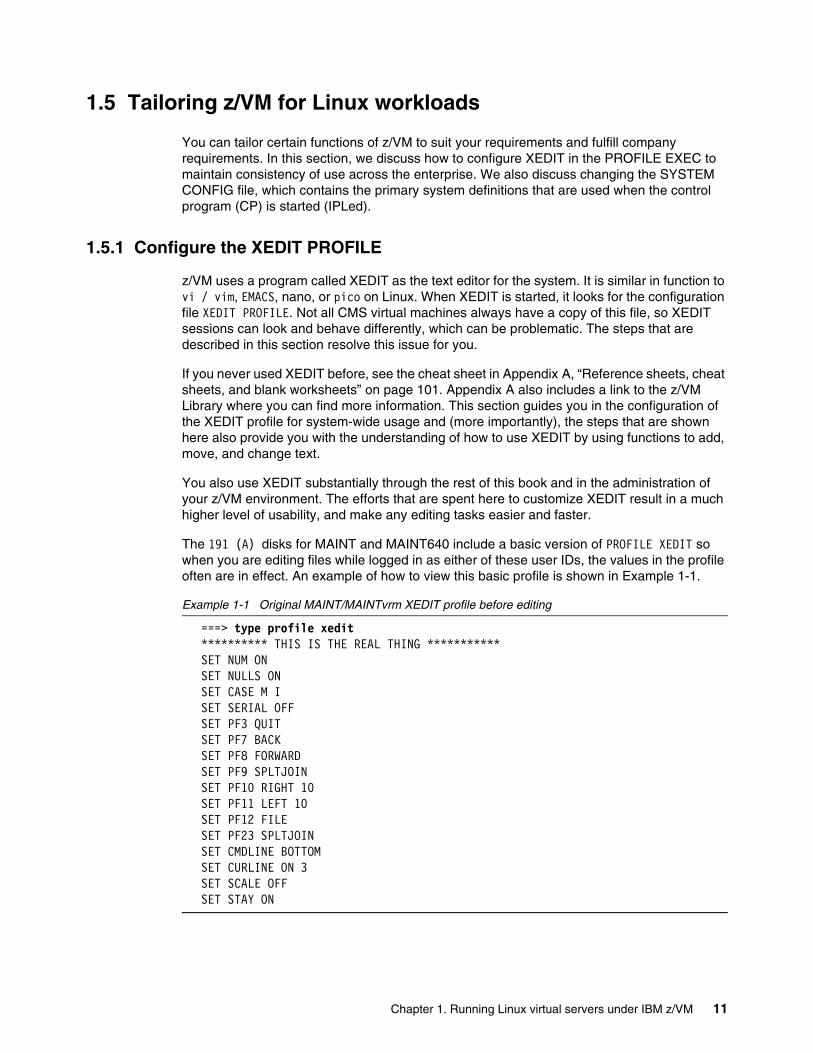
Example 1-1 Original MAINT/MAINTvrm XEDIT profile before editing
===> type profile xedit********** THIS IS THE REAL THING ***********SET NUM ONSET NULLS ONSET CASE M ISET SERIAL OFFSET PF3 QUITSET PF7 BACKSET PF8 FORWARDSET PF9 SPLTJOINSET PF10 RIGHT 10SET PF11 LEFT 10SET PF12 FILESET PF23 SPLTJOINSET CMDLINE BOTTOMSET CURLINE ON 3SET SCALE OFFSET STAY ON
Chapter 1. Running Linux virtual servers under IBM z/VM 11

Complete the following steps to configure the default XEDIT profile for use across the entire SSI cluster:
1. Log on to MAINT640 on the first SSI member if you are not logged in.
2. Make a backup copy of the existing PROFILE XEDIT by using the following command:
===> copy profile xedit a profile xediorig a (olddate
This command creates a copy of the file PROFILE XEDIT A with the new name of PROFILE XEDIORIG A and retains the date and time stamp from the original.
For comparative purposes, the functional equivalent in UNIX or Linux is shown in the following example:
cp -p profile.xedit profile.xediorig
3. Update the PROFILE XEDIT file, as shown in the following example:
===> xedit profile xedit
a. Change the comment line at the top of the file so that it indicates the name or purpose and the date and name or ID of who last modified it:
i. Replace the entire first line with the following code:
/*** DEFAULT PROFILE XEDIT FOR z/VM -- MOD YYYY-MM-DD MYUSERID ***/
ii. Replace YYYY-MM-DD with today’s date.
iii. Replace MYUSERID with something unique to identify yourself.
iv. Be sure that the line begins with /*.
v. Be sure that the line ends with */.
b. One default setting that can be dangerous, especially if you use F12 to retrieve commands, is that PF12 is set to the FILE (save and quit) subcommand. Most often, you do not want to save your changes and quit with the stroke of one key. It is recommended that you instead set PF12 to the ? (retrieve) subcommand, which retrieves the last command that is issued on the XEDIT command line.
Change the line SET PF12 FILE to:
SET PF12 ?
c. Press Enter. You are moved to the command line (====>) at the bottom of the window.
d. Because our active XEDIT session was started by using the unchanged profile, we must define PF12 as RETRIEVE for the active session. This process is also how you manually override the definitions in the PROFILE XEDIT on a temporary basis. Enter the subcommands shown to set the definition, then verify the result, as shown in the following example:
====> set pf12 ?====> query pf12
Note: Making this line the first line of any CMS REXX EXEC files that you edit is good practice, and you should make this configuration a regular habit.
12 Best practices and Getting Started Guide for Oracle on IBM LinuxONE

The active definition for PF12 should appear at the top of the window, as shown in Figure 1-1.
Figure 1-1 Output from XEDIT displaying the active definition for PF12
e. Save changes made thus far to disk, as shown in the following example:
====> save
f. Enter the following subcommands to find the string SET and replace it with 'SET instead; then, return to the top of the file.
====> top====> change/SET/'SET/* *
For comparative purposes, the functional equivalent in UNIX or Linux vi or vim is shown in the following example:
1,$s/SET/'SET/g
g. Move to line number 2; then, use the CAPPEND (character append) macro to add a closing single quotation mark to the end of the line. The following command is CAPPEND followed by a space, then a single quotation mark.
====> :2====> cappend '
h. Use the number sign (#) to chain two commands together and append the single quotation mark to the end of the next line. Again, take notice of the space and single quotation mark following CAPPEND:
====> down 1 # cappend '
Use the repeat function that is assigned to PF12 and repeat this step until each line that begins with 'SET has a closing single quotation mark.
i. Press Enter twice to return to the command line again. Enter the following subcommands to move to the last line in the file and then enable INPUT mode:
====> bottom====> input
j. You are now in INPUT mode, where you can enter multiple lines of text. Enter the following lines of text and press Enter after each one. Include all special characters and punctuation marks that are shown, such as quotations and equal signs:
'SET COLOR CURLINE YE REV''SET COLOR PREFIX BL NO'RDK = 'PF1-HELP 3-Quit 7-PgDn 8-PgUp 9-SpJn 10-R10 11-L10 12-Repeat''SET RESERVED -2 WH HI 'RDK
k. Press Enter twice to exit out of INPUT mode and return back to the command line.
PROFILE XEDIT A1 V 255 Trunc=255 Size=120 Line=0 Col=1 Alt=0PF12 ONLY ?
...
====> query pf12 X E D I T 1 File
Chapter 1. Running Linux virtual servers under IBM z/VM 13

l. Enter the subcommand FILE and press Enter again. Doing so saves your changes, quits XEDIT, and returns you to CMS and the ready prompt:
====> fileReady;
Before editing, your PROFILE XEDIT looks as shown in Example 1-1 on page 11. After editing, your PROFILE XEDIT looks as shown in Example 1-2.
Example 1-2 Modified MAINT / MAINTvrm XEDIT profile with example date and user ID shown
===> type profile xedit/*** DEFAULT PROFILE XEDIT FOR z/VM -- MOD 2018-07-06 PWNOVAK ***/'SET NUM ON''SET NULLS ON''SET CASE M I''SET SERIAL OFF''SET PF3 QUIT''SET PF7 BACK''SET PF8 FORWARD''SET PF9 SPLTJOIN''SET PF10 RIGHT 10''SET PF11 LEFT 10''SET PF12 ?''SET PF23 SPLTJOIN''SET CMDLINE BOTTOM''SET CURLINE ON 3''SET SCALE OFF''SET STAY ON''SET COLOR CURLINE YE REV''SET COLOR PREFIX BL NO'RDK = 'PF1-HELP 3-Quit 7-PgDn 8-PgUp 9-SpJn 10-R10 11-L10 12-Repeat''SET RESERVED -2 WH HI 'RDK
4. Complete the following steps to make the modified file available to other virtual machines by copying it to the MAINT 19E disk with file mode suffix 2:
a. Release the current 19E disk:
===> release 19E
a. Use VMLINK to obtain the MAINT 19E disk read/write as file mode F. The < and > characters must be included exactly as shown in the following example:
===> vmlink maint 19E < 19E F MR >
b. Copy it to the MAINT 19E disk (F) with file mode suffix 2 (because the MAINT 19E disk is commonly accessed with a file mode suffix of 2, files are not seen by other virtual machines unless they have this file mode suffix):
===> copy profile xedit A = = F2
c. Save the CMS named saved segment by using the following commands. Do not be concerned if the numeric value you see for the fileid is different on your system than from the following example because this difference is normal:
===> access 193 G===> sampnss cmsHCPNSD440I The Named Saved System (NSS) CMS was successfully defined in fileid 0014.===> ipl 190 parm savesys cms
14 Best practices and Getting Started Guide for Oracle on IBM LinuxONE
HCPNSS440I Named Saved System (NSS) CMS was successfully saved in fileid 0014.
5. LOGOFF as MAINT640 from the current member.
6. Repeat step 4 on all other members in the SSI cluster.
The same XEDIT PROFILE should now be accessible to all virtual machines in the SSI cluster.
1.5.2 Modify the z/VM SYSTEM CONFIG settings
The first configuration file read when z/VM IPLs is the SYSTEM CONFIG file. Only one SYSTEM CONFIG file is used per SSI cluster. In this section, we show you how to modify this file to enable and disable features.
To make these changes, complete the following steps while logged on as MAINT640:
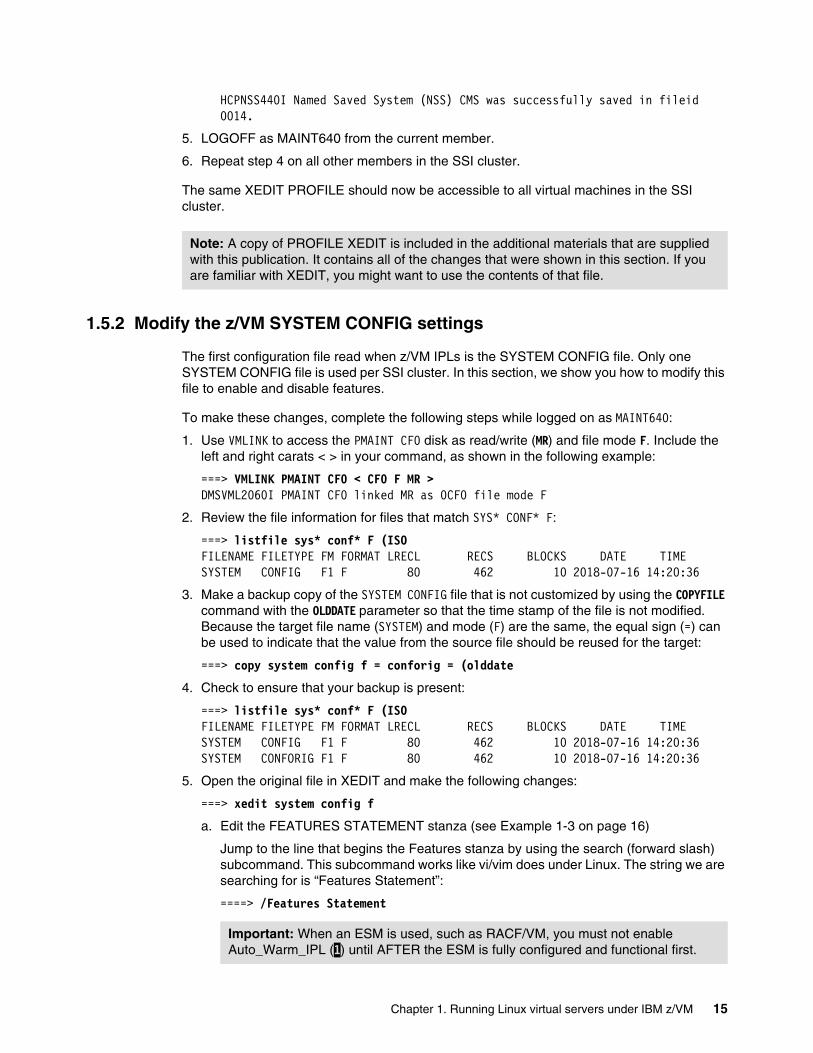
1. Use VMLINK to access the PMAINT CF0 disk as read/write (MR) and file mode F. Include the left and right carats < > in your command, as shown in the following example:
===> VMLINK PMAINT CF0 < CF0 F MR >DMSVML2060I PMAINT CF0 linked MR as 0CF0 file mode F
2. Review the file information for files that match SYS* CONF* F:
===> listfile sys* conf* F (ISOFILENAME FILETYPE FM FORMAT LRECL RECS BLOCKS DATE TIMESYSTEM CONFIG F1 F 80 462 10 2018-07-16 14:20:36
3. Make a backup copy of the SYSTEM CONFIG file that is not customized by using the COPYFILE command with the OLDDATE parameter so that the time stamp of the file is not modified. Because the target file name (SYSTEM) and mode (F) are the same, the equal sign (=) can be used to indicate that the value from the source file should be reused for the target:
===> copy system config f = conforig = (olddate
4. Check to ensure that your backup is present:
===> listfile sys* conf* F (ISOFILENAME FILETYPE FM FORMAT LRECL RECS BLOCKS DATE TIMESYSTEM CONFIG F1 F 80 462 10 2018-07-16 14:20:36SYSTEM CONFORIG F1 F 80 462 10 2018-07-16 14:20:36
5. Open the original file in XEDIT and make the following changes:
===> xedit system config f
a. Edit the FEATURES STATEMENT stanza (see Example 1-3 on page 16)
Jump to the line that begins the Features stanza by using the search (forward slash) subcommand. This subcommand works like vi/vim does under Linux. The string we are searching for is “Features Statement”:
====> /Features Statement
Note: A copy of PROFILE XEDIT is included in the additional materials that are supplied with this publication. It contains all of the changes that were shown in this section. If you are familiar with XEDIT, you might want to use the contents of that file.
Important: When an ESM is used, such as RACF/VM, you must not enable Auto_Warm_IPL (1) until AFTER the ESM is fully configured and functional first.
Chapter 1. Running Linux virtual servers under IBM z/VM 15

Continue to edit the file so that the contents of the Features Statement stanza looks as shown in Example 1-3 with the following caveats:
• If your company policy does not permit the use of any of the SET options (2,3, 4), move any of those lines underneath the DISABLE section, just below Clear_TDisk. You can also omit them, because the default is disabled.
• If you are not using the Server Time Protocol (7), omit this line.
• If you are not using PCI (8), omit this line.
• If you are not using HyperPAV aliases (9) or transport-mode channel programs (10) for paging, move these lines under the DISABLED section.
• If your company policy requires that you wipe temporary disk space clean during system initialization, move the Clear_TDisk (11) line under the ENABLE section. If this move results in nothing between DISABLE (B) and Retrieve (C), you must omit the DISABLE line entirely.
Example 1-3 Features Statement
/**********************************************************************//* Features Statement *//**********************************************************************/
Features , ENABLE , /* ------ ENABLE THE FOLLOWING FEATURES ------ */ A Auto_Warm_IPL , /* Auto warm IPL w/out prompts */ 1 Set_Privclass , /* Issue command SET PRIVCLASS */ 2 Set_Devices , /* Issue command SET DEVICES */ 3 Set_Dynamic_I/O , /* Issue command SET DYNAMIC_IO */ 4 New_Devices_Initialized_When_Added , /* Auto-Init new devices */ 5 Validate_Shutdown , /* Require shutdown mollyguard */ 6 STP_TimeZone , /* Obtain TZ from STP server */ 7 PCI , /* Usage of PCI functions */ 8 Paging_Alias , /* Hyperpav aliases for paging & SET PAGING cmd */ 9 Paging_HPF , /* Use transport-mode channel progs for paging */ 10 DISABLE , /* ----- DISABLE THE FOLLOWING FEATURES ------ */ B Clear_TDisk , /* Don't clear TDisks at IPL time */ 11 Retrieve , /* ----- COMMAND RETRIEVAL OPTIONS ----------- */ C Default 25 , /* Command retrieval default buf */ 12 Maximum 255 , /* Command retrieval max buffer */ 13 MaxUsers noLimit , /* Max total logged on users/IDs */ 14 Vdisk SysLim Infinite , /* Max total number of vdisks */ 15 Userlim 1G , /* Max ttl vdisk space per usr/ID */ 16 Disconnect_Timeout Off /* No auto-force disconn users */ 17
The features that were set in this example support most all Linux environments.
Tip: If you are not using STP, you consider doing so, especially if you are planning to run any workloads that might use high availability through active/failover. STP provides a high degree of accuracy compared to ordinary NTP.
Note: Unlike all the other lines in this stanza, the last line, Disconnect_Timeout Off (17), does not include a trailing comma.
16 Best practices and Getting Started Guide for Oracle on IBM LinuxONE

For a full listing of all the parameters and values possible to be set in the Features Statement stanza, see the z/VM 6.4.0 topic in IBM Knowledge Center.
b. Add a new Linux virtual server stanza:
i. Jump to the top line, then to the first line that contains the string Logo_Config in it, and move two lines above it (see Example 1-4):
====> top====> /Logo_Config====> up 2
Example 1-4 Logo_Config block
SYSTEM CONFIG Z1 F 80 Trunc=80 ...
===== .===== /***********************************************************/===== /* Logo_Config */===== /***********************************************************/========== Logo_Config LOGO CONFIG=====
ii. Use the XEDIT block copy function to copy the three lines that comprise the heading of the Logo_Config stanza and paste them above as a new heading. In the prefix area, enter CC over the numbers at the start and end of the three lines and press Enter. The CC on both lines turns red, as shown in Example 1-5 on page 17:
Example 1-5 Using block copy to replicate three lines
SYSTEM CONFIG Z1 F 80 Trunc=80 ...
===== .CC /***********************************************************/===== /* Logo_Config */CC /***********************************************************/=====
This change tells XEDIT that you want to copy the lines starting with the first CC through the last CC as one block.
iii. Move to the current line (highlighted in your terminal), and, enter P into the prefix area, as shown in Example 1-6. Then, press Enter. This change tells XEDIT to paste your block of text above the line with the P (see Example 1-6)
Example 1-6 Copying and pasting
SYSTEM CONFIG Z1 F 80 Trunc=80 ...
P==== .CC /***********************************************************/===== /* Logo_Config */CC /***********************************************************/=====
Chapter 1. Running Linux virtual servers under IBM z/VM 17

iv. The entire heading is now duplicated. Issue the following command to move up three lines so you can see the results:
====> up 2
v. Example 1-7 shows the results.
Example 1-7 Results
SYSTEM CONFIG Z1 F 80 Trunc=80 ...
===== /***********************************************************/===== /* Logo_Config */===== /***********************************************************/========== /***********************************************************/===== /* Logo_Config */===== /***********************************************************/=====
vi. Enter the title of Logo_Config in your newly duplicated heading with Linux Virtual Server Config.
vii. On the blank line between the two stanza headers, enter I6 in the prefix area as shown in Example 1-8. As a result, six blank lines are inserted at that line.
Example 1-8 Inserting six blank lines
SYSTEM CONFIG Z1 F 80 Trunc=80 ...
===== /***********************************************************/===== /* Linux Virtual Server Config */===== /***********************************************************/I6 ======= /***********************************************************/===== /* Logo_Config */===== /***********************************************************/
viii.Press Enter. The results are shown in Example 1-9.
Example 1-9 Results of inserting six blank lines
SYSTEM CONFIG Z1 F 80 Trunc=80 ...
===== /***********************************************************/===== /* Linux Virtual Server Config */===== /***********************************************************/======================================== /***********************************************************/===== /* Logo_Config */===== /***********************************************************/
18 Best practices and Getting Started Guide for Oracle on IBM LinuxONE

ix. Add the lines that are shown in Example 1-10 under the Linux Virtual Server Config heading.
Example 1-10 Adding the lines
SYSTEM CONFIG Z1 F 80 Trunc=80 ...
===== /***********************************************************/===== /* Linux Virtual Server Config */===== /***********************************************************/===== Set Signal ShutdownTime 300===== Modify Cmd FLASHCOPY IBMClass B PRIVClass BG============================== /***********************************************************/===== /* Logo_Config */===== /***********************************************************/
c. Save your changes:
====> save
Note: Set Signal ShutdownTime 300 permits any virtual machine or ID that is sent a shutdown signal (sigkill) 300 ticks (wall clock seconds) to complete the shutdown process before it is then forced off. Under most circumstances, this process is more than adequate. If you believe that the workloads that are running on your Linux virtual servers require more than 300 seconds to fully quiesce and cleanly end their running processes, increase this value as you see fit.
Important: As with the C programming language, Java Script, or CSS, you must ensure that all comment strings are properly enclosed between a pair of /* and */.
Chapter 1. Running Linux virtual servers under IBM z/VM 19

20 Best practices and Getting Started Guide for Oracle on IBM LinuxONE

Chapter 2. Setting up Linux guests to install the Oracle 12cR2 Grid Infrastructure and Database
In this chapter, we describe best practices in setting up Linux guests properly to install Oracle Database 12c. We include information about how to obtain Oracle documentation, code, and My Oracle Support Notes (MOS).
We also describe setting up and configuring Red Hat Enterprise Linux Servers and SUSE Linux Enterprise Servers.
This chapter includes the following topics:
� 2.1, “Obtaining Oracle documentation, Oracle code, and My Oracle Support notes” on page 22
� 2.2, “Linux large pages and Oracle Databases” on page 24
� 2.3, “Setting up Red Hat Enterprise Linux and SUSE Enterprise Linux Server” on page 26
� 2.4, “Enable Linux Random Number Generation (Entropy)” on page 37
� 2.6, “SUSE Linux Enterprise Server specific setup” on page 41
2
© Copyright IBM Corp. 2020. All rights reserved. 21

2.1 Obtaining Oracle documentation, Oracle code, and My Oracle Support notes
This section includes the following topics:
� “Master Note of Linux OS Requirements for Database Server”“� “Obtaining the Oracle 12c Software for IBM LinuxONE”“
2.1.1 Master Note of Linux OS Requirements for Database Server
The Master Note is intended to provide an index and references to the most frequently used My Oracle Support articles concerning Linux OS Requirements for Oracle Database Software Installation.
For more information, see My Oracle Support Doc ID 851598.1, which is available by logging in to your Oracle Support account.
For Red Hat 7 Oracle 12c releases, see the following resources:
� Requirements for Installing Oracle 12.2 RDBMS on RH7 on IBM: Linux on System z® (Doc ID 2454390.1) for 12.2 installations
� Requirements for Installing Oracle 12c RDBMS on RH7 on IBM: Linux on System z (s390x) (Doc ID 2213265.1) for 12.1 installations for the most up-to-date requirements for installing Oracle with Red Hat version 7
For Suse 12 Oracle 12c installations, see the following resources:
� Requirements for Installing Oracle 12.2 on SLES 12 on IBM: Linux on System z (Doc ID 2454416.1) for 12.2 installations
� Requirements for Installing Oracle 12c on SLES 12 on IBM: Linux on System z (s390x) (Doc ID 2196637.1) for 12.1 SUSE 12 installations
The latest available Red Hat 7.x or Suse 12.x distribution service pack level is recommended for new installations to have the most up-to-date features and security functionality for running Oracle databases.
The Release Schedule of Current Database Releases is described in Doc ID 742060.1, which is available by logging in to your Oracle Support account. Use the My Oracle Support Certification tab on the My Oracle support site to determine the latest release status of Oracle version releases with Linux on System z.
2.1.2 Obtaining the Oracle 12c Software for IBM LinuxONE
Depending on your company’s Oracle licensing agreement, the latest Oracle code can be downloaded from the Oracle Software Delivery cloud or from the Oracle Technology Network (OTN) developers download site.
For trial and developer network downloads, the Oracle License agreement should be understood before downloading the Oracle 12c database software from the OTN download site.
If you have a commercial Oracle license, you should download your software from the Oracle Software Delivery Cloud.
22 Best practices and Getting Started Guide for Oracle on IBM LinuxONE
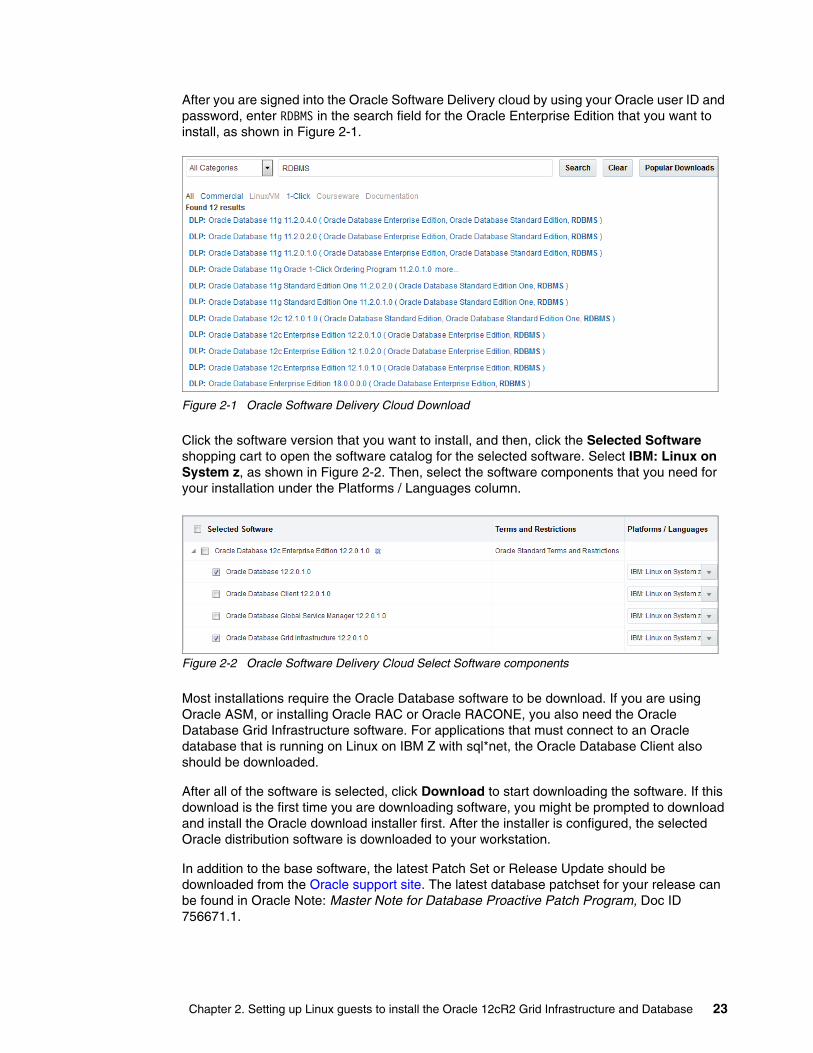
After you are signed into the Oracle Software Delivery cloud by using your Oracle user ID and password, enter RDBMS in the search field for the Oracle Enterprise Edition that you want to install, as shown in Figure 2-1.
Figure 2-1 Oracle Software Delivery Cloud Download
Click the software version that you want to install, and then, click the Selected Software shopping cart to open the software catalog for the selected software. Select IBM: Linux on System z, as shown in Figure 2-2. Then, select the software components that you need for your installation under the Platforms / Languages column.
Figure 2-2 Oracle Software Delivery Cloud Select Software components
Most installations require the Oracle Database software to be download. If you are using Oracle ASM, or installing Oracle RAC or Oracle RACONE, you also need the Oracle Database Grid Infrastructure software. For applications that must connect to an Oracle database that is running on Linux on IBM Z with sql*net, the Oracle Database Client also should be downloaded.
After all of the software is selected, click Download to start downloading the software. If this download is the first time you are downloading software, you might be prompted to download and install the Oracle download installer first. After the installer is configured, the selected Oracle distribution software is downloaded to your workstation.
In addition to the base software, the latest Patch Set or Release Update should be downloaded from the Oracle support site. The latest database patchset for your release can be found in Oracle Note: Master Note for Database Proactive Patch Program, Doc ID 756671.1.
Chapter 2. Setting up Linux guests to install the Oracle 12cR2 Grid Infrastructure and Database 23

For example, Version 12.2.0.1 Patch 28183653 applies the latest Grid Infrastructure and Database updates to your system after the base installation. Follow the readme file for the patch you plan to install, making sure to download the latest OPatch installer utility.
2.2 Linux large pages and Oracle Databases
It is recommended for performance and availability reasons to implement Linux large pages for Oracle databases that are running on IBM LinuxONE systems. Linux large pages are beneficial for systems where the database’s Oracle SGA is greater than 8 GB or if there are more than 50 database connections.
Complete the following steps to implement large pages:
1. Each database that is planned for Linux large pages cannot use Automatic Memory Management (AMM) by setting the MEMORY_MANAGEMENT parameter. It is recommended to use Automatic Shared Memory Management (ASMM) by setting the SGA_TARGET and PGA_AGGREGATE_TARGET Oracle parameters.
2. The Oracle use_large_pages parameter can be set to true, false, or only. If you have a LinuxONE system with one large database require large pages, and other smaller databases that do not require large pages, you can set the larger SGA database to “only” and the smaller databases to “false”. The default setting for use_large_pages is “true”.
3. At the Linux level, it is recommended to set the /etc/security/limits.conf to unlimited to allow for changes to the Oracle SGA/Linux large page values dynamically, as shown in the following example:
– soft memlock unlimited– hard memlock unlimited
4. Set or update the following parameters in the /etc/sysctl.conf file:
vm.nr_hugepages = ((sum of all large page SGA's)* 1024) + 16 = Nvm.hugetlb_shm_group = <Linux group number from /etc/group>
Example 2-1 shows an example of setting the parameters in the file.
Example 2-1 Setting parameters
#cat /etc/group | grep oracle dba:x:54322:oracle,grid#(SGA = 119GB*1024) + 16 page alignment or (119 * 1024) + 16 = 121872vm.nr_hugepages = 121872vm.hugetlb_shm_group = 54322
5. Restart your Linux Image and restart Oracle for the changes to take effect.
6. Review your Oracle database’s alert log to verify that the database was started with large pages enabled.
2.2.1 Disable Transparent HugePages
It is recommended for performance and stability reasons to disable transparent HugePages. Transparent HugePages are different than Linux large pages, which are still highly recommended to use.
24 Best practices and Getting Started Guide for Oracle on IBM LinuxONE

You can check whether your system has transparent HugePages enabled by using the following command:
cat /sys/kernel/mm/transparent_hugepage/enabled[always] madvise never
To disable Transparent HugePages, it is recommended that you update /etc/zipl.conf with transparent_hugepage=never at the end of the parameters line in the zipl.conf file, as shown in Example 2-2.
Example 2-2 Disable Transparent HugePages
oratest:~# cat /proc/cmdlineroot=UUID=26180fe6-b0f8-4ca8-b60c-dc98a230bc37 hvc_iucv=8 TERM=dumb hvc_iucv=8 TERM=dumb nobp=off transparent hugepage=never
1. Run zipl -VV for the changes to take effect, as shown in Example 2-3.
Example 2-3 Make changes take effect
[root@zlnxl2 etc]# zipl -VVUsing config file '/etc/zipl.conf'Target device information Device..........................: 5e:00 Partition.......................: 5e:01 Device name.....................: dasda Device driver name..............: dasd…Preparing boot device: dasda (0200).Syncing disks...Done.
2. Restart your Linux guest:
shutdown -r now
3. Verify transparent HugePages are disabled by using the following command:
cat /sys/kernel/mm/transparent_hugepage/enabledalways madvise [never]
Chapter 2. Setting up Linux guests to install the Oracle 12cR2 Grid Infrastructure and Database 25

2.3 Setting up Red Hat Enterprise Linux and SUSE Enterprise Linux Server
This section describes the common steps that are needed to implement an Oracle Database including Oracle Grid Infrastructure on SUSE Enterprise Server 12 or Red Hat Enterprise 7 on LinuxONE.
2.3.1 Pre-installation verification information
In this section, the following pre-installation verification information is provided to give you a basic understanding before starting an Oracle Database installation on LinuxONE:
� Graphical user interface (GUI)
A GUI is required to run the Oracle Installers interactively. We use the Linux vncserver on LinuxONE to start an X server and a VNC viewer client to establish a terminal emulator xterm session.
To use GUIs, such as the Oracle Universal Installer (OUI), configuration assistants, and Oracle Enterprise Manager, set the display to a system with X Window System server packages.
In our environment, we start a vncserver on LinuxONE, and use a VNC viewer client to establish the connection with the vncserver.
� Linux minimal installation
A minimal Linux installation lacks many RPMs that are required for database installation. Therefore, you must use an RPM package for Linux release to install the required packages.
� ASM
To use Oracle Automatic Storage Management (ASM), you must first install Oracle Grid Infrastructure for a stand-alone server before you install and create the database.
To provide persistence of the storage devices across restarts, ASM on LinuxONE requires specific configuration of udev rules. To use Oracle ASM on LinuxONE, you must first install the Oracle Grid Infrastructure for a stand-alone server before you install and create the database.
For Red Hat, see How to Manually Configure Disk Storage devices for use with Oracle ASM 11.2 and 12.1 on IBM: Linux on System z under RedHat, Doc ID 1377392.1
For SLES, see How to Manually Configure Disk Storage devices for use with Oracle ASM 11.2 and 12.1 on IBM: Linux on System z under SLES, Doc ID 1350008.1
Although the SUSE orarun RPM package can be used to configure the user or groups, ulimits, and kernel parms automatically, our experiences are based on manually configuring these settings.
26 Best practices and Getting Started Guide for Oracle on IBM LinuxONE
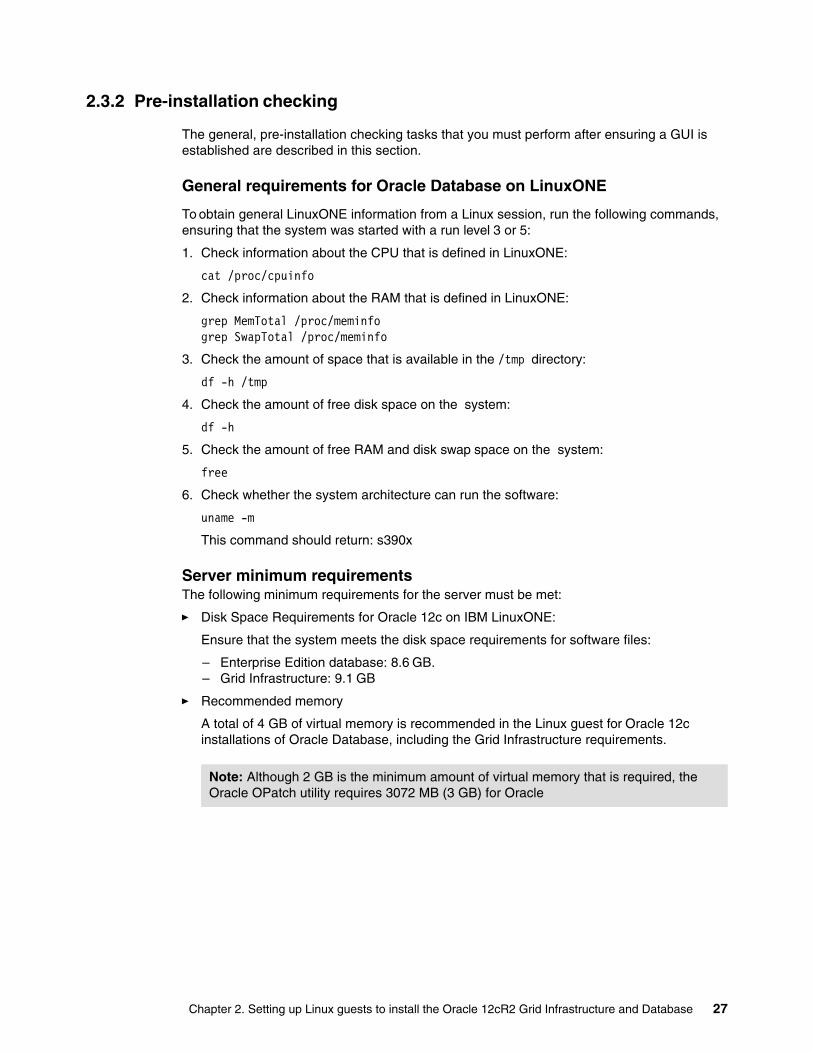
2.3.2 Pre-installation checking
The general, pre-installation checking tasks that you must perform after ensuring a GUI is established are described in this section.
General requirements for Oracle Database on LinuxONE
To obtain general LinuxONE information from a Linux session, run the following commands, ensuring that the system was started with a run level 3 or 5:
1. Check information about the CPU that is defined in LinuxONE:
cat /proc/cpuinfo
2. Check information about the RAM that is defined in LinuxONE:
grep MemTotal /proc/meminfogrep SwapTotal /proc/meminfo
3. Check the amount of space that is available in the /tmp directory:
df -h /tmp
4. Check the amount of free disk space on the system:
df -h
5. Check the amount of free RAM and disk swap space on the system:
free
6. Check whether the system architecture can run the software:
uname -m
This command should return: s390x
Server minimum requirementsThe following minimum requirements for the server must be met:
� Disk Space Requirements for Oracle 12c on IBM LinuxONE:
Ensure that the system meets the disk space requirements for software files:
– Enterprise Edition database: 8.6 GB.– Grid Infrastructure: 9.1 GB
� Recommended memory
A total of 4 GB of virtual memory is recommended in the Linux guest for Oracle 12c installations of Oracle Database, including the Grid Infrastructure requirements.
Note: Although 2 GB is the minimum amount of virtual memory that is required, the Oracle OPatch utility requires 3072 MB (3 GB) for Oracle
Chapter 2. Setting up Linux guests to install the Oracle 12cR2 Grid Infrastructure and Database 27

� Swap
Swap disk space is proportional to the system’s physical memory (as shown in Table 2-1) and recommended by Oracle for general Linux swap.
Table 2-1 Swap size recommendation
The Oracle guidelines for Linux swap can be reduced if needed, when enough memory exists to run all the databases in the Linux guest. The Oracle Installer requires a minimum of 500 MB of configured Linux swap to complete an installation and 1 GB of swap for database upgrades.
Customers that use Linux on IBM Z can use a layered virtual in-memory disk or VDISK for the Linux swap devices. Linux swap to a memory device (VDISK) is much quicker than using a physical disk storage device. z/VM does not allocate the memory that is used by a VDISK until the first swap page is “Used”.
Figure 2-3 shows an example of a recommended VDISK configuration with a VDISK being used for the first and second Level Swap with higher priority. Then, a physical disk or DASD disk can be used as a lower priority swap in the case of unexpected memory usage. Linux uses the higher priority swap devices first. When the swap device is fully exhausted, the next priority swap device is used.
Figure 2-3 Swap VDISK Configuration Priorities
The Linux mkswap and swapon commands can be used to configure swap manually. The /etc/fstab file can be used to configure permanent swap devices, as shown in Figure 2-4. The priority (pri=) should be a positive number, and the default is -1 for swap usage priority.
Figure 2-4 Swap VDISK setup in fstab
� Temporary directory
1 GB of space in the /tmp directory on LinuxONE systems.
� Linux kernel parameters
Verify that you have the required operating system kernel parameters installed. An example of kernel parameters is shown in Table 2-2 on page 29.
RAM Swap space
1 - 8 GB 2 times the size of RAM
8 - 32 GB Equal to the size of RAM
More than 32 GB 32 GB
28 Best practices and Getting Started Guide for Oracle on IBM LinuxONE

Table 2-2 Kernel parameters
Variable Example value File
file-max: Set to 512 x maximum number of user processes for the Linux Guest.
6815744 for13312processes
/proc/sys/fs/file-max
aio-max-nr: This value limits concurrent outstanding requests and should be set to avoid I/O subsystem failure. The formula is aio-max-nr =no of process per DB * no of databases * 4096.
3145728or 1048576 for smaller databases.
/proc/sys/fs/aio-max-nr
shmmax: Set this value to the size of at least the largest SGA in bytes. A more realistic “physical limit” for SHMMAX likely is “size of Linux Guest-2Gb”. For more information, see My Oracle Support note 567506.1.
2147483648(2 GB)
/proc/sys/kernel/shmmax
shmall: Set this parameter to a value that is equal to the total amount of shared memory in 4 K pages that the system can use at one time. That is, the sum of all the SGA databases on the system in bytes/4096. For most systems, this value is the value 2097152. For more information, see My Oracle Support note 301830.1.
2097152 /proc/sys/kernel/shmall
Semmsl kernel.sem= 250 32000 100128
/proc/sys/kernel/sem
Semmns /proc/sys/kernel/sem
Semopm /proc/sys/kernel/sem
Semmni /proc/sys/kernel/sem
Shmmni 4096 /proc/sys/kernel/shmmni
panic_on_oops setting is the value that allows n seconds delay before a node eviction/reboot.
1 /proc/sys/kernel/panic_on_oops
net.ipv4.ip_local_port_range 9000 65500 /proc/sys/net/ipv4/ip_local_port_range
rmem_default 262144 /proc/sys/net/core/rmem_default
rmem_max 4194304 /proc/sys/net/core/rmem_max
wmem_default 262144 /proc/sys/net/core/wmem_default
Chapter 2. Setting up Linux guests to install the Oracle 12cR2 Grid Infrastructure and Database 29

Other optional performance-related kernel parameters are listed in Table 2-3.
Table 2-3 Optional Performance Related Kernel parameters
Example 2-4 shows a sample sysctl.conf file. After kernel parameter values are updated, validate kernel parameters by using the following sysctl command:
# /sbin/sysctl -p
Example 2-4 Sample Linux kernel parameters for Oracle
vm.swappiness = 1vm.nr_hugepages = 2048vm.hugetlb_shm_group=101# Oracle specific parametersfs.aio-max-nr = 3145728fs.file-max = 6815744kernel.panic_on_oops = 1kernel.randomize_va_space = 0kernel.shmmax = 34359738368kernel.shmall = 8388608kernel.shmmni = 4096kernel.sem = 250 32000 100 128net.ipv4.ip_local_port_range = 9000 65500net.core.rmem_default = 262144net.core.rmem_max = 4194304net.core.wmem_default = 262144net.core.wmem_max = 1048576
2.3.3 Creating the database installation owner user
The installation process requires at least an Oracle database installation owner (oracle), an Oracle Inventory group (oinstall), and an Oracle administrative privileges group (dba).
wmem_max 1048576 /proc/sys/net/core/wmem_max
vm.swappiness: 1Helps avoid paging out SGA Memory when memory is constrained.
Variable Example value File
vm.nr_hugepages Sum of the Oracle SGAs + 16 MBFor example, 10256 for 10 GB SGA
Note: Linux Guest memory should always be sized larger than this value or excessive Linux swap occur.
vm.hugetlb_shm_group
<oinstall group id number> (for example 1001 if /etc/group line for oinstall is 1001)
Variable Example value File
30 Best practices and Getting Started Guide for Oracle on IBM LinuxONE

Example 2-5 shows the commands that are used to create the oracle user and groups.
Example 2-5 Creating the oracle user and groups
# /usr/sbin/groupadd oinstall -g 1001# /usr/sbin/groupadd dba -g 1002# /usr/sbin/useradd -m -g oinstall -G dba oracle# echo "oracle:newPassw0rd" | /usr/sbin/chpasswd
For separation of duty, some sites might also setting up a Linux “GRID” user ID to manage the grid infrastructure ASM and Oracle Grid Infrastructure components. If so, use the same useradd and change password steps that are shown in Example 2-5 for the Linux grid user.
2.3.4 User login security and limits configuration
The following settings must be verified before an installation is performed:
� Limits.conf
If necessary, update the resource limits in the /etc/security/limits.conf configuration file for the installation owner.
Assuming that the “oracle” Linux user performs the installation, add the following settings that are shown in Example 2-6 to /etc/security/limits.conf:
– If an Oracle Linux user ID such as GRID is used, define the same limits for the GRID Linux user as well using the following command as an example:
grid soft nproc 2047
– If you are planning to use large pages, as recommended, add the following settings to /etc/security/limits.conf:
oracle soft memlock unlimited oracle hard memlock unlimited
– If you are planning to use large pages and the Oracle SGA memory is increased, setting the ulimit memlock to unlimited is one less step that is needed to make that change.
Example 2-6 Sample limits.conf file
oracle soft nproc 2047oracle hard nproc 16384oracle soft nofile 1024oracle hard nofile 65536oracle soft stack 10240 oracle hard stack 32768grid soft nproc 2047grid hard nproc 16384grid soft nofile 1024grid hard nofile 65536 grid soft stack 10240 grid hard stack 32768 # memlock for Huge Pages supportoracle soft memlock unlimitedoracle hard memlock unlimitedgrid soft memlock unlimitedgrid hard memlock unlimited
Chapter 2. Setting up Linux guests to install the Oracle 12cR2 Grid Infrastructure and Database 31

� Oracle user shell limits
Check the current shell limits and raise them if necessary to required values.
In Oracle Linux user home, update the system base /etc/profile or each Oracle/grid users.bash_profile file to define oracle user limits value, as shown in Example 2-7. If an Oracle grid user is used, perform the same shell limits check and updates.
Example 2-7 Oracle user limits
if [ $USER = "oracle" ]; thenif [ $SHELL = "/bin/ksh" ]; then ulimit -u 16384 ulimit -n 65536 ulimit -s 32768elseulimit -u 16384 -n 65536 -s 32768 fifi
2.3.5 Shared memory file system
For Oracle Database Installations that are not using Large pages and are using Automatic Memory Management with the MEMORY_TARGET parameter, it is important to ensure that the /dev/shm mount area is of type tmpfs and is mounted with the following options:
� With RW and run permissions set on it� With noexec or nosuid not set on it
Use the following command to check the shared memory file system:
# cat /etc/fstab |grep tmpfs
The output for this command looks similar to the following example:
tmpfs/dev/shm tmpfs defaults 0 0
If needed, change the mount settings. As the root user, open the /etc/fstab file with a text editor and modify the tmpfs line. If you are planning to use Automatic Memory Management (AMM), set the tmpfs file system size to the sum of all the MEMORY_TARGET on the system, as shown in the following example:
tmpfs/dev/shm tmpfs rw,exec,size=30G 0 0
LinuxONE can use large pages of 1 MB with Oracle. The Oracle MEMORY_TARGET parameter is not eligible for large pages; instead, SGA_TARGET is used for the Oracle memory setting when Linux large pages are used.
2.3.6 Host name
Use the ping command to ensure that the computer host name is resolvable, as shown in Example 2-8.
Example 2-8 Example of the ping command and its output
# ping l3oradb0.mop.fr.ibm.comPING l3oradb0.mop.fr.ibm.com (10.3.58.144) 56(84) bytes of data.64 bytes from l3oradb0.mop.fr.ibm.com (10.3.58.144): icmp_seq=1 ttl=64 time=0.290 ms
32 Best practices and Getting Started Guide for Oracle on IBM LinuxONE

--- l3oradb0.mop.fr.ibm.com ping statistics ---2 packets transmitted, 2 received, 0% packet loss, time 999ms rtt min/avg/max/mdev = 0.090/0.190/0.290/0.100 ms
If needed, add the Fully Qualified Domain Name to the HOSTNAME file, by using the hostname command, as shown in Example 2-9.
Example 2-9 Showing the hostname
# hostname -fl3oradb2.mop.fr.ibm.com
Example 2-10 shows the command and results of displaying the contents of the HOSTNAME file.
Example 2-10 Show the contents of the HOSTNAME file
# cat /etc/hostnamel3oradb2.mop.fr.ibm.com
To update the hostname, enter the fully qualified hostname by using the hostname command, as shown in Example 2-11.
Example 2-11 Updating the hostname
# hostname# hostname l3oradb2.mop.fr.ibm.com# hostnamel3oradb2.mop.fr.ibm.com
2.3.7 Storage options for Oracle database
In this section, we describe the following disk storage configuration options that are available for database files on LinuxONE:
� Open Storage FCP/SCSI LUNs
� IBM Extended Count Key Data (ECKD) DASD with HyperPAV or PAV.
� File systems and Shared Storage (for example, Spectrum Scale 5.0 – IBM GPFS, see Chapter 4., “Using Oracle Enterprise Manager Cloud Control Agent to manage Oracle Database 12c Release 2” on page 57, and Chapter 5., “Installing and configuring Spectrum Scale” on page 71 1)
To configure disk storage for LinuxONE, assign the LUNs (with multiple paths) to Linux to ensure high availability and better performance by spreading the I/O workload across more channel paths/host bus adapters (HBAs). Consider the following points:
� FCP/SCSI: If using FCP/SCSI open system storage for your ASM disk devices, it is important to configure a multipathing and an UDEV rule that ensures device persistence and disk permissions for the Oracle ASM disks.
To configure multiple disk paths with FCP/SCSI open storage, it is necessary to set up /etc/multipath.conf to enable multipathing for high availability to the disk paths and for performance reasons.
1 This certification is limited to Oracle 12cR1.
Chapter 2. Setting up Linux guests to install the Oracle 12cR2 Grid Infrastructure and Database 33
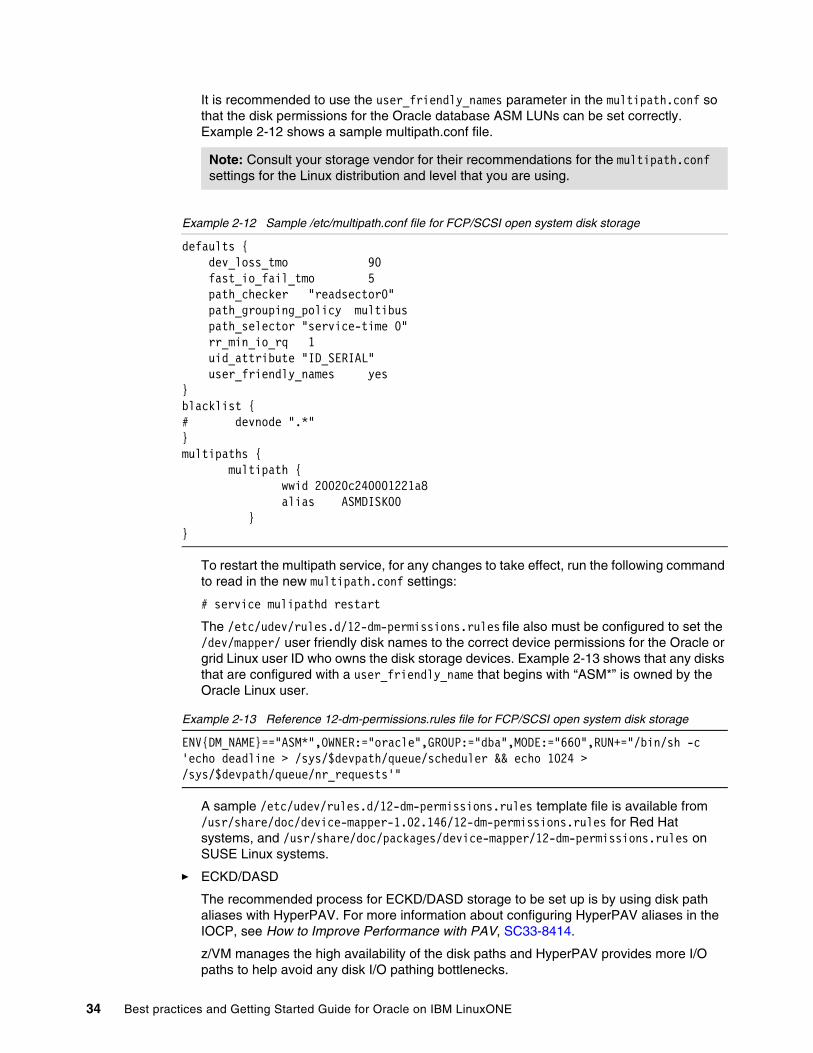
It is recommended to use the user_friendly_names parameter in the multipath.conf so that the disk permissions for the Oracle database ASM LUNs can be set correctly. Example 2-12 shows a sample multipath.conf file.
Example 2-12 Sample /etc/multipath.conf file for FCP/SCSI open system disk storage
defaults { dev_loss_tmo 90 fast_io_fail_tmo 5 path_checker "readsector0" path_grouping_policy multibus path_selector "service-time 0" rr_min_io_rq 1 uid_attribute "ID_SERIAL" user_friendly_names yes}blacklist {# devnode ".*"}multipaths { multipath { wwid 20020c240001221a8 alias ASMDISK00 }}
To restart the multipath service, for any changes to take effect, run the following command to read in the new multipath.conf settings:
# service mulipathd restart
The /etc/udev/rules.d/12-dm-permissions.rules file also must be configured to set the /dev/mapper/ user friendly disk names to the correct device permissions for the Oracle or grid Linux user ID who owns the disk storage devices. Example 2-13 shows that any disks that are configured with a user_friendly_name that begins with “ASM*” is owned by the Oracle Linux user.
Example 2-13 Reference 12-dm-permissions.rules file for FCP/SCSI open system disk storage
ENV{DM_NAME}=="ASM*",OWNER:="oracle",GROUP:="dba",MODE:="660",RUN+="/bin/sh -c 'echo deadline > /sys/$devpath/queue/scheduler && echo 1024 > /sys/$devpath/queue/nr_requests'"
A sample /etc/udev/rules.d/12-dm-permissions.rules template file is available from /usr/share/doc/device-mapper-1.02.146/12-dm-permissions.rules for Red Hat systems, and /usr/share/doc/packages/device-mapper/12-dm-permissions.rules on SUSE Linux systems.
� ECKD/DASD
The recommended process for ECKD/DASD storage to be set up is by using disk path aliases with HyperPAV. For more information about configuring HyperPAV aliases in the IOCP, see How to Improve Performance with PAV, SC33-8414.
z/VM manages the high availability of the disk paths and HyperPAV provides more I/O paths to help avoid any disk I/O pathing bottlenecks.
Note: Consult your storage vendor for their recommendations for the multipath.conf settings for the Linux distribution and level that you are using.
34 Best practices and Getting Started Guide for Oracle on IBM LinuxONE
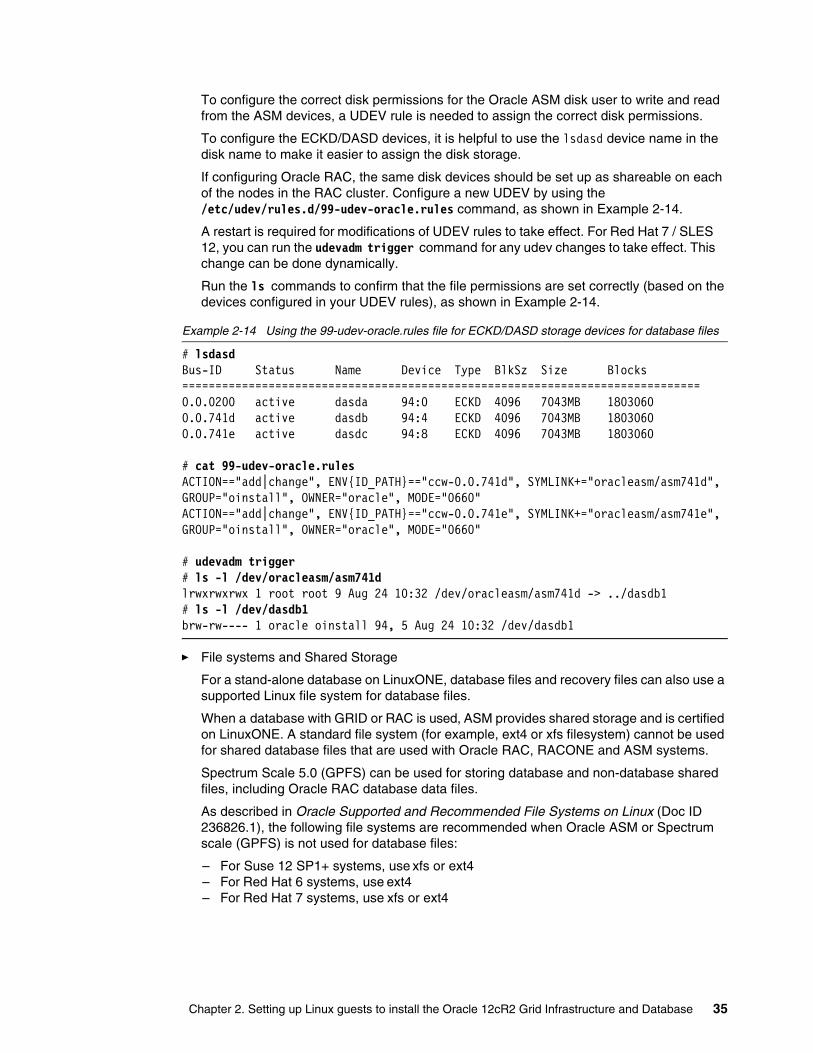
To configure the correct disk permissions for the Oracle ASM disk user to write and read from the ASM devices, a UDEV rule is needed to assign the correct disk permissions.
To configure the ECKD/DASD devices, it is helpful to use the lsdasd device name in the disk name to make it easier to assign the disk storage.
If configuring Oracle RAC, the same disk devices should be set up as shareable on each of the nodes in the RAC cluster. Configure a new UDEV by using the /etc/udev/rules.d/99-udev-oracle.rules command, as shown in Example 2-14.
A restart is required for modifications of UDEV rules to take effect. For Red Hat 7 / SLES 12, you can run the udevadm trigger command for any udev changes to take effect. This change can be done dynamically.
Run the ls commands to confirm that the file permissions are set correctly (based on the devices configured in your UDEV rules), as shown in Example 2-14.
Example 2-14 Using the 99-udev-oracle.rules file for ECKD/DASD storage devices for database files
# lsdasdBus-ID Status Name Device Type BlkSz Size Blocks==============================================================================0.0.0200 active dasda 94:0 ECKD 4096 7043MB 18030600.0.741d active dasdb 94:4 ECKD 4096 7043MB 18030600.0.741e active dasdc 94:8 ECKD 4096 7043MB 1803060
# cat 99-udev-oracle.rulesACTION=="add|change", ENV{ID_PATH}=="ccw-0.0.741d", SYMLINK+="oracleasm/asm741d", GROUP="oinstall", OWNER="oracle", MODE="0660"ACTION=="add|change", ENV{ID_PATH}=="ccw-0.0.741e", SYMLINK+="oracleasm/asm741e", GROUP="oinstall", OWNER="oracle", MODE="0660"
# udevadm trigger# ls -l /dev/oracleasm/asm741dlrwxrwxrwx 1 root root 9 Aug 24 10:32 /dev/oracleasm/asm741d -> ../dasdb1# ls -l /dev/dasdb1brw-rw---- 1 oracle oinstall 94, 5 Aug 24 10:32 /dev/dasdb1
� File systems and Shared Storage
For a stand-alone database on LinuxONE, database files and recovery files can also use a supported Linux file system for database files.
When a database with GRID or RAC is used, ASM provides shared storage and is certified on LinuxONE. A standard file system (for example, ext4 or xfs filesystem) cannot be used for shared database files that are used with Oracle RAC, RACONE and ASM systems.
Spectrum Scale 5.0 (GPFS) can be used for storing database and non-database shared files, including Oracle RAC database data files.
As described in Oracle Supported and Recommended File Systems on Linux (Doc ID 236826.1), the following file systems are recommended when Oracle ASM or Spectrum scale (GPFS) is not used for database files:
– For Suse 12 SP1+ systems, use xfs or ext4– For Red Hat 6 systems, use ext4– For Red Hat 7 systems, use xfs or ext4
Chapter 2. Setting up Linux guests to install the Oracle 12cR2 Grid Infrastructure and Database 35
2.3.8 Required software directories
Identify or create the following directories that are needed by the Oracle software installer. The examples in this section use /u01 for the mount point directory:
� Oracle Base Directory
The following directory is used:
ORACLE_BASE = /mount_point/app/software_owner
In this installation example, we created a 20GB Logical Volume to host Oracle software and data.
Where software owner is the operating system user name of the software owner that is installing the Oracle software; for example, oracle or grid.
� Oracle Inventory Directory
This directory stores an inventory of all software that is installed on the system. It is required and shared by all Oracle software installations on a single system. If Oracle Inventory paths exist, the Oracle Universal Installer continues to use that Oracle Inventory.
The Oracle Inventory path is in /var/opt/oracle/oraInst.loc.
Example 2-15 shows the command that is used to check the contents and the existence of the oraInst.loc file with the results displaying the contents of the file.
Example 2-15 Examining the oraInst.loc
# cat /var/opt/oracle/oraInst.loc inventory_loc=/oraInventory inst_group=oinstall
� Oracle Home Directory
The following directory is where the Oracle software product is installed:
ORACLE_HOME=$ORACLE_BASE/oracle_base/product/12.2.0/dbhome_1
Identifying or creating an Oracle Base DirectoryFor more information about determining whether Oracle ASM is used, see the Oracle ASM documentation How to Manually Configure Disk Storage devices for use with Oracle ASM 11.2 and 12.1 on IBM: Linux on System z under SLES (Doc ID 1350008.1).
For more information about Red Hat systems, see How to Manually Configure Disk Storage devices for use with Oracle ASM 11.2 on IBM: Linux on System z under RedHat 5 (Doc ID 1351746.1).
If ASM is not used, create a Linux file system by using the following Yast or Linux commands:
� Create physical volumes, a volume group, and add physical volumes to it and create a Logical Volume with stripping. Create an ext3 file system.
� Create the following mount point:
# mkdir /u01# chown -R oracle:oinstall /u01 l3oradb2:~ # chmod -R 775 /u01
� Mount the logical volume on ORACLE_BASE=/u01, as shown in the following example:
# mount -t ext3 /dev/mapper/vg2181-lv2181 /u01
For resiliency after restart, insert the mount statement into /etc/fstab.
36 Best practices and Getting Started Guide for Oracle on IBM LinuxONE
2.3.9 Setting the disk I/O scheduler
The following I/O schedulers (also known as elevators) are available:
� Noop: No operation; only last request merging.
� Deadline: A latency-oriented I/O scheduler. The algorithm preferably serves reads before writes.
� Complete fair queuing (CFQ): All users of a particular drive can run approximately the same number of I/O requests over a specific time.
The default scheduler in the current distributions is Deadline. Do not change the default scheduler or default settings without reason. Changing these settings can reduce throughput or increase processor consumption.
For more information about which elevator is the current default, run the command that is shown in Example 2-16. The selected scheduler is listed in brackets.
Example 2-16 Checking the scheduler
# cat /sys/devices/virtual/block/dm-1/queue/scheduler noop [deadline] cfq
2.4 Enable Linux Random Number Generation (Entropy)
New in Oracle 12.2 and later is the ability of Oracle systems to provide good random number generation for security features and for successful Oracle installations.
Oracle 12.2 now uses /dev/random rather than /dev/urandom, which means without properly configured entropy you may now encounter random access issues such as ORA-01017: invalid username/password and or random installation issues due to lack of entropy.
IBM LinuxONE provides two hardware methods to help Linux Systems replenish entropy:
� /dev/hwrng: true random number generator using the CryptoExpress CCA co-processor
� /dev/prandom: hardware assisted pseudo random number generator using the CPACF HW instructions.
With SLES 12 SP1+ entropy is in the kernel if a crypto card is installed and the device driver loaded (the haveged default is a 4 KB data cache and a 16 KB instruction cache.). RHEL 7.2+ uses rng-tools and starts the rngd service to help generate entropy using the hardware. The general rule of thumb is that /proc/sys/kernel/random/entropy_avail should always be greater than 1000 random numbers available. To see this number, perform the following command:
cat /proc/sys/kernel/random/entropy_avail
The number returned is how much “entropy” is available to the kernel.
2.4.1 Hardware crypto card
To get the best entropy available, LinuxONE can leverage a hardware crypto card if configured to the Logical Partition (LPAR) to replenish entropy. You must have a crypto domain assigned to the LPAR and you must also enable the ap module. This results in better entropy than nearly any other methods in most cases.
Chapter 2. Setting up Linux guests to install the Oracle 12cR2 Grid Infrastructure and Database 37
SUSE Linux Enterprise ServersFor more details please refer to the following IBM Redbooks publication for details on configuring the hardware crypto card option in SUSE Linux Enterprise Servers: The Virtualization Cookbook for IBM z Systems Volume 3: SUSE Linux Enterprise Server 12, SG24-8890.
If a hardware crypto card is not available and your installing on a Suse Linux systems, then make sure have you the haveged service defined and running to replenish entropy. The steps to install and enable haveged are:
1. Install haveged. e.g zypper in haveged
2. Start haveged:
/etc/init.d/haveged start
3. Enable haveged to start at boot
chkconfig haveged on
Red Hat Enterprise Linux serversIf a hardware crypto card is not available and your installing on a RedHat System and more entropy is needed, then configuring the rngd service. Perform the following steps to install and enable the rngd service:
1. Install the rngd service if it is not already installed.
yum install -y rng-tools
2. Start the /dev/prandom hardware module by using the command modprobe prng. You may want to create an entry in /etc/modules-load.d/prng.conf to load on system boot:
cat /etc/modules-load.d/prng.conf#Load prng at boot time (modprobe prng)prng
3. Create a copy of the template rngd.service file:
cp /usr/lib/systemd/system/rngd.service /etc/systemd/system
4. Edit the /etc/systemd/system/rngd.service file and replace the line starting with ExecStart with:
ExecStart=/sbin/rngd -f -r /dev/prandom
5. Reload the Systemd configuration:
# systemctl daemon-reload
6. Restart the rngd service:
# systemctl restart rngd
7. Finally, verify that your system has the required amount of entropy greater than 1000 as shown below.
cat /proc/sys/kernel/random/entropy_avail 3099
38 Best practices and Getting Started Guide for Oracle on IBM LinuxONE

2.5 Red Hat Enterprise Linux 7 and SUSE Linux Enterprise Server set up
This section describes other steps that are needed to install Oracle Single Instance Database on Red Hat Enterprise Linux for Red Hat 7. These steps are in addition to the generic Linux setup steps that are described in 2.3, “Setting up Red Hat Enterprise Linux and SUSE Enterprise Linux Server” on page 26 and apply to Red Hat Linux systems on LinuxONE only.
2.5.1 Security-Enhanced Linux
Security-Enhanced Linux (SELiInux) is a Linux kernel security module that provides a mechanism for supporting access control security policies for security of Red Hat operating systems.
By default, Red Hat Enterprise Linux server version 7 is installed with SELinux in enforcing mode (meaning that the SELinux policy is in effect and it enforces access denials and audits them). This configuration is acceptable for the 12c installation process for RedHat Enterprise Linux server version 7.
2.5.2 Pre-installation checking
This section describes more pre-installation checking that you must perform after you ensure that a GUI is established.
Operating system requirements for IBM LinuxONEThe following operating system requirements must be met when IBM LinuxONE is used:
� SSH Requirement: OpenSSH is the required SSH software.
� RHEL 7 servers must be running Red Hat kernel 3.10.0-327.el7 (s390x) or higher. (The highest available Red Hat 7.x service pack is recommended.)
Oracle RPM Checker with Red Hat Enterprise Linux Server In this section, we describe how to use the Oracle RPM Checker utility to verify that the following required Linux packages are installed on the operating system before starting the Oracle Database or Oracle Grid Infrastructure installation. The RPM Checker does not install any missing package:
� Checking for missing RPMs
Download the appropriate Oracle RPM Checker utility from one of the following My Oracle Support websites based on Oracle Database 12c Release and the Red Hat Enterprise Linux Server distribution level; for example, Requirements for Installing Oracle 12.2 RDBMS on RH7 on IBM: Linux on System z (Doc ID 2454390.1):
– RedHat 7 12.1.0.2 – RedHat 7 12.2.0.1
After you download the RPM checker on LinuxONE, decompress the RPM and install it as root. To assess the missing RPMs, use one of the following commands (depending on your distribution level):
yum install <downloaded rpm name>
or
yum install ora-val-rpm-RH7-DB-12.2.s390x.rpm
Chapter 2. Setting up Linux guests to install the Oracle 12cR2 Grid Infrastructure and Database 39

Running the command automatically pulls in the required RPMs if your yum repository is set up. If you do not have your yum repository set up, you can install the RPM dependency checker by using the following command (use the command corresponding to your distribution level):
rpm -ivh ora-val-rpm-RH7-DB-12.2.s390x.rpm
Example 2-17 shows the result of running the command to install the RPM dependency checker.
Example 2-17 Red Hat rpm checker for a 12.1.0.2 Red Hat 7 Installation
[root@oralab0l oracode]# rpm -ivh ./ora-val-rpm-RH7-DB-12.2.s390x.rpmPreparing... ################################# [100%]Updating / installing... 1:ora-val-rpm-RH7-DB-12.2 ################################# [100%]***************************************************************************** Validation complete - please install any missing rpms ** The following output should display both (s390) - 31-bit and ** (s390x) 64-bit rpms - Please provide the output to Oracle ** Support If you are still encountering problems. *****************************************************************************Found glibc (s390)Found glibc (s390x)Found libaio (s390)Found libaio (s390x)Found libaio-devel (s390)Found libaio-devel (s390x)Found libXi (s390)Found libXi (s390x)Found libXtst (s390)Found libXtst (s390x)Found glibc-devel (s390)Found glibc-devel (s390x)Found libgcc (s390)Found libgcc (s390x)Found libstdc++ (s390)Found libstdc++ (s390x)Found libstdc++-devel (s390)Found libstdc++-devel (s390x)
Example 2-18 lists the minimum Oracle 12.2 required rpms for a Red Hat installation.
Example 2-18 Red Hat 7.2 rpm list
binutils-2.23.52.0.1-55.el7.s390xcompat-libcap1-1.10-7.el7.s390xcpp-4.8.5-4.el7.s390xgcc-4.8.5-4.el7.s390xgcc-c++-4.8.5-4.el7.s390xglibc-2.17-105.el7.s390glibc-2.17-105.el7.s390xglibc-devel-2.17-105.el7.s390glibc-devel-2.17-105.el7.s390xglibc-headers-2.17-105.el7.s390xksh-20120801-22.el7_1.2.s390xlibaio-0.3.109-13.el7.s390
40 Best practices and Getting Started Guide for Oracle on IBM LinuxONE

libaio-0.3.109-13.el7.s390xlibaio-devel-0.3.109-13.el7.s390libaio-devel-0.3.109-13.el7.s390xlibgcc-4.8.5-4.el7.s390libgcc-4.8.5-4.el7.s390xlibstdc++-4.8.5-4.el7.s390libstdc++-4.8.5-4.el7.s390xlibstdc++-devel-4.8.5-4.el7.s390libstdc++-devel-4.8.5-4.el7.s390xlibX11-1.6.3-2.el7.s390libX11-1.6.3-2.el7.s390xlibXau-1.0.8-2.1.el7.s390libXau-1.0.8-2.1.el7.s390xlibxcb-1.11-4.el7.s390libxcb-1.11-4.el7.s390xlibXext-1.3.3-3.el7.s390libXext-1.3.3-3.el7.s390xlibXi-1.7.4-2.el7.s390libXi-1.7.4-2.el7.s390xlibXtst-1.2.2-2.1.el7.s390libXtst-1.2.2-2.1.el7.s390xmake-3.82-21.el7.s390xmpfr-3.1.1-4.el7.s390xnet-tools-2.0-0.17.20131004git.el7.s390xsmartmontools-6.2-4.el7.s390xsysstat-10.1.5-7.el7.s390x
2.6 SUSE Linux Enterprise Server specific setup
This section describes the steps that are used to set up Oracle Single Instance Database on SUSE Enterprise Server on LinuxONE.
These steps are in addition to the generic Linux setup steps that are described in 2.3, “Setting up Red Hat Enterprise Linux and SUSE Enterprise Linux Server” on page 26 and apply to SUSE Linux Enterprise systems on LinuxONE only.
2.6.1 Important information
Although the SUSE orarun RPM package can be used to configure the user or groups, ulimits, and kernel parms automatically, our experiences are based on manually configuring these settings based on guidance from Oracle Database Installation Guide 12c Release 2 (12.2) for Linux, E85758-03. Changes in the recommended Oracle RPMs and kernel parameters can occur between release levels; therefore, review the latest Oracle support Getting Started notes for updates.
2.6.2 Pre-installation checking
This section describes other pre-installation checking that you must perform after ensuring that a GUI is established.
Chapter 2. Setting up Linux guests to install the Oracle 12cR2 Grid Infrastructure and Database 41

Operating system requirements for IBM LinuxONEThe following operating system requirements must be met when IBM LinuxONE is used:
� SSH Requirement: OpenSSH is the required SSH software.
� SUSE Linux Enterprise Server: SUSE Linux Enterprise Server 12 SP1: kernel-default-3.12.53-60.30.1(s390x) or later. The base kernel level for SLES 12 SP1 is 3.12.49-11.1
Oracle RPM Checker with SUSE Linux Enterprise Server on LinuxONE Use the Oracle RPM Checker utility to verify that the required Linux packages are installed on the operating system before starting the Oracle Database or Oracle Grid Infrastructure installation. The RPM checker does not install any missing packages.
Complete the following steps to check for missing RPMs:
1. Download the Oracle RPM Checker utility from the link that is provided in the My Oracle Support note 2454416.1.
2. After downloading the utility to the Suse Enterprise Linux Server on LinuxONE, decompress the RPM and install it as root. To list the missing RPMs, use the following command:
# zypper install ora-val-rpm-S12-DB-12.2.s390x.rpm
The output of the command is shown in Figure 2-5.
Figure 2-5 RPM checker output showing missing RPMs
In SUSE Linux, you can also use the zypper installation utility to install all of the packages and their dependencies by running the following command:
# zypper install ora-val-rpm-S12-DB-12.1.0.2-2.s390x.rpm
With SUSE Linux Enterprise Server, software can be added by using the YAST interface or from the Linux command line (rpm -i or zypper). Example 2-19 on page 43 shows the installation of an rpm package by using zypper.
42 Best practices and Getting Started Guide for Oracle on IBM LinuxONE

Example 2-19 Package installation using zypper
3. Automatically install all of the missing RPMs in a single shell command.
To provision LinuxONE Oracle instances and simplify automation, a shell can be used to check and install the missing packages.
Create a shell command file and paste the contents, as shown in Example 2-20.
Example 2-20 Contents of shell command file
rpm -ivh /mnt/oracle/oracle.12c/ora-val-rpm-S12-DB-12.2.s390x.rpm 2>/tmp/tempo;var=$(wc -l /tmp/tempo | awk '{print $1}');tail -$(($var -1 )) /tmp/tempo | awk '{print "zypper install " $1}'>/tmp/irpm.sh;sh /tmp/irpm.sh; rm -f /tmp/tempo;cat /tmp/irpm.sh;rm -f /tmp/irpm.sh ;rpm -ivh /mnt/oracle/oracle.12c/ ora-val-rpm-S12-DB-12.2.s390x.rpm
This shell first identifies the missing RPMs and writes their name in a temporary file. Then, it starts the RPM installation by using the zypper command and removes temporary work files. Finally, it starts the RPM checker utility to ensure that all files were installed.
After all of the required RPMs and software packages are installed, your system is ready for you to install the Oracle database and grid infrastructure software.
Example 2-21 lists the minimum Oracle 12.2 required rpms for a SUSE 12 SP1 installation.
Example 2-21 SUSE SP1 rpm list
binutils-2.25.0-13.1.s390xgcc-32bit-4.8-6.189.s390xgcc-4.8-6.189.s390xgcc48-32bit-4.8.5-24.1.s390xgcc48-4.8.5-24.1.s390xgcc48-c++-4.8.5-24.1.s390xgcc-info-4.8-6.189.s390xgcc48-locale-4.8.5-24.1.s390xgcc-c++-32bit-4.8-6.189.s390xgcc-c++-4.8-6.189.s390xgcc-info-4.8-6.189.s390xgcc-locale-4.8-6.189.s390xglibc-2.19-31.9.s390xglibc-32bit-2.19-31.9.s390xglibc-devel-2.19-31.9.s390x
Note: Repositories for zypper can be found in the /etc/zypp/repos.d file system.
Chapter 2. Setting up Linux guests to install the Oracle 12cR2 Grid Infrastructure and Database 43

glibc-devel-32bit-2.19-31.9.s390xlibaio1-0.3.109-17.15.s390xlibaio1-32bit-0.3.109-17.15.s390xlibaio-devel-0.3.109-17.15.s390xlibcap1-1.10-59.61.s390xlibcap1-32bit-1.10-59.61.s390xlibcap2-2.22-11.709.s390xlibcap2-32bit-2.22-11.709.s390xlibcap-ng0-0.7.3-4.125.s390xlibcap-ng0-32bit-0.7.3-4.125.s390xlibcap-ng-utils-0.7.3-4.125.s390xlibcap-progs-2.22-11.709.s390xlibgcc_s1-5.2.1+r226025-4.1.s390xlibgcc_s1-32bit-5.2.1+r226025-4.1.s390xlibgomp1-32bit-5.2.1+r226025-4.1.s390xlibstdc++48-devel-4.8.5-24.1.s390xlibstdc++48-devel-32bit-4.8.5-24.1.s390xlibstdc++6-5.2.1+r226025-4.1.s390xlibstdc++6-32bit-5.2.1+r226025-4.1.s390xlibstdc++-devel-4.8-6.189.s390xlibstdc++-devel-32bit-4.8-6.189.s390xlibX11-6-1.6.2-4.12.s390xlibX11-6-32bit-1.6.2-4.12.s390x
44 Best practices and Getting Started Guide for Oracle on IBM LinuxONE
Chapter 3. Installing and configuring Oracle Grid Infrastructure for Oracle 12c Release 2
Oracle databases often are deployed as one of the following configurations:
� Standalone database that uses file systems � Standalone database that uses Oracle Automated Storage Management (ASM) � Real Application Cluster (RAC) databases
To use Oracle ASM and Oracle RAC configurations, an Oracle Grid Infrastructure must be available. This chapter describes the steps and best practices about how to install and configure Oracle Grid Infrastructure for Oracle 12c Release 2 on a LinuxONE environment.
This chapter includes the following topics:
� 3.1, “Grid Infrastructure for an Oracle Standalone database to use ASM ” on page 46� 3.2, “Grid Infrastructure for an Oracle RAC Database environment” on page 47� 3.3, “Installation of Single instance Oracle Database binary” on page 49� 3.4, “Creating a database by using file system” on page 52� 3.5, “Creating a database by using ASM ” on page 54
3
© Copyright IBM Corp. 2020. All rights reserved. 45
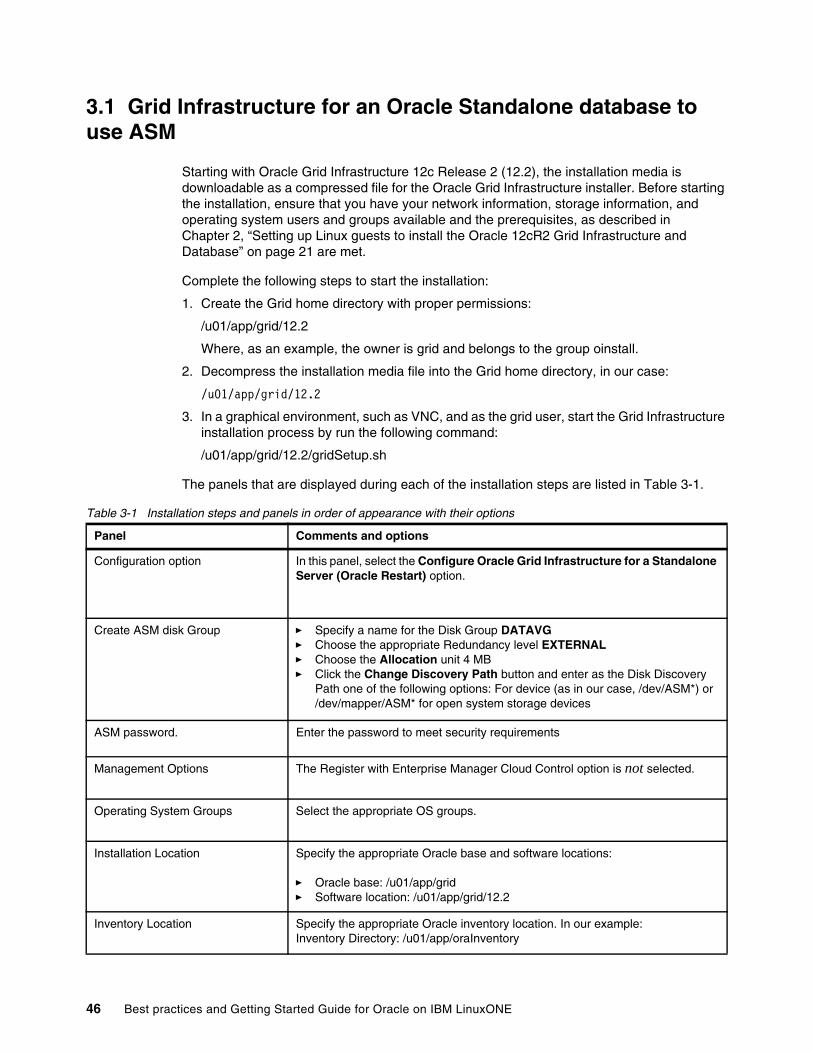
3.1 Grid Infrastructure for an Oracle Standalone database to use ASM
Starting with Oracle Grid Infrastructure 12c Release 2 (12.2), the installation media is downloadable as a compressed file for the Oracle Grid Infrastructure installer. Before starting the installation, ensure that you have your network information, storage information, and operating system users and groups available and the prerequisites, as described in Chapter 2, “Setting up Linux guests to install the Oracle 12cR2 Grid Infrastructure and Database” on page 21 are met.
Complete the following steps to start the installation:
1. Create the Grid home directory with proper permissions:
/u01/app/grid/12.2
Where, as an example, the owner is grid and belongs to the group oinstall.
2. Decompress the installation media file into the Grid home directory, in our case:
/u01/app/grid/12.2
3. In a graphical environment, such as VNC, and as the grid user, start the Grid Infrastructure installation process by run the following command:
/u01/app/grid/12.2/gridSetup.sh
The panels that are displayed during each of the installation steps are listed in Table 3-1.
Table 3-1 Installation steps and panels in order of appearance with their options
Panel Comments and options
Configuration option In this panel, select the Configure Oracle Grid Infrastructure for a Standalone Server (Oracle Restart) option.
Create ASM disk Group � Specify a name for the Disk Group DATAVG� Choose the appropriate Redundancy level EXTERNAL� Choose the Allocation unit 4 MB � Click the Change Discovery Path button and enter as the Disk Discovery
Path one of the following options: For device (as in our case, /dev/ASM*) or /dev/mapper/ASM* for open system storage devices
ASM password. Enter the password to meet security requirements
Management Options The Register with Enterprise Manager Cloud Control option is not selected.
Operating System Groups Select the appropriate OS groups.
Installation Location Specify the appropriate Oracle base and software locations:
� Oracle base: /u01/app/grid� Software location: /u01/app/grid/12.2
Inventory Location Specify the appropriate Oracle inventory location. In our example:Inventory Directory: /u01/app/oraInventory
46 Best practices and Getting Started Guide for Oracle on IBM LinuxONE

4. Verify that the installation is complete.
The next task is to create the ASM Disk Groups. Oracle recommends that you create the following Disk Groups to be used by the Oracle databases:
� Database data (DATA): Where active database files, such as data files, control files, online redo logs, archive redo logs, and change-tracking files that are used in incremental backups are stored.
� Flash Recovery Area (FRA): Where recovery-related files are created, such as multiplexed copies of the current control file and online redo logs, backup sets, and flashback log files.
However, we found that using a separate Disk Group for online redo log group improves the performance.
ASM disk groups can be created by using Oracle’s ASM Configuration Assistant (ASMCA).
3.2 Grid Infrastructure for an Oracle RAC Database environment
In this section, we outline the process to create the Grid Infrastructure for an Oracle RAC database environment. The Grid Infrastructure for the Oracle RAC creation process is similar to setting up the Grid Infrastructure for an Oracle Standalone database that uses ASM.
Starting with Oracle Grid Infrastructure 12c Release 2 (12.2), the installation media is downloadable as a compressed file for the Oracle Grid Infrastructure installer. Before starting the installation, ensure that you set up your environment according to the network information, storage information, and operating system users and groups that are available and the prerequisites, as discussed in Chapter 2 on page 21 are met.
Complete the following steps to start the installation:
1. Create the Grid home directory with proper permissions, such as:
/u01/app/grid/12.2
Where the owner is grid and belongs to the group oinstall.
2. Decompress the installation media file into the Grid home directory, in our case:
/u01/app/grid/12.2
3. In a graphical environment, such as VNC and by using the grid user ID, start the Grid Infrastructure installation process by running the following command:
/u01/app/grid/12.2/gridSetup.sh
Root script execution configuration Select the Automatically run configuration scripts option and enter the root user credentials.
Prerequisite Checks Check for any errors. If an error occurs and it can be fixed, it is displayed. Selecting the displayed command automatically runs the command by using root credentials. Otherwise, a script is created, which you can run manually.
Summary Review all of the information and select Install to start the installation.Allow the installer to run as the root user to run the configuration scripts.
Chapter 3. Installing and configuring Oracle Grid Infrastructure for Oracle 12c Release 2 47

The panels that are displayed during each of the installation steps are listed in Table 3-2.
Table 3-2 Installation steps and panels in order of appearance with their options
Panel Comments and options
Configuration option In this panel, select the Configure Oracle Grid Infrastructure for a Standalone Server (Oracle Restart) option.
Cluster Configuration In this panel, select the Configure an Oracle Standalone Cluster option.
Grid Plug and Play In the Grid Plug and Play panel, specify the cluster name, scan name, and the scan port (in our case oralab_cluster, oralab-scan, and 1521, respectively).
Cluster Node Information In this panel, we specify the node public host name, role, and the virtual host name.� Add node information by clicking the Add button. Then, add information
about the node.� Add a single node panel and then add the node host name and the virtual
host name.� Select the SSH Connectivity and provide the user name (in our case, grid
and its password). � Select setup, which sets up the password without SSH access between the
nodes. We can test the connectivity by also selecting test.
When the next button is selected, the installer validates the environment.
Network Interface Usage In this panel, you validate the public hub and private interfaces.Click Next.
Storage Option In this panel, we can specify the ASM configuration on a block device or as an NFS location. In our case, we chose the default option: block devices.
Grid Infrastructure management Repository Option
If you want a separate ASM disk group to have the Grid Infrastructure Management Repository, choose YES. In our case, we selected YES.
Create ASM disk Group � Specify a name for the disk group: OCRVG� Choose the appropriate redundancy level: EXTERNAL� Choose the allocation unit: 4 MB� Click the Change Discovery Path button and enter the appropriate Disk
Discovery Path. In our case: /dev/ASM* or /dev/mapper/ASM* for open system storage devices.
ASM password Enter a password that meets your security requirements.
Management Options Ensure that the Register with Enterprise Manager (EM) Cloud Control option is not selected.
Operating System Groups Select the appropriate OS groups.
Installation location Specify the appropriate Oracle base and software locations:� Oracle base: /u01/app/grid/base� Software location: /u01/app/grid/12.2
Inventory location Specify the appropriate Oracle inventory locations:Inventory directory: /u01/app/oraInventory
Root script execution configuration Select the Automatically run configuration scripts option and enter the root user credentials.
48 Best practices and Getting Started Guide for Oracle on IBM LinuxONE

4. Verify that the installation is complete by running cluster status commands.
The next task is to create the ASM Disk Groups. Oracle often recommends creating the following two Disk Groups to be used by the Oracle Databases:
� Database data (DATA): Where active database files, such as data files, control files, online redo logs, archive redo logs, and change-tracking files that are used in incremental backups are stored.
� Flash Recovery Area (FRA): Where recovery-related files are created, such as multiplexed copies of the current control file and online redo logs, backup sets, and flashback log files.
However, we found that the use of a separate Disk Group for online redo log group improves the performance.
ASM disk groups can be created by using Oracle's ASM Configuration Assistant (ASMCA).
3.3 Installation of Single instance Oracle Database binary
In this section, we describe the use of the Oracle Universal Installer (OUI) as a silent installation and an interactive installation for Oracle. We then provide the steps to update the oracle user profile. Then, we describe the steps to create the database by using file systems and ASM.
Ensure that the Linux guests are configured as specified in Chapter 2, “Setting up Linux guests to install the Oracle 12cR2 Grid Infrastructure and Database” on page 21.
By using OUI, you can install software only, or install and create a database. Other installers are available, such as netca, to create the Oracle listener services, or dbca, to create databases. The Oracle installers can be run interactively or in silent mode.
3.3.1 Silent installation
The silent mode is useful for automating and provisioning Oracle instances. In silence installation mode, you must use a response file that contains all of the information that is required for a successful installation.
Samples of responses files are available on the installation media. Customize that file to suit your Oracle Database environment. The response file can also be created during an interactive installation by clicking Save Response File.
The Silent Installation command is shown in the following example:
l3oradb2:~ # sudo -u oracle /media/database/runInstaller -silent -responseFile/tmp/silentInstallFile.rsp
Prerequisite checks Check for any errors. If an error occurs and it can be fixed, it is displayed. Selecting the displayed command automatically runs the command by using root credentials. Otherwise, a script is created, which you can run manually.
In this Prereq check, we encountered warning messages in SLES12 SP3 about ASM and they can be discarded.
Summary Review all the information and select Install to start the installation.Allow the installer to run as the root user to run the configuration scripts.
Panel Comments and options
Chapter 3. Installing and configuring Oracle Grid Infrastructure for Oracle 12c Release 2 49

Options, such as -debug, -force, and -ignorePrereq can be added to the command, as needed.
The following typical response file parameters to be modified for only database binary installation are available:
oracle.install.option=INSTALL_DB_SWONLY
UNIX_GROUP_NAME=oinstall
INVENTORY_LOCATION=/u01/app/oraInventory
ORACLE_HOME=/u01/app/oracle/product/12.2.0.1/dbhome_1
ORACLE_BASE=/u01/app/oracle
oracle.install.db.InstallEdition=EE
oracle.install.db.OSDBA_GROUP=dba
3.3.2 Interactive installation
Complete the following steps to run an interactive installation:
1. Run the Oracle Database Installation program through a VNC viewer by using the Oracle user.
2. Mount the installation DB under /media (for example), and browse to the following database directory:
cd /media/database/
3. Start the interactive OUI, as shown in the following example:
./runInstaller
4. Complete the required fields in each panel that are presented by the Installer.
The panels that are displayed during each of the installation steps are listed in Table 3-3.
Table 3-3 Installation panels in order of appearance with their options
Panel Comments and options
Configure security updates Use this panel to enter your My Oracle Support account information if you want to receive the latest product information and security updates by using your My Oracle Support account.
Installation options Choose one of the following installation options (our selection in bold):� Create and configure a database� Install database software only� Upgrade an existing database
Database Installation options Select one of the following type of database installations (our selection in bold):� Single instance database installation� Oracle RAC� Oracle RAC One Node
Database edition Note: Only the Enterprise Edition is selectable on LinuxONE:� Enterprise Edition� Standard Edition
50 Best practices and Getting Started Guide for Oracle on IBM LinuxONE
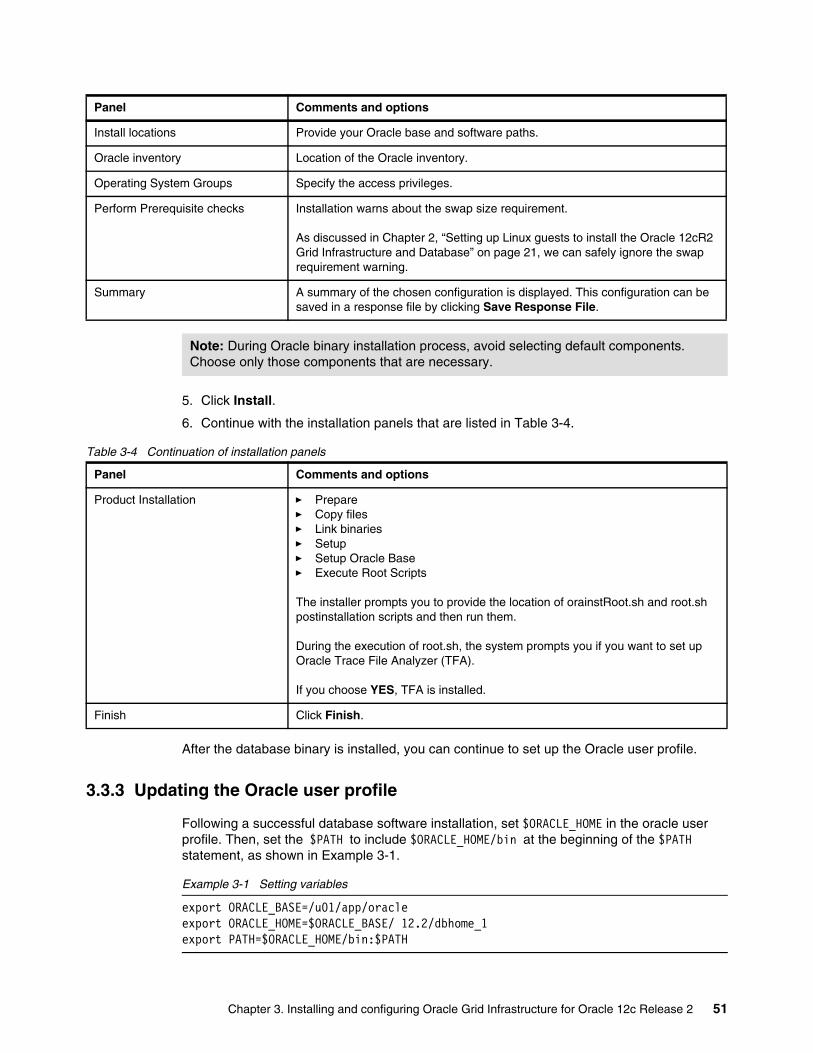
5. Click Install.
6. Continue with the installation panels that are listed in Table 3-4.
Table 3-4 Continuation of installation panels
After the database binary is installed, you can continue to set up the Oracle user profile.
3.3.3 Updating the Oracle user profile
Following a successful database software installation, set $ORACLE_HOME in the oracle user profile. Then, set the $PATH to include $ORACLE_HOME/bin at the beginning of the $PATH statement, as shown in Example 3-1.
Example 3-1 Setting variables
export ORACLE_BASE=/u01/app/oracleexport ORACLE_HOME=$ORACLE_BASE/ 12.2/dbhome_1 export PATH=$ORACLE_HOME/bin:$PATH
Install locations Provide your Oracle base and software paths.
Oracle inventory Location of the Oracle inventory.
Operating System Groups Specify the access privileges.
Perform Prerequisite checks Installation warns about the swap size requirement.
As discussed in Chapter 2, “Setting up Linux guests to install the Oracle 12cR2 Grid Infrastructure and Database” on page 21, we can safely ignore the swap requirement warning.
Summary A summary of the chosen configuration is displayed. This configuration can be saved in a response file by clicking Save Response File.
Panel Comments and options
Note: During Oracle binary installation process, avoid selecting default components. Choose only those components that are necessary.
Panel Comments and options
Product Installation � Prepare� Copy files� Link binaries� Setup� Setup Oracle Base� Execute Root Scripts
The installer prompts you to provide the location of orainstRoot.sh and root.sh postinstallation scripts and then run them.
During the execution of root.sh, the system prompts you if you want to set up Oracle Trace File Analyzer (TFA).
If you choose YES, TFA is installed.
Finish Click Finish.
Chapter 3. Installing and configuring Oracle Grid Infrastructure for Oracle 12c Release 2 51

3.4 Creating a database by using file system
Complete the following steps to create the database:
1. Log in with the Oracle user.
2. Start the Net Configuration Assistant (NETCA) installer to create an Oracle listener service.
3. Add or uncomment the ORACLE_SID in the oracle user’s profile, which is in the user’s HOME directory by using the export ORACLE_SID=orclfs command.
4. Start the Database Configuration Assistant (dbca) installer to create a database. The database creation panels are listed by appearance in Table 3-5 with the selected options in bold.
Table 3-5 Database creation panels in order of appearance with their options
Note: If you installed Oracle Grid Infrastructure, the listener services were created and running for ASM.
Panel Comments and options
Creation mode The following options are available to choose in this panel:� Create a database� Manage templates
Deployment Type Choose the Advanced Configuration option.
Select Database Deployment Type In this panel, we have a choice to select the Database type:
� Oracle Single instance database� Oracle RAC Database� Oracle RAC One Node
Choose the template for your database:� Custom Database� Data Warehouse
Specify Database Identification Details In this panel, specify the Global Database name and SID.
You also can create as a Container database.If you selected the Container database option, you can choose to configure Local Undo table space for PDBs. You can also choose to create either an empty Container database or you can specify the number of PDBs and their prefix names.
In our case, we chose a container database with an instance ID of orcl, which has a PDB of orclpdb with Local Undo table space.
Select Database Storage Option Provide your database storage attributes. In our case, we chose File System as the Database files storage type and specified the Database files location. We also chose to multiplex redo logs and control files for high availability.
52 Best practices and Getting Started Guide for Oracle on IBM LinuxONE
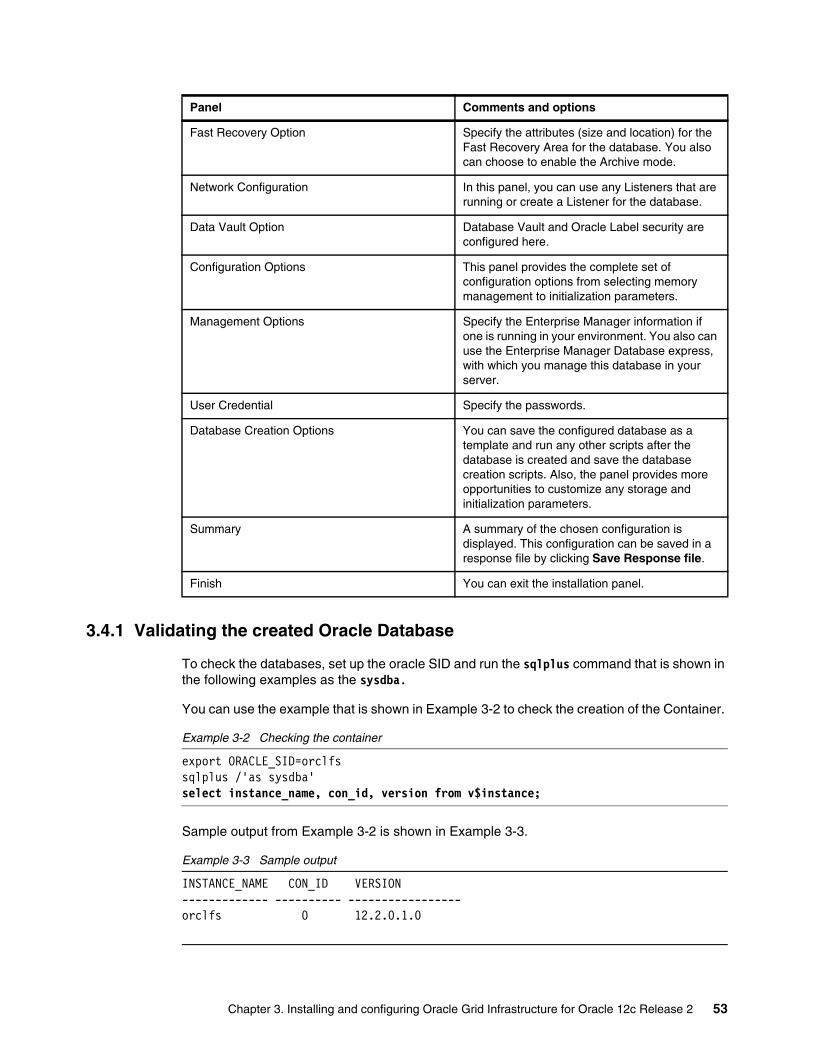
3.4.1 Validating the created Oracle Database
To check the databases, set up the oracle SID and run the sqlplus command that is shown in the following examples as the sysdba.
You can use the example that is shown in Example 3-2 to check the creation of the Container.
Example 3-2 Checking the container
export ORACLE_SID=orclfssqlplus /'as sysdba'select instance_name, con_id, version from v$instance;
Sample output from Example 3-2 is shown in Example 3-3.
Example 3-3 Sample output
INSTANCE_NAME CON_ID VERSION------------- ---------- -----------------orclfs 0 12.2.0.1.0
Fast Recovery Option Specify the attributes (size and location) for the Fast Recovery Area for the database. You also can choose to enable the Archive mode.
Network Configuration In this panel, you can use any Listeners that are running or create a Listener for the database.
Data Vault Option Database Vault and Oracle Label security are configured here.
Configuration Options This panel provides the complete set of configuration options from selecting memory management to initialization parameters.
Management Options Specify the Enterprise Manager information if one is running in your environment. You also can use the Enterprise Manager Database express, with which you manage this database in your server.
User Credential Specify the passwords.
Database Creation Options You can save the configured database as a template and run any other scripts after the database is created and save the database creation scripts. Also, the panel provides more opportunities to customize any storage and initialization parameters.
Summary A summary of the chosen configuration is displayed. This configuration can be saved in a response file by clicking Save Response file.
Finish You can exit the installation panel.
Panel Comments and options
Chapter 3. Installing and configuring Oracle Grid Infrastructure for Oracle 12c Release 2 53

To check the Pluggable databases, run the command that is shown in Example 3-4.
Example 3-4 Check the Pluggable databases with sample output
show pdbs;
Sample output: CON_ID CON_NAME OPEN MODE RESTRICTED------ --------- ------------- ---------- 2 PDB$SEED READ ONLY NO 3 ORCLFSPDB MOUNTED
3.5 Creating a database by using ASM
Complete the following steps to create the database if you want to use ASM storage for the Oracle database:
1. Log in as the Oracle user.
2. Add or uncomment ORACLE_SID in the Oracle user’s profile, which is in the user’s $HOME directory by using the export ORACLE_SID=orclasm command.
3. Use the DBCA installer to create a database.
The Database creation panels are listed in Table 3-6 in order of their appearance and with their options in bold.
Table 3-6 Database creation panels
Panel Comments and options
Creation Mode In this panel, the following two options are available:� Create a database� Manage templates
Deployment Type Choose the Advanced Configuration option.
Select Database Deployment Type In this panel, we select the Database type: � Oracle Single instance database� Oracle RAC Database� Oracle RAC One Node
We also chose the template for the database:� Custom Database� Data Warehouse
Specify Database Identification Details
In this panel, specify the Global Database name and SID.You also can create as a Container database.
If you selected the Container database option, you can choose to configure Local Undo table space for PDBs. You can also choose to create an empty Container database or you can specify the number of PDBs and their prefix names.
In our case, we chose a database with instance ID of orclasm.
54 Best practices and Getting Started Guide for Oracle on IBM LinuxONE
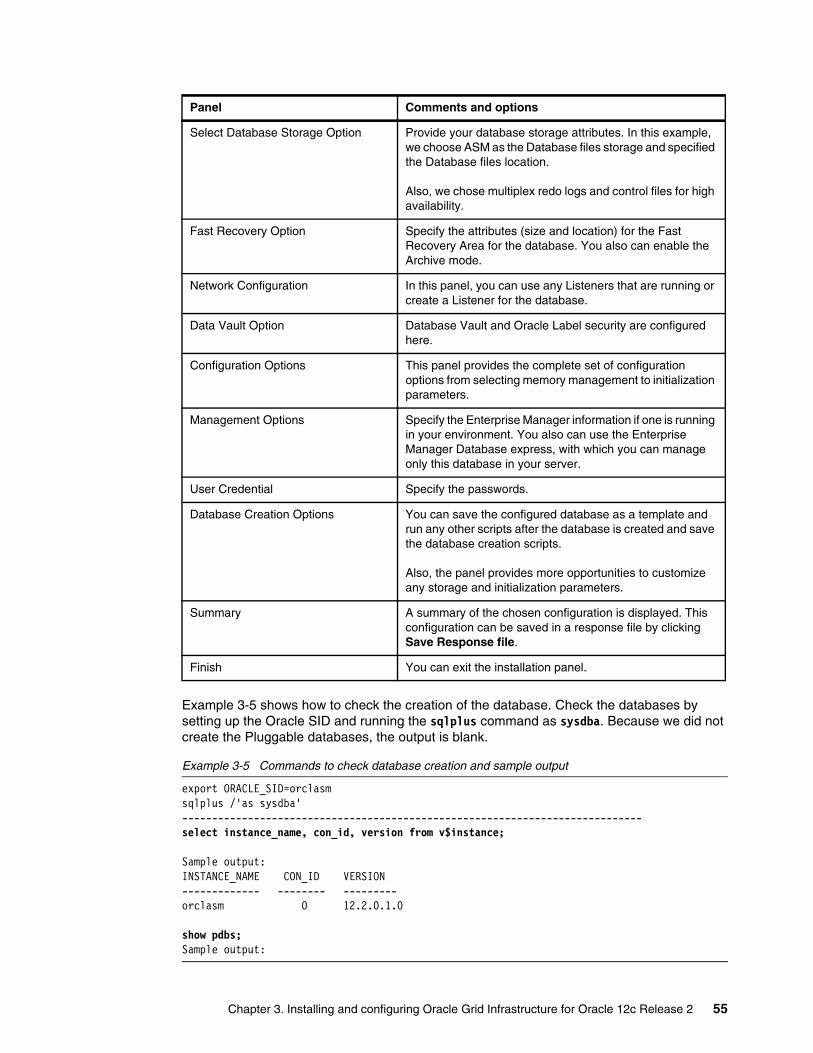
Example 3-5 shows how to check the creation of the database. Check the databases by setting up the Oracle SID and running the sqlplus command as sysdba. Because we did not create the Pluggable databases, the output is blank.
Example 3-5 Commands to check database creation and sample output
export ORACLE_SID=orclasmsqlplus /'as sysdba'-----------------------------------------------------------------------------select instance_name, con_id, version from v$instance;
Sample output: INSTANCE_NAME CON_ID VERSION------------- -------- ---------orclasm 0 12.2.0.1.0
show pdbs;Sample output:
Select Database Storage Option Provide your database storage attributes. In this example, we choose ASM as the Database files storage and specified the Database files location.
Also, we chose multiplex redo logs and control files for high availability.
Fast Recovery Option Specify the attributes (size and location) for the Fast Recovery Area for the database. You also can enable the Archive mode.
Network Configuration In this panel, you can use any Listeners that are running or create a Listener for the database.
Data Vault Option Database Vault and Oracle Label security are configured here.
Configuration Options This panel provides the complete set of configuration options from selecting memory management to initialization parameters.
Management Options Specify the Enterprise Manager information if one is running in your environment. You also can use the Enterprise Manager Database express, with which you can manage only this database in your server.
User Credential Specify the passwords.
Database Creation Options You can save the configured database as a template and run any other scripts after the database is created and save the database creation scripts.
Also, the panel provides more opportunities to customize any storage and initialization parameters.
Summary A summary of the chosen configuration is displayed. This configuration can be saved in a response file by clicking Save Response file.
Finish You can exit the installation panel.
Panel Comments and options
Chapter 3. Installing and configuring Oracle Grid Infrastructure for Oracle 12c Release 2 55

3.5.1 Important Oracle Database initialization parameters
Work with Oracle support to set each of the following important Oracle Database initialization parameters:
*._disable_highres_ticks=TRUE #vktm cpu reduction*._timer_precision=2000 #vktm cpu reduction*._fastpin_enable=1 # enable reference count based fast pindb_writter_processes =2;
56 Best practices and Getting Started Guide for Oracle on IBM LinuxONE

Chapter 4. Using Oracle Enterprise Manager Cloud Control Agent to manage Oracle Database 12c Release 2
This chapter describes how to deploy Oracle Enterprise Manager Cloud Control 13c Release 2 (13.2.0.0.0) agents on a LinuxONE environment to manage Oracle databases.
Enterprise Manager Cloud Control can monitor many databases that are running on multiple environments from a single console. In addition to databases monitoring, other applications (such as E-Business Suite) and support for monitoring certain non-Oracle products (for example, IBM WebSphere® Application Server) can be monitored from a single Cloud Control Console. Although the Enterprise Manager Cloud Control does not run on LinuxONE, the agents and the Oracle Database run on the LinuxONE guests and they communicate with the Enterprise Manager Cloud Control.
The Management Agent is deployed to the hosts that are monitored by the Enterprise Manager Cloud Control. It works with the plug-ins to monitor the targets that are running on that managed host. When OMS is installed, a Management Agent that is named the Central Agent is installed by default and is used for monitoring the first OMS host, the first OMS, and the other targets that are running on the first OMS host. To monitor other hosts and targets that are running on those hosts, you must install a separate Standalone Management Agent on each of those hosts.
In this chapter, we share our experiences of deploying agents from an Enterprise Manager Cloud Control on an x86 based Linux server to monitor the Oracle databases on Linux that are running on LinuxONE. The agents can be deployed from the Enterprise Manager Cloud Control Console or by using the silent agent deployment option at the Linux guests.
4
© Copyright IBM Corp. 2020. All rights reserved. 57

This chapter includes the following topics:
� 4.1, “Updating the agent at the Enterprise Manager Cloud Control to monitor Oracle Databases on LinuxONE (online)” on page 59
� 4.2, “Updating the agent at the Enterprise Manager Cloud Control to monitor Oracle Databases on LinuxONE (offline)” on page 61
� 4.3, “Deploying the agents from the Cloud Control console” on page 64
� 4.4, “Deploying the agents in silent mode” on page 67
� 4.5, “Adding the databases for monitoring” on page 69
� 4.6, “Summary” on page 70
58 Best practices and Getting Started Guide for Oracle on IBM LinuxONE
4.1 Updating the agent at the Enterprise Manager Cloud Control to monitor Oracle Databases on LinuxONE (online)
Enterprise Manager Cloud Control 13c by default includes the Cloud Control Agent software that is installed for the operating system where Enterprise Manager Cloud Control 13c is installed. In our case, the agent for the Linux x86-64 is available when the Enterprise Manager Cloud Control 13c is installed on the Linux x86-64 server. However, the agent to monitor the Oracle databases on LinuxONE architecture is not available in the base installation.
Management Agent software for LinuxONE architecture must be downloaded and applied by using the Self Update feature. The Self Update feature is a dashboard option that is used to obtain information about new updates. It provides a process flow to review, download, and apply those updates.
The Software Library is a repository that stores software entities, such as software patches and application software. The software library stores its repository on a file system that is accessible by the OMS. Depending on the usage, the size of this file can reach 50 GB. For more information about advanced features and the requirements of the Software Library, see the MOS document Understanding and Configuring Software Library In 12c Cloud Control, ID 1368035.1.
4.1.1 Configuring the Software Library storage space
The storage location in the Software Library represents a repository of files. These files are uploaded by the Software Library, and you must add at least one upload file storage location.
This location can be an OMS Shared location or OMS Agent location. This step is the first step to be completed. In our case, we decided to use an OMS Shared location. We used the default location, which was configured in the system during the Enterprise Manager Cloud Control 13c installation.
Click Setup → Provisioning and Patching → Software Library to configure the Software Library. In our case, /dl/swlib is configured as a Software Library location for the OMS Shared File System, so we used that location.
4.1.2 Acquiring the LinuxONE agent in online mode
The Enterprise Manager Cloud Control is in online mode when it can access My Oracle Support through the internet. The example that is presented in this section shows how the Linux on LinuxONE agent is acquired in online mode on an Enterprise Manager Cloud Control that is running on an x86-64 Linux architecture. Oracle refers to this solution as “IBM Linux on System z”.
In general, the following tasks must be completed:
� “Setting up My Oracle Support Credentials” on page 60
� “Verify that Enterprise Manager Cloud Control is in online mode” on page 60
Update the available agents in Enterprise Manager Cloud Control by using the Self Update feature.
� “Download and apply the LinuxONE Management Agent Software” on page 60(labeled as “IBM Linux on System z”).
Chapter 4. Using Oracle Enterprise Manager Cloud Control Agent to manage Oracle Database 12c Release 2 59

Setting up My Oracle Support CredentialsComplete the following steps to set up My Oracle Support Credentials in Enterprise Manager Cloud Control:
1. Log on to Enterprise Manager Cloud Control 13c.2. Click Setup → My Oracle Support → Set Credentials.3. Enter the My Oracle Support Credentials and click Apply.
The My Oracle Support Preferred Credentials are set up in Cloud Control 13c.
Verify that Enterprise Manager Cloud Control is in online modeComplete the following steps to ensure that Cloud Control is set to the online mode:
1. Click Setup → Provisioning and Patching → Offline Patching. Then, change the setting for Connection to Online.
2. Update the available agents in Enterprise Manager Cloud Control by using the Self Update feature. By default, only the Management Agent software for the OMS host platform is downloaded and applied. The other host agents’ availability must be checked by using the Self Update feature of the Enterprise Manager Cloud Control.
3. Click Setup → Extensibility → Self Update.
4. Click Check Updates to get the complete list of available updates for the Agent Software.
A background job is submitted to get the new updates from My Oracle Support.
Download and apply the LinuxONE Management Agent SoftwareAfter the list of available updates is populated in the system, you can download the required Management Agent Software and then apply it to the OMS host.
Complete the following steps:
1. Click Setup → Extensibility → Self UpdateB.
2. Select the entity type Agent Software and select Open from the Action menu. The entity type page shows agent software for different platforms.
In our example, we selected IBM: Linux on System z OS Platform and Oracle Enterprise Manager Cloud Control Agent 13c Release 2 Version 13.2.0.0.0 from the list of available updates.
3. Click Download and schedule the download job for immediate execution.
You can monitor the job. After the job completes, the status is now “Downloaded”.
4. Click Apply for the agent that was downloaded.
This step stages the agent software in the Software Library and makes it available to the Add Targets wizard, which we used to install the agent on the LinuxONE host machines.
After the job completes, the status is now Applied, as shown in Figure 4-1 on page 61.
60 Best practices and Getting Started Guide for Oracle on IBM LinuxONE

Figure 4-1 List of agents that are applied
The online update process for the Management Agent Software at the Enterprise Manager Cloud Control is complete. Now, the agent is available to deploy and monitor the Oracle databases for Linux on System z hosts.
4.2 Updating the agent at the Enterprise Manager Cloud Control to monitor Oracle Databases on LinuxONE (offline)
In section 4.1, “Updating the agent at the Enterprise Manager Cloud Control to monitor Oracle Databases on LinuxONE (online)” on page 59, we described the steps to update the Management Agent Software library in online mode. If the internet connection is not available on the OMS host server, you must follow the offline procedures that are described in this section to update the Management Agent Software library.
In this section, we show how the LinuxONE agent is acquired in offline mode on an Enterprise Manager Cloud Control that is running on an x86-64 Linux architecture.
4.2.1 Acquiring the LinuxONE agent in offline mode
In this section, we show how the Software Library can be updated in offline mode on an Enterprise Manager Cloud Control that is running on an x86-64 Linux architecture to get the management agent for LinuxONE. Oracle requires that you use the Enterprise Manager Command-Line Interface (emcli) to update the Enterprise Manager Cloud Control Software updates.
In general, the following tasks are performed:
� “Verify that Enterprise Manager Cloud Control is in offline mode” on page 61
� “Update the agents in Enterprise Manager Cloud Control by using the Self Update feature” on page 62
� “Using emcli to update the available software” on page 63
� “Acquiring the Management Agent Software offline” on page 63
Verify that Enterprise Manager Cloud Control is in offline modeYou must ensure that Cloud Control is set to the offline mode. Click Setup → Provisioning and Patching → Offline Patching and then, change the setting for Connection to Offline.
Chapter 4. Using Oracle Enterprise Manager Cloud Control Agent to manage Oracle Database 12c Release 2 61

Update the agents in Enterprise Manager Cloud Control by using the Self Update feature
By default, only the Management Agent software for the OMS host platform is downloaded and applied. The other host agents’ availability must be checked by using Enterprise Manager Cloud Control by using the Self Update feature.
Complete the following steps:1. To get the complete list of available updates for the agent software, click Setup
Extensibility Self Update. Then, click Check Updates. A window opens that shows the URL that you use to download a catalog of all the updates for the agents (see Figure 4-2).
Figure 4-2 Check updates in offline mode
2. Download the catalog file from the Oracle website (log in required).
3. Log on with the oracle credentials for MOS.
4. Figure 4-3 shows the window for downloading the catalog updates. Copy the downloaded compressed file to the Enterprise Manager Cloud Control Server where the OMS is running.
Figure 4-3 Saving the compressed file
The name of the compressed file in our example is p9348486_112000_Generic.zip. That file is copied into the /dl/tmp location on the OMS server.
62 Best practices and Getting Started Guide for Oracle on IBM LinuxONE

Using emcli to update the available softwareOracle provides the emcli command-line utility to perform some of the Enterprise Manager Cloud Control functions. This utility is installed and configured during OMS installation.
Complete the following steps to update the available software by using emcli:
1. Run emcli to log in (from OMS home) (see Figure 4-4).
Figure 4-4 emcli login
2. Synchronize Enterprise Manager CLI by running emcli sync (see Figure 4-5).
Figure 4-5 emcli sync
3. Ensure that the Software Library is configured in the system by clicking Setup → Select Provisioning and Patching → Software Library (in our case, /dl/swlib is used for Software Library).
4. To import the downloaded compressed archive in to the Oracle Management Service instance, run emcli import_update_catalog, as shown in Figure 4-6.
Figure 4-6 emcli import_update_catalog
5. After the command completes, you can see that the agents are shown as available in the Self Update window. Click Setup → Extensibility → Self Update, select the entity type Agent Software, and select Open from the Action menu. The entity type page shows agent software for different platforms.
Acquiring the Management Agent Software offlineComplete the following steps to acquire the Management Agent Software offline:
1. Select your OS platform and version. In our example, we select IBM: Linux on System z for the OS Platform and 13.2.0.0.0 for the version from the list of available updates.
2. A window opens that provides a link to download the selected agent and instructions about how to import the agent software updates into Enterprise Manager, as shown in Figure 4-7 on page 64.
Chapter 4. Using Oracle Enterprise Manager Cloud Control Agent to manage Oracle Database 12c Release 2 63
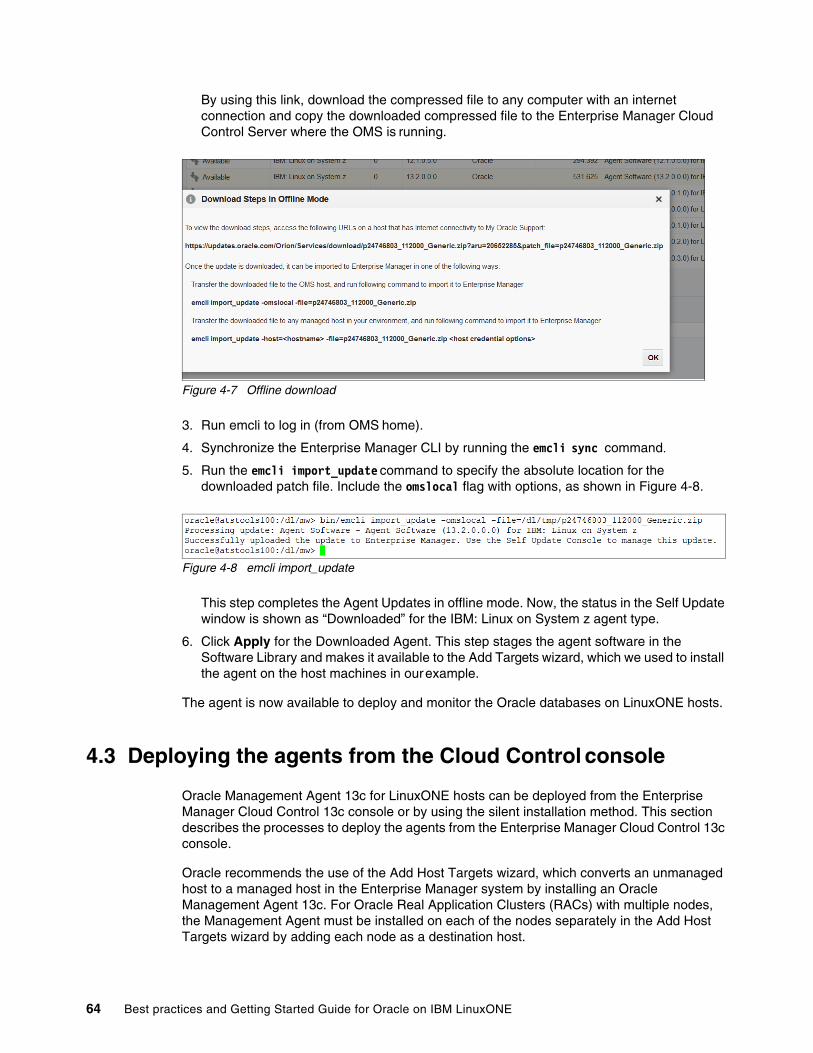
By using this link, download the compressed file to any computer with an internet connection and copy the downloaded compressed file to the Enterprise Manager Cloud Control Server where the OMS is running.
Figure 4-7 Offline download
3. Run emcli to log in (from OMS home).
4. Synchronize the Enterprise Manager CLI by running the emcli sync command.
5. Run the emcli import_update command to specify the absolute location for the downloaded patch file. Include the omslocal flag with options, as shown in Figure 4-8.
Figure 4-8 emcli import_update
This step completes the Agent Updates in offline mode. Now, the status in the Self Update window is shown as “Downloaded” for the IBM: Linux on System z agent type.
6. Click Apply for the Downloaded Agent. This step stages the agent software in the Software Library and makes it available to the Add Targets wizard, which we used to install the agent on the host machines in our example.
The agent is now available to deploy and monitor the Oracle databases on LinuxONE hosts.
4.3 Deploying the agents from the Cloud Control console
Oracle Management Agent 13c for LinuxONE hosts can be deployed from the Enterprise Manager Cloud Control 13c console or by using the silent installation method. This section describes the processes to deploy the agents from the Enterprise Manager Cloud Control 13c console.
Oracle recommends the use of the Add Host Targets wizard, which converts an unmanaged host to a managed host in the Enterprise Manager system by installing an Oracle Management Agent 13c. For Oracle Real Application Clusters (RACs) with multiple nodes, the Management Agent must be installed on each of the nodes separately in the Add Host Targets wizard by adding each node as a destination host.
64 Best practices and Getting Started Guide for Oracle on IBM LinuxONE

For more information about the hardware and software requirements for installing the Cloud Control Agent, see the Installing Oracle Management Agents website.
The network between the Cloud Control Server, where the OMS is running, and the destination hosts should be accessible.
In our example, we used the ping by host name method to ensure that the OMS Server and hosts can be reached.
To install Oracle Management Agent 13c for LinuxONE from Enterprise Manager Cloud Control 13c, complete the following steps:
1. To add or install an agent on a host, the software distribution of the agent that corresponds to the host’s platform must be available in the Software Library. In our example, we verified the availability of LinuxONE agents’ availability in the Enterprise Manager Cloud Control Server by completing the following steps:
a. Log on to Enterprise Manager Cloud Control 13c.
b. Click Setup → Extensibility → Self Update in the Status section of the Self Update window. Click the Agent Software type.
You can see that the Agent Software for Linux on System z has a status of “Applied” in the Agent Software Updates section. When we highlighted the rows, the bottom pane showed a status, such as when the agent software was available, downloaded, and applied.
2. Click Setup → Add Target → Add Targets Manually to deploy the agent.
3. In the Add Targets Manually window, select Add Host Targets and click Add Host. Then, Install Agent on Host.
4. In the Host and Platform window, we completed the following steps for our example:
a. Accept the default name that is assigned for this session.
b. Click Add and enter the fully qualified name of the host. We select IBM: Linux on System z as the platform of the host on which we wanted to install the Management Agent and click Next.
5. In the Installation Details window (Figure 4-9 on page 66), complete the following steps:
a. In the Installation Details section, for Installation Base Directory, enter the absolute path to the base directory (the software binary files, security files, and inventory files of Management Agent are copied here). In our case, it is /u01/app/oracle/agentHome.
b. For Instance Directory, enter the directory where you want all Management Agent-related configuration files to be stored. We accepted the default instance directory location (in our case, /u01/app/oracle/agentHome/agent_inst).
Note: Maintain the instance directory inside the installation base directory.
Chapter 4. Using Oracle Enterprise Manager Cloud Control Agent to manage Oracle Database 12c Release 2 65
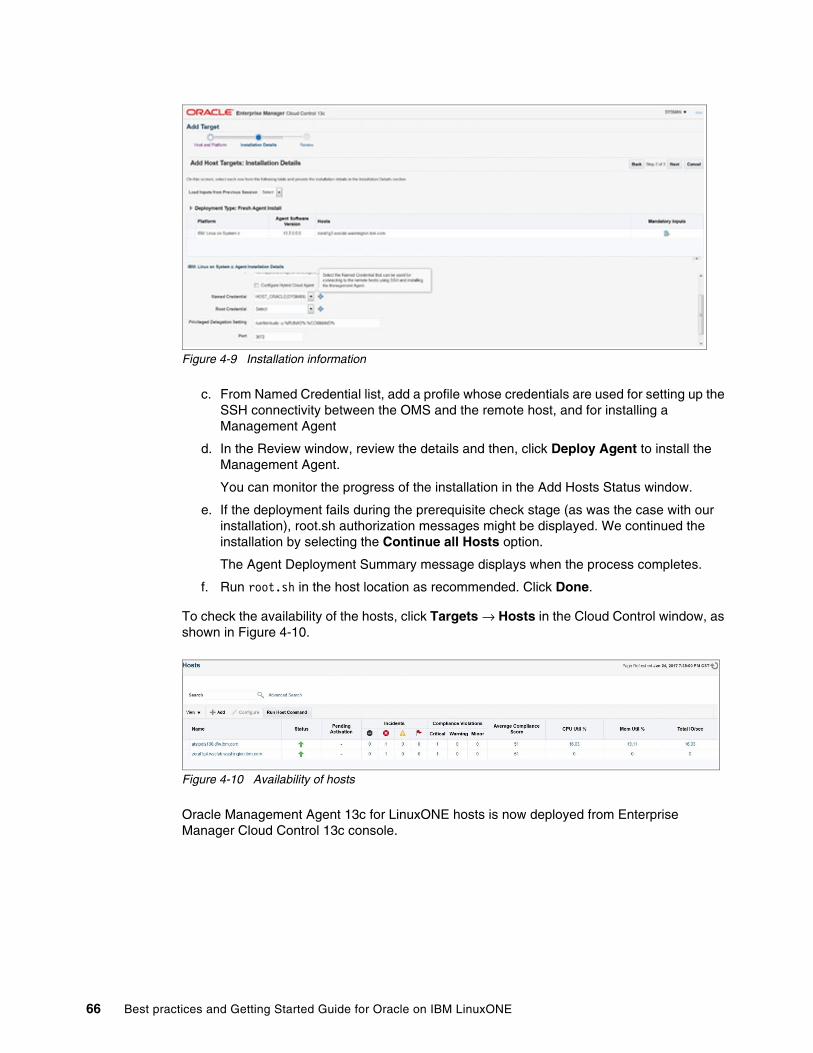
Figure 4-9 Installation information
c. From Named Credential list, add a profile whose credentials are used for setting up the SSH connectivity between the OMS and the remote host, and for installing a Management Agent
d. In the Review window, review the details and then, click Deploy Agent to install the Management Agent.
You can monitor the progress of the installation in the Add Hosts Status window.
e. If the deployment fails during the prerequisite check stage (as was the case with our installation), root.sh authorization messages might be displayed. We continued the installation by selecting the Continue all Hosts option.
The Agent Deployment Summary message displays when the process completes.
f. Run root.sh in the host location as recommended. Click Done.
To check the availability of the hosts, click Targets → Hosts in the Cloud Control window, as shown in Figure 4-10.
Figure 4-10 Availability of hosts
Oracle Management Agent 13c for LinuxONE hosts is now deployed from Enterprise Manager Cloud Control 13c console.
66 Best practices and Getting Started Guide for Oracle on IBM LinuxONE
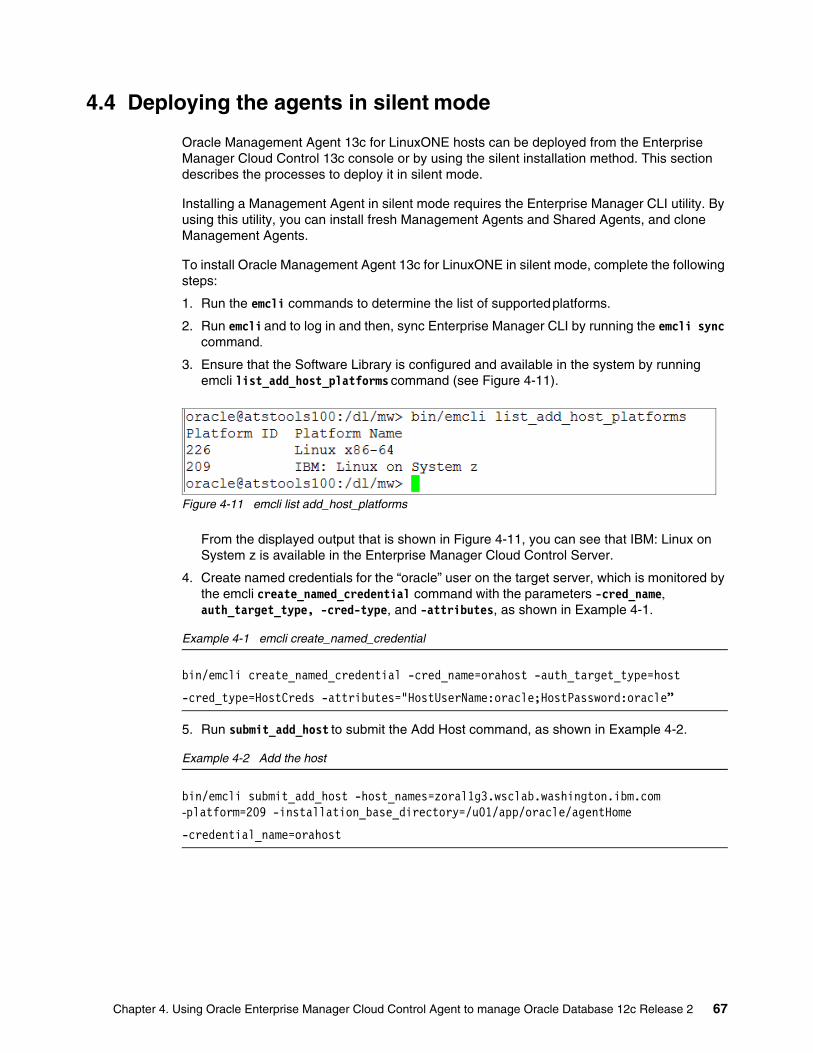
4.4 Deploying the agents in silent mode
Oracle Management Agent 13c for LinuxONE hosts can be deployed from the Enterprise Manager Cloud Control 13c console or by using the silent installation method. This section describes the processes to deploy it in silent mode.
Installing a Management Agent in silent mode requires the Enterprise Manager CLI utility. By using this utility, you can install fresh Management Agents and Shared Agents, and clone Management Agents.
To install Oracle Management Agent 13c for LinuxONE in silent mode, complete the following steps:
1. Run the emcli commands to determine the list of supported platforms.
2. Run emcli and to log in and then, sync Enterprise Manager CLI by running the emcli sync command.
3. Ensure that the Software Library is configured and available in the system by running emcli list_add_host_platforms command (see Figure 4-11).
Figure 4-11 emcli list add_host_platforms
From the displayed output that is shown in Figure 4-11, you can see that IBM: Linux on System z is available in the Enterprise Manager Cloud Control Server.
4. Create named credentials for the “oracle” user on the target server, which is monitored by the emcli create_named_credential command with the parameters -cred_name, auth_target_type, -cred-type, and -attributes, as shown in Example 4-1.
Example 4-1 emcli create_named_credential
bin/emcli create_named_credential -cred_name=orahost -auth_target_type=host
-cred_type=HostCreds -attributes="HostUserName:oracle;HostPassword:oracle”
5. Run submit_add_host to submit the Add Host command, as shown in Example 4-2.
Example 4-2 Add the host
bin/emcli submit_add_host -host_names=zoral1g3.wsclab.washington.ibm.com -platform=209 -installation_base_directory=/u01/app/oracle/agentHome
-credential_name=orahost
Chapter 4. Using Oracle Enterprise Manager Cloud Control Agent to manage Oracle Database 12c Release 2 67

6. Now, you can track the running of the submit_add_host command:
bin/emcli get_add_host_status session_name=ADD_HOST_SYSMAN_Jan_24_2017_8:16:56_PM_CST
The results are shown in Figure 4-12.
Figure 4-12 submit_add_host status
After the job status completes with “Succeeded”, you can see that the host is added in the Enterprise Manager Cloud Control.
The logs for the agent deployment at the target server can be found under the agent installation base directory /oracle/agentHome/agent_inst/install/logs.
You can also check the agent status by browsing to the Management Agent home at the target server and running the following status command:
agentHome/agent_13.2.0.0.0/bin/emctl status agent
The results are shown in Figure 4-13.
Figure 4-13 Agent status results
68 Best practices and Getting Started Guide for Oracle on IBM LinuxONE

7. You can check that the EMD upload completed successfully by browsing to the Management Agent home at the target server and running the upload agent, as shown in Example 4-3.
Example 4-3 EMD Upload
oracle@zora11g3:/u01/app/oracle> agentHome/agent_13.2.0.0.0/bin/emctl upload agentOracle Enterprise Manager Cloud Control 13c Release Copyright (c) 1996, 2016 Oracle Corporation. All rights reserved. ==============================================================EMD upload completed successfullyoracle@zora11g3:/u01/app/oracle>
8. To verify that the Management Agent is running, click Setup → Manage Cloud Control Agents.
You can see that the Management Agent is running.
4.5 Adding the databases for monitoring
After the agent for LinuxONE is deployed, complete the following steps to discover the Oracle databases on that host for monitoring:
1. In the Cloud Control window, click Targets Databases. Select Search List in the Databases section, and then, click Add.
2. In the Add Database Instance Target window, specify the Host window. In the Host field in our example, we specify the following fully qualified host name:
zoral1g3.wsclab.washington.ibm.com
Click Continue (see Figure 4-14).
Figure 4-14 Selecting target
The agent discovers the database oratest and the Listener.
3. Configure the database by selecting the Configure window at the oratest line and specifying the Database-related parameters. Ensure that you can connect to the database, as shown in Figure 4-15 on page 70.
Chapter 4. Using Oracle Enterprise Manager Cloud Control Agent to manage Oracle Database 12c Release 2 69

Figure 4-15 Database Discovery results
4. Save the database configuration in the Database Discovery Review window, as shown in Figure 4-16.
Figure 4-16 Database Discovery review
4.6 Summary
In this chapter, we shared our experiences with installing a Cloud Control Server on an x86-based Linux server. We deployed the agents from that server to monitor the databases that are running on LinuxONE.
Before deploying the agents, we also updated the Cloud Control Software Library with the required levels of agent software and plug-ins by connecting to the Oracle repository site online. Then, starting with Oracle Enterprise Manager Cloud Control 13c Release 2 (13.2.0.0.0), we showed how the command-line utility emcli can also be used to update the Grid Control Software Library in offline mode.
The agents were deployed from the Cloud Control Console and by using the silent agent deployment option at the Linux guests. We concluded this chapter by showing how to enable the Cloud Control to monitor Oracle databases.
70 Best practices and Getting Started Guide for Oracle on IBM LinuxONE

Chapter 5. Installing and configuring Spectrum Scale
In this chapter, we provide an example of hoe to install and configure Spectrum Scale, how to add disks to Spectrum Scale file systems, and how to migrate Oracle data files from Oracle ASM to Spectrum Scale file systems.
These examples are applicable to the following software:
� Oracle Database - Enterprise Edition - Version 12.1� RedHat 7.1/SLES 12.1 and later for IBM: Linux on System z
We also provide an example of installing and configuring IBM Spectrum® Scale cluster file systems such that they can be used to contain Oracle data files, archive logs, and redo files. This example uses underlying DASD disk devices (SCSI LUNs can also be used).
We describe configuration that uses a 4-node cluster with each node running the SUSE Linux Enterprise Servers (SLES) 12.3 operating system. Any differences between SLES and Red Hat Enterprise Linux (RHEL) configuration are described.
This chapter includes the following topics:
� 5.1, “Overview” on page 72� 5.2, “Verifying initial configuration” on page 73� 5.3, “Installing Spectrum Scale” on page 75� 5.4, “Building Spectrum Scale” on page 77� 5.5, “Examples” on page 82� 5.6, “References” on page 88
5
Note: Oracle OCR and voting disks are accessible only by CRS from ASM storage or NFS. The backing storage for NFS can be EXT2, EXT3, XFS, Spectrum Scale, or other supported storage types.
© Copyright IBM Corp. 2020. All rights reserved. 71
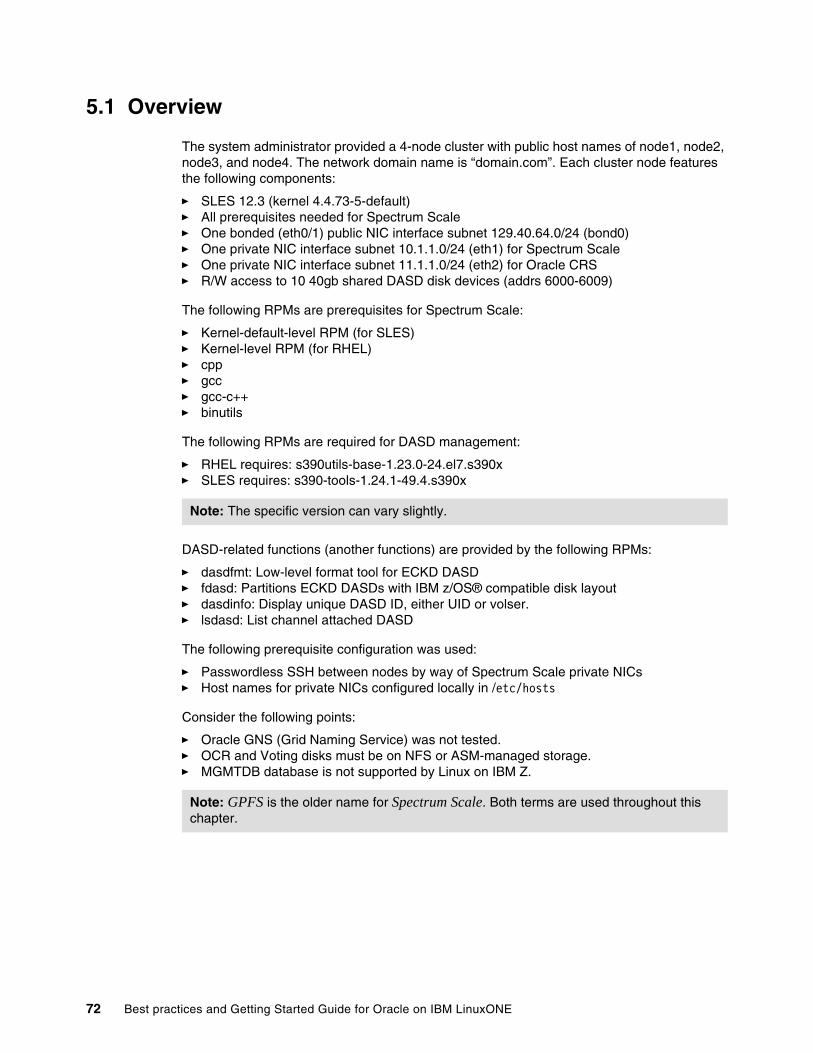
5.1 Overview
The system administrator provided a 4-node cluster with public host names of node1, node2, node3, and node4. The network domain name is “domain.com”. Each cluster node features the following components:
� SLES 12.3 (kernel 4.4.73-5-default)� All prerequisites needed for Spectrum Scale� One bonded (eth0/1) public NIC interface subnet 129.40.64.0/24 (bond0)� One private NIC interface subnet 10.1.1.0/24 (eth1) for Spectrum Scale� One private NIC interface subnet 11.1.1.0/24 (eth2) for Oracle CRS � R/W access to 10 40gb shared DASD disk devices (addrs 6000-6009)
The following RPMs are prerequisites for Spectrum Scale:
� Kernel-default-level RPM (for SLES)� Kernel-level RPM (for RHEL)� cpp� gcc� gcc-c++� binutils
The following RPMs are required for DASD management:
� RHEL requires: s390utils-base-1.23.0-24.el7.s390x� SLES requires: s390-tools-1.24.1-49.4.s390x
DASD-related functions (another functions) are provided by the following RPMs:
� dasdfmt: Low-level format tool for ECKD DASD� fdasd: Partitions ECKD DASDs with IBM z/OS® compatible disk layout� dasdinfo: Display unique DASD ID, either UID or volser.� lsdasd: List channel attached DASD
The following prerequisite configuration was used:
� Passwordless SSH between nodes by way of Spectrum Scale private NICs� Host names for private NICs configured locally in /etc/hosts
Consider the following points:
� Oracle GNS (Grid Naming Service) was not tested. � OCR and Voting disks must be on NFS or ASM-managed storage.� MGMTDB database is not supported by Linux on IBM Z.
Note: The specific version can vary slightly.
Note: GPFS is the older name for Spectrum Scale. Both terms are used throughout this chapter.
72 Best practices and Getting Started Guide for Oracle on IBM LinuxONE

5.2 Verifying initial configuration
Complete the following steps to verify the current configuration and the prerequisites on each node:
1. Verify the OS level.
As shown in Example 5-1, check the OS level. It needs to be SLES 12.1 or greater.
Example 5-1 Check the OS level
node1:~ #cat /etc/os-releaseNAME="SLES"VERSION="12-SP3"VERSION_ID="12.3"PRETTY_NAME="SUSE Linux Enterprise Server 12 SP3"ID="sles"ANSI_COLOR="0;32"
CPE_NAME="cpe:/o:suse:sles:12:sp3"
The OS is SLES 12.3, which passes.
2. Verify the public NIC.
Check the public NIC, bond0, which is a bond of eth0/1 (see Example 5-2).
Example 5-2 Check the public NIC
node1:~ # ifconfig bond0eth0 Link encap:Ethernet HWaddr 02:00:00:03:D8:A7 inet addr:129.40.64.1 Bcast:129.40.64.255 Mask:255.255.255.0 inet6 addr: fe80::ff:fe03:d8a7/64 Scope:Link
UP BROADCAST RUNNING MASTER MULTICAST MTU:1500 Metric:1
Public Bonded NIC bond0 is UP and is on subnet 129.40.64.0/24.
3. Verify the private NIC that is used by Spectrum Scale.
Check private NIC, eth1, which is used for Spectrum Scale, as shown in Example 5-3.
Example 5-3 Check the private NIC
node1:~ # ifconfig eth1eth1 Link encap:Ethernet HWaddr 6C:AE:8B:48:C1:F4 inet addr:10.1.1.1 Bcast:10.1.1.255 Mask:255.255.255.0 inet6 addr: fe80::6cae:8b00:1848:c1f4/64 Scope:Link
UP BROADCAST RUNNING MULTICAST MTU:8992 Metric:1
Private NIC eth1 is UP and is on subnet 10.1.1.0/24.
4. Verify the private NIC that is used by ASM.
Check private NIC, eth2, which is used for Oracle ASM (see Example 5-4).
Example 5-4 Check the private NIC
node1:~ # ifconfig eth2eth2 Link encap:Ethernet HWaddr 6C:AE:8B:48:C2:F2 inet addr:11.1.1.1 Bcast:11.1.1.255 Mask:255.255.255.0 inet6 addr: fe80::6cae:8b00:1748:c2f2/64 Scope:Link
UP BROADCAST RUNNING MULTICAST MTU:8992 Metric:1
Chapter 5. Installing and configuring Spectrum Scale 73
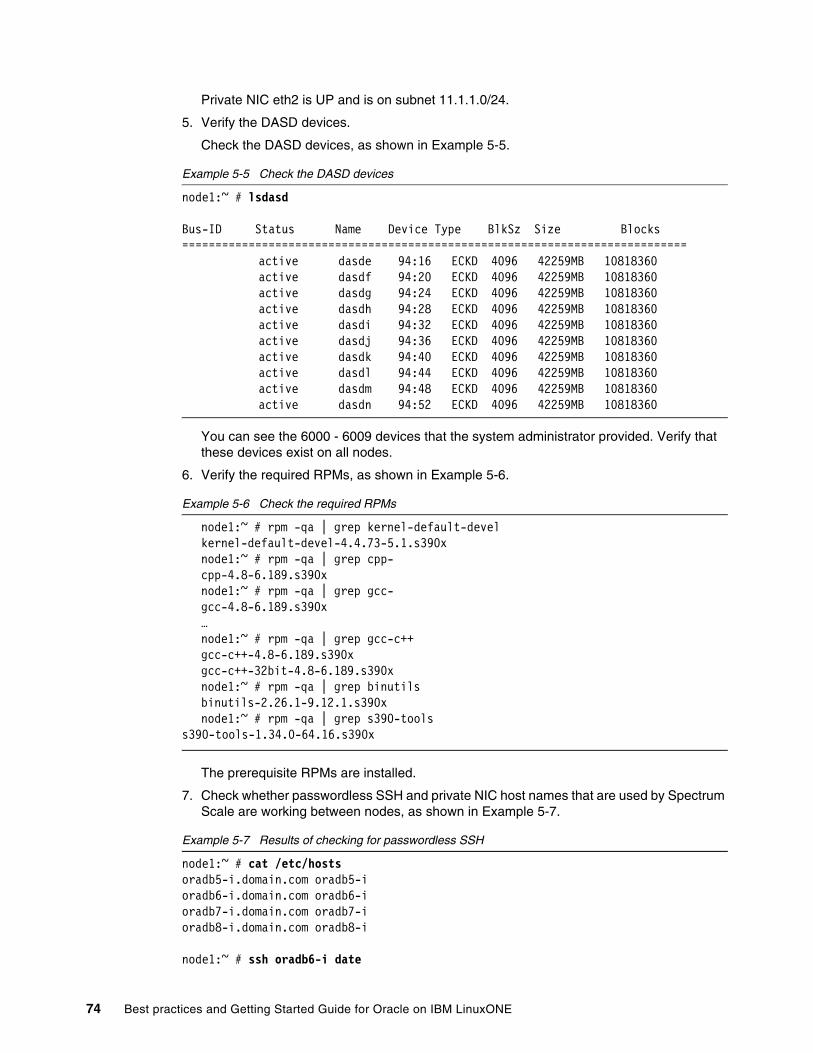
Private NIC eth2 is UP and is on subnet 11.1.1.0/24.
5. Verify the DASD devices.
Check the DASD devices, as shown in Example 5-5.
Example 5-5 Check the DASD devices
node1:~ # lsdasd
Bus-ID Status Name Device Type BlkSz Size Blocks============================================================================
active dasde 94:16 ECKD 4096 42259MB 10818360active dasdf 94:20 ECKD 4096 42259MB 10818360
active dasdg 94:24 ECKD 4096 42259MB 10818360 active dasdh 94:28 ECKD 4096 42259MB 10818360 active dasdi 94:32 ECKD 4096 42259MB 10818360 active dasdj 94:36 ECKD 4096 42259MB 10818360 active dasdk 94:40 ECKD 4096 42259MB 10818360 active dasdl 94:44 ECKD 4096 42259MB 10818360 active dasdm 94:48 ECKD 4096 42259MB 10818360 active dasdn 94:52 ECKD 4096 42259MB 10818360
You can see the 6000 - 6009 devices that the system administrator provided. Verify that these devices exist on all nodes.
6. Verify the required RPMs, as shown in Example 5-6.
Example 5-6 Check the required RPMs
node1:~ # rpm -qa | grep kernel-default-develkernel-default-devel-4.4.73-5.1.s390xnode1:~ # rpm -qa | grep cpp-cpp-4.8-6.189.s390xnode1:~ # rpm -qa | grep gcc-gcc-4.8-6.189.s390x…node1:~ # rpm -qa | grep gcc-c++gcc-c++-4.8-6.189.s390xgcc-c++-32bit-4.8-6.189.s390xnode1:~ # rpm -qa | grep binutilsbinutils-2.26.1-9.12.1.s390xnode1:~ # rpm -qa | grep s390-tools
s390-tools-1.34.0-64.16.s390x
The prerequisite RPMs are installed.
7. Check whether passwordless SSH and private NIC host names that are used by Spectrum Scale are working between nodes, as shown in Example 5-7.
Example 5-7 Results of checking for passwordless SSH
node1:~ # cat /etc/hostsoradb5-i.domain.com oradb5-ioradb6-i.domain.com oradb6-ioradb7-i.domain.com oradb7-ioradb8-i.domain.com oradb8-i
node1:~ # ssh oradb6-i date
74 Best practices and Getting Started Guide for Oracle on IBM LinuxONE
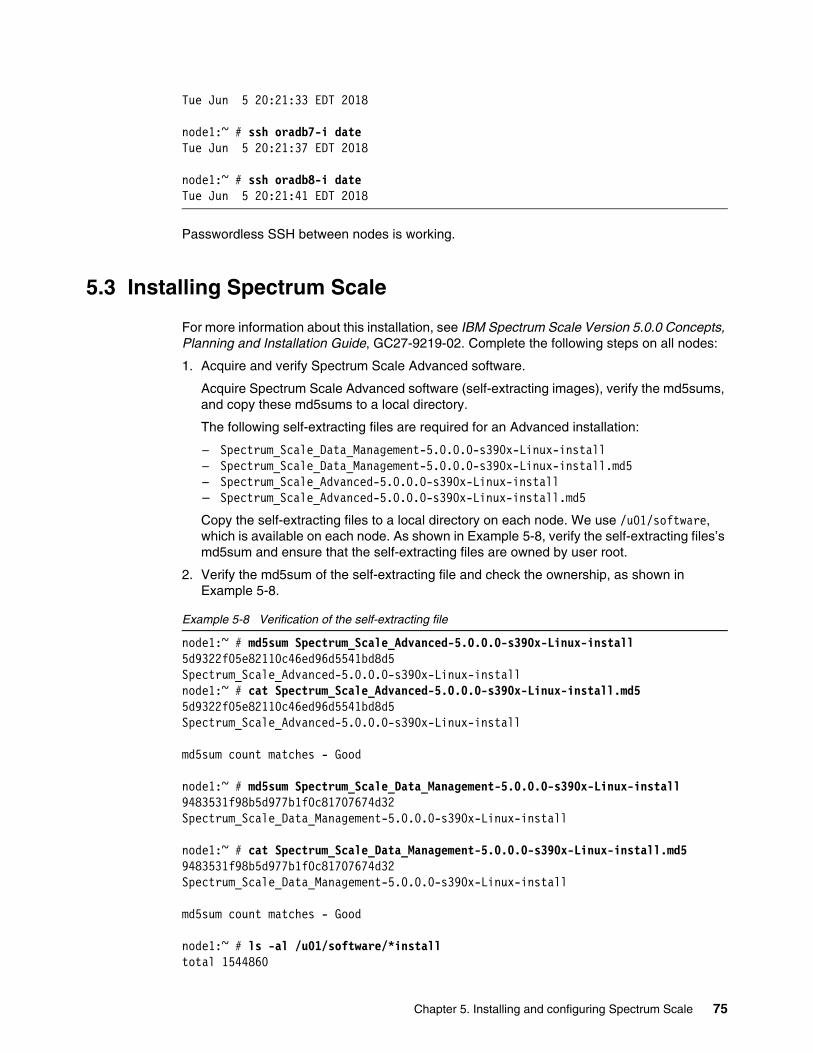
Tue Jun 5 20:21:33 EDT 2018
node1:~ # ssh oradb7-i dateTue Jun 5 20:21:37 EDT 2018
node1:~ # ssh oradb8-i dateTue Jun 5 20:21:41 EDT 2018
Passwordless SSH between nodes is working.
5.3 Installing Spectrum Scale
For more information about this installation, see IBM Spectrum Scale Version 5.0.0 Concepts, Planning and Installation Guide, GC27-9219-02. Complete the following steps on all nodes:
1. Acquire and verify Spectrum Scale Advanced software.
Acquire Spectrum Scale Advanced software (self-extracting images), verify the md5sums, and copy these md5sums to a local directory.
The following self-extracting files are required for an Advanced installation:
– Spectrum_Scale_Data_Management-5.0.0.0-s390x-Linux-install – Spectrum_Scale_Data_Management-5.0.0.0-s390x-Linux-install.md5– Spectrum_Scale_Advanced-5.0.0.0-s390x-Linux-install– Spectrum_Scale_Advanced-5.0.0.0-s390x-Linux-install.md5
Copy the self-extracting files to a local directory on each node. We use /u01/software, which is available on each node. As shown in Example 5-8, verify the self-extracting files’s md5sum and ensure that the self-extracting files are owned by user root.
2. Verify the md5sum of the self-extracting file and check the ownership, as shown in Example 5-8.
Example 5-8 Verification of the self-extracting file
node1:~ # md5sum Spectrum_Scale_Advanced-5.0.0.0-s390x-Linux-install5d9322f05e82110c46ed96d5541bd8d5 Spectrum_Scale_Advanced-5.0.0.0-s390x-Linux-installnode1:~ # cat Spectrum_Scale_Advanced-5.0.0.0-s390x-Linux-install.md55d9322f05e82110c46ed96d5541bd8d5 Spectrum_Scale_Advanced-5.0.0.0-s390x-Linux-install
md5sum count matches - Good
node1:~ # md5sum Spectrum_Scale_Data_Management-5.0.0.0-s390x-Linux-install9483531f98b5d977b1f0c81707674d32 Spectrum_Scale_Data_Management-5.0.0.0-s390x-Linux-install
node1:~ # cat Spectrum_Scale_Data_Management-5.0.0.0-s390x-Linux-install.md59483531f98b5d977b1f0c81707674d32 Spectrum_Scale_Data_Management-5.0.0.0-s390x-Linux-install
md5sum count matches - Good
node1:~ # ls -al /u01/software/*installtotal 1544860
Chapter 5. Installing and configuring Spectrum Scale 75

drwxr-xr-x 3 root root 4096 May 1 21:46 .drwxr-xr-x 5 root root 4096 Apr 12 16:54 ..rwxr-xr-x 1 root root 527633231 Jan 16 17:14 Spectrum_Scale_Advanced-5.0.0.0-s390x-Linux-installrwxr-xr-x 1 root root 527633297 Jan 16 17:14 Spectrum_Scale_Data_Management-5.0.0.0-s390x-Linux-install
User root can execute - Good
3. Run the self-extracting Spectrum Scale Advanced file as root, as shown in Example 5-9.
Example 5-9 Run the self-extracting file
node1:~ # cd /u01/softwarenode1:~ # ./Spectrum_Scale_Advanced-5.0.0.0-s390x-Linux-install
Several messages appear as the license acceptance mechanism, rpms, and other code is extracted.
For the license acceptance, we see the following message and prompt:
Press Enter to continue viewing the license agreement, orenter "1" to accept the agreement, "2" to decline it, "3"to print it, "4" to read non-IBM terms, or "99" to go backto the previous screen.
Enter 1 to accept the license. The following message appears:
The "Spectrum_Scale_Data_Management" self-extracting file will automatically be invoked.
After several messages appear that indicate the progress of the installation process, we see a message indicating that the associated RPMs was extracted:
Product rpms successfully extracted to /usr/lpp/mmfs/5.0.0.0
All RPMs are placed by the self-extracting code into /usr/lpp/mmfs/5.0.0.0/gpfs_rpms.
4. Install all RPMs, including the man pages, as shown in Example 5-10.
Example 5-10 Install the RPMs
node1:~ # cd /usr/lpp/mmfs/5.0.0.0/gpfs_rpmsnode1:~ # rpm -ivh gpfs.base*.rpm \ gpfs.gpl*.rpm \ gpfs.license.adv*.rpm \ gpfs.gskit*.rpm \ gpfs.msg*.rpm \ gpfs.ext*.rpm \ gpfs.adv*.rpm \ gpfs.crypto*.rpm \ gpfs.docs*.rpm
Apply patches if required. In our case, patches are not required because we are installing a new version with no patches available.
Spectrum Scale maintenance is available at IBM Fix Central.
Maintenance for Spectrum Scale is distributed in the form of self-extracting files as is the installation media. A readme file also is available that includes instructions about how to apply the maintenance.
76 Best practices and Getting Started Guide for Oracle on IBM LinuxONE

5. Change the PATH env variable to include Spectrum Scale binaries by running the following command:
node1:~ # export PATH=$PATH:/usr/lpp/mmfs/bin
6. Build and install the Spectrum Scale portability layer:
node1:~ # mmbuildgpl
You see the following messages:
make World ...make InstallImages ...-------------------------------------------------------mmbuildgpl: Building GPL module completed successfully at Tue Jan 16 17:07:49 EST 2018.-------------------------------------------------------
7. Update the vmalloc kernel parameter:
– For SLES systems:
i. In the /etc/default/grub file, add the parameter vmalloc=4096G to the GRUB_CMDLINE_LINUX_DEFAULT variable.
For example:
GRUB_CMDLINE_LINUX_DEFAULT="hvc_iucv=8 TERM=dumb crashkernel=113M vmalloc=4096G”
ii. Run the following command:
grub2-mkconfig -o /boot/grub2/grub.cfg
a. For RedHat systems:
i. In /etc/zipl.conf, update parameters to include vmalloc=4096G user_mode=home"
For example:
parameters="... crashkernel=auto rd.dasd=0.0.0200 vmalloc=4096G user_mode=home..."
ii. Run the following command:
usr/sbin/zipl
8. Restart the guest.
5.4 Building Spectrum Scale
Complete the following steps in this section on node1 only:
1. Create a file to be used to define each cluster node. We use the following command:
node1:~ # cat /etc/gpfs_nodelistnode1-i:quorum-managernode2-i:quorum-managernode3-i:quorum-managernode4-i:quorum-manager
2. Create the cluster by using the following nodelist file as input (the “\” character means that the command is continued on the next line):
node1:~ # mmcrcluster \ -N /etc/gpfs_nodelist \ -r /usr/bin/ssh \
Chapter 5. Installing and configuring Spectrum Scale 77

-R /usr/bin/scp \ -C my_cluster
3. Accept the Spectrum Scale license by using the following command:
node1:~ # /usr/lpp/mmfs/bin/mmchlicense \ server --accept -N node1-i,node2-i,node3-i,node4-i
4. List the cluster by using the following command:
node1:~ # mmlscluster
The output of this command is shown in Example 5-11.
Example 5-11 Output of list cluster command
GPFS cluster information========================GPFS cluster name: my_cluster.domain.com GPFS cluster id: 168269389880082585 GPFS UID domain: my_cluster.domain.com Remote shell command: /usr/bin/ssh Remote file copy command: /usr/bin/scp Repository type: CCR Node Daemon node name IP address Admin node name Designation----------------------------------------------------------------------- 1 node1-i.domain.com 10.1.1.1 node1-i.domain.com quorum-manager 2 node2-i.domain.com 10.1.1.2 node2-i.domain.com quorum-manager 3 node3-i.domain.com 10.1.1.3 node3-i.domain.com quorum-manager 4 node4-i.domain.com 10.1.1.4 node4-i.domain.com quorum-manager
5. Define the Network Shared Disks (NSDs).
Create files to be used as input to mmcrnsd to configure the NSDs.:
– If you are using shared SCSI LUNs, change the "device=" disk to point to the location of these SCSI LUNs. For multipathed SCSI LUNs, the location of SCSI LUNs are likely symlinks in /dev/mapper.
– If DM multipath SCSI is used, the /etc/multipath.conf file needs to be updated to include the following parameters:• features “0”• failback immediate• no_path_retry fail
You create three files in the tasks /etc/gpfs_data (see Example 5-12), /etc/gpfs_arch (see Example 5-13 on page 79), and /etc/gpfs_redo (see Example 5-14 on page 79).
Example 5-12 Contents of /etc/gpfs_data
%nsd: device=/dev/disk/by-path/ccw-0.0.6000-part1 nsd=nsd100 servers=node1,node2,node3,node4 usage=dataAndMetadata%nsd: device=/dev/disk/by-path/ccw-0.0.6001-part1 nsd=nsd101 servers=node1,node2,node3,node4 usage=dataAndMetadata
78 Best practices and Getting Started Guide for Oracle on IBM LinuxONE

%nsd: device=/dev/disk/by-path/ccw-0.0.6002-part1 nsd=nsd102 servers=node1,node2,node3,node4 usage=dataAndMetadata%nsd: device=/dev/disk/by-path/ccw-0.0.6003-part1 nsd=nsd103 servers=node1,node2,node3,node4
usage=dataAndMetadata
Example 5-13 Contents of /etc/gpfs_arch
%nsd: device=/dev/disk/by-path/ccw-0.0.6004-part1 nsd=nsd200 servers=node1,node2,node3,node4 usage=dataAndMetadata%nsd: device=/dev/disk/by-path/ccw-0.0.6005-part1 nsd=nsd201 servers=node1,node2,node3,node4 usage=dataAndMetadata%nsd: device=/dev/disk/by-path/ccw-0.0.6006-part1 nsd=nsd202 servers=node1,node2,node3,node4 usage=dataAndMetadata%nsd: device=/dev/disk/by-path/ccw-0.0.6007-part1 nsd=nsd203 servers=node1,node2,node3,node4
usage=dataAndMetadata
Example 5-14 Contents of /etc/gpfs_redo
%nsd: device=/dev/disk/by-path/ccw-0.0.6008-part1 nsd=nsd300 servers=node1,node2,node3,node4 usage=dataAndMetadata%nsd: device=/dev/disk/by-path/ccw-0.0.6009-part1 nsd=nsd301 servers=node1,node2,node3,node4
usage=dataAndMetadata
6) Create the NSDs using the etc/gpfs_* parameter files as input:node1:~ # mmcrnsd -F /etc/gpfs_data -v yesnode1:~ # mmcrnsd -F /etc/gpfs_arch -v yesnode1:~ # mmcrnsd -F /etc/gpfs_redo -v yes
Chapter 5. Installing and configuring Spectrum Scale 79
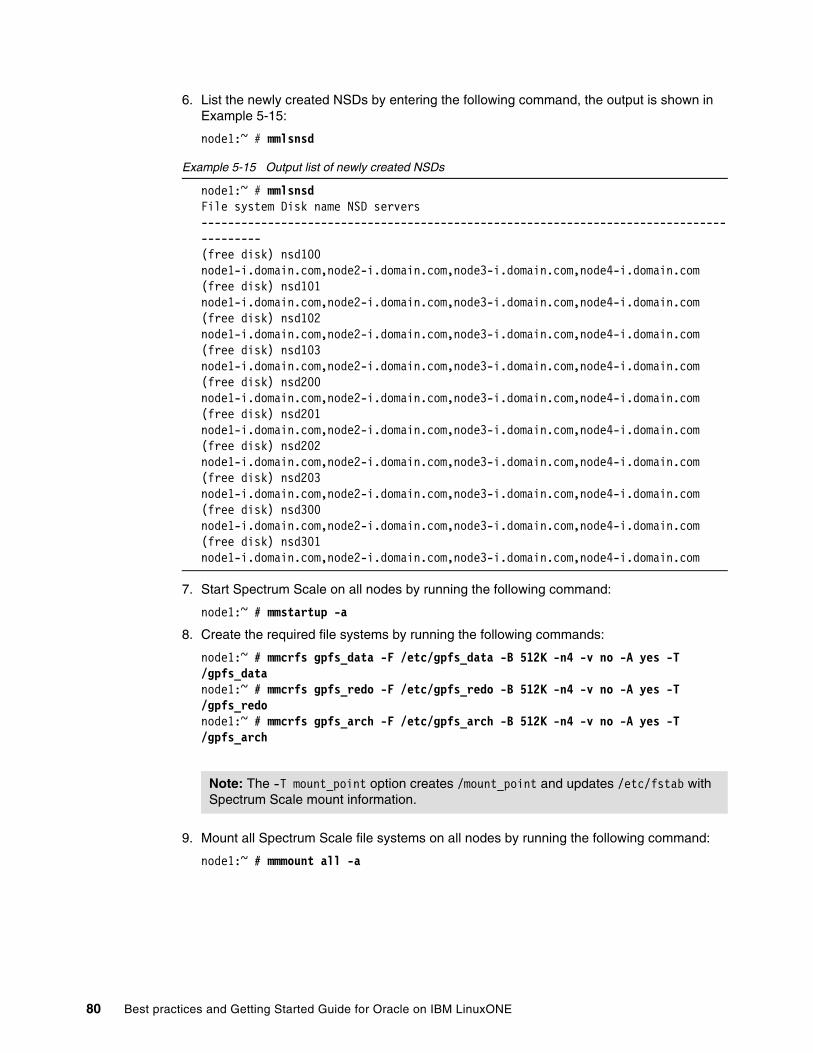
6. List the newly created NSDs by entering the following command, the output is shown in Example 5-15:
node1:~ # mmlsnsd
Example 5-15 Output list of newly created NSDs
node1:~ # mmlsnsdFile system Disk name NSD servers----------------------------------------------------------------------------------------(free disk) nsd100 node1-i.domain.com,node2-i.domain.com,node3-i.domain.com,node4-i.domain.com(free disk) nsd101 node1-i.domain.com,node2-i.domain.com,node3-i.domain.com,node4-i.domain.com(free disk) nsd102 node1-i.domain.com,node2-i.domain.com,node3-i.domain.com,node4-i.domain.com(free disk) nsd103 node1-i.domain.com,node2-i.domain.com,node3-i.domain.com,node4-i.domain.com(free disk) nsd200 node1-i.domain.com,node2-i.domain.com,node3-i.domain.com,node4-i.domain.com(free disk) nsd201 node1-i.domain.com,node2-i.domain.com,node3-i.domain.com,node4-i.domain.com(free disk) nsd202 node1-i.domain.com,node2-i.domain.com,node3-i.domain.com,node4-i.domain.com(free disk) nsd203 node1-i.domain.com,node2-i.domain.com,node3-i.domain.com,node4-i.domain.com(free disk) nsd300 node1-i.domain.com,node2-i.domain.com,node3-i.domain.com,node4-i.domain.com(free disk) nsd301 node1-i.domain.com,node2-i.domain.com,node3-i.domain.com,node4-i.domain.com
7. Start Spectrum Scale on all nodes by running the following command:
node1:~ # mmstartup -a
8. Create the required file systems by running the following commands:
node1:~ # mmcrfs gpfs_data -F /etc/gpfs_data -B 512K -n4 -v no -A yes -T /gpfs_datanode1:~ # mmcrfs gpfs_redo -F /etc/gpfs_redo -B 512K -n4 -v no -A yes -T /gpfs_redonode1:~ # mmcrfs gpfs_arch -F /etc/gpfs_arch -B 512K -n4 -v no -A yes -T /gpfs_arch
9. Mount all Spectrum Scale file systems on all nodes by running the following command:
node1:~ # mmmount all -a
Note: The -T mount_point option creates /mount_point and updates /etc/fstab with Spectrum Scale mount information.
80 Best practices and Getting Started Guide for Oracle on IBM LinuxONE
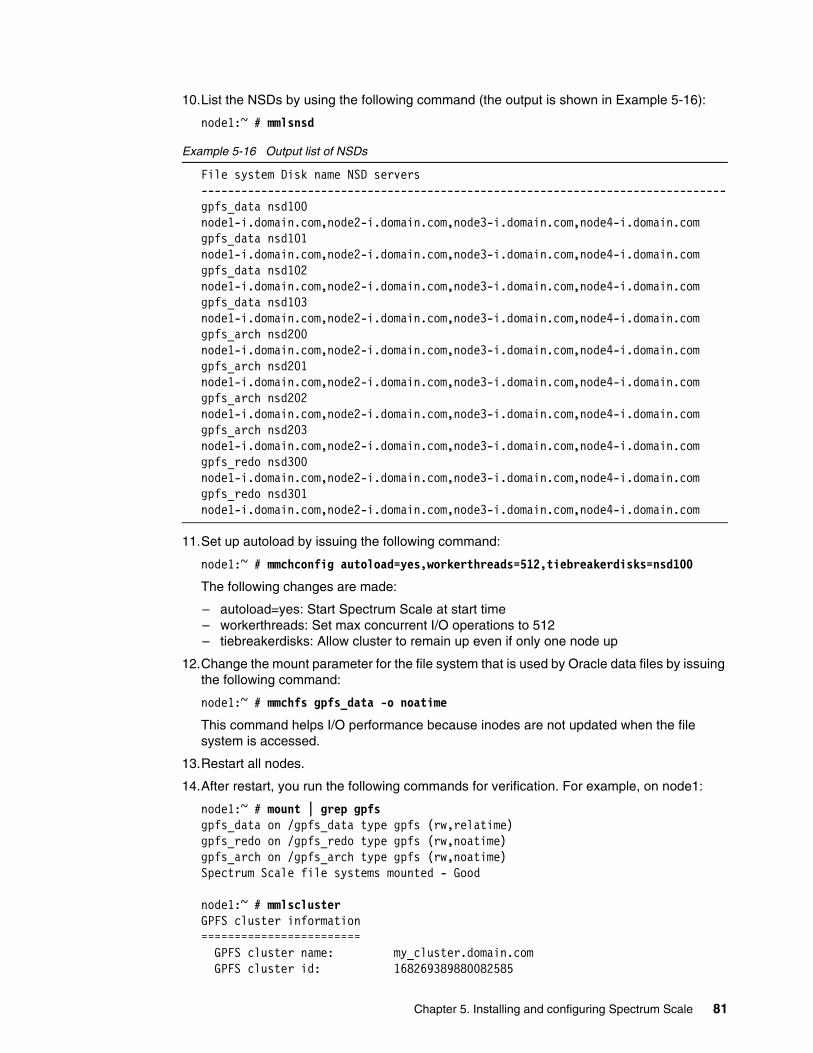
10.List the NSDs by using the following command (the output is shown in Example 5-16):
node1:~ # mmlsnsd
Example 5-16 Output list of NSDs
File system Disk name NSD servers-------------------------------------------------------------------------------gpfs_data nsd100 node1-i.domain.com,node2-i.domain.com,node3-i.domain.com,node4-i.domain.comgpfs_data nsd101 node1-i.domain.com,node2-i.domain.com,node3-i.domain.com,node4-i.domain.comgpfs_data nsd102 node1-i.domain.com,node2-i.domain.com,node3-i.domain.com,node4-i.domain.comgpfs_data nsd103 node1-i.domain.com,node2-i.domain.com,node3-i.domain.com,node4-i.domain.comgpfs_arch nsd200 node1-i.domain.com,node2-i.domain.com,node3-i.domain.com,node4-i.domain.comgpfs_arch nsd201 node1-i.domain.com,node2-i.domain.com,node3-i.domain.com,node4-i.domain.comgpfs_arch nsd202 node1-i.domain.com,node2-i.domain.com,node3-i.domain.com,node4-i.domain.comgpfs_arch nsd203 node1-i.domain.com,node2-i.domain.com,node3-i.domain.com,node4-i.domain.comgpfs_redo nsd300 node1-i.domain.com,node2-i.domain.com,node3-i.domain.com,node4-i.domain.comgpfs_redo nsd301 node1-i.domain.com,node2-i.domain.com,node3-i.domain.com,node4-i.domain.com
11.Set up autoload by issuing the following command:
node1:~ # mmchconfig autoload=yes,workerthreads=512,tiebreakerdisks=nsd100
The following changes are made:
– autoload=yes: Start Spectrum Scale at start time– workerthreads: Set max concurrent I/O operations to 512– tiebreakerdisks: Allow cluster to remain up even if only one node up
12.Change the mount parameter for the file system that is used by Oracle data files by issuing the following command:
node1:~ # mmchfs gpfs_data -o noatime
This command helps I/O performance because inodes are not updated when the file system is accessed.
13.Restart all nodes.
14.After restart, you run the following commands for verification. For example, on node1:
node1:~ # mount | grep gpfsgpfs_data on /gpfs_data type gpfs (rw,relatime)gpfs_redo on /gpfs_redo type gpfs (rw,noatime)gpfs_arch on /gpfs_arch type gpfs (rw,noatime)Spectrum Scale file systems mounted - Good
node1:~ # mmlsclusterGPFS cluster information======================== GPFS cluster name: my_cluster.domain.com GPFS cluster id: 168269389880082585
Chapter 5. Installing and configuring Spectrum Scale 81

GPFS UID domain: my_cluster.domain.com Remote shell command: /usr/bin/ssh Remote file copy command: /usr/bin/scp Repository type: CCRNode Daemon node name IP address Admin node name Designation----------------------------------------------------------------------- 1 node1-i.domain.com 10.1.1.1 node1-i.domain.com quorum-manager 2 node2-i.domain.com 10.1.1.2 node2-i.domain.com quorum-manager 3 node3-i.domain.com 10.1.1.3 node3-i.domain.com quorum-manager 4 node4-i.domain.com 10.1.1.4 node4-i.domain.com quorum-manager
node1:~ # mmlsconfigConfiguration data for cluster my_cluster.domain.com:--------------------------------------------------------clusterName my_cluster.domain.comclusterId 168269389880082585dmapiFileHandleSize 32minReleaseLevel 5.0.0.0cipherList AUTHONLYccrEnabled yesprefetchThreads 100workerThreads 512autoload yesminQuorumNodes 1tiebreakerDisks nsd100adminMode centralFile systems in cluster my_cluster.domain.com:/dev/gpfs_arch/dev/gpfs_data/dev/gpfs_redo
Now, your Spectrum Scale file systems can be used by Oracle.
For example, by using dbca (Advanced configuration) to create a database, you specify:
Database files storage type of “File System”Database files location of “/gpfs_data”Redo logs location of “/gpfs_redo”Archive log destination of “/gpfs_arch”
5.5 Examples
In this section, we provide examples that help you to perform the following tasks:
� “Adding disks to a Spectrum Scale file system” on page 83
� “Migrating a database from ASM to Spectrum Scale” on page 84
� “Get inventory of source database prod12c” on page 84
� “Creating an Oracle password file for the target database” on page 85
� “Updating tnsnames.ora to add target database NEWDB service” on page 85:
– Create a simple pfile for the target database
– Copy the production database to the target database
– Note the file system location of all files
82 Best practices and Getting Started Guide for Oracle on IBM LinuxONE

5.5.1 Adding disks to a Spectrum Scale file system
Assume that we want to add four disks to the /dev/gpfs_data file system. To ass these disks, complete the following steps:
1. Create an NSD stanza file to be used to define the new four DASD disks as NSD devices by updating the following parameter file:
/etc/gpfs_data_add4
Add the following lines to this file:
%nsd: device=/dev/disk/by-path/ccw-0.0.600A-part1 nsd=nsd104 servers=node1,node2,node3,node4 usage=dataAndMetadata%nsd: device=/dev/disk/by-path/ccw-0.0.600B-part1 nsd=nsd105 servers=node1,node2,node3,node4 usage=dataAndMetadata%nsd: device=/dev/disk/by-path/ccw-0.0.600C-part1 nsd=nsd106 servers=node1,node2,node3,node4 usage=dataAndMetadata%nsd: device=/dev/disk/by-path/ccw-0.0.600D-part1 nsd=nsd107 servers=node1,node2,node3,node4 usage=dataAndMetadata
2. Create the NSDs by using the parameter file from Step 1 as input by using the following command:
node1:~ # mmcrnsd -F /etc/gpfs_data_add4 -v yes
3. Add the disks to the gpfs_data file by using the following command:
node1:~ # mmadddisk gpfs_data -F /etc/gpfs_data_add4 -v yes
The following output from this command results:
The following disks of gpfs_data will be formatted on node node1: nsd104: size 42259 MB nsd105: size 42259 MB nsd106: size 42259 MB nsd107: size 42259 MBExtending Allocation MapChecking Allocation Map for storage pool systemCompleted adding disks to file system gpfs_data.mmadddisk: Propagating the cluster configuration data to all affected nodes. This is an asynchronous process.
Chapter 5. Installing and configuring Spectrum Scale 83
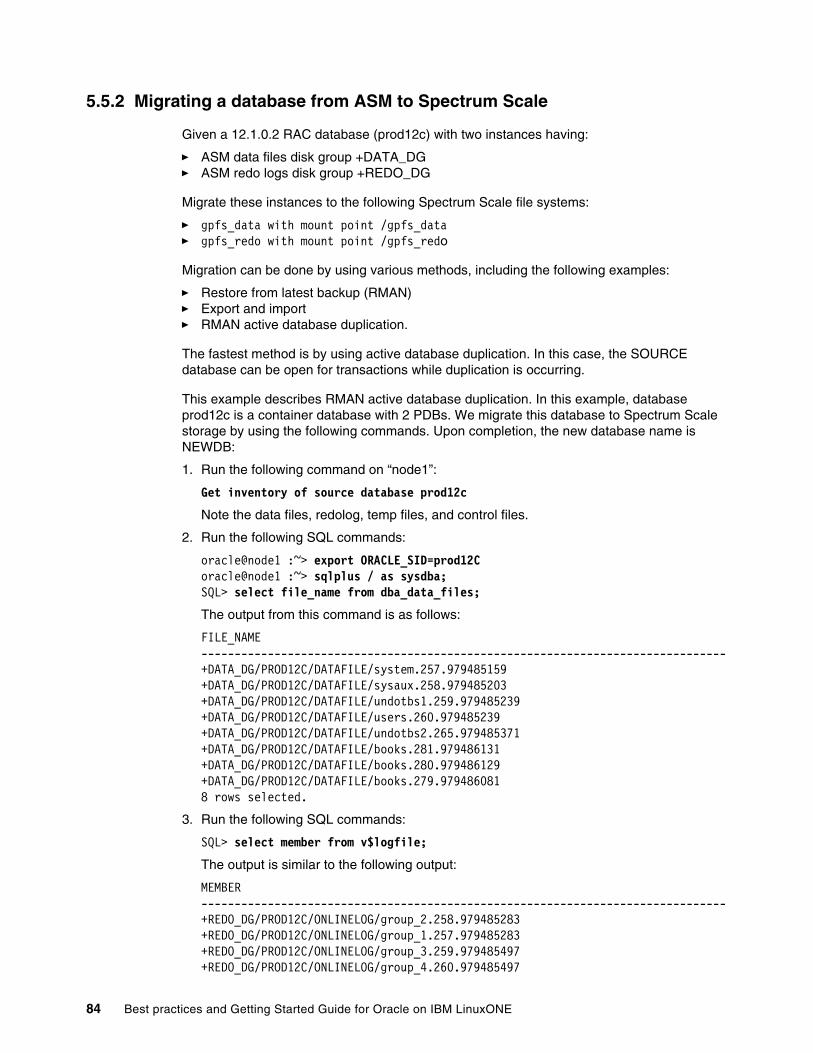
5.5.2 Migrating a database from ASM to Spectrum Scale
Given a 12.1.0.2 RAC database (prod12c) with two instances having:
� ASM data files disk group +DATA_DG� ASM redo logs disk group +REDO_DG
Migrate these instances to the following Spectrum Scale file systems:
� gpfs_data with mount point /gpfs_data� gpfs_redo with mount point /gpfs_redo
Migration can be done by using various methods, including the following examples:
� Restore from latest backup (RMAN)� Export and import � RMAN active database duplication.
The fastest method is by using active database duplication. In this case, the SOURCE database can be open for transactions while duplication is occurring.
This example describes RMAN active database duplication. In this example, database prod12c is a container database with 2 PDBs. We migrate this database to Spectrum Scale storage by using the following commands. Upon completion, the new database name is NEWDB:
1. Run the following command on “node1”:
Get inventory of source database prod12c
Note the data files, redolog, temp files, and control files.
2. Run the following SQL commands:
oracle@node1 :~> export ORACLE_SID=prod12Coracle@node1 :~> sqlplus / as sysdba;SQL> select file_name from dba_data_files;
The output from this command is as follows:
FILE_NAME-------------------------------------------------------------------------------+DATA_DG/PROD12C/DATAFILE/system.257.979485159+DATA_DG/PROD12C/DATAFILE/sysaux.258.979485203+DATA_DG/PROD12C/DATAFILE/undotbs1.259.979485239+DATA_DG/PROD12C/DATAFILE/users.260.979485239+DATA_DG/PROD12C/DATAFILE/undotbs2.265.979485371+DATA_DG/PROD12C/DATAFILE/books.281.979486131+DATA_DG/PROD12C/DATAFILE/books.280.979486129+DATA_DG/PROD12C/DATAFILE/books.279.9794860818 rows selected.
3. Run the following SQL commands:
SQL> select member from v$logfile;
The output is similar to the following output:
MEMBER-------------------------------------------------------------------------------+REDO_DG/PROD12C/ONLINELOG/group_2.258.979485283+REDO_DG/PROD12C/ONLINELOG/group_1.257.979485283+REDO_DG/PROD12C/ONLINELOG/group_3.259.979485497+REDO_DG/PROD12C/ONLINELOG/group_4.260.979485497
84 Best practices and Getting Started Guide for Oracle on IBM LinuxONE
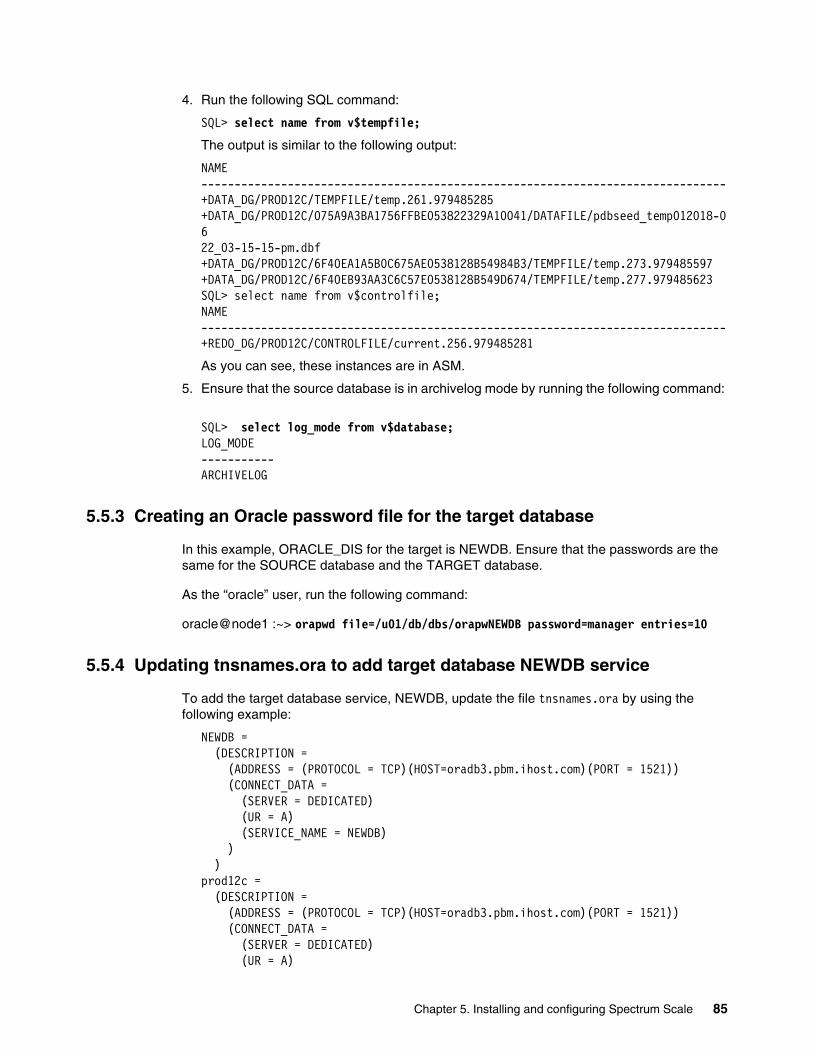
4. Run the following SQL command:
SQL> select name from v$tempfile;
The output is similar to the following output:
NAME-------------------------------------------------------------------------------+DATA_DG/PROD12C/TEMPFILE/temp.261.979485285+DATA_DG/PROD12C/075A9A3BA1756FFBE053822329A10041/DATAFILE/pdbseed_temp012018-0622_03-15-15-pm.dbf+DATA_DG/PROD12C/6F40EA1A5B0C675AE0538128B54984B3/TEMPFILE/temp.273.979485597+DATA_DG/PROD12C/6F40EB93AA3C6C57E0538128B549D674/TEMPFILE/temp.277.979485623SQL> select name from v$controlfile;NAME-------------------------------------------------------------------------------+REDO_DG/PROD12C/CONTROLFILE/current.256.979485281
As you can see, these instances are in ASM.
5. Ensure that the source database is in archivelog mode by running the following command:
SQL> select log_mode from v$database;LOG_MODE-----------ARCHIVELOG
5.5.3 Creating an Oracle password file for the target database
In this example, ORACLE_DIS for the target is NEWDB. Ensure that the passwords are the same for the SOURCE database and the TARGET database.
As the “oracle” user, run the following command:
oracle@node1 :~> orapwd file=/u01/db/dbs/orapwNEWDB password=manager entries=10
5.5.4 Updating tnsnames.ora to add target database NEWDB service
To add the target database service, NEWDB, update the file tnsnames.ora by using the following example:
NEWDB = (DESCRIPTION = (ADDRESS = (PROTOCOL = TCP)(HOST=oradb3.pbm.ihost.com)(PORT = 1521)) (CONNECT_DATA = (SERVER = DEDICATED) (UR = A) (SERVICE_NAME = NEWDB) ) )prod12c = (DESCRIPTION = (ADDRESS = (PROTOCOL = TCP)(HOST=oradb3.pbm.ihost.com)(PORT = 1521)) (CONNECT_DATA = (SERVER = DEDICATED) (UR = A)
Chapter 5. Installing and configuring Spectrum Scale 85
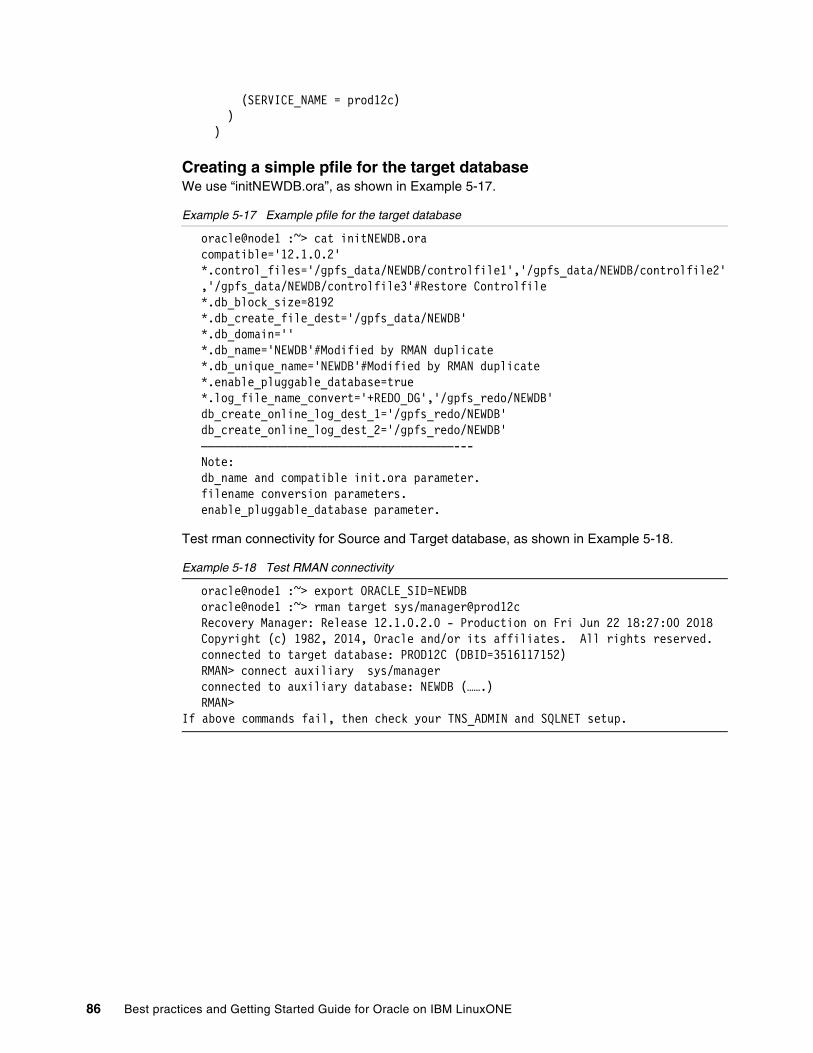
(SERVICE_NAME = prod12c) ) )
Creating a simple pfile for the target databaseWe use “initNEWDB.ora”, as shown in Example 5-17.
Example 5-17 Example pfile for the target database
oracle@node1 :~> cat initNEWDB.oracompatible='12.1.0.2'*.control_files='/gpfs_data/NEWDB/controlfile1','/gpfs_data/NEWDB/controlfile2','/gpfs_data/NEWDB/controlfile3'#Restore Controlfile*.db_block_size=8192*.db_create_file_dest='/gpfs_data/NEWDB'*.db_domain=''*.db_name='NEWDB'#Modified by RMAN duplicate*.db_unique_name='NEWDB'#Modified by RMAN duplicate*.enable_pluggable_database=true*.log_file_name_convert='+REDO_DG','/gpfs_redo/NEWDB'db_create_online_log_dest_1='/gpfs_redo/NEWDB'db_create_online_log_dest_2='/gpfs_redo/NEWDB'——————————————————————————————————————---Note:db_name and compatible init.ora parameter.filename conversion parameters.enable_pluggable_database parameter.
Test rman connectivity for Source and Target database, as shown in Example 5-18.
Example 5-18 Test RMAN connectivity
oracle@node1 :~> export ORACLE_SID=NEWDBoracle@node1 :~> rman target sys/manager@prod12cRecovery Manager: Release 12.1.0.2.0 - Production on Fri Jun 22 18:27:00 2018Copyright (c) 1982, 2014, Oracle and/or its affiliates. All rights reserved.connected to target database: PROD12C (DBID=3516117152)RMAN> connect auxiliary sys/managerconnected to auxiliary database: NEWDB (…….)RMAN>
If above commands fail, then check your TNS_ADMIN and SQLNET setup.
86 Best practices and Getting Started Guide for Oracle on IBM LinuxONE

Copying the production database to the target databaseRun the script that is shown in Example 5-19 as user “oracle”.
Example 5-19 Test RMAN connectivity
oracle@node1 :~> cat duplicate.shrman target sys/manager@prod12c << !EOFconnect auxiliary sys/managerrun {ALLOCATE AUXILIARY CHANNEL aux1 DEVICE TYPE DISK;ALLOCATE AUXILIARY CHANNEL aux2 DEVICE TYPE DISK;ALLOCATE AUXILIARY CHANNEL aux3 DEVICE TYPE DISK;duplicate target database to NEWDB from active database NOFILENAMECHECK;}
!EOF
You should see output similar to that shown in Example 5-20.
Example 5-20 Output listing of RMAN command
Recovery Manager: Release 12.1.0.2.0 - Production on Fri Jun 22 17:21:42 2018Copyright (c) 1982, 2014, Oracle and/or its affiliates. All rights reserved.connected to target database: PROD12C (DBID=3516117152)RMAN>connected to auxiliary database: NEWDB (not mounted)… many lines herecontents of Memory Script:{ Alter clone database open resetlogs;}executing Memory Scriptdatabase openedcontents of Memory Script:{ sql clone "alter pluggable database all open";}executing Memory Scriptsql statement: alter pluggable database all openFinished Duplicate Db at 22-JUN-18
Now the target database NEWDB is UP and functional.
Note the file system location of all files:
node1:~ $ export ORACLE_SID=NEWDBnode1:~ $ sqlplus / as sysdba;SQL> show pdbs;CON_ID CON_NAME OPEN MODE RESTRICTED--------- ---------------------------------------- ----------2 PDB$SEED READ ONLY NO3 PDB121 READ WRITE NO4 PDB122 READ WRITE NOSQL> select file_name from dba_data_files;FILE_NAME-------------------------------------------------------------------------------
Chapter 5. Installing and configuring Spectrum Scale 87
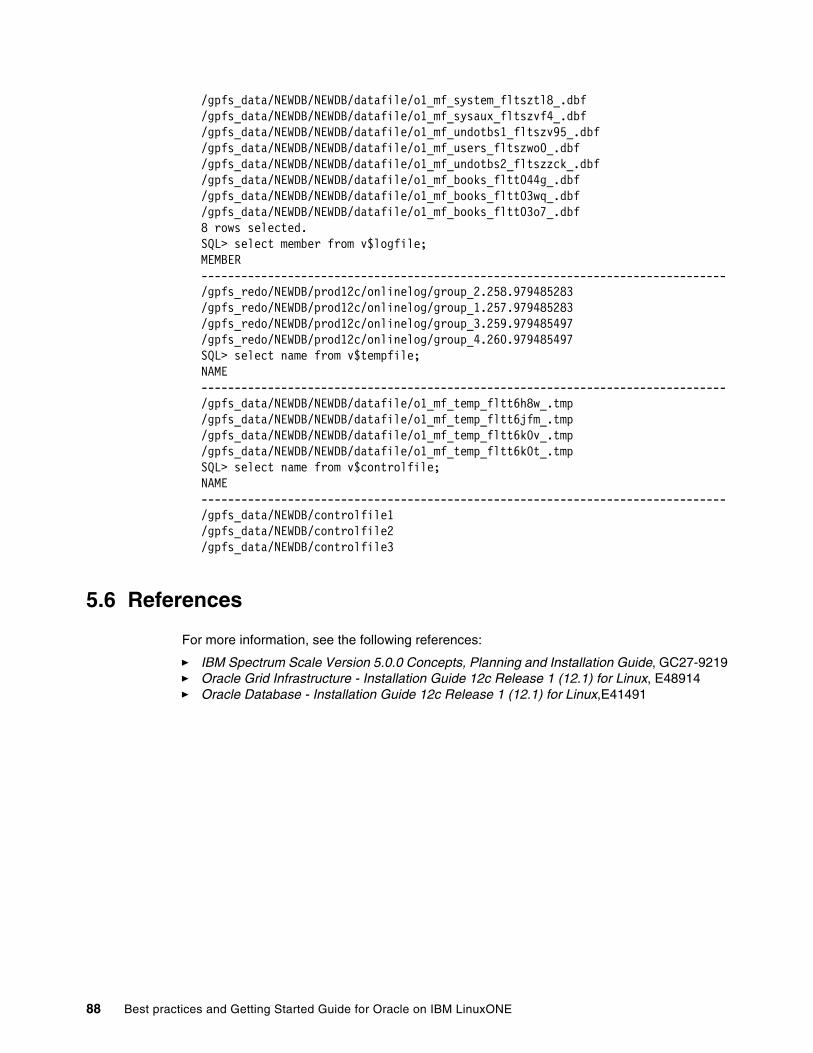
/gpfs_data/NEWDB/NEWDB/datafile/o1_mf_system_fltsztl8_.dbf/gpfs_data/NEWDB/NEWDB/datafile/o1_mf_sysaux_fltszvf4_.dbf/gpfs_data/NEWDB/NEWDB/datafile/o1_mf_undotbs1_fltszv95_.dbf/gpfs_data/NEWDB/NEWDB/datafile/o1_mf_users_fltszwo0_.dbf/gpfs_data/NEWDB/NEWDB/datafile/o1_mf_undotbs2_fltszzck_.dbf/gpfs_data/NEWDB/NEWDB/datafile/o1_mf_books_fltt044g_.dbf/gpfs_data/NEWDB/NEWDB/datafile/o1_mf_books_fltt03wq_.dbf/gpfs_data/NEWDB/NEWDB/datafile/o1_mf_books_fltt03o7_.dbf8 rows selected.SQL> select member from v$logfile;MEMBER-------------------------------------------------------------------------------/gpfs_redo/NEWDB/prod12c/onlinelog/group_2.258.979485283/gpfs_redo/NEWDB/prod12c/onlinelog/group_1.257.979485283/gpfs_redo/NEWDB/prod12c/onlinelog/group_3.259.979485497/gpfs_redo/NEWDB/prod12c/onlinelog/group_4.260.979485497SQL> select name from v$tempfile;NAME-------------------------------------------------------------------------------/gpfs_data/NEWDB/NEWDB/datafile/o1_mf_temp_fltt6h8w_.tmp/gpfs_data/NEWDB/NEWDB/datafile/o1_mf_temp_fltt6jfm_.tmp/gpfs_data/NEWDB/NEWDB/datafile/o1_mf_temp_fltt6k0v_.tmp/gpfs_data/NEWDB/NEWDB/datafile/o1_mf_temp_fltt6k0t_.tmpSQL> select name from v$controlfile;NAME-------------------------------------------------------------------------------/gpfs_data/NEWDB/controlfile1/gpfs_data/NEWDB/controlfile2/gpfs_data/NEWDB/controlfile3
5.6 References
For more information, see the following references:
� IBM Spectrum Scale Version 5.0.0 Concepts, Planning and Installation Guide, GC27-9219� Oracle Grid Infrastructure - Installation Guide 12c Release 1 (12.1) for Linux, E48914� Oracle Database - Installation Guide 12c Release 1 (12.1) for Linux,E41491
88 Best practices and Getting Started Guide for Oracle on IBM LinuxONE

Chapter 6. Integrating IBM Spectrum Scale snapshots with Oracle Recovery Manager incremental backups
Oracle announced the official support for using third-party snapshot technologies to create crash-consistent images that can be used as a backup, restore, and recovery options. This announcement is a breakthrough for customers who want to use the efficiency of snapshot technology to create backup images. IBM Spectrum Scale supports atomic snapshots of any files or file sets, including file systems.
In this chapter, incremental backups and IBM Spectrum Scale snapshots are used to reduce the time and administrative complexity that is required to create and restore Oracle databases, and reduce storage requirements of the backup target.
This chapter includes the following topics:
� 6.1, “Introduction” on page 90� 6.2, “integrating snapshot technology with RMAN backup and restore” on page 94� 6.3, “Summary” on page 99
6
© Copyright IBM Corp. 2020. All rights reserved. 89

6.1 Introduction
Exponential increases in data that is stored in databases are putting enterprise IT infrastructures under severe pressure from a cost, performance, scalability, recovery time, and manageability perspective. It is imperative to employ more efficient ways of storing and managing data to meet the growing demands being placed on IT systems.
Dramatic increases in storage volumes are evident in all types of applications and enterprise databases. Regulatory requirements are also changing how and why data is being retained because as many organizations are now required to retain and control much more information for much longer periods. These requirements often extend beyond structured data (which are often stored in relational databases, such as Oracle Database) to semi-structured and unstructured data, such as medical images, videos, photos, contracts, and documents.
The result is an explosion in the amount of data that organizations are required to obtain, organize, manage, and store securely (and safely), while still providing easy, scalable, and high-performance access.
IBM Spectrum Scale for Linux on IBM Z is a powerful file system. It is based on the IBM General Parallel File System (GPFS) technology, which is a proven, scalable, high-performance data and file management solution. It is enabled for technical computing, big data and Analytics, and Cloud.
IBM Spectrum Scale is being used extensively across multiple industries worldwide. Spectrum Scale has a powerful feature that is called snapshots that can be used along with Oracle Database 12c to save backup storage costs.
IBM Spectrum Scale is designed to provide high availability through advanced clustering technologies, dynamic file system management, and data replication. IBM Spectrum Scale can continue to provide data access, even when the cluster experiences storage or node malfunctions.
IBM Spectrum Scale scalability and performance are designed to meet the needs of data-intensive applications, such as database backup and recovery. Oracle Recovery Manager (RMAN) incremental backup integrates well with Spectrum Scale snapshots to provide daily full backup images in a storage saving manner and provide near-term protection against storage failures and other disasters to the production databases.
Oracle RMAN is an Oracle Database utility that can back up, restore, and recover database files. It is a feature of Oracle Database and does not require a separate installation. RMAN can perform online backups when a database is online and busy committing transactions. It automates many routine backup and recovery tasks and provides methods to perform encrypted backups, compressed backups, incremental backups, block recovery options, and many more critical backup and recovery procedures that are commonly used by a database administrator (DBA).
For large databases, backing up the full database takes too much time and can consume much network bandwidth and disk storage. To address this issue, Oracle introduced incremental backups and a scheme to merge incremental backups with a previous day full (level 0) backup.
An incremental backup backs up data blocks that were changed from the previous incremental backup. Incremental backups are faster, and use less network bandwidth and storage. Block change tracking improves the performance of incremental backups by recording changed blocks in the block change tracking file.
90 Best practices and Getting Started Guide for Oracle on IBM LinuxONE

During an incremental backup, instead of scanning all data blocks to identify which blocks changed, RMAN uses this file to identify the changed blocks that must be backed up.
Incremental backup can greatly reduce daily backup duration. However, at restore time, these incremental backup sets must merge back to level-0 backup and be restored. This requirement increases database restore time, which is not ideal. Many DBAs perform the merge after the daily backup.
To preserve one week of full backups, storage snapshots are helpful. The scenario that is described next can be adopted to perform an incremental backup and incremental merge, and save storage by way of IBM Spectrum Scale snapshot.
6.1.1 Spectrum Scale snapshots
IBM Spectrum Scale (GPFS) snapshots are a point-in-time copy of files and directories. If a block is changed or updated after a snapshot is created, the following methods are available to preserve the old block contents:
� Copy on Write (COW)
In this method, the block is pushed to the snapshot before writing new block contents.
� Redirect on write
In this method, a new block is allocated and written. The file metadata is changed such that the snapshot data points to the old block and file data points to the newly allocated block.
Much confusion surrounds the fact that the GPFS snapshot algorithm claims to use a copy-on-write method. “Copy-on-write” is a term for a programming methodology; in GPFS, it should be called “copy-on-write-only-when-you-have-to-otherwise-redirect-on-write”, but COW is a much cleaner acronym than COWOWYHTOROW.
For most data operations, new snapshot data in GPFS is directed into new data blocks and pointers are changed for the version of the file that is modified. For example, when a file is deleted from the active file system, GPFS updates the inode moving it from the active file system to the snapshot. This metadata operation does not need to “move or copy” any data blocks.
In the case where a few bytes of a file are updated, and these bytes represent data space less than a GPFS file system block (defined by the file system block size setting), on modification GPFS must create a block and copy over the unchanged data so the rest of the block can be available for the active file system.
When a partial block update occurs, the unchanged portions of the block are copied to a new block. Logically, this issue cannot be avoided. The GPFS method reduces file fragmentation and improves workload read and write performance.
With Oracle RMAN backup workload, the read and write size is 1 MB in the presence of block change tracking. This result implies that the copy on write size to the snapshots are minimal. This result makes GPFS snapshots a perfect fit for RMAN backup I/O.
Chapter 6. Integrating IBM Spectrum Scale snapshots with Oracle Recovery Manager incremental backups 91

6.1.2 Oracle Database backup by using snapshots
According to My Oracle Support (MOS) note 604683.1, Oracle Database now officially supports the use of third-party snapshot technologies to create crash-consistent images that can be used for backup, restore, and recovery of the database. This announcement is a breakthrough for customers who want to use the efficiency of GPFS snapshot technology to create backup images. MOS note 604683.1 states that third-party snapshot technology must meet the following requirements:
� The database is crash consistent at the point of the snapshot.� Write ordering is preserved for each file within a snapshot.
IBM GPFS snapshots are atomic point-in-time copies of files and directories and write order is guaranteed within the snapshot.
6.1.3 Use case example
A retail customer has several multi-TB Oracle Databases. As part of the business requirements, all databases must be backed up daily to a backup server with a large amount of storage and the backup must be completed within a 1 hour window.
The full (level 0) backup is not completed in an hour and hence the incremental backup method is adopted. The incremental backup takes much less time compared to a full backup.
The customer wants to reduce database restore time by using RMAN incremental merge. The proposed procedure in this test saves a considerable amount of storage and can be used whether the database is on ASM, file system, or another UNIX platform. Only the backup server must use an IBM Spectrum Scale file system.
Figure 6-1 shows an example of a proposed backup architecture.
Figure 6-1 Proposed backup architecture
92 Best practices and Getting Started Guide for Oracle on IBM LinuxONE

Figure 6-1 on page 92 shows how snapshot technology can be integrated with RMAN backup and restore methodology. Spectrum Scale snapshot augments Oracle database incremental backup and recovery and provides a complete backup solution.
The following procedure provides an example of how to integrate snapshot technology with RMAN backup and restore methodology:
1. Enable Block Change Tracking for database.
2. Take a full (level-0) database backup on every Sunday.
3. On Monday, take an incremental backup (level-1). Perform the following tasks:
a. Take a Spectrum Scale snapshot.
b. Merge the incremental backup with the full backup (level-0).
The snapshot contains a point in time copy of the previous level-0 copy of backup.
c. If the RMAN catalog is used, catalog the snapshot files.
4. On Tuesday - Saturday, repeat Step 3.
5. On the following Sunday, start a fresh cycle by performing all of the steps starting from Step 1.
6. Delete snapshots that are one-week old in reverse time order. For example, delete the Friday snapshot before taking the Thursday snapshot.
The details of our test environment are listed in Table 6-1.
Table 6-1 Test environment
In the test setup, the Database is stored in file system /spectrum1. The backups are stored in /spectrum2 and incremental backups are stored in /spectrum3. Only the default options are used for the spectrum scale file system.
Example 6-1 provides more information about each file system.
Example 6-1 File system details
# df -hFilesystem Size Used Avail Use% Mounted onspectrum1 166G 142G 24G 87% /spectrum1spectrum2 166G 157G 8.4G 95% /spectrum2spectrum3 166G 129G 37G 78% /spectrum3
Linux on IBM Z with four nodes
OS SLES 12
Spectrum Scale 4.2
Database Oracle Database12.1.0.2 with Oracle Real Application Clusters (RAC)
Workload Star schema benchmark with database size of 120 GB
Work between backups � Insert 1,000,000 rows to new table.� Update 1,000,000 rows (random) of table lineorder� Update Star schema indexes
Chapter 6. Integrating IBM Spectrum Scale snapshots with Oracle Recovery Manager incremental backups 93

6.2 integrating snapshot technology with RMAN backup and restore
Complete the following steps to integrate snapshot technology with RMAN backup and restore:
1. Enable block change tracking for the Oracle Database. The commands with the result are shown in Example 6-2.
Example 6-2 Enable block change tracking
SQL> alter database enable block change tracking using file '/spectrum1//block_change.dbf' reuse;SQL> SELECT filename, status FROM v$block_change_tracking;
FILENAME STATUS------------------------------------------------- /spectrum1/block_change.dbf ENABLED
2. Identify the parent of the incremental backup chain by using RMAN tags. In this test, GPFS_OBK is used as the TAG.
A sample script is shown in Example 6-3.
Example 6-3 Sample script
export BKUP_TAG="GPFS_OBK" #Note the TAG name## Backup files are stored in /spectrum2 filesystem# The file names start with FULL_L0 to indicate this is a level-0 backup#rman target / << !EOFrun {allocate channel d1 type disk FORMAT "/spectrum2/ssbdb_bkup/FULL_L0_%d-%s_%p.db";allocate channel d2 type disk FORMAT "/spectrum2/ssbdb_bkup/FULL_L0_%d-%s_%p.db";sql 'alter system archive log current'; backup incremental level 1 tag "$BKUP_TAG" filesperset 1 for recover of copy with tag "$BKUP_TAG" database archivelog all ;release channel d1;release channel d2;}!EOF
3. After running the sample script that is shown in Example 6-3, check the /spectrum2/ssdb_bkup directory, as shown in Example 6-4.
Example 6-4 Check the /spectrum2/ssdb_bkup directory
## ls -lrt /spectrum2/ssdb_bkup#-rw-r----- 1 oracle oinstall 913104896 Jul 17 16:48 FULL_L0_SSBDB-1284_1.db-rw-r----- 1 oracle oinstall 913104896 Jul 17 16:48 FULL_L0_SSBDB-1285_1.db
94 Best practices and Getting Started Guide for Oracle on IBM LinuxONE

-rw-r----- 1 oracle oinstall 896094208 Jul 17 16:48 FULL_L0_SSBDB-1286_1.db-rw-r----- 1 oracle oinstall 891912192 Jul 17 16:48 FULL_L0_SSBDB-1287_1.db-rw-r----- 1 oracle oinstall 882651136 Jul 17 16:48 FULL_L0_SSBDB-1288_1.db-rw-r----- 1 oracle oinstall 881991680 Jul 17 16:48 FULL_L0_SSBDB-1289_1.db-rw-r----- 1 oracle oinstall 881205248 Jul 17 16:48 FULL_L0_SSBDB-1290_1.db
4. Run the SQL workload. The workload that is used in our example inserts one million rows and updates one million random rows. In our test environment, it took approximately 30 minutes to complete the updates.
5. Take a snapshot of /spectrum2, as shown in Example 6-5. This process requires root privileges.
Example 6-5 Snapshot of /spectrum2
export SNP=snp_`date +%m%d@%HH%MM`sudo /usr/lpp/mmfs/bin/mmcrsnapshot spectrum2 $SNP
The snapshot name is specific a time stamp. This name helps to identify the time when the snapshot was taken. Example 6-6 shows an example of the snapshots with their time-stamped names. In this example, snapshots are taken on 07-17 at 16:56, 17:19, and 17:35.
Example 6-6 Snapshots
/u01/db/dbs> ls -la /spectrum2/.snapshots/
dr-xr-xr-x 8 root root 8192 Jul 17 19:01 .drwxr-xr-x 3 oracle oinstall 262144 Jul 12 17:48 ..drwxr-xr-x 3 oracle oinstall 4096 Jul 12 17:48 snp_0717@16H56Mdrwxr-xr-x 3 oracle oinstall 4096 Jul 12 17:48 snp_0717@17H19Mdrwxr-xr-x 3 oracle oinstall 4096 Jul 12 17:48 snp_0717@17H35M
6. Take an incremental backup by using the RMAN script, as shown in Example 6-7.
Example 6-7 Incremental backup script
echo INCR-BACKUP-BEGIN `date`export BKUP_TAG="GPFS_OBK"
rman target / << !EOFrun {allocate channel d1 type disk FORMAT "/spectrum3/incr_ssdb/INCR_L1_%d-%s_%p.db";allocate channel d2 type disk FORMAT "/spectrum3/incr_ssdb/INCR_L1_%d-%s_%p.db";sql 'alter system archive log current'; backup incremental level 1 tag "$BKUP_TAG" for recover of copy with tag "$BKUP_TAG" database archivelog all ;release channel d1;release channel d2;}!EOFecho INCR-BACKUP-END `date`
Note: All files have FULL_L0 for full (level-0) in the name. RMAN adds the sequence number.
MERGE
Chapter 6. Integrating IBM Spectrum Scale snapshots with Oracle Recovery Manager incremental backups 95
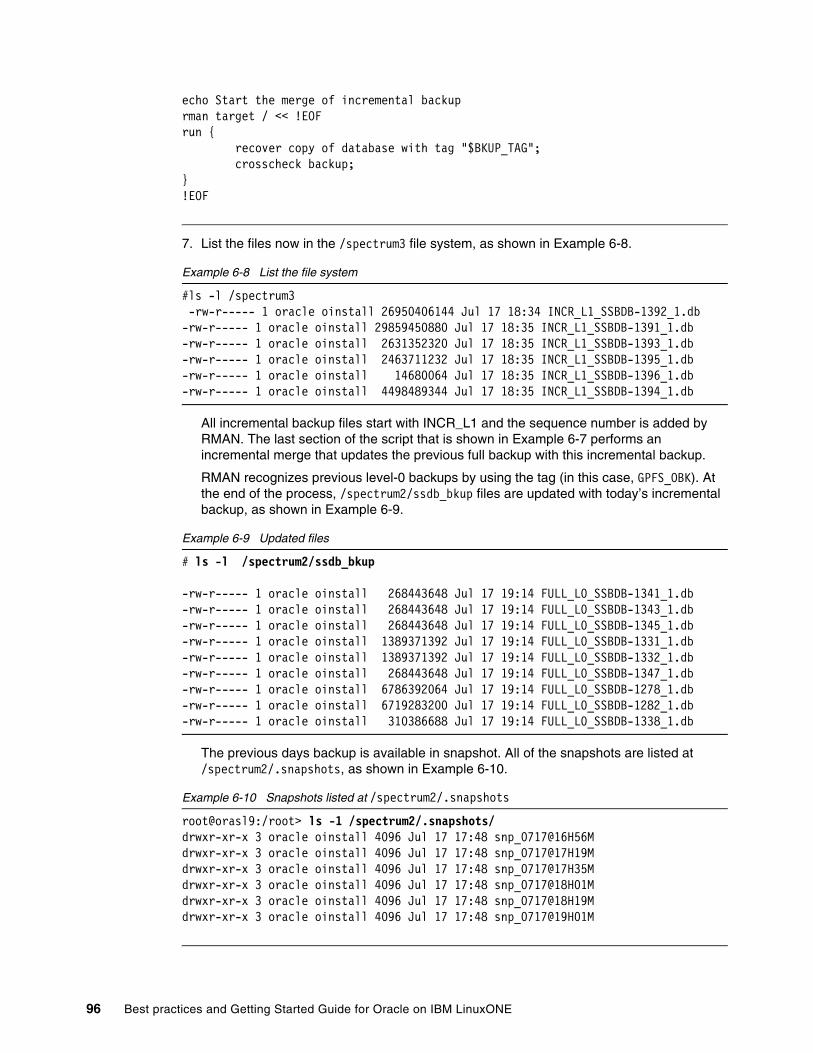
echo Start the merge of incremental backuprman target / << !EOFrun { recover copy of database with tag "$BKUP_TAG"; crosscheck backup;}!EOF
7. List the files now in the /spectrum3 file system, as shown in Example 6-8.
Example 6-8 List the file system
#ls -l /spectrum3 -rw-r----- 1 oracle oinstall 26950406144 Jul 17 18:34 INCR_L1_SSBDB-1392_1.db-rw-r----- 1 oracle oinstall 29859450880 Jul 17 18:35 INCR_L1_SSBDB-1391_1.db-rw-r----- 1 oracle oinstall 2631352320 Jul 17 18:35 INCR_L1_SSBDB-1393_1.db-rw-r----- 1 oracle oinstall 2463711232 Jul 17 18:35 INCR_L1_SSBDB-1395_1.db-rw-r----- 1 oracle oinstall 14680064 Jul 17 18:35 INCR_L1_SSBDB-1396_1.db-rw-r----- 1 oracle oinstall 4498489344 Jul 17 18:35 INCR_L1_SSBDB-1394_1.db
All incremental backup files start with INCR_L1 and the sequence number is added by RMAN. The last section of the script that is shown in Example 6-7 performs an incremental merge that updates the previous full backup with this incremental backup.
RMAN recognizes previous level-0 backups by using the tag (in this case, GPFS_OBK). At the end of the process, /spectrum2/ssdb_bkup files are updated with today’s incremental backup, as shown in Example 6-9.
Example 6-9 Updated files
# ls -l /spectrum2/ssdb_bkup
-rw-r----- 1 oracle oinstall 268443648 Jul 17 19:14 FULL_L0_SSBDB-1341_1.db-rw-r----- 1 oracle oinstall 268443648 Jul 17 19:14 FULL_L0_SSBDB-1343_1.db-rw-r----- 1 oracle oinstall 268443648 Jul 17 19:14 FULL_L0_SSBDB-1345_1.db-rw-r----- 1 oracle oinstall 1389371392 Jul 17 19:14 FULL_L0_SSBDB-1331_1.db-rw-r----- 1 oracle oinstall 1389371392 Jul 17 19:14 FULL_L0_SSBDB-1332_1.db-rw-r----- 1 oracle oinstall 268443648 Jul 17 19:14 FULL_L0_SSBDB-1347_1.db-rw-r----- 1 oracle oinstall 6786392064 Jul 17 19:14 FULL_L0_SSBDB-1278_1.db-rw-r----- 1 oracle oinstall 6719283200 Jul 17 19:14 FULL_L0_SSBDB-1282_1.db-rw-r----- 1 oracle oinstall 310386688 Jul 17 19:14 FULL_L0_SSBDB-1338_1.db
The previous days backup is available in snapshot. All of the snapshots are listed at /spectrum2/.snapshots, as shown in Example 6-10.
Example 6-10 Snapshots listed at /spectrum2/.snapshots
root@orasl9:/root> ls -1 /spectrum2/.snapshots/ drwxr-xr-x 3 oracle oinstall 4096 Jul 17 17:48 snp_0717@16H56Mdrwxr-xr-x 3 oracle oinstall 4096 Jul 17 17:48 snp_0717@17H19Mdrwxr-xr-x 3 oracle oinstall 4096 Jul 17 17:48 snp_0717@17H35Mdrwxr-xr-x 3 oracle oinstall 4096 Jul 17 17:48 snp_0717@18H01Mdrwxr-xr-x 3 oracle oinstall 4096 Jul 17 17:48 snp_0717@18H19Mdrwxr-xr-x 3 oracle oinstall 4096 Jul 17 17:48 snp_0717@19H01M
96 Best practices and Getting Started Guide for Oracle on IBM LinuxONE
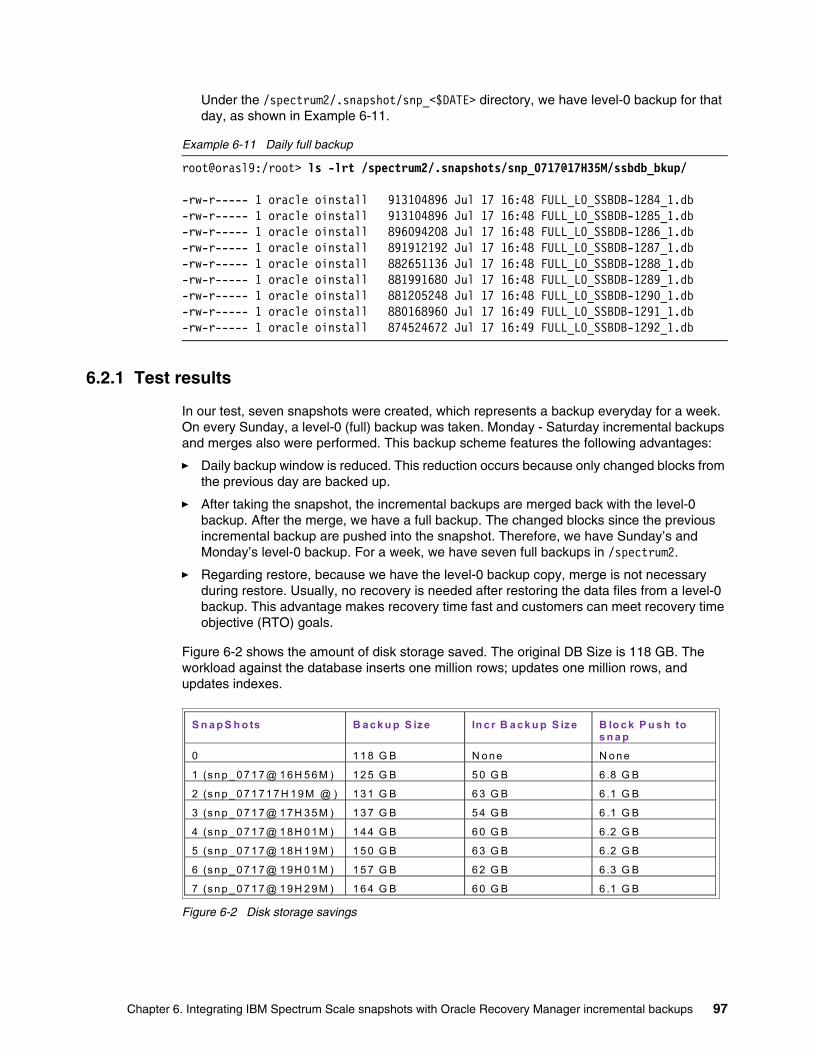
Under the /spectrum2/.snapshot/snp_<$DATE> directory, we have level-0 backup for that day, as shown in Example 6-11.
Example 6-11 Daily full backup
root@orasl9:/root> ls -lrt /spectrum2/.snapshots/snp_0717@17H35M/ssbdb_bkup/
-rw-r----- 1 oracle oinstall 913104896 Jul 17 16:48 FULL_L0_SSBDB-1284_1.db -rw-r----- 1 oracle oinstall 913104896 Jul 17 16:48 FULL_L0_SSBDB-1285_1.db-rw-r----- 1 oracle oinstall 896094208 Jul 17 16:48 FULL_L0_SSBDB-1286_1.db-rw-r----- 1 oracle oinstall 891912192 Jul 17 16:48 FULL_L0_SSBDB-1287_1.db-rw-r----- 1 oracle oinstall 882651136 Jul 17 16:48 FULL_L0_SSBDB-1288_1.db-rw-r----- 1 oracle oinstall 881991680 Jul 17 16:48 FULL_L0_SSBDB-1289_1.db-rw-r----- 1 oracle oinstall 881205248 Jul 17 16:48 FULL_L0_SSBDB-1290_1.db-rw-r----- 1 oracle oinstall 880168960 Jul 17 16:49 FULL_L0_SSBDB-1291_1.db-rw-r----- 1 oracle oinstall 874524672 Jul 17 16:49 FULL_L0_SSBDB-1292_1.db
6.2.1 Test results
In our test, seven snapshots were created, which represents a backup everyday for a week. On every Sunday, a level-0 (full) backup was taken. Monday - Saturday incremental backups and merges also were performed. This backup scheme features the following advantages:
� Daily backup window is reduced. This reduction occurs because only changed blocks from the previous day are backed up.
� After taking the snapshot, the incremental backups are merged back with the level-0 backup. After the merge, we have a full backup. The changed blocks since the previous incremental backup are pushed into the snapshot. Therefore, we have Sunday’s and Monday’s level-0 backup. For a week, we have seven full backups in /spectrum2.
� Regarding restore, because we have the level-0 backup copy, merge is not necessary during restore. Usually, no recovery is needed after restoring the data files from a level-0 backup. This advantage makes recovery time fast and customers can meet recovery time objective (RTO) goals.
Figure 6-2 shows the amount of disk storage saved. The original DB Size is 118 GB. The workload against the database inserts one million rows; updates one million rows, and updates indexes.
Figure 6-2 Disk storage savings
S n a p S h o ts B a ck u p S ize In c r B a ck u p S ize B lo c k P u s h to s n a p
0 1 1 8 G B N o ne N o n e
1 (snp _ 07 1 7@ 1 6H 5 6 M ) 1 2 5 G B 5 0 G B 6 .8 G B
2 (snp _ 07 1 71 7 H 19 M @ ) 1 3 1 G B 6 3 G B 6 .1 G B
3 (snp _ 07 1 7@ 1 7H 3 5 M ) 1 3 7 G B 5 4 G B 6 .1 G B
4 (snp _ 07 1 7@ 1 8H 0 1 M ) 1 4 4 G B 6 0 G B 6 .2 G B
5 (snp _ 07 1 7@ 1 8H 1 9 M ) 1 5 0 G B 6 3 G B 6 .2 G B
6 (snp _ 07 1 7@ 1 9H 0 1 M ) 1 5 7 G B 6 2 G B 6 .3 G B
7 (snp _ 07 1 7@ 1 9H 2 9 M ) 1 6 4 G B 6 0 G B 6 .1 G B
Chapter 6. Integrating IBM Spectrum Scale snapshots with Oracle Recovery Manager incremental backups 97

6.2.2 Observations
The entire database size in our test was 118 GB. Therefore, a full level-0 backup takes 118 GB of storage. Seven days of level-0 backups without snapshots require 826 GB of storage space. With the snapshot feature, we needed only 164 GB, which is a significant savings in storage costs.
The incremental backup size for each day is approximately 60 GB. The default block change tracking unit size is 1 MB. Theoretically, we can remove the incremental backup after merge to level-0 backup is completed.
Because the workload that was used is the same between two backups, the data blocks that are pushed to snapshot are also of similar size. In this test, the amount of data that was pushed is approximately 6.2 GB.
The database can be restored and cloned from any day’s level-0 backup.
In our test, we created seven snapshots, which represents a backup for every day of the week. On Sundays, a new level-0 (full) backup is taken. Monday - Saturday incremental backups and merges are performed.
This backup scheme features the following advantages:
� The daily backup window is reduced because only changed blocks from previous day are backed up.
� After taking the snapshot, the incremental backups are merged with the level-0 backup. After the merge, we have today’s full backup for the day. The previous day’s backup is pushed to the snapshot, which means we have Sunday’s and Monday’s level-0 backup.
� For restore, merge does not need to be done during restore because we have a level-0 backup copy. This advantage allows customers to meet or exceed their recovery time objective (RTO) and their recovery point objective (RPO).
6.2.3 Other snapshot use cases
Many customers need database clones for test and development cycles. The common use cases include the following examples:
� Application functionality testing� Verifying new APP and OS patches� Testing a new platform, hardware, and storage
For multi-terabyte databases, the storage that is needed to maintain database clones is enormous and cost prohibitive. Creating a clone database from daily level-0 backups is a common practice that is adopted by many customers.
For example, assume that you must create a clone database from Wednesday’s backup. You can create a second snapshot from Wednesday’s backup. Name this snapshot as snap-clone. You can then recover the clone and use it for testing. All of the updates are limited to snap-clone. When testing is completed, you can shut down the database and delete the snapshot. No changes are made to Wednesday’s backup image.
98 Best practices and Getting Started Guide for Oracle on IBM LinuxONE

6.3 Summary
IBM Spectrum Scale GPFS snapshots are a perfect match for database backup targets. Customers can save storage space and time during the backup window. A specific backup image can also be used to create development and test environments for upgrades and to verify bug-fixes. When deploying this solution, the production database does not need to be on the Linux for IBM Z platform. They can be on any operating system, file system, or ASM.
All platforms can use the Linux on Z solution to consolidate on the backup target by using GPFS storage. In a data-guard replication environment, backups also can be run from standby destinations.
Chapter 6. Integrating IBM Spectrum Scale snapshots with Oracle Recovery Manager incremental backups 99

100 Best practices and Getting Started Guide for Oracle on IBM LinuxONE

Appendix A. Reference sheets, cheat sheets, and blank worksheets
This appendix provides additional materials for your reference that can be printed or downloaded from the internet, as described next.
Important z/VM files
z/VM differs from Linux in regard to the location and number of configuration files. In Linux, many configuration files are available and most are in or under the /etc/ directory. On z/VM, relatively few configuration files are available but are on many different minidisks. Table A-1 provides a summary and the location of important z/VM configuration files.
Table A-1 Important z/VM configuration files
A
File Location Description
SYSTEM CONFIG PMAINT CF0 This file is the operating system’s main configuration file. It defines the system name, the CP volumes, user volumes, and other settings.
USER DIRECT MAINT 2CC This directory is the initial z/VM user directory. All virtual machines that are known to the system are defined here. If a directory maintenance product is in use, this file is no longer authoritative.
PROFILE TCPIP TCPMAINT 198 This file defines the resources for the primary z/VM TCP/IP stack, including TCP/IP address, OSA resources, subnet mask, and gateway. It is initially created by the IPWIZARD tool as PROFILE TCPIP.
SYSTEM DTCPARMS TCPMAINT 198 This file is created to define the TCP/IP stacks on the system. It is initially created by the IPWIZARD tool.
TCPIP DATA TCPMAINT 592 This file defines the DNS server, the domain name, and some other settings. It is initially created by the IPWIZARD tool.
© Copyright IBM Corp. 2020. All rights reserved. 101

Cheat sheets
This section contains quick references or “cheat sheets” for the XEDIT and vi editors.
XEDIT cheat sheet
XEDIT has line commands that are entered on the command line (====>) and prefix commands, which are entered over the line numbers on the left side of the window.
Line commandsIn all of these items, curly brackets { } are used to indicate variables. Do not include the { } in your commands.
a Add a line
a{n} Add {n} lines
c/{old}/{new}/{n} {m}
Search for string {old} and replace it with {new} for {n} lines below the current line and {m} times on each line. * can be used for {n} and {m}
/<string> Search for êstringÊ from the current line
-/<string> Search backwards for êstringÊ
all /<string>/ Show all occurrences of êstringÊ and hide other lines
bottom Move to the bottom of the file
top Move to the top of the file
down <n> Move down ênÊ lines
up <n> Move up ênÊ lines
file Save the current file and exit XEDIT
ffile Save the current file and exit but donÊt warn of overwrite
save Save the current file but donÊt exit
quit Exit XEDIT if no changes have been made
qquit Exit XEIDT even if changes have not been saved
left <n> Shift ênÊ characters to the left
right <n> Shift ênÊ characters to the right
get <file> Copy file and insert past the current line
input Enable INPUT mode to insert multiple lines of text beginning at the current line
:<n> Move to line ênÊ
PROFILE EXEC AUTOLOG1 191 This file is a REXX EXEC that is run when the system starts. It is analogous to the /etc/inittab file in Linux.
File Location Description
102 Best practices and Getting Started Guide for Oracle on IBM LinuxONE

? Display last command
= Execute last command
x <file> Edit êfileÊ and put it into the XEDIT ëringË
x Move to the next file in the ring
Prefix commandsa Add one line a<n> Add 'n' lines c Copies one line cc Copies a block of lines d Deletes one line dd Deletes a block of lines f Line after which a copy (c) or a move (m) is to be inserted p Line before which a copy (c) or a move (m) is to be inserted i Insert a line i<n> Insert 'n' lines m Move one line mm Move a block of lines " Replicate a line"<n> Replicate a line 'n' times "" Replicate a block of lines
A vi cheat sheet
In this section, we provide a small subset of the most commonly used vi commands. The vi editor includes the following modes:
� Input mode: The Insert key, i, o (add a line below), O (add a line above), and other commands put you in this mode where you can type text into the file. When you are in this mode, you see the text --INSERT-- in the last line.
� Command mode: Pressing the Esc key moves you out of input mode and into command mode. You can issue the following commands:
i brings you back to input modedd deletes a line and puts it in the buffer<n>dd delete <n> linesx delete a characterdw delete a wordp add the buffer past the current locationP add the buffer before the current locationo add a line and go into insert mode/string search for stringn do the last command again (this can be powerful)jkl; cursor movementA add text at the end of the line<nn>G go to line <nn>G go to the last line in the fileyy yank a line (copy into buffer)<n>yy yank n lines
� Command line mode: Pressing the colon (:) key brings you to this mode at the bottom of the window. You can issue the following commands:
:wq save (write & quit):q! quit and discard changes
Appendix A. Reference sheets, cheat sheets, and blank worksheets 103
:<nn> go to line number <nn>:r <file>read <file> into the current file:1,$s/old/new/g globally replace <old> with <new>:help give help
DirMaint cheat sheet
AddAdd a new user or profile directory entryAMDisk Adds a new minidiskDEDicate Add or delete an existing dedicate statementsDMDisk Removes a minidiskFILE Add or replace a DirMaint control fileRLDCode Reload DirMaint resident operating proceduresRLDExtn Reload DirMaint CONFIG* DATADVH fileREView Review a user or profile directory entryMDisk Change the access mode and passwords for minidisksSTorage Change logon storage sizeSEND Request a copy of a DirMaint control fileSETOptn Add, change, or delete CP optionsCLAss Change the CP class for a directory entrySPEcial Add or delete an existing special statement
DirMaint example commandsThe following DirMaint example commands are available:
� Add a new 50 cylinder minidisk 200 to user ID spiedie:
DIRMAINT FORUSER SPIEDIE AMDISK 200 3390 AUTOG 50 {VOLGROUP}
� Add a link statement to TCPMAINT’s 592 minidisk into the directory entry for user vmfrau:
DIRMAINT FORUSER VMFRAU LINK TCPMAINT 0592 0592 RR
Blank planning worksheet
This section contains a blank copy of the planning worksheet that is used in The Virtualization Cookbook for IBM z Systems® Volume 1: IBM z/VM 6.3, SG24-8147 in Section 2.1, Planning for VMSSI with LGR”.
This worksheet is included for your convenience, and hopefully is organized to be in the order that you need the data.
It is recommended that you specify all values that apply to make your installation process go more smoothly.
IBM Shopz
If you are ordering z/VM using Shopz, as described in The Virtualization Cookbook for IBM z Systems Volume 1: IBM z/VM 6.3, SG24-8147, use Table A-2 on page 105 to record the values you use.
104 Best practices and Getting Started Guide for Oracle on IBM LinuxONE

Table A-2 Shopz data
Hardware Management Console
The Virtualization Cookbook for IBM z Systems Volume 1: IBM z/VM 6.3, SG24-8147, the section entitled, “Start the z/VM installation” describes how to start a z/VM installation from the HMC. Complete Table A-3 to record the values that you use.
Table A-3 HMC values
z/VM Installation Planning Panels (INSTPLAN)
The Virtualization Cookbook for IBM z Systems Volume 1: IBM z/VM 6.3, SG24-8147, in the section entitled, “Copy a vanilla z/VM system to DASD” describes the INSTPLAN command run from the Integrated 3270 Console. The information in this section is necessary.
INSTPLAN panels 1 and 2Complete Table A-4 to record the values that are required in the first two INSTPLAN panels.
Table A-4 INSTPLAN values for first two panels
Name Value Comment
Starting URL ibm.com/shopz
User ID Customer number (for IBM employees, it is your intranet user ID and password)
Password
Order number
Name Value
HMC host name or URL
HMC user ID
HMC password
FTP source system(If installing from FTP)
z/VM installation directory
Name Value Comment
Language AMENG
USENG
KANJI
AMENG (American English), UCENG (UPPERCASE English), or KANJI
DASD model 3390 Model-3
3390 Model-9
3390 Model-3 or Model-9 (Installation to FBA disk is not described in this book)
File pool name VMPSYS (default) recommended
System type SSI (Non-SSI is not described in this book)
Non-SSI system name Used for non-SSI installation only
Appendix A. Reference sheets, cheat sheets, and blank worksheets 105
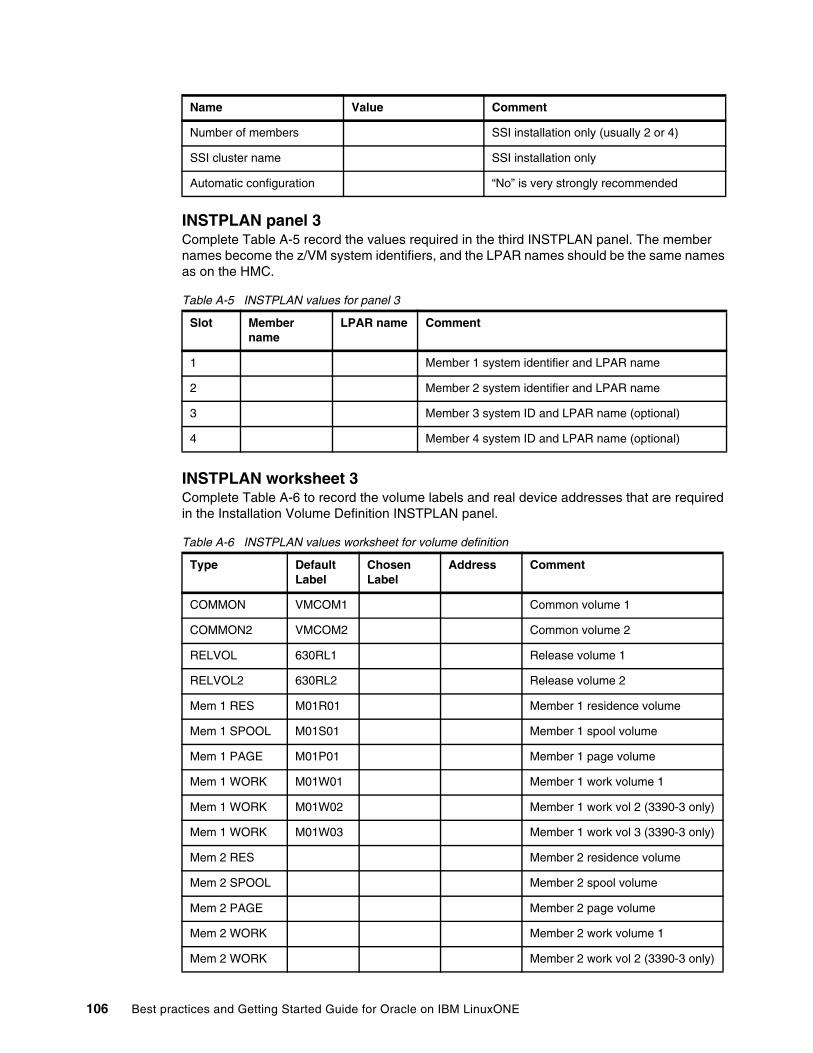
INSTPLAN panel 3Complete Table A-5 record the values required in the third INSTPLAN panel. The member names become the z/VM system identifiers, and the LPAR names should be the same names as on the HMC.
Table A-5 INSTPLAN values for panel 3
INSTPLAN worksheet 3Complete Table A-6 to record the volume labels and real device addresses that are required in the Installation Volume Definition INSTPLAN panel.
Table A-6 INSTPLAN values worksheet for volume definition
Number of members SSI installation only (usually 2 or 4)
SSI cluster name SSI installation only
Automatic configuration “No” is very strongly recommended
Slot Member name
LPAR name Comment
1 Member 1 system identifier and LPAR name
2 Member 2 system identifier and LPAR name
3 Member 3 system ID and LPAR name (optional)
4 Member 4 system ID and LPAR name (optional)
Type Default Label
Chosen Label
Address Comment
COMMON VMCOM1 Common volume 1
COMMON2 VMCOM2 Common volume 2
RELVOL 630RL1 Release volume 1
RELVOL2 630RL2 Release volume 2
Mem 1 RES M01R01 Member 1 residence volume
Mem 1 SPOOL M01S01 Member 1 spool volume
Mem 1 PAGE M01P01 Member 1 page volume
Mem 1 WORK M01W01 Member 1 work volume 1
Mem 1 WORK M01W02 Member 1 work vol 2 (3390-3 only)
Mem 1 WORK M01W03 Member 1 work vol 3 (3390-3 only)
Mem 2 RES Member 2 residence volume
Mem 2 SPOOL Member 2 spool volume
Mem 2 PAGE Member 2 page volume
Mem 2 WORK Member 2 work volume 1
Mem 2 WORK Member 2 work vol 2 (3390-3 only)
Name Value Comment
106 Best practices and Getting Started Guide for Oracle on IBM LinuxONE

INSTPLAN worksheet 4Complete Table A-7 to record the common volume and CTC addresses required in the INSTPLAN panel. More information about this worksheet can be found in The Virtualization Cookbook for IBM z Systems Volume 1: IBM z/VM 6.3, SG24-8147 in the section entitled “Copy a vanilla z/VM system to DASD”.
If you have only two members in the SSI, you must specify only two pairs of CTCs (from member 1 to member 2, and vice versa).
Table A-7 INSTPLAN values worksheet for volume definition
Mem 2 WORK Member 2 work vol 3 (3390-3 only)
Mem 3 RES Member 3 residence vol (optional)
Mem 3 SPOOL Member 3 spool volume
Mem 3 PAGE Member 3 page volume
Mem 3 WORK Member 3 work volume 1
Mem 3 WORK Member 3 work vol 2 (3390-3 only)
Mem 3 WORK Member 3 work vol 3 (3390-3 only)
Mem 4 RES Member 4 residence vol (optional)
Mem 4 SPOOL Member 4 spool volume
Mem 4 PAGE Member 4 page volume
Mem 4 WORK Member 4 work volume 1
Mem 4 WORK Member 4 work vol 2 (3390-3 only)
Mem 4 WORK Member 4 work vol 3 (3390-3 only)
Real addresses for the common volume on each member LPAR:
Member 1 Member 2 Member 3 Member 4
CTC device addresses:
From member 1 From member 2
To: member 1 N/A To: member 1 _______ _______
To: member 2 _______ _______ To: member 2 N/A
To: member 3 _______ _______ To: member 3 _______ _______
To: member 4 _______ _______ To: member 4 _______ _______
From member 3 From member 4
To: member 1 _______ _______ To: member 1 _______ _______
To: member 2 _______ _______ To: member 2 _______ _______
To: member 3 N/A To: member 3 _______ _______
Type Default Label
Chosen Label
Address Comment
Appendix A. Reference sheets, cheat sheets, and blank worksheets 107

z/VM Networking resources
Complete the worksheet in Table A-8 to list the networking resources that are needed when starting the IPWIZARD and when a VSWITCH for the Linux virtual machines is created.
Table A-8 z/VM and networking resources worksheet
z/VM DASD worksheet
Use the worksheet in Table A-9 to document the z/VM DASD that you use.
Table A-9 z/VM DASD blank worksheet
To: member 4 _______ _______ To: member 4 N/A
Name Value Comment
TCP/IP user ID TCPIP is recommended
z/VM host name, member 1
z/VM host name, member 2
TCP/IP domain name System domain name usually set in DNS
TCP/IP gateway The router to and from the local subnet
DNS server 1 Assigned by the network administrator
DNS server 2/3 Optional
Interface name
OSA starting device number Start of OSA triplet for z/VM TCP/IP stack
Subnet mask Assigned by network administrator
OSA device type
MTU size Check with network administrator
Primary OSA device for virtual switch
Specify the first real device number and the next two device numbers will also be used
Secondary OSA device for virtual switch
Ideally, it should be on a different CHPID/OSA card
Device number
Label Type Notes
108 Best practices and Getting Started Guide for Oracle on IBM LinuxONE

Linux resources worksheet
Use the worksheet in Table A-10 to document the resources that are associated with the NFS server that are used to be the installation source of the first Linux on z Systems.
Table A-10 Linux NFS server resources blank worksheet
Use the worksheet in Table A-11 to document your Linux on z Systems resources.
Table A-11 Linux resources blank worksheet
6.3.1 Host names and IP addresses worksheet
Use the worksheet in Table A-12 to document the host names and associated IP addresses and virtual machines that you use.
Table A-12 Host names blank worksheet
Device number
Label Type Notes
Name Value Comment
TCP/IP address
User/password
NFS-exported installation directory
Name Value Comment
Linux installation password
Linux root password
Linux TCP/IP gateway
Linux TCP/IP broadcast
Linux DNS server
VNC installation password
Host name IP address Virtual machine/LPAR
Notes
Appendix A. Reference sheets, cheat sheets, and blank worksheets 109

Host name IP address Virtual machine/LPAR
Notes
110 Best practices and Getting Started Guide for Oracle on IBM LinuxONE


ibm.com/redbooks
Printed in U.S.A.
Back cover
ISBN 0738457272
REDP-5499-00
®