best practice principles for teaching orientation and
TRANSCRIPT

Best Practice Principles for teaching Orientation and Mobility skills to a person who is Deafblind in Australia

This booklet was developed during the Fundable Future Deafblind Orientation and Mobility Project funded by Able Australia and is accompanied by a DVD which shows examples of all the signs and haptics.
The project team were:
Project Manager: Meredith Prain Orientation and Mobility Specialist: Bronwen ScottDeafblind expert adviser: Heather LawsonInterpreter: Dennis Witcombe
People with deafblindness, or dual sensory loss all experience some degree of difficulty in orienting themselves to their environment and moving about safely, particularly in unfamiliar environments. Their communication needs differ from those of people with a single sensory disability and these communication needs must be addressed when teaching orientation and mobility skills to ensure the best outcome.
This booklet will outline some key principles to consider when teaching orientation and mobility skills to a person who is deafblind and will show some specific signs to use for Auslan users. The information presented is relevant to orientation and mobility specialists, interpreters, deafblind communication guides, people with deafblindness and their families and support staff.
Key principles in teaching a person who has deafblindness
Allow more time
Communication breakdowns occur more frequently for people with deafblindness due to issues hearing in noisy environments, use of interpreters, and missing key visual information such as facial expression. Also, it is extremely difficult for people who are deafblind who sign to communicate more than basic information while moving so conversations can only occur when stationary. For people with a hearing impairment allow one and a half hours for every hour you would normally plan to spend training. For people who use an interpreter allow twice as long for each session. Work with the person who is deafblind to decide whether you want longer sessions or more short sessions.
Book an Auslan Interpreter through National Auslan Booking Service
For anyone whose first language is Auslan, book an Auslan interpreter through National Auslan Booking Service (NABS). This service is funded to provide interpreters for medical and allied health appointments including training with an orientation and mobility specialist. Check with the person if they have a preferred interpreter and if they have special requirements e.g. visual frame or tactile signing.
For planning meetings where discussions may last more than one hour, book two interpreters. If it is a practical training session with more walking and moving around, book one interpreter. After the initial planning meeting, book in as many future sessions as necessary with the same interpreter so concepts can be built upon using the same signs and haptics determined in previous sessions.
1

When booking the interpreter let them know it is for an Orientation and Mobility session so they should wear flat shoes and appropriate clothing for outdoor work and different weather conditions. Let them know they may be traveling on public transport during the session and may end in a different place to where they started the job.
Show phone number and web address for NABS on DVD.
Set very clear goals for each lesson
At the start of the lesson, be clear on the concepts and strategies which will be taught and practiced. A lesson may focus only on a technique with little information about landmarks or orientation points. Once the technique is learnt and understood and there is clear and consistent use of the appropriate signs, then a lesson could focus purely on landmarks. Don’t introduce too many new concepts at once, and allow for a longer training program than for someone with a single sensory disability.
Explain new terms as you go
There are a number of signs required for teaching orientation and mobility concepts to a person who is Deaf. These signs will most likely be new to the person who is Deaf and so will require some explanation and demonstration for them to learn the meaning. Discuss the concepts and relevant signs to be used at the start of the lesson.
Use more practice and less talking
The more physical and tactile examples that can be provided the better the person who is deafblind will understand. Do not spend a lot of time explaining concepts. It’s best to demonstrate these concepts using your own body or the body of the person who is deafblind. If you are talking about landmarks and they are within reach, explore these with hands if appropriate or feet or long cane.
Don’t assume everything you have said has been understood
As mentioned earlier, people with deafblindness experience communication break downs more frequently so it is important to double check that new concepts and ideas have been understood. Ask the person to recap what has been taught so you can be sure they have understood correctly and can demonstrate use of new techniques and concepts.
2
ORIENTATION AND MOBILITY RELATED SIGNS
Please refer to the DVD for signs and haptics. This section of the booklet provides basic information about O&M skills and techniques. An O&M Specialist should always be involved in the teaching of O&M skills and techniques.
Guiding
Also known as sighted guide or human guide. This technique involves the person who is blind holding the arm of another person who then leads them through the environment. The recommended technique is for the person being guided to hold the guide’s arm just above the elbow, thumb on the inside and fingers on the outside, and walk one pace behind. However, this technique can be adapted to suit individual requirements (small or very tall people for example).
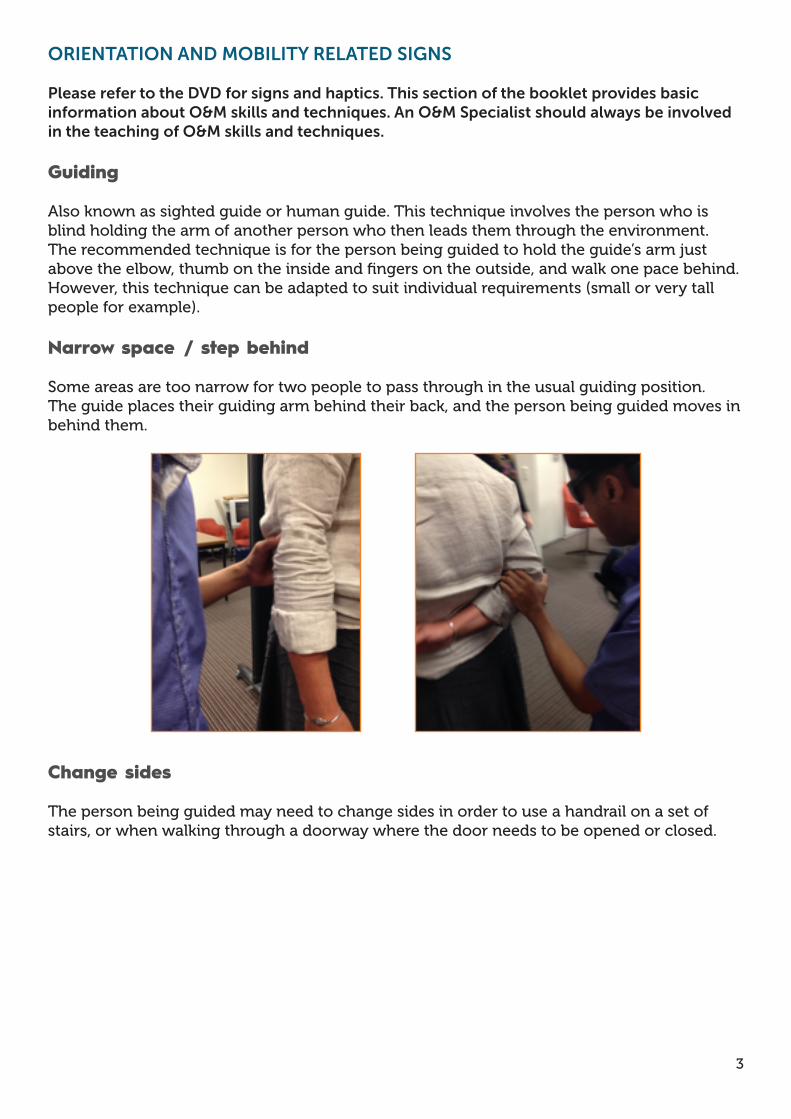
Narrow space / step behind
Some areas are too narrow for two people to pass through in the usual guiding position. The guide places their guiding arm behind their back, and the person being guided moves in behind them.
Change sides
The person being guided may need to change sides in order to use a handrail on a set of stairs, or when walking through a doorway where the door needs to be opened or closed.
3
Door ahead
Moving through doorways where the door needs to be opened or closed is easier if the person being guided is positioned on the hinge side of the door. The guide therefore may need to ask them to change sides, and should let them know the following:
Door opening towards you
Door opening away from you
Sliding doors
Lift
Step up (self explanatory)
Step down (self explanatory)
Seat (self explanatory)
Orientation
L M permanent there:
A landmark is an environmental feature used as an orientation point that is constant, permanent, and unique. It allows the traveller to know where they are as they move through their environment. Therefore, the sign for landmark includes the words ‘permanent there’.
Mobility
Cane
The long cane is a primary mobility aid which has evolved over time from a rigid aluminium cane to the more common folding lightweight cane used today. There are a variety of cane tips, from a straight metal tip to a large rolling ball tip, which suit different travel environments and conditions. The cane is traditionally white, although different coloured canes are used in some parts of the world such as the United States and Australia.
The purpose of the long cane is to:
• preview the environment and protect the traveller from obstacles that are below waist height, as well as from drop-offs such as kerbs or steps;
• provide additional tactual information about the environment as perceived through the cane; and
• identify the traveller as being blind or having low vision.
4
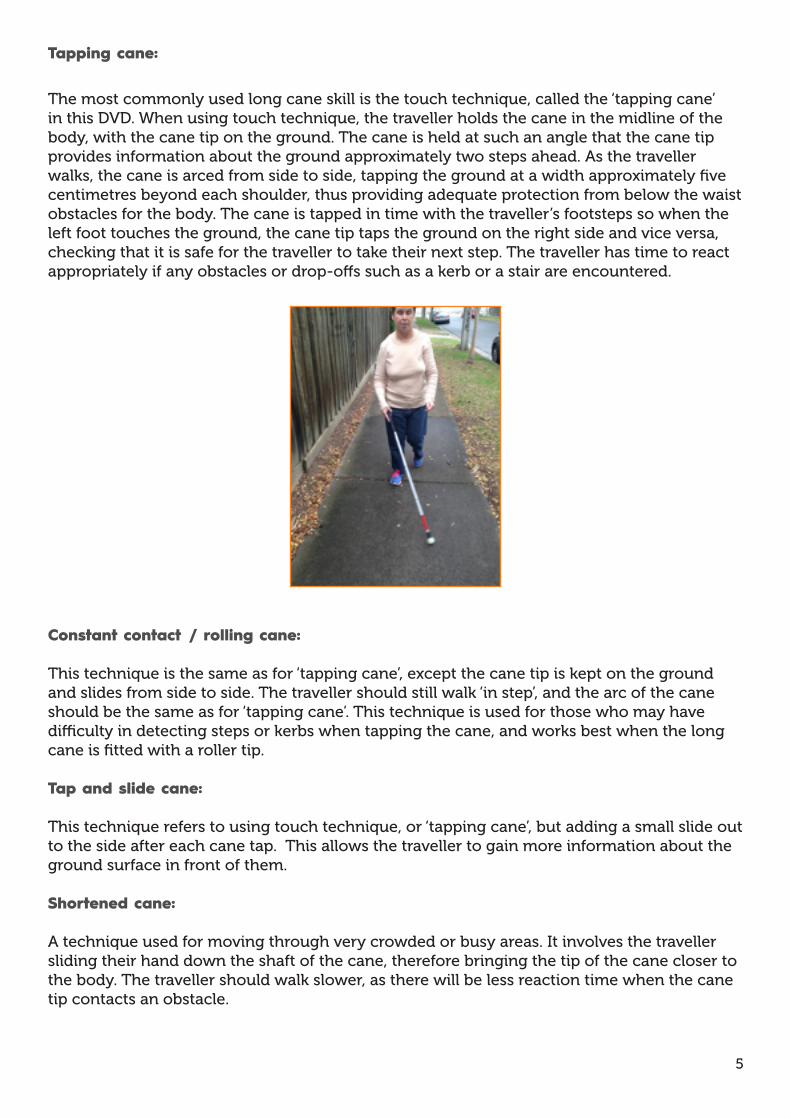
Tapping cane:
The most commonly used long cane skill is the touch technique, called the ‘tapping cane’ in this DVD. When using touch technique, the traveller holds the cane in the midline of the body, with the cane tip on the ground. The cane is held at such an angle that the cane tip provides information about the ground approximately two steps ahead. As the traveller walks, the cane is arced from side to side, tapping the ground at a width approximately five centimetres beyond each shoulder, thus providing adequate protection from below the waist obstacles for the body. The cane is tapped in time with the traveller’s footsteps so when the left foot touches the ground, the cane tip taps the ground on the right side and vice versa, checking that it is safe for the traveller to take their next step. The traveller has time to react appropriately if any obstacles or drop-offs such as a kerb or a stair are encountered.
Constant contact / rolling cane:
This technique is the same as for ‘tapping cane’, except the cane tip is kept on the ground and slides from side to side. The traveller should still walk ‘in step’, and the arc of the cane should be the same as for ‘tapping cane’. This technique is used for those who may have difficulty in detecting steps or kerbs when tapping the cane, and works best when the long cane is fitted with a roller tip.
Tap and slide cane:
This technique refers to using touch technique, or ‘tapping cane’, but adding a small slide out to the side after each cane tap. This allows the traveller to gain more information about the ground surface in front of them.
Shortened cane:
A technique used for moving through very crowded or busy areas. It involves the traveller sliding their hand down the shaft of the cane, therefore bringing the tip of the cane closer to the body. The traveller should walk slower, as there will be less reaction time when the cane tip contacts an obstacle.
5

Shoreline:
This technique allows the traveller to use a wall, building, or grass line to find a specific objective, or help maintain a straight line of travel. The traveller makes consistent contact with that surface, the ‘shoreline’, when they tap their cane to the side the shoreline is on.
Independent travel
Upper body protection: The purpose of the upper body protection technique is to provide protection from chest and head high obstacles. It can be used in an indoor area where there are known obstacles, or when familiarising oneself with a new indoor environment. It can also be used in conjunction with a mobility aid, such as the long cane, if a known obstacle, such as an overhanging tree branch, is in the path of travel.
One arm is positioned horizontally across the body, at shoulder height with the elbow bent at an angle of approximately 120 degrees. The palm of the hand is held outwards with the fingers cupped and slightly relaxed. This allows the traveller to contact objects with the palm of the hand first, enabling most of the shock to be absorbed through the hand and wrist. It is important to keep the arm across the body to protect the opposite shoulder and the face, and to ensure that the forearm does not drift back too close to the body as this reduces reaction time when an obstacle is contacted.
The upper body technique is used only for short periods of time, where there is a known obstacle, or when exploring a new environment.
6

Trailing:
The purpose of trailing is to assist with straight-line travel by maintaining a constant contact with a surface such as a wall. Ideally, it should only be used over short distances for locating a particular objective, such as a doorway. Travellers who lack the skills or confidence to maintain straight-line travel when using a mobility aid such as a long cane may use trailing more often and over longer distances than those who are competent in moving through space. In busy or crowded areas, travellers need to be careful when trailing as they may make unexpected and frequent contact with other pedestrians in the environment.
Facing the direction he or she wishes to move in, the traveller extends the arm closest to the wall until the hand is approximately at waist height. The hand is turned so that the back of the ring and little fingers gently rest on the wall. It is important to keep fingers slightly flexed and relaxed to absorb any contact made with objects along the wall. The traveller maintains a light contact with the wall whilst walking parallel to it.
It is important that the arm is kept in front of the body, and not allowed to drop to the side, as this does not allow sufficient reaction time when an obstacle is met. Travellers also need to be aware of the possibility of jamming fingers or of doors opening unexpectedly.
Squaring off:
The purpose of squaring-off is to establish a straight line of travel when crossing an open area of space.
The traveller positions himself against an object, such as a wall, that is perpendicular to the direction of travel. They should stand with their back to the surface, and at least two body parts, such as the shoulders and heels, are contacting the surface. Using upper and lower body protection, they cross over the open space until they reach the other side.
It is best to square-off on a flat permanent surface such as a wall or a doorway. However, if using a doorway, the traveller needs to be aware that it may suddenly open.
Search patterns:
This is a method of systematically searching for an object that has been dropped or previously placed on a surface. It also can be used for familiarisation to a room, such as locating light switch positions.
Feedback signs
Yes / goodNo / stop
Every person with deafblindness will have their own preferences with communication. Don’t assume once you’ve worked with one person who is deafblind that their needs and preferences will be the same for the next person. Take time to get to know the persons communication and learning preferences.
If you would like more information about anything discussed in this DVD or about Deafblindness or Orientation and Mobility, please contact Able Australia Deafblind Services or Independent Options for Mobility.
7