bending wood
DESCRIPTION
Bending WoodTRANSCRIPT

Essential Techniques for
Bending Wood
Plus a Bent Wood Shelf Plan

Phot
o by
Al P
arris
h

Most of the time when a piece of wood has a bend or a curve, it means trou-
ble: Your stock is warped or bowed. But sometimes a bent part can add an interesting design element. The curved supports in these shelves transform what might be plain and ordinary into an interesting and contemporary design.
I usually like to keep things simple, which to me means using as few parts as possible. But when it comes to curved parts, such as the supports for these shelves, I form the curves by gluing together sev-eral thin strips rather than steam bending one piece of wood. This technique of bent lamination is faster and the results are more predictable than steam bending.
Bent Laminations
by Robert W. Lang
Comments or questions? Contact Bob at 513-531-2690 ext. 1327 or [email protected]
popwood.com
Make curved forms without getting steamed.
With steam bending, you need a boiler, a steam box and a way to quickly clamp a scalding-hot piece of wood to a form. Then you need to wait several days for the part to dry. With bent lamination you need only a form and a way to clamp the thin strips of wood to it. You don’t need to wait an hour or more for the wood to get ready to bend and you don’t need to race like a madman to get a hot piece of wood clamped in place. Once the glue is thoroughly dry, the parts are ready to use.
The techniques I used to build these shelves can be employed many different ways. Table aprons and chair backs are common uses for curved parts. Once the shape and size of the curve is determined, you build a form for gluing, and decide what thickness of strips to use to make the curved parts.
Make an Educated GuessI like to use the thickest strips possible to minimize the number of parts and glue lines. The more strips in the lamination however, the stronger it will be, and the likelihood of the curve spring-ing back away from the form will be minimized.
To get the fi nished thickness of 3⁄3⁄3 4⁄4⁄ ", I could use four strips 3⁄3⁄3 16⁄16⁄ "thick, six strips 1 ⁄1 ⁄1 8⁄8⁄ " thick, eight
strips 3⁄3⁄3 32⁄32⁄ " thick or a dozen pieces 1⁄1⁄1 16⁄16⁄ " thick. It all depends on what wood is used and how tight the radius of the curve is.
I make a good guess at a thick-ness, and resaw a piece of the mate-rial to that size. I then bend the piece to roughly the curve I want. If it’s diffi cult to bend, or I hear any popping or cracking noises as I make the bend, I try again with a slightly thinner piece. For this project, which uses ash, I started at 3⁄3⁄3 16⁄16⁄ " thickness but ultimately decided to use 1 ⁄1 ⁄1 8⁄8⁄ " for the strips to make the shelf supports.
The next step is to build the form used for bending the curved parts. The shelf supports finish at 2" wide, but the laminations are glued together at 21 ⁄1 ⁄1 2⁄2⁄ ". The extra width means I don’t have to worry about keeping all of the edges perfectly lined up during gluing. After the glue has dried overnight, I can get a clean edge on the jointer, and achieve the fi nal width by ripping the part on the table saw. One more light cut on the jointer will remove any saw
After smoothing the fi rst piece, rough-cut parts are then added to the form. A fl ush-trimming bit is used in the router to make identical curves for the bending form.
Instead of mak-ing a giant com-pass, I draw the curve by bending a thin strip of wood across the layout marks. Finish nails hold the shape while I mark the curve with a pencil.

marks. A few quick swipes with a card scraper leave the edges ready for fi nishing.
To get the 21⁄1 ⁄1 4⁄4⁄ " thickness for the form, I used three layers of 3⁄3⁄3 4⁄4⁄ "-thick birch plywood cut to the inside radius of the curve, and a fourth piece as a base plate. It doesn’t matter what the form is made from; I used material that was left over from another project. I would have used particleboard or medium-density fi berboard (MDF) if I had found a piece of that fi rst.
The radius is 5611 ⁄11 ⁄11 16⁄16⁄ ", which would require a long trammel to draw and cut the curve. Instead, I simply marked the end points and centerline of the curve, and marked off the 4" rise at the center. I then drove a 4d fi nish nail at each of these points, and bent a thin strip of wood across them.
It takes three hands to bend and mark the curve. If you don’t have someone to help you, drive fi nishing nails at an angle close to the points used to defi ne the curve. With the midpoint inside the nail, and the ends outside, the thin piece will hold its shape. You can bend the nails to position it exactly where you want it. I cut the curve on the band saw, being care-ful to saw just outside the pencil line. Then I used #80-grit sandpa-per wrapped on a block of wood to get the curved edge smooth.
The First Part is the PatternThe fi rst layer of the pattern is the only one that requires this much work. The remaining pattern pieces can be marked by tracing the fi rst one. After cutting them slightly oversize, they are attached to the fi rst piece with half-a-dozen #8 x 11⁄1⁄1 4⁄4⁄ " screws, and the edges are trimmed with a fl ush-cutting bit in the router.
After attaching the base plate, the surfaces of the form were given a couple coats of paste wax to keep glue from sticking to them.
Now make the strips for the laminations. They can be ripped on the table saw, but it can be dangerous to work with parts that thin, and nearly half of the material will be lost to the saw kerf. By using the band saw, the operation is much safer and less material is wasted. I cut the strips to 3⁄3⁄3 16⁄16⁄ " and took them down to the fi nished thickness of 1⁄1⁄1 8⁄8⁄ " by send-ing them through the thickness planer. I clamped a piece of scrap MDF to the planer bed to carry the thin pieces. Because the ash I used was straight grained, I didn’t worry about the edge grain match-ing, and cut all the strips I needed from 4/4 stock.
In addition to cutting the strips wider than they need to be, I also cut the strips about 6" longer. When you glue six pieces together at a time, they can slide around some, and each layer is slightly shorter than the layer next to it. It’s easier to leave them long and trim them when you’re done.
Get Ready to GlueBefore attempting a glue-up, I made a dry run to make sure my clamping method would work, and that everything I needed was at hand. To form a fair curve, pressure must be evenly applied. This means a lot of clamps placed closely together. During the dry run I determined that 4" or 5" apart was a good spacing.
Typically I use yellow glue for most of my woodworking but bent lamination isn’t a standard pro-cess. The wood wants to straighten back out, and yellow glue is some-what fl exible after it’s dry. A glue that dries more rigidly should be used. Epoxy, plastic resin and reac-tive polyurethane all dry to a rigid line. I chose to use polyurethane (Gorilla Glue) because it doesn’t need to be mixed before using.
I laid the strips out in order, and put a thin bead of glue down
POPULAR WOODWORKING October 2005
Resawing strips on the band saw is safer and less wasteful than using the table saw. I cut them a little thicker than necessary, clean up the saw marks, and bring them to fi nal thickness with the planer.
Thin pieces can be sent through the planer on a sled, a piece of 3⁄4⁄4⁄ "-thick MDF that extends past the feed rollers and is clamped to the planer bed.
Polyurethane glue can be messy as it cures. I use a thin bead of glue and spread it out with a putty knife to avoid this.
MDF sled

��
������ ���� �
��
��
���
���
���
���
��
����� ���� �
������� ���� � ������� ���� � ����� ���� �
����� ���� �
popwood.com
Profi le Elevation
Hanging blocksHanging blocks
Starting at the center and working out to each end, clamps are placed every 4" to 5" around the form.
BENT-LAMINATION WALL SHELFNO. ITEM DIMENSIONS (INCHES) MATERIAL COMMENTS
T W L
❏ 2 Rear 3⁄4⁄4⁄ 21⁄2⁄2⁄ * 54* Ash From 12 supports 1⁄8"⁄8"⁄ pieces
❏ 2 Front 3⁄4⁄4⁄ 21⁄2⁄2⁄ * 54* Ash From 12 supports 1⁄8 "⁄8 "⁄ pieces
❏ 3 Shelves 3⁄4⁄4⁄ 8 22 Ash
❏ 4 Hanging 1 11⁄2⁄2⁄ 13⁄4⁄4⁄ Ash Cut from blocks larger block*Sizes refl ect overage for trimming
After scraping off the excess glue, one edge is evened up on the jointer. Make sure to keep the curve in contact with the fence on the outfeed side of the cutterhead.
the middle of each strip. I then used a putty knife to spread out the bead evenly across each strip. I stacked the strips back up, and placed them in the form. I started clamping in the center, and worked out to the ends, alter-nating right and left.
Each lamination was left in the clamps for four hours to dry. After removing the bent part from the form, I scraped off the excess glue. After the last part was removed from the form, I waited another 24 hours to be sure that the glue was fully cured before moving on to the next step.
I cleaned up one edge of each curved piece on the jointer. I then carefully ripped each part to 1⁄1⁄1 32⁄32⁄ "over the finished width on the table saw. This can be done safely by keeping the part flat against

POPULAR WOODWORKING October 2005
the table and tight against the fence at the infeed edge of the saw blade. After this cut, I returned to the jointer and removed the saw marks with one pass over the machine’s cutterhead.
Form Does Double DutyTo make the 3⁄3⁄3 4⁄4⁄ "-wide x 1"-deep notches in the supports, I put them back in the gluing jig. I added spac-ers below them to keep the top of each piece fl ush with the top of the jig. I added guide strips to the form to guide my router when cutting the notches. To prevent making two lefts and no rights, I didn’t trim the ends to their fi nal lengths until all the 3⁄3⁄3 4⁄4⁄ " notches
were cut and the pairs of curves were glued together.
I marked the center 2" of each piece and planed a fl at in this area with my block plane. I clamped pairs of curves together, using scraps of wood to keep the notches aligned and in the same plane. After the glue had dried over-night, I marked the ends of the uprights from locations marked on the bending form and trimmed the ends with a handsaw.
I used my smoothing plane to fi ne-tune the fi t of the shelves to the notches. I scraped all of the parts and then hand-sanded them with #220 grit before assembly. The ends of the shelves slide into
Use layout lines on the top of the bending form to attach guide strips for the router. Working from the center, I also established lines for the ends of the supports. Then I notched the curved parts for the shelves with the router.
The other edge is ripped on the table saw, maintaining contact with the table on the infeed side of the saw blade.
With the fi nished part back in the jig, I lay out a 2"-long fl at at the center of each curved piece and then plane it by hand. Check the fi t by measur-ing the space between the two parts at the shelf locations.
The ends of the shelves fi t in the notches. Adjust the fi t with a few swipes with a smoothing plane. Mark the support locations on the bottom of the shelves to keep the parts in line during assembly.
the notches and are simply glued and clamped.
It’s a bit of a challenge to keep everything lined up during assem-bly. I started the shelves in the notches before brushing in glue.
To keep the shelves aligned while clamping, I placed 3⁄3⁄3 4⁄4⁄ "-thick sticks on my bench to support the back edges. This is the distance from the wall in the fi nished shelf. I also made sure that the ends of
Guide strip
Notch for shelf

HANGING THE SHELVESTo hang the shelves, I made two small blocks to fi t behind the top of the back uprights.The dimensions of the blocks aren’t critical, but they need to fi t neatly together, and be tight against the inside of the curved support. I started with blocks larger than I needed so that I could cut them to shape while keeping my fi ngers a safe distance from the band saw blade. After cutting the blocks to shape I fi t the curved edge to the back of the shelf support.
These can be fastened to a wall with Zip-it anchors (available from your local home center) after drawing a level line on the wall. The matching half of the hanger is glued to the back of each of the curved uprights. To hang the shelf on the wall, it is simply dropped in place on the hangers. – RL
Line up the shelves in the notches, then brush glue on all surfaces of the joint.
Assemble the shelves on a fl at surface, making sure the ends are fl at on the table. Square sticks keep the backs of the shelves in position.
Cut the curve fi rst, then make two short cuts to form the interlocking joint. The last cut frees the hanger from the block.
the back uprights were fl at on the surface of the bench.
After a fi nal hand sanding with #280 grit, I fi nished the shelves with three coats of lacquer sprayed from an aerosol can.
Lay out the hanging blocks on a piece of wood big enough to let you cut them safely on the band saw.
Curved parts aren’t hard to make, and can be both structural and visually interesting. The abil-ity to make them adds to the skills that make a well-rounded wood-worker. PW
popwood.com
The other half of the hanger is glued to the back of the shelf support, letting the shelves hang nearly invisibly.
The bottom half of the hanging cleat is attached to the wall form-ing a hook.
Sticks to support shelves

www.popwood.com
Bending Wood the Wright WayCold bending is a whole lot easier with this flexible clamping fixture.
In my mind, there are three classifica-tions of woodworking techniques. There
are many that I classify as “useful,” a small-er number that I think of as “indispens-able,” and then a very few that represent atrue breakthrough in woodworking tech-nology. Bending wood is one of the latter.
The ability to alter the grain directionas our imagination dictates while preserv-ing the strength inherent in a straight pieceof wood allows us to create the elegantbeauty of a continuous-arm Windsor chairand the inspiring sweep of a vaulted ceil-ing. We first explored our world in sailingships with bent wood hulls, then left it inairplanes with bent wood wings. Our worldwould be much less beautiful and muchless exciting without this simple wood-working technique.
I’m currently engaged in a woodwork-ing project designed to create a little ex-citement, and bending wood is at the veryheart of it. I’m part of a group of histori-ans and aviators who are recreating the sixexperimental airplanes of the Wrightbrothers, beginning with their model glid-er of 1899 and ending with the 1905Wright Flyer 3, the first practical airplane.The frames of these primitive aircraft area collection of bent wood parts — ribs,wing ends, braces and skids — ingenious-ly arranged to catch the wind and lift aman into the air.
True Geniuses Prefer Cold BendingWhen most of us hear the words “bendingwood,” we think of steam bending. Thewood is heated briefly in low-pressuresteam to soften the lignin (a glue-like pro-tein that holds the cellulose fibers togeth-er). While the wood is still hot, it’s clampedinto a bending form. The cellulose fiberstelescope to conform to the curve, and thelignin cools to hold them in place. Or al-most. In actual practice, the fibers neverquite conform, and when you remove thewood from the bending form, there is agreat deal of springback — the wood loses
some of its curve. If the wood is not at-tached to the other parts in the project soas to hold the curve, it may continue torelax and it will spring back even more.This problem plagued the Wright broth-ers while they were doing their glider ex-periments — they calculated precise curvesfor the ribs to fly as efficiently as possible,only to have the ribs relax and lose a gooddeal of curvature before they could get theirgliders in the air.
To solve this problem, they eventual-ly abandoned steam bending for an earlyform of cold bending. They arranged theparts of the ribs for their Flyers in a bend-ing form, then nailed them together with
brads. They could not use glue — the ad-hesives 100 years ago were not weather-proof. A good rain and the wings wouldhave come apart.
Fortunately, we have a much larger andmore reliable selection of adhesives tochoose from than the Wrights. We decid-ed to make the bent wood ribs of our repli-ca Wright gliders by laminating the partswith a water-resistant aliphatic resin (yel-low) glue. You could also use Resorcinol,epoxy or polyurethane glue for an appli-cation like ours. If your project won’t beexposed to the weather, you can use al-most any good wood glue.
To cold-bend wood, first resaw your
INGENIOUS JIGSPh
otos
by
Chr
is S
chw
arz

INGENIOUS JIGS
POPULAR WOODWORKING February 2001
stock into thin strips and plane it so thethickness is even. The thickness of thestrips depends to a large extent on the ra-dius of the curve. The tighter the radius,
the thinner the strips. I use this chart as ajumping-off point:
• 2" to 4" radius — 3⁄32" thick• 4" to 8" radius — 1⁄8" thick
• 8" to 12" radius — 3⁄16" thick• 12" radius or larger — 1⁄4" thickThere are other factors to consider: the
species of wood, the slope of the grain (asit runs between the faces of the strips), thestrength you want, and the amount ofspringback you can tolerate. For maximumstrength and minimum springback, we de-cided to glue up the ribs from 1⁄8"-thickstrips, although the radius of the curve wasnowhere near 8".
Stack the strips as you will glue themtogether. If you use strips that were all re-sawn from the same board, flip every otherstrip end for end to reverse the grain slope.Spread a thin layer of glue on the face ofone strip, lay the next strip on top of it,spread more glue and repeat. If you’re lam-inating a large number of strips, you maywant to choose an adhesive with an ex-tended working time.
Before the glue sets, clamp the lami-nated strip in the bending form. Let theglue set up for its full clamp time. If you’renot sure of the clamp time, wait a full daybefore you remove the assembly from thebending form. As you release the clamps,there will be a small amount of springback.If the curve is critical (as it was for our glid-er ribs) make the curves in the bendingform slightly tighter to compensate.
Making a Cold Bending FormPretty simple, huh? The only real trick tocold bending is in making a form that willapply an even clamping pressure all alongthe laminated assembly. Traditional bend-ing forms consist of two parts, the form(the positive shape) and the press (the neg-ative shape). Both of these parts are nor-mally cut from the same stock. Begin bydrawing the curve you want on the face ofthe stock. Cut the curve with a band saw,separating the stock into two parts. On thenegative part, mark the thickness of thebent wood part. (Tip: Use a compass likea calipers, set it to the desired thickness.Follow the curve with the point of thecompass, marking the thickness with thescribe.) Cut away the thickness on theband saw — this will create the press.
The trouble with this traditional bend-ing form is that the press doesn’t compen-sate for small variations in the thicknessof the laminated stock or a band saw blade
Help Kids Build a Wright FlyerThe most exciting woodworking project in 100 years.The year 2003 will mark the 100thanniversary of the first controlled,sustained flight.On Dec.17,1903,Wilbur and Orville Wright flew theirfirst powered aircraft,called simplythe Flyer,852 feet across the sands ofKitty Hawk,North Carolina.Thiscoming anniversary presents a uniqueopportunity to get young people allacross America excited about avia-
tion — and woodworking!The Wright brothers built the
gliders and airplanes in their work-shop in Dayton,Ohio.These machineswere largely made of wood:spruce forthe straight parts,ash for the bentparts and a little boxwood for thepulleys.The end result of these laborswas that the Wrights,by virtue oftheir ingenuity and craftsmanship,achieved the age-old dream of flight.The story of their woodworkingprojects has become one of the mostinspiring stories in American history.
That said, it is becoming harderand harder for young people to ac-quire the woodworking skills thatgave us the airplane and a thousandother useful and beautiful innova-tions.High school shop programs arebecoming a thing of the past.Vocational schools train students forindustry,which relies more and moreon computer-aided manufacturing.The old manual machine setups —what we use every time we make acut or drill a hole — are no longerbeing taught on a wide scale,and ourcraft will suffer if we don’t find otherways to introduce young people tothe joys of woodworking.
Popular Woodworking has lent itssupport to a unique program of theWright Brothers Aeroplane
Company (WBAC) of Dayton,Ohio,that addresses these concerns direct-ly.The WBAC is a non-profit educa-tional organization of craftsmen,historians and aviators who are build-ing replicas of Wright aircraft, includ-ing the 1903 Wright Flyer.They willbuild the Flyer with the involvementof young people across America!
Here’s how it works:The WBAChas scripted a learning experi-ence for kids ages 10 to 18 dur-ing which they learn a littleaviation,a little history and alittle woodworking.During thisexperience,which takes just afew hours of a morning or anafternoon, the kids build 1⁄4-scaleribs of the Flyer that they cantake home.Then the whole classcomes together to build a full-scale rib.The kids sign it andsend it to the WBAC in Dayton,Ohio.There,more kids under thesupervision of accomplished
craftsmen,will assemble the ribs in areplica Flyer, that’s 40 feet fromwingtip to wingtip.
And that’s not all.Each of the kidswho works on a rib gets to sign it.TheWBAC also invites each young per-son to make a prediction about whatthe next 100 years of aviation willbring.All the signatures will be pre-served on the replica Flyer,and thepredictions will be edited and assem-bled into a large book.The completedkid-built Flyer and the book will beunveiled at the Dayton InternationalAirport on December 17,2002 (ayear before the centennial anniver-sary),where it will serve as a milepostin both aviation and craftsmanship,pointing 100 years back and looking100 years forward.
We’re looking for woodworkers toserve as teachers and mentors tohelp conduct these learning experi-ences and to communicate the thrillof building something wonderful tochildren.The WBAC will send youinformation on these experiences ifyou’ll just raise your hand and say “I’lldo it.” You can contact them throughthe Internet a www.wright-brothers.org,or write WrightBrothers Aeroplane Company,KidsBuild a Flyer!,P.O.Box 204,WestMilton,OH 45383.
Meanwhile,we’ll continue to re-port on this exciting woodworkingproject as it progresses.PW
A replica of the Wright Brothers’ 1900 Gliderthat Nick Engler built and got airborne at KittyHawk,N.C., in late October.
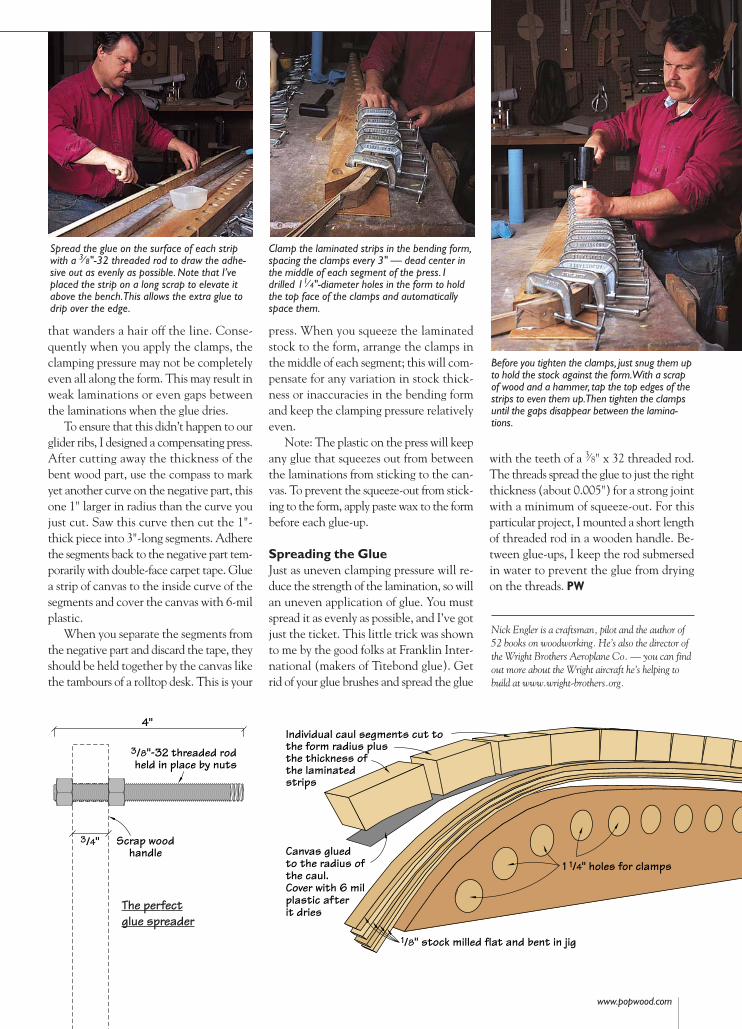
that wanders a hair off the line. Conse-quently when you apply the clamps, theclamping pressure may not be completelyeven all along the form. This may result inweak laminations or even gaps betweenthe laminations when the glue dries.
To ensure that this didn’t happen to ourglider ribs, I designed a compensating press.After cutting away the thickness of thebent wood part, use the compass to markyet another curve on the negative part, thisone 1" larger in radius than the curve youjust cut. Saw this curve then cut the 1"-thick piece into 3"-long segments. Adherethe segments back to the negative part tem-porarily with double-face carpet tape. Gluea strip of canvas to the inside curve of thesegments and cover the canvas with 6-milplastic.
When you separate the segments fromthe negative part and discard the tape, theyshould be held together by the canvas likethe tambours of a rolltop desk. This is your
press. When you squeeze the laminatedstock to the form, arrange the clamps inthe middle of each segment; this will com-pensate for any variation in stock thick-ness or inaccuracies in the bending formand keep the clamping pressure relativelyeven.
Note: The plastic on the press will keepany glue that squeezes out from betweenthe laminations from sticking to the can-vas. To prevent the squeeze-out from stick-ing to the form, apply paste wax to the formbefore each glue-up.
Spreading the GlueJust as uneven clamping pressure will re-duce the strength of the lamination, so willan uneven application of glue. You mustspread it as evenly as possible, and I’ve gotjust the ticket. This little trick was shownto me by the good folks at Franklin Inter-national (makers of Titebond glue). Getrid of your glue brushes and spread the glue
with the teeth of a 3⁄8" x 32 threaded rod.The threads spread the glue to just the rightthickness (about 0.005") for a strong jointwith a minimum of squeeze-out. For thisparticular project, I mounted a short lengthof threaded rod in a wooden handle. Be-tween glue-ups, I keep the rod submersedin water to prevent the glue from dryingon the threads. PW
1 1/4" holes for clamps
1/8" stock milled flat and bent in jig
Individual caul segments cut tothe form radius plusthe thickness ofthe laminatedstrips
Canvas gluedto the radius ofthe caul.Cover with 6 milplastic afterit dries
www.popwood.com
Nick Engler is a craftsman, pilot and the author of52 books on woodworking. He’s also the director ofthe Wright Brothers Aeroplane Co. — you can findout more about the Wright aircraft he’s helping tobuild at www.wright-brothers.org.
4"
3/4" Scrap woodhandle
3/8"-32 threaded rodheld in place by nuts
Spread the glue on the surface of each stripwith a 3⁄8"-32 threaded rod to draw the adhe-sive out as evenly as possible. Note that I’veplaced the strip on a long scrap to elevate itabove the bench.This allows the extra glue todrip over the edge.
Clamp the laminated strips in the bending form,spacing the clamps every 3" — dead center inthe middle of each segment of the press. Idrilled 11⁄4"-diameter holes in the form to holdthe top face of the clamps and automaticallyspace them.
Before you tighten the clamps, just snug them upto hold the stock against the form.With a scrapof wood and a hammer, tap the top edges of thestrips to even them up.Then tighten the clampsuntil the gaps disappear between the lamina-tions.
The perfectglue spreader

■ POPULAR WOODWORKING MAGAZINE April 2011
T he package of wood looked everything like a mummy when it arrived in our shop. The wood
was wrapped in clear plastic, bound by plastic straps and wrapped by more plastic and cardboard.
We peeled away each layer to reveal a stick of unassuming 8/4 ash that was about 6" wide and 54" long. Aside from the fact that the wood was cool to the touch, it looked like regular ash.
I took it to the jointer and planer and machined it fl at. I ripped off a 1"-wide slice and machined that to 13⁄8" thick, just like any other piece of wood.
But then I put that stick into a bend-ing form, and the wood gave up its secret identity. Working alone, I bent the piece of ash along its 13⁄8" dimension and pulled it around a C-shaped bending form with a 9" radius. In 10 minutes, the wood was bent and clamped up. No steam or heat. No adhesives.
This is Compwood, a 1988 Euro-pean invention that allows you to bend room-temperature wood around a form in multiple dimensions. The lumber comes to your shop wrapped in plastic because it is fairly wet – my piece of ash measured 20 percent moisture content.
Bend the Laws of LignumB Y C H R I S TO P H E R S C H WA R Z
A recent innovation lets
you bend wood without
steam or adhesives.
I can bend that. With Compwood, you can bend wood in ways that are surprising. When the wood dries, it holds its shape and can be worked with standard woodworking tools.
LEAD PHOTO BY AL PARRISH; STEP PHOTOS BY THE AUTHOR
While it’s wet, you can bend the wood in almost any direction. When it’s dry, it holds its shape and can be worked just like any other piece of wood.
Why Try It?I became interested in Compwood when I saw it in use at Jeffrey Miller’s woodworking shop in Chicago. He’s been experimenting with the material to use in some of his chair designs and he showed me how it works. Intrigued, I purchased some for my own chairs, and I fi rst cut into this batch to make some arm bows for some Welsh stick chairs.
The Compwood appealed to me for several reasons. While expensive, the Compwood allows me to make my arm bows without investing in a steam box, which I don’t have room for. Also, the material allows me to bend wood to a tight radius without a bending strap and without the risk of compression ruptures on the inside curves or delami-nations on the outside curves.
How tight? There’s a formula for each species. For ash, the smallest bending radius without a strap is six times the
thickness of the work being bent. So my 13⁄8" arm bow could be bent to an 81⁄4" radius or larger. So a 9" radius could be bent without a strap.
The Compwood is also less labor- and machine-intensive than a typical cold-lamination job. When I make cold laminations, I typically have to sand all the pieces down to 1⁄8" thick or less for tight bends – that’s a lot of machine work. And I prefer to use plastic resin
“The New Age? It’s just the old age stuck in a microwave oven for 15 seconds.”
— James Randi (1928-)magician, skeptic
Flexible terms. Compwood can be bent without steam or – in many cases – a bending strap. It also can be bent in three dimensions.
36-37_1104_PWM_CompWood.indd 3636-37_1104_PWM_CompWood.indd 36 1/26/11 3:56:21 PM1/26/11 3:56:21 PM

popularwoodworking.com ■
glue for these parts, and it is nasty and messy stuff.
While I probably wouldn’t consider the Compwood if I made hundreds of chairs for a living (I’d probably invest in a steam box), it did make sense for me for a short run of chairs.
How to Dry itSo how did the material fare? I found that it worked as advertised. After clamping up my arm bows, I let the wood air-dry in the form for a day, and its moisture content dropped to about 12 percent. Then I placed the form in a box that was heated with a lightbulb to 85° F and the work quickly dropped to 7 percent, according to our pinless mois-ture meter. That’s when I fi rst removed it from the form.
The piece sprang out a little at the ends (though it was nothing unaccept-able). The reason for the springback was that the wood likely wasn’t com-pletely dry.
My makeshift “kiln” wasn’t ideal. Miller makes his kilns out of 2"-thick pink foam insulation boards then heats the kiln with a ceramic heater with a fan. His kilns are leaky, which is good because it allows the moisture to escape. He leaves parts in his kiln for about a week. The results were impressive.
“It was pretty much fl awless from a springback perspective,” Miller says. “It didn’t move a bit.”
Chris Mroz, who makes and sells Compwood to woodworkers and indus-try through his company, Fluted Beams, says that I probably removed the wood from the form too soon. For a piece like mine, he would dry it at 110° F for about six days. If he were to air-dry it, he would leave the piece in the form for two or three weeks. So I clamped my arm bows back into the form and let them sit.
How the Stuff is MadeThe way Compwood is made is just as interesting as using it. Compwood is made by fi rst steaming the wood at 212° Funtil it becomes plasticized. Then it is placed in a press that compresses the wood in length. A 3-meter-long piece of wood will end up about 2.4 meters long when in the press. When the press is released the board will expand again, but it will have lost about 5 percent of its length.
This time in the press bends the cells of the wood like an accordion. The structural change in the cells is what allows the Compwood to bend when it is in a cold but wet state.
Not all species work with this pro-cess, but the range is expanding all the time. Fluted Beams, which has the only Compwood press in the Americas, sells 14 different species, from beech, white oak and walnut to cherry, elm and even osage orange.
Softwood species and exotics don’t seem to respond well to the Compwood process, though experiments with exot-ics are ongoing.
As far as pricing goes, expect to spend $30 to $40 a linear foot for 8/4 material that is about 6" wide. Thin-ner stock is considerably less ($18.75 a linear foot). And Fluted Beams (fl utedbeams.com or 253-988-2046) also offers small bundles of Compwood for as little as $20 that will allow you to experi-ment with the wood without buying large planks.
Mroz quickly acknowledges that because Compwood is expensive it’s not for every job. If the project can be done with steam-bending, that defi-nitely is a cheaper way to go.
“I tend to focus on using this product for things that haven’t been done before – when the wood needs to bend in mul-
tiple dimensions,” he says. “It’s when-ever the shape gets more sculptural that this product becomes useful.”
And while I can see that side of the equation, I also am a fan of it for my simple bends because it’s easy to use in a small shop with limited equipment. Plus it doesn’t fail spectacularly like some of my steam-bending adventures. PWM
Christopher is the editor of this magazine and secretly wishes at times to be a starving chairmaker,
instead of a starving writer.
Go Online FOR MORE …
For links to all these online extras, go to:u popularwoodworking.com/apr11
VIDEO: See Chris bend an arm bow around a form using Compwood.
ARTICLE: Read about the drying process and see our makeshift kiln.
WEB SITE: Visit the Fluted Beams web site to order Compwood.
WEB SITE: Read details of how Comp-wood is made at the factory.
IN OUR STORE: ”Woodworker’s Guide to Bending Wood.”
Our products are available online at:u ShopWoodworking.com
u
Relax(ed).One of my arm bows sprung out a little after being released from the form before the arm bow was completely dry. Back onto the form for you.
The golden arches. I was well pleased with the way the Compwood behaved for these arm bows. Now I just have to get on with saddling the seats of the chairs.
36-37_1104_PWM_CompWood.indd 3736-37_1104_PWM_CompWood.indd 37 1/26/11 3:56:34 PM1/26/11 3:56:34 PM

Enter Our New Contest!
Popular Woodworking is giving away a Shopclass Subscription* to the best, or worst,
wood bending project photo. Submit your photos (prior to, during or post project) to
We’ll post the submissions on www.popularwoodworking.com/ how-to-bend-wood-photo-contest
for the public to vote on, so be sure to share, tweet, post and vote for your favorite picture!
On October 31, 2013 we’ll declare a winner!*The Winner will receive a one-year subscription;
the Runner Up a 6-month subscription; Third Place a one-month subscription.
Submit Your Photos Today!