bench garden bench1
TRANSCRIPT

8/11/2019 Bench Garden Bench1
http://slidepdf.com/reader/full/bench-garden-bench1 1/4
Georgia-Pacificfrom
backyard projects A
n n i ve r s
a r
y
EDITION
Garden Bench
8/11/2019 Bench Garden Bench1
http://slidepdf.com/reader/full/bench-garden-bench1 2/4
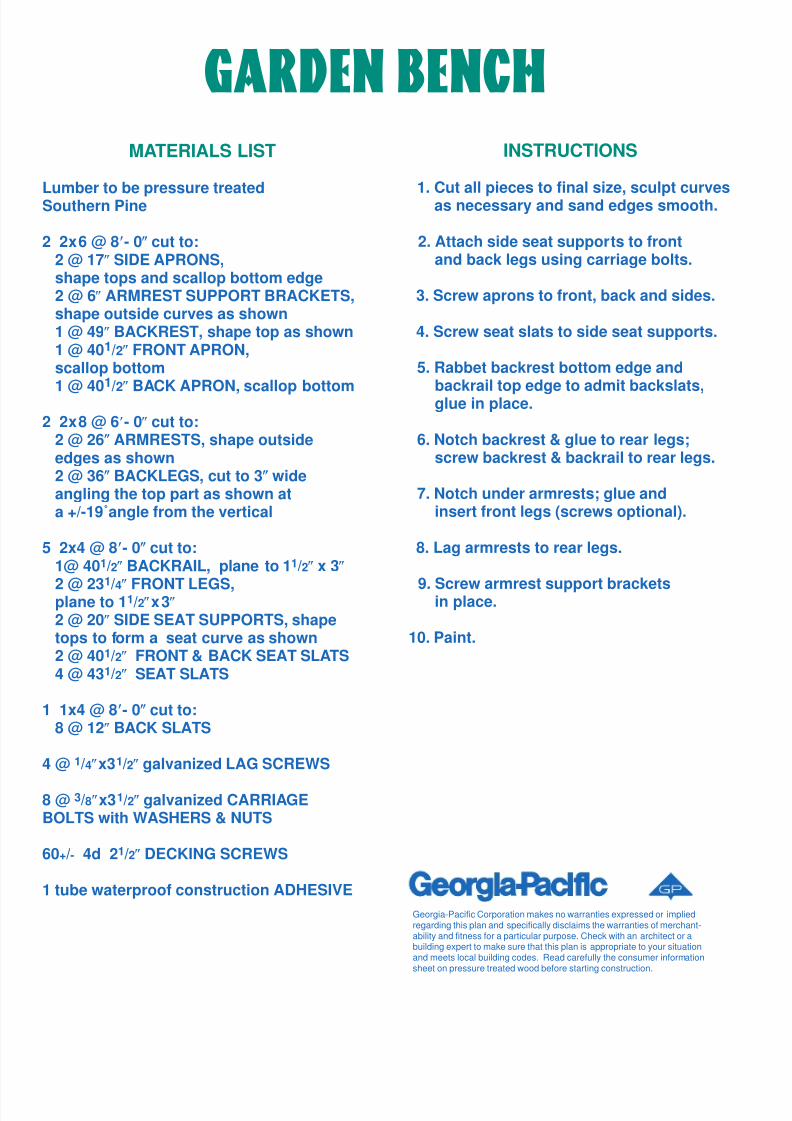
Garden BenchMATERIALS LIST
Lumber to be pressure treatedSouthern Pine
2 2x6 @ 8- 0 cut to:2 @ 17 SIDE APRONS,shape tops and scallop bottom edge2 @ 6 ARMREST SUPPORT BRACKETS,shape outside curves as shown1 @ 49 BACKREST, shape top as shown1 @ 401/2 FRONT APRON,scallop bottom
1 @ 401
/2
BACK APRON, scallop bottom
2 2x8 @ 6- 0 cut to:2 @ 26 ARMRESTS, shape outsideedges as shown2 @ 36 BACKLEGS, cut to 3 wideangling the top part as shown ata +/-19˚angle from the vertical
5 2x4 @ 8- 0 cut to:1@ 401/2 BACKRAIL, plane to 11/2 x 3
2 @ 231
/4
FRONT LEGS,plane to 11/2x3
2 @ 20 SIDE SEAT SUPPORTS, shapetops to form a seat curve as shown2 @ 401/2 FRONT & BACK SEAT SLATS4 @ 431/2 SEAT SLATS
1 1x4 @ 8- 0 cut to:8 @ 12 BACK SLATS
4 @ 1/4x31/2 galvanized LAG SCREWS
8 @ 3/8x31/2 galvanized CARRIAGEBOLTS with WASHERS & NUTS
60+/- 4d 21/2 DECKING SCREWS
1 tube waterproof construction ADHESIVE
INSTRUCTIONS
1. Cut all pieces to final size, sculpt curvesas necessary and sand edges smooth.
2. Attach side seat supports to frontand back legs using carriage bolts.
3. Screw aprons to front, back and sides.
4. Screw seat slats to side seat supports.
5. Rabbet backrest bottom edge and
backrail top edge to admit backslats,glue in place.
6. Notch backrest & glue to rear legs;screw backrest & backrail to rear legs.
7. Notch under armrests; glue andinsert front legs (screws optional).
8. Lag armrests to rear legs.
9. Screw armrest support bracketsin place.
10. Paint.
Georgia-Pacific Corporation makes no warranties expressed or impliedregarding this plan and specifically disclaims the warranties of merchant-ability and fitness for a particular purpose. Check with an architect or abuilding expert to make sure that this plan is appropriate to your situationand meets local building codes. Read carefully the consumer informationsheet on pressure treated wood before starting construction.

8/11/2019 Bench Garden Bench1
http://slidepdf.com/reader/full/bench-garden-bench1 3/4
Garden Bench
FRONT ELEVATION
PLAN VIEW
SIDE ELEVATION
Back Rest
1x4 Backslats
2x8 Armrest
2x8 Armrest
big enough tohold a drink.
SupportBrackets
Side Seat Supports
Back Apron
Side Apron
SupportBrackets
BackRest
36 Back Rail
2x8 Back Leg
2x4 Seat Slats
2x6 Apron
2x6 Apron
Front Leg
1 7 1
/ 2
1 4
2 6
17
49
3
3
+/- 19˚

8/11/2019 Bench Garden Bench1
http://slidepdf.com/reader/full/bench-garden-bench1 4/4
Garden BenchGarden BenchWHENEVER YOU BUILD WITHTREATED WOOD PRODUCTS FROMGEORGIA-PACIFIC, BUILD CORRECTLY.Whatever you build with Georgia-Pacific treated wood prod-ucts should last a long time. So, it makes good sense to buildin a craftsmanlike manner. Here are some helpful tips to makeyour job easier and look better.
USE GALVANIZED FASTENERS.Use galvanized or stainless nails, screws, or bolts
when working with pressure treated wood. These types offasteners are corrosion-resistant and should minimize rust
stains on your project.
NAIL BARK SIDE UP.Always nail boards bark side up(annual rings arc upward) to
reduce cupping. Nail thinboards to thicker boards tomaintain structural integrity.
DRILL PILOT HOLES.Especially when nailing near the edge or endof a board, it’s a good idea to drill pilot holes
for your fasteners.
BUTT BOARDS TIGHTLY.Butt decking boards together firmly. As drying occurs,some shrinkage can be expected.
APPLY AWEATHER-RESISTANT FINISH…Any exposed wood, pressure treated or not, should be pro-tected from the weather. Application of a finish coat of clearwater repellent or semi-transparent stain will help to minimizewarping, checking, or splitting. The finish coat should beapplied to pressure treated wood as soon as it is dry to thetouch, and immediately to untreated wood. (Option: stain orwater repellent may be applied when the wood is surface dry.)
Consumer information approved by the U.S.Environmental Protection Agency For InorganicArsenical Pressure Treated Wood.
CONSUMER INFORMATIONThis wood has been preserved by pressure-treatmentwith an EPA-registered pesticide containing inorganic arsenicto protect it from insect attack and decay. Wood treated withinorganic arsenic should be used only where such protectionis important.
Inorganic arsenic penetrates deeply into and remains inthe pressure-treated wood for a long time. Exposure to inorganicarsenic may present certain hazards. Therefore, the following pre-cautions should be taken both when handling the treated woodand in determining where to use or dispose of the treated wood.
USE SITE PRECAUTIONSWood pressure-treated with waterborne arsenical
preservatives may be used inside residences as long as allsawdust and construction debris are cleaned up and disposedof after construction. Do not use treated wood under circum-stances where the preservatives may become a component offood or animal feed. Examples of such sites would be structuresor containers for storing silage food.
Do not use treated wood for cutting-boards or countertops.Only treated wood that is visibly clean and free of surface
residue should be used for patios, decks, and walkways.Do not use treated wood for construction of those portions
of beehives which may come into contact with the honey.Treated wood should not be used with public drinking
water, except for uses involving incidental contact such asdocks and bridges.
HANDLING PRECAUTIONSDispose of treated wood by ordinary trash collection or bur-ial. Treated wood should not be burned in open fires or in stoves,fireplaces, or residential boilers because toxic chemicals may beproduced as part of the smoke and ashes. Treated wood fromcommercial or industrial use (e.g., construction sites) may beburned only in commercial or industrial incinerators or boilers inaccordance with state and Federal regulations.
Avoid frequent or prolonged inhalation of sawdust fromtreated wood, When sawing and machining treated wood, weara dust mask. Whenever possible, these operations should beperformed outdoors to avoid indoor accumulations of airbornesawdust from treated wood.
When powersawing and machining, wear goggles to protecteyes from flying particles. Gloves can provide extra protectionagainst splinters and freshly treated wet wood. Allow freshly treat-ed wet wood to dry thoroughly before handling. Follow good per-sonal hygiene practices in the shop and on the job. After workingwith the wood, and before eating, drinking, and use of tobaccoproducts, wash exposed areas thoroughly. If preservatives orsawdust accumulates on clothes, launder before reuse. Washwork clothes separately from other household clothing.
Treated Lumber
Treated Lumber
Treated Lumber
The best treated lumber you can buy, from the name you trust.
www.gp.com
©1999 Georgia-Pacific Corporation. All rights reserved.Printed in the U.S.A. 6/99. Lit. Item #121782.