beginner's guide to sewing - 2014
TRANSCRIPT

8/15/2019 Beginner's Guide to Sewing - 2014
http://slidepdf.com/reader/full/beginners-guide-to-sewing-2014 1/164
GUIDE TO
DIGITAL EDITION
B EG INN ER ’ S
L e a r n
t o s e w t o d a y !
28 PROJECTS
& PATTERNS+
EASY TO USETUTORIALS
P82!
FELT! BASKET!

8/15/2019 Beginner's Guide to Sewing - 2014
http://slidepdf.com/reader/full/beginners-guide-to-sewing-2014 2/164
W o r l d M a g s . n e t W o r l d M a g s . n e t
W o r l d M a g s . n e t

8/15/2019 Beginner's Guide to Sewing - 2014
http://slidepdf.com/reader/full/beginners-guide-to-sewing-2014 3/164
Welcome...
…to The Beginner’s Guide To Sewing! Whether you’re new to sewing, want torefresh your skills and learn some newones, or are in need of inspiration for thingsto make, then this is the magazine for you.
Sewing is a fantastic skill to have – not only
is it really useful for making lovely thingsfor your home but it’ll save you money andit’swonderfully therapeutic too. It’s oftenreally hard to find accessories and itemsfor your home and yourself which fitexactly in terms of colour, shape, size andtaste – but once you’ve learnt to makethem yourself then you are only limitedby your imagination.
We’re going to show you what toolsand materials you’ll need and what’savailable to buy. We’ll explain the basics to sewing, including a step-by-stepguide on using your sewing machine.Then we’ll teach you some essential techniques as well as the skills neededfor hand and machine sewing. Each skill is followed byprojects where you canpractice the technique and make abeautiful item into the bargain.
So, turn the page and learn to sew withus – it’s a wonderfully absorbing hobbyand very addictive too!
Future produces high-quality multimedia products which
reach our audiences online, on mobile and
in print. Future attracts over 50 million consumers
to its brands every month across five core sectors:
Technology, Entertainment, Music, Creative and Sports &
Auto. We export and license our publications.
Future plc is a public
company quoted on
the London Stock
Exchange (symbol: FUTR).
www.futureplc.com
Chief Executive Mark Wood
Non-executive Chairman Peter Allen
Group Financial Officer Zillah Byng-Maddick
Tel +44 (0)20 7042 4000 (London)
Tel +44 (0)1225 442244 (Bath)
CONTACT US
Beginner’s Guide to Sewing ,Future, 30 Monmouth Street, BathBA1 2BW Tel: 01225 442244
MEET THE TEAM
Editor: Rebecca Reid Art Editors: Rob Bowen, Rob Eyres, Rob SpeedProduction Editors: Charlotte Martin,Jenny May Forsyth, Zoe WilliamsEditor in Chief: Debora BradleyGroup Senior Editor: Julie TaylorHead of General Craft: Liz TaylorHead of Women’s Creative: Kerry LawrenceManaging Director, Future Women:Jo Morrell
CONTRIBUTORS
Katy Berwick, Alice Blackledge, SusanCousineau, Chris Jefferys, Melanie McNeice,Lola Nova, Cheryl Owen, Helen Philipps,Debbie Shore, Kate Smith, Alyssa Thomas,Susan Wasinger, Laura Wilhelm
ADVERTISING
Senior Advertising Manager: Penny Stokes
Deputy Advertising Manager: Mike Pyatt Advertising Sales Executive:Samantha WhittinghamUK Sales Director: Clare Coleman-Straw
CIRCULATION
Trade Marketing Manager: Janine SmithInternational Account Manager:Rebecca RicherHead of Trade Marketing: James Whitaker
PRINT & PRODUCTION
Production Controller: Stephanie SmithProduction Manager: Mark Constance
LICENSING
International Licensing Senior Licensing andSyndication Manager:Regina Erak, [email protected]: + 44 (0)1225 732359Fax: + 44 (0)1225 788105
CUSTOMER SERVICE
UK hotline: 0844 848 2852International hotline: +44 (0) 1604 251045Email: [email protected]
Printed in the UK by Williams Gibbons on behalfof Future.Distributed in the UK by Seymour DistributionLtd, 2 East Poultry Avenue, London EC1A 9PT.Tel: 020 7429 4000
We are committed to only using magazinepaper which is derived from well-managed,certified forestry and chlorine-freemanufacture. Future Publishing and itspaper suppliers have been independentlycertified in accordance with the rules of theFSC (Forest Stewardship Council).
© Future Publishing Limited 2014. All rights reserved. No partof this magazine may be used or reproduced without thewritten permission of the publisher. Future Publishing Limited(company number 2008885) is registered in England andWales. The registered office of Future Publishing Limited is atBeauford Court, 30 Monmouth Street, Bath BA1 2BW. Allinformation contained in this magazine is for informationonly and is, as far as we are aware, correct at the time ofgoing to press. Future cannot accept any responsibility forerrors or inaccuracies in such information. Readers areadvised to contact manufacturers and retailers directlywith regard to the price of products/services referred to inthis magazine. If you submit unsolicited material to us, youautomatically grant Future a licence to publish yoursubmission in whole or in part in all editions of the magazine,including licensed editions worldwide and in any physicalor digital format throughout the world. Any material yousubmit is sent at your risk and, although every care is taken,neither Future nor its employees, agents or subcontractorsshall be liable for loss or damage.
Rebecca Reid, Editor
116
154
90
W o r l d M a g s . n e t W o r l d M a g s . n e t
W o r l d M a g s . n e t

8/15/2019 Beginner's Guide to Sewing - 2014
http://slidepdf.com/reader/full/beginners-guide-to-sewing-2014 4/164
MATERIALS
& TOOLS
10 Tools & notions All you
need to get started
13 FabricsChoose theperfect material
16 GlossaryLearn the lingo
19 WashingWhat the
symbols mean
20 Machine sewing Get to
grips with the basics
ESSENTIAL
TECHNIQUES24 All about Pinning,
tacking, and hand
stitches
26 PROJECT Padded coathangerPretty wardrobe
essential for a lovely gift
154
72
82
101
28 All about Seams
30 PROJECT Crazypatchwork buntingDecorate your home
with fabric off-cuts
34 PROJECT Retro-stylepeg bag Jazz up
laundry days
38 All about Hems
40 PROJECT Classy cafénapkins Upcycle your
bloke’s cotton shirts
44 All about Binding
a fabric edge
46 PROJECT Pretty boundnapkinPerfect for
al fresco entertaining
50 PROJECT Summervagabond bag Go
shopping in style
54 All about Ties, handles
and straps
57 PROJECT Child’s playapronProtect little
clothes from big
creative messes!
60 PROJECT Pretty cushionwith tiesEasy-peasy
home décor
62 All about Trims
64 PROJECT Minidrawstring bag A lovely gift to wrap
treasured trinkets in
66 All about Bordering
a fabric edge
68 PROJECT Deep boundthrow Add a touch of
textile luxury
70 All about Buttons and
buttonholes
72 PROJECT Envelopebuttoned cushionStylish accent piece
74 All about Casings
76 PROJECT Buntingnursery toy sack Rustle
up a bag kids will love
78 PROJECT Delicate
drawstring bag Perfectfor pyjamas and lingerie
80 All about Interfacing
82 PROJECT Handy feltbasketsSturdy
storage solutions
HAND SEWING
TECHNIQUES88 All about Patchwork
90 PROJECT Little hexagonquilt Great first project
94 All about Appliqué96 PROJECT Lollipop
flowers picture Bring a
splash of colour to walls
GUIDE TO B EG INN ER ’ S
L e a r n
t o
s e w
t o d a y !
W o r l d M a g s . n e t W o r l d M a g s . n e t
W o r l d M a g s . n e t

8/15/2019 Beginner's Guide to Sewing - 2014
http://slidepdf.com/reader/full/beginners-guide-to-sewing-2014 5/164
Iron the fusible web pieces, paper side up, on
the wrong side o f the fabric and le t them cool.
Place a damp tea to wel on top o f the web as
this will help pro tec t it and s tick the glue.
152
90144
107 120
34
101 PROJECT Funky monkeypillow A cheeky chappy
to brighten any room
104 All about Hand
embroidery
107 PROJECT Hedgerowcoffee cosy Hug your
favourite hot beverage
111 PROJECT Dress-uppretty patchesJazz up your jeans
MACHINE
SEWING
TECHNIQUES116 All about Machine
embroidery
118 PROJECT Embroideredflower napkin Table
linen to treasure – make
a new family heirloom
120 PROJECT Freehandteacup cushionPractise drawing with
your sewing machine!
124 All about Bag making
126 PROJECT Sporty dufflebag Practical and
pretty, too – use it for
your gym kit
130 PROJECT Oilcloth lunchbag Eat out in retro
style – be the envy of
the lunchtime crowd
134 All about Machine
patchwork
136 PROJECT Pieceful easyscarf A fab way to
recycle old jumpers and
other favourite woollies140 PROJECT Patchwork
seat pad Give your
dining room a new look
142 All about Machine
appliqué
144 PROJECT Chequeredtea cosy Keep your
teapot toasty
146 PROJECT Floralshopping bag Carry a
garden around with you
150 All about Filled shapes
152 PROJECT Portabledoorstop An easy
project for practising
machine skills
154 PROJECT Sebastian the
softie snail The cuddliest
ever toy to snuggle
NEXT STEPS
160 Learn more Now you’ve
mastered the basics,
take your sewing to
the next level
S t e p-b y- s t e p
pi c tur e s an d
in s tru c ti on s
f or d o z en s o f
t e chni qu e s
L o a d s o f
f abri c i d e a s ,
an d hin t s &
ti p s , t o in s pir e
y ou!
W o r l d M a g s . n e t W o r l d M a g s . n e t
W o r l d M a g s . n e t

8/15/2019 Beginner's Guide to Sewing - 2014
http://slidepdf.com/reader/full/beginners-guide-to-sewing-2014 6/164
page13
page11
page20
We guide you throughhow to get the best outof your sewing machine– see page 20.
page40
Handmade is super-trendy right now and sewingseems to be everywhere – whether it’s aboutmaking your own or buying ready-made. If you’re
completely new to sewing then don’t worry, you’ll findeverything you need here to show you how. Starting off withsome essentials, we’ll show you, in easy-to-follow guides howto master the basic techniques of sewing from perfect seamsto brilliant buttonholes. Each guide is then followed by a
project using that skill to make a beautiful finished item.Sewing really is all about practise, practise, practise andthat’s what you’ll have plenty of as you work your waythrough. You’ll learn new skills in the hand and machinesewing sections and, again, be inspired to make somegorgeous things for you and your home.
Start sewing today...Whether you’re a complete beginner to
sewing or just want to refresh your skills,The Beginner’s Guide to Sewing has agreat mix of projects and tips for you…
First off, turn to page 10and page 13 for anat-a-glance guide towhat products you needto buy and which fabricsyou’ll need to use.
Beginner’s Guide to Sewing6
Our Essential Techniquessection starting on page23 will teach you all thebasic skills you need, fromperfect hems to using bias
binding and much more.
W o r l d M a g s . n e t W o r l d M a g s . n e t
W o r l d M a g s . n e t

8/15/2019 Beginner's Guide to Sewing - 2014
http://slidepdf.com/reader/full/beginners-guide-to-sewing-2014 7/164
Sewing a bound edge to asquare of fabric is a quick andeasy way to make a stunningset of napkins. We showyou how to stitch the fabricstrips on and make a reallyneat finish. Get to grips withbinding skills onpage 44.
page76
page144
page110
page96
Adding a casing to thetop of a piece of fabric(page 74) is a useful skillfor making drawstringbags, which can beused for so many things,like this fun Toy Sack fora child – just perfect forkeeping everything neatand tidy (page 76).
Using fusible web to attach simpleappliqué shapes (page 94), andlearning how to work some basicembroidery stitches (page 106),means you’ll be able to decoratefavourite items of clothing and makelovely things, like textile pictures. Ourstunning projects will inspire you to
make and create your own designs.
page46
Beginner’s Guide to Sewing 7
Practical & prett y T he best way to practise
em broidery is to ma ke
somet hing as lo vely as it is
useful. T he cute cof f ee cosy
on p107 fits t he bill perfectly.
M y perfectgiftI love ma king gif ts for lo ved
ones, and it’s e ven nicer to
stitch a little dra wstring bag
to wrap up the present in
style. T hat’s w hy I lo ve t he
pretty floral bag on p78.
Use all your skillsOnce you’ve mastered all
t he se wing skills you can
ma ke Se bastian t he Snail,
our cutecuddly toy on p154.
He’s my all-time f a vourite!
Ed’s Pic ks
1
2
3
W o r l d M a g s . n e t W o r l d M a g s . n e t
W o r l d M a g s . n e t

8/15/2019 Beginner's Guide to Sewing - 2014
http://slidepdf.com/reader/full/beginners-guide-to-sewing-2014 8/164
3 ISSUESFOR £5
DELIVERY DIRECTTO YOUR DOOR
SAVE MONEY ON THESHOP PRICE
FREE GIFT EVERY ISSUEEXCLUSIVE PROJECT
FOR SUBSCRIBERS
www.myfavouritemagazines.co.uk/mmsx34Call 0844 848 2852 and quote reference code MMSX34
Lines open 8am-9.30pm weekdays, 8am-4pm SaturdaysThis trial offer is for new print subscribers only subscribing by Direct Debit. You will receive 3 issues for £5 and then continue on a quarterly Direct
Debit of £12.49 thereafter. Full details of the Direct Debit guarantee are available on request. Prices correct at point of print and subject to change.For full terms and conditions please visit: www.myfavouritemagazines.co.uk/terms. Offer ends 30 June 2014.
facebook.com/MollieMakeswww.molliemakes.com twitter.com/MollieMakes youtube.com/MollieMakes
when you subscribe today!
try 3 issues for £5
W o r l d M a g s . n e t W o r l d M a g s . n e t
W o r l d M a g s . n e t

8/15/2019 Beginner's Guide to Sewing - 2014
http://slidepdf.com/reader/full/beginners-guide-to-sewing-2014 9/164
In this chapter, we’ll talk youthrough a few of the suppliesyou’ll need to start sewing. Getready to top up your tool kit, findfavourite fabrics and learn thelingo with our handy glossary.&
Materials tools
W o r l d M a g s . n e t W o r l d M a g s . n e t
W o r l d M a g s . n e t

8/15/2019 Beginner's Guide to Sewing - 2014
http://slidepdf.com/reader/full/beginners-guide-to-sewing-2014 10/164
Tools & notionsIf you’re all brand new to sewing, we’ll talk you through a
few basic supplies that may come in handy along the way
THREAD
There’s a thread for almost
every occasion and your
local fabric shop will be
able to help you find theright one for your project.
Cotton is a fabulous
all-purpose thread, but
polyester (or a mix) is handy
if you need extra strength.
Cheap thread is more likely
to break easily, so it’s worth
spending a little more for
a great finish.
BUTTONS
Whether you’re using them
for practical fastenings or
just for decoration, you
can never have enough
buttons! They’re usually sold
by size (diameter in
millimetres inches), either
individually or in packs.
Most are flat, but ‘shanked’
buttons have a loop on
their underside that helps
thicker fabrics to sit
beneath them when the
garment is buttoned up.
FASTENINGS
Snap fasteners (also known
as press studs) are used to
hold two pieces of fabric
together and can’t be seen
from the front. Hooks and
eyes hold fabric edges flush
together or you can buy
magnetic fastenings, which
are ideal for bag and purse
closures. Safety pins aregreat for securing thicker
fabrics or for threading
cord through casings.
SEAM RIPPER
Everyone makes mistakes
now and then, and this
clever gadget takes some
of the frustration out ofunpicking your stitches.
Simply slip the pointed end
under your stitch (taking
care not to catch the fabric
as you go) and cut through
it by gently pulling upwards.
Look out for non-slip
handles as these make the
seam ripper easier to use.
THIMBLE
It’s a good idea to save
yourself from pricked or
calloused fingers with a
thimble. They are usually
worn on your middle finger
to help you push your
needle through thicker
fabrics. Thimbles come in
different shapes and sizes
and are made from plastic,
porcelain, metal or leather.
Choose one that fits snugly
but not tightly.
EMBROIDERY SCISSORS
At about 10cm (4in) long,
these are much smaller
than fabric scissors.
Whether you’re hand
sewing or working on a
machine, the fine, straight
blade makes them good
for trimming stray threads
and removing excess fabric
in tight spaces.
NEEDLES
The needle you use is
dependent on what you’re
sewing. You’ll find all sorts of
specialist needles are
available for embroidery,
quilting and cross stitch, but
a pack of assorted sewingneedles is a good place to
start. When you choose
your needle, make sure the
eye is just large enough for
your thread to go through
but not too large that it’s
constantly slipping out. Use
a sharp pointed needle for
all sewing – the blunt ones
are used for cross stitch
and needlepoint.
THREAD CUTTER
Essential for the travelling
stitcher, this nifty device
enables you to snip your
threads even when you
don’t have the space for
(or are not permitted to
carry) scissors. Some cutters
double up as a pendant, so
you can wear them around
your neck. If you plan to
sew on a flight, take a
minute to check theairline’s restrictions before
you travel.
FABRIC
You’ll usually purchase
fabric by the yard or metre,
but if you just want a small
amount of material, opt for
a ‘fat quarter’, which is a
yard that’s been cut into
four sections, making a
piece of fabric thatmeasures about 46x56cm
(18x22in). You can buy
these individually or in
bundles. See page 13 to
find out more about the
different types of fabric.
PINSYou’ll use these to hold your
pieces of fabric in place.
You might find traditional
dressmakers’ pins fiddly to
work with – if so, try pins with
larger glass or ‘flower’
heads. Most are between
2.5-5cm (1-2in) long, so you
could always collect a
variety to use on different
projects. Don’t forget to buy
a tin or make a pincushion
to keep them safe!
DRESSMAKERS’ SCISSORS
A pair of dedicated
dressmakers’ scissors will
help you snip through any
fabric with ease. Look for
some that are about 20cm
(8in) long and have a
curved handle to enable
accurate cutting on flat
surfaces, with pointed tips
for precision. Avoid usingyour scissors on anything
other than fabric or you
will blunt the blades.
TAPE MEASURE
Measuring fabric correctly
is crucial to a perfect
finished project (measure
twice, cut once!), so a tape
measure is one of your most
important tools. Find one
that measures around150cm (59in) and has both
metric and imperial units for
quick conversions.
Beginner’s Guide to Sewing10
Basic Techniques
W o r l d M a g s . n e t W o r l d M a g s . n e t
W o r l d M a g s . n e t

8/15/2019 Beginner's Guide to Sewing - 2014
http://slidepdf.com/reader/full/beginners-guide-to-sewing-2014 11/164
Beginner’s Guide to Sewing 11
Basic Techniques
W o r l d M a g s . n e t W o r l d M a g s . n e t
W o r l d M a g s . n e t

8/15/2019 Beginner's Guide to Sewing - 2014
http://slidepdf.com/reader/full/beginners-guide-to-sewing-2014 12/164
EXTRA TOOLS As your skills develop, so
will your toolbox. Buy
good quality items and
they’ll last you for years.
Here are a few more tools
and notions you’ll find
indespensible as you start
to tackle more complext
projects.
BEADS
Use beads to add a touch
of glamour and sparkle to
your projects – choose from
glass, ceramic, wooden or
metal. Seed beads are the
smallest variety, but if you’renew to beading then you
may find larger ones easier
to work with. Attach seed
beads with a beading
needle – it has a small eye
to slip through the bead.
METAL RULER
Keep a ruler in your sewing
kit to make sure you get
perfect measurements
every time. Your ruler shouldhave both metric and
imperial units – a 15cm (6in)
ruler is enough for smaller
projects. Go for durable
metal rather than plastic
and you’ll also be able
to use it as a guide for
creating straight lines
with a rotary cutter.
ROTARY CUTTER
Used to cut fabric, rotary
cutters are extremely sharpand should be kept away
from children. They’re
popular with quilters
because they can cut
several layers of material at
once and give more even
results than scissors. Decide
what size blade you need
before you buy – small
diameters tend to be better
at cutting curves.
CUTTING MAT
A cutting mat protects your
work surface while you’re
using a rotary cutter. Most
are ‘self-healing’ (meaning
that any scratches
magically disappear after
use) and are printed with
grid lines to help you line up
your fabrics. Cutting mats
are about 2mm thick,
come in a range of sizes
and should be stored flat so
they don’t bend and warp.
LARGE NEEDLES
It’s a good idea to keep a
few larger needles in your
sewing box, so you always
have the right one
available for your project.Tapestry needles, for
example, are great for tasks
such as threading elastic
through a hem to create
a drawstring, while chenille
needles are perfect for
embroidery as they have
a larger eye.
PINKING SHEARS
Some woven fabrics can
fray easily, but you can
help prevent this by cutting
them with a pair of pinking
shears. These leave a
zigzag edge that’s great for
storing fabrics and also
makes a pretty decorative
effect. Choose a pair with
steel blades and a
contoured handle that’s
comfortable to work with.
TAILOR’S CHALK
Before you start stitching
you’ll need something to
transfer guidelines on to
your fabric. Tailor’s chalk is
ideal for this because it
goes on and comes off
easily – so easily, in fact,
that you may need to be
careful you don’t brush it offby accident. Choose basic
white or go for a coloured
chalk if you’re working
with pale fabrics.
FABRIC PENCIL
Fabric pencils are ideal for
marking finer lines on to
your fabric. They come in
different types – iron-on, air
erasable, water erasable
and chalk (which will brush
off). They also come in
different shades, so you
can find the colour that
stands out best on your
material. Soapstone pencils
rub off easily and show up
on darker fabrics.
FABRIC PEN
For extra precision, and
lines that are easier to see
on pale cloth, use a soluble
fabric pen to mark out your
design. Always test the pen
on a scrap of fabric before
you begin to ensure that it
comes off easily with water,
and avoid ironing over any
of the marks because
this can make the line
permanent. Fabric pens aregood to use for embroidery.
EMBROIDERY THREAD
As the name suggests,
these are most commonly
used for embroidery, cross
stitch and other forms of
needlework. They’re usually
made from six strands of
cotton, which you can
separate into individual
strands. If you’re following a
chart then you’ll see a key
with numbers that
correspond to the required
colours of thread.
SEWING MACHINE
NEEDLES
You’ll find there are many
types of sewing machine
needle to choose from –
including specialist varieties
just for leather – and
different sizes are suitablefor different fabrics and
stitches. To ensure
compatibility with your
machine, check the
manual for recommended
brands and weights. See
page 20 to find out more.
Fabric scissors
Small embroidery scissors
Needles (assorted sizes)
Sewing thread (various colours)
Tape measure
Pins
Pin cushion
Transfer pencil or chalk
Iron & ironing board
Sewing machine
BASIC SEWING KIT
Whatever project you decide to tackle, thereare a few essential bits and bobs you shouldalways have to hand. With the following itemsin your kit you’ll be ready for anything!
Beginner’s Guide to Sewing12
Basic Techniques
W o r l d M a g s . n e t W o r l d M a g s . n e t
W o r l d M a g s . n e t

8/15/2019 Beginner's Guide to Sewing - 2014
http://slidepdf.com/reader/full/beginners-guide-to-sewing-2014 13/164
FabricsThere are hundreds of fabrics to choose from, but which should you buy? We help
you understand your options and pick the perfect material for every pattern
WOVEN FABRICS
Woven fabrics are made
from two groups of threads,
a warp (the threads that
run lengthwise) and a weft
(the threads that run
widthwise). The fabric maybe plain or patterned,
according to the colour
and sequence of warp and
weft yarns used. It’ll also
have a border around the
edge called a selvedge,
which is more tightly woven
to prevent the fabric from
unravelling – but you don’t
use this in your sewing. If
you are making a project
that is going to be used alot then choose a fabric
that can be easily washed
and is colourfast.
COTTON
Cotton is one of the world’s
most popular woven
fabrics. It’s strong, easy to
work with and can be
machine washed at high
temperatures. However, itcreases easily, so do make
sure you press cotton fabric
regularly as you cut and
stitch it. Most patchwork
fabrics are made from
100% cotton, which is ideal
as you can buy a variety of
patterns and colours and
join them together as they
are all the same weight.
Polyester cotton works in
the same way but willcrease less – it doesn’t have
the crisp feel of pure
cotton, though.
LINEN
Linen, woven from flax
fibres, is even stronger than
cotton, although it has a
higher tendency to crease.
Its natural appearance
makes it ideal for thathomespun look, but again,
remember to press it
regularly as you are
working. Linen is perfect for
tea towels and table linen,
as when washed and
pressed, it is lovely and crisp.
HEAVIER WEIGHT FABRICS
Home furnishing fabrics,
canvas, cotton drill, denim
and corduroy (includingneedlecord) are great
choices for projects that
need a bit more strength
such as bags and aprons.
They will also add more
structure to the finished
projects so will look better.
Some soft furnishing fabrics
have the added bonus of a
protective stain-resistantfinish making them ideal for
items that are vulnerable to
spillages, such as seat pads
and outdoor table linen.
DELICATE FABRICS
Silk, cotton lawn and some
vintage fabrics need a little
more special care as they
are much finer to work with.
Only use these for projects
that won’t be treatedharshly, such as lingerie and
decorative items like dainty
bags or pictures.
Beginner’s Guide to Sewing 13
Basic Techniques
W o r l d M a g s . n e t W o r l d M a g s . n e t
W o r l d M a g s . n e t

8/15/2019 Beginner's Guide to Sewing - 2014
http://slidepdf.com/reader/full/beginners-guide-to-sewing-2014 14/164
FELT AND FLEECE
Felt is created by matting
woollen fibres in hot soapy
water, either by hand or in
a machine. You can also
felt knitted fabric by
washing it in a machine at
a high temperature. Fleece
is also known as polar
fleece and has a combed
nap, which makes it warmand cosy. Always iron
fleece with a thin cloth on
top of it to prevent it from
felting, or being flattened
too much. These fabrics
have become popular with
crafters and beginners
because they are fray-
resistant, don’t stretch like
woven materials, can easily
be cut to any shape, and
come in an array ofinteresting colours and
textures. They’re ideal for
appliqué for this reason.
NET AND LACE
Net and lace are made by
knotting together lengths of
thread to create a pattern.
These materials are often
used as decoration, and
are best cut with small,
sharp sewing scissors for a
neat finish. They can be
used for appliqué or to
edge or decorate an item.Many lace fabrics and trims
are made from artificial
fibres, but check what your
lace fabric is made from
before you wash it, in case
of potential shrinkage.
INTERFACING
Interfacing gives an extra
layer of support to your
material – to stiffen bags or
fabric baskets, for example.Choose an interfacing
that’s slightly lighter than
your main fabric, and if
FABRIC WIDTHS
Other fabrics...
Fabrics are sold in
standard widths, which
vary according to their
purpose – for example,
dressmakers’ or
patchwork cotton cloth
generally comes in
standard widths of 90cm(36in) or 115cm (45in).
However, some
manufacturers use metric
units and some use
imperial, so a fabric
measuring 36in will
actually be a bit wider
than 90cm. You will also
see ‘fat quarters’, which is
a quarter of a yard or
metre of fabric produced
by cutting half a yard of
fabric in half across the
length, making a piece of
fabric about 45.5x56cm(18x22in). Curtain or soft
furnishing fabric is
normally 137cm (54in)
wide and is really useful
for bags and aprons as it’s
thicker and stronger than
dressmaking fabrics.
Beginner’s Guide to Sewing14
Basic Techniques
W o r l d M a g s . n e t W o r l d M a g s . n e t
W o r l d M a g s . n e t

8/15/2019 Beginner's Guide to Sewing - 2014
http://slidepdf.com/reader/full/beginners-guide-to-sewing-2014 15/164
you’re using a fusible
(iron-on) option then
always test it on a scrap of
the fabric first. Interfacing is
available in different
weights and as an iron-on
or sew-in version. With
fusible interfacing, press the
shiny side to the wrong side
of your fabric. Tack sew-in
interfacing to the wrongside of the fabric pieces
around the edges. Medium
interfacing is soft and
lightweight and you should
use this to add a little body
to your finished item. Firm
interfacing is stiffer and will
add more definition and
structure. For more in-depth
detail, turn to page 80.
INTERLINING ANDWADDING
Curtain interlining is a more
flexible alternative to
interfacing and will give
projects such as bags and
baskets a fuller look. Tack
this to the wrong side of
your main fabric then work
with it in the usual way. It’s
ideal for putting between
the main fabric and lining
on the base of a bag.
Wadding comes in many
different weights andmaterials and is not only
used as the padding
between the top layer and
backing on quilts but also
to add shape and softness
to bags and fabric boxes.
TEAR-AWAY STABILISER
This non-woven material is
perfect for machine
embroidery as it adds body
to the finished item andsupports the fabric. After
stitching, gently tear away
the excess stabiliser.
The beauty of vintage
fabrics is that they
already have that worn
homespun look and will
give a truly unique feel
to your finished project.
Buy old fabric itemssuch as table linen,
curtains and even old
clothing from sales and
cut them up to use for
new projects. Hand
wash vintage fabrics
before you use them to
ensure the colour
doesn’t run and to
remove possible years’
worth of dust and dirt.
Nap is the direction of
the raised pile on a
material such as velvet
and fleece and it
makes the fabric look
and feel different from
different angles. If youbrush ‘against the
nap’, the fabric feels
rougher. When you cut
out different pieces
make sure the nap runs
in the same direction
on each one.
VINTAGE
FABRICS
KNOW
YOUR NAP
Basic Techniques
W o r l d M a g s . n e t W o r l d M a g s . n e t
W o r l d M a g s . n e t

8/15/2019 Beginner's Guide to Sewing - 2014
http://slidepdf.com/reader/full/beginners-guide-to-sewing-2014 16/164
GlossaryFrom appliqué to zigzag stitch, our reference guide explains
all the common sewing terms you need to know about
APPLIQUÉA decorative technique
that involves sewing a
smaller piece of fabric onto
a larger one. It may bedone by hand or machine.
BACKSTITCHUseful when starting and
ending sewing to stop
stitches coming undone,
this can be done by hand
or using a machine: stitch
back over your sewing line.
BASE PLATE
Also called ‘needle plate’,it is the metal plate on a
sewing machine beneath
the foot. It often has
measurements marked on
it, which to use as seam
allowances guides.
BIASThe bias lies at 45° to the
lengthwise and widthwise
grains of the fabric. Fabrics
have more stretch when
cut along the bias.
BIAS BINDINGThis is a length of fabric that
has been cut on the bias so
that it’ll bend and stretch
easily around curves. It’s
used to bind or enclose the
edges of fabric for a neatly
finished look.
BLANKET STITCH
This stitch is used toreinforce the edges of a
piece of material. It may
also be decorative.
BOBBINThis small plastic or metal
spool holds thread and sits
in the sewing machine
below the foot. The bobbinthread and the top thread
meet to form each stitch.
BODKINA blunt-headed needle
used for threading ribbon,
elastic or cord through a
casing or a hem.
BOLTA length of fabric stored on
a roll. They are commonly
found in fabric shops,
where they can easily be
stacked for display.
CASINGA tunnel of fabric fored with
parallel rows of stitching
through which elastic or
cord can be threaded.
FABRIC GLUES
Available as permanent ortemporary sprays or liquids.
FACINGA fabric trim or lining that
finishes edges, rather than
leaving them raw.
FAT QUARTERA quarter of a metre (or
yard) of fabric, 45.5x56cm
(18x22in), made by cutting
half a metre/yard in half
across the length.
FELTA woollen fabric that has
been washed so the fibres
bond together. It’s great for
toys and accessories.
FINISHAn edge is described as
finished when it has been
sewn or hemmed to reduce
fraying. The technique usedwill depend on the fabric.
FOOTOn a sewing machine, this
sits under the needle and
keeps your fabric in place.
Specialist feet are available
for different techniques,
such as a zipper foot, or a
buttonhole foot, or a
quarter-inch foot, which
has markings to keep hems
or seams even as you sew.
FUSIBLE WEBThis is the fabric form of
double-sided sticky tape.
It is an interfacing type of
fabric, which has glue on
both sides so you can stick
fabric shapes to a fabric
backing. This is most often
used in appliqué.
GRAINThe arrangement of
threads in a piece of fabric.
Lengthwise grain is created
by the warp threads and
crosswise grain by the weft.
GUSSETA piece of fabric shaped to
fit into other seams for ease
of movement, or to add a
base to a bag, for example.
HEMTo hem a fabric, turn its
edge under (towards the
Beginner’s Guide to Sewing16
Basic Techniques
W o r l d M a g s . n e t W o r l d M a g s . n e t
W o r l d M a g s . n e t

8/15/2019 Beginner's Guide to Sewing - 2014
http://slidepdf.com/reader/full/beginners-guide-to-sewing-2014 17/164
inside) and sew it in place.
This helps prevent fraying
and can be decorative.
INTERFACING
A layer added to the wrong
side of a piece of fabric to
provide extra strength or
stiffness. It may be ironed
on or sewn in place.
LENGTHWAYS
The long edges of a piece
of fabric. So, if instructions
tell you to fold fabric in half
lenthways you fold along
the longest edge.
LINING
An underlying, often
lightweight fabric used to
give a neat finish, as well as
to conceal seams and the
back of stitching.
MITRED CORNER
The 45° diagonal seam
made where two different
pieces of fabric meet at a
corner. Often used in
cushion making.
NOTCH
Small triangle wedges of
fabric cut from curved
seams to reduce the bulk
of the seams to help them
lie flat. Cut larger notches
on really tight curves.
NOTION
A general term for sewing
tools and accessories.
Notions include needles,
pins, threads and buttons.
PATTERN PAPER
Paper that comes with a
printed grid for you to draw
up your own patterns.
PINKING SHEARS
A pair of scissors that cut a
zigzag edge on fabrics.
They can be used toreduce fraying or for
decorative purposes.
PINS
There are different types of
dressmakers’ pins available.
Look for ones with glass
rather than plastic heads so
they won’t melt when you
press over them.
POLYESTER FIBREFILLAlso known as ‘soft toy
filling’, this is ideal for
stuffing any fabric shapes
like small cushion and toys.
You can buy non-allergenic
fillings, which are ideal for
allergy sufferers or children.
PRESS
A method of smoothing out
creases that’s gentle on the
grain. Lift the iron between
presses rather than running
it across fabric, especially
on artificial fibres.
QUILTING
Placing a layer of wadding
between two layers of
fabric and sewing through
all three layers by hand or
machine creates a
padded, or quilted, item.
RAW EDGE
The edge where a piece offabric has been cut. This
may unravel over time if it
isn’t finished with a hem or
binding (for example).
REVERSE STITCH
Machine stitch that simply
stitches back over a row of
stitches to prevent the
seam from unravelling.
RIC-RACA flat, zigzag-shaped
decorative braid, available
in many colours and widths.
RIGHT SIDE
The front of a piece of
fabric, which shows the
design. Some fabrics don’t
have an obvious right side.
ROTARY CUTTER
This can cut through
multiple layers of fabric in
a straight line. It should be
used with a cutting mat.
RUNNING STITCH
A basic stitch used for
many hand-sewing
purposes and as the basis
of embroidery. Made by
passing the needle in and
out of the fabric to create
evenly spaced stitches.
SAFETY PINS
These are ideal for holding
the three layers of top
fabric, wadding and
backing fabric together on
a quilt before you tack and
quilt it. You can also buy
curved safety pins which
pass through the three
layers more easily.
SATIN STITCHThis stitch is used to create
a solid ‘filled’ area or line. It
can be produced with a
sewing machine, using a
very narrow zigzag stitch, or
sewn by hand with stitches
lying very close together.
Beginner’s Guide to Sewing 17
Basic Techniques
W o r l d M a g s . n e t W o r l d M a g s . n e t
W o r l d M a g s . n e t

8/15/2019 Beginner's Guide to Sewing - 2014
http://slidepdf.com/reader/full/beginners-guide-to-sewing-2014 18/164
SEAM ALLOWANCE
The distance that you need
to leave between your
stitching and the raw edge
of the fabric. This is typically
6mm (¼in) for patchwork,
1.5cm (½in) for general
sewing or 1.6cm (5/ 8in) for
dressmaking, but will be
stated on your pattern or
sewing instructions.
SEAM RIPPER
A tool that unpicks stitches
by cutting through thread,
protecting the fabric.
SELF-COVERED BUTTONSThese can be bought in
packs of white plastic or
metal and in a range of
diameters. Cover them in
scraps of fabric for unique
buttons to embellish a
project or jazz up clothing.
SELVEDGE
The edge of the fabric,
usually tightly woven so it
doesn’t fray. It may include
information, such as the
manufacturer and pattern
repeat length. There are
also coloured circles to
show the shades used in
the pattern.
SLIP STITCH
Use this to apply bindings or
appliqué, or to close seams
after you’ve turned an item
the right way out. This
technique is a good way to
make an invisible hem and
gives a better drape than
machine finishing, which
can be too heavy.
STANDARD FABRIC WIDTHS
Fabric sold on the roll
comes in different standard
widths. Metric to imperial
conversions may vary, so
always measure the fabric
yourself if width is important.
STRAIGHT STITCH
The basic sewing machine
stitch. Alter the stitch length
using the relevant dial on
your machine.
TACKING STITCH
A long running stitch used
as temporary fixing stitches
before an item is sewn
permanently. Referred to as
basting in the USA.
TEMPLATE
A shape made from paper
or thin card which you draw
round onto fabric to create
accurate shapes – they are
used mostly in appliqué
and English patchwork.
TENSION
Even-sized stitches are
important in hand and
machine sewing so your
fabric doesn’t pucker.
Adjust the tension of the
thread and bobbin on a
sewing machine. Check
your tension on a scrap of
fabric before beginning a
new project.
TOP STITCH
A row of stitches, visible onthe right side of the fabric,
that runs parallel to the
seam about 6mm (¼in)
from the edge. Often
decorative, it helps the
seam lie flat.
WADDING
Available in different
weights, it forms the central
layer of padding in quilts
between the top and the
backing fabrics. Small
running stitches are worked
through it to create a
quilted effect. Wadding
can also be used in pictures
for a slightly raised effect.
WARP
Warp threads run
lengthwise along a woven
fabric, at right angles to the
weft. There is almost no
stretch or give in the warp
threads of a fabric.
WEFT
Weft threads run crosswise
along a woven fabric, at
right angles to the warp.
Weft threads sometimes
contain a little stretch.
WIDTHWAYS
The short edges of a piece
of fabric. So, if instructionstell you to fold fabric in half
widthways you fold along
the shortest edge.
WRONG SIDE
The back of a piece of
fabric, though some fabrics
don’t have an obvious right
or wrong side.
ZIGZAG STITCH
This machine stitch is used
on the raw edges of a
seam to reduce fraying. A
narrow zigzag is often used
around buttonholes. It can
also be sewn as a
decorative hand stitch.
Beginner’s Guide to Sewing18
Basic Techniques
W o r l d M a g s . n e t W o r l d M a g s . n e t
W o r l d M a g s . n e t

8/15/2019 Beginner's Guide to Sewing - 2014
http://slidepdf.com/reader/full/beginners-guide-to-sewing-2014 19/164
Washing
Dry-clean
Dry-clean using
any solvent
Dry-clean using
any solvent EXCEPT
trichloroethylene
Dry-clean using
petroleum
solvent only
Do NOT
dry-clean
Cotton, linen orviscose articleswithout special
finishes where coloursare fast at 40°C
but not 60°C
WASHING
IRONING
DRY CLEANING
May be
tumble-dried
Do NOT
tumble-dry
TUMBLE DRYING
Chlorine bleach
may be used
Do NOT use
chlorine bleach
BLEACHING
Iron on hot
temp setting
Iron on warm
temp setting
Iron on cool
temp setting Do NOT iron
Cotton, linen orviscose articleswithout specialfinishes where
colours are fastat 60°C
Handwash(do NOTmachine
wash)
Acrylics, acetateand triacetate,
including mixtureswith wool;
polyester/woolblends
Nylon; polyester/cottonmixtures; polyestercotton and viscosearticles with special
finishes; cotton/acrylicmixtures
Wool,wool mixedwith otherfabrics; silk
Do NOTwash
Wool, cashmereand delicates where
the temperatureneeds to be similar to
handwashing
Most handmade fabric items
will need washing from time
to time and it’s important to
know how to do this properly to keep
them looking fresh.
It’s always best to wash all fabrics
before you begin cutting or stitching
them. Although the temptation is to get
started on a project, taking the time to do
this is really worth it. Fabric can shrink
when washed and often at different rates.
So, if you are stitching several different
fabrics together you may find that they
shrink differently and you will have an
uneven finished piece.
Sometimes, especially if using vintage
fabrics, the colours can run so it’s best to
get all this shrinking and excess dye
release out of the way before you start
stitching. Also, it’s much easier to cut and
stitch with newly washed and pressed
fabric as it’s crisper and flatter.
Most fabric you’ll be using is 100%
cotton so simply unfold it, put it all in the
washing machine (remembering not to
mix up darks and lights) and wash it on
a 30°- 40° cycle. If the fabric isn’t pure
cotton then handwash it in warm water
with a suitable detergent then rinse
thoroughly. Many fabrics have washing
symbols on the selvedge – use this handy
guide to refer to when washing and
pressing your fabrics.
DRYING AND
PRESSINGOnce you’ve washed yourfabric, hang it on the line to dryor drape it over the banistersinside if you prefer. While it’s still just slightly damp, iron out the
creases and you’re ready tobegin. If it’s an artificial fabric,such as polyester or fleece, thenplace a thin clean cloth on topof it before you press.
Treat your fabrics with love and they’ll last for years to come
Beginner’s Guide to Sewing 19
Basic Techniques
W o r l d M a g s . n e t W o r l d M a g s . n e t
W o r l d M a g s . n e t
8/15/2019 Beginner's Guide to Sewing - 2014
http://slidepdf.com/reader/full/beginners-guide-to-sewing-2014 20/164
MACHINE SEWINGWe’ve got all the know-how so you can get
the best from your sewing machine
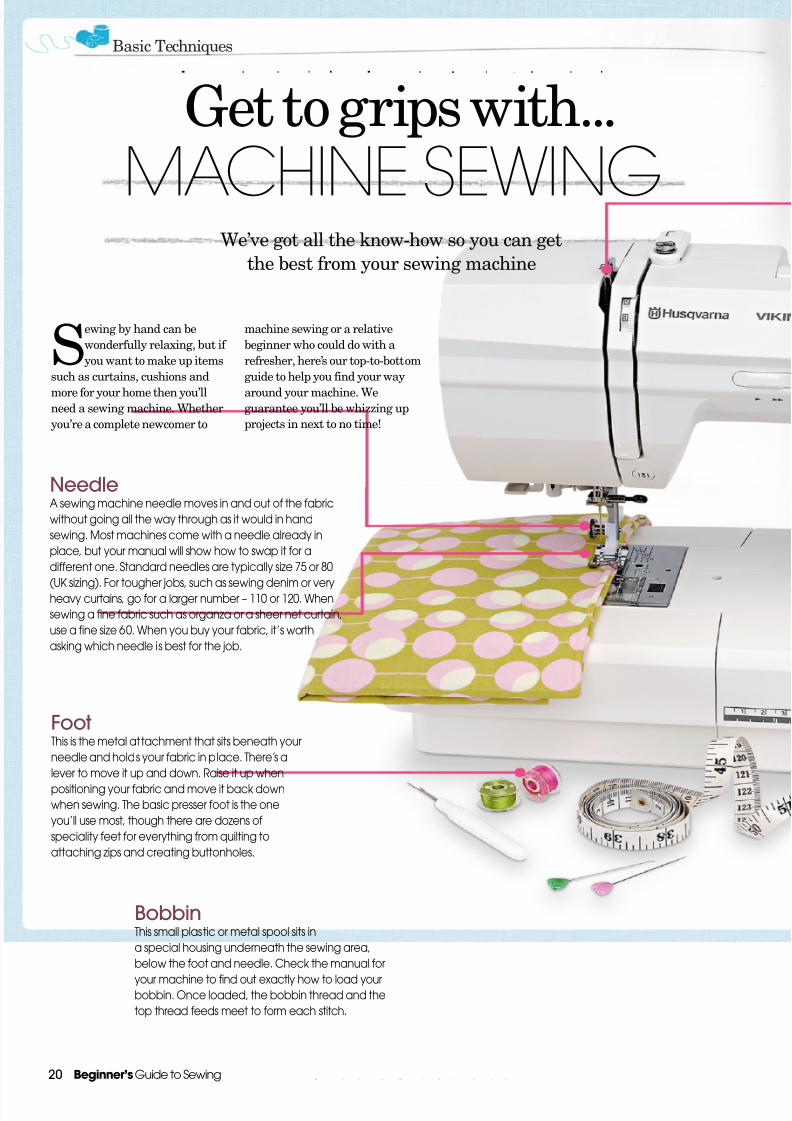
Needle
A sewing machine needle moves in and out of the fabric
without going all the way through as it would in hand
sewing. Most machines come with a needle already in
place, but your manual will show how to swap it for a
different one. Standard needles are typically size 75 or 80
(UK sizing). For tougher jobs, such as sewing denim or veryheavy curtains, go for a larger number – 110 or 120. When
sewing a fine fabric such as organza or a sheer net curtain,
use a fine size 60. When you buy your fabric, it’s worth
asking which needle is best for the job.
FootThis is the metal attachment that sits beneath your
needle and holds your fabric in place. There’s a
lever to move it up and down. Raise it up when
positioning your fabric and move it back downwhen sewing. The basic presser foot is the one
you’ll use most, though there are dozens of
speciality feet for everything from quilting to
attaching zips and creating buttonholes.
BobbinThis small plastic or metal spool sits in
a special housing underneath the sewing area,
below the foot and needle. Check the manual for
your machine to find out exactly how to load yourbobbin. Once loaded, the bobbin thread and the
top thread feeds meet to form each stitch.
Get to grips with...
Sewing by hand can be
wonderfully relaxing, but if
you want to make up items
such as curtains, cushions and
more for your home then you’llneed a sewing machine. Whether
you’re a complete newcomer to
machine sewing or a relative
beginner who could do with a
refresher, here’s our top-to-bottom
guide to help you find your way
around your machine. Weguarantee you’ll be whizzing up
projects in next to no time!
Beginner’s Guide to Sewing20
Basic Techniques
W o r l d M a g s . n e t W o r l d M a g s . n e t
W o r l d M a g s . n e t

8/15/2019 Beginner's Guide to Sewing - 2014
http://slidepdf.com/reader/full/beginners-guide-to-sewing-2014 21/164
Reverse stitchingMost machines have a button or switch
that enables you to sew in the reverse
direction. Even older machines should
have a method for reverse stitching. It’s
the best technique to start and finish off
your sewing – all you need to do is stitch
forwards and backwards for a fewcentimetres to secure your threads.
Stitch selectorDials, switches, knobs… the
method used to change the
stitch type varies between
machines, but the principle is the
same. For most craft and home
projects, all you’ll need are the
basic straight stitch and zigzag.
Once you’re more experienced,
you can try some of the more
decorative stitches your machine
has to offer.
Foot pedalThe foot pedal is connected to the
machine and sits on the floor. The pedal
is pressure-sensitive, so gentle pressure
results in slow stitching, while pressing
harder will run the motor faster. Some
machines also have a separate speed
control, which gives you even more
command over your pace.
Stitch lengthA dial or knob will enable you to change
the length of your stitches, whether
they’re simple straight stitches, zigzags or
any other pattern. A long stitch length is
useful for creating quick tacking lines.For regular sewing, aim for a length of
around 2 or 2.5, which will be strong
enough for most ordinary seams.
Stitch widthSometimes this function is built in, so the
machine automatically adjusts itself as you
change the stitch type. If your machine
has a dial, leave the width at 0 for straightstitches because the needle doesn’t need
to move from side to side. For all other
stitches, adjust the width as needed,
practising on a scrap of fabric first.
Thread feedYour spool of thread sits at the top of the
machine. It threads through a series of
numbered channels and loops before it
reaches the needle. This maintains an
even thread tension and avoids tangles.
Your machine will have a numbered dial
that can be raised or lowered to adjust
the tension as your fabric requires.
Hand wheelUse the hand wheel to move the
needle up and down manually. It’s
essential for controlling the sewing line
in tight spots and corners. To avoid
your thread getting caught or tangled,
be sure to always turn the wheel
towards you. When winding bobbins,
you’ll need to disengage the needle
action by pulling out the hand wheel.
Consult your manual to learn exactly
how to do this on your machine.
Beginner’s Guide to Sewing 21
Basic Techniques
W o r l d M a g s . n e t W o r l d M a g s . n e t
W o r l d M a g s . n e t

8/15/2019 Beginner's Guide to Sewing - 2014
http://slidepdf.com/reader/full/beginners-guide-to-sewing-2014 22/164
1Use the same colour of
thread in the top and
bottom spools for most of
your stitching – only use
different colours for
decorative stitching.
2Use the same type of
thread in the top andbottom spools, as you will
get a more even tension.
3Always ensure your fabric
is flat and smooth, as you
will get neater stitching.
Pressing before you start is
always a good rule.
4Always work a few
stitches on a spare scrap
of the same fabric you willbe using to make sure the
tension is correct. Different
thread and fabric need
different tensions. If the
stitches are loopy or overly
tight then you need the
change the tension so that
the top and bottom thread
loop together evenly. Read
your machine manual to see
how to change the tension
as each machine differs.
5 The most important thingabout machine stitching
is keeping your stitching
straight. Machines come
with marked measure lines
on the needle plate – keep
the edge of your fabric
running along it as you stitch.
Stitch very slowly to start with
and increase your speed as
you gain confidence.
6 If you are stitchingcurves, stitch very slowly
and gradually ease the
fabric round using both
hands so you stitch a neat
curved line.
7Don’t forget to clean your
machine regularly as fluff
gets caught under the teeth
and this will stop your
machine working smoothly.
Your manual will show you
how to remove the needle
plate and get all the fluff out.
8Get your sewing
machine serviced
regularly or if you don’t feel it
stitching the same as usual
– it will make a great deal of
difference! Look online to
find your nearest machine
service or repair shop.
9Keep your sewing
machine covered up
when you’re not using it tokeep the dust out, and
protect it from accidents.
With your new-found skills
you could even make your
own pretty cover!
10 Have a look at all the
different stitches your
machine can do and read
your manual, which will tell
you what to do with them.
Mostly, you will only use the
straight stitch for seams and
hems, but the zigzag stitch
can be just as useful – it’sbrilliant for working along the
edge of a fabric to stop it
from fraying. You can alter
the length and the width of
the zigzag using your
machine dials, so adjust it to
suit your fabric weight. The
zigzag stitch can also be
used for decoration so have
a practice to see which
different effects you like.
11Change your needle
regularly – they
become blunt with time and
use, and your machine
won’t stitch as well.
1Raise the presser foot
and slide the fabric
under it where you want to
start sewing. Your machine
probably has an indicator
guide on the plate, givingmeasuring guides for seam
allowances. Line up the
fabric edge with this guide.
3It’s easy to turn a corner
without finishing your
thread. Make sure the needle
is down in the fabric at the
point where you need to turn,
then raise the foot and spinthe fabric round to the new
direction. Lower the foot and
carry on sewing.
2As you control the speed
of your sewing with the
foot pedal, feed the fabric
under the presser foot. If you
find that you need to support
the fabric with a little moretension, hold it in front of, and
behind, the foot and ease it
gently through.
4Once your stitching line
is done, finish securely
by making a few stitches
back and forth over your line.
With the needle in the up
position, raise the presser footand pull out your fabric. The
threads will still be attached,
so snip these off.
MACHINE STITCHING
SEWING MACHINE
Get the best from your
Beginner’s Guide to Sewing22
Basic Techniques
W o r l d M a g s . n e t W o r l d M a g s . n e t
W o r l d M a g s . n e t

8/15/2019 Beginner's Guide to Sewing - 2014
http://slidepdf.com/reader/full/beginners-guide-to-sewing-2014 23/164
In this chapter you’ll learn all the essential techniques needed forsewing. Each section starts off by teaching you the individual
skills, then there are projects so you can practise and perfect them.
Essential Techniques
W o r l d M a g s . n e t W o r l d M a g s . n e t
W o r l d M a g s . n e t

8/15/2019 Beginner's Guide to Sewing - 2014
http://slidepdf.com/reader/full/beginners-guide-to-sewing-2014 24/164
Essential Techniques
Beginner’s Guide to Sewing24
All about…
PINNING, TACKINGAND HAND STITCHES
Preparing your fabric before you
stitch does take a little time but it’s
well worth it in the long run. It
saves you from having to unpick mistakes
and you’ll also get a neater finish. Pin,
then tack, then stitch is the golden rule –
particularly if you are a beginner.
Although a sewing machine can be
used for a lot of projects, some hand
stitches are also necessary so it’s
important to understand these and
practice them first.
PINNING
Pins are vital for stopping your fabricmoving about while you’re sewing. For
large projects, insert pins at right angles
to the edge of your fabric, about 15cm
(6in) apart. For smaller projects, insert
your pins much closer together. You
should also use more pins if you’re
securing a curve or corner. Don’t use pins
with plastic heads if you’re going to press
your fabric because they may melt, but
you can buy larger glass-headed pins,
which are ideal for thicker fabric and
you can iron on top of them.
If you are pinning tricky areas, such
as curved edges, then place your pin
lengthways along the seam line. Always
remove the pins as you go if you are
machine stitching as you may bend or
snap your needle if you stitch over them.
When pinning hems you can pin in
either direction, but if the hem is quite
deep then place pins at right angles
because it’s easier for easing fabric into
place using this method.
Whether you will be stitching by hand or machine, you need to hold your fabric pieces
together firmly in place by pinning and tacking – follow our handy guide to the basic stitches
TACKING
Tacking (also known as basting) issomething we often skip as it does taketime. Pinning is fine for just straightseams, but if you are working oncurves, or joining slippery or stretchyfabrics together, then tacking is wellworth the effort. It avoids you having tounpick your seam later, and possiblymarking your fabric in the process.
The more you stitch and becomeconfident, the less you will feel the
need to tack seams first. Use acontrasting coloured thread fortacking so the stitches can easily beseen when you remove them later.
BASIC TACK
Simple tacking stitches are used for holding two pieces of fabric togetherand making temporary hems. Since the stitches won’t be staying in the
fabric, you can use a knot to start off. Just use a single thread to makestraight stitches, evenly spaced. When you need to remove them, if yourfabric is loosely woven, you can just pull the thread. On denser material,cut the thread every few stitches and pull it out of the fabric gently.
W o r l d M a g s . n e t W o r l d M a g s . n e t
W o r l d M a g s . n e t

8/15/2019 Beginner's Guide to Sewing - 2014
http://slidepdf.com/reader/full/beginners-guide-to-sewing-2014 25/164
Essential Techniques
Beginner’s Guide to Sewing 25
HAND STITCHESFor most projects you will need to do
some sewing by hand – for example,
making hems, stitching trickier areas,
or for a little decoration.
DOUBLE STITCH
This is a tidy way to start off without
using a knot when you are working any
hand stitches or even tacking. Make your
first stitch and then stitch over it a couple
of times, keeping it as neat as possible.
Slide the needle through the stitches on
the wrong side for extra security before
you start sewing. You can also use double
stitch to fasten off when you finish
sewing, to secure your thread.
SLIP STITCH
Since this stitch is almost invisible you
can use it for hems and to sew on bias
binding and appliqué shapes.It’s usually formed by slipping the
thread under a fold of fabric and can be
used to join two folded edges together,
a folded edge to a flat piece of fabric or
even two flat pieces of fabric.
Work from right to left. Fasten the
thread by taking a couple of stitches
where they won’t be seen and then bring
the needle and thread out through one
folded edge (upper part of illustration).
The stitch visible under the fabric will be
a long diagonal one.
Next push your needle down through
the second fabric, very close to where the
first fabric lies, forming a tiny vertical
stitch (lower part of illustration). Bring
your needle out and draw the thread
through. Repeat for each stitch.
RUNNING STITCH
This stitch is similar to tacking and is
generally used for decorating a finished
project and for gathering fabric.
Simply bring your needle up and down
through the fabric at regular intervals to
create evenly-spaced stitches. Make sure
that all the stitches are the same length
and the spaces between them too – this is
particularly important if you are using it
as an embellishment.
BACKSTITCH
A strong stitch, this is useful for seams
that will take a lot of weight. It’s also a
decorative embroidery stitch.
Working from right to left, bring the
needle up through the fabric a stitch
length to the left of where you actually
want the stitching to start and then take
the needle back to the start, through the
fabric and up again another stitch length
to the left.
BLANKET STITCH
This can be used to edge blankets as well
as for stitching appliqué to the base
material. Push the needle in a short
distance from the edge of the fabric, then,
with the thread underneath the needle,
pull it through to form a loop. The
vertical stitches should be evenly spaced
and of the same length.
DOUBLE STITCH SLIP STITCH
BACKSTITCH
RUNNING STITCH
LONG AND SHORT TACK
This is a neater stitch that’s handy when the
stitches might be kept in the fabric for a whilebefore removal. Simply create a long versionof the basic tack and leave a short space in
between each stitch.
DIAGONAL TACK
Diagonal tacks are used on folds or areas where
one piece of fabric lies on top of another. Thestitches are worked vertically and appear on theright side as diagonal stitches, but are vertical
on the wrong side of the fabric.
BLANKET STITCH
W o r l d M a g s . n e t W o r l d M a g s . n e t
W o r l d M a g s . n e t

8/15/2019 Beginner's Guide to Sewing - 2014
http://slidepdf.com/reader/full/beginners-guide-to-sewing-2014 26/164
Essential Techniques
Beginner’s Guide to Sewing26
YOU WILL NEED
Wooden coat hanger: 40.5cm
(16in) across
Two pieces of fabric: 48x13cm
(19x5in)
Wadding cut into 5cm (2in)
strips
Ribbon for trimming
Fabric adhesive spray
Basic sewing kit (see page 12)
Finished size
This will match your hanger size
Seam allowance
1.5cm (½in) included
GlossaryTurn to page 16 for our list of terms
Padded
coat hangerBy Debbie Shore
Alovely first project, this paddedcoat hanger is easy to make with a
small amount of fabric and the
minimum of sewing. It’s ideal for using up
scraps of fabric from other projects – before
long you might collect a wardrobe full of
them, in a cornucopia of textiles that match
newly-made garments and accessories.
Padded hangers make delightful gifts,
especially if lavender or other petals and
spices are sprinkled throughout the wadding
or a scented sachet in matching fabric is
hung from the hook. Of course, they’re
useful, too – padded hangers protect the
shoulders of delicate clothes and stop strappy
tops and dresses from falling to the floor.
Half Yard Heavenby Debbie ShoreFabric left over from sewing projects, or old shirts
and pillow cases that aren’t yet ready for the
scrap heap, come in handy for little projects that
don’t require a great deal of fabric. In this book
you’ll find lovely ideas, with full instructions, for
making 26 items to wear, use, give away, play
with or simply to treasure. Easy to make, they can
be completed in a day or a weekend.Published by Search Press, PB, £9.99
www.searchpress.com
This pretty coat hanger will looklovely in your closet, and it willhelp to maintain the shape ofyour delicate garments
W o r l d M a g s . n e t W o r l d M a g s . n e t
W o r l d M a g s . n e t

8/15/2019 Beginner's Guide to Sewing - 2014
http://slidepdf.com/reader/full/beginners-guide-to-sewing-2014 27/164
Beginner’s Guide to Sewing 27
Essential Techniques
MAKING THE HANGER
Lay your two pieces of fabric right sides together. Place thecoat hanger on the top part of the fabric so that the hook is
approximately 1.5cm (½in) in from the edge. Draw aroundhalf the hanger, leaving a border of 1.5cm (½in).
Fold in the fabric at the join, then hand stitch the two sleevestogether. Don’t worry too much about stitching neatly as thiswill be covered by ribbon.
Spray the hanger with fabric adhesive, then wrap the stripsof wadding around it. Put an extra square of wadding overthe ends of the hanger as shown in next step...
Cut out these shapes, then repeaton the lower part of the fabric. You
should have four shapes altogether.
Glue a piece of decorative ribbon over your stitches, andfinish off with a little bow. If you like, pop a little fabric adhesiveon to the hook and wrap ribbon around it to finish.
Place the cut-out pieces right sides together, pin them, thensew all the way round, leaving the short straight end open.Turn the right way out and press. You will now have twomatching ‘sleeves’. Slip the fabric sleeves over each sideof the hanger.
1
5
3
2
6
4
T o p ti p
Glue the wadding to
the hanger, o ther wise i t
will ‘scrunch up ’ when
pulling the slee ve o f
fabric o ver i t
W o r l d M a g s . n e t W o r l d M a g s . n e t
W o r l d M a g s . n e t

8/15/2019 Beginner's Guide to Sewing - 2014
http://slidepdf.com/reader/full/beginners-guide-to-sewing-2014 28/164
Essential Techniques
Beginner’s Guide to Sewing28
All about…
SEAMS
Stitching a neat straight seam is the
first thing you need to master on
your sewing machine. The answer
is, of course, practice, practice, practice. A
really good way to do this is to draw
pencil lines on a spare piece of light cotton
fabric. Now stitch along these lines until
you can stitch accurately on top of them.
Now try the same thing but without the
drawn lines and see how you get on.
You could draw seams lines onto your
fabric with an air erasable pen then stitch
over them until you are confident you can
stitch in a straight line.
This is also a good opportunity to check
that you have set the tension and the
stitch length of your sewing machine
correctly to suit the weight and type offabric you are stitching on or together.
However, taking the time to pin, then
tack, will make stitching with your
sewing machine a lot easier as you can
concentrate on stitching neat seams
without the worry of the fabric pieces
separating and slipping. It won’t be long
until stitching seams become second
nature and you’re off.
A seam joins two or more layers of fabric together and can be done by hand or
machine – most are worked on a machine as they are stronger and quicker to make
HOW TO SEW A FLAT SEAM (PLAIN SEAM)
Put the edges of your fabric together,secure your thread and then sew along
the edge, making sure you keep the seam
allowance even all the way along (fig. 1).
Sewing machines have lines on the
base plate that are standard seam
allowance distances from the needle.
When stitching, keep the raw edges lined
up with the relevant line to keep the size
of the seam allowance constant. Insert
the needle in the seam line about 1cm
(3
/ 8in) from the start and reverse stitchback to the start, then stitch forward.
When you reach the end of the seam,
reverse stitch for about 1cm (1/ 3in) again
to secure the thread. If you are stitching
a continuous seam – for example, round a
circle – overlap the start of the stitching
by about 1cm (1/ 3in). If there are pins in
your fabric, take each one out just before
you reach it – don’t sew over them.
1
SEAM KNOW-HOW
Once you’ve mastered basicstraight seams, there are othertechniques you need to master forthe perfect finished seam.
SEAM ALLOWANCES
The seam allowance is the areabetween the stitching and the rawedge of the fabric. It’s important tokeep this the same throughout andthe individual project instructions will
tell you what this is.To stitch accurately, you must be
able to use the correct seamallowance without having to mark it
on the fabric. Most sewing machineshave seam allowance lines on theneedle plate. All you do is line the rawedge of your fabric up with yourchosen line then lower the foot andstitch your seam.
Common seam allowances are6mm (¼in) for patchwork, 1.5cm (½in)for general sewing and 1.6cm (5/ 8in)for dressmaking.
REINFORCING SEAMS
Some seams, such as bag seams, can
be reinforced to strengthen them. Afteryou have worked the main seam, workanother one 3mm (1/ 8in) in towards theraw edges from the first one.
LAYERING SEAMS
If you are stitching together thickfabric, or several layers of fabrics, thenyou need to reduce the bulk of fabricin the seam allowance.
This is done by trimming the rawedges of each fabric by differentamounts after the seam has beenstitched. Always trim the seamallowances of piping as they will beparticularly bulky otherwise.
TRIMMING SEAMS
Once you have finished your seam,it’s best to press the seam open on thewrong side so it lies flat. The projectinstructions will tell you if you should
W o r l d M a g s . n e t W o r l d M a g s . n e t
W o r l d M a g s . n e t

8/15/2019 Beginner's Guide to Sewing - 2014
http://slidepdf.com/reader/full/beginners-guide-to-sewing-2014 29/164
Essential Techniques
Beginner’s Guide to Sewing 29
HOW TO SEW CORNERSPin the fabric together, with right sides facing, and then
stitch the seam (fig. 2).
The stitching lines are at right angles to each other
(fig. 3), which means the finished corner will have asharp point when turned to the right side. To reinforce your
corner, stitch right to the edge on both sides.
HOW TO SEW AN OUTER CURVEPlace right sides of fabric
together and stitch the seam.
Ensure the sewing line follows
the curve at the distance from
the edge for the seam allowance, as
set in the project instructions (fig. 6).
Cut notches in the seam
allowance to reduce the bulk of
the seam (fig. 7). You need to do this
so that the fabric can be turned to
the right side.
Turn right sides out and press.
HOW TO SEW AN
INNER CURVEPlace right sides of
fabric together.
Sew a seam, ensuringthe sewing line follows
the curve at the distance
from the edge for the seam
allowance, as set in the
project instructions (fig. 4).
You’ll need to reduce
the bulk so the curve
lies flat, so cut out notches
(fig. 5). On extreme curves
and angles, cut small
wedges out of the seam
allowance to reduce the
bulk further.
Turn right sides out
and press. 2 3 5
6 7
4
press the seams to one side instead.
This is done quite often in patchwork.Usually the seams allowances are
left as they are as they do help to
strengthen the seam but sometimesthey cause too much bulk so they canbe trimmed to half their original width.
NEATENING EDGESIf your fabric has a tendency to fray
you can neaten the raw edges afteryou have worked the seam.
Set your sewing machine to the
zigzag stitch, then stitch close to theraw edge all the way along. Thezigzag must be small enough to stopthe fabric from fraying, but large
enough to enclose the bulk of thefabric so practise a few stitch lengths
and widths before you begin.Alternatively, you can trim the raw
fabric edges with a pair of pinking
shears, which gives a zigzag edge.
NARROW SEAM
This seam is ideal for sheer or moredelicate fabrics as it is a little neaterand stands out less than a flat seam.
Stitch a flat seam in the usual way,then trim both seam allowances to
half their original width. Zigzag stitchthe two raw edges together, thenopen out the fabric and press theseams to one side.
T o p t i p A l w a y s
u s e s h a r p
d r e s s m a k i n g s c i
s s o r s
f o r t r i m m i n g s e a m
s
f o r a c r i s p fi n i s h
–
c u t s l o w l y a n d
c a r e f u l l y
W o r l d M a g s . n e t W o r l d M a g s . n e t
W o r l d M a g s . n e t

8/15/2019 Beginner's Guide to Sewing - 2014
http://slidepdf.com/reader/full/beginners-guide-to-sewing-2014 30/164
Sew Buntingby Debbie ShoreA book with nothing but bunting projects – what
a great idea! You’ll never be stuck for ideas for
bunting for any occasion, whether it’s a birthday
party, a wedding or a royal jubilee. There are
nearly 30 projects, some seasonally-themed,
others simply celebrating the joy of bunting! We
love the bunting made of lavender-scented
sachets, and the bunting-adorned lampshade!Published by Search Press, PB, £9.99
www.searchpress.com
Beginner’s Guide to Sewing30
Essential Techniques
YOU WILL NEED
72 strips of fabric: 15x5cm
(6x2in)
Contrasting fabric for backing:
100x20.5cm (40x8in), cut into 12
triangles each15cm (6in) across
wide x 20.5cm (8in) tall
Bias binding tape: 3m (10ft) x
2.5cm (1in) wide
Basic sewing kit (see page 12)
Finished size
2m (80in) long x 17.5cm (7in) tall
Seam allowance
1.5cm (½in) included
GlossaryTurn to page 16 for our list of terms
Crazy
patchwork buntingBy Debbie Shore
Bunting is hugely popular right now,and it’s not just for festive occasions.
It looks fantastic hung in any room,
whether kitchen, bedroom, nursery or
lounge. Don’t stop there, though – bright
bunting adds a special touch to gardens, too.
The process is simple: cut some triangles
(as many as you want, depending on the
length you need) and stitch them in a row to
bias binding tape. Our bunting uses a
patchwork technique, but you could cut out
single-pieced triangles to save time.
Bunting is a good way of using up scraps of
fabric, but can be made from other materials
too – oilcloth is a good choice for the garden
and can be glued instead of stitched, and
how about leather for a den or home office?
This is a good way of using upscraps of fabric to create abright, fun decoration to addcheerfulness to your home
W o r l d M a g s . n e t W o r l d M a g s . n e t
W o r l d M a g s . n e t

8/15/2019 Beginner's Guide to Sewing - 2014
http://slidepdf.com/reader/full/beginners-guide-to-sewing-2014 31/164
Beginner’s Guide to Sewing 31
MAKING THE
BUNTINGPlace two strips of fabric right sidestogether, twist slightly and sew them
together along one edge.
Fold back the fabricand press open.
1 2 T o p t i p
I f y o u h a v e e m
b r o i d e r y
s t i t c h e s o n
y o u r s e w i n g
m a c h i n e, y o u c o u l d a d d
a f e w p r e t t y s t i t c h e s t o
t h e s e a m s b e f o r e
c u t t i n g o u t
1
2
W o r l d M a g s . n e t W o r l d M a g s . n e t
W o r l d M a g s . n e t

8/15/2019 Beginner's Guide to Sewing - 2014
http://slidepdf.com/reader/full/beginners-guide-to-sewing-2014 32/164
Essential Techniques
Beginner’s Guide to Sewing32
Fold back the fabric and press openas before. Join five strips together inthis way until you have a rectangleapprox 15x20.5cm (6x8in).
Mark the centre point on one ofthe 15cm (6in) sides and cut fromhere to the two corners of thefacing side to make a triangle.
4 5Place the next piece of fabric facedown on one of the joined strips andtwist it in the opposite direction. Sewalong the edge as before. Your fabric
strips should be taking on a zigzag look.
3
4
3
5
W o r l d M a g s . n e t W o r l d M a g s . n e t
W o r l d M a g s . n e t

8/15/2019 Beginner's Guide to Sewing - 2014
http://slidepdf.com/reader/full/beginners-guide-to-sewing-2014 33/164
Essential Techniques
Take each triangle andplace it on top of a piece ofbacking fabric, right sidestogether. Sew along the two
long sides using a 6mm (¼in)seam allowance. Snip acrossthe corners.
Turn right side outand press. Trim awayany untidy edgesacross the top.
7 6
FINISHING THE BUNTING
1 PREPARE THE BIAS BINDINGFold your bias tape in half lengthwise and press.
2 PLACE THE TRIANGLESStarting at the centre point, slip the triangles
inside the bias tape, leaving a gap of 5cm (2in)between each one. Pin them in place as you go.
3 STITCH IT ALL TOGETHERMachine stitch all the way along the bias tape,
trapping the triangles as you sew.
T o p t i p I f t h e b u n t i n g i s f o r a s p e c i a l o c c a s i o n , a d d e x c i t e m e n t b y s t i c k i n g o n e m b e l l i s h m e n t s
6
7
W o r l d M a g s . n e t W o r l d M a g s . n e t
W o r l d M a g s . n e t

8/15/2019 Beginner's Guide to Sewing - 2014
http://slidepdf.com/reader/full/beginners-guide-to-sewing-2014 34/164
Essential Techniques
Beginner’s Guide to Sewing34
YOU WILL NEED
Fabric: 100x115cm (40x45in)
Wooden coat hanger
Pattern paper
Pencil and ruler
Thread in matching colours
Basic sewing kit (see page 12)
Finished size
To match hanger size
Seam allowance
2 cm (¾in) included
Glossary
Turn to page 16 for our list of terms
Retro-style
peg bagBy Chris Jefferys
This handy little peg bag is just thething for hanging on your washing
line to keep pegs safe and sound. Peg
bags are enjoying a come back, and you can
personalise this one easily by picking a
patterned fabric that tickles your fancy to
make the basic bag from. Opt for a pastel
gingham pattern to give your bag a vintage
feel or pick a bold floral print to make sure
your finished creation stands out on the line
when friends pop round for a cuppa.
Our finished peg bag has a stylish
rounded opening at the front (ready for you
to pop your pegs in), finished with a simple
bound edge. Hang it in pride of place in your
garden or laundry room with a wooden coat
hanger, slipped inside the top edges, to
suspend it from a door hook or washing line.
This is quite a quick project, so you should be
able to whip it up in just a couple of evenings.
Learn to Sewby Chris JefferysThis easy peg bag is a taster of just one of 14 must-
try beginners’ sewing projects in Learn to Sew .
From eye-catching tablecloths to cushion covers,
aprons and curtains, you’ll find loads or projects
to play with, alongside step-by-step tutorials for
an array of techniques, from seams to fastenings
and mitred corners. Plus learn how to add pretty
finishing touches like bows, ties and frills.Published by New Holland
www.newhollandpublishers.com
Jazz up laundry days with thischecked peg bag. It’s pretty& practical, and is a great wayto flex your new sewing skills!
W o r l d M a g s . n e t W o r l d M a g s . n e t
W o r l d M a g s . n e t

8/15/2019 Beginner's Guide to Sewing - 2014
http://slidepdf.com/reader/full/beginners-guide-to-sewing-2014 35/164
W o r l d M a g s . n e t W o r l d M a g s . n e t
W o r l d M a g s . n e t

8/15/2019 Beginner's Guide to Sewing - 2014
http://slidepdf.com/reader/full/beginners-guide-to-sewing-2014 36/164
Essential Techniques
Beginner’s Guide to Sewing36
SEWING THE BAG
Zigzag stitch around the outeredge of the facing to neaten.Place the facing to the openingwith right sides together, andstitch in place around theopening, taking a 1cm (3/ 8in)seam allowance. Snip and notchthe seam allowances around the
curves and press the facing overto the wrong side. Top stitcharound the facing 1cm (3/ 8in)in from the edge.
Place the front piece to theback piece with right sidesfacing and outer edges level.Stitch together around the outeredges. Notch the seam at thecurves and trim the corners. Turnthe bag right side out and pressthe seam to the edge. Slip the
coat hanger inside the topedge to hang the peg bag.
1 2NOW TRY A
BOUND EDGE
Bias binding is an alternative way to bindthe opening of your peg bag. It’ll give you a
neat contrast outline around your bag’srounded front opening. As bias binding isalways cut on the bias, it should mould
easily to sit smoothly around the curves. Thebinding shown above was first
machine-stitched to the right side, then theother edge was folded over to the wrong
side and hand-stitched in place.
CUTTING OUT YOUR FABRIC
1 MAKE THE PEG BAG PATTERNLay a coat hanger onto some paper, draw
around it, then mark the centre. Add anextra 2cm (¾in) above the top and down
either side. Draw a 50cm (19¾in) base edgedown from each side, and join along thebottom with a horizontal line. Cut out two
fabric pieces from this pattern – oneeach for the front and back.
2 CUT THE FACINGFor the inner line, draw a circular central
opening onto the bag pattern about 28cm(11in) down from the central point at the top
edge, and about 19cm (7½in) wide. For theouter edge, draw a line 4cm (1½in) outsidethis opening. Trace the pattern and cut itout from the fabric, then transfer the innerline to the bag front fabric and cut it out.
W o r l d M a g s . n e t W o r l d M a g s . n e t
W o r l d M a g s . n e t

8/15/2019 Beginner's Guide to Sewing - 2014
http://slidepdf.com/reader/full/beginners-guide-to-sewing-2014 37/164
Terms and conditions: This trial offer is for new print subscribers only subscribing by Direct Debit. You will receive 3 issues for £5 and then continue on a quarterly Direct Debit of £12.49 thereafter. Full details of the Direct
Debit guarantee are available on request. Prices correct at point of print and subject to change. For full terms and conditions please visit: www.myfavouritemagazines.co.uk/terms. Offer ends 31st July 2014.
@LoveQuiltingMag LoveQuiltingMagLovePatchworkandQuilting LoveQuiltingMag
www.myfavouritemagazines.co.uk/LPQCall 0844 848 2852 and quote code LPQ
Lines open 8.00am–9.30pm weekdays, 8.00am–4pm Saturdays
3 ISSUESFOR £5
DIRECT DELIVERYTO YOUR DOOR
NEVER MISS AN ISSUE
SAVE MONEY ONTHE SHOP PRICE
W o r l d M a g s . n e t W o r l d M a g s . n e t
W o r l d M a g s . n e t
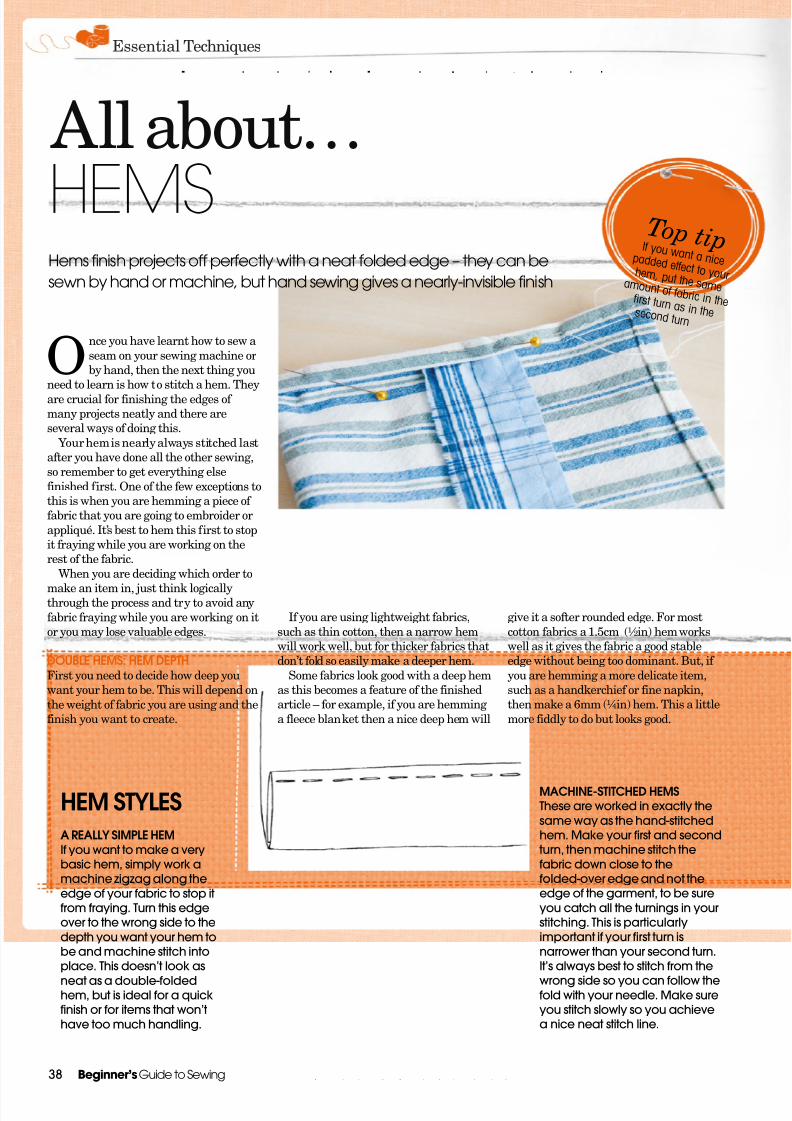
8/15/2019 Beginner's Guide to Sewing - 2014
http://slidepdf.com/reader/full/beginners-guide-to-sewing-2014 38/164
Essential Techniques
Beginner’s Guide to Sewing38
Once you have learnt how to sew a
seam on your sewing machine or
by hand, then the next thing you
need to learn is how to stitch a hem. They
are crucial for finishing the edges of
many projects neatly and there are
several ways of doing this.
Your hem is nearly always stitched last
after you have done all the other sewing,
so remember to get everything else
finished first. One of the few exceptions to
this is when you are hemming a piece of
fabric that you are going to embroider or
appliqué. It’s best to hem this first to stop
it fraying while you are working on the
rest of the fabric.
When you are deciding which order to
make an item in, just think logicallythrough the process and try to avoid any
fabric fraying while you are working on it
or you may lose valuable edges.
DOUBLE HEMS: HEM DEPTH
First you need to decide how deep you
want your hem to be. This will depend on
the weight of fabric you are using and the
finish you want to create.
If you are using lightweight fabrics,
such as thin cotton, then a narrow hem
will work well, but for thicker fabrics that
don’t fold so easily make a deeper hem.
Some fabrics look good with a deep hem
as this becomes a feature of the finished
article – for example, if you are hemming
a fleece blanket then a nice deep hem will
give it a softer rounded edge. For most
cotton fabrics a 1.5cm (½in) hem works
well as it gives the fabric a good stable
edge without being too dominant. But, if
you are hemming a more delicate item,
such as a handkerchief or fine napkin,
then make a 6mm (¼in) hem. This a little
more fiddly to do but looks good.
All about…
HEMSHems finish projects off perfectly with a neat folded edge – they can be
sewn by hand or machine, but hand sewing gives a nearly-invisible finish
HEM STYLES
A REALLY SIMPLE HEM
If you want to make a verybasic hem, simply work amachine zigzag along the
edge of your fabric to stop itfrom fraying. Turn this edgeover to the wrong side to the
depth you want your hem tobe and machine stitch intoplace. This doesn’t look as
neat as a double-foldedhem, but is ideal for a quickfinish or for items that won’t
have too much handling.
MACHINE-STITCHED HEMS
These are worked in exactly the
same way as the hand-stitchedhem. Make your first and secondturn, then machine stitch the
fabric down close to thefolded-over edge and not theedge of the garment, to be sure
you catch all the turnings in yourstitching. This is particularlyimportant if your first turn is
narrower than your second turn.It’s always best to stitch from the
wrong side so you can follow thefold with your needle. Make sureyou stitch slowly so you achievea nice neat stitch line.
T o p t i pI f y o u w a n t a n i c e p a d d e d e f f e c t t o y o u r h e m , p u t t h e s a m e a m o u n t o f f a b r i c i n t h e fi r s t t u r n a s i n t h e s e c o n d t u r n
W o r l d M a g s . n e t W o r l d M a g s . n e t
W o r l d M a g s . n e t

8/15/2019 Beginner's Guide to Sewing - 2014
http://slidepdf.com/reader/full/beginners-guide-to-sewing-2014 39/164
Essential Techniques
Beginner’s Guide to Sewing 39
Decide the depth of your hem and
turn the fabric over that amount to
the wrong side – for example if you want
a 1.5cm (½in) finished hem, turn the
fabric edge 1.5cm (½in) and press.
Now press your fabric over by the
same amount again and press,
then pin and tack into place.
Stitch your hem into place using a
neat hemming stitch. Remember
to use a thread that matches your fabric
so the stitches won’t be seen.
HOW TO WORK
HEMMING STITCH Secure the end of your
thread by working a few
tiny stitches over and over
each other.
Take a small stitch into
the edge of the folded-
over fabric of the hem.
Now make a small stitch
into the main fabric just
above the first stitch.
Push your needle into
the edge of the hem about
6mm (¼in) ahead of the
first stitch then repeat this
process all the way along
the hem.
HAND-STITCHED HEMSThe same method is used however deep you decide your hem is going to be.
CURVED HEMS
If you are hemming a curved edge offabric, such as a round tablecloth or anapron (as illustrated), then make the hemquite narrow, because the fabric is fuller atthe edge than it is towards the inside of thefabric. When you turn to make the first andsecond turn, take care topress well each time andthis should help to easethe fullness into thehem. It also helps toclip the fabric slightly.
T o p t i p T o r e d u c e t h e b u l k o n a
d e e p h e m o f 2. 5 c m ( 1 i n )
o r m o r e y o u o n l y n e e d t o
t u r n t h e f a b r i c o v e r 6 m m
( ¼ i n ) f o r t h e fi r s t t u r n
t h e n 2. 5 c m ( 1 i n ) f o r
t h e s e c o n d
W o r l d M a g s . n e t W o r l d M a g s . n e t
W o r l d M a g s . n e t

8/15/2019 Beginner's Guide to Sewing - 2014
http://slidepdf.com/reader/full/beginners-guide-to-sewing-2014 40/164
Beginner’s Guide to Sewing40
Essential Techniques
Classy
café napkinsBy Susan Wasinger
YOU WILL NEED
Bits and pieces of four men’s
extra-large, long-s leeve,
button-down shirts
Threads in matching colours
Basic sewing kit (see page 12)
Finished size
30cm (12in) square
Seam allowance
1.5cm (½in) included
Glossary
Turn to page 16 for our list of terms
These petite napkins are perfect forcatching your morning croissant
crumbs or keeping you civilised over
a light lunch. They cleverly ‘borrow’ the
buttons and buttonholes from a recycled
shirt to make napkin rings that are built in.
One large shirt should provide enough for
four napkins, and a fabulous effect is gained
from mixing and matching the fabric from
two shirts – make the main part with one
and the contrasting part from another.
If you haven’t got any old shirts lying
around your wardrobe waiting to be
upcycled (or you can’t persuade anyone to
give theirs up!), markets and second-hand
shops are the perfect place to find them.
As long as the fabric is in good condition,
they’ll do just nicely.
We’ve made ours using men’s shirts, but
look for women’s blouses, too – pretty floral
prints will make lovely summer napkins.
Recycle old shirts into a set oftrendy napkins – the detailing inthe stitching and tailoring addsstylish charm and pizzazz
Sewn by HandBy Susan WasingerAnything homemade has a unique character,
and is special to a gift recipient because it’s
obvious how much love, effort and attention has
gone into its making. In this book, you’ll find more
than 20 projects to hand stitch, each one
a modern take on a traditional theme. Find
pillows, aprons, pincushions, totes and lots of
other pretty things for treasuring and gift-giving.Published by Lark Books, PB, £16.99
www.thegmcgroup.com
W o r l d M a g s . n e t W o r l d M a g s . n e t
W o r l d M a g s . n e t

8/15/2019 Beginner's Guide to Sewing - 2014
http://slidepdf.com/reader/full/beginners-guide-to-sewing-2014 41/164
W o r l d M a g s . n e t W o r l d M a g s . n e t
W o r l d M a g s . n e t

8/15/2019 Beginner's Guide to Sewing - 2014
http://slidepdf.com/reader/full/beginners-guide-to-sewing-2014 42/164
6
MAKING THE
NAPKINS Cut squares of fabricfrom the back and sleevesof the shirts. You should beable to cut two 36cm(14in) squares out of theback and one out ofeach sleeve.
Cut the button placket offanother shirt (fig. 1). Cutalong the straight of thegrain close to the foldededge. On a tightly wovenshirt, you can cut close tothe folded edge and leaveit raw. If it’s a looser weavethat might fray, cut about
3mm (1/ 8in) from the fold,then tease a couple of
threads off to create a littlefray. As long as it is on thestraight of the grain, the fraywill be stable and look great.
For the tab, cut the placketso that there is about 2.5cm(1in) of length below abuttonhole, and about10-13cm (4-5in) above thebuttonhole. Hem the shortend (closest to thebuttonhole) by folding it up6mm (¼in), then 6mm (¼in)again. Stitch to hem.
1 3 2
Essential Techniques
Beginner’s Guide to Sewing42
1
T o p t i p T h e r e ’ s l
o t s o f f a n c y
s t i t c h i n g a n d f a b
r i c
i n a s h i r t – t h e s e
n a p k i n s l e t y o u g i v e
i t a n e w l e a s e
o f l i f e !
W o r l d M a g s . n e t W o r l d M a g s . n e t
W o r l d M a g s . n e t

8/15/2019 Beginner's Guide to Sewing - 2014
http://slidepdf.com/reader/full/beginners-guide-to-sewing-2014 43/164
Now move onto the napkins.Hem the perimeter of thenapkin by rolling the edgeunder 6mm (¼in) once, then6mm (¼in) again. Pin to hold.If you like, iron the foldededges to hold them in placewhile you sew. Stitch a tightand even running stitcharound the perimeter of thenapkin. Stop stitching at the
half-way point on the lastside, but leave your needlethreaded. Now is the time tomark the position for the tab.
To mark the tab position,fold the napkin in half alongthe napkin edge you leftpartially open. Mark thecentre. Then measurebetween the centre andthe edge, and mark thecentre of that area. Your tabwill centre on that mark.
Tuck the unhemmed end of the tabunder the rolled edge of the napkin atthe marked point with wrong sidesfacing. Pin (fig. 2). Test the length of thetab by rolling up the napkin andwrapping the tab around it. Thebuttonhole on the tab should betangent to the edge napkin hemwithout rolling it too loosely or tootightly. If the tab is a bit long, cut somelength off the end that is currently
tucked into the napkin hem. Use theneedle and thread from step 4 to finishthe napkin hem, sewing the tab intoplace as you stitch.
Turn the tab up andstitch across it along thenapkin hem about 3mm(1/ 8in) from the edge(fig. 3). Now remove abutton from the shirtplacket and sew it ontothe right side of thenapkin. Position it on thehem, centred on the tab.This napkin is ready to roll!
4 65 7
Beginner’s Guide to Sewing 43
Essential Techniques
2
3
W o r l d M a g s . n e t W o r l d M a g s . n e t
W o r l d M a g s . n e t

8/15/2019 Beginner's Guide to Sewing - 2014
http://slidepdf.com/reader/full/beginners-guide-to-sewing-2014 44/164
Essential Techniques
Beginner’s Guide to Sewing44
All about…
BINDING AFABRIC EDGE
Learning how to bind the edge of a
piece of fabric or layers of fabric is
a really useful skill. It’s great for
finishing off the edges of napkins,
tablecloths, tea towels, bags, purses,
quilts or anything where you want a neat
strong edge. Instead of just hemming
your fabric you can use a contrasting
fabric to make an item look extra special.
You can make your own binding to
edge your fabric, which is the method
used on the Bound Napkins project on
p46. Alternatively, you can buy
ready-made bias binding which is used to
bind the Vagabond Bag on p50.There are several methods of binding
fabric and the single fold method is used
for the Bound Napkins project (p46).
DOUBLE FOLD METHOD
Another method is the double fold
method, which will give you neat mitred
corners too using really simple steps.
Also, with the double fold of fabric on the
edge you get a good strong finish which is
ideal for any items which will have a lot
of wear and washing.
NB In these photographs we have shown
the stitching in a contrasting thread so it
shows up. When you bind your fabric
remember to use a thread that matches it
as closely as possible.
HOW TO BIND
CUTTING STRIPS
First, start off by cutting the strips to
bind the edge of your fabric.
Width: A 1.5cm (½in) finished binding
is wide enough for most items and will
fold well on the mitred corners. You needto cut fabric strips of 6cm (2¼in) wide to
achieve this. But, if your fabric is thick or
if there are several layers, then add an
extra 6mm (¼in) to this width.
Length: Measure all round the edge of
your fabric to be bound and add 30cm
(12in) to allow for mitres and ends.
JOINING STRIPS
The fabric strips all need to be joined on
the diagonal to make one long strip. Place
one strip right side up vertically and lay
the next strip right side down
horizontally on top at right angles.
Draw a diagonal pencil line from the
top left corner to the bottom right corner
and pin together. Stitch along this line,
and then repeat this process to join allyour strips together.
TRIMMING THE SEAM
Now trim all the seams to 6mm (¼in),
open out and press flat.
FOLDING THE STRIP
Fold your joined strip in half lengthways,
wrong sides together. Match raw edges
and press in half along the entire length.
ATTACHING THE STRIP
Fold one short edge of the strip over by
1.5cm (½in), then pin it to the centre of
the lower edge of the fabric being
bound, as this is usually the least
noticeable place for the ends to be
seen. Make sure you keep the
raw edges of the folded fabric
strip even with the fabric to be
bound and stitch together along the edge
using a 6mm (¼in) seam allowance. Stop
when you get to 6mm (¼in) from the end
of the fabric being bound and stitch
backwards to secure, then cut and
remove it from the machine.
MITRING THE CORNER
Fold the fabric strip upwards so the raw
edges run in a straight line with the edge
of the fabric being bound.
Binding the edges of your projects with a strip of fabric creates neat edges that won’t fray or
distort – the binding can even be a decorative feature of the finished article
T o p t i p
I f y o u r b i n d i n g i s t o
b e s t i t c h e d r o u n d
a
c u r v e, c u t t h e s t
r i p s
d i a g o n a l l y a t 4 5
°
t o t h e s e l v e d g e
CUT THE STRIPS JOIN THE
STRIPS
W o r l d M a g s . n e t W o r l d M a g s . n e t
W o r l d M a g s . n e t

8/15/2019 Beginner's Guide to Sewing - 2014
http://slidepdf.com/reader/full/beginners-guide-to-sewing-2014 45/164
Essential Techniques
Beginner’s Guide to Sewing 45
Fold the strip back down so the fold is
running level with the top of the bound
fabric and the raw edges of the strip
running level down the bound fabric.
Starting at the top of the folded-over
strip, stitch down using a 6mm (¼in)
seam allowance, stitching backwards for
a little way at the top to secure. Continue
stitching down the strip over the folds.
Mitre each corner in the same way.
FINISHING THE END
When you reach the folded over edge where
you started simply stitch the end of the
strip on top of it, overlapping it by 1.5cm
(½in). Cut off any excess. Ensure you
stitch over the stitches at the beginning
and stitch backwards to secure.
FINISHING YOUR BINDING
Fold the binding strip over to the wrong
side of the bound fabric and press. When
you get to the corners, fold them over and
mitre them.Sew the back of the folded strip to the
bound fabric and cover the machine
stitches. You can do this by hand slip
stitching, or, if you prefer, you can
machine stitch this down for a stronger
finish. However, you will see the stitches
if you have used a machine, so it depends
on the look you want.
READY-MADE BIAS BINDING
Shop-bought binding is sold in a variety
of widths and lengths. It’s easy to use as
the cutting into strips and folding have
already been done, so all you have to do ispin, tack and stitch.
The variety of colours and patterns
available makes it a great way to add
decoration to edges and hems.
It’s cut on the bias, so it will curve
round edges easily. The binding comes
pre-folded so all you need to do is fold it
over the edges of your fabric, making
sure the fabric is tucked right inside,
then machine stitch it into place.
You must take care that the back of the
binding is stitched in place as well as the
front. If you tack the binding onto the
fabric before you begin then this will
really help to keep it still.
TRIM AND PRESS THE SEAM
ATTACH THE STRIP
FINISH THE END
FOLD AND STITCH THE BINDINGA NICE NEAT EDGE
READY-MADE BIAS BINDING
FOLD THE STRIP
FOLD TO MITRE CORNERS
STITCH MITRED CORNERS
W o r l d M a g s . n e t W o r l d M a g s . n e t
W o r l d M a g s . n e t

8/15/2019 Beginner's Guide to Sewing - 2014
http://slidepdf.com/reader/full/beginners-guide-to-sewing-2014 46/164
Beginner’s Guide to Sewing46
Essential Techniques
Pretty
bound napkinBy Cheryl Owen
YOU WILL NEED
One piece of fabric for main
part: 40cm (15¾in) square
Fabric for binding: 20x112cm
(8x44in)
Thread in matching colours
Basic sewing kit (see page 12)
Finished size
40cm (15¾in) square
Seam allowance
2cm (¾in) included
GlossaryTurn to page 16 for our list of terms
Sewing a border can take just a fewminutes once you’ve mastered the
technique, so it’s a brilliant way to
quickly jazz up your table linen – although
for this project we’re also making the main
part of the napkins for a personal finish!
Whether you choose to make the whole
napkin or just the border, you’ll want a
relatively hardwearing fabric as these items
are likely to see plenty of use (and washing).
Why not choose something in a colour that
matches your crockery?
Given that most table linen – napkins,
runners, table cloths – has straight edges,
it’s possible to create a full set of matching
linen, either from scratch or by adding a
border to a shop-bought set. It’s a lovely idea
as a gift, perhaps for a friend who’s moved
house or maybe even a wedding present.
Make every meal an occasionwith these bordered napkins.A few strips of fabric and you’reready for a transformation!
Love… SewingBy Cheryl OwenBy following the projects in Love… Sewing
you’ll be able to fill your home with beautiful
creations. With 25 patterns for everything
from table runners to doorstops, the book is
an invaluable guide for anyone taking their
first steps in making their own soft furnishings.
Step-by-step instructions mean you can
transform your home in no time!Published by New Holland, PB, £12.99
www.newhollandpublishers.com
W o r l d M a g s . n e t W o r l d M a g s . n e t
W o r l d M a g s . n e t

8/15/2019 Beginner's Guide to Sewing - 2014
http://slidepdf.com/reader/full/beginners-guide-to-sewing-2014 47/164
W o r l d M a g s . n e t W o r l d M a g s . n e t
W o r l d M a g s . n e t

8/15/2019 Beginner's Guide to Sewing - 2014
http://slidepdf.com/reader/full/beginners-guide-to-sewing-2014 48/164
6
MAKING THE
NAPKIN Cut two 82cm (32¾in)straight strips of 8cm (3in)wide fabric for thebinding. With right sidesfacing, join the lengths,taking 6mm (¼in) seamallowance to make acontinuous length. Pressthe seam open. Press thebinding lengthwise in half.Open out the binding and
press the long edges tomeet at the centre (fig. 1).
Open out the binding atone end and press under6mm (¼in). With the rightsides facing and startinghalfway along one edgeof the napkin, pin andstitch the binding to thenapkin, taking a 2cm (¾in)seam allowance. Stitchalong the fold line, finishing2cm (¾in) from the adjacent
edge (fig. 2).
With wrong sides facing,fold the binding at a 45ºangle from the corner(fig. 3). Next, fold thebinding level with thestitched raw edges to liealong the adjacent edgeof the napkin.
1 3 2
Essential Techniques
Beginner’s Guide to Sewing48
2
3
T o p t i p
U s e a r o t a r y c u t t e r t o
c u t p e r f e c t l y s t r a i g h t
a n d r e g u l a r b i n d i
n g
s t r i p s
W o r l d M a g s . n e t W o r l d M a g s . n e t
W o r l d M a g s . n e t

8/15/2019 Beginner's Guide to Sewing - 2014
http://slidepdf.com/reader/full/beginners-guide-to-sewing-2014 49/164
Mark the end of the previous stitchingwith a pin and stitch from this mark,finishing 2cm (¾in) from the nextadjacent edge (fig 4). Continue all theway around the napkin, overlappingthe pressed end of the binding.
Press the binding outwards from thenapkin then turn it to the undersidealong the centre fold line (fig. 5).
Pin the binding to the underside,folding under the fullness at thecorners in a neat mitre. Slipstitchthe pressed edges along theseams (fig. 6). Now all you needto do is to lay the table!
4 65
Beginner’s Guide to Sewing 49
Essential Techniques
4
5
6
T o p t i pU s e a t h r e a d w h i c h m a t c h e s y o u r b i n d i n g t o w o r k t h e s l i p
s t i t c h e s
W o r l d M a g s . n e t W o r l d M a g s . n e t
W o r l d M a g s . n e t

8/15/2019 Beginner's Guide to Sewing - 2014
http://slidepdf.com/reader/full/beginners-guide-to-sewing-2014 50/164
Beginner’s Guide to Sewing50
Essential Techniques
The vagabond bag is the perfecttravelling companion, whether
you’re shopping in the bazaars of
Morocco, perusing the flea markets of
Paris, carrying beach essentials in
Greece, or making a trip to your local
farmers’ market. Its unique design allows
it to fold up nice and tidy for packing, and
opens up with pleated sides that add
extra room for all of your treasures.
The construction is straightforward –
just cut a simple shape and sew the bias
binding on the edges. Our step-by-step
instructions will guide you all the way
if you get stuck.
Before you know it, you’ll be skipping
along with a trendy shopping bag, looking
for goodies to fill it with!
YOU WILL NEED
Fabric for outer bag: 50x114cm
(20x45in)
Fabric for lining: same size as
outer bag
Single-fold bias binding: 2.75m
(3yds), 25mm (1in) wide
Thread in matching colours
Basic sewing kit (see page 12)
Finished size
48x38cm (19x15in)
Seam allowance
1cm (3/ 8in) included
Glossary
Turn to page 16 for our list of terms
Summer
vagabond bagBy Lola Nova
Simple Sewing with Lola Novaby Alexandra SmithAs the title suggests, everything in this collection
of 25 projects, beautifully photographed by
Yuki Sugiura, is designed to be easy to make
and the emphasis is on having fun while doing
so. Chapters are arranged into Boho, Natural,
Vintage, Eclectic and Whimsy, and you’ll find
step-by-step instructions for each of the projects,
including things to wear and things for the home.Published by Mitchell Beazley, HB, £16.99
www.octopusbooks.co.uk
Make this simple bag andpractise your bias binding atthe same time – it’s perfect forshopping and projects
W o r l d M a g s . n e t W o r l d M a g s . n e t
W o r l d M a g s . n e t

8/15/2019 Beginner's Guide to Sewing - 2014
http://slidepdf.com/reader/full/beginners-guide-to-sewing-2014 51/164
Fold your main fabric in halfwidthways, matching the selvedgeedges, right sides together. Press it flatto make the fold hold its shape.
Using the fold as the shorter topedge of the bag, cut a rectangle40cm wide x 50cm long (15¾x19¾in).
Keep your fabric folded and all rawedges aligned.
To create the handles and openingof the bag, follow the dimensions onthe template to draw paper patterns.
Pin the templates along the top foldof the bag as shown above (fig. 1).
Place the large bag opening patternpiece in the centre and pin in place(this will be the opening in the bag),then place the two bag handlepattern pieces at the side edgesalong the fold and pin in place.
Now cut out the pattern pieces (fig.2). Repeat for the lining fabric. Savethe large cut-outs from the bagopening pattern piece – these willbecome the bag’s inside pocket.
SEWING THE
INSIDE POCKET
Using the cut-out piece from theouter bag, fold with wrong sides
together and pin.
Stitch around all the raw edges usinga 5mm (¼in) seam allowance, leavinga 5cm (2in) opening for turning. Cut the
seam allowance at the corners andclip the curves, then turn right side out(fig. 3). Turn under the seam allowance
at the opening and press.
Pin the pocket to the right side of thelining (fig. 4). Centre it about 10cm (4in)below the bag’s large opening, then
top-stitch close to the edge around thesides and bottom of the pocket,
making sure to back-stitch at bothends of your stitching line.
TIP If you would like a sturdier pocket,use the cut-out lining piece as
interfacing for your pocket.
CUTTING OUT THE PATTERN PIECES
1
3
4
2
Essential Techniques
Beginner’s Guide to Sewing 51W o r l d M a g s . n e t W o r l d M a g s . n e t
W o r l d M a g s . n e t

8/15/2019 Beginner's Guide to Sewing - 2014
http://slidepdf.com/reader/full/beginners-guide-to-sewing-2014 52/164
With right sides facing and matchingthe raw edges, pin the sides of yourouter bag in place. Stitch along thesides of the bag, using a 1cm (3/ 8in)seam allowance. Repeat for the lining.Press open the seam allowances.
Turn the outer bag right sides out. Placethe lining wrong side out into the outerbag, matching the seams and rawedges, and pin everything into place.
Tack the two layers together close tothe raw edges along the handles andopening – this will help keep the layersfrom slipping around as you apply thebias binding.
Cut a length of bias binding longenough to go around the entireopening of the bag with a bit ofoverlap. Fold it in half along its lengthand press it into a slight curve – this will
help with easing it on around the curvesof the handle and give a flatter finish.
Apply the bias binding along the rawedge of the bag opening, making surethat you fold the bias over the raw
edges so that both the outer and liningare covered (figs. 5–7).
Attach bias binding in the same way toboth of the handle openings.
SEWING THE BAG
5
7
Essential Techniques
Beginner’s Guide to Sewing52
T o p t i p T a c k t h e
b i a s b i n d i n g
i n p l a c e b e f o r e y
o u
s e w i t i f y o u fi n d i t
t r i c k y t o k e e p i t
s t i l l
a s y o u s t i t c h
6
W o r l d M a g s . n e t W o r l d M a g s . n e t
W o r l d M a g s . n e t

8/15/2019 Beginner's Guide to Sewing - 2014
http://slidepdf.com/reader/full/beginners-guide-to-sewing-2014 53/164
Lay the bag flat (fig. 6) on a tableor floor to make it easy to work with.Take the outer edge of the handleand fold it under until it meets theinner edge of the opening.
Continue the fold, making a pleatdown the side of the bag (fig. 7),adjusting as you go to keep it even,and making sure to include thelining layer in the fold. Pin in place.
Repeat the pleating for theopposite side and press the foldsin place. Tack the folds in placeand along the bottom edgeof the bag.
To keep the folded handles fromshifting, you can stitch the top ofthe folded handle in place (fig. 7).Use small neat hand stitches whichwon’t show up.
FOLDING THE BAG
Beginner’s Guide to Sewing 53
Essential Techniques
8 9
FINISHING
THE BAG
1 CUT SOME BIAS BINDING
Cut a length of bias binding 2.5cm(1in) longer than the width of the
bottom of the bag. Fold it in half alongits length and press. Turn under 1cm
(3/ 8in) on either end of the biasbinding and press (fig. 8).
2 CLOSE UP THE BOTTOMApply the bias binding to the bottom
of the bag to close the opening.Sandwich all of the layers betweenthe folds of the bias binding. Ensurethe bias tape is folded over all raw
edges, encasing both the front and
back of the bag. Pin and stitchin place (fig. 9).
21cm (8¼in)
17cm (6¾in)
33cm (13in)
TEMPLATESUsing the dimensions shown,
draw these templates onto
plain paper to make a pattern
Bag opening
Bag handle3cm (1¼in)
W o r l d M a g s . n e t W o r l d M a g s . n e t
W o r l d M a g s . n e t

8/15/2019 Beginner's Guide to Sewing - 2014
http://slidepdf.com/reader/full/beginners-guide-to-sewing-2014 54/164
Essential Techniques
Beginner’s Guide to Sewing54
All about…
TIES, HANDLESAND STRAPS
Ties, handles and straps are really
easy to make, and it’s a useful
skill to learn as they can be used
on so many items, from clothing to
accessories. One of the big advantages of
sewing your own is that you can make
them from the same fabric as your
finished item so they’ll match beautifully,
which a ready-made tape or ribbon just
won’t. Of course, you can might decide to
make them from a contrasting or
co-ordinating fabric to complement your
finished project.
Sewing your own handles or straps also
means you can tailor them to your exact
requirements, as they can be any width
or length to give a really professional
finish – and this is all something that a
beginner can easily achieve.
Ties, handles and straps are all made
in exactly the same way – but they can be
finished and attached differently to give a
variety of styles and uses. We’ve covered
all the basics here…
From bags to bootlaces, mastering the simple technique needed to make
ties, handles and straps will let you give any project a professional finish
Decide what finished length and
width you want your fabric tie to be.
You need to double the width so youhave enough fabric for the back and
front of the tie. This will give you the
finished fabric width and length.
2Add 1.5cm (½in) to both ends and
sides of this fabric strip for seam
allowances. Fold your tie in half
lengthways with right sides together.
3Stitch down the length 1.5cm
(½in) from the raw edges.
4Turn your tie right sides out and
press. You can either press it so
the seam runs down one side or so the
seam runs centrally on the back.
5Turn the two short ends 1.5cm
(½in) to the inside of your fabric
tube and slip stitch in place.
Use this basic fabric tie
method to jazz up your
trainers with brand new,
handmade shoelaces
HOW TO MAKE A BASIC FABRIC TIE MAKING A CORDED HANDLEIf you want to make a handle with extra
strength and substance then you need to
make a fabric strip using the method of
turning the long ends under and stitchinginto place. But, before you stitch them
together, put a length of thick piping cord
inside the fabric strip (fig. 1), fold the strip
round it (fig. 2), then stitch into place. This
will give you a thicker handle, which is
more comfortable to carry.
STRENGTHENING YOUR HANDLEFor a much stronger handle, iron some
fusible interfacing to the wrong side of
your fabric strip. You can then make thehandle in the usual way, but this will give
your handle more strength and weight.
This is ideal for fabrics such as woven
wool and tweed, which are more flexible.
1
2
W o r l d M a g s . n e t W o r l d M a g s . n e t
W o r l d M a g s . n e t

8/15/2019 Beginner's Guide to Sewing - 2014
http://slidepdf.com/reader/full/beginners-guide-to-sewing-2014 55/164
Essential Techniques
Beginner’s Guide to Sewing 55
ANOTHER WAY TO MAKE A BASIC FABRIC TIEThis is another way to make a fabric tie – particularly if your fabric strip is quite
narrow or your fabric is thick and may be difficult to turn right sides out.
Cut the fabric strip in the same way
as with the basic tie, then turn the
long edges under by 1.5cm (½in) (fig. 3).
Now fold the strip in half
lengthways with wrong sides
together, matching up the turned
under edges (fig. 4).
3Stitch these edges together close
to the fold all the way down both
sides and across the top and bottom
(fig. 5).
4Turn the short ends over to one side
of the tie twice and slip stitch
down to neaten (fig. 6, 7 & 8).
ATTACHING HANDLES
AND STRAPS
1Once you’ve made your fabric
tie, then you need to attach it
securely to your project.
2Pin it in place to the fabric you
are attaching it to – and tack if
needed – then stitch it firmly down.
3For a bag it’s best to overlap it
on to the fabric you are
attaching it to by 2.5cm (1in), then
stitch in a square all the way round,
then diagonally through the centre.
This will give it extra strength.
TWO-COLOURED TIE
1Cut two strips of
different fabrics to
the width and length of
the finished tie, adding
an extra 1.5cm (½in) allthe way round for the
seam allowances.
2Place the two strips
right sides together,
matching all raw edges
and sew down both long
edges using a 6mm (¼in)seam allowance.
3Turn the strip right
sides out and press.
Then you will have one
colour on one side and
one on the other. This isgood if you are making
bag handles as you can
use the main fabric on
one side and the lining
fabric for another.
T o p t i p T i e s c a n
b e u s e d
a s a d e c o r a t i v e
a l t e r n a t i v e t o e l a s t i
c
b a n d s t o k e e p
o p e n e d p a c k e t s
s e a l e d
3
4
5
6
7
8
W o r l d M a g s . n e t W o r l d M a g s . n e t
W o r l d M a g s . n e t

8/15/2019 Beginner's Guide to Sewing - 2014
http://slidepdf.com/reader/full/beginners-guide-to-sewing-2014 56/164
Your magazine for inspiring, trend-led makes
No.1 for trends
Available from WHSmith & all good newsagents
Online at www.myfavouritemagazines.co.uk
And digitally at www.myfavouritemagazines.co.uk/digital-magazines
No.1stitching trend
magazineplus FREE giftevery issue!
*
Find us on facebook.com/CrossStitcherMagor follow us at twitter.com/XStitchmagazine
W o r l d M a g s . n e t W o r l d M a g s . n e t
W o r l d M a g s . n e t

8/15/2019 Beginner's Guide to Sewing - 2014
http://slidepdf.com/reader/full/beginners-guide-to-sewing-2014 57/164
Beginner’s Guide to Sewing 57
Essential Techniques
YOU WILL NEED
Fabric: 70x80cm (28x32in)
Pattern paper
Pencil and ruler
Thread in matching colours
Basic sewing kit (see page 12)
Finished size
60x44cm (23½x17½in)
Seam allowance
1cm (3/ 8in) included
GlossaryTurn to page 16 for our list of terms
Child’s
play apronBy Chris Jefferys
Creative kids can sometimes get a bitmessier than adults when they’re
baking, drawing or otherwise
expressing themselves, so this apron is the
perfect garment to make if you know any
children who like to get hands-on!
With its straps, pocket and curved hems,
it’s a great project for practising a couple of
new skills. If you don’t want to sew the
straps for the head loop and waist ties,
however, you could use tape or ribbon. In
fact, making the ties out of a ribbon in a
contrasting colour rather than the same
fabric as the apron is a great way to
customise it.
The dimensions given here will make an
apron that should fit children aged between
about four and seven, but the template is an
easy shape to scale up if you want to make a
larger one – just remember to buy a longer
piece of fabric!
Put your new skills into practiceand protect your kids’ clotheswith this simple, pretty andpractical apron!
Learn to Sewby Chris JefferysWith a series of tutorials that gradually introduce
new techniques, Learn To Sew is a great resource
for anyone who’s keen to pick up the basics of
sewing. As well as guides on making items from
scratch, the book also boasts a wealth of advice
on making simple alterations, such as taking up
hems or moving buttons – perfect for breathing
new life into old favourites!Published by New Holland, PB, £7.99
www.newhollandpublishers.com
W o r l d M a g s . n e t W o r l d M a g s . n e t
W o r l d M a g s . n e t

8/15/2019 Beginner's Guide to Sewing - 2014
http://slidepdf.com/reader/full/beginners-guide-to-sewing-2014 58/164
Beginner’s Guide to Sewing58
Essential TechniquesEssential Techniques
Beginner’s Guide to Sewing58
SEWING THE APRON
To hem the curved edges of thebib, turn them over 1cm (3/ 8in), then1cm (3/ 8in) again to the wrong side,press and pin. Machine stitch inplace close to the edge. Hem thesides and lower edge in exactlythe same way.
Hem the top of the apron byturning the top edge over 1cm(3/ 8in) to the wrong side, then 2cm(¾in) to the wrong side again andmachine stitch in place.
As the bottom corners are curved itcan be tricky to hem these as there willbe extra fabric in the hems. The bestway to do this is to sew a line of tacking
stitches round each corner 1cm (3/ 8in) infrom the edge remembering to securethe beginning of the thread with a fewstitches. Pull the tacking stitches up to
gather each corner then you will find iteasier to turn them over to hem.
1 3 2
CUTTING OUT
THE FABRIC
First make a paper pattern for yourapron. Following the measurements
on the diagram opposite, draw a
line 19cm (7½in) long across for thetop edge of the apron, then draw aline 60cm (23½ in) down the centre
to mark the length. Mark 21cm(8¼in) down from the top on thecentre line, then measure 22cm(8¾in) out from either side of the
mark to mark the side edges. Drawin the side and lower edges, joining
them with curves at the lowercorners. Then draw curved lines to
join the top corners to the sideedges to form the apron shape.
Draw out a pocket pattern 23cm(9in) wide by 15cm (6in) deep with
a curved lower edge. Fold thepatterns in half before cutting themout to ensure that both halves are
symmetrical. Pin the paper patternsto your fabric and cut round them.For the apron straps, cut three strips
of fabric 53x6cm (21x2¼in).
W o r l d M a g s . n e t W o r l d M a g s . n e t
W o r l d M a g s . n e t

8/15/2019 Beginner's Guide to Sewing - 2014
http://slidepdf.com/reader/full/beginners-guide-to-sewing-2014 59/164
Beginner’s Guide to Sewing 59Beginner’s Guide to Sewing 59
To make the pocket, stitch a rowof machine stitching around
1.6cm (5/ 8in) in from the curvededge of the pocket. Using thestitching as a guide, press theseam allowance over to thewrong side so that the stitchingrolls over onto the wrong side.
Press the pocket in half to mark itscentre. Pin then tack the pocketon the apron with its top edge23cm (9in) down from the top ofthe apron. Machine stitch inplace around the curved edgesand down the centre, followingthe crease as a guide.
Turn and press all the edges of thestraps over 1cm (3/ 8in) to the wrong side.Now press the straps in half lengthwaysand stitch along the length and acrossthe ends. Pin the ends of one strap overthe hem on the top corners of theapron to make the neck strap andstitch in place with a square of stitching.
Stitch the other two straps to the top ofthe side edges in the same way.
4 5 6
Essential Techniques
TEMPLATEUsing the dimensions
shown, draw this
template onto plain
paper to make a pattern
T o p t i p A br ight ly pat t e r ne d f abr ic w ill disguise
mor e me ss , so choose y our
f abr ic w ise ly !
60cm (23½in)
19cm (7½in)
22cm (8¾in) 22cm (8¾in)
W o r l d M a g s . n e t W o r l d M a g s . n e t
W o r l d M a g s . n e t

8/15/2019 Beginner's Guide to Sewing - 2014
http://slidepdf.com/reader/full/beginners-guide-to-sewing-2014 60/164
Essential Techniques
Beginner’s Guide to Sewing60
YOU WILL NEED
Medium-weight furnishing
fabric: 43x86cm (17x34in)
Contrasting fabric for facing
and ties: 43x40cm (17x16in)
Cushion pad: 40cm (16in)
square
Thread in matching colours
Basic sewing kit (see page 12)
Finished size
40cm (16in) square
Seam allowance
1.5cm (5/ 8in) included
Glossary
Turn to page 16 for our list of terms
Pretty
cushion with tiesBy Chris Jefferys
The pretty cushion is simple to make.It has a flap facing to tuck the pad
behind and straight ties to hold the
edges together. The facing and ties can
either be made from a contrast fabric or from
the same fabric as the cover.
If you’re making curtains or other soft
furnishings, why not buy some extra fabric
to make yourself a cushion or several? The
same pattern in a different colour works well
for contrast and interest as part of a theme.
Something else to experiment with is
using two different fabrics – one for the
front, one for the back – to give flexibility for
refreshing your colour scheme.
This is a great design for cushions for a
room that gets dusty or dirty, as the ties
make it easy to remove the cover for washing.
Weekend Projects: Soft Furnishingsby Chris JefferysHere’s a collection of 50 gorgeous soft
furnishing projects for your home. Divided
into four sections (Beds, Chairs, Tables and
Windows), instructions are accompanied by
step-by-step illustrations. Many items are easy
to make but, with practice, beginners can
graduate to more complex projects, such as
lined curtains and fitted bed linen.Published by New Holland, HB, £9.99
www.newhollandpublishers.com
A new cushion to brighten yourdécor… what a great idea! Thisone is simple to make, and isheld together with fuss-free ties
W o r l d M a g s . n e t W o r l d M a g s . n e t
W o r l d M a g s . n e t

8/15/2019 Beginner's Guide to Sewing - 2014
http://slidepdf.com/reader/full/beginners-guide-to-sewing-2014 61/164
Beginner’s Guide to Sewing 61
Essential Techniques
SEWING THE CUSHIONCUTTING OUT
THE FABRIC Make the ties by folding a strip in halflengthways with right sides togetherand sewing across one short edge andthe long edge. Trim the seams andcorners, turn right side out and press.
Place two ties right sides together onone edge of the front and back pieces,spaced equally and with the rawedges level. Place a facing piece ontop of each of the front and backpieces with right sides together. Stitchtogether along the edge so the ends of
the ties are sewn in the seams (fig. 1).
Open out the facings away from thecushion and press the seams open.Place the front and back right sides
Cut two pieces for the frontand back of the cover out of
your main fabric, eachmeasuring 43cm (17in)
square. Cut two pieces ofyour contrast fabric for thefacings, each measuring
12x43cm (4¾x17in).Cut four strips of contrastfabric for the ties, each
measuring 18x8cm (7x3¼ in).
together with the facing seamsmatching exactly. Stitch the front andback together around three sidesincluding the sides of the facing (fig. 2).
Trim the corners and turn the coverright sides out. Make a double hemaround the edge of the facing byturning the fabric over 6mm (¼in) then6mm (¼in) again to the wrong side andstitching. Press the facing inside thecushion so the seam is at the edge.Open the side seams out and, working
from the right side, sew down each sideseam through the cover and facing tohold the facing in place (fig. 3).
Insert the cushion pad and tie the ties.
1
2
3
W o r l d M a g s . n e t W o r l d M a g s . n e t
W o r l d M a g s . n e t

8/15/2019 Beginner's Guide to Sewing - 2014
http://slidepdf.com/reader/full/beginners-guide-to-sewing-2014 62/164
Essential Techniques
Beginner’s Guide to Sewing62
All about…
TRIMS
A dding trims to your
finished project can
make it look very
special and is really easy to
do. There is a huge choice of
trimmings to choose from,
such as ribbon, fringing,
pom-poms, lace, feathers
and sequins. All you
need to know is what
can be applied to what
and how to attach it.
RIBBON
Ribbon is a very useful
and extremely versatile
trim as it comes in an
enormous variety ofmaterials, colours, widths
and patterns, including
seasonal designs for
festivities and special
occasions. Some are wired,
which is ideal for when you
want to fix a shape.
Where to attach
You can stitch ribbon on
top of ready-made items,
such as fabric bags,
aprons or table
linen. Choose a
mixture of ribbons
and attach them in
rows, evenly spaced
or overlap them for
a more striking
effect. Attach
a length ribbon
round the hems
of jeans, sleeves,
lapels or simply
use one to pull up
a drawstring bag.
The possibilities
are endless.
How to attach
It can only be sewn
on in straight lines,
unless you gather it
or fold it. You can buy
pre-gathered ribbon
if you prefer.
Cut the ribbon to the
length you need it, adding
2.5cm (1in) extra on the
ends for hemming.
Pin it into place, then tack, turning
the ends under to the wrong side to stop
them from fraying and to look neat.
Ribbon can easily move and slip so
tacking really will hold it in place and
you will get a neater finish.
Work small hand stitches through
only the very edge of the ribbon, then
into your fabric to stitch it into place.
Alternatively you can machine stitch the
ribbon on – but make sure you keep your
sewing line nice and straight. Sew both
sides of the ribbon in the same direction,
otherwise it might wrinkle.
POM-POM & BEADED BRAIDS
Both of these braids look really effective
embellishing the edges of items – you justneed to take a little care when attaching
them. You can buy pom-poms attached to
a length of fabric tape in different sizes
and colours. Pom-pom trims are also sold
with the colour of the pom-poms
changing along the length for a really
interesting multi-coloured effect.
Beaded braids are sold as lengths of
ribbon or tape with droplets of beads
attached along their length – a variety
of sizes, shapes and colours are available.
Finish your sewing projects perfectly by embellishing them with edgings and
trims – it’s an effective way to add colour, glamour and extra personality
Ric-rac comes in different widthsand colours and gives a really
home-spun charm to any project,and works really well when youwant a vintage country look.
WHERE TO ATTACH
Ric-rac can be used to embellish
any item or to just give a littlepretty detail along a top edge.
It works well stitched on top of
the edge of napkins orhandkerchiefs or in parallel rowsalong the bottom of a skirt. Ric-rac
also looks really effective when
RIC-RAC BRAID
W o r l d M a g s . n e t W o r l d M a g s . n e t
W o r l d M a g s . n e t

8/15/2019 Beginner's Guide to Sewing - 2014
http://slidepdf.com/reader/full/beginners-guide-to-sewing-2014 63/164
Essential Techniques
Where to attach
You can use pom-poms around the topsof little bags like the one on p64 or stitch
a row of them along the bottom of a wall
hanging. They also look fabulous in the
seams of cushions and bolsters.
They also look really effective if you
stitch them down the leading edge of a
curtain as they can be seen when the
curtain is open and closed. Stitch a
length of them along the bottom of
Roman blinds for a really pretty finish or
sew a length along the top of a fabric bag
63
or in parallel rows across the bag so the
pom-poms hang downwards over the bag.Beaded trims look very pretty, but don’t
attach them to anything that will get a
lot of handling or the beads may come
unstrung. Stitch a row to the bottom of a
fabric lampshade, attach them round the
edge of a cushion or sew overlapping rows
of them to an evening bag for expensive
looking glamour. Or for a simple, but
eye-catching look, edge an umbrella with
a contrasting row of beads – it’s a quick,
inexpensive instant upcycle.
How to attach
You can stitch pom-pom or beaded trimson by hand or machine. The only thing
you need to be careful is of catching the
little pom-poms or beads in your thread.
Use small neat hand stitches or, if you
are stitching by machine you could stick
masking tape over the trims to hold them
in place and stop them from getting
caught under your needle while you
are stitching them onto your item.
sewn into the seams round the edge ofa cushion cover or bag as only the tophalf of the curves are seen so it gives areally pretty effect – use a jumboric-rac braid for this.
You can also create effectivezigzag-shaped stripy patterns ontextile surfaces, such as tablecloths,curtains and cushions.
HOW TO ATTACH
Pin, then tack, your length of ric-racinto place, turning the short ends
underneath to neaten. It’s best to machine stitch it with a
straight line of stitching into placedown the centre so it is firmly attached.
To put ric-rac into aseam, pin the ric-rac braidall the way round theedge of your fabric,positioning it so that thecentre of the braid width is1.5cm (½in) from the raw edgeof the fabric. Start and finish inthe centre of the lower edge ofthe fabric and ease the braidround corners. Fold the ends ofthe ric-rac at a right angle sothey overlap slightly towards
the edge of the fabric. Nowtack the ric-rac in place andstitch the other piece of fabricwrong sides together on top.
W o r l d M a g s . n e t W o r l d M a g s . n e t
W o r l d M a g s . n e t

8/15/2019 Beginner's Guide to Sewing - 2014
http://slidepdf.com/reader/full/beginners-guide-to-sewing-2014 64/164
Beginner’s Guide to Sewing64
Essential Techniques
Mini
drawstring bagBy Cheryl Owen
YOU WILL NEED
Cotton fabric for main bag
and facings: 35x40cm (14x16in)
Small pom pom trim: 40cm
(16in) to co-ordinate with fabric
Fine cord: 90cm (35in), for the
drawstring
Basic sewing kit (see page 12)
Finished size
18x14cm (7x5½in)
Seam allowance
1cm (3/ 8in)
Glossary
Turn to page 16 for our list of terms
This small quirky bag gives you anopportunity to practice working with
trims on a small project. Use it to store
trinkets like jewellery or other small
treasures, or present it as a special gift.
The bag is edged with a funky pom-pom
trim, which picks up the colouring of the
patterned fabric. When choosing your trim,
it’s nice to pick a colour that picks up the
design in the main fabric, but you could just
as easily choose a completely different colour
– white pom-poms edging black fabric will
look really striking.
For the drawstring cord we’ve used the
same colour as the background of the fabric,
but here, too, you could just as easily go for
contrast by choosing something different.
It’s all about expressing your personality
(or the personality of your gift recipient)!
Edged with pom-pom trim, thislittle drawstring bag makes agreat gift… you could evenhide a bonus present inside!
The Book of BagsBy Cheryl OwenMake sure you’re never without the perfect
accessory – The Book of Bags contains 30
stunning projects that cover all sorts of bags,
from duffle bags to handbags, beach bags,
purses and more. With detailed instructions,
templates and photos, Cheryl Owen’s
designs are easy to follow and simple to
make, even for complete beginners.Published by New Holland, PB, £14.99
www.newhollandpublishers.com
W o r l d M a g s . n e t W o r l d M a g s . n e t
W o r l d M a g s . n e t

8/15/2019 Beginner's Guide to Sewing - 2014
http://slidepdf.com/reader/full/beginners-guide-to-sewing-2014 65/164
Essential Techniques
Beginner’s Guide to Sewing 65
MAKING THE BAG
Using the template, cut two bag outersand two facings from your fabric.Neaten the straight side and loweredges of the bag outers with a zigzagstitch. On the right side of the bagouters, pin and tack a length ofpom-pom trim to both of the curvededges within 2cm (¾in) of the sideedges (fig. 1).
Stitch the bag outers together with rightsides facing, leaving the curved upperedge open. Leave a gap between thedots which are shown on the templateat the ends of the channel stitchinglines. Turn right sides out and press.
1
c u t t i n g l i n
e f a
c
i n g
Place to fold
TEMPLATEEnlarge this template to
140% to make your bag
2
Stitch the facings together with rightsides facing, along the short sideedges (fig. 2). Press the seams open.Remove the bed of the sewingmachine to make it easier to stitch.Turn under the straight lower edge1cm (3/ 8in) then stitch in place tohem the facing.
Pin the joined facings to the upperedge of the bag outers with right sidestogether and matching side seams.Stitch the curved upper edges usinga zip foot and taking care not to catchthe pom-poms as you stitch. You cantack these down to help with this.
Press the facings to the inside of thebag, then stitch the two lines for thecasing channel in the positions shownon the template.
Cut the length of cord in half, then usea bodkin to thread one half throughthe channel, entering and emergingthough one side. Repeat with the otherhalf of the cord, starting and finishing atthe other side of the bag.
Snip off six pom-poms from the lengthof trim. Stitch the two ends of the cordtogether on each side, then stitch threepom-poms to each end to finish.
c h a n n e l s t i t c h i n g l i n
e s
W o r l d M a g s . n e t W o r l d M a g s . n e t
W o r l d M a g s . n e t

8/15/2019 Beginner's Guide to Sewing - 2014
http://slidepdf.com/reader/full/beginners-guide-to-sewing-2014 66/164
Essential Techniques
Beginner’s Guide to Sewing66
All about…
BORDERING AFABRIC EDGE
A dding a border to a piece of fabric
gives it that extra special finishing
touch which is quite easy to do but
will make it look more professional. You
can add a border to ‘frame’ a piece of fabric
for a cushion front before you attach the
back to it. Or, add a deep mitred border to
a length of fabric for a table runner.
You can very quickly make a lovely gift
by bordering a blanket or length of fleece
in a contrasting fabric to make a very
attractive throw. The Bordered Throw
project on p68 shows you a really clever
way of adding a border with mitred corners
to a length of chenille fabric or read on to
learn some other border ideas.
Learn how to create a neat finish to the edges of throws and other textile
squares with a sewn-on border that’s a decorative feature in itself
T o p t i p W h e n c h o o s i n g f a b r i c
f o r a b o r d e r , l o o k f o r a c o m p l e m e n t a r y o n e – o r p i c k o u t a c o l o u r i n t h e m a i n p a t t e r n
MAKING A SIMPLE BORDERED THROW
Measure the length of the piece of
fabric you wish to add a border to –
this will be the length of your two sidestrips as the opposite border will be the
same. Decide how wide you want your
border to be. A narrow 2.5cm (1in) border
will give a neat edge but a deeper 8cm
(3in) will give a good strong contrast. Your
fabric needs to be twice the width plus a
1.5cm (½in) seam allowance on either
edge. So, for example, if you want an
8cm (3in) finished border then your fabric
strip needs to be 18cm (7in) wide. To cut
the top and bottom strips, measure the
width of the fabric to work out the lengththey need to be and add a 1.5cm (½in)
seam allowance plus the border width
you cut for the side strips, at either end.
This is because the top and bottom
border strips will be attached over the
fabric and side strips so will need to be
longer. The width of the strip needs to be
the same as the width for the other strips
you cut previously.
1
2 4 3
Fold one of the side strips in half
lengthways, wrong sides together
and press. This pressed fold will be the
edge of your border. Matching raw
edges, place the length of it right sides
together along the length of your
fabric. Stitch the border to the fabric
using a 1.5cm (½in) seam allowance.
Press this seam open, then fold the
border over to the other side of your
main piece of fabric so that the pressed
fold is at the edges. Turn the long edge
under by 1.5cm (½in) and stitch it in place
either by machine or by hand using slip
stitch (see p25 for instructions). Repeat this
with the opposite border.
Attach the other two border
strips in the same way. With
these you need to turn under the short
ends by 1.5cm (½in) before you
attach them, then slip stitch them
down when you have finished. Press
the strips on both sides to complete
and make them flat and neat.
W o r l d M a g s . n e t W o r l d M a g s . n e t
W o r l d M a g s . n e t

8/15/2019 Beginner's Guide to Sewing - 2014
http://slidepdf.com/reader/full/beginners-guide-to-sewing-2014 67/164
Essential Techniques
Beginner’s Guide to Sewing 67
SIMPLE FABRIC BORDERSIf you want to frame a piece of plain or
embroidered fabric to make a cushion
cover bigger, then choose this method.
Decide what the finished size ofyour cushion is going to be, then
measure the outside of the central
fabric piece and add a 1.5cm (½in)
seam allowance all round.
Calculate the fabric border,
remembering to add seam
allowances. You need two short ones at
the top and bottom and two longer
ones to go down the sides of your top and
bottom borders and the central fabric.
Sew the top and bottom borders to
the fabric, right sides together. Pressthe seams open.
Attach the two side borders in the
same way, down the edges of the
top and bottom borders as well as the
stitched fabric.
Your cushion front is now ready to
attach to the cushion back to finish.
MITRED FABRIC BORDERSThis will achieve the same fabric
framed look as with the simple fabric
borders but gives a different effect. It’s
trickier to do, but take your time –
measure and stitch carefully and
accurately and you will achieve a
professional looking effect.
Decide on the finished size of your
cushion cover, then trim the main
fabric to the central dimensions plus a
1.5cm (½in) seam allowance all round.
Cut four fabric border strips –
each one needs to be:
Length: same length as finished coverplus seam allowance,
Width: the width of the border strip plus
the seam allowance.
Pin one border strip to one side of
the main fabric, making sure it is
placed centrally and has right sides
together. Stitch the border to the centre
using a 1.5cm (½in) seam allowance but
starting and finishing 1.5cm (½in) in from
each edge (fig. 1).
Attach the other border strips in the
same way. Be careful not to stitch
into the strips already attached (fig. 2).
To create the mitred corners, place
your cushion front right sides down
and work on one corner at a time. Fold
one strip over the other and pin. Draw adiagonal line on the border from the
inner corner where the two border strips
meet to the outer corner of the strip.
1 3 4
2
6
Swap the positions of the border
strips and draw this same
line on the other border (fig. 3).
7 With right sides of the border strips
together, match up the pencil
lines, pin, then stitch along these lines.
Press the seam open and trim (fig. 4).
8Mitre the other three corners in
the same way then trim the seam
allowances and press.
W o r l d M a g s . n e t W o r l d M a g s . n e t
W o r l d M a g s . n e t

8/15/2019 Beginner's Guide to Sewing - 2014
http://slidepdf.com/reader/full/beginners-guide-to-sewing-2014 68/164
Beginner’s Guide to Sewing68
Essential Techniques
Deep
bound throwBy Cheryl Owen
YOU WILL NEED
Fabric for main part: 137cm
(54in) square
Fabric for border: 161x92cm
(63x36in)
Thread in matching colours
Basic sewing kit (see page 12)
Finished size
145cm (57in) square
Seam allowance
1.5cm (½in) included
GlossaryTurn to page 16 for our list of terms
Ready-made soft furnishings can bepicked up so cheaply these days that
it’s easy to give a room a makeover
without breaking the bank. A colourful
throw is great for covering up an armchair
that’s a little worn – and much cheaper than
reupholstering if you’ve decided you don’t
like the sofa fabric any more! But if you want
something unique, a border is a quick way of
adding interest to a shop-bought throw.
Upcycle an inexpensivethrow… give it a touch of luxuryby adding a deep border in apretty fabric of your choice
Love… SewingBy Cheryl OwenBy following the projects in Love… Sewing
you’ll be able to fill your home with beautiful
creations. With 25 patterns for everything
from table runners to doorstops, the book is
an invaluable guide for anyone taking their
first steps in making their own soft furnishings.
Step-by-step instructions mean you can
transform your home in no time!Published by New Holland, PB, £12.99
www.newhollandpublishers.com
1 2 cm ( 4 ¾i n )
1 2 c m ( 4
¾ i n )
11.5cm (4½in) 11.5cm (4½in)
W o r l d M a g s . n e t W o r l d M a g s . n e t
W o r l d M a g s . n e t

8/15/2019 Beginner's Guide to Sewing - 2014
http://slidepdf.com/reader/full/beginners-guide-to-sewing-2014 69/164
Essential Techniques
Beginner’s Guide to Sewing 69
6
MAKING A DEEP BORDER
Cut four strips of fabric for theborder each measuring161x23cm (63x91in). Cut the
ends of the borders to points,by following the diagram onp68 for the measurements.
Press under 1.5cm (½in) onone long edge of each
border (fig. 1).
With right sides facing, pinand stitch the long rawedges of the border to thethrow, taking a 1.5cm (½in)seam allowance andpivoting the seam at thecorners. Press the seamtoward the border. Trim theseam allowance on therectangle to 1cm (3/ 8in) tolayer the seam (fig. 3).
With right sides facing andmatching the pressed edges,stitch the four borderstogether to make a squareat the mitred ends, finishing1.5cm (½in) from the longraw edges (fig. 2). Clip thecorners, then press the seamsopen – use a moistenedfinger to press the corners.
Pin the pressed edges of theborder along the seam. Pressthe border in half. Slip stitchthe pressed edge along theseam (fig. 4). See p25 to findout how to work slip stitch.
1 3 2 4
1
3
2
4
T o p t i p W o r k t h e s l i p s t i t c h e s c l o s e t o g e t h e r s o t h e y a r e s t r o n g a n d w o n ’ t c o m e u n d o n e w i t h w e a r
W o r l d M a g s . n e t W o r l d M a g s . n e t
W o r l d M a g s . n e t
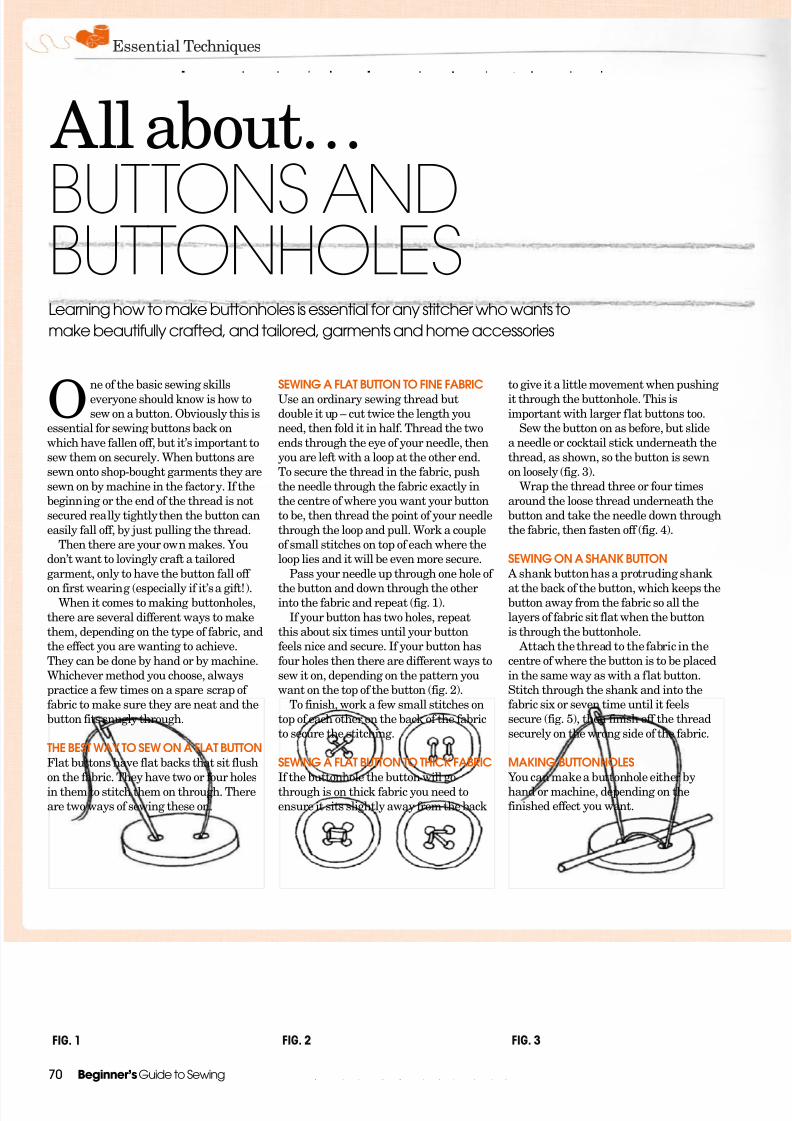
8/15/2019 Beginner's Guide to Sewing - 2014
http://slidepdf.com/reader/full/beginners-guide-to-sewing-2014 70/164
Essential Techniques
Beginner’s Guide to Sewing70
All about…
BUTTONS ANDBUTTONHOLES
One of the basic sewing skills
everyone should know is how to
sew on a button. Obviously this is
essential for sewing buttons back on
which have fallen off, but it’s important to
sew them on securely. When buttons are
sewn onto shop-bought garments they are
sewn on by machine in the factory. If the
beginning or the end of the thread is not
secured really tightly then the button can
easily fall off, by just pulling the thread.
Then there are your own makes. You
don’t want to lovingly craft a tailored
garment, only to have the button fall off
on first wearing (especially if it’s a gift!).When it comes to making buttonholes,
there are several different ways to make
them, depending on the type of fabric, and
the effect you are wanting to achieve.
They can be done by hand or by machine.
Whichever method you choose, always
practice a few times on a spare scrap of
fabric to make sure they are neat and the
button fits snugly through.
THE BEST WAY TO SEW ON A FLAT BUTTON
Flat buttons have flat backs that sit flush
on the fabric. They have two or four holes
in them to stitch them on through. There
are two ways of sewing these on.
Learning how to make buttonholes is essential for any stitcher who wants to
make beautifully crafted, and tailored, garments and home accessories
SEWING A FLAT BUTTON TO FINE FABRIC
Use an ordinary sewing thread but
double it up – cut twice the length you
need, then fold it in half. Thread the two
ends through the eye of your needle, then
you are left with a loop at the other end.
To secure the thread in the fabric, push
the needle through the fabric exactly in
the centre of where you want your button
to be, then thread the point of your needle
through the loop and pull. Work a couple
of small stitches on top of each where the
loop lies and it will be even more secure.
Pass your needle up through one hole of
the button and down through the otherinto the fabric and repeat (fig. 1).
If your button has two holes, repeat
this about six times until your button
feels nice and secure. If your button has
four holes then there are different ways to
sew it on, depending on the pattern you
want on the top of the button (fig. 2).
To finish, work a few small stitches on
top of each other on the back of the fabric
to secure the stitching.
SEWING A FLAT BUTTON TO THICK FABRIC
If the buttonhole the button will go
through is on thick fabric you need to
ensure it sits slightly away from the back
to give it a little movement when pushing
it through the buttonhole. This is
important with larger flat buttons too.
Sew the button on as before, but slide
a needle or cocktail stick underneath the
thread, as shown, so the button is sewn
on loosely (fig. 3).
Wrap the thread three or four times
around the loose thread underneath the
button and take the needle down through
the fabric, then fasten off (fig. 4).
SEWING ON A SHANK BUTTON
A shank button has a protruding shank
at the back of the button, which keeps thebutton away from the fabric so all the
layers of fabric sit flat when the button
is through the buttonhole.
Attach the thread to the fabric in the
centre of where the button is to be placed
in the same way as with a flat button.
Stitch through the shank and into the
fabric six or seven time until it feels
secure (fig. 5), then finish off the thread
securely on the wrong side of the fabric.
MAKING BUTTONHOLES
You can make a buttonhole either by
hand or machine, depending on the
finished effect you want.
FIG. 1 FIG. 3FIG. 2
W o r l d M a g s . n e t W o r l d M a g s . n e t
W o r l d M a g s . n e t
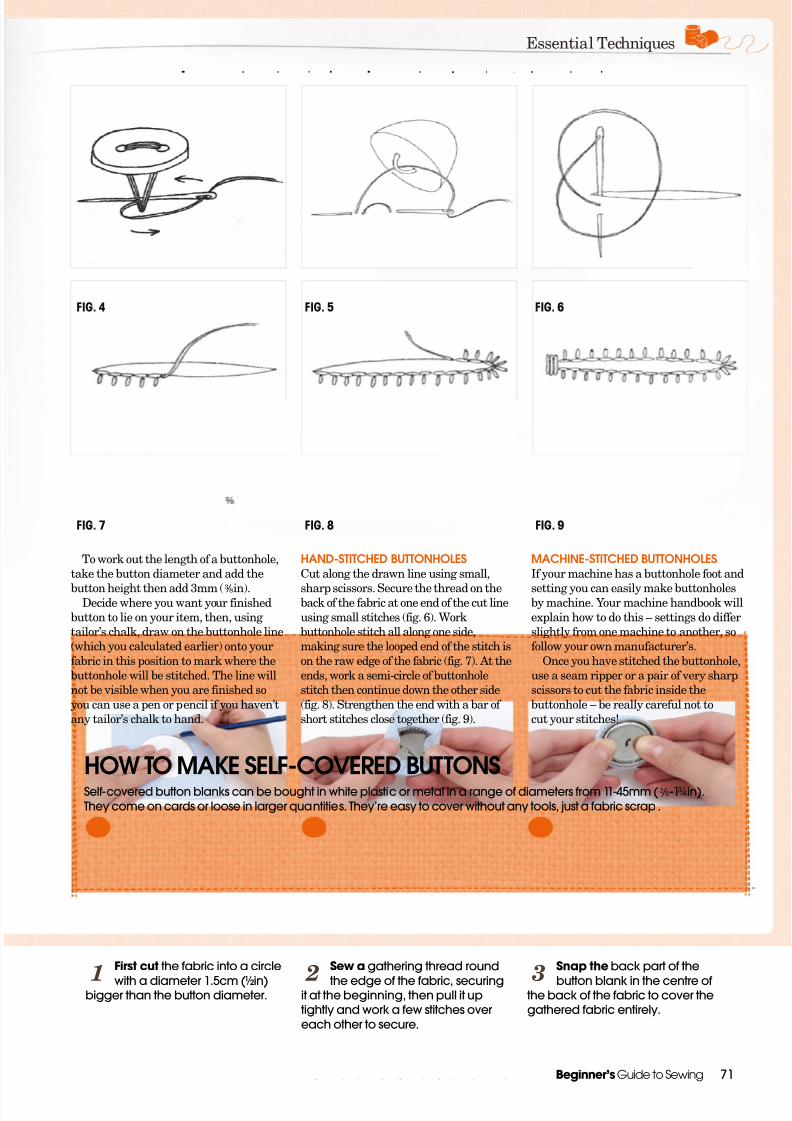
8/15/2019 Beginner's Guide to Sewing - 2014
http://slidepdf.com/reader/full/beginners-guide-to-sewing-2014 71/164
Essential Techniques
Beginner’s Guide to Sewing 71
To work out the length of a buttonhole,
take the button diameter and add the
button height then add 3mm (3
/ 8in).Decide where you want your finished
button to lie on your item, then, using
tailor’s chalk, draw on the buttonhole line
(which you calculated earlier) onto your
fabric in this position to mark where the
buttonhole will be stitched. The line will
not be visible when you are finished so
you can use a pen or pencil if you haven’t
any tailor’s chalk to hand.
HAND-STITCHED BUTTONHOLES
Cut along the drawn line using small,
sharp scissors. Secure the thread on theback of the fabric at one end of the cut line
using small stitches (fig. 6). Work
buttonhole stitch all along one side,
making sure the looped end of the stitch is
on the raw edge of the fabric (fig. 7). At the
ends, work a semi-circle of buttonhole
stitch then continue down the other side
(fig. 8). Strengthen the end with a bar of
short stitches close together (fig. 9).
MACHINE-STITCHED BUTTONHOLES
If your machine has a buttonhole foot and
setting you can easily make buttonholesby machine. Your machine handbook will
explain how to do this – settings do differ
slightly from one machine to another, so
follow your own manufacturer’s.
Once you have stitched the buttonhole,
use a seam ripper or a pair of very sharp
scissors to cut the fabric inside the
buttonhole – be really careful not to
cut your stitches!
FIG. 4 FIG. 5 FIG. 6
FIG. 7 FIG. 8 FIG. 9
2Sew a gathering thread round
the edge of the fabric, securingit at the beginning, then pull it uptightly and work a few stitches overeach other to secure.
3Snap the back part of the
button blank in the centre ofthe back of the fabric to cover thegathered fabric entirely.
1First cut the fabric into a circle
with a diameter 1.5cm (½in)bigger than the button diameter.
HOW TO MAKE SELF-COVERED BUTTONSSelf-covered button blanks can be bought in white plastic or metal in a range of diameters from 11-45mm (3/ 8-1¾in).They come on cards or loose in larger quantities. They’re easy to cover without any tools, just a fabric scrap.
W o r l d M a g s . n e t W o r l d M a g s . n e t
W o r l d M a g s . n e t

8/15/2019 Beginner's Guide to Sewing - 2014
http://slidepdf.com/reader/full/beginners-guide-to-sewing-2014 72/164
Essential Techniques
Beginner’s Guide to Sewing72
YOU WILL NEED
Main fabric for back, lower
front panel and buttons:
33x66cm (13x26in)
Contrast fabric for upper front
panel: 14.5x33cm (6x13in)
Three buttons: 29mm (1¼in)
Cushion pad: 30cm (12in)
square
Threads in matching colours
Basic sewing kit (see page 12)
Finished size
30cm (12in) square
Seam allowance
1.5cm (½in) included
Glossary
Turn to page 16 for our list of terms
Envelope
buttoned cushionBy Cheryl Owen
This pretty cushion cover is simple tosew up, and it’s a great beginner’s
project. We’ll talk you through how
to make an envelope opening, topped off
with fabric- covered buttons to fasten your
cushion case shut. We’ve made ours using
two furnishing fabrics that complement
each other, one with a chirpy bird print and
the other in a matching colour. You can
easily put your stamp on this project by
switching the fabrics that you use to
quickly alter the finished look. Equally, if
you wanted to make your cushion bigger,
simply adjust the dimensions we’ve listed
below. You could even turn it into a
super-sized floor cushion!
Little Book of HomeSewing Techniquesby Cheryl OwenAuthor, fashion designer and dressmaker
Cheryl Owen has packed her book
full of simple sewing tutorials and
contemporary projects for the home.
It’s great for beginners plus you get to try
some next-step tricks like ruching, tassels
and frills too!Published by New Holland, £9.99
www.newhollandpublishers.com
Sew up this eye-catchingenvelope cushion with sweetdetails – it’s the perfect way totry out your new button skills!
W o r l d M a g s . n e t W o r l d M a g s . n e t
W o r l d M a g s . n e t

8/15/2019 Beginner's Guide to Sewing - 2014
http://slidepdf.com/reader/full/beginners-guide-to-sewing-2014 73/164
Beginner’s Guide to Sewing 73
Essential Techniques
HOW TO MAKE THE ENVELOPE CUSHION
CUTTING OUT
YOUR FABRIC
1 ENVELOPE OPENINGSAn envelope opening is a flap thatcloses over the front or back of your
cushion cover. You can instantly makea feature of an envelope opening by
using a contrast fabric then addingbuttonholes and buttons for fastening.
2 HEM THE FRONTS
Take the lower front panel of mainfabric and turn one long edge over by
1.5cm (½in) then 1.5cm (½in) again and
press. Stitch into place, close to the
edge. Repeat this with the contrasting
upper front panel of fabric.
3 MARK BUTTONHOLES
Measure and mark three 3.5cm (13/8 in)
buttonholes on the contrasting frontpanel of fabric. To do this, first positionthe middle one 2cm (¾in) in from the
hemmed edge and centrally down the
front. Then mark the other two 8cm(3¼in) above and below the first one.
4 STITCH BUTTONHOLESNow stitch the buttonholes either by
hand or machine following ourinstructions on pages 70-71.
5 ASSEMBLE THE CUSHIONTake your cushion back piece of fabricand position it so that it’s right side up.Now place the contrast upper front
panel, right side down, on top –matching up the three raw edges.
Place the lower front panel right sidedown on top, again matching the three
raw edges to the cushion back.
6 STITCH TOGETHER
Pin all three pieces together and stitchall round the edge, allowing a 1.5cm
(½in) seam. Clip the corners and turnright sides out. Now press well.
7 MAKE THE BUTTONS
Make three self-covered buttons usingscraps of your main fabric (or choose
another contrasting fabric if you prefer).To make these, cut a circular piece of
fabric with a 4.5cm (1¾in) diameter,then follow our instructions on page 71
for how to cover a button.
8 ATTACH THE BUTTONS
Mark the position of the buttons underthe buttonholes by placing them on toyour cushion, then marking where theshank meets the lower front with a pin.Stitch each button carefully into place
on to the lower front panel followingour instructions on page 70.
9 TO FINISH
Insert the cushion pad and fastenthe buttons to close and complete
your envelope cushion.
For the cushion back,cut a 33cm (13in) square
of your main fabric. For thelower front panel, cut a
29.5x33cm (12x13in) pieceof the main fabric.
From the contrast fabric,cut a 14.5x33cm (6x13in)rectangle to make the
upper front panel.
W o r l d M a g s . n e t W o r l d M a g s . n e t
W o r l d M a g s . n e t

8/15/2019 Beginner's Guide to Sewing - 2014
http://slidepdf.com/reader/full/beginners-guide-to-sewing-2014 74/164
Essential Techniques
Beginner’s Guide to Sewing74
Acasing, or drawstring channel, is
simply a channel sewn through
fabric layers to thread a length of
ribbon or cord through so the finished
item can be drawn up. This is most often
used for the top of a drawstring bag and
there are several ways of doing this.
MAKING A SIMPLE CASING
1Once you have finished making your
bag, fold the top of the fabric over
1.5cm (½in) to the wrong side, then fold it
over again. This fold needs to be slightly
deeper than twice the width of the ribbon,
tape or cord you are going to thread
through the casing so that it draws up
easily and isn’t too tight.
2 Stitch the folded-over fabric down,
close to the edge of the final fold all
round the top of your bag.
3 In order to make a gap to thread your
ribbon through, snip the side seam
stitches of the bag above your stitched
casing line and secure the top and bottom
of this gap with a few small hand stitches.
All about…
CASINGSLittle finishing touches go a long way to giving your projects a nifty finished
feel! Add simple channels for threading cord or ribbon with our mini tutorials
4 Attach a safety pin to one end of your
ribbon, or use a bodkin, and thread it
all the way through your casing. Then tie
the two ends of the ribbon in a knot a
short distance away from where the two
ends both emerge from the casing. Pull
up the ribbon to close the bag.
A pretty idea for the drawstring is to use ribbon or
cord that matches the fabric of your bag. Pick outa colour or pattern and find a ribbon to match
MAKING A FRILLED CASINGThis sort of casing gives a frilled edgeabove the casing channel for a prettyeffect. The Toy Sack on p76 has a smallfrill , while the Delicate Little Bag on p78has a larger one for a frillier look. Aslightly different method is used for thisbag but the effect is the same.
1After making your bag, turn thetop over 1.5cm (½in) to the wrong
side all the way round.
2Now turn the fabric over again butthis time allow for the height you
want your frill to be plus the allowanceneeded for the drawstring channel.
3Stitch the turned-over fabric downclose to the turned-over edge.
Now stitch another line above this tothe depth of the drawstring channel.
4Snip the stitches in the seambetween your two lines of stitching
to open the channel up to accept theribbon, and hand stitch to secure.
5Thread your ribbon through the
channel and knot the ends. Whenthe drawstring is pulled up the fabricabove the channel creates a frillededge. For added interest, you coulddecorate the frill with lace.
T o p t i pT o m a k e a s m a l l b a g y o u ’ l l fi n d i t e a s i e r i f y o u r e m o v e t h e b e d o f y o u r s e w i n g m a c h i n e b e f o r e y o u s t i t c h t h e c a s i n g – y o u r m a n u a l w i l l e x p l a i n h o w
W o r l d M a g s . n e t W o r l d M a g s . n e t
W o r l d M a g s . n e t

8/15/2019 Beginner's Guide to Sewing - 2014
http://slidepdf.com/reader/full/beginners-guide-to-sewing-2014 75/164
Essential Techniques
Beginner’s Guide to Sewing 75
1After making your
bag make a simplecasing at the top and
stitch it down.
2To make the corners
more stable stitch a
diagonal line a couple of
inches in across the two
bottom corners. Punch an
eyelet in each bottom
corner inside the
diagonal stitched line.
3Undo the stitches on
the side seams
within the casing and
work a few hand stitches
at the top to secure.
4Cut two pieces of
ribbon or cotton
tape, each to the length
of the casing plus twice
the length of the bag.
Add a few inches for
knotting together.
5
Thread one length
through the casing
all the way round then
thread both ends through
the eyelet from the front
of the bag to the back
and tie the two ends in
a knot. Repeat with the
other piece of tape but
starting and finishing at
the either side of the
casing this time.
6 You now have two
straps – when you
pull up the tapes these
can either be slung over
a shoulder or worn on the
back over both shoulders
as a rucksack.
TURN A BAG INTO A RUCKSACKYou can easily turn a simple, drawstring bag into a rucksack by cutting the
ribbon or tape longer and attaching it to the bottom corners of the bag.
CASINGS WITH LINED BAGSThis method looks really effective
on frilled casings, as the lining
fabric of the bag will be seen on
the inside of the frill.
1Make the bag outer and the
bag lining in the same way
as each other, but leave a small
gap on the bottom seam of the
lining, which will be needed later.
2 Place the lining and outerbags right sides together,
matching top raw edges and
stitch all the way round the top.
3Turn right sides out through
the gap left in the lining
seam, then push the lining inside
the outer, and stitch up the gap.
4Now stitch your two lines of
casing in the same way as
the basic frilled casing.
5Snip the side seams, insert
the ribbon – make either a
single or double drawstring – thenpull up the drawstring to close.
You will then see the lining on the
inside of the frill.
OTHER IDEASDOUBLE
DRAWSTRING For a different effect and a
more securely drawn-up bag,cut two lengths of ribbon to the
length of the channel plusextra for knotting the ends.
Snip the stitches betweenthe casing lines on both
sides of the bag.
Thread one ribbon all theway through from one side andknot the ends. Thread the otherlength of ribbon from the other
side, and knot the ends.
Now pull up both lengthsof the ribbon at the same
time to close the bag.
W o r l d M a g s . n e t W o r l d M a g s . n e t
W o r l d M a g s . n e t

8/15/2019 Beginner's Guide to Sewing - 2014
http://slidepdf.com/reader/full/beginners-guide-to-sewing-2014 76/164
Essential Techniques
Beginner’s Guide to Sewing76
YOU WILL NEED
Main fabric for bag: 40x120cm
(16x47in)
Three pieces of fabric in
assorted prints and patterns for
bunting: 20cm (8in) square
Iron-on medium interfacing:
20x60cm (8x24in)
Thick piping cord: 2m (2¼yd)
Thread in matching colours
Sticky tape
Basic sewing kit (see page 12)
Finished size
45x35cm (18x14in)
Seam allowance
1.5cm (5/ 8in) included
GlossaryTurn to page 16 for our list of terms
Bunting
nursery toy sackBy Cheryl Owen
This vintage-style toy sack is deckedwith a colourful row of bunting. It’s
a great opportunity to plunder your
stash of off-cuts for a bright project that
won’t cost the earth to sew up.
The sack ties up at the top with a
drawstring length of cord, sewn in place
using a casing channel along the top edge.
Use your finished bag as a handy room tidy
to brighten up a child’s bedroom, or if you
can’t bear to give it away, replace the fabrics
with your favourite colours and turn it into a
shopping bag or gym kit holder. It’s fabulous
for storing lingerie, too.
This jaunty drawstring bag issure to inspire little ones toengage in some enthusiastictidying up of their playthings!
Little Book of HomeSewing Techniquesby Cheryl Owen
Author, fashion designer and
dressmaker Cheryl Owen has packed
her book full of simple sewing tutorials
and contemporary projects for the
home. It’s great for beginners plus you
get to try some next-step tricks likeruching, tassels and frills too!
Published by New Holland, £9.99
www.newhollandpublishers.com
W o r l d M a g s . n e t W o r l d M a g s . n e t
W o r l d M a g s . n e t

8/15/2019 Beginner's Guide to Sewing - 2014
http://slidepdf.com/reader/full/beginners-guide-to-sewing-2014 77/164
Beginner’s Guide to Sewing 77
Essential Techniques
CUTTING OUT YOUR FABRICTo make the bunting,press iron-on interfacing
onto the wrong side ofthree patterned fabrics.Use our bunting patternbelow to cut out sixtriangles from this fabric.
For the bag, cut twopieces: 38x16cm(15x6¼in) for the lowersection, and two pieces:38x40cm (15x15¾in) forthe upper section.
MAKING THE BAG
FINISHING THE BAG
Pin three triangles in a row to each of the lower sections ofthe bag fabric – with right sides facing up. Match the topstraight edges of the triangles to the long upper edges ofthe lower sections and butt the short edges of the trianglestogether, arranging them centrally across the fabric. Tackin place, as shown above.
Stitch each tacked edge of a lower section to one shortedge of an upper section (with right sides facing and
taking a 1.5cm (5/ 8in) seam allowance), to make the frontand back of your bag. Neaten the seam with a zigzagstitch. Press the seam towards the bag. On the right side,topstitch 7.5 mm (5/ 16in) above the seam.
1
Now finish off with some piping cordSnip the stitches in the side seams between the two casinglines and oversew the top and bottom to secure. Cut your
piping cord in half, then thread one half through the casingstarting and finishing at one of the side seams and tie theends together in a knot. Repeat with the other half butstarting and finishing at the other side seam this time.Unravel and separate the strands of the cord endsbelow the knots.
Stitch the pieces togetherPlace the front and back sides of the bag together, rightsides facing each other, and stitch them together downone side – stitching along the bottom and up the otherside. To make a frilled casing, turn the top edge over 1cm(3/ 8in) to the wrong side and stitch down. Now turn over5.5cm (2¼in) to the wrong side and press. To make thecasing channel, work a line of machine stitching all theway round 2cm (¾in) from the top edge, then 4cm (1½in)from the top again.
2
11cm (4½in)
1.5cm (½in)
12cm (1¾in)
TEMPLATE
Using the dimensionsshown, draw this
template onto plain
paper to make a pattern
W o r l d M a g s . n e t W o r l d M a g s . n e t
W o r l d M a g s . n e t

8/15/2019 Beginner's Guide to Sewing - 2014
http://slidepdf.com/reader/full/beginners-guide-to-sewing-2014 78/164
Essential Techniques
Beginner’s Guide to Sewing78
YOU WILL NEED
Fabric for outer bag: 25×52cm
(9¾×20½in)
Fabric for inner bag: 39×52cm
(15¼×20½in)
Satin ribbon, 2cm (¾in) wide,
52cm (20½in) long
Cord or ribbon, 1.5cm (½in)
wide, 70cm (27½in) long
Thread in matching colours
Basic sewing kit (see page 12)
Finished size
30×24cm (11¾×9in)
Seam allowance
1.5cm (½in) included
Glossary
Turn to page 16 for a list of terms
Delicate
drawstring bagBy Laura Wilhelm
Satin or silk are the the ideal fabrics touse for this delicate drawstring bag,
and you’ll get an interesting effect
with contrasting colours and patterns – why
not try stripes or spots with florals, or bright,
bold colours with pastels?
This bag is good practise for getting the
hang of sewing casings. If it’s your first time
with casings, you can make the task a bit
easier for yourself by omitting the ribbon in
step 4, but it does make a gorgeous detail
and really isn’t too difficult.
If you’ve got pieces of fabric left over from
other projects, this is a nice way to use them
up. It’s also a great way to collect a stash of
delightful, but inexpensive, presents.
Stylish Sewingby Laura WilhelmYou’ll find ideas, patterns and instructions for 35
garments, bags, toys and home accessories.
Garments include pyjamas, floaty skirts and
dresses, plus myriad hats and bags… with
matching make-up bags and technology cases.
For the home there are squishy cushions, bolsters,
table runners and napkins. Toys include the cutest
ever miniature play houses.Published by Search Press, PB, £12.99
www.searchpress.com
Perfect for pyjamas, lingerie orscented petals, this pretty bagmakes a perfect present… foryou too, so give yourself a treat
W o r l d M a g s . n e t W o r l d M a g s . n e t
W o r l d M a g s . n e t

8/15/2019 Beginner's Guide to Sewing - 2014
http://slidepdf.com/reader/full/beginners-guide-to-sewing-2014 79/164
Beginner’s Guide to Sewing 79
Essential Techniques
MAKING
THE BAG Push the inner bag insidethe outer bag so that theside seams meet. Place theseam allowance of theouter bag under the turnedunder trim of the inner bag.
Sew a second seam forthe drawstring channel
2cm (¾in) up from theedge of the trim.
Undo the top layer of fabricof the side seam betweenthe zigzag bar tacks. Threadthrough the cord or ribbonand sew or tie them together.
Make another, small zigzagseam along the side seam,
2cm (¾in) long, with a stitch asnarrow as for a buttonhole.Finish this off with straight stitch.
Tack the satin ribbon ontothe outer bag to make adecorative braid over thetrim, then stitch into place.
1 3 2
5 7 6 4
Cut out the pieces for theouter and inner bags. Fold theouter bag in half widthways,right sides together, thenstitch together down the sideand along the bottom.Repeat for the inner bag.
Turn the outer bag rightside out. Fold the top edgeof the inner bag towardsthe outside by 8cm (3¼in),then turn the edge underby 1cm (3/ 8in) for the seamallowance, press and tack.
W o r l d M a g s . n e t W o r l d M a g s . n e t
W o r l d M a g s . n e t

8/15/2019 Beginner's Guide to Sewing - 2014
http://slidepdf.com/reader/full/beginners-guide-to-sewing-2014 80/164
Essential Techniques
Beginner’s Guide to Sewing80
All about…
INTERFACING
Interfacing adds body to textile items.
It is an additional unseen layer,
which you can use in projects to
strengthen and support the fabric or
prevent it from stretching out of shape.
It is used a lot in dressmaking to stiffen
different parts of garments, but is also
really useful in home and craft sewing.
There is quite a choice of different types,
though, so read this handy guide to
choosing and using interfacing.
IRON-ON OR SEW-IN INTERFACING?There are two types of interfacing:
iron-on (fusible) and sew-in (non-fusible).
They are used for different things so you
need to choose the right one for the job.
Iron-on interfacing is the easiest to use
as it is ironed to the wrong side of thefabric so will stay in place while you are
working with it. You can use it for most
fabrics and finished items.
Sew-in interfacing is best used for:
Really textured fabrics as the glue
won’t stick very well
Fabrics such as velvet and fur as
pressing will flatten the nap of the fabric
Heat-sensitive fabrics, which could
melt when ironed, such as vinyls and
metallic fabrics
Very open weave fabrics, such as lace
or net, where the glue might come
through to the right side
NON-WOVEN OR WOVEN INTERFACING?Non-woven interfacing is the most
popular interfacing to use as it is made by
bonding fibres together and therefore it
has no grain that needs to be matched
with the grain of your fabric. This makes
it really economical as you can cut it, stick
it, or sew it on in any direction.
Woven interfacing has a grain, just like
woven fabric, so it’s really important to
cut the interfacing piece in the same
direction as the fabric. Although it’s lesseconomical than woven interfacing it
works better with really fine fabrics such
as silk, as it will drape better than
interfacing without a grain.
We explain how you can add body and structure to your makes
with the help of a secret layer of stiffening which is really easy to do
T o p t i p U s e i n t e
r f a c i n g
d e s i g n e d f o r k n i t t
e d
f a b r i c s w h e n s t r e t c
h
a n d s u p p o r t a r e
n e e d e d f o r j e r s e
y
f a b r i c s
Always buy an interfacing that feels the
same weight as the fabric you will beattaching it to or just a little bit lighter.
Remember that iron-on interfacing will
become stiffer once it’s been pressed
and the glue dries. When you buy your
interfacing ask for advice or just feel thethickness and choose which one feels
about the same as the fabric you are
using. Use this table as a guide.
WEIGHT USE FOR WHICH FABRIC
Light Small areas ofgarments like collars,pockets, flaps etc; idealfor putting behindlightweight fabrics youwant to embroider onto give it more body
Delicate fabrics such assilk, viscose and acetate
Medium Facings for dresses,waistcoats, jackets andcoats as well as collars,pockets, flaps, etc;good for adding a littlebody to cotton bags
Light- to medium-weightfabrics such as purecotton, wool or raw silk,velvet, corduroy, andmetallic fabrics
Heavy Coats and jackets; it’sthe most commoninterfacing for bags toadd structure to thesides or bottom
Wools, tweeds, heavycotton fabrics
Ultra Heavy Fabric baskets andbowls, cap peaks, bagbottoms; doesn’t creaseeasily so will keep itsstrength; makes bagsstand up but feels soft
Thick felt fabrics or canvas
WHICH WEIGHT TO USE?
W o r l d M a g s . n e t W o r l d M a g s . n e t
W o r l d M a g s . n e t

8/15/2019 Beginner's Guide to Sewing - 2014
http://slidepdf.com/reader/full/beginners-guide-to-sewing-2014 81/164
Essential Techniques
Beginner’s Guide to Sewing 81
HOW TO USE SEW-IN
Place the interfacing on the wrong side of
your fabric then tack together all round
the edge. You can either cut the fabric and
interfacing to shape then tack them
together, or tack the interfacing to the
fabric then cut round it afterwards – itdepends how small or fiddly the shape is.
If you are interfacing a particuarly large
piece of fabric then it’s best to work
diagonal lines of tacking across it to really
hold it in place. Just remember to remove
them after you have finished making up.
BONDING WEB
This is an interfacing that works like
double-sided tape and is perfect for hand
or machine appliqué.
It has a paper backing, which you draw
the shape you want to appliqué on (in
reverse though!) but don’t cut it out yet.
Iron the bonding web on to your fabric
– paper side up. Once it is firmly stuck,
cut out the shape round the drawn lines
and peel off the paper backing.
Turn the shape over and press it on to
the fabric you want to appliqué the shape
to. Now stitch it on by hand or machine
for a permanent fix.
COLOURED INTERFACING
Interfacing comes in two colours: light
(white) or dark (charcoal). Choose the one
that won’t show through the main fabric.
HOW TO USE
IRON-ON
Whenever you use iron-on
interfacing, always test a small piece
on a scrap of fabric first to make sure
it’s the right weight and doesn’t add
more stiffness than you need.
Look at the interfacing and you will
see it has a shiny side and a matt
side. The shiny side has the glue on it.
3You don’t need to use thesteam setting of your iron as
the damp cloth will provide thesteam as well as protect the fabric
and interfacing. Every now andthen, lift your cloth and check to seeif the interfacing is firmly glued inplace. If not, keep pressing until it is.
1Place your main fabric wrongside up on your ironing board,
then place the interfacing glue sidedown over it. If you’re using woven
interfacing make sure the grain ofthe fabric and interfacing followthe same direction.
2Place a damp cloth (like a teatowel) over the fabric and
interfacing, then press your iron ontop of it. Hold the iron in place for 10
to 15 seconds then move it. Lift andpress – don’t glide the iron or this willshift the interfacing.
T o p t i pT he w o o l s e t t
ing o n y o ur ir o n is ab o ut r ight f o r mo s t f ab r ic s b ut alw ay s s t ar t lo w and gr ad ually inc r e as e t he he at
Interfacing adds body to
textile items, helping them
to hold their shape
W o r l d M a g s . n e t W o r l d M a g s . n e t
W o r l d M a g s . n e t

8/15/2019 Beginner's Guide to Sewing - 2014
http://slidepdf.com/reader/full/beginners-guide-to-sewing-2014 82/164
Beginner’s Guide to Sewing82
Essential Techniques
Handy
felt basketsBy Lola Nova
Useful for storing essentials andlovely to look at, too… everyhome needs a pair of thesestylish and sturdy baskets
Simple Sewing with Lola Novaby Alexandra SmithAs the title suggests, everything in this collection
of 25 projects, beautifully photographed by
Yuki Sugiura, is designed to be easy to make
and the emphasis is on having fun while doing
so. Chapters are arranged into Boho, Natural,
Vintage, Eclectic and Whimsy, and you’ll find
step-by-step instructions for each of the projects,
including things to wear and things for the home.Published by Mitchell Beazley, HB, £16.99
www.octopusbooks.co.uk
YOU WILL NEED
For each basket:
Two sheets of felt in different
colours: 30.5x46cm (12x18in)
One sheet of felt in a third
colour: 23x30.5cm (9x12in)
Heavyweight fusible interfacing
Ribbon: 1.5-2.5cm (½–1in)
wide, 25cm (10in) long
Threads in matching colours
Fabric marker
Button or other embellishment
(optional)
Basic sewing kit (see page 12)
Finished size
Large: 12x7cm (6x2¾in)
Small: 9x5.75cm (3½x2¼in)
Seam allowance
1cm (3/ 8in) included
Note
Instructions are for the large
basket; differences for the small
basket are in square brackets
GlossaryTurn to page 16 for our list of terms
These versatile baskets, in two sizes,will soon become essentials. You’ll
find homes in the kitchen for tea,
garlic, gadgets and much more. They’re also
good for the bathroom, the kids’ rooms, and
home offices. They can be made up in cotton,
linen, corduroy and wool instead of felt.
W o r l d M a g s . n e t W o r l d M a g s . n e t
W o r l d M a g s . n e t
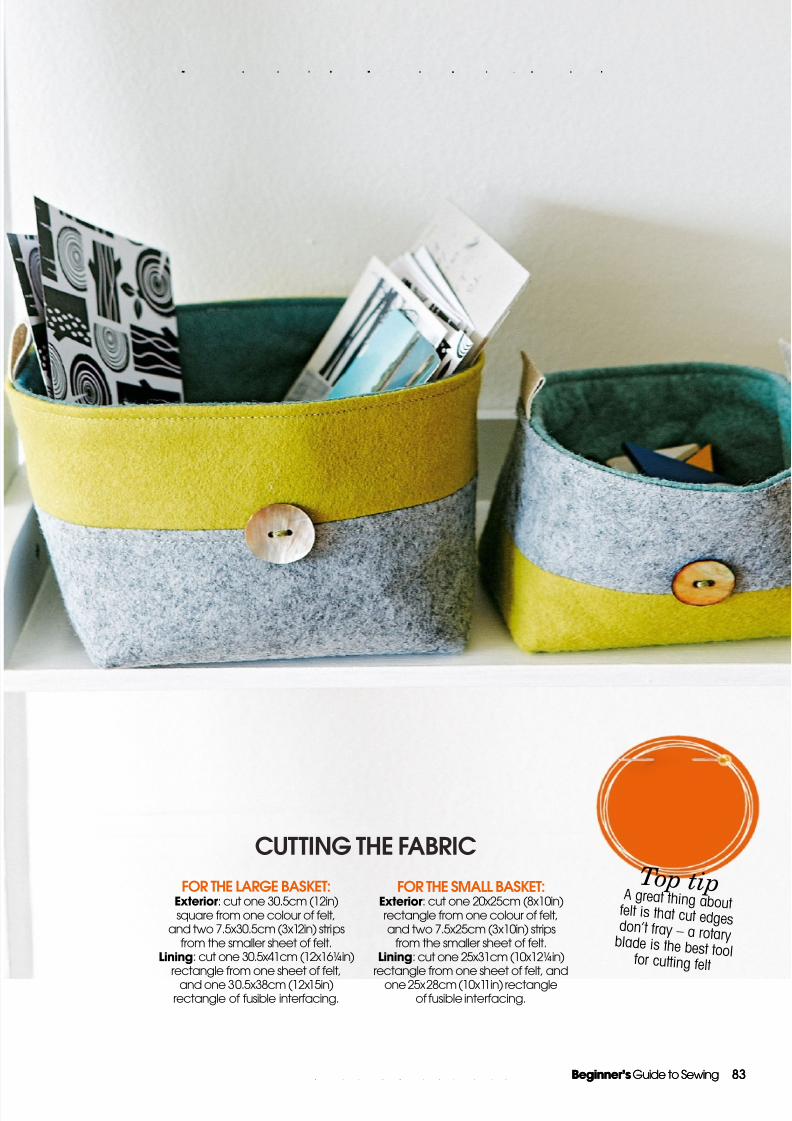
8/15/2019 Beginner's Guide to Sewing - 2014
http://slidepdf.com/reader/full/beginners-guide-to-sewing-2014 83/164
Beginner’s Guide to Sewing 83
CUTTING THE FABRIC
FOR THE LARGE BASKET:Exterior: cut one 30.5cm (12in)square from one colour of felt,
and two 7.5x30.5cm (3x12in) stripsfrom the smaller sheet of felt.
Lining: cut one 30.5x41cm (12x16¼in)rectangle from one sheet of felt,
and one 30.5x38cm (12x15in)rectangle of fusible interfacing.
FOR THE SMALL BASKET:Exterior: cut one 20x25cm (8x10in)rectangle from one colour of felt,and two 7.5x25cm (3x10in) strips
from the smaller sheet of felt.Lining: cut one 25x31cm (10x12¼in)
rectangle from one sheet of felt, and
one 25x28cm (10x11in) rectangleof fusible interfacing.
T o p t i p A gr e at t hing about f e lt is t hat cut e dge s don’ t f r ay – a r ot ar y blade is t he be st t ool
f or cut t ing f e lt
Beginner’s Guide to Sewing 83W o r l d M a g s . n e t W o r l d M a g s . n e t
W o r l d M a g s . n e t

8/15/2019 Beginner's Guide to Sewing - 2014
http://slidepdf.com/reader/full/beginners-guide-to-sewing-2014 84/164
MAKING THE BASKETS
1 PIN THE PIECESPin each of the two 7.5x30.5cm
(3x12in) [7.5x25cm (3x10in)]felt strips on either side of the
30.5x30.5cm (12x12in) [20x25cm(8x10in)] felt piece, matching
edges (fig.1).
2 STITCH PIECES TOGETHERStitch along the pinned
allowance, back-stitching atthe beginning and end of yourseam. Press the seams openand topstitch close to both
seams (fig. 2).
3
FOLD AND PINFold the sewn felt piece in half,right sides together, edges
matching with the strips of felt atthe top. Pin both sides of the
folded piece, as shown (fig. 3).
4 STITCH AND PRESSStitch along both pinned sides,back-stitching at the beginning
and end. Clip the bottomcorners of the seam allowance
on both sides and press theseams open (fig. 4).
SEWING
THE OUTER
Pull the the bottom corner of the seamand pinch into a triangle, ensuring youcentre the seam. You may choose toplace a pin into the triangle to keep itfrom shifting as you work.
Using a seam gauge or ruler, measure7.5cm (3in) [5cm (2in)] from the tip of thetriangle and make a mark with a fabricmarker in the centre of the seam. Draw astraight line across at the 7.5cm (3in)
[5cm (2in)] mark (fig. 5).
Repeat this process for theother corner (fig. 6).
5 6
1
SEWING THE
LINING
FUSE INTERFACINGCentre the fusible interfacing on
the largest felt rectangle andfuse in place following the
manufacturer’s instructions.
STITCH TOGETHERFold the interfaced rectangle inhalf across the width with rightsides together. Follow steps 3-4
of the outer and 5-8 of the boxedcorners. Leave the lining the
wrong side out.
Essential Techniques
Beginner’s Guide to Sewing84
5
3 4
2
6
W o r l d M a g s . n e t W o r l d M a g s . n e t
W o r l d M a g s . n e t

8/15/2019 Beginner's Guide to Sewing - 2014
http://slidepdf.com/reader/full/beginners-guide-to-sewing-2014 85/164
Tuck the basket lining insidethe basket exterior,matching side seams andthe top edge. Cut two
11.5cm (4½in) lengths ofribbon and fold them inhalf. Tuck the raw edges ofthe ribbon between theexterior and lining at theside seams and pin inplace. Pin the lining and
exterior together aroundthe entire top edge of thebasket (fig. 9)
Topstitch approx 6mm(¼in) from the top edgearound the entire basket(fig. 10) – this will secure theribbon handles in place.Add a hand-sewn buttonor other embellishment,if you so desire.
Stitch along the lines youhave just drawn,back-stitching at thebeginning and end of yourseams. Trim away theexcess triangle, ensuringyou don’t cut through yourstitches (fig. 7).
Fold over 1.5cm (½in) at thetop of the basket and press(fig. 8). Turn the basket rightside out.
9 107 8
Beginner’s Guide to Sewing 85
Essential Techniques
7
8
9 10
T o p ti pI f using the bask
e ts for
things tha t migh t mark
(like ar t ma terials ), tr y a wipe-clean fabric
for the lining
W o r l d M a g s . n e t W o r l d M a g s . n e t
W o r l d M a g s . n e t

8/15/2019 Beginner's Guide to Sewing - 2014
http://slidepdf.com/reader/full/beginners-guide-to-sewing-2014 86/164
P R O G U I D E T O S E W I N G
P I P I N G
Z I P S
F R I L L S &
P L E A T S
P RO
GUI D E T O
S P R I N G 2 0 1 3
P R I N T E D
I N
T H E U K
£ 9 . 9 9
24MUST - MAK E P ROJECT S
+ 15 ADV ANCED T ECHNIQUES
T O T RY
24MUST - MAK E P ROJECT S
+ 15 ADV ANCED T ECHNIQUES
T O T RY
JUST £9.99 FROM WHSMITH
AND ALL GOOD NEWSAGENTSOr visit www.myfavouritemagazines.co.uk/
stitch-and-craft-bookazinesOr call 0844 848 2852 (UK) or +44 1604 251 045 (international)
ON SALE NOW
W o r l d M a g s . n e t W o r l d M a g s . n e t
W o r l d M a g s . n e t

8/15/2019 Beginner's Guide to Sewing - 2014
http://slidepdf.com/reader/full/beginners-guide-to-sewing-2014 87/164
Sewing by hand is one of our most traditonal skills and iswonderfully therapeutic too. Learn the basic skills and someclever tips needed for patchwork, appliqué and embroidery.
Hand Sewing Techniques
W o r l d M a g s . n e t W o r l d M a g s . n e t
W o r l d M a g s . n e t

8/15/2019 Beginner's Guide to Sewing - 2014
http://slidepdf.com/reader/full/beginners-guide-to-sewing-2014 88/164
Hand Sewing Techniques
Beginner’s Guide to Sewing88
Patchwork sewn by hand is also
known as ‘English paper piecing’.
It is the process of folding fabric
round paper templates, tacking them in
place, stitching them all together, then
remove the papers to reveal beautiful
pieces of hand-stitched patchwork.
MATERIALS AND TOOLS
PAPER
You can make your paper shapes
in any one of three ways:
Draw your shape onto paper using a
reasonably heavyweight paper so that it’s
thick enough to hold its shape but thin
enough to be flexible while stitching. Print shapes out on your computer,
then cut round them. Search online to
find websites that will give you free
shapes to print out.
Buy pre-cut papers to save you time.
FABRIC
100% cotton fabric works best, as it is
crisp and will fold round the paper well,
and won’t fray easily. You can use other
fabrics too but it’s best to stick to the
same weight fabrics for your whole piece
so they sit together properly.For a memory or heirloom patchwork
quilt, cut fabric from favourite pieces of
clothing you no longer wear – it will
forever remind you of them.
Always wash and press all your fabric
before you begin – this is because fabric
can shrink at different rates, plus it’s
much easier to cut and sew with crisp,
newly pressed fabric.
THREAD
You can use any thread, but make sure
it matches the fabrics as your stitches
will be very slightly visible.
NEEDLES
You need to use a sharp-pointed needle
so you pierce just the fabric and not the
paper. Short needles work better as they
will be easier to handle when working
small stitches. ‘Betweens’ or crewel
needles are ideal and it’s worth investing
in hard-wearing gold-plated ones.
All about…
PATCHWORKHand sewn patchwork is perfect for using up all those fabric scraps to make
an heirloom piece, and the hand stitches used are really simple too
1 STARTING OFF
First decide how big a piece of
patchwork you want to make and
what shape you want to use. Sketch it
out roughly to decide the size of each
shape and therefore how many
paper pieces you will need. The size
of shape you will cut out from your
paper piece will be the finished size of
the patch once the fabric is tacked
round so that’s fairly easy to work out.
2 CUTTING OUT THE
PAPER TEMPLATES
Once you have worked out howmany shapes you need, cut them
all out from paper or print them
out if you prefer.
3 CUTTING OUT THE FABRIC
The fabric you will tack round your
templates needs to be bigger – 6mm
(¼in) all the way round is about right. It’s
best to make a fabric template too by
drawing a bigger shape. Cut this from
card and use it to draw round your fabric.
You could make a template instead from
thin plastic then you can cut round it with
a rotary cutter if you prefer. If you do this,
you can stack several layers of fabric and
cut them all out together round the
template, to save you a lot of time. You
can either plan exactly what colours and
patterns you want at the beginning andcut them to suit your placement or just
cut fabrics you like which you think will
blend together more randomly.
W o r l d M a g s . n e t W o r l d M a g s . n e t
W o r l d M a g s . n e t

8/15/2019 Beginner's Guide to Sewing - 2014
http://slidepdf.com/reader/full/beginners-guide-to-sewing-2014 89/164
Hand Sewing Techniques
Beginner’s Guide to Sewing 89
TACKING THE FABRIC IN PLACE
Now you need to tack all the fabric
shapes round your paper shapes.
This process is time consuming but
really part of the process so work
methodically and your pile offabric-covered shapes will soon grow!
Place the paper template in the
centre of the wrong side of the fabric
shape (fig. 1). Fold the fabric edges
round the template (fig2). You can
pin them into place first or fold the
edges and stitch as you go (fig3).1
2 3
T o p t i pI f y o u r s h a p e s a r e a n g l e d , l i k e h e x a g o n s , c r e a t e a
s t r a i g h t e d g e o n a q u i l t b y u s i n g p a r t - s h a p e s t o fi l l i n t h e m i s s i n g p o r t i o n s
SEWING ANGLES
For shapes with narrow angles, like this
hexagon, leave the excess fabric
‘flapping’ as this will be on the back of
your work once you have sewn the pieces
together. If you are making diamonds or
triangles, the fabric flaps will be even
larger so you will find it easier to trim them
a little or tack them well out of the way so
they don’t get caught in the stitches when
you are joining all your patches together.
SEWING THE PATCHES TOGETHER
Take two of your fabric shapes that
will be placed side by side and place
them right sides together. Start by
stitching two sides together, which
need to sit next to each other.
Stitch through the fabric that runs
along the edge of the paper piece,
being careful not to sew through the
paper itself. Try to make your stitches
small so they aren’t too visible. The
best stitch to use for this is a whip
stitch, or oversewing.
Continue joining all your pieces
together in this way working on one
seam at a time until it is complete.
Secure your thread at the edge of thefabric by working three or four tiny
stitches on top of each other. Then
push your needle through both layers
of fabric, coming out at the top layer,
and push it down through the bottom
layer, angling the needle so it comes
back up through the top layer about
3mm (1/ 8in) from the first stitch (fig. 4).
For the next stitch, push the needle
vertically down through the bottom
layer, angling it so it comes out
diagonally through the top layer.
Continue in this way all along the
two fabric layers (fig. 5), securing yourfinal stitch in the same way as at the
beginning. All your stitches should be
parallel and spaced evenly apart. 4 5
HOW TO WORK WHIP STITCH
W o r l d M a g s . n e t W o r l d M a g s . n e t
W o r l d M a g s . n e t

8/15/2019 Beginner's Guide to Sewing - 2014
http://slidepdf.com/reader/full/beginners-guide-to-sewing-2014 90/164
Beginner’s Guide to Sewing90
Hand Sewing Techniques
YOU WILL NEED
Two pieces of fabric for front
and back: 40x36cm (16x14¼in)
Wadding: 40x36cm (16x14¼in)
Scraps of assorted colourful,
printed fabrics
Bias binding
Curved quilting pins
Thread in assorted colours
Stranded cotton in assorted
colours Four buttons
Thin card
Scrap paper
Sharp pencil
Basic sewing kit (see page 12)
Finished size
37.5x33cm (14¾x13in)
Seam allowance
6mm (¼in) included
Glossary
Turn to page 16 for our list of terms
Little
hexagon quiltBy Helen Philipps
Perfect for using up scraps ofyour favourite fabrics, this miniquilt is an ideal first patchworkproject, and makes a lovely gift
This gorgeous doll’s quilt is madeusing the English paper piecing
technique, which involves copying
hexagonal templates on to pieces of scrap
paper and tacking fabric around them to
make hexagons for patchworking. Use
scraps of floral, striped and polka dot fabrics
in an array of colours for maximum visual
interest. The red bias binding and matching
spotty buttons add a striking finishing touch
and the quilt can be flipped over to reveal a
bright and bold backing fabric.
Pretty Patchwork Giftsby Helen PhilippsThere’s more to patchwork than quilting, and
Helen Philipps’ ingenious deigns let you make
brooches, boxes, toys and more. Over 25
projects are easy to follow, with step-by-step
instructions and clear patterns. And it’s not just
patchwork skills you’ll be learning, but appliqué
and embroidery too. Once you’ve finishedevery gift you’ll want to make another to keep!
Published by David & Charles, PB, £14.99
www.stitchcraftcreate.co.uk
W o r l d M a g s . n e t W o r l d M a g s . n e t
W o r l d M a g s . n e t
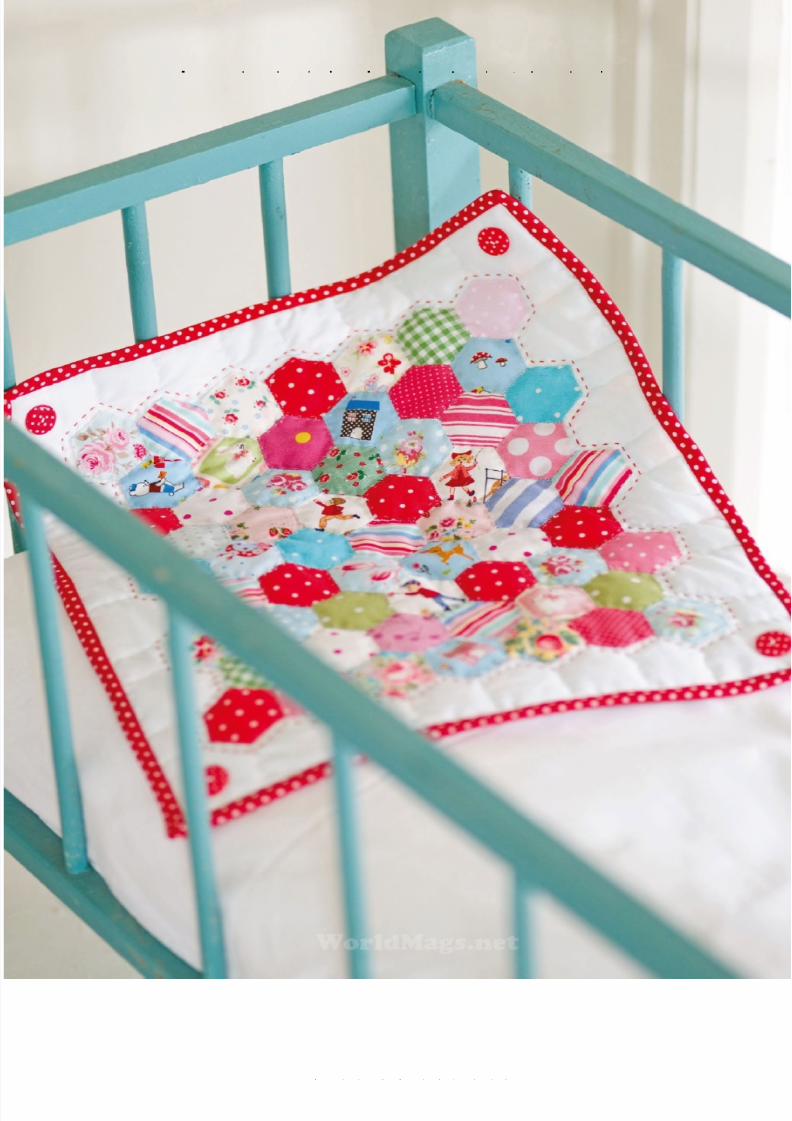
8/15/2019 Beginner's Guide to Sewing - 2014
http://slidepdf.com/reader/full/beginners-guide-to-sewing-2014 91/164
W o r l d M a g s . n e t W o r l d M a g s . n e t
W o r l d M a g s . n e t

8/15/2019 Beginner's Guide to Sewing - 2014
http://slidepdf.com/reader/full/beginners-guide-to-sewing-2014 92/164
Hand Sewing Techniques
Beginner’s Guide to Sewing92
SEWING THE PATCHWORK
Using the template, tracethe hexagon on to thin card.Place the card templateonto a piece of scrap paperand draw around it carefullywith a sharp pencil. Repeat59 times on the same sheetof paper and carefully cut
out the hexagons.
Join the hexagons byplacing them right sidestogether and oversewingthe seams with small stitches.Keep joining the hexagonsuntil the arrangementmatches the diagramabove. Remove the papers
and press the patchwork,keeping the hems on theouter edges turned under.
Cut out the fabric pieces,leaving a 6mm (¼in) seamallowance all the wayaround. Fold the fabric neatlyaround the paper hexagonsand tack in place.
Place the patchwork in thecentre of the white fabric, pinit in position, then slip stitch itin place around the outeredges of the patchwork.
1 3 2 4
W o r l d M a g s . n e t W o r l d M a g s . n e t
W o r l d M a g s . n e t

8/15/2019 Beginner's Guide to Sewing - 2014
http://slidepdf.com/reader/full/beginners-guide-to-sewing-2014 93/164
Beginner’s Guide to Sewing 93
Hand Sewing Techniques
3
Beginner’s Guide to Sewing 93
MAKING THE QUILT
Take the backing fabricand the wadding andmake a quilt sandwich, withthe patchwork on the top,the backing fabric on thebottom and the wadding inthe middle. Pin the layerstogether with curved safety
pins to hold them securelyin place (fig. 1).
To finish the white border,stitch a line of simple whitequilting stitch from thepoint of each hexagon tothe outer edge of the quilt(fig. 3).
Using white cotton, quiltaround each hexagon(fig. 2), smoothing the layersand moving the quilting pinsas you go. When all thehexagons are quilted, usetwo strands of red strandedcotton to sew a decorative
running stitch around theoutside of the hexagonpatchwork (fig. 2).
Bind the quilt with biasbinding (fig. 4) – see p44 tofind out how to bind fabric –and sew a pretty button onto each corner fordecoration.
1 3 2 4
TEMPLATEUsing the
dimensions
shown, draw
the template
onto plain
paper to make
a pattern
1
2
4
4 7 m m ( 1 ¾ i n )
W o r l d M a g s . n e t W o r l d M a g s . n e t
W o r l d M a g s . n e t

8/15/2019 Beginner's Guide to Sewing - 2014
http://slidepdf.com/reader/full/beginners-guide-to-sewing-2014 94/164
Hand Sewing Techniques
Beginner’s Guide to Sewing94
All about…
APPLIQUÉAdorn clothes, fashion accessories and home décor items by stitching on
decorative patches… personalise your makes with motifs, letters and pretty shapes
WHAT IS
FUSIBLE WEB?
Fusible web is a man-madefibre backed with glue thatmelts when heated. It’s the
fabric version of double-sidedsticky tape! When placed
between two pieces of fabricand heated, the fabrics sticktogether, making it ideal forappliqué. To ensure it sticks,wash and dry both the base
fabric and the appliqué fabricsbefore you start. Fusible webhas a paper backing on oneside, which you can draw a
shape on. The paper backingprotects one sticky side while
you press the other on theappliqué fabric. You then
remove the paper packingto stick the other to the base
fabric. There are severaldifferent makes and weights –
choose one which has a similarweight to your appliqué fabric.
The word appliqué comes from
the French verb appliquer which
means ‘to apply’. It is used to
describe a technique used in many
different crafts, such as quilt-making
and pottery.
In sewing terms, the word appliqué is
used to describe a smaller fabric shape,
which is cut out then stitched to larger
piece of base fabric.
There are several methods for working
hand-appliqué and you should choose the
one that not only suits your project, but
also which you feel the most comfortable
with and gives you your desired result.
RAW EDGE METHOD
This is the simplest appliqué method, but
does require neater stitching when yousew it on. It is the method used in both
the Lollipop Flowers Picture on p96 and
the Funky Monkey Pillow on p101.
REVERSED IMAGES
If your appliqué shape isn’t regular – for
example, a letter of the alphabet that will
only work in one orientation – then you
must first reverse the shape. To do this,
first draw the shape in reverse onto a
piece of tracing paper. The easiest way to
do this is to trace the shape, then turn the
tracing paper over and draw over the
lines on the back. Use this reversed
pattern shape to follow this method.
TURNED UNDER
EDGE METHOD
For this method you hem theedges of your appliquéshapes before you stitch themto the main base fabric. Thebest product to use for this isfreezer paper, but you canuse any thick paper instead.
1 First trace the appliqué shape ontopaper, making sure you leave spacebetween shapes so there is room to cutthem out. For freezer paper, trace theshape onto the non-shiny side.
2 Cut out the drawn shape, then cutyour fabric 6mm (¼in) bigger than thepaper shape all the way round.
3 If you are using freezer paper, lay itshiny side up on to the wrong side of yourappliqué fabric.
4 Turn the edge of the fabric over ontothe paper and iron them into place,snipping curves and corners as you go,
if needs be. The shiny side of the freezerpaper will stick to the fabric. If you areusing ordinary paper then just tack theminto place (fig. 1).
5 Continue turning the edges over inthis way until you have worked your wayall round the shape (fig. 2).
6 Now turn your shape over to the rightside and pin, then iron it into place ontoyour base fabric. If using freezer paper,the shiny side will hold it in place. Stitch it
on using small neat stitches just throughthe very edge of the turned-overappliqué fabric, taking care not to stitchthrough the paper (fig. 3).
T o p t i p Y o u c a n u s e a l m o s t a n y e m b r o i d e r y s
t i t c h t o a t t a c h a p p l i q u é p a t c h e s – e x p e r i m e n t t o fi n d o u t w h a t y o u l i k e
W o r l d M a g s . n e t W o r l d M a g s . n e t
W o r l d M a g s . n e t

8/15/2019 Beginner's Guide to Sewing - 2014
http://slidepdf.com/reader/full/beginners-guide-to-sewing-2014 95/164
Hand Sewing Techniques
Beginner’s Guide to Sewing 95
APPLYING FUSIBLE WEBSo easy to use – fusible web simplifies the process of working appliqué… follow
our step-by-step guide for how to make the most of this handy product
1
DRAW YOUR SHAPE
First you trace the pattern shape onto the paper sideof the fusible web.
4
CUT AGAIN
Cut out the pieces along the traced lines.
2
CUT OUT THE SHAPE
Cut out the shape, leaving approximately 6mm(¼in) around the shape.
3
GET THE IRON OUT
Iron the fusible web pieces, paper side up, onto thewrong side of the fabrics, then let them cool. Place
a damp tea towel on top of the fusible web as this
will help protect the web and stick the glue.
6
GET STITCHING
You can now stitch your appliqué shape into place
for a more permanent fix – work a blanket stitch
all round the edge, or work small straight stitches,
which cross from the base fabric to the appliqué
shape, or experiment with other stitches.
5
IRON AGAIN
Remove the paper backing, then fuse the appliqué
pieces to your base fabric, again using a damp tea
towel on top of the fabrics.
7 Finally, remove the backing paper,
which you need to do by pulling it
through the fabric. You can do thisin one of two ways:
Leave one edge of the appliquédshape unstitched, undo the tacking
stitches and pull out the paper. Thenturn the edge back under and finish
stitching it to your base fabric.For a more intricate shape, make a
small snip in the base fabric behindthe centre of the appliquéd shape
and remove the paper through thishole. Obviously this will only work if
you are then going to put a backingfabric over the back of your basefabric to hide the cut. This works wellfor complicated appliqué quilts.
1 2 3
W o r l d M a g s . n e t W o r l d M a g s . n e t
W o r l d M a g s . n e t
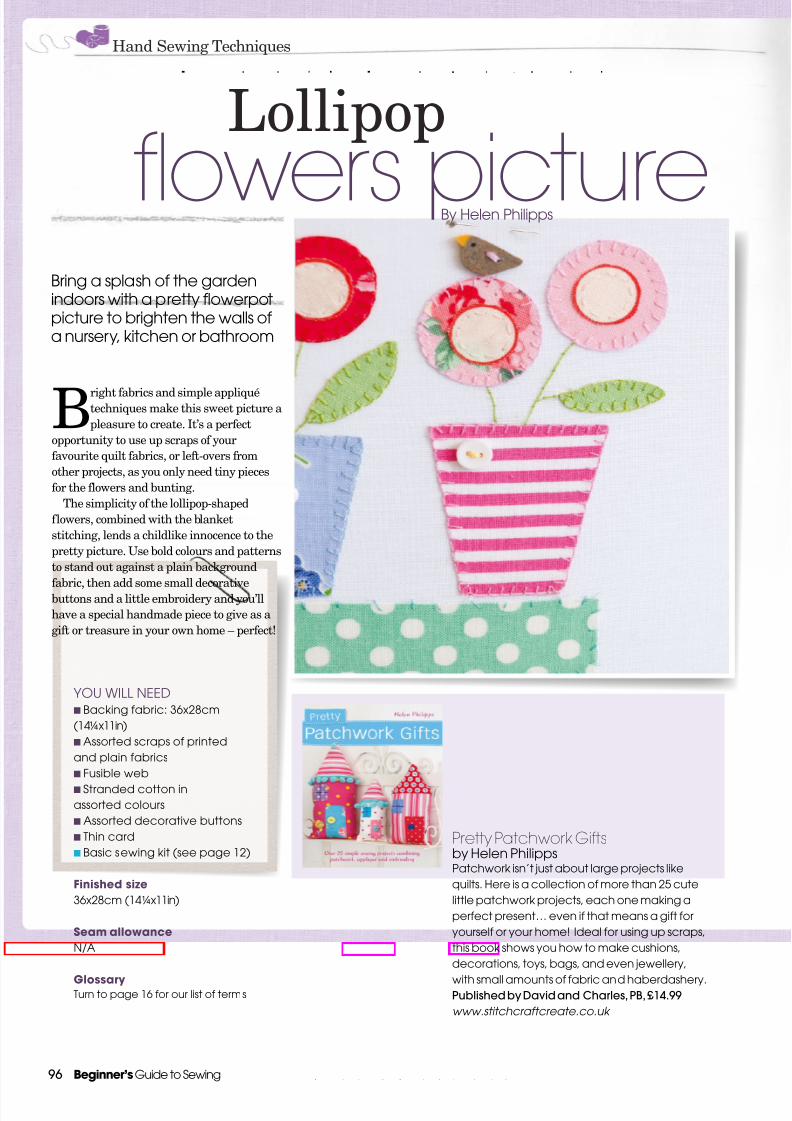
8/15/2019 Beginner's Guide to Sewing - 2014
http://slidepdf.com/reader/full/beginners-guide-to-sewing-2014 96/164
Hand Sewing Techniques
Beginner’s Guide to Sewing96
YOU WILL NEED Backing fabric: 36x28cm
(14¼x11in)
Assorted scraps of printed
and plain fabrics
Fusible web
Stranded cotton in
assorted colours
Assorted decorative buttons
Thin card
Basic sewing kit (see page 12)
Finished size
36x28cm (14¼x11in)
Seam allowance
N/A
GlossaryTurn to page 16 for our list of terms
Lollipop
flowers pictureBy Helen Philipps
Bright fabrics and simple appliquétechniques make this sweet picture a
pleasure to create. It’s a perfect
opportunity to use up scraps of your
favourite quilt fabrics, or left-overs from
other projects, as you only need tiny pieces
for the flowers and bunting.
The simplicity of the lollipop-shaped
flowers, combined with the blanket
stitching, lends a childlike innocence to the
pretty picture. Use bold colours and patterns
to stand out against a plain background
fabric, then add some small decorative
buttons and a little embroidery and you’ll
have a special handmade piece to give as a
gift or treasure in your own home – perfect!
Bring a splash of the gardenindoors with a pretty flowerpotpicture to brighten the walls ofa nursery, kitchen or bathroom
Pretty Patchwork Giftsby Helen PhilippsPatchwork isn’t just about large projects like
quilts. Here is a collection of more than 25 cute
little patchwork projects, each one making a
perfect present… even if that means a gift for
yourself or your home! Ideal for using up scraps,
this book shows you how to make cushions,
decorations, toys, bags, and even jewellery,
with small amounts of fabric and haberdashery.Published by David and Charles, PB, £14.99
www.stitchcraftcreate.co.uk
W o r l d M a g s . n e t W o r l d M a g s . n e t
W o r l d M a g s . n e t

8/15/2019 Beginner's Guide to Sewing - 2014
http://slidepdf.com/reader/full/beginners-guide-to-sewing-2014 97/164
W o r l d M a g s . n e t W o r l d M a g s . n e t
W o r l d M a g s . n e t
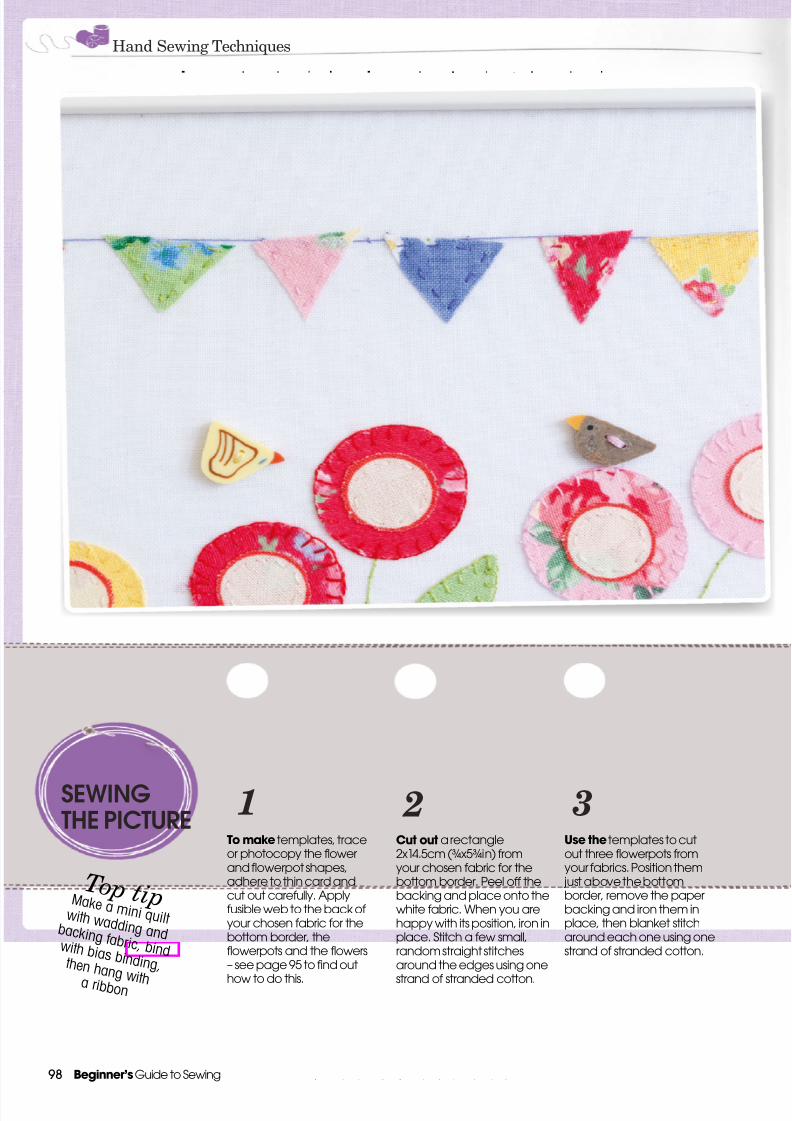
8/15/2019 Beginner's Guide to Sewing - 2014
http://slidepdf.com/reader/full/beginners-guide-to-sewing-2014 98/164
Hand Sewing Techniques
SEWING
THE PICTURETo make templates, traceor photocopy the flowerand flowerpot shapes,adhere to thin card andcut out carefully. Applyfusible web to the back ofyour chosen fabric for thebottom border, theflowerpots and the flowers– see page 95 to find out
how to do this.
Cut out a rectangle2x14.5cm (¾x5¾in) fromyour chosen fabric for thebottom border. Peel off thebacking and place onto thewhite fabric. When you arehappy with its position, iron inplace. Stitch a few small,random straight stitchesaround the edges using one
strand of stranded cotton.
Use the templates to cutout three flowerpots fromyour fabrics. Position them just above the bottomborder, remove the paperbacking and iron them inplace, then blanket stitcharound each one using onestrand of stranded cotton.
1 3 2
Beginner’s Guide to Sewing98
T o p t i p M a k e a m i n i q u i l t w i t h w a d d i n g a n d b a c k i n g f a b r i c , b i n d w i t h b i a s b i n d i n g , t h e n h a n g w i t h a r i b b o n
W o r l d M a g s . n e t W o r l d M a g s . n e t
W o r l d M a g s . n e t

8/15/2019 Beginner's Guide to Sewing - 2014
http://slidepdf.com/reader/full/beginners-guide-to-sewing-2014 99/164
Beginner’s Guide to Sewing 99
Hand Sewing Techniques
Use the templates to cut outsix coloured fabric circles forthe flowers and six smallerwhite fabric circles for thecentres. Arrange and ironthem in place, then blanketstitch around the outside ofeach flower using one strandof stranded cotton. Sewa line of running stitch in
stranded cotton aroundthe flower centres.
Cut out three leaf shapesfrom fabric, iron in placeand blanket stitch aroundeach leaf. Using one strandof stranded cotton, make along stitch and couch itdown to form stems from thebase of the flowers to thetop of the pots.
Apply fusible web onto theback of scraps of fabric andcut out eight tiny trianglesfor the bunting. Sew a lineacross the top of thetriangles using one length ofstranded cotton andcouch down. This is done bylaying the length of threadacross the fabric and
holding it in place with tiny,evenly-spacedperpendicular stitches.
Sew your assorted buttonsabove the flowers. Finally,press the work carefully, sewsome decorative buttons onto the flowerpots and framethe picture.
4 65 7
Beginner’s Guide to Sewing 99
TEMPLATESTrace or photocopy
these templates at
100% to make patterns
W o r l d M a g s . n e t W o r l d M a g s . n e t
W o r l d M a g s . n e t

8/15/2019 Beginner's Guide to Sewing - 2014
http://slidepdf.com/reader/full/beginners-guide-to-sewing-2014 100/164
YOUR WEEKLY HELPING OF CRAFTYGOODNESS FROM MOLLIE MAKES
www.molliemakes.com/gathered@GatheredByMM www.facebook.com/GatheredbyMM
5 ISSUES FREE!
Head here to tr y it no w
http://goo.gl / X T vC x
Availa ble now on
iPhone & iPad
W o r l d M a g s . n e t W o r l d M a g s . n e t
W o r l d M a g s . n e t

8/15/2019 Beginner's Guide to Sewing - 2014
http://slidepdf.com/reader/full/beginners-guide-to-sewing-2014 101/164
Beginner’s Guide to Sewing 101
Hand Sewing Techniques
YOU WILL NEED
Two pieces of fabric for
cushion: 36cm (14in) square
One piece of fabric for motif
backing: 25cm (10in) square
Scraps of felt for ears and
face: pink, cream, brown, tan
Pillow foam: 36cm (14in)
square, or polyester fibrefill Regular or lightweight paper-
backed fusible web
Stranded cotton in
assorted colours
Basic sewing kit (see page 12)
Finished size
36cm (14in) square
Seam allowance
6mm (¼in) included
Glossary
Turn to page 16 for our list of terms
Funky
monkey pillowBy Susan Cousineau
The bold design motifs featuredin this cheeky, cheerful cushionare created using simple, triedand tested appliqué techniques
Sweet Nursery Chicby Susan CousineauIdeas and instructions for making everything
you’ll need for a nursery – blankets, quilts, pillows,
wall hangings and accessories – is here. It’s easy
to make a coordinating ensemble as projects
are grouped into themes, and you’re bound
to find the perfect one to suit any baby. For
beginners to embroidery, an illustrated stitch
guide tells you all you need to know.Published by David and Charles, PB, £15.99
www.stitchcraftcreate.co.uk
Brighten up a nursery or child’sbedroom with this gorgeous
smiling monkey cushion. We’ve
made ours in pinky colours but it’s just as
easy to use a different colour palette for
children who don’t like pink!
It’s put together in layers by making the
appliqué motif first, then stitching that onto
one of the squares of fabric that goes into
making the cushion. Building it in stages
means it can be tackled in manageable
chunks, making light work of a finished
project that looks impressively complex.
W o r l d M a g s . n e t W o r l d M a g s . n e t
W o r l d M a g s . n e t

8/15/2019 Beginner's Guide to Sewing - 2014
http://slidepdf.com/reader/full/beginners-guide-to-sewing-2014 102/164
Hand Sewing Techniques
HOW TO MAKE THE CHEEKY MONKEY
MAKING THE CUSHION
Pin the two 36cm (14in) pillowpieces of fabric, right sides together.Sew around the edges of the pillowusing a 6mm (¼in) seam allowance.As you go, you need to leave anopening at the bottom that’s largeenough to insert the pillow foam(or to stuff with fiberfill).
Clip the seam allowance at thecorners, turn the pillow right sideout and press for a neat finish.
Cut out the differentshaped pieces of themonkey from scraps
of felt. Now backyour shapes withfusible web, followingour step-by-stepguide (above).
Blanket stitch around the edgesof the monkey to
attach him to your25cm (10in) square ofbacking fabric. Useour photo as a guideto position him.
Embroider your cheeky monkey’sfacial features, using
our cushion photoas your guide. Usebackstitch for hismouth and Frenchknots for his eyes.
Attach the monkeypanel on to the rightside of one of your
36cm (14in) cottonsquares. Pin or tackthe panel in place,then blanket stitcharound the edges.
Insert the pillow foam, or stuff withpolyester fiberfill. To finish, simply slipstitch the opening closed.
TIP If you’re using a pillow insert, you canalso add small pieces of fiberfill toplump up and add firmness to the sidesand corners. Pillow inserts can vary inthickness among manufacturers, soremember that fiberfill is always anoption if you are uncertain about thefit of any pillow insert.
1
1 3
3 2
2 4
Beginner’s Guide to Sewing102
T r ace t he pat t er n shape ont o t he paper side of a sheet of f usible w eb.
Cu t ou t the pieces, lea ving around
6mm (¼in ) around the shapes.
1 2
T o p t i p Y o u c o u l d a l s o m a k e t h i s u s i n g t h e
fl o w e r p o t o n p 9 6 o r t r y d e s i g n i n g y o u r o w n s h a p e s
Getting your finished
design looking asgood as possibledepends on how well
you cut out yourpieces. Follow thesesimple steps to makeyour funky monkey
face perfect.
CUTTING OUT
THE SHAPES
W o r l d M a g s . n e t W o r l d M a g s . n e t
W o r l d M a g s . n e t

8/15/2019 Beginner's Guide to Sewing - 2014
http://slidepdf.com/reader/full/beginners-guide-to-sewing-2014 103/164
Beginner’s Guide to Sewing 103
Hand Sewing Techniques
Beginner’s Guide to Sewing 103
Follow ing manuf act ur er ’s inst r uct ions, ir on t he f usible w eb pieces, paper side up, ont o t he w r ong side of t he f abr ic.
Remove the paper backing, then fuse
your shapes into place following the
manufacturer’s instructions.Once fabric has cooled, cu
t ou t
the pieces along the traced lines.
3 4
5
TEMPLATEPhotocopy this template
at 125% to make a pattern
W o r l d M a g s . n e t W o r l d M a g s . n e t
W o r l d M a g s . n e t

8/15/2019 Beginner's Guide to Sewing - 2014
http://slidepdf.com/reader/full/beginners-guide-to-sewing-2014 104/164
Hand Sewing Techniques
Beginner’s Guide to Sewing104
TRACING DESIGNS
Most embroidery projects use templates,
which you’ll first need to transfer onto
your fabric in order to stitch the design.
1 Before you start tracing, press your
fabric to make sure it’s completely flat.
Plan where you want to place the design
and leave yourself enough space. Check
the project instructions for whether you
need to enlarge the template on a
photocopier – you can enlarge or reduce
any design to suit your specific project.
2 The simplest way to transfer a design
onto fabric is to trace it. Place the
fabric right side up over the template.Secure with masking tape so it can’t slip.
Trace over all the lines using a pencil. If
you struggle to see the design through the
fabric, trace the design onto tracing paper
using a fine black pen. Then tape the
design and fabric to a window or a light
box, and trace the design. To help with
this, you could turn your fabric upside
down and stretch it into a hoop or frame
All about…
HAND EMBROIDERYProjects are transformed by the addition of decorative stitchwork… you can
create pictures, write messages and trim edges with patterned borders
with the right side in the back of the hoop
and the wrong side flush against thedesign surface. Then, remove the fabric
from the frame and reinsert it right side
up, ready to embroider.
3 If your fabric is too thick to do this or
it’s impossible to trace through the
window, trace the design onto tracing
paper and pin to your fabric. Following
your pencil lines, tack around the design
using small stitches in a contrasting
coloured thread. Score along your tackingstitches with the tip of a needle and then
remove the paper by tearing.
4 Alternatively, try dressmakers’
carbon paper. Trace the design onto
plain paper. Place the carbon paper over
your fabric, where you want to place the
design, with the dark side next to the
fabric surface. Place your paper template
Trace your picture directly onto your fabric using
a washable or fading fabric pen, available at most
craft and sewing shops.
Place dressmaker’s carbon paper face down onto
your fabric. Place your picture on top and trace
using a blunt pencil.
STARTING STITCHING WASTE KNOT This is the simplest way to get started with your embroidery.
T o p t i pT h r e a d f o r e m b r o i d e r y u s u a l l y c o m e s i n s k e i n s o f s i x s t r a n d s o f c o t t o n – t h e m o r e y o u u s e t h e t h i c k e r y o u r s t i t c h e s w i l l b e
Knot one end of your thread andtake it down through the front of
your fabric, about 2.5cm (1in) fromyour starting point. Bring it back upto make your first stitch.
Begin stitching your design.Stitch over your starting thread,
then, once your starting thread issecure, simply snip off the knot.
To secure the thread whenyou’ve finished stitching, weave
it through the back of your stitches.
W o r l d M a g s . n e t W o r l d M a g s . n e t
W o r l d M a g s . n e t

8/15/2019 Beginner's Guide to Sewing - 2014
http://slidepdf.com/reader/full/beginners-guide-to-sewing-2014 105/164
Hand Sewing Techniques
on top and trace over the outline using
a blunt pencil or similar. Remove
the carbon paper and you will have
created a dark outline for your
embroidery design.
5 Once you’ve drawn your designonto the fabric, place it into a hoop
or frame. This will provide the correct
tension, your stitches will be neater
and it will prevent the fabric from
puckering.
Beginner’s Guide to Sewing 105
STARTING STITCHING LOOP KNOT This easy start to your embroidery is brilliantly neat.
HOOPS AND FRAMES Although not absolutely essential, you will get a much better finished result if you mount
your fabric in an embroidery hoop or frame before you begin stitching.
WOODEN HOOP
A wooden hoop is the most economical option,with various sizes available and most costing just
a few pounds. You can also buy metal and plastic
spring-tension hoops which work in the same way.
PLASTIC CLIP FRAME
An interlocking clip frame is a great portable option
– the hollow plastic tubes make the frame super-
light. Simply place your stitching over the frame
and use the plastic clips to secure in place.
SEAT FRAME
This sort of frame is an ingenious embroidery tool.It consists of a wooden hoop, stand and base,
which you sit on to steady it. It’s the best option for
anyone who prefers stitching with both hands.
INTERLOCKING BAR FRAME
With this sort of versatile frame you can create the
perfect size every time by mixing and matching the
wooden lengths. Stretch your fabric over the frame
and secure using drawing pins.
SEALING
FABRIC EDGESUse these simple methods tostop your fabric from fraying
and the thread getting caughtin your stitching as you work.
1 MASKING TAPE
For a quick fix, seal edges withmasking tape. It may leave aresidue, so leave extra fabricaround your design, which
you can cut off whenyou’re finished.
2 BLANKET STITCH
If you’ve got more time, use ablanket stitch to stop your
fabric fraying. This can also beused for a decorative finish.
3 ZIGZAG STITCH
For the most secure finish, usea sewing machine to stitch azigzag right up to the edges.It’s the best choice for linen.
When working with two strands,a loop knot is a neat method.
Cut a length of thread and fold it in
half to create a loop at one end.
Thread your needle with thetwo tail ends. Bring your needle
up to the front of your fabric, leaving
a small loop of thread on the reverse.
Make your first stitch and passthe needle through the loop on
the reverse. Pull to secure the thread.
Continue with your stitching as normal.
W o r l d M a g s . n e t W o r l d M a g s . n e t
W o r l d M a g s . n e t

8/15/2019 Beginner's Guide to Sewing - 2014
http://slidepdf.com/reader/full/beginners-guide-to-sewing-2014 106/164
Hand Sewing Techniques
Follow our simple finishing techniques
to ensure a professional result for your
embroidery projects.
WASHING
The washing stage can really bring
your stitching to life and also restore
the crispness to cotton or linen fabrics
1 Before you start, check that your
fabric and threads are colourfast
and if there are any specific washing
instructions for them. Fill a tray with
warm water and add a small amount
of bleach-free detergent. Gently
immerse your stitching in the water.
2 Leave to soak for about 15 minutes
then gently agitate it in the tray.
To remove frame marks, rub the fabric
together at the edge, avoiding marking
your stitches.
3 For stubborn stains, empty your
water. Place your stitching face up
on the tray and use a sponge and fresh
warm water to sponge that area.
4
Rinse under warm water to
remove the detergent. To removeexcess water, roll your stitching in a
clean, white towel. Place face down
on a towel to dry.
PRESSING
You may need to eliminate wrinkles
from your finished piece with an iron
and if you have washed it then
it’s best to press your fabric
while it’s still slightly damp.
Pad your ironing board
with a thick towel. Place
your work right side
down on top with a thin,
clean cloth over it. Press
carefully until the
fabric is dry. The
towel will stop the
iron from flattening
the stitches. Press
gently, working
the point of the
iron into the
stitches. Avoid
having the iron
too hot.
FINISHING
YOUR WORKHOW TO DO… EMBROIDERY STITCHESFollow our stitching guides to five of the most popular embroidery stitches to complete
the projects on the following pages.
FRENCH KNOT
French knots are the most common type of
embroidery knot. They can be used singly for small
details or in closely worked groups for features such
as flower centres. You can stitch these knots in just
one colour or create a different look by combining
two colours of thread in your needle. Holding the
thread with your left hand, twist the needle around
the thread twice (do not twist the thread around
the needle). Insert the point of the needle back
into the fabric and pull the thread to tighten the
knot. Push the needle through the fabric close
to where the thread emerged. To make a
larger knot, increase the number
of times you twist the needle.
CROSS STITCH
One of the most common embroidery stitches,
cross stitch can be worked in vertical or horizontal
rows with all the stitch points touching. Each cross
can be worked any size, depending on the effect
you wish to achieve. It makes attractive borders
or can be used to fill a shape, and is also useful asan isolated stitch worked at random over fabric.
Bring the needle up at 1 and down at 2 to form a
diagonal stitch. Bring the needle up again at 3,
across the first stitch and down at 4. When working
in rows, the top diagonal stitches should all lie in
the same direction.
RUNNING STITCH
Running stitch can be used to outline,to pad before working another stitch on
top of it, or even to strengthen the edge
of a design for cutwork. The stitches
should all be of the same length. Bring
the needle up at 1, down at 2, up at
3 and so on. The spaces between the
stitches are usually the same length as
the stitches themselves but you can vary
the length of the spaces for effect.
SATIN STITCH
Satin stitch is a popular filling stitch
as it covers the fabric well with a
smooth, even surface. It is versatile
enough to fit any size of area. Work
with your fabric in an embroidery hoop to
keep to tension of the stitches even. Bring theneedle up at 1, down at 2 and up again at 3.
Keep stitching in this under and over motion
so that the back of the work looks the same
as the front.
BACKSTITCH
Backstitch forms a neat line, which can be
used on its own or to outline other stitches.It should be worked so that all the stitches
are of the same length with no gaps
between them. Bring the needle up at 1,
down at 2, up at 3, down at 4 and so on.
Continue stitching in this way, always
working back on yourself.
1
1
1
2
2
2
3
4
3
3
1
2 3
4
W o r l d M a g s . n e t W o r l d M a g s . n e t
W o r l d M a g s . n e t

8/15/2019 Beginner's Guide to Sewing - 2014
http://slidepdf.com/reader/full/beginners-guide-to-sewing-2014 107/164
Beginner’s Guide to Sewing 107
Hand Sewing Techniques
Beginner’s Guide to Sewing 107
Hedgerow
coffee cosyby Alyssa Thomas
YOU WILL NEED
Quilt-weight fabric for the
front: at least 41x30cm (16x12in)
Heavy-weight fabric for the
lining: at least 36x13cm (14x5in)
Stranded cotton in assorted
colours
Water-soluble marker (or other
transfer materials such as
iron-on transfer paper)
Embroidery scissors
Embroidery hoop
4cm (1½in) button
Basic sewing kit (see page 12)
Finished size
28x6cm (11x2½in)
Seam allowance
6mm (¼in) included
Glossary
Turn to page 16 for our list of terms
Don’t grab a disposable paper sleeveon your next coffee run… use this
sweet reusable one instead!
Environmentally-friendly and adorable,
what more could you want to sweeten
your morning brew?
This coffee cosy is home to a tiny and
sweet birdie, bunny and hedgehog. In case
you miss the look of a typical coffee sleeve,
you could use corduroy, which mimics the
familiar corrugated paper, for the lining.
Embellish your coffee cosy with a big button,
and you’ll be ready to keep your latte warm
and your hands cool.
What better way to experienceyour favourite hot drink thenwith a uniquely decoratedcup cosy wrapped around it?
Sew and Stitch Embroideryby Alyssa ThomasThis collection of 20 textile projects (some of
which don’t require any stitching) includes 30
hand embroidery designs. Create wall art and
other gorgeous things to hang, dangle, disaply
and otherwise decorate your home with. There
are also pretty fashion accessories and cute
playthings, too. One of our favourites is the
child’s grinning octupus bed linen… so cute!Published by David and Charles, PB, £16.99
www.stitchcraftcreate.co.uk
W o r l d M a g s . n e t W o r l d M a g s . n e t
W o r l d M a g s . n e t

8/15/2019 Beginner's Guide to Sewing - 2014
http://slidepdf.com/reader/full/beginners-guide-to-sewing-2014 108/164
ASSEMBLING THE COSY
1 TRANSFER THE DESIGNTransfer the Woodland
Creatures pattern on p110onto your front fabric. Make
sure you centre it insidethe cosy outlines.
2 EMBROIDER THE MOTIFPlace the front of the fabric
in the embroidery hoop and,
using stranded cotton incolours of your choice,
embroider the motif, referringto the stitching guide overleaf.
EMBROIDERINGTHE MOTIF
Tuck in the raw edges ofthe opening 6mm (¼in)toward the inside and pinin place. Topstitch aroundthe entire edge of the cosy3mm (1/ 8in) from the edge,sewing shut the opening in
the process (fig. 2).
Place front and back fabrics wrong sidestogether. Then cut along the cosy templatemarkings on the front fabric.
With right sides together, pin and machine sewaround the entire edge, using a 6mm (¼in)seam allowance and leaving the marked gap
open (fig. 1). Clip the corners. Cut notches in theoutward curve and clip the inward curve. Turnthe cosy right-side out through the opening.
21
1
Beginner’s Guide to Sewing108
Hand Sewing Techniques
Beginner’s Guide to Sewing108
2
TEMPLATETrace or photocopy this
template at 150%, then trace
around the outer curved line,
to make a pattern
W o r l d M a g s . n e t W o r l d M a g s . n e t
W o r l d M a g s . n e t

8/15/2019 Beginner's Guide to Sewing - 2014
http://slidepdf.com/reader/full/beginners-guide-to-sewing-2014 109/164
STITCHING THE BUTTONHOLE
Use the stranded cotton colour of yourchoice to stitch the buttonhole. Make onebackstitch within the rectangle around yourslash on the back fabric. This will hold thethread in place while you stitch. Starting onthe left edge, bring the needle up throughthe slash between the front and back
fabrics. Using a buttonhole stitch, stitchalong the side of the slash (fig. 5).
With the sewing machine, sew3mm (1/ 8in) around each sideof the line, making a rectangle.Then carefully slice open thecentre of the buttonhole usinga seam ripper (fig. 4).
To determine the size of thebuttonhole, measure the diameterof the button, then add the thickness.With a water-soluble pen, draw ahorizontal line the length of thatmeasurement on the front of the cosyabout 2cm (¾in) from the right edge,
centered vertically (fig. 3).
5 4 3
3 4
5
Beginner’s Guide to Sewing 109
Hand Sewing Techniques
T o p ti pI f you don ’ t wan t
bu t tonholes to be as
visible as this cos y, use a thread col
our
tha t ma tches the
fabric
W o r l d M a g s . n e t W o r l d M a g s . n e t
W o r l d M a g s . n e t

8/15/2019 Beginner's Guide to Sewing - 2014
http://slidepdf.com/reader/full/beginners-guide-to-sewing-2014 110/164
STITCHING THE BUTTONHOLE CONTINUED...
Lay your button on the left-front of
the coffee cosy, centred vertically,3mm (1/ 8in) from the left edge.Using a water-soluble pen, markthe centre of the button on thecosy. Using the stranded cottoncolour of your choice, stitch thebutton to the cosy (fig. 8).
When you get to end of the second side
and back to where you started, finish thebuttonhole with a bar tack (fig. 7). To make abar tack, make a stitch across the entireheight of the two sides at the left end of theslash. Blanket stitch around the long stitchand the layers of fabric. Tie off the end of thethread, and the buttonhole is complete.
When you reach the right end, fan
out the buttonhole stitches aroundthe end. Continue stitching aroundthe second side (fig. 6).
87 6
6 7
8
T o p t i pInst e ad of one big , bold but t on y ou
could use a couple of smalle r , mor e de licat e one s
Beginner’s Guide to Sewing110
Hand Sewing Techniques
EMBROIDERY PATTERNTrace this pattern at 100%
inside the cosy template
on your fabric
KEY TO STITCHESLines: backstitch
Filled-in shapes:
satin stitch
Dots: French knot
Dashed lines:
running stitch
Xs: cross stitch
Turn to p106 for
instructions onhow to do
these stitches
W o r l d M a g s . n e t W o r l d M a g s . n e t
W o r l d M a g s . n e t

8/15/2019 Beginner's Guide to Sewing - 2014
http://slidepdf.com/reader/full/beginners-guide-to-sewing-2014 111/164
Hand Sewing Techniques
Beginner’s Guide to Sewing 111
Dress-up
pretty patchesBy Susan Wasinger
YOU WILL NEED
Jeans to patch
Scraps of fabric
Iron-on denim patches
Thread in assorted colours
Stranded cotton in assorted
colours
Basic sewing kit (see page 12)
Finished size
N/A
Seam allowance
6mm (¼in)
Glossary
Turn to page 16 for our list of terms
Mend your jeans and show yourrenegade craft style at the same
time. A few charming scraps from
your fabric stash and a couple of bold hand
stitches make even the most bedraggled old
dungarees spanking new again.
The patches are easy to make and stitch
as this method shows you how to use iron-on
denim patches to press some pretty cotton
fabric on to then attach beneath the holes in
your jeans. Rows of running stitch in
matching stranded cotton are worked round
the edges for extra strength and decoration.
If you are feeling ambitious, use the same
cotton fabric to make a belt or to edge the top
of your pockets for a perfect finish. Choose a
range of fabric patterns and colours that
you love or ones which match a favourite
top for a coordinated look.
These pretty cotton patchesare quick and easy to stitch toyour jeans. Perfect for mendingholes… or make your own!
Sewn by Handby Susan WasingerAnything homemade has a unique character,
and is special to a gift recipient because it’s
obvious how much love, effort and attention has
gone into its making. In this book, you’ll find more
than 20 projects to hand stitch, each one
a modern take on a traditional theme. Find
pillows, aprons, pincushions, totes and lots of
other pretty things for treasuring and gift-giving.Published by Lark Books, PB, £16.99
www.thegmcgroup.com
W o r l d M a g s . n e t W o r l d M a g s . n e t
W o r l d M a g s . n e t

8/15/2019 Beginner's Guide to Sewing - 2014
http://slidepdf.com/reader/full/beginners-guide-to-sewing-2014 112/164
Hand Sewing Techniques
Beginner’s Guide to Sewing112W o r l d M a g s . n e t W o r l d M a g s . n e t
W o r l d M a g s . n e t

8/15/2019 Beginner's Guide to Sewing - 2014
http://slidepdf.com/reader/full/beginners-guide-to-sewing-2014 113/164
PATCHING YOUR JEANS
Measure the hole and cut a piece ofiron-on denim patch that is 2.5-5cm(1-2in) larger than the hole in width andlength. Next cut a piece of cotton printthat is about 2-3cm (¾-1¼in) larger thanthe hole in both dimensions. Centre thiscotton print on the adhesive side(wrong side) of the iron-on patch. Make
sure there is at least 6mm (¼in) border ofiron-on adhesive exposed around theoutside edge of the cotton piece. Putone pin in the centre to hold (fig. 3).
Fold the edges of the hole 6mm (¼in)under to the inside of the jeans and pin.Tack around the edges to hold theseturnings firmly in place (fig. 2). Pressingthese down at this stage will help withthis as the denim is quite stiff.
Cut around the hole in your jeans tosmooth the shape into a square, circle,or oval. Clip about 6mm (¼in) into thecorners of your square or at intervalsaround a circle (fig. 1).
3 21
T o p t i pEx pe r ime nt w it h
dif f e r e nt scr aps of f abr ic unde r t he hole s in y our je ans t o se e w hich w or k be st
Beginner’s Guide to Sewing 113
Hand Sewing Techniques
1
3
2
W o r l d M a g s . n e t W o r l d M a g s . n e t
W o r l d M a g s . n e t

8/15/2019 Beginner's Guide to Sewing - 2014
http://slidepdf.com/reader/full/beginners-guide-to-sewing-2014 114/164
Once the stitching is complete, turn the jeans inside out and finish ironing on thepatch to secure it completely. Theinstructions given with the patch willexpain exactly how to do this to makesure your patch is firmly attached.
Thread a large, sharp needle withstranded cotton. You can use all sixstrands in your needle for boldstitches or use less if you prefer amore subtle look. Try using differentnumbers of strands until you arehappy with the look. Sew a line ofrunning stitch around the patch
about 3mm (1/ 8in) in from the edge ofthe hole (fig. 5). Add more rows of
stitching if you wish. Follow our guideonpage 106 for working this stitch.
On your ironing surface, fit the patch in thehole of the jeans with the right side of thecotton up and the iron-on adhesive faceup on the inside of the jeans. Make sure toposition it in the hole so all the raw edges ofthe cotton fabric are covered by thefinished edge of the jeans. Remove the pinand follow the manufacturer’s directions toiron the patch into place (fig. 4). At thispoint, you will only be able to tack the
patch in place as you will be ironing just onthe front side. Remove the tacking.
65 4
Beginner’s Guide to Sewing114
Hand Sewing Techniques
6
4
5
W o r l d M a g s . n e t W o r l d M a g s . n e t
W o r l d M a g s . n e t
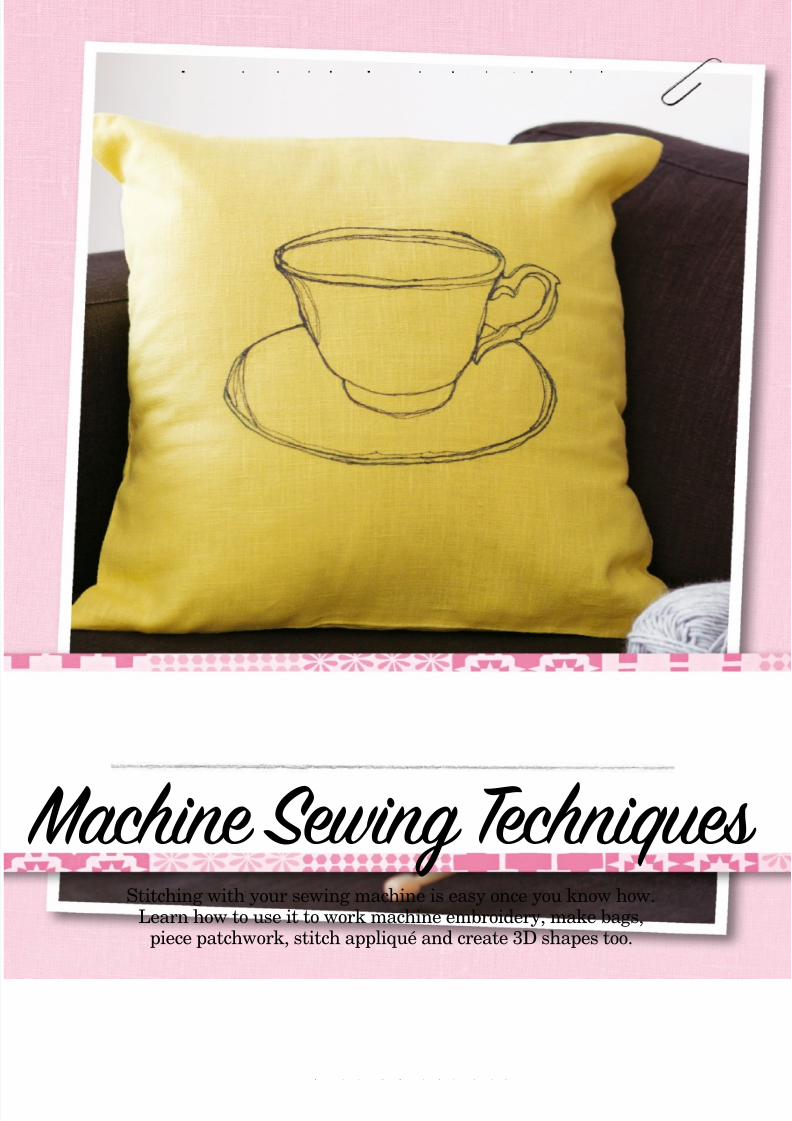
8/15/2019 Beginner's Guide to Sewing - 2014
http://slidepdf.com/reader/full/beginners-guide-to-sewing-2014 115/164
Stitching with your sewing machine is easy once you know how.Learn how to use it to work machine embroidery, make bags,
piece patchwork, stitch appliqué and create 3D shapes too.
Machine Sewing Techniques
W o r l d M a g s . n e t W o r l d M a g s . n e t
W o r l d M a g s . n e t

8/15/2019 Beginner's Guide to Sewing - 2014
http://slidepdf.com/reader/full/beginners-guide-to-sewing-2014 116/164
Machine Sewing Techniques
Beginner’s Guide to Sewing116
All about…
MACHINEEMBROIDERY
Freehand machine embroidery
means using your sewing machine
in a ‘freehand’ style rather than
working in straight lines, so you have
more freedom to ‘doodle’ with your
machine and work the stitches in any
direction. The freehand style turns your
sewing machine into an artistic tool you
can use to create designs on fabric, often
combining it with appliqué motifs.
To do machine embroidery you don’t
need much specialist equipment. Aside
from fabric and spools of thread, you’ll
need to have a sewing machine that
allows you to lower the feed dogs. Thefeed dogs are like metal teeth in the plate
of the machine that hold onto your fabric
and feed it past the needle. Lowering the
feed dogs enables your fabric to move
freely as you stitch.
You’ll need to use an embroidery hoop
to keep the fabric taut, and a darning or
free-motion foot to attach to your sewing
machine, to keep the fabric smooth.
GETTING STARTED
Purchase a darning foot, which can often
be picked up for less than £10 at your
local sewing shop. Consult your sewing
machine manual for instructions on how
to attach your darning foot, because all
machines are different.
Mount your fabric into an embroidery
hoop, but in the opposite way to normal,
so the inner ring is facing up (fig. 1).
On your sewing machine, drop the
feed dogs and thread the needle. Lift up
the darning foot and place the hoop
underneath. Hold the hoop firmly with
both hands. Begin sewing, moving thehoop in any direction.
GAINING CONFIDENCE
Start by using a piece of scrap fabric to
practise making squiggles and shapes
(fig. 2). It takes a while to get the hang of
it, so don’t get discouraged. Once you feel
a bit more confident, try stitching some
shapes, starting with easy ones.
PLAYING WITH STITCHES
Start off by doodling and playing with
your sewing machine’s different stitches.
Have a go at straight stitches in different
lengths and colours, then move on to
zigzag stitches in various sizes and types.Then try making scribbles and loops.
MAKING SHAPES
Move on to making basic outlines for
various shapes, such as circles, squares,
hearts and flowers. Practise making
double outlines by going around the
shape again – your aim should be to get
the shapes tidy but sketchy (fig. 3).
While hand embroidery can be wonderfully relaxing, using your sewing
machine to embroider will allow you to become brilliantly creative!
T o p t i p S t a r t w i t h f a b
r i c s
s u c h a s c o t t o n
a n d l i n e n t h a t w
o n ’ t
s l i p, s n a g o r p u c
k e r
i n t h e m a c h i n e
W o r l d M a g s . n e t W o r l d M a g s . n e t
W o r l d M a g s . n e t

8/15/2019 Beginner's Guide to Sewing - 2014
http://slidepdf.com/reader/full/beginners-guide-to-sewing-2014 117/164
Machine Sewing Techniques
Beginner’s Guide to Sewing 117
START SHADINGOnce you’re confident with making
outlines, try colouring them in, which is
called shading. Move the fabric
backwards and forwards to fill the
outline with stitches of thread, a bit like
satin stitch in hand embroidery.
APPLIQUÉ MOTIFS Add an extra dimension to your shapes
with appliqué. Cut out shaped pieces of
fabric and attach with straight stitch or
zigzag stitch outlines, or try stitching
over both the appliqué shape and the
background fabric.
LAYERED APPLIQUÉPut together all the skills you’ve
practised and you can create gorgeous
designs like the pretty gift in the
bottom-left photo – it’s layered up with
appliqué motifs, outlining, shading and
other interesting stitch styles.
DARNING FOOTA darning foot differs froma normal presser foot
because it allows you tostitch in whatever directionyou like while still keeping
your fabric smooth. Eachbrand varies so check theinstructions for how to
attach it. Once it’s fitted,slide the fabric underthe foot, drop the
needle and you’reready to start.Most darning feet
can be movedup and down,allowing room for
a hoop underneath.
T o p t i p F o r u n i q u e g r e e t n g s c a r d s , y o u c a n u s e y o u r m a c h
i n e t o e m
b r o i d e r d e s i g n s o n c h u n k y p a p e r !
W o r l d M a g s . n e t W o r l d M a g s . n e t
W o r l d M a g s . n e t

8/15/2019 Beginner's Guide to Sewing - 2014
http://slidepdf.com/reader/full/beginners-guide-to-sewing-2014 118/164
Machine Sewing Techniques
Beginner’s Guide to Sewing118
YOU WILL NEED
One piece of fabric for each
napkin: 49cm (19¼in) square
White thread for bottom bobbin
Decorative strong cotton
thread in 2 colours for top bobbin
Basic sewing kit (see page 12)
Finished size
45cm (17¾in) square
Seam allowance
2cm (¾in) seam included
GlossaryTurn to page 16 for our list of terms
Embroidered
flower napkinBy Laura Wilhelm
Transforming table linen fromsomething functional into a thing of
beauty is really easy – particularly if
you fancy trying machine embroidery. You
don’t even have to make your own napkin –
this design could be applied to napkins you
already have, whether they’re made from
plain or patterned fabric – but of course if
you do make them from scratch then you’ll
get exactly the fabric you want.
Once you’ve got the hang of the flower
design here, experiment with different
colours to get a range of results. And of
course there’s nothing to stop you sketching
your own floral patterns and turning them
into embroidered blooms.
As with all machine embroidery, it’s a good
idea to practise on a few scraps of material
before sewing on your finished napkins.
Stylish Sewingby Laura WilhelmHere’s a collection of 35 contemporary projects,
from clothes and accessories to homewares and
toys. With beautiful photography, and full-size
patterns included, this book will really inspire
you to get sewing. For needle-wielders who are
feeling particularly creative, many of the designs
lend themselves to customisation, letting you pick
your own fabrics or make subtle adjustments.Published by Search Press, PB, £12.99
www.searchpress.com
Bring a little flower power topicnics and lunches with afloral napkin that’s so easy tomake with a sewing machine
W o r l d M a g s . n e t W o r l d M a g s . n e t
W o r l d M a g s . n e t
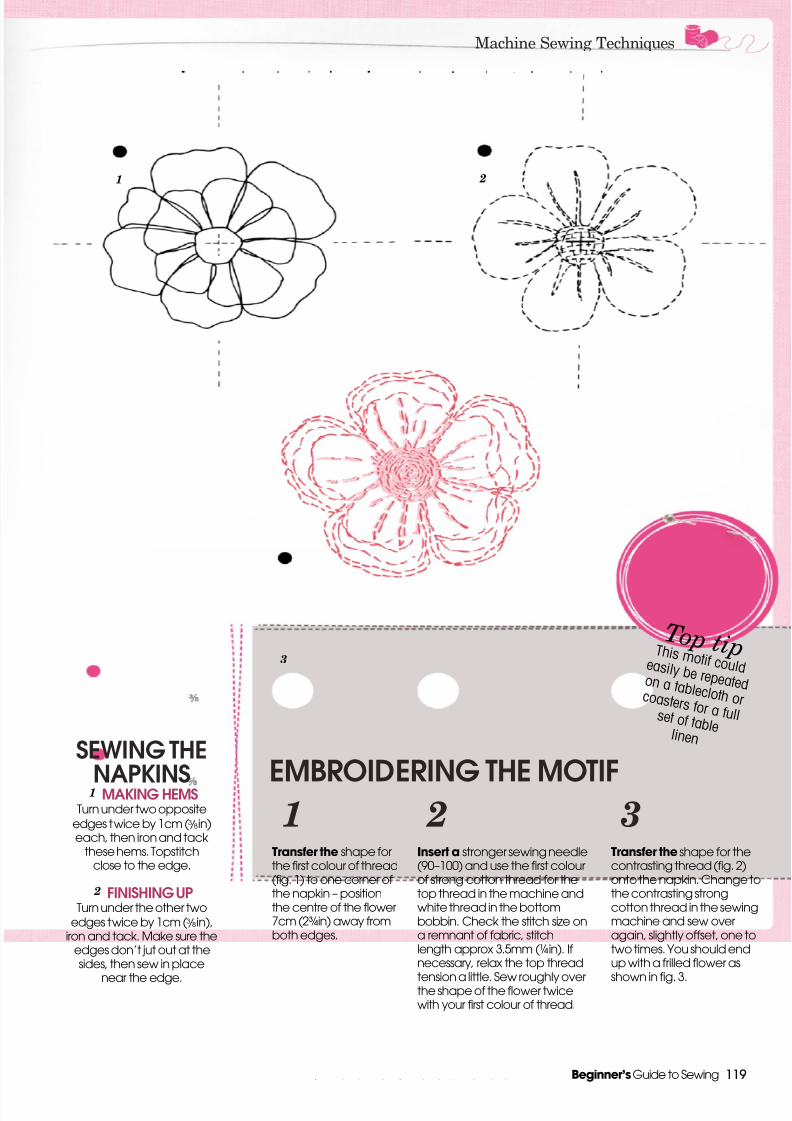
8/15/2019 Beginner's Guide to Sewing - 2014
http://slidepdf.com/reader/full/beginners-guide-to-sewing-2014 119/164
Beginner’s Guide to Sewing 119
Machine Sewing Techniques
EMBROIDERING THE MOTIF
Transfer the shape forthe first colour of thread(fig. 1) to one corner ofthe napkin – positionthe centre of the flower7cm (2¾in) away fromboth edges.
Transfer the shape for thecontrasting thread (fig. 2)onto the napkin. Change tothe contrasting strongcotton thread in the sewingmachine and sew overagain, slightly offset, one totwo times. You should endup with a frilled flower as
shown in fig. 3.
Insert a stronger sewing needle(90–100) and use the first colourof strong cotton thread for thetop thread in the machine andwhite thread in the bottombobbin. Check the stitch size ona remnant of fabric, stitchlength approx 3.5mm (¼in). Ifnecessary, relax the top thread
tension a little. Sew roughly overthe shape of the flower twicewith your first colour of thread.
1 3 2
T o p t i p T h i s m o t i f c o u l d e a s i l y b e r e p e a t e d o n a t a b l e c l o t h o r c o a s t e r s f o r a f u l l s e t o f t a b l e l i n e n SEWING THE
NAPKINS1 MAKING HEMS
Turn under two opposite
edges twice by 1cm (3/ 8in)each, then iron and tack
these hems. Topstitchclose to the edge.
2 FINISHING UPTurn under the other two
edges twice by 1cm (3/ 8in),iron and tack. Make sure the
edges don’t jut out at thesides, then sew in place
near the edge.
1 2
3
W o r l d M a g s . n e t W o r l d M a g s . n e t
W o r l d M a g s . n e t

8/15/2019 Beginner's Guide to Sewing - 2014
http://slidepdf.com/reader/full/beginners-guide-to-sewing-2014 120/164
Beginner’s Guide to Sewing120
Machine Sewing Techniques
YOU WILL NEED
One piece of fabric for the
front: 43cm (17in) square
Two pieces of fabric for the
back: 43cm (17in) square
Thread in assorted colours
15cm (6in) embroidery hoop
Cushion pad 40cm (16in)
square
Basic sewing kit (see page 12)
Finished size
40cm (16in) square
Seam allowance
1.5m (½in) included
Glossary
Turn to page 16 for our list of terms
Freehand
teacup cushionBy Katy Berwick
Create quirky soft furnishings bydrawing with your sewingmachine! This teacup cushionis sure to get people talking…
Free machine embroidery is thetechnique of using your sewing
machine to ‘draw’ on fabric. Rather
than sewing in the rigid straight lines you
might be used to, in free machine sewing
you move the fabric around under the needle
to create images of surprising intricacy.
Kate Smith, author of Makery, says, “I love
how it takes away all the rules. You can just
go where your needle takes you – even if
you’re using a template. If you’ve not tried it
before, be warned that once you get the hang
of it, free machine embroidery is addictive!”
This cool teacup design, taken from Kate’s
book, is the brainchild of The Makery tutor
Katy Berwick . You can see more of Katy’s
work atwww.dropthedog.etsy.com.
Makeryby Kate SmithCovering all sorts of crafts, from jewellery
making to sewing,Makery is a beautifully
presented collection of projects. Inspired by
the classes held at The Makery venue in Bath,
each project is lavishly photographed and
has detailed instructions to ensure that even
complete beginners can create gorgeous gifts,accessories and homewares.
Published by Octopus, PB, £14.99
www.octopusbooks.co.uk
W o r l d M a g s . n e t W o r l d M a g s . n e t
W o r l d M a g s . n e t

8/15/2019 Beginner's Guide to Sewing - 2014
http://slidepdf.com/reader/full/beginners-guide-to-sewing-2014 121/164
W o r l d M a g s . n e t W o r l d M a g s . n e t
W o r l d M a g s . n e t

8/15/2019 Beginner's Guide to Sewing - 2014
http://slidepdf.com/reader/full/beginners-guide-to-sewing-2014 122/164
Machine Sewing Techniques
Beginner’s Guide to Sewing122
SETTING UP YOUR SEWING MACHINE AND TEMPLATE
Strat by setting up yoursewing machine. Followingyour machine’s manual,lower the feed dog (theteeth that are below thepresser foot that draw thefabric through themachine). This will allow youto move the needle freely,as if you were drawingfreehand with the needle.
Set your machine tostraight stitch and ensurethe needle is positionedcentrally. Don’t worryabout the stitch length;you will determine that bymanually drawing thefabric through themachine. Thread yourmachine with thecontrasting thread thatyou want to use for the
teacup design.
Again, following yourmachine’s manual, attachthe darning foot. This willprevent the fabric frompuckering and allows formore stability.
Iron your fabric. Now tracethe teacup outline onto yourfront piece of cushion fabricwith the fine marker pen orchalk. Make sure the teacupis central and square on thefabric. Or you could tracedirectly onto the back of thepaper template using tailor’schalk, then lay the templatechalk down on your fabricand trace the teacup with a
pencil to transfer the chalkdesign to your fabric.
1 3 2 4
1 FIX THE HOOPAttach the embroidery hoop to a
central position of the teacup design.You need to attach the hoop in the
opposite way to usual, so place the inner(smaller) hoop on top of the fabric and
the outer (larger) hoop underneath.Secure and tighten the hoop. Pull
the fabric through the hoop so thatit’s drum-tight (fig. 1).
2 HOOP ON THE MACHINERaise the darning foot, and placethe stretched fabric on the hoopunderneath, ensuring the inner
hoop is uppermost.
3 FIND YOUR THREADSLower the darning foot. Manually lower
and raise the needle into the fabricat your chosen start point using the
fly-wheel – this should bring a loop of thelower (bobbin) thread up to the surfaceof the fabric. Carefully pull on the loop,
so that you have two loose threadson the surface of the fabric – the
top and bottom threads.
4 START SEWINGYou’re ready to sew! Turn the
machine on and gently lower thepedal – make slow stitches at first.
Rather than allowing the machine topull the fabric through, you need toguide the fabric using the hoop, sothat the needle follows the lines ofthe teacup. Try to keep the stitches
even in length by moving the fabric/hoop at an even pace, but don’t
worry too much about following thetemplate lines exactly – wiggly linesgive the finished product an extra
uniqueness and charm.
5 RETRACE YOUR STEPS
For the effect shown in thephotograph, sew several lines ofstitching over each other, tracing
over the lines a few times. You don’tneed to secure your stitching at thestart or end – just ensure it overlaps.
6 MOVE THE HOOPWhen you’re close to the edge ofthe hoop, remove the fabric and
reposition the hoop. You may needto do this several times until you’ve
completed the whole design.
7 PRESS AND FINISHOnce you’ve finished stitching,
remove the fabric from the hoopand press it with a moderate iron.
EMBROIDERING THE TEACUP DESIGN
T o p t i pE x
p e r i m e n t w i t h f r e e m a c h i n e e m b r o i d e r y o n s c r a p s o f f a b r i c b e f o r e y o u e m b a r k o n t h i s p r o j e c t
1
2
3
W o r l d M a g s . n e t W o r l d M a g s . n e t
W o r l d M a g s . n e t

8/15/2019 Beginner's Guide to Sewing - 2014
http://slidepdf.com/reader/full/beginners-guide-to-sewing-2014 123/164
Beginner’s Guide to Sewing 123
Machine Sewing Techniques
Beginner’s Guide to Sewing 123
MAKING THE CUSHION COVER
Set your machineback to standardsewing – replacethe darning footwith a regularpresser foot,change thethread to aco-ordinatingcolour, raise thefeed dogs and
set the stitchlength tomedium.
Place theembroidered fabricin front of you, rightside up. Lay onesmaller fabric pieceon top, right sidefacing down. Theraw edges shouldline up along thetop, bottom andleft-hand sides,
and the neathemmed edgeshould sit vertically, just right of centre.Pin it in place.
Take the twosmaller pieces offabric. Fold over a2.5cm (1in) hemdown one of the43cm (17in) sideson each piece,folding towardsthe back, press,then fold over byanother 2.5cm
(1in). Pin andpress, then stitchtogether close tothe folded-overedge (fig. 2).
Take the secondsmaller fabric pieceand lie it on topwith the right sidefacing down. Theraw edges shouldline up along thetop, bottom andright-hand sidesthis time, with thehemmed edge
lying verticallyleft of centre. Pin itin place.
Stitch all the wayaround the fouredges of thecushion, using a1.5cm (½in) seamallowance (fig. 3).
Carefully trim thecorners, ensuringyou don’t cut tooclose to yourstitching. Turn thecushion coverright side out.Insert the cushionpad to completeyour teacupcushion.
1 3 2 4 5 6
TEMPLATETrace or photocopy
this template at
100% to make
a pattern
W o r l d M a g s . n e t W o r l d M a g s . n e t
W o r l d M a g s . n e t

8/15/2019 Beginner's Guide to Sewing - 2014
http://slidepdf.com/reader/full/beginners-guide-to-sewing-2014 124/164
Machine Sewing Techniques
Beginner’s Guide to Sewing124
All about…
BAG MAKING
Making bags is one of the most
useful projects you can make
with your new-found sewing
skills as there are so many different types
and variations to make. From a larger
simple drawstring bag for a child’s PE kit
or a more miniature one to store dried
lavender to a more complicated clutch bag
– the choices are endless. The Toy Sack on
p76 is ideal for fun storage and the Lunch
Bag on p132 is a perfect way to carry your
lunch to work on a stylish way. Here are
some ideas and instructions to start your
bag-making hobby.
DRAWSTRING BAGS
Drawstring bags are the simplest bags to
make and the best place to start. They
are ideal for storing things because thetop can be pulled up tight to keep the
contents safely inside.
THE BASIC DRAWSTRING
A plain drawstring bag is made from
two pieces of fabric sewn together down
the side and along the bottom. The top is
then turned over twice and stitched down
to make a casing through which the
drawstring is threaded.
Decide how big you want your finished
bag to be, then simply add a seam
allowance to this and cut your fabric
pieces to this size, remembering to add
extra for the casing at the top.
You, your family and your home can never have too many bags, and
learning how to make them must surely count as an essential sewing skill
T o p t i p I f y o u ’ r e m a k i n g a
b a g t h a t w i l l c a r r y
h e a v y i t e m s, y o u c a n
r e i n f o r c e t h e s e a m s –
s e e p a g e 2 8 t o fi n d
o u t h o w
MAKING A GATHERED TOP
This makes a plain drawstring bag look
more special and much prettier.
1Make a basic drawstring bag but
allow extra fabric at the top – for
example, if you want a 5cm (2in) gather
across the top then you need to add 11cm
(5½in) at the top (fig. 1).
2 Fold over the top 1.5cm (½in) then
5cm (2½in) then stitch this down
close to the edge and stitch another line
all the way round 1.5cm (½in) above this
to make the casing (fig. 2).
3
When you pull up the drawstring you
will have a gathered top. To alter the
height of your gather add more or less
fabric to the top of the bag.
MAKING A HANDLED BAG
Bags with handles are really useful – not
only can you vary the size and shape of
the bag to suit your needs but also you
can make the handles different lengths
and widths, depending on use.
Short handles are ideal for small gift
bags when you only need to hold the bag,
or storage bags where the bag will be
hung on a hook or knob.
Medium handles are good for smallhandbags of book-bag styles where you
just need to hold the handles.
Long handles are perfect for shopping
bags where you want to be able to put the
bag over your shoulder. Their length can
be adjusted depending on how far you
want the bag to hang down your body.
MEASURING UP AND CUTTING OUT
1Decide on the width and height of your
finished bag then add a 1.5cm (½in)
seam allowance to the sides and bottom
and 2.5cm (1in) at the top edge. Cut two
pieces to these measurements.
2Now decide on the length of your
handles. Pinning a tape measure to
the top of one of the bag pieces often helps
as you adjust this to see exactly what
length works. You will need to cut two
strips of fabric to this length but add 4cm
(1½in) to each end (1.5cm (½in) for
turning and 2.5cm (1in) to overlap on the
inside of the bag when attaching it).
3 Decide what width you want your
handle to be. Small gift bags will only
need handles that are around 1.5cm
(½in) wide but large shopping bags mayneed up to 5-7.5cm (2-3in). The width you
need to cut is twice the finished width of
the handle plus 1.5cm (½in) either side
for a seam allowance.1 2
W o r l d M a g s . n e t W o r l d M a g s . n e t
W o r l d M a g s . n e t

8/15/2019 Beginner's Guide to Sewing - 2014
http://slidepdf.com/reader/full/beginners-guide-to-sewing-2014 125/164
Machine Sewing Techniques
Beginner’s Guide to Sewing 125
MAKING THE BAG
1Stitch the two bag pieces, right sides
together, down one side, across the
bottom and up the other side.
2 Now turn the top over 1.5cm (½in)
then 1.5cm (½in) again to the wrong
side and stitch into place (fig. 3).
MAKING HANDLES
1 Fold handles in half lengthways rightsides together and stitch down using
a 1.5cm (½in) seam allowance – this will
create a tube.
2 Turn the tube right sides out and
press, making sure the seam runs
down the centre back of the handle (fig. 4).
3 Turn the two short ends under 1.5cm
(½in) to the inside of the tube then
stitch each end of the handle to the inside
of the bag. It’s best to pin them in place
first to make sure you are happy with
their positioning – make sure you put the
end of each handle the same distance
from the side seams as each other, so the
bag hangs straight (fig. 5).
ROUND BOTTOMED BAGS
You can put round bottoms on drawstring
or handled bags. They look really
effective and are practical as they holdmore things and can sit flat on a surface.
You can make the bottom circular or oval.
To calculate the circumference for
measuring your side panels, measure
round the circle or oval.
1First work out how big you want the
diameter of the bottom of the bag to
be then cut this out, adding 6mm (¼in)
all round to the circle.
2 Multiply the diameter by 3.142 and
this will give you the circumference
of the bag body. Add your seam
allowance, plus a little extra for easing to
this and cut it the height you require
(remembering to add on extra for a casing
or a gathered casing) (fig. 6).
3 Even though you have calculated the
circumference of the bag and added a
seam allowance, the circle doesn’t alwaysfit exactly due to fabric movement and
stretch. So, pin the main bag body right
sides together to the circle then pin
exactly where the seam on the bag body
need to go (fig. 7).
4 Take out a few pins and stitch the
body seam. Stitch the circle to the
bottom of the bag (fig. 8).
5 Stitch your casing or handles at the
top to complete (fig. 9).
T o p t i pD r a w s t r i n g b a g s l o o k l o v e l y w h e n r i b b o n o r c o r d i s u s e d f o r t h e t i e – g o f o r e i t h e r c o m p l e m e n t a r y o r c o n t r a s t i n g
c o l o u r s
Bags look so much betterwhen lined as they have more
body and structure whichmeans they stand better andthey also look more finished
inside. Choose a fabric thatcomplements the outer or ismuch bolder to make a
dramatic statement!
1Make the bag lining in
exactly the same way asthe bag outer but leave asmall gap in one of the side
seams for turning later.
2Put the outer inside thelining right sides together,
matching all seams.
3Stitch together round the
top edge then turn it rightsides out. Sew up the smallgap in the lining then push the
lining inside the bag.
4If adding handles, pin
them in place, matchingraw edges, before sewing theouter and lining together,
stitching through all layers.
LINING YOUR BAG
3
7 8 9
4 5 6
W o r l d M a g s . n e t W o r l d M a g s . n e t
W o r l d M a g s . n e t

8/15/2019 Beginner's Guide to Sewing - 2014
http://slidepdf.com/reader/full/beginners-guide-to-sewing-2014 126/164
Beginner’s Guide to Sewing126
Machine Sewing Techniques
YOU WILL NEED
Fabric for main part: 50x112cm
(20x44in)
Fabric for contrast triangles:
20x112cm (8x44in)
Iron-on medium interfacing:
20x112cm (8x44in)
Fabric for lining: 40x112cm
(16x44in)
Two 11mm (3/ 8in) gilt eyelets
and fixing tool and hammer
Sticky tape
Cord: 3.4m (3¾yds) x 6mm (¼in)
Thread in matching colours
Basic sewing kit (see page 12)
Finished size
39.5cm (15½in) tall x 35cm
(13¾in) wide
Seam allowance
1cm (3/ 8in) included
Glossary
Turn to page 16 for our list of terms
Sporty
duffle bagBy Cheryl Owen
This versatile bag is easy to make,simple to customise and sohandy you’ll wonder how youmanaged without it!
K eep your belongings safe and yourhands free with this easy-to-make
duffle bag. It’s kept closed with a
drawstring in a channel at the top, which is
threaded back through the bottom of the bag
to form the straps.
Contrasting fabric triangles are decorative
but also reinforce the corners of the bag so
you can fix metal eyelets to thread the
drawstring through. Choose a hardwearing
fabric to make sure your bag will withstand
plenty of use!
The Book of Bagsby Cheryl OwenMake sure you’re never without the perfect
accessory – The Book of Bags contains 30
stunning projects that cover all sorts of bags,
from duffle bags to handbags, beach bags,
purses and more. With detailed instructions,
templates and photos, Cheryl Owen’s
designs are easy to follow and simple tomake, even for complete beginners.
Published by New Holland, PB, £14.99
www.newhollandpublishers.com
W o r l d M a g s . n e t W o r l d M a g s . n e t
W o r l d M a g s . n e t

8/15/2019 Beginner's Guide to Sewing - 2014
http://slidepdf.com/reader/full/beginners-guide-to-sewing-2014 127/164
Beginner’s Guide to Sewing 127
Machine Sewing Techniques
6MAKING THE
TRIANGLESCut two 46x37cm (18x14½in) rectanglesfrom the main fabric. The 46cm side is thelength of the bag and the 37cm side is thewidth. With right sides facing up, tack atriangle to the bottom corners of bothpieces of fabric, matching the raw edges.Stitch close to the pressed edges (fig. 2).
Using the template, cut four trianglesfrom your triangle fabric and theiron-on medium interfacing. Press theinterfacing to the wrong side of the
triangles. Press under 1cm (3/ 8in) on thelongest edge of each triangle (fig. 1).
21
1 2
T o p t i p Ap p l i q u é d i n i t i a l s w i l l q u i c k l y t u r n t h i s p r o j e c t i n t o t h e p e r f e c t P E b a g f o r s c h o o l k i d s
TEMPLATEUsing the dimensions
shown, draw this
template onto plain
paper to make a pattern
1 0 c m ( 4 i n )
14cm (5½in)
W o r l d M a g s . n e t W o r l d M a g s . n e t
W o r l d M a g s . n e t

8/15/2019 Beginner's Guide to Sewing - 2014
http://slidepdf.com/reader/full/beginners-guide-to-sewing-2014 128/164
Machine Sewing Techniques
Beginner’s Guide to Sewing128
MAKING THE BAG
Place the two bag fabricpiece right sides together andstitch down one side, along thebottom and up the other side,but starting and finishing 2cm(¾in) from the top edge. Clipthe corners and press theseams open. Press under 1cm(3/ 8in) on the upper edge of the
bag and stitch in place to hemthe bag (fig. 3).
Cut two 38.5x37cm (15x14½in) rectangles of liningfabric. With right sides facing, stitch the long sideedges and the short lower edge of the linings
together, starting and finishing 1.5cm (5/ 8in) belowthe short upper edge. Clip the corners and pressthe seams open. Turn the lining right side out.
Slip the bag inside the lining with wrong sidesfacing, matching the seams and lining up the
bottom edges – the lining will come below the topedge of the main bag. Pin and tack the raw edgeof the lining to the bag (fig. 4).
Turn the bag right side out. Pressunder 4.5cm (1¾in) on the upperedge of the bag and pin in place.To make the channel for thedrawstring, stitch around the bag1.5cm (5/ 8in) below the upperedge then 3.5cm (13/ 8in) belowthe upper edge again (fig. 5).
3 4 5
3
4
5
W o r l d M a g s . n e t W o r l d M a g s . n e t
W o r l d M a g s . n e t

8/15/2019 Beginner's Guide to Sewing - 2014
http://slidepdf.com/reader/full/beginners-guide-to-sewing-2014 129/164
Beginner’s Guide to Sewing 129
Machine Sewing Techniques
Beginner’s Guide to Sewing 129
FINISHING THE BAG
Make sure the lining fits neatly intothe lower corners of the bag. Lie thebag down smooth and flat. Fix aneyelet in the centre of the trianglesthrough all the layers, following themanufacturer’s instructions.
Cut two 4cm (15/ 8in) squares of thetriangle fabric and the interfacing.Press the interfacing to the wrong sideof the fabric pieces. Press under 6mm(¼in) on three edges. Starting at theraw edge, wrap the fabric around theoverlapped cord ends, hand sew tothe cord with small, neat stitches toconceal the cord ends.
Bind sticky tape around the centreand ends of the cord. Cut the cord inhalf (through the taped section). Use abodkin to thread one cord through thechannel, entering and emergingthrough the same gap. Insert one endof the cord through the eyelet on thesame edge of the bag. Overlap theends of the cord by 2.5cm (1in). Hand
sew the cord ends securely together(fig. 6). Repeat with the other cordthrough the opposite gap and eyelet.
1 3 2
T o p t i p M e t a l e y e l e t s a n d p u n c h e s c a n b e b o u g h t o n l i n e o r i n g o o d s e w i n g s h o p s
6
W o r l d M a g s . n e t W o r l d M a g s . n e t
W o r l d M a g s . n e t

8/15/2019 Beginner's Guide to Sewing - 2014
http://slidepdf.com/reader/full/beginners-guide-to-sewing-2014 130/164
Beginner’s Guide to Sewing130
Machine Sewing Techniques
YOU WILL NEED
Oilcloth fabric for lining:
56x34cm (22x13½in)
Oilcloth fabric for outer:
56x36cm (22x14½in)
Oilcloth fabric for tag: 16x7cm
(6½x 2¾in)
Thread in assorted colours
Bulldog clip
Basic sewing kit (see page 12)
Optional extras
Stazon inkpad
Letter stamps
Dry-wipe pen
Baker’s twine or ribbon:
35cm (13¾in)
Finished size
35x27cm (13¾x10½in)
Seam allowance
1cm (¼in) included
Glossary
Turn to page 16 for our list of terms
Oilcloth
lunch bagBy Kate Smith
A retro-style bag is just the thingfor toting a tasty lunch or snack,and oilcloth is the perfecteasy-clean material to use
Packing up a lunch for yourself orsomeone else can be comforting, and
how cared-for would a person feel if it
came in a specially handmade bag? This
lunch bag mimics the shape and style of a
classic brown paper bag by making a
flat-based shape with a pinking-sheared
edge. Oilcloth is great to work with – no
fraying – and it’s wipe-clean. The inner bag
is easy to remove, and the name tag and
bulldog clip add a special touch.
Makeryby Kate SmithHere are 30 gorgeous projects arranged
according to whether you want to make
something to wear, something to adorn your
home or something to give to someone. There’s
a very handy tips section, too, which is full of
lessons Kate has learned along the way and
generously shares with the world. Photographyis by Aliki Kirmitsi and Ania Wawrzkowicz.
Published by Mitchell Beazley, PB, £14.99
www.octopusbooks.co.uk
W o r l d M a g s . n e t W o r l d M a g s . n e t
W o r l d M a g s . n e t

8/15/2019 Beginner's Guide to Sewing - 2014
http://slidepdf.com/reader/full/beginners-guide-to-sewing-2014 131/164
W o r l d M a g s . n e t W o r l d M a g s . n e t
W o r l d M a g s . n e t

8/15/2019 Beginner's Guide to Sewing - 2014
http://slidepdf.com/reader/full/beginners-guide-to-sewing-2014 132/164
Machine Sewing Techniques
Beginner’s Guide to Sewing132
1 FIRST FEW STEPSRepeat steps 1–5 for making the lining,but with your outer oilcloth fabric. Theonly difference will be that your folded
fabric in step 2 will be slightly larger.
2 DEFINE THE EDGESTo create the defined edges on theside seams, take your outer bag and
turn it right side out. Carefully crease thetall straight edges from the base to the
top on all four corners of the bag.Finger-press the creases in place (fig.2).
3 CREATE CONTRASTChange to contrasting thread on yourmachine and carefully sew the lengthof these folds close to the edge – with a2mm (1/ 12in) seam allowance – from the
base to the top. Have a practice ona scrap first. To get a nice even line of
stitching, line up the folded edge with aline on the plate below the presser foot.
Reverse stitch at the start and end ofeach line to secure your sewing.
4 FINISH THE BAGSit the lining bag inside your outer bag,making sure the two bags fit together
comfortably. To finish, fold over thetop of your bag and secure the
fold with the bulldog clip.
MAKING THE LINING BAG
MAKING THE OUTER BAG
Trim the top 56cm(22in) edge of thelining oilcloth fabricwith pinking shears.
Thread up yourmachine withmatching threadand set to straightstitch, stitch length2.5–3. Stitch downthe side and alongthe bottom with a
1cm (3/ 8in) seamallowance tocreate a pocket.
Fold the oilcloth in halflengthways, matchingup the two shortedges, with right sidesfacing. Don’t pin theoilcloth before sewingas it will leave holes inthe fabric. Instead,use masking tape tohold edges together.
Make the flat base ofthe bag: put your handinside the (inside-out)bag and flatten outone of the corners tomake a triangle, withthe side seam that youhave just sewn runningdown the middle of thetriangle (fig.1). Securewith a pin (this time itwon’t matter if your pinmarks the oilcloth as
the point will bediscarded).
With your pen or tailor’schalk, mark a linehorizontally across thetriangle, measuring 8cm(3¼in) from edge to edge(fig.1). This line really doesneed to be horizontal, oryour bag will be wonky.Machine stitch along theline, securing byreversing. Cut off thetriangle point, leaving a
1cm (3/ 8in) seam
allowance. Repeat onthe other corner.
1 3 2 4 5
T o p t i p U s e ‘ i r o n
- o n v i n y l ’
t o m a k e y o u r o w n
o i l c l o t h – s i m p l y i r
o n
t h e v i n y l o n t o t h e
f a b r i c o f y o u r
c h o i c e
W o r l d M a g s . n e t W o r l d M a g s . n e t
W o r l d M a g s . n e t

8/15/2019 Beginner's Guide to Sewing - 2014
http://slidepdf.com/reader/full/beginners-guide-to-sewing-2014 133/164
MAKING A TAG
FOR YOUR BAG
1 STITCH THE SEAMSFold the fabric in half widthways, with wrong
sides together, so you have a rectangle8x7cm (3¼x2¾in). Fold your baker’s twine in
half and place the folded end betweenthe layers of your tag at the top. Then stitcharound the outside, all four edges, leaving
a 3mm (1/ 8in) seam allowance.
2 WRITE A MESSAGEUsing your letter stamps and Stazonink,
stamp a name or message on to the backof the tag. (Alternatively you could leave itblank for a message written in a dry-wipe
pen.) When the ink is dry, tie the looseends of baker’s twine to the bulldog clip.
W o r l d M a g s . n e t W o r l d M a g s . n e t
W o r l d M a g s . n e t

8/15/2019 Beginner's Guide to Sewing - 2014
http://slidepdf.com/reader/full/beginners-guide-to-sewing-2014 134/164
Machine Sewing Techniques
Beginner’s Guide to Sewing134
All about…
MACHINEPATCHWORK
Machine-pieced patchwork is
quicker to do and stronger than
hand-pieced, but you do get a
different effect and it’s obviously less
portable. Crafters often prefer one
method to the other – or maybe it just
depends on your mood!
FABRICS TO USE
FabricsThe easiest fabrics to use for patchwork
are closely woven, 100% cotton. They
don’t fray too much and are easy to cut
and stitch together. Patchwork and
quilting shops sell an amazing array ofcolours and patterns so it’s easy to find
fabrics that work together. They usually
come in standard 115cm (45in) widths so
you can buy a selection to join together.
Backing fabricIf you are quilting your patchwork you
will also need to buy a backing fabric and
one to bind it. Make sure these fabrics are
the same weight as your main fabric. You
can use a plain fabric that co-ordinates
with the design on top, or be adventurous
and choose a really interesting pattern or
design so the back looks as good as the
front. For binding, choose a fabric to
co-ordinate with your top or one that will
make the patchwork fabrics really stand
out against it.
PLANNING YOUR DESIGNOnce you’ve chosen your fabric and
decided on the pattern you want to create
then the best thing to do is to draw a plan
of your finished patchwork on graph
paper. Add the measurements of each
piece to this so you can see what the
finished designs will look like. From thisyou need to write a cutting list, which
should include the seam allowances for
each piece too. A 6mm (¼in) seam is
standard for joining together patchwork
pieces but you can change this as long as
you’re consistent and add the same seam
allowance to each piece.
CUTTING OUT You can either cut out your patchwork
pieces by hand or using a rotary cutter. If
you’re cutting out by hand then the best
thing to do is draw your cutting lines in
pencil or tailor’s chalk on the back of your
fabric. Use a sharp pair of dressmaking
scissors to cut out all the pieces. Stack
and label them so you know which piece
goes where.
ROTARY CUTTINGIt’s far quicker and more accurate if you
cut out your fabric using a rotary cutter.
The basis of rotary cutting is that fabric is
cut first in strips – usually across the
width of the fabric, then cross-cut into
squares or rectangles.
Press all your fabric pieces before you
begin, but before you start cutting your
strips make sure your fabric edge is
straight and you remove the selvedge as
this can pull the fabric out of shape. Put
your fabric on your cutting mat, line up
the selvedge with one of the lines on the
mat then cut 1.5cm (½in) inside this to
get a good straight edge. Use this edge as
a guide for cutting out your fabric strips.
Always make sure your fabric is flat on
the mat and smooth it out, then place the
ruler on top with the edge placed the
distance away from your straight edge
that you want your strip to be. Hold theruler steady on the fabric with your hand,
applying enough pressure so it doesn’t
move. Run the rotary cutter along the
ruler edge to cut a perfect strip (fig. 1).
Once you’ve cut your strips you can
now cut these into the shapes you want
your finished pieces to be.
It’s quick, it’s nifty, it’s rather addictive! Machine stitching is a great way to
whip up pretty patchwork effects – we’re here to show you how it’s done
1
2
W o r l d M a g s . n e t W o r l d M a g s . n e t
W o r l d M a g s . n e t

8/15/2019 Beginner's Guide to Sewing - 2014
http://slidepdf.com/reader/full/beginners-guide-to-sewing-2014 135/164
Machine Sewing Techniques
Beginner’s Guide to Sewing 135
JOINING THE PIECES TOGETHER You will have decided your seam
allowance when you cut the fabric pieces
out so make sure you use this when you
stitch them together. Your sewing
machine will have seam allowancesmarked on it so all you need to do is place
the two pieces of fabric to be joined right
sides together and stitch, making sure
the raw edges of the fabric run along the
sewing machine line to get an accurately
placed seam.
If you want to be sure you have the
correct seam allowance, unthread your
machine and stitch through a piece of
paper, lining up the edge of it on the seam
allowance line. Now remove the paper
and check that the holes that have been
created are the correct distance from the
edge of the paper. If it isn’t exactly right
then redo it – you can always mark this
seam allowance on the bed of your
machine with a piece of masking tape.
You only really need to do this if you’re
using a non-standard seam allowance
that’s not marked on your machine.
Use a thread that matches your fabric
so the stitches won’t show on the right side.
CHAIN PIECINGThis is a great technique for joining lots
of fabric pieces together and saves you
having to start and stop your thread eachtime. Put all the pairs of patches or strips
together ready in a pile. Place the first
pair in the machine, right sides together,
and stitch. Just before you reach the end,
stop stitching and pick up the next pair.
Place them on the bed of the machine, so
that they just touch the first pair of
patches, then stitch the next pair straight
after the first. Continue this until you’ve
stitched all the pairs together in a chain
(fig. 2). You can cut the threads between
each pair to separate them.
PRESSINGIt’s best to press your seams open or to
one side (whichever you prefer) after
you’ve stitched them and before you join
them to other pieces. This will give you a
neater and more accurate finish, and also
makes the stitching a lot easier.
ADDING THE BORDERSMost patchwork quilts have borders
around them. To find out how to add a
border, see the instructions on p66. You
can either add borders to the patchwork
before you quilt it or quilt the whole piecefirst and add borders later, in the form of
binding. A narrow 6mm (¼in) binding will
neatly finish off a small quilt, but use a
deeper 5cm (2in) binding for a larger quilt.
EQUIPMENT NEEDEDRotary cutter
There are several brands, mainly inthree sizes: small, medium and large.
Medium is the most commonly usedfor patchwork. The blade is extremelysharp, so be careful when you use it.You slide it open for use so remember
to close it as soon as you’ve finished.The blades do go blunt so replaceyours when it starts to ‘miss’ threads.
Self-healing cutting mat
This is essential for rotarycutting – don’t use a rotary cutter
without one. You can buy them in a
variety of shapes and sizes, usuallywith a measured grid printed on
one side. Buy the biggest one that
will fit on your table so you canavoid having to cut fabric in stages,
which can give an uneven edge.
Rotary cutting rulerThese are made from acrylic and
must be used with a rotary cutter.Don’t use metal rulers, as themetal will blunt the blade if you
accidentally cut into it. The rulersare marked with measurements
and angled lines to use as aguide when cutting fabrics. Thereare a variety of sizes and shapesyou can buy.
Scissors (fabric and paper)
Make sure these are sharp, andnever use your fabric scissors on
paper or they’ll go blunt.
NeedlesFor hand quilting you’ll need
betweens needles. For tacking
fabric layers together, it’s best touse longer crewel needles.
PinsLong pins with glass heads are
ideal as they’ll hold the fabricsecurely together and you caniron over the heads without
melting them.
W o r l d M a g s . n e t W o r l d M a g s . n e t
W o r l d M a g s . n e t

8/15/2019 Beginner's Guide to Sewing - 2014
http://slidepdf.com/reader/full/beginners-guide-to-sewing-2014 136/164
Beginner’s Guide to Sewing136
Machine Sewing Techniques
YOU WILL NEED
About six 100% wool sweaters
(not machine washable) – in
addition to sheep’s wool, you
could consider cashmere,
alpaca and angora
Threads in assorted colours
Washing machine/dryer
Small piece of stiff cardboard
Pen
Basic sewing kit (see page 12)
Finished size
23x191cm (9x75in)
Seam allowance
6mm (¼in) included
Glossary
Turn to page 16 for our list of terms
Pieceful
easy scarfBy Susan Wasinger
With some help from a washingmachine you can reinvent yourneglected woollen sweaters intoa vibrant patchwork scarf
Up to your neck in old sweaters?Have you ever accidentally washed
your favourite woollen jumper in
really hot water and had it come out looking
like a tea cosy? Although it’s a sad day for
your sweater, it’s just that transformation
that makes this scrumptiously soft scarf
possible. Fun to mix and match, simple to
stitch together, it’s a great way to make a
warm and fuzzy scarf without ever touching
a knitting needle.
A sewing machine can make light work of
patchwork, letting you quickly stitch
together dozens of pieces of fabric to create
unique garments. And with the washing
machine taking care of the felting process,
this is a really easy project!
The Feisty Stitcherby Susan WasingerSusan Wasinger looks at a sewing machine
and sees endless possibilities! The Feisty Stitcher
contains 20 projects that encourage you to
experiment with your machine, from punching
holes in non-fabric materials, to playing with
seams to create 3D objects. With a focus on
recycling and using unusual materials, this isa treasure trove of unique ideas.
Published by Lark, PB, £12.99
www.larkcrafts.com
W o r l d M a g s . n e t W o r l d M a g s . n e t
W o r l d M a g s . n e t

8/15/2019 Beginner's Guide to Sewing - 2014
http://slidepdf.com/reader/full/beginners-guide-to-sewing-2014 137/164
W o r l d M a g s . n e t W o r l d M a g s . n e t
W o r l d M a g s . n e t

8/15/2019 Beginner's Guide to Sewing - 2014
http://slidepdf.com/reader/full/beginners-guide-to-sewing-2014 138/164
Machine Sewing Techniques
Beginner’s Guide to Sewing138
MAKING THE SCARF
Cut out a 9x21cm (3½x8in) cardboardrectangle. Use this cardboard templateto cut 28 ‘bricks’ out of the feltedsweaters (fig. 1).
Set your machine to an overcast stitch(a wide zigzag works too). Experimentwith a fabric scrap until you get thewidth you want. Pin together two bricksalong the short end, overlapping eachpiece about 6mm (¼in). Sew togetherwith the overcast stitch (fig. 2).
1 2Start with 100% wool-fibre sweaters(sheep’s wool, cashmere, angoraor alpaca) in a variety of colours
and patterns. Machine-wash themon a hot cycle and tumble dry in ahot dryer. This will shrink and tangle
the fibres to make a dense,fray-free felted fabric that’s warm,
fuzzy and easy to work with.Repeat the process if necessary to
get a satisfying level of felting.
FELTING THE
SWEATER
1
4
2
5
W o r l d M a g s . n e t W o r l d M a g s . n e t
W o r l d M a g s . n e t

8/15/2019 Beginner's Guide to Sewing - 2014
http://slidepdf.com/reader/full/beginners-guide-to-sewing-2014 139/164
Beginner’s Guide to Sewing 139
Machine Sewing Techniques
Beginner’s Guide to Sewing 139
Make the side edges straight bysnipping off any ‘bulge’ created by theseam. Then trim the seam so it’s flush tothe stitching on both sides of the scarf.Repeat steps 1, 2, and 3 to make twonine-brick-long columns and one10-brick-long column (fig. 3 and 4).
Pin the 10-brick column to onenine-brick column on the long side.Let the seams offset by about half abrick, top to bottom, to make a moreinteresting pattern. Overlap the twocolumns about 6mm (¼in) and pin,sew and trim just as before (fig. 5).
Add the third column (the othernine-brick one) on the other side of the10-brick column. Pin, sew and trim asbefore. Cut the excess length off the10-brick column to even up the scarf’stop and bottom. You can use a warmiron to flatten and square up the scarf.Trim any uneven edges or errantthreads to finish (fig. 6).
3 4 5
TEMPLATEUsing the dimensions shown,
draw this template onto plain
paper to make a pattern
T o p t i p Y o u c o u l d m a k e t h e s c a r f l a r g e r b y m a k i n g t h e i n d i v i d u a
l ‘ b r i c k s ’ a l i t t l e w i d e r o r t a l l e r – o r s m a l l e r , i f y o u p r e f e r
Individualsweater piece
or ‘brick’
6
3
9cm (3½in)
20cm(8in)
W o r l d M a g s . n e t W o r l d M a g s . n e t
W o r l d M a g s . n e t

8/15/2019 Beginner's Guide to Sewing - 2014
http://slidepdf.com/reader/full/beginners-guide-to-sewing-2014 140/164
Beginner’s Guide to Sewing140
Machine Sewing Techniques
YOU WILL NEED
Three different print fabrics for
the patchwork squares
Pattern paper
Fabric for seat pad back
Fabric for the seat ties:
36x20cm (14x8in)
Medium weight wadding
Thread in matching colours
Basic sewing kit (see page 12)
Finished size
To match your chair
Seam allowance
1.5cm (½in) included
Glossary
Turn to page 16 for our list of terms
Patchwork
seat padBy Chris Jefferys
Spruce up basic wooden chairswith these easy-sew seat pads!They’re a fun way to give yourdining room a fresh new look!
You don’t need to be a masterupholsterer to brighten up tired or
plain chairs. These fun, floral seat
pads are a great way to practise your new
patchwork skills using just a few pieces of
fabric from your stash.
All you need to do is piece together a
patchwork top piece, fill it with wadding for
a comfy finish, then finish with no-fuss
fabric ties. We’ve used bold floral prints, but
switching the fabrics will quickly alter the
finish to match the rest of your decor.
Give it an outdoors twist by making a
version with sturdy fabrics for garden
chairs or pick a sweet, pastel print and you
could alter this project to fit a rocking chair
in a baby’s nursery. The options are
endless, so pick a chair and have some fun!
Weekend Projects: Soft Furnishingsby Chris JefferysHere’s a collection of 50 gorgeous soft
furnishing projects for your home. Divided
into four sections (Beds, Chairs, Tables and
Windows), instructions are accompanied by
step-by-step illustrations. Many items are easy
to make but, with practice, beginners can
graduate to more complex projects, such aslined curtains and fitted bed linen.
Published by New Holland, HB, £9.99
www.newhollandpublishers.com
W o r l d M a g s . n e t W o r l d M a g s . n e t
W o r l d M a g s . n e t

8/15/2019 Beginner's Guide to Sewing - 2014
http://slidepdf.com/reader/full/beginners-guide-to-sewing-2014 141/164
Beginner’s Guide to Sewing 141
Machine Sewing Techniques
SEWING THE SEAT PADCUTTING OUT
THE FABRIC1 SEW A PATCHWORK ROW
Take three of your patchwork squares
and sew them right sides together intoone long strip to make the top row. Trimthe seam allowances and press open.
2 MAKE TWO MORE ROWSStitch the middle row and bottom row inthe same way. If you want a balanced
finished design, number your threedifferent patchwork fabrics and then
vary the order in which you stitch themtogether – for example 1, 2, 3 for the toprow, 3 ,1, 2 for the middle row and 2, 3, 1
for the bottom row. If you prefer arandom look, just stitch them together in
any order you think looks best.
3 JOIN THEM TOGETHERNow stitch your three patchwork rowsright sides together by sewing alongtheir long edges, to create a largesquare patchwork panel (fig. 1).
4 MAKE THE FRONT PIECEPlace your paper pattern (see ‘Cutting
out the fabric’) onto the patchworksquare you made in step 3. Add a
1.5cm (½in) seam allowance all aroundthe pattern then trace this shape
and cut out (fig. 2).
5 MAKE THE BACK PIECETake your piece of backing fabric andcut it to match exactly the same shape
and size as your finished front piecefrom step 4 .
Start by making a paper
pattern, using pattern paper,to match the size and shape
of your chair seat.
Patchwork squares: takeyour seat pattern and
measure the distance frontto back and side to side.
Take the longest of these twomeasurements and divide
by three to calculate the sizeof one square. Add 1.5cm
(½in) seam allowance all the
way round to this square. Cutnine squares of patterned
fabric to match thismeasurement.
For the chair seat ties, cutfour pieces of fabric, eachmeasuring 36x5cm (14x2in).
6 CREATE YOUR CHAIR TIESTo do this, take your first piece of seat tie
fabric and press 1cm (3/ 8in) to the wrongside across both short ends, and along
both long edges. Fold the tie in halflengthways, wrong sides together and
press again. Stitch down thelength of the tie.
7 POSITION THE TIESPlace the ties on to the right side of the
pad front, positioning them in pairsat each of the two back corners.
Arrange the ends of the ties level withthe raw edge and stitch in place,
1.5cm (½in) from the edge.
8 SEW IT ALL UPPlace your back and front pad pieces
right sides together. Stitch the twopieces together, starting and finishing
on the back edge, 5cm (2in) in from thecorners, leaving an opening along theback edge. Trim the corners, then press
all the seams open, including theopening. Turn the pad right side out,
and press again for a neat finish.
9 AND FINALLY...Cut your wadding to the same size as
the finished pad then slip it through theopening along the back edge. Tuck inthe raw edges along the opening thenhand stitch the opening closed usingsmall slip stitches. Tie your pad to the
back of the chair, finishing yourties in a bow.
1 2
T o p t i p
U s e m a t c h i n g r i b
b o n
o r c o t t o n t a p e t o
m a k e t i e s i f y o u
p r e f e r
W o r l d M a g s . n e t W o r l d M a g s . n e t
W o r l d M a g s . n e t
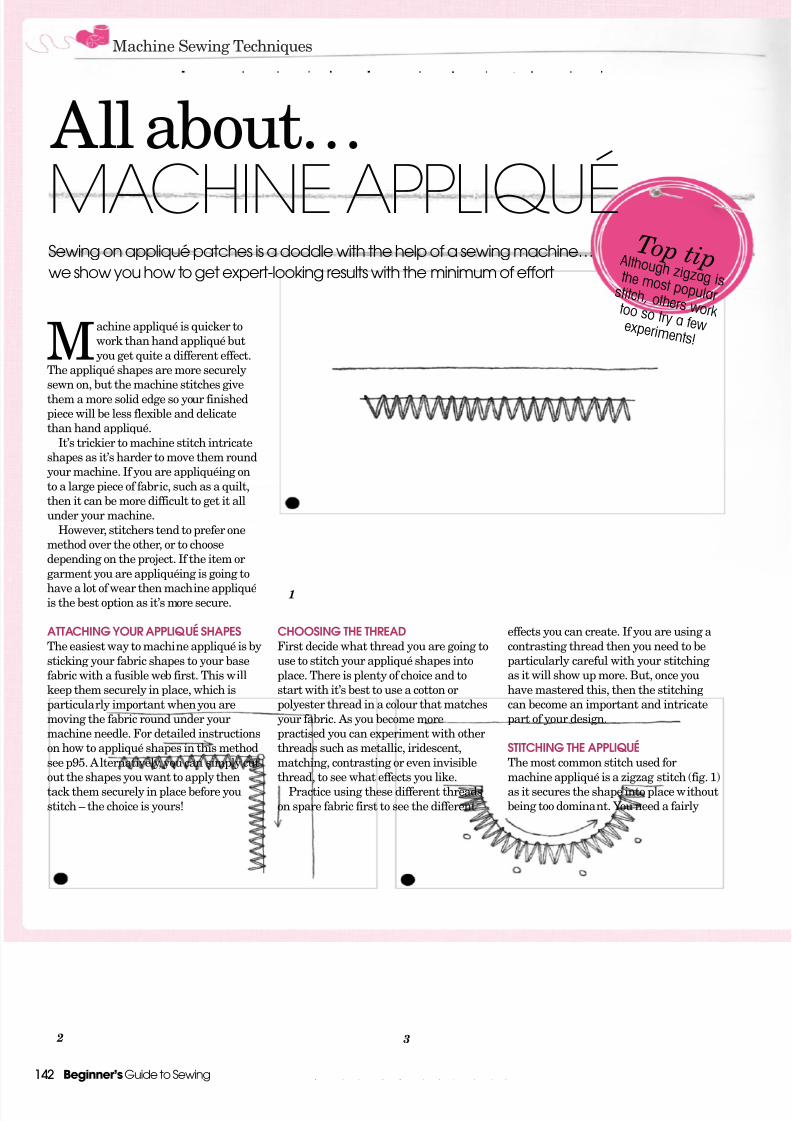
8/15/2019 Beginner's Guide to Sewing - 2014
http://slidepdf.com/reader/full/beginners-guide-to-sewing-2014 142/164
Machine Sewing Techniques
Beginner’s Guide to Sewing142
All about…
MACHINE APPLIQUÉ
Machine appliqué is quicker to
work than hand appliqué but
you get quite a different effect.
The appliqué shapes are more securely
sewn on, but the machine stitches give
them a more solid edge so your finished
piece will be less flexible and delicate
than hand appliqué.
It’s trickier to machine stitch intricate
shapes as it’s harder to move them round
your machine. If you are appliquéing on
to a large piece of fabric, such as a quilt,
then it can be more difficult to get it all
under your machine.
However, stitchers tend to prefer one
method over the other, or to choose
depending on the project. If the item or
garment you are appliquéing is going to
have a lot of wear then machine appliquéis the best option as it’s more secure.
ATTACHING YOUR APPLIQUÉ SHAPESThe easiest way to machine appliqué is by
sticking your fabric shapes to your base
fabric with a fusible web first. This will
keep them securely in place, which is
particularly important when you are
moving the fabric round under your
machine needle. For detailed instructions
on how to appliqué shapes in this method
see p95. Alternatively, you can simply cut
out the shapes you want to apply then
tack them securely in place before you
stitch – the choice is yours!
CHOOSING THE THREADFirst decide what thread you are going to
use to stitch your appliqué shapes into
place. There is plenty of choice and to
start with it’s best to use a cotton or
polyester thread in a colour that matches
your fabric. As you become more
practised you can experiment with other
threads such as metallic, iridescent,
matching, contrasting or even invisible
thread, to see what effects you like.
Practice using these different threads
on spare fabric first to see the different
effects you can create. If you are using a
contrasting thread then you need to be
particularly careful with your stitching
as it will show up more. But, once you
have mastered this, then the stitching
can become an important and intricate
part of your design.
STITCHING THE APPLIQUÉThe most common stitch used for
machine appliqué is a zigzag stitch (fig. 1)
as it secures the shape into place without
being too dominant. You need a fairly
Sewing on appliqué patches is a doddle with the help of a sewing machine…
we show you how to get expert-looking results with the minimum of effort
1
2 3
T o p t i p Al t h o u g h z i g z a g i s t h e m o s t p o p u l a r s t i t c h , o t h e r s w o r k t o o s o t r y a f e w e x p e r i m e n t s !
W o r l d M a g s . n e t W o r l d M a g s . n e t
W o r l d M a g s . n e t

8/15/2019 Beginner's Guide to Sewing - 2014
http://slidepdf.com/reader/full/beginners-guide-to-sewing-2014 143/164
Machine Sewing Techniques
Beginner’s Guide to Sewing 143
USINGSTABILISER
Stabilisers are really importantin machine appliqué,
especially when you’re usinga zigzag stitch, particularly
the satin stitch. This is becauseit keeps your stitches evenand stops the fabric from
pulling out of shape. Thereare various makes of stabiliseryou can buy, so ask for adviceat your local fabric shop – orone can be bought online.
Place a piece of stabiliserthat is larger than your
appliqué shape beneaththe base fabric you are
appliquéing onto.Stitch the appliqué fabricon in the usual way.
Once you have finished allyour stitching you can remove
it from beneath and just thestitches are left stabilised.
close zigzag so the fabric won’t fray but
not too tight or the stitching will be too
dense. A stitch width between 1mm and
3mm (1/ 24-1/ 8in) wide is about right.
Set the stitch length just above (not at)
the satin-stitch setting, or between 0.5
and 1mm. Practice setting the stitch
width and length on spare fabric until
you are happy with the finished effect.
Using a clear presser foot, line up your
appliqué shape right in the middle of your
foot, so that the needle will go into thefabric right at the very edge. Take a few
very small straight stitches along the
edge of the shape to secure the thread.
Now stitch round the shape so that the
needle goes into the fabric just outside
the space and into the fabric again just
inside the fabric shape.
To finish off work a few stitches
backwards to secure the thread.
STITCHING CORNERSIf your shape has corners, manually place
your needle right at the corner, in the
main fabric. Lift your presser foot, pivot
the fabric until it is aligned, then begin
stitching again (fig. 2).
STITCHING CURVESOn larger, more gradual curves, stitch
slowly round the curves, easing the fabric
as you go, to achieve a smooth line of
stitches. On smaller or tighter curves,pivot the needle in the same way as for
corners, only move the fabric round a
little so you just work round the curve
gradually. A really good way of achieving
smooth curves is to mark your shape
with the 12 positions of the clock before
you begin. Then, as you are stitching,
pivot the needle at each marked position
and you will get a smooth curved edge.
STITCHING INSIDE CURVESStop stitching at the first pivot point with
the needle down in the appliqué, rather
than the base, fabric. Now raise the
machine foot, move the fabric roundslightly then stitch to the next pivot point.
Continue in this way until you have
stitched the whole curve (fig. 3).
STITCHING OUTSIDE CURVESWork these in the same way as for inside
curves, but pivot with the needle down in
the base, rather than the appliqué, fabric
instead (fig. 4).
4
USING DIFFERENTMACHINE STITCHESFOR APPLIQUÉYour sewing machine might havemany different stitches you nevernormally use. But, with machineappliqué, here is your chance to trythem out. Always practice first on ascrap of fabric and experiment byusing different stitch lengths and
widths with each one.
Zigzag stitchThis is the most common appliquéstitch, but you can achieve two verydifferent-looking stitches with thezigzag, depending on the settingsused on your machine. Closelyworked stitches will form a satinzigzag while more open stitches willproduce a narrow zigzag.
Straight stitchThough this won’t stop your fabricfrom fraying as much as a zigzag
stitch, it gives a more homespunfrayed edge to machine appliqué.It works well with stretchy materials,such as t-shirt fabrics.
Blanket stitchSome sewing machines have up to fiveblanket stitches – choose the one youlike most. Make sure you work it so it justoverlaps the edge of the appliquéshape in the same way as you wouldwith zigzag.
Other stitchesTry all the stitches on your machine tosee which you like the best. Decorativestitches like scalloped or wavy stitchescan look really effective.
W o r l d M a g s . n e t W o r l d M a g s . n e t
W o r l d M a g s . n e t

8/15/2019 Beginner's Guide to Sewing - 2014
http://slidepdf.com/reader/full/beginners-guide-to-sewing-2014 144/164
Machine Sewing Techniques
Beginner’s Guide to Sewing144
YOU WILL NEED
Two pieces of fabric for outer
layer: 35.5x30.5cm (14x12in)
Two pieces of fabric for the
lining: same size as above
Two pieces of fabric for
wadding: same size as above
Contrast fabric for appliqué:
about 20.5x13cm (8x5in)
Fabric adhesive spray
A large dinner plate to use as
a template
Basic sewing kit (see page 12)
Finished size
29.5x34.5cm (11½x13½in)
Seam allowance
6mm (¼in) included
Glossary
Turn to page 16 for our list of terms
Chequered
tea cosyBy Debbie Shore
There are few things as satisfying asfinishing a sewing project that you
can use every day – and who doesn’t
enjoy a daily tea break? This tea cosy design
is really versatile, as you can not only choose
fabrics to complement your kitchen, but you
can come up with any appliqué design that
takes your fancy!
We’ve suggested a simple ‘TEA’ logo and a
heart embellished with buttons, but once
you’ve mastered the basic cosy pattern you
can rustle up any design you like – why not
make personalised cosies for tea-loving
friends, or experiment with more complex
shapes such as stars?
Half Yard Heavenby Debbie ShoreFabric left over from sewing projects, or old shirts
and pillow cases that aren’t yet ready for the
scrap heap, come in handy for little projects that
don’t require a great deal of fabric. In this book
you’ll find lovely ideas, with full instructions, for
making 26 items to wear, use, give away, play
with or simply to treasure. Easy to make, they
can be completed in a day or a weekend.Published by Search Press, PB, £9.99
www.searchpress.com
Keep your teapot warm withthis pretty cosy. Use fabrics thatco-ordinate with your kitchendécor to add a stylish touch
W o r l d M a g s . n e t W o r l d M a g s . n e t
W o r l d M a g s . n e t

8/15/2019 Beginner's Guide to Sewing - 2014
http://slidepdf.com/reader/full/beginners-guide-to-sewing-2014 145/164
Beginner’s Guide to Sewing 145
Machine Sewing Techniques
MAKING THE TEA COSY
T o p t i p S e w a l o o p o f r i b b o n i n t o t h e t o p o f t h e
c o s y s o y o u c a n h a n g i t u p , a n d a d d a f e w b u t t o n s a s d e c o r a t i o n
1 Lay out the patterned fabricwith the longer sides at the top
and bottom and place the plate ontop, with the edge of the platetouching the top edge of the fabric.Draw the arc shape around the top ofthe plate then cut it out to make theshape of the tea cosy.
2Repeat step 1 on the waddingand lining fabric.
3Cut out the letters T, E and A, ora simple heart shape, from your
contrasting fabric so they fit within yourcut tea cosy shape. Tack your appliquémotifs to the right side of one piece ofpatterned fabric.
4 If you are adding embellishments,such as buttons or charms, sew
them on at this stage.
5Sew around the motif with a zigzagstitch on your machine (fig. 1).
6Put the patterned fabric facedown, spray with fabric adhesive
and place the wadding on top.
7 Turn the fabric over, so it’s face up,and put the lining on top. Don’t
use fabric adhesive this time.
8Sew across the straight bottomof all three layers, using a 6mm
(¼in) seam allowance.
9 Repeat step 8 on the other sideof the tea cosy.
10Fold back the lining so that youare looking at two large oval
shapes that are half lining and halfpatterned (fig. 2).
11Place the two halves of the cosytogether, right sides facing and
seams matching, and sew all the wayround. Leave a gap in the lining side ofaround 10cm (4in) for turning (fig. 3).
12 Turn right sides out, press your newtea cosy with a moderate iron,invite some friends round, then put thekettle on and relax!
1
2 3
W o r l d M a g s . n e t W o r l d M a g s . n e t
W o r l d M a g s . n e t

8/15/2019 Beginner's Guide to Sewing - 2014
http://slidepdf.com/reader/full/beginners-guide-to-sewing-2014 146/164
Beginner’s Guide to Sewing146
Machine Sewing Techniques
YOU WILL NEED
Fabric, such as calico, for the
bag: 55x94cm (22x37in)
Fabric for lining: 36x94cm
(14x37in) Heavyweight iron-on
interfacing: 36x94cm (14x37in)
Fusible web: 50x45cm (20x18in)
Fabric scraps for appliqué
Thread in matching colours
Basic sewing kit (see page 12)
Finished size
28.5x37cm (11x14½in)
Seam allowance
1.5cm (5
/ 8in) included
Glossary
Turn to page 16 for our list of terms
Floral
shopping bagBy Chris Jefferys
Simple designs look great whenthey’re appliquéd… prettydaisies turn this shopping baginto an eye-catching accessory
The versatility of appliqué means thatin many ways the only limit to what
you can make is your imagination.
This plain bag has been brightened up with
a simple daisy design, but you can piece
together any shapes that you like.
A big advantage of making your own bag
means you can choose a lining in a colour or
pattern than co-ordinates with your
appliqué design. Bear in mind that if you’re
using a patterned fabric such as gingham or
tartan then it’s good to line up the pattern
with the edge of the bag for a neat finish.
The daisy template here needs to be
enlarged to give you two flowers (a large one
and a small one), but you could always
shrink it, too – a row of small ones across
the bottom will look very pretty.
Learn To Sewby Chris JefferysWith a series of tutorials that gradually introduce
new techniques, Learn To Sew is a great resource
for anyone who’s keen to pick up the basics of
sewing. As well as guides on making items from
scratch, the book also boasts a wealth of advice
on making simple alterations, such as taking up
hems or moving buttons – perfect for breathingnew life into old favourites!
Published by New Holland, PB, £7.99
www.newhollandpublishers.com
W o r l d M a g s . n e t W o r l d M a g s . n e t
W o r l d M a g s . n e t

8/15/2019 Beginner's Guide to Sewing - 2014
http://slidepdf.com/reader/full/beginners-guide-to-sewing-2014 147/164
W o r l d M a g s . n e t W o r l d M a g s . n e t
W o r l d M a g s . n e t

8/15/2019 Beginner's Guide to Sewing - 2014
http://slidepdf.com/reader/full/beginners-guide-to-sewing-2014 148/164
Machine Sewing Techniques
Beginner’s Guide to Sewing148
SEWING THE BAG
Open out the lower corners and refoldthem diagonally so the side and baseseams are on top of the other at thecentre of the point. Stitch across at rightangles to the seams 4.5cm (1½in) infrom the point (for instructions on thistechnique see p132). Trim the pointaway above the stitching. Stitch the
lining corners in the same way.
Apply the fusible web to the wrong sideof the calico pieces. Lightly mark thepositions for the flower stems on the frontarea on one calico piece. Adjust themachine to a wide, close zigzag stitchand stitch the stems in satin stitch. Pull thethread end through to the wrong side andknot together to finish. Cut out and apply
the appliqué design, using fusible weband following instructions on p95. Stitcharound the edges with a zigzag stitch.
Stitch the two calico piecesfacing together around the sideand base edges. Stitch the liningstogether in the same way, butleave a 15cm (6in) gap on thebase edge. Press the seams open.
31 2
1 FOR THE BAGCut out a paper pattern 47cm
(18½in) wide by 36cm (14¼in) deep(this includes 1.5cm (5/ 8in) seamallowances). Using the pattern,cut two pieces each from thecalico, interfacing and lining.
Cut two handles 60x9cm(23½x3½in) from the calico.
2 FOR THE FLOWERS Mark an area on your paper
pattern 6cm (2¼in) in from the sideand base edges and 1.5cm (5/ 8in)down from the top edge of yourfront piece. Enlarge and trace
the small and large flower designfrom the template and transfer it
to the pattern, keeping withinthe marked area.
CUTTING OUT
THE FABRIC
T o p t i p F o l d t h e f a b r i c i n h a l f t h e n p i n t h e p a t t e r n i n p l a c e – n o w y o u c a n c u t b o t h p i e c e s a t o n c e
W o r l d M a g s . n e t W o r l d M a g s . n e t
W o r l d M a g s . n e t

8/15/2019 Beginner's Guide to Sewing - 2014
http://slidepdf.com/reader/full/beginners-guide-to-sewing-2014 149/164
Beginner’s Guide to Sewing 149
Machine Sewing Techniques
Press down 1.5cm (5/ 8in) to thewrong side along both long edgesof the handles. Then press thehandles in half lengthways andstitch along both long edges. Withthe handles pointing downwards,pin and tack their ends to the topedge of the bag 11cm (4¼in) in
from the side seams.
Place the lining to the bag with rightsides facing and the top edges levelso the handles are sandwiched, andstitch the lining to the bag aroundthe top edge. Turn the bag right sideout through the gap in the liningstitching. Hand stitch the gap in thelining closed. Press the lining to the
inside of the bag and topstitcharound the top edge to finish.
4 5
TEMPLATETrace or photocopy this
template to make patterns,
as follows:
Large flower: 145%
Small flower: 125%
MAKING A
FIRM BASE
1 CUT THE CARDA fabric-covered cardboard insert willgive the bag a firm base and help it
keep its shape. First, cut the cardboardto the size of the base of the bag, thencut a piece of lining fabric that’s twice
as wide as the card, plus seamallowances all round.
2 MAKE A FABRIC SLEEVEFold the fabric in half lengthways andstitch together along one short andone long edge. Turn the fabric right
side out and press. Slip the cardboardinto the fabric, tuck in the raw edges
and hand stitch them together. Lie thecardboard in the bottom of the bag.
W o r l d M a g s . n e t W o r l d M a g s . n e t
W o r l d M a g s . n e t

8/15/2019 Beginner's Guide to Sewing - 2014
http://slidepdf.com/reader/full/beginners-guide-to-sewing-2014 150/164
Machine Sewing Techniques
Beginner’s Guide to Sewing150
All about…
FILLED SHAPESMake toys, cushions, sachets and a myriad of other stuffed objects…
it’s easy when you know how to make a shape and fill it
Making three-dimensional
stitched items or filled shapes
are really just an extension of
your other sewing skills. You need to be
able to cut out fabric pieces accurately,
stitch them together, then stuff them.
Sewing neat seams and working small
hand stitches, then embellishing with
embroidery, is all there is to it.
Follow these instructions and ideas to
help you make gorgeous stuffed animals,
decorations or items for your home.
CUTTING PATTERN PIECES
You need to make sure you cut out all
your fabric pieces accurately before you
begin. If you are following a pattern from
a book or magazine then templates for
the pieces will be printed there. Checkfirst to see if a seam allowance has been
included. In most cases it will have been,
but, if not, then make sure you add your
own everywhere there is a seam – 1.5cm
(½in) is about right, but remember to be
consistent. Trace each pattern shape
(remembering to add the seam allowance
if you need to) or cut it out if you are using
a pre-printed pattern paper.
PINNING INTO PLACE
Pin each pattern piece to the right side of
your fabric (fig. 1). Make sure you look at
the grain lines printed on the pattern. If
they don’t have them then think logically
which way each piece will face. This is
particularly important if you are using a
patterned fabric as the pattern should
run in the same direction when you join
up all the pieces. If you need to match a
pattern then think about this too when
you are pinning your patterns on.
CUTTING THE FABRIC
Cut out each shape carefully and either
keep the pattern pieces pinned to the
fabric just until you stitch, or label them.
STITCHING TOGETHERFollowing the instructions given with the
pattern, stitch each piece together using a
consistent seam allowance. It’s really
important to remember that you will
need to leave a gap in one seam so you
can turn your assembled fabric pieces
right sides out for stuffing (fig. 2). It’s best
to leave this gap along a straight seam if
at all possible as that will be easier to sew
back up accurately with a small slipstitch than on a corner seam.
TRIMMING AND CLIPPING SEAMS
Once you have stitched the seams, clip
curves and snip corners to help the seams
lie flat when turned right sides out (fig. 3).
For more intricate shapes, trim seam
allowances to 6mm (¼in) so they don’t
add too much bulk to your finished shape.
STUFFING
THE SHAPE
FILLINGSNormally you would use polyester soft toyfilling for stuffing your filled shape but there
are other choices if you prefer.Dry, uncooked rice is ideal for weighing
down doorstops.
Polystyrene beads are good if you wantto make a flexible bean bag type of effect.
Use dried lavender or pot pourri to mix
with your filling, or if it’s a small shape thenuse just this for a really fragrant shape,which is perfect for hanging on your coat
hangers in the wardrobe.Sawdust makes really good stuffing for
stuffing pincushions, or use fine sand to
keep pins sharp.
T o p t i p I f s t u f fi n g a n i t e m w i t h i r r e g u l a r s h a p e s – l i k e
a t o y – t a k e y o u r t i m e s o i t d o e s n ’ t e n d u p l u m p y
1
W o r l d M a g s . n e t W o r l d M a g s . n e t
W o r l d M a g s . n e t

8/15/2019 Beginner's Guide to Sewing - 2014
http://slidepdf.com/reader/full/beginners-guide-to-sewing-2014 151/164
Machine Sewing Techniques
Beginner’s Guide to Sewing 151
EMBELLISHING
If you are going to embroider or embellish
your filled shape then sometimes it’s best
to embroider each fabric piece before
assembling them. For other projects, you
should embroider them after joining the
fabric pieces together but before filling.
This is particularly so if the embroidery is
worked over the seams. Your pattern will
advise on which is the best order to workin. Sometimes you add stitches after you
have filled the shape, particularly if you
want to use them to sculpt the piece. For
example, if you are making a fabric doll,
you can embroider the features, fingers
and toes on with back stitches through
the filling as well. This pulls the fabric
into the shape to create definition and is
excellent for creating body features.
PRESSING
As you stitch each seam, press it as you
go for a neater finish. If it’s too fiddly to
do this with an iron then finger-press the
seams open instead. To do this, support
the seam inside with one hand then open
the seam and run a moistened finger from
your other hand along the seam. Leave to
dry before turning right sides out.
Alternatively, you can make a pad froma folded tea towel and put this under the
seam to press it with an iron without
creasing the rest of the fabric.
TURNING OUT
Once all the seams are stitched, trimmed
and pressed, you can turn your finished
piece right sides out. If there are any
corners, push these out into a point gently
with a pin or bodkin, but take care when
doing this as the snipped seam allowance
could fray and show on the right side.
FINISHING
Finally, close up the gap in the seam (that
you used to turn your piece right side out)
with small, neat hand stitches.
HOW TO STUFF
1If you are using soft toy filling thengently tease the stuffing apart
before you push it in. Don’t just add
FIG. 4 FIG. 5
dense lumps of filling or the finishedeffect will be bumpy. To push the fillinginto narrow areas and points, use arounded tool such as the end of a
paintbrush or wooden spoon – don’tuse a pointed tool, as it could breakthe stitches.
2If you are using one of the otherfillings then it’s best to pour it in.
Roll a piece of paper into a funneland stick it together with tape. Pushthe narrow end of the funnel into thegap in your filled shape and pour inyour filling (fig. 4). A small teaspooncan also be used for smaller shapes.
3Pin the pressed edges of the
gap closed, then slipstitch theedges together (fig. 5). Make sureyou make these stitches particularlysmall if you are using rice or sawdust.
T o p t i p D o n ’ t o v
e r - s t u f f y o u r
s h a p e s o r y o u m i
g h t
fi n d t h a t t h e y b u r
s t
a t t h e s e a m s !
2 3
W o r l d M a g s . n e t W o r l d M a g s . n e t
W o r l d M a g s . n e t

8/15/2019 Beginner's Guide to Sewing - 2014
http://slidepdf.com/reader/full/beginners-guide-to-sewing-2014 152/164
Machine Sewing Techniques
Beginner’s Guide to Sewing152
YOU WILL NEED
One piece of furnishing fabric:
30x137cm (12x54in)
Iron-on medium interfacing:
12.5x8cm (5x3¼in)
Uncooked rice: 1.75kg (3¾lb)
Thread in matching colours
Basic sewing kit (see page 12)
Finished size
17cm (7in) tall x 13cm (5in) deep
Seam allowance
1cm (3/ 8in) included
GlossaryTurn to page 16 for our list of terms
Portable
doorstopBy Cheryl Owen
Besides its practical purpose, thisdoorstop makes a strong visual
statement with the use of vibrant
patterned fabric. The handle at the top
enables it to be moved with ease from place
to place where needed.
We’ve used rice to provide a weighty
filling, but you could use sand to make it
heavier or dried beans to make it lighter. It’s
best to use furnishing fabric, either in
curtain or upholstery weight, so your
doorstop is strong enough to hold the filling.
The doorstop is made from six different
pieces so you can use up your fabric stash
and cut each piece from a different colour or
pattern for a really fun look. Or use your
embroidery or appliqué skills to decorate
each piece before you sew them all together.
Little Book of HomeSewing Techniquesby Cheryl OwenAuthor, fashion designer and
dressmaker Cheryl Owen has packed
her book full of simple sewing tutorials
and contemporary projects for the
home. It’s great for beginners, plus
you get to try some next-step tricks
like ruching, tassels and frills too!Published by New Holland, £9.99
www.newhollandpublishers.com
Doorstops are a really handyitem to have around thehouse… practise your machinesewing skills to make your own
W o r l d M a g s . n e t W o r l d M a g s . n e t
W o r l d M a g s . n e t

8/15/2019 Beginner's Guide to Sewing - 2014
http://slidepdf.com/reader/full/beginners-guide-to-sewing-2014 153/164
Beginner’s Guide to Sewing 153
Machine Sewing Techniques
Pin the gussets to the doorstop topand base, matching the corners.
Stitch, pivoting the seam at thecorners, leaving a 10cm (4in) gap inone edge of the base to turn through.
Clip the corners, press the seamsopen, then turnthe whole doorstop
right side out.
3
Use this template to make a paper patten for the gusset.From the fabric cut: four doorstop gussets from your pattern,
one 12.5x8cm piece (5x3¼in) for the handle, one 11cm (43/ 8in)square for the top, and one 15cm (57/ 8in) square for the base.
1 MAKE THE HANDLEPress interfacing to the wrong side of
the handle piece. To make the handle,
press under 1cm (3/ 8in) on the long
edges, then press lengthways in half,right sides together matching the
pressed edges. Stitch close to bothpressed edges. Pin the handle across the
centre of the right side of the doorstoptop, matching raw edges. Stitch in place
6mm (¼in) inside the raw edges.
To define the gusset seams, fold alongone seam, wrong sides facing. Topstitch6mm (¼in) from folded edge, startingand finishing 6mm (¼in) from top andbase. Repeat on the other seams. Fillwith rice then slip stitch the gap.
2 SEW THE GUSSETSWith right sides facing, stitch thegussets together along the long
slanted edges, starting and finishing1cm (3/ 8in) from the top and bottomof each seam. Press seams open.
CUTTING OUT THE FABRICSEWING THE
DOORSTOP
4 5
11cm (4¼in)
15cm (6in)
19cm (7½in)
W o r l d M a g s . n e t W o r l d M a g s . n e t
W o r l d M a g s . n e t

8/15/2019 Beginner's Guide to Sewing - 2014
http://slidepdf.com/reader/full/beginners-guide-to-sewing-2014 154/164
Beginner’s Guide to Sewing154
Machine Sewing Techniques
YOU WILL NEED
Fabric for main body: one fat
quarter: 46x56cm (18x22in)
Fabric for shell and antennae:
30x46cm (12x18in)
Lightweight fusible fleece:
30x20cm (12x8in)
Small scraps of wool felt for
eyes: blue and white
Stranded cotton in assorted
colours
Sewing thread in matching
colours
Template plastic
Polyester toy filling
Basic sewing kit (see page 12)
Finished size
19cm (7½in) high x 22cm (8½in)
long
Seam allowance
6mm (¼in) included
Glossary
Turn to page 16 for our list of terms
Sebastian
the softie snailBy Melanie McNeice
What an adorable, cuddlycreature! Who can resist ourcotton-soft, summery snail toadorn a nursery or play room?
Sebastian the Snail is such a sweet littlecreature – his face is so smiley and
sunny. He goes about his day as silent
as can be, crawling among the beautiful
flowers in the garden, and at the end of a
busy day romping about, he likes nothing
better than coming indoors, cuddled tightly
in little arms. He would make the perfect
companion for any little explorer!
Make him with a fun collection of pretty
fabric pieces leftover from other projects.
Snug as a Bugby Melanie McNeiceIf you love bugs, you’ll adore this collection of
soft, squishy creatures, each buzzing with lovable
personalities, and all made from Melly and
Me’s range of gorgeous printed fabrics (www.
mellyandme.com).Apart from Sebastian – the
cuddliest snail in the world – we love the ladybug
handbag and butterfly mobile. It includes ahandy guide to embroidery stitches, too.
Published by David and Charles, PB, £7.99
www.stitchcraftcreate.co.uk
W o r l d M a g s . n e t W o r l d M a g s . n e t
W o r l d M a g s . n e t

8/15/2019 Beginner's Guide to Sewing - 2014
http://slidepdf.com/reader/full/beginners-guide-to-sewing-2014 155/164
W o r l d M a g s . n e t W o r l d M a g s . n e t
W o r l d M a g s . n e t

8/15/2019 Beginner's Guide to Sewing - 2014
http://slidepdf.com/reader/full/beginners-guide-to-sewing-2014 156/164
Machine Sewing Techniques
Beginner’s Guide to Sewing156
1 MAKE TEMPLATESUsing the templates, trace Sebastianonto template plastic, transferring allthe markings. Carefully cut them out
around the traced lines.
2 CUT THE FABRICFold the main body fabric in half withright sides together. Draw around themain body template once onto thefolded fabric and cut out along thedrawn line to make two main bodypieces. Unfold the fabric and drawaround the head and base gusset
templates once onto the wrong sideof the single layer of fabric. Cut out
along the drawn lines.
3 START STITCHING
Take the head and base gusset piecesand machine stitch together alongthe neckline edge as marked, with
right sides facing.
4 SEW THE BODYTake one of the main body pieces andthe joined gusset piece. Matching up
the neckline seam of the gusset with theneck on the snail’s main body, tack thegusset in place with right sides facing,working from the snail’s tail, along the
base and all the way around the head.Machine stitch the gusset in place.
5 SEW ALONG THE BACKTack the remaining raw edge of the
gusset to the second main body piecewith right sides facing. Machine stitch in
place and then continue to sew theremaining raw edges of the snail’sback together, leaving the turning
gap open as indicated.
6 STUFF THE BODYCarefully snip the tail point and the
corners. Turn Sebastian right side out,and stuff firmly with toy filling. Ladder
stitch the turning gap closed.
7 CUT OUT THE SHELLFold the shell fabric in half with rightsides facing. Draw around the shelltemplate twice and the shell gusset
template once onto the folded fabricand cut out along the drawn lines.
8 EMBROIDER THE SPIRALSMark the shell spiral onto one shell
front piece and one shell back piece.Interface one shell gusset piece andthe two shell pieces marked with thespirals. Embroider the spirals with small
chain stitches using two strands ofpink stranded cotton.
9 STITCH THE SHELLTack the gusset (with fleece) betweenthe two embroidered shell pieces withright sides together, matching the stars
marked on the templates. Machinestitch in place. Repeat with the
remaining shell and gusset pieces(without fleece) to make the shell lining.
MAKING THE SOFTIE
Note: Use a very small stitch on your sewing machine.
W o r l d M a g s . n e t W o r l d M a g s . n e t
W o r l d M a g s . n e t

8/15/2019 Beginner's Guide to Sewing - 2014
http://slidepdf.com/reader/full/beginners-guide-to-sewing-2014 157/164
Beginner’s Guide to Sewing 157
Machine Sewing Techniques
Beginner’s Guide to Sewing 157
10 FINISH THE SHELLPlace the main shell and shell lining
pieces together with right sides facing,and machine stitch all the way around
the raw edges. Snip into the cornersand curves. Cut a turning gap in thecentre of the shell lining, making surethat you cut the lining layer only, and
turn the shell right side out through thisgap. Press, then topstitch all the way
around the bottom edge.
11 STUFF THE SHELLStuff the shell lightly and then sit it on thesnail’s back in the desired position. Pinor tack into place. Ladder stitch the
inner bottom edge of the shell onto thesnail’s back using a double strand of
strong polyester thread. When you areapprox 2.5-5cm (1-2in) from finishing
the sewing, stuff the shell firmly throughthe remaining gap until you are happy
with the shape. Ladder stitchthe gap closed.
12 TRACE THE ANTENNAETake the remaining shell fabric and fold
in half, right sides together. Draw theantennae templates onto the folded
fabric but do not cut out.
13 SEW THE ANTENNAEMachine stitch the antennae along the
drawn lines, leaving the bottom straightedges open for turning. Cut them out
approx 3-6mm (1/ 8-¼in) outside the sewnlines. Turn right side out and stuff withfilling, taking care not to damage the
seams. Fold the raw edges to the inside,then stitch the antennae in place onthe snail’s head by ladder stitching
along the folded bottom edge. Sewaround the base of each antenna
twice to make sure they are securelystitched on. TIP To turn small pieces
easily, insert a pair of tweezers into yourunturned piece, grab the end and pull
it through the opening. When stuffingsmall and fiddly pieces, it can behelpful to use the blunt end of a
wooden skewer to push in small piecesof stuffing one at a time.
14 MAKE THE EYESDraw around the pupil template twiceonto white wool felt and cut out alongthe drawn lines. Position the pupils onto
blue wool felt, making sure there isadequate space around each one.
To appliqué the pupils in place, blanketstitch by hand or statin stitch by
machine. Mark the eye dot inside eachpupil and work a French knot with six
strands of grey stranded cotton.Draw the eye template around each
pupil and cut out the completedeyes along the drawn lines.
15 SEW THE FACEPosition the eyes onto the snail’s face
and glue or tack into position. Using twostrands of blue stranded cotton, blanketstitch the eyes to secure in place. Markthe stitching line for the snail’s mouth
between the eyes, and sew with chain
stitch using two strands of dark greystranded cotton.
T o p t i p I f t h e s na i
l i s w e l l
s t u f f ed, i t w i l l b e
ea s i e r to s t i tc h
t h e fac e d e ta i l s a nd a t tac
h t h e
a n t e n na e
W o r l d M a g s . n e t W o r l d M a g s . n e t
W o r l d M a g s . n e t
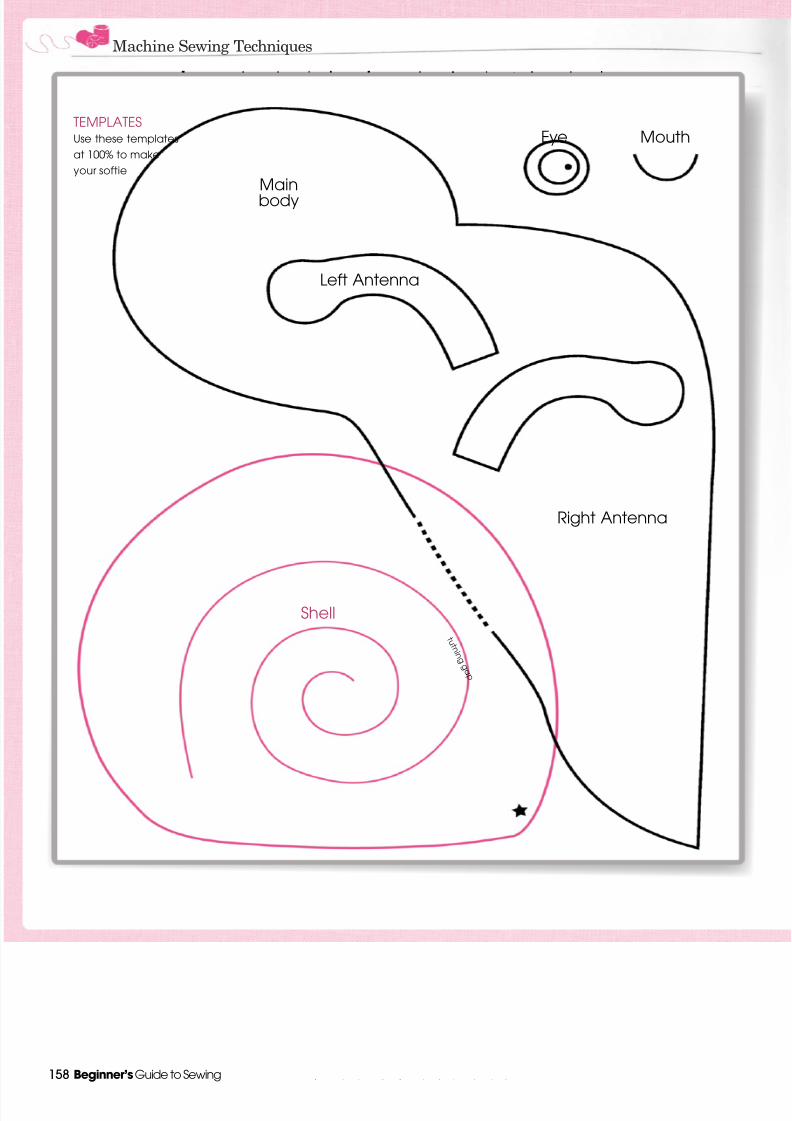
8/15/2019 Beginner's Guide to Sewing - 2014
http://slidepdf.com/reader/full/beginners-guide-to-sewing-2014 158/164
Machine Sewing Techniques
Beginner’s Guide to Sewing158
TEMPLATESUse these templates
at 100% to make
your softie
Left Antenna
Right Antenna
Eye Mouth
Mainbody
t u t n i n g g a p
Shell
W o r l d M a g s . n e t W o r l d M a g s . n e t
W o r l d M a g s . n e t

8/15/2019 Beginner's Guide to Sewing - 2014
http://slidepdf.com/reader/full/beginners-guide-to-sewing-2014 159/164
Machine Sewing Techniques
Neckline Neckline
Beginner’s Guide to Sewing 159
Shell Gusset
Base Gusset
Head Gusset
Neckline Neckline
W o r l d M a g s . n e t W o r l d M a g s . n e t
W o r l d M a g s . n e t

8/15/2019 Beginner's Guide to Sewing - 2014
http://slidepdf.com/reader/full/beginners-guide-to-sewing-2014 160/164
Next Steps
Beginner’s Guide to Sewing160
Frills and pleats Frills and pleats can add a stylish finishing touch toyour home-sewn projects. Create frills from a single or
double layer of fabric (single frills can add a simple
decorative edge to a cushion, while double frills offer
‘wow’ factor). Making pleats is another way of adding
fullness to your finished fabric. Have a play around
with different types – they have great names like knife
pleats, box pleats, inverted box pleats or pin tucks! They
all offer different effects and are great ways to add
texture to your creations.
FANTASTIC ELASTICElastic is a handy little helper to have in your sewing kit.
It’ll give your fabric fullness and help to control it. It’s ideal
for waistbands, pyjamas bottoms or fancy dress costumes.
It’s also pretty nifty for making loose chair covers (thread
it through a hem edge for a perfect fit) or use it in a casing
for an easy-fit ironing board cover.
You can stitch with elastic by inserting sewing thread
into the top bobbin of your sewing machine and shirring
elastic in the bottom bobbin. We call this ‘gathering’ if you
only stitch one row or ‘shirring’ if you stitch more than one.
Zips are a nifty way to close cushion or seat covers,
and they’re ideal for securely closing fabric bags. Opt
for lightweight nylon zips for small make-up bags or
sturdy metal zips for shoulder satchels. Inserting zips
can be one of the trickiest sewing skills to master but
the key is to take your time, work methodically and
tack everything before you stitch. Pick a zip that suits
the weight of fabric you’re stitching on to, and always
check it works before you sew it in… there’s nothing
worse than inserting the zip then finding it’s faulty!
ZIP IT!
Now you’ve mastered the basics, you’re ready to take your sewing tothe next level! Have fun with frills, pleats, zips, piping & pro appliqué…
just a few of the next tempting techniques you can explore Next steps...
W o r l d M a g s . n e t W o r l d M a g s . n e t
W o r l d M a g s . n e t

8/15/2019 Beginner's Guide to Sewing - 2014
http://slidepdf.com/reader/full/beginners-guide-to-sewing-2014 161/164
Next Steps
Beginner’s Guide to Sewing 161
Perfect piping Covered piping adds a perfect finishing touch to soft
furnishings like cushion covers. You can pick a fabric
that matches your cushion exactly, or choose one that
highlights the piped edge with a contrasting colour or
pattern. Piping cord comes in a range of thicknesses.
As a general guide, the smaller your item, the thinner
the cord you should use.
You can buy cotton twist cord or synthetic cord – try
them both to see which you prefer. Secure your piping
in place with your sewing machine’s zipper or piping
foot. Piping foots have a ridge that sits on top of the
piping cord, holding it firmly in place.
Now you’ve mastered your basic seams, you can move
on to working with more complex types, which come in
handy for different effects. Flat felled seams are often
used when both sides of the fabric need to be invisible,
for example to make joins in a tablecloth or sheet.
Narrow seams are ideal for sheer or more delicate
fabrics as they’re neater and stand out less. French
seams are narrow seams which are perfect for fabrics
that fray. A bound seam encloses the raw fabric edges
within a strip of bias binding tape, to strengthen the
finished item and prevent it from fraying.
S UPER SE A MS
PRO APPLIQUÉIf you enjoy hand appliqué then the next step is to try
reverse appliqué. This is when you layer up fabrics, then
cut away from the top layer to reveal the fabric beneath.
Use two different-coloured or patterned pieces of fabric of
the same size and trace the shape you want to cut out on
to the right side of one piece. Now cut it out, then put it on
top of the other piece of fabric and tack them together.
Turn the edges of the top piece under and stitch into
place. Use your needle to fold the edges under and
stitch as you go with small, neat stitches.
W o r l d M a g s . n e t W o r l d M a g s . n e t
W o r l d M a g s . n e t

8/15/2019 Beginner's Guide to Sewing - 2014
http://slidepdf.com/reader/full/beginners-guide-to-sewing-2014 162/164
Beginner’s Guide to Sewing162
HAND QUILTINGIf you enjoy patchwork then hand quilting is
great for creating a homespun feel. Quilting
involves three layers of fabric – the top layer,
wadding sandwiched in the middle, then a
bottom layer of backing fabric. Tack thesethree layers together to hold them firmly in
place before you quilt.
Quilting is basically a running stitch worked
through all three layers of fabric and wadding.
Put one hand under the quilt to make sure the
point of your needle always goes right through
to the back, then use your other hand to stitch
with. Make a few running stitches on your
needle then pull it all the way though. Hand
quilting stitches need to be small with evenly
spaced gaps in between.
More fun with bag making You can make all sorts of different style fabric bags,
but adding bag hardware to them is certain to give
a professional finish. Try these ideas…
Magnetic snap closures are easy to attach to your
bag and provide a quick way of closing it without the
need for buttons or buckles. Twist locks are used to
close the front of the bag and are best used on bags
made from heavier-weight fabrics so the bag will
support the metal closures. Instead of just stitching
your strap directly to your bag, you could attach aD-ring to the bag and a trigger hook to the strap –
that way you can remove the straps if you want,
which is ideal if you want to add both a handle and
a shoulder strap. You can also buy clasp frames,
which attach directly to the top of your bag, either
with stitching or glue.
LEARN MORE TECHNIQUESOnce you’ve mastered all the tutorials and projects in ourBeginner’s Guide to Sewing, it’s time to try some of the next-steptechniques we’ve described above. You can find tips, t ricks andtutorials for them all in the Pro Guide to Sewing , which includes allsorts of must-make projects that use the methods we’vedescribed here. You’ll find many of the techniques you’ve learntin this guide are used again but taken one step further, and with
24 projects and 15 tutorials to try, you’re sure to find inspi ration. With a litt le practise you’ll soon transform your sewing skills from
a newbie into a needle ninja in no time! Find out more or treatyourself to a copy at www.myfavouritemagazines.co.uk.
Next Steps
W o r l d M a g s . n e t W o r l d M a g s . n e t
W o r l d M a g s . n e t

8/15/2019 Beginner's Guide to Sewing - 2014
http://slidepdf.com/reader/full/beginners-guide-to-sewing-2014 163/164
W o r l d M a g s . n e t W o r l d M a g s . n e t
W o r l d M a g s . n e t

8/15/2019 Beginner's Guide to Sewing - 2014
http://slidepdf.com/reader/full/beginners-guide-to-sewing-2014 164/164
W o r l d M a g s . n e t