bd facscanto flow cytometer reference...
TRANSCRIPT

http://www.bdbioscienPart No. 338617 Rev. ASeptember 2004
For In Vitro Diagnosti
BD Biosciences2350 Qume DriveSan Jose, CA 95131-1807USATel (877) 232-8995Fax (408) 954-2347
BD FACSCanto Flow Cytometer
Reference Manual
ces.com/
c Use
Brazil Tel (55) 11-5185-9995Fax (55) 11-5185-9895
Europe Tel (32) 53-720211Fax (32) 53-720452
MexicoTel (52) 55 5999 8296Fax (52) 55 5999 8288
JapanNippon Becton Dickinson Company, Ltd.Tel 0120-8555-90
Asia Pacific
Fax (65) 6-860-1590
CanadaTel (888) 259-0187
Fax (905) 542-9391
Tel (65) 6-861-0633(905) 542-8028

© 2004, Becton, Dickinson and Company. All rights reserved. No part of this publication may be reproduced, transmitted, transcribed, stored in retrieval systems, or translated into any language or computer language, in any form or by any means: electronic, mechanical, magnetic, optical, chemical, manual, or otherwise, without prior written permission from BD Biosciences.
The information in this guide is subject to change without notice. BD Biosciences reserves the right to change its products and services at any time to incorporate the latest technological developments. Although this guide has been prepared with every precaution to ensure accuracy, BD Biosciences assumes no liability for any errors or omissions, nor for any damages resulting from the application or use of this information. BD Biosciences welcomes customer input on corrections and suggestions for improvement.
BD FACSDiva software © 2004, Becton, Dickinson and Company. This software is the property of Becton, Dickinson and Company. Each sale of a stored unit of this software grants the purchaser a nontransferable, nonexclusive, personal license. This software may not be duplicated, reproduced, or copied in any form or by any means whatsoever, except as otherwise permitted by law.
BD FACSCanto clinical software © 2004, Becton, Dickinson and Company. This software is the property of Becton, Dickinson and Company. Each sale of a stored unit of this software grants the purchaser a nontransferable, nonexclusive, personal license. This software may not be duplicated, reproduced, or copied in any form or by any means whatsoever, except as otherwise permitted by law.
BD, the BD logo, BD Calibrite, BD FACS, BD FACSCalibur, BD FACSCanto, BD FACSDiva, BD FACSFlow, BD Falcon, BD Multiset, BD Multitest, and BD Trucount are trademarks of Becton, Dickinson and Company.
JDS Uniphase is a trademark of JDS Uniphase, Inc.
Microsoft and Windows are registered trademarks of Microsoft Corporation.
PE-Texas Red is a registered trademark of Molecular Probes, Inc.
Sapphire is a trademark and Coherent is a registered trademark of COHERENT, INC.
Teflon is a registered trademark of E.I. du Pont de Nemours and Company.
All other company and product names might be trademarks of the respective companies with which they are associated.
Patents
PE and APC: US 4,520,110; 4,859,582; 5,055,556; Europe 76,695; Canada 1,179,942PerCP: US 4,876,190Cy5.5 and Cy7: US 5,268,486; 5,486,616; 5,569,587; 5,569,766; and 5,627,027Pe-Cy7: US 4,542,104APC-Cy7: US 5,714,386

FCC Information
WARNING: Changes or modifications to this unit not expressly approved by the party responsible for compliance could void the user’s authority to operate the equipment.
NOTICE: This equipment has been tested and found to comply with the limits for a Class A digital device, pursuant to Part 15 of the FCC Rules. These limits are designed to provide reasonable protection against harmful interference when the equipment is operated in a commercial environment. This equipment generates, uses, and can radiate radio frequency energy and, if not installed and used in accordance with the instruction manual, can cause harmful interference to radio communications. Operation of this equipment in a residential area is likely to cause harmful interference in which case the user will be required to correct the interference at his or her own expense.
Shielded cables must be used with this unit to ensure compliance with the Class A FCC limits.
This Class A digital apparatus meets all requirements of the Canadian Interference-Causing Equipment Regulations.
Cet appareil numérique de la classe A respecte toutes les exigences du Réglement sur the matériel brouilleur du Canada.
Notice
BD Biosciences delivers software and workstations that are intended for running the instruments supplied by BD Biosciences. It is the responsibility of the buyer/user to ensure that all added electronic files including software and transport media are virus free. If the workstation is used for Internet access or purposes other than those specified by BD Biosciences, it is the buyer/user’s responsibility to install and maintain up-to-date virus protection software. BD Biosciences does not make any warranty with respect to the workstation remaining virus free after installation. BD Biosciences is not liable for any claims related to or resulting from buyer/user's failure to install and maintain virus protection.
History
Revision Date Change Made
336928 Rev. A 1/04 Initial release
337969 Rev. A 4/04 Updated for CE IVD release
338619 Rev. A 9/04 Updated for BD FACSDiva software 4.1 release

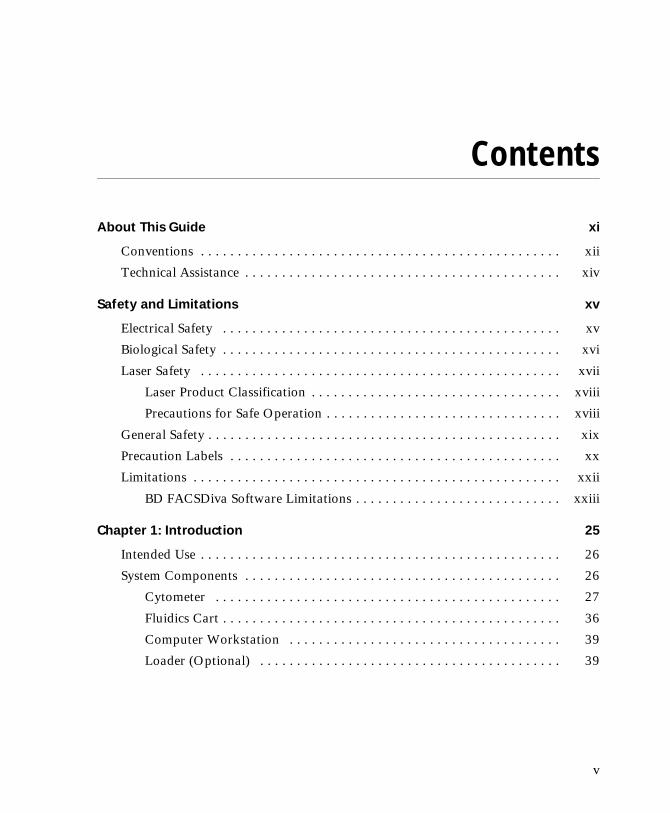
Contents
About This Guide xi
Conventions . . . . . . . . . . . . . . . . . . . . . . . . . . . . . . . . . . . . . . . . . . . . . . . . . xii
Technical Assistance . . . . . . . . . . . . . . . . . . . . . . . . . . . . . . . . . . . . . . . . . . . xiv
Safety and Limitations xv
Electrical Safety . . . . . . . . . . . . . . . . . . . . . . . . . . . . . . . . . . . . . . . . . . . . . . xv
Biological Safety . . . . . . . . . . . . . . . . . . . . . . . . . . . . . . . . . . . . . . . . . . . . . . xvi
Laser Safety . . . . . . . . . . . . . . . . . . . . . . . . . . . . . . . . . . . . . . . . . . . . . . . . . xvii
Laser Product Classification . . . . . . . . . . . . . . . . . . . . . . . . . . . . . . . . . . xviii
Precautions for Safe Operation . . . . . . . . . . . . . . . . . . . . . . . . . . . . . . . . xviii
General Safety . . . . . . . . . . . . . . . . . . . . . . . . . . . . . . . . . . . . . . . . . . . . . . . . xix
Precaution Labels . . . . . . . . . . . . . . . . . . . . . . . . . . . . . . . . . . . . . . . . . . . . . xx
Limitations . . . . . . . . . . . . . . . . . . . . . . . . . . . . . . . . . . . . . . . . . . . . . . . . . . xxii
BD FACSDiva Software Limitations . . . . . . . . . . . . . . . . . . . . . . . . . . . . xxiii
Chapter 1: Introduction 25
Intended Use . . . . . . . . . . . . . . . . . . . . . . . . . . . . . . . . . . . . . . . . . . . . . . . . . 26
System Components . . . . . . . . . . . . . . . . . . . . . . . . . . . . . . . . . . . . . . . . . . . 26
Cytometer . . . . . . . . . . . . . . . . . . . . . . . . . . . . . . . . . . . . . . . . . . . . . . . 27
Fluidics Cart . . . . . . . . . . . . . . . . . . . . . . . . . . . . . . . . . . . . . . . . . . . . . . 36
Computer Workstation . . . . . . . . . . . . . . . . . . . . . . . . . . . . . . . . . . . . . 39
Loader (Optional) . . . . . . . . . . . . . . . . . . . . . . . . . . . . . . . . . . . . . . . . . 39
v

System Requirements . . . . . . . . . . . . . . . . . . . . . . . . . . . . . . . . . . . . . . . . . . 40
Chapter 2: Using BD FACSDiva Software 41
Workspace Components . . . . . . . . . . . . . . . . . . . . . . . . . . . . . . . . . . . . . . . . 42
Instrument Menu Commands . . . . . . . . . . . . . . . . . . . . . . . . . . . . . . . . . . . . 43
Fluidics Controls . . . . . . . . . . . . . . . . . . . . . . . . . . . . . . . . . . . . . . . . . . . 43
Instrument Configuration . . . . . . . . . . . . . . . . . . . . . . . . . . . . . . . . . . . . 44
Instrument Status Report . . . . . . . . . . . . . . . . . . . . . . . . . . . . . . . . . . . . 46
Standby . . . . . . . . . . . . . . . . . . . . . . . . . . . . . . . . . . . . . . . . . . . . . . . . . . 47
Controls in the Instrument Frame . . . . . . . . . . . . . . . . . . . . . . . . . . . . . . . . . 48
Fluid Level Indicators . . . . . . . . . . . . . . . . . . . . . . . . . . . . . . . . . . . . . . . 48
Laser Tab . . . . . . . . . . . . . . . . . . . . . . . . . . . . . . . . . . . . . . . . . . . . . . . . 50
Status Tab . . . . . . . . . . . . . . . . . . . . . . . . . . . . . . . . . . . . . . . . . . . . . . . . 51
Acquisition Controls . . . . . . . . . . . . . . . . . . . . . . . . . . . . . . . . . . . . . . . . . . . 52
Chapter 3: Running Samples 55
Workflow . . . . . . . . . . . . . . . . . . . . . . . . . . . . . . . . . . . . . . . . . . . . . . . . . . . 56
Instrument Startup . . . . . . . . . . . . . . . . . . . . . . . . . . . . . . . . . . . . . . . . . . . . 57
Instrument Quality Control . . . . . . . . . . . . . . . . . . . . . . . . . . . . . . . . . . . . . . 61
Performing Automated Setup . . . . . . . . . . . . . . . . . . . . . . . . . . . . . . . . . 61
Optimizing Instrument Settings . . . . . . . . . . . . . . . . . . . . . . . . . . . . . . . . 68
Data Recording and Analysis . . . . . . . . . . . . . . . . . . . . . . . . . . . . . . . . . . . . 83
Setting Up the Global Worksheet . . . . . . . . . . . . . . . . . . . . . . . . . . . . . . 83
Recording Data . . . . . . . . . . . . . . . . . . . . . . . . . . . . . . . . . . . . . . . . . . . . 85
Analyzing Data . . . . . . . . . . . . . . . . . . . . . . . . . . . . . . . . . . . . . . . . . . . . 87
Reusing the Analysis . . . . . . . . . . . . . . . . . . . . . . . . . . . . . . . . . . . . . . . . 90
Saving the Analysis . . . . . . . . . . . . . . . . . . . . . . . . . . . . . . . . . . . . . . . . . 90
Logging Out . . . . . . . . . . . . . . . . . . . . . . . . . . . . . . . . . . . . . . . . . . . . . . 91
Daily Shutdown . . . . . . . . . . . . . . . . . . . . . . . . . . . . . . . . . . . . . . . . . . . . . . 92
Chapter 4: Maintenance 95
Scheduled Maintenance . . . . . . . . . . . . . . . . . . . . . . . . . . . . . . . . . . . . . . . . . 96
vi BD FACSCanto Flow Cytometer Reference Manual

Changing a Cubitainer . . . . . . . . . . . . . . . . . . . . . . . . . . . . . . . . . . . . . . 98
Emptying the Waste Container . . . . . . . . . . . . . . . . . . . . . . . . . . . . . . . . 102
Purging the Fluidics Filters . . . . . . . . . . . . . . . . . . . . . . . . . . . . . . . . . . . 105
Decontaminating the Fluidics System (Long Clean) . . . . . . . . . . . . . . . . 107
Replacing the Air Filter . . . . . . . . . . . . . . . . . . . . . . . . . . . . . . . . . . . . . 108
Replacing Fluidics Filters . . . . . . . . . . . . . . . . . . . . . . . . . . . . . . . . . . . . 111
Unscheduled Maintenance . . . . . . . . . . . . . . . . . . . . . . . . . . . . . . . . . . . . . . 114
Removing Bubbles from the Flow Cell . . . . . . . . . . . . . . . . . . . . . . . . . . 115
Cleaning the Flow Cell . . . . . . . . . . . . . . . . . . . . . . . . . . . . . . . . . . . . . . 116
Purging the Bubble Filter . . . . . . . . . . . . . . . . . . . . . . . . . . . . . . . . . . . . 117
Cleaning External Surfaces . . . . . . . . . . . . . . . . . . . . . . . . . . . . . . . . . . . 118
Decontaminating the Fluidics System for Storage . . . . . . . . . . . . . . . . . . 119
Replacing the Bal Seal . . . . . . . . . . . . . . . . . . . . . . . . . . . . . . . . . . . . . . 120
Resetting the Cytometer Circuit Breaker . . . . . . . . . . . . . . . . . . . . . . . . 124
Reconnecting the Ethernet and Network Cables . . . . . . . . . . . . . . . . . . 125
Reconnecting the Fluidics Cart Tubing . . . . . . . . . . . . . . . . . . . . . . . . . . 125
Removing an Air Lock . . . . . . . . . . . . . . . . . . . . . . . . . . . . . . . . . . . . . . 128
Replacing the Fluidics Level Sensors . . . . . . . . . . . . . . . . . . . . . . . . . . . . 130
Replacing the Fluidics Cart Fuses . . . . . . . . . . . . . . . . . . . . . . . . . . . . . . 134
Chapter 5: Troubleshooting 137
Instrument Troubleshooting . . . . . . . . . . . . . . . . . . . . . . . . . . . . . . . . . . . . . 138
Fluidics Cart Troubleshooting . . . . . . . . . . . . . . . . . . . . . . . . . . . . . . . . . . . 142
Acquisition Troubleshooting for BD FACSDiva Software . . . . . . . . . . . . . . . . . . . . . . . . . . . . . . . . . . . . . . . . 143
Appendix A: Technical Overview 149
Flow Cytometry . . . . . . . . . . . . . . . . . . . . . . . . . . . . . . . . . . . . . . . . . . . . . . 150
Fluidics System . . . . . . . . . . . . . . . . . . . . . . . . . . . . . . . . . . . . . . . . . . . . . . . 150
Optics System . . . . . . . . . . . . . . . . . . . . . . . . . . . . . . . . . . . . . . . . . . . . . . . . 153
Light Scatter . . . . . . . . . . . . . . . . . . . . . . . . . . . . . . . . . . . . . . . . . . . . . . 154
Contents vii
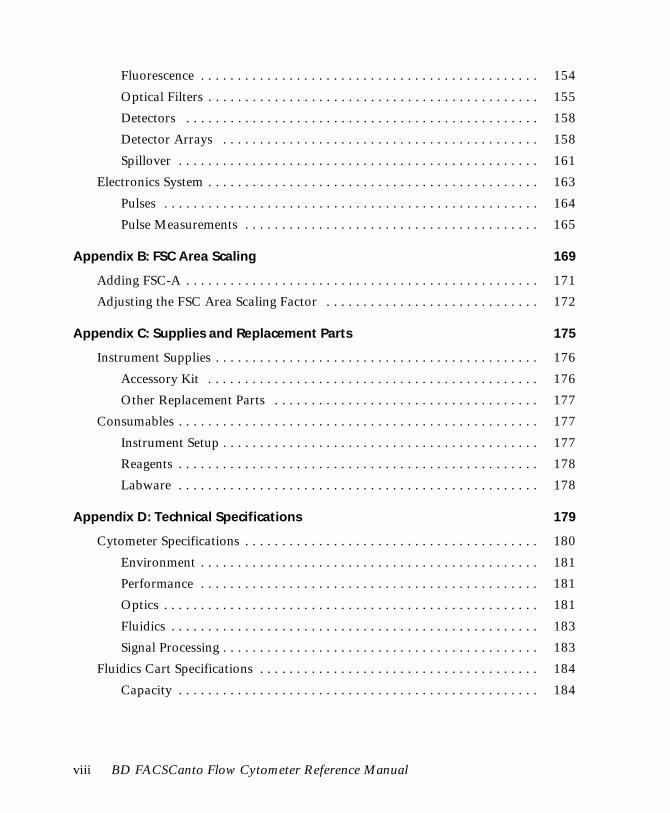
Fluorescence . . . . . . . . . . . . . . . . . . . . . . . . . . . . . . . . . . . . . . . . . . . . . . 154
Optical Filters . . . . . . . . . . . . . . . . . . . . . . . . . . . . . . . . . . . . . . . . . . . . . 155
Detectors . . . . . . . . . . . . . . . . . . . . . . . . . . . . . . . . . . . . . . . . . . . . . . . . 158
Detector Arrays . . . . . . . . . . . . . . . . . . . . . . . . . . . . . . . . . . . . . . . . . . . 158
Spillover . . . . . . . . . . . . . . . . . . . . . . . . . . . . . . . . . . . . . . . . . . . . . . . . . 161
Electronics System . . . . . . . . . . . . . . . . . . . . . . . . . . . . . . . . . . . . . . . . . . . . . 163
Pulses . . . . . . . . . . . . . . . . . . . . . . . . . . . . . . . . . . . . . . . . . . . . . . . . . . . 164
Pulse Measurements . . . . . . . . . . . . . . . . . . . . . . . . . . . . . . . . . . . . . . . . 165
Appendix B: FSC Area Scaling 169
Adding FSC-A . . . . . . . . . . . . . . . . . . . . . . . . . . . . . . . . . . . . . . . . . . . . . . . . 171
Adjusting the FSC Area Scaling Factor . . . . . . . . . . . . . . . . . . . . . . . . . . . . . 172
Appendix C: Supplies and Replacement Parts 175
Instrument Supplies . . . . . . . . . . . . . . . . . . . . . . . . . . . . . . . . . . . . . . . . . . . . 176
Accessory Kit . . . . . . . . . . . . . . . . . . . . . . . . . . . . . . . . . . . . . . . . . . . . . 176
Other Replacement Parts . . . . . . . . . . . . . . . . . . . . . . . . . . . . . . . . . . . . 177
Consumables . . . . . . . . . . . . . . . . . . . . . . . . . . . . . . . . . . . . . . . . . . . . . . . . . 177
Instrument Setup . . . . . . . . . . . . . . . . . . . . . . . . . . . . . . . . . . . . . . . . . . . 177
Reagents . . . . . . . . . . . . . . . . . . . . . . . . . . . . . . . . . . . . . . . . . . . . . . . . . 178
Labware . . . . . . . . . . . . . . . . . . . . . . . . . . . . . . . . . . . . . . . . . . . . . . . . . 178
Appendix D: Technical Specifications 179
Cytometer Specifications . . . . . . . . . . . . . . . . . . . . . . . . . . . . . . . . . . . . . . . . 180
Environment . . . . . . . . . . . . . . . . . . . . . . . . . . . . . . . . . . . . . . . . . . . . . . 181
Performance . . . . . . . . . . . . . . . . . . . . . . . . . . . . . . . . . . . . . . . . . . . . . . 181
Optics . . . . . . . . . . . . . . . . . . . . . . . . . . . . . . . . . . . . . . . . . . . . . . . . . . . 181
Fluidics . . . . . . . . . . . . . . . . . . . . . . . . . . . . . . . . . . . . . . . . . . . . . . . . . . 183
Signal Processing . . . . . . . . . . . . . . . . . . . . . . . . . . . . . . . . . . . . . . . . . . . 183
Fluidics Cart Specifications . . . . . . . . . . . . . . . . . . . . . . . . . . . . . . . . . . . . . . 184
Capacity . . . . . . . . . . . . . . . . . . . . . . . . . . . . . . . . . . . . . . . . . . . . . . . . . 184
viii BD FACSCanto Flow Cytometer Reference Manual

Appendix E: Performance Data 185
BD FACSCanto System Accuracy . . . . . . . . . . . . . . . . . . . . . . . . . . . . . . . . . 186
Lyse/Wash Method Subset Percentages . . . . . . . . . . . . . . . . . . . . . . . . . 186
Lyse/No-Wash Method Absolute Counts . . . . . . . . . . . . . . . . . . . . . . . . 189
Lyse/No-Wash Method Subset Percentages . . . . . . . . . . . . . . . . . . . . . . 192
BD FACSCanto System Precision . . . . . . . . . . . . . . . . . . . . . . . . . . . . . . . . . 195
Lyse/Wash Method Subset Percentages . . . . . . . . . . . . . . . . . . . . . . . . . 195
Lyse/No-Wash Method Absolute Counts . . . . . . . . . . . . . . . . . . . . . . . . 196
BD FACSCanto System Linearity . . . . . . . . . . . . . . . . . . . . . . . . . . . . . . . . . 198
BD FACSCanto System Carryover . . . . . . . . . . . . . . . . . . . . . . . . . . . . . . . . 200
Appendix F: QC Log 201
Index 207
Contents ix

x BD FACSCanto Flow Cytometer Reference Manual
About This Guide
This user’s guide contains the instructions necessary to operate and maintain your BD FACSCanto™ flow cytometer. Most instrument functions are controlled by BD FACSDiva™ software and BD FACSCanto™ clinical software. BD FACSCanto clinical software contains modules for dedicated clinical applications with automatic gating algorithms, while BD FACSDiva software is non-application specific. You can use both softwares to perform instrument quality control.
Each software package has its own reference manual. You’ll find a description of BD FACSDiva software features specific to the BD FACSCanto cytometer within this manual.
BD Biosciences recommends that first-time user’s of this instrument take advantage of operator training offered with the sale of every new instrument.
The BD FACSCanto Flow Cytometer Reference Manual assumes you have a working knowledge of basic Microsoft® Windows® operation. If you are not familiar with the Windows operating system, refer to the documentation provided with your computer.
xi

Conventions
The following tables list conventions used throughout this manual. Table 1 lists the symbols that are used in this booklet or on safety labels to alert you to a potential hazard. Text and keyboard conventions are shown in Table 2 on page xiii.
Table 1 Hazard symbolsa
a. Although these symbols appear in color on the instrument, they are in black and white throughout this user’s guide; their meaning remains unchanged.
Symbol Meaning
CAUTION: hazard or unsafe practice that could result in material damage, data loss, minor or severe injury, or death
Electrical danger
Laser radiation
Biological risk
xii BD FACSCanto Flow Cytometer Reference Manual
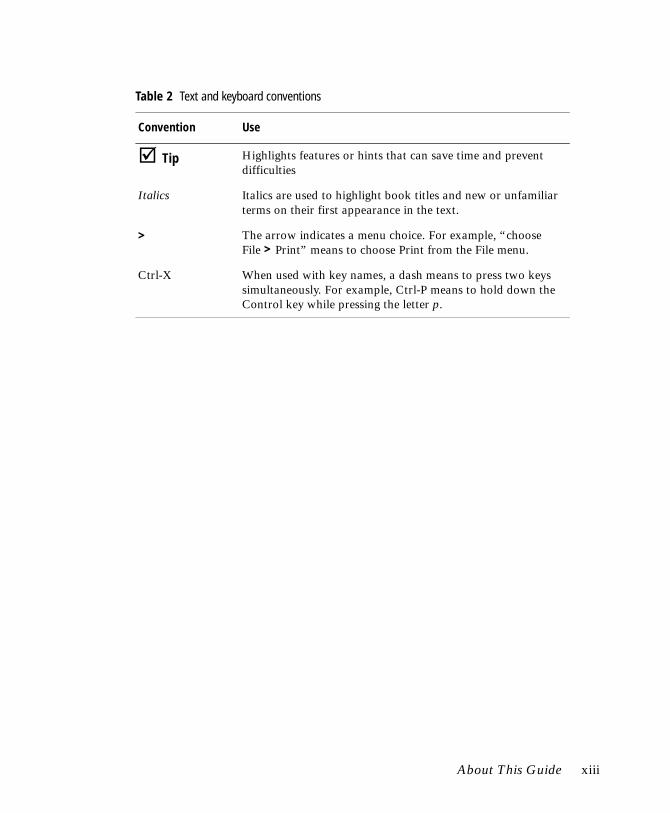
Table 2 Text and keyboard conventions
Convention Use
! Tip Highlights features or hints that can save time and prevent difficulties
Italics Italics are used to highlight book titles and new or unfamiliar terms on their first appearance in the text.
> The arrow indicates a menu choice. For example, “choose File > Print” means to choose Print from the File menu.
Ctrl-X When used with key names, a dash means to press two keys simultaneously. For example, Ctrl-P means to hold down the Control key while pressing the letter p.
About This Guide xiii

Technical Assistance
For technical questions or assistance in solving a problem:
• Read the section of the manual specific to the operation you are performing.
• See Chapter 5, Troubleshooting.
If additional assistance is required, contact your local BD Biosciences technical support representative or supplier.
When contacting BD Biosciences, have the following information available:
• product name, part number, and serial number
• software version number
• any error messages
• details of recent system performance
For instrument support from within the US, call (877) 232-8995, prompt 2, 2.
For support from within Canada, call (888) 259-0187.
Customers outside the US and Canada, contact your local BD representative or distributor.
xiv BD FACSCanto Flow Cytometer Reference Manual

Safety and Limitations
The BD FACSCanto™ flow cytometer and the BD FACS™ Loader are equipped with safety features for your protection. Operate them only as directed in the reference manual. Do not perform instrument maintenance or service except as specifically stated. If you operate this instrument in any way not specified in the user’s guides, the protection provided by the equipment might be impaired. Keep this safety information available for reference.
Electrical Safety
• Turn off the power switch and unplug the power cord before servicing the instrument, unless otherwise noted.
• Connect the equipment only to an approved power source. Do not use extension cords. Have an electrician immediately replace any damaged cords, plugs, or cables.
• Do not remove the grounding prong from the power plug. Have a qualified electrician replace any ungrounded receptacles with properly grounded receptacles in accordance with the local electrical code.
Lethal electrical hazards are present in some lasers, particularly in laser power supplies. Many portions of the electrical system, including the printed circuit boards, are at a dangerous voltage level. To prevent shock injury or damage to the instrument, follow these guidelines.
Protect against the risk of fire by replacing fuses only with those of the specified type and rating.
xv

Biological Safety
• Handle all biological specimens and materials as if capable of transmitting infection. Dispose of waste using proper precautions and in accordance with local regulations. Never pipette by mouth. Wear suitable protective clothing, eyewear, and gloves.
• Always wear gloves when manually loading samples. A fluid flush of the exterior of the sample injection tube (SIT) occurs between samples that might contain biohazardous waste.
• To prevent a biohazardous spill during manual loading, always hold the sample tube on the SIT when you move the aspirator arm.
• Expose waste container contents to bleach (10% of total volume) before disposal. Dispose of waste in accordance with local regulations. Use proper precaution and wear suitable protective clothing, eyewear, and gloves.
• Prevent waste overflow by emptying the waste container daily or whenever the waste indicator in the software shows the waste is getting full.
• The waste tank can become pressurized when the cytometer is running. Always disconnect the tank from the fluidics cart before you empty it. Wait at least 30 seconds for pressure to dissipate before you remove the waste cap or sensor.
• Replace the waste tank cap every month. Failure to do so could cause the waste tank to malfunction. For tracking, write the date on the waste cap label each time you change the cap.
Do not plug the fluidics cart power cord into a wall outlet. Plug the cord into the cytometer only. This ensures proper electrical grounding and protects against electrical shock or damage to the instrument.
All biological specimens and materials coming into contact with them can transmit potentially fatal disease. To prevent exposure to biohazardous agents, follow these guidelines.
xvi BD FACSCanto Flow Cytometer Reference Manual

• Do not wet the waste tank cap. If wet, the filter in the cap will cause the tank to malfunction. To keep the cap dry, place it on the bench label-side up when it is not on the tank. If you see liquid in the waste cap trap, remove the drain plug and fully drain the liquid before you replace the plug.
For information on laboratory safety, refer to the following guidelines. NCCLS documents can be ordered online at www.nccls.org.
• Protection of Laboratory Workers from Instrument Biohazards and Infectious Disease Transmitted by Blood, Body Fluids, and Tissue; Approved Guideline. Wayne, PA: National Committee for Clinical Laboratory Standards, 1997. NCCLS document M29-A.
• Procedures for the Handling and Processing of Blood Specimens; Approved Guideline. Wayne, PA: National Committee for Clinical Laboratory Standards; 1990. NCCLS document H18-A.
Laser Safety
Lasers or laser systems emit intense, coherent electromagnetic radiation that has the potential of causing irreparable damage to human skin and eyes. The main hazard of laser radiation is direct or indirect exposure of the eye to thermal radiation from the visible and near-infrared spectral regions (325–1,400 nm). Direct eye contact can cause corneal burns, retinal burns, or both, and possible blindness.
There are other potentially serious hazards in other spectral regions. For cytometers that contain UV lasers, excessive ultraviolet exposure produces an intolerance to light (photophobia) accompanied by redness, a tearing discharge from the mucous membrane lining the inner surface of the eyelid (conjunctiva), shedding of the corneal cell layer surface (exfoliation), and stromal haze. These symptoms are associated with photokeratitis, otherwise known as snow blindness or welder’s flash, which results from radiant energy–induced damage to the outer epidermal cell layer of the cornea. These effects can be the result of laser exposure lasting only a fraction of a second.
drain plug
trap
Safety and Limitations xvii

Laser Product Classification
Laser hazard levels depend on laser energy content and the wavelengths used. A numbered system is used to categorize laser products according to different hazard levels. The higher the classification number, the greater the potential hazard. The BD FACSCanto flow cytometer is a Class I laser product per 21 CFR Subchapter J and IEC/EN 60825-1:1994 + A2:2001. The lasers and the laser energy are fully contained within the instrument structure and call for no special work area safety requirements except during service procedures. These procedures are to be carried out only by BD Biosciences service personnel.
Precautions for Safe Operation
Modification or removal of the optics covers or laser shielding could result in exposure to hazardous laser radiation. To prevent irreparable damage to human skin and eyes, do not remove the optics covers or laser shielding, adjust controls, or attempt to service the instrument any place where laser warning labels are attached (see Precaution Labels on page Precaution labels).
Use of controls, adjustments to the cytometer, or performance of procedures other than those specified in the instrument user’s guide can result in exposure to hazardous visible laser radiation.
Keep all instrument doors closed during instrument operation. When operated under these conditions, the instrument poses no danger of exposure to hazardous laser radiation.
xviii BD FACSCanto Flow Cytometer Reference Manual

General Safety
To prevent injury and maintain data quality, do not relocate the cytometer after it has been set up by BD Biosciences service personnel. If you need to relocate the cytometer, call BD Biosciences. Your service representative will arrange the relocation and verify that the cytometer is functioning properly afterwards.
Mechanical moving parts within the Loader can pinch or injure your hands or fingers. To prevent injury by moving parts, keep the Loader cover closed while running samples. Remove the cover only when installing carousels or performing routine maintenance. The Loader will not run with the cover removed.
Safety and Limitations xix

Precaution Labels
The following precaution labels appear on the BD FACSCanto flow cytometer, Loader, or fluidics cart to indicate a potential hazard. Do not remove these labels. Use appropriate precaution to avoid injury by the indicated hazard. See the previous sections for more information.
Label Location(s) Potential Hazard
Waste tank, waste tank connectors on fluidics cart, waste tank connectors on instrument
Risk of exposure to biologically transmissible disease
Waste tank Risk of exposure to biologically transmissible disease
Near sample injection tube (SIT) and aspirator arm
Risk of exposure to biologically transmissible disease
Fluidics cart, beneath the power cord
Potential of electrical shock if fluidics cart is plugged into the wall outlet. Plug into the cytometer only.
Waste (A)336325 Rev. A
338677 Rev A
Waste (A)
3337
70
!
xx BD FACSCanto Flow Cytometer Reference Manual

On or near all removable covers and any place where the laser beam can emerge from the instrument
Risk of exposure to hazardous laser radiation
Loader Risk of crushing or pinching by moving parts
Label Location(s) Potential Hazard
CAUTIONVISIBLE AND/OR INVISIBLE
CLASS 3B LASER RADIATIONWHEN OPEN AND INTERLOCKSDEFEATED. AVOID EXPOSURE
TO THE BEAM.335751
�CAUTION
VISIBLE AND/OR INVISIBLECLASS 3B LASER RADIATION
WHEN OPEN. AVOIDEXPOSURE TO THE BEAM.
335749
DANGER: VISIBLE AND/OR INVISIBLE LASER RADIATION WHEN REMOVED. AVOID EYE OR SKIN EXPOSURE TO DIRECT OR SCATTERED RADIATION.
FARE: SYNLIG OG/ELLER USYNLIG LASERSTRÅLING, HVIS FJERNET. UNDGÅ EKSPONERING AFØJNE ELLER HUD FOR DIREKTE ELLER SPREDT STRÅLING.
GEVAAR: ZICHTBARE EN/OF ONZICHTBARE LASERSTRALING INDIEN VERWIJDERD. VERMIJD BLOOTSTELLING VAN DE OGEN OF DE HUID AAN DIRECTE OF VERSTROOIDE STRALING.
VAARA: NÄKYVÄÄ JA/TAI NÄKYMÄTÖNTÄ LASERSÄTEILYÄ, JOS TÄMÄ KANSI POISTETAAN.VÄLTETTÄVÄ SILMIEN JA IHON ALTISTUMISTA SUORALLE SÄTEILYLLE TAI HAJASÄTEILYLLE.
DANGER: RAYONNEMENT LASER VISIBLE ET/OU INVISIBLE LORS DU RETRAIT. EVITER TOUTE EXPOSITION OCULAIRE OU CUTANEE AU RAYONNEMENT DIRECT OU DIFFUSE.
GEFAHR:NACH DEM ENTFERNEN TRITT SICHTBARE UND UNSICHTBARE LASERSTRAHLUNG AUS.BESTRAHLUNG VON AUGE ODER HAUT DURCH DIREKTE ODER STREUSTRAHLUNG VERMEIDEN.PERICOLORADIAZIONI LASER VISIBILI E/O INVISIBILI, QUANDO LA PROTEZIONE È RIMOSSA. EVITARE IL CONTATTO DELLA PELLE O DEGLI OCCHI CON LE RADIAZIONI DIRETTE O DIFFUSE.
3356
00 R
ev. A
FARE!: SYNLIG OG/ELLER USYNLIG LASERSTRÅLING VED FJERNING. UNNGÅ EKSPONERINGAV ØYNE OG HUD FOR DIREKTE ELLER SPREDT STRÅLING.
PERIGO: RADIAÇÃO LASER VISÍVEL E/OU INVISÍVEL QUANDO REMOVIDA. EVITE AEXPOSIÇÃO DOS OLHOS OU DA PELE À RADIAÇÃO DIRECTA OU DISPERSA.
PELIGRO:RADIACIÓN LÁSER VISIBLE Y/O INVISIBLE SI SE RETIRA. EVITE LA EXPOSICIÓN DELOS OJOS O LA PIEL A LA RADIACIÓN DIRECTA O DISPERSA.
FARA!:SYNLIG OCH/ELLER OSYNLIG LASERSTRÅLNING FRAMKOMMER VID AVLÄGSNANDE. UNDVIK EXPONERING AV ÖGON ELLER HUD FÖR DIREKT ELLER SPRIDD STRÅLNING.
CAUTION:MOVING PARTS!
Safety and Limitations xxi
Limitations
• For In Vitro Diagnostic Use.
• Not all 12 x 75-mm test tubes and bulk fluids have been qualified for use on the cytometer. Use only the following tubes:
- 12 x 75-mm polystyrene BD Falcon™ tubes
- 12 x 75-mm BD Trucount™ tubes (do not use with BD FACSDiva software)
- 12 x 75-mm BD FACS 7-color setup bead tubes
• When unloading tubes from the SIT, always move the aspirator arm all the way to the left to activate SIT cleaning and preserve data integrity.
• A droplet of approximately 10–50 µL of sheath fluid could remain on the SIT after automatic cleaning. Therefore, always use a sample size that will not be affected by the addition of this much sheath.
• Do not place any heavy objects on top of the cytometer at any time; doing so could cause alteration of data.
• For sample and reagent limitations, refer to the appropriate reagent package insert.
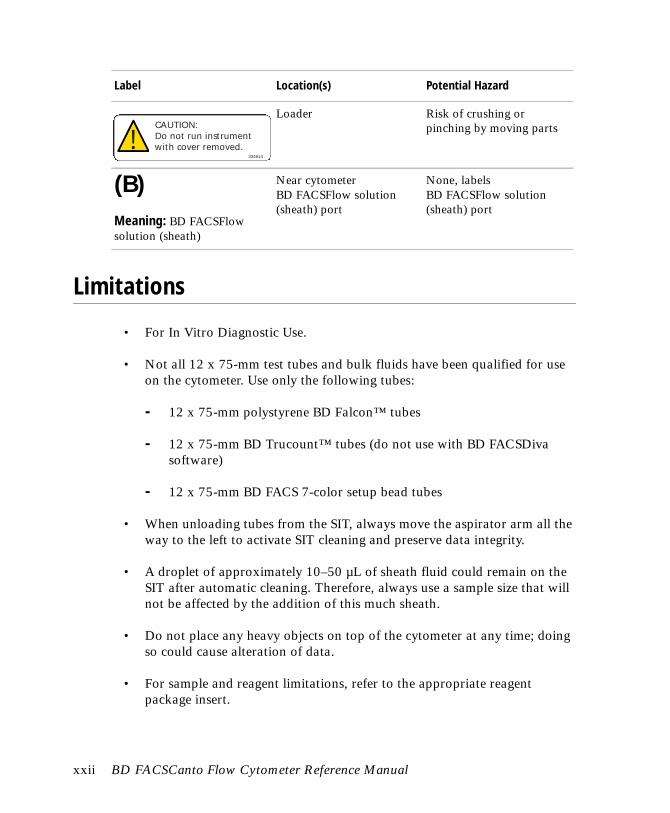
Loader Risk of crushing or pinching by moving parts
(B)Meaning: BD FACSFlow solution (sheath)
Near cytometer BD FACSFlow solution (sheath) port
None, labels BD FACSFlow solution (sheath) port
Label Location(s) Potential Hazard
334614
!CAUTION:Do not run instrumentwith cover removed.
xxii BD FACSCanto Flow Cytometer Reference Manual

• If your instrument is equipped with a Loader, be aware that BD Biosciences has not validated Loader mixing for volumes greater than 1 mL.
BD FACSDiva Software Limitations
• The BD FACSCanto instrument with BD FACSDiva software was developed for use with the lyse/wash method of sample preparation, which is not compatible with absolute counting beads. BD Biosciences does not recommend using BD Trucount tubes when preparing samples using the lyse/wash method.
• Calculation of the lymphocyte subset percentages in BD FACSDiva software involves computing the ratio of reagent-positive events to the CD45-positive lymphocyte events and reporting this ratio as a percentage for each lymphocyte subset.
• You must create manual gates when using BD FACSDiva software. The software does not provide application-specific analysis templates.
Safety and Limitations xxiii

xxiv BD FACSCanto Flow Cytometer Reference Manual

1
Introduction
The BD FACSCanto system sets a new standard for performance in flow cytometry. With its fixed-optics design and digital electronics, the BD FACSCanto flow cytometer allows multicolor analysis of up to six fluorescent markers and two scatter parameters at a time.
You need no special facilities: the instrument plugs into a standard wall outlet, uses air-cooled lasers, and provides its own air pressure and vacuum for the fluidics and waste. You can prepare samples on the BD FACS™ Sample Prep Assistant II and import the worklist. For further automation, use BD FACSCanto clinical software and the BD FACS Loader for sample acquisition. You can also use BD FACSDiva software for more flexibility in acquisition and analysis.
This chapter contains these topics:
• Intended Use on page 26
• System Components on page 26
• System Requirements on page 40
25

Intended Use
The BD FACSCanto flow cytometer identifies and enumerates lymphocyte subsets in human cells in suspension.
System Components
The BD FACSCanto system consists of three major components: a benchtop flow cytometer, a self-contained fluidics cart, and the BD FACSCanto computer workstation (see Figure 1-1). An optional, automated sample loader is also available.
Figure 1-1 BD FACSCanto system
For a description of system components, see the following sections.
• Cytometer on page 27
• Fluidics Cart on page 36
• Computer Workstation on page 39
• Loader (Optional) on page 39
26 BD FACSCanto Flow Cytometer Reference Manual

Cytometer
With the exception of the power button, you control all cytometer and fluidics cart functions from within the two software packages provided with the instrument: BD FACSCanto clinical software and BD FACSDiva software.
The BD FACSCanto flow cytometer consists of an optics subsystem, a fluidics subsystem, and an electronics subsystem. For a more in-depth discussion of fluidics, optics, electronics, and flow cytometry, see the Technical Overview on page 149.
Fluidics
The fluidics system consists of the sample injection tube (SIT), the aspirator arm, the flow cell, a pressurized interior reservoir, and a network of tubing that provides sheath and cleaning fluids to and removes waste from the flow cell. See Figure 1-2 on page 28.
side door
optics
flow cell
sample injectiontube
power button
fluidics cart connections
data ports
access door
access door
Chapter 1: Introduction 27

Figure 1-2 Sample injection tube
The following table briefly describes these components.
You will install tubes onto the SIT. A pump within the fluidics cart pressurizes the interior reservoir, which then provides sheath fluid to the flow cell. At the same time, sample is pushed up the SIT and into the flow cell.
flow cell where the laser beam intercepts particles
tubing tubing that brings sheath and cleaning fluids to and waste away from the flow cell
SIT the hollow metal tube that brings sample to the flow cell
adapter lever the lever used to change the SIT from manual to automatic loading
aspirator arm a movable waste aspiration port
aspirator arm bar a metal bar used to push the aspirator arm away from the SIT during manual loading
aspirator arm
flow cell
tube guide(Loader option only)
aspirator arm bar
adapter lever
tubing
sample injection tube (SIT)
28 BD FACSCanto Flow Cytometer Reference Manual
When you remove tubes, and when the cytometer cleans the SIT between tubes, fluid drops will be evacuated into a port on the aspirator arm. To activate SIT cleaning, push the aspirator arm all the way to the left when you manually unload a tube. When you are using the Loader, SIT cleaning occurs automatically.
You do not need to leave a tube of distilled water on the SIT between sample tubes or after daily shutdown.
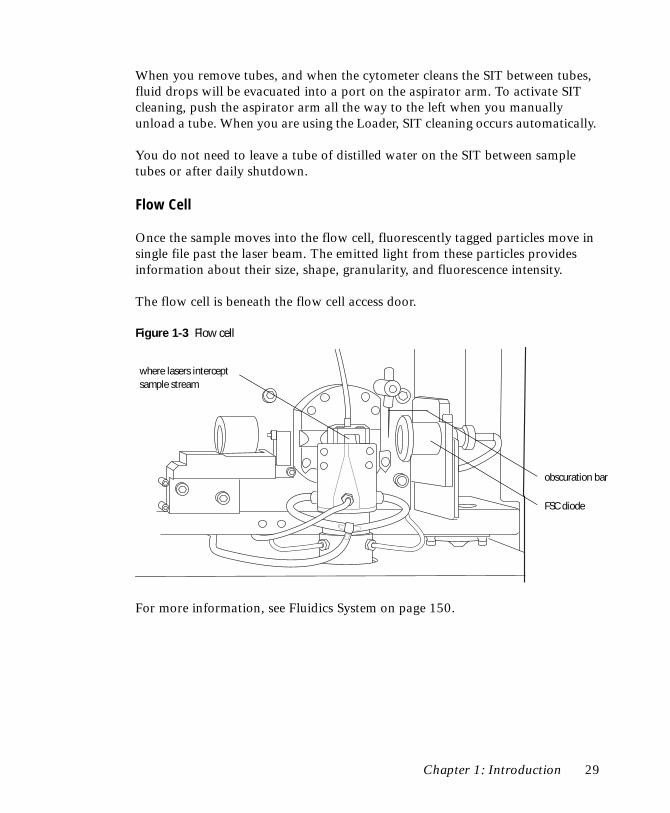
Flow Cell
Once the sample moves into the flow cell, fluorescently tagged particles move in single file past the laser beam. The emitted light from these particles provides information about their size, shape, granularity, and fluorescence intensity.
The flow cell is beneath the flow cell access door.
Figure 1-3 Flow cell
For more information, see Fluidics System on page 150.
FSC diode
where lasers intercept sample stream
obscuration bar
Chapter 1: Introduction 29

Optics
Excitation optics bring light to the flow cell.
Collection optics gather the light emitted or scattered by the tagged particles and convert them from optical to electronic signals.
The BD FACSCanto cytometer uses innovative designs for both the excitation optics and collection optics. Some of the collection optics can be viewed by opening the optics access door.
Excitation Optics
The excitation optics consist of lasers, fiber optic cables, beam-shaping prisms, and an achromatic focusing lens, as shown in Figure 1-4 on page 31.
The BD FACSCanto instrument uses low-powered air-cooled and solid state lasers that do not have special power and cooling requirements.
LaserWavelength
(nm)Min. Powera
(mW)
a. Measured out of fiber optic cable
Commonly Used Fluorochromes
Coherent® Sapphire™ Solid State
488 (blue) 20 FITC, PEb, PE-Texas Red®, PerCP, PerCP-Cy5.5,
PE-Cy7, PI
b. For a list of patents, see the second page of this guide.
JDS Uniphase™ HeNe Air Cooled
633 (red) 17 APC, APC-Cy7
30 BD FACSCanto Flow Cytometer Reference Manual

Fiber optic cables direct the laser light onto beam-shaping prisms, which in turn transmit the laser light to a focusing lens. The lens directs the laser light onto the sample stream within the flow cell (Figure 1-4).
Figure 1-4 Optical pathway
When the flow cell access door opens, an interlock shutters the laser light and blocks its pathway for safety reasons.
1
2
3
45
6
interlock flow cell
prisms red He-Ne laser
focusing lens blue solid-state laser
1 4
2 5
3 6
Chapter 1: Introduction 31

Collection Optics
From the flow cell, laser light is routed to the collection optics, which efficiently gather the signals from each laser.
The BD FACSCanto instrument’s collection optics include two detector arrays, each consisting of a series of photomultiplier tubes (PMTs) arranged in an octagon or trigon (Figure 1-5). The octagon, containing five PMTs, detects light from the 488-nm (blue) laser. The trigon, containing two PMTs, detects light from the 633-nm (red) laser. One PMT in the octagon collects side scatter (SSC) signals.
Figure 1-5 Octagon and trigon detector arrays
AC
B
D
F
H
A
CE
GB
670L
P
780/60660/20
530/
30
488/10
780/60
585/42
735LP
655L
P50
2LP
735LP556LP
octagon
PMTbandpassfilter
longpassdichroicmirror
trigon
red-lasersignal
blue-lasersignal
32 BD FACSCanto Flow Cytometer Reference Manual

When light arrives at an array, a long-pass dichroic mirror transmits the highest wavelengths to the first PMT in the series and reflects lower wavelengths to the next PMT. Likewise, the next PMT’s long-pass dichroic mirror will transmit the next highest wavelengths and reflect lower wavelengths, and so on around the array. A bandpass filter in front of each PMT further screens unwanted light.
In addition to the PMT detectors, a photodiode collects the stronger forward scatter signals. The obscuration bar prevents excess laser light from entering this diode (Figure 1-3 on page 29).
Optics System on page 153 further discusses the detector arrays and how dichroic mirrors and filters work.
A
B
C
D E
Fiber
Chapter 1: Introduction 33

At installation, the octagon and trigon arrays have the filter and mirror combinations shown in Table 1-1.
Blank optical holders do not contain any glass in the central opening. They are used in the octagon and trigon to prevent unwanted light from interfering with your fluorescence signal.
Table 1-1 Octagon and trigon optical filters
Detector Array (Laser)
PMTPosition
LP Mirror BP Filter or LP MirrorIntended
Dye
Octagon (488-nm blue laser)
A 735 780/60 PE-Cy7
B 655 670 LP PerCP-Cy5.5, PerCP
C 556 585/42 PE
D 502 530/30 FITC
E blankoptical holder
488/10 Side scatter (SSC)
F blank optical holder
blank optical holder
—
G blank optical holder
blank optical holder
—
H blank optical holder
blank optical holder
—
Trigon (633-nm red laser)
A 735 780/60 APC-Cy7
B blank 660/20 APC
34 BD FACSCanto Flow Cytometer Reference Manual

Electronics
The electronics system converts optical signals to electronic signals and digitizes them for computer analysis. The photodiode and PMTs generate signals proportional to the amount of light they receive. The cytometer’s onboard electronics amplifies and then converts the signals from continuous voltage values (analog) into discrete values (digital). Upon amplification and digital conversion, fluorescent light signals from consistently prepared and stained particles characteristically fall into certain channels, thus allowing analysis.
On the BD FACSCanto, electronic system components consist of power controls and connectors along with processing boards in the card cage. This section describes only user-adjustable instrument electronics.
For more information, see Electronics System on page 163.
Power Panel
Power to the instrument, lasers, and fluidics cart is supplied by a power cord from the cytometer plugged directly into a standard electrical outlet. The main power button turns on the instrument and fluidics cart, and powers the lasers.
Figure 1-6 Flow cytometer power panel
The instrument circuit breaker is located next to the power cord (Figure 1-6). The breaker will need to be reset if there is a power surge in the laboratory.
cytometer circuit breaker
main powerbutton
Chapter 1: Introduction 35

Fluidics Cart
A separate, self-contained fluidics cart provides filtered sheath and cleaning fluids to and collects waste from the instrument (Figure 1-7). The cart supplies the required air pressure and vacuum, which eliminates the need for an external source (although the cart can be hooked up to an in-house air source, if one is available).
Figure 1-7 Fluidics cart
pressuregauge
dooraccess knob
10-L waste
filters
cubitainer
container
36 BD FACSCanto Flow Cytometer Reference Manual

Containers and Ports
The fluidics cart holds one 10-L waste container, one 20-L BD FACSFlow™ cubitainer and two 5-L auxiliary cleaning fluid containers (Figure 1-8).
Use the waste container provided with the system; do not substitute other containers.
Figure 1-8 Fluidics cart containers and ports
Each solution has its own non-interchangeable fluid port and level-sensor connection. Fluid level alarms occur within BD FACSCanto clinical software and BD FACSDiva software.
waste tank
waste port
BD FACSFlow cubitainer
BD FACSFlow port
BD FACS shutdownsolution port and cubitainer
BD FACS cleaning solutionport and cubitainer
Chapter 1: Introduction 37

Controls
The fluidics cart connects directly to the flow cytometer unit via a power cord. When you turn on the power to the cytometer, the fluidics cart powers on also. Under ordinary circumstances, you do not need to adjust any of the switches on the cart’s power panel (located on the side of the cart). Leave the auxiliary air supply switch off, as shown in Figure 1-9, unless the cart has been attached to an in-house air supply by BD Biosciences service personnel, and leave the cart circuit breaker on at all times.
Figure 1-9 Fluidics cart panel
Powering Off
To turn off the fluidics cart (and the cytometer, as well), press the cytometer main power button. During cart shutdown, you will normally hear a hiss, and a small amount of condensed water will discharge from the pumps.
auxiliary air supply
cart circuit breaker, on
switch, off
38 BD FACSCanto Flow Cytometer Reference Manual

Computer Workstation
The workstation consists of a computer compatible with Microsoft® Windows® XP Professional operating system, a flat-screen monitor, and a printer.
Loader (Optional)
The Loader automatically introduces prepared samples to the cytometer. It consists of a drawer, a cover, two optical sensors, an electronics module, a tube lifter, and a 40-tube carousel. Operate the Loader from within either BD FACSCanto clinical software or BD FACSDiva software.
You can add the Loader to your system at any time.
Refer to the BD FACSCanto Options Manual for information about the Loader.
Chapter 1: Introduction 39

System Requirements
Software
BD FACSDiva or BD FACSCanto clinical software, depending upon your laboratory needs.
Workstation
BD FACSCanto workstation purchased through BD Biosciences
Tubes
• 12 x 75-mm polystyrene BD Falcon tubes
• 12 x 75-mm BD Trucount tubes
Bulk Fluids
• BD FACSFlow solution
• BD FACS™ cleaning solution
• BD FACS™ shutdown solution
• full-strength bleach (waste tank)
Other Fluids, Required for External Cleaning
• BD FACS cleaning solution
• Deionized (DI) water
Setup Beads
BD FACS 7-color setup beads and tubes for use with BD FACSCanto clinical software
40 BD FACSCanto Flow Cytometer Reference Manual

2
Using BD FACSDiva Software
You can control most BD FACSCanto instrument functions using either BD FACSCanto clinical software or BD FACSDiva software. BD FACSCanto clinical software contains modules for dedicated clinical applications with automatic gating algorithms, while BD FACSDiva software is non–application specific. You can use both softwares for performing instrument quality control.
This chapter provides a general overview of the workspace components in BD FACSDiva software and describes instrument controls unique to the BD FACSCanto instrument. For an in-depth description of software components not described in this chapter, refer to the BD FACSDiva Software Reference Manual.
For information on using BD FACSCanto clinical software, refer to the BD FACSCanto Clinical Software User’s Guide.
The following topics are covered in this chapter:
• Workspace Components on page 42
• Instrument Menu Commands on page 43
• Controls in the Instrument Frame on page 48
• Acquisition Controls on page 52
41

Workspace Components
When you start BD FACSDiva software, the workspace appears (Figure 2-1). Frames containing the main application components are displayed within the workspace. For an overview of the workspace and to get started using the software, refer to the BD FACSDiva Quick Start Guide. In addition to the frames shown in the BD FACSDiva Quick Start Guide, the BD FACSCanto also has a Carousel Controls frame that you can access by clicking ( ) in the Workspace toolbar; refer to the BD FACSCanto Options Reference Manual for a description of this frame.
Figure 2-1 BD FACSDiva workspace
42 BD FACSCanto Flow Cytometer Reference Manual

Instrument Menu Commands
Most BD FACSCanto–specific instrument controls are accessed through the Instrument menu.
Other menu commands (Instrument Name, Instrument Setup) are described in the BD FACSDiva Software Reference Manual.
Fluidics Controls
Fluidic control of the BD FACSCanto instrument is completely automated by BD FACSDiva software. The software contains pre-programmed fluidics protocols that are activated by choosing the corresponding command from the Instrument menu. In addition, fluid level indicators are available in the Instrument frame; see Fluid Level Indicators on page 48.
Fluidics Startup
The Fluidics Startup procedure verifies waste and sheath levels and primes the fluidics system with BD FACSFlow. For instructions on using this command, see Instrument Startup on page 57.
Fluidics Shutdown
The Fluidics Shutdown procedure removes sheath from the fluidics system and replaces it with BD FACS shutdown solution. For instructions on using this command, see Daily Shutdown on page 92.
Cleaning Modes
BD FACSDiva software contains pre-programmed cleaning modes that are activated by choosing the corresponding command from the Instrument > Cleaning Modes menu (Figure 2-2 on page 44). For information on when to use these commands, see Scheduled Maintenance on page 96 and Unscheduled Maintenance on page 114.
Chapter 2: Using BD FACSDiva Software 43

Figure 2-2 Instrument > Cleaning Modes menu commands
Automatic Clean
Choose Instrument > Automatic Clean to turn on automatic cleaning. A checkmark appears next to the menu command when automatic cleaning is in effect.
When automatic cleaning is on (command checked), the system runs Fluidics Startup automatically each time a user logs in or the cytometer resumes running from Standby, and runs Fluidics Shutdown each time a user logs out or the cytometer is put into Standby.
When automatic cleaning is off (command unchecked), you will need to choose the corresponding command to run Fluidics Startup and Fluidics Shutdown.
Instrument Configuration
The BD FACSCanto instrument is equipped with a specific set of lasers, filters, and dichroic mirrors. The Instrument Configuration dialog box lets you define which fluorochromes or cell parameters will be measured at each photomultiplier tube (PMT) detector.
automaticcleaning off
automaticcleaning on
44 BD FACSCanto Flow Cytometer Reference Manual

The following default configuration is provided when you install BD FACSDiva software for the BD FACSCanto instrument. The default configuration cannot be edited.
Before you start any Experiment, verify that the instrument configuration contains appropriate parameters for the samples you are running, and that the instrument optics match the current configuration. If needed, you can define a custom configuration for your system setup and application.
In general, it is best if you do not switch between configurations too often. One way to avoid switching configurations is to design a configuration that includes all the colors your laboratory uses. You can assign multiple colors to the same PMT location and laser assignment, as shown in the following table.
For accurate data results, the octagon and trigon arrays must match the current Instrument Configuration.
Parameter Laser Detector
PerCP-Cy5-5 Blue B
PerCP Blue B
PI Blue B
Chapter 2: Using BD FACSDiva Software 45

Selections in the Instrument Configuration dialog box determine the parameters listed on the Parameters tab in the Instrument frame. When more than one parameter is available for a detector, access it through the drop-down menu.
Figure 2-3 Parameters Tab view in Instrument frame
Refer to the BD FACSDiva Software Reference Manual for details on how to create your own configuration.
Instrument Status Report
Choose Instrument > Instrument Status Report to view a report of the current instrument settings. The Instrument Status Report is displayed in a separate window with a menu bar above the report header. You must be connected to the cytometer to view the Instrument Status report.
For a full description of the Instrument Status Report, refer to the BD FACSDiva Software Reference Manual. A BD FACSCanto instrument status report includes the sheath pressure and sample flow rate in the Instrument Info section, along with the lasers used, corresponding Delay and Area Scaling factors, and the Window Extension (Figure 2-4 on page 47).
46 BD FACSCanto Flow Cytometer Reference Manual

Figure 2-4 Supplemental items on a BD FACSCanto Instrument Status Report
Delay is not adjustable and is for information only.
Standby
Choose Instrument > Standby to disconnect the cytometer from the workstation. (Laser power is unchanged in Standby mode.) After a brief pause, the workstation disconnects from the cytometer and the menu command changes to Connect. If the Automatic Clean command is selected, the systems runs Fluidics Shutdown automatically.
The Standby command is not available when the application is acquiring or recording data, running any of the fluidics modes, or running a Loader carousel.
In Standby mode, you can set up Experiments or analyze data, but you cannot acquire new data—all instrument and acquisition controls are disabled. Refer to the BD FACSDiva Software Reference Manual for additional information on working offline.
Chapter 2: Using BD FACSDiva Software 47

Controls in the Instrument Frame
To display the Instrument frame, click the Instrument button in the Workspace toolbar ( ). Along with the controls described in the BD FACSDiva Software Reference Manual, the Instrument frame for the BD FACSCanto flow cytometer contains fluid level indicators at the bottom of the frame, and reference values on the Laser tab, both of which are described in this section.
Fluid Level Indicators
BD FACSDiva software provides fluid level indicators in the Instrument frame (Figure 2-5). The FACSFlow and waste indicators give an approximate indication of the fluid levels in each tank, while the shutdown solution and cleaning solution indicators appear full until the fluid level descends below approximately 20% of the tank capacity. When this occurs, the corresponding level indicator turns red.
Figure 2-5 Levels indicators
• Green represents the amount of fluid in a tank.
• Black represents the amount of empty space in a tank.
• Red indicates that a tank needs service because it is full (waste tank) or empty (fluid tanks).
! Tip Place your cursor over one of the boxes to see which fluid level it represents.
wasteshutdown cleaning solution
(empty)solutionFACSFlow
48 BD FACSCanto Flow Cytometer Reference Manual

When BD FACSFlow solution is low (<17%) or the waste is nearly full (>83%) during acquisition, a message such as the following displays:
If you...
• close the message box without replacing the BD FACSFlow container or emptying the waste, the message reappears every 5 minutes. The system continues running.
• do not close the dialog, the fluidics will shut down in 15 minutes.
If the BD FACSFlow container becomes empty (0%) or the waste becomes full (99%), the system shuts down. You will need to service the indicated container to continue.
Chapter 2: Using BD FACSDiva Software 49

Laser Tab
The values in the Laser tab compare measured laser current or power to a reference point set during instrument installation. If the measured value is 20% higher or lower than the reference value, an error message appears in the Status tab (Figure 2-6). When this occurs, make sure the flow cell access door is completely closed. If this does not resolve the problem, call your BD Biosciences service representative for assistance.
Figure 2-6 Laser tab
The Laser tab also contains Window Extension and FSC Area Scaling controls. The Window Extension extends the time in which area is measured. The FSC Area Scaling factor adjusts area measurements to be on the same scale as height measurements for signals from the FSC photodiode.
For standard clinical applications, use the default settings (Table 2-1).
Table 2-1 Default settings
Control Default
Window Extension 7.000
FSC Area Scaling Varies from instrument to instrument. Preset by BD Biosciences.
50 BD FACSCanto Flow Cytometer Reference Manual

Status Tab
This tab lists status messages specific to your instrument, such as communication errors, fluidics errors, or laser power errors.
message shownwhen value outof range
Chapter 2: Using BD FACSDiva Software 51

Acquisition Controls
The Acquisition Controls frame contains controls used to acquire and record data. To display the frame, click the Acquisition Controls button on the Workspace toolbar ( ).
Acquisition controls are visible only when the workstation is connected to the cytometer. Along with the controls described in the BD FACSDiva Software Reference Manual, the following controls are available for the BD FACSCanto instrument. In Figure 2-7, the controls unique to the BD FACSCanto are indicated by a blue outline.
Figure 2-7 Acquisition controls unique to the BD FACSCanto
• Remove Tube—starts countdown for manual cleaning of the SIT
In combination with the aspirator arm movement, the Remove Tube button initiates cleaning of the SIT to eliminate carryover between samples. The button must be clicked each time you change a tube, according to the following sequence.
It is critical that you follow the tube removal sequence exactly. Failure to follow this sequence could result in carryover between samples.
52 BD FACSCanto Flow Cytometer Reference Manual

- Click Remove Tube.
A progress dialog appears.
- Hold your sample tube with one hand while you push the aspirator arm all the way to the left with the other hand.
Always hold onto your sample tube when you push the aspirator arm to the side. If you move the arm without holding the tube, the tube could fall off the SIT and expose you to potentially biohazardous sample.
- Remove the tube from the SIT.
- Release the aspirator arm.
SIT cleaning occurs when the aspirator arm comes to center.
- When the Progress dialog disappears, you can load the next tube onto the SIT.
The Remove Tube button is disabled during acquisition.
• Flow Rate—controls the rate of sample flow through the flow cell
Three options are available:
- Low = 10 µL/min of sample
- Medium = 60 µL/min of sample
- High = 120 µL/min of sample
Flow rates are approximate.
Chapter 2: Using BD FACSDiva Software 53

54 BD FACSCanto Flow Cytometer Reference Manual

3
Running Samples
BD FACSDiva software can work together with the automated setup module in BD FACSCanto clinical software to provide a total package for running samples.
The following topics are covered in this chapter:
• Workflow on page 56
• Instrument Startup on page 57
• Instrument Quality Control on page 61
• Data Recording and Analysis on page 83
• Daily Shutdown on page 92
55

Workflow
BD Biosciences recommends that when you run samples using BD FACSDiva software, you use the automated instrument setup feature in BD FACSCanto clinical software for instrument QC. Then, use stained cells to optimize for your assay, record, and analyze data with BD FACSDiva software. Figure 3-1 shows the recommended workflow.
Figure 3-1 Workflow when running samples in BD FACSDiva software
start up (BD FACSCantoclinical software)
run automated
(BD FACSCanto clinical software)
optimize for assay
(BD FACSDiva software)
1 2 3 4
record andanalyze data
(BD FACSDivasoftware)
shutdown (BD FACSDiva
software)
5
BD FACSCanto clinical software
BD FACSDiva software
setup
56 BD FACSCanto Flow Cytometer Reference Manual

Instrument Startup
Follow these steps to start up your BD FACSCanto flow cytometer.
1 Turn on the main power.
The main power button is on the left side of the cytometer. The button turns on power to both the cytometer and the fluidics cart.
2 Start up the computer; launch BD FACSCanto clinical software.
Double-click the application shortcut on the desktop.
To prevent fluid overflow, make sure there is no tube on the SIT at startup.
main power button
Chapter 3: Running Samples 57
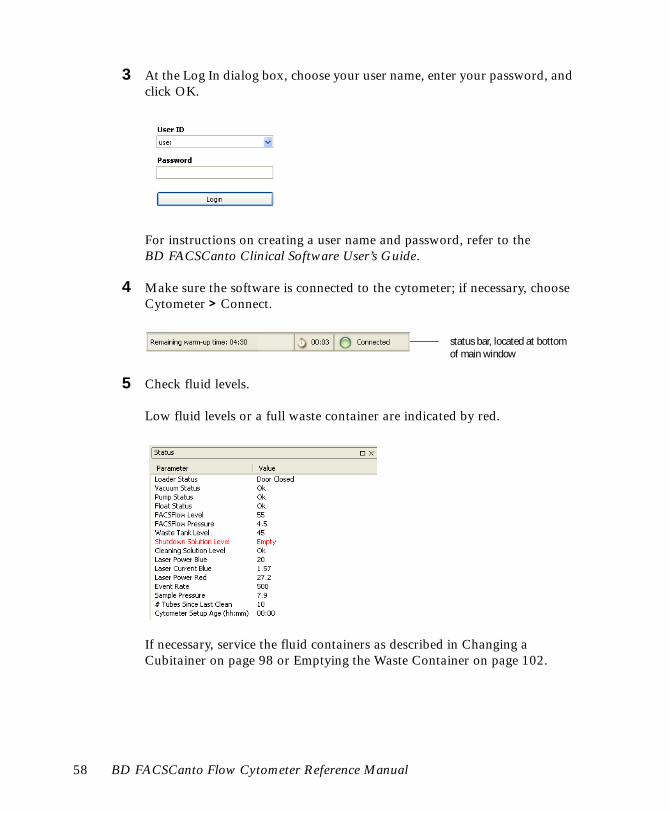
3 At the Log In dialog box, choose your user name, enter your password, and click OK.
For instructions on creating a user name and password, refer to the BD FACSCanto Clinical Software User’s Guide.
4 Make sure the software is connected to the cytometer; if necessary, choose Cytometer > Connect.
5 Check fluid levels.
Low fluid levels or a full waste container are indicated by red.
If necessary, service the fluid containers as described in Changing a Cubitainer on page 98 or Emptying the Waste Container on page 102.
status bar, located at bottomof main window
58 BD FACSCanto Flow Cytometer Reference Manual

6 If automatic cleaning is disabled, choose Cytometer > Fluidics Startup.
If automatic cleaning is enabled, fluidics startup runs automatically when the cytometer connects to the workstation.
Fluidics startup removes BD FACS shutdown solution from the fluid lines and replaces it with BD FACSFlow solution. It takes about 4 minutes to complete.
7 When Fluidics Startup completes, click OK.
8 Check the flow cell for air bubbles.
Lift the flow cell access door to see the flow cell.
If you see bubbles, remove them as described in Removing Bubbles from the Flow Cell on page 115.
9 Check that the laser warmup has finished.
When laser warmup is complete, a Ready message appears:
You have finished starting up the cytometer.
check here for bubbles
Status bar
Chapter 3: Running Samples 59
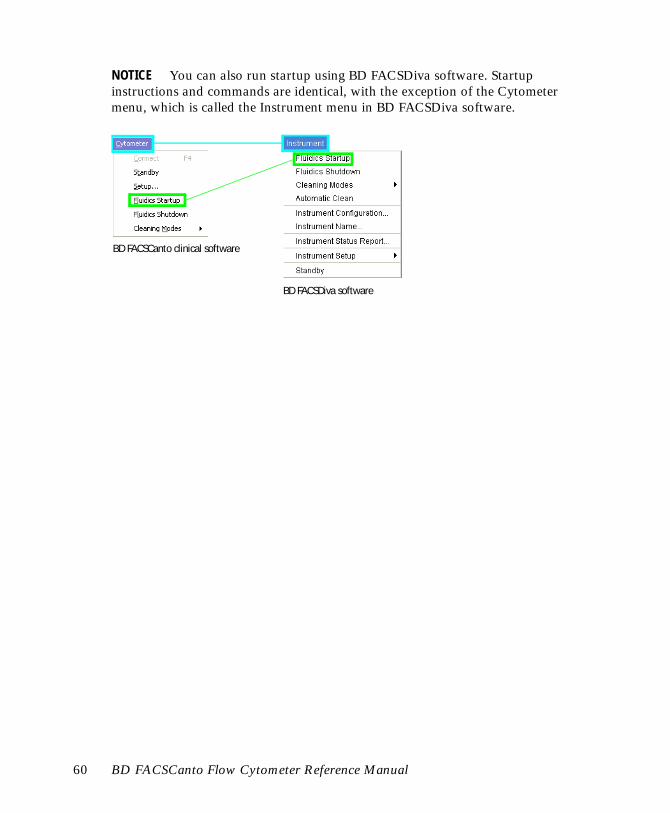
NOTICE You can also run startup using BD FACSDiva software. Startup instructions and commands are identical, with the exception of the Cytometer menu, which is called the Instrument menu in BD FACSDiva software.
BD FACSCanto clinical software
BD FACSDiva software
60 BD FACSCanto Flow Cytometer Reference Manual

Instrument Quality Control
Perform instrument quality control (QC) to ensure consistent instrument performance over time.
Performing Automated Setup
Use the automated setup function within BD FACSCanto clinical software to adjust detector voltages to place channel-specific setup beads at defined target values. During the process, spectral overlap values are also calculated and applied to compensate data for fluorescence spillover.
You must use BD FACS 7-color setup beads to perform setup. Refer to the package insert for preparation instructions.
Run setup once every 24 hours. The software tracks the time between setups and displays it in the Status window. A setup age of more than 24 hours appears in red. Running a successful setup resets the timer.
time sincelast setup
Chapter 3: Running Samples 61

Running the Setup Beads (Manual Mode)
1 Prepare BD FACS 7-color setup beads (refer to the reagent instructions for use).
2 Prepare the cytometer for manual loading.
3 Choose Cytometer > Setup.
The Cytometer Setup Wizard appears.
adapter lever in highest position
tube guide pushed back
aspirator arm bar vertical
drawer pulled out, carousel removed
62 BD FACSCanto Flow Cytometer Reference Manual

Chapter 3: Running Samples 63
4 Select the current bead lot from the Lot ID drop-down menu, and click .
Refer to the BD FACSCanto Clinical Software User’s Guide for information on entering new Lot IDs, Targets, and Spectral Overlap Factors.
5 Select Run setup in Manual mode, and click .

6 When prompted, load the bead tube onto the SIT.
• Push the aspirator arm to the left.
• Place the beads tube onto the SIT and push up until the tube is firmly seated.
• Center the aspirator arm under the beads tube.
7 Click .
8 Wait for setup to finish.
in process
completed
symbols key
undone
64 BD FACSCanto Flow Cytometer Reference Manual

9 Unload the bead tube when prompted.
• Hold the sample tube while pushing the aspirator arm all the way to the left.
• Remove the tube from the SIT.
• Release the aspirator arm.
SIT cleaning occurs when the aspirator arm comes to center.
10 (Optional) View the Setup report by clicking .
11 If setup is successful, click .
Chapter 3: Running Samples 65

12 If setup completed but some parameters were out of range, decide how you want to proceed.
Discard current results
You will be given the option to use the last setup results
Run setup again
Proceed and optimize current setup with BD FACSCanto clinical software
Exit and save current setup
66 BD FACSCanto Flow Cytometer Reference Manual

13 If setup is not successful, note the message provided by the software and refer to Setup Troubleshooting in the BD FACSCanto Clinical Software Reference Manual.
Quitting BD FACSCanto Clinical Software
If you are ready to optimize instrument settings using stained samples, do the following:
1 Choose File > Exit BD FACSCanto Software.
A dialog appears.
2 Select Exit only.
3 Click OK.
4 Launch BD FACSDiva software, enter your user name and password, and then click OK.
Chapter 3: Running Samples 67

Optimizing Instrument Settings
Before you record data for a sample, the PMT voltages, compensation, and threshold settings should be optimized for each sample type and fluorochrome used. These adjustments position the cells of interest on scale for scatter and fluorescence parameters.
This section describes how to perform optimization using the Instrument Setup feature in BD FACSDiva software. With this feature you can automatically calculate compensation settings. For more information, refer to the BD FACSDiva Software Reference Manual. If you are performing compensation manually, not all steps apply.
In general, optimization of instrument settings consists of the following steps; each step is explained in detail in the sections that follow. It is important that you perform these steps in order. You might need to vary certain steps for different sample types.
• Verify Instrument Configuration and the User Preferences are set appropriately.
• Create an Experiment.
• Apply the BD FACSDiva software instrument settings to the setup generated by BD FACSCanto clinical software.
• Optimize instrument settings.
• Calculate compensation.
68 BD FACSCanto Flow Cytometer Reference Manual

Verifying Instrument Configuration and User Preferences
Check the instrument configuration and User Preferences before you set up your Experiment.
1 Choose Instrument > Instrument Configuration and verify that the current configuration contains appropriate parameters.
2 Verify that the filters are appropriate to run FITC, PE, PerCP or PerCP-Cy5.5, PE-Cy7, APC, and APC-Cy7 fluorochromes.
The default filter configuration is appropriate for six-color assays.
3 Choose Edit > User Preferences and select the following values:
For a complete discussion of User Preferences, refer to the BD FACSDiva Software Reference Manual.
For accurate data results, the octagon and trigon arrays must match the current Instrument Configuration.
Chapter 3: Running Samples 69
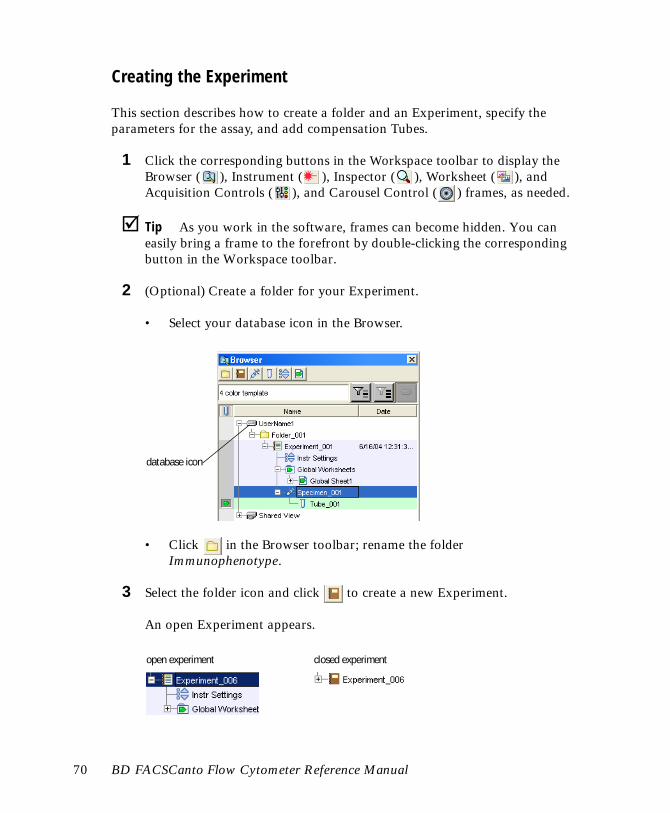
Creating the Experiment
This section describes how to create a folder and an Experiment, specify the parameters for the assay, and add compensation Tubes.
1 Click the corresponding buttons in the Workspace toolbar to display the Browser ( ), Instrument ( ), Inspector ( ), Worksheet ( ), and Acquisition Controls ( ), and Carousel Control ( ) frames, as needed.
! Tip As you work in the software, frames can become hidden. You can easily bring a frame to the forefront by double-clicking the corresponding button in the Workspace toolbar.
2 (Optional) Create a folder for your Experiment.
• Select your database icon in the Browser.
• Click in the Browser toolbar; rename the folder Immunophenotype.
3 Select the folder icon and click to create a new Experiment.
An open Experiment appears.
database icon
closed experimentopen experiment
70 BD FACSCanto Flow Cytometer Reference Manual

4 Rename the Experiment.
5 In the Experiment Inspector, select Use global instrument settings.
6 Click to add a Specimen and Tube.
7 Expand the Specimen by clicking the + .
8 Move the Current Tube pointer to the new Tube.
current tube pointer
Chapter 3: Running Samples 71

9 In the Instrument frame, click the Parameters tab.
Change, add, or delete parameters as needed.
• To change parameters, select a parameter, and choose a new parameter from the drop-down menu.
• To add a parameter, click Add; a new line appears; select it, and choose a parameter from the drop-down menu.
• To delete a parameter, select it and click Delete.
! Tip When the list contains 6 parameters plus FSC and SSC, the Add button becomes inactive.
Applying the Setup Results
1 Right-click the Experiment-level Instrument Settings.
Experiment-levelInstrument Settings
72 BD FACSCanto Flow Cytometer Reference Manual

2 From the menu, choose Apply Setup.
The Setup Catalog appears.
3 Select a setup from the list.
BD FACSCanto clinical software generated a Lyse/No Wash and a Lyse/Wash setup.
4 Click Apply.
Creating Compensation Controls
1 Choose Instrument > Instrument Setup > Create Compensation Controls.
A dialog appears.
Chapter 3: Running Samples 73

2 Click OK to unlink.
Applying a setup imports the clinical software setup. Unlinking allows you to optimize the setup.
The Create Compensation Controls dialog appears.
(Optional) Edit the labels associated with parameters, as needed.
Edit labels when your experiment contains samples stained with the same fluorophore conjugated to different antibodies (labels) that require different compensation values. This is especially noticeable in tandem conjugates due to lot-to-lot variation. Refer to the BD FACSDiva Software Reference Manual for more information about label-specific tubes.
74 BD FACSCanto Flow Cytometer Reference Manual

3 Click OK when done.
A Compensation Specimen is added to the Experiment, along with one Unstained Control Tube and a Stained Control Tube for each parameter that was specified in step 9. Worksheets containing the appropriate plots are added for each compensation Tube.
Optimizing Instrument Settings
When you performed instrument setup, voltage settings were adjusted to set each parameter at a target value. These settings might not be appropriate for the stained sample(s) you plan to analyze. Before recording data, you need to adjust FSC, SSC, and threshold settings; gate on the population of interest (such as lymphocytes); and adjust voltages to optimize fluorescent signal.
For these adjustments, you will need an unstained control sample. It is important to perform these steps in order, as some adjustments influence others.
1 Install the unstained control tube on the cytometer.
• Push the aspirator arm to the left.
• Place the tube onto the SIT and push up until the tube is firmly seated.
• Center the aspirator arm under the tube.
2 Verify that the green Current Tube pointer is in front of the Unstained Control Tube in the Browser; click Acquire.
Do not place any heavy objects on top of the cytometer at any time; doing so could cause alteration of data.
Chapter 3: Running Samples 75

3 Adjust the FSC and SSC voltages to appropriately display the scatter properties of the LWB sample (Figure 3-2).
Figure 3-2 Voltages adjusted
4 Click the Threshold tab and adjust the FSC Threshold, if needed.
Set the threshold to remove most of the debris without cutting off the lymphocyte population (Figure 3-2).
5 Adjust the P1 gate on the Unstained Control worksheet to surround only the lymphocyte population (Figure 3-2).
Select the gate by clicking on the boundary. Once selected, you can drag the gate to move it, or drag any of the selection handles to change its size and shape.
6 Once the gate is adjusted, right-click its boundary and choose Apply to All Compensation Controls.
This applies your gate changes to the P1 gates on the remaining compensation worksheets.
7 Select all fluorescence histograms on the Unstained Control worksheet.
76 BD FACSCanto Flow Cytometer Reference Manual

8 In the Plot Inspector, select the Show Grid checkbox (Figure 3-3).
For this example, do not select Biexponential.
Figure 3-3 Plot Inspector for fluorescent plots
Gridlines are used to delineate log decades on plots. In a four-log display, values are displayed from 26–262,143. Thus, the first log decade ranges from 26–262. The lines are shown only in plots that display log parameters.
9 Optimize the voltages to place the negative population for each fluorescent parameter within the first log decade (Figure 3-4 on page 78).
checkboxselected
Chapter 3: Running Samples 77
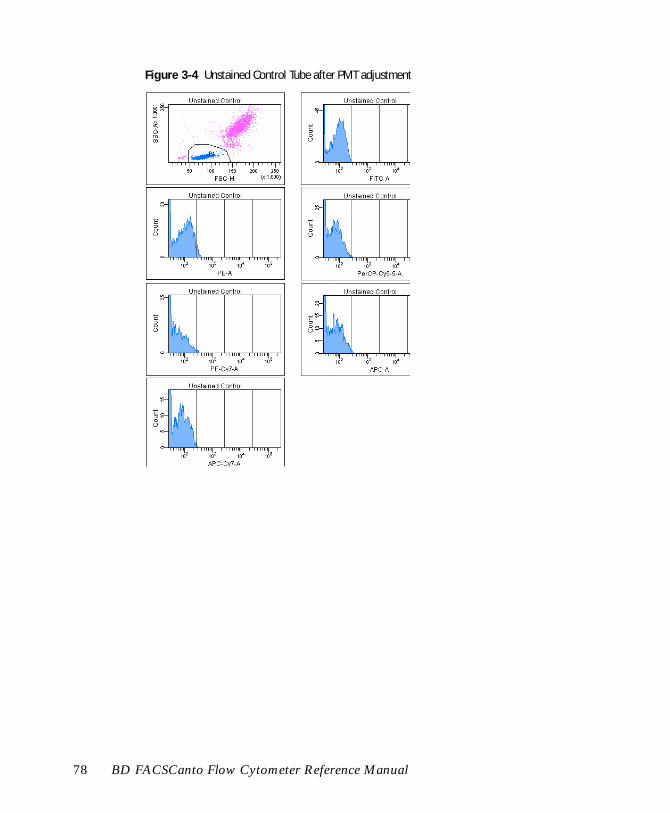
Figure 3-4 Unstained Control Tube after PMT adjustment
78 BD FACSCanto Flow Cytometer Reference Manual

10 Click Record
11 After all events have been recorded, click Remove Tube.
A progress dialog appears.
• Hold your sample tube with one hand while you push the aspirator arm all the way to the left with the other hand.
Always hold onto your sample tube when you push the aspirator arm to the side. If you move the arm without holding the tube, the tube could fall off the SIT and expose you to potentially biohazardous sample.
• Remove the tube from the SIT.
• Release the aspirator arm.
SIT cleaning occurs when the aspirator arm comes to center.
• When the Progress dialog disappears, you can load the next tube onto the SIT.
It is critical that you follow the tube removal sequence exactly. Failure to follow this sequence could result in carryover between samples.
Do not change the PMT voltages after the first compensation Tube has been recorded. To calculate compensation, all Tubes must be recorded with the same PMT voltage settings. If you need to adjust the PMT voltage for a subsequent compensation Tube, you will need to record all compensation Tubes again.
Chapter 3: Running Samples 79

Calculating Compensation
Before you calculate compensation, you need to record data for each single-stained control.
1 Install the first stained control tube onto the cytometer.
Make sure the Remove tube dialog disappears first.
2 In the Acquisition Controls frame, click the Next button.
Next moves the Current Tube pointer to the next Tube in the Browser.
3 Click Acquire.
4 Verify the P1 gate still encircles the population of interest.
5 To record data, click Record.
6 When recording is finished, click Remove Tube.
7 Install the next tube onto the SIT.
8 Repeat steps 2 through 7 until data for all stained control tubes has been recorded.
Adjusting Gates
Now that data has been recorded, you need to adjust the gates around the positive populations on the histogram for each stained control Tube.
1 Double-click the first Stained Control Tube (FITC Stained Control) to locate the corresponding plots on the worksheet.
Do not place any heavy objects on top of the cytometer at any time; doing so could cause alteration of data.
80 BD FACSCanto Flow Cytometer Reference Manual

2 If needed, move the P2 gate to encompass the fluorescence-positive population.
Figure 3-5 Gating the positive populations
3 Double-click the next Stained Control Tube in the Browser to locate the corresponding plots on the worksheet.
4 Repeat steps 2 and 3 for the remaining compensation Tubes.
Creating a Compensation Matrix
Once all gates have been adjusted, you are ready to calculate compensation.
1 Choose Instrument > Instrument Setup > Calculate Compensation.
If the calculation is successful, a dialog box appears where you can enter a name for the compensation Setup.
2 Enter a name for the compensation Setup; click OK.
! Tip To keep track of compensation Setups, include the Experiment name, date, or both in the Setup name.
Chapter 3: Running Samples 81

The named Setup is automatically linked to the Experiment’s instrument settings.
! Tip Collapse the Compensation Specimen to save room in the Browser.
BD Biosciences recommends that you confirm the compensation setup by running a process control before you run samples.
82 BD FACSCanto Flow Cytometer Reference Manual

Data Recording and Analysis
Once you optimize the instrument settings for your sample type, you are ready to record and analyze data.
During analysis, recorded data is displayed in plots, and gates are used to define populations of interest. You can use global worksheets to view and optimize data before it is recorded. BD FACSDiva software analyzes the gated data and calculates statistics that you can print or export.
This section describes how to use BD FACSDiva software features to record and analyze sample data. As an example, data will be recorded and analyzed for two Tubes of human peripheral blood stained with the following reagents:
• CD45 FITC
• CD16+CD56 PE
• CD8 PerCP-Cy5.5
• CD19 PE-Cy7
• CD3 APC
• CD4 APC-Cy7
Two strategies are shown for reusing Analysis objects. If you are using a global worksheet to analyze data, you can reuse the analysis strategy by displaying data for different Tubes on the same worksheet. Alternatively, you can copy Analysis objects to multiple Tubes at a time.
Setting Up the Global Worksheet
This section shows you how to use a global worksheet to preview and record data for multiple samples. To switch between the standard and global worksheet view, click the Global Worksheets button on the Worksheet toolbar ( ).
1 Create a new Specimen; rename the Specimen LWB.
Chapter 3: Running Samples 83
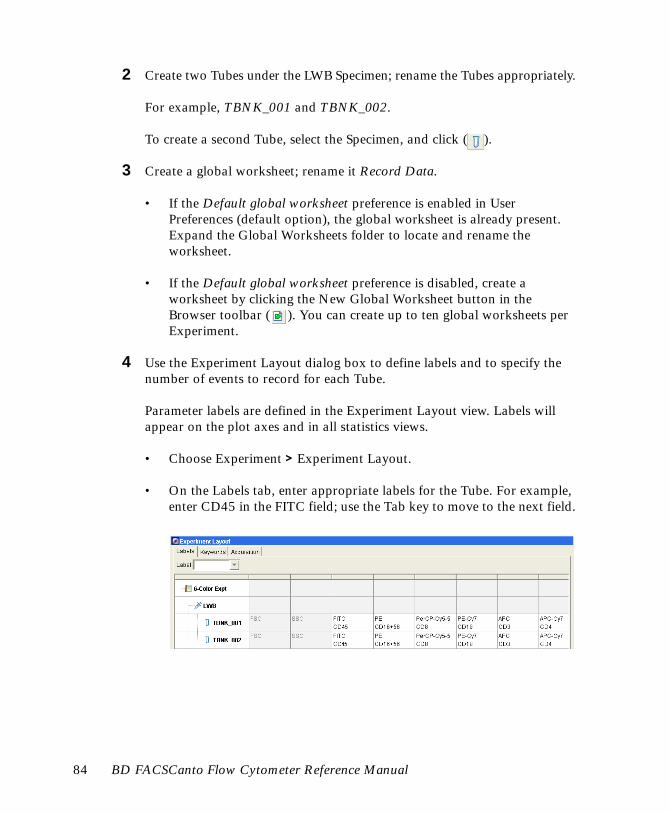
2 Create two Tubes under the LWB Specimen; rename the Tubes appropriately.
For example, TBNK_001 and TBNK_002.
To create a second Tube, select the Specimen, and click ( ).
3 Create a global worksheet; rename it Record Data.
• If the Default global worksheet preference is enabled in User Preferences (default option), the global worksheet is already present. Expand the Global Worksheets folder to locate and rename the worksheet.
• If the Default global worksheet preference is disabled, create a worksheet by clicking the New Global Worksheet button in the Browser toolbar ( ). You can create up to ten global worksheets per Experiment.
4 Use the Experiment Layout dialog box to define labels and to specify the number of events to record for each Tube.
Parameter labels are defined in the Experiment Layout view. Labels will appear on the plot axes and in all statistics views.
• Choose Experiment > Experiment Layout.
• On the Labels tab, enter appropriate labels for the Tube. For example, enter CD45 in the FITC field; use the Tab key to move to the next field.
84 BD FACSCanto Flow Cytometer Reference Manual
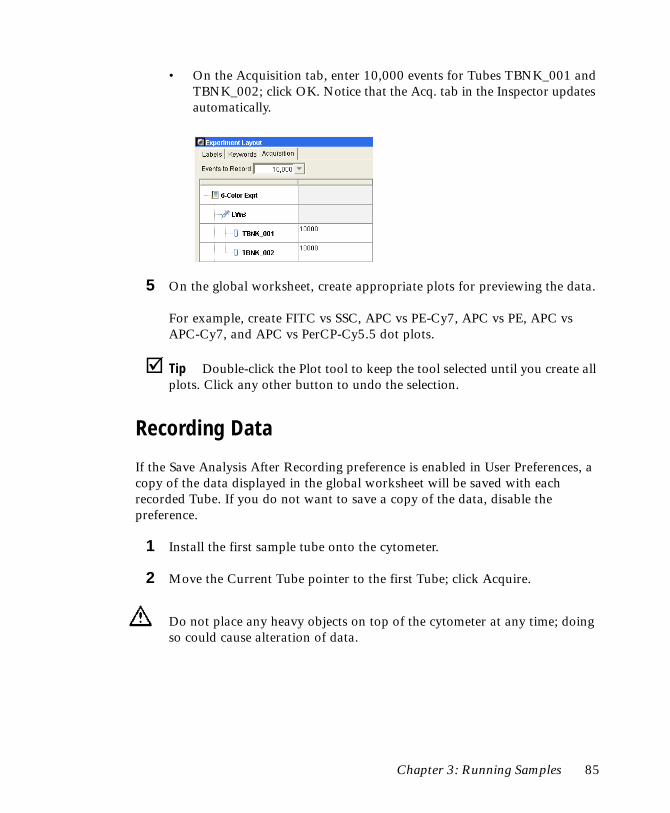
• On the Acquisition tab, enter 10,000 events for Tubes TBNK_001 and TBNK_002; click OK. Notice that the Acq. tab in the Inspector updates automatically.
5 On the global worksheet, create appropriate plots for previewing the data.
For example, create FITC vs SSC, APC vs PE-Cy7, APC vs PE, APC vs APC-Cy7, and APC vs PerCP-Cy5.5 dot plots.
! Tip Double-click the Plot tool to keep the tool selected until you create all plots. Click any other button to undo the selection.
Recording Data
If the Save Analysis After Recording preference is enabled in User Preferences, a copy of the data displayed in the global worksheet will be saved with each recorded Tube. If you do not want to save a copy of the data, disable the preference.
1 Install the first sample tube onto the cytometer.
2 Move the Current Tube pointer to the first Tube; click Acquire.
Do not place any heavy objects on top of the cytometer at any time; doing so could cause alteration of data.
Chapter 3: Running Samples 85

3 While data is being acquired, draw a gate around the lymphocytes; set the other plots to show data from the Lymphocyte population.
4 Click Record to record data.
5 When all events have been recorded, follow these instructions for tube removal.
• Click Remove Tube.
A progress dialog appears.
• Hold your sample tube with one hand while you push the aspirator arm all the way to the left with the other hand.
Always hold onto your sample tube when you push the aspirator arm to the side. If you move the arm without holding the tube, the tube could fall off the SIT and expose you to potentially biohazardous sample.
• Remove the tube from the SIT.
• Release the aspirator arm.
SIT cleaning occurs when the aspirator arm comes to center.
6 When the Progress dialog disappears, you can load the next tube onto the SIT.
It is critical that you follow the tube removal sequence exactly. Failure to follow this sequence could result in carryover between samples.
86 BD FACSCanto Flow Cytometer Reference Manual

7 Move the pointer to the corresponding Tube in the Browser and click Acquire.
8 Preview the data in the global worksheet; click Record to record data.
9 Repeat steps 5 through 8 until data has been recorded for all tubes.
10 (Optional) Print the Experiment-level instrument settings or the Instrument Status report.
To print the settings, right-click the instrument settings icon and choose Print.
Analyzing Data
This section describes how to set up plots, gates, and a statistics view to analyze the recorded data. By the end of this section, your analysis should look similar to that shown in Figure 3-6 on page 89.
1 Create a new global worksheet; rename the worksheet TBNK Analysis.
2 Select the first Tube under the LWB Specimen and create the following plots on the Analysis template:
• FITC vs SSC
• APC vs PE-Cy7
• APC vs PE
• APC vs APC-Cy7
• APC vs PerCP-Cy5-5
3 Resize the plots so they fit on one page, as shown in Figure 3-6 on page 89.
4 On the FITC vs SSC plot, draw a gate around the lymphocytes; use the Population Hierarchy to rename the population Lymphocytes.
Chapter 3: Running Samples 87

5 Select all plots except the FITC vs SSC plot and specify to show only the Lymphocyte population.
Hold down the Control key while you select successive plots. Once all plots are selected, click the checkbox next to Lymphocytes in the Plot Inspector.
6 Select all plots and click the Title tab in the Plot Inspector; select the checkboxes to display the Tube and Specimen names in the plot titles.
7 Create a Statistics view; edit the view to show the Lymphocyte population and subpopulations, and to display the mean for all fluorochromes.
For instructions on how to create and edit a Statistics view, see the BD FACSDiva Software Reference Manual.
8 Draw a region around the CD19-positive population on the CD3 APC vs CD19 PE-Cy7 plot; name the population B Cells.
! Tip When drawing regions, be sure to include events on the plot axes.
9 Draw a region around the CD16+56-positive population on the CD3 APC vs CD16+56 PE plot; name the population NK Cells.
10 Draw a region around the double-positive population on the CD3 APC vs CD4 APC-Cy7 plot, and name the population T Helper.
11 Draw a region around the double-positive population on the CD3 APC vs CD8 PerCP-Cy5-5 plot; name the population T Cytotoxic.
88 BD FACSCanto Flow Cytometer Reference Manual

12 Print the analysis (Figure 3-6).
Figure 3-6 Lymphocyte analysis (example)
Chapter 3: Running Samples 89

Reusing the Analysis
Now that the analysis strategy has been defined, you can use it to analyze the remaining Tubes in the Experiment. Global worksheets allow you to apply an analysis strategy to a series of data files without saving the analysis each time. After previewing the data, you can print the analysis or save it to a Tube-specific worksheet (see the following section, Saving the Analysis).
1 Move the Current Tube pointer to the next Tube under the LWB Specimen.
2 View the data on the global worksheet; make adjustments to gates, as needed.
Adjustments will also apply to the next Tube that is viewed on the global worksheet. If you don’t want to alter the global worksheet, save the analysis as described in the next section and make adjustments on the Tube’s worksheet.
Saving the Analysis
Since the Analysis objects were created on a global worksheet, the analysis will not be saved with each Tube. If you want to save a copy of the analysis with any Tube, do the following.
1 Expand the TBNK global worksheet in the Browser.
2 Right-click the Analysis object and choose Copy.
3 On the Worksheet toolbar, click the Global Worksheets button ( ) to switch to the Worksheet view.
4 Create a new worksheet for the destination Tube; rename the worksheet appropriately.
Analysis object under global worksheet
90 BD FACSCanto Flow Cytometer Reference Manual

5 Select the Tube in the Browser; right-click the Tube icon and choose Paste.
The elements on the global worksheet are copied to the new worksheet. You can view the analysis by double-clicking the Tube in the Browser.
! Tip Apply the analysis to multiple Tubes by selecting more than one Tube. Do not select any analysis objects along with the Tubes. Enable the Tube-specific worksheet user preference to automatically create a new worksheet for the pasted Analysis objects.
Automatically save a copy of the analysis with each Tube by enabling the Save Analysis After Recording preference before you record Tube data. In this case, the analysis plots are placed on the worksheet that is open at the time of recording. To control where the plots are placed, create a new worksheet before data is recorded.
Logging Out
When you are finished using BD FACSDiva software, but not ready to shut down the system, choose File > Log Out.
The BD FACSDiva workspace is hidden and the Log In dialog appears.
This leaves the system available for the next operator to log in.
To shut down the system at the end of the day, see Daily Shutdown on page 92.
Chapter 3: Running Samples 91

Daily Shutdown
At the end of the day, run the Fluidics Shutdown procedure to remove BD FACSFlow solution from all lines and rinse them with BD FACS shutdown solution. This prevents saline crystals from clogging the fluidics lines and minimizes bacterial growth.
1 Install a tube with 3 mL of BD FACS cleaning solution on the SIT.
2 In the Acquisition Controls frame, click Acquire.
3 After about 5 minutes, click Acquire and remove the tube from the SIT.
4 Install a tube with 3 mL of DI water on the SIT.
5 Click Acquire.
6 After about 5 minutes, click Acquire and remove the tube from the SIT.
To prevent fluid overflow, do not leave a tube on the SIT during fluidics shutdown.
92 BD FACSCanto Flow Cytometer Reference Manual

7 Choose Instrument > Fluidics Shutdown.
The following message appears.
8 Empty the waste and refill fluids, if prompted to do so.
See Emptying the Waste Container on page 102 or Changing a Cubitainer on page 98. If you disconnect any fluid container for refilling, prime the system before continuing.
9 Click OK when you see a message informing you that the system can be turned off.
To keep the fluid lines free of salt buildup, do not exit the software or shut down the instrument until the fluidics shutdown procedure finishes.
Chapter 3: Running Samples 93

10 Turn off the instrument main power.
During shutdown, you will normally hear a hiss, caused by condensed water discharging from the fluidics cart pumps.
Turn off power to the cytometer at least once a day. Doing so empties the condensation trap in the fluidics cart and prevents excess moisture from overflowing the trap or causing cart damage.
If your laboratory runs the cytometer continuously and does not shut down at the end of the day, toggle the Auxiliary Air Supply switch on for 15 seconds every 8 hours (every 4 hours in an extremely humid climate). Doing this empties the cart condensation trap and prevents excess moisture from overflowing the trap or causing cart damage.
94 BD FACSCanto Flow Cytometer Reference Manual
4
Maintenance
The BD FACSCanto requires little maintenance. However, to preserve the instrument’s reliability, you must regularly perform basic preventive maintenance. This chapter explains the procedures you should follow to keep your instrument in good condition.
• Scheduled Maintenance on page 96
• Unscheduled Maintenance on page 114
95
Scheduled Maintenance
For optimal instrument functioning, perform the following maintenance according to the recommended schedule.
Table 4-1 Scheduled Maintenance
Maintenance Procedure Recommended Frequency
Daily Startup
• For BD FACSDiva software, see Instrument Startup on page 57
• For BD FACSCanto clinical software, refer to Daily Startup in the BD FACSCanto Clinical Software User’s Guide
Every day
Daily Shutdown
• For BD FACSDiva software, see Daily Shutdown on page 92
• For BD FACSCanto clinical software, refer to Daily Shutdown in the BD FACSCanto Clinical Software User’s Guide
Every day
Changing a Cubitainer on page 98 Check fluid levels daily and as needed
Priming on page 101 Whenever a fluidics line is disconnected to change a cubitainer or perform other maintenance
Emptying the Waste Container on page 102
Check waste level daily and as needed
Changing the Waste Tank Cap; see step 6 on page 104
Every month
Purging the Fluidics Filters on page 105 Every week
Decontaminating the Fluidics System (Long Clean) on page 107
Every month
96 BD FACSCanto Flow Cytometer Reference Manual

Replacing the Air Filter on page 108 BD Biosciences recommends replacement every 6 months
Replacing Fluidics Filters on page 111 BD Biosciences recommends replacement every 6 months
Table 4-1 Scheduled Maintenance (continued)
Maintenance Procedure Recommended Frequency
Chapter 4: Maintenance 97

Changing a Cubitainer
Three fluidics cubitainers (disposable boxes of approved fluids) and a waste container fit onto the cart in the following configuration:
.
Each cubitainer and the waste tank has its own port. Connect the cubitainers and waste tank to the ports listed in the following table.
! Tip The ports and connectors are color coded.
Container Port Label
waste Waste (A)
BD FACSFlow solution BD FACSFlow
BD FACS shutdown solution BD FACS Shutdown Solution
BD FACS cleaning solution BD FACS Cleaning Solution
BD FACS shutdown solution
waste container
BD FACS cleaning solution
BD FACSFlow solution
98 BD FACSCanto Flow Cytometer Reference Manual

Procedure
1 Ensure that the cytometer is not acquiring events.
2 Detach the sensor and fluid line from the cart.
• To detach the sensor, turn the connector counterclockwise and pull.
• To detach the fluid line, press the metal clip on the quick-disconnect coupling.
You could damage the sensor line if you leave it connected while changing a cubitainer.
sensor
metal clip
Chapter 4: Maintenance 99

3 Unscrew the cap on the cubitainer.
4 Remove the cap assembly and set it aside.
Figure 4-1 Cubitainer cap and sensor
I
The cap, sensor and fluid lines, and the level sensor come attached in a single assembly piece.
5 Put a new cubitainer onto the fluidics cart.
6 Replace the cap assembly and hand-tighten it until it is fully closed.
7 Reattach the sensor line and fluid line to the cart.
• To attach the sensor line, gently rotate until the connection aligns, and then push.
• To attach the fluid line, push the quick-disconnect coupling into the port until it clicks into place.
To ensure that the appropriate solutions are dispensed, match the label on the container to the port on the fluidics cart.
100 BD FACSCanto Flow Cytometer Reference Manual

8 Prime the fluidics.
IMPORTANT! Go to Priming.
Priming
Use the Prime After Tank Refill command to remove air from the fluid lines after you change a cubitainer or detach the fluidics lines for other maintenance.
1 Choose Instrument or Cytometer > Cleaning Modes > Prime After Tank Refill.
2 Select the checkboxes for the cubitainers you changed; click OK.
3 Wait while the instrument primes the specified lines.
The BD FACSDiva Instrument menu corresponds closely with the BD FACSCanto Cytometer menu. There are slight discrepancies between the menus, for example, there are more commands in the BD FACSDiva Instrument menu. Instructions in this and following sections list the BD FACSDiva menu first, followed by the BD FACSCanto menu.
BD FACSDiva software BD FACSCanto clinical software
Chapter 4: Maintenance 101

4 Click OK when the completion message appears.
Emptying the Waste Container
1 Ensure that the cytometer is not acquiring events.
All biological specimens and materials coming into contact with them can transmit potentially fatal disease. To prevent exposure to biohazardous agents, expose waste container contents to bleach (10% of total volume) before disposal. Dispose of waste in accordance with local regulations. Use proper precaution and wear suitable protective clothing, eyewear, and gloves.
BD FACSDiva software BD FACSCanto clinical software
waste tank
waste port
disposable waste cap
trap
102 BD FACSCanto Flow Cytometer Reference Manual

2 Detach the waste container’s sensor and fluid line from their respective ports on the cart.
• To detach the sensor, turn the connector counterclockwise and pull.
• To detach the fluid line, press the metal clip on the quick-disconnect coupling.
The waste tank can become pressurized when the cytometer is running. Always disconnect the tank from the fluidics cart before you empty it. Wait at least 30 seconds for pressure to dissipate before you remove the waste cap or level sensor cap.
metal clip
sensor
Chapter 4: Maintenance 103

3 Remove the disposable waste cap (large-sized cap) and the attached trap from the container; place the assembly on the bench label-side up.
4 Empty the bleach-exposed waste.
5 Add approximately 1 L of bleach to the empty waste container (10 L container).
6 If one month has passed since the last cap change, detach it from the trap and replace it with a new cap.
! Tip Write the date on the cap as a reminder.
Do not wet the cap. If you see liquid inside the trap, remove the drain plug and fully drain the liquid before you replace the plug.
To prevent tank overpressurization, do not overtighten the trap or attached filter cap. Tighten each component only until it is hand-tight. Do not use sealants such as Teflon® tape or other adhesives.
drain plug
trap
338677 Rev A
Waste (A)
space for date
104 BD FACSCanto Flow Cytometer Reference Manual

7 Screw the cap assembly onto the tank and hand-tighten until it is fully closed.
8 Attach the sensor and quick-disconnect coupling to their ports.
Purging the Fluidics Filters
Once a week, purge air from all fluid filters by opening the bleeder valve on the top of each filter, one at a time. This ensures that the filters will not dry out.
Materials
No tools are required; use your hands to open and tighten the bleeder valve.
• paper towels
• proper protective equipment
Procedure
1 Place a few paper towels beneath the filter.
Some fluid leakage might occur.
Chapter 4: Maintenance 105

2 Loosen the bleeder valve near the top of the filter by turning it counterclockwise.
! Tip You do not need to completely unscrew the valve; if you do, it will come off.
3 Wait until fluid seeps out.
Fluid should seep from the open valve within 30 seconds. If no fluid appears, make sure the corresponding cubitainer is not empty or detached from the cart. If the cubitainer contains fluid and the fluid lines are attached, the filter might be airlocked. To remove the airlock, see Removing an Air Lock on page 128.
4 Close the valve by turning it clockwise.
5 Repeat steps step 1 through 4 with the next filter.
bleedervalve, open
106 BD FACSCanto Flow Cytometer Reference Manual

Decontaminating the Fluidics System (Long Clean)
Use the Long Clean command to decontaminate the internal sheath path with BD FACS cleaning solution. After decontamination, the lines are rinsed with BD FACS shutdown solution. The procedure takes 75 minutes to complete.
Materials
• undiluted bleach (for waste tank)
• BD FACS cleaning solution (approximately 275 mL)
• BD FACS shutdown solution (approximately 1,100 mL)
Procedure
1 Ensure fluid levels are adequate; empty the waste container if it is full.
2 Choose Instrument or Cytometer > Cleaning Modes > Long Clean.
A confirmation dialog appears. Click OK to continue. Once you have begun the Long Clean, you cannot abort the process.
3 Wait approximately 70 minutes for the cleaning cycle to finish.
4 Click OK when the completion message appears.
If the completion message does not appear after 90 minutes, verify that there are no error messages in the Status tab of the Instrument frame. If the cleaning mode fails, see Fluidics Cart Troubleshooting on page 142.
BD FACSCanto clinical softwareBD FACSDiva software
Chapter 4: Maintenance 107

5 Choose to shut down or continue.
• To shut down, quit the software and turn off the power to the cytometer.
• To continue, choose Instrument or Cytometer > Fluidics Startup.
BD FACS shutdown solution can lyse cells. The Fluidics Startup procedure removes BD FACS shutdown solution from the interior reservoir and fluid lines and replaces it with BD FACSFlow solution.
Replacing the Air Filter
The BD FACSCanto instrument has an air filter located in the side door. Replace the filter every 6 months to ensure proper instrument performance.
Materials
replacement filter
Procedure
To change the air filter, follow these steps.
1 Turn off the power to the cytometer.
108 BD FACSCanto Flow Cytometer Reference Manual

2 Open the side door.
To open the door, press the black button. A round handle will pop out.
Twist the handle and pull.
Chapter 4: Maintenance 109

3 On the door’s interior, turn the pegs along the upper edge of the filter and remove the old filter.
4 Install a new filter and turn the pegs to hold the filter in place.
Dispose of the old filter. It cannot be reused.
5 Close the side door; twist the round handle and push it in.
To preserve your instrument’s best function, be careful not to close the door on any tubing or wires.
110 BD FACSCanto Flow Cytometer Reference Manual

Replacing Fluidics Filters
Change the fluid filters as needed when you see increased debris in FSC vs SSC plots or every 6 months.
Materials
• paper towels
• proper protective equipment
• felt tip pen
filter
Chapter 4: Maintenance 111

Procedure
1 Place a few paper towels beneath the filter to collect drips.
2 Remove the filter by pressing the tabs on each quick-disconnect coupling.
3 Position the new filter and connect the couplings.
! Tip Write today’s date on the filter so you will know when to replace it.
metal tab
metal tab
quick-disconnectcoupling
112 BD FACSCanto Flow Cytometer Reference Manual

4 Open the bleeder valve on top of the filter and leave it open until fluid seeps out.
Turn it counterclockwise to open.
5 Close the valve.
bleedervalve
Chapter 4: Maintenance 113

Unscheduled Maintenance
Perform these maintenance procedures as needed.
Cytometer Maintenance
• Removing Bubbles from the Flow Cell on page 115
• Cleaning the Flow Cell on page 116
• Purging the Bubble Filter on page 117
• Cleaning External Surfaces on page 118
• Decontaminating the Fluidics System for Storage on page 119
• Replacing the Bal Seal on page 120
• Resetting the Cytometer Circuit Breaker on page 124
• Reconnecting the Fluidics Cart Tubing on page 125
Fluidics Cart Maintenance
• Reconnecting the Fluidics Cart Tubing on page 125
• Removing an Air Lock on page 128
• Replacing Fluidics Filters on page 111
• Replacing the Fluidics Level Sensors on page 130
• Replacing the Fluidics Cart Fuses on page 134
114 BD FACSCanto Flow Cytometer Reference Manual

Removing Bubbles from the Flow Cell
Use the De-gas Flow Cell command to remove bubbles from the flow cell.
1 Choose Instrument or Cytometer > Cleaning Modes > De-gas Flow Cell.
2 Click OK when the completion message appears.
3 Check the flow cell for bubbles.
If you still see bubbles, repeat the process.
BD FACSDiva software BD FACSCanto clinical software
Chapter 4: Maintenance 115

Cleaning the Flow Cell
Use the Clean Flow Cell command to run a tube of BD FACS cleaning solution through the SIT and flow cell. After the procedure is complete, the cleaning fluid remains in the SIT and flow cell until you run fluidics startup or shutdown.
Perform the procedure when poor optical performance indicates that additional cleaning is needed.
Materials
• 3 mL of BD FACS cleaning solution
• one 12 x 75-mm polystyrene BD Falcon tube
Procedure
1 Choose Instrument or Cytometer > Cleaning Modes > Clean Flow Cell.
2 If you have a Loader, remove the carousel.
3 When prompted, manually install a tube containing approximately 3 mL of 10% bleach onto the SIT, and click OK.
The instrument cleans the flow cell. A progress message appears during the cleaning (Figure 4-2 on page 117).
BD FACSDiva software BD FACSCanto clinical software
116 BD FACSCanto Flow Cytometer Reference Manual

Figure 4-2 Clean Flow Cell progress message
4 After the completion message appears, wait 5 minutes.
Waiting allows the BD FACS cleaning solution to dissolve deposits in the flow cell cuvette.
5 Click OK.
6 Remove the tube from the SIT.
7 Run Fluidics Startup to remove BD FACS cleaning solution from the line.
Purging the Bubble Filter
The bubble filter sits between the fluidics tanks and reservoirs and the flow cell and ensures that the flow cell remains bubble-free. However, should the fluidics run dry, you might need to remove air from the bubble filter. Poor CVs might indicate a need to purge the bubble filter.
Use the Bubble Filter Purge command in BD FACSDiva software to remove air from the bubble filter.
1 From the menu, choose Instrument > Cleaning Modes > Bubble Filter Purge.
Wait while the purge finishes.
BD FACSCanto clinical softwareBD FACSDiva software
Chapter 4: Maintenance 117

2 Click OK when the completion message appears.
3 Repeat steps 2 through 4 at least four times to remove all air from the filter.
Cleaning External Surfaces
To keep the system free from salt buildup, wipe down all external instrument surfaces that have been exposed to sheath fluid.
Materials
• BD FACS cleaning solution
• DI water
• clean, lint-free cloths or disposable wipes
All instrument surfaces that come in contact with biological specimens can transmit potentially fatal disease. Use universal precautions when cleaning instrument surfaces. Wear suitable protective clothing and gloves.
Do not use isopropyl alcohol or ethanol on any cytometer or fluidics cart surfaces. They will damage the system.
118 BD FACSCanto Flow Cytometer Reference Manual

Procedure
1 Switch off the instrument power and unplug the AC power cord.
2 Wipe all accessible surfaces with BD FACS cleaning solution.
3 Wet a fresh cloth with DI water and wipe all exposed surfaces to prevent bleach corrosion.
4 Wipe all exposed surfaces with a clean, dry cloth.
Decontaminating the Fluidics System for Storage
If your cytometer is to be taken out of operation, perform the following procedure to clean out the fluidics lines with BD FACS shutdown solution.
1 Perform steps 1 through 4 in Decontaminating the Fluidics System (Long Clean) on page 107.
2 Shut down the software and turn off the power to the cytometer.
To avoid potential shock, always switch off the power and unplug the AC power cord before you begin cleaning.
To prevent damage, do not use ethanol as a cleaning agent on the exterior of the flow cell or any other instrument surface.
Chapter 4: Maintenance 119
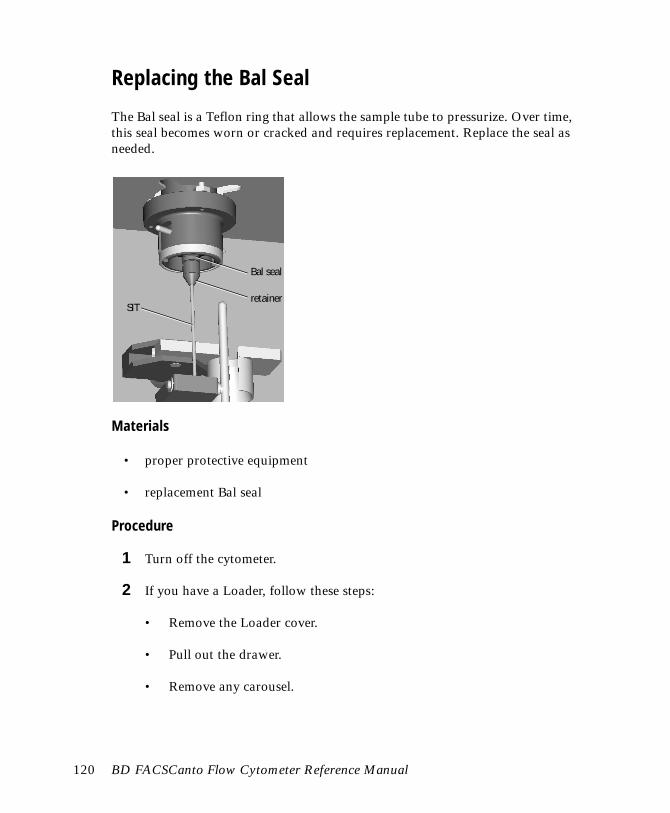
Replacing the Bal Seal
The Bal seal is a Teflon ring that allows the sample tube to pressurize. Over time, this seal becomes worn or cracked and requires replacement. Replace the seal as needed.
Materials
• proper protective equipment
• replacement Bal seal
Procedure
1 Turn off the cytometer.
2 If you have a Loader, follow these steps:
• Remove the Loader cover.
• Pull out the drawer.
• Remove any carousel.
Bal seal
retainerSIT
120 BD FACSCanto Flow Cytometer Reference Manual

• Change the cytometer from automatic to manual mode (refer to the BD FACS Loader Option Reference Manual for instructions.)
If you do not change the cytometer’s mode, you will not be able to access the Bal seal.
3 Move the aspirator arm to the left and hold it.
aspirator arm
aspirator arm bar
Chapter 4: Maintenance 121

4 Remove the retainer from the SIT by turning it in the direction shown.
5 Remove the Bal seal by pulling it off with your fingers.
6 Install the new Bal seal spring-side up.
Bal seal
122 BD FACSCanto Flow Cytometer Reference Manual

7 Reinstall the retainer over the SIT and tighten in the direction shown.
8 Test the installation by manually loading a tube onto the SIT and running fluid.
9 If you encounter any problems, repeat the procedure.
Chapter 4: Maintenance 123

Resetting the Cytometer Circuit Breaker
To reset the circuit breaker for the cytometer, follow these steps.
1 Toggle the cytometer circuit breaker switch to the on position.
Locate the circuit breaker switch on the left side of the cytometer.
2 If it is off, turn the cytometer power on.
Press the main power button to do this.
cytometer circuit breaker, on
main powerbutton
124 BD FACSCanto Flow Cytometer Reference Manual

Reconnecting the Ethernet and Network Cables
The cytometer connects to and communicates with the workstation through an Ethernet cable and a network cable. If these cables should become disconnected, use the following diagram to reconnect them.
Both cables connect to ports on the PC workstation. As the make and model of the workstation might vary, refer to the documentation that came with your system for information.
Reconnecting the Fluidics Cart Tubing
Should any plugs, cords, or tubings become accidentally disconnected, use the following diagrams to reconnect the fluidics cart to the cytometer (Figure 4-3 on page 126).
! Tip The ports and connectors are color coded.
Ethernet cable
network cable
Chapter 4: Maintenance 125

Figure 4-3 Cytometer and fluidics cart ports
The ports on the cytometer have their corresponding fluidics cart ports listed in Table 4-2. For example, make sure the tubing for f. Sheath (B) connects to the port labeled i. Fluid Out. Table 4-3 on page 127 lists port functions.
Table 4-2 Correspondence of cytometer ports to fluidics cart ports
Port or Button on Cytometer Port on Fluidics Cart
a. System Power ——
b. Power Out k. Power In
c. Air In m. Air Out
d. Waste (A) n. Waste
e. Communications j. Communication
f. Sheath (B) i. Fluid Out
g. Waste (A) o. Waste
—— h. On/Off
—— l. Air In
f
g
d
c
b
a
e
i
mj
k o
n
h l
cytometer ports fluidics cart ports
126 BD FACSCanto Flow Cytometer Reference Manual

Do not plug the fluidics cart power cord into a wall outlet. Plug the cord into the cytometer only. This ensures proper electrical grounding and protects against electrical shock or damage to the instrument.
Table 4-3 Function of ports, buttons, and switches
Port or Switch Additional Information
a. System Power Powers both cytometer and fluidics cart
b. Power Out Connects to fluidics cart
c. Air In ——
d. Waste (A) Vacuums waste out
e. Communications Data port
f. Sheath (B) BD FACSFlow solution port
g. Waste (A) ——
h. On/Off Auxiliary air supply switch. Keep in off position unless connected to house air.
i. Fluid Out BD FACSFlow solution port
j. Communication Data port
k. Power In Connects to cytometer. Do not connect to wall outlet
l. auxiliary air in There will be no tubing on this port unless connected to house air.
m. Air Out Sends compressed air to cytometer
n. Waste Waste in
o. Waste Waste in, under vacuum
Chapter 4: Maintenance 127

Removing an Air Lock
If too much air gets into the sheath filter, it becomes impermeable to fluid and an air lock can develop. To remove an air lock, follow this procedure.
Materials
• paper towels
• bypass tubing
Procedure
1 Place a few paper towels beneath the air-locked filter to collect drips.
2 Remove the filter by pressing the tabs on each quick-disconnect coupling.
metal tab
metal tab
quick-disconnectcoupling
128 BD FACSCanto Flow Cytometer Reference Manual

3 Install the bypass tubing in place of the filter.
Push the tubing into each quick-disconnect port until you hear a click.
4 Choose Instrument or Cytometer > Cleaning Modes > Prime After Tank Refill.
5 Select the checkbox that corresponds to the filter you changed; click OK.
Although it is most likely to occur for the sheath filter, an air lock can develop in any of the fluidics filters.
6 When the prime finishes, remove the bypass tubing.
7 Reattach the filter to the fluidics cart.
bypass tubing,installed
BD FACSDiva software BD FACSCanto clinical software
Chapter 4: Maintenance 129

8 Open the bleeder valve and wait for fluid to seep out; close the valve.
9 Repeat the Prime After Tank Refill.
Replacing the Fluidics Level Sensors
Replace the fluidics level sensors when instructed to do so by a BD Biosciences service representative. Before you replace a sensor, try rinsing it with DI water.
Materials
• replacement fluidics sensor probe assembly
• proper protective equipment
If you are changing the sensor on the waste tank, use proper precaution and wear suitable protective clothing, eyewear, and gloves. All biological specimens and materials coming into contact with them can transmit potentially fatal disease.
The waste tank can become pressurized when the cytometer is running. Always disconnect the tank from the fluidics cart and wait at least 30 seconds for pressure to dissipate before you remove the level sensor cap.
bleedervalve
130 BD FACSCanto Flow Cytometer Reference Manual

Procedure
1 Ensure that the cytometer is idle (not acquiring events).
2 Detach the sensor and fluid lines from the cart bulkhead.
• To detach the sensor, turn the connector counterclockwise and pull.
• To detach the fluid line, press the metal clip on the quick-disconnect coupling.
sensor
metal tab
Chapter 4: Maintenance 131

3 Unscrew the cap on the cubitainer.
4 Remove the cap, level sensor, sensor and fluid lines and discard into a suitable receptacle.
5 Put a new level sensor assembly on the cubitainer or tank. Hand-tighten the cap until it is fully closed.
Make sure to use the correct assembly (Figure 4-4 on page 133).
132 BD FACSCanto Flow Cytometer Reference Manual

Figure 4-4 Level sensor assemblies
6 Reattach the sensor line and fluidics line to the cart.
• To attach the sensor line, gently rotate until the connection aligns, and then push.
• To attach the fluid line, push the quick-disconnect coupling into the port until it clicks into place.
7 Prime the fluidics lines.
IMPORTANT! Go to Priming on page 101.
To ensure that the appropriate solutions are dispensed, make sure the label on the container matches the labeled port on the fluidics cart.
waste level sensor red connector
BD FACSFlow level sensor blue connector
BD FACS cleaning solution and BD FACS shutdown solution level sensor
green connector
1
2
3
1 2 3
Chapter 4: Maintenance 133

Replacing the Fluidics Cart Fuses
Power surges and other electrical events could cause a fuse to blow. Use the following procedure to replace the fuses.
Materials
• two replacement fuses (from the Accessories kit)
• small screwdriver
Removing the Old Fuses
1 Shut down the cytometer and turn off the power to the system.
2 Unplug the power cord from the wall outlet.
3 Unplug the power cord from the fluidics cart.
Figure 4-5 Fuse door and plug
Removing the plug allows easier access to the fuse door.
To protect against shock, always turn off the cytometer and unplug the power cord before performing this procedure.
empty socket,
slot for screwdriverfuse access door
circuitbreaker
plug removed
134 BD FACSCanto Flow Cytometer Reference Manual

4 Insert a small screwdriver into the slot (Figure 4-5 on page 134) and gently pry outward.
This opens the access door.
5 With the screwdriver, gently pry the fuse drawer out until you can grip it.
6 Remove the fuse drawer.
7 Remove and dispose of the old fuses.
! Tip It’s a good idea to replace both fuses at the same time.
Installing New Fuses
1 Replace both fuses.
Make sure the fuse sits as shown in Figure 4-6 on page 136.
Chapter 4: Maintenance 135

Figure 4-6 Proper placement of fuse
2 Make sure the text for your area’s voltage is right-side up.
3 Slide the drawer back into the instrument.
Push gently on the drawer until it snaps into place.
4 Close the fuse access door.
5 Reconnect the power cord to the fluidics cart.
6 Plug the cytometer power cord into the wall outlet and switch on the power.
You have finished replacing the fuses.
For protection against risk of fire, replace fuses only with those provided by BD Biosciences.
right wrong
136 BD FACSCanto Flow Cytometer Reference Manual

5
Troubleshooting
The tips in this section should help you troubleshoot instrument problems. If you require additional assistance, contact your local BD Biosciences technical support representative. Refer to our website, http://www.bdbiosciences.com, for up-to-date contact information.
For software problems, refer to the BD FACSDiva Software Reference Manual or to the BD FACSCanto Clinical Software User’s Guide. For Loader problems, refer to the BD FACSCanto Options Manual.
Troubleshooting suggestions can be found under the following topics:
• Instrument Troubleshooting on page 138
• Fluidics Cart Troubleshooting on page 142
• Acquisition Troubleshooting for BD FACSDiva Software on page 143
137

Instrument Troubleshooting
Observation Possible Causes Recommended Solutions
Flow cell will not fill Fluidics cart power off Turn on the power to the fluidics cart by resetting the circuit breaker, located on the cart. Figure 4-5 on page 134. Always use the power button, located on the left side of the cytometer, to turn the system off and on.
No BD FACSFlow or sheath pressure
To correct the problem, follow these steps.
1 Check the BD FACSFlow solution cubitainer connections to the fluidics cart. Make sure the tubing is attached. See Changing a Cubitainer on page 98.
2 Check the cytometer to fluidics cart connections. See Reconnecting the Fluidics Cart Tubing on page 125.
3 Check all tubing for kinks.
BD FACSFlow cubitainer empty
Replace the BD FACSFlow cubitainer. See Changing a Cubitainer on page 98.
Air in BD FACSFlow filter (on fluidics cart)
Purge air from the BD FACSFlow filter. See Purging the Fluidics Filters on page 105.
Air lock in BD FACSFlow filter (on fluidics cart)
See Removing an Air Lock on page 128.
138 BD FACSCanto Flow Cytometer Reference Manual

Fluid backfill into sample tube
Cracked tube • Use a new tube for the sample.
• Make sure you are using the correct tubes. See System Requirements on page 40.
Bal seal worn Install a new Bal seal. See Replacing the Bal Seal on page 120.
Air lock in BD FACSFlow filter
See Removing an Air Lock on page 128.
Remove tube sequence not followed correctly, cytometer still in acquisition mode
• For BD FACSDiva software, perform the tube removal sequence again (step 10 on page 79), even if a tube is no longer on the SIT.
• For BD FACSCanto clinical software, refer to the BD FACSCanto Clinical Software User’s Guide.
Cytometer on, no response to software commands
Bad keyboard or mouse connection
Check keyboard or mouse connections to computer. Refer to the documentation that came with your workstation.
Communication failure (Ethernet error) between computer and instrument
To correct the problem, follow these steps.
1 Turn off the computer and the instrument.
2 Reseat the Ethernet cable, located next to the power cord on the right side of the flow cytometer.
3 Turn on the instrument, followed by the computer.
Instrument Troubleshooting (continued)
Observation Possible Causes Recommended Solutions
Chapter 5: Troubleshooting 139

Cytometer and fluidics cart will not turn on
Power cords disconnected from wall socket or cytometer
Reconnect the power cord to the wall socket or the cytometer.
Circuit breaker tripped Reset the circuit breaker. See Resetting the Cytometer Circuit Breaker on page 124.
Sample tube does not fit snugly on SIT
Sample tube other than Falcon or BD Trucount brand used
Use Falcon brand 12 x 75-mm polystyrene or BD Trucount tubes. See System Requirements on page 40.
Adapter lever in incorrect position for manual loading
Make sure the lever is in the manual loading position. Modify the cytometer appropriately. Refer to Changing to Manual Loading in the BD FACSCanto Options Reference Manual.
Bal seal worn Replace the Bal seal. See Replacing the Bal Seal on page 120.
Liquid leakage around cytometer base
Interior valve failure 1 Turn off the cytometer power.
2 Clean up the liquid, using proper precautions.
3 Call BD Biosciences.
Instrument Troubleshooting (continued)
Observation Possible Causes Recommended Solutions
140 BD FACSCanto Flow Cytometer Reference Manual

Fluid leaking from SIT or aspirator arm
Cytometer still in acquisition mode, remove tube sequence not followed correctly
• For BD FACSDiva software, perform the tube removal sequence again (step 10 on page 79), even if a tube is no longer on the SIT.
• For BD FACSCanto clinical software, refer to the BD FACSCanto Clinical Software User’s Guide.
Interior valve failure or leak 1 Turn off the cytometer power.
2 Clean up the liquid, using proper precautions.
3 Call BD Biosciences.
Waste line to fluidics cart disconnected
1 Turn off the cytometer power.
2 Clean up the liquid, using proper precautions.
3 Check that both ends of all waste lines are securely plugged in.
4 Turn on the cytometer power.
5 If the problem persists, call BD Biosciences.
>20% difference between Measured and Reference laser power
Flow cell access door open Make sure the access door is completely closed. If this does not resolve the problem, contact BD Biosciences.
BD FACSDiva software not launching
Cytometer.dat file not found Install saved .dat file or contact BD Biosciences.
Higher than expected CVs for some (brightest) populations during DNA analysis
Possible pre-amp non-linearity with very bright signals
Set G0/G1 diploid population peak at channel 25,000 or less.
Instrument Troubleshooting (continued)
Observation Possible Causes Recommended Solutions
Chapter 5: Troubleshooting 141

Fluidics Cart Troubleshooting
Observation Possible Causes Recommended Solutions
Water leakage around fluidics cart base
• Normal condensation overflow from pressure relief valve
• Extremely humid climate
1 Turn off the cytometer power.
2 Clean up the water.
3 Turn off the power to the system daily. This empties the condensation trap in the fluidics cart.
Bleeder valve on fluidics cart filter open
1 Turn off the cytometer power.
2 Clean up the liquid.
3 Check and close all bleeder valves. See Purging the Fluidics Filters on page 105.
Broken fluid line Contact BD Biosciences.
Fluidics cart will not power on, cytometer on
Circuit breaker switch to cart off
Toggle the cart circuit breaker on.
Auxiliary air supply switch on, cart not normally connected to auxiliary air
Toggle the auxiliary air supply switch off. When the auxiliary air supply is switched on, the cart’s own air pumps turn off.
Power cord from fluidics cart to cytometer disconnected
Make sure both ends of the power cord are connected.
Fuse blown Replace the fluidics cart fuses. See Replacing the Fluidics Cart Fuses on page 134.
142 BD FACSCanto Flow Cytometer Reference Manual

Acquisition Troubleshooting for BD FACSDiva Software
Observation Possible Causes Recommended Solutions
No events in plots after clicking Acquire
Current Tube pointer not set to current Tube
Click to move the pointer in front of the appropriate Tube.
Viewing plots for a different Tube
Double-click the current Tube in the Browser to display the plots for that Tube.
Incorrect population(s) in plot
Right-click the plot and choose Show Populations. Verify that the appropriate populations are displayed.
Event color matches plot background or set to No Color
• Assign a color to the population displayed in the plot.
• Format the plot to display all events.
• Verify the population drawing order.
Current instrument configuration different from optical bench
Verify that the current instrument configuration corresponds to the optical bench setup.
No sample in tube Add sample to tube or install new sample tube.
Sample not mixed properly Mix sample to suspend cells.
Sample tube cracked Replace the sample tube.
Chapter 5: Troubleshooting 143

No events in plots after clicking Acquire (continued)
Threshold not set to correct parameter (usually FSC)
Set the threshold to the correct parameter for your application.
Multiple Threshold parameters not set correctly
Verify the correct Boolean logic (And/Or) was used for the Threshold parameters.
Threshold channel too low or too high
Adjust the Threshold channel.
Unexpected results after clicking Next
Current Tube pointer on wrong Tube
Verify that the pointer is in front of the Tube you want to duplicate before clicking Next.
No fluorescent signal Current instrument configuration different from optical bench
Verify the current instrument configuration corresponds to the optical bench setup.
Wrong filter installed Make sure the appropriate filter is installed for each fluorochrome.
Unexpected events in plot
Incorrect logic in Population Hierarchy
Verify the gating strategy.
Incorrect population(s) in plot
Right-click the plot and choose Show Populations. Verify the appropriate populations are displayed.
Incorrect drawing order Verify the required population is not hidden by another population. Right-click the plot and choose Order Populations by Count.
Acquisition Troubleshooting for BD FACSDiva Software (continued)
Observation Possible Causes Recommended Solutions
144 BD FACSCanto Flow Cytometer Reference Manual

Unexpectedly high event rate
Threshold channel too low Adjust the Threshold channel.
Sample too concentrated Dilute the sample.
Sample flow rate too high Decrease the flow rate.
Air bubble Remove the air bubble.
Unexpectedly low event rate
Threshold channel too high Adjust the Threshold channel.
Sample not adequately mixed Mix the sample to suspend cells.
Sample too dilute Concentrate the sample.
Erratic event rate Sample aggregates Filter the sample.
Sample contaminated Re-stain the sample, making sure the tube is clean.
BD FACSFlow solution cubitainer low
Replace the BD FACSFlow solution cubitainer.
Distorted scatter parameters
Instrument settings adjusted incorrectly
Optimize the scatter parameters.
Air bubble Remove the air bubble.
Excessive amount of debris in plots
Threshold channel too low Increase the Threshold channel.
Dead cells or debris in sample Examine the sample under a microscope.
Sample contaminated Re-stain the sample, making sure the tube is clean.
Acquisition Troubleshooting for BD FACSDiva Software (continued)
Observation Possible Causes Recommended Solutions
Chapter 5: Troubleshooting 145

High CVs Sample flow rate too high Decrease the flow rate.
Poor sample preparation Repeat sample preparation.
Old or contaminated quality control (QC) particles
Make new QC samples and perform the quality control procedure again.
Window extension too low Increase the window extension.
High electronic abort rate (>10% of system event rate)
Event rate too high Decrease the event rate.
Sample aggregated Filter the sample.
Sample too concentrated Dilute the sample.
Threshold channel too low Increase the threshold channel.
Window extension too high Decrease the window extension.
Fewer events than expected in gated population
Events left out of gate When drawing a gate, make sure events on the axis are included.
Plot zoomed Unzoom the plot or make the gate bigger.
Window extension set incorrectly
Adjust the window extension.
Increasing threshold results in decreased Area signal
Window extension too low Slightly increase the window extension to maximize Area signal.
NOTICE Increasing the window extension too much results in more electronic aborts or high CVs.
Acquisition Troubleshooting for BD FACSDiva Software (continued)
Observation Possible Causes Recommended Solutions
146 BD FACSCanto Flow Cytometer Reference Manual

Area measurement off-scale while Height measurement on scale
(for FSC)
FSC Area Scaling too high Decrease area scaling to move the Area measurement on scale. If necessary, adjust area scaling to make the Area measurement match the Height measurement.
No signal in FSC-A, or all events against left axis in FSC-A
FSC Area Scaling set to 0 Set FSC Area Scaling correctly. See FSC Area Scaling on page 169.
Cannot delete from Parameters, Threshold, Compensation, or Ratio tab views
Row not selected Select the row using the selection button.
Recorded data in Tube Make a new Tube.
Acquisition Troubleshooting for BD FACSDiva Software (continued)
Observation Possible Causes Recommended Solutions
Chapter 5: Troubleshooting 147

148 BD FACSCanto Flow Cytometer Reference Manual

Appendix A
Technical Overview
This appendix provides more information about these topics.
• Flow Cytometry on page 150
• Fluidics System on page 150
• Optics System on page 153
• Electronics System on page 163
149

Flow Cytometry
Flow cytometry measures certain properties of particles, such as size and internal complexity, using light. To do this, a flow cytometer needs a method to move the particles past a light source. It also needs a way to collect and convert the light scattered or emitted by the particles into electrical signals. Most modern cytometers use lasers as the light source and transport the particles under investigation past the lasers using fluid or air.
The major systems in a cytometer that moves particles by fluid transport include
• a fluidics system
• an optical system
• an electronics system
Fluidics System
A fluidics system in a flow cytometer moves particles in fluid through a flow cell, past a laser beam, and then into a waste tank.
Sheath Cubitainer to Flow Cell
On the BD FACSCanto flow cytometer, a separate fluidics cart houses the sheath cubitainer, cleaning fluid cubitainers, and the waste tank. Positive-pressure pumps in the cart send sheath past a 0.22-µm filter to a pressurized interior reservoir within the cytometer, called the plenum. The plenum maintains a nearly constant fluid level and dampens pump pulsation. As a result, sheath pressure does not vary with the level of fluid in the sheath cubitainer. The plenum delivers sheath that has been filtered for air via a bubble filter to the flow cell with minimal flow rate variations. Figure A-1 on page 151 shows the fluidics pathway for the BD FACSCanto.
150 BD FACSCanto Flow Cytometer Reference Manual

Figure A-1 Sheath and sample flow pathways for the BD FACSCanto cytometer
You can view the current sheath pressure in BD FACSDiva software by choosing Instrument > Instrument Status Report. In BD FACSCanto clinical software, look in the Status window.
Sheath Flow
sheath tank
Sample Flow
interior reservoir
interrogation point
sheath filter
tube (SIT)
test tube
flow cell
bubble filter
sample injection
(plenum)
waste aspirator
waste tank
BD FACSDiva software BD FACSCanto clinical software
Appendix A: Technical Overview 151

Test Tube to Flow Cell
When you place a test tube on the cytometer, sample travels up the sample injection tube (SIT) in a separate, pressurized stream. It arrives in the lower chamber of the flow cell at a slight overpressure relative to the sheath fluid. The conical shape of the lower chamber creates a laminar sheath flow that entrains and carries the sample particles upward through the center of the flow cell in a stable stream. A laser beam then interrogates the sample, one cell at a time. (Figure A-2).
The difference in pressure between the sample stream and sheath fluid stream can be used to vary the diameter of the sample stream, also known as the sample core. Increasing the sample pressure increases the core diameter and therefore the flow rate (Figure A-2).
• A higher flow rate is generally used for measurements such as immunophenotyping. The data is less resolved but is acquired more quickly.
• A lower flow rate is generally used in applications where greater resolution is critical.
Figure A-2 Hydrodynamic focusing of the sample core through the flow cell
low sample pressure(10 µL/min)
red beam
blue beam
sheathfluid
sheathfluid
sample
high sample pressure(120 µL/min)
sheathfluid
sheathfluid
sample
152 BD FACSCanto Flow Cytometer Reference Manual

When using BD FACSCanto clinical software, the cytometer automatically regulates the sample pressure according to the currently selected panel.
Optics System
As stained cells or other particles pass through the focused laser beam, they scatter the laser light and fluoresce. Because the laser beam is focused to a small spot and particles move rapidly through the flow cell, the scatter or fluorescence emission has a very brief duration—only a few microseconds. This brief flash of light is collected, filtered, and then converted into an electrical signal by the detectors (Figure A-3).
Figure A-3 Light pathway through the BD FACSCanto flow cytometer
The following sections discuss these processes in greater detail.
blue laser
red laser
fiber optic cables prisms focusinglens
collectinglens
flow cell
stained particle
PMT
BPfilter
LPmirror
fiber opticcable
forward scatterdiode detector
detector
steering plate obscurationbar
Appendix A: Technical Overview 153

Light Scatter
When a cell or particle passes through a focused laser beam, laser light is scattered in all directions (Figure A-4). Light that scatters roughly in the same direction as the laser beam is called forward scatter (FSC); light that scatters roughly perpendicular to the laser beam is called side scatter (SSC). FSC and SSC intensities are related to certain physical properties of cells:
• FSC—indicates relative differences in the size of the cells or particles
• SSC—indicates relative differences in the internal complexity or granularity of the cells or particles
Figure A-4 Forward scatter (FSC) and side scatter (SSC)
Fluorescence
When cells or particles stained with fluorochrome-conjugated antibodies or other dyes pass through a laser beam, the dyes can absorb photons (energy) and be promoted to an excited electronic state. In returning to their ground state, the dyes release energy, most of which is emitted as light. This light emission is known as fluorescence.
Fluorescence is always a longer wavelength (lower-energy photon) than the excitation wavelength. Some fluorescent compounds emit at a much longer wavelength than their excitation wavelength. PerCP absorbs blue light (488 nm) and emits red light (675 nm); other fluorochromes, such as FITC, absorb blue
laser
side scatter
forward scatter
154 BD FACSCanto Flow Cytometer Reference Manual

light (488 nm) and emit green light (530 nm). These differences between excitation and emission allow one laser to excite many fluorochromes.
The emission spectra for some commonly used fluorochromes are shown in Figure A-5.
Figure A-5 Emission spectra of commonly used fluorochromes
Optical Filters
Optical filters modify the spectral distribution of light scatter and fluorescence directed to the detectors. When photons encounter an optical filter, they are either transmitted, absorbed, or reflected (Figure A-6).
wavelength (nm)
norm
aliz
ed in
tens
ity
0%
100%
400 500 700600 800
FITC APC PerCP-Cy5.5
PE-Cy7 APC-Cy7
PE-Cy7
APC-Cy7
PE
Appendix A: Technical Overview 155
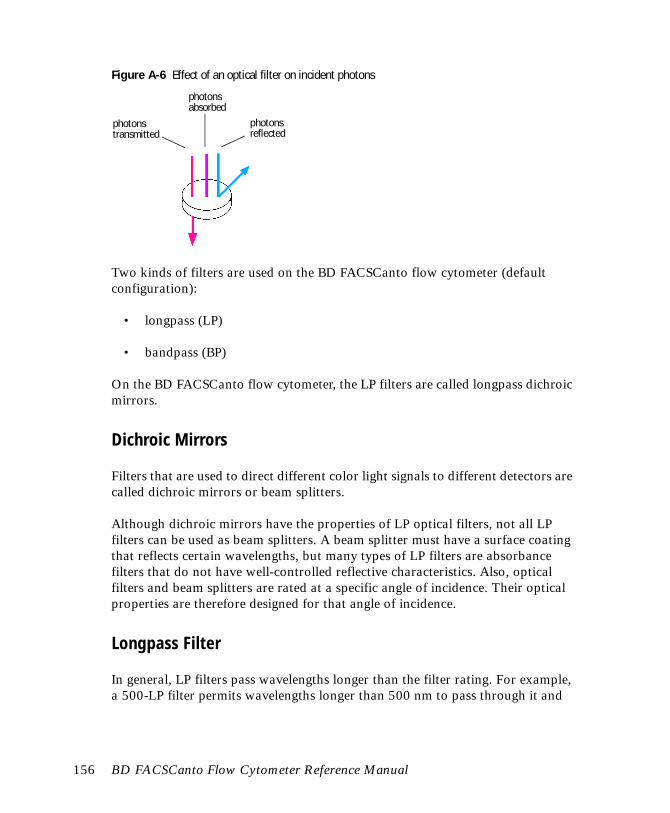
Figure A-6 Effect of an optical filter on incident photons
Two kinds of filters are used on the BD FACSCanto flow cytometer (default configuration):
• longpass (LP)
• bandpass (BP)
On the BD FACSCanto flow cytometer, the LP filters are called longpass dichroic mirrors.
Dichroic Mirrors
Filters that are used to direct different color light signals to different detectors are called dichroic mirrors or beam splitters.
Although dichroic mirrors have the properties of LP optical filters, not all LP filters can be used as beam splitters. A beam splitter must have a surface coating that reflects certain wavelengths, but many types of LP filters are absorbance filters that do not have well-controlled reflective characteristics. Also, optical filters and beam splitters are rated at a specific angle of incidence. Their optical properties are therefore designed for that angle of incidence.
Longpass Filter
In general, LP filters pass wavelengths longer than the filter rating. For example, a 500-LP filter permits wavelengths longer than 500 nm to pass through it and
photons transmitted
photons absorbed
photons reflected
156 BD FACSCanto Flow Cytometer Reference Manual

either absorbs or reflects wavelengths shorter than 500 nm (Figure A-7 on page 157).
Figure A-7 Longpass filter
Not all light with shorter wavelengths is absorbed or reflected. Some will still pass through.
Bandpass Filter
A BP filter transmits a relatively narrow range or band of light. Bandpass filters are typically designated by two numbers. The first number indicates the center wavelength and the second refers to the width of the band of light that is passed. For example, a 500/50 BP filter transmits light that is centered at 500 nm and has a total bandwidth of 50 nm. Therefore, this filter transmits light efficiently between 475 and 525 nm (Figure A-8).
wavelength (nm)
% tr
ansm
issi
onlongpass
Appendix A: Technical Overview 157

Figure A-8 Bandpass filter
Detectors
Detectors convert light signals into electrical signals that can be processed by the electronics system and a computer and then displayed on a plot.
There are two types of signal detectors in the BD FACSCanto flow cytometer: the photodiode and the photomultiplier tube (PMT). The photodiode is used to detect the stronger FSC signal (generated by light from the blue laser). The more sensitive PMTs are used to detect the weaker signals generated by SSC and all fluorescence channels.
In BD FACSCanto clinical software, the fluorochromes are preset.
In BD FACSDiva software, the Instrument Configuration dialog box lets you define the fluorochrome or cell parameter that will be measured at each PMT detector. You can add additional parameters to your configuration and choose the appropriate fluorochrome within your software Experiment.
Detector Arrays
On the BD FACSCanto flow cytometer, the PMTs are organized into two basic configurations, the octagon and the trigon. The octagon has five PMTs; the
wavelength (nm)
% tr
ansm
issi
on
bandpass
158 BD FACSCanto Flow Cytometer Reference Manual

trigon has two PMTs. These arrays efficiently direct the emitted light from each fluorochrome to a specific PMT, through placement of LP dichroic mirrors and BP filters.
When the collected light leaves the fiber optic cable at the octagon, it first meets a 735 LP dichroic mirror (Figure A-9 on page 159). The mirror passes through light with wavelengths greater than 735 nm and reflects lower wavelengths on to the next PMT.
Figure A-9 Light pathway around an octagon
Behind the LP mirror, a 780/60 BP filter admits light from 750 nm to 810 nm and substantially blocks other wavelengths. The light that finally reaches PMT A will from dyes such as PE-Cy7 that emit in this range.
B
D
FH
A
CE
G
670L
P53
0/30
488/10
780/60
585/42
655L
P50
2LP
735LP556LP
750–810 nm
> 670 nm
564–606 nm515–545 nm
483–493 nm
Appendix A: Technical Overview 159

Figure A-10 Excitation and emission spectra of PE-Cy7
Likewise, the 655 LP dichroic mirror for PMT B will reflect light with a wavelength of less than 655 nm to the next PMT. Light with a longer wavelength will pass through to another LP filter (670 nm) that further blocks shorter wavelength light. Light from dyes such as PerCP-Cy5.5 pass through this filter.
The beam continues around the array, with the yellowish light from particles stained by fluorochromes such as PE (emission spectrum 560 to 600 nm) collected by PMT C, and the green light from particles stained by fluorochromes such as FITC collected at PMT D. PMT E collects side scatter signals (blue laser light that was deflected by irregularities on the surface within the particles).
As you can see, the arrangement of filters and mirrors allows each PMT to receive the majority of signals from a specific fluorochrome.
Unfortunately, not all the screening can be done by filters and mirrors alone.
blue excitation
emission
bandpass filterlaser light
160 BD FACSCanto Flow Cytometer Reference Manual

Spillover
Fluorochromes emit light over a range of wavelengths. As a result, a signal from one fluorochrome can appear in a detector used for another fluorochrome (Figure A-11).
Figure A-11 Spillover of FITC into PE detector
For example, FITC appears primarily in the FITC detector, but some of its fluorescence spills over into the PE detector. PE appears primarily in the PE detector, but some of its fluorescence spills over into the FITC detector. This spillover must be corrected, or compensated, for. Thus, the term compensation.
In Figure A-11, a portion of the FITC emission will be detected by both the FITC and PE channels. This can be seen in an x, y plot of FITC vs PE (Figure A-12 on page 162). In this figure, the green circle represents a population stained with FITC; the gray circle represents a population negative for both FITC and PE.
norm
aliz
ed in
tens
ity
BP filters
emission spectrum of FITCemission spectrum of PE
FITC spillover into PE
Appendix A: Technical Overview 161

Figure A-12 Theoretical display of FITC vs PE before compensation
If the fluorescence is to be assigned to PE, the FITC signal must be removed from the PE channel, as indicated by the arrow. Both PE and FITC fluoresce in the yellow (575 nm) range, so there is no way to isolate the emission from each fluorochrome optically. Instead, fluorescence compensation moves the FITC population out of the PE positive area (Figure A-13).
Figure A-13 FITC signal properly compensated out of the PE channel
The software automatically computes these adjustments during setup, which you can further refine:
• In BD FACSDiva software, adjust spectral overlap in the Compensation tab in the Instrument frame.
• In BD FACSCanto clinical software, adjust spectral overlap on the Spectral Overlap tab.
PE
FITC
PE
FITC
162 BD FACSCanto Flow Cytometer Reference Manual

Once compensation has been set for one sample, the spectral overlap or compensation value remains valid whether a dim or bright sample is run. Figure A-14 demonstrates this principle. Although the signals differ in intensity, the percentage of signal detected in the FITC and PE channels remains constant.
Figure A-14 Two FITC signals of different intensity
Electronics System
Any discussion of electronics requires a basic understanding of the bit.
Computers and digital circuits use bits, binary numbers consisting of ones and zeros to pass information along. A 4-bit number has 4 digits that are either 1 or 0. A 10 bit number has 10 digits that are either 1 or 0. An 18-bit number has 18 digits that are either 1 or 0; 000000000000011110 is one example of an 18-bit number. Converted into base 10, the scale we normally use, this number is equivalent to 30. All together, there are 262,144 possible 18-bit numbers.
FITC PE
different intensity FITC signals
same proportion or percentage of spillover in PE channelno
rmal
ized
inte
nsity
Appendix A: Technical Overview 163

Pulses
Inside the PMTs, the laser light is converted into an electrical signal. This electrical signal is called a pulse (Figure A-15).
Figure A-15 Anatomy of a pulse
A pulse begins when a particle enters the laser beam. At this point, both the beam intensity and signal intensity are low.
The pulse reaches a maximum intensity or height when the particle reaches the middle of the beam, where the beam and signal intensity are the brightest. The peak intensity, or height of the pulse, is measured at this point.
As the particle leaves the beam, the pulse trails off.
a
b
c
time
signa
l int
ensi
tysig
nal i
nten
sity
sign
al in
tens
ity
time
time
laser beam
particle
a
b
c
164 BD FACSCanto Flow Cytometer Reference Manual

Pulse Measurements
The pulse of electricity travels from the PMTs to the electronics boards within the cytometer.
Figure A-16 Electronics boards
The pulse is amplified and then sent to a 14-bit analog-to-digital converter (ADC) on the acquisition board that changes the analog (continuous) pulse into digital (discrete) data. The ADC does this by sampling the pulse up to 10 million times per second, slicing it into 16,384 levels, and assigning a measurement to each time sample (Figure A-17 on page 166).
FPGA
embedded computer
workstation
preamp
PMT PMT PMT PMT PMT
ADC ADC ADC ADC ADC ADC ADC ADC
PMT SSC FSC diode
signalprocessor
digital
preamp preamp preamp preamp preamp preamp preamp
FPGA FPGA FPGA FPGA FPGA FPGA FPGA
RAM RAM RAM RAM RAM RAM RAM RAM
signalprocessor
digital
master board
acquisitionboard
acquisitionboard
Appendix A: Technical Overview 165

Figure A-17 A digitized pulse
The ADC sends these numbers to short-term memory (RAM) so that a field programmable gate array (FPGA) can rebuild a digital version of the pulse for analysis.
During this process, when a pulse exceeds the user-assigned threshold, its height and area are simultaneously calculated by the FPGA (Figure A-18).
Figure A-18 Pulse measurements
measured 10,000,000 times
digitized into 16,384 levels
secondevery
pulse height
time
sign
al in
tens
ity
pulsearea
166 BD FACSCanto Flow Cytometer Reference Manual

An FPGA calculates pulse height and area in the following manner:
• The maximum digitized value of all data points for the pulse becomes the pulse height.
• The sum of all data points that occur within a discrete time period becomes the pulse area.
After height and area calculations occur, they are sent to the signal processors.
Compensation, Gating, and Scaling
The digital signal processors (DSPs), located on the acquisition boards and on the master board, perform several important functions including
• correcting for spillover between fluorochromes through a series of mathematical calculations
• gating
• scaling
Scaling
The DSPs take the values arrived at by the FPGAs and scale them from 14 to 18 bits. When calculating area, the electronics add all data points under the pulse, in effect increasing the resolution from 16,384 maximum levels of measurement (14 bits) to close to 300,000. This is equivalent to approximately 18 bits (262,144 levels). For the height to match the area, it must be scaled to 18 bits.
Because data has been converted into 18-bits, an 18-bit display is used to keep all data on scale. That means a pulse (an event), will fall into one of 262,144 digital bins, or channels, when it is eventually assigned to a dot plot or histogram.
Appendix A: Technical Overview 167

Embedded Computer
The computer embedded within the cytometer communicates with the electronics board and your workstation.
For more about digital theory, refer to Appendix B in the BD FACSDiva Software Reference Manual. For an in-depth discussion, visit our website at http://www.bdbiosciences.com/immunocytometry_systems/ and download the BD FACSDiva Option White Paper. From the side menu on the Immunocytometry Systems home page, choose Products > Literature >White Papers. From the list, choose BD FACSDiva Option White Paper.
side menu choice
168 BD FACSCanto Flow Cytometer Reference Manual

Appendix B
FSC Area Scaling
This appendix provides more information about these topics.
• Adding FSC-A on page 171
• Adjusting the FSC Area Scaling Factor on page 172
169

The default FSC parameter for the BD FACSCanto flow cytometer is height (FSC-H). If you intend to collect data based on FSC area (FSC-A), you must check the FSC area scaling factor routinely prior to running samples, and adjust it as needed. You can find more details about the FSC area scaling factor in the BD FACSDiva Software Reference Manual.
Figure B-1 shows the point at which you should select FSC-A as a parameter, and check and adjust the FSC area scaling factor.
Figure B-1 Workflow and adjustment of FSC area scaling factor
start up (BD FACSCantoclinical software)
run automated
(BD FACSCanto clinical software)
optimize for assay
(BD FACSDiva software)
1 2 3 4
record andanalyze data
(BD FACSDivasoftware)
shutdown (BD FACSDiva
software)
5
setup
adjust FSC and SSC
adjust threshold
gate population of interest
adjust fluorescence PMT settings
calculate compensation
adjust FSC area scaling factor
create the Experiment
create compensation controlsselect FSC-A and FSC-H
170 BD FACSCanto Flow Cytometer Reference Manual

Adding FSC-A
Before you begin an Experiment in which you will collect data based on FSC-A, you must add FSC-A to the FSC parameter. To do this, follow these steps.
1 In the Instrument frame, click the Parameters tab.
2 Select FSC-A.
FSC-A
Appendix B: FSC Area Scaling 171

3 Do not deselect FSC-H.
You will need FSC-H selected to adjust FSC area scaling.
Adjusting the FSC Area Scaling Factor
1 In the Acquisition Controls frame, click Acquire to stop acquisition.
2 Create a dot plot on the Unstained Control worksheet.
3 Make sure the plot axes are labeled FSC-H and FSC-A.
4 Make sure the Current Tube pointer is next to the Unstained Control Tube.
5 Click Acquire.
6 View the events in the FSC-H vs FSC-A dot plot.
7 In the Instrument frame, click the Laser tab.
172 BD FACSCanto Flow Cytometer Reference Manual

8 Adjust FSC Area Scaling, if necessary, by clicking the arrows or moving the slider control.
Adjust the value until the events in the plot are approximately at a 45 degree angle.
Figure B-2 Correctly adjusted FSC area scaling factor
=
arrows and slider control
unadjusted adjusted
Appendix B: FSC Area Scaling 173

174 BD FACSCanto Flow Cytometer Reference Manual

Appendix C
Supplies and Replacement Parts
This appendix provides a list of supplies and options available for the BD FACSCanto instrument.
• To order spare parts and consumables from BD Biosciences from within the US, call: (877) 232-8995 or go to www.bdbiosciences.com.
In other countries, contact your local BD Biosciences representative.
• To order instrument options, contact your sales representative.
This information is correct at the time of publication; for up-to-date information refer to our website (http://www.bdbiosciences.com).
175

Instrument Supplies
Accessory Kit
The instrument is shipped with an accessory kit containing the following items. Use these part numbers if you need to order any replacements.
Item Part No.
Sheath filter (1) 331394
Cplg Insrt Barb-elbow 1/4 Barb 1/4" Flow (2) 333072
6-ft cordset for US power (15A, 5–15P/320-C13) 337219
2.5-m cordset for Australian power (10A C13) 335696
2.5-m cordset for European power (10A C13) 335697
2.5-m cordset for UK power (10A C13 R/A) 335698
Filter bypass assembly (1) 335760
Bal seal for SIT (6) 343509
Blank 3 1/2-in disk (1) 343572
12 x 75-mm test tubes (bag of 125) 343675
10-L waste tank (1) 333503
Vented cap for waste tank (1) 336482
Waste cap label (1) 336326
5.0-A 250V Slo-blo fuse (2) 90069-22
176 BD FACSCanto Flow Cytometer Reference Manual

Other Replacement Parts
The following items are not included in the accessory kit, but you can use the indicated part numbers to order spare or replacement parts.
Consumables
Instrument Setup
Item Part No.
Sheath sensor probe (5-level) 334914
Waste sensor probe (6-level) 334915
Auxiliary sensor probe (1-level) 334911
Air filter (side door) 336303
Fuses, fluidics cart 96-20054-00
Bypass tubing 336768
Bal seal retainer 335513
Particle Supplier Catalog No.
BD FACS 7-color setup beads BD Biosciences(877) 232-8995
335775
Appendix C: Supplies and Replacement Parts 177

Reagents
Labware
Reagent Supplier Catalog No.
BD FACSFlow sheath fluid BD Biosciences(877) 232-8995
340398(US and Latin America)
342003(other countries)
BD FACS cleaning solution BD Biosciences 340345
BD FACS shutdown solution BD Biosciences 334224
Monoclonal antibodies BD Biosciences a
a. Refer to the BD Biosciences Immunocytometry Products Catalog or the BD Biosciences website (www.bdbiosciences.com).
BD FACS™ lysing solutionb
b. US Patent Nos. 4,654,312; 4,902,613; 5,098,849
BD Biosciences 349202
Item Supplier Catalog No.
5-mL polystyrene test tubes, 12 x 75-mm (BD Falcon™)
• uncapped, 125 per bag
• capped, 125 per bag
• capped, 25 per bag
• with cell-strainer cap, 25 per bag
BD Biosciences(877) 232-8995
• 352052
• 352054
• 352058
• 352235
178 BD FACSCanto Flow Cytometer Reference Manual

Appendix D
Technical Specifications
This appendix covers the following topics:
• Cytometer Specifications on page 180
• Fluidics Cart Specifications on page 184
179
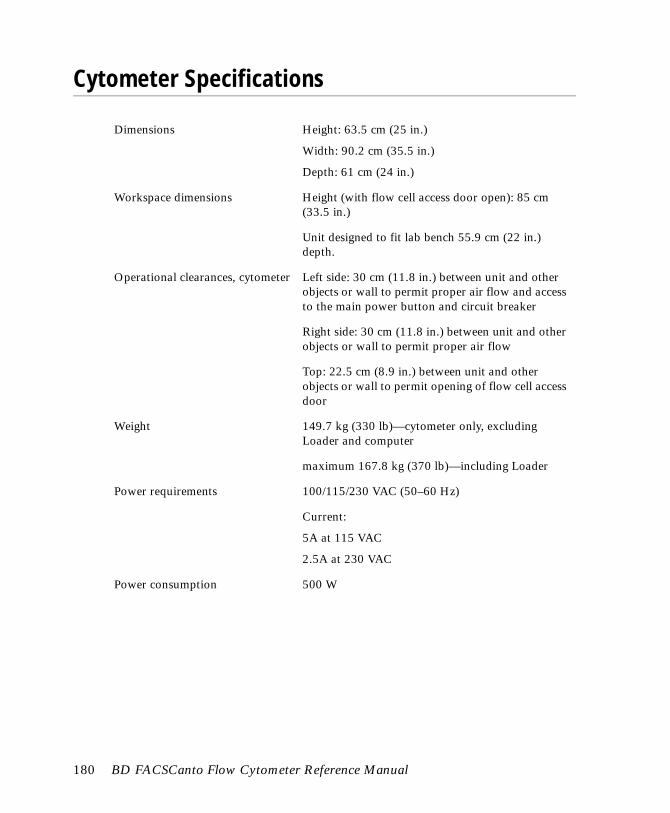
Cytometer Specifications
Dimensions Height: 63.5 cm (25 in.)
Width: 90.2 cm (35.5 in.)
Depth: 61 cm (24 in.)
Workspace dimensions Height (with flow cell access door open): 85 cm (33.5 in.)
Unit designed to fit lab bench 55.9 cm (22 in.) depth.
Operational clearances, cytometer Left side: 30 cm (11.8 in.) between unit and other objects or wall to permit proper air flow and access to the main power button and circuit breaker
Right side: 30 cm (11.8 in.) between unit and other objects or wall to permit proper air flow
Top: 22.5 cm (8.9 in.) between unit and other objects or wall to permit opening of flow cell access door
Weight 149.7 kg (330 lb)—cytometer only, excluding Loader and computer
maximum 167.8 kg (370 lb)—including Loader
Power requirements 100/115/230 VAC (50–60 Hz)
Current:
5A at 115 VAC
2.5A at 230 VAC
Power consumption 500 W
180 BD FACSCanto Flow Cytometer Reference Manual

Environment
Performance
Optics
Laser Specifications
The following Class 3B lasers are mounted on the BD FACSCanto instrument.
Because these lasers are contained within the instrument, the BD FACSCanto is a Class 1 laser product.
Storage temperature 1–40°C
Operating temperature 15–30°C (59–86°F)
Operating relative humidity 5–80% (noncondensing)
Noise level ≤62 dBA
Facilities No special room requirements
Fluorescence threshold sensitivities FITC <100 MESF; PE <50 MESF
Forward and side scatter sensitivity Sensitivity enables the resolution of platelets from noise
Forward scatter sensitivity 1 micron
Side scatter sensitivity 0.5 micron
Manufacturer ModelWavelength
(nm)Power (mW)
Coherent Sapphire 488-20 488 20
JDS Uniphase 1144-P 633 17
Appendix D: Technical Specifications 181

Excitation Optics
Emission Optics
Optical platform Fixed optical assembly
Beam geometry Blue and red laser: 9 µm x 65 µm elliptical beam
Collection lens Optical gel–coupled to flow cell
Numerical aperture (NA) = 1.2
Fluorescence detection 6 photomultiplier tube detectors:
Four wavelength ranges detected from 488-nm laser:
• 750–810 nm (PE-Cy7)
• >670 nm (PerCP-Cy5.5)
• 564–606 nm (PE)
• 515–545 nm (FITC)
Two wavelength ranges detected from 633-nm laser:
• 750–810 nm (APC-Cy7)
• 650–670 nm (APC)
Forward scatter detection Photodiode with 488/10 bandpass filter
Side scatter detection PMT with 488/10 bandpass filter
182 BD FACSCanto Flow Cytometer Reference Manual

Fluidics
Signal Processing
General operation Integrated fluidics cart with automated startup, shutdown and cleaning cycles
Sheath consumption 1.08 L/hr, normal operation
<1.0 mL/hr, standby
Sheath pressure 5 psi
Sample flow rates Reagent dependent, controlled automatically by BD FACSCanto clinical software
Low = 10 µL/min
Medium = 60 µL/min
High = 120 µL/min
Sample acquisition rate 10,000 events/sec
Recommended maximum particle size
50 µm
Workstation resolution 262,144-channel resolution
Data acquisition channels 8 parameters: 6 fluorescent and 2 scatter parameters
Fluorescence compensation No limit to inter- and intra-beam compensation
Pulse processing Height, Area, and Width measurements available for any parameter (BD FACSDiva software)
Time Can be correlated to any parameter
Channel threshold Available for any parameter from all lasers
Appendix D: Technical Specifications 183

Fluidics Cart Specifications
Capacity
Dimensions Height: 66 cm (26 in.)
Width: 81.3 cm (32 in.)
Depth: 66 cm (26 in.)
Operational clearances Fluidics cart, side air vent: 20 cm (7.9 in.) between air vent and other objects or wall to permit proper air flow
Fluidics cart, door air vent: 20 cm(7.9 in.) between door and other objects or wall to permit proper air flow
Weight 45.4 kg (≤100 lb)—fluidics cart only, excluding tanks
81.7 kg (≤180 lb)—with tanks full
Power Receives power from cytometer
Current: 2A at 100 and 115 VAC, 1A at 230VAC
Consumption: 175W
Facilities No air or vacuum required. Room air and vacuum can be attached.
BD FACSFlow cubitainer 20 L
BD FACS cleaning solution cubitainer
5 L
BD FACS shutdown solution cubitainer
5 L
Waste tank 10 L
184 BD FACSCanto Flow Cytometer Reference Manual

Appendix E
Performance Data
This appendix covers the following topics:
• BD FACSCanto System Accuracy on page 186
• BD FACSCanto System Precision on page 195
• BD FACSCanto System Linearity on page 198
• BD FACSCanto System Carryover on page 200
185

BD FACSCanto System Accuracy
Lyse/Wash Method Subset Percentages
Table E-1 BD FACSCanto system accuracy with BD FACSDiva software
Measurement(unit)
CD3 CD4 CD8 CD19 CD16+56
Slope of fitted linear regression line
Confidence Interval
0.99
(0.96, 1.02)
1.03
(1.01, 1.05)
0.98
(0.96, 1.00)
1.01
(0.97, 1.06)
0.96
(0.93, 0.98)
Intercept of fitted linear regression line (%)
Confidence Interval
1.90
(-0.31, 4.11)
-0.50
(-1.03, 0.02)
-0.99
(-2.07, 0.09)
-0.20
(-0.83, 0.44)
-0.85
(-1.28, -0.41)
Total # points used in regression (#)
128 128 128 128 128
Range of Data: lowest, highest value of X
37.8, 93.5 0.0, 63.0 15.0, 80.0 1.0, 36.0 3.0, 62.0
Range of Data: lowest, highest value of Y (%, %)
38.7, 93.0 1.2, 68.9 14.0, 79.2 0.1, 40.7 1.4, 59.3
Standard error of estimate of the data (%)
3.08 2.22 4.07 2.97 1.91
Correlation coefficient
0.986 0.995 0.993 0.968 0.988
186 BD FACSCanto Flow Cytometer Reference Manual

Notes
• The comparative method used in regressions was BD FACSCalibur™ with BD Simulset™ software and BD Simultest™ IMK-Lymphocyte kit.
• The method used to fit the linear regression for all subsets was least-squares. A log of the least-squares was used for CD4 and CD19 to stabilize the variance.
• Accuracy studies were conducted over a period of 35 days at three sites.
• The number of replicate determinations used to calculate each mean for X: Four replicates for CD3, one for all other subsets.
• The number of replicate determinations used to calculate each mean for Y: One to two replicates for all subsets.
• A difference exists between measurements of natural killer (NK) cell (CD16+56) populations on the BD FACSCalibur with BD Simulset software and the BD FACSCanto with BD FACSDiva software. BD FACSDiva software uses a polygonal gate that allows more flexibility to accommodate the population shape. This gate provides a tighter fit around the NK cluster and may exclude extraneous cells included with the rectangular gating provided by BD Simulset software.
Appendix E: Performance Data 187

Individual lymphocyte Subset Accuracy
Scatter Plots for Lyse/Wash Method Subset Percentages
patientnormal
regression lineconfidence limit
ideal line
188 BD FACSCanto Flow Cytometer Reference Manual

Lyse/No-Wash Method Absolute Counts
Table E-2 BD FACSCanto system accuracy with BD FACSCanto software
Measurement (Unit)
CD3 CD4 CD8 CD19 CD16+56
Slope of fitted linear regression line
Confidence Interval
0.99
(0.96, 1.02)
0.97
(0.94, 0.99)
0.96
(0.93, 1.00)
1.02
(1.00, 1.05)
0.95
(0.92, 0.99)
Intercept of fitted linear regression line (cells/µL)
Confidence Interval (n, n)
-6.27
(-53.20, 40.70)
10.80
(-5.51, 27.00)
24.60
(-8.84, 58.10)
-7.93
(-17.90, 2.01)
10.80
(1.87, 19.80)
Total number of points used in regression (#)
108 108 108 108 108
Range of data: lowest, highest value of X (cells/µL, cells/µL)
105.0, 4929.1 3.7, 3441.8
95.9, 2472.4
2.1, 1909.1 13.3, 1459.6
Range of data: lowest, highest value of Y (cells/µL, cells/µL)
75.1, 5257.3
2.5, 3210.8
68.3, 2754.0
0.0, 2526.7
11.0, 1374.1
Standard error of estimate of the data (cells/µL)
128.4 61.4 97.8 38.3 33.4
Correlation coefficient
0.987 0.991 0.983 0.990 0.981
Appendix E: Performance Data 189

Notes
• The comparative method used in regressions was BD FACSCalibur with BD Multiset™ software and BD Multitest™ IMK Kit with BD Trucount tubes.
• The least-squares method was used to fit the linear regression for all subsets.
• Accuracy studies were conducted over a period of 12 days at two sites.
• Number of replicate determinations used to calculate each mean for X: two replicates for CD3, one for all other subsets.
• Number of replicate determinations used to calculate each mean for Y: minimum of two and maximum of four replicates for CD3 and minimum of one and maximum of two for all other subsets.
190 BD FACSCanto Flow Cytometer Reference Manual

Individual Lymphocyte Subset Accuracy
Scatter Plots for Lyse/No-Wash Method Absolute Counts
regressionconfidence
ideal
Appendix E: Performance Data 191

Lyse/No-Wash Method Subset Percentages
Table E-3 BD FACSCanto system accuracy with BD FACSCanto software
Measurement (Unit)
CD3 CD4 CD8 CD19 CD16+56
Slope of fitted linear regression line
Confidence Interval
1.00
(0.98, 1.02)
0.99
(0.98, 1.00)
1.00
(0.98, 1.02)
0.99
(0.97, 1.02)
1.00
(0.97, 1.02)
Intercept of fitted linear regression line (%)
Confidence Interval
-0.17
(-1.86, 1.52)
0.26
(-0.06, 0.57)
0.27
(-0.62, 1.16)
-0.05
(-0.41, 0.31)
0.39
(0.01, 0.78)
Total number of points used in regression (#)
108 108 108 108 108
Range of Data: lowest, highest value of X (%, %)
40.1, 94.1 0.7, 69.2 9.4, 82.0 0.1, 43.9 1.5, 44.3
Range of Data: lowest, highest value of Y (%, %)
39.9, 93.3 0.5, 70.2 9.4, 81.3 0.0, 41.9 1.9, 44.9
Standard error of estimate of the data (%)
1.35 0.91 1.50 0.97 1.12
Correlation coefficient
0.993 0.998 0.996 0.994 0.989
192 BD FACSCanto Flow Cytometer Reference Manual

Notes
• The comparative method used in regressions was BD FACSCalibur with BD Multiset software and BD Multitest IMK Kit with BD Trucount tubes.
• The method used to fit the linear regression for all subsets was least squares.
• Accuracy studies were conducted over a period of 12 days at two sites.
• Number of replicate determinations used to calculate each mean for X: two replicates for CD3, one for all other subsets.
• Number of replicate determinations used to calculate each mean for Y: minimum of two and maximum of four replicates for CD3 and minimum of one and maximum of two for all other subsets.
Appendix E: Performance Data 193

Individual Lymphocyte Subset Accuracy
Scatter Plots for Lyse/No-Wash Method Subset Percentages
regressionconfidence
ideal
194 BD FACSCanto Flow Cytometer Reference Manual
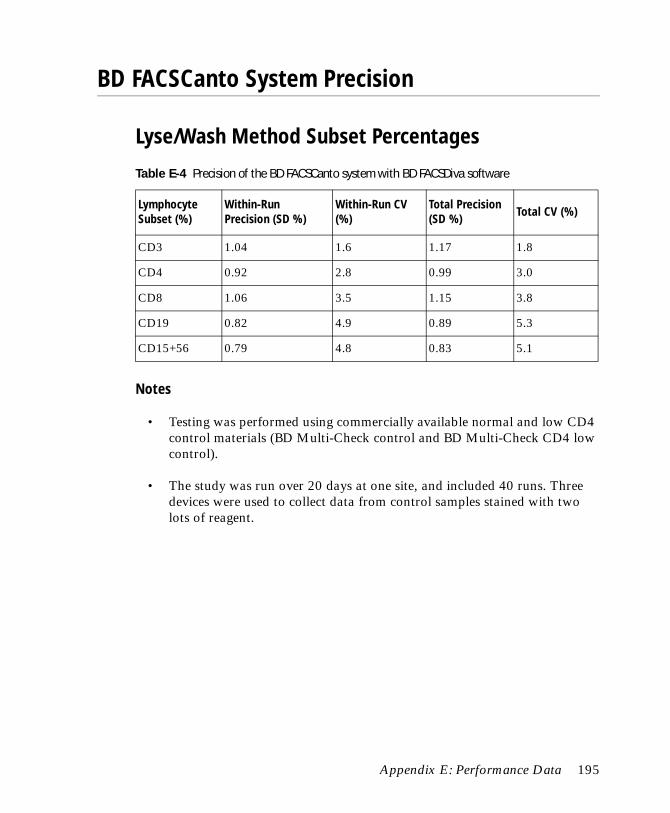
BD FACSCanto System Precision
Lyse/Wash Method Subset Percentages
Notes
• Testing was performed using commercially available normal and low CD4 control materials (BD Multi-Check control and BD Multi-Check CD4 low control).
• The study was run over 20 days at one site, and included 40 runs. Three devices were used to collect data from control samples stained with two lots of reagent.
Table E-4 Precision of the BD FACSCanto system with BD FACSDiva software
Lymphocyte Subset (%)
Within-Run Precision (SD %)
Within-Run CV (%)
Total Precision (SD %)
Total CV (%)
CD3 1.04 1.6 1.17 1.8
CD4 0.92 2.8 0.99 3.0
CD8 1.06 3.5 1.15 3.8
CD19 0.82 4.9 0.89 5.3
CD15+56 0.79 4.8 0.83 5.1
Appendix E: Performance Data 195

Lyse/No-Wash Method Absolute Counts
Notes
• Testing was performed using commercially available normal and low CD4 control materials (BD Multi-Check control [MC] and BD Multi-Check CD4 low control [MCL]).
• The study was run over 20 days at one site, and included 40 runs. Three devices were used to collect data from control samples stained with one lot of reagent.
Table E-5 Precision of the BD FACSCanto system with BD FACSCanto software
Lymphocyte Subset
MC Within-Run CV(% cells/µL)
MC Total CV(% cells/µL)
MCL Within-Run CV(% cells/µL)
MCL Total CV(% cells/µL)
CD3 3.89 4.83 3.20 4.08
CD4 5.74 5.94 5.83 6.53
CD8 6.38 7.10 5.14 5.79
CD19 6.99 7.75 4.91 7.08
CD16+56 7.96 9.90 6.63 8.22
196 BD FACSCanto Flow Cytometer Reference Manual

Lyse/No-Wash Method Subset Percentages
Notes
• Testing was performed using commercially available normal and low CD4 control materials (BD Multi-Check control [MC]and BD Multi-Check CD4 low control [MCL]).
• The study was run over 20 days at one site, and included 40 runs. Three devices were used to collect data from control samples stained with one lot of reagent.
Table E-6 Precision of the BD FACSCanto system with BD FACSCanto software
Lymphocyte Subset
MC Within-RunPrecision(% SD)
MC TotalPrecision(% SD)
MCL Within-RunPrecision (% SD)
MCL TotalPrecision (% SD)
CD3 1.15 1.21 1.16 1.22
CD4 1.04 1.18 0.73 0.76
CD8 1.03 1.15 0.97 1.17
CD19 0.68 0.77 0.70 1.05
CD16+56 0.89 1.03 1.03 1.14
Appendix E: Performance Data 197

BD FACSCanto System Linearity
For immunophenotyping lymphocyte subsets by flow cytometry, the BD FACSCanto instrument with BD FACSDiva software has been demonstrated to be linear within the following ranges for each fluorescence parameter (Table E-7).
Table E-7 Linearity
Fluorophore (Unit)
Linearity Measured From
Linearity Measured To
R2
Inst. #1(%)
R2
Inst. #2(%)
R2
Inst. #3(%)
FITC (MEFa FITC)
a. MEF: Manufacturer’s Equivalent Fluorescence
600 330,000 99.90 99.90 99.90
PE (MEF PE) 400 300,000 100.00 100.00 100.00
PerCP-Cy5.5 (MEF Cy5)
1,900 1,115,000 99.80 99.90 99.80
APC (RFIb APC)
b. RFI: Relative Fluorescence Intensity
0.025 29 99.70 99.70 99.80
PE-Cy7 (RFI %) .098 100 100.00 100.00 99.60
APC-Cy7 (RFI %)
.025 100 99.80 99.80 99.70
198 BD FACSCanto Flow Cytometer Reference Manual

For immunophenotyping lymphocyte subsets by flow cytometry, the BD FACSCanto instrument with BD FACSCanto clinical software has been demonstrated to be linear within the following ranges appropriate for each lymphocyte subset using BD Multitest IMK Kit with BD Trucount tubes (Table E-8).
Table E-8 Linearity of lymphocyte subsets
Lymphocyte SubsetLinearity Measured From (cells/µL)
Linearity Measured To(cells/µL)
R2
(%)
CD3 47.5 9627.4 99.98
CD4 28.6 5827.2 99.96
CD8 22.2 4075.6 99.95
CD19 5.2 1130.8 99.93
CD16+56 3.7 670.5 99.78
Appendix E: Performance Data 199
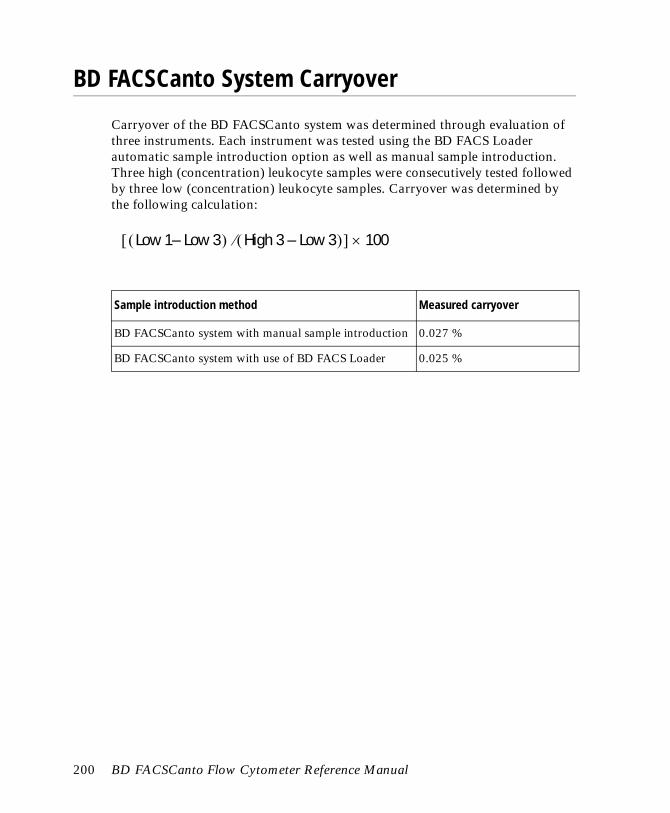
BD FACSCanto System Carryover
Carryover of the BD FACSCanto system was determined through evaluation of three instruments. Each instrument was tested using the BD FACS Loader automatic sample introduction option as well as manual sample introduction. Three high (concentration) leukocyte samples were consecutively tested followed by three low (concentration) leukocyte samples. Carryover was determined by the following calculation:
Sample introduction method Measured carryover
BD FACSCanto system with manual sample introduction 0.027 %
BD FACSCanto system with use of BD FACS Loader 0.025 %
Low 1– Low 3( ) High 3 – Low 3( )⁄[ ] 100×
200 BD FACSCanto Flow Cytometer Reference Manual

Appendix F
QC Log
This sample quality control (QC) log can be photocopied or used as a guide in designing your own QC log. Figure F-3 on page 205 shows an example of a QC log in use.
201

202 BD FACSCanto Flow Cytometer Reference Manual

Inst
rum
ent
Seri
al N
umbe
r/N
ame
Calib
rati
on P
arti
cle
Lot
#
Dat
e
Volt
ages
FSC
SSC
FITC
PE PerC
P
PerC
P-Cy
5.5
PE-C
y7
APC
APC
-Cy7
Blue
Las
er
Pow
er
Blue
Las
er
Curr
ent
Red
Lase
r Po
wer
Ope
rato
r In
itia
ls
Appendix F: QC Log 203

204 BD FACSCanto Flow Cytometer Reference Manual

Figure F-3 Example of QC log in progress
Appendix F: QC Log 205

206 BD FACSCanto Flow Cytometer Reference Manual

Index
A
aborts, electronictroubleshooting 146
accessory kit 176acquisition
controls 52events to record 84troubleshooting 143
Acquisition Templatescreating 83previewing data 83, 90
adapter lever 28adjusting
flow rate 53PMT voltages 75threshold 75
air filter 108air lock, removing 128alcohol, isopropyl 118analysis
data 83immunophenotyping 87reusing 90saving 90
Analysis objects, copying 90area scaling
troubleshooting 147arrays, detector 32aspirator arm 28assistance, technical xiv
automatic clean 44auxiliary air supply switch 38
B
Bal seal 120bandpass (BP) filters 157beads
running setup 62setup 61
bleeding filters 105breaker, main circuit 35bubble filter 117Bubble Filter Purge 117button, power 35, 57bypass tubing, installing 128, 129
C
cables, reconnecting 125calculating compensation 80, 81cap, waste tank 104changing cubitainers 98circuit breaker
cytometer 35fluidics cart 38fluidics cart, resetting 124
Clean Flow Cell 116
207

cleaningautomatic 44decontaminate fluidics 107external surfaces 118flow cell 116fluidics for storage 119
cleaning fluidsnot recommended 118recommended 40
coefficient of variation (CV)high 146
compensationcalculating 80, 81gating data 80Setup 81theory 161–163Tubes, creating 73
componentsBD FACSDiva workspace 42FACSCanto system 26fluidics cart 36
computershutting down 94starting 57
connecting power cords 35controls
acquisition 52compensation 73fluidics 43instrument 43
cord, damaged xv
creatingAcquisition Templates 83Analysis objects 87compensation Tubes 73
cubitainerchanging 98described 37
cytometercomponents 27not responding to software 139power 35setup 61starting 57
D
damaged cord xvdata
analyzing 83, 87gating 80, 87recording 83, 85
De-gas Flow Cell 115detector arrays 32dichroic mirrors 156diode, forward scatter 29Diva software
launching 57log in 58log out 91workspace, described 42
208 BD FACSCanto Flow Cytometer Reference Manual

doorsaccess 27flow cell access 27how to open side door 109optics 27side 27
E
electrical safety xvelectronic
aborts 146electronics 163ethanol 118event rate 64events
not showing in plots 143, 144rate, troubleshooting 145troubleshooting 146
Experiment Layout 84Experiments
immunophenotyping 83sample optimization 70
F
failed setup 66fiber optics 31filters
air 108bandpass 157bubble 117fluidic, changing 111fluidic, purging 105fluidic, shown 36longpass 156optical theory 155removing an air lock 128waste tank cap 104
flow cellaccess door 27checking for bubbles 59cleaning 116described 28, 29, 31problems 138removing bubbles 115
flow rate, adjusting 53fluidics
controls 43description 150level indicators 48, 58level sensors, replacing 130priming 101shutdown 43, 92startup 43, 59system components 27
fluidics cartcomponents 36controls 38dimensions 184fuses, replacing 134level sensor 100maintenance 98, 102problems 142reconnecting tubing 125troubleshooting 140
fluidsleaks, cytometer 140leaks, fluidics cart 142leaks, SIT 141levels 48, 58not recommended 118required 40
fluorescence 154, 155fluorescence signal, troubleshooting 144fluorochromes
emission spectra 155for 488-nm and 633-nm lasers 30instrument configuration and 44spectral overlap and 161
Index 209

focusing lens 31forward scatter (FSC)
described 154diode 29
framesabout 42acquisition controls 52See also views, windows.
fusesfluidics cart, replacing xv, 134
G
gatingcompensation Tubes 80data 87
general safety xix
I
immunophenotypinganalysis 87Experiment 83
Inspectorstroubleshooting 147
installingair filter 108bypass tubing 129cubitainers 98fluidics level sensors 130fuses 134tubes 64
instrumentconfiguration 44controls 43power 35QC particles 177quality control 61settings, optimization 68specifications 180, 184starting 57status report 46supplies 176
interlock, laser path 31isopropyl alcohol 118
L
labels, parameter 84lasers
current 50described 30interlock 31power 35safety xviishown 31specifications 181troubleshooting 141
leakscytometer 140fluidics cart 142SIT 141
levelsfluid 48, 58sensor 100, 130
limitations, system xxLoader 39loading tubes 64logging
in 58out 91
Long Clean 107
210 BD FACSCanto Flow Cytometer Reference Manual

longpass (LP) filters 156
M
maintenancescheduled 96unscheduled 114
manualsetup mode 63
menu, Instrument 43mode
automatic to manual 121standby 47
O
obscuration bar 29, 33octagon, optics 32, 34optics
access door 27components 30dichroic mirrors 156fiber 31filters, default 34filters, theory 155optical pathway 31
optimizationinstrument 61instrument settings 68
ordering supplies 175
P
parametersassigning 44labels 84scatter, distorted 145
photodiode 29, 33
photomultiplier tubes (PMTs)applying voltages 75assigning 44described 32
plotsexcessive debris 145no events in 143unexpected events in 144
populationstroubleshooting 146
powerbutton 27, 35fluidics cart 38instrument 35laser 35
preferences, user 91Prime After Tank Refill 101priming, fluid lines 101prisms 31purging filters 105
Q
QCcytometer 61
quality control (QC) 61log 201performing 61
R
recordingcompensation Tubes 80data 83, 85
Remove Tube button 52, 79, 86removing tubes 65replacing fuses xv, 134report, instrument status 46results, troubleshooting 144reusing analyses 90
Index 211

runningsetup 62
S
safetyelectrical xvgeneral xixlaser xvii
sample injection tube (SIT)described 27problems 139, 140, 141
sample optimizationabout 68Experiment 70
samples, running 85saving, analyses 90scaling
troubleshooting area 147scatter parameters, distorted 145scatter, light 154scheduled maintenance 96seal, Bal 120sensors, fluidics 130setup
about 61age 61beads 61failure 66manual mode 63running 62
Setup, compensation 81shutting down
computer 94fluidics 43, 92
side door, cytometer 27side scatter (SSC) 154signals
no fluorescent 144troubleshooting 147
specificationscytometer 180fluidics cart 184
standby mode 47starting
computer 57fluidics 43, 59instrument 57
supplies, instrument 176
T
technical assistance xivthreshold
troubleshooting 146threshold, adjusting 75trigon, optics 32, 34troubleshooting
acquisition 143CVs 146electronic aborts 146event rate 145Inspector 147plots 143, 144, 145populations 146scatter parameters 145signals 144, 147window extension 146
tube removal 52, 79, 86Tubes
compensation 73tubes
loading 64removing 65
U
unscheduled maintenance 114user preferences 91
212 BD FACSCanto Flow Cytometer Reference Manual

V
voltageadjusting PMT 75compensation and 79fluidics cart fuses 136
W
waste containerdescribed 37emptying 102
waste tank cap 104window extension
troubleshooting 146windows
See also frames, views.workspace
components 42workstation
shutting down 94starting 57
Index 213

214 BD FACSCanto Flow Cytometer Reference Manual