basic gmail operations - keio university 1. basic operations for google apps gmail 1.1. receiving...
TRANSCRIPT

Basic Gmail Operations

Contents
1. Basic Operations for Google Apps Gmail .................................................................. 1 1.1. Receiving and Reading Emails ........................................................................................................ 1
1.1.1. The Inbox and displaying emails ............................................................................................ 1
1.1.2. Email threads .......................................................................................................................... 2
1.2. Composing and sending emails ........................................................................................................ 3
1.2.1. Before sending emails ............................................................................................................ 3
1.2.2. Composing and sending new emails ...................................................................................... 4
1.2.3. Composing an email from Contacts ....................................................................................... 5
1.2.4. Replying to emails .................................................................................................................. 6
1.2.5. Forwarding emails .................................................................................................................. 7
1.2.6. Saving an email draft .............................................................................................................. 8
1.2.7. Attaching files ........................................................................................................................ 8
1.2.8. Automatically forwarding emails ........................................................................................... 9
1.3. Organizing emails .......................................................................................................................... 11
1.3.1. Classifying emails by labels ................................................................................................. 11
1.3.2. Starring emails ...................................................................................................................... 13
1.3.3. Archiving emails .................................................................................................................. 14
1.3.4. Deleting emails ..................................................................................................................... 15
1.3.5. Automatically sort emails using filters ................................................................................. 16
1.4. Other ............................................................................................................................................... 19
1.4.1. Searching emails ................................................................................................................... 19
1.4.2. Printing emails ...................................................................................................................... 20
1.4.3. Spam ..................................................................................................................................... 20
1.4.4. Importance markers .............................................................................................................. 21
1.5. More details .................................................................................................................................... 22

1
1. Basic Operations for Google Apps Gmail
1.1. Receiving and Reading Emails 1.1.1. The Inbox and displaying emails Once you have logged in, the Inbox screen will be displayed, as in Fig. 1. This is the list of emails you
have received. New emails are shown in bold. The Inbox can be shown at any time by just clicking
"Inbox" on the left of the screen.
Fig. 1 Inbox
Clicking the email you want to read will display the email main body, like in Fig. 2. This email is an
example of one that has an attachment.
Fig. 2 Email main body display
Sometimes there will be numbers in parentheses beside the "Inbox" to the left of the screen. In Fig.
1, it shows "Inbox (3)", which means there are three emails there that you have not yet read.
The Google Apps Gmail Inbox screen is updated periodically, but if you want to check for updates
immediately, you can do by clicking the (Refresh) button.
Click the email you
want to read
Subject
Sender
Main body
Reply button

2
1.1.2. Email threads In Google Apps Gmail, when you reply to a message you received or someone replies to one you
sent, all these multiple emails are collected in the form of "threads". Using this function makes it easier
to see the order of an email exchange, and simpler to find the email you want.
In lists of emails like in the Inbox, each thread is shown on a single line, even if there are multiple
emails in it. However, in this case, the number of emails in a thread is shown in parentheses beside the
sender.
Fig. 3 List display when there are multiple emails in a thread
In Fig. 3, "(2)" is shown in Line 1, so that lets you know that there are two emails in this thread.
Clicking the thread may show you the emails overlapping, like in Fig. 4. In this case, the latest
email is always shown at the front. If you want to read the emails at the back, click their subjects.
Note that if all emails in a thread are unread, they will be displayed as all open, without being
overlapped.
Fig. 4 Displaying threads
If you want to expand all emails, then click “ (Expand all)” at the right of Fig. 4.
Displays the number of emails

3
1.2. Composing and sending emails 1.2.1. Before sending emails
Normally, you should sign an email in the same way as you would write your name and address
when you send a letter. To save having to do this each time you compose an email, Google Apps Gmail
allows you to prepare an email signature ahead of time. You should use a signature that shows your
name clearly to avoid having your emails mixed up with spam.
To set your signature, click " (Settings)" at the top right of the Google
Apps Gmail screen, then "Mail Settings"
and check that the "General" tab is
showing. Next, check the radio button
below the "Signature:" section (see Fig. 5),
and enter your signature in the text box.
Once you have entered your signature,
click the "Save changes" at the bottom of
the screen to save your signature.
If you are going to be sending a lot of
emails overseas, using Roman letters only
for your signature will prevent kanji
characters from not displaying properly
for the recipient.
Setting a signature like this will mean
that every time you write an email, your
signature will be pre-appended to the end
of the email.
Signature example
Taro Keio
Keio University
Phone: 03-****-****
Fax: 03-****-****
Fig. Fig. Fig. Fig. 5555 Setting a signatureSetting a signatureSetting a signatureSetting a signature

4
1.2.2. Composing and sending new emails To send a new email, click "Compose Mail", which is always displayed at the top left of the screen.
Clicking this will display the screen for entering the address, subject, and main body, as shown in Fig.
6 (hereafter, "the Compose Mail screen").
Fig. 6 Compose Mail
(1) Enter the email address to where you wish to send the email in the "To" section. If you want to send the email to multiple recipients, set off each email address with commas.
If you want to send an email using Cc1 or Bcc2, click either "Add Cc" or "Add Bcc", then add the email addresses you wish to include in the entry area, in the same way as you did in the "To" area.
(2) Enter the title of the email in "Subject". (3) Check the main body format.
The main body entry field uses Rich Text3 by default, and emails you compose here will be sent as HTML emails. Not all recipients will have an environment which allows HTML emails to be read, so text format is normally used. To change to text format, use the "Unformatted text" link at the top of the main body entry field.
(4) Enter the main text of your email in the main body entry field. (5) Once you have entered your message, click the "Send" button to send your email.
Once everything has been entered, click "Send". This will send the email to every recipient in the "To", "Cc", and "Bcc" fields.
1 Short for "Carbon copy". Use this when you want to let the recipients in the "To" area to know that the email has been sent to the other people as well. 2 Short for "Blind carbon copy". This works in the same way as "Cc" but the recipients listed in "Bcc" will not be visible to those getting this email. 3 You can change the letter size and color, use bullet points, and add emoji.
To compose an email,
click "Create"
5555
33334444
1111
2222
5
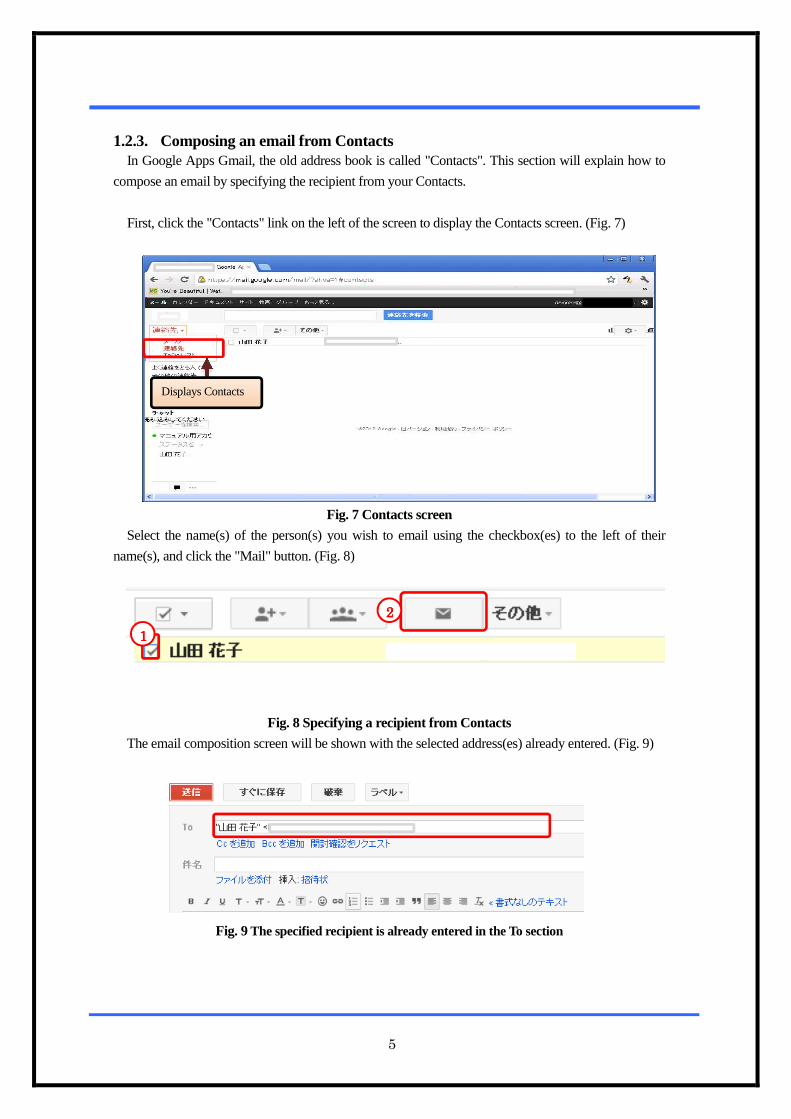
1.2.3. Composing an email from Contacts In Google Apps Gmail, the old address book is called "Contacts". This section will explain how to
compose an email by specifying the recipient from your Contacts.
First, click the "Contacts" link on the left of the screen to display the Contacts screen. (Fig. 7)
Fig. 7 Contacts screen
Select the name(s) of the person(s) you wish to email using the checkbox(es) to the left of their
name(s), and click the "Mail" button. (Fig. 8)
Fig. 8 Specifying a recipient from Contacts
The email composition screen will be shown with the selected address(es) already entered. (Fig. 9)
Fig. 9 The specified recipient is already entered in the To section
Displays Contacts
2222
1111

6
1.2.4. Replying to emails To reply to an email, either click the "Reply" button at the top right of the email body or the "Reply"
link below the email. This will display the box to enter the reply into below the main body, as in Fig.
10.
Fig. 10 Replying to an email
(1) Enter your response.
Enter your response message in the reply field where the original email has been automatically
reprinted.
(2) Once you have entered your message, click the "Send" button to send your email.
If you want to reply to multiple people, you can add them in the "To" field in Fig. 10 by separating
them with commas.
Simply replying by editing the main message in this way will automatically attach "Re:" to the front
of the original message subject. To change the subject, click the "Edit subject" link between the "To"
field and the response entry field to display the text box for changing the subject.
2222
1111

7
1.2.5. Forwarding emails When you want to forward an email to someone else, click the "▼" mark to the right of "Reply" at the top right of the email body, and select "Forward" from the pulldown menu, or click the "Forward" link at the bottom of the email body.4 (Fig. 11)
Fig. 11 Email forwarding button and link This will display the address of the forwarding recipient, the subject, and the entry box for the forwarded message below the email main body, as in Fig. 12.
Fig. 12 Email forwarding text entry box (1) Enter the email address of the person to whom you wish to forward the email in the "To" section. The subject of the forwarded email will automatically have "Fwd:" appended in front of the original subject. (2) Enter any message you wish to include in addition to the forwarded contents. The contents of the original email will be included beneath the "Forwarded message" in the forwarding message entry field. (3) Click the "Send" button.
This will send the email to the email address(es) in the "To" field.
4 When the email is part of a thread, you can click "Forward all" to forward the entire thread. (Displayed on the right of the main body)
1111
2222
Select "Forward" from
the pulldown menu, or
click the "Forward" link
below the main body.
1111
2222
3333

8
1.2.6. Saving an email draft You can save an email while still writing it if you think you will want to edit it or send it later. To
save your email, click the "Save Now" button at the bottom of the Compose Mail screen.
The saved email can be shown at any time by just clicking "Drafts" on the left of the screen.
Clicking "Drafts" will display the list of draft emails as shown in Fig. 13.
Fig. 13 List of drafts
Clicking the email you wish to reopen for editing from the list of drafts will display the Compose
Mail screen for that email. Click "Send" at the bottom left of the editing screen to send the email once
you have edited it. Once it has been sent, it will be removed from "Drafts".
Note that in Google Apps Gmail, emails are automatically saved every few minutes in "Drafts"
without having to click the "Save Now" button. Therefore if you close the window by mistake, the
email you were working on may still be left in the "Drafts" section.
1.2.7. Attaching files5 Sometimes you might want to send a file to the recipient when sending an email. In this case, click "Attach File" at the bottom of the Compose Mail screen. This will open the dialog box for selecting your file, so you can attach it once you decide which file you want to send. In addition, you can drag and drop files to the Compose Mail screen to attach them as well. In general, you can attach any sort of file format you like, but as an anti-virus measure, you cannot attach executable files (with extensions like ".exe") which might contain dangerous executable codes. In addition, executable files will be checked even when compressed into zip or similar files, so they cannot be attached then either. Note that the upper limit to the size of emails you can send is 25 MB, including all attachments. Make sure you do not try to exceed this when creating an email to which files will be attached.
5 Refer to the following link for details on attaching files. http://mail.google.com/support/bin/topic.py?hl=jp&topic=12834
Displaying emails saved in
"Drafts"

9
1.2.8. Automatically forwarding emails You can forward emails you receive to a separate email address.
Clicking the "Forwarding and POP/IMAP" tab will display the Forwarding and POP/IMAP screen as
shown in Fig. 14.
Fig. 14 Forwarding and POP/IMAP screen
Click "Add a forwarding address" in the "Forwarding:" section.
Clicking "Add a forwarding address" in Fig. 14 will display the Add Forwarding Address screen as
shown in Fig. 15. Enter any forwarding address you like, and click "Next".
Fig. 15 Add Forwarding Address screen
Clicking "Next" in Fig. 15 will display the confirmation screen for the forwarding address as shown in
Fig. 16, so click "OK".
11112222
1111
2222

10
Fig. 16 Add Forwarding Address confirmation screen
When the confirmation code arrives6 at the email forwarding address you specified in Fig. 17, enter
the code in accordance with the instructions and click the "Confirm" button.
Fig. 17 Forwarding and POP/IMAP screen
Once you have entered your confirmation code, set the handling of emails following forwarding and
click the "Save changes" button.
Fig. 18 Forwarding and POP/IMAP screen
You can select how emails will be handled after forwarding from the following. - keep Google Apps Gmail's copy in the Inbox - mark Google Apps Gmail's copy as read - archive Google Apps Gmail's copy - Delete Google Apps Gmail's copy ※ Selecting "Archive" will automatically move them to "All Mails" or to the Bin when "Delete" is
selected.
6 If the forwarding address is in the same domain, a sub-domain of the same domain, or a Google Apps domain alias, you will not need to enter the confirmation code. No confirmation code email will be sent, either.
1111 2222
1111
2222
11
1.3. Organizing emails 1.3.1. Classifying emails by labels Normal email client software has a system for organizing received emails by folders. Google Apps
Gmail uses "Labels" instead of folders. This classifies by marking emails or threads. For example, you
could attach the "Circle" label to all emails related to circles, or "Lectures" to all emails related to
lectures, and these labels would be shown to the left to the screen in the "Labels" column, making it
easy to see and sort them.
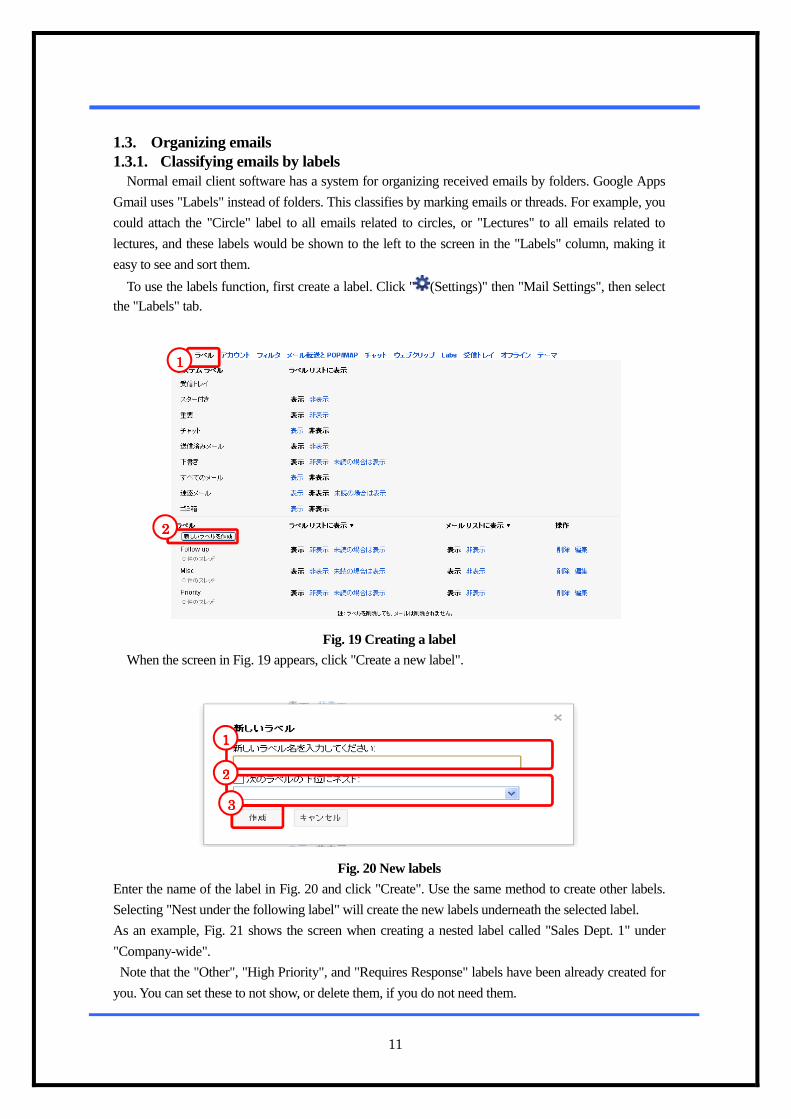
To use the labels function, first create a label. Click " (Settings)" then "Mail Settings", then select the "Labels" tab.
Fig. 19 Creating a label
When the screen in Fig. 19 appears, click "Create a new label".
Fig. 20 New labels
Enter the name of the label in Fig. 20 and click "Create". Use the same method to create other labels.
Selecting "Nest under the following label" will create the new labels underneath the selected label.
As an example, Fig. 21 shows the screen when creating a nested label called "Sales Dept. 1" under
"Company-wide".
Note that the "Other", "High Priority", and "Requires Response" labels have been already created for
you. You can set these to not show, or delete them, if you do not need them.
1111
2222
3333
2222
1111

12
Fig. 21 Screen after label creation
To attach a label to emails you have written, first click "Inbox" at the top left of the screen to display
the list of emails. Select the email(s) you wish to attach a label to by inserting checks in the checkboxes.
Fig. 22 shows the top two rows selected.
Fig. 22 Selecting emails to label
Once you have selected the emails, click the " (Labels)" pulldown at the top of the email list. This will open the selected list, as in Fig. 23, and allow you to check that the label you
created in Fig. 21 is displayed.
Fig. 23 Selecting a label
Select from the list the label you want to attach to the selected email(s) You can specify multiple
labels. Once you have decided which label to specify, click "Apply" at the bottom of the pulldown
menu. The list of emails in the Inbox will be updated, and the label names will be shown to the left of
the subject. (Fig. 24)
1111
2222
2222
1111

13
Fig. 24 Results of adding labels
After labels have been added to emails, the label names will be listed on the left of the screen, so you
can click these to see them. Only those emails with the label you clicked will be shown. (Fig. 25)
Fig. 25 Classifying emails by labels
1.3.2. Starring emails You can add stars to important emails or ones that you need to respond to later to set them apart.
Directly click the star mark to the right of the checkbox in the email list screen to star an email. If
you want to star multiple emails at once, select the ones you want to star in the Inbox or other list of
emails by using the checkboxes, then click the "More Actions" pulldown menu. Then select "Add star"
from the displayed menu.
Fig. 26 shows an example of a starred email.
Fig. 26Adding stars
In this way, adding stars to emails makes them stand out from other emails, and you can display
only starred emails by clicking "Starred" on the left of the screen.
Only emails with the "Sales Dept. 1"
label are shown.
1111
2222
3333
4444
Starred email Only shows
starred emails

14
1.3.3. Archiving emails An archive function is provided as a way to organize the Inbox. By archiving specific emails, you
can remove them from the Inbox. (This does not delete them.) Archived emails are saved in "All Mail"
and can be searched for.
To archive an email, select the email you wish to archive from the Inbox screen, and click the "
(Archive)" button.
Fig. 27 Archiving mail (selection)
Fig. 28 Archiving mail (after archiving)
Fig. 29 Archiving mail (all emails selected)
To return archived emails to the Inbox, select the target email or thread and click the "Move to
Inbox" button.
1111
2222
All emails can be
checked

15
1.3.4. Deleting emails You can delete emails you no longer need. Deleted emails are moved to the Bin, and also removed
from normal searches, but when they meet the search results, that fact is also shown in the search
results. Emails moved to the Bin will be automatically deleted after 30 days, but you can still view
emails or return them to the Inbox through accessing the Bin before those 30 days are up.
Deleting emails is done by adding check marks to the emails (threads) you wish to delete in the
Inbox screen, and clicking the "Delete" button. When selecting a thread, note that all emails included
in that thread will be deleted. Deleted emails will be moved to the Bin, so you can check that they
have been deleted by clicking "Bin" on the left of the screen.
If you want to delete individual emails rather than threads, display the email you wish to delete, then
select "Delete this Mail" from the pulldown menu to the right of the "Reply" button at the top right of
the email.
Fig. 30 Deleting emails, Bin
To completely delete an email, click "Bin" and then click "Empty the Bin Now" at the top of the list.
Clicking "OK" when the confirmation dialogue appears will delete all emails in the Bin completely.
To delete individual emails, add check marks to the emails you wish to delete, then click the "Delete
Completely" button. No confirmation dialogue will be shown in this case.

16
1.3.5. Automatically sort emails using filters By using the filter function, you can automatically label or star emails based on certain criteria, and
delete or archive them. Email filters can be set from screen displayed by clicking " (Settings)", then
"Mail Settings" at the top of the screen, then the "Filters" tab on the displayed screen. (Fig. 31)
Fig. 31 Filters setting screen
Clicking "Create a New Filter" in Fig. 31 will display the "Create a filter" screen as shown in Fig.
32.
Fig. 32 Create a filter screen
In the screen in Fig. 32, enter the criteria (filters) for the emails you want to be sorted automatically.
For example, is you want all emails from "[email protected]" to be starred, you would enter
"[email protected]" in the "From" section. Or, if you want to attach a specific label to emails that
contain the phrase "Sales Dept. 1" in their subject, you would enter "Sales Dept. 1" in the "Subject"
section. You can also create filters that use multiple criteria.
Clicking "Test Search" in the middle of the screen will display all emails that match the filter criteria
from emails you have already received. This allows you to check that the filter criteria you set
yourself are working.
Entering filter criteria and clicking "Next Step" will display the "Create action" screen as shown in
Fig. 33.
11112222
3333
4444
2222
1111

17
Fig. 33 Selecting the action for the filtered email
You can choose from the following actions.
- Skip the Inbox (Archive it)
- Mark as read
- Star it
- Apply the label:
- Forward it to:
- Delete it
- Do not treat as spam
- Always mark as important
- Do not mark as important
Select the action you wish to be taken from these choices. You can also set multiple actions for a
single filter. Finally, clicking the "Create Filter" button will apply this filter to emails you receive, and
allow them to be automatically sorted.
Checking "Also apply filter to XX conversations below" when you create the filter will apply it to
existing emails that match the criteria.
2222
1111

18
(Setting Example) How to forward emails using filters
This will explain how to forward emails that arrive at Google Apps Gmail addresses by using the
email filter function.
First, click "Create a New Filter" in the same way as in Fig. 31 to move to the "Create a filter"
screen.
Here, enter an asterisk (half-byte) in the "From:" section of the filter criteria. (Fig. 34) By entering
this, you can target all senders.
Fig. 34 Targeting all senders
Click "Next Step" to move to the screen for selecting the action to take for the filtered emails.
Here, select "Forward it to" from the actions available and specify the forwarding email address.7
(Fig. 35)
* To add a forwarding address, refer to the steps in "1.2.5. Forwarding emails".
Fig. 35 Entering the forwarding email address
Clicking "Create Filter" after entering the address will mean that all new emails will be forwarded to
the address you have specified.8
7 To make "Forward it to" valid, you will need to check the forwarding email address in same way as for "1.2.8.
Automatically forwarding emails" earlier.
8 If you want to target emails you have already received for forwarding as well, select the check box in "Also apply filter to XX conversations below".
1111
2222
1111
2222

19
1.4. Other 1.4.1. Searching emails All emails you have received (with the exception of those in the Bin) can be searched by subject and
contents. Enter the character string you wish to search for in the text box to the left of the "
(Search Mail)" button at the top of the screen (Fig. 36) and click the " (Search Mail)" button or
"Search Mail" pulled-down location.
Fig. 36 Searching emails
This will find and display the emails that contain the character string in the text box.
To search with more detailed conditions, click the " (Show search options)" pulldown to the right
of the text box.
Fig. 37 Search options
You can specify the following conditions in Search Options.
- From: The person who sent the email
- To: The person who got the email
- Subject: The subject of the email
- Has the words: Any key words you like
- Doesn't have: Key words to exclude from the search
- Has attachment: Only search emails with attachments
2222
1111
1111
2222

20
1.4.2. Printing emails There is a special Google Apps Gmail screen to use for printing emails cleanly. To print an email,
click the " (Other)" pulldown to the right of the " (Reply)" at the top right of the email main
body screen. A menu will open underneath, so click "Print". (Fig. 38)
This will open the printing screen in another screen, and the printing dialogue box.
Fig. 38 Printing emails
You can also print all emails in one thread at the same time. Displaying the thread and clicking " (Print All)" at the right of the screen will open the printing screen in another screen and display the
printing dialogue box.
1.4.3. Spam Google Apps Gmail automatically determines if an incoming email is spam or not, and if it
determines it is spam, will sort it into the Spam folder on the left of the screen. Clicking the Spam
folder will display the list of emails Gmail has determined are spam.
Rarely, a genuine email will be wrongly judged as spam and be sorted into the Spam folder.
Therefore, from time to time you should click the Spam folder and check that there are no genuine
emails in there.
Note that emails sorted into the Spam folder will be automatically deleted after thirty days.
1111
2222

21
1.4.4. Importance markers Gmail displays email types with colored arrows. The yellow mark " " means "important emails".
This mark is not applied to emails that are not classified as important in Gmail.
Clicking "Important" to the left of the screen will allow you to display only emails with this
importance marker .
If a specific type of email is not sorted correctly, selecting and correcting it using "Mark as
important" or "Do not mark as important" will allow Gmail to learn which emails are important. (Fig.
39)
Fig. 39 Importance markers
You can set whether or not to display this importance marker. From " (Settings)" then "Mail
Settings", click the "Inbox" tab. This will change to the screen in Fig. 40 Setting importance markers,
so select whether or not display the importance marker in the "Importance Marker:" section, and click
the "Save changes".
Fig. 40 Setting importance markers
1111 2222
3333 Important emails
Only display important
emails
1111
2222
22
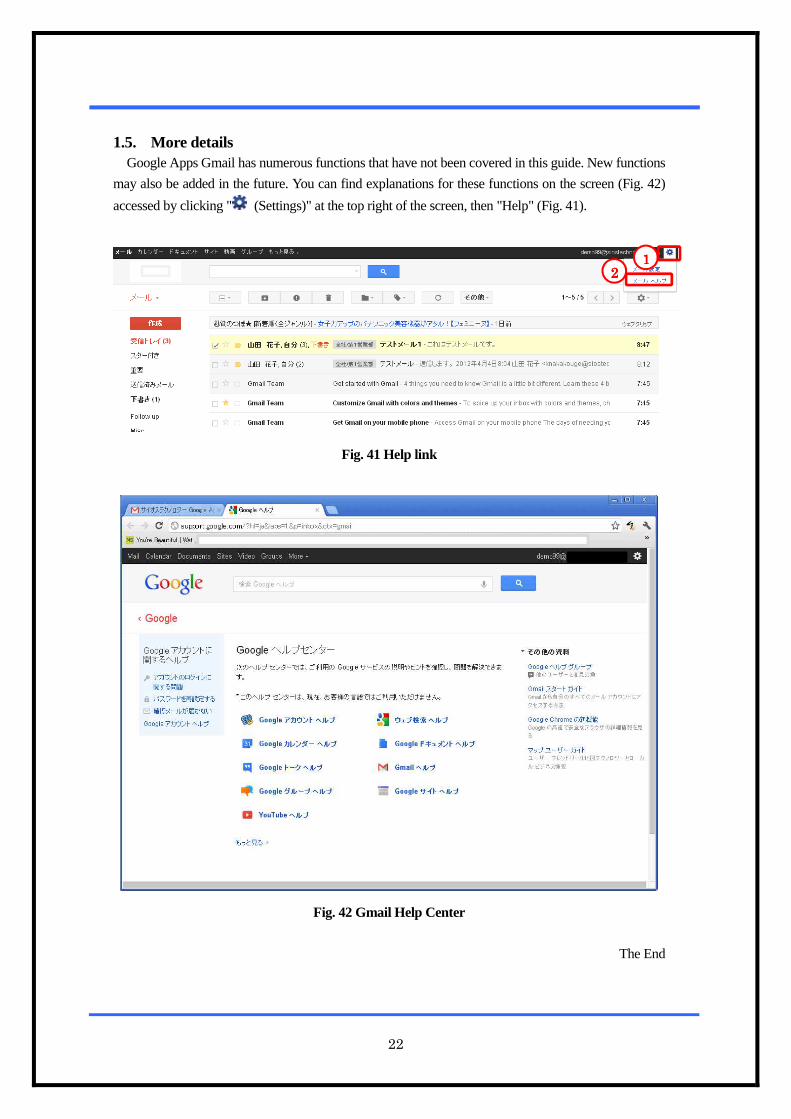
1.5. More details Google Apps Gmail has numerous functions that have not been covered in this guide. New functions
may also be added in the future. You can find explanations for these functions on the screen (Fig. 42)
accessed by clicking " (Settings)" at the top right of the screen, then "Help" (Fig. 41).
Fig. 41 Help link
Fig. 42 Gmail Help Center
The End
22221111