ba tx plus e - home - röhren- und pumpenwerk … · manual for bauer rainstar ii introduction...
TRANSCRIPT
OPERATING MANUAL
for
Rainstar
Series TX Plus

Manual for BAUER Rainstar II
Introduction
Thank you very much for purchasing a BAUER Rainstar!
We have pleasure to present to you the BAUER Rainstar, an irrigation machine that features state-of-art technology and top quality. This manual describes how to assemble, operate and service your BAUER Rainstar. For reasons of clearness and because of the many possibilities this manual does not cover every information down into detail. In particular, it cannot possibly deal with every conceivable aspect of operation and maintenance. If you need further information or if you are faced with any special problem for which this manual does not offer sufficient details, please do not hesitate to contact BAUER company at Kowaldstraße 2, A-8570 Voitsberg in Austria for the information you need. We should also like to emphasise that the contents of this operating manual neither form part of or alter in any way, previous or existing agreements, promises, or legal relationships. Any commitment on the part of BAUER is based solely on the respective purchase contract, which also contains the complete and only valid warranty arrangement. The contents of the present operating manual neither extend nor limit said contractual terms of warranty. All information contained in the present manual is based on the latest product details available at the time of printing. BAUER company reserves the right to change without notice, without assuming any liability! BAUER Rainstar is designed for safe and dependable performance provided it is operated according to the present instruction manual. Therefore, in spite of the simplicity of the Rainstar, we request that you read this manual carefully before putting your BAUER Rainstar into operation! All instructions given for handling, operating and servicing the machine must be strictly observed. On condition that these instructions are followed your BAUER Rainstar will operate trouble-free to your full satisfaction for many years! Non-observance of these instructions may cause personal injury or damage the equipment!
Please make this manual available to your staff. You are kindly requested to state Rainstar type and serial number in all inquiries, correspondence, warranty problems or parts orders. These details are specified on the nameplate.
We wish you success and hope you will enjoy working with your BAUER Rainstar!
This operating manual is considered an integral part of the Rainstar. Suppliers of new and used Rainstar machines are advised to put down in writing that this manual was handed over together with the device.
Manual for BAUER Rainstar III
Product details
Type designation: Rainstar
Type number: Series TX Plus
Serial number1:
Dealer: Name:
Address:
Tel./Fax:
Date of shipment:
Manufacturer: Röhren- und Pumpenwerk BAUER Ges.m.b.H. Kowaldstr. 2 A - 8570 Voitsberg Tel.: +43 / 3142 / 200 - 0 Fax: +43 / 3142 / 23 0 95
Owner or operator: Name:
Address:
Tel. / Fax: Note: Please make a note of the type and serial number of your Rainstar and accessories. Be sure to specify these details every time you contact your dealer. Printing date / revised: January 1999 / 00
1In all warranty claims and correspondence relating to this machine it is essential to specify the full serial number group including all letters. This applies to both the machine and the components concerned. We cannot emphasise this point often enough.

Manual for BAUER Rainstar IV
General Safety Instructions Symbols and terms
The CE symbol that has to be affixed on the machine by the manufacturer outwardly demonstrates compliance of the machine with the directives for machines and other relevant EU directives.
This “Warning” symbol refers to important safety instructions in this manual.
Whenever you see this symbol be aware of possible injury hazards. Read the note following the symbol very carefully and inform the other operators accordingly.
Non-observance of this instruction may cause damage to or destroy the
machine or individual components. It is very important to observe this note or condition!
Qualified operators are persons who on account of their training, experience and instruction as well as their knowledge of relevant standards, rules, precautions to be taken for accident prevention, and prevailing operating conditions, have been authorised by the person in charge of plant safety to perform the respective tasks required, and in doing so are able to recognise and avoid potential hazards. Among other things, knowledge of first-aid procedures is also required.
Product liability As defined by the product liability law every farmer is also an entrepreneur! According to §9 PHG (Product Liability Law), liability for damage to corporeal things caused by defective products is expressly excluded. This exclusion of liability also applies to parts not manufactured by BAUER itself but purchased from external suppliers.
Duty to furnish information Even if the customer passes on the machine later-on he is obliged to hand the operating manual on to the new receiver, too. The receiver of the machine must be instructed with reference to the mentioned regulations.
Intended use • BAUER Rainstar is built exclusively for normal agricultural applications (intended use). • Any use beyond this normal use is considered non-conforming. Manufacturer is not liable for damage
resulting from such non-conforming use, the sole liability for damage from non-conforming use is with the user.
• Intended use also includes compliance with the manufacturer’s operating, maintenance and service instructions.
• The BAUER Rainstar may be used and operated only by persons who are familiar with the device and aware of the hazards involved.
• All rules for accident prevention as well as any other generally valid specifications and regulations relating to safety, work medicine and traffic law must be strictly observed.
• Unauthorised modifications on the machine release the manufacturer from liability for damage resulting therefrom.
WARNING!
CAUTION
NOTE

Manual for BAUER Rainstar V
Index 1 GENERAL INSTRUCTIONS FOR SAFETY AND ACCIDENT PREVENTION ..............................................1
2 GENERAL........................................................................................................................................................3
3 SAFETY PRECAUTIONS FOR RAINSTAR TX PLUS ...................................................................................4
4 DESCRIPTION.................................................................................................................................................5
65 TX PLUS WITH GEARBOX G2 ........................................................................................7
5 PUTTING INTO OPERATION..........................................................................................................................7
5.1 STEPS TO BE PERFORMED ONCE OR AS REQUIRED ..............................................................................7
5.2 OPERATING MODE I: PE-PIPE PULL-OFF ..................................................................................................8
5.2.1 MACHINE TRANSPORT TO SET-UP POSITION .......................................................................................8
5.2.2 LOWERING THE CART.................................................................................................................................9
5.2.3 PE-PIPE PULL-OFF ......................................................................................................................................11
5.2.4 SPEED CONTROL WITH ECOSTAR 4000 S .............................................................................................13
5.3.4 SPEED ADJUSTMENT with mechanical regulation ( Optional ) .................................................................13
5.3 OPERATING MODE II: LAYING DOWN THE PE-PIPE............................................................................16
5.3.1 FUNCTIONAL DESCRIPTION OF THE MAIN COMPONETNS ............................................................17
5.3.1.1 MACHINE DRIVE - FULL-FLOW TURBINE ..........................................................................................17
6 SPEED CONTROL WITH ECOSTAR 4000 S ...............................................................................................20
7.1 TACHOMETER ( OPTIONAL ) ........................................................................................................................36
8 EMERGENCY SHUT-OFF.............................................................................................................................38
9 WINDING MECHANISM ................................................................................................................................39
10 SHUT-OFF AND SAFETY EQUIPMENT...................................................................................................39
11 CART..........................................................................................................................................................40
12 OVERPRESSURE SHUT-OFF VALVE (OPTIONAL ON ECOSTAR STAR 4000 S)..............................40
13 OVERPRESSURE SHUT-OFF VALVE (OPTIONAL WITH MECHANICAL SPEED CONTROL) ..........41
14 LOW-PRESSURE OR UNDERPRESSURE SHUT-OFF VALVE (OPTIONAL WITH ECOSTAR 4000 S) ........................................................................................42
15 LOW-PRESSURE OR UNDERPRESSURE SHUT-OFF VALVE (OPTIONAL WITH MECHANICAL SPEED CONTROL)...........................................................................42
16 WINTERIZATION – DRAINING .................................................................................................................43
17 SETTING INSTRUCTIONS FOR RAINSTAR TX WITH GEARBOX G2..................................................44
17.1 SETTING THE BAND BRAKE (1) ....................................................................................................................44
17.2 SETTING THE THREADED ROD (4) ..............................................................................................................44
17.3 SETTING THE SHIFTING GATE (8)...............................................................................................................45
17.4 SETTING 1st GEAR SHUT-OFF........................................................................................................................46
17.5 SETTING 2nd GEAR SHUT-OFF.......................................................................................................................46
17.6 SHUT-OFF FRAME (14) ADJUSTMENT ........................................................................................................47
17.7 SHUT-OFF ROD ADJUSTMENT (20) ..............................................................................................................47
17.8 TESTING 2nd GEAR SHUT-OFF.......................................................................................................................48
Manual for BAUER Rainstar VI
18 WINDING MECHANISM - STARTING POSITION................................................................................... 49

Manual for BAUER Rainstar VII
90 TX PLUS WITH G4 GEARBOX......................................................................................50
19 PUTTING INTO OPERATION....................................................................................................................50
19.1 OPERATING MODE I: PE-PIPE PULL-OFF ................................................................................................50
19.2 LOWERING THE CART....................................................................................................................................50
19.3 POSITIONS OF THE SHUT-OFF LEVER.......................................................................................................50
19.4 PE-PIPE PULL-OFF............................................................................................................................................50
19.4.1 SPEED ADJUSTMENT................................................................................................................................53
19.5 OPERATING MODE II: LAYING DOWN THE PE-PIPE............................................................................53
19.5.1 FUNCTIONAL DESCRIPTION OF THE MAIN COMPONENTS .............................................................53
19.5.2 PTO REWIND:...............................................................................................................................................56
19.6 SPEED CONTROL ..............................................................................................................................................57
19.7 TACHOMETER...................................................................................................................................................57
19.8 EMERGENCY SHUT-OFF.................................................................................................................................57
20 SETTING INSTRUCTIONS FOR RAINSTAR TX WITH G4 GEARBOX...................................................59
20.1 SETTING THE SHIFTING GATE ....................................................................................................................60
20.2 SETTING THE BAND BRAKE..........................................................................................................................60
20.3 SETTING THE THREADED ROD....................................................................................................................61
20.4 TESTING THE BAND BRAKE for release of the brake band........................................................................61
20.5 SETTING THE GEARBOX SHUT-OFF...........................................................................................................62
20.6 TESTING THE SHUT-OFF................................................................................................................................63
21 SERVICE AND MAINTENANCE ...............................................................................................................63
22 TROUBLESHOOTING ...............................................................................................................................64
23 CONFORMITY CERTIFICATE...................................................................................................................69


Manual for BAUER Rainstar 1
1 GENERAL INSTRUCTIONS FOR SAFETY AND ACCIDENT PREVENTION
CHECK THE OPERATIONAL SAFETY OF THE MACHINE BEFORE EVERY START-UP. 1. In addition to the instructions contained in this manual, all specifications generally valid for safety and
accident prevention must be observed! 2. The warning and instruction signs affixed to the machine give very important instructions for safe operation.
Observing them serves your own personal safety! 3. Never put the machine into operation unless all guards and safety devices are completely mounted and in
their proper working position! 4. Acquaint yourself with all equipment components and controls as well as their respective functions before
starting to work. It is too late when the device is already running! 5. The operator’s clothes should fit tightly. Avoid wearing loose clothes! 6. When handling slurry always keep in mind that the gasses produced are highly toxic and extremely
explosive in combination with oxygen. Therefore, open fires, light tests, sparking and smoking are strictly forbidden!
7. Utmost care is required with regard to gasses in slurry and dung channels at open valves to the preliminary pit, before the main pit, or at cross channels. The same applies to mixing and withdrawal points when mixers or pumps are running!
8. When handling slurry always ensure sufficient ventilation! 9. Keep the machine clean to avoid fire hazards! Power take-off (applies only to PTO driven machines) 1. It is not allowed to use any other types of PTO drive shafts except the ones prescribed by the manufacturer! 2. Drive-shaft guard tube and guard cone as well as the PTO guard – also on the machine side - must be
mounted and in good working order! 3. When using a PTO drive shaft always observe the specified overlap in transport and working position! 4. Never connect or disconnect the PTO drive shaft unless the PTO is stopped, the engine turned off, and the
ignition key pulled out! 5. Make sure the drive shaft is always connected and secured properly! 6. Attach the safety chain to keep the drive shaft guard from rotating with the shaft! 7. Before you turn on the PTO make sure that the selected tractor PTO speed corresponds with the permissible
implement speed! 8. Before starting the PTO make sure that nobody is standing in the danger zone of the machine! 9. Never turn on the PTO when the engine is turned off or during a transport drive! 10. When working with the PTO nobody is allowed near the turning PTO or drive shaft! 11. Warning! The PTO shaft may continue turning due to its centrifugal mass after the PTO has been turned off!
Keep clear of the machine during this time and do not touch until the PTO shaft stands absolutely still! 12. For cleaning, greasing, or adjusting the PTO driven implement or drive shaft, PTO and engine must be
switched off and the ignition key pulled out! 13. Place the disconnected drive shaft on the provided support! 14. When drive shaft has been removed put the guard on the PTO shaft! 15. If a defect occurs repair it immediately before starting to work with the machine! Hydraulic system 1. Hydraulic system is under high pressure! 2. When connecting hydraulic cylinders and motors, make sure the hydraulic hoses are connected as
specified! 3. Before coupling the hydraulic hoses with the tractor’s hydraulic system make sure that the entire hydraulic
system is pressureless both on the tractor and implement side ! 4. Inspect the hydraulic lines at regular intervals and replace them immediately in case of defects or ageing.
Replaced hoses must comply with the technical specifications of the implement manufacturer! 5. When looking for leaks use only suitable equipment because of the injury hazard involved! 6. Liquids emerging under high pressure (hydraulic oil) may penetrate the skin and cause serious injuries! An
injured person must see a doctor immediately! Danger of infection! 7. Before working on the hydraulic system the machine must be lowered, the system depressurised and the
engine turned off!

Manual for BAUER Rainstar 2
Electric-driven implements 1. All work beyond normal maintenance of the implement should be performed only by a professional
electrician! 2. Defective or broken plugs and sockets must be replaced by a professional electrician! 3. Never pull a plug out of the socket at the flexible electric cord! 4. Extension cables for power supply should be used only temporarily! Never use such lines permanently as a
substitute for the required fixed installations! 5. Flexible lines laid across traffic areas on the farm must have at least 5 m ground clearance! 6. Always turn off the power supply before you do any work on the machine! 7. Check all electric lines for visible defects before you put the machine into operation! Replace defective cables and do not
start the machine before that! 8. Never use electric-driven implements in damp situations or locations exposed to fire hazard unless they are adequately
protected against moisture and dust! 9. Covering electric motors may cause heat concentration with high temperatures which could destroy the operating
equipment and cause fires! Hand-operated devices (valves) 1. Because of the slurry gasses produced in the lines, no slurry is allowed to remain in closed pipelines –
bursting hazard! 2. Lay the pipelines with sufficient inclination and make sure that the selected closing order of valves allows all
lines to be drained completely! 3. Protect the valves against unauthorised handling! 4. If a valve gets jammed do not apply force! Use only the operating levers supplied with the implement! 5. Observe the permissible maximum operating pressure of valves and pipelines when pumps are operated! 6. Service only when the tanks are empty! Maintenance 1. Never perform any maintenance, service or cleaning work or fault elimination steps unless the drive is
turned off and the engine is standing still! 2. Check proper fit of all nuts and bolts regularly and tighten them, if necessary. 3. If maintenance work is required on the lifted machine always secure it by means of appropriate supports! 4. When exchanging tools with cutting edges always use proper tools and wear safe protective gloves. 5. Dispose of oil, grease and filters according to local laws and regulations! 6. Always turn off power before working on the electric system! 7. Before electric welding on the tractor and mounted machines the generator and battery cables must be
disconnected! 8. Spare parts must meet manufacturer’s minimum technical specifications! This is the case for instance with
original spare parts for instance!

Manual for BAUER Rainstar 3
2 GENERAL BAUER products are designed and manufactured carefully, subject to a system of continuous quality control. BAUER Rainstar models 65/75/85/90 TX Plus are turbine-driven machines designed for fully mechanised and labour-saving irrigation. Individual pipe sets are no longer laid down by hand; system set-up, repositioning, and operation are all done with the tractor only. BAUER Rainstar is a universal machine capable of covering fields of varying lengths and widths. There is no need for supervision while the system is operating. Strict observance of all operating and service instructions in this manual is the basic prerequisite for many years of trouble-free operation. Therefore please make sure that all operators on your staff are familiar with the instructions given in this manual. The model number as well as the serial number (Vehicle identification number) are stamped into the nameplate. In addition, the serial number is stamped into the frame of the undercarriage. Please state these data in all your inquiries, correspondence, warranty matters and parts orders. We warrant for this Rainstar according to our General Terms of Sale.

Manual for BAUER Rainstar 4
3 SAFETY PRECAUTIONS FOR Rainstar TX PLUS 1. Read this manual before you put the system into operation for the first time. 2. Never handle the PE-pipe near the device or the device itself during pull-off or retraction. 3. During PE-pipe rewind with the tractor’s PTO or during pipe pull-off, always make sure that the gear
shift lever is in the proper position. Moreover, the maximum permissible speed must not be exceeded.
Danger by improper handling!
4. Never service or set any part of the system while it is operating. 5. Keep clear of all moving parts. 6. Never expose any moving parts by removing protective elements. 7. Keep a safe distance from the sprinkler during operation. 8. Be careful in case of high connecting pressure! 9. Make sure that the sprinkler’s water jet does not hit public roads. 10. The Rainstar is licensed for transport in agricultural operation only.
For transportation on public roads all applicable traffic requirements must be strictly adhered to.
For safety reasons it is not allowed to transport the Rainstar by pulling it with a fork-type drawbar (OPTIONAL) and the toolbar!
11. When loading the machine on a trailer note that the water remaining in the pipe shifts the system’s centre of
gravity upward. 12. When driving in curves with the Rainstar loaded on a trailer the permissible maximum driving speed is
considerably reduced dependent on the position of the Rainstar’s centre of gravity! 13. Always ensure that the locks and stops are secured according to the machine’s general conditions for
transport. 14. Before starting to irrigate near electric power lines you should contact your local power supply company
regarding safe distances that have to be allowed. 15. Maximum permissible speed: 10 km/h
WARNING!
WARNING!

Manual for BAUER Rainstar 5
4 DESCRIPTION The Rainstar is a universal irrigation machine for varying lengths and widths of fields and best suited for irrigating seedbed and garden crops, park areas and horticultural plantations as well as any kind of grassland. The main components of the Rainstar are a two-wheel undercarriage on which is mounted the turntable swivelling through 270°, and the reel with the special PE-pipe, the multifunctional compact gearbox with TX20 turbine, and the high-rise cart that is ideal particularly for high crops, with the BAUER wide-range gun. The material of the PE-pipe corresponds to the latest findings of the art. One end of the pipe connects to the reel drum and to the water supply through its axle. The other end of the pipe is coupled with the high-rise cart. The cart’s track width is infinitely adjustable (See Technical Data). The heart of the Rainstar is the TX 20 turbine. It is a full-flow turbine mounted in a flow-promoting position directly on the reel. This turbine is nearly insensitive to soiled water and offers maximum efficiency. The drive shaft is made of stainless steel. The regulating cam inside the turbine is coated with a wear-proof rubber lining. The lifetime lubricated drive shaft bearing is sealed by a maintenance-free mechanical seal. TX 20 turbine is designed for water flow rates from 13 to over 60 m³/h and features a wide control range. Impeller speeds range from 200 to 800 rpm. The cart retraction speed is infinitely variable. It is adjusted by means of the ECOSTAR 4000 S and can be read from the display. Depending on the available water flow and connecting pressure, it may vary between 8 and 150 m/h. The connecting pressure at the machine should not exceed 11 bar. Power is directly transmitted from the turbine to the change-speed gearbox and the chain drive onto the reel. A band brake prevents fast reverse rotation of the reel in the final shut-off position, when the PE-pipe is stretched. The band brake as well as the gear wheels in the oil-filled change-speed gearbox act like a brake and prevent the PE-pipe windings on the reel from loosening during pipe pull-off. For safety reasons the drive is fitted with an emergency stop and a reversing stop as well. With this emergency stop device the drive can be stopped immediately by hand.
Never remove the drive cover before you have turned off the water supply to the machine and slackened the stretched PE-pipe.
To slacken the stretched PE-pipe move the gear shift lever downward carefully (see proper procedure). A winding carriage moved by a helically grooved spindle ensures that the PE-pipe is wound up properly on all layers.
WARNING!

Manual for BAUER Rainstar 6
ECOSTAR 4000 S keeps the retraction speed constant on all layers independent of the pipe length still lying on the field. Mechanical control option: In order to ensure that the retraction speed remains constant on all layers independent of the length of PE-pipe still lying on the ground, RAINSTAR machines with this option are equipped with a special layering mechanism. This compensating mechanism is activated by the speed compensating bar of the shut-off frame that fits closely on the pipe on all layers and activates the regulating cam of the turbine through the regulating rod. At the end of the irrigation strip the cart is automatically lifted into the transport position. Thereby the automatic drive shut-off is activated by rods. After being lifted automatically the cart is locked in the transport position. If the machine is equipped with a shut-off flap (ECOSTAR) or a shut-off valve (mechanical speed regulation) the water supply to the machine is shut off simultaneously. After shut-off the Rainstar can be transported to its next setting-up position immediately. Then the PE-pipe can be pulled or laid down again, the water supply connected, and the machine is ready for the next run. When driving on public roads the reel must be turned into the driving direction and secured with the lock bolt. The PE-pipe must be fully wound up on the reel and the cart lifted and locked. The jack and both rear machine supports must be withdrawn to their uppermost position. On public roads the drawbar and coupling ring must be hitched to the tractor’s yoke and secured with the pin.. The maximum permissible driving speed of 10 km/h must be observed. For increased safety against overturning in curves we recommend to set the maximum possible track width. On principle, it is possible to transport the machine between hydrants in the field with the cart lifted on the side. In this configuration the driving speed must always be adapted to the existing conditions and should never exceed 5 km/h. You must also take into consideration that this type of transport requires a wider driving lane.

Manual for BAUER Rainstar 7
65 TX Plus – 90 TX Plus with gearbox G2
5 PUTTING INTO OPERATION Before and during the first start-up grease all bearings, chains and guide parts of the winding mechanism. Use normal ball bearing grease for all bearing assemblies with grease nipples, and a viscous and durable type of grease for chains, guide rods and joints. Tighten the wheel nuts before the first operation and check the tires for specified pressure (see Technical Data). Tighten also the connecting bolts, the connection of the turntable side member on the undercarriage, the ball race on the undercarriage, and the fastening of the hitch eye, according to the “Service and Maintenance“ table.
5.1 STEPS TO BE PERFORMED ONCE OR AS REQUIRED
Set the required track width on high-rise cart and Rainstar undercarriage, depending on the existing type of crop.
Place the appropriate number of balancing weights on the balancing pendulum of the cart. Two weights will do for nozzle diameters from 14 to 24 mm. For diameters larger than 24 mm two additional weights should be placed on the pendulum when the smallest track width setting is used.
Nozzle DIA Track 1500 14 - 24 mm 2 weights
from 25 mm 4 weights
If the asymmetric cart design is used, the cart pendulum must be loaded with two weights and the opposite cart wheel with two additional weights. Set the part circle on the wide-range sprinkler (approx. 220° for full strip width). Confer to separate sprinkler manual for detailed sprinkler instructions. Adjust the WINDGUN to prevailing wind conditions by adjustment of the trajectory angle.

Manual for BAUER Rainstar 8
5.2 OPERATING MODE I: PE-PIPE PULL-OFF
5.2.1 Machine transport to set-up position
During transport the reel should be turned into the driving direction and secured with the lock bolt. Cart, jack, and both rear support legs must be lifted or withdrawn. For lateral PE-pipe pull-off, set up the Rainstar on the headland at right angles to the selected irrigation strip and detach it from the tractor.
Adjust the undercarriage about level with the jack.
When you position the Rainstar make sure that the machine’s vertical axis of rotation is in the middle of the driving lane or centred between two crop rows.
For lateral pull-off remove the lock bolt, turn the reel into the direction of the driving lane and secure it again with the lock bolt.
Remove transport lock bolts from support legs.

Manual for BAUER Rainstar 9
Machine supports slide to the ground automatically.
Drive the supports into the ground with the detachable hand wheel ...
......... and secure the supports with lock bolts.
If your Rainstar 90 TX Plus is equipped with the „hydraulic machine supports“ option, couple both hydraulic hoses with the tractor’s hydraulic system and extend the supports.
The standard Rainstar equipment does not include a control unit (Optional). Therefore the tractor’s hydraulic system must be switched over accordingly after the hoses have been coupled. If this is not possible exchange the two hoses.
On very hard soil the machine supports must be lowered or extended into the holes dug into the ground for this purpose. Machine supports are equipped with a spike which penetrates the soil very easily with the „hydraulic supports“ option.
5.2.2 LOWERING THE CART
Disengage the mechanical locking of the cart in the operating position.
WARNING!
WARNING!

Manual for BAUER Rainstar 10
In doing so the operator’s position should be outside of the machine supports.
POSITIONS OF THE GEAR SHIFT LEVER
Push the gear shift lever downward carefully - the carts moves down slowly.
Slackening the PE-pipe
Gear stage I
PE-pipe pull-off PTO rewind
Gear stage II
Shut-off position Transport position
WARNING!

Manual for BAUER Rainstar 11
Move the gear-shift lever to the „PE-pipe pull-off“ position. A spring presses the lever up and locks it.
5.2.3 PE-PIPE PULL-OFF
Pick up the draw-out hook with the toolbar and start pulling the cart .
The standard wheel cart or the asymmetric wheel cart need not be hoisted (therefore 1 draw-out hook is sufficient). Pull-off speed: do not exceed 5 km/h!
Do not stop abruptly. Always slow down gradually at an intermediate stop in the field or at the end of the pull-off. Stop pulling off the pipe when the white marking line becomes visible on the reel.
If the PE-pipe has been exposed to the sun for a longer period or if its surface temperature rises above 35 °C for some other reason you must let water run through the pipe to cool it off before the unwinding or retraction procedure.
WARNING!
Manual for BAUER Rainstar 12
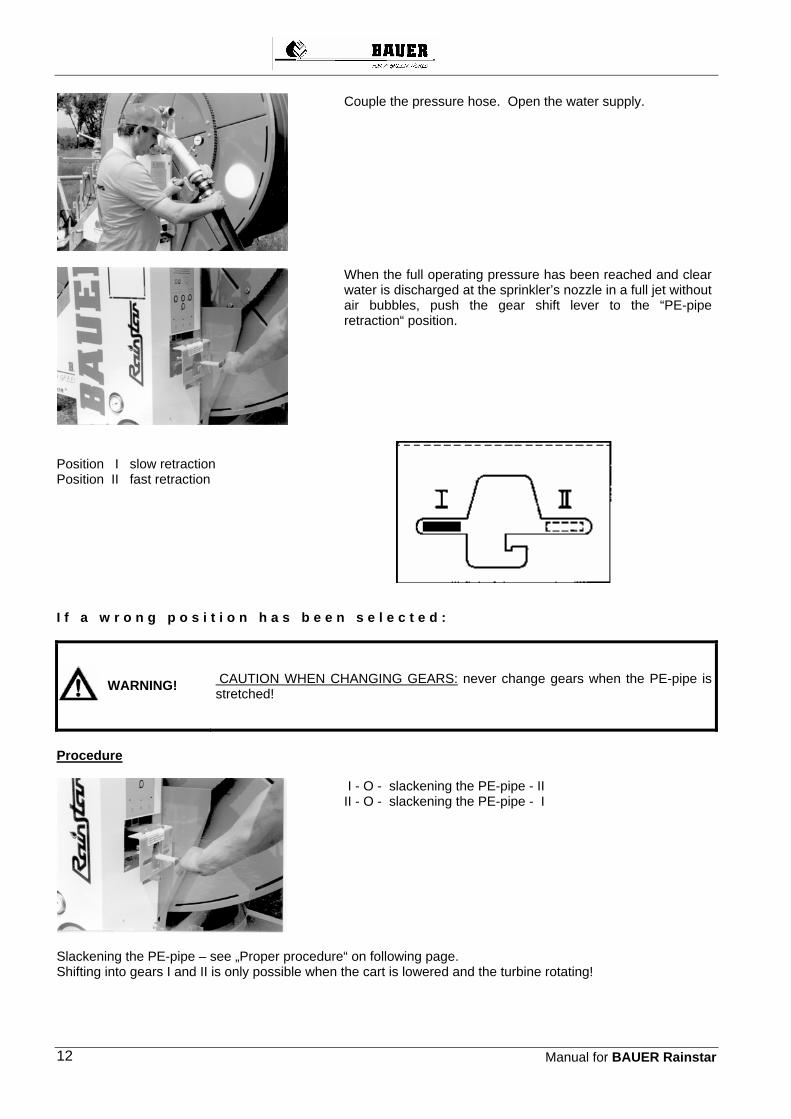
Couple the pressure hose. Open the water supply.
When the full operating pressure has been reached and clear water is discharged at the sprinkler’s nozzle in a full jet without air bubbles, push the gear shift lever to the “PE-pipe retraction“ position.
Position I slow retraction Position II fast retraction I f a w r o n g p o s i t i o n h a s b e e n s e l e c t e d :
CAUTION WHEN CHANGING GEARS: never change gears when the PE-pipe is stretched!
Procedure
I - O - slackening the PE-pipe - II II - O - slackening the PE-pipe - I
Slackening the PE-pipe – see „Proper procedure“ on following page. Shifting into gears I and II is only possible when the cart is lowered and the turbine rotating!
WARNING!

Manual for BAUER Rainstar 13
When the cart is lifted in the shut-off position the gear-shift lever is held in the 0 position and shifting is not allowed!
The reel starts pulling in the PE-pipe .
5.2.4 SPEED CONTROL WITH ECOSTAR 4000 S
Do not set the speed until half a PE-pipe winding has been wound up on the reel and the pipe is already stretched.
Set the required retraction speed with the arrow keys in the operating mode of ECOSTAR 4000 S. You can readjust the speed any time while the
machine is operating. See Retraction speed control with ECOSTAR
5.3.4 SPEED ADJUSTMENT with mechanical regulation ( Optional )
Do not set the speed until half a PE-pipe winding has been wound up on the reel and the pipe is already stretched.
Loosen the knurled nuts that secure the adjusting lever. Set the desired retraction speed with the adjusting lever – the speed is indicated on the tachometer (optional equipment). Afterwards secure the adjusting lever again with the knurled nuts.
CAUTION!
CAUTION!
CAUTION!

Manual for BAUER Rainstar 14
The drive has four speed ranges (see Functional Description on page 16).
Therefore the speed reading on the tachometer (optional) must be applied to the appropriate chart.
At the end of the run the cart is lifted automatically and the drive is shut off through shut-off rods.
The water supply is stopped by means of the „overpressure shut-off valve“ option, or the pumping unit is shut down by the „low-pressure shut-off valve“ option in combination with a pressure switch in the supply line.
Lever up = slower Lever down = faster
WARNING!

Manual for BAUER Rainstar 15
When the pipe has been fully rewound, relieve the machine supports with the hand wheel, move them into the transport position and secure them with the locking bolts.
If the Rainstar becomes misaligned or pulled aslant during the irrigation run, it must be realigned. For this purpose you have to slacken the PE-pipe first.

Manual for BAUER Rainstar 16
Proper procedure: 1. Shut off water supply to the Rainstar. The PE-pipe slackens only slightly through the turbine acting as a
hydraulic brake.
2. Move gear shift lever to the middle position and slacken the pipe by pushing the lever down slowly and carefully.
3. Realign the machine and support it adequately. 4. Open the water supply again. PE-pipe retraction continues. 5. Put the gear shift lever into the desired position.
5.3 OPERATING MODE II: LAYING DOWN THE PE-PIPE
In addition to the pull-off method the PE-pipe can also be laid down on the ground while the machine is hauled over the field. This method is mostly used in situations where heavy soil makes it impossible to pull the cart across the field or where the field is longer than one or two times the PE-pipe length. Moreover, the laying down method allows using smaller tractors because no pulling forces are applied on the pipe.
Drive the Rainstar into the field allowing for the sprinkler’s distance of throw. *) W = distance of through of the sprinkler

Manual for BAUER Rainstar 17
Lower the cart as described in Operating mode I, chapter “Lowering the cart” and anchor it slightly. Now drive over the field with the machine.
Carry out all other steps as described before.
5.3.1 FUNCTIONAL DESCRIPTION OF THE MAIN COMPONETNS
5.3.1.1 MACHINE DRIVE - FULL-FLOW TURBINE
TX20 full-flow turbine is a specifically designed turbine with large cross sections and minimum pressure loss. Therefore it can reach high retraction speeds also at very low flow rate. It features a highly flow-promoting design and is mounted directly on the reel shaft. The turbine provides the energy needed for PE-pipe retraction. Speed is taken directly off the impeller shaft and transmitted over a two-stage (three-stage) V-belt drive to the change-speed gearbox.
The change-speed gearbox contains gear wheels which reduce the turbine’s speed accordingly. The gearbox features two speeds. Reel drive stop at the end of the irrigation strip is achieved by disengagement of the toothed clutch.
In combination with the two belt stages the two-speed gearbox allows precise adaptation to existing operating conditions. As a result, the following retraction speeds (m/h) can be reached:
8 - 30 22 - 45 40 - 80 50 - >100
65 TX Plus , 75 TX Plus , 85 TX Plus
833 5804 . 4
vE = [ m/h ] vE = [ m/h ] vE = [ m/h ] vE = [ m/h ]
90 TX Plus , PE Ø 85 - 90 , Getriebe / gearbox G285 TX Plus , PE Ø 90
90 TX Plus [ m/h ]
85 TX Plus , PE Ø 90 [ m/h ]
11 - 30 22 - 55 15 - 40 30 - >100
9 - 23 18 - 45 12 - 30 25 - >100 vE = <10
833 5861 . 4

Manual for BAUER Rainstar 18
On RAINSTAR models with 90 mm PE-pipe diameter (basic units 85 TX and 90 TX ) the turbine is fitted with a special connecting bend as well as a three-stage V-belt drive. This design allows low retraction speeds and as a result precipitation rates of up to 50 mm, even in case of large flow rates (up to nozzle dia. 30 mm). For this purpose you screw out the regulating screw (1) which is easily accessible, and screw it back into the hole after turning it around 180° with the sealing cone side pointing outward. As a result, part of the water flow is redirected above the turbine’s impeller. This reduces the output of the turbine and consequently also the retraction speed. Moreover, the 3-grooved V-belt pulley provides an additional reduction stage so that the low retraction speed required for such extreme conditions can be reached (for 50 mm precipitation height).
Never remove the drive cover for service work or change of the transmission unless the PE-pipe has been completely slackened! Put the gear shift lever into the shut-off position! This shut-off position applies also for transporting the machine on streets and roads!
Switching from I to II or the other way round is easy to do with the gear shift lever when the cart is lowered and the turbine rotating.
I
WARNING!

Manual for BAUER Rainstar 19
But note: When the cart is lifted and in the shut-off position, the gear-shift lever is held in “0” position and shifting is impossible! If the PE-pipe is streteched you have to slacken it first, before engaging the next gear
Move the gear shift lever from a gear stage to the middle position. A spring presses the gear shift lever up and prevents fast reversing of the reel and PE-pipe by means of the band brake. By pushing the gear shift lever down very slowly you release the brake and slacken the PE-pipe.
Afterwards you can change into the required gear.
PTO DRIVE
If required, you can rewind the PE-pipe with the tractor and a PTO shaft. Move the gear shift lever to zero position. A spring presses the gear shift lever into the locking recess. In this position the band brake is released. This gear shift lever position serves also for PE-pipe pull-off.

Manual for BAUER Rainstar 20
Rewinding the PE-pipe with the PTO shaft becomes necessary if irrigation is no longer necessary due to natural rainfall or if the PE-pipe has been pulled off to drain the machine for winterization • Rewind at lowest possible PTO speed – start slowly and smoothly – always
avoid jerky start-up. • Maximum PTO speed = 540 rpm • Avoid extra strain by smallest possible PTO shaft articulation. • If the PE-pipe is covered with mud it should be loosened and set free before the
rewind operation to reduce the pulling forces. • If the soil is deep and heavy the rewind must be carried out at a lower speed in
order to ensure that the permissible loads and pulling forces for PE-pipe and Rainstar are not exceeded.
• If you disengage the tractor’s PTO during PE-pipe rewind the reel must stand absolutely still when the PTO shaft is re-engaged. Double motion may cause severe damage.
When you drive the reel with the PTO, the automatic final shut-off is inactive. Therefore you must stop the PTO in time and wind up the end of the PE-pipe with the hand wheel. This will prevent damage to cart, shut-off, gearbox, etc.
6 SPEED CONTROL WITH ECOSTAR 4000 S
WARNING!

Manual for BAUER Rainstar 21
BAUER ECOSTAR 4000 S allows you to operate your irrigation machine with ease at the touch of a button. An illuminated four-line display offers you a comprehensive indication of the machine’s current operating condition. Through permanent comparison of set-point and actual value of the retraction speed you can administer your crops precisely the precipitation they need. ECOSTAR 4000 S consists of the electronic box, a cable harness with the connected sensors for PE-pipe length – retraction speed and shut-off as well as connections for battery, solar panel, and turbine regulating motor. Connections are also provided for installing both a shut-off valve and a pressure switch (both optional equipment). The electronic system of ECOSTAR 4000 S is rigidly built and has been tested under different climatic conditions. If problems still occur it is advisable to exchange the complete electronic box. If a sensor is defective it is possible to exchange only the sensor, too.
The front panel must be opened very carefully!
To guarantee that the cover sealing provides proper protection against moisture the cover must be closed very carefully, too!
Always disconnect the battery before carrying out welding work and repairs on the Rainstar!
Because of the standard solar panel it is not necessary to charge the battery during the irrigation season. If you still have to charge it, the maximum charging current should not exceed 2 amperes. ECOSTAR 4000 S maintains the pre-selected retraction speed at a constant level throughout the pipe retraction. Due to simple key assignment the operator control requirements are very low. Normally the ECOSTAR 4000 S is in the energy-saving mode without displaying information. Simply press the “POWER ON“ or “PE-pipe retraction” key to activate the electronic system and turn on the background illumination with the standard display.
ECOSTAR 4000 S has 3 different display windows:
6.1 Standard display ( operating condition )
Pre-set speed 30.0 m/h
Remaining irrigation time 00 : 00
Laid down PE-pipe length 000 m
Pre-irrigation 0 0 min Post-irrigation 0 0 min The first line indicates the desired retraction speed; it can be altered any time also while the system is irrigating (pre-setting 30 m/h). The second line indicates the remaining time (in hours and minutes) until the irrigation run is finished, including pre and post irrigation. This time setting can be read off any time during the irrigation run. The third line shows the length of PE-pipe laid down on the ground. It is possible to enter this length by hand, for instance after counting error (locate the cause and exchange the length sensor for instance) – for this purpose see Parameter Sheet no. 1, program constant no. 07. The fourth line shows the pre and post irrigation time in minutes. If the number is blinking it means that the system is currently operating running on pre or post irrigation.
WARNING!
WARNING!

Manual for BAUER Rainstar 22
If the display shows LOW BAT instead of the speed the battery voltage is lower than 11.8 V. Charge the battery with a power supply unit or exchange the battery. (Check if the solar panel charges properly, see 4th line of test menu).
Press the „TEST“ button once (1 x) to get to the
6.2 1st Test menu ( performance test )
Test 1
Current speed 030 m/h
Battery voltage 12.3 V
Charging by solar panel ON
The first line shows the menu status „Test 1“ The second line indicates the actual speed at which the machine is currently running. This display information is needed to be able to check the maximum possible retraction speed of the machine in case the ECOSTAR 4000 S is set at speed much higher than possible on account of the connected loads. The actual speed may deviate from the pre-set speed, for instance after the start when the PE-pipe is not yet tensioned. The average running speed of the ECOSTAR 4000S is precise within 10 m retraction and corresponds exactly with the desired pre-set speed (in the standard menu). The third line indicates the battery voltage. The fourth line shows if the battery is being charged by the solar panel. The battery is charged if the voltage is below 14.0 volts.
Press the „TEST“ button twice ( 2 x ) to display the 6.3 2nd Test menu (performance test)
Test 2 Pressure switch Stop - sensor
Speed - sensor
MOTOR 1 MOTOR 2
If the symbol appears on the display it means that this function is switched on.
The first line on the left indicates the menu status „Test 2“

Manual for BAUER Rainstar 23
The first line on the right shows if – with a pressure sensor mounted –pressure at the machine is sufficient. The symbol appears when pressure rises above the minimum pressure at which the pressure switch is set. The machine will operate only with sufficient pressure, that means it will stop in case the pressure is lower than the set minimum pressure. The second line shows if the stop sensor is activated, the symbol is displayed if the stop sensor is activated (operating position, the magnet sits 2 – 3 mm close to the sensor) The machine can only operate if the stop sensor is switched on and in the operating position.
Operating position Shut-off position
The stop sensor has three functions: 1) Reset for the laid-down PE-pipe length:
When operated the laid-down pipe length is set to zero. 2) Post irrigation:
If the post-irrigation procedure is carried out at the end of the irrigation run ( 0 m laid-down PE-pipe length) the post-irrigation function is activated first and then the ECOSTAR shut-off. In the standard program, post-irrigation is activated 8 m before the end of the run.
3) Prevents pulses to the regulating motor. After the stop sensor is activated no pulses are passed on to the regulating motor.
The third line shows if the speed sensors are in proper working order. The symbol appears when a magnet activates the two speed sensors at the turning of the magnet disk. The fourth line shows if the motors 1 and 2 have been turned off after having reached their mechanical stop. If the symbol appears and one motor has not reached its end position there is a blockage inside the turbine (MOTOR 1) or the shut-off valve ( MOTOR 2 ). The motor is turned off when the current input rises above 4.7 amperes, the symbol appears. If the display shows MOTOR 1 blinking, it means that the regulating motor is currently running.
MOTOR 1 During this motor running time (max. 26 sec.) it is impossible to make entries on the keyboard. If the display shows a blinking MOTOR 2 it means that the shut-off motor for the shut-off valve is currently running.

Manual for BAUER Rainstar 24
MOTOR 2
Is it impossible to activate keys on the display while the motor is running. The motor runs for max. 26 seconds. If the STOP button is pushed while the shut-off sensor is in the shut-off mode (end of irrigation, the magnet does not sit close on the shut-off sensor), the display shows POWER OFF for 2 seconds. Then the electronic system is in the stand-by mode.
POWER OFF
The electronic system is activated again when the PROG/POWER ON key is pressed or the PE-pipe pulled off.
The battery is only charged while the electronic system is activated. No charging takes place in the stand-by mode. 6.4 HOW TO OPERATE BAUER ECOSTAR 4000 S SHORT INSTRUCTION: Pull off or lay down the PE-pipe Couple the water supply. Engage the gearbox
ECOSTAR : Make entries only in the standard menu: Take over the retraction speed from the previous run or make a new entry. Push START-RESET button.
Activate pre-irrigation, if required Activate post-irrigation, if required. Open the water supply.
The irrigation cycle runs automatically.
FURTHER INSTRUCTIONS
After a longer standstill the electronic system of ECOSTAR 4000 S is in the stand-by mode.

Manual for BAUER Rainstar 25
Pulling off or laying down of the PE-pipe activates the electronic system and the length of the pulled off or laid down pipe is counted.

Manual for BAUER Rainstar 26
Example for standard display:
SPEED 30.0 m/h
TIME 10 : 00
LENGTH 300 m
PRE 00 min POST 00 min
SPEED ADJUSTMENT
The pre-set speed of 30 m/h can be increased or reduced by means of the keys First the speed changes by 0.1 m/h step by step, than the speed changes by 1.0 m in steps of 10. The speed can be changed at any time while the machine is running. The unfinished irrigation time until the end of the run is adapted automatically, too.
It is impossible to change the speed while a turbine regulating or shut-off valve motor is operating. The display shows MOTOR 1 or MOTOR 2.
Along with the speed change the time pertaining to the speed setting it is also changed.
SPEED 20.0 m/h
TIME 15 : 00
LENGTH 300 m
PRE 00 min POST 00 min
Caution! When setting the speed you must check on the speed actually possible according to the test window (push test key once).
In case of deviation you have to reduce the set speed to the speed actually possible.
6.5 PRE and POST IRRIGATION
The keys PRE and POST IRRIGATION are used to activate this function.
Pre and post irrigation time are pre-programmed. The ECOSTAR 4000 S calculates them as being 8 times the time required for covering 1 m at the actual speed. Example: at vE = 20 m/h the time for retracting 1 m is 3 minutes. The resulting pre irrigation time amounts to 8 x 3 min = 24 min The post irrigation time is also 8 x 3 min = 24 min

Manual for BAUER Rainstar 27
Example on standard display:
SPEED 20.0 m/h
TIME 15 : 48
LENGTH 300 m
PRE 24 min POST 24 min
This value “8” can be changed in the program (program constants no. 1 and no. 2) - see Parameter Sheet 1: Constants If the pre-irrigation mode is activated the machine runs for about half a meter after the start and then it stops for the pre-irrigation time. If you press the START-RESET key in the pre-irrigation mode the pre-irrigation mode is cancelled. Before activating the pre-irrigation mode the PE-pipe should be pulled off (the shut-off frame and thus the shut-off sensor should be in the operating state) and the START-RESET button should have been pressed.
If the post-irrigation mode is activated the machine stops 8 m before the end of the run for the post-irrigation time. This value is pre-adjusted and can be changed in the program constant no. 6 – see Parameter Sheet 1 : Constants.
If you push the START-RESET key in the post-irrigation mode the post irrigation function is cancelled. Before activating the post-irrigation mode the PE-pipe should be pulled off (the shut-off frame and thus also the shut-off sensor should be in the operating status) and the START-RESET key should have been pressed.
6.6 START When the PE-pipe has been pulled off and the desired speed is set on the device start the irrigation run by pressing the START–RESET key. If pre or post irrigation are required the respective key must be pressed.
The turbine can only start if the shut-off frame and thus also the shut-off sensor are in the operating state (PE-pipe pulled off). If the START–RESET key is pressed the turbine flap closes (the turbine starts to rotate) and the shut-off valve (if available - optional) opens.

Manual for BAUER Rainstar 28
6.7 MONITORING The program has a built-in monitoring system. This systems will work only in combination with a shut-off valve - overpressure. In the factory setting, this monitoring is deactivated (Parameter sheet 2, machine data 17, value set to “0” – monitoring off). If system is set according to parameter sheet 2, machine data 17 at value “1”, the monitoring function is activated. In this mode the monitoring function starts to work if the RAINSTAR fails to reach the set speed within the programmed monitoring time (according to parameter sheet 1, program constant 03). In the factory setting 20 minutes are designed for program constant 03. After this time the shut-off valve is closed and the machine stops. Mostly the reasons are excessively high retraction speed setting or blocked regulating flaps etc. In order to ensure that the set retraction speed is really reached and the system is not shut off after the monitoring time, check up on the retraction speed that can actually be reached by pressing the TEST key once. If a pressure switch is mounted the machine will start operating when a certain pre-set minimum pressure is reached, or irrigation is discontinued at low pressure. Irrigation is resumed as soon as pressure returns to standard.
6.8 STOP At the end of the irrigation run the shut-off sensor is activated through shut-off frame and shut-off rods.
Sensor in shut-off position
That way the turbine stops and the shut-off valve - overpressure - is slowly closed and remains in this position until the next run. If the Rainstar is connected to a hydrant the water pressure existing after the closing of the hydrant can be released by pressing the START-RESET key. The shut-off valve opens and the pressure is released through he PE-pipe. If a low-pressure shut-off valve is mounted it opens very quickly. It closes again after about 15 minutes.

Manual for BAUER Rainstar 29
The irrigation cycle can be stopped at any time by pressing the STOP key. The turbine flap opens (the turbine stops), the overpressure shut-off valve closes or the low-pressure shut-off valve opens. The laid-down PE-pipe length is maintained. It is only reset to 000 if the shut-off sensor (shut-off position) is activated.
PRESSURE SWITCH ( OPTIONAL EQUIPMENT) If the Rainstar, after having been positioned for the run, is supposed to start-up only after the required pressure has built up in the supply line (pressure start), a pressure switch must be installed. If such a switch is available, the monitoring system will also interrupt the irrigation cycle in case of low water pressure. As soon as the pressure returns to standard the run is continued.
6.9 FAULT DESCRIPTION – ECO STAR 4000 S
FAULT CAUSE REMEDY
Solar panel soiled. Clean
Solar panel defective. Leave the machine in the sun. Exchange the solar panel.
The battery is not being charged.
Battery defective. Charge. Exchange.
Electronic failure.
Cover solar panel, disconnect the battery and hook it up again (Reset). Call customer service.
Electronic system defective.
Exchange the electronic box
Overwinding fault. Turn off water supply. Slacken PE-pipe. Readjust the machine. Premature machine shut-off
Shut-off frame has been activated unintentionally.
Put the shut-off frame into the operating position and press “START”
Low pressure in supply line or pump station
Increase pressure or enter retraction speed according to the performance chart
Incorrect gear ratio Change ratio The retraction speed is not reached.
Blocked turbine regulation. Remove foreign object.

Manual for BAUER Rainstar 30
6.10 PROGRAMMING PROCEDURE: The electronic system is factory-programmed. However, if site conditions require settings which deviate from these data it is possible to modify the program constants and machine data accordingly. Proceed as follows: The speed must be set at 11.1 m/h or 11 f/h for reaching the constants. Note: If the setting is in US units you have to enter 11 [f/h] instead of 11,1 [m/h]. Immediately press the PROGRAM key 3 times in order to get access to the program constant 01 (see parameter sheet no. 1). Press the PROGRAM key for a short while again to select the program constants 01 to 09 – see parameter sheet no.1. Use the cursor keys to change the values of the constants.
If you press the TEST key the program returns to the standard display and the changed constants are saved. If the TEST key is not pressed the program will return to the standard display after 1 minute and the changes are not saved. The constants remain saved even if the battery is disconnected for a longer period of time. In the program constant 09 with the value 111 you have access to the machine data. By pressing the PROGRAM key you enter the machine data mode. . See Parameter Sheet No. 2.

Manual for BAUER Rainstar 31
Press the PROGRAM key for a short while again to select machine data numbers 00 – 17. Now you can use the cursor keys to change the values according to the actual requirements.
If you press the TEST key the program returns to the standard display and the changed machine data are saved.
6.11 PARAMETER SHEETS No. 1 and No. 2 Example
Constants: Parameter Sheet No. 1
Program version : 4,1 (3,11) Prog. Setting Lowest Highest Description const. value value value
01 8 1 15 pre-irrigation [m]
02 8 1 15 post-irrigation [m]
03 20 0 99 monitoring time [min.] 04 1 1 7 1 = English
2 2 = Danish 3 3 = German 4 4= = French 5 5 = Dutch 6 6 = Swedish 7 7 = Spanish (Finish for version 3.11)
05 0 0 1 0 = slow shut-off , for overpressure shut-off valve option 1 1 = fast shut-off, for low pressure shut-off valve option 2 2 = without shut-off valve option
06 0 0 15 distance to post-irrigation [m]
07 0 0 1000 Input of laid down PE-pipe [m] if shut-off sensor defective or removed
08 0 0 0 Not used
09 111 - - Code for access to the machine data (Parameter sheet 2)

Manual for BAUER Rainstar 32
Machine data: Parameter sheet no. 2
Program version : 4,1 (3,11)
Machine Setting Lowest Highest Description
data value value value
00 420 0 1000 Pipe length [m]
01 90 40 200 Pipe diameter [mm]
02 1650 500 3000 Reel diameter [mm]
03 13,30 5,00 30,00 Windings per layer
04 256 50 1000 Large chain wheel (reel sprocket) number of teeth x 2
05 13 5 40 Small chain wheel (driving pinion) number of teeth
06 4 1 20 number of magnets
07 0,89 0,70 1,0 pipe ovality [%]
08 3 0 45 first pulse to the shut-off motor [sec]
09 160 0 300 short pulses to the shut-off motor [msec]
10 3 1 5 time between pulses [sec]
11 100 0 250 Number of short pulses
12 1 0 2 shut-off system 0 = no shut-off valve 1 = shut-off valve with overpressure shut-off valve 2 = shut-off system with low-pressure shut-off valve
13 0,90 26,10 pulses for closing the regulating flap [sec] 8,20 TX60 [sec] 4,20 TX20 [sec]
14 0 0 2 0 = pressure switch not operating 1 = pressure switch operating
15 0 0 160 0.0 = length sensor on gearbox (System BAUER)
16 0 0 1 0 = shut-off valve opens with one pulse ( 12 sec. )
1 = shut-off valve opens with the same pulses as with the ones it closes
17 1 0 1 Monitoring correct speed 1 = monitoring on 0 = monitoring off
18 0 0 1 Display of units of measurement: (not available for version 3.11) 0 = metric [m] 1 = US units [ft]
Caution: If you have a setting with US units, enter 11/f/h to select the programming mode.
Then the program constants are entered in US units, machine data in metric units.

Manual for BAUER Rainstar 33
6.12 BATTERY
The standard factory equipment includes a battery with 12 volts and 6.5 ampere-hours. Due to the standard solar panel it is not necessary to charge the battery during the irrigation season. The battery should be newly charged every 6 month at a charging voltage of max. 2 amperes. (Please observe the enclosed service and maintenance instructions. When you connect the battery the display shortly shown VERSION 4.1 and then the standard display comes up.
6.13 SOLAR PANEL
The standard factory equipment includes a 12 V/4 W solar panel. The solar panel is maintenance-free. In order to ensure optimum output the surface should be cleaned with a soft cloth and a household detergent (no abrasives) from time to time. In order to avoid overloading of battery or error of ECOSTAR the electronic system will discontinue loading when the STOP key is pushed of the battery is being connected. (The machine is supplied with the terminals detached). The loading procedure is resumed when the START button is pressed or during PE-pipe pull-off.
6.14 CABLE CONNECTIONS – WIRING DIAGRAM:
6.15 Wiring diagram ECOSTAR 4000 S
Terminal no. Designation of device Core
Colour
1 2
Battery + 12 V Battery – 12 V Solar module –
brown blue
3 4
Solar module + Solar module –
brown blue
5 6
Motor 1 Motor 1 Regulating motor
Regulating motor
7 8
Speed sensor 1 Speed sensor 1
blue black
9 10
Speed sensor 2 Speed sensor 2
yellow / green brown
11 12
Stop sensor Stop sensor
blue or brown blue or brown
13 14
Motor 2 Motor 2 shut-off motor
shut-off motor
15 16
Pressure sensor Pressure sensor
blue or brown blue or brown
17 free
18 free

Manual for BAUER Rainstar 34
CHECK-UP OF CONNECTIONS: Press START key The regulating motor closes (the segment turns away from the reel). The overpressure shut-off valve is opened. The low-pressure shut-off valve remains closed. Press STOP key The regulating motor opens the turbine (the segment turns towards the reel). The overpressure shut-off valve is closed. The low-pressure shut-off valve is opened.
CHECK-UP OF LENGTH SENSOR: The magnet disk with 4 magnets is mounted on the input shaft of the gearbox and turns clockwise during the pull-off procedure. By turning of the magnet disk in clockwise direction the display of the laid-down PE-pipe must count from 0 up. If the distance meter counts into the opposite direction the speed sensor must be turned around so that the cable connection is on top.
Speed sensor
Cable connection on the bottom Speed sensor

Manual for BAUER Rainstar 35
7 Mechanical CONTROL
The retraction speed is infinitely variable with the speed regulating lever which is secured with the knurled nuts after the setting. It remains next to constant from the first to the last layer and on each individual layer. This is achieved by readjustment of the turbine speed through the speed compensation bar fitting closely on every PE-pipe layer during the run ...
... and the regulating rods which actuate the regulating flap located directly on the turbine.
Varying soil conditions and low flow rates may cause uneven retraction speeds in spite of the layering mechanism. If retraction speeds up or slows down, the regulating rod must therefore be hooked up in the next suitable hole.
Proper speed control adjustment depends also on the PE-pipe diameter and differs for pipe dimensions 65 - 90 mm.
MECHANICAL SPEED CONTROL SETTING ON TX RAINSTARS
Wassermenge Water flow
Débit
Einzugsgeschwindigkeit Retraction speed
Vitesse d’enroulement
Loch/Hole/Trou
m³/h m/h 65 TX Plus 75 TX Plus 85 TX Plus 90 TX Plus 13 10
25 5 1
6 6
3 1
- -
20
10 20 35
8 7 8
6 6 6
7 5 6
9 1 1
26
10 25 45
8 7 8
6 6 7
5 7 7
7 6 6
32
12 25 55
9 8 9
7 6 6
7 8 7
7 7 7
52
15 25 60
- - -
- - -
9 9 9
9 9 9

Manual for BAUER Rainstar 36
7.1 TACHOMETER ( OPTIONAL ) The retraction speed of Rainstar with mechanical speed regulation can be read from BAUER SPEEDOMETER . Operating instructions: SPEEDOMETER Description : With this novel tachometer design you can read the sprinkler retraction speed comfortably from the large LCD display. To show the retraction speed precisely in metres per hour on the display, use the keys of the keypad to enter the gear at which the machine is currently running and the respective PE-pipe layer. By means of measuring pulses, the precise retraction speed at the given operating data is computed in the electronic box. Pick-up of measuring pulses is contact-less by magnet sensors on the gearbox input. The machine data are stored permanently in the electronic box, therefore they only need to be entered once when the device is installed. However, if required, these data can always be reprogrammed to fit other models. Technical data: Power supply 9 Volt battery (type PP3) suitable for 1.000 speed readings of 4 minutes each. Housing: plastic, dimensions 82 mm x 80 mm x 50 mm Sensor: permanent magnet insert and magnet sensor on the input shaft

Manual for BAUER Rainstar 37
Operating steps:
1. Press the - to switch on the display. Note! The display is switched off automatically after 4 minutes.
2. Press the until the current pipe layer is displayed.
3. Press the until the current gear is displayed.
4. Immediately the retraction speed in m/h is displayed on the right of the display.
5. While you hold the depressed, the display shows the revolutions per minute at the gearbox input.
6. A blinking Lo on the display indicates low battery voltage (lower than 7.5 Volt) – the battery must be replaced!
Programming the machine data The tachometer is supplied with standard factory setting according to the table below. In order to ensure that your machine displays the precise and valid retraction speed, the specific parameters of your machine must be programmed.
Constant no. Description Possible setting
range Standard setting
1 Pulses per meter in gear step 1 100-4000 1000 2 Pulses per meter in gear step 2 100-4000 900 3 Pulses per meter in gear step 3 100-4000 800 4 Pulses per meter in gear step 3 100-4000 700 5 Pulses per meter in gear step 3 100-4000 600 6 Pulses per meter in gear step 3 100-4000 500 7 Inner reel drum diameter (in mm) 500-3000 1400 8 PE-pipe diameter (in mm) 40-200 100 9 Number of pipe layers 1-9 5 A Number of gear stages 1-6 3 b Data are saved by pressing the "ON" key .
Please take specific machine data of the individual models from the table.
ON key
LAYER key
GEAR key
ON key

Manual for BAUER Rainstar 38
Procedure for data input: 1. Press the following 3 keys simultaneously for at least 3
seconds. The number 1 (constant no. 1) appears blinking on the display – enter the pulses per metre
according to sheet 1 or 2.
2. Press the to increase the value, and the to reduce the numerical
value.
3. Push the to proceed to the next following constant. The data input corresponds to
the step described above. Enter the data up to the constant "A" or keep the
depressed until "b" appears.
4. When “b” appears on the display, push the to save the machine data. .
Thereby the machine data are saved permanently and they remain stored in the electronic system even if
the battery is replaced.
5. Checking the version number of the electronic system: Press the first and then the
- the version number appears on the display.
The speed indicated on the tachometer applies only to innermost PE-pipe layer (depending on the respective transmission). For 2nd, 3rd and 4th layer you have to take the retraction speed from the diagram. The radial lines on the diagram stickers symbolise the individual PE-pipe layers.
8 EMERGENCY SHUT-OFF
If something unforeseen happens you can interrupt pipe retraction. Pull or push the gear shift lever with your open hand from gear position I or II into the middle position. (Do not operate the lever with your hand closed, or let it go immediately). The gearbox is disengaged, 0 position. A spring presses the lever up (shut-off position) and prevents fast reversing of PE-pipe or reel.
WARNING!
LAYER GEAR ON
ON key GEAR key
LAYER key
ON key
LAYER key
ON key
LAYER key

Manual for BAUER Rainstar 39
Slacken the PE-pipe by carefully pushing the gear shift lever down.
9 WINDING MECHANISM
The winding mechanism operates synchronously with the winding or unwinding of the PE-pipe. Starting from the reel it is operated through a chain and the helically grooved spindle transporting the winding carriage of the PE-pipe. The winding mechanism ensures that the PE-pipe is properly guided winding for winding. When you put the machine into operation for the first time, pull off the full length of the PE-pipe to let it take a circular shape under pressure. This step is essential for trouble-free operation of the winding mechanism.
10 SHUT-OFF AND SAFETY EQUIPMENT
Unattended performance of the Rainstar is made possible by a final and safety shut-off. The final shut-off is actuated when the sprinkler cart presses against the shut-off frame, which in turn operates the gear shift lever through a system of rods. This way the drive is stopped. To avoid troubles caused by faulty windings of the PE-pipe on the reel, shut-off is also activated by the shut-off frame when faulty pipe windings build up on the reel.

Manual for BAUER Rainstar 40
11 CART
High construction of both symmetric and asymmetric wheel carts provides maximum crop protection (asymmetric wheel cart OPTIONAL). With infinitely variable track width you can adapt the carts to any crop row spacing. Easier pulling of the cart is ensured by the drawing-out hook.
You pick up this hook with the tractor’s toolbar and pull the cart across the field. For turning the pipe reel and placing the Rainstar in a new setting-up position, the cart must be in its end position.
Depending on the type of sprinkler used, the nozzle height of the mounted sprinkler ranges between approx. 1800 - 1960 on 65/75/85 TX Plus approx. 1960 - 2120 on 90 TX Plus At the end of retraction the cart is lifted automatically. Owing to its pendulous mounting the sprinkler is not tilted but always remains in the optimum position regarding distance of throw and distribution uniformity. This pendulous mounting assembly compensates also slopes in the terrain in longitudinal direction.
12 OVERPRESSURE SHUT-OFF VALVE (OPTIONAL on ECOSTAR Star 4000 S)
With the overpressure shut-off valve, water supply to the machine is turned off completely at the end of the irrigation run. When the valve closes, pressure rises in the supply line.

Manual for BAUER Rainstar 41
13 OVERPRESSURE SHUT-OFF VALVE (OPTIONAL with mechanical speed control)
With the overpressure shut-off valve, water supply to the machine is turned off completely at the end of the irrigation run. When the valve closes, pressure rises in the supply line.
Therefore this valve can only be used in combination with an automatic pump shut-off device or in a line network supplying several machines. Before starting up with water again the hand lever must be shifted to the START position (downward) - the shut-off valve is relieved and opens.

Manual for BAUER Rainstar 42
14 LOW-PRESSURE OR UNDERPRESSURE SHUT-OFF VALVE (OPTIONAL with ECOSTAR 4000 S)
With the low pressure shut-off valve option, a diaphragm valve is opened quickly at the end of the irrigation run, releasing a big water stream into the open. This causes sudden pressure decrease in the supply line (to about half the original pressure). Through this drop in pressure a pressure switch shuts off the pumping unit and thus also the water supply. Therefore this valve can only be used in combination with an automatic pump shut-off device.
15 LOW-PRESSURE OR UNDERPRESSURE SHUT-OFF VALVE (OPTIONAL with mechanical speed control)
With the low pressure shut-off valve option, a diaphragm valve is opened quickly at the end of the irrigation run, releasing a big water stream into the open. This causes sudden pressure decrease in the supply line (to about half the original pressure). Through this drop in pressure a pressure switch shuts off the pumping unit and thus also the water supply. Therefore this valve can only be used in combination with an automatic pump shut-off device.
Before starting up with water again the hand lever of the three-way cock must be shifted to the START position (downward) - the shut-off valve is relieved and opens.

Manual for BAUER Rainstar 43
16 WINTERIZATION – DRAINING In areas where frost is likely in winter after the irrigation season, the machine must be drained in time. A compressor with a minimum air capacity of 800 l/min at 2.5 bar overpressure is best suited for this purpose. Connect the compressor to the inlet of the machine. For blowing out the water the PE-pipe should not be pulled off. It can stay on the reel. Otherwise, winding up the pressureless PE-pipe would cause extreme ovality and proper winding would become impossible. Before the blow-out procedure, turn out the nozzle of the wide-range sprinkler or uncouple the sprinkler connecting hose. The small amount of water remaining in the PE-pipe after the draining will not do any harm. Turn out the drain plug at the bottom of the TX 20 turbine. We recommend to turn this plug in again only when you start up the machine at the beginning of the next season. If a shut-off valve is mounted the connecting hoses also have to be drained by opening the screwed joints. Clean the Rainstar and regrease all appropriate points. Store the machine, preferably in a roofed shelter where it is protected from direct exposure to the weather.
Drain screw for gear oil.
Oil or grease the jack.

Manual for BAUER Rainstar 44
17 SETTING INSTRUCTIONS FOR RAINSTAR TX with gearbox G2
17.1 SETTING THE BAND BRAKE (1) Tighten the hex. nut (2) of the band brake with the spring (3) hooked up, until spring length A = 265 – 267 mm.
17.2 SETTING THE THREADED ROD (4) Shift the shut-off lever (5) to the shut-off position = gear stage „0“. Turn the hex. nuts (6) on threaded rod (4) apart until a spacing of 2 - 3 mm results between the shut-off lever (5) and the gear shift lever (7). Then lock the hex. nuts (6).
23
4
5
6
78
9 1 - 3
22

Manual for BAUER Rainstar 45
17.3 SETTING THE SHIFTING GATE (8) The shifting gate (8) must be set symmetrically to the gearbox shut-off range. Procedure: Switch into 1st gear (position “I”). Turn the V-belt pulley (9) - die the PTO shaft (10) will rotate, too!“ Slowly shift the gear shift lever (5) towards „0“. The shut-off point is reached when the PTO shaft no longer turns along. Set the shifting gate in this position according to the drawing (1 - 2 mm)! Switch into 2nd gear (position “II“). Proceed as described above. If the spacing is smaller than 1 mm or large than 3 mm, the difference must be split up equally on both sides!
2
I II0
2
I II0
= =
I II0

Manual for BAUER Rainstar 46
17.4 SETTING 1st GEAR SHUT-OFF Fix the shut-off lever (11) in the shut-off position (60 - 62 mm). Switch into 1st gear (position “I“). Screw down the setscrew (12) to the gear shift lever (7) and turn it in until the shut-off point (see above) is reached! Lock the setscrew (12).
17.5 SETTING 2nd GEAR SHUT-OFF The shut-off lever (11) remains fixed in the shut-off position (60 - 62 mm). Switch into 2nd gear (position “II”). Screw down the setscrew (13) with the cap nut to the shut-off lever (7) and turn it in until the shut-off point is reached (see above). Lock the setscrew (13).
13
11
12
60 - 62
11
13
60 - 62

Manual for BAUER Rainstar 47
17.6 SHUT-OFF FRAME (14) ADJUSTMENT In the operating position the distance between shut-off frame (14) and reel (18) X = 10 mm. Shut-of position: Hook up the cart lift bracket (15) with the locking hook (16). Screw down the setscrew (17) to the cart lift bracket (15) and turn it in until a spacing “X“ (see chart) results between the shut-off frame (14) and the outer reel diameter (18). Screw down the second setscrew (17) to the cart lift bracket. Lock the setscrews (17).
Basic unit X 65 TX Plus 35 75 TX Plus 40 85 TX Plus 45 90 TX Plus 45
Grease gliding planes!
17.7 SHUT-OFF ROD ADJUSTMENT (20) Switch into 1st gear. (Position “I). Screw down the adjusting nuts (21) to the shut-off frame (14) and turn them in until shut-off is actuated. Lock the adjusting nuts (21)!
65 TX85 TX
90 TX75 TX
1415
16
17
18
Gleitfäche fetten !
X
14
18
Gleitfäche fetten !
2021
Grease gliding planes!

Manual for BAUER Rainstar 48
17.8 TESTING 2nd GEAR SHUT-OFF Put cart lift into operating position. Switch into 2nd gear (Position “II”). Move the cart lift towards the shut-off position. Shut-off must be actuated 5 mm after locking of the cart lift. .
If shut-off is not actuated, proceed as follows: Hook up the cart lift bracket (15) with the locking hook (16). Turn in the setscrew (17) on the shut-off frame (14) – see above – further until shut-off is actuated! Lock setscrew!
15
16
1615
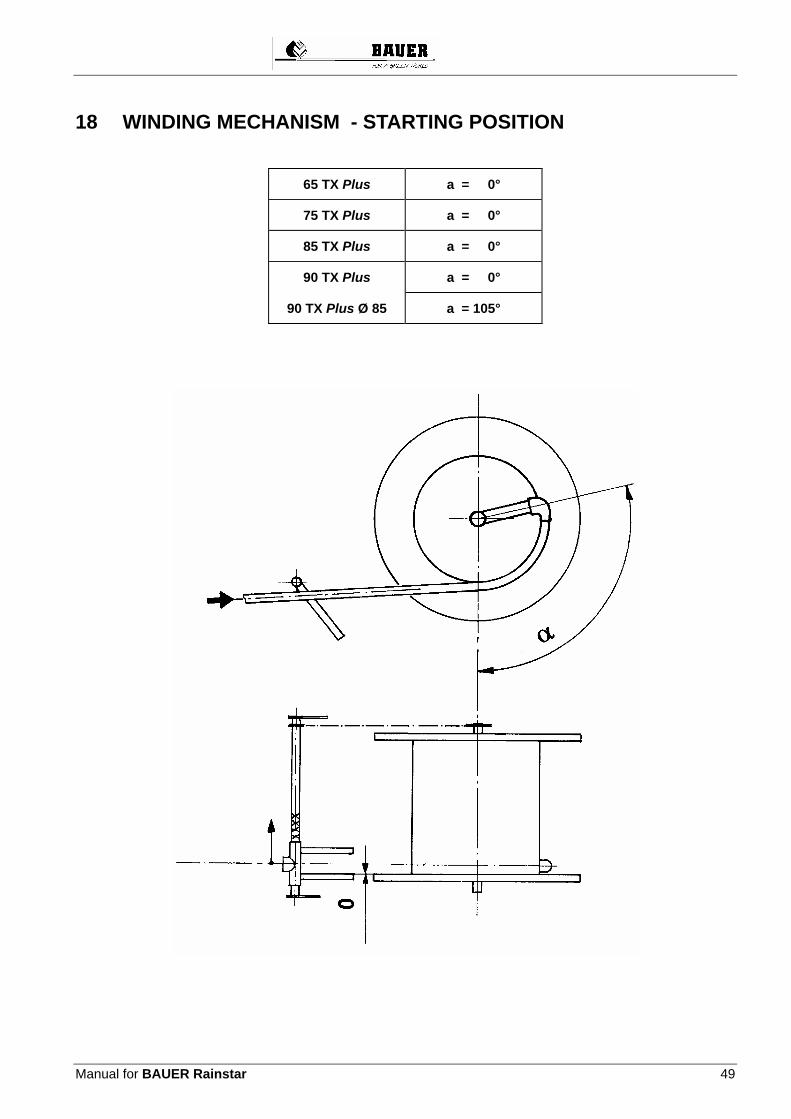
Manual for BAUER Rainstar 49
18 WINDING MECHANISM - STARTING POSITION
65 TX Plus a = 0°
75 TX Plus a = 0°
85 TX Plus a = 0°
90 TX Plus a = 0°
90 TX Plus Ø 85 a = 105°

Manual for BAUER Rainstar 50
90 TX Plus with G4 gearbox
19 PUTTING INTO OPERATION see page 12
19.1 OPERATING MODE I: PE-PIPE PULL-OFF see page 12
19.2 LOWERING THE CART see page 13
19.3 POSITIONS OF THE SHUT-OFF LEVER
19.4 PE-PIPE PULL-OFF
Move gear shift lever into the “PE-pipe pull-off“ position.A spring presses the lever up and locks it.
Slackening PE-pipe PE-pipe retraction
Brake release PE-pipe pull-off
PTO rewind
Shut-off position Transport position

Manual for BAUER Rainstar 51
Pick up the draw-out hook with the toolbar and pull off the cart.
Pull-off speed: do not exceed 5 km/h! Do not stop abruptly. Always slow down gradually at an intermediate stop in the field or at the end of the pull-off. Stop pulling off the pipe when the white marking line becomes visible on the reel.
If the PE-pipe is to be pulled off in a wide bow, make sure that it is pulled in a straight line of about 80 to 100 m first (90° angle to the reel) and then in a wide bow.
If the PE-pipe has been exposed to the sun for a longer period or if its surface temperature rises above 35 °C for some other reason, you must let water run through the pipe to cool it off before the unwinding or retraction procedure.
Couple the pressure hose. Open water supply.
Put the gear shift lever into the correct position.
TX 201 8 -- 20 m / h
2 16 -- 32 m / h
3 28 -- 50 m / h
4 > 45 m / h
WARNING!
Warning!

Manual for BAUER Rainstar 52
When the full operating pressure has been reached and only clear water is discharged at the sprinkler’s nozzle in a full jet without air bubbles, push the gear shift lever to the “PE-pipe retraction“ position.
I f a w r o n g g e a r w a s s e l e c t e d :
BE CAREFUL WHEN SHIFTING: If the PE-pipe is stretched .. SLACKEN IT!
PROPER PROCEDURE:
Pull shut-off lever into shut-off position ...
WARNING!

Manual for BAUER Rainstar 53
...and slacken the PE-pipe by pressing the shut-off lever downward slowly and carefully.
Switching into gears1 to 4 is only possible when the turbine is rotating!
Shift gear shift lever into the desired position and return the shut-off lever to the “PE-pipe retraction” position. The reel starts to wind up the PE-pipe.
19.4.1 SPEED ADJUSTMENT With ECOSTAR 4000 S - see page 16 With mechanical speed control - see page 34
19.5 OPERATING MODE II: LAYING DOWN THE PE-PIPE see page 17
19.5.1 FUNCTIONAL DESCRIPTION OF THE MAIN COMPONENTS
19.5.1.1 MACHINE DRIVE – FULL-FLOW TURBINE
The TX20 full-flow turbine is a specifically designed turbine model with large cross sections and minimum pressure loss. Therefore it is also suited for high retraction speeds at very low flow rates. This turbine features a highly flow-promoting design and is mounted directly on the reel shaft. It provides the energy needed for PE-pipe retraction. The turbine speed is taken directly off the impeller shaft and transmitted over a V-belt drive to BAUER change-speed gearbox.
CAUTION!

Manual for BAUER Rainstar 54
BAUER change-speed gearbox reduces the turbine speed according to the set retraction speed. The gearbox incorporates four gears. Reel drive stop at the end of the irrigation strip is ensured by disengagement of the tooth clutch.
The four-speed gearbox allows you to adapt the system precisely to existing operating conditions. As a result the following retraction speeds [m/h] can be reached:
GEAR SELECTION
TX 201 8 -- 20 m / h
2 16 -- 32 m / h
3 28 -- 50 m / h
4 > 45 m / h
Removal of the drive cover for service is only permitted when the PE-pipe is completely slack and the water supply turned off ! The gear shift lever must be moved to the shut-off position ! This shut-off position must also be used for transporting the machine on the road !
WARNING!

Manual for BAUER Rainstar 55
Changing between gears 1 to 4 is very easy with the gear shift lever when the turbine is rotating. Note also the following: If the shut-off lever is in the “PE-pipe retraction“ position, the gear shift lever is locked and cannot be shifted.
If the shut-off lever is in the “PE-pipe pull-off” position ..
or in the shut-off position,
you can shift it to the gears 1 to 4 as required.
Before shifting gears - slacken the PE-pipe!
If the shut-off lever is in the shut-off position, press the lever down slowly and carefully so that the band brake is released and the PE-pipe slackens (see also page 15).
WARNING!

Manual for BAUER Rainstar 56
19.5.2 PTO REWIND:
If required, you can rewind the PE-pipe also with the tractor’s PTO system. Shift the shut-off lever to the “PE-pipe pull-off” position.
A spring presses the gear shift lever into a locking recess. In this position the band brake is slightly loosened and does not have any braking action during the wind-up. Winding up the PE-pipe with the PTO will become necessary if there is no need to continue irrigating due to natural rainfall, or if the PE-pipe was pulled off the reel for winterization.

Manual for BAUER Rainstar 57
• Retract the pipe at the lowest possible PTO speed - start slowly and smoothly
and avoid jerks. • Max. PTO speed = 540 rpm • Avoid strain by excessive articulation of the PTO shaft. • If the PE-pipe is covered with mud it should be loosened and set free to reduce
the tension load before rewinding it. • You can release the PE-pipe and lift it off the ground by tying around a hemp
rope or a fabric belt and pulling it along the pipe. • If the soil is deep and heavy the PE-pipe must be wound up more slowly to
make sure that the permissible loads on PE-pipe and RAINSTAR are not exceeded.
• If you disengage the PTO shaft during PE-pipe retraction, make sure that the pipe reel stands still when you re-engage the PTO shaft.(Slacken the PE-pipe).Double motion may cause severe damage!
• When driving the reel with the PTO the automatic shut-off system is inactive. Therefore you must stop the PTO shaft in time and wind up the end of the PE-pipe with the hand wheel. This will prevent damage to cart, shut-off system, gearbox, etc.
19.6 SPEED CONTROL Speed control with ECOSTAR - see page 18 Mechanical speed control - see page 34
19.7 TACHOMETER Optional equipment for systems with mechanical speed control – see page 12
19.8 EMERGENCY SHUT-OFF
If something unforeseen happens, pipe retraction can be interrupted by means of the emergency stop device. Pull the gear shift lever with the open hand from “PE-pipe retraction“ to the shut-off position (Do not operate the lever with the closed hand, or release it immediately!). The gearbox is disengaged. A spring snubs the lever up (shut-off position) and the band brake prevents fast reversing of PE-pipe and the reel.
WARNING!
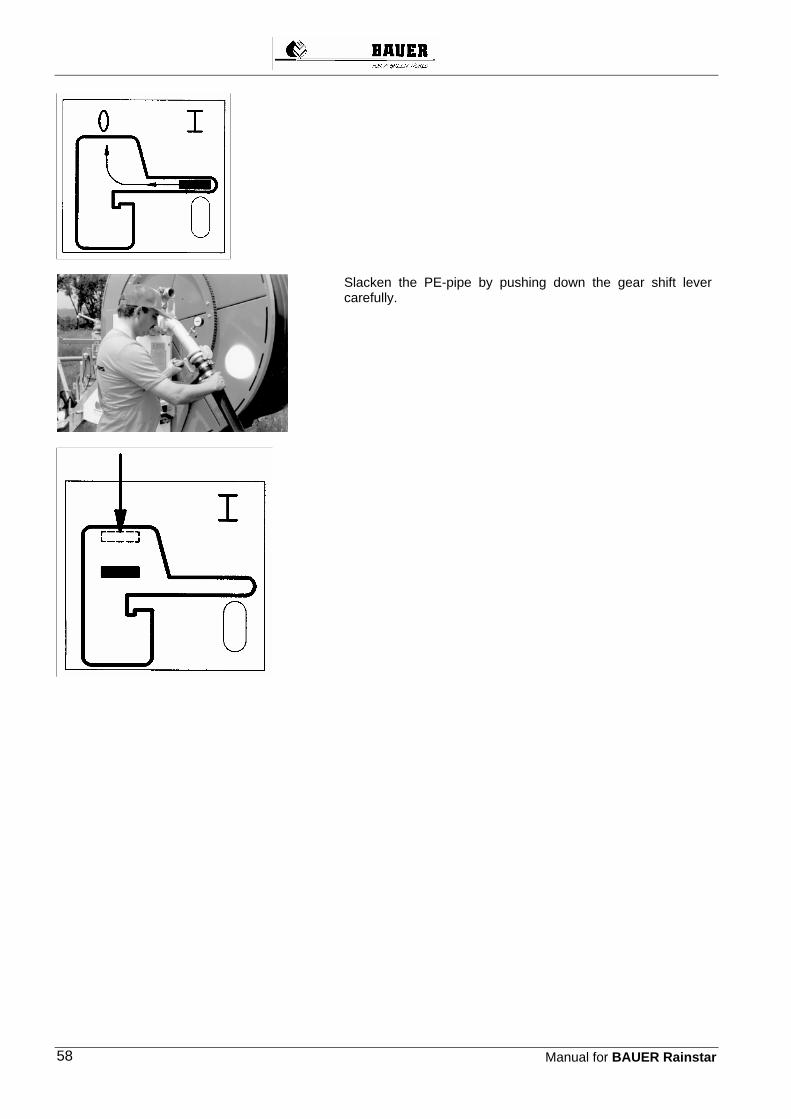
Manual for BAUER Rainstar 58
Slacken the PE-pipe by pushing down the gear shift lever carefully.

Manual for BAUER Rainstar 59
20 SETTING INSTRUCTIONS FOR RAINSTAR TX with G4 gearbox

Manual for BAUER Rainstar 60
20.1 SETTING THE SHIFTING GATE The shifting gate (8) must be adjusted to the gearbox shut-off point. Procedure: Shift the shut-off lever (9) into “PE-pipe retraction” position.
Turn the V-belt pulley (10) – the PTO shaft (11) rotates too. Slowly shift the shut-off lever (9) to “0” position.
The shut-off point is reached when the PTO shaft no longer turns along. Set the shifting gate in this position according to the drawing ( 2 mm)! The spring (12) presses the shut-off lever (9) upward along the incline of the shifting gate and thus also into the recess provided in the gearbox.
20.2 SETTING THE BAND BRAKE Tighten the hex. nuts (2) of the band brake until the bolt thread of the brake band (1) projects B =13 mm. At that the length of the stretched spring (12) A = 144 - 148 mm. Then lock the hex. nuts (2). Tighten the hex. nut (3) until the spring (5) is pretensioned C = 22mm, lock with nut (4).

Manual for BAUER Rainstar 61
20.3 SETTING THE THREADED ROD Shift the shut-off lever into the shut-off position.
Turn the hex. nuts (6) on the threaded rod (7) apart until a spacing of 4 to 5 mm results between the shifting gate (8) and the shut-off lever (9). Lock the hex. nuts (6).
20.4 TESTING THE BAND BRAKE for release of the brake band Move shut-off lever (9) to “release” position.
In this position the brake band must be lifted slightly off the brake disc. This prevents the brake band from sticking to the brake disc! The brake band may stick tight after a longer standstill or after the winter season. In
such case it must be loosened before you operate the system the next time. For this purpose turn the PTO shaft shortly to the right and to the left with the hand wheel. If you do not observe this the gearbox may break!
WARNING!

Manual for BAUER Rainstar 62
20.5 SETTING THE GEARBOX SHUT-OFF Set the speed compensating bar (13) at the distance X mm from the reel (17) ( see chart )
Move the shut-off lever (9) into the shut-off position.
Screw the hex. nut (15) on the control rod (16) down to the lever (14) of the shut-off frame. Lock the nut.
Basic unit X mm
90 TX Plus 45
65 TX85 TX
90 TX75 TX
1415
16
17
18
Gleitfäche fetten !
X
Grease gliding plane

Manual for BAUER Rainstar 63
20.6 TESTING THE SHUT-OFF
Put the shut-off frame (13) on the PE-pipe (last layer). Move the shut-off lever (9) to “PE-pipe retraction” position. Pull the shut-off frame (13) into the shut-off position ( = X mm from the reel). The shut-off lever must jump into the shut-off position.
21 SERVICE AND MAINTENANCE We cannot emphasise often enough that proper service is essential for the operating reliability and service life of a machine. At the end of every irrigation season the Rainstar should be thoroughly checked and cleaned, and all parts re-greased carefully. Machine part Service interval Lubricant, grease, oil
1. Helically grooved spindle of the winding mechanism
every 250 hours Alvania Grease 3
2. Drive chain of winding mechanism
every 250 hours Alvania Grease 3
3. Driver (spindle nut) of winding mechanism
every 250 hours, change recommended after 2500 service hours
Alvania Grease 3
4. Driving chain as required Alvania Grease 3
5. Change-speed gearbox
Change oil for first time after 500service hours and then every 500 to 800 hours or at least once a year
6,0 l oil SAE 90 EP
6. Ball race every 500 hours through grease nipple Alvania Grease 3
7. Jack
as required Oil SAE 20,Alvania Grease3 through grease nipple
8. Shut-off point on the cart lift bracket (see page 32,point 7)
as required Alvania Grease 3
9. Screwed joints Tightening torques
Turntable side frame 210 Nm
Ball race on turntable and undercarriage
85 Nm
Trailer coupling 210 Nm

Manual for BAUER Rainstar 64
22 TROUBLESHOOTING
FAULT CAUSE REMEDY
PE-pipe cannot be pulled off. Gear shift lever in wrong position Move to pull-off position.
Brake bank sticking on the brake drum.
Loosen brake band.
PE-pipe retraction stops before final shut-off activated.
Turbine blocked by foreign object. Remove foreign object.
Pressure drop in supply line. Check pumping station and water connection at the hydrant.
Overwinding PE-pipe actuates the safety shut-off.
Adjust the winding mechanism.
Repair broken winding chain.
Final shut-off activated but the shut-off valve does not close.
Values set for shut-off valve actuation are not correct.
Adjust setting according to instructions.
Thin plastic hose of shut-off valve is blocked up or broken.
Replace the plastic hose.
The reel overwinds during pull-off or the PE-pipe windings become loose.
Tractor stopped abruptly. Slow down gradually.
No oil in the change-speed gearbox.
Refill oil.
Retraction speed varies from one PE-pipe layer to the next.
Varying ground conditions. Adjust speed control system to the ground conditions (Change rod position on the lever of the layering mechanism. )
The desired retraction speed is not reached.
Incorrect transmission. Select correct V-belt and transmission.
Sprinkler nozzle blocked. Remove foreign object.
General: compare connecting pressure and water flow with performance chart values.
Cart is not lifted Wrong gearbox transmission Select correct V-belt and drive transmission.

Manual for BAUER Rainstar 65
A PE-pipe dia. x length B Max. strip length C Capacity D Connecting pressure E Nozzle range F Weight incl. PE-pipe with water G Weight incl. empty PE-pipe H Overall length incl. cart I Max. width at largest track width K Overall height L Overall length without cart
M Track width of undercarriage N Tires - undercarriage O Tire pressure - undercarriage P Ground clearance Q Hitch height - standard R Hitch height - below PTO S Hitch height - w. height increase T Cart track width U Cart tires V Cart tire pressure

Manual for BAUER Rainstar 66
Model 65 TX Plus 75 TX Plus 65-220 65-250 65-300 75-200 65-340 75-250 75-270 75-300 85-200
A mm x m 65x220 65x250 65x300 75x200 65x340 75x250 75x270 75x300 85x200
B m 260 290 340 250 275 300 315 345 250
C m3 / h 13 - 32 13-52 13-28 13-52 13-45 13-38 13-60
D bar 3,5 - 10 3,5 - 10
E mm 14 - 22 14-28 14-20 14-28 14-26 14-24 14-30
F kg 1790 1890 2050 1940 2340 2320 2400 2540 2350
G kg 1270 1300 1350 1330 1570 1530 1550 1600 1550
H mm 4700 5300
I mm 1900 2050
K mm 2320 2660
L mm 3000 3650
M mm 1500 1500 - 1800
N 185 / 70 R13 195 / R14 C
O bar 2,7 3,5
P mm 240 280
Q mm 460 500
R mm 235 235
S mm 710 750
T mm 1500 - 2800 1500 - 2800
U 165 / 70 R 13
V bar 1,3

Manual for BAUER Rainstar 67
Model 85 TX Plus 75-320 75-350 75-400 85-300 85-320 90-230 90-250 90-280 90-300
A mm x m 75x320 75x350 75x400 85x300 85x320 90x230 90x250 90x280 90x300
B m 365 390 435 340 360 280 300 320 340
C m3 / h 13 - 38 13 - 32 13 - 28 13 - 52 17 - 65
D bar 3,5 - 10
E mm 14 - 24 14 - 22 14 - 20 14 - 28 14 - 26 16 - 30
F kg 2780 2910 3130 3020 3180 3830 2950 3150 3270
G kg 1740 1780 1880 1800 1860 1740 1770 1820 1850
H mm 5350
I mm 2050
K mm 3060
L mm 3700
M mm 1500 - 1800
N 205 / R14 C
O bar 3,5
P mm 290
Q mm 500
R mm 235
S mm 750
T mm 1500 - 2800
U 165 / 75 R 13
V bar 1,3

Manual for BAUER Rainstar 68
Model 90 TX Plus 85-350 85-370 85-400 85 - 450 90-330 90-350 90-380 90-400 100-310
A mm x m 85x350 85x370 85x400 85x450 90x330 90x350 90x380 90x400 100x310
B m 395 415 440 490 380 400 415 435 360
C m3 / h 17 - 50 17 - 48 17 - 46 17 - 44 17 - 63 17 - 56 17 - 52 17 - 48 17 - 72
D bar 3,5 - 10
E mm 16 - 26 16 - 24 16 - 30 16 - 28 16 - 26 16 - 32
F kg 3650 3770 3940 4220 3770 3900 4090 4220 4100
G kg 2220 2270 2340 2490 2250 2290 2370 2430 2390
H mm 6470
I mm 2150
K mm 3180
L mm 4320
M mm 1500 - 1800
N 10,0 / 75 – 15,3
O bar 5,0
P mm 305
Q mm 530
R mm 265
S mm 780
T mm 1500 - 2800
U 165 / 70 R 13
V bar 1,3

Manual for BAUER Rainstar 69
23 CONFORMITY CERTIFICATE
EU Declaration of Conformity in accordance with General EU Directive for Machinery 89/392/EWG, Annex II A
We,
Röhren- und Pumpenwerk BAUER Gesellschaft m.b.H. Kowaldstraße 2, A - 8570 Voitsberg - Austria
Tel. +43 / 3142 / 200 - 0, Telefax: +43 / 3142 / 23 0 95
herewith declare that in respect of its conception and design and in the models and styles which we market, the machine mentioned below fully corresponds with the relevant fundamental provisions for safety and health stipulated in the General EU Practices for machinery. This declaration becomes null and void should any modification be made on the machine without our prior consent
Designation: BAUER Rainstar Basic models: 65 TX Plus, 75 TX Plus, 85 TX Plus, 90 TX Plus
This range of machines has been developed and manufactured according to the standard: EN 809 – June 1994 which also contains normative reference to
EN 292-1 - 1991, EN 292-2 – 1991 and EN 294 – 1992.
Voitsberg, 01. Oct. 1999 Johann Langmann