ax1810 dual 10.1” ultra-thin hd led clip-on …
TRANSCRIPT

1
2WARRANTYYEAR
GENERAL - Monitors: 10.1” LED HD - Resolution: 1024 x 600 Digital - Mounting: Tablet Style Universal Fit - System: PAL/NTSC - Display Mode: 16:9 Widescreen - Controls: Touch Sensitive Buttons (Unit), IR Remote - Formats: DVD/DVD+R/DVD-R/VCD/CD/CD-R/MP3/MPEG4/JPEG - DVD Loader: Top Slot-In, Anti-Shock Mechanism - Input: USB 2.0 / MicroSD /HDMI / AV Input- Output: AV Output - IR Transmitter: 2 CH Built-In for Wireless Headphones (Not Included) - FM Modulator: 8 CH for Audio Output- Earphone Jack: For Wired Headphones- Speakers: Built-In - OSD Multi-Language: English, Turkish, Portuguese, Spanish, Thai, Arabic, Russian - Remote Control: Full Function- Universal Installation: Pole Adapters Included - Power Connection: Hardwire, or Lighter Plug - Power Supply: 12V Negative Ground (10-14V) - Dimensons: 286W x 178H x 56D mm
INCLUDES- 2 x DVD Monitors - Pole Size Adaptors - Cig Power Lead - Hardwiring Kit - 2 x Remote Controls - 2 Year Warranty
AX1810DUAL 10.1” ULTRA-THIN HD LED
CLIP-ON HEADREST + DVD SYSTEM
2
Contents Functions ............................................................................................ 2 Remote Control .................................................................................. 3 Battery Installation .............................................................................. 3 Installation .......................................................................................... 4 DVD/MP3 Operation ........................................................................... 4 Menu Setup ........................................................................................ 5 USB/SD Function ............................................................................... 6 AV Function ........................................................................................ 6 HDMI Function.................................................................................... 6 Troubleshooting .................................................................................. 7 Video/Audio Compatibility Chart ......................................................... 7 Warranty ............................................................................................. 8
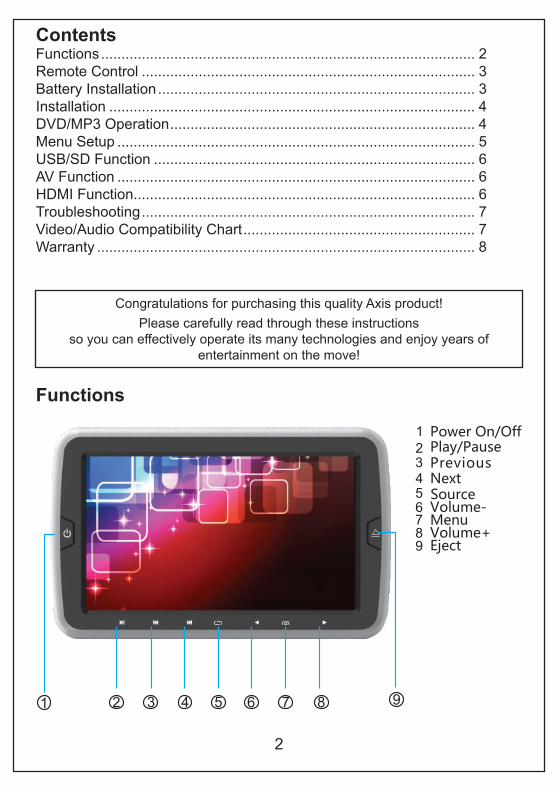
Functions
Congratulations for purchasing this quality Axis product! Please carefully read through these instructions
so you can effectively operate its many technologies and enjoy years of entertainment on the move!
1 2
Functions
Play/Pause123456789
Power On/Off
1 2 3 4 5 6 7 8 9
PreviousNextSourceVolume-MenuVolume+Eject
Congratulations for purchasing this quality Axis product!
Please carefully read through these instructionsso you can effectively operate its many technologies
and enjoy years of entertainment on the move!1 2
Functions
Play/Pause123456789
Power On/Off
1 2 3 4 5 6 7 8 9
PreviousNextSourceVolume-MenuVolume+Eject
Congratulations for purchasing this quality Axis product!
Please carefully read through these instructionsso you can effectively operate its many technologies
and enjoy years of entertainment on the move!

3
Remote Control
Power on/off DVD/AV Audio right/left
Mute key
Number key
ReturnSkip next Fast back
Back to last Fast forward
Setup key (Menu) Up
Play/ pause key Stop/ back play
LeftEnter key
Root menu/PBC Right
Volume decrease Down
Volume increase USB/SD shiftTitle Subtitle
TFT Menu Display
Angle switching key Repeat
Program Zoom in/out
Remote control
Battery installation
Attention:
1. Do not touch the infrared light.
2. Do not press remote control when
disassembling the battery cover of
remote control.
3. Please remove the battery when not beingused for an extended period.
4. Normally, battery life is about one year.
Please replace battery when the remote
loses sensitivity.
Pull out the battery holder to insert or remove the battery.(CR2025)
34
Step 2: HeightSlide the top button down and insert the C part
Step 4: AngleInstallation finished!
1
2
3
A
B
C
1 2 3
InstallationStep 1: SpacingThere are three slide switches on the bracket marked withSlide the switch to the right side to open the left arm A of the bracket.Slide the switch 3 to the left side to open the right arm of the bracket.
to the desired position.
Step 3: ReleaseSlide the switch 1, then insert the monitor securing tab.
2
Battery Installation

4
InstallationPower on/off DVD/AV Audio right/left
Mute key
Number key
ReturnSkip next Fast back
Back to last Fast forward
Setup key (Menu) Up
Play/ pause key Stop/ back play
LeftEnter key
Root menu/PBC Right
Volume decrease Down
Volume increase USB/SD shiftTitle Subtitle
TFT Menu Display
Angle switching key Repeat
Program Zoom in/out
Remote control
Battery installation
Attention:
1. Do not touch the infrared light.
2. Do not press remote control when
disassembling the battery cover of
remote control.
3. Please remove the battery when not beingused for an extended period.
4. Normally, battery life is about one year.
Please replace battery when the remote
loses sensitivity.
Pull out the battery holder to insert or remove the battery.(CR2025)
34
Step 2: HeightSlide the top button down and insert the C part
Step 4: AngleInstallation finished!
1
2
3
A
B
C
1 2 3
InstallationStep 1: SpacingThere are three slide switches on the bracket marked withSlide the switch to the right side to open the left arm A of the bracket.Slide the switch 3 to the left side to open the right arm of the bracket.
to the desired position.
Step 3: ReleaseSlide the switch 1, then insert the monitor securing tab.
2
Power on/off DVD/AV Audio right/left
Mute key
Number key
ReturnSkip next Fast back
Back to last Fast forward
Setup key (Menu) Up
Play/ pause key Stop/ back play
LeftEnter key
Root menu/PBC Right
Volume decrease Down
Volume increase USB/SD shiftTitle Subtitle
TFT Menu Display
Angle switching key Repeat
Program Zoom in/out
Remote control
Battery installation
Attention:
1. Do not touch the infrared light.
2. Do not press remote control when
disassembling the battery cover of
remote control.
3. Please remove the battery when not beingused for an extended period.
4. Normally, battery life is about one year.
Please replace battery when the remote
loses sensitivity.
Pull out the battery holder to insert or remove the battery.(CR2025)
34
Step 2: HeightSlide the top button down and insert the C part
Step 4: AngleInstallation finished!
1
2
3
A
B
C
1 2 3
InstallationStep 1: SpacingThere are three slide switches on the bracket marked withSlide the switch to the right side to open the left arm A of the bracket.Slide the switch 3 to the left side to open the right arm of the bracket.
to the desired position.
Step 3: ReleaseSlide the switch 1, then insert the monitor securing tab.
2
5 6
Press remote control for stop
Press remote control for pause
Play MP3
The device will automatically play once the
storage medium is inserted.Press on remote control to stop.Press on panel or on remote control
to pause.
Press on panel or on remote control to play/pause/replay.1. Press to repeat one or more songs
2. Press number key to directly play selected song.
Menu function setupPress setup on the panel or MENU key on the remote control to access the Menu.
keys to choose desired key for confirmation.
can also
Use themenu, then press the (See below) The universal panel keys be used for adjustment.
1. Picture setup
Adjust the display ratio, brightness, contrast, saturation, sharpness, hue etc.
2. Sound setup
Adjust for sound mode, mixed mode, output mode, dynamic range, IR transmitter and FM transmitter.
3. System setupIncluding sound mode, fixed mode, outputmode, dynamic range, IR transmitter,FM transmitter.
4. Player settingsTo adjust TV format, screen saver, displayratio, password, memory play, audiolanguage, subtitle language, OSD language.
1) TV Format: Set disc output format to PAL/ NTSC or AUTO.2) Screen Saver: For screen protection.3) Screen Picture Ratio: Choose image output ratio as desired.4) Password: Set new password. The default password is (0000).5) Level Set: Set parental lock level.6) Memory Play: Optional Power off.7) Audio Language: Set the output language.
NTSC
OFF
4:3�LB
----
ON
ENGLISH
TV�SYSTEM
SCREEN�SAVE
ASPECT�RATIO
PASSWORD
RESUME
AUDIO�LANGUAGE
NTSC
OFF
4:3�LB
----
ON
ENGLISH
PICTURE
SOUND
SYSTEM
PLAYERMOVE ADJUST SETIP EXIT
NTSC
OFF
4:3�LB
----
ON
ENGLISH
SOUND MODE
DOWN MIX
OP MODE
DYNAMIC RANGE
IR OUT
FM OUT
STANDARD
LT/RT
LINE OUT
OFF
OFF
OFF
PICTURE
SOUND
SYSTEM
PLAYERMOVE ADJUST SETIP EXIT
NTSC
OFF
4:3�LB
----
ON
ENGLISH
LANGUAGE
OSD DURATION
DEFAULT SOURGE
VIDEO OUTPUT
RESET
ENGLISH
10 SECONDS
AUTO
AV
PICTURE
SOUND
SYSTEM
PLAYERMOVE ADJUST SETIP EXIT
NTSC
OFF
4:3�LB
----
ON
ENGLISH
PICTURE MODE
COLOR TEMP
STANDARO
STANDARO
PICTURE
SOUND
SYSTEM
PLAYERMOVE ADJUST SETIP EXIT
8) Subtitle Language: Set disc subtitle language.9) Menu language: Set disc menu language.
Operation of DVD system(DVD/DCD/CD Formats)To load the disc in the device please press right button so that the disc slot can be clearly seen. Insert the disc into the DVD with the label facing the screen for automatic playback.
DVD/MP3 Operation

5
5 6
Press remote control for stop
Press remote control for pause
Play MP3
The device will automatically play once the
storage medium is inserted.Press on remote control to stop.Press on panel or on remote control
to pause.
Press on panel or on remote control to play/pause/replay.1. Press to repeat one or more songs
2. Press number key to directly play selected song.
Menu function setupPress setup on the panel or MENU key on the remote control to access the Menu.
keys to choose desired key for confirmation.
can also
Use themenu, then press the (See below) The universal panel keys be used for adjustment.
1. Picture setup
Adjust the display ratio, brightness, contrast, saturation, sharpness, hue etc.
2. Sound setup
Adjust for sound mode, mixed mode, output mode, dynamic range, IR transmitter and FM transmitter.
3. System setupIncluding sound mode, fixed mode, outputmode, dynamic range, IR transmitter,FM transmitter.
4. Player settingsTo adjust TV format, screen saver, displayratio, password, memory play, audiolanguage, subtitle language, OSD language.
1) TV Format: Set disc output format to PAL/ NTSC or AUTO.2) Screen Saver: For screen protection.3) Screen Picture Ratio: Choose image output ratio as desired.4) Password: Set new password. The default password is (0000).5) Level Set: Set parental lock level.6) Memory Play: Optional Power off.7) Audio Language: Set the output language.
NTSC
OFF
4:3�LB
----
ON
ENGLISH
TV�SYSTEM
SCREEN�SAVE
ASPECT�RATIO
PASSWORD
RESUME
AUDIO�LANGUAGE
NTSC
OFF
4:3�LB
----
ON
ENGLISH
PICTURE
SOUND
SYSTEM
PLAYERMOVE ADJUST SETIP EXIT
NTSC
OFF
4:3�LB
----
ON
ENGLISH
SOUND MODE
DOWN MIX
OP MODE
DYNAMIC RANGE
IR OUT
FM OUT
STANDARD
LT/RT
LINE OUT
OFF
OFF
OFF
PICTURE
SOUND
SYSTEM
PLAYERMOVE ADJUST SETIP EXIT
NTSC
OFF
4:3�LB
----
ON
ENGLISH
LANGUAGE
OSD DURATION
DEFAULT SOURGE
VIDEO OUTPUT
RESET
ENGLISH
10 SECONDS
AUTO
AV
PICTURE
SOUND
SYSTEM
PLAYERMOVE ADJUST SETIP EXIT
NTSC
OFF
4:3�LB
----
ON
ENGLISH
PICTURE MODE
COLOR TEMP
STANDARO
STANDARO
PICTURE
SOUND
SYSTEM
PLAYERMOVE ADJUST SETIP EXIT
8) Subtitle Language: Set disc subtitle language.9) Menu language: Set disc menu language.
Operation of DVD system(DVD/DCD/CD Formats)To load the disc in the device please press right button so that the disc slot can be clearly seen. Insert the disc into the DVD with the label facing the screen for automatic playback.
Menu Setup
6
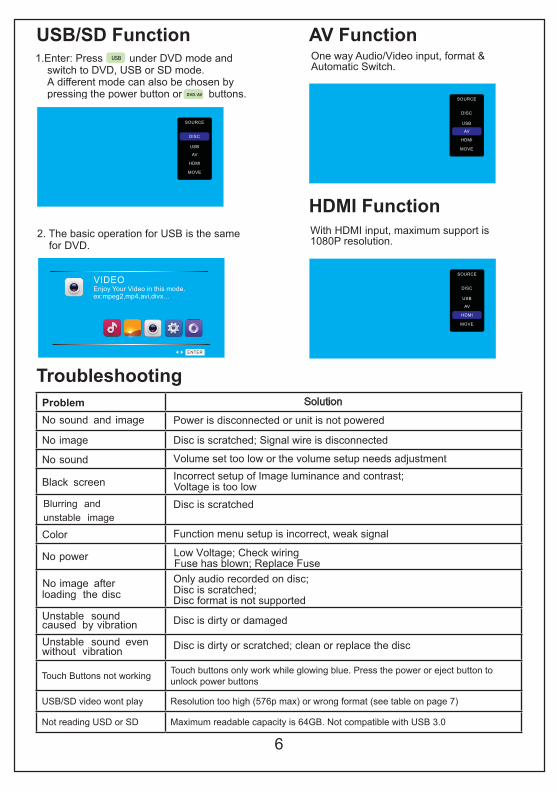
Problem Solution
No sound and image Power is disconnected or unit is not powered
No image Disc is scratched; Signal wire is disconnected
No sound Volume set too low or the volume setup needs adjustment
Black screen Voltage is too low Incorrect setup of Image luminance and contrast;
Blurring and
unstable image
Disc is scratched
Color Function menu setup is incorrect, weak signal
No power
No image after loading the disc
Trouble shooting
Low Voltage; Check wiringFuse has blown; Replace Fuse
AV Display
Source Switch
Only audio recorded on disc; Disc is scratched; Disc format is not supported
Unstable sound caused by vibration Disc is dirty or damaged
Unstable sound even without vibration
Disc is dirty or scratched; clean or replace the disc
Picture mode
Volume+
Menu
Volume-
Brightness modePower switch
109
NOTE: Due to the great variety of devices with DVD, USB and SD card interfaces that sometimes have manufacturer specific functions - we cannot guarantee that all media will be recognised and that all operational functions will be available on this device.
DVD Player
Disc In/Out
Menu
Volume+ Volume-
Source
Next
PreviousPower Switch
8
Play/Pause
DVD/AV
HDMI FunctionWith HDMI input, maximum support is1080P resolution.
1.Enter: Press under USB DVD mode andswitch to DVD, USB or SD mode.A different mode can also be chosen by pressing the power button or buttons.
2. The basic operation for USB is the samefor DVD.
AV FunctionOne way Audio/Video input, format &Automatic Switch.
SOURCE
DISC
USB
AV
HDMI
MOVE
SOURCE
DISC
USB
AV
HDMI
MOVE
SOURCE
DISC
USB
AV
HDMI
MOVE
VIDEOEnjoy Your Video in this mode.ex:mpeg2,mp4,avi,divx...
ENTER
Introduction of USB/SD
7
DVD Player
Disc In/Out
Menu
Volume+ Volume-
Source
Next
PreviousPower Switch
8
Play/Pause
DVD/AV
HDMI FunctionWith HDMI input, maximum support is1080P resolution.
1.Enter: Press under USB DVD mode andswitch to DVD, USB or SD mode.A different mode can also be chosen by pressing the power button or buttons.
2. The basic operation for USB is the samefor DVD.
AV FunctionOne way Audio/Video input, format &Automatic Switch.
SOURCE
DISC
USB
AV
HDMI
MOVE
SOURCE
DISC
USB
AV
HDMI
MOVE
SOURCE
DISC
USB
AV
HDMI
MOVE
VIDEOEnjoy Your Video in this mode.ex:mpeg2,mp4,avi,divx...
ENTER
Introduction of USB/SD
7Troubleshooting
USB/SD FunctionDVD Player
Disc In/Out
Menu
Volume+ Volume-
Source
Next
PreviousPower Switch
8
Play/Pause
DVD/AV
HDMI FunctionWith HDMI input, maximum support is1080P resolution.
1.Enter: Press under USB DVD mode andswitch to DVD, USB or SD mode.A different mode can also be chosen by pressing the power button or buttons.
2. The basic operation for USB is the samefor DVD.
AV FunctionOne way Audio/Video input, format &Automatic Switch.
SOURCE
DISC
USB
AV
HDMI
MOVE
SOURCE
DISC
USB
AV
HDMI
MOVE
SOURCE
DISC
USB
AV
HDMI
MOVE
VIDEOEnjoy Your Video in this mode.ex:mpeg2,mp4,avi,divx...
ENTER
Introduction of USB/SD
7
DVD Player
Disc In/Out
Menu
Volume+ Volume-
Source
Next
PreviousPower Switch
8
Play/Pause
DVD/AV
HDMI FunctionWith HDMI input, maximum support is1080P resolution.
1.Enter: Press under USB DVD mode andswitch to DVD, USB or SD mode.A different mode can also be chosen by pressing the power button or buttons.
2. The basic operation for USB is the samefor DVD.
AV FunctionOne way Audio/Video input, format &Automatic Switch.
SOURCE
DISC
USB
AV
HDMI
MOVE
SOURCE
DISC
USB
AV
HDMI
MOVE
SOURCE
DISC
USB
AV
HDMI
MOVE
VIDEOEnjoy Your Video in this mode.ex:mpeg2,mp4,avi,divx...
ENTER
Introduction of USB/SD
7
AV Function DVD Player
Disc In/Out
Menu
Volume+ Volume-
Source
Next
PreviousPower Switch
8
Play/Pause
DVD/AV
HDMI FunctionWith HDMI input, maximum support is1080P resolution.
1.Enter: Press under USB DVD mode andswitch to DVD, USB or SD mode.A different mode can also be chosen by pressing the power button or buttons.
2. The basic operation for USB is the samefor DVD.
AV FunctionOne way Audio/Video input, format &Automatic Switch.
SOURCE
DISC
USB
AV
HDMI
MOVE
SOURCE
DISC
USB
AV
HDMI
MOVE
SOURCE
DISC
USB
AV
HDMI
MOVE
VIDEOEnjoy Your Video in this mode.ex:mpeg2,mp4,avi,divx...
ENTER
Introduction of USB/SD
7
DVD Player
Disc In/Out
Menu
Volume+ Volume-
Source
Next
PreviousPower Switch
8
Play/Pause
DVD/AV
HDMI FunctionWith HDMI input, maximum support is1080P resolution.
1.Enter: Press under USB DVD mode andswitch to DVD, USB or SD mode.A different mode can also be chosen by pressing the power button or buttons.
2. The basic operation for USB is the samefor DVD.
AV FunctionOne way Audio/Video input, format &Automatic Switch.
SOURCE
DISC
USB
AV
HDMI
MOVE
SOURCE
DISC
USB
AV
HDMI
MOVE
SOURCE
DISC
USB
AV
HDMI
MOVE
VIDEOEnjoy Your Video in this mode.ex:mpeg2,mp4,avi,divx...
ENTER
Introduction of USB/SD
7
HDMI Function
Touch Buttons not working Touch buttons only work while glowing blue. Press the power or eject button to unlock power buttons
USB/SD video wont play Resolution too high (576p max) or wrong format (see table on page 7)
Not reading USD or SD Maximum readable capacity is 64GB. Not compatible with USB 3.0

7
Video Container Video Codec Audio Codec Max Resolution & Frame Rate
AVI (.avi/.divx)
MP4V DIVX3.xx/4.xx/5.xx/6.xx
Xvid MPEG-1
Dolby Digital (AC3) WMA/PCM/LPCM
AAC-LC (2ch) MPEG-Audio
(MP1/MP2/MP3)
720 x 576 (576p) 30fps
MPG (.mpg/.mpeg) MPEG-1/MPEG-2
Dolby Digital (AC3) LPCM
MPEG-Audio (MP1/MP2/MP3)
720 x 576 (576p) 30fps
DAT (.dat) MPEG-1/MPEG-2
Dolby Digital (AC3) LPCM
MPEG-Audio (MP1/MP2/MP3)
720 x 576 (576p) 30fps
FLV (.flv) H.263 LPCM/MP3 AAC-LC (2ch)
720 x 576 (576p) 30fps
RMVB (.rm/.rmvb/.rmv/ra) RV8/9/10
COOK AAC-LC (2ch)
Dolby Digital (AC3)
1280 x 720 (720p) 30fps
VOB (.vob) MPEG-1/MPEG-2 Dolby Digital (AC3) 720 x 576 (576p) 30fps
MP4/MOV (.MP4/.MOV) MP4V
Dolby Digital (AC3)WMA/LPCM
AAC-LC (2ch) MPEG-Audio
(MP1/MP2/MP3)
720 x 576 (576p) 30fps
Audio Bit Rate Sampling Rate
MP3 (.MP3) 16kbps ~ 320kbps 8K ~ 48KHz
ASF, WMA7, WMA8, WMA9 (only CBR, VBR) (Only Supports 353) (.wma/.asf) 16kbps ~ 320kbps 8K ~ 48KHz
OGG Vorbis (.ogg) 16kbps ~ 320kbps 8K ~ 48KHz
Video/Audio Compatibility Chart

AX1810