aws essentials student guide 1 - amazon s3essentials+student...aws essentials student guide 1.8 1...
TRANSCRIPT

AWS ESSENTIALS STUDENT GUIDE 1.8 1 © 2013 Amazon Web Services, Inc. and its affiliates. All rights reserved.
AWS Essentials Student Guide
Welcome to AWS Essentials! This guide will walk you through the hands-on lab portions of this course. If you have any questions as you move through these hands-on labs, please don’t hesitate to ask your instructor for assistance.
Training Agenda
Start End Agenda Name
9:00 9:15 Intro
9:15 10:30 Cloud Paradigm
10:30 10:45 Morning Break
10:45 12:00 Cloud Storage
12:00 1:00 Lunch
1:00 3:00 Cloud Compute
3:00 3:15 Afternoon Break
3:15 4:00 Operations & Managed Services
4:00 4:30 Wrap-up
4:30 5:00 Open Forum / Q&A

2 AWS ESSENTIALS STUDENT GUIDE 1.8 2013 Amazon Web Services, Inc. and its affiliates. All rights reserved
AWS Storage Services
Amazon Simple Storage Service – S3
Storage for the Internet. Natively online, HTTP access
Store and retrieve any amount of data, any time, from anywhere on the web
Highly scalable, reliable, fast and durable
Stores objects
Amazon Glacier
Extremely low-cost storage
Secure, durable storage for data archiving and backup
Optimized for data that is infrequently accessed
Archives data
Amazon Elastic Block Storage - EBS
Block storage volumes for use with Amazon EC2 instances
Attach to running instance and expose as a block device
Off-instance storage that persists independently of Amazon EC2 instances
Snapshots stored durably in Amazon S3
Primary storage
Amazon Storage Gateway
Connect an on-premises software appliance with cloud-based storage
Securely upload data to the AWS cloud for cost effective backup and rapid disaster recovery
Back up point-in-time snapshots of your on-premises application data to Amazon S3 for future recovery
Mirror your on-premises data to Amazon EC2 instances
Amazon Import Export
Accelerates moving large amounts of data into and out of Amazon S3 or Amazon EBS
Transfers your data directly onto and off of storage devices
Uses Amazon high-speed internal network

AWS ESSENTIALS STUDENT GUIDE 1.8 3 © 2013 Amazon Web Services, Inc. and its affiliates. All rights reserved.
Exercise #1: Getting Started with S3
1. Create a Bucket 2. Add an Object to a Bucket 3. View an Object 4. Move an Object 5. Delete an Object and Bucket
Create a Bucket:
Every object in Amazon S3 is stored in a bucket. Before you can store data in
Amazon S3 you must create a bucket.
Note: You are not charged for creating a bucket; you are only charged for storing
objects in the bucket and for transferring objects in and out of the bucket.
1. Sign into the AWS Management Console and open the Amazon S3 console at
https://console.aws.amazon.com/s3.
2. Click Create Bucket. The Create a Bucket dialog box appears.
3. Enter a bucket name in the Bucket Name field. The bucket name you choose
must be unique across all existing bucket names in Amazon S3. One way to do

4 AWS ESSENTIALS STUDENT GUIDE 1.8 2013 Amazon Web Services, Inc. and its affiliates. All rights reserved
that is to prefix your bucket names with your company's name. Bucket names
must comply with the following requirements. Bucket names:
Can contain lowercase letters, numbers, periods (.) and dashes (-)
Must start with a number or letter
Must be between 3 and 255 characters long
Must not be formatted as an IP address (e.g., 265.255.5.4)
Note: There might be additional restrictions on bucket names based on the
region your bucket is in or how you intend to access the object. Once you
create a bucket, you cannot change its name. In addition, the bucket name is
visible in the URL that points to the objects stored in the bucket. Make sure the
bucket name you choose is appropriate.
4. In the Region drop-down list box, select a region.
Tip: Ask the Instructor what region to select.
5. Click Create. When Amazon S3 successfully creates your bucket, the console
displays your empty bucket in the Buckets panel.
Great Job: You've created a bucket in Amazon S3.

AWS ESSENTIALS STUDENT GUIDE 1.8 5 © 2013 Amazon Web Services, Inc. and its affiliates. All rights reserved.
Add and Object to a Bucket:
Now that you've created a bucket, you're ready to add an object to it. An object
can be any kind of file: a text file, a photo, a video and so forth. When you add a
file to Amazon S3, you have the option of including metadata with the file and
setting permissions to control access to the file.
6. In the Amazon S3 console click the bucket you want to upload an object into
and then click Upload in the Objects and Folders panel. The Upload - Select
Files wizard opens (appearance may differ slightly in different borwsers):
7. If you want to upload a folder you must click Enable Enhanced Uploader for
the Java applet. After you download the Java applet, the Enable Enhanced
Uploader link disappears from the wizard. You only need to do this once per
console session and you can transfer entire folders.
Note: If you are behind any corporate firewall you will need to install your
corporate supported proxy client for the Java applet to work.

6 AWS ESSENTIALS STUDENT GUIDE 1.8 2013 Amazon Web Services, Inc. and its affiliates. All rights reserved
8. Click Add Files to select the file to upload from your computer. A file selection
dialog box opens.
9. The following image shows a sample Java file selection dialog box.
10. Select a sample graphic that came with your computer to upload and click
Open. The Upload - Select Files wizard shows the files and folders you've
selected to upload.
Tip: If you enabled advanced uploader in step 2, you see a Java file
selection dialog box. If not, you see an operating system specific dialog
box.

AWS ESSENTIALS STUDENT GUIDE 1.8 7 © 2013 Amazon Web Services, Inc. and its affiliates. All rights reserved.
11. Click Start Upload. You can watch the progress of the upload using the
Transfer panel. The Transfer panel appears on the bottom of the screen as
soon as a you begin the upload. TipIf you want to toggle between hiding and
viewing the Transfer panel, click the Transfers button in the top right of the
Objects and Folders panel. After the object uploads successfully to Amazon
S3, it appears in the object listing.
Great Job: You've added a file to your bucket.
View an Object:
12. Now that you've added an object to a bucket, you can open and view it in a
browser. In the Amazon S3 console, right-click the objects you want to open.
13. Click Properties to browse the URL for the item you added.
Note: By default your Amazon S3 buckets and objects are private. To view
object using a URL, for example, https://s3.amazonaws.com/Bucket/Object the
object must be publicly readable. Otherwise, you will need to create signed
URL that includes a signature with authentication information. You can

8 AWS ESSENTIALS STUDENT GUIDE 1.8 2013 Amazon Web Services, Inc. and its affiliates. All rights reserved
optionally save the object locally.
Great Job: You've opened your object.
Move an Object:
Now that you've added an object to a bucket and viewed it, you might like to move
the object to a different bucket or folder.
14. In the Amazon S3 console, right-click the object you want to move.TipYou
can use the SHIFT and CRTL keys to select multiple objects and perform the
same action on them simultaneously.
15. Click Cut.
16. Navigate to the bucket (and folder) you want to move the object to, and right-
click the folder or bucket you want to move the object to.

AWS ESSENTIALS STUDENT GUIDE 1.8 9 © 2013 Amazon Web Services, Inc. and its affiliates. All rights reserved.
17. Click Paste Into.Amazon S3 moves your files to the new location.
Tip: You can monitor the progress of the move on the Transfers panel. To hide
or show the Transfer panel, click the Transfers button at the top right of the
console page.
Great Job: Your file has been moved.
Delete an Object and Bucket:
You've viewed the object. Now, you can delete it and the bucket it's in.
If you no longer need to store the objects you uploaded and moved while going
through this guide, you should delete them so you do not incur further charges on
those objects.
18. In the Amazon S3 console, right-click on the object you want to delete. A
dialog box shows the actions you can take on the selected object(s).
Tip: You can use the SHIFT and CRTL keys to select multiple objects and
perform the same action on them simultaneously.

10 AWS ESSENTIALS STUDENT GUIDE 1.8 2013 Amazon Web Services, Inc. and its affiliates. All rights reserved
19. Click Delete
20. Confirm the deletion when the console prompts you to.
21. Right-click the bucket you want to delete. A dialog box shows the actions you
can take on the selected bucket.
22. Click Delete. Confirm the deletion when the console prompts you to.
Tip: To delete a bucket, you must first delete all of the objects in it. If you
haven't deleted all of the objects in your bucket, do that now.

AWS ESSENTIALS STUDENT GUIDE 1.8 11 © 2013 Amazon Web Services, Inc. and its affiliates. All rights reserved.
AWS Compute Services
Amazon Elastic Compute Cloud – EC2
Resizable compute capacity
Complete control of your computing resources
Reduces the time required to obtain and boot new server instances to minutes
Scale capacity as your computing requirements change
Pay only for capacity that you actually use
Amazon Auto Scaling
Scale your Amazon EC2 capacity automatically
Well suited for applications that experience variability in usage
Available at no additional charge
Amazon EC2 Families
Micro: Provide a small amount of consistent CPU
resources and enable you to burst CPU capacity when
additional cycles are available. They're well suited for
lower throughput applications and websites that consume
significant compute cycles periodically.
Standard: Have memory-to-CPU ratios suitable for most
general-purpose applications.
High- CPU: Have proportionally more CPU resources
than memory (RAM). They're well suited for compute-
intensive applications.
High- Memory: Have proportionally more memory
resources. They're well suited for high-throughput
applications, such as database and memory caching
applications.
High I/O: Provide tens of thousands of low-latency,
random I/O operations per second (IOPS) to an
application. They're well suited for NoSQL databases,

12 AWS ESSENTIALS STUDENT GUIDE 1.8 2013 Amazon Web Services, Inc. and its affiliates. All rights reserved
clustered databases, and OLTP (online transaction
processing) systems.
Cluster Compute: Have a very large amount of CPU
coupled with increased networking performance. They're
well suited for High Performance Compute (HPC)
applications and other demanding network-bound
applications.
Cluster GPU: Provide general-purpose graphics
processing units (GPUs), with proportionally high CPU
and increased network performance for applications that
benefit from highly parallelized processing. They're well
suited for HPC applications as well as rendering and
media processing applications
Lab 2: Working with EC2
1. Instance launch
2. Security groups
3. Instance bootstrapping
4. Machine images, and
5. Elastic IPs

AWS ESSENTIALS STUDENT GUIDE 1.8 13 © 2013 Amazon Web Services, Inc. and its affiliates. All rights reserved.
Creating EC2 Resources- Launch a Linux Instance
In this example we will launch a default Amazon Linux Instance with an Apache
PHP web server installed on initialization.
1. Once logged in to AWS Console, navigate to the EC2 Section of the console.
2. Next click on Launch Instance:

14 AWS ESSENTIALS STUDENT GUIDE 1.8 2013 Amazon Web Services, Inc. and its affiliates. All rights reserved
3. Select Classic Wizard and click Continue:

AWS ESSENTIALS STUDENT GUIDE 1.8 15 © 2013 Amazon Web Services, Inc. and its affiliates. All rights reserved.
4. Select the Micro (t1.micro) instance size and click Continue:
5. In the next screen, copy & paste the following initialization script (you may need
to type this into a text editor and copy & paste the results) into the User Data field
(this will automatically install and start Apache on launch).
#!/bin/sh
yum -y install httpd php
chkconfig httpd on
/etc/init.d/httpd start
Tip: Depending upon the resources or OS your instance requires, you may
select another type. As we require a Linux instance, select the Basic 64-bit
Amazon Linux AMI.

16 AWS ESSENTIALS STUDENT GUIDE 1.8 2013 Amazon Web Services, Inc. and its affiliates. All rights reserved
6. Now click Continue:
7. Click Continue to accept the default Storage Device Configuration.
8. Next, choose a “friendly name” for your AMI. This name, more correctly known
as a tag, will appear in the console once the instance launches. It makes it easy
to keep track of running machines in a complex environment. We named ours
“AWS Essentials Lab Instance”; however the only thing that matters is whether

AWS ESSENTIALS STUDENT GUIDE 1.8 17 © 2013 Amazon Web Services, Inc. and its affiliates. All rights reserved.
the name is meaningful to you. Put the name you choose in the Value field (see
below).
9. Then click Continue.
10. Then create a new key pair, and download it to a suitable directory on your
hard drive. In the example below, we named the key pair “EssentialsLab”. The
name is up to you. Just remember the name, and where (file path) it is saved.
11. Create a security group, which will be your firewall rules. We named this one
“EssentialsLab”. Again, the name is up to you. Make sure to open two ports: 22
(SSH) and 80 (HTTP). Port 22 is there by default. Select Custom TCP Rule,

18 AWS ESSENTIALS STUDENT GUIDE 1.8 2013 Amazon Web Services, Inc. and its affiliates. All rights reserved
Enter 80 in port range/click add rule (see below). Click Continue when finished.
12. Review your choices, and then click Launch.

AWS ESSENTIALS STUDENT GUIDE 1.8 19 © 2013 Amazon Web Services, Inc. and its affiliates. All rights reserved.
Note: You will receive a popup window notifying you your instances are
launching. You may close the Launch instance box. 13. Launch the instance and monitor it to make certain it’s running by navigating
to Services/EC2 and the Instances. Click refresh in the event the instance is not
running
Connect to the Linux Instance Using the Console (Java)
These instructions require Java to launch a web-based SSH client through the
console. You can also use any other SSH client such as PuTTY.
14. Once the instance is running, right-click on the instance and select “Connect”:

20 AWS ESSENTIALS STUDENT GUIDE 1.8 2013 Amazon Web Services, Inc. and its affiliates. All rights reserved
15. Make sure the User name is ec2-user, provide the location to the private key
that you created earlier on page 14 (e.g.: C:\ec2\Lab.pem). Make sure you use
the name you selected and the correct path to where the file was downloaded.
Check the option to save the key location in browser cache so you will not have to
retype this location in every time you connect to EC2 instances.

AWS ESSENTIALS STUDENT GUIDE 1.8 21 © 2013 Amazon Web Services, Inc. and its affiliates. All rights reserved.
16. Then click on Launch SSH Client:
It can take some time for the Java applet to download and run. If this is the first
time you have used this particular Java SSH client (MindTerm), you may be
prompted to accept the MindTerm license. Additionally you may be asked a series
of questions such as:
- Create known hosts directory?
- Grant access to the app?
Click “Yes” or “Accept” for these prompts. Keep in mind, depending on your configuration and whether MindTerm has been used before on your computer or not, you may or may not get all of these prompts. 19. You may also be asked if you want to store the host key for your Instance. At
this point you have the option to verify the host key MindTerm is seeing with the
host key provided by the AWS console to verify that you are connecting directly to
your EC2 instance and not some third-party in the middle. Select Yes if
prompted.
20. And finally, you should be logged into your Instance:

22 AWS ESSENTIALS STUDENT GUIDE 1.8 2013 Amazon Web Services, Inc. and its affiliates. All rights reserved
21. Once logged in, we’re going to modify the default web page to display
information about this instance.
Hint: For the following sections, it might be useful for you to use the
“Edit Paste” command from the MindTerm menu.
Configure the Linux Instance
22. The AMI has already been customized with the installation of Apache and
PHP from the script you entered as User Data when the instance was launched.
Modify the web server by adding the following index.php file. The following must
be typed at the $ prompt in the screen shot above.
cd /var/www/html
sudo vi index.php
23. If you are an experienced Linux user, you should know the basics of vi, the
default text editor. Otherwise you may want to check out some vi basics.
Press “i” to turn on insert mode.
Enter the following. If copying, you might want to cut and paste to notepad first,
then copy an paste from notepad to MindTerm:

AWS ESSENTIALS STUDENT GUIDE 1.8 23 © 2013 Amazon Web Services, Inc. and its affiliates. All rights reserved.
<?php
$url = "http://169.254.169.254/latest/meta-data/instance-id";
$instance_id = file_get_contents($url);
echo "Instance ID: <b>" . $instance_id . "</b><br/>";
$url = "http://169.254.169.254/latest/meta-data/placement/availability-zone";
$zone = file_get_contents($url);
echo "Zone: <b>" . $zone . "</b><br/>";
?>
24. Press Escape, followed by:
:wq
to save and quit after you add the PHP code above. This code will display the
web server’s ID and Availability Zone.
Connect to the web server
25. Enter the DNS name of your instance (you’ll find it in the Description tab in the
EC2 console) into your browser and connect to the server:

24 AWS ESSENTIALS STUDENT GUIDE 1.8 2013 Amazon Web Services, Inc. and its affiliates. All rights reserved
Assign a Fixed IP Address
AWS offers Elastic IP Addresses (EIPs), which are actually NAT addresses that
operate at a regional level. That is, an Elastic IP Address works across Availability
Zones, within a single region.
26. Let’s assign an EIP to your instance. Click on the Elastic IPs link in the AWS
Console and allocate a new address:

AWS ESSENTIALS STUDENT GUIDE 1.8 25 © 2013 Amazon Web Services, Inc. and its affiliates. All rights reserved.
27. You’ll see a confirmation prompt. Click Yes, Allocate
28. After confirmation, you’ll see your newly allocated EIP. Right-click on it and
choose Associate from the pop-up menu:
29. A popup will allow you to associate the EIP with one of your running
instances. Choose the instance that you just launched and click Yes, Associate:

26 AWS ESSENTIALS STUDENT GUIDE 1.8 2013 Amazon Web Services, Inc. and its affiliates. All rights reserved
Now your Elastic IP address is associated to your instance:
30. And your instance should now report its new IP address in the console:

AWS ESSENTIALS STUDENT GUIDE 1.8 27 © 2013 Amazon Web Services, Inc. and its affiliates. All rights reserved.
31. Now, verify the new IP address of your web server in a browser:
Congratulations! You now have successfully:
Learned about the basic concepts and terminology of the Amazon Elastic
Compute Cloud (EC2) service,
Created your own Amazon EC2 server instance running Linux in the AWS
cloud,
Modified it to run a web server with a page that displays machine-specific
information,
Assigned a fixed public IP address (Elastic IP) to your instance.

28 AWS ESSENTIALS STUDENT GUIDE 1.8 2013 Amazon Web Services, Inc. and its affiliates. All rights reserved
AWS Networking, Monitoring and Deployment & Management Services
Amazon Elastic Load Balancer - ELB
Supports the routing and load balancing of HTTP, HTTPS, and TCP traffic to Amazon EC2 instances
Supports health checks to ensure detect and remove failing instances
Dynamically grows & shrinks required resources based on traffic
Seamlessly integrates with Auto Scaling to add and remove instances based on scaling activities
Single CNAME provides stable entry point for DNS configuration
AWS Identity and Access Management - IAM
Create and manage AWS users and groups and use permissions to allow / deny their permissions to resources
Enables identity federation between your corporate directory and AWS services
Use existing corporate identities to grant secure access to AWS resources, such as Amazon S3 buckets, without creating new AWS identities for those users
Amazon CloudWatch
Visibility into resource utilization, operational performance, and overall demand patterns
Metrics including CPU utilization, disk reads and writes, and network traffic
Custom application-specific metrics of your own
Accessible via AWS Management Console, APIs, SDK, or CLI
Amazon Elastic Beanstalk
• Simply upload your application • Automatically handles the deployment details of capacity
provisioning, load balancing, auto scaling, & application health monitoring
• Keep full control over AWS resources powering your app

AWS ESSENTIALS STUDENT GUIDE 1.8 29 © 2013 Amazon Web Services, Inc. and its affiliates. All rights reserved.
Amazon CloudFormation
• Create templates of stack of resources • Deploy stack from template with runtime parameters • CloudFormer supports generating templates from running
environments
Exercise #5: Getting Started with ELB
1. Create an ELB across several EC2 instances 2. Deploy a simple application on EC2 3. Then distribute load by viewing the application
Overview
This lab will walk you through the process of creating an Elastic Load Balancer
(ELB) to load balance traffic across several EC2 instances in a single Availability
Zone. You will deploy a simple application on EC2 instances over which you will
distribute load by viewing the application in your browser.
During this lab you will achieve the following:
Launch a multiple server web server farm on EC2 using bootstrapping
techniques to configure a Linux server with Apache, PHP and a simple
PHP application downloaded from S3
Create an Elastic Load Balancer (ELB) using the console to front your
created EC2 instances
Configure the ELB to front the web servers and distributed load
Explore Cloud Watch metrics for the ELB and also the instances behind
the ELB.
Launch Web Servers
In this lab we will launch a 2 server Amazon Linux farm with an Apache PHP web

30 AWS ESSENTIALS STUDENT GUIDE 1.8 2013 Amazon Web Services, Inc. and its affiliates. All rights reserved
server and basic application installed on initialization. This lab introduces you to a
very basic example of bootstrapping your instances using the meta-data service
to get you thinking about more complicated patterns that you might want to
implement to configure instances as they are started.
1. To start your instances navigate to the EC2 page in the AWS Console
Note: Please ensure your region is set to US East (N. Virginia). In the upper right
corner of the page, you can choose the region using the selector in the console
shown below:
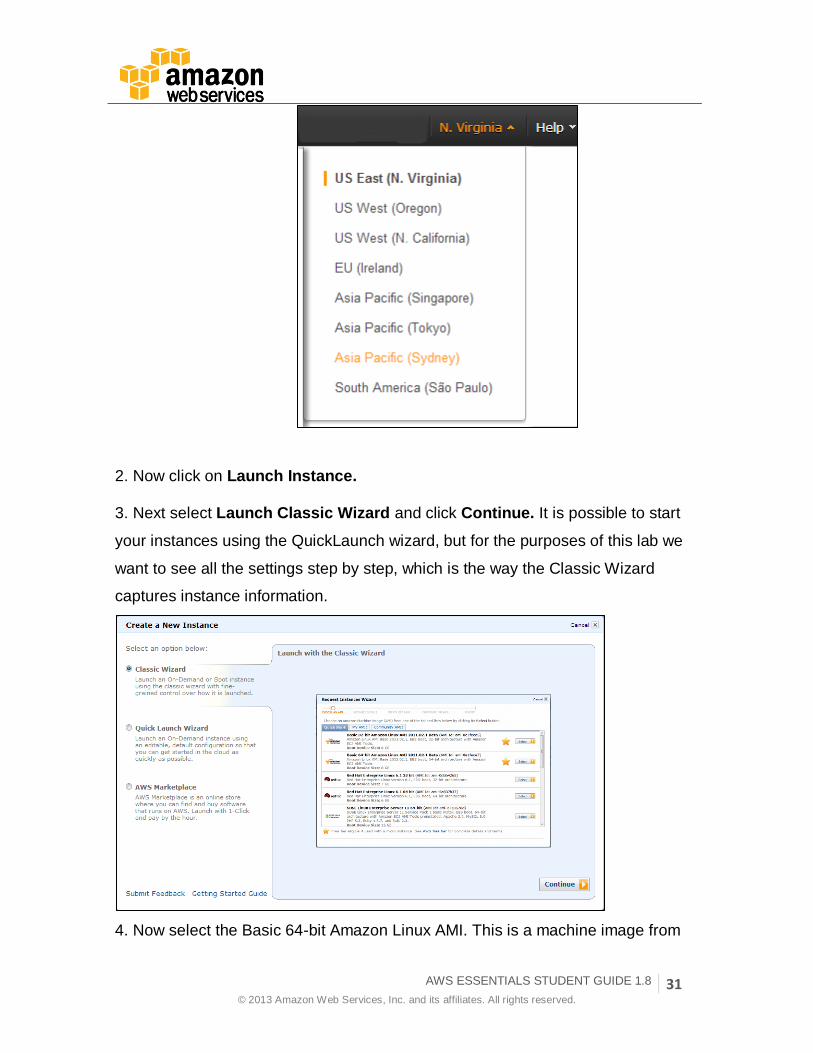
AWS ESSENTIALS STUDENT GUIDE 1.8 31 © 2013 Amazon Web Services, Inc. and its affiliates. All rights reserved.
2. Now click on Launch Instance.
3. Next select Launch Classic Wizard and click Continue. It is possible to start
your instances using the QuickLaunch wizard, but for the purposes of this lab we
want to see all the settings step by step, which is the way the Classic Wizard
captures instance information.
4. Now select the Basic 64-bit Amazon Linux AMI. This is a machine image from

32 AWS ESSENTIALS STUDENT GUIDE 1.8 2013 Amazon Web Services, Inc. and its affiliates. All rights reserved
which our instances will be created. In this case this is an Amazon maintained
Linux distribution with access to all the software repositories we require to install
software for this lab (such as Apache and PHP)
5. We want to start more than one instance for this lab, so change the number of
instances to 2 and click Continue.

AWS ESSENTIALS STUDENT GUIDE 1.8 33 © 2013 Amazon Web Services, Inc. and its affiliates. All rights reserved.
6. In the next screen we will use the User Data field to bootstrap our instance,
running a custom script to install the necessary packages (Apache and PHP) and
sample code (PHP scripts) that we will use in this lab. User data provides a
mechanism to pass information to the Amazon metadata service, which instances
request information from at launch time. One property of the metadata service is
that shell scripts passed in will be executed. In our case we will bootstrap using
the script shown in the box below.
7. To do this, copy & paste the following initialization script (you can use Shift-
Enter to get to a new line in the text box) into the User Data field and click
Continue:
#!/bin/sh
curl -L http://bootstrapping-assets.s3.amazonaws.com/bootstrap-elb.sh | sh
8. As an FYI - the shell script at the url above downloads from S3 and then executes the following command:
yum -y install httpd php
chkconfig httpd on
/etc/init.d/httpd start
cd /var/www/html
wget http://bootstrapping-
assets.s3.amazonaws.com/examplefiles-elb.zip
unzip examplefiles-elb.zip
This downloads and installs various components, starts them, and installs our
sample application.

34 AWS ESSENTIALS STUDENT GUIDE 1.8 2013 Amazon Web Services, Inc. and its affiliates. All rights reserved
10. Next you can click continue on this screen, but you will notice that should you
require, you are able to edit the size of the root volume, plus add aditional disks to
the instance at boot time.

AWS ESSENTIALS STUDENT GUIDE 1.8 35 © 2013 Amazon Web Services, Inc. and its affiliates. All rights reserved.
11. Give your new web servers a nice name like Essentials Lab Servers and
click Continue.
12. For this lab, we will reuse the key pair we created in the earlier lab. You also
have the option of creating a new key pair.
36 AWS ESSENTIALS STUDENT GUIDE 1.8 2013 Amazon Web Services, Inc. and its affiliates. All rights reserved
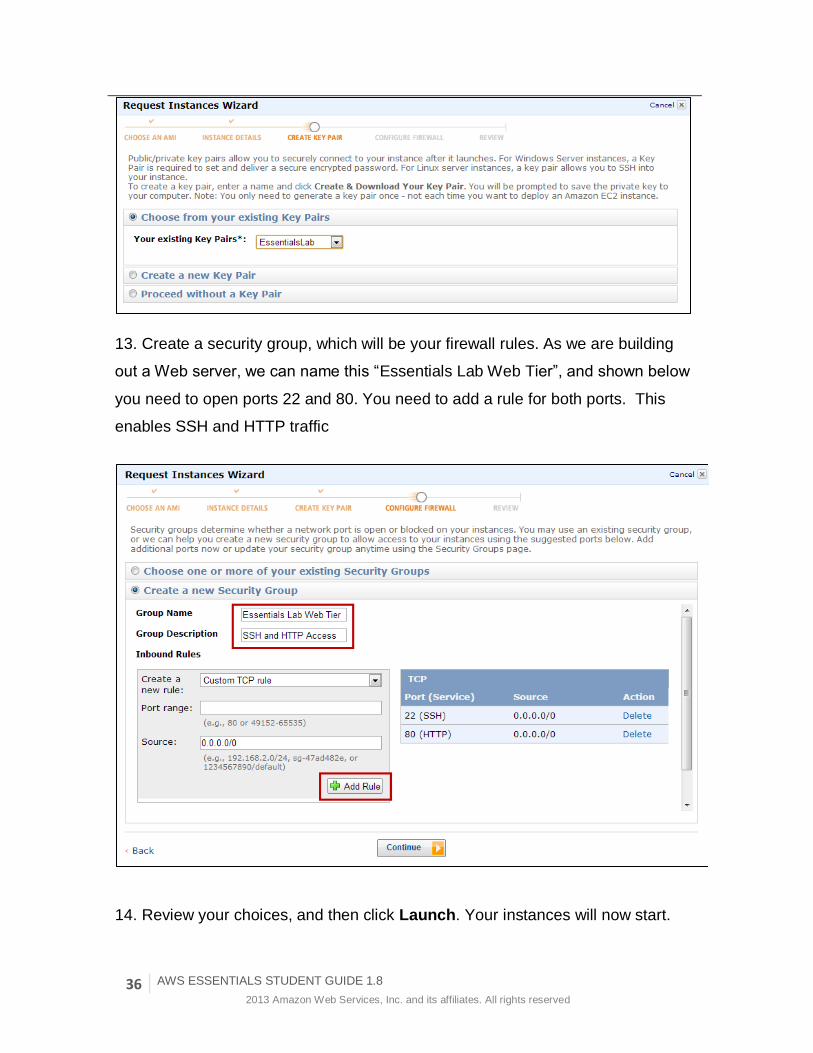
13. Create a security group, which will be your firewall rules. As we are building
out a Web server, we can name this “Essentials Lab Web Tier”, and shown below
you need to open ports 22 and 80. You need to add a rule for both ports. This
enables SSH and HTTP traffic
14. Review your choices, and then click Launch. Your instances will now start.

AWS ESSENTIALS STUDENT GUIDE 1.8 37 © 2013 Amazon Web Services, Inc. and its affiliates. All rights reserved.
Independently Connect to Each Web Server
15. First check the instances we started have finished their creation cycle by
monitoring them to make certain they are running. You’ll notice that the instances
will be in a ‘running’ state with ‘2/2 checks passed’
16. Now we can grab the public DNS entry allocated to each server so that we
can use this to hit the server in our web browser. Click on the first Web Server,
locate the server’s DNS name, select and copy the server’s name.

38 AWS ESSENTIALS STUDENT GUIDE 1.8 2013 Amazon Web Services, Inc. and its affiliates. All rights reserved
17. Paste the DNS name of each instance into another browser window or tab
and you should see something like the following images:

AWS ESSENTIALS STUDENT GUIDE 1.8 39 © 2013 Amazon Web Services, Inc. and its affiliates. All rights reserved.

40 AWS ESSENTIALS STUDENT GUIDE 1.8 2013 Amazon Web Services, Inc. and its affiliates. All rights reserved
18. This is the web page returned by the PHP script that was installed when the
instance when it started. It is a simple script that interrogates the metadata
service and returns the instance ID and where it is running. This will be
information that will help you see which instance you are hitting when we put an
Elastic Load Balancer in front of them.
Create an Elastic Load Balancer (ELB)
You now have two web servers, but you need a load balancer in front of these
servers to give your users a single location for accessing both servers and to
balance user requests across your simple web server farm.
19. In the EC2 console, click on the Load Balancers link, and click on Create
Load Balancer button.
20. For this lab we will be creating a simple HTTP load balancer, so give your

AWS ESSENTIALS STUDENT GUIDE 1.8 41 © 2013 Amazon Web Services, Inc. and its affiliates. All rights reserved.
ELB a new name like LabELB, accept the default listener, and click Continue.
21. On the next screen change Ping Path to / (delete index.html) and change
the Healthy Threshold to 3. The ping path is the location on our web servers the
ELB will check is returning a healthy response to keep instances in service or not.
In our example / will return the default page – our PHP generated page seen
earlier. The Healthy Threshold is the number of successful checks the ELB
expects to see in a row before bringing an instance into service behind the ELB.
We are lowering this to speed things up for our lab.

42 AWS ESSENTIALS STUDENT GUIDE 1.8 2013 Amazon Web Services, Inc. and its affiliates. All rights reserved
22. Click continue to accept the advanced options. Note that these options can
be changed in the future, and configure how the ELB Health Check will be
performed including the health check protocol, port, and path as well as the health
check interval, timeout, and heath thresholds.
23. Select your Web Servers to add them to your ELB and click Continue.

AWS ESSENTIALS STUDENT GUIDE 1.8 43 © 2013 Amazon Web Services, Inc. and its affiliates. All rights reserved.
24. Review your ELB settings and click Create (followed by Close).
25. AWS is now creating your ELB. It will take a couple of minutes to spin up your
load balancers, attach your web servers, and pass the health checks.
Click on your load balancer, select the Instances tab, and wait until the
instances status changes from Out of Service to In Service. Also note that the
overall ‘Healthy?’ column turns from N0 to Yes. Your ELB is ready when this
happens.

44 AWS ESSENTIALS STUDENT GUIDE 1.8 2013 Amazon Web Services, Inc. and its affiliates. All rights reserved
26. Once your ELB is healthy, click on the Description tab, select and copy the
ELB’s DNS name.
Note: ELBs work across availability zones and they also scale elastically as
demand dictates. They therefore do not have IP addresses but rather a URL to
hit.
27. Open the ELB URL in another browser tab. Hit the browser refresh button a
few times and you should cycle through your web servers such as the following

AWS ESSENTIALS STUDENT GUIDE 1.8 45 © 2013 Amazon Web Services, Inc. and its affiliates. All rights reserved.
images. Note the URL in these browsers is the ELB address, not the instance
addresses.

46 AWS ESSENTIALS STUDENT GUIDE 1.8 2013 Amazon Web Services, Inc. and its affiliates. All rights reserved
View ELB CloudWatch Metrics
ELB automatically reports load balancer metrics to CloudWatch. You can view
these metrics by clicking on the CloudWatch tab in the console.
In CloudWatch, click on the ELB link on the left, and select the metric you would
like to view. ELB reports request latency, requestcount, heathy & unhealthy host
counts, and a number of additional metrics. The metrics are reported as they are
encountered and can take several minutes to show up in CloudWatch. The
following screenshot shows CloudWatch graphing the HealthyHostCount, which
transitioned from zero healthy hosts to two shortly after the ELB was created for
this lab.

AWS ESSENTIALS STUDENT GUIDE 1.8 47 © 2013 Amazon Web Services, Inc. and its affiliates. All rights reserved.
Congratulations. You have now been able to create an Elastic Load Balancer
backed by multiple EC2 servers. In normal operation we would advise that these
servers be located in separate availability zones to enable your application to be
fault tolerant. You have also briefly seen how you can monitor the ELB metrics in
Cloud Watch.

48 AWS ESSENTIALS STUDENT GUIDE 1.8 2013 Amazon Web Services, Inc. and its affiliates. All rights reserved
AWS Resources
Glossary
API is an abbreviation for application program interface. The interface (calling conventions) by which an application program accesses operating system and other services. An API is defined at source code level and provides a level of abstraction between the application and the kernel (or other privileged utilities) to ensure the portability of the code.
Web Services can convert your application into a Web-application, which can
publish its function or message to the rest of the world. The basic Web Services platform is XML + HTTP. Web services are application components.
HTTP is an abbreviation for Hypertext Transfer Protocol. It is designed to
enable communications between clients and servers. SDK is an abbreviation for Software Development Kits. It is used for popular
software programming languages to enable rapid development against AWS services without having to use the granular APIs directly. They provide a layer of abstraction on top of the APIs.
CLI are command line tools or programs that execute AWS APIs from the OS
prompt. This is a quick and easy way to create scripts. AWS does not stand still and features are being constantly introduced to make the AWS platform more powerful, hence the tools need to be updated to make use of the latest API improvements so CLI tools will need to be updated from time to time.
Asynchronous of a computer, means having each operation started only after
the preceding operation is completed. Tags are managed AWS resources. Tags are key, value pair that you define.
E.g. you can define NAME=PRODSERVER1 for an EC2 instance or DEPARTMENT=FINANCE to later run a report against DEPARTMENT tags for each resource to be used for cost allocation to different departments.
AMI is an abbreviation for Amazon Machine Image. An Amazon Machine Image (AMI) is an encrypted machine image stored in Amazon S3. It contains all the information necessary to boot instances of your software.
Instance is a result of running a system. After you launch an Amazon Machine Image (AMI), the resulting running system is referred to as an instance.
IaaS is an abbreviation for Infrastructure as a service. It is the "computing" in cloud computing.
Service Oriented Architectures use web services to programmatically
AWS ESSENTIALS STUDENT GUIDE 1.8 49 © 2013 Amazon Web Services, Inc. and its affiliates. All rights reserved.
control infrastructure from within applications. This is “the model” for building large scale distributed and multi-tier complex systems.
Compute is a feature that allows one to take advantage of thousand of
networked servers. Utility Computing is the packaging of computing resources, such as
computation and storage, as a metered service similar to a traditional public utility (such as electricity, water, natural gas, or telephone network).
Eventual Consistency is one of the consistency models used in the domain
of parallel programming, for example in distributed shared memory, distributed transactions, and Optimistic replication.
Auto Scaling Group: An Auto Scaling group is a representation of multiple Amazon EC2 instances that share similar characteristics, and that are treated as a logical grouping for the purposes of instance scaling and management. For example, if a single application operates across multiple instances, you might want to increase or decrease the number of instances in that group to improve the performance of the application. You can use the Auto Scaling group to automatically scale the number of instances or maintain a fixed number of instances. An Auto Scaling group can contain EC2 instances that come from one or more EC2 Availability Zones.
Health Check: A health check is a call to check on the state of each instance
in an Auto Scaling group. Auto Scaling checks the state of the instances by making calls to Amazon EC2 Describe Instances action. If the instance returns any other state other than running, Auto Scaling considers the instance to be Unhealthy. Auto Scaling then terminates the instance and launches another one to take its place. This ensures that your Auto Scaling group is consistent and operating normally. For more information, see Maintaining Current Scaling Level.
Launch Configuration: A launch configuration captures the parameters
necessary to create new EC2 instances. You can attach only one launch configuration to an Auto Scaling group at a time. When you attach a new or updated launch configuration to your Auto Scaling group, any new instances will be launched using the new configuration parameters. Existing instances are not affected. When Auto Scaling needs to scale down, it first terminates instances that have an older launch configuration.
Tagging: Tagging is an Auto Scaling group tag is a tool for organizing your
Auto Scaling resources and providing additional information for your Auto Scaling group such as software version, role, or location. Auto Scaling group tags work like Amazon EC2 tags; Auto Scaling group tags provide search, group, and filter functionality. These tags have a key and value that you can modify. You can also remove Auto Scaling group tags any time.
Trigger: A trigger is a concept that combines two AWS features: a CloudWatch alarm (configured to watch a specified CloudWatch metric)

50 AWS ESSENTIALS STUDENT GUIDE 1.8 2013 Amazon Web Services, Inc. and its affiliates. All rights reserved
and an Auto Scaling policy that describes what should happen when the alarm threshold is crossed. In most cases, you will need two triggers—one trigger for scaling up and another for scaling down. For example, if you want to scale up when your CPU usage increases to 80 percent, you need to configure a CloudWatch alarm and create an Auto Scaling policy. The alarm detects when the CPU usage has reached 80 percent and sends a message to Auto Scaling. Auto Scaling determines what to do by using the instructions in the scaling policy. If you also want to scale down when your CPU usage decreases to 40 percent, you need a second trigger. In other words, you need to configure a separate CloudWatch alarm to detect the 40 percent threshold and create a separate Auto Scaling policy that scales down.
Policy: A policy is a set of instructions for Auto Scaling that tells the service
how to respond to CloudWatch alarm messages. You can configure a CloudWatch alarm to send a message to Auto Scaling whenever a specific metric has reached a triggering value. When the alarm sends the message, Auto Scaling executes the associated policy on an Auto Scaling group to scale the group up or down.
Schedule Update: A scheduled update is a call to Auto Scaling that is scheduled for a future time. Currently, updates are supported only to min-, max-, and desired capacity. For more information about the supporting API action, go to PutScheduledUpdateGroupAction in the Auto Scaling API Reference.
Scaling Activity: A scaling activity is a long-running process that implements
a change to your Auto Scaling group, such as changing the size of the group. It can also be a process to replace an instance, or to perform any other long-running operations supported by the service. Cooldown is the period of time after Auto Scaling initiates a scaling activity during which no other scaling activity can take place. A cooldown period allows the effect of a scaling activity to become visible in the metrics that originally triggered the activity. This period is configurable, and gives the system time to perform and adjust to any new scaling activities (such as scale-in and scale-out) that affect capacity.
Alarm: Alarm is an Amazon CloudWatch alarm, an object that watches over a
single metric. An alarm can change state depending on the value of the metric. When an alarm changes state it executes one or more actions. To create an alarm, use the Amazon CloudWatch PutMetricAlarm action to specify the metric to watch, the threshold values for the metric, the number of evaluation periods, and, optionally, one or more Amazon Simple Notification Service actions to perform when the alarm changes state.
Metric: A metric is the fundamental concept for Amazon CloudWatch and
represents a time-ordered set of data points. Either you or AWS products publish metric data points into Amazon CloudWatch and you retrieve statistics about those data points as an ordered set of time-series data. You can think of a metric as a variable that you want to

AWS ESSENTIALS STUDENT GUIDE 1.8 51 © 2013 Amazon Web Services, Inc. and its affiliates. All rights reserved.
monitor. The data points represent the values of that variable over time. For example, the CPU usage of a particular Amazon EC2 instance is one metric, and the latency of an elastic load balancer is another. Amazon CloudWatch stores your metric data for two weeks. You can publish metric data from multiple sources, such as incoming network traffic from dozens of different Amazon EC2 instances, or requested page views from several different web applications. You can request statistics on metric data points that occur within a specified time window.
Namespaces: Amazon CloudWatch namespaces are conceptual containers for metrics. Metrics in different namespaces are isolated from each other, so that metrics from different applications are not mistakenly aggregated into the same statistics. Dimension.
Dimensions: A dimension is a name/value pair that helps you to uniquely identify a metric. Every metric has specific characteristics that describe it, and you can think of dimensions as categories for those characteristics. Dimensions help you design a conceptual structure for your statistics plan. Because dimensions are part of the unique identifier for a metric, whenever you add a unique name/value pair to one of your metrics, you are creating a new metric.
Time Stamp: with Amazon CloudWatch, each metric data point must be marked with a time stamp. The time stamp can be up to two weeks in the past and up to one day in the future. If you do not provide a time stamp, Amazon CloudWatch creates a time stamp for you based on the time the data element was received.
Units: represent your statistic's unit of measure. For example, the units for the
Amazon EC2 Networking metric is Bytes because Networking tracks the number of bytes that an instance receives on all network interfaces.
Statistics: are metric data aggregations over specified periods of time. Amazon CloudWatch provides statistics based on the metric data points you or AWS products have provided to Amazon CloudWatch. Aggregations are made using the namespace, metric name, dimensions, and the data point unit of measure, within the time period you specify. The following table describes the available statistics.
Period: is the length of time associated with a specific Amazon CloudWatch statistic. Each statistic represents an aggregation of the metrics data collected for a specified period of time. You can adjust how the data is aggregated by varying the length of the period. A period can be as short as one minute (60 seconds) or as long as two weeks (1,209,600 seconds)
Region: Each Amazon Region is designed to be completely isolated from the other Amazon Regions. This achieves the greatest possible failure independence and stability, and it makes the locality of each Amazon resource unambiguous.

52 AWS ESSENTIALS STUDENT GUIDE 1.8 2013 Amazon Web Services, Inc. and its affiliates. All rights reserved
Appendix A. - Creating an AWS Account
AWS Management Console
1. Create an AWS Account 2. Sign Up for AWS Services 3. Find Your AWS Account Number 4. Find Your AWS Access Keys 5. Redeem Your AWS Credits
Create an AWS Account:
1. Go to the AWS web site at http://aws.amazon.com.
2. Click to get to the Amazon Web Services Sign In page.
3. On the Amazon Web Services Sign In page, in the My e-mail address is box,
type your e-mail address.
4. Click I am a new user.
5. Click
6. On the Login Credentials page type your name and type your e-mail
address in My e-mail address is text box and again in Type it again text box
below to confirm your email address is the same is both text boxes.

AWS ESSENTIALS STUDENT GUIDE 1.8 53 © 2013 Amazon Web Services, Inc. and its affiliates. All rights reserved.
Note: This email address will be used to content you about your account
information.
7. In the Enter a new password text box, type a password and again in Type it
again text box below to confirm you have a the same password in both text boxes.
8. Click Continue.
9. On the Contact Information page, type in your information: your address,
phone number, company or web site name, and web site URL. Boxes marked
with * are mandatory.
10. In the Amazon Web Services Customer Agreement section, select the check
box to indicate that you accept the terms of the agreement.
11. Click
Tip: Make sure that it is a strong password with mixed-case letters,
punctuation, and numbers. Make sure that you remember your password.

54 AWS ESSENTIALS STUDENT GUIDE 1.8 2013 Amazon Web Services, Inc. and its affiliates. All rights reserved
12. Enter your Credit Card information and Billing Information.
13. Once done, click Continue to move on to the next step verify identity by
telephone.
14. There are 3 steps in the Identity Verification by Telephone. 1. Provide a
telephone number and click Call Me Now to move on to the next step. 2. Call in
progress 3. Identity verification complete.
Note: You will be notified by email once the verification is complete.
Find Your AWS Account Number & Key:
1. Go to the AWS website at http://console.aws.amazon.com.
2. Enter the email and password you used to create an account.

AWS ESSENTIALS STUDENT GUIDE 1.8 55 © 2013 Amazon Web Services, Inc. and its affiliates. All rights reserved.
3. Click
4. Click Account Identifiers to view your
new AWS Account ID.
6. Click Access Credentials to view your Access Keys, X.509 Certificates, and
Key Pairs.
Create an EC2 Key Pair:
Create an EC2 Key Pair that will be used to access EC2 instances you launch.
1. Go to the AWS Management Console
https://console.aws.amazon.com/ec2/home and sign in with your new email and
password.
2. Navigate to Amazon EC2
under Amazon Web Services on the home page.
3. Use the drop down button to select the appropriate AWS Region. This is
located in the top right hand corner in between your user name and help.
4. In the navigation panel on the left under NETWORK & SECURITY click Key
Tip: Your Account Number is the same as your AWS Account ID.

56 AWS ESSENTIALS STUDENT GUIDE 1.8 2013 Amazon Web Services, Inc. and its affiliates. All rights reserved
Pairs.
5. In the Key Pairs screen, click Create Key Pair.
6. Enter ec2KeyPair for Key Pair Name and click Create and your private key
should begin downloading in a few seconds. Depending on the browser, the
downloaded .pem file will be saved in your Downloads folder.
Note: If you have an existing EC2 Key Pair that you would like to use, these steps
may be skipped. Future lessons in this course will refer to the key pair named
ec2KeyPair created in this section. Replace that value with the name of your
existing key pair if you choose that option.