avenue of flags - optimist international
TRANSCRIPT

Avenue of Flags Guide Book
June 29, 2009 Updated Jan. 18, 2010
By Dale Robertson Underwood Optimist Club J.O.O.I. High School Club
sponsored by Underwood Optimist Club (Iowa District, Club #40-113) Advisors: Pam Miller, Teresa Goodsell, Barb Robertson President Mallory Goodsell
By: Dale Robertson Page 1 of 13 Date: 1/18/10

Table of Contents Contact Information............................................................ 3 History.................................................................................. 3 Holidays ............................................................................... 3 Cost Estimates .................................................................... 3 Vendor Information............................................................. 4
Flags................................................................................................ 4 Hardware & Paint ............................................................................ 4 Rivets and Caps .............................................................................. 4
Subscription Spreadsheet Example.................................. 4 Subscription Form .............................................................. 5 Flag Products Required...................................................... 6
Flags................................................................................................ 6 Rivets .............................................................................................. 6 Flag Pole Inserts ............................................................................. 6 Flag Poles ....................................................................................... 6 Flag Pole Inserter device................................................................. 6 Flag Insert Cap................................................................................ 6 Location Stencil ............................................................................... 7 Flag Storage Cart ............................................................................ 7
Assembly ............................................................................. 7 Flags mounted onto poles ............................................................... 7 Flag Pole Ground Inserts ................................................................ 7 Pole Insert Supplies needed for Installation .................................... 8 Flag Pole Insert Removal ................................................................ 8
Flag locations...................................................................... 8 City Approval ................................................................................... 8 Locating flags .................................................................................. 9 Iowa One Call.................................................................................. 9
People Instructions............................................................. 9 Items to provide each group for placement: .................................... 9 Flag Placement Instructions ............................................................ 9 Items to provide each group for removal: ...................................... 10 Flag Removal Instructions............................................................. 10
Insurance Binder............................................................... 11 City Agreement.................................................................. 12
By: Dale Robertson Page 2 of 13 Date: 1/18/10

By: Dale Robertson Page 3 of 13 Date: 1/18/10
Contact Information Dale Robertson 505 North Street Underwood, IA 51576
Res: 712-566-2820 Fax: 712-566-2820 Bus: 712-366-9553 ext. 281 E-mail: [email protected]
History
• Dale Robertson proposed the idea to the J.O.O.I. High School Club at a meeting.
• Underwood Optimist Club fronted the purchase of 100 flags. • Underwood Optimist Club applied for an O.I. Foundation Grant for start-up
of this project and was awarded $500 at OI convention in Orlando, FL 2009.
• First Avenue of Flags displayed: May 31, 2009-Memorial Day • Subscriptions:
o 69 flags May 31, 2009 o 84 flags June 15, 2009 o 102 flags July 4, 2009
Holidays
1. Memorial Day (Last Monday in May) 2. Flag Day June 14 3. Independence Day July 4 4. Labor Day (1st Monday in Sept.) 5. Patriot Day Sept. 11 6. Veteran’s Day Nov. 11
Cost Estimates Direct Costs
Description Supplier Per Flag Flag 3’x5’ Nylon Mr. Ed’s Flags-Council Bluffs $13.91 Pole ¾” x 10’ Menards $4.22 Pole Insert 1” x 17” Menards $1.14 Plastic Cap Central Iowa Fastners $.10 (est.) Two 3/16” x 3/8” large flange rivets Central Iowa Fastners $.06 (est.) Total per Flag $ 19.43
Additional Costs spread across several flags
Description Supplier Approx. Coverage
Flags @ $Costs Per Flag Flag Pole Inserter Device Menards 20 @ $16 $ .80 Spray paint Menards 100 @ $4 $ .40 Auger bit Menards Infinite- 100@$16 $ .16 Miter Saw metal cutting blades Menards 50 @ $8 $ .16 Total per Flag $ 1.52
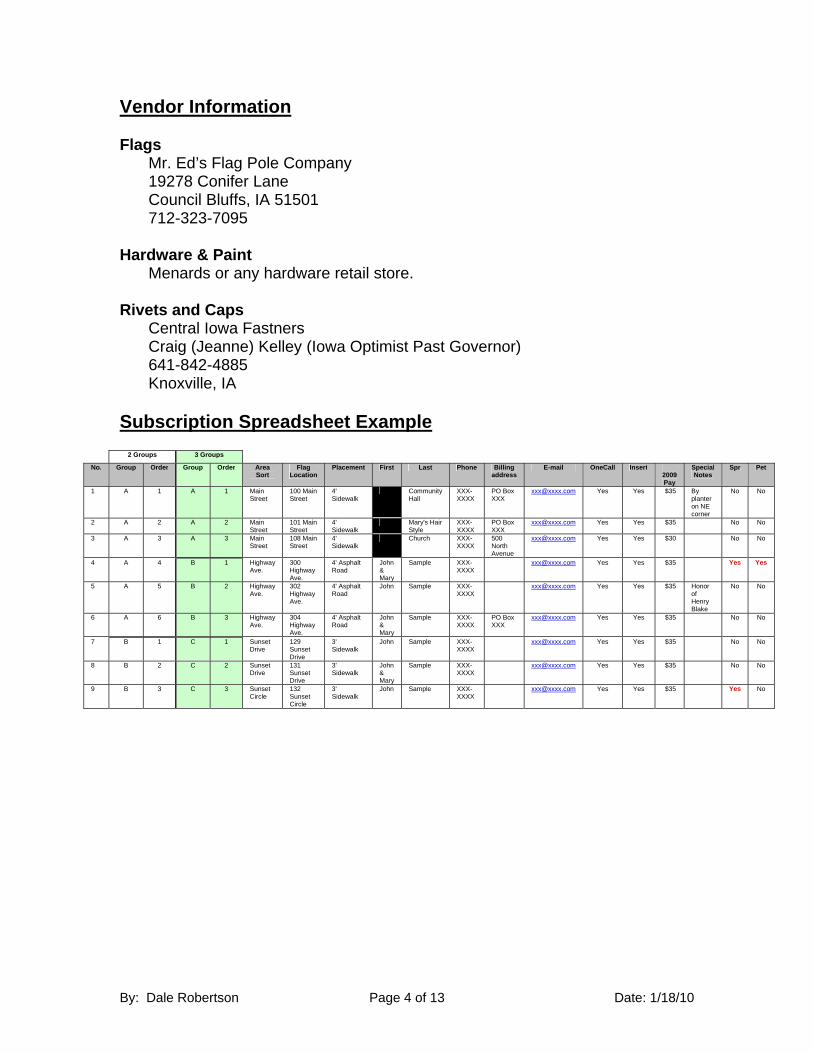
Vendor Information Flags Mr. Ed’s Flag Pole Company 19278 Conifer Lane Council Bluffs, IA 51501 712-323-7095 Hardware & Paint
Menards or any hardware retail store. Rivets and Caps
Central Iowa Fastners Craig (Jeanne) Kelley (Iowa Optimist Past Governor) 641-842-4885 Knoxville, IA Subscription Spreadsheet Example
2 Groups 3 Groups
No. Group Order Group Order Area Sort
Flag Location
Placement First Last Phone Billing address
E-mail OneCall Insert 2009 Pay
Special Notes
Spr Pet
1 A 1 A 1 Main Street
100 Main Street
4' Sidewalk
Community Hall
XXX-XXXX
PO Box XXX
[email protected] Yes Yes $35 By planter on NE corner
No No
2 A 2 A 2 Main Street
101 Main Street
4' Sidewalk
Mary's Hair Style
XXX-XXXX
PO Box XXX
[email protected] Yes Yes $35 No No
3 A 3 A 3 Main Street
108 Main Street
4' Sidewalk
Church XXX-XXXX
500 North Avenue
[email protected] Yes Yes $30 No No
4 A 4 B 1 Highway Ave.
300 Highway Ave.
4' Asphalt Road
John & Mary
Sample XXX-XXXX
[email protected] Yes Yes $35 Yes Yes
5 A 5 B 2 Highway Ave.
302 Highway Ave.
4' Asphalt Road
John Sample XXX-XXXX
[email protected] Yes Yes $35 Honor of Henry Blake
No No
6 A 6 B 3 Highway Ave.
304 Highway Ave.
4' Asphalt Road
John & Mary
Sample XXX-XXXX
PO Box XXX
[email protected] Yes Yes $35 No No
7 B 1 C 1 Sunset Drive
129 Sunset Drive
3' Sidewalk
John Sample XXX-XXXX
[email protected] Yes Yes $35 No No
8 B 2 C 2 Sunset Drive
131 Sunset Drive
3' Sidewalk
John & Mary
Sample XXX-XXXX
[email protected] Yes Yes $35 No No
9 B 3 C 3 Sunset Circle
132 Sunset Circle
3' Sidewalk
John Sample XXX-XXXX
[email protected] Yes Yes $35 Yes No
By: Dale Robertson Page 4 of 13 Date: 1/18/10

Subscription Form
By: Dale Robertson Page 5 of 13 Date: 1/18/10

Flag Products Required Flags
• 3’x5’ nylon for outdoors (has two grommets already top and bottom). • Purchased from Ed’s Flags.
Rivets
• Attach to the pole with two 3/16” diameter x 3/8” long Large Flange rivets. Flange is important to be large enough to cover grommet hole.
• Purchased from Central Iowa Fastners. Flag Pole Inserts
• 1” diameter EMT conduit x 17” length (cut 7 pieces from 10’ length)
• Purchased Menards Flag Poles
• ¾” diameter EMT conduit x 10’ length • Purchased Menards
Flag Pole Inserter device
All galvanized threaded pipe from Menards • 10” x ½” pipe • ½” x ¾” reducer (must be type with
flange bigger than the ¾” conduit) • ¾” Coupler • 24” x ¾” pipe (to help prevent potential electrical
shock along with comfort.) End becomes beat up after use.
• ¾” cap • ¾” x 24” pipe insulation
Flag Insert Cap
• Red caps purchased from Central Iowa Fastners.
QuickTime™ and a decompressor
are needed to see this picture.
By: Dale Robertson Page 6 of 13 Date: 1/18/10

Location Stencil • Used our Optimist octagon logo shape cut out.
Spray-painted in blue on sidewalk or curb (wherever you want to record measure from). Note that placing on curb really helps to locate quickly from vehicle.
Flag Storage Cart
• An old chair storage rack with upright pipes on sides works well to hold rolled up flags.
• Use a large clear plastic wrap placed on bottom of rack and after flags are all placed on rack wrap plastic up and around entire stack of flags. Use stretchable straps to hold wrapped plastic around flags.
• Place flags on top of each other so they don’t get dirty or you can alternate every so many flags per layer (say 20) to the other end as long as a plastic (bag will work) is between layers so pipes don’t dirty flags.
• Our Community Center allowed us to store flags in the building. • If flags are wet do not store wet. Unfurl so they are loose until they are
dried out. Let them totally dry out before placing in storage. Assembly Flags mounted onto poles
1. Drill a 3/16” diameter hole (size of rivet) approx. 1” from top. 2. Attach top of flag with rivet to top of pole. 3. Stretch flag down the pole so flag is reasonably tight and drill
the second hole. 4. Attach bottom of flag with rivet to top of pole. 5. Roll flag onto pole. Special notes:
• Do not pre-drill 2nd hole as not all flag grommets are the same distance apart. Keep flag reasonably tight.
• Make sure 2nd hole is in-line with the 1st hole on the pole so flag is straight. Flag Pole Ground Inserts
1. Cut 1” x 10’ pole in seven approx. 17” lengths. a. Cut ends square so top will be flush with ground and cap. b. I used an electric miter saw with a metal cut-off blade. c. I made a short 2”x6” wood scrap to use as a guide placed in the
bed of the miter saw. Cut a V shape into it in a location that would center under the cutting blade to hold pipe squarely when cutting.
By: Dale Robertson Page 7 of 13 Date: 1/18/10

2. Use heavy-duty hammer or sledgehammer to hammer two sides against an anvil to create taper point for ease in driving in ground without dirt fill-in.
3. Cutting will leave rough edges inside and outside the open end. a. For the inside use a half round hand file to clean up. b. For the outside use a stationary metal grinder to clean up.
Pole Insert Supplies needed for Installation
1. Blue spray paint 2. Stencil 3. Large hammer or sledge hammer 4. Inserter device 5. Insert 6. 1” diameter x 16” long auger bit. (Could use an 1 1/8” bit, but those were
dramatically more expensive at Menards.) 7. At least a 3/8” cordless powered drill. 8. Cap insert 9. Leather Gloves 10. Locations list so you can record distance.
Flag Pole Insert Removal If ever needed.
1. Use a vise grip pliers and tightly clamp to pipe edge. 2. Place some scrap wood near the vise for lift leverage. 3. Use a crow bar and the wood for leverage to lift insert
out of ground. 4. Once lifted a few inches you should be able to lift by
hands out. 5. When removed the vise grips will have bent the end in
which will prevent future flags using it when re-installed. Best to cut off approx. ½” so it will be round inside again.
Flag locations City Approval
• Since flags will be placed on City right-a-ways approval must be sought from the City.
• City of Underwood required us to: 1. Keep flags a min. of 36” from curbs. 2. Bottom of Flag where attached to pole must be 5 ½’ from the ground. 3. Flag must be no closer that 25’ from a stop sign on a corner lot. 4. Proof of Liability Insurance. Optimist International insurance
company Marsh Affinity Group provided us a Certificate of Liability (Insurance Binder) see page 14.
5. Sign a Right-of-Way Encroachment Agreement (see agreement on pages 15 and 16) with the City.
By: Dale Robertson Page 8 of 13 Date: 1/18/10

Locating flags • Try to place in-line with others on same street. • Can be no closer than 3’ to street curb in Underwood as required by City. • Try to place approx. 4’ from street curb and approx. 4’ from driveway on
the house side of driveway. If too close to sidewalk, then place more into yard approx. 3’ from sidewalk. Must clear utilities, dog fence and sprinkler systems.
• Call Iowa One-call a min. of 48 hours before placing inserts. Iowa One Call
• Any installation in ground requires at least a 48 hour advance notice prior to install so utility companies can mark the public utilities so you may avoid.
• Private lines, sprinkler systems and buried invisible dog fence are to be addressed between you and the subscriber.
• Iowa One Call 1-800-292-8989. There are options of sending in via fax or doing on the Internet using ONTRY. See instructions on the Internet: www.iowaonecall.com.
• Information that will be required before calling or doing on-line if within city limits:
1. Street address: 2. Name and address of excavator: Underwood Optimist Club 3. Type and extent of excavation: Installing Pole 4. Date and Time excavation to begin: 5. Approx. location on the property: Front of Property
People Instructions Items to provide each group for placement:
1. Flag location list sorted by group and in order of installation. Use same list in same order for evening removal.
2. Flags to install per each respective group. 3. Vehicle with clean area to lay rolled up flags. 4. Pliers (possible removal of tight cap and possibly to pull wire) 5. Flat tip screwdriver (possible removal of tight cap) 6. Container to put the caps in. 7. Meeting place upon completion so all above materials may be retrieved.
Flag Placement Instructions
It is very helpful to review with everyone the following before placing flags: 1. Safety First:
a. Always make sure area is clear. b. Watch vehicles and any overhead power lines, etc. c. Be SAFE d. Any problems contact leader.
2. Flag etiquette: Flag should never touch ground.
By: Dale Robertson Page 9 of 13 Date: 1/18/10

3. Explain supplies provided each group. 4. Explain list order. 5. Remove cap from insert:
a. First with your fingers. b. If to tight use flat tip screwdriver. c. If still unable, use pliers.
Try not to damage cap too much 6. Place the flag with the white trim side (riveted side of flag) out to the street
so you see more of flag than pole. Items to provide each group for removal:
1. Flag location list sorted by group and in order of installation. 2. Caps to install per each respective group. Provide a few extra. 3. Vehicle with clean area to lay rolled up flags. 4. Pliers (possible removal of a tight cap) 5. Meeting place upon completion so all above may be retrieved or placed
back in storage Flag Removal Instructions
1. Safety First: a. Always make sure area is clear. b. Watch vehicles and any overhead power lines, etc. c. Be SAFE d. Any problems contact leader.
2. Flag etiquette: Flag should never touch ground. 3. Roll up flag onto poll. Easiest to hold pole horizontal to ground and roll up
reasonable tight by occasionally pulling flag to tighten roll. 4. Place caps onto each pole insert. Make sure red flag cap inserts are flush
with top of pole insert so mowers don’t hit.
By: Dale Robertson Page 10 of 13 Date: 1/18/10

Insurance Binder
By: Dale Robertson Page 11 of 13 Date: 1/18/10

City Agreement
By: Dale Robertson Page 12 of 13 Date: 1/18/10

By: Dale Robertson Page 13 of 13 Date: 1/18/10 By: Dale Robertson Page 13 of 13 Date: 1/18/10