avatar login info 1-12-15 - pasco county schools · avatar custom training ... there are several...
TRANSCRIPT
1
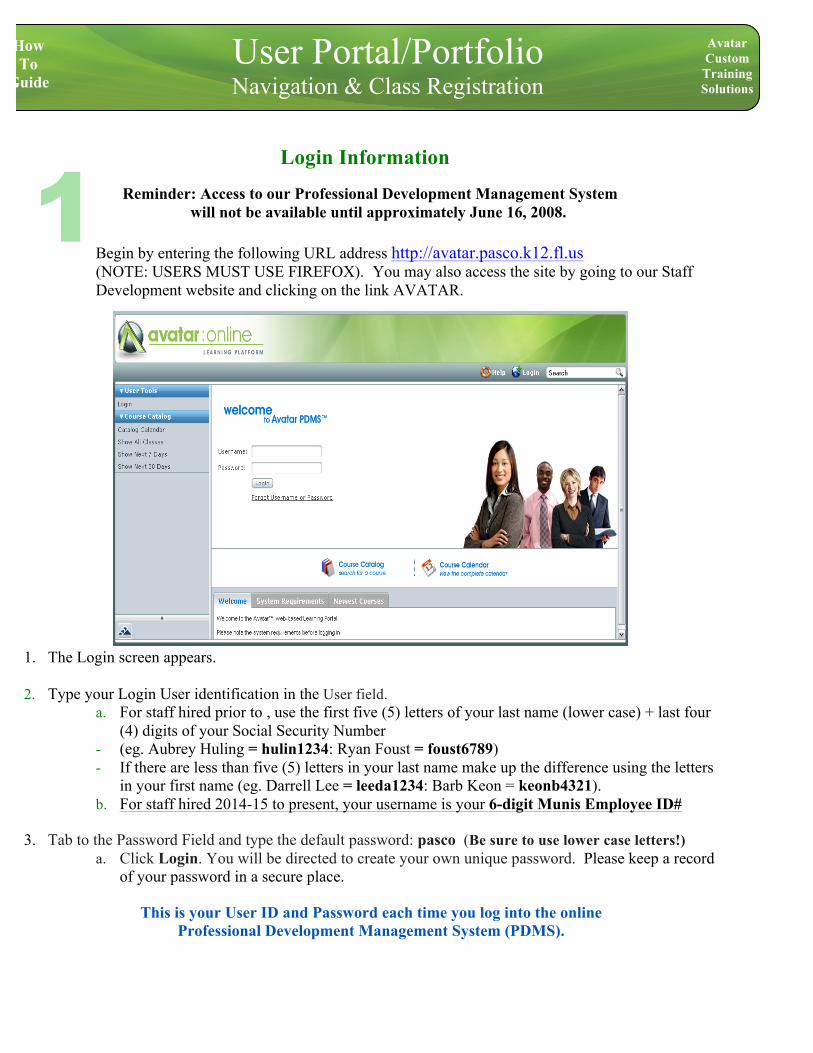
Login Information Begin by entering the following URL address http://avatar.pasco.k12.fl.us (NOTE: USERS MUST USE FIREFOX). You may also access the site by going to our Staff Development website and clicking on the link AVATAR.
1. The Login screen appears. 2. Type your Login User identification in the User field.
a. For staff hired prior to , use the first five (5) letters of your last name (lower case) + last four (4) digits of your Social Security Number
- (eg. Aubrey Huling = hulin1234: Ryan Foust = foust6789) - If there are less than five (5) letters in your last name make up the difference using the letters
in your first name (eg. Darrell Lee = leeda1234: Barb Keon = keonb4321). b. For staff hired 2014-15 to present, your username is your 6-digit Munis Employee ID#
3. Tab to the Password Field and type the default password: pasco (Be sure to use lower case letters!) a. Click Login. You will be directed to create your own unique password. Please keep a record
of your password in a secure place.
This is your User ID and Password each time you log into the online Professional Development Management System (PDMS).
User Portal/Portfolio Navigation & Class Registration
How To
Guide
Avatar Custom Training Solutions
Reminder: Access to our Professional Development Management System will not be available until approximately June 16, 2008.
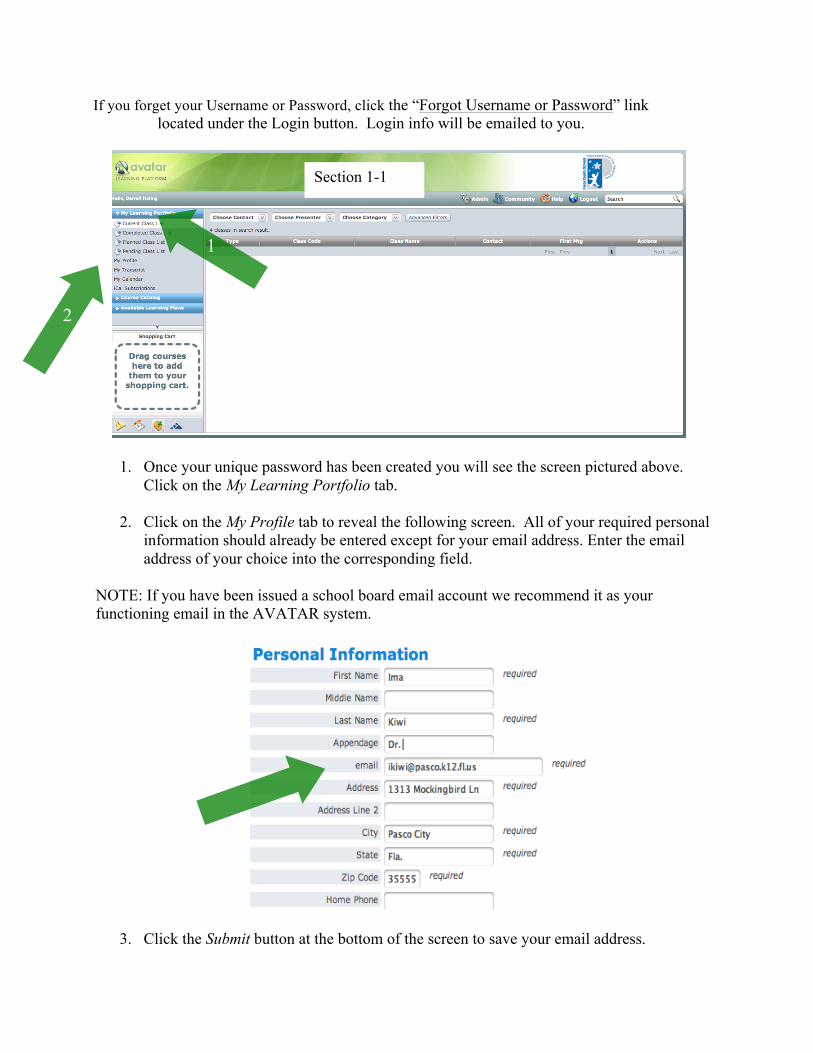
If you forget your Username or Password, click the “Forgot Username or Password” link located under the Login button. Login info will be emailed to you.
1. Once your unique password has been created you will see the screen pictured above. Click on the My Learning Portfolio tab.
2. Click on the My Profile tab to reveal the following screen. All of your required personal
information should already be entered except for your email address. Enter the email address of your choice into the corresponding field.
NOTE: If you have been issued a school board email account we recommend it as your functioning email in the AVATAR system.
3. Click the Submit button at the bottom of the screen to save your email address.
Section 1-1
1
2

221
Class Catalog and Registration There are several methods to search the catalog and register for a class.
Method One: Registering for a course you already know exists. 1. Under the Course Catalog menu, click the Catalog Calendar link to access the catalog via a calendar
view. The screen defaults to a Day view. Click on the Month tab.
Class Catalog Calendar View
2. The top left of the screen tells you the current period of time displayed on the calendar. Use the arrows to change pages forward or backward on the calendar.
3. Click on a class to view Overview and Details to find specific training information like the training’s
location.
4
1
Section 2-1
3
Section 1-2
4

4. To register, click the Overview tab. Locate the add to cart button and click. The course you selected should appear in the Shopping Cart section of your screen.
Method Two: Search for available inservice offerings.
6. Under the Course Catalog menu, click the Show All Classes link to reveal a screen like the one above. 7. The row of dropdown menus at the top of the page allows you to browse and sort by a selected Contact, Presenter, or Category. 8. To search by Keyword or Class Code, type a keyword or code in the Search box located at the top of the
screen, click the magnifying class icon to initiate search. 9. To search by Date, click the Advanced Filters button.
a. Click the icon located to the left of the Meeting Start field to insert a date. Note: You do not have to enter information in any of the other fields.
b. Click the search button. Results will appear on the bottom section of your screen.
9.a
6
86
96 6 9
9.b

10. View class Overview and Details by clicking on the title. 11. To register, click the Overview tab. Locate the add to cart button and click. The course you selected should appear in the Shopping Cart section of your screen. You may also select the class by clicking your mouse on the title to drag and drop it into the Shopping Cart. 12. Click the Check Out button at the bottom of the Shopping Cart section to complete your registration. 13. You will be prompted to confirm your choices, click the Finalize button.
14. The next screen will indicate that your Registration is Complete (or that you have been
placed on a Waiting List if the class is full).
You have now selected and registered for your training. An email confirming your registration
will be sent to your email account. In the upcoming months our new system will offer many other features to help make your Professional Development experience as seamless as possible.
Look for additional information when you return in August.
13 6
12 6
Section 2-2
Section 2-3