automate your boat · automate your boat manual 9 juli 2018 . title ayb manual document ayb manual...
TRANSCRIPT

Automate Your Boat
Manual
9 juli 2018

Title AYB manual
Document AYB manual
Date 24th May 2018
Revision 3rd
Page 2 of 42

Title AYB manual
Document AYB manual
Date 24th May 2018
Revision 3rd
Page 3 of 42
Publisher dotOcean NV
Gistelse Steenweg 294/205 8200 Brugge Belgium
BE 0807.246.767
Date 9 juli 2018
Contact [email protected]
Revisions Rev No. Date Description
1 21/03/2018 1st AYB-draft
2 18/05/2018 update
3 24/05/2018 minor adjustments
4 09/07/2018 Set APN configurations
This document is copyright protected. All rights are reserved by dotOcean NV. Nothing of this document or related information collected can be sold,
reused, or otherwise disclosed without written consent of the authors.
Title AYB manual
Document AYB manual
Date 24th May 2018
Revision 3rd
Page 4 of 42
1. Contents
1. Contents ..................................................................................................................................................................4
2. Introduction .............................................................................................................................................................6
3. Safety precautions ...................................................................................................................................................6
4. AYB Unit content .....................................................................................................................................................8
5. Prior to first use .......................................................................................................................................................9
5.1 Charging the battery .......................................................................................................................................... 9
5.2 Inserting the SIM cards .................................................................................................................................... 10
5.2.1 Tablet ..................................................................................................................................................... 10
5.2.2 AYB unit .................................................................................................................................................. 10
5.3 Configuring the tablet ...................................................................................................................................... 12
5.3.1 Setting up a Google account .................................................................................................................. 12
5.3.2 Installing the AYB app ............................................................................................................................. 12
5.3.3 Installing the Victron Connect app ......................................................................................................... 12
5.4 AYB- and Atlantis account ................................................................................................................................ 13
6. Installation instructions .........................................................................................................................................14
6.1 Install battery ................................................................................................................................................... 14
6.2 Mount box on vessel ........................................................................................................................................ 14
6.3 Install compass ................................................................................................................................................. 14
6.4 Install measurement sensor ............................................................................................................................. 14
6.5 Install an external GPS (optional) ..................................................................................................................... 15
6.6 Connect motor cables to case .......................................................................................................................... 15
6.7 Turn device on ................................................................................................................................................. 15
7. Operating the vessel ..............................................................................................................................................16
7.1 Autonomous mode .......................................................................................................................................... 16
7.1.1 Managing your project ........................................................................................................................... 16
7.1.2 Creating a task ........................................................................................................................................ 19
7.1.3 Managing multiple tasks in 1 project ..................................................................................................... 25
7.1.4 Managing multiple projects ................................................................................................................... 26
7.1.5 Starting the project ................................................................................................................................ 28
7.1.6 During the project .................................................................................................................................. 30
7.1.7 Stopping the project ............................................................................................................................... 30
7.2 RC mode ........................................................................................................................................................... 31
7.3 Managing your vessel/AYB unit ....................................................................................................................... 32
7.3.1 The vessel screen ................................................................................................................................... 32
7.4 Managing your data ......................................................................................................................................... 35
7.4.1 Exporting your data ................................................................................................................................ 35

Title AYB manual
Document AYB manual
Date 24th May 2018
Revision 3rd
Page 5 of 42
8. Battery system .......................................................................................................................................................36
8.1 Battery Protector ............................................................................................................................................. 36
8.2 Battery Monitor ............................................................................................................................................... 36
8.3 LiFePo4 Battery ................................................................................................................................................ 36
8.4 Blue Smart IP65 charger ................................................................................................................................... 36
8.5 Victron Connect app ........................................................................................................................................ 36
9. Transport, storage and maintenance .....................................................................................................................37
10. Technical data ........................................................................................................................................................38
11. Troubleshooting (FAQ) ...........................................................................................................................................39
11.1 Device .......................................................................................................................................................... 39
11.1.1 No internet connection .......................................................................................................................... 39
11.1.2 Vessel does not come online in app ....................................................................................................... 39
11.1.3 Vessel does not turn the appropriate way ............................................................................................. 39
11.1.4 No GPS .................................................................................................................................................... 39
11.1.5 Nothing happens .................................................................................................................................... 39
11.2 App .............................................................................................................................................................. 39
11.2.1 App is not responding to anything ......................................................................................................... 39
11.2.2 Vessel will not start ................................................................................................................................ 39
11.2.3 Logging will not start .............................................................................................................................. 39
12. Support ..................................................................................................................................................................40
13. Warranty ................................................................................................................................................................40
14. Addendum .............................................................................................................................................................41
14.1 Addendum A: Preparation of Calypso ......................................................................................................... 41
14.1.1 Inflate vessel........................................................................................................................................... 41
14.1.2 Attach motor fins ................................................................................................................................... 41
14.1.3 Install measurement sensor ................................................................................................................... 41
14.1.4 Place compass ........................................................................................................................................ 42
14.1.5 Place vessel in water .............................................................................................................................. 42

Title AYB manual
Document AYB manual
Date 24th May 2018
Revision 3rd
Page 6 of 42
2. Introduction
The Automate Your Boat (AYB) unit enables customers to build their own autonomous vessel.
The AYB unit allows to automate electrical propulsion, ranging from thrusters, outboards to pod or hybrid drives. The motor and
battery pack can be selected from market providers.
Via 3G/4G the AYB unit connects to the Atlantis cloud platform without the need for line-of-sight.
Atlantis provides augmented maps on which the AYB module can take decisions. Based on the augmented maps the AYB box can
plan its trajectory and can cover a selected area.
3. Safety precautions
NOTICE: Before using the AYB, read this instruction manual carefully, and obey all warnings and caution labels. Only use the AYB
according to the instructions in this manual.
- Keep hands, hair and loose clothing away from the propellers when the power is switched on.
- Always keep a safe distance in all directions around your vessel to avoid collisions and/or injury. Stay away from obstacles.
- Never completely exhaust the battery. When the vessel starts to lose power, bring it back to the shore and change the
batteries.
- Make sure the inside of the AYB box is not exposed to water. Always close the box properly when the box is turned on or
on water. Do not exchange the battery of the box, when the box is on water. dotOcean shall have no liability for any claims
resulting from exposing the inside of the AYB box to water.
- Before connecting or disconnecting any cables to the AYB box, make sure the emergency stop is pushed in. Do not connect
or disconnect the cables, when the power is switched on.
- Make sure the batteries of the RC unit, tablet and the box are properly charged before use.
- Before a mission check with the RC unit if the motors of the vessels are working properly.
Battery safety instructions:
- While working on the Li-ion Battery wear protective eye-glasses and clothing.
- Any uncovered battery material such as electrolyte or powder on the skin or in the eyes must be flushed with plenty of
clean water immediately. Then seek medical assistance. Spillages on clothing should be rinsed out with water.
- Explosion and fire hazard. Terminals of the Li-ion Battery are always alive; therefore, do not place items or tools on the Li-
ion Battery. Avoid short circuits, discharging too much and high charge currents. Use insulated tools. Do not wear any
metallic items such as watches, bracelets, rings, necklaces, et cetera. In case of fire, you must use a type D, foam or CO2
fire extinguisher.
- Never try to open or dismantle the Li-ion Battery. Electrolyte is very corrosive. In normal working conditions contact with
the electrolyte is impossible. If the battery casing is damaged do not touch the exposed electrolyte or powder because it
is corrosive.

Title AYB manual
Document AYB manual
Date 24th May 2018
Revision 3rd
Page 7 of 42
- Discharging too much, damages the Li-ion battery seriously and can even be dangerous. Therefore, use of an external
safety relay is mandatory.
- Li-ion Batteries are heavy. If involved in an accident they can become a projectile! Ensure adequate and secure mounting
and always use suitable handling equipment for transportation. Handle with care, because Li-ion Batteries are sensitive to
mechanical shock.
- If charged after the Li-ion battery was discharged below the Discharge cut-off voltage, or when the Li-ion battery is
damaged or overcharged, the Li-ion battery can release a harmful mixture of gasses such as phosphate.
Transportation instructions
- When transporting the AYB box, make sure it is fastened properly. Handle with care because mechanical shock can cause
damage to the box. Cover the connector panel with the lid to protect all connectors on top of the AYB box. Always
disconnect all connectors when transporting the AYB box.
- The Li-ion battery must be transported in an upright position. Do not stand below a Li-ion battery when it is hoisted. Never
lift the battery at the terminals, only lift the battery at the handles. Batteries are tested according to UN Handbook of Tests
and Criteria, part III, sub section 38.3 (ST/SG/AC.10/11/Rev.5). For transport, the batteries belong to the category UN3480,
Class 9, Packaging Group II and have to be transported according to this regulation. This means that for land and sea
transport (ADR, RID & IMDG) they have to be packed according to packaging instruction P903 and for air transport (IATA)
according to packaging instruction P965. The original packaging satisfies these instructions.

Title AYB manual
Document AYB manual
Date 24th May 2018
Revision 3rd
Page 8 of 42
4. AYB Unit content
The AYB Unit contains the following items:
- AYB motor control
- 3G/4G communication (optionally with dual SIM)
- Compass
- Waterproof box
- R/C controller
- Tablet
- Manual
- IP67 emergency button
- Cloud Link
o Mission preparation
o Mission execution
o Real-time visualization on multiple Android devices
o Online data storage
o Use of latest machine learning algorithms to improve vessel control
o Free app upgrades
Options:
- Battery types
- Connector types (wet-mate or dry-mate)

Title AYB manual
Document AYB manual
Date 24th May 2018
Revision 3rd
Page 9 of 42
5. Prior to first use
5.1 Charging the battery
- Connect the charger to the battery
- Connect the charger to the wall socket
- If required, press the mode button until the blue Li-ion LED turns on.
- The battery is about 80 % charged when the ABSORPTION LED turns on.
- The battery is fully charged when the FLOAT or STORAGE LED is on. The battery is now ready for use.
- Stop charging at any time by disconnecting the charger from the wall socket.
For more information about the charger, please check the manual:
https://www.victronenergy.nl/upload/documents/Manual-Blue-Smart-IP65-Charger-EN-NL-FR-DE-ES-SE-FI.pdf

Title AYB manual
Document AYB manual
Date 24th May 2018
Revision 3rd
Page 10 of 42
5.2 Inserting the SIM cards
5.2.1 Tablet
- Insert the opener for the SIM holder into the small hole in the SIM holder on the side of
your tablet
- Remove the SIM holder from your tablet
- Turn your SIM so the angled corner of your SIM matches the angled corner of the SIM
holder
- Place your SIM in the SIM holder
- Slide the SIM holder into your tablet
5.2.2 AYB unit
Wi-Fi Router with dual SIM
- Turn of the power of the AYB unit.
- Open the AYB box.
- Remove the anti-theft lid at the top of the router.
- Insert the SIM card according to the picture. If using only one SIM card,
the card needs to be inserted in SIM card holder nr 1, as it is in the
picture.
- Push the card until it locks.
- Put the anti-theft lid back.
Router without Wi-Fi
- Turn of the power of the AYB unit.
- Open the AYB box.
- Carefully lift out the metal frame. The router is at the bottom.
- Remove the router from the DIN rail.
- With a small tool, push on the button to release the SIM card holder
on the back.
- Insert the SIM card into the card holder as shown in the picture.
- Put the card holder back in the router.
- Push the card until it locks.
- Put the router back on the DIN rail.
- Put the metal frame back in its initial place. Be careful to not damage
any wires when you put the frame back.

Title AYB manual
Document AYB manual
Date 24th May 2018
Revision 3rd
Page 11 of 42
Configuring the router APN
- Plug in a PC to the router. You can browse to the router at the IP address 192.168.10.1.
- To configure the WAN interface, navigate in the menu of the web interface to Home > Setup > WAN interface
- Make sure the checkbox next to Enabled is marked.
- Enter the APN of your mobile service provider and the PIN code of your SIM card in the corresponding fields.
o Some examples:
▪ Proximus
• APN: internet.proximus.be
• No login or password required
▪ Mobile Vikings
• APN: web.be
• Login: web
• Password: web
▪ Orange
• APN: mworld.be
• No login or password required
- Check the box next to show advanced parameters
- Enter the login and password for the APN.
- Press save and reboot the router.
For more information about the router, you can check the manual:
http://www.etictelecom.com/telechargement/produits/doc_dev_ipl_user_guide_b.pdf
Title AYB manual
Document AYB manual
Date 24th May 2018
Revision 3rd
Page 12 of 42
5.3 Configuring the tablet
5.3.1 Setting up a Google account
- Open the Google Play Store app
- Choose whether or not you have an existing account
- Sign in with your credentials
- Next Follow the wizard
5.3.2 Installing the AYB app
- Open the Google Play store app
- Search for AYB (By dotOcean)
- Tap install
- Review the requested access permissions and tap Accept
- Tap open to start the app
5.3.3 Installing the Victron Connect app
- Open the Google Play Store app
- Search for Victron Connect (By Victron Energy BV)
- Tap install
- Review the requested access permissions and tap Accept
- Tap open to start the app

Title AYB manual
Document AYB manual
Date 24th May 2018
Revision 3rd
Page 13 of 42
5.4 AYB- and Atlantis account
On purchasing an AYB unit, you will receive an account to login into the app. This same account (email address and password) can
be used to login into Atlantis: https://atlantis.dotocean.eu/. This is dotOcean’s online platform to manage all the recorded data into
projects.
After you’ve logged in into Atlantis you can create projects, import datafiles and create datasets from it, interpolate single beam
data, …
You can also use the project wizard to select your AYB project (from the app) and to automatically import all the recorded data and
to immediately create the needed layers and interpolations to show on the map.
More info about the projects and the wizard are available in the Atlantis manual found online:
http://atlantis.dotocean.eu/Manual#/projects.

Title AYB manual
Document AYB manual
Date 24th May 2018
Revision 3rd
Page 14 of 42
6. Installation instructions
6.1 Install battery
Before installing the battery, check if the emergency button is pushed in.
Open the box by lifting every fastener. Place the battery in the provided
compartment next to the drive unit. Next connect the cables of the AYB
box to the battery. If everything is installed, close the box and secure every
fastener of the case again. Make sure no cables are stuck between the box
and the lid.
6.2 Mount box on vessel
Place the AYB box on the vessel. Make sure that the connectors on top of the box are closest to the front of the boat. Attach the
rubber fasteners to make sure that the box is firmly attached.
6.3 Install compass
Install the external compass on top of your vessel, so that the front of the compass is
aligned with the raft. The front of the compass is indicated by two arrows on top of
the device. Connect the compass to the AYB unit, by placing the cable connector in the
appropriate socket.
6.4 Install measurement sensor
Install the measurement device in its appropriate position. The communication between device and driving unit is done with either
the RS323 or the RS485 protocol, according to the device requested. When placing the measurement device, make sure that it cannot
detect any turbulence from the engines. The default baud rate of the serial connection is configured at 4800. The AYB supports
NMEA 0183 DBT and DESO-25 depth sentences. The default is NMEA DBT, should you want to change this or the baud rate, please
contact dotOcean for support.
Should you wish to connect another device, please contact dotOcean for support.

Title AYB manual
Document AYB manual
Date 24th May 2018
Revision 3rd
Page 15 of 42
6.5 Install an external GPS (optional)
The AYB box has a basic internal GPS unit, so it is not necessary to install another GPS. If you want higher precision you can however
connect a GPS to the AYB box. The box needs NMEA 0183 GGA and RMC sentences to operate. The baud rate of this connection is
set at 9600. If your GPS has a different baud rate, please contact dotOcean for support.
6.6 Connect motor cables to case
At the top side of the connector compartment there are three connectors:
- Left connector: To connect the left motor (Port)
- Middle connector: Is connected to the red emergency stop button
- Right connector: To connect the right motor (Starboard)
Before connecting the motor cables, make sure the AYB unit is not switched on. Remove
the dummy connectors from the left and right connector by turning them to the left
and pulling it out. Now connect the motors to each side of the connector compartment
by plugging it in and turning the fastener to the right. Make sure the pins from the
connector line up to each other. If the vessel is not turning the right way in the water,
it is possible that the connectors are swapped.
6.7 Turn device on
After the vessel is correctly assembled and put into the water, it can be switched
on. Find the red emergency stop on top of the box. Slightly turn the button to the
right and pull it up. Now the drive unit is booting up and will be ready within the
minute to start your survey!

Title AYB manual
Document AYB manual
Date 24th May 2018
Revision 3rd
Page 16 of 42
7. Operating the vessel
7.1 Autonomous mode
7.1.1 Managing your project
7.1.1.1 Logging in
Log in using your username and password. These are provided when purchasing the AYB unit, by the dotOcean support team. Contact
the dotOcean support team if you don’t have any credentials to login.
Title AYB manual
Document AYB manual
Date 24th May 2018
Revision 3rd
Page 17 of 42
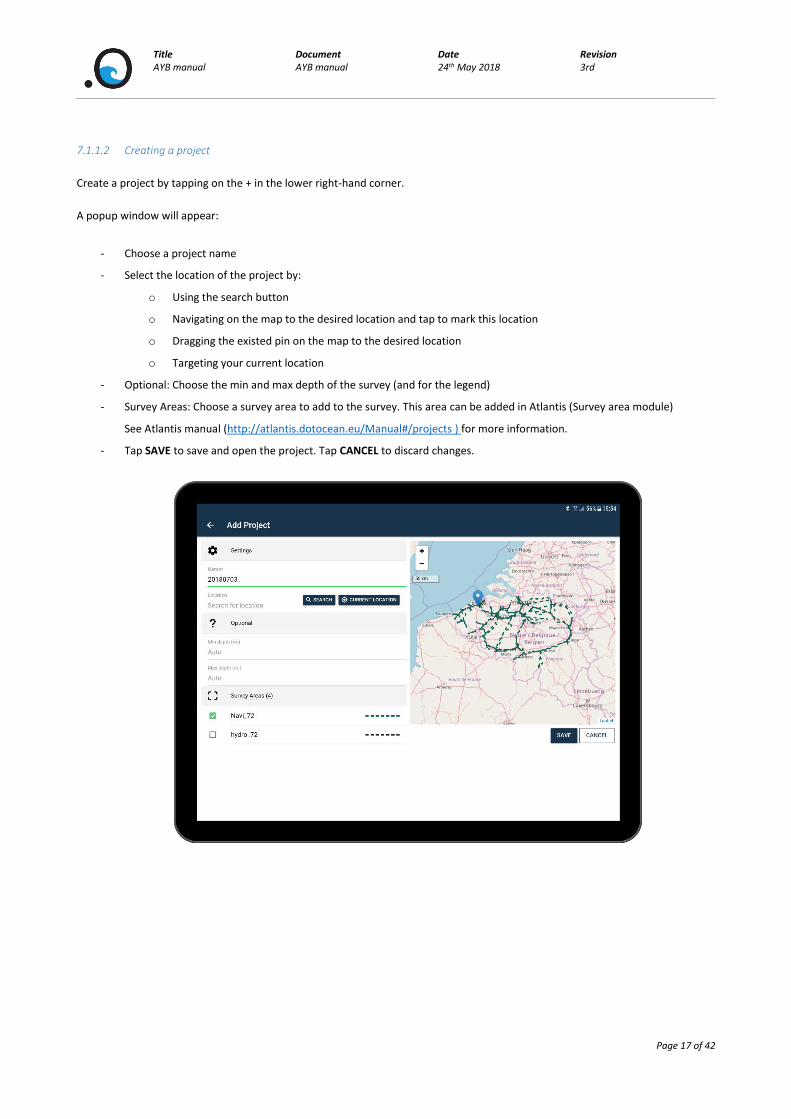
7.1.1.2 Creating a project
Create a project by tapping on the + in the lower right-hand corner.
A popup window will appear:
- Choose a project name
- Select the location of the project by:
o Using the search button
o Navigating on the map to the desired location and tap to mark this location
o Dragging the existed pin on the map to the desired location
o Targeting your current location
- Optional: Choose the min and max depth of the survey (and for the legend)
- Survey Areas: Choose a survey area to add to the survey. This area can be added in Atlantis (Survey area module)
See Atlantis manual (http://atlantis.dotocean.eu/Manual#/projects ) for more information.
- Tap SAVE to save and open the project. Tap CANCEL to discard changes.
Title AYB manual
Document AYB manual
Date 24th May 2018
Revision 3rd
Page 18 of 42
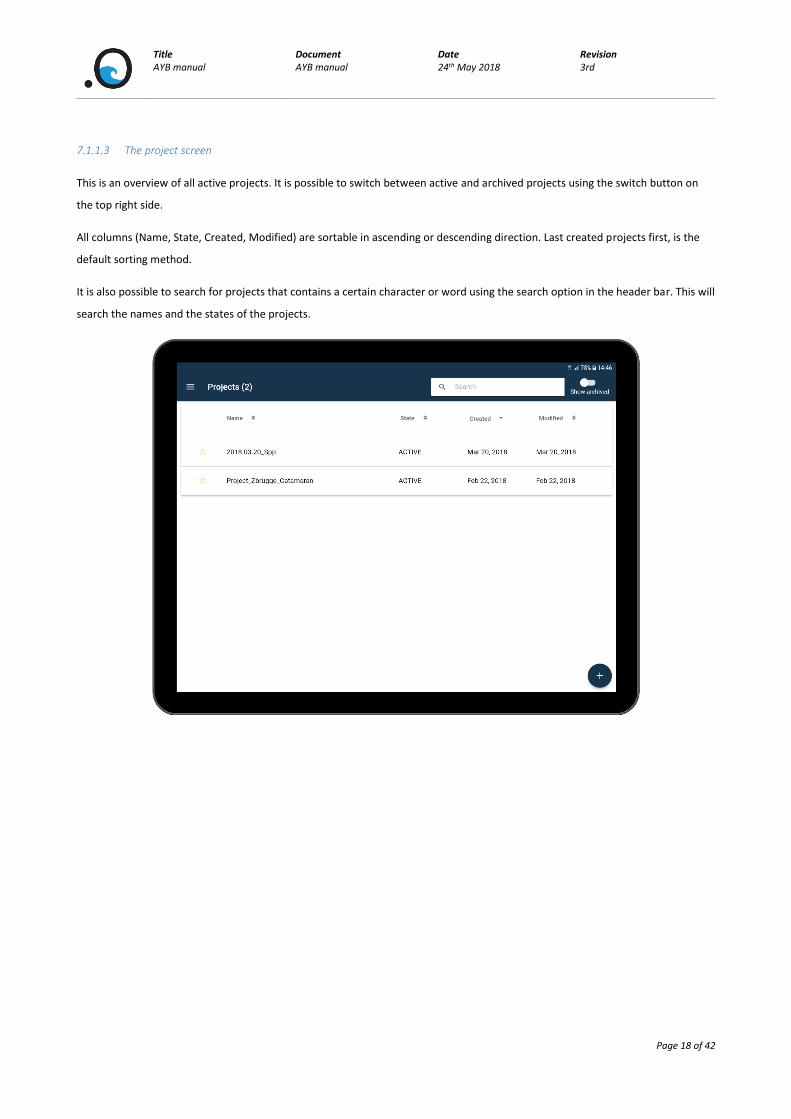
7.1.1.3 The project screen
This is an overview of all active projects. It is possible to switch between active and archived projects using the switch button on
the top right side.
All columns (Name, State, Created, Modified) are sortable in ascending or descending direction. Last created projects first, is the
default sorting method.
It is also possible to search for projects that contains a certain character or word using the search option in the header bar. This will
search the names and the states of the projects.

Title AYB manual
Document AYB manual
Date 24th May 2018
Revision 3rd
Page 19 of 42
7.1.2 Creating a task
7.1.2.1 The task screen
The lists of tasks can be accessed by tapping the TASKS button on the project detail page. Then the following screenshot will appear:
To create a task, click the + button on the bottom right-hand side.

Title AYB manual
Document AYB manual
Date 24th May 2018
Revision 3rd
Page 20 of 42
7.1.2.2 Types of tasks
When creating a new task, a selection window appears. In order to select the type, tap the radio button next to the desired shape
and tap OK. Each task can be given a name.

Title AYB manual
Document AYB manual
Date 24th May 2018
Revision 3rd
Page 21 of 42
There are 3 types of tasks:
- Grid (The vessel will move covering the surface of the rectangle drawn):
A grid task is represented by a rectangle drawn on the map. To draw the rectangle, tap the screen to place the starting
corner, swipe to the point where the diagonally opposite corner has to be. Dragging one of the corners will change the size
of the rectangle. By holding and dragging the middle point of the grid it is still possible to move the shape elsewhere.
Extra options:
o Desired speed (default 1, max 5): An indication for the vessel at which speed it tries to sail (in m/s)
o Lane width (default 5, max 50): The distance between the sail lines (in m)
o Direction (default auto): The direction the vessel should survey the grid. Automatic, vertical or horizontal
o Rotate: The grid can be rotated to fit everything on the map. Just drag the slider to the left or to the right
o Show all tasks in survey
o Show all survey areas in survey

Title AYB manual
Document AYB manual
Date 24th May 2018
Revision 3rd
Page 22 of 42
- Circle (The vessel will move along the circumference of the circle until given another task):
A circle task is represented by a circle drawn on the map. To draw the circle, tap the map and swipe to determine the
radius of the circle. Release to set the circle.
Extra options:
o Desired speed (default 1, max 5): An indication for the vessel at which speed it tries to sail (in m/s)
o Show all tasks in survey
o Show all survey areas in survey

Title AYB manual
Document AYB manual
Date 24th May 2018
Revision 3rd
Page 23 of 42
- Waypoints (The vessel will move from waypoint to waypoint):
A waypoint task is represented by points, which are connected in order of time placed. It is also possible to import the
points by using a csv file, tap the icon, then the icon. A file explorer window will appear, where the csv file can be
selected. To draw waypoints, tap the map. To finish drawing double-tap the last point. The waypoints can be edited by
dragging the waypoints.
Extra options:
o Desired speed (default 1, max 5): An indication for the vessel at which speed it tries to sail (in m/s)
o Show all tasks in survey
o Show all survey areas in survey
Tap SAVE to save the task or CANCEL to discard changes.
NOTE: All drawn shapes can be redrawn by tapping the icon and then the recycle bin. After that, redrawing starts.
NOTE: Tasks cannot be edited when the task is queued or started.
NOTE: When a task is removed that is started, the next queued task will begin.

Title AYB manual
Document AYB manual
Date 24th May 2018
Revision 3rd
Page 24 of 42
7.1.2.3 Assigning a vessel to the task
To assign the vessel to the task, tap the NONE indicator under VESSEL.

Title AYB manual
Document AYB manual
Date 24th May 2018
Revision 3rd
Page 25 of 42
A popup window will appear with vessels. Vessel that are offline will have a * next to its name. Select the correct vessel and tap
OK.
7.1.3 Managing multiple tasks in 1 project
It is possible to add multiple tasks to 1 project. The task screen gives an overview of all the tasks that were created. The priority that
the vessel will finish off the tasks is determined by the place in the list. To change its priority, drag up or down in the list.
Tasks can have the following statuses:
- Unknown: Task has been created but is never attached to a vessel
- Queued: Task is in queue to be executed
- Started: Vessel is busy with this task
- Cancelled: User has stopped the survey
- Removed: Task has switched from vessels
- Completed: Task is successfully done

Title AYB manual
Document AYB manual
Date 24th May 2018
Revision 3rd
Page 26 of 42
7.1.4 Managing multiple projects
7.1.4.1 Archiving a project
In the list of projects, swiping the project to the right gives the option to archive the project. This will remove the project from the
active projects and it will be added to the archived projects.

Title AYB manual
Document AYB manual
Date 24th May 2018
Revision 3rd
Page 27 of 42
7.1.4.2 Pinning a project
It is possible to pin projects to the top of the list. This will be remembered the next time the user logs in. To pin a project, tap the
icon.
Title AYB manual
Document AYB manual
Date 24th May 2018
Revision 3rd
Page 28 of 42
7.1.5 Starting the project
When navigating to a project detail, the following items will be shown:
- Map:
o The vessels will be represented by an icon in its colour
o The tasks will be shown in the colour of the vessel. When a task is not assigned the colour will be grey
o A pin marker will be visible that shown the home location of the project
o At the left top there is a scale available of the map
o Buttons to zoom in or out
o Data from the sensors are plotted on the map (single beam, multi beam, …)
o A legend on the right-hand corner of the map, this shows a colour indication and scale of the measured depth
once the vessel has started its first task. Note that the scale is relative to the project and this will vary from project
to project
- Tasks
o On the right side of the screen (hide/show by tapping top right button)
o A button to go to the tasks page together with a number of how many tasks there are
o A list of tasks, ordered by status. The name or status and type is visible
o When tapping a task, it will be highlighted on the map, to undo, tap it again
o To go directly to the task detail, press and hold the task
- Vessels
o In the footer of the screen there will be info about the vessel(s)
o By clicking the arrow it is possible to expand or collapse the vessel bar
- Project settings
o Archive the project
o Export the project (More info further in this manual)
o Edit the project (Name or start location)

Title AYB manual
Document AYB manual
Date 24th May 2018
Revision 3rd
Page 29 of 42
Tap on the green button to start the vessel or to stop it.
When first starting a task on a vessel, a token will be synchronised to establish a connection between the server and the vessel. The
first task in the queue’s state will become: In progress. When this task is done, it will become: finished, then the next task in the
queue will be started. If the status of the task changes to in progress and the vessel does not start, check on the RC unit if autonomous
mode is enabled.
Tap on the red button to start logging of the vessel or to stop it.
If the logging button is active, the AYB app will record all data about that vessel, this data will be available in the projects export:
- Vessel information
o Battery
o Location
o Heading
o Speed
- Sensor information
o Depth low
o Depth high
o …

Title AYB manual
Document AYB manual
Date 24th May 2018
Revision 3rd
Page 30 of 42
7.1.6 During the project
During the project all the acquired data will be plotted on the map. All the vessel information is at hand also to view during the
survey. It is still possible to create new tasks and assign them to a vessel that already is started. The new task will appear in the queue
and waits there until started automatically.
When a value lower than or higher than the current map legend is found, the legend automatically adjusts to the new depths.
7.1.7 Stopping the project
To stop the project, simply stop all the vessels and stop all the logging of those vessels. Now the project is done and is ready to be
exported and/or archived.

Title AYB manual
Document AYB manual
Date 24th May 2018
Revision 3rd
Page 31 of 42
7.2 RC mode
The vessel can also be controlled via the supplied Remote-Control unit. The RC unit can be turned on by switching the power button,
marked with number four, to the right.
To toggle between autonomous and RC operation, use the switch marked with the number 1. When the switch is facing upwards (as
it is showed in the picture), the AYB is operating autonomous. When the switch is facing downwards, the AYB is controlled by the RC
unit.
The vessel can then be controlled with the joysticks marked with numbers 2 and 3. The left joystick controls the left motor, while the
right joystick controls the right motor. For the motors to rotate forward, push the joysticks forward. To put the motors in reverse,
pull the joysticks backwards. Pushing the joysticks to the right or left has no effect on the motors. The manual of the RC unit can be
found at: https://www.graupner.de/mediaroot/files/S1001_mz-10-HoTT_manual_EN.pdf
1
. 2
.
3
. 4
.

Title AYB manual
Document AYB manual
Date 24th May 2018
Revision 3rd
Page 32 of 42
7.3 Managing your vessel/AYB unit
7.3.1 The vessel screen
Open the menu to the left where you have Project, Vessels and Logout by tapping the button and then Vessels. This will open a
new page with all the available vessels. It is divided in two pages, online vessel and offline vessels. To switch between the 2 views,
press the Show online radio button. It is also possible to search for a vessel name by tapping the search bar in the header.
Main information about all the vessel is also shown here:
- Vessel name
- Last update of the vessel
- State (Online or offline)
- Task State (Is the vessel idle or working)
- Percentage of the battery
When tapping a vessel, the user is redirected to the detail page.
Title AYB manual
Document AYB manual
Date 24th May 2018
Revision 3rd
Page 33 of 42
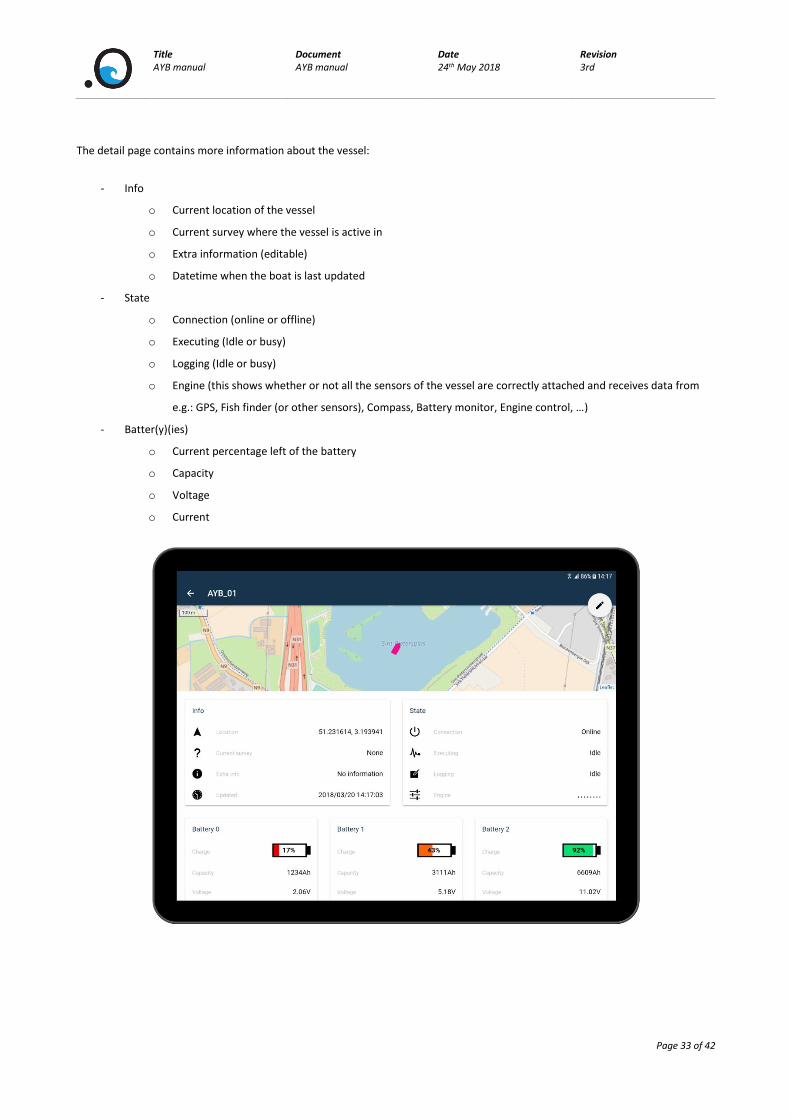
The detail page contains more information about the vessel:
- Info
o Current location of the vessel
o Current survey where the vessel is active in
o Extra information (editable)
o Datetime when the boat is last updated
- State
o Connection (online or offline)
o Executing (Idle or busy)
o Logging (Idle or busy)
o Engine (this shows whether or not all the sensors of the vessel are correctly attached and receives data from
e.g.: GPS, Fish finder (or other sensors), Compass, Battery monitor, Engine control, …)
- Batter(y)(ies)
o Current percentage left of the battery
o Capacity
o Voltage
o Current

Title AYB manual
Document AYB manual
Date 24th May 2018
Revision 3rd
Page 34 of 42
It is also possible to adjust the colours of the vessel. The primary colour is the main colour of the vessel. The secondary is the
outline colour.
Name and extra information of the boat is editable by clicking the pencil button on the top right. This will open a popup window
where the user can change all these settings. This can also be SAVED or CANCELLED.

Title AYB manual
Document AYB manual
Date 24th May 2018
Revision 3rd
Page 35 of 42
7.4 Managing your data
7.4.1 Exporting your data
All the data that has been logged can be exported by either the project settings menu in project detail or by going to the overview
of all the projects and swiping that project to the left and tapping EXPORT.
Exporting will result in generating a zip-file that contains the following items:
- <sensor> folder: This contains all the data of measurements of this sensor per vessel. Every time the user taps logging, a new file is created. The csv-file contains following items:
o Timestamp o Latitude o Longitude o Depth Low o Depth High
- Vessel folder: This contains information about all the vessels in this project: o PNG-images of the measured depth data o Metadata-files about these images o Extra information about the vessel (Battery, info, location)
- Vessel.csv o Containing a list of all the participating boats together with their name, first time in use and last time in use in
this project.

Title AYB manual
Document AYB manual
Date 24th May 2018
Revision 3rd
Page 36 of 42
8. Battery system
The battery system is manufactured by Victron Energy ( https://www.victronenergy.com).
It consists of a battery protector, a battery monitor, a LiFePO4 Battery and the Blue Smart IP65 charger.
8.1 Battery Protector
The Victron Battery Protect disconnects the battery from non-essential loads before it is completely discharged (which would damage
the battery) or before it has insufficient power left to power the engine(s).
For more information, read the manual: https://www.victronenergy.com/upload/documents/Datasheet-Battery-Protect-48-V-100-
A-EN.pdf
8.2 Battery Monitor
A Victron BMV-700 battery monitor is installed to calculate ampere hours consumed and the state of charge of a battery.
For more information, read the manual: https://www.victronenergy.com/upload/documents/Manual-BMV-700-700H-702-712-EN-
NL-FR-DE-ES-SE-PT-IT.pdf
8.3 LiFePo4 Battery
See the Victron Energy Smart LiFePO4 manual:
https://www.victronenergy.com/upload/documents/Manual-Lithium-iron-phosphate-batteries-Smart-EN-NL-FR-DE-ES.pdf
8.4 Blue Smart IP65 charger
The AYB box is supplied with the Blue Smart IP65 charger from Victron Energy. The charger can charge a LiFePo4 battery as a lead-
acid battery by selecting the correct mode.
For more information, read the manual: https://www.victronenergy.nl/upload/documents/Manual-Blue-Smart-IP65-Charger-EN-
NL-FR-DE-ES-SE-FI.pdf
8.5 Victron Connect app
The battery and charger have a build in Bluetooth interface. The Victron Connect app can be downloaded via the Google Play Store
to view the status off the LiFePO Battery and the status of charging.
See the Victron Connect manual:
https://www.victronenergy.com/live/victronconnect:start
Title AYB manual
Document AYB manual
Date 24th May 2018
Revision 3rd
Page 37 of 42
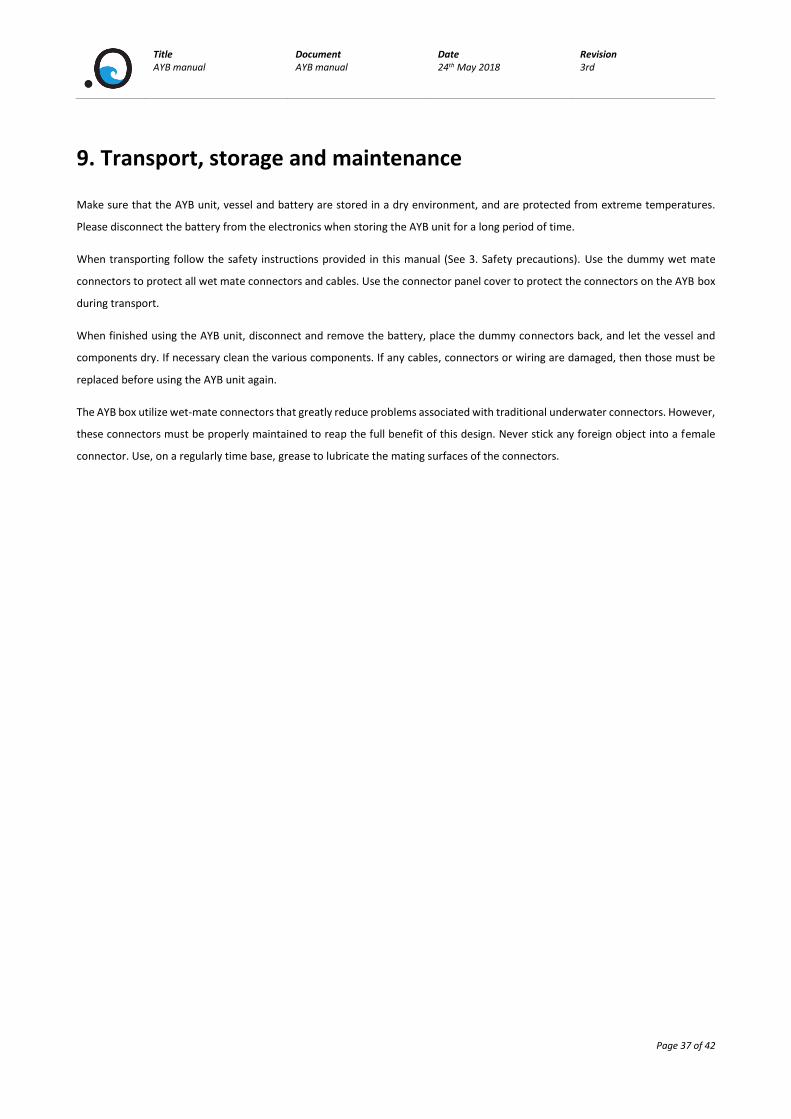
9. Transport, storage and maintenance
Make sure that the AYB unit, vessel and battery are stored in a dry environment, and are protected from extreme temperatures.
Please disconnect the battery from the electronics when storing the AYB unit for a long period of time.
When transporting follow the safety instructions provided in this manual (See 3. Safety precautions). Use the dummy wet mate
connectors to protect all wet mate connectors and cables. Use the connector panel cover to protect the connectors on the AYB box
during transport.
When finished using the AYB unit, disconnect and remove the battery, place the dummy connectors back, and let the vessel and
components dry. If necessary clean the various components. If any cables, connectors or wiring are damaged, then those must be
replaced before using the AYB unit again.
The AYB box utilize wet-mate connectors that greatly reduce problems associated with traditional underwater connectors. However,
these connectors must be properly maintained to reap the full benefit of this design. Never stick any foreign object into a female
connector. Use, on a regularly time base, grease to lubricate the mating surfaces of the connectors.
Title AYB manual
Document AYB manual
Date 24th May 2018
Revision 3rd
Page 38 of 42
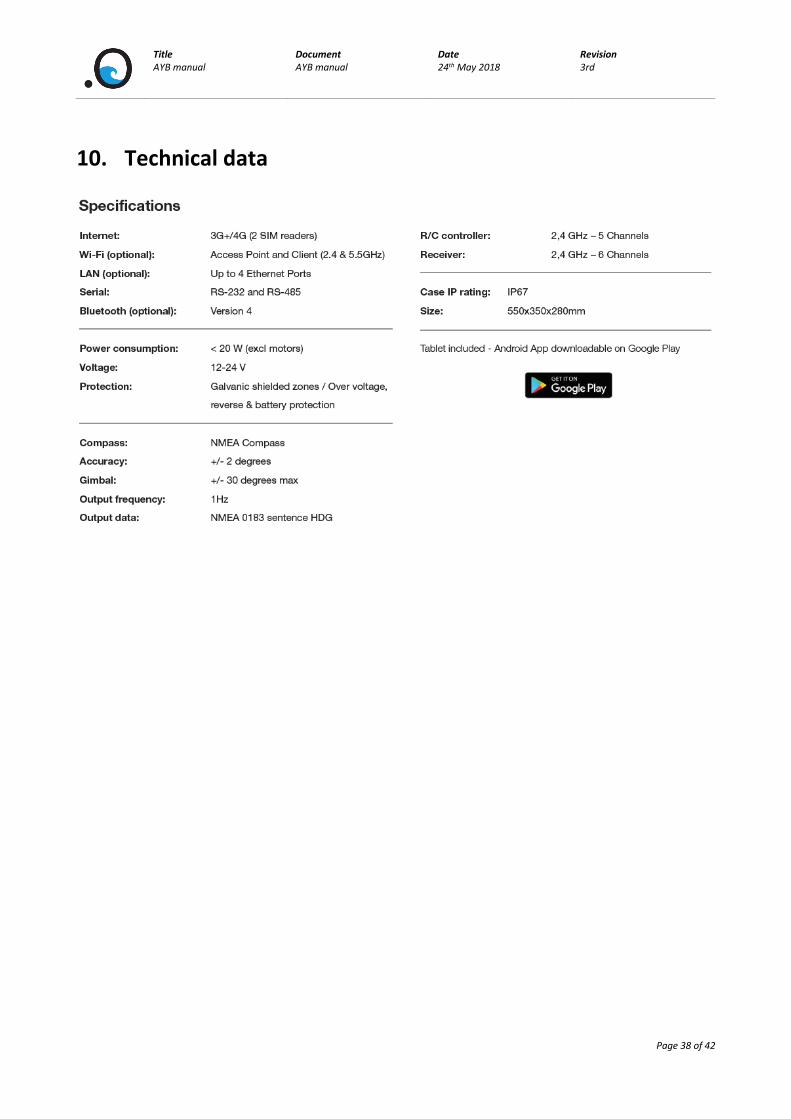
10. Technical data

Title AYB manual
Document AYB manual
Date 24th May 2018
Revision 3rd
Page 39 of 42
11. Troubleshooting (FAQ)
11.1 Device
11.1.1 No internet connection
Check if the data SIM-card is correctly plugged into the router. Be sure that there is data available on the card.
11.1.2 Vessel does not come online in app
First of all, check point 1 of the troubleshooting (Device - No internet connection). If this Is ok, please press and lift the emergency
button of the AYB box to reboot the device and refresh the app
11.1.3 Vessel does not turn the appropriate way
If the vessel is not responding correctly towards a task or the remote controller, it is possible that there is something wrong with the
motors. Check if all motors are working by manually controlling the RC. If one motor is not working, check if the cables are correctly
connected. If the left motor is turning right and the other way around, it is possible that the motor cables are switched.
11.1.4 No GPS
Check If all the cables of the GPS are correctly connected and the AYB box is not located indoors. Please try rebooting the device if
the problem returns.
11.1.5 Nothing happens
When nothing happens, it is possible that the battery is dead. Please switch the batteries with a fully loaded one and restart the
device. Check also if the battery is connected to the electronic frame.
11.2 App
11.2.1 App is not responding to anything
Please check if your tablet/phone has an internet connection by enabling Wi-Fi/3G/4G. Restart the app. In case of 3G/4G: check if
there is data on the SIM card.
11.2.2 Vessel will not start
Check if the RC unit is in autonomous mode. If it is, there is a problem with the device, please reboot the AYB box.
11.2.3 Logging will not start
There is a problem with the server or the project is corrupt. Try again later or try to create a new project.
Title AYB manual
Document AYB manual
Date 24th May 2018
Revision 3rd
Page 40 of 42
12. Support
If you have any remarks or questions, don’t hesitate to contact us at [email protected] or https://dotocean.zendesk.com/hc/en-
us
13. Warranty
dotOcean offers a one-year warranty against manufacturer’s defects on the assembly and all parts of the AYB box.
Warranty is only valid for original purchase and is non-transferable.
Manufacturer defects do not include malfunction or damage resulting from improper use, lack of proper maintenance, misuse, abuse
or vandalism, unauthorized modification or alteration.
Travel expenses, accommodation and freight cost involved to be covered by buyer.
This warranty does not cover failure of product or components due to any act of nature; lightning, floods, hurricanes, tornadoes or
any other such catastrophic events.
All repairs must be authorized by dotOcean. Unauthorized repairs will not be reimbursed under any circumstances.

Title AYB manual
Document AYB manual
Date 24th May 2018
Revision 3rd
Page 41 of 42
14. Addendum
14.1 Addendum A: Preparation of Calypso
In case of one wants to use the AYB box with the inflatable board (Calypso packet), one has to follow these instructions additionally
to those in paragraph 6 Installation instructions.
14.1.1 Inflate vessel
To inflate the vessel, take the accompanied pump and attach it to the rear of the vessel. First
open the grey protection cap by turning it to the left.
Attach the pump and then turn the end 90 degrees to the right. This way the tube will stay in
place while pumping. (1)
Inflate the boat to around 0.25bar / 4 psi. When you detach the pump and the vessel is
deflating, press the white button in the middle of the hole. This prevents deflating. When done
put the grey protection back in the hole and turn it to the right.
14.1.2 Attach motor fins
Turn the vessel around. To place the motor fins correctly, make sure that the motors are on the
outside. Slide the fins in their place and fasten the bolt to secure that the motor no longer comes
loose. Put the two cables of the motors through the closest hole of the vessel and turn the boat
around again.
NOTE: When the weather conditions aren’t that good (Windy or high
waves), it is recommended to place an extra fin at the bottom of the
vessel. This will result in much smoother sailing and better data
measurements. It is attached the same way the motor fins are (see
6.2). Place the extra fin at the front of the vessel.
14.1.3 Install measurement sensor
Install the measurement device in its appropriate position. Make sure that the device is fastened enough, so that it cannot get lost
during sailing.
1
.

Title AYB manual
Document AYB manual
Date 24th May 2018
Revision 3rd
Page 42 of 42
14.1.3.1 Default Single Beam
For the default calypso package, a single beam device is provided. Take the single beam device
and put it in the appropriate hole of the vessel. Make sure it’s deep enough for good
measurements and stuck enough so it’s stays in position.
14.1.3.2 Hydrobook
In case you bought the hydrobook upgrade package, take the
mounting bracket and unbolt the top. Place the bottom through the
appropriate hole of the vessel, then bolt the top bock on the clamp.
Make sure that the clamp is fastened enough so that the clamp no
longer can move.
Put the cable through the bracket, then screw the
hydrobook onto the bracket.
14.1.4 Place compass
On the bow of the calypso inflatable boat, a Velcro patch is provided to
place the compass and keep it in place.
Place the compass so that the front of the compass, indicated by two
arrows on top of the device, is aligned with the raft.
14.1.5 Place vessel in water
Carefully place the boat in the water.