autobase touch atp12 user manual ver.1
TRANSCRIPT

Just TouchautobaseTouchIntelligent Touch Panel Computer
ATP12 User Manual[Ver. 1.1]
http://www.autobase.biz

User Manual Ver.1.1

This user manual and all about copyright of Autobase ATP series panel computer
© 2012 Autobase, Inc. All rights reserved
Second edition, April, 2013
< Notice >
Information in this document is subject to change without prior notice.
Contents
1. ATP12 CONFIGURATION ··················································· 5
1.1 ATP12 Hardware Specifications ········································· 5
1.2 Part Names and Description ·············································· 6
1.3 ATP12 Dimensions and Panel Cut-out ································· 7
2. SERIAL COMMUNICATION PORT ······································· 8
2.1 Serial communication port ················································· 8
2.1.1 RS-232C Port ····································································· 8
3. AUTOMATED SYSTEM RECOVERY ···································· 9
3.1 System recovery ····························································· 9
3.1.1 Initial state recovery ····························································· 9
3.1.2 Restore point update·························································· 10
4. MANUAL SYSTEM RECOVERY ········································ 12
4.1 Device driver setup ·························································12
4.1.1 The mainboard chipset driver setup ····································· 12

4.1.2 Audio driver setup ······························································ 16
4.1.3 Graphic driver setup··························································· 19
4.1.4 Touch screen driver setup ·················································· 21
4.1.5 Ethernet driver setup ·························································· 24
4.2 Programs for Autobase Touch Pro Pack ·····························26
4.2.1 Autobase SCADA Program installation ································ 26
CUSTOMER SERVICE ························································ 27

5
1. ATP12 Configuration
1.1 ATP12 Hardware Specifications
Items Model
ATP12
Display 12.1 inch LED Panel
SVGA (800 * 600)
CPU Intel ATOM D525 Dual Core 1.8GHz (FSB 800MHz)
Touch Controller Pen Mount 5-wire USB controller
Mainboard Chipset ICH8M
Main Memory DDR3 2GB (1066MHz/PC8500)
Secondary Storage SSD 60GB(Max Read:500MB/s Write:400MB/s)
or HDD 500GB(SATA2 7200RPM)
VGA Intel GMA 3150
Serial/Printer Port RS-232C 3 Ports
USB USB 4 Ports
Ethernet Port Dual Gigabit Ethernet (10/100/1000Mbits/s) LAN Ports
Keyboard/ Mouse USB Type
CD-ROM -
OS Windows Embedded POSReady 2009
Utility Rescue (Recovery Tools Included)
Voltage DC 12V(50~60Hz)
Power 38W(Max 60W)
Weight 4.02 kg
Service life of LCD Backlight 40,000h or more
<Table 1-1> AUTOBASE Touch hardware specifications

6
1.2 Part Names and Description
<Figure 1-1> Input/output ports of ATP series
Power ON/OFF : Power On/OFF switch
Audio IN/OUT : Microphone input/output ports
USB : USB 4 ports
LAN 1 : 10/100/1000 Base-T Ethernet port
LAN 2 : 10/100/1000 Base-T Ethernet port
VGA : External D-SUB VGA monitor output port
COM 1 : RS-232C input/output ports
COM 2 : RS-232C input/output ports
COM 3 : RS-232C input/output ports
COM 3 : RS-232C input/output ports
DC IN : DC-12V Power input connector

7
1.3 ATP12 Dimensions and Panel Cut-out
<Figure 1-2> ATP12 dimensions(unit : mm)
<Figure 1-3> ATP12 Panel cut-out dimensions(unit : mm)

8
2. Serial Communication port
2.1 Serial communication port
ATP12 has 3 serial ports for communication.
Serial ports COM1/COM2/COM3 are RS-232C dedicated port so they can be used as
RS-232C only.
2.1.1 RS-232C Port
COM1/COM2/COM3 serial ports
support the RS-232C only.
<Table 2-1> shows pin functions for
RS-232C. Before you connect device
with serial port, verify the pin
functions.
Connector Type핀 Female)
Pin Number Function
1 DCD (Data Carrier Detect)
2 RXD (Receive Data)
3 TXD (Transmit Data)
4 DTR (Data Terminal Ready)
5 GND (Ground)
6 DSR (Data Set Ready)
7 RTS (Request to Send)
8 CTS (Clear to Send)
9 RI (Ring Indicator)
<Table 2-1> RS-232C Pin Functions

9
3. Automated System Recovery
You can recover the system simply with the previous recovery point, using the recovery
program, installed on Autobase Touch Panel.
3.1 System recovery
External keyboard is required when you have to reset Autobase Touch Panel as factory state
or repair to the recent recovery point, for reasons such as the damage of operating system or
loss of important data.
3.1.1 Initial state recovery
During system boot, press the ' Home ' of the keyboard, the login dialog box will be
appeared, as shown in <Figure 3-1>.
<Figure 3-1> Login dialog box
When <Figure 3-1> login dialog box is appeared, input user(as Administrator) and
password(default password :admin) that you has set in the recovery program and then the
recovery selection screen will be displayed as shown in <figure 3-2>.

10
<Figure 3-2 Recovery selection screen
When the recovery selection screen is
displayed, using external keyboard, select
to recover the initial state
and select to delete the
restored area.
3.1.2 Restore point update
When you complete the commissioning and project in the field, you can update the optimal
restore point for preparing of problem occurrence to the system.
After booting up Autobase Touch Panel system normally, double click the icon at the
bottom right corner of the screen then the logon dialog box will be appeared as shown in
<Figure 3-3>
<Figure 3-3> Logon dialog box of recovery program
First of all, enter the user and password in <Figure 3-3> the logon dialog box to log on.
*Factory setting – user : Administrator, Password : admin
After log on if you select ‘Restore settings’ on the left side of dialog box, <Figure 3-4>
dialog box will be appeared.
11
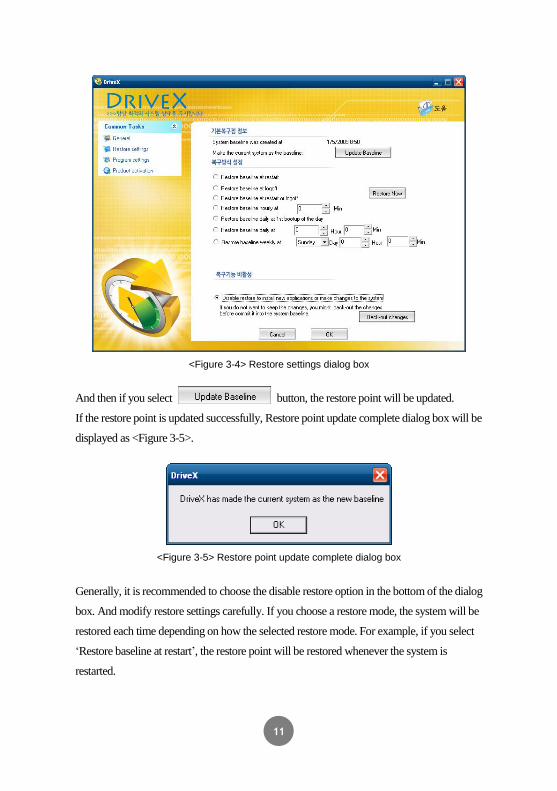
<Figure 3-4> Restore settings dialog box
And then if you select button, the restore point will be updated.
If the restore point is updated successfully, Restore point update complete dialog box will be
displayed as <Figure 3-5>.
<Figure 3-5> Restore point update complete dialog box
Generally, it is recommended to choose the disable restore option in the bottom of the dialog
box. And modify restore settings carefully. If you choose a restore mode, the system will be
restored each time depending on how the selected restore mode. For example, if you select
‘Restore baseline at restart’, the restore point will be restored whenever the system is
restarted.

12
4. Manual System Recovery
4.1 Device driver setup
Install the device driver of Autobase Touch Panel after the Windows OS setup.
You can install device drivers from Touch System Software DVD or the Internet
downloading. Touch System Software DVD is included in the product package.
4.1.1 The mainboard chipset driver setup
<Figure 4-1> Mainboard chipset driver folder

13
You can find ‘infinst911autol.exe’ file as shown in <Figure 4-1> when you select
‘Driver\ATP12\Chipset’ folder from Touch System Software DVD. And run
‘infinst911autol.exe’, <Figure 4-2> initial screen will be displayed. Then select
from <figure 4-2>, <Figure 4-3> license agreement dialog box will be displayed.
<Figure 4-2> Initial screen of the mainboard chipset driver setup

14
<Figure 4-3> License Agreement dialog box of mainboard chipset driver setup
If you select from <Figure 4-3>, the driver installation process will be
continued. During the driver installation, if it needed an OS file, <Figure 4-4> screen will be
appeared and then select the needed file in
‘\Driver\WindowsXP_POSReady2009_SystemFiles’ folder of Touch System Software
DVD.
<Figure 4-4> Specify OS System Setup file
When the installation is complete, reboot system information screen will be appeared as
shown in <Figure 4-5> and proceed to reboot.

15
<Figure 4-5> Mainboard chipset driver installation complete screen

16
4.1.2 Audio driver setup
<Figure 4-6> Audio driver folder
You can find the setup file in‘Driver\ATP12\Audio’ folder of Touch system Software DVD.
And if you run ‘WDM_R270.exe’ from <Figure 4-6>, the initial screen will be displayed as
shown in <Figure 4-7>. Then, if you select in <Figure 4-7> it will proceed to
setup. During the installation, the dialog box will be displayed to specify the related system
file path as shown in <Figure 4-8>.

17
<Figure 4-7> Audio driver setup initial screen
<Figure 4-8> Related system file location setting dialog box
After the related system file location setting if you select button, the audio
driver installation will be completed and Windows restart setting dialog box will be
displayed as shown in <Figure 4-9>.

18
<Figure 4-9> Windows restart setting dialog box

19
4.1.3 Graphic driver setup
<Figure 4-10> Graphic driver folder
If you select the provided Touch System software DVD ‘Driver\ATP12\Graphic’ folder, the
files will be displayed as <Figure 4-10>. And run ‘Setup.exe’ in <Figure 4-10>, the graphic
driver setup initial screen will be appeared as <Figure 4-11>.

20
<Figure 4-11> Graphic driver setup initial screen
Then, select button in <Figure 4-11>, the graphic driver setup will be started.
When the graphic driver setup completed <Figure 4-12> dialog box will be displayed and
you can set whether to restart the computer or not. After installing the graphic driver, adjust
the proper screen resolution (ATP12 : 800 * 600).
<Figure 4-12> Graphic driver setup complete dialog box

21
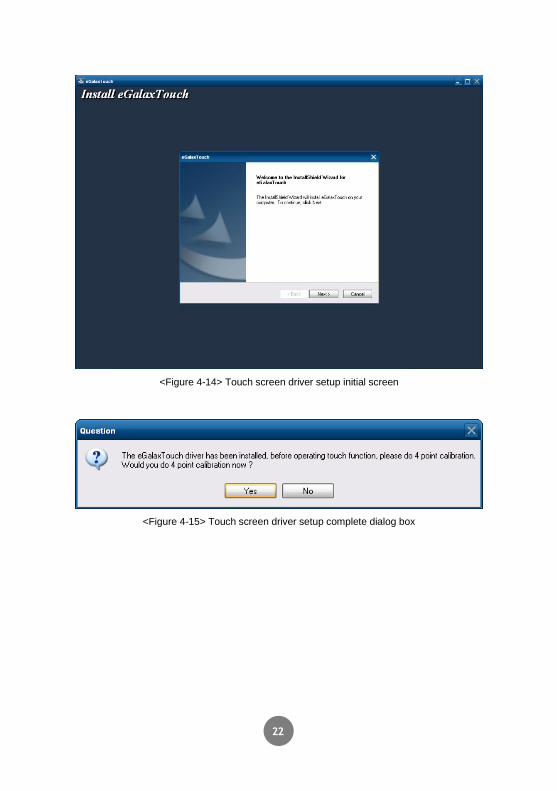
4.1.4 Touch screen driver setup
<Figure 4-13> Touch screen driver folder
If you select ‘Driver\ATP12\TouchScreen’ folder from Touch System Software DVD, you
can find ‘TouchKit_2KXP_5.6.0.6806.exe’ as shown in <Figure 4-13>. And if you run
‘TouchKit_2KXP_5.6.0.6806.exe’, you can see the initial screen for setting as shown in
<Figure 4-14>. Then, select button, the setup program will be run and start to
install the touch screen driver. After you have completed the touch screen driver installation,
<Figure 4-15> dialog box will be displayed. And select button in <Figure
4-15> dialog box, the screen calibration program will be executed as shown in <Figure
4-16>. After then, set the screen position of the touch screen with the calibration program of
<Figure 4-16>. And if you need the detailed screen calibration, run ‘Configure Utility’ and
select ‘Tools’ tab. Then click button to do a finer screen calibration.
22
<Figure 4-14> Touch screen driver setup initial screen
<Figure 4-15> Touch screen driver setup complete dialog box

23
<Figure 4-16> Touch screen calibration
<Figure 4-17> Tools tab of Configure utility

24
4.1.5 Ethernet driver setup
<Figure 4-18> Ethernet driver folder
When you open ‘Driver\ATP12\Ethernet’ folder of ‘Touch System Software DVD’, you
can find files as shown in <Figure 4-18>. And if you run ‘Setup.exe’ file from
‘Driver\ATP12\Ethernet’ folder, installShield wizard will be started as shown in <Figure
4-19>.

25
<Figure 4-19> InstallShield Wizard for graphic driver setup
Then select , installShield Wizard will start graphic driver setup. After the
graphic driver installation is completed, <Figure 4-20> will be appeared.
<Figure 4-20> InstallShield Wizard Complete dialog box

26
4.2 Programs for Autobase Touch Pro Pack
4.2.1 Autobase SCADA Program installation
Autobase Touch Pro Pack required Microsoft DotNet Framework, Autobase SCADA
Program and Autobase SCADA license by default.
For more details about the installable Autobase SCADA version and how to install the
license, contact Autobase technical support team.

27
Customer service
Limited Warranty
When this product goes out of order under the normal use of customer, we will repair it free of charge for one
year from the date of your purchase. Even during the warranty period, we will provide repair services with
reasonable charges for problems due to customer’s negligence and natural disasters.
Paid service
Autobase, Inc. does not warrant in the following cases.
Malfunction by foreign substances(water, soda, coffee, toys, etc.) spills into the product.
Damage and malfunction of a product due to be dropped or shocked
Exterior damage and deformation in organic solvents such as thinner, benzene,
Malfunction by using non-genuine parts or supplies.(ex: adapter, cooling fan, LCD, etc.)
Repair and replacement of parts due to normal wear and tear.
Failure due to wrong voltage.
Malfunction due to the failure of connected device.
Damage or loss of product parts due to disassemble by consumer
Defects or damages result from repairs or modifications by someone other than customer service
representative of Autobase, Inc. Technical Support Center.
Failure by natural disasters(fire, flood, lightning, gas, salt, earthquake, etc.)
Reinstallation due to the improper installation of consumers
Service request, but the product has no defective parts, will be charged service fee.(Please read the user
manual)
Defects or damage that result from improper operation of user.

28
Safety Information
For any reason, damage caused by disassembling the equipment will not be covered under the warranty.
Do not open the cabinet to avoid electric shock. Please request service to qualified technicians.
Sound or images might be distorted because to place this product near devices, emit electromagnetic
waves.
Protect touch panel from rain or moisture to avoid fire or electric shock.
Unplug the power cord and all connected cables during thunderstorms.
Connection of Network port on the touch panel is allowed 10BASE-T, 100BASE-T and 10000BASE-T.
Don’t connect other kinds of network cables or telephone lines.
Improper connection can result in the current load on the connector can cause a fire, overheating or
malfunctioning.
Don’t block the air-intake and exhaust vents.
This touch panel surface is made of metal so if you do not use in the ground environment you can feel the
subtle flow of currents.

1201, Biz Center, SKnTechno Park, Sangdaewon-dong,
Jungwon-gu, Seongnam-si, Gyeonggi-do, Korea
Phone : +82.31.776.0800 / Fax : +82.31.776.0802
http://www.autobase.biz