aura 2007 a 6/14/06 8:43 am page 1 - owner … the manual seat to adjust the position of the seat,...
TRANSCRIPT

DRIVER INFORMATIONInstrument Panel . . . . . . . . . . . . . . . . . . . . . . . . . . . .2Instrument Panel Cluster . . . . . . . . . . . . . . . . . . . . . .3Vehicle Symbols . . . . . . . . . . . . . . . . . . . . . . . . . . . . .4Driver Information Center . . . . . . . . . . . . . . . . . . . . . .4
REMOTE KEYLESS ENTRYRemote Keyless Entry Features . . . . . . . . . . . . . . . .5Remote Vehicle Start System . . . . . . . . . . . . . . . . . .6
SAFETY & SECURITYOnStar® . . . . . . . . . . . . . . . . . . . . . . . . . . . . . . . . . . . . .7Passenger Air Bag Status Indicator . . . . . . . . . . . . .7Rear Door Security Locks . . . . . . . . . . . . . . . . . . . . .7
COMFORT Seat Adjustments . . . . . . . . . . . . . . . . . . . . . . . . . . . .7Heated Seat Controls . . . . . . . . . . . . . . . . . . . . . . . . .8Steering Column Adjustment . . . . . . . . . . . . . . . . . . .8Shoulder Belt Height Adjuster . . . . . . . . . . . . . . . . . .8Adjustable Accelerator and Brake Pedals . . . . . . . .9Climate Controls . . . . . . . . . . . . . . . . . . . . . . . . . . . . .9
ENTERTAINMENT Audio System Features . . . . . . . . . . . . . . . . . . . . . .10Multiple-Disc CD Player . . . . . . . . . . . . . . . . . . . . . .12Audio Steering Wheel Controls . . . . . . . . . . . . . . . .13XM Satellite Radio . . . . . . . . . . . . . . . . . . . . . . . . . . .13Rear Seat Audio . . . . . . . . . . . . . . . . . . . . . . . . . . . .13
CONVENIENCE Automatic Headlamp System . . . . . . . . . . . . . . . . . .13Fog Lamps . . . . . . . . . . . . . . . . . . . . . . . . . . . . . . . . .14Cruise Control . . . . . . . . . . . . . . . . . . . . . . . . . . . . . .14Speed-Sensitive Wipers . . . . . . . . . . . . . . . . . . . . . .14Express Power Windows . . . . . . . . . . . . . . . . . . . . .15Power Outside Mirrors . . . . . . . . . . . . . . . . . . . . . . .15Automatic Dimming Rearview Mirror with Compass . . . . . . . . . . . . . . . . . . . . . . . .15Center Console Features . . . . . . . . . . . . . . . . . . . . .16Universal Home Remote . . . . . . . . . . . . . . . . . . . . . .16Interior Lighting Features . . . . . . . . . . . . . . . . . . . . .16Sunroof . . . . . . . . . . . . . . . . . . . . . . . . . . . . . . . . . . . .17Panoramic Sunroof . . . . . . . . . . . . . . . . . . . . . . . . . .17Split-Folding Rear Seat . . . . . . . . . . . . . . . . . . . . . . .17
PERFORMANCE & MAINTENANCE Traction Control System . . . . . . . . . . . . . . . . . . . . . .18StabiliTrak® – Stability Control System . . . . . . . . .18TAPshift . . . . . . . . . . . . . . . . . . . . . . . . . . . . . . . . . . .18Tire Pressure Monitor . . . . . . . . . . . . . . . . . . . . . . . .19Resetting the Oil Life System . . . . . . . . . . . . . . . . .19
OWNER INFORMATIONRoadside Assistance . . . . . . . . . . . . . . . . . . . . . . . .20My Saturn . . . . . . . . . . . . . . . . . . . . . . . . . . . . . . . . . .20
Congratulations on your purchase of a Saturn AURA. Please read this information and your Owner Manual to ensure anoutstanding ownership experience. Note that your vehicle may not include all the features described in this booklet. Keep thisbooklet with your Owner Manual for easy reference.
AURA 2007 A 6/14/06 8:43 AM Page 1
Getting to Know
YourAU
RA
2
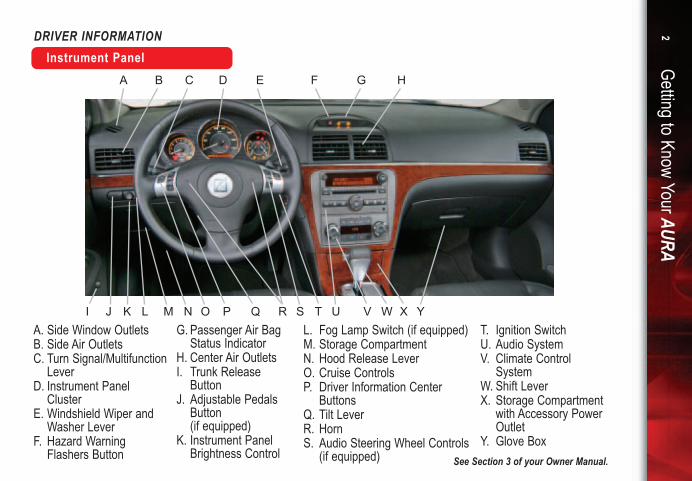
Instrument Panel
See Section 3 of your Owner Manual.
D G H
I
FB
Q
EA
RJ K M ON
C
PL UTS
DRIVER INFORMATION
V YXW
A. Side Window OutletsB. Side Air OutletsC. Turn Signal/Multifunction
LeverD. Instrument Panel
ClusterE. Windshield Wiper and
Washer LeverF. Hazard Warning
Flashers Button
G. Passenger Air BagStatus Indicator
H. Center Air OutletsI. Trunk Release
ButtonJ. Adjustable Pedals
Button(if equipped)
K. Instrument PanelBrightness Control
L. Fog Lamp Switch (if equipped)M. Storage CompartmentN. Hood Release LeverO. Cruise ControlsP. Driver Information Center
ButtonsQ. Tilt LeverR. HornS. Audio Steering Wheel Controls
(if equipped)
T. Ignition SwitchU. Audio SystemV. Climate Control
SystemW. Shift LeverX. Storage Compartment
with Accessory PowerOutlet
Y. Glove Box
AURA 2007 A 6/14/06 8:43 AM Page 2

Your vehicle’s instrument panel is equipped withthis cluster or one very similar to it. The instrumentpanel cluster includes these key features:A. TachometerB. SpeedometerC. Driver Information CenterD. Fuel GaugeE. Engine Coolant Temperature Gauge
3See Section 3 of your Owner Manual.
B EDCA
Instrument Panel Cluster
Note: The instrument panel cluster is designed tolet you know about many important aspects of yourvehicle’s operation. It is important to read yourOwner Manual and become familiar with the infor-mation being relayed to you by the lights, gaugesand indicators, as well as what action can be takento ensure safety and to prevent damage.
AURA 2007 A 6/14/06 8:43 AM Page 3

Getting to Know Your AURA4
Driver Information Center
Your vehicle has a Driver InformationCenter (DIC) that provides vehicleinformation and enables vehicle featurepersonalization. The DIC messages willbe shown on the instrument panel clus-ter display. The DIC buttons are located
on the left side of the steering wheel. Tooperate the DIC, the ignition switch mustbe in the Run position.
(Information): Press this button toscroll through the following vehicleinformation:• Outside Air
TemperatureandOdometer
• Trip A• Trip B• Fuel Range• Econ (Fuel Economy)• Average Speed• Oil Life
(Reset): Press this button to resetDIC information while it is displayed,select a personalization feature setting,or acknowledge a warning message.Vehicle Feature PersonalizationA variety of your vehicle’s features canbe personalized to your preference. Topersonalize features:1. Turn on the ignition with the vehicle in
Park. (Access to the personalizationfeatures, except Units, is not avail-able while the vehicle is moving.)
Vehicle Symbols
Following are examples of symbols youwill find on your vehicle. It is importantto become familiar with them, as theyalert you to various vehicle operatingconditions.
Air Bag Readiness Light
Air Conditioning (A/C)
Antilock Brake System Warning Light
Cruise Control Set
DIC Info Button
DIC Reset Button
Malfunction Indicator Lamp(Check Engine Light)
Off
Off/On
On
Rear Window Defogger
Safety Belt Reminder Light
Security Light
StabiliTrak Light
Traction Control Off Light
Tire Pressure Warning Light
Note: System may require use of atleast one tank of fuel to correctly reportFuel Economy and Average Speed.
AURA 2007 A 6/14/06 8:43 AM Page 4
5
2. Press and hold the (Information)button and the (Reset) button atthe same time to enter the personal-ization menu.
3. Press the button to scroll throughthe available personalization features.
4. With the desired feature displayed,press and hold the button for onesecond to scroll through each setting.
5. With the desired setting displayed,press the button to record yourchoice and move on to the nextfeature.
6. To exit the personalization menu,press the button until the end ofthe menu is reached.
Personalization features may include:• Oil Life Reset• Units (English/Metric)• Remote Start (if equipped)• Lock Horn (during Remote Keyless
Entry (RKE) locking)• Unlock Horn (during RKE unlocking)• Light Flash (during RKE locking or
unlocking)• Delay Lock• Auto Unlock• Exterior Lights (during RKE
unlocking)• Language (English, French, Spanish
or German)
Warnings and MessagesThe DIC provides a variety of vehicle
Note: Depending on equipment, not allpersonalization features may be avail-able on your vehicle.
messages (depending on optional equip-ment) as well as warnings if a problemis sensed in a vehicle system. To acknowledge a message and clear itfrom the display, press the (Reset)button. Some urgent messages cannotbe cleared from the DIC display. If you have a current OnStar subscrip-tion, and a warning message appears,you can press the blue OnStar buttonand speak to an OnStar Advisor. Inmany vehicles, OnStar Advisors canaccess certain diagnostic informationand can tell you how serious the prob-lem is and what you should do about it.
See Section 3 of your Owner Manual.
Note: Your vehicle’s warnings andmessages provide critical informationthat can prevent damage to your vehi-cle. Review your Owner Manual tobecome familiar with the informationdisplayed and the action required.
Remote Keyless Entry Features
REMOTE KEYLESS ENTRY
The RemoteKeyless Entry(RKE) transmitterallows you to lockand unlock yourvehicle and performother functions fromup to 196 feet (60meters) away fromthe vehicle. RKE functions include:
(Remote Vehicle Start) (ifequipped): This feature can be used tostart the engine. (See Remote VehicleStart System.)
AURA 2007 A 6/14/06 8:43 AM Page 5

Getting to Know Your AURA6
(Lock): Press this button to lock allthe doors. RKE feedback (light flashand/or horn chirp) can be programmedusing the DIC.
(Unlock): Press this button to unlockthe driver’s door. Press it again withinfive seconds to unlock all remainingdoors. RKE feedback (light flash and/orhorn chirp) can be programmed usingthe DIC.
(Trunk Release): Press and holdthis button for approximately one secondto unlatch the trunk. The trunk also maybe opened by pressing the TrunkRelease button located on the frontbottom of the driver’s door.
(Vehicle Locator/Panic Alarm):Press and release this button to locateyour vehicle. The horn will sound threetimes and the headlamps and parkinglamps will flash three times.To sound the panic alarm, press andhold the button for three seconds. Thehorn will sound and the headlamps andparking lamps will flash for 30 seconds.Press the button again to cancel thepanic alarm.See Section 2 of your Owner Manual.
This feature allows you to start theengine from outside the vehicle byusing the RKE transmitter. The remotestart capability must be turned on usingthe DIC.During a remote vehicle start, the manu-al climate control system will operate atits last setting before the vehicle wasturned off. With automatic climate con-trol (if equipped), the system will sense
Remote Vehicle Start System (if equipped)
your vehicle’s interior temperature andoperate as necessary to warm or coolthe vehicle to a preset interior tempera-ture. It will also activate the reardefogger if needed, based on outsidetemperature.Starting the VehicleTo remote start the vehicle:1. Aim the RKE transmitter at the
vehicle. 2. Press and release the (Lock)
button on the transmitter.3. Immediately press and hold the
(Remote Start) button for about fourseconds. When the vehicle starts, theparking lamps will light and stay onwhile the engine is running. Theengine will continue running for 10minutes.
4. Repeat these steps for a 10-minutetime extension. Only two consecutiveremote starts are allowed.
When you enter the vehicle after aremote start, the key must be inserted inthe ignition and turned to the Run posi-tion before driving.
Canceling a Remote StartIf you wish to turn off the engine insteadof driving after a remote start, performone of the following functions:• Press and hold the (Remote Start)
button until the parking lamps turn off.
Note: The Remote Vehicle Start fea-ture will not operate if the key is in theignition, if a door or the hood is open,or if the Check Engine light is illuminat-ed on the instrument panel cluster.
AURA 2007 A 6/14/06 8:43 AM Page 6

7
SAFETY & SECURITY
OnStar®
Passenger Air Bag StatusIndicator
• Press and release the HazardWarning Flashers button. Press itagain to turn off the flashers.
• Turn the key in the ignition switch tothe Run position and then off.
• The engine will stop automaticallywhen time expires.
See Section 2 of your Owner Manual.
If your vehicle is OnStar-equipped, theOnStar system provides in-vehicle safe-ty, security and phone services, avail-able 24 hours a day, 7 days a week.These services are easily accessedthrough the three OnStar buttons in yourvehicle. For more information aboutOnStar features, refer to the OnStarOwner’s Guide and enclosed audio CDlocated in your glove box.See Section 2 of your Owner Manual.
Your vehicle is equipped with aPassenger Sensing System located inthe front passenger’s seat for the pas-senger’s frontal air bag, and a passen-ger air bag status indicator located onthe center of the instrument panel.See Sections 1 and 3 of your Owner Manual.
Rear Door Security Locks
Your vehicle has rear door security locksto prevent passengers from opening therear doors from the inside. They arelocated on the inside edge of each reardoor. To set the locks, follow the instruc-tions on the label located near the reardoor latch.See Section 2 of your Owner Manual.
COMFORT
Seat Adjustments
Adjusting the Manual SeatTo adjust the position of the seat, lift thebar located under the front of the seat tounlock it. Slide the seat to the desiredposition and release the bar. Try tomove the seat with your body to be surethe seat is locked in place.To adjust the position of the seatback,lift the recline lever on the outboard sideof the seat. Move the seatback to thedesired position and release the lever.Push on the seatback to make sure it islocked in place.Adjusting the Power Seats (if equipped)
The power seat controls are located onthe outboard side of the seat.
AB
AURA 2007 A 6/14/06 8:43 AM Page 7

Getting to Know Your AURA8
Shoulder Belt Height Adjuster
Steering Column Adjustment
Adjust thedriver’s seat toa comfortableposition beforeadjusting thesteering wheel.To tilt and tele-scope the posi-tion of the steering wheel:1. Pull down the lever on the left side of
the steering column.2. Adjust the wheel to a comfortable
position by moving it up or downas well as in or out.
3. Pull up the lever to lock the wheel inplace.
See Section 3 of your Owner Manual.
The shoulder beltcan be adjusted tothe height that isright for you. Tomove the heightadjuster up ordown, squeeze
The heated front seatcontrols are locatedon the outboard cor-ner of the driver andfront passenger seats.The seats feature ahigh and low heat setting.
Heated Seat Controls (if equipped)
Use the horizontal control (A) to:• Move the seat forward or rearward
by sliding the control forward orrearward.
• Move the seat up or down by movingthe entire control up or down.
• Raise or lower the front or rear part ofthe seat cushion by moving the frontor rear of the control up or down.
Use the vertical control (B) to:• Recline the seatback by tilting the top
of the control rearward.• Bring the seatback forward by tilting
the top of the control forward.Adjusting Lumbar Support (if equipped) The adjust-ment handleis located onthe outboardside of theseatback.To adjustsupport:• Ratchet the handle up repeatedly
to decrease lumbar support. • Ratchet the handle down repeatedly
to increase lumbar support.See Section 1 of your Owner Manual.
High: Press the top of the switch ( )once to turn on the seat to the highsetting (indicator light number 2).Low: Press the top of the switch ( )twice to turn on the seat to the lowsetting (indicator light number 1).Off: Press the bottom of the switch ( )to turn off the heated seat.See Section 1 of your Owner Manual.
AURA 2007 A 6/14/06 8:43 AM Page 8
9
Adjustable Accelerator andBrake Pedals (if equipped)
The acceler-ator andbrake pedalscan beadjusted to acomfortableand safeoperatingpositionusing the controls located on the leftside of the instrument panel. Adjust thedriver’s seat to a comfortable positionbefore adjusting the pedals. The vehiclemust be in Park and your foot must notbe pushing on either pedal in order tomake adjustments. Press the left arrow to move the pedalsaway from you and the right arrow tomove the pedals toward you.See Section 2 of your Owner Manual.
Climate Controls
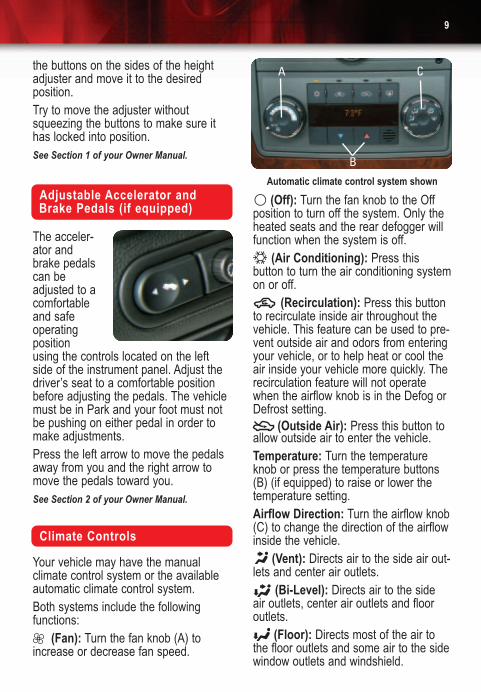
Your vehicle may have the manualclimate control system or the availableautomatic climate control system.Both systems include the followingfunctions:
(Fan): Turn the fan knob (A) toincrease or decrease fan speed.
the buttons on the sides of the heightadjuster and move it to the desiredposition.Try to move the adjuster withoutsqueezing the buttons to make sure ithas locked into position.See Section 1 of your Owner Manual.
(Off): Turn the fan knob to the Offposition to turn off the system. Only theheated seats and the rear defogger willfunction when the system is off.
(Air Conditioning): Press thisbutton to turn the air conditioning systemon or off.
(Recirculation): Press this buttonto recirculate inside air throughout thevehicle. This feature can be used to pre-vent outside air and odors from enteringyour vehicle, or to help heat or cool theair inside your vehicle more quickly. Therecirculation feature will not operatewhen the airflow knob is in the Defog orDefrost setting.
(Outside Air): Press this button toallow outside air to enter the vehicle.Temperature: Turn the temperatureknob or press the temperature buttons(B) (if equipped) to raise or lower thetemperature setting.Airflow Direction: Turn the airflow knob(C) to change the direction of the airflowinside the vehicle.
(Vent): Directs air to the side air out-lets and center air outlets.
(Bi-Level): Directs air to the sideair outlets, center air outlets and flooroutlets.
(Floor): Directs most of the air tothe floor outlets and some air to the sidewindow outlets and windshield.
A C
B
Automatic climate control system shown
AURA 2007 A 6/14/06 8:43 AM Page 9
Getting to Know Your AURA10
ENTERTAINMENT
(Defog): Directs air to the wind-shield, side window outlets and flooroutlets.
(Defrost): Directs most of the air tothe windshield and some air to the sidewindow outlets.
(Rear Window Defogger): Pressthis button to activate the rear windowdefogger and the heated outside mirrors(if equipped). They will shut offautomatically.Automatic Climate Control (if equipped)To have the system automatically controlthe air delivery mode and fan speed, turnthe fan and airflow knobs to the AUTOposition. Use the temperature buttons toadjust the temperature setting.See Section 3 of your Owner Manual.
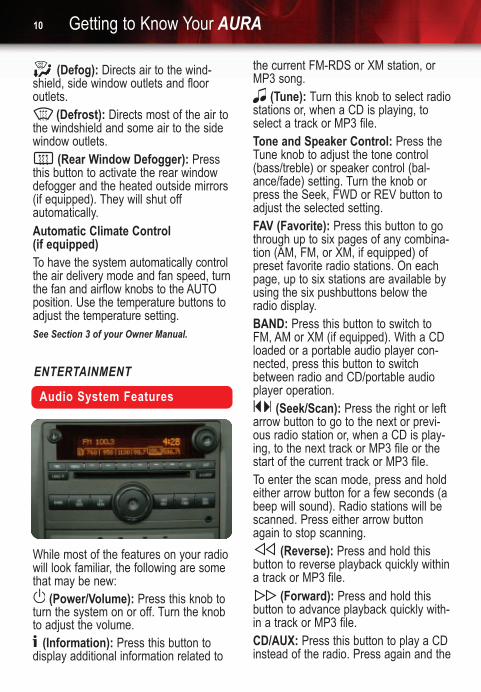
Audio System Features
While most of the features on your radiowill look familiar, the following are somethat may be new:
(Power/Volume): Press this knob toturn the system on or off. Turn the knobto adjust the volume.
(Information): Press this button todisplay additional information related to
the current FM-RDS or XM station, orMP3 song.
(Tune): Turn this knob to select radiostations or, when a CD is playing, toselect a track or MP3 file. Tone and Speaker Control: Press theTune knob to adjust the tone control(bass/treble) or speaker control (bal-ance/fade) setting. Turn the knob orpress the Seek, FWD or REV button toadjust the selected setting.FAV (Favorite): Press this button to gothrough up to six pages of any combina-tion (AM, FM, or XM, if equipped) ofpreset favorite radio stations. On eachpage, up to six stations are available byusing the six pushbuttons below theradio display.BAND: Press this button to switch toFM, AM or XM (if equipped). With a CDloaded or a portable audio player con-nected, press this button to switchbetween radio and CD/portable audioplayer operation.
(Seek/Scan): Press the right or leftarrow button to go to the next or previ-ous radio station or, when a CD is play-ing, to the next track or MP3 file or thestart of the current track or MP3 file.To enter the scan mode, press and holdeither arrow button for a few seconds (abeep will sound). Radio stations will bescanned. Press either arrow buttonagain to stop scanning.
(Reverse): Press and hold thisbutton to reverse playback quickly withina track or MP3 file.
(Forward): Press and hold thisbutton to advance playback quickly with-in a track or MP3 file.CD/AUX: Press this button to play a CDinstead of the radio. Press again and the
AURA 2007 A 6/14/06 8:43 AM Page 10

11
system will automatically search for aportable audio player connected to theauxiliary input jack.EQ (Automatic Equalization): Pressthis button to select preset equalizationsettings.CAT (Category) (if equipped): Press thisbutton to find XM stations within adesired category.Auxiliary Input Jack: A portable audioplayer can be connected to the auxiliaryinput jack located on the radio. Whenconnected, press the CD/AUX button tobegin playing audio from the portabledevice over the vehicle speakers.MP3 CapabilityA CD-R or CD-RW containing MP3audio tracks will play automatically wheninserted into the CD player. An MP3symbol will be displayed.Setting Favorite Stations
Before setting your favorite stations,shift the vehicle into Park.
Up to six pages of any combination (AM,FM, or XM, if equipped) of favorite radiostations, with up to six stations stored oneach page, can be displayed by press-ing the FAV (Favorite) button.
To set the number of favorite stationpages:1. Press the MENU button to display the
radio setup menu.2. Press the pushbutton located below
the FAV 1–6 label on the radiodisplay.
3. Select the desired number of favoritestation pages.
4. Press the FAV button. You may nowbegin storing your favorite stations forthe chosen number of pages.
To store favorite stations:1. Tune in the desired radio station.2. Press the FAV button to display the
page where the station is to bestored.
3. Press and hold one of the six push-buttons until a beep sounds to storethe station.
4. Repeat the steps for each pushbuttonon each page.
Note: Choosing to engage in extendedsearching for specific audio stations orsongs by using buttons and knobs — orto give extended attention to entertain-ment tasks — can lead you to lookaway from the road frequently or longerthan usual. Looking away from the roadfor prolonged periods may cause you tomiss seeing things on the road that youneed to see. Be sure to keep your eyeson the road and mind on the drive —and avoid engaging in extended search-ing for specific items while driving.
AURA 2007 A 6/14/06 8:43 AM Page 11

Getting to Know Your AURA12
Setting the Time
To set the time:1. Turn on the radio.2. Press the (Clock) button. Or, if
equipped, press the MENU buttonuntil the clock option is displayed;then press the pushbutton locatedunder the clock option label. The HR,MIN, MM, DD, YYYY labels willappear on the display.
3. Press the pushbutton under any ofthe labels to be changed.
4. Press the pushbutton again, the rightSeek arrow or the FWD button toincrease the numbers. Press the leftSeek arrow or the REV button todecrease the numbers. Rotating the
(Tune) knob also will increase ordecrease the selected label.
5. Press the Clock or MENU buttonagain to set the currently displayedtime and date.
See Section 3 of your Owner Manual.
With thein-dash6-discCD play-er, youcannotdirectlyload a CD as in single-play systems.
Multiple-Disc CD Player (if equipped)
To load a CD:• To load a single CD, press and
release the LOAD button. Waitfor the display prompt to load the CD.
• To load multiple CDs, press and holdthe LOAD button for two sec-onds. Follow the display prompts toload each CD. Press the LOAD button again to cancel loading moreCDs.
To play a specific CD:• Press the pushbutton below the arrow
label on the display to select thedesired CD number.
To eject a CD:• To eject the CD that is currently play-
ing, press the EJECT buttononce.
• To eject all CDs, press and hold theEJECT button for two seconds.
If a CD is not removed after severalseconds, it will be pulled back into theplayer automatically.
See Section 3 of your Owner Manual.
Note: CDs with any affixed labels mayjam in the CD player. Label a CD usinga permanent marker. If more than oneCD is inserted into the slot at one time,or if scratched or damaged CDs areplayed, the CD player could be dam-aged. When using the CD player, useonly CDs in good condition withoutlabels; load one CD at a time; and keepthe CD player and the loading slot freeof foreign materials, liquids or debris.
AURA 2007 A 6/14/06 8:44 AM Page 12

13
The followingaudio controlsare located onthe steeringwheel:+ – (Volume):Press the plusor minus buttonto increase ordecrease the volume.
(Seek): Press the up or downarrow to go to the next or previouspreset radio station or, when a CD isplaying, to the next or previous track.Press and hold the up or down arrow fortwo seconds to seek the next or previ-ous radio station with a strong signal.
(Mute/Voice Activation): Press thisbutton to mute the audio system. Pressand hold the button for two seconds tointeract with OnStar Hands-Free Calling.See Section 3 of your Owner Manual.
Audio Steering Wheel Controls(if equipped)
Rear Seat Audio (if equipped)
Rear seat audio (RSA) allows rear seatpassengers to listen to and control anyof the sources, such as the radio or CDplayer. You can operate the RSA withthe main radio on or off. Adjust thevolume on the wireless headphones byturning the volume control on eachheadset. Wired headphones (not includ-ed) connect to the outlets on the RSAsystem.See Section 3 of your Owner Manual.
XM Satellite Radio (if equipped)
XM Satellite Radio offers more than 170channels of digital-quality sound thatgoes wherever you go — coast to coast.XM can display song title, artist or enter-tainment genre by pressing the (Information) button.Activation fee and service subscriptionare extra. Service is based in the 48contiguous U.S. states and Canada.For more information, visit XM onlineat www.XMradio.com or call 1-800-852-XMXM (9696).See Section 3 of your Owner Manual.
CONVENIENCE
Automatic Headlamp System
Your vehicle is equipped with anAutomatic Headlamp System, whichturns on the Daytime Running Lamps inthe daytime and the headlamps andother exterior lamps at night or whennecessary. The headlamps also will turnon if the wipers are on for more than15 seconds.
AURA 2007 A 6/14/06 8:44 AM Page 13

Getting to Know Your AURA14
The system uses a light sensor, locatedon top of the instrument panel, to deter-mine light conditions. For proper opera-tion, avoid placing any objects on ornear the sensor.Exterior Lamp Control SwitchThe exterior lamps also can be operatedmanually using the control switch on thelever to the left of the steering column.The switch can be rotated to the follow-ing positions:AUTO (Automatic Lamp Control):This position turns on the AutomaticHeadlamp System.
(On/Off): When operating in theAUTO position, a momentary turn of thelamp control switch to this position willturn off the Automatic HeadlampSystem. To activate the system, turn the switchto this position again. The AutomaticHeadlamp System is always turned onwhen the vehicle is started.
(Parking Lamps): This positionturns on the parking lamps andtaillamps.
(Headlamps): This position turnson the headlamps, parking lamps andtaillamps. See Section 3 of your Owner Manual.
Fog Lamps (if equipped)
Press the (Fog Lamps)button on theleft side of theinstrument panelto turn the foglamps on or off.
See Section 3 of your Owner Manual.
Cruise Control (if equipped)
The cruise controlbuttons are locat-ed on the steeringwheel. Theyinclude the follow-ing functions:
(On/Off):Press this buttonto turn the cruise control system onor off.RES+ (Resume): Press this button toresume a set speed. If the system isactive, press and release this button toincrease speed one mph, or press andhold the button to increase speed morethan one mph.SET– (Set): Press this button to set aspeed. If the system is active, press andrelease this button to decrease speedone mph, or press and hold the buttonto decrease speed more than one mph.When the cruise control is set, thecruise control symbol will illuminate inthe instrument panel cluster.See Section 3 of your Owner Manual.
Speed-Sensitive Wipers
The speed-sensitive wipers lever islocated to the right of the steering col-umn. It includes the following functions:
AURA 2007 A 6/14/06 8:44 AM Page 14
15
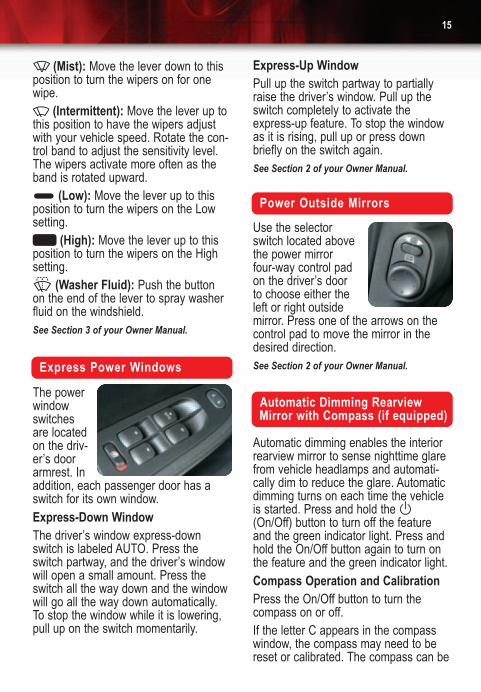
Express Power Windows
The powerwindowswitchesare locatedon the driv-er’s doorarmrest. Inaddition, each passenger door has aswitch for its own window.Express-Down WindowThe driver’s window express-downswitch is labeled AUTO. Press theswitch partway, and the driver’s windowwill open a small amount. Press theswitch all the way down and the windowwill go all the way down automatically.To stop the window while it is lowering,pull up on the switch momentarily.
Power Outside Mirrors
Use the selectorswitch located abovethe power mirrorfour-way control padon the driver’s doorto choose either theleft or right outsidemirror. Press one of the arrows on thecontrol pad to move the mirror in thedesired direction. See Section 2 of your Owner Manual.
(Mist): Move the lever down to thisposition to turn the wipers on for onewipe.
(Intermittent): Move the lever up tothis position to have the wipers adjustwith your vehicle speed. Rotate the con-trol band to adjust the sensitivity level.The wipers activate more often as theband is rotated upward.
(Low): Move the lever up to thisposition to turn the wipers on the Lowsetting.
(High): Move the lever up to thisposition to turn the wipers on the Highsetting.
(Washer Fluid): Push the buttonon the end of the lever to spray washerfluid on the windshield.See Section 3 of your Owner Manual.
Express-Up WindowPull up the switch partway to partiallyraise the driver’s window. Pull up theswitch completely to activate theexpress-up feature. To stop the windowas it is rising, pull up or press downbriefly on the switch again.See Section 2 of your Owner Manual.
Automatic Dimming RearviewMirror with Compass (if equipped)
Automatic dimming enables the interiorrearview mirror to sense nighttime glarefrom vehicle headlamps and automati-cally dim to reduce the glare. Automaticdimming turns on each time the vehicleis started. Press and hold the (On/Off) button to turn off the featureand the green indicator light. Press andhold the On/Off button again to turn onthe feature and the green indicator light.Compass Operation and CalibrationPress the On/Off button to turn thecompass on or off.If the letter C appears in the compasswindow, the compass may need to bereset or calibrated. The compass can be
AURA 2007 A 6/14/06 8:44 AM Page 15
Getting to Know Your AURA16
Center Console Features
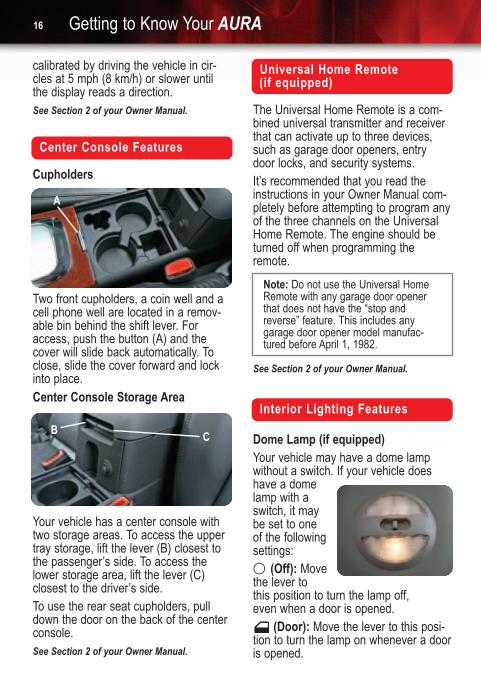
Cupholders
Two front cupholders, a coin well and acell phone well are located in a remov-able bin behind the shift lever. Foraccess, push the button (A) and thecover will slide back automatically. Toclose, slide the cover forward and lockinto place. Center Console Storage Area
Your vehicle has a center console withtwo storage areas. To access the uppertray storage, lift the lever (B) closest tothe passenger’s side. To access thelower storage area, lift the lever (C)closest to the driver’s side.To use the rear seat cupholders, pulldown the door on the back of the centerconsole.See Section 2 of your Owner Manual.
A
BC
Universal Home Remote(if equipped)
The Universal Home Remote is a com-bined universal transmitter and receiverthat can activate up to three devices,such as garage door openers, entrydoor locks, and security systems.It’s recommended that you read theinstructions in your Owner Manual com-pletely before attempting to program anyof the three channels on the UniversalHome Remote. The engine should beturned off when programming theremote.
See Section 2 of your Owner Manual.
Note: Do not use the Universal HomeRemote with any garage door openerthat does not have the “stop andreverse” feature. This includes anygarage door opener model manufac-tured before April 1, 1982.
Interior Lighting Features
Dome Lamp (if equipped)Your vehicle may have a dome lampwithout a switch. If your vehicle doeshave a domelamp with aswitch, it maybe set to oneof the followingsettings:
(Off): Movethe lever tothis position to turn the lamp off,even when a door is opened.
(Door): Move the lever to this posi-tion to turn the lamp on whenever a dooris opened.
calibrated by driving the vehicle in cir-cles at 5 mph (8 km/h) or slower untilthe display reads a direction.See Section 2 of your Owner Manual.
AURA 2007 A 6/14/06 8:44 AM Page 16
The control switchfor the sunroof islocated on the over-head console. It willoperate only whilethe ignition is in theOn or ACC position,or if Retained Accessory Power (RAP) isactive.To vent the sunroof, press and releasethe rear part of the switch.To express-open the sunroof, press andrelease the rear part of the switch twice. To close the sunroof, press and hold thefront part of the switch until the roofcloses.See Section 2 of your Owner Manual.
17
Sunroof (if equipped)
Panoramic Sunroof (if equipped)
The controls for the panoramic sunroofare located on the overhead console.They will operate only while the ignition is
(On): Move the lever to this positionto turn on the dome lamp.Instrument Panel BrightnessThe control forthis feature islocated on theleft side of theinstrumentpanel. Turn theknob clockwiseto brighten the instrument panel lights orcounterclockwise to dim them.See Section 3 of your Owner Manual.
in the On or ACC position, or if RetainedAccessory Power (RAP) is active.
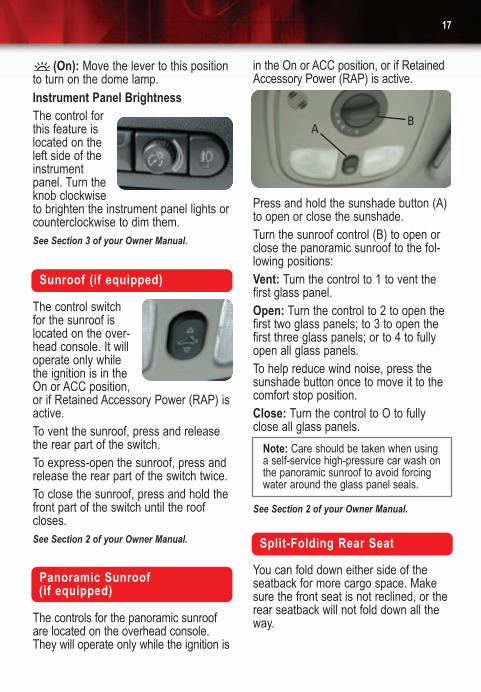
Press and hold the sunshade button (A)to open or close the sunshade.Turn the sunroof control (B) to open orclose the panoramic sunroof to the fol-lowing positions:Vent: Turn the control to 1 to vent thefirst glass panel.Open: Turn the control to 2 to open thefirst two glass panels; to 3 to open thefirst three glass panels; or to 4 to fullyopen all glass panels.To help reduce wind noise, press thesunshade button once to move it to thecomfort stop position.Close: Turn the control to O to fullyclose all glass panels.
See Section 2 of your Owner Manual.
AB
Note: Care should be taken when usinga self-service high-pressure car wash onthe panoramic sunroof to avoid forcingwater around the glass panel seals.
Split-Folding Rear Seat
You can fold down either side of theseatback for more cargo space. Makesure the front seat is not reclined, or therear seatback will not fold down all theway.
AURA 2007 A 6/14/06 8:44 AM Page 17

Getting to Know Your AURA18
PERFORMANCE & MAINTENANCE
Traction Control System
The Traction ControlSystem turns on everytime you start yourvehicle. When one ormore of the drivewheels begin to spinfrom traction loss, theTraction Control System will reduceengine power, indicated by a flashinglight on the instrument panel. The frontbrakes may be applied and the transaxlemay upshift to help regain traction. Ifyour vehicle becomes stuck and rockingthe vehicle is required, the systemshould be turned off.To turn off the Traction Control System,press the (Traction Control) buttonlocated behind the center consolecupholders. When the system is turnedoff, the traction control light willilluminate.See Section 4 of your Owner Manual.
StabiliTrak® – Stability ControlSystem (if equipped)
StabiliTrak is an advanced computer-controlled vehicle stability system thatassists with directional control of thevehicle in difficult driving conditions. Itturns on automatically every time youstart your vehicle.When the system senses a discrepancybetween your intended path and thedirection the vehicle is actually traveling,it selectively applies brake pressure atany one of the wheels to help steer thevehicle in the direction in which you aresteering.See Section 4 of your Owner Manual.
TAPshift (if equipped)
You can enjoy the sporty driving charac-teristics provided by a manual transaxlewith the TAPshift feature. To change gears similar to a manualtransaxle:1. Move the shift lever
to Manual (M).2. Press the shift plus
(+) paddle (A)located on top ofthe steering wheelforward to upshift,or press the backof the shift paddle(B) behind thesteering wheeltoward you todownshift.
The Driver Information Center (DIC) inthe instrument panel cluster will displaythe letter M for manual position and anumber indicating the selected gear.
A
B
To lower the rear seatback:1. Pull up on the seatback release loop
located behind the top of the out-board side of the seatback to releasethe seatback latch.
2. Grip the center top of the seatbackand fold the seatback down.
To raise the rear seatback, lift up theseatback and make sure it latches.Ensure that the safety belts are properlystowed over the seatback in all threepositions.See Section 1 of your Owner Manual.
AURA 2007 A 6/14/06 8:44 AM Page 18

19
While usingthe TAPshiftfeature, thetransaxle willhave firmershifting and sportier performance. Thetransaxle will allow you to shift only intogears appropriate for the vehicle speedand engine revolutions per minute (rpm).While driving in the manual mode, thetransaxle will remain in the driver-select-ed gear unless a shift is required toprotect the engine or transmission. If thevehicle slows almost to a stop, an auto-matic downshift will occur.See Section 2 of your Owner Manual.
Tire Pressure Monitor
The Tire Pressure Monitor alerts youwhen a significant reduction in pressureoccurs in one or more of your vehicle’stires by illuminating the (Low TirePressure) warning light on the instru-ment panel. The low tire pressure warn-ing light will remain on until you correctthe tire pressure.You may also have a CHECK TIREPRESSURE message appear on the DIC.Correcting the Tire PressureWhen the low tire pressure warning lightilluminates, you must fill the tire to theproper tire inflation pressure. The Tireand Loading Information label, locatedon the center pillar below the driver’sdoor latch, shows the correct inflationpressure for the tires when they’re cold.“Cold” means your vehicle has been sit-ting for at least three hours or driven nomore than one mile. You can temporarily remove the DICmessage by acknowledging it with your
Resetting the Oil Life System
The Oil Life System calculates engineoil life based on vehicle use and displaysCHANGE OIL SOON in the DriverInformation Center (DIC) when it’s nec-essary to change your engine oil andfilter. The Oil Life System should be resetto 100% only following an oil change.To reset the Oil Life System:1. Turn on the ignition.2. Press and hold the (Information)
button and the (Reset) button atthe same time to enter the personal-ization menu.
3. Oil Life Reset will be displayed.4. Press and hold the button for at
least one second. An ACKNOWL-EDGED message will appear whenthe system has been reset.
5. Turn off the ignition.See Section 5 of your Owner Manual.
DIC controls. However, at the nextvehicle startup, the DIC message willreappear if the tire pressure has notbeen corrected.You may notice during cooler conditionsthat the low tire pressure warning lightwill appear when the vehicle is firststarted and then turn off as you start todrive the vehicle. This could be an earlyindicator that your tire pressures are get-ting low and need to be inflated to theproper pressure.
See Section 5 of your Owner Manual.
Note: The Tire Pressure Monitor canalert you about low tire pressure, but itdoesn’t replace normal monthly tiremaintenance.
AURA 2007 A 6/14/06 8:44 AM Page 19

15864100 A
Roadside Assistance
My Saturn
1-800-553-6000 TTY Users: 1-888-889-2438As the proud owner of a new Saturnvehicle, you are automatically enrolledin the Saturn Roadside Assistanceprogram. This value-added service isintended to provide you with peace ofmind as you drive in the city or travelthe open road. Saturn’s Roadside Assistance toll-freenumber is staffed by a team of techni-cally trained advisors who are available24 hours a day, 365 days a year, toprovide minor repair information ormake arrangements to tow your vehicleto the nearest Saturn retailer.Saturn will provide the following servicesduring the Bumper-to-Bumper warrantyperiod at no expense to you:• Fuel delivery• Lockout service (identification
required)• Tow to nearest retailer for warranty
service• Flat tire assistance• Jump startsIn many instances, mechanical failuresare covered under Saturn’s comprehen-sive warranty. However, when otherservices are utilized, our advisors willexplain any payment obligations youmight incur.
The complimentary My Saturn ownerswebsite is a one-stop resource toenhance your Saturn ownership experi-ence. Exclusive owner benefits includeonline vehicle maintenance schedules,service reminders, frequently askedquestions, retailer information and more.Visit My Saturn today at Saturn.com andenjoy the ride.
Certain restrictions, precautions and safety procedures apply to your vehicle. Please read your OwnerManual for complete instructions. All information contained herein is based on information available at thetime of printing and is subject to change without notice. Copyright 2006 by GM Corp. All rights reserved.
!15864100=A!
Getting to Know Your AURA20
OWNER INFORMATION For prompt and efficient assistancewhen calling, please provide the follow-ing information to the advisor:• Location of the vehicle• Telephone number and your location• Vehicle model, year and color• Vehicle mileage• Vehicle license plate numberSaturn reserves the right to limit servic-es or reimbursement to an owner ordriver when, in Saturn’s judgment, theclaims become excessive in frequencyor type of occurrence.Roadside Assistance and OnStar (if equipped)If you have a current OnStar subscrip-tion, press the blue OnStar button andthe vehicle will send your current GPSlocation to an OnStar Advisor who willspeak to you, assess your problem, con-tact Roadside Assistance and relay yourexact location so you will get the helpyou need.
AURA 2007 A 6/14/06 8:44 AM Page 20