august covisint pqrs 2013
TRANSCRIPT
Covisint PQRS™
August
2013 User Guide

Covisint PQRS
User Guide
Compuware-Covisint
All rights reserved 2013 PQRSUserGuideCovisint-081613 - Covisint™ is a registered trademark of Compuware-Covisint. The materials in this manual are provided by Compuware-Covisint as a service to its customers and may be used for informational and planning purposes only. All other brand and product names are trademarks, registered trademarks, or service marks of their respective holders.
Page 2 of 67
Table of Contents
Section I - Introduction to Covisint PQRS ........................................................................ 3
1. Covisint PQRS Overview ................................................................................................... 3
A. About the User Guide ....................................................................................................... 3
B. About Covisint PQRS ........................................................................................................ 3
C. About the PQRS Program ................................................................................................. 3
D. What's new for 2013 ......................................................................................................... 3
E. Hardware/Software Requirements for Using Covisint PQRS ............................................. 3
Section II - Getting Started ............................................................................................ 4
1. Covisint PQRS Registration ............................................................................................... 4
2. Accessing Covisint PQRS and Logging In ......................................................................... 13
3. Navigating Covisint PQRS ............................................................................................... 16
A. Main Navigation Menu .................................................................................................... 16
B. Secondary Navigation Menu ........................................................................................... 17
Section III - Using Covisint PQRS ................................................................................. 18
1. PQRS Data Collection Overview....................................................................................... 18
A. PQRS Collection Forms and Resource Guides ............................................................... 18
B. PQRS Data Collection Process ....................................................................................... 18
C. Accessing the PQRS Collection Forms ........................................................................... 18
2. Managing User and Provider Account Information ............................................................ 20
A. Editing User Account Information .................................................................................... 20
B. Adding Providers............................................................................................................. 22
3. Covisint PQRS Submission Process .................................................................................. 27
A. Entering Patient Data for PQRS Submission – Measure Groups .................................... 27
4. Entering Patient Data for PQRS Submission – Individual Measures ..................................... 38
5. Covisint eRx Submission ................................................................................................. 48
A. Entering Patient Data for eRx Submission ...................................................................... 48
6. PQRS Submission Summary Reports ................................................................................ 58
A. Generating a Report ....................................................................................................... 58
7. Reporting of Submitted Data and CMS Incentive Payment Information ............................... 61
8. 2013 CMS Incentives FAQ .............................................................................................. 62
Page 3 of 67
Section I - Introduction to Covisint PQRS
1. Covisint PQRS Overview
A. About the User Guide
This guide is for providers participating in the Medicare PQRS incentive who use the Covisint application to report their data to the Centers for Medicare and Medicaid Services (CMS).
The guide provides step-by-step instructions for using Covisint PQRS to enter and submit measures/measures groups patient data.
B. About Covisint PQRS
Covisint PQRS offers a simple, effective, and affordable way for every provider to quickly earn their Medicare PQRS incentive. Using Covisint, providers simply:
Select a measures group to report from the 22 CMS-approved groups offered by Covisint.
Collect the clinical data for 20 unique, Medicare Part B fee-for-service patients. Or, providers can select three individual measures applicable to their specialty and report at 80%.
Enter and submit the data using the Covisint application.
Eligible physicians can earn an additional 0.5% of total estimated Medicare Part B Physician Fee Schedule (PFS) allowed charges for the reporting year.
C. About the PQRS Program
IMPORTANT! The CMS rule regarding 0% performance rates that was implemented in 2011. An eligible professional reporting via registry for a measures group needs to report all of the measures in the group (where the patient is eligible for the measure) for 20 unique patients – over 50% (11 patients) must be Medicare Part B FFS AND have a performance rate >0% for each applicable measure during a specified reporting period to be considered incentive eligible. New for 2013: providers can submit a measure group with a zero percent violation to avoid a payment adjustment. They will not qualify for an incentive. For example, an answer of "Not Done/unknown" for all eligible patients for a given measure within the selected measures group will result in a performance rate of 0% for that measure and the provider WILL NOT be eligible for the PQRS incentive.
ALL 20 patients submitted via measures groups must be Medicare Part B Fee-For-Service.
D. What's new for 2013
Read the 2013 CMS Incentives FAQ.
E. Hardware/Software Requirements for Using Covisint PQRS
Browser Software: Microsoft Internet Explorer 7.0 or above
Browser Software: FireFox 3.X or above
Monitor Settings: Set to 1024 x 768 Display or higher
Adobe Acrobat Reader: Please go to www.adobe.com and download the latest version of Acrobat Reader. You will need this application to view reports.

Page 4 of 67
Section II - Getting Started
1. Covisint PQRS Registration
You must register to use Covisint PQRS. The following section explains the four-step registration process.
Step 1: Enter practice and user information.
Step 2: Accept agreement terms.
Step 3: Enter provider information.
Step 4: Confirm information.
To access and register for Covisint PQRS:
1. Using your internet browser, navigate to the Covisint PQRS website at: https://www.covisint.com/healthcare-pqrs
2. Click PQRS - Registration
Figure 1.- Click: PQRS - Registration

Page 5 of 67
Step 1: Complete the Practice and User Information
IMPORTANT! If you have registered with Covisint previously, please DO NOT register again. If you cannot recall your username or password please contact a Covisint representative at 866-823-3958 for assistance.
NOTE: Field names in blue are required fields.
1. When the Registration screen displays, complete the Practice Information fields.
a. Practice Name - Enter the name of the practice.
b. Address - Enter the practice’s business address.
c. (Address) - Additional address line (e.g., suite number) if needed.
d. City - Enter the city where the practice’s business is located.
e. State - Select the state where the practice’s business is located from the drop-down list.
f. Zip - Enter the zip code where the practice’s business is located.
g. Practice Phone – Enter the practice’s main phone number.
2. Complete the User Information fields.
a. First Name – Enter the first name of the person who will be the main contact for the data entry.
b. Last Name - Enter the last name of the person who will be the main contact for the data entry.
c. Email - Enter a valid email address that is accessible by the user who is doing the data entry. NOTE: Covisint sends an automated password email to this email address. Covisint support sends new passwords when one is forgotten or when the account is locked due to too many inappropriate login attempts. Also, should Covisint have an update about the PQRS application or an issue in the PQRS data that requires notification, this email address will be used.
3. Username – Create a user name for the user(s) who will login to the Covisint CMS Incentive Programs portal to enter data.
4. Click Next.

Page 6 of 67
Figure 2.- Complete the Registration Form
Step 2: Accept the Covisint Portal Services Agreement
1. Read the Covisint Portal Service Agreement.
2. Click the “I have read and agree to the “Covisint Portal Services Agreement.” checkbox indicating the agreement has been read.
3. Click the “I hereby attest that I am an authorized signer for the providers registered” checkboxes indicating the agreements have been read. NOTE: BOTH checkboxes must be checked to proceed to the next step.
4. The agreements can be printed and filed for later reference, if necessary. Click Printable Version at the top right corner of each agreement.
5. Click Next.

Page 7 of 67
Figure 3.- Accept the Portal Services Agreement
Step 3: Add Providers
You may opt to enter only one provider and add the rest of the providers when you log into the Covisint PQRS application, or you may enter all providers during the registration process.
You will need the following information to add a provider to Covisint PQRS:
INDIVIDUAL National Provider Identifier number (NPI) for each provider
Practice’s Federal tax identification number (TIN)
1. In the Provider List section, click Add New.

Page 8 of 67
Figure 4.- Click: Add a New Provider
2. The screen refreshes and the NIP Search screen displays. Enter the provider’s NPI number to retrieve the provider’s demographic data from the NPI registry.
NOTE: Only providers with claims reported to CMS using their NPI are eligible for reporting for CMS incentive programs. Mid-levels reported under another provider’s NPI should not report.
Figure 5.- Enter the Provider NPI Number
3. The Provider Details screen displays the provider’s demographic data from the NPI registry.
a. Review the information on the screen and enter missing data and/or update incorrect data. NOTE: All fields labeled with blue titles are required fields, specifically the Specialty, Email, and Medicare Tax ID fields, which are not populated from the NPI registry and need to be completed.
b. Click the “I verify I have entered the provider's INDIVIDUAL NPI in combination with the TIN used to file this Provider's CMS claims. I also understand that Covisint cannot verify the TIN/NPI
combination entered and that an incorrect TIN and/or NPI may result in no payment from CMS.” checkbox.
c. Click Save Provider.

Page 9 of 67
Figure 6.- Edit Provider Demographics and Click Save Provider
4. The Provider List screen displays with the new provider’s demographic data from the NPI registry added to Covisint PQRS. Use the page size feature if you want to display more than 5 providers per
page.
5. Continue adding providers or click Next to proceed to the final step in registration.
6. To remove a provider from the Covisint PQRS application, click Delete. IMPORTANT! Deleting a provider will also delete any existing PQRS data entered for this provider.
NOTE: Additional providers can also be added whenever you login to the Covisint PQRS application.
Figure 7.- New Provider Added to Covisint PQRS
NOTE: If the provider’s individual NPI is unavailable, you can search for the provider’s NPI on the Free National NPI Number Registry Lookup website.
Figure 8.- Click: Click Here to Lookup NPI
7. Click the Click Here to Lookup NPI link.

Page 10 of 67
8. A pop-up window opens in front of the Covisint registration screen. Enter the following in the appropriate fields:
a. Provider’s Last Name or Entity
b. Provider’s First Name
c. State in which the provider practices
9. Click Search For NPI.
Figure 9.- Enter Provider Information
10. The NPI Number Lookup results screen displays. Scroll to find your provider The NPI Number Lookup results screen is not an interactive screen. Highlight the desired NPI number and use CTRL+C to copy the number, or record the number for later use.
11. Exit the NPI Number Lookup results screen by clicking the X in the top right corner of the window to return to the Covisint PQRS registration screen.
Figure 10.- Copy the Provider NPI Number
12. Click into the Enter Medicare Provider NPI field on the NPI Search screen and use CTRL+V to paste the NPI number into the field, or type the number into the field.
13. Click Get Provider Detail and the provider’s demographic data as recorded in the NPI registry populates into the Covisint Provider Details screen.

Page 11 of 67
Figure 11.- Click: Get Provider Detail
14. The Provider Details screen displays the provider’s demographic data from the NPI registry.
a. Enter missing data and update incorrect data.
NOTE: All fields labeled in blue are required fields. The Specialty, Email, and Medicare Tax ID fields, which are not populated from the NPI registry and need to be completed.
b. Click Save Provider.
Figure 12.- Edit Provider Demographics and Click: Save
15. The Provider List screen displays with the new provider’s demographic data from the NPI registry added to Covisint PQRS. Continue adding providers or click Next to proceed to the final step in registration.
Figure 13.- New Provider Added to Covisint PQRS
Page 12 of 67
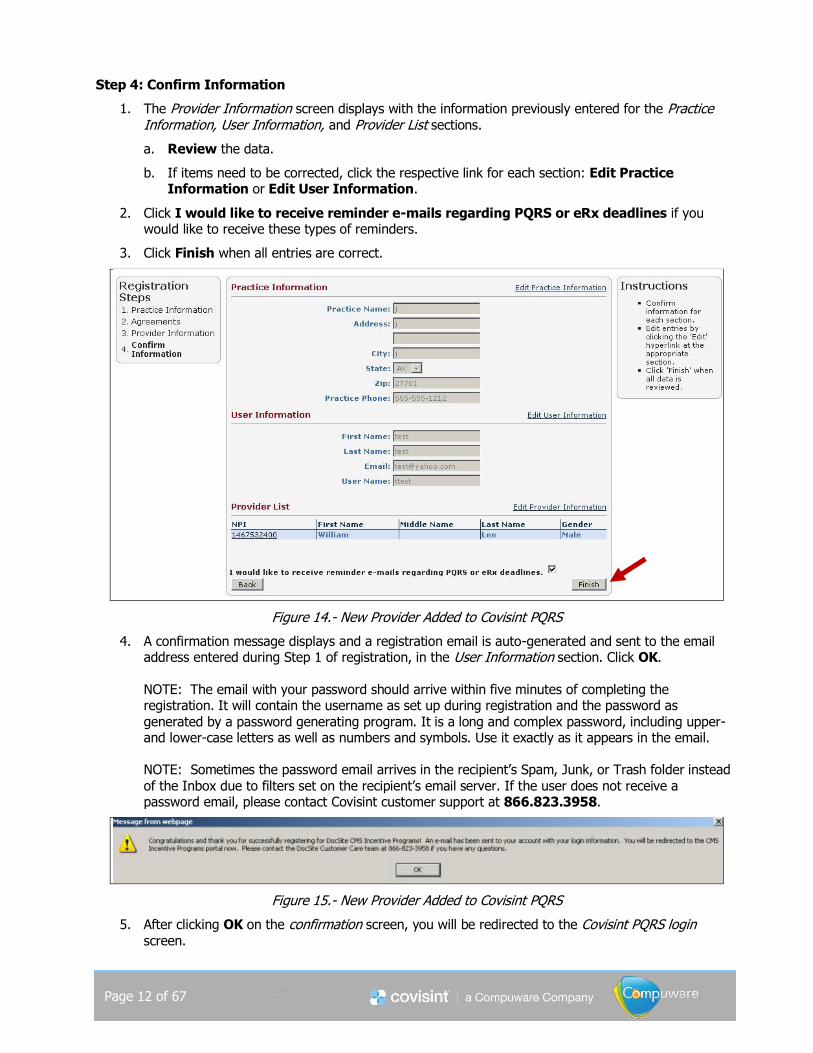
Step 4: Confirm Information
1. The Provider Information screen displays with the information previously entered for the Practice Information, User Information, and Provider List sections.
a. Review the data.
b. If items need to be corrected, click the respective link for each section: Edit Practice Information or Edit User Information.
2. Click I would like to receive reminder e-mails regarding PQRS or eRx deadlines if you would like to receive these types of reminders.
3. Click Finish when all entries are correct.
Figure 14.- New Provider Added to Covisint PQRS
4. A confirmation message displays and a registration email is auto-generated and sent to the email address entered during Step 1 of registration, in the User Information section. Click OK. NOTE: The email with your password should arrive within five minutes of completing the registration. It will contain the username as set up during registration and the password as generated by a password generating program. It is a long and complex password, including upper- and lower-case letters as well as numbers and symbols. Use it exactly as it appears in the email. NOTE: Sometimes the password email arrives in the recipient’s Spam, Junk, or Trash folder instead of the Inbox due to filters set on the recipient’s email server. If the user does not receive a password email, please contact Covisint customer support at 866.823.3958.
Figure 15.- New Provider Added to Covisint PQRS
5. After clicking OK on the confirmation screen, you will be redirected to the Covisint PQRS login screen.

Page 13 of 67
2. Accessing Covisint PQRS and Logging In
Covisint PQRS is a browser-based web application, meaning it runs completely in an internet browser requiring no additional hardware or software. You can access Covisint PQRS from virtually any computer as long as it is connected to the Internet.
To Access and Log in to Covisint PQRS:
1. Using your internet browser, navigate to Covisint PQRS at: https://registry.Covisint.com/PQRS2013 TIP: At the login screen, either click Favorites > Add to Favorites or right-click and click Create a Shortcut to save the login link for quick access in the future.
Figure 16.- Login to Covisint PQRS
2. On the Sign In area of the screen, enter your User Name and Password exactly as received in the registration email from Covisint.
3. Click Sign In.
NOTE:
The system requires you to change your password every 90 days.
After three unsuccessful login attempts, you will be locked out of the account, which will have to be reset by an administrator or Covisint Customer Support.
TIP: If you forget your username or password, click “Click here to Unlock account.” If the message: "Patient Planner was unable to process your request. Please contact Covisint Support” displays, contact Customer Support at 866.823.3958, or email [email protected].
The FIRST time you log in to Covisint PQRS:
The screen displays the My Account data-entry page of the Covisint PQRS application. Review the data, paying special attention to the fields labeled in blue. These are required fields.
NOTE: It is RECOMMENDED that you enter your email address and answer the security question. Should you forget your password, this will allow you to self-request your password, which will be sent to the email address you provide.
1. Complete the following fields.
a. Address Line 1 - Enter your street address.
b. Address Line 2 - Additional street address line if needed.
c. City – Enter the city where you reside.
d. Phone – Enter a phone number.

Page 14 of 67
e. State – Enter the state where you reside.
f. Postal Code – Enter your zip code.
g. Email – Enter or change your email address.
h. Security Question - Select a security question from the drop-down list.
i. Answer – Enter the answer to the security question you selected.
2. Click Save.
Figure 17.- Change Your Password
Result
The screen refreshes to display the same My Account screen, but in a read-only mode rather than a data-entry mode.
To change your temporary password (using the following password rules):
Passwords must include the following:
o upper case character or lower case character
o numeric character or special character
o must be 6-12 characters in length
1. Click Change Password at the top of the screen. The Manage Password screen displays.
2. Complete the following fields on the Manage Password screen.
a. Current Password - Enter your temporary password received from your Covisint administrator.
b. New Password - Enter a password that conforms to the password rules.

Page 15 of 67
c. Confirm New Password - Enter the newly created password again to confirm that it was entered correctly.
3. Click Save.
Figure 18.- Change Your Password
Result
The new password has been created. Use the new password the next time you login to the Covisint PQRS application.

Page 16 of 67
3. Navigating Covisint PQRS
Covisint PQRS functions and features are accessible via two menus that display on all screens within the application. The main menu includes links to the Covisint PQRS functions and Home page. The secondary menu (located at the top right of the screen) includes links to user features for accessing guides, managing
your account, changing your password, logging off, etc.
Since Covisint PQRS is a web-based application, everywhere blue text appears is a link. Each link is a shortcut, and clicking on a link will take you to another page or section.
A. Main Navigation Menu
The functions that appear on the main menu are described below.
Home – Displays a list of the available the PQRS guides. Click on the title to view a guide.
PQRS Submission – This function is used to select the PQRS Submission method: Measure Groups or Individual Measures.
eRx Submissions - This function is used to select a provider and a PQRS measure to complete
an eRx submission form. PQRS Submission Summary Report - This function is used to generate and view the following reports:
o PQRS 2012Feedback Report
o PQRS 2013 Submission Summary Report
Admin - This function is used to add new providers or edit existing provider information.
Figure 19.- Main Navigation Menu

Page 17 of 67
B. Secondary Navigation Menu
The following functions are accessible via the secondary menu by clicking on the function name. This menu is located at the top right of the screen.
Help – Link to the Covisint PQRS Support website.
Change Password – Navigates to the Manage Password screen, which you may use to change your current password.
My Account - Displays a read-only screen with specific information about your account, including username, name, address, phone, email, and security question. The screen includes a link to edit your account information.
Logoff – Click to log out.
Support – Navigates to the Contact Covisint PQRS Support screen, which you may use to report an issue or problem. The Covisint PQRS support team is also available to answer questions. Call 866.823.3958 or email [email protected].
There is a timer in the top right corner, which after fifteen (15) minutes of inactivity will log you out of the Covisint PQRS application. You must log back into Covisint PQRS application to continue entering PQRS data. Unsaved data entered prior to the time out will be lost. A popup window will display with 2 minutes left giving the user the opportunity to reset the timer to 15 minutes.
‘
Figure 20.- Secondary Navigation Menu

Page 18 of 67
Section III - Using Covisint PQRS
1. PQRS Data Collection Overview
A. PQRS Collection Forms and Resource Guides
Covisint has created collection forms and resource guides specific to the CMS-approved measure groups to help users correctly collect qualifying patients’ clinical data for reporting to CMS. The collection forms display each individual measure specific to the chosen measure group written in a question format, with all possible answers allowed by CMS indicated. Brief directions for the measure group as well as for each individual measure associated with a measure group are provided on the collection forms. Detailed directions for each measure group, as well as for each individual measure are included in the respective resource guides.
Individual collection forms for each of the CMS-approved measure groups, as well as respective resource guides are provided at the bottom of the Home screen. CMS’ specific directions and requirements for collecting clinical data using the 20-patient measure group reporting method, is also provided at the bottom of the Home screen.
B. PQRS Data Collection Process
Print the desired collection forms. Then complete the forms as patients visit the practice, recording measure responses while reviewing the patient’s (paper or electronic) chart at the time of the visit. Keep a completed copy of the collection form for each of the 20 patients who are reported by a provider. Use the completed collection forms as resource when entering the responses into the Covisint PQRS application. The order of the individual measures on the collection form should directly correspond to the order of the individual measures in the application. Copy the answers from the collection form into the appropriate data entry screen of the PQRS application at a later time that may be more convenient than when sitting with a patient.
Data entry can occur directly into the Covisint PQRS application, also, instead of using the collection forms. Review the resource guide and/or CMS’ Measure Groups Specifications Manual for requirements and directions associated with reporting clinical data correctly for a chosen measure group.
Finally, data can be entered into the application retroactively, as long as reported patient visits are for the appropriate reporting year. A user can report data from the medical records of patients with scheduled visits starting January 1 of the reporting year through the end of the reporting year. To report retroactively, choose a patient’s date of service and search the patient’s medical records prior to that specific date of service, recording the measure responses on the collection form and then entering them into the application, or recording them directly into the PQRS application. This method of reporting is more time consuming, but still just as appropriate as proactively reporting the clinical data at the time of the patient visit.
C. Accessing the PQRS Collection Forms
At the bottom of the Home screen review the lists of resource guides and collection forms for the CMS-
approved PQRS measure groups for the submission year. Additionally, refer to the link to CMS’ Measure Group Specifications Manual, if necessary.
To access Covisint’s PQRS application, the collection forms, the resource guides, and CMS’ Measure Groups Specifications Manual:
1. Login to the Covisint PQRS application or, if you have not completed your registration, go to http://www.covisint.com/healthcare-pqrs to access the PQRS Collection Forms.

Page 19 of 67
2. Click a title under the Guides, Collection Forms, or Other Documents column headers. A secondary pop-up window appears, displaying a PDF of the selected document. The PDF does not allow for on-
screen entry.
‘
Figure 21.- PQRS Guides, Collection Forms, and Other Documents
3. This file can be viewed, downloaded and saved to your computer, or printed from this pop-up window. When the desired function (view, save or print) is completed, click the X in the top right corner of the pop-up window.
4. The window closes and the PQRS screen refreshes to the forefront, ready for use again.
5. When all desired collection forms and resource guides are accessed, saved, and/or printed the user may exit the PQRS application by clicking Logoff in the top right corner of the screen.

Page 20 of 67
2. Managing User and Provider Account Information
A. Editing User Account Information
Users have the ability to edit and/or update their account information, which was created during the registration process. This includes the user’s name, address, phone, email, and security question.
To edit your user account information:
1. Click My Account in the top right corner of the screen.
Figure 22.- Click My Account
2. Click Edit Account at the bottom of the My Account screen.

Page 21 of 67
Figure 23.- Click Edit Account
3. Edit existing data or enter additional data at any field showing on the screen. Items labeled in bright blue are required fields (Username, First Name, Last Name, Security Question, and Answer). These fields cannot be left blank; the screen will not save if a required field is blank. When a “Save” is attempted while required fields are blank a message will appear advising what field(s) should be completed.
4. When all edits and additions are completed, click Save at the bottom of the Edit My Account screen.

Page 22 of 67
Figure 24.- Click Save
Result
The changes to your account have been saved and the screen refreshes displaying the My Account screen. You may logoff or proceed to another area in the PQRS application.
B. Adding Providers
Providers that were not added to the PQRS application during the registration process may be added afterwards at any time.
You will need the following information to add a provider:
individual National Provider Identifier number (NPI) for each provider
practice’s tax identification number (TIN)
To add a provider:
1. On the main menu bar, click Admin.
Figure 25.- Click: Admin
2. When the screen refreshes click Edit Providers.
Figure 26.- Click Edit Providers
3. On the Providers screen click Add New.

Page 23 of 67
Figure 27.- Click Add New
4. When the provider search screen displays, in the Enter Medicare Provider NPI field, enter the provider’s individual NPI.
5. Or, if you do not have the provider’s NPI available, search the NPI registry by clicking the Click Here to Lookup NPI link.
Figure 28.- Click: Click Here to Lookup NPI
6. A pop-up window opens in front of the Covisint registration screen. Enter the following in the appropriate fields:
a. Provider’s Last Name or Entity
b. Provider’s First Name
c. State in which the provider practices
7. Click Search For NPI.

Page 24 of 67
Figure 29.- Enter Provider Information
8. The NPI Number Lookup results screen displays. Scroll to find your provider The NPI Number
Lookup results screen is not an interactive screen. Highlight the desired NPI number and use CTRL+C to copy the number, or record the number for later use.
9. Exit the NPI Number Lookup results screen by clicking the X in the top right corner of the window to return to the Covisint PQRS registration screen.
Figure 30.- Copy the Provider NPI Number
10. Click into the Enter Medicare Provider NPI field on the NPI Search screen and use CTRL+V to paste the NPI number into the field, or type the number into the field.
11. Click Get Provider Detail and the provider’s demographic data as recorded in the NPI registry populates into the Covisint Provider Details screen.

Page 25 of 67
Figure 31.- Enter NPI and Click: Get Provider Detail
12. The Provider Details screen displays the provider’s demographic data from the NPI registry.
a. Enter missing data and update incorrect data. NOTE: All fields labeled in blue are required fields. The Specialty, Email, and Medicare Tax ID fields, which are not populated from the NPI registry and need to be completed.
Changing data in the fields on this screen that originally populated from the NPI registry does not affect the data in the NPI registry. You are only changing the data within the Provider Details screen. The provider information should reflect the address and number that is best to reach the provider should there ever be a question about the data that is entered and the main contact at the site is not available. It is appropriate to enter the address of the practice. It is also
appropriate to enter the main contact’s email address if not entering the provider’s email address.
b. Click Save Provider.
Figure 32.- Edit Provider Demographics and Click: Save

Page 26 of 67
13. The Provider List screen displays with the new provider’s demographic data from the NPI registry added to Covisint.
NOTE: To sort the Provider List, click on a category name (e.g., NPI, First Name, etc.).
Figure 33.- New Provider Added to Covisint PQRS
Result
The new provider has been added. Continue adding new providers using these same steps until all providers to be reported for PQRS are entered.

Page 27 of 67
3. Covisint PQRS Submission Process
Using Covisint PQRS, physicians simply select a measures group to report from the 22 CMS-approved groups, collect the clinical data for 20 patients – with at least 50% being - Medicare Part B fee-for-service patients, enter, and submit the data using the Covisint PQRS application.
A. Entering Patient Data for PQRS Submission – Measure Groups
For PQRS data entry, over 50% of the 20 patients entered must be Medicare Part B Fee-For-Service patients. The PQRS application will calculate and identify when a CMS minimum of 20 patients is met. At that time, in addition to the “Add New” button the “Submit” button will be made available. The Covisint system will give you the option to add up to a total of 35 patients (Note: this is not a requirement). All data entered will be submitted to CMS. TIP: For a specific measure, you may not answer “Not done/unknown” across all 20 patients. This will results in zero performance for that measure criteria.
IMPORTANT! There is a HIPAA privacy feature at the top, right corner of the data entry page denoted as “HIPAA privacy timeout in: 15:00”. It is an automatic lock out feature to protect patient data remaining on an unattended computer screen and counts down from 15 minutes to zero. At the time of automatic lock out the text changes to “HIPAA privacy timeout.” When this happens, click “Logoff” in the top, right corner. The user will need to log back into the service and continue entering data. Patient data not saved prior to the lock out will be lost and will need to be re-entered. A popup will display with 2 minutes remaining giving the user the opportunity to reset the timer to 15 minutes.
1. On the main menu bar, click PQRS Submission. When the user hovers over the PQRS Submission tab, two choices are displayed; Measure Groups and Individual Measures. The users would select Measure Groups to display the next screen.
Figure 34.- Click: PQRS Submission – Measure Groups

Page 28 of 67
2. Click the down arrow in the Providers field.
a. The drop-down list expands to display all providers currently entered for the site in the PQRS application.
b. Click the appropriate provider’s name. The selected provider’s name populates the Provider field and the drop-down list closes.
3. Click the down arrow in the Conditions field.
a. The drop-down list expands to display all measure groups approved for the appropriate PQRS submission year.
b. Click the appropriate measure group name.
Figure 35.- Select a Provider and Condition
After selecting the provider and the measure group for reporting for the selected provider, the screen refreshes to display the entry fields for the selected condition criteria. If this is the first patient for this provider and this measure group, the fields will be blank.
4. Enter data for the first patient. Complete all required fields labeled in blue.
NOTE: An error message will display if a required field is not completed. All required fields must be completed to save the patient data.
a. Enter the patient’s last name.
b. Enter the patient’s first name.
c. Enter the patient’s middle name, if needed.
d. Enter the patient’s date of birth using the format of mm/dd/yyyy.
e. Select the patient’s gender from the drop-down list.
f. Enter the patient’s medical record number (MRN), if needed.
g. Enter the appointment date using the format of mm/dd/yyyy, or click the calendar icon and choose the date.
h. Enter the ICD-9 code, if available
i. Enter the Encounter code, if available
j. Click the appropriate insurance checkbox IMPORTANT! PQRS requires 20 unique patients the majority (>50%; 11 patients) of which must be insured under Medicare Part B to qualify for the PQRS incentive.

Page 29 of 67
Figure 36.- Enter the Patient Demographics
5. In the Measure Entry section of the screen, enter the measure data.
a. Enter data for each field, using the drop-downs, radio buttons, or check boxes to select or enter data specific to that measure.
6. After entering data from the data collection form, click Save at the bottom of the screen.
Figure 37.- Enter the Measure Date for the Selected Condition
7. A patient list is automatically generated on the left hand side of the screen in alphabetical order by patient last name.
a. Patients identified in red have incomplete data and will need to be completed prior to submission.
b. To revise saved data, click on the name of the patient in the patient list. The patient’s data will appear on the screen.
c. Make changes then click Save.
8. Click Add New to continue with data entry for another patient.
9. Review all data entered for accuracy.

Page 30 of 67
Figure 38.- Enter the Measure Date for the Selected Condition
10. When at least 20 patients are entered, the following message displays letting you know that you may enter up to 35 total patients or proceed to submit your data. Click OK.
11. The screen refreshes and the patient list now includes a Submit link in addition to the Add New link.
a. If you are ready to submit the patient data, click Submit to begin the submission process.
Figure 39.- Patient List Now Displays the Submit Link
b. Or you may enter a total of 35 patients.
12. When 35 patients are entered, the following message displays letting you know that you have entered the maximum patients allowed. Click OK.

Page 31 of 67
Figure 40.- Message Displays When 35 Patients Are Added
13. The screen refreshes and the patient list now includes only a Submit link.
14. If you are ready to submit the patient data, click Submit to begin the submission process.
15. A Submit Confirmation message displays. Read the message and click OK to acknowledge that the Individual NPI and Federal Tax ID numbers entered are correct and that you accept sole responsibility for any inaccuracies which may prevent you from receiving your CMS incentives.
Figure 41.- Submit Confirmation Message
16. A second Submit Confirmation message displays. Read the message and click OK to acknowledge that you are aware that each measure group has ICD-9 and Encounter code requirements as defined by CMS.

Page 32 of 67
Figure 42.- Submit Confirmation Message
17. The screen refreshes to an attestation screen where you must attest to the correctness and completeness of all data being submitted for this provider. Read the attestation statement.
18. Click I Accept to continue the submission process.
Figure 43.- Click: I Accept to Continue the Submission Process

Page 33 of 67
19. The screen refreshes to the payment screen. Select one of the methods below to complete the payment process.
VERY IMPORTANT! If you have a coupon, enter the coupon code BEFORE clicking “Submit.” After clicking “Submit” there will be NO option to resubmit using another coupon.
a. Paying by Credit Card:
i. To submit the $299.00 payment via credit card, enter your billing and credit card information in the provided fields
ii. Click Submit.
iii. A pop up window will appear with a Confirmation Code indicating successful submission of data to Covisint. A receipt will be sent to the email address entered during the registration process.
b. Paying by Coupon:
i. Enter your issued coupon code in the provided Coupon Code field.
ii. Click Update Cart. This will process the amount of your coupon, refresh the payment screen, and indicate any remaining charges.
iii. If you have a partial payment Coupon:
1. After clicking Update Cart, the screen will refresh, indicating your balance. To pay the balance, you enter your billing and credit card information in the provided fields
2. Click Submit.
c. If you have a Coupon for the Full Amount:
i. After clicking Update Cart, the screen will refresh leaving a balance of $0.00.
ii. Click Submit. DO NOT complete the billing and credit card fields.
iii. A pop up window will appear with a Confirmation Code indicating successful submission of data to Covisint. A receipt will be sent to the email address entered during the registration process.
20. Click Next to proceed to the next screen.

Page 34 of 67
Figure 44.- Coupon Code
21. The screen refreshes to the submission screen. Click Next to go to the next screen in the process. The sales tax screen will display. Click Submit to complete the process.

Page 35 of 67
Figure 45.- Click: Next

Page 36 of 67
22. You should receive a confirmation message indicating the process is completed successfully and an automated confirmation email will be sent to the email address entered for the main contact at User Information in registration. Click OK.
Figure 46.- Click: OK

Page 37 of 67
Result
Measure data has been entered for a minimum of 20 unique patients the majority of which must be Medicare Part B fee-for-service patients for a specified provide. You may either log out of the PQRS application, or start the data entry process for another provider.

Page 38 of 67
4. Entering Patient Data for PQRS Submission – Individual Measures
Eligible Professionals (EP) can choose to report three (3) individual measures applicable to their patient population at an 80% reporting rate. The EP must report on a minimum of three (3) measures from the list of approved measures found in the CMS 2013 PQRS Measure Specifications Manual. Review and understand the reporting requirements for each measure you are considering. You should only report measures that you can document or attest to.
To report an individual measure, you first identify the denominator which is the Total Eligible Instances to which the measure applies. The Total Eligible Instances can be determined from your Practice Management or billing system based on the denominator requirements (including age, gender, and disease) as found in the CMS 2013 PQRS Measure Specifications Manual. Then you determine the numerator - of the patients in the denominator, identify the total number of patients that met the performance of the measure, didn’t meet the performance of the measure or were excluded from the measure as per the numerator requirements. (Definitions are included below.) These are the values that you enter into the Covisint PQRS web application.
Encounters versus patients – Some measures specify that the measure is to be reported at each visit while others state unique patients or once per reporting period. Be sure to read the measure instructions to ensure you understand what the measure is asking you to report.
1. On the main menu bar place the cursor over PQRS Submission and select Individual Measures.
2. Click the down arrow in the Providers field. The drop-down list expands to display all providers currently entered for the site in the PQRS application.
3. Click the appropriate provider’s name. The selected provider’s name populates the Provider field and the drop-down list closes.

Page 39 of 67
After selecting the provider, the Individual Measure Reporting screen displays where the user will select the individual measures being reported by this provider.
4. Select Add new measure.
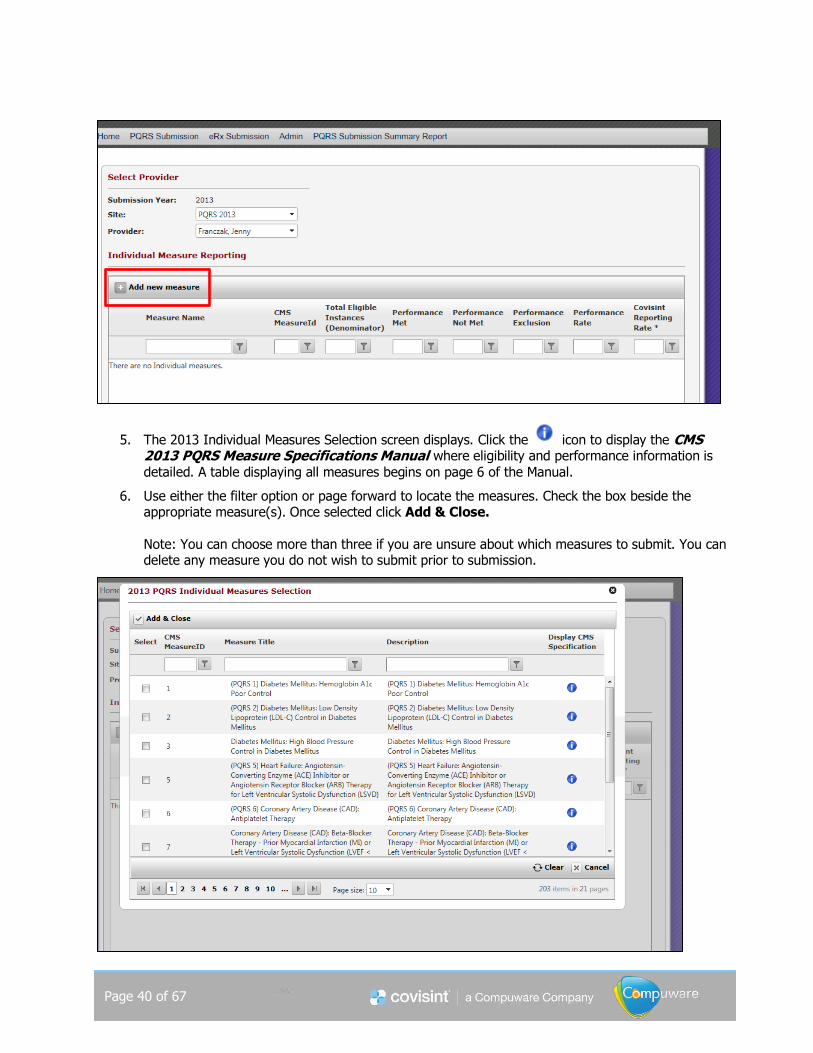
Page 40 of 67
5. The 2013 Individual Measures Selection screen displays. Click the icon to display the CMS 2013 PQRS Measure Specifications Manual where eligibility and performance information is detailed. A table displaying all measures begins on page 6 of the Manual.
6. Use either the filter option or page forward to locate the measures. Check the box beside the appropriate measure(s). Once selected click Add & Close. Note: You can choose more than three if you are unsure about which measures to submit. You can delete any measure you do not wish to submit prior to submission.

Page 41 of 67
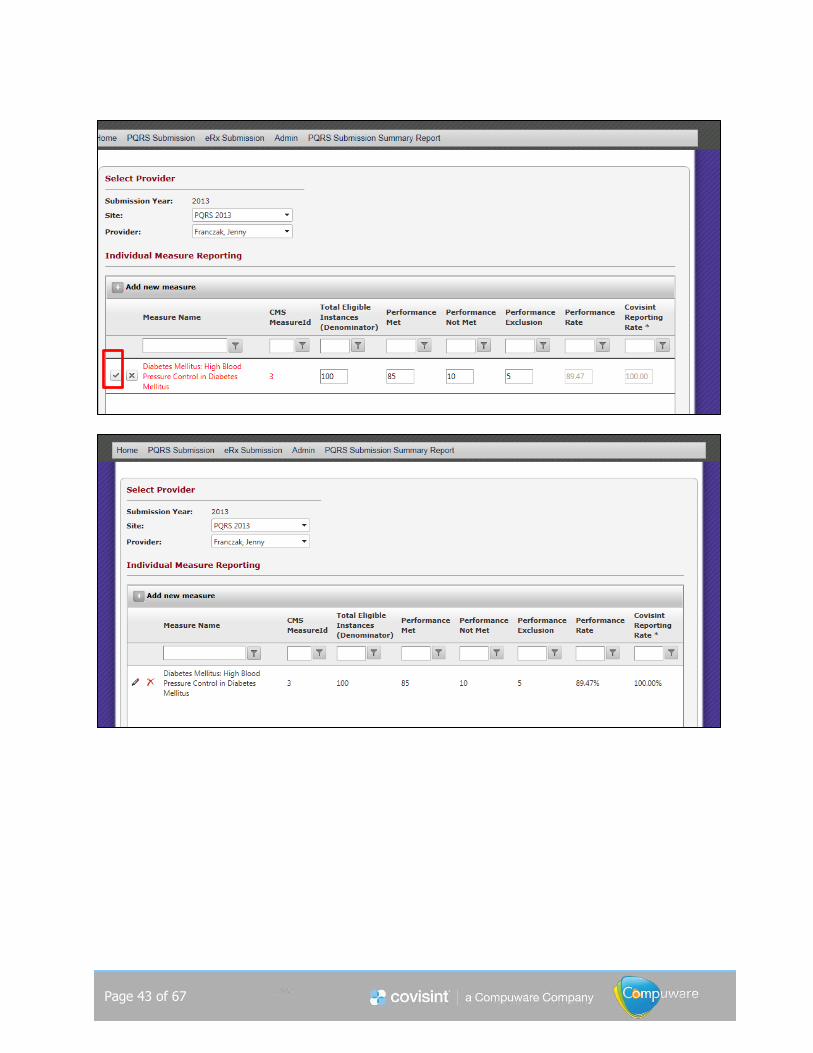
7. For each measure displayed on the Individual Measure Reporting screen, click the icon and enter values for Total Eligible Instances, Performance Met, Performance Not Met, and Performance Exclusion.
8. When complete, click the icon to save the measure. To close the edit window without saving
any data, click on the icon.
9. Identify the Total Eligible Instances (denominator) from your Practice Management or billing system based on the denominator requirements (including age, gender, and disease) as found in the CMS
2013 PQRS Measure Specifications Manual (use the icon). Enter the quantity in the Total Eligible Instances column for each measure.
Note about the denominator:
The denominator must be a minimum of 80% of the provider’s Total Eligible Instances for which this measure applies during the reporting year.
The denominator can be unique patients or each visit unless otherwise indicated by the measure definition. Exceptions include procedure-based or episodic measures. Be sure to read the measure specification instructions to ensure you are reporting this correctly.
Visits are ambulatory unless otherwise indicated by the measure.
All patients reported must be Medicare Part B FFS.

Page 42 of 67
10. Of the Total Eligible Instances for each measure, determine how many met performance for the measure, how many did not meet performance and if there were any excluded from the measure. Enter these numbers for each measure.
Note:
Performance Met + Performance Not Met + Performance Exclusions must equal the
Denominator (Total Eligible Instances) or the measure will not save.
Zero Percent Performance Violation: if a measure has a zero in Performance Met, the measure will not save as CMS will not accept a zero performance for most measures
Performance Rate and Reporting Rate are automatically calculated.
o The performance rate is the total number of patients who meet the performance for the
measure divided by the total number of patients seen who are eligible for the measure. The performance rate must be greater than 0% with the exception of inverse measures (see inverse measure exception below).
o The reporting rate is the number of patients (or encounters) who are eligible for the measure that you report on divided by the total number of patients seen who are eligible for the measure. The Reporting Rate must be at least 80%* of total eligible instances for the
measure being reported.
*Note: the reporting rate calculated in the Covisint web application will always be 100% and assumes that EP’s are always reporting all eligible instances.
If you decide not to submit data for a measure you selected, from the Individual Measure
Reporting screen, click on the icon next to the measure.
Once data entry is completed for a minimum of three measures, click Submit to proceed to the attestation screen. Once you have attested you will be directed to the payment screen.
Page 43 of 67

Page 44 of 67
Submit displays the attestation page followed by payment. The individual measures being reported are displayed on both pages.

Page 45 of 67

Page 46 of 67
Definitions:
Measures - the sets of established clinical elements or processes that define how a managed condition is tracked. Measures consist of two major components: a denominator that describes the eligible patients for a measure (the eligible patient population associated with a measure’s numerator); and a numerator that describes the Quality Service / Clinical Action required by the measure for reporting and performance.
Total Eligible Instances (Denominator) – the number of patients who are eligible for the measure. Example: Patients aged 18 years and older with a diagnosis of heart failure (HF) with a current or prior left ventricular ejection fraction (LVEF) < 40% seen during the reporting period.
Measure Numerator = Performance Met + Performance Not Met + Performance Exclusions.
Performance Met – the number of Total eligible patients upon whom the quality service / clinical action was performed. Example: Patients who were prescribed ACE inhibitor or ARB therapy either within a 12 month period when seen in the outpatient setting or who were already taking ACE inhibitor or ARB therapy as documented in the current medication list. [A clinical action to be counted as meeting a measure’s requirements=Performance Met.]
Performance Not Met – the number of Total eligible patients who do not meet the performance
criteria (the quality service / clinical action was not performed). Example: The number of Eligible Patients for whom ACE inhibitor or ARB therapy was not prescribed, with appropriate code indicating reason not otherwise specified.

Page 47 of 67
Performance Exclusion – the number of Total eligible patients who are excluded from the clinical action. Example: The number of Eligible Patients who were not prescribed ACE or ARB therapy along with the appropriate codes indicating the clinical action was not performed for Medical Reasons, Patient Reasons, or System Reasons.

Page 48 of 67
5. Covisint eRx Submission
Using the Covisint PQRS application, physicians simply collect the eRx data for 25 unique, Medicare Part B fee-for-service patients, enter and submit the data.
A. Entering Patient Data for eRx Submission
For eRx data entry, all patients must be Medicare Part B Fee-For-Service patients. The PQRS application will calculate and identify when a CMS minimum of 25 patients is met. At that time, in addition to the “Add New” button the “Submit” button will be made available. All data entered will be submitted to CMS. IMPORTANT! There is a HIPAA privacy feature at the top, right corner of the data entry page denoted as “HIPAA privacy timeout in: 15:00”. It is an automatic lock out feature to protect patient data remaining on an unattended computer screen and counts down from 15 minutes to zero. At the time of automatic lock out the text changes to “HIPAA privacy timeout.” When this happens, click “Logoff” in the top, right corner. The user will need to log back into the service and continue entering data. Patient data not saved prior to the lock out will be lost and will need to be re-entered.
1. On the main menu bar, click eRx Submission.
Figure 47.- Click: eRx Submission
2. Click the down arrow in the Providers field.
a. The drop-down list expands to display all providers currently entered for the site in the PQRS application.
b. Click the desired provider’s name. The selected provider’s name populates the Provider field and the drop-down list closes.
After selecting the provider, the screen refreshes to display the entry fields for the selected condition criteria. If this is the first patient for this provider, the fields will be blank.

Page 49 of 67
3. Enter data for the first patient. Complete all required fields labeled in blue.
NOTE: An error message will display if a required field is not completed. All required fields must be completed to save the patient data.
a. Enter the patient’s last name.
b. Enter the patient’s first name.
c. Enter the patient’s middle name, if needed.
d. Enter the patient’s date of birth using the format of mm/dd/yyyy.
e. Select the patient’s gender from the drop-down list.
f. Enter the patient’s medical record number (MRN), if needed.
g. Enter the appointment date using the format of mm/dd/yyyy, or click the calendar icon and choose the date.
h. Click the checkbox in the Traditional Medicare (FFS) field. IMPORTANT! In 2013, the 25 patients submitted MUST be insured under Medicare Part B to qualify for the PQRS incentive.
Figure 48.- Enter the Patient Demographics
4. In the Measure Entry section of the screen.
a. Click the Yes radio button to attest that at least one prescription was electronically prescribed using a qualified e-prescribing system.
b. Enter the Patient visit CPT or HCPCS code.
c. After entering data from the data collection form, click Save.

Page 50 of 67
Figure 49.- Enter the Measure Date for the Selected Condition
5. A patient list is automatically generated on the left hand side of the screen in alphabetical order by patient last name.
a. Patients identified in red have incomplete data and will need to be completed prior to submission.
b. To revise saved data, click on the name of the patient in the patient list. The patient’s data will appear on the screen.
c. Make changes then click Save.
6. Click Add New to continue with data entry for another patient.
7. Review all data entered for accuracy.

Page 51 of 67
Figure 50.- Click: Add New to Add Another Patient
8. After entering the 25th patient, the screen refreshes and the patient list now includes a Submit link in addition to the Add New link.
a. If you are ready to submit the patient data, click Submit to begin the submission process.

Page 52 of 67
Figure 51.- Patient List Now Displays the Submit Link
9. A Submit Confirmation message displays. Read the message and click OK to acknowledge that the Individual NPI and Federal Tax ID numbers entered are correct and that you accept sole responsibility for any inaccuracies which may prevent you from receiving your CMS incentives.
Page 53 of 67
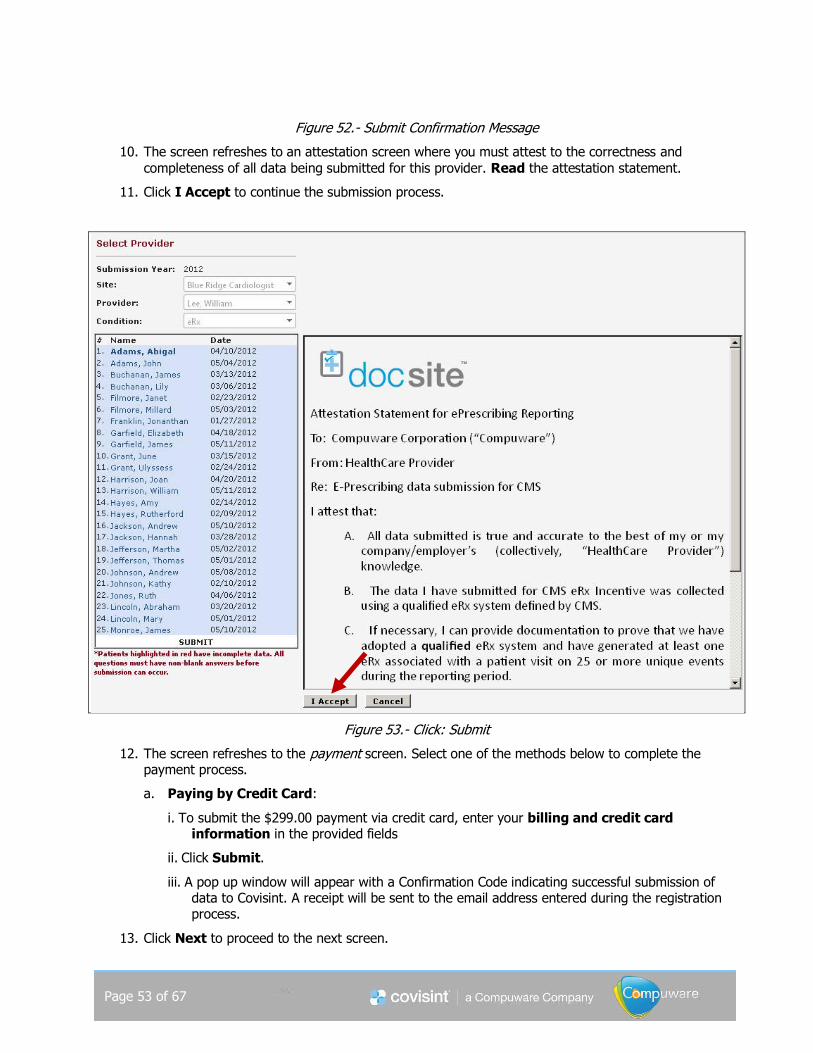
Figure 52.- Submit Confirmation Message
10. The screen refreshes to an attestation screen where you must attest to the correctness and
completeness of all data being submitted for this provider. Read the attestation statement.
11. Click I Accept to continue the submission process.
Figure 53.- Click: Submit
12. The screen refreshes to the payment screen. Select one of the methods below to complete the payment process.
a. Paying by Credit Card:
i. To submit the $299.00 payment via credit card, enter your billing and credit card information in the provided fields
ii. Click Submit.
iii. A pop up window will appear with a Confirmation Code indicating successful submission of data to Covisint. A receipt will be sent to the email address entered during the registration process.
13. Click Next to proceed to the next screen.

Page 54 of 67
Figure 54.- Payment Screen

Page 55 of 67
14. The screen refreshes to the submission screen. Click Next.

Page 56 of 67
Figure 55.- Click: Submit
15. A confirmation screen displays. Read the confirmation message and click OK.
Figure 56.- Click: OK
16. The confirmation message window closes. You should receive a confirmation message indicating the process is completed successfully and an automated confirmation email will be sent to the email address entered for the main contact at User Information in registration.

Page 57 of 67
Result
The eRx data for 25 unique, Medicare Part B fee-for-service patients has been entered and submitted. You
may either log out of the PQRS application, or start the data entry process for another provider.

Page 58 of 67
6. PQRS Submission Summary Reports
A. Generating a Report
Users have the ability to generate and view the following Covisint PQRS Submission Summary reports:
PQRS 2012 Submission Summary Report – Performance summary for 2012 submissions. This report is only available if your practice submitted PQRS data via Covisint in 2012. The report is organized by provider and condition. It includes total patients submitted per measure within a
condition, and the number of met, not met, and exclusion performances.
PQRS 2013 Submission Summary Report – Performance summary for 2013 submissions. The report is organized by Provider and condition. It includes total patients submitted per measure within a condition, and the number of met, not met, and exclusion performances.
To generate and view a report:
1. Click PQRS Submission Summary Report on the main menu bar.
Figure 57.- Click PQRS Submission Summary Report
2. On the Report screen:
a. In the Report field, click on the report name you want to view. For this example, the “PQRS 2013 Submission Summary Report" was selected.

Page 59 of 67
Figure 58.- Select the Provider and Click on the Name of a Report
3. A new window displays.
a. In the Select Providers field, select the providers from the drop down list to include in the report.
b. Click View Report.
Figure 59.- Select the Provider and Click View Report
4. The screen refreshes displaying additional fields.
a. In the Select a format field, select the format from the drop down list. For this example, the PDF format was selected.
b. Click Export. Report displays in the selected format.
Figure 60.- Select the Format and Click Export
5. A new window opens displaying the report, which you may save to your computer or print.

Page 60 of 67
Figure 61.- 2013 PQRS Submission Summary Report

Page 61 of 67
7. Reporting of Submitted Data and CMS Incentive Payment Information
Covisint processes all submitted data from the PQRS application at one time, at the end of the reporting year. If a practice did not complete the entire process, submitting data for each provider by the designated close date posted at our website, the data will not be included in the information sent to CMS. CMS has a designated window of time when the data can be submitted by vendors, usually in mid-March of the year
following the reporting year. Covisint will post a close date on the website that allows us time to process the data and prepare it for submission to CMS in mid-March.
Upon receipt of the data CMS will process data and determine eligible professionals who satisfactorily reported clinical data in a selected measure group on 20 qualifying patient visits. CMS will provide an incentive payment equal to a percentage of the eligible provider’s estimated total allowed charges for covered Medicare Part B PFS services provided during the reporting year. For the 2013 reporting year, the incentive is 0.5% of the provider’s 2012 allowed charges for covered Medicare Part B PFS services.
CMS does not notify Covisint when they start making payments of the incentives. Covisint receives no information indicating which providers were incentive eligible and which were not, nor does Covisint know what a specific provider’s actual incentive total is or should be.
CMS decides when they will make the incentive payments. Precedence has the payments being distributed anywhere between late summer and early fall after the completion of the reporting year. CMS will make a lump-sum incentive payment to a practice or provider in the normal manner of Medicare Part B reimbursement. If a practice normally receives a direct deposit, that is how the incentive payment will be received. If the practice normally receives a paper check in the mail, then that is how the incentive payment will be received. Typically, there is no message prior to receipt of the incentive payment. It arrives, and you are expected to review the CMS feedback report for details related to the incentive payment.
CMS provides multiple methods for practices and providers to receive feedback reports. A user can contact CMS’ QualityNet Help Desk Support at 866-288-8912 for assistance, or a user can contact the practice’s Medicare carrier for a feedback report.
If you need assistance ordering your feedback report, CMS has provided a Quick Reference Guide that highlights the most up-to-date toll free contact numbers. It gives specific directions depending upon the need, be it to determine if the feedback report is available or to determine how the incentive payment was calculated: http://www.cms.gov/PQRI/Downloads/PQRI-eRxEPQuickRefGuideDiagram_100209.pdf

Page 62 of 67
8. 2013 CMS Incentives FAQ
Physician Quality Reporting System
What is the Physician Quality Reporting System?
Formerly known as PQRI (Physician Quality Reporting Initiative), the Physician Quality Reporting System (PQRS) is a CMS Pay-For-Performance program that started in 2007. Currently, it is a voluntary, incentivized program where eligible physicians report quality clinical data collected during patient visits to CMS. Eventually, participation in Physician Quality Reporting will be mandated. There are multiple ways to report data for Physician Quality Reporting including:
Claims-based - where quality data codes associated with individual measures (pieces of clinical data) are reported and turned in on claims directly to CMS
EHR-based – where eligible professionals report quality measures using a qualified EHR
Registry-based – where eligible professionals report data for measures/measures groups to a CMS-certified registry like Covisint PQRS
For additional information, visit the CMS website at www.cms.gov/pqri.
How do I know if I am eligible to participate in the Physician Quality Reporting System?
Refer to the CMS list of eligible professionals at http://www.cms.gov/Medicare/Quality-Initiatives-Patient-Assessment-Instruments/PQRS/downloads//EligibleProfessionals.pdf.
When using an alternative reporting method for 2013, can providers choose any measures to report?
Covisint PQRS offers providers two services and both are recognized by CMS as “registry” or qualified alternative reporting methods. A provider can choose to self-report Physician Quality Reporting clinical data via the Covisint PQRS web application choosing either one of 22 measures groups or three (3) individual measures. Large provider groups can submit a claim combined data file (including billing or PMS data, lab results and/or medications data) at the end of the 2013 reporting year for the Covisint PQRS Enterprise service. If using the Covisint PQRS web application, a provider must report clinical data for 20 Unique patients for only one measure group. At least 11 of the 20 patients must be Medicare Part B FFS. Alternatively, new in 2013, providers can select three (3) individual measures applicable to their patient population and report at 80%. More information on this reporting option is available on our website at www.pqrs.covisint.com. If using Covisint PQRS Enterprise to submit data files, a provider must provide data on all Medicare Part B patients. Covisint will analyze your data to identify at least three individual measures at 80% for the entire 2013 reporting year. There is no change to your workflow and Covisint does all the work.
We’re a GPRO, can you help us?
Yes, Covisint, as a certified registry, can report on behalf of a GPRO (non-ACO) using the three individual measures at 80% reporting option. Contact sales directly at 866-823-3958 for more information or to sign up.
Do all the patients have to be traditional Medicare Part B Fee-For-Service?
It depends on the reporting option. The 2013 requirement for the measure group reporting option is that greater than half or 11 out of 20 patients must be Medicare Part B FFS. The individual measure reporting option requires reporting on only Medicare Part B FFS patients.

Page 63 of 67
What are the available measures groups for 2013?
A measures group is composed of four to ten individual measures and they are created and approved by
CMS. Measures groups are not editable to include or omit specific individual measures. Covisint will offer all 22 approved measures groups for 2013 reporting. The following measures groups are available:
Asthma (5-50) Heart Failure (18+)
CAD (Coronary Artery Disease) (18+) HIV/Aids (13+)
CKD (Chronic Kidney Disease) (18+) IVD (Ischemic Vascular Disease) (18+)
Diabetes (18-75) Preventive Care (50+)
Hepatitis C (18+)
Perioperative (18+)
CABG (18+)
Back Pain (18-79)
RA (Rheumatoid Arthritis) (18+)
Cataracts (18+)
Oncology (New) (18+)
Hypertension (15-90)
Cardiovascular Prevention (18+) Irritable Bowel Disease (IBD) (18+)
Chronic Obstructive Pulmonary Disorder (COPD) (18+)
Parkinson’s (18+)
Dementia (All ages) Sleep Apnea (18+)
Are there any changes for 2013?
Changes are as follows: There is one (1) new measure group, Oncology, added for 2013 reporting. Providers only need to report 20 patients in 2013 using the measure group reporting option. Of the
20 only 11 must be Medicare Part B FFS. The incentive payment for successfully reporting in 2013 is .5% Failure to report will result in a payment adjustment of 1.5% in 2015 Refer to the 2013 Measure Group Guides for each measure group to see any specific reporting and
patient requirements changes.
New in 2011 and remaining for 2013 is the zero percent performance rule– see question specific to this topic below for additional information.
What if none of the measures groups or measures within the measures group applies to us? (Zero Percent Participation Rate)
The new rule implemented in 2011 continues for 2013 Physician Quality Reporting. An eligible professional reporting via registry for a measures group needs to report all of the measures in the group (where the patient is eligible for the measure) for 20 patients AND have a performance rate >0% for each applicable measure during a specified reporting period to be considered incentive eligible. In cases where a measure within a measures group is not applicable to a patient, the patient would not be counted in the performance denominator for that measure, so those patients should not be affected (e.g., Preventive Care Measures Group - Measure #39: Screening or Therapy for Osteoporosis for Women would not be applicable to male patients according to the patient sample criteria).

Page 64 of 67
An answer of “Not Done/Unknown” or “Performance Not Met” equivalent for all eligible patients for a given measure within the measures group will result in a performance rate of 0% for that measure and the
provider will not qualify for the Physician Quality Reporting incentive. Providers with specialties that do not fit within the guidelines for measures groups approved by CMS are encouraged to report using an alternative reporting method. New this year, Covisint is offering an easy way to submit three (3) individual measures. Refer to the previous question on alternative reporting methods or contact us for additional information.
If I participate in the Meaningful Use/EHR incentive do I still have to participate in the
Physician Quality Reporting System?
These are separate incentive programs with different requirements and incentive payments. The Physician Quality Reporting System is not included in the Meaningful Use incentive unless you have self-nominated to participate in the EHR/PQRS pilot program. For 2013, you can participate in both programs and receive both incentive payments. Furthermore, only participation in 2013 PQRS will let you avoid the 1.5% penalty in 2015. Please note that successfully participating in one program does not give you credit for the other.
How much is the incentive for 2013?
One-half percent (.5%) of the eligible provider’s total estimated Medicare Part B Physician Fee Schedule (PFS) allowed charges for covered professional services provided during the 2013 reporting year.
Payment adjustments are here….
Eligible Professionals (EPs) can successfully report PQRS in 2013 to earn both an incentive as well as avoid a 1.5% payment adjustment in your 2015 fee schedule. EP’s can choose to report a single measure to avoid the penalty only and not earn an incentive. Note: In 2016 the payment adjustment increases to 2.0% based on 2014 reporting. As mentioned previously, successfully qualifying for Meaningful Use does not exempt you from the PQRS payment adjustment.
If I have already started reporting data with my claims can I still submit data for payment using Covisint PQRS?
Yes. You can submit both methods with no penalty, but you will only be paid the .5% incentive once. CMS will review all submissions and accept the submission that is most beneficial to the provider.
Will I earn additional incentive submitting data on more than one measure group?
No. Submitting data for multiple measure groups will not earn additional incentive.
How and when will I be paid?
CMS will release incentive payments using the same method in which you receive your standard Medicare reimbursements. For example, if you typically receive reimbursements via direct deposit your incentive payment will be received via direct deposit. If you submit for multiple providers under the same practice, all incentive payments will come together as a lump sum. Historically, payments are distributed in the fall of the year following the reporting year. Payment information is confidential to your practice and Covisint does not have access to this information.
What is a Feedback Report and how do I get one?
Feedback Reports are available for every TIN under which at least one eligible professional (identified by his or her National Provider Identifier, or NPI) submitting Medicare Part B PFS claims reported at least one valid measure a minimum of once during the reporting period. Feedback Reports provide a breakdown of submission data, eligibility, and payment information. These reports are not automatically provided and must be requested from CMS and your Medicare carrier. New in 2012 was the ability to request a feedback report through the Quality Reporting Communication

Page 65 of 67
Support page at http://www.qualitynet.org/pqrs (see the Related Links in the upper left corner of the web page). Click on the Communication Support Page link then choose Create NPI Level Report Request and
follow the instructions to request your feedback report.
What does this program have to do with improving patient and care quality?
The Physician Quality Reporting System is designed to encourage providers to discuss quality care oriented questions during an office visit, as well as to encourage appropriate documentation of data in a patient’s medical chart for follow up or reference at a later date/time. Reporting the requested data for the Physician Quality Reporting System promotes awareness by providers and practices about what data may or may not be fully or appropriately documented during their current processes.
In 2013 CMS has introduced the Value Based Modifier. Medical practice groups of 100 or more eligible professionals (all of whom file Medicare Fee-For-Service claims under the physician fee schedule using a single tax identification number) must register and participate in PQRS as a group in order to avoid a negative one percent payment adjustment (in 2015) under the value modifier. Click here for more on the value-based payment modifier.
Does a copy of the patient appointment list have to be submitted with the data?
No. However, in the event validation of a patient visit is required, be sure to document the completed measures in the patient chart and retain a copy of the source you used to determine reported patients for auditing purposes.
How can I contact CMS with additional questions?
You can contact the Quality Net Help Desk at 866-288-8912 or visit their http://www.qualitynet.org/. Additional information can also be found on the CMS website. You can also participate in CMS-sponsored Provider Calls.
Covisint Programs, Pricing, and Contact Information
What are the requirements to submit a measures group using the Covisint PQRS web application?
1. Register each provider using their Individual NPI and Federal TIN. (Note: Changes in TIN during the reporting calendar year may require multiple reporting, once under each TIN. Contact a Sales representative at 866-823-3958 for guidance)
2. Each provider selects one measure group to report (if there are multiple providers in a practice they do not have to report the same measure group)
3. Each provider selects 20 unique patients, of which greater than half or a minimum of 11 need to be Medicare Part B Fee-For-Service patients that meet ALL the requirements for the selected measure group (Refer to the Measure Group Guides on our Home Page once registered and logged into the web application for patient and reporting requirements)
4. Answer all the individual measures within the selected measure group for each of the patients, making sure to leave nothing blank. For most measures, there is the option to answer “Not Done/Unknown” or something similar. However, you cannot report “Not Done/Unknown” or “Performance Not Met” for all 20 patients for any given individual measure within the measure group.
o Please refer to the question that explains the zero percent performance rates.
5. Once you’ve collected the data on all 20 patients, log into the web application using your username and password and enter the patient data under the appropriate provider.
6. Submit.

Page 66 of 67
7. If you have Internet connection in the exam room, you can skip using the data collection forms to collect the data and enter it directly into the web application at the time of the visit.
If I registered for Covisint PQRS last year do I need to register again this year?
No. You do not need to re-register for the web application. Your login credentials will carry over each year. Use your same username and password to login to the 2013 web application. If you cannot remember your username and/or password please contact the Covisint PQRS Support Team at 866-823-3958 to have it reset.
What is the cost to submit Physician Quality Reporting data through Covisint?
It is $299 per provider to submit using the Covisint PQRS web application. There is no registration fee and no upfront costs. The one-time payment of $299 per provider is paid at the time of submission using any major credit card. The fee for Covisint PQRS Enterprise varies slightly depending on the number of submitted providers. This service is more costly than the web application. As such, we recommend it for larger practices (≥50 providers) to ensure cost effectiveness. There is an upfront data file processing fee and a per provider submission fee. Please contact a Covisint PQRS Sales representative at 866-823-3958 for additional information about pricing.
Can we be invoiced for our providers’ submissions?
Yes. You will need to contact a Covisint PQRS Sales representative at 866-823-3958 to receive a coupon code to use at each submission. No provider data will be transmitted to CMS until payment is received in full.
When is the last day to report for 2013?
Covisint will close the web application on March 1, 2014
How do I contact Covisint for additional questions or support?
You can reach Covisint PQRS Sales at 866.823.3958 or [email protected]. For assistance with a password reset only call Covisint PQRS support at 866-823-3959.
E-Prescribing
Can I get an incentive for both Meaningful Use and e-prescribing?
No. If you participate in both programs you will only receive incentive payment from Meaningful Use (MU). The 2013 reporting year is the final incentive year for e-prescribing. Successful reporting, if you are not
earning a MU incentive, results in an incentive of 0.5% of your total Medicare part B allowed charges. For additional information about the e-Prescribing program, please visit the CMS website.
How can I be a successful eRx submitter?
Eligible professionals (EPs) must use a qualified e-Prescribing system and submit a total of 25 unique e-Prescribing encounters for the year. All 25 patients reported must be Medicare Part B Fee-For-Service.