atomik war 3 - narod.ruxeele.narod.ru/files/addons/atomik_war30.pdf · atomik war, p.2 table of...
TRANSCRIPT

Written By: Mark Chase ([email protected]) Additional Plug-Ins: Doyle Erin West
All material within, Copyright 2000, all rights reserved
Home Base
Meta-Earth http://www.meta-earth.com
A Plug-in for the Fuziontm Roleplaying Game

ATOMIK WAR, p. 2
Table of Contents (Warning: Contents Under Pressure)
TABLE OF CONTENTS.............................................................................................................................................................2
INTRODUCTION........................................................................................................................................................................4
ABOUT ATOMIK FUZION .............................................................................................................................................................4 PLAYING FUZION .......................................................................................................................................................................4 ATOMIK WAR 3.0 EXTREME (A.W.E).........................................................................................................................................4 DISCLAIMER ..............................................................................................................................................................................4
BASIC TRAINING......................................................................................................................................................................5
GETTING STARTED ....................................................................................................................................................................5 FUZION TERMS AND DEFINITIONS ...............................................................................................................................................5 CAMPAIGN SETTINGS AND LEVELS..............................................................................................................................................5 THE PLAY OF THE GAME ............................................................................................................................................................5 DETERMINING INITIATIVE ............................................................................................................................................................5 GETTING DOWN TO BUSINESS ...................................................................................................................................................6 TAKING ACTION.........................................................................................................................................................................6 WHAT CAN YOU DO? ................................................................................................................................................................7 MOVEMENT...............................................................................................................................................................................7
THERE'S SPEED, AND THEN THERE'S SPEED ....................................................................................................................8
HE WHO GOES FIRST..................................................................................................................................................................8 SPEED, STANDARD EDITION.......................................................................................................................................................8 SPEED 2, PHASE CONTROL .......................................................................................................................................................8
ACTION RESOLUTION SYSTEM .............................................................................................................................................9
RESOLVING ACTIONS.................................................................................................................................................................9 STATIC RESOLUTION .................................................................................................................................................................9 LOW VARIABLE RESOLUTION......................................................................................................................................................9 MEDIUM VARIABLE RESOLUTION ..............................................................................................................................................10 HIGHLY VARIABLE RESOLUTION................................................................................................................................................10 WHAT DIE TO USE?.................................................................................................................................................................10 CRITICAL SUCCESS/FAILURES..................................................................................................................................................10
COMBATUM CINEMATICUS..................................................................................................................................................11
MAKING THE ATTACK ...............................................................................................................................................................11 ALL THE BETTER TO SLAY YOU WITH........................................................................................................................................11 RANGE ...................................................................................................................................................................................12
EXPLOSIONS AND AREA OF EFFECT.................................................................................................................................13
AREA OF EFFECT.....................................................................................................................................................................13 HITTING THE TARGET ...........................................................................................................................................................15
EXPANDED HIT LOCATION PLUG-IN...........................................................................................................................................15 GRAPHIC VIOLENCE, ON A GRAPH ....................................................................................................................................16
MAPPED HIT LOCATION PLUG-IN ..............................................................................................................................................16 HITTING THE TARGET...............................................................................................................................................................18 HIT LOCATION DETAILS............................................................................................................................................................20

ATOMIK WAR, p. 3
A KNIFE IN A GUNFIGHT .......................................................................................................................................................21
MELEE/HTH COMBAT PLUG-IN ................................................................................................................................................21 HAND-TO-HAND COMBAT.........................................................................................................................................................21 MELEE WEAPONS ...................................................................................................................................................................21
ALL GUNS BLAZING ..............................................................................................................................................................22
RANGED COMBAT PLUG-IN ......................................................................................................................................................22 AUTOFIRE RULES! ...................................................................................................................................................................22 AUTOFIRE RATIO THREE WAYS ................................................................................................................................................23 ARCHERY ATTACKS .................................................................................................................................................................23
ACTION EXTREME .................................................................................................................................................................24
THE ACTION PACK PLUG-IN .....................................................................................................................................................24 DIE HARD WITH A BATTERING .................................................................................................................................................24 WE HAVE A SITUATION HERE! ..................................................................................................................................................26 SPECIAL EFFECTS AND PYROTECHS .........................................................................................................................................27 JOHN WOO'S ACTION THEATER................................................................................................................................................29
THE QUICK AND THE DEAD..................................................................................................................................................30
QUICK DAMAGE PLUG-IN .........................................................................................................................................................30 TERMS AND DEFINITIONS .........................................................................................................................................................30 DERIVING DAMAGE CLASSES ...................................................................................................................................................30 OTHER DERIVED CHARACTERISTICS.........................................................................................................................................30 OTHER CONVERSIONS.............................................................................................................................................................31 TAKING DAMAGE CLASSES.......................................................................................................................................................31 DAMAGE CLASSES EFFECTS ....................................................................................................................................................31 HIT LOCATIONS .......................................................................................................................................................................31
MULTIPLIER DAMAGE RESOLUTION..................................................................................................................................32
MARGIN OF SUCCESS DCS PLUG-IN.........................................................................................................................................32 AFTERMATH AND RECOVERY.............................................................................................................................................33
INJURY AND RECOVERY PLUG-IN..............................................................................................................................................33 THE DAMAGE CLASS (DC).......................................................................................................................................................33 REALLY BIG THINGS (KILLS) .....................................................................................................................................................33 TAKING DAMAGE .....................................................................................................................................................................34 RECOVERING FROM DAMAGE...................................................................................................................................................35 FIRST AID ...............................................................................................................................................................................36
GUNSHOT TRAUMA EFFECTS .............................................................................................................................................37
GUNSHOT WOUND PLUG-IN.....................................................................................................................................................37

ATOMIK WAR, p. 4
Introduction About Atomik Fuzion
Atomik Fuzion is collection of "Fuzionable Materials" developed by Mark Chase, for use with any Fuzion RPG gameworld from modern-day, to sci-fi, to high fantasy. These plug-ins include Atomik Magick, Atomik WAR, Atomik Deathmatch (made for Atomik WAR), the mecha gameworlds of Vigilantian, Metal Storm: 2380, and world of Lodoss War RPG (base on the anime), as well as generic plug-ins for LifePath, psionics, and alien creatures.
Playing Fuzion
So. you have this Atomik Fuzion plug-in, but how do you play Fuzion? First, you must get a set of Total Fuzion rules. As mentioned (see side bar), the rules to create characters and play the game can be found in any Fuzion RPG book, or at the Fuzion web site. If you are having trouble finding a Fuzion game book, visit your local gaming store and ask about the R.Talsorian Games, Heroes Games, or Obsidian Studios product line. I recommend Shards of the Stone (a fantasy world), or Champions: The New Millennium. For Sci-Fi, you might look into getting Bubblegum Crisis or Votoms. Eventually, a Fuzion version of Cyberpunk and Mekton, will be released, which should be excellent as well.
Atomik WAR 3.0 Extreme (A.W.E)
The Fuzion system presents a fast and straightforward combat system adequate for most typical RPG campaigns where combat may not play a large role. However, for those seeking a more realistic or detailed combat system, many may turn to an alternative system or spend weeks developing their own house rules.
Atomik WAR 3.0 Extreme (or A.W.E.) addresses this issue, offering a a new "Advanced Combat System" designed to plug-in and replace the existing Fuzion combat system. A.W.E. is modular, with various individual plug-ins, which can be used however your campaign requires.
A.W.E is divided into a series of plug-ins which you can use or discard as you see fit. Together, these plug-ins form the Advanced Combat System known as Total WAR. As of release 3.0, weapons and equipment have been moved to a new sourcebook, Armory, Accessories, and Equipment, or A.X.E., as it may be called.
Disclaimer
Atomik WAR's combat system utilizes some existing rules based on Fuzion books by R.Talsorian Games and Hero Games. For consistency, some text has been copied for reference purposes only. Fuzion is a trademark of Hero Games and R. Talsorian Games, Inc. Fuzion is a copyright 1998 by Hero Games and R. Talsorian Games, Inc. All trademarks and copyrights used without expressed permission.
What is Fuzion? Fuzion is a unified set of role-playing rules combining the best of the Hero System (Champions) and Interlock (Cyberpunk, Mekton Z). Not only can Fuzion be adapted to cover nearly every time, place, or setting, but it also has the ability to utilize existing Hero and Interlock rules and materials; if it is marketed as Fuzion Capable, it can be used as part of the Fuzion system. Hero Games and R. Talsorian Games, Inc., jointly developed Fuzion. Many existing games systems use Fuzion,including Champions: The New Millennium, Sengoku, Usagi Yojimbo, Bubblegum Crisis the RPG, Shards of the Stone, Dragonball Z, and many more. Fuzion uses a unique Plug-In system that allows for easy addition and removal of rules. For instance, to add Martial Arts to your campaign, you need only turn to a Martial Arts plug-in. To add Magic, Psionics, or Superpowers, these too may be easily plugged-in to the core rules (Total Fuzion). Where Can I Get Fuzion? The basic Fuzion rules (for character generation, combat, game mechanics, and basic plug-ins) can be found in any Fuzion product produced by R.Talsorian, Hero Games, or Gold Rush Games. However, as it is, these companies were kind enough to provide an on-line version of their core rules system. To obtain this file, please visit the following URL on the Internet (provided the site does not move, of course): www.herogames.com/Fuzion/

ATOMIK WAR, p. 5
Basic Training "Alright you primitive screwheads, listen up!"
- Ash, Army of Darkness
Getting Started
These Plug-Ins are designed to replace the standard Fuzion rules regarding combat (Conflict and Combat chapter of the Generic Fuzion Rules v5.02). This system is based off all standard Fuzion rules for distance, time, actions, and conflict resolutions. All existing rules should be compatible with A.W.E.'s Advanced Combat System. This system is Fully Modular, and consists of several individual Plug-Ins which, though related to each other, can be turned on or off to suit your campaign as you see fit. Existing Martial Arts Plug-Ins, such as the one in Champtions:tNM, can be added in to expand the functionality of this system.
Fuzion Terms and Definitions
Below are some basic Fuzion terms used in this book. Actions: "Doing something". AV: Action or Attack Value. Skill roll made to accomplish a task (Task Roll) verses a DV. Characteristic: The physical ability of the character. Also called Stats in some games. CP: Character Points. Points used to buy Characteristics at character creation time. DC: Damage Class. Basically, 1DC equals 1D6 of damage (Stunning or Lethal). Die Roll: Usually 3D6 added to your Task Roll (your AV), but alternative dice (such as 1D10 or 1D20) could be used. DV: Difficulty or Defense Value. The target number (or defense roll of a character) for the AV role. KD: Killing Defense. Also called Armor. This is the armor rating of body armor or an armored unit (like a tank). 1 KD protects from 1 point of damage (Lethal and Stun). Lethal Damage: Damage that physically wounds, maims, and can kill. Also called Killing Damage. It takes away from both Hit and Stun Points. OP: Option Points. Points used to buy skills, talents, powers, and sometime equipment. Given as rewards for role-playing and used for character improvement. SDP: Structural Damage Points. How many damage points a non-living structure can take. 1 point of Lethal Damage inflicts 1 SDP (Stun does nothing). Stunning Damage: Bruising or knockout damage inflicted by non-lethal things (punches, sleep gas, rubber bullets). Takes away from Stun Points.
Campaign Settings and Levels
Atomik WAR 3.0 Extreme is designed for modern day to near future campaigns. It can be adapted to suit far future or historical campaigns (such as the Wild West) as well. A.W.E. is an attempt to increase the realism of combat while at the same time balance the need for cinematics in gaming, which are normally mutually exclusive concepts. To this end, A.W.E. is suitable for most Semi-Realistic to Heroic level campaigns. Super-Heroic campaigns may find A.W.E. too harsh or not cinematic enough, while Realistic campaigns may find it too cinematic.
The Play of the Game
Combat takes place in Action Rounds (12 seconds) which are comprised for four Action Phases of 3 seconds each. Each character will have a number of Actions during the Round. For their Action the character should do the following: 1. Choose Your Action - You have 1 Action lasting 1 Phase.
These Actions can be attacks or involve other types of activities. If other, skip to 4.
2. Check Line of Sight - You can attack anything positioned in front of you or to your sides.
3. Check Range - There are 6 ranges - Point-Blank, Close, Near, Medium, Long, and Extreme. If you are in range you can attack, applying modifiers.
4. Resolve Action - In general, roll Stat + Skill + Die Roll vs. your opponent's Stat + Skill + Die Roll or preset Difficulty Value.
5. Resolve Damage - If you hit, roll the number of 6-sided dice equal to the DC of the attack or weapon.
Determining Initiative
Initiative is the order in which PCs and NPCs act during the course of an Action Phase (3 second unit of time). Typically the one with the highest initiative goes first, but he may chose to Wait, using his Action at some later in that Phase (he cannot hold his Action to the next Phase, however). Initiative must be determined at the beginning of each Action Phase for each character who has an Action (some characters may not get an Action during certain Phases, depending on their SPD, if the optional Speed2 system is

ATOMIK WAR, p. 6
used). There are three methods for determining Initiative: Simple, Reflexive and Awareness based. OPTION1: Simple Initiative With Simple Initiative, the Character with the Highest REF goes first. If there is a tie, DEX, followed by INT, can be used to determine the winner (or a die roll). Actions are taken in turn. That is to say, the character that goes first is acting first, not all at once as in some game systems. OPTION2: Reflexive Initiative With Reflexive Initiative every character must roll REF + Die Roll. The highest roll goes first. If there is a tie, another die roll can be made to break it. Actions are taken in turn. That is to say, the character that goes first is acting first, not all at once as in some game systems. OPTION3: Awareness Initiative Pay attention. This is an alternative to reflex based Initiative where the sharpest and keenest gets to go first. Granted, you may have the reflexes of a fox, but if you're dumb as rock with the eyes of a bat, you're outta luck. With Awareness Initiative every character must roll INT + Perception + Die Roll. The highest roll goes first. If there is a tie, another die roll can be made to break it. Actions are taken in turn. That is to say, the character that goes first is acting first, not all at once as in some game systems.
Getting Down To Business
If your character can see something, he can generally interact with it (i.e., shoot it, kill it, maim it, or destroy it). If there's anything in the way, it's considered to be blocked and you can't directly interact with it. If the object is positioned forward of your shoulders, you are considered to be facing the target. If the object is within reach (roughly 2 meters), or you can touch it (or reach out and smash it), this is considered Melee Range (or Point-Blank Range). Further out than that, you'll need to use some other method to extend your reach. Which now brings us to the subject of measurement. In Fuzion, everything is measured in either meters or yards. The difference between a meter and a yard is only about 2 inches, so this is not a big deal. In A.W.E. meters are used by convention. Roughly speaking, a meter (or yard) is about 3 feet. Hexes are, by default, 1 meter in size, thus a distance of 5 hexes is 5 meters (or 15 feet) away.
Movement Scale In Fuzion, two scales of movement are used. So called "Figurative Movement" is the raw MOVE score compared to another character's MOVE in order to determine which has the higher overall score. This is primarily used to make
quick speed decisions (i.e., in a race, each participant adds a die roll to his or her MOVE and the highest total wins). Then there is the "Literal Movement". This measures the actual distance that can be covered, used mostly on hex maps or miniature sets. The distance you can move has already been determined by the RUN Derived Characteristic (MOVE x2 meters) and Sprint (MOVE x 3 meters). As always, your Walk score is equal to your MOVE in meters. These numbers will tell you exactly how far you can Walk, Run, or Sprint in a Phase (a 3 second unit of time). Terrain The type of terrain you happen to be walking, running, or slipping on can effect movement. Terrain is rated as either Easy, Rough, or Very Rough, and these reduces your overall MOVE characteristic (and subsequently, Walk, Run, and Sprint) in the following manner:
Easy Rough Very Rough No Change Half Move Quarter MOVE
The roughness does not necessarily mean it's full of rocks, only that it's hard to cross for whatever reason. Easy terrain would be grass, sidewalks, a flat floor, and so forth. Rough terrain could light brush, tall grass, stairs, or a blood slick floor. Very rough terrain might be a swamp, snow or ice, thick brush, or a mosh pit at a rock concert.
Time Fuzion uses two ways of measuring time. "Roleplaying Time" works just like it does in real life: dividing reality into seconds, minutes, hours, days, weeks, etc. The second way is "Combat Time". Combat Time is divided into 3 second combat Phases. Anything that takes longer than a phase is considered to be a Long Action, and will take several Phases or Rounds to complete. In extreme cases, you may even want to use minutes or hours to describe especially long actions.
Taking Action
When your turn comes up in the Round, you can take an Action. Actions are basically things you can do within the span of a few seconds, like use a weapon, dodge, or even start an Action that may stretch over several Phases (like searching a dead body). In general, you may do one of four things: Attack, Move, Dodge, or take a Non-Combat Action.
These Actions are as per Standard Fuzion Rules, and included Basic Actions (Attack, Block, Dodge, Move, Grab), Advanced Actions (Aim, Disarm, Escape, Wait), Martial Art Actions, and so forth. Please remember to use these actions! Some many players just let their characters stand in a room with a hail of bullets like a big fragging target. Dodge, Dive for Cover, Sprint, get up... Just do something! It always takes one Action to change weapons, reload a magazine, change the setting on a gun (mode, safety, etc.).

ATOMIK WAR, p. 7
These are considered Non-Combat Actions, though they are combat related.
Special Actions • Changing a clip or gun setting takes 1 Action. • Reloading a revolver takes 2 Actions. • Reloading shells into a pump-action shotgun takes 1
Action per 2 shells. • Reloading a rocket launcher takes 1 Round. • Loading a machine gun belt takes 1 Round. • Unjamming a firearm takes 1d6 Actions. • Binding a wound takes 2-3 Actions.
What Can You Do?
Below is a summary list of the Basic and Advanced Actions which a character can perform in his Action Phase. Each of these takes one Action to perform. Your AV and DV penalties are also list, if any. Most are Hand-To-Hand.
BASIC ACTIONS Attack: Shoot or Strike; 1 attack counts as 1 Action. Block: Stops any one attack with a successful Defensive Roll vs the Attacker's Attack roll. Dodge: Makes you harder to hit against all attacks this Phase. Adds +3 DV, but you cannot attack. Get Up: Get up from being prone. Grab: -2 to perform; lets you grab the target or weapon; -3 Defense for both. Run: Move up to your full Combat Move (a Run). Sprint: Move at full Non-Combat Move at 1/2 DEX, 0 REF. Other Action: Any single action not otherwise specified, such as using a Skill, reloading, mounting a weapon, etc. Throw: Throw an object (-4 if object is not made for throwing).
ADVANCED ACTIONS Abort: Interrupt opponent's turn to use a Defense (Dodge, Block, Dive for Cover), at cost of your next upcoming action. Aim: Each phase taken Aiming adds +1 to Attack, up to your DEX; no other Action possible. Choke Hold: A Grab at -4 REF. 2D6 Killing Attack. It is not possible to talk while being choked. Disarm: Knock opponent's weapon from his hand. Dive for Cover: Avoid an area attack. Defender makes REF + Athletics skill roll vs 8, +1 difficulty per each extra meter dived. Draw & Attack: Draw weapon and attack in one Action. -3 Penalty to attack. Entangle: Immobilize opponent until he can Escape. Escape: Escape from Grabs or Entangles, using STR+Athletics skill vs opponent's STR+Athletics skill. Haymaker: +3 dice damage, with -3 to REF. Move By: Full Move and attack during movement with a -2 penalty to REF & DEX. Damage is half of STR + 1 die for every 10meters moved. You will also take one third of that damage yourself (HTH attacks only).
Move Thru: Full Move and HTH attack at end of move with a -1 penalty for every 10m.yds moved and a DEX penalty of -3 total. Damage is STR + 1 die for every 5meters moved; you will also take one half of that damage yourself. Recover: -5 to Defense Value, get Recovery back in Stun or END. Sweep/Trip: Opponent falls; takes -2 penalty to his REF next phase, must spend an Action to get up. Wait: Wait for a chance to take your action or hold an action until later.
Movement
Your MOVE characteristic determines how far and how fast your character can move during the course of a Phase or Round. Typically, a character can walk up to his MOVE in a 3-second Phase, or run up to his MOVE x 2 (or Sprint at x3). This means is that a character can walk up to his MOVE x 4 in a single Round, or Run up to his MOVE x 8. For example, a character with a MOVE of 5 can potentially walk 20 meters in a 12 second Round, or run 40 meters (which is about 7 to 8 miles per hour). Remember, Running and Sprint both take a full Action. Walking is always a free action, and you may perform most other non-movement action while walking. When Sprinting you are at 1/2 your Defense Roll and have an effective 0 REF! Facing Facing is the direction you are pointing. Since many Fuzion games are played "in the head" (without maps), the rule simply states that you can face anything positioned forward of your shoulders (or within a 90 degree arc there of). It takes one Move (walking or running) to turn another 90 degrees (right or left). Line of Sight and Firing Arc Facing is only part of the story. The other part is whether or not you can actually see your intended target. This is called Line of sight. Hex Maps If you are using hex map sheets it is easiest to say that 1 Hex equals 1 meter (any other scale would force you to recompute movement, speed, and ranges). Movement and range is fairly straightforward. Facing changes should cost 1 Movement per 2 hex-side changes. That is to say, if you turn just one facing, or are "zigzagging" down alternating hexes to move in a line, this does not count against your Movement. But if you turn 2 hex facings, this does take one Movement (walking or running, you cannot turn while sprinting).

ATOMIK WAR, p. 8
There's Speed, and then there's SPEED "Gimme fuel, gimme fire, gimme that which I desire!"
- Metallica, Fuel (Reload)
He who goes first...
This is a "dual Plug-in" allowing for one of two options regarding how to treat a character's Speed (SPD) stat. The first is the same as what is presented in Champions:TNM, and is listed here for completeness and ease of reference. Speed2 is a new approach, and the subject matter of this Plug-In.
Speed, Standard Edition
Every Round is divided into four Phases of 3 seconds. Typically, all characters get 1 Action per Phase, taking that action in order according to their determined Initiative. However, players with an exceptionally high SPD may get extra Actions. For every 4 points of SPD a character gets +1 Action per Phase.
Speed 2, Phase Control
What purpose does SPD really serve in a non-superhero game? Nothing, you might say, because SPD 1 is the same as SPD 4 -- everyone gets 4 Actions per Round (1 per Phase in the order of Initiative). The average human would have a REF of 3, SPD 2. Based on the Speed Chart in Champions:TNM, we can see that SPD is directly proportional to the number of Actions per Round. A person with SPD 3 goes 3 times in one Round, rather than 4 times which would be the case if taken on a Phase per Phase basis (since there are 4 Phases in 1 Round).
Put simply, the Speed2 system says that your SPD equals the number of Actions you have per Round. Fractions do count when computing SPD, therefore, so therefore REF 5 equals SPD 2.5, which we will show as 2 \ 3 (not 2/3rds). The notation 2 \ 3 means 2 Actions on Round 1, then 3 Actions on Round 2.
How does this work? Refer to the Phase Control Chart to determine who goes on what Action Phase during the course of the Round. For example, a person with a SPD of 4 would get to go on each Action Phase, but a person with a SPD of 3 would only get to take an Action on three of the Phases. This chart is only meant for characters with a SPD below 8. Anything higher is considered better suited to the Standard Speed system.
CHARACTER'S SPEED 1 2 3 4 5 6 7 8
1 0 0 0 1 1 1 1 2 2 0 1 1 1 1 2 2 2 3 0 0 1 1 2 2 2 2 4 1 1 1 1 1 1 2 2
This table shows how many Actions a character with a certain Speed will have on a given Phase of combat. For example, the poor sap with a SPD of 1 will only get one Action on Phase 4 (what a loser). A slightly better loser (with a SPD of 2) will get 1 Action on Phase 2, and 1 Action on Phase 4. Jackie Chan, on the other hand (SPD 8), would get 2 Actions on all four Phases. Remember, characters with a split SPD (say, 2 \ 3) will have Actions on different Phases each alternating Round. You may take a Free Action on any Phase (such as walking), even if you have no Actions that Phase, but your action is taken last. Initiative must also be determined each Phase, unless only one character has an Action that Phase.
Example: Chow Yun (SPD 3) meets up with Speedyman (SPD 5) in a hallway. Using the simple Initiative (highest REF always goes first) it is determine that Speedyman goes first. On Phase 1 only Speedyman gets an Action, and he starts by drawing his MP5KA5. On Phase 2 both Speedyman and Chow get an Action, but Speedman still gets to go first. He is unsure of what Chow is up to, so he decides to Wait (hold his action) until after Chow goes. Chow Yun, already carrying both of his Eagle .357s in hand, uses his first Action to open fire. Speedyman, who held his Action, decides to spend it in an Active Dodge, given him a +3 to Evade. Despite his best efforts, when we roll to resolve, we find that Speedyman was still hit by one bullet. On Phase 3 Chow gets 1 Action, but Speedyman gets 2 Action! Still going first, Speedyman uses his third Action to open up with his MP5KA5, spraying hot lead at Chow. Chow does not Abort to Dodge, and so does not get a +3 to Evade. Nevertheless, when we resolve the attack, we see that Speedyman is a terrible shot -- he has missed Chow entirely! It is now Chow's Action, but he takes a Free Action to drop both of his empty pistols, then uses his Action to grab the Mini-Uzi he was packing. Speedyman still has one Action for this Phase, and uses it to reload his empty MP5KA5. It is now the 4th and last Phase of the Round, and both Chow and Speedyman get 1 Action (Speedyman, again going first). Speedyman spends his Action switching modes on his MP5 (from full auto to burst), a foolish mistake on his part. It is Chow's turn, and he uses his action to unloading his Uzi's entire magazine. We resolve Chow's attack and see that six rounds have peppered Speedyman.

ATOMIK WAR, p. 9
Action Resolution System "Follow where they beckon, vengeance on our enemies! The die is cast."
- Julius Caesar, Crossing the Rubicon
Resolving Actions
Whenever your character tries to do something, there is always the question of whether he will succeed or fail. Sometimes the task is so easy that its obvious; for instance, walking, opening an unlocked door, turning on the TV, etc. In those cases you can just tell the GM what you're doing and no die roll is needed. However, if you're trying to walk in a ship pitching wildly in a driving rainstorm, it may be more difficult. That is where the Action Resolution comes in.
There are two ways to resolve an action. The first is to resolve an action against another character (i.e. attacking him in combat). To do this, you will add your Characteristic + Skill + a die roll (your AV, or Action/Attack Value) verses your opponent's Characteristic + Skill + their die roll (DV or Difficulty/Defense Value). In other words AV vs DV. The higher number always wins.
Attacker's AV Defender's DV
Char + Skill + Die Roll vs Char + Skill + Die Roll
The second way is to resolve based on how hard it will be to perform the action (typically for use against a situation or inanimate object that has no skills). How hard it is to resolve the situation is based on how hard it will be to perform the action. This should be determined by the GM, with DVs ranging from 5 to 30 or more.
Base Point Difficulty The Fuzion system allows the GM to calibrate a campaign exactly to his liking. Unlike most RPGs, he can even choose what sort of dice to use. Standard Fuzion uses either 1D10 or 3D6 for Action Resolution. However, A.W.E. allows many difference dice options.
The Unopposed DV Table in Fuzion is tailored for usage with a 3D6 system. To use 1D10 (or alternative dice), it is necessary to recompute all the DVs on the table. This is entirely unnecessary if a Base Point DV Table were to be supplied. And here is that Base Point DV Table!
Base Point Difficulty DV Challenged 0 Everyday 4 Competent 8 Heroic 12 Incredible 16 Legendary 20 Superheroic 24
This Base Point DV (or BPDV) should have added to it a Static Number (like +10) or Die Roll (like 1D10) depending on the selection made on the Action Resolutions Dial.
Action Resolution Dial The Action Resolution Dial is used to set exactly how variable a Task Resolution is in your campaign. If you want raw skill and characteristics to have overriding importance, set the Dial low. If you want random chance to have a dominating role, set the Dial high. The best bet is a setting somewhere in between. By setting the Action Resolution Dial you must select a type of die to use when rolling Task Resolutions. The default for Hero Fuzion is Highly Variable Resolution using 3D6 (+10 or +3D6 to the Base Point DV Table). The default for Interlock Fuzion Medium Variable using 1D10 (+5 or +1D10 to the Base Point DV Table).
Whatever Action Resolution setting you choose; it should be used for all task resolutions in your campaign, to insure consistency.
Static Resolution
Simplest is the "Diceless" option; that is to say, AV or DV = Char + Skill. This is not recommended for a default game setting, but rather, should be used occasionally to speed up the resolution of combat or tasks, or when dealing with trivial matters. It is very straight foreword, but there is absolutely no variation, other than that given by task modifiers. Add nothing to the Base Point DV table -- you may use it as is for Static Resolution.
Low Variable Resolution
Low Variable Resolution uses a single six-sided die to add to AV or DV (that is, Char + Skill + 1D6). This allows for the Characteristics and skills of the character to outweigh the random chance of the die. This is good for a hardcore

ATOMIK WAR, p. 10
action game, where counting and adding dice may take too long, and the pace of the game is all-important. It is also good for campaigns where skill and abilities hold a higher importance. Add +3 or +1D6 to the Base Point DV table when making Unopposed skill checks.
Medium Variable Resolution
Medium Variable Resolution is a good compromise for any campaign. It uses a single 10 sided die, the sum of two six siders, or a 1D12, to add to AV or DV (that is, Char + Skill + 1D10). This is almost as quick as Low Variable, but adds more random chance, allowing for a greater degree of success or failure. 2D6 is a bit more random than 1D10 or 1D12, and has a probability bell curve. Add +5, or +1D10, +1D12, or +2D6 to the Base Point DV table when making Unopposed skill checks.
Highly Variable Resolution
Highly Variable Resolution gives a wide degree of random chance, far outweighing the value of the character's skills. It uses three six-sided dice, two ten siders, or 1D20, to add to AV or DV (that is, Char + Skill + 3D6). In fact, it is possible for a character with no skill and low characteristic to succeed at even a Heroic task, just from random chance! Though 1D20 or 2D10 is easier to roll and count (and has a higher max), 3D6 is more random and has a probability bell curve weighted to 11 or 12, instead of the 10 of a 2D10 or 1D20. Add +10, or +3D6, +2D10, or +1D20 , to the Base Point DV table when making Unopposed rolls.
What Die to Use?
If the GM chooses the Medium or Highly Variable Resolution options he must then pick what sort of dice to use for Task Resolutions in his campaign. Again, standard Fuzion uses either 3D6 (Highly Variable, for the Hero option), or 1D10 (Medium Variable for the Interlock option). But those are not your only options. For Medium Resolution you can take 1D10, 1D12, or 2D6. Which is better? In the end it amounts to personal preference. With a 1D10 or 1D12 you need only roll one die and don't have to add so many numbers. But a 1D10 has a minimum value of 1, a max of 10, and a median of 5. On the
other hand 2D6 has a minimum of 2, a maximum of 12 and a Median of approximately 6.5 (or 6 to 7 on the average roll). A 2D6 also has a bell-curve giving rise to better average but lessening the chance of a critical failure or critical success (about a 2.5% chance). A 1D10 has a 10% of critical failure or success!
For Highly Variable Resolutions you have even more options. You can use the standard 3D6, but 2D10 and 1D20 also work quiet well. The same pros and cons apply as mentioned above. 1D20 has a minimum of 1 and a max of 20, but a median of 10 and no bell-curve. A 1D20 has a 5% chance of a critical success or failure. With a 2D10 (not a bad alternative), you have a minimum of 2, a max of 20, and a medium slightly above 10 (10 to 11 on average) with a slight bell-curve. You have close to a 1% chance of a critical success or failure. 3D6, which is the default for most Fuzion games, looks to be the worst! It has a minimum of 3, a max of 18, and a median floating some where between 10 to 11. 3D6 does have a nice bell-curve, but this makes critical success and failures very rare (less than half a percentage).
Critical Success/Failures
While on the topic of Task Resolutions now would be a good time to mention how to handle critical success and failures with these alternative dice systems. Fuzion is an "open ending" success system. When you roll the natural score of the min or max for the dice (3 or 18 for 3D6, 1 or 10 for 1D10, etc), you get to roll one or two of those dice again and either add or subtract them (add to the score if you rolled critical success or subtract on failure). • If you're rolling 1D6: On a critical success or failure roll a 1D6
"critical check". If this rolls 1 (on failure) or 6 (on success), roll 1D6 more and add or subtract if from your total.
• If you're rolling 2D6: On a critical success or failure roll 1D6 more and add or subtract if from your total.
• If you're rolling 3D6: On a critical success or failure roll 2D6 more and add or subtract if from your total.
• If you're rolling 1D10: On a critical success or failure roll 1D10 more and add or subtract if from your total.
• If you're rolling 2D10: On a critical success or failure roll 1D10 more and add or subtract if from your total.
• If you're rolling 1D20: On a critical success or failure roll 1D20 more and add or subtract if from your total.
"You say Carpe Diem, I say Carpe Noctem" - Me

ATOMIK WAR, p. 11
Combatum Cinematicus "Good, Bad... I'm the guy with the gun."
- Ash, Army of Darkness
Making the Attack
In combat, the Attacker combines his Skill (Hand-to-Hand, Melee, or appropriate weapon) with his REF and a die roll to create and Attack Value (AV). He may also have to add or subtract modifiers from the AV to determine the final outcome (as above). For example, an attacker with a REF of 5, a Firearms(Pistol) skill of 4, a die roll of 8 has an AV of 17. A -2 mod for Range brings this town to 15.
The Defender combines his DEX, plus an Evade skill (there are two Evade skills -- Melee and Ranged) and a die roll (or a static number) to produce a Defense Value. A character with a DEX of 4, Ranged Evade of 3, and a die roll of 6 has a DV of 13. AV and DV (plus die rolls) are compared to determine who won. See Dynamic and Static DV for more information of DVs.
Dynamic DV There are two ways to handle defense against attack. The most common form is Dynamic DV where the defending character rolls his Char + Skill + Die Roll for every attack made against him. This allows for much more variation and the chances of scoring very high or extremely low -- even the greatest acrobat could stumble make a critical failure.
However, with Dynamic DV the action can quickly become bogged down with roll after roll to defend. Nevertheless, Dynamic DV is often favorable for games where combat is not as intense and the survivability of the characters is more important.
Static DV With Static DV characters will not roll dice to find their Defense Value (except when taking an Active Dodge action). Every character will have a set DV equal to their Char + Skill + some number (usually +5 or +10). This number is given as per the dice chosen for skill rolls (see Action Resolutions). In a game using 3D6, Static DV is Char + Skill + 10. This number is always what the attacker must roll greater than or equal to to hit the target. If the character chooses Active Dodge, Dynamic DV must be rolled (with the Active or Martial Dodge bonus).
Static DV makes combat much faster, as only the attacker rolls. However, the defender's DV will never change (for good or for ill). On the other hand, the defender can still declare an Active Dodge or other defensive maneuver. Static DV should be used if it seems combat is too slow, or reserved for usage when fighting NPCs.
All the Better to Slay You With
Surprise Attack An attack that surprises the target, such as an ambush or a stab in the back, gives the Attacker gets a +5 bonus for that attack (but no initiative bonus). To ambush requires the following conditions: • The opponent is unaware of your location and intention
to attack. He may only detect you with a successful Perception roll.
• The opponent's attention is distracted or focused on another situation, such as another attack.
Shooting an Immobile Target Shooting a helpless target which can neither move nor defend itself is fairly straightforward. You should use the normal Targeting Against Range difficulty table to see if you hit. As a general rule, shooting an immobile target at point-blank range, you are almost 100% assured to hit with all rounds fired. If you miss, you're a loser. Weapon Accuracy Weapon Accuracy [WA] reflects the difference in quality between weapons, and their effect on their user's abilities; the better and easier to use the weapon, the better you use it (and the worse the weapon...). WA's are not always used in Fuzion games, as their use varies from campaign to campaign. When they are brought into play, you will always find them listed in the description of the weapon. To use them, just apply the WA to your Attack roll as with any other Modifier. Shooting Blind If you cannot see your target, or your vision is impaired, this is concerned to be Shooting Blind (or near-blind). Conditions for this may vary -- you could actually be blind, permanently or temporarily (i.e., from a hit to the eyes or Flashbang grenade), you may be blind folded, in near or total darkness, or in a room full of smoke. The penalty for being totally blind to the target is -6. The penalty is only -4 if you are partially blinded (smoke, near-total darkness). Some devices (such as Nightvision or IR goggles) compensate for this to a degree. If you have the Talent "Blind Reaction" you can still counterattack your target in melee combat with no penalty.
ATOMIK WAR, p. 12
Obstructions When something is between you and your target, it blocks your Line of Sight. You may still shoot at it (assuming your weapon can penetrate the obstacle), but will have to attack blind (-6 penalty). If you can sort of see your target (a shadow or lighting, etc.), the penalty can be as low as -4.
What You Can Shoot Through Trees • Brush • Smoke • Tents • Glass • Snow
What You Can't (Usually) Shoot Trough
Concrete • Brick • Metal
If you have to shoot through a hard object, such as a wall, door, or person, your bullets have to penetrate. This is discussed later, in the Action Pack plug-in.
Additional LOS Modifiers There are a great many other modifiers which can effect the attack roll. Most of these are listed in the Standard Fuzion rules. However, for reference, some are given below.
Completely Blind (i.e., by total darkness) -6 Sight obscured(partial darkness, smoke) -4 Moving target -1 per 10 metrs Target silhouetted (easier to see) +2 Vehicle mounted weapon, off turret -4 Firing shoulder weapon from hip -2 Aiming +1 per Phase Braced +2 Tiny Target (bullseye, eye, vital area) -6 Small Target (less than 1m, head, limb) -4 Undersized Target (dog or cat sized) -2 Large Target (trees, cars, large animals) +2 Very Large Target (truck, plane, walls) +4 Broad Side of a Barn +6 Surprise Attack +5 Firing a 2nd or 3rd shot in same Action -1, -2 Firing 2nd or 3rd Burst in the same Action -2, -3 (3rd) Firing at Full Auto (F-mode) +0 Emptying the magazine! (E-mode) +2
Partial Cover An obstacle may also only partially block your line of sight, allowing you to try and shoot around it. Determine how much of your target is exposed, then reduce your Attack roll as below. You may only hit an area that is exposed.
Cover Modifier Half Body -2 Head and Shoulders Only -3 Head Only -4 Behind Someone Else -4 Target prone (lying down) -2 Target crouched -1
Aiming Aiming is not needed, but it can help in hitting a target. For every consecutive Action you spend aiming, +1 is added to your skill. However, your Aiming bonus cannot be greater than your DEX score. That is to say, if your character has a DEX of 6, he can (at most) accumulate a +6 from aiming. If you are interrupted or distracted at anytime (anything from
being hit to sneezing to moving) then all aiming bonuses are lost. You can't move, actively dodge, or take any other Action without losing the bonuses (you are considered an Immobile Target). If you have a scope which adds a bonus, that bonus is added in addition to your aiming bonus, but you must aim for at least one Action to gain this bonus. You can also declare what body part you are aiming for (as per Aimed Shots) and apply the appropriate modifier.
Range
Every gun has a max range. This is the Extreme Range of the weapon. For Melee Weapons all ranges must be within 2 meters (Point-Blank). Atomik WAR introduces a new range, Near, between Close and Medium. Range penalties have been adjusted to be different from those of standard Fuzion, to better reflect the difficulty in reality.
Point-Blank Range Attacking at point-blank range has massive added effects for ranged firearms. Instead of randomly rolling to see where the shot hits, you must declare the target location of your opponent. You will receive a +1 bonus to hit, however, you still incur the penalty to hit your chosen location (so Chest is at no penalty to hit, head is -3 to hit, etc.). Furthermore, all damage is at +1 DC due to the extra force of the firearm's blast and extreme muzzle velocity. Point-blank is only valid for ranged firearms, not melee weapons or Hand-to-Hand. Targeting Against Range Sometimes you need to hit an apple, tree, target area, or something else at range. In these cases, the GM will set a DV based on the range:
Range DV Point-Blank (< 2m) 1 Melee (4m or less) 4 Close (10m or less) 8 Near (20m or less) 10 Medium (50m or less) 12 Long (to the listed range) 16 Extreme (beyond listed range) 16, +1 per +50m
Modify appropriately for the Resolution option you are using. Static Variable +0 Low Variable +3 or +1D6 Med. Variable +5 or +2D6 or +1D10 High Variable +10 or +3D6, +1D20, or +2D10
Point-Blank [special] 2m or less of the target. Melee (<4m) [+0] Melee range. 4m or less of the target. Close (10m) [-1] Within 10m of the target Near (20m) [-2] Within 20m of the target Medium (50m) [-3] Within 50m of the target Long (to listed) [-4] 51m to Max Range of the Weapon Extreme [-5, plus -1 for every 50m past listed range.

ATOMIK WAR, p. 13
Explosions and Area of Effect "No Boom today. Boom tomorrow. There's always a Boom tomorrow."
- Susan Ivanova, Babylon 5
Area of Effect
Area Effect attacks (explosions, shotgun blast, atom bombs, and so forth) strike an area rather than a character (though the shell could be directly fire upon a character). The area of effect depends on the kind of attack made or type of weapon involved (i.e., a grenade with a Blast Radius of 3 meters). These types of attacks use the Targeting Against Range rule to see if they hit their area (alternatively, a person could be targeted and hit directly, ouch!). Anyone within the effected area must roll for damage (see Area Effect Damage) or Dive for Cover to evade. For example, Chow Yun throws a grenade toward Jet Li, who is about 10 meters away. His target is 18 (DV 8 for range, +10 because we are using High Variable Resolution). His AV total turns out to be 20, so he hits the target area. Li (and anyone else), standing in the area, must roll for damage or Dive for Cover. Alternative, if Chow Yun fired a grenade directly at Jet Li, who was 10 meters away, he would roll against Li's DV to dodge. If hit, Jet would take full damage to the hit location. Anyone else standing in the area of effect would take explosion's area effect damage as well. If the grenade missed, but still landed close enough to catch Li in the explosion he will still take damage (unless he Dove for Cover). Area Effect: Explosions If the area of effect attack was an explosion, then the effect may spread beyond the listed area of effect (consisting of shrapnel, overpressure, and fire). Outward from the center of the explosion damage is reduced by 1DC every meter away. In other words, a 5DC explosion does 5D6 damage to everything within a 1 meter area. At 1 meter further out the damage is 4DC. At 4 meters out the damage is 2DC. At 5 meters out the damage is just 1DC and beyond that it's negligible.
Typical Area Effects Effect Radius 40mm Grenade 1m per DC Hand Grenade 1m per DC High Explosives 1m per DC Heavy Weapon 4m per Kill
If the attacker fails the roll, the center of the attack shifts 1m for every 1 point by which his missed. Roll 1D6 to see which direction the center of the attack scatters. Then roll 1D6 to determine how many meters the round fell in that direction.
Roll Area Effect Result 1-2 landed short of target 2-4 landed behind target 5 landed to right of target 6 landed to left of target
Area Effect: Focused Some explosions, like those of a shape-charged explosive, claymore mine, or shotgun have an area effect that is shaped like a cone, rather than a sphere. This is called a Focused Area Effect. For such weapons, the area effect or blast radius is only for the forward 30 o to 60o or so. It is usually more powerful as the full force of the explosion is focused in that direction. For example, Little Timmy, skipping through the forest, stumbles over a trip-wire for a claymore mine (poor Timmy!). The claymore mine is a 1.5 kg explosive shaped-charge, so it concentrates 15DC of damage outward for 15 meters in a 45o arc. Timmy is just 4 meters away, so he takes 11DC of damage, tearing him to pulpus pieces.
Pulpus Pieces! The yummy new treat from KandyWells! Now in tangy Leadbarry for a limited time at S-Mart!
Area Effect Damage (Simplex) Anyone standing in an area effect explosion takes damage as listed for that weapon. For a 6 DC explosion, everyone in the area effect must roll 6D6 damage. All damage is applied generically, that is, if you roll 12 damage you take 12 damage. For the purposes of armor use the KD listed for the Torso. However, if the area most impacted is very clear (such as stepping on a mine) the damage may be applied to that area instead. For example, when Timmy trips the claymore mine all damage is applied to him generically. If he happens to be wearing a bulletproof vest, it can help to protect him, but his flak pants won't. On the other hand, if Timmy had step on a 5 DC landmine all damage would be applied to his foot and leg (split evenly across, or as the GM sees fit). Wearing armored boots and flak pants will shield against land mines, but a bulletproof vest will be of little use. Everyone else outside the immediate area of effect takes damage from shrapnel and overpressure (the blast). This is call the secondary area of effect, and it extends for about 1 meter for every DC of damage. Every meter away from the
ATOMIK WAR, p. 14
center of the explosion damage drops by 1 DC until it is effectively nothing. Anyone standing in this area must also roll for the appropriate level of damage which is applied generically (or Dive for Cover). That is why when Timmy trips the 15DC claymore mine from 4 meters away he only takes 11DC. If directly hit by an area effect weapon (like a missile or grenade) fully damage should rolled and applied directly to the body location struck. Area Effect Damage (Complex)
Alternatively, and realistically, Area Effect damage can be applied all over the target, rather than generically. This requires each DC to be rolled on a different location, and then applied all at once to the target (you may also group DCs if there is a
great deal of damage). Roll on the Standard or Atomik Hit Table, or the Upper or Lower Hit Table as appropriate (i.e., use the Lower Hit Table for stepping on landmines). For example, if you are hit by 10DCs of damage, each DC could be rolled randomly to hit different areas (i.e., 10 rolls of 1DC or 5 rolls of 2DC). If an area is hit more than once, the total damage it takes is treated as one hit (not multiple hits) for armor penetrating purposes. Area Effect: Shotgun Blasts "This is my BOOM stick!"
- Army of Darkness Shotgun blast is a special case for area effect weapons. Typically, a shotgun has a max effective range of about 40 to 60 meters. This is because the shot spreads out so quickly. When a shotgun is fired,
the blast of pellets will spread out in a cone, increasing its blast radius but lowering the overall damage. Unmodified Shotgun Area Effect Table Range DC Area Effect Point-Blank (<2m) -0 none 5 meters or less -1 1 meter 10 meters or less -2 1.5 meters 15 meters or less -3 2 meters 20 meters or less -4 2.5 meters 30 meters or less -5 3 meters Extreme (beyond listed range) -1 per +10 m
This table is modified by the Shotgun weapon itself. A shotgun with a DC of 8 and a Range of x1.5 means it does 8 DC at point-blank, and all ranges (above) are multiplied by x1.5 (so at 30 meters it does 4 DC with a 2.5m area of effect). A sawed off shotgun has a multiplier of x0.5, meaning all ranges are halved, due to the much shorter barrel. A shotgun can be fired into an area (indirect fire) or directly at a target. If fired into an area, anyone in that area my Dive for Cover. If hit, apply damage as per Area Effect Damage
rules (Simplex or Complex). However, when directly fired at a target, he may make an Evade or Dive for Cover roll, but verse the DV of the attacker. If directly hit, roll the specific hit location and apply all damage there. You could use the Complex Area Effect damage, applying half of all DCs to the first location, and then the roll the remaining DCs randomly (roll on Upper or Lower Hit tables depending on where the first hit struck), but this gets complicated. Big Booms, Small Places A nice little gag to play on your friends is to roll a grenade into their elevator as the doors close -- they'll have a blast! When something explodes in a confined space, the damage from the explosion is greatly amplified for a variety of reasons. Primarily, the overpressure from the explosion is tremendous and there is no way it can be released, utterly crushing anything inside. Shrapnel ricochets around the area relentlessly, a literal maelstrom of burning hot metal and deadly debris. As a general rule, anyone caught in such a situation will not survive. If you must know exactly how much damage is done, consider the table below:
Type of Area Damage 2x2 meters (Elevator or closet) x4 4x3 meters (bathroom or sunroom) x3 5x5 meters (room, hallway, bunker) x1.5 In a vehicle (car, van, etc.) x3 In a tank (very enclosed) x4 In an APC x3 In a large plane (737, etc) x2
This section was not left blank intentionally. You must be missing something...
42
Fnord

ATOMIK WAR, p. 15
Hitting the Target "Dodge this!"
- Trinity, "The Matrix"
Expanded Hit Location Plug-In
This is the first of two hit location plug-ins. This one being the standard method, as present in other Fuzion sourcebooks, in addition to an expanded Hit Location Chart. The second system is "Mapped Hits", which follows.
Aimed Shots One way to increase the amount of damage in any attack is to aim a shot directly at a particular body part. You pay a modifier penalty, choose the target, and make the attack. If you hit, the damage is modified as per the Hit Location Table. This Hit Location Table is slightly modified over the one presented in standard Fuzion, being somewhat more realistic as far as location sizes are concerned.
Location Penalty Effect Head Sub-Area -6 See Head Chart Head -4 Roll on Head Arm -3 1/2 dmg Hand -4 1/2 dmg Chest -1 1x dmg Shoulder -2 1x dmg Stomach -3 1.5x dmg Vitals -5 1.5x dmg Thigh -2 1x dmg Leg -3 1/2 dmg Foot -4 1/2 dmg
Random Hit Tables If you do not aim at a specific location, you must roll randomly for each round that hits your target. The Standard Hit Chart is presented for easy reference. The Atomik Hit Chart is balanced for probably and realism. If only his upper body is visibly, use the Upper Hit Chart. If only his lower body is visible, use the Lower Hit Chart.
Standard Hit Chart 3D6 Roll Location Effect
3-5 Head Roll on Head 6 Hand 1/2 dmg
7-8 Arm 1/2 dmg 9 Shoulder 1x dmg
10-11 Chest 1x dmg 12 Stomach 1.5x dmg 13 Vitals 1.5x dmg 14 Thigh 1x dmg
15-16 Leg 1/2 dmg 17-18 Foot 1/2 dmg
Atomik Hit Chart
3D6 Roll Location Effect 3 Right Foot 1/2 dmg 4 Right Hand 1/2 dmg 5 Right Arm 1/2 dmg 6 Right Leg 1/2 dmg 7 Head Roll on Head 8 Right Shlder 1x dmg
9 - 10 Chest 1x dmg 11 Vitals 1.5x dmg 12 Stomach 1.5x dmg 13 Left Shlder 1x dmg 14 Thighs 1x dmg 15 Left Leg 1/2 dmg 16 Left Arm 1/2 dmg 17 Left Hand 1/2 dmg 18 Left Foot 1/2 dmg
Upper Hit Chart 3D6 Roll Location Effect
3 Right Hand 1/2 dmg 4 Right Arm 1/2 dmg
5 - 6 Head Roll on Head 7 - 8 Right Shldr 1x dmg 9 - 10 Chest 1x dmg 11 - 12 Left Shldr 1x dmg 13 - 14 Stomach 1.5x dmg 15 -16 Vitals 1.5x dmg
17 Left Arm 1/2 dmg 18 Left Hand 1/2 dmg
Lower Hit Chart 3D6 Roll Location Effect
3 Right Hand 1/2 dmg 4 - 5 Right Foot 1/2 dmg 6 - 7 Right Leg 1/2 dmg 8 - 9 Thighs 1x dmg 10 Stomach 1.5x dmg 11 Vitals 1.5x dmg
12 - 13 Thighs 1x dmg 14 -15 Left Leg 1/2 dmg 16 - 17 Left Foot 1/2 dmg
18 Left Hand 1/2 dmg
Head Chart (roll this on any Head Hit) 1D6 Roll Location Effect
1 Face 1 x dmg 2 Eye 2 x dmg 3 Cranium 2 x dmg 4 Jaw 1 x dmg 5 Throat 1.5 x dmg 6 Ear 1/4 dmg

ATOMIK WAR, p. 16
Graphic Violence, on a Graph "Watch Out! Son of a Gun! Superhero Number One!"
- KMFDM, "Son of a Gun"
Mapped Hit Location Plug-In
The Mapped Hit Location plug-in is a different approach to the "random roll" hit charts traditionally used in role-playing games (such as Fuzion). The attempt is to provide a more visual system that better reflects real-world combat. This system is partially derived from Babylon Project RPG by Chameleon Eclectic, though somewhat modified and adapted for Fuzion. It is fully compatible with Total Fuzion and Instant Fuzion, and any RPG in general! Pros (the good) • Hits are not completely random. Though they still have a small
random element, all hits are logically placed and grouped in a contiguous manner.
• Gives a visual and graphic feel to combat. Instead of rolling "Leg hit, Thigh hit, Arm hit", your rolls on the Target Map will show the bullets staggering across the body like in a movie or video game.
• Resolves confusion with partially hidden targets, or adversaries standing behind hostages. With a Target Map, a terrorist behind cover (or holding a hostage) can be fairly portrayed, and hitting him (or hitting the obstruction) is seamlessly handled by this system.
• Adds greater realism. Soldiers and police are trained to target the center of the body (the Base Target Point for most Target Maps), thus increasing the probability of hitting a vital location. Such silly hits as "Head hit, then left foot hit" will virtually never occur.
• There are less to-hit penalties to worry about, since this system automatically handles a number of situations, such as cover, defensive positions, and target shape and size.
Cons (the not quite as good) • Requires numerous Target Maps. Though the default ones
cover most situations, the GM may be required to draw new Target Maps for different positions, animals, monsters, or vehicles, as needed.
• "Vitals" (to Head, Vitals, etc.) are much easier to hit, as the chest is the Base Target Point, and "less damaging" locations, such as arms and feet, will happen far less.
• It is possible for a valid "hit" to actually miss or strike an obstruction. It is also possible for a "miss" (or a successful dodge) to still hit, though usually is only a glancing hit or on an extremity.
The Target Map The first chart (on the following page) shows the default Target Map for an upright humanoid target (which should be the case 90% of the time), face on. As can be seen, the center of the target is the Base Target Point, where
unaimed shots generally go, but this Base Target Point may be different depending on the situation (more on this later). With the first chart, because it is face on, the left hand side of the chart is the target's right, and the right hand side is the target's left. This should be reversed when shooting a person in the back (so you may use the same chart for both of these situations).
On the following page you will find eight hexed base Hit Location Maps. The first are detailed with critical location information. The second set are clear of these notes. There is also a blank sheet provided for your own sketches. For larger, more detailed maps, visit
http://www.meta-earth.com/fuzion/mapped-hits.html (Special Thanks to Otto Blix of STUDiO187 for providing images)
Base Target Point The Base Target Point is the default target location for an unaimed shot, usually the center of the chest (see the first Chart) for a standing, unobscured humanoid target. However, this Base Target Point (or BTP) can be anywhere on the target, depending on the situation (this must be determined by the GM). If the target is obscured (partially behind a wall or under light cover, etc.), but is still in roughly the same profile as in the chart, the BTP of "center chest" should be used. If your shot hits the obstruction, too bad, that was why he was standing behind cover! The attacker may also designate any other hex point on the Target Map as his aim point, offsetting the BTP at a certain penalty. Examples will follow shortly. When shooting non-humanoid targets (a car, a dog, a six-legged Klakkath warrior, etc.), the GM need only sketch its silhouette on a scrap of hex-paper and assign the numbers similar to what is illustrated in the first Chart.
Aiming Declaring that you are shooting at any other spot besides the BTP imposes a penalty to hit. For every hex away from the BTP you have a -1 penalty to hit. Thus, shooting the face is a -3 penalty. Shooting the hand is a -5 penalty. Though this is much different than the penalty listed in the core Fuzion rules, it is more realistic. Shooting a standing target in the foot or hand is a great deal more difficult than shooting the head, even though it is "not as fair" in game terms (who said guns were fair anyway?). Aiming (taking time to aim) works as normal, for example, aiming for two actions gives you a +2 to hit. If you were aiming at the head, this balances out, and the head becomes the BTP at little or no penalty.

ATOMIK WAR, p. 17

ATOMIK WAR, p. 18
Hitting the Target
This is what Hex-Base Hit Locations are all about. Even a miss may still hit, though not often. If you succeed in "hitting" the target, there is a chance that you might not hit the designated BTP. The margin of success, not a random die roll, determines how accurate you hit. The BTP (whether by default or chosen by the attacker) is the intended aim point. If the margin of success was at least 2, then the hit was dead on (i.e., in the BTP). A success of 1 is 1 hex off, a success of "0" (even AV/DV tie) is 2 hexes off, a failure by 1 is 3 hexes off, and a failure by 2 is 4 hexes off. Beyond that, it was a total miss. The later cases will usually miss the target, but may have a chance of hitting an outer extremity. • If you succeeded by 2 or better, the BTP was hit dead on. • If you succeeded by 1, the hit was 1 hex off on the Target
Map. • If the roll was a "tie" (AV/DV the same), the hit was 2 hexes off
(remember, Attacker wins in Fuzion by default) • If you missed, but only failed by 1, the hit was 3 hexes off, and
was a "glancing" hit. • If you missed, but only failed by 2, the hit was 4 hexes off, and
was a "glancing" hit. • The GM may expand this further, at his discretion. Once the margin of success or failure has been determined, roll 1D6 to determine the direction the shot went (see the first Chart). Then count the number of hexes you were off, and the resulting hex is where the shot hit. If the resulting hex is outside of the Target Map, then you missed (even if you technically succeeded). Furthermore, if the target was behind something (such as an over-turned table), and the resulting roll hits a location that is obscured, then that object (the table) will provide some defensive cover.
For example, if your hit succeeded by 1, then we see by the numbers above that we were one hex off from the BTP on the Target Map. We roll 1D6 and get a result of 4. Looking at the Chart we see that this shows the round hit in "Direction 4" one hex below the BTP. Note: Any hit which technically failed, but still struck the target, is automatically considered a "glancing" blow, and does half-damage (unless you are using MOS-DC Plug-In).
For example, Jet jump kicks Chow, going for his BTP (the center chest) and succeeds by 1 (off by 1 hex). He rolls a 2, and it is determined that Chow was hit in the left shoulder.
Simi-Auto Shots Successive shots from a semi-auto weapon (a handgun, for example), is not autofire. Instead, the weapon may simply be fired more than once in an Action, usually with a penalty (of -1 or -2, etc.). The roll to hit is made for each shot, as normal, dropping back down to the BTP, along with the penalty for the successive shot. If you wish to aim at a particular location, this may pose a penalty for each shot.
For example, Chow clicks off two shots from his Desert Eagle at Jet. He had aimed for Jet's stomach (-2 to hit), and succeeds by 0 (an AV/DV tie), which means he was 2
hexes off and the hit was a "glancing hit" doing half-damage. We roll and determine that this has the effect of hitting Jet in the right leg. On his second shot Chow suffers a -2 to hit from recoil, but does not continue to aim (so the BTP is again the chest). He makes the roll with a success of 2, hitting Jet square in the chest. Had Chow tried to maintain his aim on the stomach, he would have suffered a -4 to hit.
Autofire Autofire is a bit different than semi-auto. Instead of rolling for each shot, you only roll once, then determine how many bullets hit. There are several methods of handling Autofire (determining penalty, using Autofire Ratio, etc.), which will not be discussed here. We will simply assume that the target was hit, and the Autofire Ratio has determined the total number of bullets.
When a target is hit by more than 1 bullet on autofire, each bullet after the first hits one hex away from the previous, and the BTP shifts to the last location hit. That is to say, if you successfully hit the target, and if it was determined that 6 rounds could hit, then the first round will hit either on the BTP or a hex or two off, depending on your margin of success (as determined by the rules in "Hitting the Target"). The 2nd round will be 1 hex off (roll 1D6 to determine direction), and that hex then becomes the BTP. The 3rd round will be 1 hex off the new BTP, and the BTP then shifts to that hex. The 4th shot will be 1 hex off the new BTP, shifting the BTP once more, and so forth. Any number of these rounds may still miss if their roll lands them on a "gap" spot on the Target Map.
This is optional, due to complexity. To better portray the advantages of more accurate weapons or greater skill, any hit which has a margin of success of 2 or better may have that number of bullets
(Margin of Success minus 2) all hit the BTP, then each successive bullet after that strike in accordance to the rules above. For example, if the AV Total was 22 and the target's DV was 17, then the success total was 5. Thus, the first 3 bullets would hit the BTP, and the remaining rounds would each hit one hex off the previous hex, as above.
To-Hit Penalties With the Mapped Hit Location Plug-in there are less to-hit penalties to worry about, since this system automatically handles a number of situations.
All penalties for Range, Environment, and Speed remain the same. There are no penalties for cover, positioning, target size, or shape. These factors are built into the very nature of how Target Maps work.
For example, there is no additional penalty to hit a target standing behind a brick wall with only his head visible. Your BTP is still his center chest, though it is obstructed. You may change your BTP to his head or neck and hope to hit (or a -3 or -4 penalty), but any shot may still strike the brick wall. If the target was standing behind some tree branches (and the GM had drawn these on the Target Map), then any rounds which hit a hex with a tree limb in it would have its

ATOMIK WAR, p. 19
damage greatly reduced (or it may not penetrate at all). Likewise, if the target was standing behind a hostage, and your shot hits a hex covering part of the hostage's body, then the hostage was hit.
If the target was crouching or lying prone on the ground, you must shift your BTP to this new position. This penalty is listed on the sample Target Maps to hit the default BTP shown. The GM should determine the penalty for the BTP on new positions or targets. Size does not matter, it will simply cover a smaller or greater number of hexes on the Target Map, thus increasing or decreasing the chances of a hit landing on the map.
Area Effect Damage Simplified, all damage from an Area Effect explosion will be inflicted upon the Base Target Point.
However, to take advantage of the unique features offered by the Mapped Hit Location Plug-in, Area Effect can be treated in a much more realistic (though complex) fashion.
First, all damage from an Area Effect explosion should be divided into 5-point units. Thus, if the explosion did 18 points of damage, then there are 3 units of 5 and 1 of 3. The first 5-point unit of damage will hit the default BTP. Next, 1D6 is rolled to determine the direction on the Target Map where the next unit will land, and the next damage unit will be applied to this spot. All subsequent damage-units are then applied in a clockwise spiral from this point. If a damage unit hits a "gap" in the target map, then that damage unit missed. The BTP may also change, depending on the situation. For example, if the character stepped on a mine (or a grenade exploded at his feet) then that foot would be the BTP, and all damage would apply upward (rather than outward in an even circle). Note: All damage is applied at once for purposes of penetrating armor. Thus, if 3 damage units of 5 points hit the chest then a total of 15 damage was inflicted. If the target had 12 Armor, then 3 points would have penetrated.
Shotgun Damage Shotguns (when using shot, not slugs) acts much like Area Effect (above). You can use a simplified method and say that all damage is applied to the BTP (reducing damage for long ranges, as normal).
However, to take advantage of the unique features offered by the Hex-based Hit Locations Plug-in, Shotgun Damage can be treated in a much more realistic (though complex) fashion. But it does require some quick figuring on the part of the GM.
Put simply, all damage must be evenly distributed to all "hexes" in a certain Effect Zone (or as close to even as feasible). At point-blank (or in melee range) this "Effect Zone" is simply the target hex that was hit. At each successive "step out" on the Range chart, this zone expands one radius (the Atomik WAR range chart was used). Thus, at Near Range, the total effect zone is two hex radii out, totaling 19 hexes. If 38 damage was rolled, then
this damage must be equal distributed to all 19 hexes, in a circular pattern out from the center point (with the majority of "remainder" damage hitting the center point). Note that damage from shotguns is not reduced for range using this system. The fact that much of the damage will miss the target at long ranges balances out. If a damage unit hits a "gap" in the target map, then that damage unit missed.
For example, a shotgun does 8DC of damage, which is rolled to be 38 hits. At Near Range the total effect zone extends out two radii from the center point, totaling 19 hexes (the center hex, then 6 in the next level, then 12 in the next layer). This actually divides out evenly, with 2 damage points to each hex (how nice). However, if only 20 hits were inflicted, then 2 damage could be dealt to the BTP, and 1 to each of the 19 hexes. Example 2: A shotgun blast (8DC) is rolled to inflict 32 hits of damage. At Medium Range the total effect zone extends out three radii from the center point, totaling 37 hexes (the center hex, then 6 in the next level, then 12 in the next layer, then 18 in the next). The center hex takes 2 hit, and the 6 surrounding hexes take 1 hit each (totaling 8 damage). In the next layer out, each hex takes 1 hit (brining our total to 20), and in the third layer out, 1 point is applied to every other hex until the total of 32 damage is reached (only 12 of the 18 outer hexes were affected). Much of the outer damage has probably missed the target, or had minimal effect by hitting a limb.
Note: All damage is applied at once for purposes of penetrating armor. Thus, if 5 damage units of 2 points hit the chest then a total of 10 damage was inflicted. If the target had 8 Armor, then 2 points would have penetrated. "Shotgun Damage" can be used for Claymore Mines and other Focused Area Effect blasts. Shotgun Range Table Note, all ranges are as per Atomik WAR. Original Fuzion range is listed as well.
Range Effect Radius
Hexes Effected
(original)
Melee < 4m 0 1 Melee Close < 10m 1 7 Close Near < 20m 2 19 (none) Medium < 40m 3 37 Medium Long (list range) 4 61 Long
Alternate Damage Systems Mapped Hit Location plug-in is fully compatible with other alternate damage plug-ins, such as Quick Damage Classes and or MOS-DC, both in this sourcebook. Together, Mapped Hit Locations with either of these two plug-ins can create a nearly diceless combat system for Fuzion. Only 1D6 is required for determining the hit location, and no dice are used with QDC or MOS-DC.
ATOMIK WAR, p. 20
With Gunshot Wound Plug-In The Mapped Hit Location plug-in may also work with the Gunshot Wound Plug-in, with a little bit of tweaking. Foremost, you will find below details of all primary hit locations possible with Mapped Hit Location along with a short description.
Hit Location Details
With this method, it is much easier to hit any physical location on the human body, above and beyond those listed on the standard Fuzion hit table. Therefore, more details will be covered below. All locations are grouped by their traditional Fuzion Hit Locations for armor coverage and backward compatibility (thus anything under the "Chest" category is covered by Chest armor).
Head (location 3-6) It is important to note that most head armor only covers the top of the head, and the back of the head, leaving the rest (face, jaw, neck) fully exposed. Some helmets have light cover over the face area, either a Plexiglas faceplate, heavy goggles, and so forth. These should be noted on the Target Map (if worn), along with their proper armor value. Top of the Head - x2 Damage. This is the very top of the head, the brainpan if you would, which is very sensitive to high-velocity foreign objects. Usually covered by a helmet. Face - x2 Damage. The region including the eyes, nose, and cheek. In order to target a particular facial feature (i.e., an eye) imposes an additional -4 on top on of penalty to move the Base Target Point to the facial region. Cranium - x2 Damage. Generally, the back of the head, including where the skull meets the spine. Usually covered by a helmet. Ear - 1/4 Damage. It hurts a lot to get hit in the ear, but it's not fatal. Any damage is reduced to 1/4. The ear is often covered by a helmet. Jaw - x1 Damage. Your lower jaw, which is rough living without when it gets ripped off by a .50 Browning round. Throat - x1.5 Damage. The throat region is fairly self-explanatory. It contains many important arteries.
Chest (location 10-11) Wishbone - x1 Damage. Or upper sternum. This is the upper part of the chest, just below the neck. It is still technically part of the sternum. Sternum - x1 Damage. This is the dead center of the chest, and by default, the Base Target Point. Chest - x1 Damage. Most everything else in the chest area, basically whatever your rib cage covers.
Vitals (location 13) Heart - x1.5 Damage. Slightly to the left of the sternum is a particularly important organ, which, if hit, general results in death. This Vital location is covered by Chest armor. Guts - x1.5 Damage. The guts are the belt line regions of the body, containing the intestines. It is vital due to the extreme bleeding (internal and external) which will occur
when this area is ruptured. This Vital location is covered by Stomach armor. Groin - x1.5 Damage. Though not vital as far as one's life is concerned, this area is considered Vital for damage purposes due to the extreme pain at being hit here (for both females as well as males). This Vital location is covered by Thigh area armor.
Shoulders (location 9) Collar - x1 Damage. The collarbone is considered part of the Shoulders for damage purposes. Shoulders - x1 Damage. The place where your arm bone and collar bone come together. It also includes the shoulder blades on the back.
Stomach (location 12) Abdomen - x1.5 Damage. Just below the chest is the muscular area (muscular on some people) known as the abdomen. It contains the stomach, liver, and other organs which are not truly vital, but critical. Belly - x1 Damage. Below the abs is the "belly" region, usually containing fatty tissues and other organs, such as the pancreas, kidneys, gall bladder, and so forth. It is not as critical to be hit in the belly, though just below (in the guts) are very critical.
Arm (location 7-8) Upper Arm - 1/2 Damage. The upper arm. Elbow - x1 Damage. The elbow joint is pretty sensitive, and in fact, if a large caliber bullet hits the elbow it can blow the limb completely off. For this reason, damage is x1, rather than at 1/2. It is also very sensitive, as there is a large nerve here known as the "funny bone". Lower Arm - 1/2 Damage. The lower arm.
Hand (location 6) Hand - 1/2 Damage. The hand. Individual fingers may be targeted at an additional -3 penalty on top on of penalty to move the Base Target Point to the Hand.
Thigh (location 14) Thigh - x1 Damage. Also know as the Hips.
Leg (location 15-16) Upper Leg - 1/2 Damage. The upper leg. There is a very large artery in the upper leg, which can be deadly if it is ruptured. Knee - x1 Damage. The main joint of the leg. It is difficult for injuries to the knee to heal properly, and so if the knee takes significant damage, you will probably be crippled or lame for life. For this reason, damage is x1, rather than at 1/2. In fact, if a large caliber bullet hits the knee it may blow the limb completely off. Lower Leg - 1/2 Damage. The lower leg.
Foot (location 17-18) Foot - 1/2 Damage. The foot. You may target individual toes at a -4 penalty on top on of penalty to move the Base Target Point to the foot (if you can see the toes), but that's rather silly.
ATOMIK WAR, p. 21
A Knife in a Gunfight "Never bring a knife to a gunfight."
- Anonymous Advice
Melee/HTH Combat Plug-In
Melee Combat includes Hand-to-Hand fighting (fist fighting, brawling, Martial Arts) as well as melee weapon fighting (swords, axes, clubs, and so forth). A hand-to-hand attack is always made using the Hand-To-Hand combat skill (or Martial Arts skill if you are using that). Weapon attacks are made using the skill for that weapon, such as Sword, Knife, Polearm, and so forth. Evasion against both types is always Melee Evade. Remember, throwing a knife or axe at someone is not melee combat, it is ranged combat.
Hand-to-Hand Combat
Strike is the basic attack and includes punches and kicks, as well as special maneuvers -- all Standard Fuzion Basic and Advanced Actions (such as strike, block, grab, disarm, martial throw, etc.). Hand-to-hand damage is normally only Stunning, unless augmented by a weapon (in which case it is Melee combat). The primary skills used in hand-to-hand combat are Hand-to-Hand (for attack) and Melee Evade (for defense). Marital Arts plug-ins can be used to augment the potential of this form of combat. There are several different plug-ins for Martial Arts, all of which should work well with Atomik WAR. Duke It Out Hand-To-Hand combat (fist fighting, martial arts, boxing, and so forth) is melee combat, only using your body to deliver the blows. Damage is determined by the Strength of the attacker. A punch (unmodified by Martial Arts or special moves) does 1 DC of Stun per level of STR. A kick does the same, plus an additional +1 DC, but suffers a -1 Attack Total penalty. So, if Chow Yun has a STR of 5, he could punch for 5 DC Stun or kick for 6 DC Stun (of course, he will probably use Martial Arts). Blocking is done with the hands or arms, so be careful not to block a sword or other lethal melee weapon (a raised arm will not stop a sword...).
Melee Weapons
Melee weapons (such as swords and knives) can be used to strike at close range. Melee weapons have a DC class listed, and minimum STR, along with other stats such as weight and cost. The weapon will normally deal out Lethal damage equal to its DC (for instance, a 6DC Battle Axe will do 6D6 points of damage). However, if your STR is below the minimum STR the damage will be less. For each level under the minimum, you take a -1 REF and -1 DC to use the weapon. For instance, Little Timmy (STR 2) picks up a 6 DC battle-axe with a minimum STR of 5. He can only do 2 DC of damage and suffers a -3 REF penalty. On the other hand, for every point of STR you have above the minimum, you do an extra DC of damage, up to twice the weapon's listed DC. For example, Jet Li strikes at Chow Yun with a short sword (2 DC, 2 min STR). His STR is 5, 3 higher than the minimum of the weapon. However, he can only do 4 DC with the sword since that is twice the listed DC.

ATOMIK WAR, p. 22
All Guns Blazing "We need guns. Lots of guns."
- Neo, "The Matrix"
Ranged Combat Plug-In
The big difference between Ranged combat and Hand-to-Hand/Melee combat is, as you might imagine, a matter of range. Most guns can fire upwards of 50 to 100 meters for pistols to over a thousand meters for some rifles. Using ranged firearms adds complexity to combat above that of Hand-to-Hand melee combat (but the same basic principles of game mechanics apply). You can aim, shoot, target a location, or just fire into a crowd at randomly. Targeting body locations is actually done more frequently in Real Life than you might think. The natural tendency when shooting at a target is generally to either shoot at the torso or the head (unless you have a specific reason to shoot the limbs). Few, if any, gunmen will shoot "randomly", unless they are spraying lots of lead, panicking, or just unskilled. Aiming Aiming is not needed, but it can help in hitting a target. For every consecutive Action you spend aiming, +1 is added to your Attack Value. However, your Aiming bonus cannot be greater than your DEX. That is to say, if your character has a DEX of 6, he can, at most, accumulate a +6 from aiming. If you are interrupted or distracted at anytime (anything from being injured to sneezing or moving) then all aiming bonuses are lost. You can't move, actively dodge, or take any other action without losing the bonuses (you are considered an Immobile Target). If you happen to have a scope which adds a bonus, that bonus is added in addition to your aiming bonus, but you must aim for at least one Action to gain this bonus. You can also declare what body part you are aiming for (as per Aimed Shots) and apply the appropriate modifier.
Non-Combat Gun Actions There are several actions you can perform with your gun which do no involve pulling the trigger but still take an action. Ready - Take a gun out of its holster, off your back, and so forth. This requires one Action unless you make a successful Heroic skill roll to "quick-draw" your firearm (or have the Quick-Draw Gun Fu ability) Reload - It takes one action to eject a magazine and slap in a new one, assuming one is readily available (i.e. on your belt). For revolvers this may take 2 to 3 Actions. For pump-action (non-clip fed) shotguns, it takes 1 Action per 2 shells
to reload. Some guns may even take longer. Set Safety - It takes one action to set the safety to "On" or "Off", unless you make a successful Competent skill roll with your weapon skill. Set Mode - It takes one action to set the Mode (Single fire, Burst, Full) on your weapon, unless you make a successful Competent skill roll with your weapon skill. Drop Weapon - This is a Free Action.
Autofire Rules!
Rate of Fire is described as RoF. Autofire rules in Atomik WAR is modified from the standard Fuzion rules and complies with the notation used in A.X.E. (the Weapons and Equipment supplement to A.W.E.). With Atomik WAR, there are four different RoFs. These are listed as S/B/F/E (i.e., 2/3/10/30) -- (S)ingle shot, (B)urst shot, (F)ull auto, and (E)xtended. Single Shot (or Semi-Auto) The first mode is Single Shot (S), or Semi-Auto. Most weapons have S-mode capability. In S-mode the gun can be fired one to three times (or as listed) in a single Action. That is to say, if a pistol has an autofire S-mode of 2, then you can fire it twice in one Action (3 second Phase), making a separate skill role for each. Each shot can be fired at a different location or different target all together. However, each subsequent shot is at an additional -1 Penalty due to recoil factors (-1, then -2 for the 3rd shot). This is not an issue on weapons with little or no recoil, but most modern weapons do have recoil. Burst Fire The (B) mode is Burst. This is almost always 3 (or 0 for weapons with no Burst mode). With one trigger squeeze it fires a Burst of 3 bullets. In one Action you may fire a Burst a number of time equal to your S-mode. Therefore, an SMG with 2/3/10/30 RoF can fire 2 Burst of 3 bullets in one Action! The first Burst has no to-hit penalty. However, the second Burst is at -2, and the third is at -3 to hit as the gun is wildly bucking around. If you were targeting a specific location, only the first round of the first Burst will hit the location, all others should be random (accept on guns where noted). But how many rounds hit? When firing a Burst of 3 roll 1D6/2 for each individual Burst (round up).

ATOMIK WAR, p. 23
Full Auto Modes The (F) and (E) modes are Full Auto. In Full Auto mode you can fire a controlled burst (F), which is the approximate number of rounds the gun can fire in just one second. As an optional rule, this may vary by +/-1D6 shots, depending on how long you hold the trigger. Firing F-mode gives no to-hit penalty. Though the gun is bucking around a bit, the F-mode is a short, controlled burst, and the number of bullet's fired actually increases the probability of a hit such that the penalties and bonuses balance out! You can also fire an E-burst (E for Extended, Extreme, Entire Magazine, Empty Out, Eradicate, etc.). Basically, this is just holding back the trigger for the entire 3 second Phase, spitting out as many bullets as possible. Most SMGs and assault rifles can completely empty their magazine in three seconds. Firing (E)xtended gives a +2 bonus to hit (but only if you expend greater than the F-mode burst). This is because you are spraying out so many bullets that it's hard not to hit the target. In all cases, if there are fewer bullets in the magazine than you can fire in any mode, the weapon will of course stop short. If you were targeting a specific location, only the first round will hit that location, all others should be rolled randomly. Shooting at Multiple Targets Also called Strafing, Suppressive Fire, or "Crowd Control". An autofire attack may be directed against more than one target by sweeping the fire across a given area, called a "fire zone". This fire zone must be within the gunman's firing arc (typically, within 90o in front of him). At the time of the attack, the width of the Fire Zone must be specified in meters. The total number of rounds unleashed is divided equal between this area, and his becomes the total number of rounds that can possibly hit a target in that area. The attack is then made as normal (roll once, as you would for any full autofire attack), with each target defending individually against the attacker's single Attack total. For example, Jet Li bursts into a Yakuza hide out. There are three Yakuza in the room, one near a table, one two meters away from the first, and the third standing one meter from the second. Jet opens fire with his MP5SD6, strafing across the four meter wide area at full auto (RoF 12). Thus, 3 bullets are thrown into each area, and each soldier must make a Defense roll against Jet's Attack roll, or be hit by (at max) 3 rounds (use Autofire Ratio to determine).
Autofire Ratio Three Ways
So you have fired 30 bullets at your target... But how many hit? Fuzion presents two different ways to handle Autofire, both using the same Autofire Ratio chart. Atomik War introduces a third way. Select one for your campaign.
The Simple Autofire Way This is the simplest way to handle Autofire. For every X number of shots in the ratio (2 for Cinematic) one round hits the target. Thus, with autofire set to 2, 1 round hits for every 2 rounds fire. If 30 rounds were fired, 15 rounds hit! That's a lot of bullets. Recommended: Ratio 4 on PCs, 2 on NPCs. The Heroic Autofire Way The number of bullets that hit a target is directly proportional to the degree by which you succeeded. In other words, if the DV was 12 and you rolled a 16, the difference is 4. So 4 bullets hit. But the number of bullets that hit must be divided by the Autofire Ratio. Set to Heroic (Ratio 2), the number of bullets that hit would be divided by two. Even if you fired 30 rounds, only 2 would hit! All fractions are rounded up. Best for superheroic campaign where Bad Guys always miss. Recommended setting: Ratio 2 on PCs, 1 on NPCs.
The Atomik Autofire Way The Atomik Way combines both Simple and Heroic. The total number of bullets fired (or Strafed into an area) is divided by the Autofire Ratio to find the max number which could have hit. The degree of success then becomes the number of bullets that hit a target, up to the autofire max. For example, if set to Heroic (Ratio 2), and firing 30 rounds, then only 15 rounds could hit. If the degree of success was 4, then 4 rounds hit. If the degree of success was 20, then only 15 rounds hit (15 was max). Recommended setting: Ratio 4 on PCs, 2 on NPCs.
Archery Attacks
Bows are a special category of ranged attack because they're Strength-based ranged attacks. Bows do 1DC of damage and have 20 meters of range for every 1 point of STR, to a maximum STR of 7. Compound bows and longbows have a maximum STR of 10. Crossbows work like normal firearms.

ATOMIK WAR, p. 24
Action Extreme "Alright... who wants some!"
- Ash, Army of Darkness
The Action Pack Plug-In
The Atomik WAR Action Pack Plug-in presents a number of optional rules, house rules, and rules that just rule, to give any combat scenario a real cinematic movie feel. If you've seen it in the movies, you can probably do it with the Action Pack.
Warning: This plug-in may contain highly cinematic components, and may not be suitable for young aud... Er, I mean, realistic campaigns.
Die Hard With A Battering
Armor Damage As armor absorbs more and more damage it will begin to lose some of its protective qualities. This is called armor depletion. When a piece of armor is hit by Lethal Damage it will lose 1 KD. Generally, this is just to simplify matters. That is to say, if you are hit, no matter by how much damage, that armor location will lose 1 KD. If, however, you wish to add further realism, you could optionally say that the damage done must equal half the armor's current KD, but this just adds math and slows down combat. For example, Little Timmy is wearing a Kevlar Vest (10 KD), trying to protect himself from his cruel aggressors. He is hit by 16 points of damage, of which his armored vest absorbs 10 points worth. Unfortunately, it now drops 1 point to 9. On the next attack he is hit by 8 points of damage, and his armor absorbs all of it, but again drops 1 KD. His armor now just has an 8 KD value. Knockback A great deal of damage delivered in a single impact can cause the victim to be knocked down, or even knocked back a meter or more. To determine how much knockback is taken, simply subtract the subject's (BOD + 1D6) from the DCs of the attack. If the result is greater than zero, that is the distance he is knocked back. If the result is zero, the subject is knocked down. However, the campaign style can alter this result. At a Realistic level, the subject can only be knocked down, no matter how much damage was delivered. On the other hand, in a Superheroic setting, even a slight margin of difference can throw a character back a great distance.
For example, Little Timmy (BOD 3) is hit by a shotgun blast a point-blank range (9DCs). We roll 1D6 and add the result of 2 to his BOD, which totals 5. This is subtracted for the 9DC attack, so Timmy is Knockback 4 units. In a Semi-Realistic campaign, this would translate to 2 meters. However, in a Cinematic campaign setting, he would have been blasted 8 meters across the room! Now that's more like it!
High Impact Damage This rule can get complicated, and so it is very optional, but it does add a lot of realism. After all, you can still get hurt even if a bullet does not penetrate your bulletproof vest. For example, wearing a 16DC Kevlar Vest does offer a good protection. But even a pistol round impacting such armor will cause severe bruising, pain, and may break a rib or two, even if the bullet does not penetrate the armor itself. On the other hand, Stun Defense (and such things as High Pain Threshold) often negates these effects all together. High Impact Damage (HID) is used to simulate these factors. You will always take HID if your have Soft or Medium type armor (noted on the armor listings in A.X.E.). Such damage is only Stunning, and Stun Defense will protect. But remember, for every 5 Stun taken, you take 1 Hit of Lethal Damage.
With Soft (S) type armor, you will always take the full damage of the attack as Stunning hits. For Medium (M) type armor, you will always take (at minimum) half damage as Stunning hits, even if no Hits penetrated. If Hits did penetrate, you will take Stun as normal, but will at minimum take at least half damage as Stun. For these reason, it is often easier to resolve Stun damage first, then apply Lethal damage second.
For example, Chow Yun (with SD 8) is wearing a Kevlar Vest, (12 KD Soft armor). Jet Li shoots him with a Glock-17, doing 11 Hits of damage. Chow's jacket absorbs all 11 points, however, he still takes 3 Stun from the impact (11 Stun Damage minus his SD of 8). If Jet had shot Chow doing 15 damage, then Chow would have taken 4 Stun, and

ATOMIK WAR, p. 25
3 Hits of damage. This is calculated from 14 damage minus 12 DC of the armor, equals 3 Hits & 3 Stun. But at minimum he will take 12 Stun damage. This, minus his SD of 8, deals him 4 Stun rather than 3 -- a small difference over all, and hardly worth the trouble in this instance.
Armor Piercing Attacks Many weapons, missiles, or ammunition types are armor piercing, meaning they are designed to maximize armor penetration. Most armor piercing projectiles are made of a dense material (such as tungsten or depleted uranium), have a sharp point, or a shape-charged warhead, or any combination there of. Only half of the Value of the armor can protect against an AP attack.
For example, if Jet Li is wearing a 10 KD Kevlar vest and is shot by an armor piercing "cop-killer", for 19 damage. His vest is effectively 5 KD against the hit, so 14 damage penetrates. However, some AP attacks have their damage reduced against soft-targets (as is the case with cop-killers). This, and other effects, will be described for that type of ammunition. For instance, the cop-killer that hit Jet Li does half-damage against flesh, so he only takes 7 damage on impact. Surprisingly, this is less than the 9 he would have taken had the bullet been an FMJ or JHP round. As you can see, AP ammo has it place in certain circumstances (such as against hard or thick armor), but is less effective in other cases.
Most armor piercing bullets also list the types of armor they are effective against. These will be Soft (Kevlar type armor), Medium (ballistic type armor), or Hard (solid metal or steel). Some fléchette rounds, for example, are armor piercing, but only against Soft armor. AP(all) means it is armor piercing against all types of armor. Alternating Ammo Loads It is often times desirable to load more than one type of ammunition into a gun, be it a revolver, semi-auto, SMG, or machinegun. In fact, most heavy machineguns, such as Brownings, are typically loading with an alternating arrangement of FMJ, armor piercing, and tracers to achieve maximum effectiveness against a verity of targets.
Our sample gun is loaded with ammunition types marked "R,G,B,Y" (they may be anything, such as JHP, FMJ, JSP, or whatever), in an alternating sequence. • With semi-auto the matter is simple -- just keep track of
the rounds you are firing in the order they are loaded. • With Burst or Autofire, we must first determine how
many rounds hit (using 3D6/2 or Autofire Ratio) as normal. Then simple have the bullets hit in the order they are loaded. For example, if we hit with 6 bullets, then they struck in the order of R,G,B,Y,R,G.
• More realistically, however, the order will be somewhat random since the first or last few (or any in-between) could miss. Thus, we must roll for each bullet to see what type it was. Number each load and roll a die to determine (for example, our R,G,B,Y load is denoted as 1,2,3,4).
Load Die Roll 2 loads Roll Odd/Even 3 loads 1D6/2 4 loads 1D4 or 1D6/1.5 5 loads 1D10/2 or 1D20/4 6 loads 1D6
Therefore, for each of our 6 bullets that hit we roll 1D4 to determine what type it was. We roll the sequence 2,4,3,3,1,4 which translates to G,Y,B,B,R,Y. Reroll if the number of rounds for the type exceeds the possible number of rounds in that burst - in other words, if you fired 12 rounds, and there were 3 of each 4 types, then you can have, at max, 3 hits from one type, because no more than that was fired in this burst.
Throwing Things Sometimes you might need to throw something, be it a grenade, baseball, dagger, or a bandage to your buddy who just got his arm blown off. If the throw is uncontested, or of small importance, just let it be done. But for combat related issues, such as throwing a grenade or dagger at an opponent, you may need to resolve it as an Action. To do this, we will use the "Fuzion Baseball Test", since grenades, baseballs, and large knives all weight roughly the same (look, we're trying to make this easy on you, okay?). Thus, this system will work for anything under 1 kilogram. To throw a "baseball size" item, simply add your STR + Athletics + Die Roll, and beat the DV to hit the target (or the target area), i.e., if the distance is 12 meters, the DV is 20 (on a 3D6 system). If the object was not aerodynamic (say you were throwing a book), then subtract -4 from your total. If you are trying to throw the object into a small target area, such as a window, the GM may apply an additional -2 or -3 to-hit penalty.
Is the object heavier than a baseball? Are you trying to throw a refrigerator at an oncoming police car? Simply add the Difficulty of Lifting the object to the Difficulty of Throwing (above) to get the final Difficulty. The GM can use Lifting charts provided in other text, or use this guideline value up to 100 kilograms: Divide the weight in kgs by 10 to get the DV to lift (up to 100 kgs). Thus, to throw 50 kilogram object adds +5 to the Difficulty.
Quick Combat Resolution When dealing with lots of NPC goons, fire fights (though exciting) can become tedious, or even boring. Thus, to speed things along and get back to the plot, the GM can opt for a Quick Combat Resolution. This should only be for use against cannon-fodder goons, not PCs or major NPCs! To resolve AV verses DV, the "diceless" Static Resolution option should be used (see the beginning of this chapter). When a goon is hit by one or more rounds, simply subtract the DC of the gun from the goon's BOD stat. If BOD ever

ATOMIK WAR, p. 26
falls to zero, the goon is out of combat, on the floor dead or dying. If it falls to negatives, he is very dead or dying very quickly. If the goon was wearing armor, then 1/5th of the armors KD is subtracted from the weapon's DC. For example, Chow Yun bursts into a room with ten Triad goons sitting around. He sprays them all with his two MAC-10s, one held in either hand, and hits all but two of them. Each take at least 3DC of damage, those that were hit by two rounds take 6, and those that were hit by three rounds take 9DC! All but one of those are killed or incapacitated, except for one big goon who had a BOD of 6. Even he is seriously wounded, and staggers for the door to escape. But Chow plugs one more round into his back, finishing him off. Chow then shoot one of the remaining goons, but this goon is wearing a 10KD Kevlar vest. 1/5th of 10KD is 2, so only 1DC is applied against the goon when Chow shoots him. This drops the goon's BOD to 2, hurting him badly.
We Have a Situation Here!
Shooting Hostages Or trying to avoid it, can be very difficult. In a typical hostage situation, the adversary is using another individual as a human shield. In many cases this individual may be a friend or innocent by-stander, and for heroes, officers, or good-aligned individuals, the safety of friends and by-standers should be a high priority. If you are a bad guy you probably don't care. When the bad guy has a hostage, he is for the most part, completely behind him, and usually has a gun pointed at the hostage's head or into his back. If the gun can be seen, the good guy can try to ascertain the chances of it going off accidentally. The first thing that should always be done is attempt to negotiate for the hostage's release -- do anything to make the villain more relaxed to catch him off guard or buy time for a comrade to sneak up from behind (or put some other plan into action). If you must put your gun down (as per the bad guy's likely demands), you'd better have a back-up within quick reach -- you will need to get to it fast! Once you have drop your gun and "surrendered" to let the villain escape with his hostage, most evil-doers cannot resist taking their gun away from the hostage's head, laughing maniacally, and then try to shoot you, the hero. At this point, you should dive for cover, draw your backup weapon, and nail him through the head. Naturally, this requires a great deal of skill. It might be better to just have a partner sneak up behind the villain and waste him. If you think you are good enough you can try shooting the weapon or the villain's hand (-4 penalty), and hope the gun doesn't go off. You could also try to shoot him in the head (at a -4 penalty) or through the eye.
Using Hostages If you are a bad guy, you should at least know how to use a hostage as a human shield. If you are a hero, police officer,
or good-aligned individual you should never do this. See the above rule for countering this most nefarious action.
When you have a hostage, be sure you are completely behind him. Your head should be behind the hostage's head, and keep your legs as closely aligned to the hostage's legs as possible. Never have your gun where your enemy can see it. Always have the gun to the hostage's back, never to the side of his head. Your enemy may shoot your gun right out of your hand.
Also, if the hostage is someone your enemy knows, or is friends with, all the better. If you are shot, pull the trigger no matter what. Even if you die, at least you die with the satisfaction of ending the story with a heart-twisting tragedy. Laughing manically sometimes helps, too.
Shooting Through People A human body is quite capable of completely stopping small arms fire. High-powered bullets, rifle rounds, or large caliber rounds can, however, penetrate a human body and strike whatever is behind. Sometimes it is necessary to shoot through one person to hit another, generally in an attempt to kill two foes with one shot. This is not advisable for resolving hostage situations, though it is likely something a dark anti-hero or bad guy might do. It could also happen accidentally.
When a person is shot you should roll on the "Bullet Lodge" table provided in the Gunshot Wound plug-in, to see if the bullet was lodge in the body. If the bullet was not lodged then it blew through. Whatever damage the body did not absorb (the difference between max damage and damage rolled) can be applied to the person behind him, after it is converted to DCs (divide by 6, and round up).
For instance, Indiana is about to shoot two Nazis, one of whom is standing behind the other. He shoots the first Nazi doing 5DC damage, and rolls 20 damage. The bullet was not lodged it the body, so it passes through. The second bad guy must also make a defense against Indie's AV. He fails and is also hit by the bullet. The max 5DC could do is 30 damage. The first soldier already absorbed 20. Therefore, 10 damage points remain. This should be turned into DC to be rolled again, and for this we divide the remaining damage by 6 and round up (resulting in 2DC). So the second soldier is hit by 2DC of damage, and we roll this to be 7. You cannot apply more than max (10, in this case), so if we had rolled 11 or 12, we could only have applied 10 damage to the second soldier.
Dying Action When a PC or major NPC has been killed, and the GM is allowing this rule, he can take one last action before perishing. This action will be taken on the character's next Action (on his turn) as he goes down. The action could be firing off that last round that counts, hitting the alarm or self-destruct button, or simply making a short dramatic monologue such as, "Now you'll never find the Ancient Codex of Power!" even if it is complete irrelevant (such as

ATOMIK WAR, p. 27
this line might be if yelled by a Yakuza boss in a cyberpunk campaign... Imagine the players' befuddlement!).
A character that has been very thoroughly destroyed (eradicated) may not do this.
When Show-offs Attack... A powerful personality can have a strong effect on the weak minded... By words, actions, or sometimes by their mere presence alone. This type of attack is called a Presence Attack. A Presence Attack can be many different things, depending on the intent of the attacker: Fear, awe, surprise, surrender, rage, courage, hope, commitment, or other emotions or actions.
Making a Presence Attack does not require a combat Action, though sometimes performing a combat Action makes a Presence Attack more powerful (see Presence Attack Modifiers table). Usually a Presence Attack consists of a well-chosen phrase, such as "Surrender or die!" or "In the name of Freedom!" or even just "Stop!" Roll 1D6 for every 1 point of PRE; you may add or subtract dice depending on the GM's judgment (see the Presence Attack Modifiers table for suggested modifiers). Total the dice and compare the total against each target's Resistance value to find the effect. PRE Total Possible Effect of PRE Attack is
> than RES Target is very impressed; hesitates and must act after the Attacker.
10 > than RES Target is very impressed; hesitates and must act after the Attacker. He also only gets one Action this Round, even if using it to Run. He may follow a command he is already inclined to do.
20 > than RES Target is awed; may not take any Actions, half Dex, and will do what the attacker commands if not against his highest principles.
30 > than RES Target is cowed; may surrender, run away, or faint. Target is at Dex 0, and will nearly always follow attacker's command
Presence Attacks depend heavily on the circumstances, so the GM should feel free to modify the number of dice in the attack. The table below has some suggested modifiers:
Modifier # of Dice Inappropriate Setting -1D6 to -2D6 In combat -1D6 At a disadvantage -1D6 Wrong reputation -1D6 to -2D6 Runs against current mood -1D6 to -3D6 Repeated PRE attack -1D6 to -2D6 Right reputation +1D6 to +2D6 Surprise +1D6 Exhibiting superior power +1D6 Violent action +1D6 to +3D6 Good dramatic monolog +1D6 to +3D6 Appropriate setting +1D6 to +2D6 Target in partial retreat +2D6 Target in full retreat +4D6
The modifiers and the effects of Presence Attacks really depend a great deal on exactly what's happening and what
is intended. The GM should use Presence Attacks to increase the drama of a situation or make things more interesting.
Special Effects and Pyrotechs
When Wizards Attack... If you are using magic, mental powers, or super powers, you may have to deal with some rather odd sorts of attacks. Energy Blasts are made much in the same way as other ranged attacks, taking range and skill into account with other modifiers. The range of these attacks is usually an effect of the attack (there are various other Magic, Mental, and Superpower plug-ins which go into this). In most cases, Mental attacks have no range limitations; they are simply direct line of sight -- if you can see it, you can hit it, no matter how small or far way it is. Direct, physical ranged attacks, such as throwing a fireball, energy blast, lightning bolt, or heat-ray are subject to all the same rules and penalties as standard Ranged Attacks, including distance, line of sight, cover, speed, and visibility. Secondary Fire With all those bullets flying around, bouncing off walls, and breaking off shrapnel, someone is bound to get hurt. During the course of a firefight, dozens of magazines could be emptied and countless grenades or other explosive devices may be going off. As this is occurring, bullet that missed their target could hit other people or objects, and fragments from explosions could be spinning about indiscriminately. If the GM is using this option, then at the end of every Round he should roughly evaluate the level of destruction and chaos and make all PCs and NPCs roll a "Wild Fire Defense" roll to avoid being hit by such "wild" projectiles. The AV against which they roll depends on how much destruction was unleashed (DV bonus from Dodge and Diving for Cover continue to apply). Chaos and Destruction Unleashed Base DV 15+ rounds fired, and/or 1 explosion 3 20+ rounds fired, and/or 1 large explosion 5 30+ rounds fired, and/or 1 big explosion 7 40+ rounds fired, and/or several explosions 9 50+ rounds fired, and/or 3-4 explosions 12 100+ rounds fired, and/or many explosions 15 200+ rounds fired, and/or many explosions 18
Modify appropriately for the Resolution Option you are using.
Static Variable +0 Low Variable +3 or +1D6 Med. Variable +5 or +2D6 or +1D10 High Variable +10 or +3D6, +1D20, or +2D10
How large the area of battle is could also effect this table at

ATOMIK WAR, p. 28
the GM's discretion. A large, wide-open area will make the DV significantly less. If hit by secondary fire, the damage is usually only a few DC (and often no more than 3DC tops). Damage should be applied generically to the torso.
Detecting Gunshots When a gun is fired, someone will likely hear it. Range, gun type, environment, and so forth, all effect how far the sound can be heard. Thus, it would be very difficult to tabulate an actual chart showing the Difficulty Values for detecting gunshots. Nevertheless, a rough guide is provided below. Remember, the GM should modify the actual DV to account of other conditions. Someone being shot five stories above you may go completely unnoticed, especially if you are playing Metallica at full blast, while the person directly above you has his TV turned up all the way as well.
To detect a gunshot anyone can make a Perception check (INT + Perception + Die Roll) vs. the total Gunshot Detection DV. See the following table to calculate this DV. All relevant points should be added up to accumulate the total DV. This is the DV to hear the actual gunshots. Perception is always used for detecting gunshots. Gunshot Detection DV Table DV Pistol +6 Rifle +4 Burst Fire +2 Full autofire +0 Shotgun -4 Explosion -8 Close (<10 meters) +0 Nearby (<50 meters) +2 Near (<200 meters) +5 Distant (<500 meters) +10 Very Distant (1 km) +12 Extremely Distant (5 km) +16 No extraneous noise (a silent night) -2 A bit of noise (crowded room) +0 A good bit of noise (loud music, TV) +2 A lot of noise (subway, machine room) +5 A whole lot of noise (a typical concert) +10 A Heavy Metal Rock Concert +20 No insulation (outdoors) +0 A little insulation (several thin walls) +3 A good bit of insulation (several stories) +6 A lot of insulation (thick walls, many stories) +10 A great deal of insulation (vault door) +15 Gun was Surpessed (Silenced) +5 Gun was Flash Surpessed +3 Subsonic Bullets were used +5
Modify appropriately for the Resolution Option you are using. Static Variable +0 Low Variable +3 or +1D6 Med. Variable +5 or +2D6 or +1D10 High Variable +10 or +3D6, +1D20, or +2D10
For example, a pistol shot at close range, using a silencer would have a (21 DV) to anyone to detect (on the 3D6 system), which is fairly easy. On the other hand, it the pistol was using subsonic bullets, the DV to detect the shot would be 26, a good bit tougher.
On the other hand, if a rifle was fired at one end of an aircraft carrier, someone in the engine room would be at a (44 DV) to detect the shot (Rifle +4, 500 meters away +10, a lot of noise +10, a lot of insulation +10, and +10 if we are using the 3D6 system), which is virtually impossible.
If someone was shot right next to you in a Marilyn Manson concert, you would be at a 36 DV to notice, which is a frightfully realistic probability.
Damaging Objects Whether you shoot an object on purpose or if it was hit by stray bullets, it can be destroyed. And almost anything can be destroyed if it takes enough damage. Below is listed the Armor, "KD Kills" (Kill-level Armor), SDP (how many hits it can take), and the SDP in Kills.
Object Armor KD Kills SDP Kills Brush - - 5 - Rocks 28 - 30 - Large Tree - 1 - 1 Lamp Post - 1 - 2 Pistol 1 - 5 - Rifle 1 - 10 - Glass Window 3 - 5 - Bulletproof Glass 20 - 15 - Wood Wall 5 - 15 - Sheetrock Wall 3 - 10 - Brick Wall 20 - 30 - Concrete Wall 25 - 50 - Metal Wall 32 - 70 - Metal Lock 20 - 5 - Wood Door 7 - 5 - Metal Door 20 - 30 - Vault Door - 2 - 4 Furniture 3 - 15 - Console 10 - 20 - Machinery 10 - 30 -
This is not a list of how much damage it takes to penetrate the object (such as a wall), but to destroy it. Though one meter of sheetrock takes 10 hits before it is destroyed, a bullet will rip though it with ease! And glass will completely shatter when it is penetrated. These objects provide their KD and SDP as protection to anyone behind them (see Shooting Through Things). An object is considered functionally disabled when it reaches 0 SDP, but it is not totally destroyed until it is reduced to below twice its SDP value. See Shooting Through Things, below.
Shooting Through Things It is unfortunate that so many believe a mere wall will protect them from bullets. Most walls are made of plaster and paper -- good luck on that stopping a bullet! Unless the wall is thick wood, metal, brick, or concrete, do not rely on its protective qualities (or lack there of). Above you will find a chart listing the KD and SDP of many objects, including doors and walls. The listed SDP is how much damage the object can take before it is considered to be destroyed. Both KD and SDP will provided protection for anyone standing behind the object. This works pretty much the
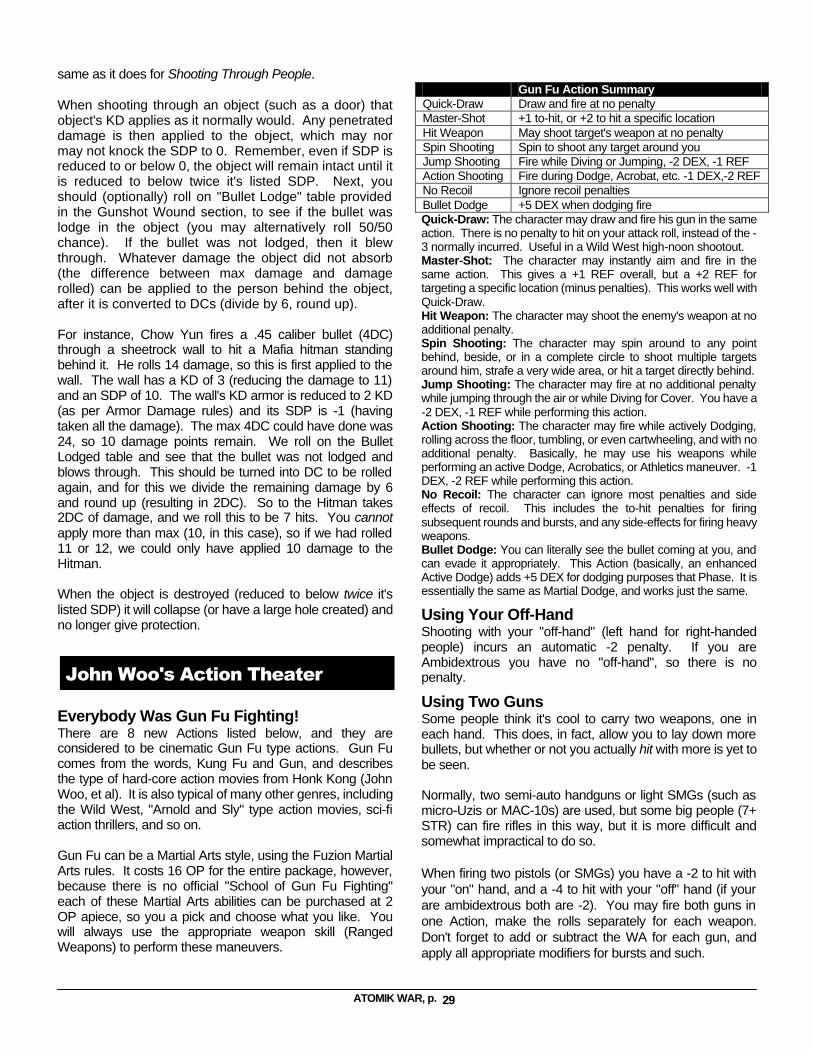
ATOMIK WAR, p. 29
same as it does for Shooting Through People. When shooting through an object (such as a door) that object's KD applies as it normally would. Any penetrated damage is then applied to the object, which may nor may not knock the SDP to 0. Remember, even if SDP is reduced to or below 0, the object will remain intact until it is reduced to below twice it's listed SDP. Next, you should (optionally) roll on "Bullet Lodge" table provided in the Gunshot Wound section, to see if the bullet was lodge in the object (you may alternatively roll 50/50 chance). If the bullet was not lodged, then it blew through. Whatever damage the object did not absorb (the difference between max damage and damage rolled) can be applied to the person behind the object, after it is converted to DCs (divide by 6, round up). For instance, Chow Yun fires a .45 caliber bullet (4DC) through a sheetrock wall to hit a Mafia hitman standing behind it. He rolls 14 damage, so this is first applied to the wall. The wall has a KD of 3 (reducing the damage to 11) and an SDP of 10. The wall's KD armor is reduced to 2 KD (as per Armor Damage rules) and its SDP is -1 (having taken all the damage). The max 4DC could have done was 24, so 10 damage points remain. We roll on the Bullet Lodged table and see that the bullet was not lodged and blows through. This should be turned into DC to be rolled again, and for this we divide the remaining damage by 6 and round up (resulting in 2DC). So to the Hitman takes 2DC of damage, and we roll this to be 7 hits. You cannot apply more than max (10, in this case), so if we had rolled 11 or 12, we could only have applied 10 damage to the Hitman. When the object is destroyed (reduced to below twice it's listed SDP) it will collapse (or have a large hole created) and no longer give protection.
John Woo's Action Theater
Everybody Was Gun Fu Fighting! There are 8 new Actions listed below, and they are considered to be cinematic Gun Fu type actions. Gun Fu comes from the words, Kung Fu and Gun, and describes the type of hard-core action movies from Honk Kong (John Woo, et al). It is also typical of many other genres, including the Wild West, "Arnold and Sly" type action movies, sci-fi action thrillers, and so on. Gun Fu can be a Martial Arts style, using the Fuzion Martial Arts rules. It costs 16 OP for the entire package, however, because there is no official "School of Gun Fu Fighting" each of these Martial Arts abilities can be purchased at 2 OP apiece, so you a pick and choose what you like. You will always use the appropriate weapon skill (Ranged Weapons) to perform these maneuvers.
Gun Fu Action Summary Quick-Draw Draw and fire at no penalty Master-Shot +1 to-hit, or +2 to hit a specific location Hit Weapon May shoot target's weapon at no penalty Spin Shooting Spin to shoot any target around you Jump Shooting Fire while Diving or Jumping, -2 DEX, -1 REF Action Shooting Fire during Dodge, Acrobat, etc. -1 DEX,-2 REF No Recoil Ignore recoil penalties Bullet Dodge +5 DEX when dodging fire Quick-Draw: The character may draw and fire his gun in the same action. There is no penalty to hit on your attack roll, instead of the -3 normally incurred. Useful in a Wild West high-noon shootout. Master-Shot: The character may instantly aim and fire in the same action. This gives a +1 REF overall, but a +2 REF for targeting a specific location (minus penalties). This works well with Quick-Draw. Hit Weapon: The character may shoot the enemy's weapon at no additional penalty. Spin Shooting: The character may spin around to any point behind, beside, or in a complete circle to shoot multiple targets around him, strafe a very wide area, or hit a target directly behind. Jump Shooting: The character may fire at no additional penalty while jumping through the air or while Diving for Cover. You have a -2 DEX, -1 REF while performing this action. Action Shooting: The character may fire while actively Dodging, rolling across the floor, tumbling, or even cartwheeling, and with no additional penalty. Basically, he may use his weapons while performing an active Dodge, Acrobatics, or Athletics maneuver. -1 DEX, -2 REF while performing this action. No Recoil: The character can ignore most penalties and side effects of recoil. This includes the to-hit penalties for firing subsequent rounds and bursts, and any side-effects for firing heavy weapons. Bullet Dodge: You can literally see the bullet coming at you, and can evade it appropriately. This Action (basically, an enhanced Active Dodge) adds +5 DEX for dodging purposes that Phase. It is essentially the same as Martial Dodge, and works just the same.
Using Your Off-Hand Shooting with your "off-hand" (left hand for right-handed people) incurs an automatic -2 penalty. If you are Ambidextrous you have no "off-hand", so there is no penalty.
Using Two Guns Some people think it's cool to carry two weapons, one in each hand. This does, in fact, allow you to lay down more bullets, but whether or not you actually hit with more is yet to be seen. Normally, two semi-auto handguns or light SMGs (such as micro-Uzis or MAC-10s) are used, but some big people (7+ STR) can fire rifles in this way, but it is more difficult and somewhat impractical to do so. When firing two pistols (or SMGs) you have a -2 to hit with your "on" hand, and a -4 to hit with your "off" hand (if your are ambidextrous both are -2). You may fire both guns in one Action, make the rolls separately for each weapon. Don't forget to add or subtract the WA for each gun, and apply all appropriate modifiers for bursts and such.

ATOMIK WAR, p. 30
The Quick and the Dead "You are dust, and to dust you shall return."
- Genesis 3:19
Quick Damage Plug-in
Quick Damage Classes is a complete alternative to dealing and taking damage in Fuzion. Instead of having Hit (or Stun) Points and inflicting "Dice" of damage character's simply have Damage Classes, and the Damage Class of an attack will directly effect the character's Damage Class without the rolling of dice and tedious computation.
This system is intended to greatly speed up combat while minimizing the lose of flexibility and maintaining compatibility with the Fuzion system and other plug-ins. Thus, a gun which does 4DCs of damage still does 4DCs of damage -- its effect is simply treated differently.
A Character Sheet has been designed to use Damage Classes, and Damage Category Tables (PDF format). It is available at this web address:
www.meta-earth.com/fuzion/quick-dmg.html
Terms and Definitions
SDC: Stun Damage Class -- akin to STUN. SDC is denoted both for inflicting damage as well as taking damage. A punch may do 4SDC, and a character may have a Medium SDC of 8. HDC: Hit Damage Class -- akin to HITS. HDC is denoted both for inflicting damage as well as taking damage. A handgun may do 4HDC, and a character may have a Medium HDC of 8. Armor: Armor now has DC (HDC or SDC), instead of "KD". A bulletproof vest with 4HDC can protect from 4HDC (or SDC) of damage. A padded jacket may have 5SDC, protecting from 5SDC of Stun damage. Math: When doing math, all fractional numbers should be rounded to nearest whole number (.5 and above rounds up, anything below .5 rounds off)
Deriving Damage Classes
The Derived Characteristics HIT and STUN no longer exist. In their place now exists a "Damage Category Table" with 5 levels of damage. These damage levels are Light, Medium, Heavy, Critical, and Terminal, and are computed from BODY (or PHYS in the case of Instant Fuzion). If you are at a damage level less than or equal to Light (but greater than 0) you are at Light Damage. Above Light, but less than or
up to Medium, you are in Medium, and so forth. DMG Level Value Light x1/2 BOD or PHY Medium x1 BOD or PHY Heavy x1.5 BOD or PHY Critical x2 BOD or PHY Terminal x2.5 BOD or PHY
Below are sample Damage Category Tables:
Joe, has a BOD of 4 Damage Category Table
Lt Md Hvy Crt Trm SDC 2 4 6 8 10 HDC 2 4 6 8 10
Jack, has a BOD of 5 Damage Category Table
Lt Md Hvy Crt Trm SDC 3 5 8 10 13 HDC 3 5 8 10 13
Bruno, has a BOD of 8 Damage Category Table
Lt Md Hvy Crt Trm SDC 4 8 12 16 20 HDC 4 8 12 16 20
Buying up Damage Categories can be done with OP, just as done with HITS and STUN. 10 OP can buy +1 DC to all categories for either SDC or HDC. In other words, if Joe (above) spends 20 OP, he can increase his HDC by +2 across the table (thus having an Lt value of 4, a Med of 6, and is Terminal at 12). Optionally, a GM may allow a character to increase by +1 DC a single category for 2 OP, but it must remain one less than the next category value.
Other Derived Characteristics
There are two important Derived Characteristics which must be modified for this system (other than HIT and STUN, of course). These are Stun Defense and Recovery. Stunning Defense (SD) now equals CON / 2 (or PHY / 2 in Instant Fuzion). If a character had a BOD of 5, and an SD of 3, he would take 3DCs less damage from Stunning damage. Recovery (REC) now equals (STR + CON) / 4 (or just PHY / 2 in Instant Fuzion). This measures how fast the character recovers from damage. You get back this many SDC each turn when you rest, and this many HDC back for each day of medical attention.

ATOMIK WAR, p. 31
Other Conversions
Armor: To convert Armor (KD) to this system, divide its KD by 4 and round to nearest whole number. Thus, 20 KD of armor comes to 5HDC Armor, and 13 KD of armor comes to 3HDC Armor. HDC always protects from both SDC as well as HDC damage. Any "Stun only" armor, such as Stun Defense, only protects from SDC. Kills: Every 14HDC of damage equals 1 Kill. So 14HDC of armor is the same as 1 Kill of armor, and 28HDC of damage does 2Kills of damage. Kill Damage: To convert Kill Damage (for Human-sized targets) to HDC, take Kills+13 = HDCs (so 1 Kill = 14HDC, and 6 Kills is 20HDC). To convert Kill Damage to HDC for big objects, machines, etc. (which do not suffer from blow-through) simply take Kills x 14 = HDC. So 3 Kills = 42HDC (but using Kills vs. Kills would still be much better). SDP Hits: Objects (or vehicles or machines) with SDP Hit Points must also be converted to having HDC (Hit Damage Class). Simply divide its SDP by 4 to get its HDC (so a vault door with 80SDP has 20HDC).
Taking Damage Classes
Instead of starting with a set number of Hits all characters (unless already injured) will be at 0DC (Zero Damage Class) in both SDC and HDC. Every time they are hit and take damage, these damage classes (SDC and HDC) will increase as appropriate. As mentioned earlier, this is a "less than or equal to" table, so that if Bruno (above) is at 3 or 4HDC he is Lightly damaged, and at 10HDC he is considered to be Heavily Damaged (up to 12HDC). Critical damage (for Bruno) runs from 13 to 16, beyond that he is Terminal.
To understand how Damage Classes work, an examples will be illustrated.
Joe (STR 3) punches Jack, who has a BOD of 5 (you can see his Damage Table above). Joe's punch does 3SDC, which puts Jack into Light damage, and at the threshold of Medium. If Joe punches him again, doing 3SDC, this gives Jack a total of 6SDC, which is just into Heavy. If that was not enough, Joe then decides to shoot Jack with his pistol, doing 4HDC damage. This places Jack into Medium HDC, and kicks his SDC up to 10 (Critical). Note that "Stun Roll Over", Armor, and Stun Defense, was ignored to simplify this example.
Damage Classes Effects
The Effect of being at certain Damage Categories is very important. When Heavily and Critically damaged, a character will be impaired and have difficulty functioning ("I can't feel my legs!").
Stun Effect There are no actual Stun Effects, other than being in a great deal of pain (more so at higher levels). At Critical SDC, the character is at the verge of blacking out, and once in the Terminal range, he is "Unconscious" (Terminally Stunned). At which point he will then begin to slowly Recovery levels of SDC, until he is out of the "Terminal Stun" status.
To handle Stun Roll Over, simply for every 5SDC which are inflicted, take 1 HDC.
Dazed A character can be "Dazed" when he takes damage from an SDC or HDC attack (stunned, knocked out, etc.). When damage is taken, make a Resistance roll vs. DCs + 10 (if the character took 5HDCs, roll verses 15). A Dazed character will lose his next Action. For example, Joe punches Jack for 5SDCs of Stun Damage. Jack has an SD of 3 (and has no armor), so he just takes 2SDCs. He must pass a Resistance roll verses 12 (10 + the 2 Hits), or he will lose his next Action from being "Dazed". The GM can omit Dazed rules, or simplify them as he wishes, if it appears to be slowing down combat.
Hit (or Harmed) Effect Being hit by lethal (or killing) damage is a very bad thing, and tends to have an adverse effect on the human body. At different levels of HDC, a character may be adversely effected. At Light: "Just a flesh wound". No additional Adverse Effect. At Medium: Serious, but not threatening. All AVs are at -1. At Heavy: The character is hurt, bad. All AVs are at -2. At Critical: The character is now at the threshold of death. All AVs are at -4. If bleeding (very often the case) he will take +1HDC per Round unless treated (basic first add to stop bleeding). At Terminal: The character is dying or dead. All AVs are at -6, but the character will usually be unconscious. The character, bleeding or not, will take +1HDC per Round unless stabilized by a Heroic medical task roll (First Aid, Surgery, etc.). Beyond Terminal the character is dead. The GM of a cinematic campaign may still allow an Incredible medical task roll to resuscitate the character at this point.
Hit Locations
This simplified damage system can still be used with multiple hit location rules. That is, Head hits do double damage, Stomach hits do x1.5 damage, half damage for hits on the limbs, etc. This continues to work as normal. For example, if Jack is shot in the stomach by a 3HDC handgun, he actually takes 5HDC of damage. The damage modification for the location is counted after all armor is considered, just as normal.

ATOMIK WAR, p. 32
Multiplier Damage Resolution Created By Doyle Erin West, Edited by Mark Chase
Margin of Success DCs Plug-In
This Plug-In was written to streamline combat in Fuzion with minimal impact to existing Fuzion rules. With this system all that is needed is a single set of dice (1D10, 3D6, or what ever you use) to determine the to-hit Task Resolution. Damage Class All Damage Classes (for HTH, Melee, or firearms) are unchanged, but are considered to represent multipliers instead of "dice of damage". That is to say, 3DC does not mean "3D6", it means the damage is a x3 multiplier.
Attacks are rolled as normal, and all modifiers for accuracy and other bonus are applied as normal. Unlike standard Fuzion, ties go to the defender under this system, which is the only change (otherwise, you can consider a tie to be a "0 Success", doing ½ x DC damage). You then calculate your Margin of Success (MOS) by subtracting your AV (Attack Value of the roll) from your Target's DV. Your damage is MOS x DC, applied as normal. So, if you succeed in an attack by 3 with a 4DC pistol, the target takes 12 damage (3 x 4 =12). However, if your AV vs. DV scores were even you missed (or did 2 points of damage, depending on how the GM wish to treat ties for MOS-DC).
Autofire Burst - Roll 1D6/3 to determine the number which hit. Each round's success level is 1 lower than the previous. So, if all 3 rounds hit, and MOS was 2, then the 1st round hit for 2xDC, the second for 1xDC, then third for ½xDC. If only 2 rounds hit, and the MOS was 8, then the 1st round hit for 6xDC, the second also 6xDC. All hits are rolled on a random location (the first shot may hit a declared location, as always).
Auto - Determine the number which hit by Autofire Ratio (though the Autofire Ratio may be discarded since this system has a simple form built-in!). For each round that hit, take [(MOS ≤ 6) x DC] and each rounds' success level is 1 lower than the previous. So, if 2 rounds hit, and MOS was 4, then the 1st round hit for 4xDC, the second for 3xDC, and all others missed. If, on the other hand, 6 rounds hit and the MOS was 8, then the hits would be, 6xDC, 6xDC, 6xDC, 5xDC, 4xDC, 3xDC, 2xDC, 1xDC. All hit locations are rolled randomly (the first shot may hit a declared location).
Mapped Hit Location Plug-In Simply off-set the MOS damage to be "MOS(F) +3", but half the damage on all "misses". That is, if MOF was -2 then 1xDC damage, divided by 2 (or 1/2xDC) was done. If MOF
was -1 then 2xDC damage, divided by 2, (or 1xDC) was done. If MOS was 2, then 5xDC, and so on. The Cap is MOS 4, which is a 6 multiplier. Use this table for reference.
MOS/F Damage MOF -2 ½ x DC MOF -1 1 x DC MOS 0 2 x DC MOS 1 3 x DC MOS 2 4 x DC MOS 3 5 x DC MOS 4 6 x DC
Area of Effect In an Area Effect attack, the Target must roll his defense (to Dive for Cover), or use his flat DV (Evade+10) and from that calculate a Margin of Failure (MOF), to see how much he failed by. This then becomes the multiplier for the DCs of the attack.
Note: If characters are allowed to “Buy down” an attack roll targeted at them, this "buy down" should start at the Full MOS, not the Damage Cap proposed below.
Damage Cap Switches Below is the switch for damage caps. Use either Position one or two.
Position One: The Damage Cap is 6. That is to say, your multiplier cannot exceed 6 because that is the theoretical maximum damage 1 DC can do. For example, if your MOS is 8 with a 3DC handgun, the damage is only 18 (6 x 3 = 18) because we capped the multiplier at 6.
Position Two: Roll hit the locations for each attack. Any MOS over 6 could be applied to altering the Point of Impact (POI) on a 1 point per hit location area. In other words, to turn a stomach hit into a head hit, it would cost (stomach, 0, POI; Chest, 1; Shoulders, 1; head, 1) 3 points. Smaller or more specific targets would cost extra. To expand on the above example, to turn that stomach shot into an Eye shot would cost 6 pts. 3 for the move to the head, and 3 for the tiny target of an eye.
Critical Hit Switches Below is the Switch for handling Critical Hits. Pick one of the two positions.
Position One: Critical hit rolls do get added to the damage multiplier, over and above the Damage Cap. This is very deadly and should be used only if the GM knows what he is getting in to. He could end up with 16xDC damage modifiers.
Position Two: Critical hits just give +1 to the multiplier, increasing the damage, but not to an extreme.

ATOMIK WAR, p. 33
Aftermath and Recovery "There's a big difference between Mostly Dead and All Dead."
- Miracle Max, "The Princess Bride"
Injury and Recovery Plug-In
So, a 9mm Jacketed Hollow-Point has ripped through your abdomen at point-blank range, ruptured your spleen, and now you're bleeding profusely on the floor screaming in agony. But what does this mean in game terms? In short, you're screwed. But before anything else, we must understand the basics of how damage works under the Fuzion system (which you probably already know), and how it relates to the fragile bundle of organic chemicals known as the human body.
The Damage Class (DC)
In Fuzion, there are four types of damage: Stunning (which measures shock, pain, bruising, and other light, non-life-threatening damage), Lethal (which is killing damage), Structural damage (which measures hits to damage to objects or vehicles), and the last is "Kill-level damage", used for large vehicle or ship-to-ship combat, or for very heavy high-powered weapons. Damage is measured in six sided dice, each "D6" representing a unit called a Damage Class (or DC). That is to say, Damage Class 3 (or 3DC) is equal to 3D6. Each point of DC represents one six sided die when rolling for damage. You roll the specified number of dice, add the results together, and the total is the amount of damage done to your target: Example: I have a 3DC handgun. I roll three dice and get a 5, a 6 and a 3. I do 14 points of Lethal Damage with that attack. With the exception of bows and spears, ranged weapons always do damage based on the DC of the weapon. However, damage caused by any part of the body is determined by the Strength of the attacker with fists doing one DC of Stunning Damage for each point of Strength the attacker has (a kick does an extra DC on top of your STR, but suffers a -1 AV penalty). Example: if your Strength is 5 you do 5DC STUN punching and 6DC STUN kicking. Taking Hits Hits are Lethal Damage. In Fuzion, all living things have Hits. These are points that represent how much damage they can take. A character generally has as many Hits as
his BOD characteristic x5. One Lethal point of damage from a weapon or attack will remove one Hit. At zero you are dead or dying, and certainly incapacitated. For example, Little Timmy (BOD 3) has 15 Hits. If he is shot by a gun and takes 12 Lethal Damage, he is reduced to only 3 Hits, and is barely staying alive. Taking Stun Living things also have Stun points; a measure of how much damage they can take before they pass out from pain and shock. Stun damage has no lasting effect, it is only a measure of how much trauma or "bruising" damage one can take. A fistfight is a good example of something which deals primarily with Stunning Damage (so would sleep gas or a futuristic "stun-ray"). Your Stun is equal to your Hits, (BOD x 5). One point of damage from a body blow or stunning weapon will remove one point of Stun. If your Stun reaches zero, you will be knocked out. Structural Damage (SDP) "Soft targets" like living things take damage differently than "hard targets" (structures and vehicles). So in Fuzion, inanimate structures, vehicles and other non-organic objects (commonly called "hard targets") have Structural Damage Points instead of Hits or Stun. SDP is different from Hits, but works the same way -- one point of Lethal Damage will remove one SDP (5 points of Stun will remove 1 SDP as well).
Really Big Things (Kills)
Really big things, such as tanks, battleships, mecha, and starships do such staggering amounts of damage that they are measured in a larger scale called "Kills", to represent the massive forces associated with military hardware, very large objects, or extremely powerful attacks. Conversely, very large or tough things (tanks, mecha, etc.) are also defined as having Kills of structure or armor to represent the huge amounts of punishment they can take ("Kill level SDP" or KD). Unlike DCs, Kills represent whole values rather than numbers of dice; a way of simplifying the bucket-o-dice that such attacks would normally require. So when attacking objects with Kills with weapons that do Kills, you will simply subtract the damage done from the Kills remaining, instead of rolling dice for damage.

ATOMIK WAR, p. 34
Kills and DC Because a Kill represents a whole value, rather than a number of dice, applying damage is greatly simplified. When attacking an object with Kills with a weapon that does Kills, you will simply subtract the damage done from the Kills remaining, instead of rolling a bucket of dice. For example, Mecharanger-1 attacks the giant evil robot Zeirkrank with a 6 Kill laser. Therefore, any Kills that penetrated Zeirkrank's armor would subtract for his total Kill Hits. Damage Scaling Really big guns are designed to hit and damage really big targets. It's nearly impossible to apply the full force of a huge attack to a small target (like a man) because the majority of the damage just doesn't have a big enough surface area to expend itself on. Really big damage is also more likely to expend its force by hurling a small target out of the way rather than directly applying all of its force to the target. By contrast, it takes a lot more force to move a large object and it has a lot more surface area to absorb that force, so it stands there and takes it all. Therefore, in Fuzion, small targets (things with damages measured in Hits and SDP) are damaged differently by large-scale attacks. Small Targets (people, cars, motorbikes, Little Timmy) do not take the full force of Kill rated attacks. Instead, they scale down the huge damages done by Kills into smaller, dice based Hits or SDP, representing the results of this effect. As a rule, the first Kill of a Kill-rated attack will always be equal to 14DC. Each additional Kill of damage adds only 1DC to the base 14DC, because the remaining damage effects just don't have a big enough surface to expend themselves on. But all that force didn't just vanish! It's just been converted into Knockback. And since knockback subtracts the BOD (or Kills) of the target from the TOTAL DC done, chances are you still got blown several meters away. Ouch. For example, a tank shoots a 4-Kill shell at Little Timmy, who has somehow found a powersuit with 45KD of armor. The impact does 14D6 for being a Kill, plus 3D6 for the Kills above 14. So Timmy is now faced with 17D6 of damage. If the rolls are about average this comes to 60 hits, 15 more than the armory can absorb. Timmy will take 15 hits and be thrown back 17 units (8 to 17 meters depending on the campaign setting). As you can see, this does mirror the effect of big weapons in most common action genres (science fiction, animé, superheroes, action movies), where characters are more likely to be maimed or hurled through the air by blast or overpressure effects rather than just obliterated on the spot.
DC attack vs. Targets with SDP or Hits No Change Kill Attacks vs. large vehicles with Kills No Change Kill Attacks vs. a big vehicle with SDP Multiply the number of kills by 50 to produce the required SDP or Hits. For example, a mecha attacks a car doing 4 Kills. 4x50 = 200, so the car takes 200 hits. Kill Attacks vs. a small vehicle with SDP Add 13 to the number of Kills done. This equals the DC value of the attack. For example, a mecha shoots Little Timmy (for no reason) doing 4 Kills of damage, which equals 17DC. DC Attacks vs. really large vehicle with Kills Divide the DC of the weapon by 14, and round down, to get the Kills. For example, a 36DC weapon would translate to 36/14 = 2.5, rounded down, resulting in a 2 Kill attack.
Taking Damage
There are two kinds of damage that you can take from an attack; Stunning Damage and Lethal Damage. Stunning Damage is damage that creates pain and shock, but not serious injury. It's "fist fighting" damage, impacts done with the parts of the body, such as hands or feet.
Stunning damage is always subtracted from your character's pool of STUN points, after being reduced by the higher of either your character's SD or his Armor. When his STUN points are at 0, his body will react by shutting off the pain-and passing out.
You will take 1 point of Lethal Damage for every 5 STUN that penetrates.
Lethal Damage, on the other hand, is serious injury that can maim or kill. Anytime a weapon hits you, even if it's just a club, you will take Lethal Damage. In addition, any sharpened part of the body (fangs, claws, horns), can also do Lethal Damage.
Lethal damage is always subtracted from your character's pool of Hits. When this is reduced to (or below) zero, your character is dying.
Collateral Damage Since Lethal damage also causes a fair amount of pain and shock, you will lose 1 point of STUN for every 1 HIT you lose, until you run out of Stun points. (Note: you don't get your SD!). Sometimes a Stunning blow is powerful enough that a small amount of Lethal Damage is also done (see above on Taking Damage).
Stun Rollover When you have lost all of your Stun points, any subsequent Stun damage you take will continue to convert into Lethal damage at the 1/5th rate, reducing your remaining Hits. If you're beaten senseless and the beating continues, you could well be beaten to death!
Dazed If you take more than 1/2 of your total Stun in one attack, you are Dazed. A Dazed character may take no more actions that Round and loses his first Action on the next

ATOMIK WAR, p. 35
Round. He is also at -5 to all Primary Characteristics. During this time, he cannot move and may take no other actions. He will remain Dazed for the remanded of that Round, becoming "un-dazed" using his first Action on next Round.
Applying Damage to Objects You can't stun an inanimate object. Therefore, objects will always take both Stunning and Lethal damage. However, Stun damage only applies 1/5th of its value against SDP, unless deemed otherwise by the GM.
Impairing Wounds Whenever your Hits have been reduced enough, you will become impaired. At half of your total Hits, all of your Primary Characteristics will be reduced by -2; at 1/4 of total, they will be reduced by -4 points: a Characteristic cannot, however, be reduced to less than 1.
Injury Level Penalty Stunned -5, but cannot act 0 Stun, or less Unconscious Half total Hits -2 1/4 total Hits -4 0 or less Hits -6
Knocked Out Your character is knocked out whenever your Stun is reduced to 0 or below: you are automatically unconscious. You are effectively knocked out, but will regain consciousness once you have recovered enough Stun to put you back over 0 again (see side table below to see how long this takes).
Death When you reach 0 Hits, you are dying. You will be able to keep moving if you've still got Stun left, but you'll be at -6 (GM's Option) to all Primary Characteristics. You will also lose 1 additional Hit (in shock and blood loss) per round (4 Phases). When you lose up to 2x your BOD, you are dead. For example, at the end of our show, Little Timmy dies. He had a BOD of 3, which gave him 15 Hit points. At 0 Hits, he is dying -- twitching in a pool of his own blood, gasping for air. But there is still a chance he can be saved, and he may even be able to perform a "Dying Action" or continue on with massive penalties. Unless bandaged or treated with First Aid or some other medical skill, he will lose 1 Hit every round from blood lose and trauma. At -6 hits he is completely dead, and there's no coming back (at least, not for our Little Timmy).
Recovering From Damage
So, your Kevlar vest didn't protect you from that 20mm armor piercing round like you thought it would? Assuming you aren't dead, the next step is to get better. Your Recovery Characteristic (REC) determines how fast you can get back on your feet, and recover lost Hits and Stun.
Recovering Stun Damage Stun recovers fairly quickly. Whenever you take a Recovery Action, you will regain Stun equal to your REC. If your Stun is below 0, you are unconscious, and thus cannot take any Recovery. But you're body will recovery at a given rate, even when you are knock out.
Stun Level Recover Stun 0 to -10 Every Phase -11 to -20 Every Round -21 to -30 Every Minute >30 A long time
For example, if Jet does a spin-kick on Chow Yun, striking him for 12 Stun damage, Chow can spend his next action Recovering from the blow. If Chow's REC is 10, then he will recover 10 of those lost Stun points when he takes that Recovery Action. However, if Jet knocked Chow unconscious, and he was at -11 Stun, then he would recovery 10 Stun at the end of every Round.
Recovering Hits Hits are actual life-threatening injuries, which should be treated and watched carefully. Unless you are dying (bleeding to death), you will naturally recovery 1/2 your REC score in a 24 hour period (that is, without proper medical treatment, or in a primitive low tech world).
However, under medical care you will heal up to your full REC every 24 hours. By this, "medical care" assumes at least one person, other than yourself, who has a medical skill, and that you are located in a sanitary environment with your wounds dressed and bandaged. This does not necessarily require you to be in a hospital, but in a hospital surgery and advanced treatments can be performed (see below).
Having all your hits recovered does not mean you are fully healed. You may need surgery time and further time to heal broke bones, and so forth.
Recovering from Death It is possible to save a dying character (with Hits at or below 0). The key is to stop the bleeding and stabilize him. To do this, another character must make a successful medical skill roll (Paramedical, First Air, Surgery, etc). The Difficulty Value is two times the number of Hits below 0.
For example, Wesley, our heroic adventurer, has been nearly killed by a life-siphoning torture machine (Hits now at -10), but his friends have brought him to Miracle Max. Max must make a medical roll against a DV of 22 to save his life. It would take a miracle, but that is what Max is best at.
Remember, if using a different Difficulty scale (such as a 1D10), subtract the appropriate modifiers.
Crippling Injuries Atomik WAR adds a new level of gruesome detail to combat that carries with it the possibility that a character will suffer from a crippling injury. This may be temporary (hopefully), but it can be a permanent injury. Permanence of the injury does depend on the gameworld. Atomik WAR

ATOMIK WAR, p. 36
assumes late 20th, early 21st century technology (TL5) is available. If, in your campaign, cybernetics and advanced bioengineering is commonplace, many (or all) crippling injuries can be healed. Using the Gunshot Wound plug-in a character is hit by a great deal of damage. Many of these effects are crippling, some severely crippling. It is quite possible to have a leg or hand blown off, as well as receive deadly spinal injuries. A limb is considered crippled if it is destroyed (obviously), but also if it is broken (the bone snaps or fractures). When a limb is crippled, you can no longer use it, until it is healed (if it cannot be healed, tough). If it was a hand or arm, you can no longer hold a weapon or use items with that hand. If it was a foot, your MOVE is halved. If it was a leg or both feet, you must crawl (1/4 MOVE). A damaged or destroyed spine is extremely serious. It means you are paralyzed from the waist down (or neck down in really horrible cases). Unless regenerative magic or advanced cybertechnology exists, this is injury permanent. While you can fully heal your hit points, you cannot walk, and if paralyzed from the neck down, you cannot use your arms either (time to get a new character).
First Aid
On the battlefield or in a firefight, injuries are common and doctors are not. This posses a dire problem. The solution, of course, is for every fighter to be skilled somewhat in the medical arts. In basic Fuzion, the only medical skill is Paramedic, which can be used at Level 1 or 2 to represent First Aid. However, in more advanced Fuzion, medical skills break down to First Aid, Paramedics, Surgery, Neurosurgery, and so forth. This will all depend on the specific gameworld of the campaign. In either case, first aid is the art of quickly treating wounds, superficially, in order to stop bleeding and stabilize a patient so that he may survive long enough to receive proper care far away from battle. In most cases, even an unskilled person can perform rudimentary first aid successfully. If a medical kit is available (such as those listed Atomik A.X.E.) use it. Any and every wound should be bandaged with a clean cloth, and if disinfectants are available, use them too. All told, first aid treatment generally takes 1 Round, per person, against an Everyday Difficulty Value. If the subject has received some serious damage, such as internal bleeding or severe internal injuries, the DV will be higher. Unless you are treated further in a sanitary environment (as per Recovering Hits) you will heal much slower (half REC every 24 hours), and may have lasting scars, or other, unforeseen complications, like infections.
Surgery Many injuries require medical attention beyond simply bandaging the wound. Superficial surgery includes cleaning and dressing a wound, stitching, and other minor attention. Setting a bone, though extremely important, is also a rather simple medical practice that has been employed since the dawn of civilization. These require only a few hours of attention, and are considered part of monitored medical attention described in Recovering Hits. However, some injuries require the attention of a professional medical doctor or military medic. The removal of bullets from the body should be done by someone with a high skill in Paramedic or Surgery. The operation to remove a bullet is usually very short, under an hour, and with a Competent success roll. Failure, however, can result in an additional 1D6 damage, though the bullet will still be removed. An unskilled person (with a strong stomach) can also remove a bullet without a success roll, but again, 1D6 damage in incurred from the operation, which can be fatal if the patient is already badly injured. If anesthetics are unavailable, this can be an extremely painful operation (double Stun damage). Recovery should take a few more days after the operation. More severe damage, given from critical hits on the Physiological Effects table, often requires serious medical attention. After each effect description is listed the type of medical attention required, number of operations, and hospital stay (or stay under supervised care). For instance, an injury calls for 2 operations, Critical medical care, and 3 weeks of recovery. This means the patient is admitted in a Critical Condition (the highest level of priority). He will undergo 2 operations during the course his 3 week stay in the hospital, often the first on the day of arrival, and the second a few days after, but could occur the same day or even weeks later. The patient may not be in the hospital for the full three weeks. This is only recommended time that he should at least be monitored in case of unforeseen complications. In the event that a character has sustain multiple critical injuries (and has manage to survive it), all recovery requirements are accumulative, accept for the recovery time. The recovery time is the largest of the values listed for the injuries. For instance, if a character take two critical injuries, one requiring 1 week recovery, Serious medical attention, and 1 operation, and the other requiring 3 weeks of recovery, Critical attention, and 2 operations, then all in all, he is admitted in Critical Condition must have 3 operations, and has a recovery time of 3 weeks. Often before the required recovery time has expired the character has fully healed (due to a high REC score). Nevertheless, he should take it easy and remain under medical watch for the listed time.

ATOMIK WAR, p. 37
Gunshot Trauma Effects "Game over, man! Game over!"
- Hudson, "Aliens"
Gunshot Wound Plug-In
It is well known that a bullet hitting your body will not kill you. It is the effect of the bullet that kills you. You die only because of what the bullet did, such as puncture your heart, rupture a major artery, shatter your spin, blow out your brains, and so on. Because of their high velocity and ballistic effects, bullets do a great deal of extraneous damage to a human body. Most bullets fragment inside the body, or mushroom through tissues, causing very ugly thing to happen to one's internal organs. The bullet wound charts that follow assumes that the bullet has entered the body. For a bullet to enter body, at least 1 points of Lethal Damage had to have penetrated armor. That is to say, if a point of Lethal Damage (not Stun) got past the armor, the bullet is said to have penetrated the body. Otherwise, if the target only took Stunning (or no damage at all), the bullet clearly did not penetrate. In such a case it is assumed that all damage (Stunning) was from the kinetic force itself. The first step is to determine where the round hit (if you have not already done so), see if the bullet was lodged to penetrated straight through, and finally, see if there was a traumatic effect, and if so, roll on the Traumatic Effect Chart. Determining Hit Location The Hit Location must be known in order to use the Gunshot Wound Effects Plug-In. This should have already been taken care off when the target was hit, and there are various ways to do it (standard hit location chart or Mapped Hit Location Plug-In). Atomik WAR further narrows down Head Hits to sub-regions (such as Face, Ear, Throat, etc.) and if this region of the Head has not already been determined, you should roll it now:
Head Hit Chart 1D6 Roll Location Effect
1 Face 1 x dmg 2 Eye 2 x dmg 3 Cranium 2 x dmg 4 Jaw 1 x dmg 5 Throat 1.5 x dmg 6 Ear 1/4 x dmg
With Mapped Hit Location Plug-In It is entirely up to you (or the GM) if Traumatic Effects are to be used in conjunction with the Mapped Hit Location Plug-In (if that is what you are using instead of random hit charts). This Gunshot Wound Effects Plug-In is fully compatible, and you should have no (or very little) trouble using it. If there is any question as to what Mapped Location matches with a standard location, use common sense. "Top of the Head" is counted as the Cranium, Collar bone should be counted as Shoulder, for Elbows and Knees, just use the Limb Hit table, and so forth. Logged Bullets When a bullet has penetrated the body, it may be either be lodged within the body (which is bad) or it may blow all the way though, which also bad, but not quite as much. Simply roll 3D6 and consult the bellow chart, based on the type of ammunition fired, to determine if it was lodged.
Bullet Type Lodged on Roll of: Full Metal Jacked 8 to 12 Jacked Soft Point 7 to 14 JHP or Cor-Bon JHP 6 to 12 Hydra-Shok 6 to 15 Tri-Core 6 to 15 Black Talon 5 to 16 KTW Round 8 to 12 Glaser Round 4 to 16 Armor Piercing 3 to 7 Tracer / Incendiary 8 to 14 Subsonic 6 to 13 Fléchette (any kind) 8 to 16 Shotgun Shot 6 to 18 Shotgun Slug 6 to 12 20mm or 15mm 3 to 5
If bullet is lodged it may require surgery to remove (a 1 Day Serious operation), in addition to whatever other surgery or medical care is need for other damage. It is not always necessary to remove a bullet. Sometimes it is actually better not to remove them, so ask your doctor to be sure.
Next, consult the Traumatic Effects Charts, below.

ATOMIK WAR, p. 38
Traumatic Effects Determination If at least 1 point of Lethal Damage impacted the body through armor, you should roll 1D6 to determine if the bullet had a Traumatic Effect or not. Depending on the campaign setting, if this roll is less than or equal to the Trauma Effect number, then you must consult the Wound Effects Charts to decide what effect the bullet actually had on the body. Warning: this will be fatal or crippling in many cases! It should be used with extreme care for PCs and major NPCs! Roll 1D6.
Campaign Setting Trauma Effect # Realistic 6 (always) Semi-Realistic 5 Heroic 4 Cinematic 3 Legendary 2 Super-Heroic 1 (rarely ever)
For example, in a Heroic campaign, if the Trauma Effect Roll was 4 or less (a roll of 1 to 4 on 1D6), then we must use the Traumatic Effects Charts below. Optionally, the GM could set this number differently for PCs verse NPCs. I would recommend Legendary (2) for PCs and Heroic(4) or Semi-Realistic(5) for NPCs or goons. Traumatic Effect Chart To use this chart you must know four things: the Type of Bullet, its Caliber, and where it hit, and how much damage it did. To find the effect you should roll 1D6, 2D6, 3D6, or 4D6 (depending on the damage done) and apply modifiers for the Type and Caliber. With the resulting number consult the Traumatic Effects Chart on the following page for the appropriate location and apply the effects as shown. For any hit to Vitals on the hit location table, roll on the Chest Hit Chart and add +4.
Damage Dealt* Dice to Roll Light (1 to 5 dmg) Roll 1D6 Serious (6 to 10) Roll 2D6 Severe (11 - 15) Roll 3D6 Critical (16+) Roll 4D6 Type of Bullet Chart Modifier Full Metal Jacketed +0 Jacketed Soft Point +1 Jacketed Hollow Point +2 Cor-Bon JHP +3 Hydra-Shok +4 Tri-Core +0 / see description Black Talon +5 KTW Round +3 Glaser Round +6 Armor Piercing +0 Tracer / Incendiary +1 Subsonic -1 Fléchette (any kind) -2 Shotgun Shot See Calibers Shotgun Slug See Calibers 20mm or 15mm See Calibers Caliber Chart Modifier .32 / .38 / .22 LR +0 .357 / .45 / 9mm +1 .44 Magnum +2 .50 Magnum (pistol) +3 5.56mm / .223 / 4.92mm +3 .30 / 7.62mm / .308 Rifle +4 30-06 Rifle +6 .50 Browning +8 Shotgun Shot +4 Shotgun Slug +8 15mm / 20mm +10 Other Weapons Chart Modifier Cutting Weapon +0 Impaling Weapon +2 Blunt Weapon -4 Energy Weapon +4, no bleeding An Explosion +0 Other Things Chart Modifier Vitals Hit +4 on Chest Chart PC or major NPC -5 (to save their butts)
* Damage is only what penetrated the armor and struck the body, before the damage modifier for hitting the location is counted.

ATOMIK WAR, p. 39
Face Hit Effect (Damage x1) Recovery 1 - 2 A superficial wound. There will be no lasting scars. Normal 3 - 4 Superficial, but ugly wound. There will be long lasting scars. Normal 5 - 6 Hit rips a terrible gouge through the face. There will be a lasting scar. Any "Beautiful/Handsome"
advantages are nullified. 1 Day or two of medical attention.
7 - 8 Upper jaw or cheekbone struck and shattered. You lose a number of teeth, and your jaw will be wired shut for 1 week.
1 Week, Serious medical attention. One operation, plus 1D6 weeks for jaw to heal.
9 - 10 Nose blasted off. There will be a lasting scar. This may be repaired by extensive plastic surgery. Any "Beautiful/Handsome" advantages are nullified.
1 Week, Serious medical attention. One operation to repair the wound.
11 - 12 Shattered facial bone, and the round is lodged in the sinus cavity. Requires surgery to remove. 2 Weeks, Serious medical attention. One operation to repair the wound.
13 - 14 Eye hit (roll odd/even for left/right). Roll (with the same number of dice) on the Eye hit chart (below) with the same modifiers you used on this one.
2 Weeks, Critical medical attention. One operation to repair the wound.
15 Right between the eyes. Roll (with the same number of dice) on the Cranium hit chart, with a +5 modifier.
As Per Cranium Hit
16 Your face is literally blown off. You are permanently blind in both eyes. You must under go 3 months of reconstructive surgery to look reasonably normal again. Any "Beautiful/Handsome" advantages are nullified.
3 Months, Critical medical attention. Many reconstructive and surgical operations.
17 Hit hard through the face, shattering the facial bone and causing extensive cosmetic damage. Furthermore, bone fragments, shrapnel, or the bullet itself punches through into the brain cavity. Roll (with the same number of dice) on the Cranium hit chart, with a +5 modifier.
3 Months, Critical medical attention. Many reconstructive and surgical operations. Plus results from Cranium Hit.
18+ Hit hard through the face, shattering the facial bone and causing extensive cosmetic damage. Furthermore, bone fragments, shrapnel, or the bullet itself punches through into the brain cavity. Roll (with the same number of dice) on the Cranium hit chart, with a +10 modifier.
3 Months, Critical medical attention. Many reconstructive and surgical operations. Plus results from Cranium Hit.
Eye Hit Effect (Damage x2 or as noted) Recovery 1 - 2 Hit gouges into the eye, but is deflected by the skull. Damage is only x1. 1 Day or two of medical attention. 3 - 4 Hit gouges into the eye, and is lodged in the sinus cavity. Damage is only x1. 1 Day or two of medical attention. 5 - 6 One or both (roll odd/even) eyes are blinded (blasted out, seared, hit by shrapnel, etc). You are
permanent blind in that (or both) eyes. 1 Week, Serious medical attention. One operation to repair the wound.
7 Hit comes in at an angle and tears through both eyes, blinding both permanently. However, the bullet passed through doing only x1 damage.
1 Week, Serious medical attention. One operation to repair the wound.
8 Hit through the eye, and is lodged in the sinus cavity. However, fragments of bone or shrapnel cause further damage inside the head. The hit does x2 damage.
1 Week, Serious medical attention. One operation to repair the wound.
9 - 12 Hit directly through the eye. The bullet continues on into the brain cavity. Roll (with the same number of dice) on the Cranium hit chart, with a +2 modifier. You are permanent blind in that eye.
As Per Cranium Hit
13 - 17 Hit directly through the eye. The bullet continues on into the brain cavity. Roll (with the same number of dice) on the Cranium hit chart, with a +5 modifier. You are permanent blind in that eye.
As Per Cranium Hit
18+ Hit directly through the eye. The bullet continues on into the brain cavity. Roll (with the same number of dice) on the Cranium hit chart, with a +10 modifier. You are permanent blind in that eye.
As Per Cranium Hit
Cranium Hit Effect (Damage x2) Recovery 1 - 2 A superficial wound. There will be no lasting scars. Normal 3 - 4 Superficial, but ugly wound. There will be long lasting scars. Normal 5 - 6 Bullet lodged deep into sinus cavity, but does not impact the brain. Requires surgery to remove. 1 Week, Serious medical attention.
One operation to repair the wound. 7 - 8 Bullet tears into the head and either impacts the brain or is imbedded in the skull. But
miraculously, there is no apparent, permanent brain damage caused. Requires critical neurosurgury to remove the bullet.
1 Week, Serious medical attention. One operation to repair the wound.
9 - 10 Bullet tears into the head impacts the brain, causing lasting brain damage. Your permanently lose 2 points in either DEX, REF, or INT, or -1 in two of these (you may choose).
3 Weeks, Critical medical attention. One neurosurgical operation and several follow up operations.
11 Brain suffers trauma. Roll 1D6. If roll is higher than your INT, you are permanently comatose and eventually go brain-dead. Otherwise, your INT is reduced by the amount rolled, permanently.
1 Month, Critical medical attention. One neurosurgical operation and several follow up operations.
12 - 13 Brain suffers severe trauma. Roll 1D6. If roll is higher than your INT, you are permanently comatose and eventually go brain-dead. Otherwise, your INT is reduced by the amount rolled, and you suffer a -1 REF and -1 DEX, permanently.
1 Month, Critical medical attention. One neurosurgical operation and several follow up operations.
14 Sever damage caused to one hemisphere of the brain (roll odd/even for right or left, or choose depending on point of impact). If the right side was hit, your entire left side is permentantly paralyzed, and vice versa. You also suffer an over all -1 INT, -1 REF, and -2 DEX, permanently.
2 Month, Critical medical attention. Three neurosurgical operation and several follow up operations.
15 The Medulla Oblongata is messily cleaned out from the brainpan, leaving you severely dead. N/A 16 Brainstem hit and severed at the base. Death is instantaneous. N/A 17 - 18 Your brain is forcefully evacuated from your skull cavity by the sheer impact of the blast,
splattering out from the exit wound like a firecracker in a cherry pie. You die instantly. N/A
19 - 21 Bullet blasts through head, exploding out the other side, taking half the skull with it. You die instantly.
N/A
22+ Head explodes like an overripe watermelon. You are, to say the least, extremely dead. N/A

ATOMIK WAR, p. 40
Jaw Hit Effect (Damage x1) Recovery 1 - 2 A superficial wound. There will be no lasting scars. Normal 3 - 4 Superficial, but ugly wound. There will be long lasting scars. Normal 5 - 6 Hit tears through the mouth, breaking 1D6 teeth, and cutting the tongue (not critically). 1 or 2 days, Serious medical
attention. One orthopedic operation. 7 - 8 Jaw fractured, 1D6 teeth lost. Requires reconstructive surgery. Your jaw will be wired shut for 1
week. 1 Week, Serious medical attention. Two orthopedic operations.
9 - 10 Jaw fractured, 1D6 teeth lost. Tongue is badly torn, and bleeds profusely, losing 1 Hit a minute unless bandaged. Requires reconstructive surgery. Your jaw will be wired shut for 1 week.
1 Week, Serious medical attention. Two orthopedic and surgical operations.
11 Jaw fractured, 1D6 teeth lost. The tongue is torn off, and bleeds profusely, losing 1 Hit a Round unless bandaged. Requires reconstructive surgery. Your jaw will be wired shut for 1 week. Speech permanently impaaad by da luss ov da tung.
1 Week, Serious medical attention. Four orthopedic and surgical operations.
12 - 13 Hit rips through lower jaw, fracturing it, and into the throat. Roll (with the same number of dice) on the Throat hit chart, with a +5 modifier. Furthermore, jaw will be wired shut for 1 week.
1 Week, Serious medical attention. One operation, plus 1 week for jaw to heal. Plus results from Throat Hit.
14 Jaw shattered! Requires reconstructive surgery, and your jaw will be wired shut for 1D6 weeks. 2 Week, Serious medical attention. Two operations, plus 1D6 weeks for jaw to heal.
15 - 16 Hit rips through lower jaw, fracturing it, and tears into the back of the head. Roll (with the same number of dice) on the Cranium hit chart, with a +5 modifier. Furthermore, jaw will be wired shut for 1 week.
1 Week, Serious medical attention. One operation, plus 1 week for jaw to heal. Plus results from Cranium Hit.
17 Jaw completely torn away. Requires reconstructive surgery, and your cosmetic jaw replacement will be wired shut for 2D6 weeks. You can only ingest liquids and liquefied foods. Any "Beautiful/Handsome" advantages are nullified. Speech permanently impaired.
3 Week, Serious medical attention. Five operations, plus 2D6 weeks for jaw to heal.
18+ Hit rips through lower jaw, shattering it, and tears into the back of the head. Roll (with the same number of dice) on the Cranium hit chart, with a +10 modifier. Furthermore, jaw will be wired shut for 1 week.
2 Week, Serious medical attention. Two operation, plus 1 week for jaw to heal. Plus results from Cranium Hit.
Throat Hit Effect (Damage x1.5) Recovery 1 - 2 A superficial wound. There will be no lasting scars. Normal 3 - 4 Superficial, but ugly wound. There will be long lasting scars. Normal 5 - 6 Hit tears into throat and damages vocal cords. Voice is impaired until healed and 3D6 weeks of
physical therapy. 1 Week, Serious medical attention. One operation
7 - 8 Side of the neck is hit and skin is torn open. You will lose 1 Hit every Round from blood loss, unless quickly treated.
1 Week, Serious medical attention. One operation
9 Trachea hit. You begin choking on blood and have extreme difficulty breathing. You will suffocate or drown in blood within 2D6 Rounds unless first aid is applied. You also lose 1 Hit every Round from blood loss unless treated.
1 Week, Serious medical attention. One operation
10 Neck hit. Major arteries are missed, but vocal cords seriously damaged. Only after 2 months of therapy can you speak again.
3 Week, Serious medical attention. One operation
11 - 12 Neck hit. Major arteries ruptured. You will lose 1 Hit every Round from blood loss, unless quickly treated.
1 Week, Critical medical attention. One operation to repair the wound.
13 Spine fractured. You suffer permanent semi-paralysis cutting your DEX, REF, and MOVE in half. 2 Weeks, Critical medical attention. One operation to repair the wound.
14 - 15 Neck hit. Major arteries ruptured. You will lose 2 Hits every Phase from blood loss unless quickly treated. Your vocal cords are also damaged. Only after 2 months of therapy can you speak again.
1 Week, Critical medical attention. One operation to repair the wound.
16 Spine shattered. You are permanently paralyzed from the neck down. 4 Weeks, Critical medical attention. Three surgical operations.
17 - 18 Neck hit. Major arteries ruptured. You will lose 2 Hits every Phase from blood loss unless quickly treated. Your vocal cords are torn to pieces. You can never speak again.
2 Weeks, Critical medical attention. One operation to repair the wound.
19 Spine shattered at 3rd vertebra. Death occurs instantly. N/A 20 - 21 Head half torn off at the neck. You will lose 1 Hit every Phase from blood loss and shock unless
quickly treated. If you somehow live, you can never speak again. N/A
22+ Head is blown off at the neck. Death occurs instantly. N/A Ear Hit Effect (Damage x1/4 or as noted) Recovery 1 - 2 A superficial wound. There will be no lasting scars. Damage 1/4. Normal 3 - 4 Superficial, but ugly wound. There will be long lasting scars. Damage 1/4. Normal 5 - 6 Damage is only 1/4th, but the ear is ripped in half. Plastic surgery can repair this lasting scar. You
are partially deaf in that ear (-2 Perception on sound related checks). 1D6 days, Serious medical attention. Two plastic surgery operations.
7 - 9 You are "van Gogh'ed" (you ear is totally torn off). Plastic surgery can repair this lasting scar. You are deaf in that ear (-4 Perception on sound related checks). Damage 1/4.
1 Week, Serious medical attention. Three plastic surgery operations.
10 - 12 Ear is totally torn off and the bullet cuts into the side of the head. Roll (with the same number of dice) on the Cranium hit chart (no bonuses or modifiers). You are deaf in that ear (-4 Perception on sound related checks). Damage x 1/2.
3 Weeks, Serious medical attention. Three plastic surgery operations. Plus results from Cranium Hit.
13 - 14 Bullet tears through the ear canal and into the brain cavity. Roll (with the same number of dice) on the Cranium hit chart, with a +2 modifier. You are deaf in that ear (-4 Perception on sound related checks). Damage x1.
As Per Cranium Hit.
15 - 16 Bullet tears through the ear canal and into the brain cavity. Roll (with the same number of dice) on the Cranium hit chart, with a +5 modifier. You are deaf in that ear (-4 Perception on sound related checks).
As Per Cranium Hit.

ATOMIK WAR, p. 41
17 - 18 Shoots through one ear and out the other! Brain takes catastrophic damage. Death occurs instantly.
N/A
19+ Bullet tears through the ear canal and into the brain cavity. Roll (with the same number of dice) on the Cranium hit chart, with a +10 modifier. You are deaf in that ear (-4 Perception on sound related checks).
As Per Cranium Hit.
Shoulder Hit Effect (Damage x1) Recovery 1 - 3 It's only your shoulder. Just count yourself lucky, punk. Normal 4 - 5 You get lucky. Nothing vital hit, minimal traumatic effect. Normal 6 - 9 Shoulder hit and bone chipped. -1 to use arm. 3 Days, Normal medical attention.
One minor operation to fix. 10 - 12 Bullet Imbedded in the bone. Requires more detailed surgery to remove.
-1 to use arm. 4 Days, Serious medical attention. One operation to remove bullet.
13 - 15 Shoulder bone fractured. -2 to use that arm until healed. 1 Week, Serious medical attention. One surgical operation to fix.
16 - 18 Collar bone broken. -3 to use that arm until healed. 1 Week, Serious medical attention. One surgical operation to fix.
19 - 21 Shoulder severely injured. -4 to use that arm, if at all, until healed. 2 Week, Serious medical attention. Two surgical operations to fix.
22+ Shoulder pulverized! Severe damage. Arm rendered useless, until healed. 3 Week, Critical medical attention. Four surgical operations to fix.
Chest Hit Effect (Damage x1) Recovery 1 - 2 Nothing vital, but there is internal bleeding. Requires immediate medical or surgical attention or
you will bleed to death in 4 minutes. Normal.
3 - 4 You get lucky. Nothing vital hit, minimal traumatic effect. Normal. 5 - 7 Lung punctured. You die in 20 minutes if it goes untreated. 1 Week, Serious medical attention.
One operation to repair the wound. 8 - 9 Nothing vital, but there is internal bleeding. Requires immediate paramedical or surgical attention
or you will bleed to death in 3 minutes. Normal.
10 - 11 Sternum hit and fractured or broken! 2 Weeks, Stable medical attention. 12 - 13 Aorta Hit. Profuse bleeding (lose 1 Hit per Phase), requires immediate Paramedical attention and
emergency blood transfusion. 2 Weeks, Critical medical attention. Requires 2 or 3 surgical operations.
14 - 15 Lung ruptured. You die in 10 minutes if it goes untreated. 1 Week, Serious medical attention. One operation to repair the wound.
16 - 17 Spine shattered. You are permanently paralyzed from the waist down. 2 Weeks, Critical medical attention. One operation.
18 - 19 Heart hit! You will die at the end of the Round, and cannot be saved. N/A 20 - 22 One lung is torn apart by the mushrooming effect. Requires a three week stay in the hospital for
surgery and removal. With only one lung, you suffer a -2 CON and -1 STR permanently (modify all derived stats accordingly).
3 Weeks, Critical medical attention. On ventilator for 1D6 days. 3 operations and cost 100 OP to replace the lung.
23+ Chest trauma, x1.5 damage! Shrapnel rips into your lungs. You must struggle just to keep breathing, as your lungs are filling with blood. You will lose 1 Hit every Round from blood loss, unless quickly treated. Requires immediate paramedical or surgical attention. Requires surgery and two weeks in the hospital to repair damage.
4 Weeks, Critical medical attention. On ventilator for 1 week and 1D6 surgical operations to repair damage.
Stomach Hit Effect (Damage x1.5) Recovery 1 - 2 Nothing vital, but there is internal bleeding. Requires immediate paramedical or surgical attention
or you will bleed to death in 4 minutes. Normal.
3 - 4 A kidney was hit. CON reduced by -1 until stay in hospital is complete. This only has long term effect if both kidney's are lost (you must have at lest one).
2 Weeks, Serious medical attention. Requires 30 OP (cost) to replace the kidney (but you just need one).
5 - 7 Nothing vital, but serious internal bleeding. You lose 1 Hit every Round from blood loss. Requires first aid care or medical treatment to stop.
Normal.
8 - 9 Spleen busted! Also causes severe blood lose (1 Hit every Round). The ruined spleen must be removed. If you survive, you must take lots of medications and artificial enzymes for the rest of your life (unless viable organ replacement technology exists).
3 Weeks, Critical medical attention. Spleen must be removed.
10 - 12 Stomach hit, giving severe internal bleeding. You lose 2 Hits every Round from blood loss. Requires first aid care or paramedical treatment to stop.
Normal
13 - 14 Spine shattered. You are permanently paralyzed from the waist down. 2 Weeks, Critical medical attention (non-recoverable injury).
15 - 17 The round rips through your body, tearing through your intestinal track and lower stomach. You lose 1 Hit every Round from blood loss, unless quickly treated.
2 Weeks, Serious medical attention. One operation.
18 - 19 Your guts are torn all to hell, possibly blown right out of your body and hanging out. You will lose 1 Hit every Round from blood loss, unless quickly treated.
2 Weeks, Critical medical attention. One operation.
20 - 24 Belly Buster! x2 damage (rather than x1.5). Your spleen bursts, your stomach ruptures, your liver is gutted, and your intestines are destroyed. You lose 2 Hits every Round from blood loss, unless quickly treated. Even if you recover, you will be on medication, antibiotics, and enzyme supplements for the rest of your life.
3 Weeks, Critical medical attention. Two operations.
25+ You've taken so much damage you are literally blown in half. x2 damage (rather than x1.5). Your spine is shattered and all your abdominal organs are destroyed. If you are some how still alive, you will lose 1D6 hits every Round from blood loss, and there is no way you can be saved.
N/A

ATOMIK WAR, p. 42
Thigh Hit Effect (Damage x1) Recovery 1 - 3 Bullet embedded in hipbone. Requires more detailed surgery to remove. 4 Days, Serious medical attention.
One surgical operation to remove bullet.
4 - 6 You get lucky. Nothing vital hit, minimal traumatic effect. Normal. 7 - 10 Nothing vital, but there is internal bleeding. Requires immediate paramedical or surgical attention
or you will bleed to death in 4 minutes. Normal.
11 - 12 Small intestines ruptured. You will lose 1 Hit every Round from blood loss, unless quickly treated. 2 Weeks, Serious medical attention. One operation.
13 - 14 Large intestines ruptured. You will lose 2 Hit every Round from blood loss, unless quickly treated. 2 Weeks, Critical medical attention. One operation.
15 - 16 Genitalia hit. Yes, this hurts a lot for both males and females. Double Stun damage. This will have a long term crippling effect, but it is not incapacitating.
1 Weeks, Serious medical attention. One operation.
17 - 18 Colon hit. Same as above, but more traumatic. 2 Weeks, Serious medical attention. Two operations.
19 - 22 Severe Abdominal Trauma! Large and small intestine ruptures, possible damage to colon or genitalia (flip a coin). You will lose 2 Hit every Round from blood loss, unless quickly treated. CON at -1 for next 3 weeks.
3 Weeks, Critical medical attention. Two operations.
23+ Abdomen gutted! x1.5 damage. Massive trauma to intestinal track, CON permanently reduced by -1. Damage to colon and genitalia.
4 Weeks, Critical medical attention. Three operations.
A Limb Hit Effect (Damage x1/2) Recovery 1 - 2 You get lucky. Only a flesh wound. Minimal traumatic effect. Normal. 3 - 5 Muscle damage incurred. -1 to use that limb until healed. 2 Days, Serious medical attention.
One surgical operation. 6 - 8 Bullet embedded in bone. -2 to use that limb until healed. Requires more detailed surgery to
remove. 2 Days, Serious medical attention. One surgical operation.
9 - 12 Bone hit, and fractured. -2 to use that limb until healed. 1 Weeks, Serious medical attention. One operation.
13 - 15 Bone hit and broken. -3 to use that limb until healed. 1 Weeks, Serious medical attention. One operation.
16 - 18 Bone shattered. -4 to use that limb until healed. Permanent -1 to use that limb, until after 2 months of physical therapy.
2 Weeks, Serious medical attention. One operation. Plus physical therapy.
19 - 21 Limb crippled and rendered useless. The limb is severely mauled, and may have to be amputated. Even if the limb is saved, there is a permanent -2 to use that limb. Six months of physical therapy can reduce this to -1, but that is all.
3 Weeks, Critical medical attention. Two operations. Plus physical therapy.
22+ Limb was completely torn away and is utterly useless. This is a permanent and debilitating injury. 3 Weeks, Critical medical attention. Two operations. Permanent injury.
Hand or Foot Effect (Damage x1/2) Recovery 1 - 2 You get lucky. Only a flesh wound. Minimal traumatic effect. Normal. 3 - 5 Muscle and bone damage incurred. -1 to use that hand (or -1 to Move if foot) until healed. 2 Days, Serious medical attention.
One surgical operation. 6 - 8 Bullet tears through the appendage, shattering bone and ligaments. -2 to use that hand (or -1 to
Move if foot) until healed. 2 Days, Serious medical attention. One surgical operation.
9 - 10 1 finger (or toe) torn off. Also, you have a permanent -1 to use that hand (no penalty if it was the foot).
1 Weeks, Serious medical attention. One operation.
11 - 12 1D6/2 fingers (or toes) torn off. Also, you have a permanent -2 to use that hand (no penalty if it was the foot).
1 Weeks, Serious medical attention. One operation.
13 - 15 Hand (or Foot) is blown in half. All or most fingers (or toes) lost. You have a permanent -4 to use that hand (or -1 Move if foot).
1 Weeks, Serious medical attention. One operation.
16 - 18 Appendage crippled and rendered useless. It is severely mauled, and may have to be amputated. Even if the appendage is saved, there is a permanent -5 to use that hand (or -2 Move if foot0. Six months of physical therapy can reduce this to -3, but that is all.
3 Weeks, Critical medical attention. Two operations. Plus physical therapy.
19+ Appendage was completely torn away and is utterly useless. This is a permanent and debilitating injury (-3 Move if foot).
3 Weeks, Critical medical attention. Two operations. Permanent injury.

ATOMIK WAR, p. 43
Atomik WAR © 2000 Mark Chase
AATTOOMMIIKK WWAARR Advanced Combat Screen
COMBAT MODIFIERS Range to Target! MODIFIER Point Blank (<2m) +1, +1 DC Melee (<4m) +0 Close (to 10m) -1 Near (to 20m) -2 Medium (to 50m) -3 Long (to list range) -4 Extreme (past listed) -4, + -1 /50m Take Cover! MODIFIER Completely Blind -6 Sight obscured -4 Moving target -1 / 10 meters Target silhouetted +2 Half Body -2 Head and Shoulders -3 Head Only -4 Behind Someone -4 Target Prone -2 Target Crouching -1 We have a Situation! MODIFIER Vehicle weapon, no turret -4 Shoulder weapon at hip -2 Aiming +1 / Phase Braced +2 Tiny Target -6 Small Target -4 Undersized Target -2 Large Target +2 Very Large Target +4 Broad Side of a Barn +6 Surprise Attack +5 You are Sprinting 1/2 Def,0 REF Open Fire! MODIFIER Firing a 2nd or 3rd shot -1, -2 Firing 2nd or 3rd Burst -2, -3 (3rd) Firing at Full Auto +0 Emptying the magazine! +2 Using Off Hand -2 Firing two guns -2 / -4
BASE POINT DV DV Challenged 0 Everyday 4 Competent 8 Heroic 12 Incredible 16 Legendary 20 Superheroic 24
RESOLUTION MODIFIER Static (diceless) +0 Low Variable +3 Med. Variable +5 Highly Variable +10
TARGET AGAINST RANGE Point-Blank DV 1 Melee DV 4 Close DV 8 Near DV 10 Medium DV 12 Long DV 16 Extreme 16,+1 /50m
Unmodified Shotgun Area Effect DC Area Effect Point-Blank (<2m) -0 none 5 meters or less -1 1 meter 10 meters or less -2 1.5 meters 15 meters or less -3 2 meters 20 meters or less -4 2.5 meters 30 meters or less -5 3 meters Extreme (beyond listed range) -1 per +10 m
Location Penalty Effect Eye (Head) -6 2.5x dmg Head -4 2x dmg Arm -3 1/2 dmg Hand -4 1/2 dmg Chest -1 1x dmg Shoulder -2 1x dmg Stomach -3 1.5x dmg Vitals (Chest) -5 1.5x dmg Thigh -2 1x dmg Leg -3 1/2 dmg Foot -4 1/2 dmg
Fuzion Time Table 1 Phase = 3 Seconds
1 Round = 12 Seconds 5 Rounds = 1 Minute
25 Rounds = 5 Minutes 100 Rounds = 20 Minutes
Gun Fu Action Summary Quick-Draw Draw and fire for -1 penalty Master-Shot +1 to-hit, or +2 to hit a location Hit Weapon May shoot target's weapon at no penalty Spin Shooting Spin to shoot any target Jump Shooting Fire while Diving or Jumping, -2 DEX, -1 REF Action Shooting Fire during Dodge, Acrobat, etc.-1 DEX,-2 REF No Recoil Ignore Recoil Penalties Bullet Dodge +5 DEX when dodging fire
AUTOFIRE RULES! Burst Fire: 1D6/2 hit Simple Autofire: Divide RoF by Ratio Heroic Autofire: 1 hit per point above DV, divide by Autofire Ratio Atomik Autofire: 1 hit per point above DV, max is Autofire Ratio AUTOFIRE RATIO CAMPAIGN STYLE RATIO Realistic 1 Semi-Realist 1 Heroic 2 Cinematic 2 Legendary 3 Superheroic 4 KNOCKBACK CAMPAIGN STYLE KB MOD Realistic down Semi-Realist 1/2 Heroic 1 Cinematic 2 Legendary 3 Superheroic 4
DC - Body + 1D6 = Units x KB Mod
BIG BOOMS IN SMALL PLACES! DMG 2x2 meters (Elevator or closet) x4 4x3 meters (bathroom) x3 5x5 meters (room or bunker) x1.5 In a vehicle (car, van, etc.) x3 In a tank (very enclosed) x4 In an APC x3 In a large plane (737, etc) x2
THAT HURTS! 1 point of Stun for every Hit taken 1 Hit for every 5 Stun taken Impairing Wounds Half your Hits, -2 to Characteristics 1/4 your Hits, -4 to Characteristics 0 Hits left, -6 to Characteristics Stun Stunned if 1/2 Stun taken in one attack lose next action, -5 to all Chars. When Stun at 0, you are knocked out.
ENDURANCE EXPENDITURE 1 END every Round of Combat 1 END every Minute of Running 1 END every Round of Sprinting 2 END every Phase if not breathing 1-2 END to exert all Strenght 1-5 END to perform a Strenght Feat
ATOMIK HIT CHART Roll Location
3 Right Foot 4 Right Hand 5 Right Arm 6 Right Leg 7 Head 8 Right Shlder
9 - 10 Chest 11 Vitals 12 Stomach 13 Left Shlder 14 Thighs 15 Left Leg 16 Left Arm 17 Left Hand 18 Left Foot
SPECIAL ACTIONS
Ready Weapon 1 Action Set Safty 1 Action Set Fire Mode 1 Action Drop Gun Free Action Reload Clip 1 Action Reload Revolver 2 Actions Reload 2 shells 1 Action Reload Rocket 3 Actions Feed ammo chain 3 Actions Unjam Gun 1D6 Actions Bind Wounds 2-3 Actions
CHARACTER'S SPEED
Phase
1 2 3 4 5 6 7 8 1 0 0 0 1 1 1 1 2 2 0 1 1 1 1 2 2 2 3 0 0 1 1 2 2 2 2 4 1 1 1 1 1 1 2 2