ath overs user guide - oregon.gov · the mother’s birth place control is used to capture the...
TRANSCRIPT

OVERS User Guide Facility & Midwife Edition
OVERS User Guide
Electronic Registration System for Birth & Fetal Death Records
Public Health Division
Center for Health Statistics
Last Revised: January 1, 2018
This manual is intended as a technical guide for using the Electronic birth and fetal death registration system. For definitions and
additional information for completing the Oregon report of fetal death, see additional information at
http://www.oregon.gov/oha/PH/BIRTHDEATHCERTIFICATES/REGISTERVITALRECORDS/Pages/InstructionsFetalDeath.aspx
Duplication and distribution is permitted.
Com
ple
ting a
Feta
l D
eat
h
Reco
rd
OVERS User Guide Facility & Midwife Edition
T
3 Completing a Fetal Death Record
Table of Contents Start a New Record ....................................................................................................... 73 Locate an Existing Record ............................................................................................. 75 Fetal Death Registration ................................................................................................ 75
Personal Information .................................................................................................. 76 Fetus Page ............................................................................................................. 76 Mother .................................................................................................................... 78 Mother’s Address ................................................................................................... 79 Mother Attributes .................................................................................................... 80 Mother Health......................................................................................................... 81 Marital Status ......................................................................................................... 83 Father ..................................................................................................................... 84 Father Attributes ..................................................................................................... 84 Place of Delivery .................................................................................................... 86 Reporter ................................................................................................................. 87 Affirm ...................................................................................................................... 88
Medical Information .................................................................................................... 89 Prenatal .................................................................................................................. 89 Pregnancy Factors ................................................................................................. 91 Delivery .................................................................................................................. 92 Fetal Attributes ....................................................................................................... 94 Cause/Conditions Contributing to fetal death ......................................................... 96 Attendant/Certifier .................................................................................................. 99 Certify ................................................................................................................... 101
Affirm/Certify ................................................................................................................ 101 Uncertify ................................................................................................................... 102
his chapter aims to explain the data entry process for creating, certifying and retrieving fetal death reports from OVERS. The definitions and procedures for properly completing an Oregon fetal death record are addressed in a separate document available on the Center for Health Statistics’ registration website (http://www.oregon.gov/DHS/ph/chs/registration/instructions.shtml).
For additional instruction or troubleshooting help contact the Help Desk during normal business hours (Monday – Friday, 8 am to 5 pm) at (971) 673-0279. For questions about the definitions and procedures for completing the Oregon Fetal Death Report, contact the Center for Health Statistics, Registration department at (971) 673-1160.
Fetal deaths should only be recorded by a facility birth clerk or Medical Examiner. Midwives must refer all fetal deaths to a Medical Examiner.

OVERS User Guide Facility & Midwife Edition
Chapter 3: Completing a Fetal Death Record 73
Start a New Record
To start a new report of fetal death, select Life Events > Fetal Death > Start/Edit New Case. This will bring up the Start/Edit New Case page.
Use Locate Case to search for an existing report, whether registered or only partially completed.
Required Entries The first step in entering a new report of fetal death is to perform a search. This helps to minimize the creation of duplicate records. For fetal death records, notice that Fetus Last Name, Date of Delivery, and Gender are in red boxes. These fields are required entries and must be completed before you will be allowed to start a new case.
Once you have completed the required items, click the Search button to proceed or the Clear button to clear all entries and start over.
Note: Before you will be allowed to create a new fetal death record you must first
search for an existing record. This is to prevent the creation of duplicate records.
OVERS User Guide Facility & Midwife Edition
Chapter 3: Completing a Fetal Death Record 74
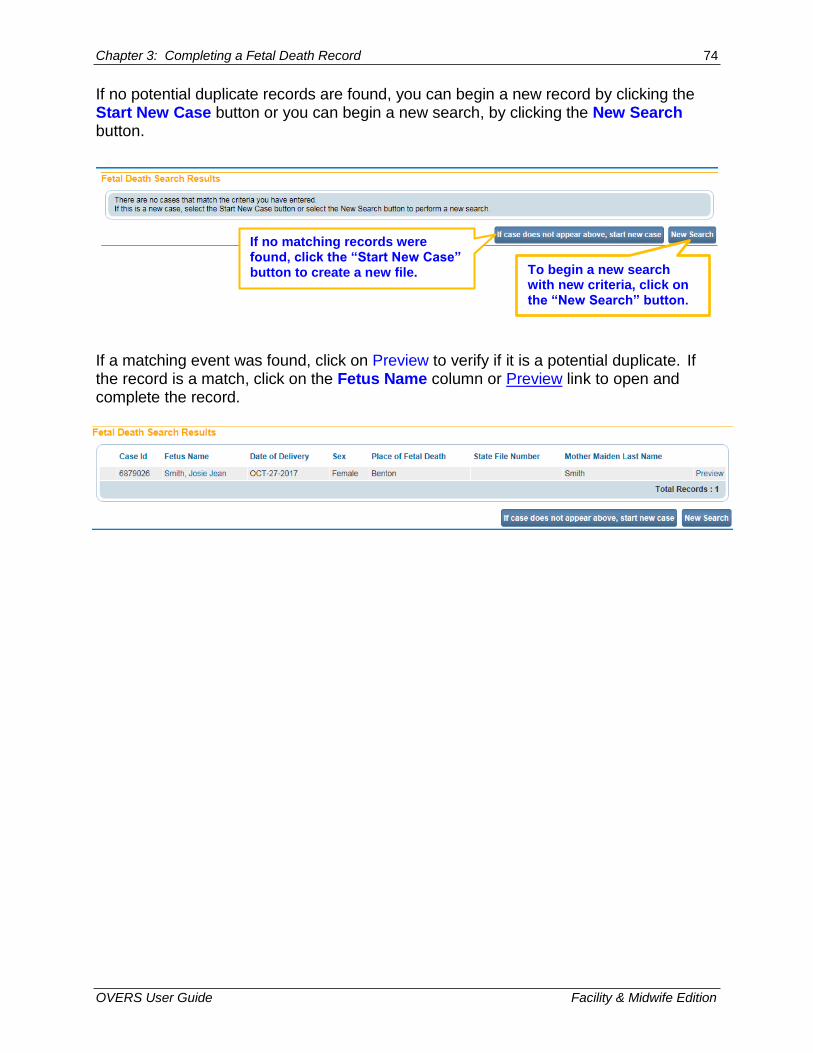
If no potential duplicate records are found, you can begin a new record by clicking the Start New Case button or you can begin a new search, by clicking the New Search button.
If a matching event was found, click on Preview to verify if it is a potential duplicate. If the record is a match, click on the Fetus Name column or Preview link to open and complete the record.
If no matching records were found, click the “Start New Case” button to create a new file.
To begin a new search with new criteria, click on the “New Search” button. Search” button.

OVERS User Guide Facility & Midwife Edition
Chapter 3: Completing a Fetal Death Record 75
For our purposes, we are selecting Start New Case. The Fetal Death Registration Menu will open, displaying the Fetus page:
Locate an Existing Record There are two ways to locate records in the OVERS application using the Life Events menu: Locate Case and Start/Edit New Case.
Locate Case is used to locate records that have been started by or are “owned” by the user or facility currently using the application. A facility becomes the owner of a record if a user at that facility started the case or assumed ownership from another facility.
Although Start/Edit New Case can also be used to find existing, partially complete records it is not recommended as a search tool. Start/Edit New Case is best used to start a new case or to pick up a case that is not owned by another facility.
NOTE: The Locate Case option is the more flexible search tool if not all required criteria are known.

OVERS User Guide Facility & Midwife Edition
Chapter 3: Completing a Fetal Death Record 76
Fetal Death Registration The Fetal Death Registration Menu provides links to a series of pages that are used for gathering all the information needed to register a new fetal death record. The pages that comprise the Fetal Death Registration Menu are grouped into Personal Information, Medical Information and Affirm/Certify sub-menus.
Personal Information
The first sub-menu, Personal Information, contains the pages necessary to gather personal, legal information about the fetal death and parents.
Fetus Page
The first page in the Personal Information sub-menu is the Fetus page. The first step in completing this page is to complete the Fetus Name tab.
Note: Each name field allows up to 50 characters. More than one name can be entered into any of the name fields by either separating the two names with a
space or with a hyphen.

OVERS User Guide Facility & Midwife Edition
Chapter 3: Completing a Fetal Death Record 77
Date of Delivery is in a red box, indicating that this is a required item. Enter the date
manually or use the Calendar icon ( ) to launch the Calendar Control. (See Chapter 1, Basic Navigation for details on using a calendar control.)
Time of Delivery consists of 3 controls: 2 number entry boxes and one AM/Military/PM dropdown list. In the first number entry box enter the 2-digit hour. For example, if the fetal death occurred at 6:30 am, enter ‘06’ in the first number box.
In the second number entry box enter the 2-digit minute at which delivery occurred. If the delivery occurred at 6:30 am, enter ‘30’ in the 2nd number box. To complete the Time of Delivery entry, make a valid selection from the AM/Military/PM dropdown list.
Sex – Make a selection from the dropdown list. Method of Disposition - Make a selection from the dropdown list. If Burial is selected, then the Funeral Home Facility Name must be entered. Funeral Home Facility Name –To enter a funeral home facility name, click on the
magnifying glass ( ) control to search.
Enter two-digit minute here. Enter two-digit hour here.
Note: For Medical Examiners Only
If the actual date of delivery of the fetus is not known, enter the date
the fetus was found as the date of delivery.

OVERS User Guide Facility & Midwife Edition
Chapter 3: Completing a Fetal Death Record 78
In the web page dialog window that appears, enter all or part of the Funeral home name. If entering only part of the name, use the wildcard (%) at the end of the entry. Click the Search button. The search results will appear. Click the select button next to the appropriate facility.
The Funeral Home section is auto-filled with the user’s office location.
To delete the entry, click on the Eraser control ( ). ID Tag Number – Enter the Disposition ID Tag number provided by the funeral home.
Click the Next button to save and proceed to the Mother page, Clear to clear all entries, or Save to save changes without leaving this page. The Return button will take you out of the record without saving your entries. Clicking the Validate Page button will save the entries and check the entire record for errors.
OVERS User Guide Facility & Midwife Edition
Chapter 3: Completing a Fetal Death Record 79
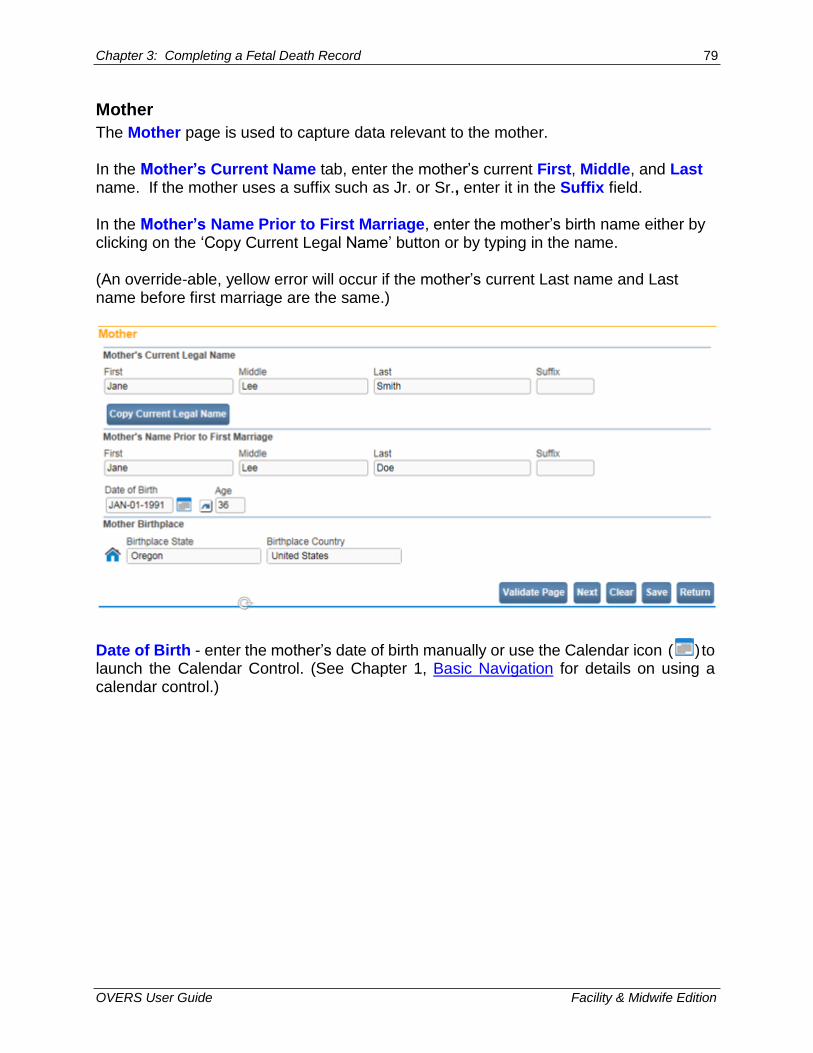
Mother
The Mother page is used to capture data relevant to the mother.
In the Mother’s Current Name tab, enter the mother’s current First, Middle, and Last name. If the mother uses a suffix such as Jr. or Sr., enter it in the Suffix field.
In the Mother’s Name Prior to First Marriage, enter the mother’s birth name either by clicking on the ‘Copy Current Legal Name’ button or by typing in the name.
(An override-able, yellow error will occur if the mother’s current Last name and Last name before first marriage are the same.)
Date of Birth - enter the mother’s date of birth manually or use the Calendar icon ( ) to launch the Calendar Control. (See Chapter 1, Basic Navigation for details on using a calendar control.)

OVERS User Guide Facility & Midwife Edition
Chapter 3: Completing a Fetal Death Record 80
After entering the Date of Birth, click the auto-populate ( ) button to auto-calculate the age in the Age field.
The Mother’s Birth Place control is used to capture the mother’s Birthplace State and Birthplace Country.
Enter the birthplace manually or use the House icon ( ) to launch the Places Control.
Click the Next button to save and proceed to the Mother Address page, Clear to clear all entries, or Save to save changes without leaving this page. The Return button will take you out of the record without saving your entries. Clicking the Validate Page button will check the entire record for errors.
OVERS User Guide Facility & Midwife Edition
Chapter 3: Completing a Fetal Death Record 81
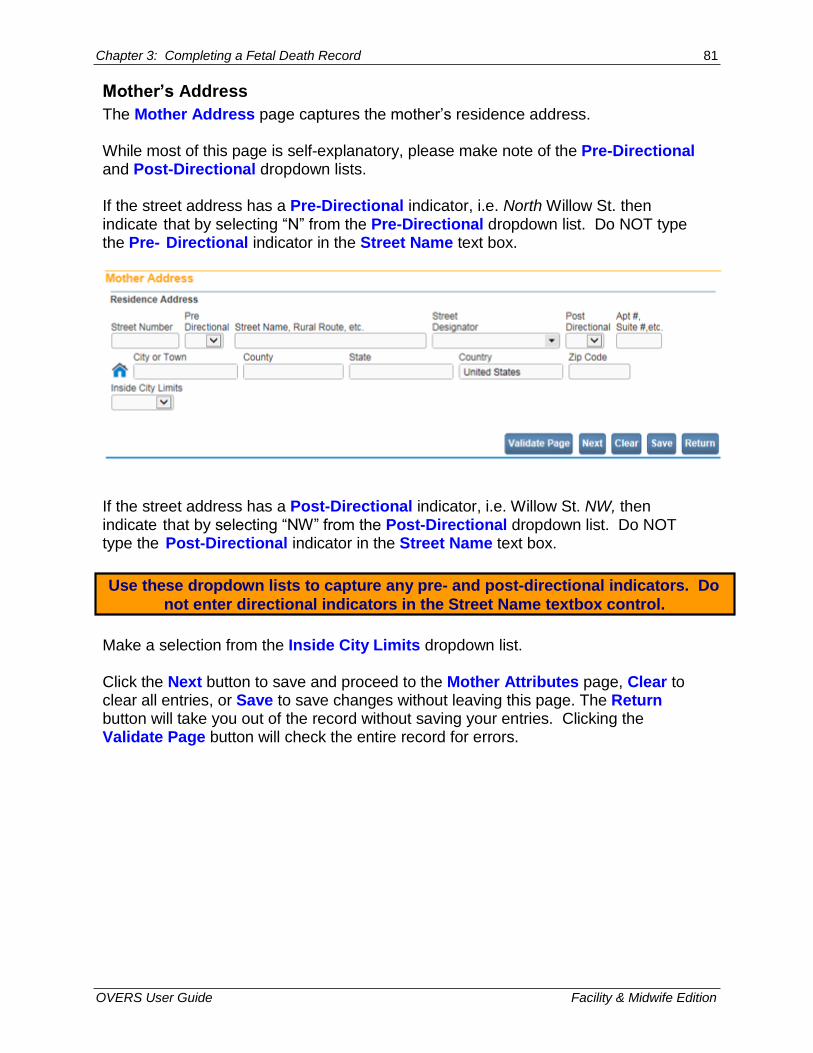
Mother’s Address
The Mother Address page captures the mother’s residence address.
While most of this page is self-explanatory, please make note of the Pre-Directional and Post-Directional dropdown lists.
If the street address has a Pre-Directional indicator, i.e. North Willow St. then indicate that by selecting “N” from the Pre-Directional dropdown list. Do NOT type the Pre- Directional indicator in the Street Name text box.
If the street address has a Post-Directional indicator, i.e. Willow St. NW, then indicate that by selecting “NW” from the Post-Directional dropdown list. Do NOT type the Post-Directional indicator in the Street Name text box.
Make a selection from the Inside City Limits dropdown list.
Click the Next button to save and proceed to the Mother Attributes page, Clear to clear all entries, or Save to save changes without leaving this page. The Return button will take you out of the record without saving your entries. Clicking the Validate Page button will check the entire record for errors.
Use these dropdown lists to capture any pre- and post-directional indicators. Do
not enter directional indicators in the Street Name textbox control.
OVERS User Guide Facility & Midwife Edition
Chapter 3: Completing a Fetal Death Record 82
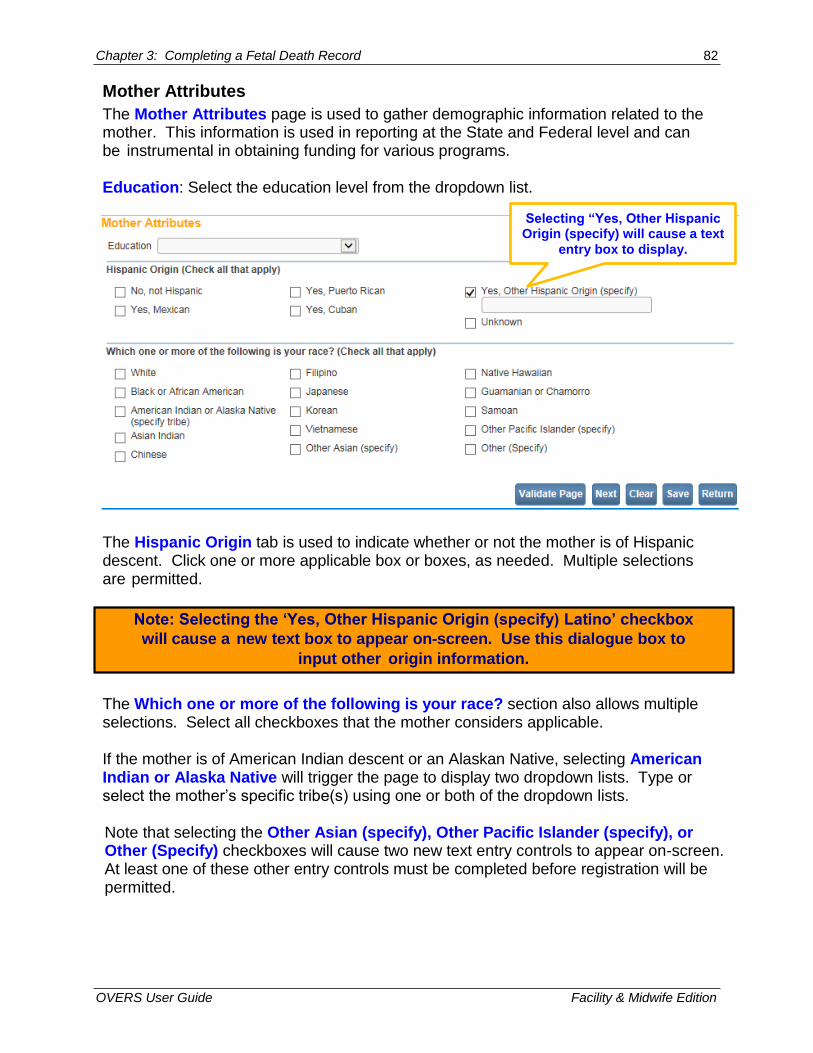
Mother Attributes
The Mother Attributes page is used to gather demographic information related to the mother. This information is used in reporting at the State and Federal level and can be instrumental in obtaining funding for various programs.
Education: Select the education level from the dropdown list.
The Hispanic Origin tab is used to indicate whether or not the mother is of Hispanic descent. Click one or more applicable box or boxes, as needed. Multiple selections are permitted.
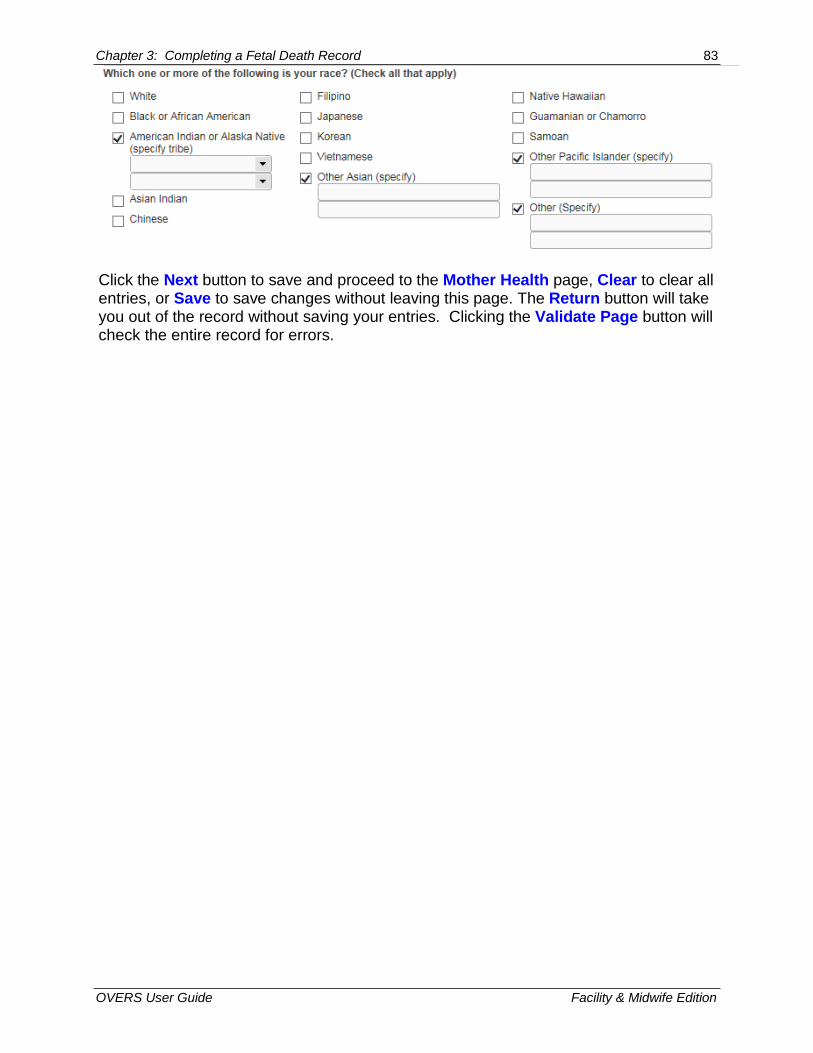
The Which one or more of the following is your race? section also allows multiple selections. Select all checkboxes that the mother considers applicable.
If the mother is of American Indian descent or an Alaskan Native, selecting American Indian or Alaska Native will trigger the page to display two dropdown lists. Type or select the mother’s specific tribe(s) using one or both of the dropdown lists. Note that selecting the Other Asian (specify), Other Pacific Islander (specify), or Other (Specify) checkboxes will cause two new text entry controls to appear on-screen. At least one of these other entry controls must be completed before registration will be permitted.
Note: Selecting the ‘Yes, Other Hispanic Origin (specify) Latino’ checkbox
will cause a new text box to appear on-screen. Use this dialogue box to
input other origin information.
Selecting “Yes, Other Hispanic Origin (specify) will cause a text
entry box to display.
OVERS User Guide Facility & Midwife Edition
Chapter 3: Completing a Fetal Death Record 83
Click the Next button to save and proceed to the Mother Health page, Clear to clear all entries, or Save to save changes without leaving this page. The Return button will take you out of the record without saving your entries. Clicking the Validate Page button will check the entire record for errors.
OVERS User Guide Facility & Midwife Edition
Chapter 3: Completing a Fetal Death Record 84
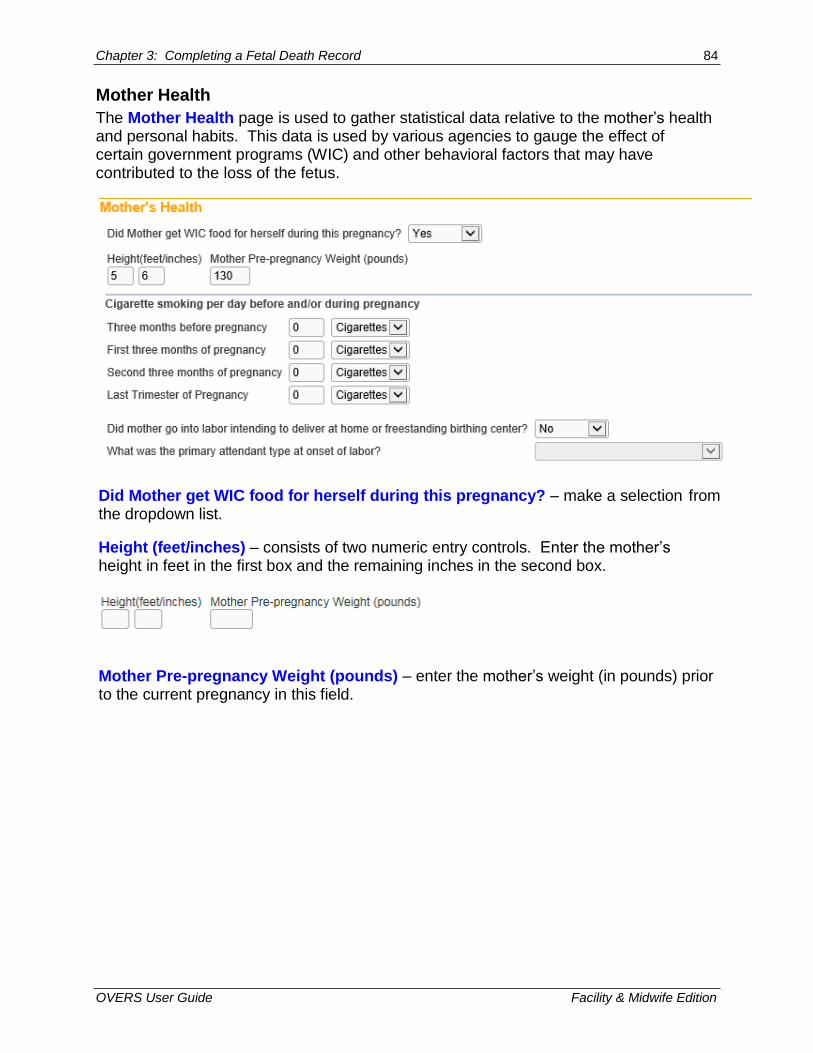
Mother Health
The Mother Health page is used to gather statistical data relative to the mother’s health and personal habits. This data is used by various agencies to gauge the effect of certain government programs (WIC) and other behavioral factors that may have contributed to the loss of the fetus.
Did Mother get WIC food for herself during this pregnancy? – make a selection from the dropdown list.
Height (feet/inches) – consists of two numeric entry controls. Enter the mother’s height in feet in the first box and the remaining inches in the second box.
Mother Pre-pregnancy Weight (pounds) – enter the mother’s weight (in pounds) prior to the current pregnancy in this field.

OVERS User Guide Facility & Midwife Edition
Chapter 3: Completing a Fetal Death Record 85
Cigarette Smoking per day before and during pregnancy – this section is used to capture the mother’s use of tobacco (smoking) during the 3 months prior to the current pregnancy and each of the trimesters of pregnancy. Enter zero or the approximate number of cigarettes smoked and select Cigarettes from the applicable dropdown lists.
Did mother go into labor intending to deliver at home or freestanding birthing center? - make a selection from the dropdown list. If the answer is Yes, provide the answer to the What was the primary attendant type at onset of labor? question.
Click the Next button to save and proceed to the Marital Status page, Clear to clear all entries, or Save to save changes without leaving this page. The Return button will take you out of the record without saving your entries. Clicking the Validate Page button will check the entire record for errors.

OVERS User Guide Facility & Midwife Edition
Chapter 3: Completing a Fetal Death Record 86
Marital Status
The Marital Status page collects Marital Information and Paternity Information.
First, make a selection from the Was Mother Married at Conception, at Delivery, or within 300 days of Delivery? dropdown list. [This list includes a selection for Domestic Partner.]
Second, make a selection from the Will Father information be collected in this Report? If the mother is married to a same sex spouse or has an Oregon Registered Domestic Partnership and the spouse or partner will be reported on the record, select Yes.
If Yes is selected and the Save button clicked, then the page will refresh and an additional page will appear in the Personal Information submenu: Father.
The Personal Information menu may change according to the selections made on this page.
Selecting ‘Yes’ for ‘Mother married at delivery…’ and clicking the Next or the Save button will cause a new menu option (Father) to
appear.
OVERS User Guide Facility & Midwife Edition
Chapter 3: Completing a Fetal Death Record 87
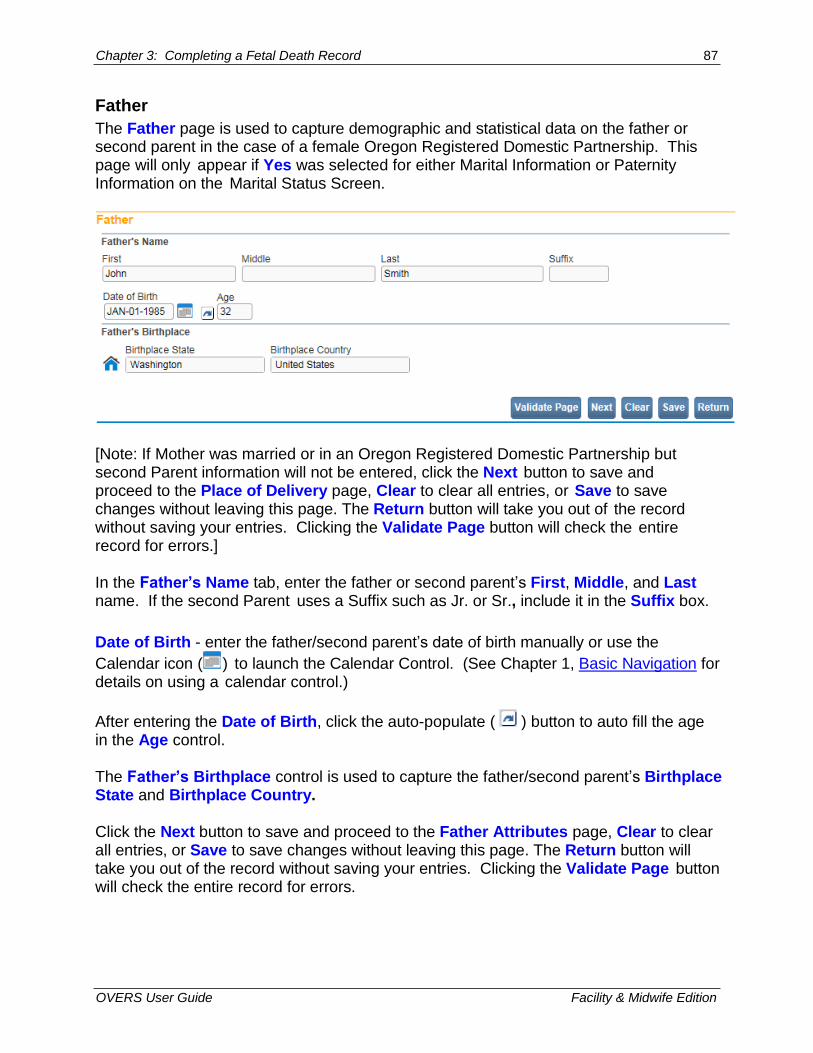
Father
The Father page is used to capture demographic and statistical data on the father or second parent in the case of a female Oregon Registered Domestic Partnership. This page will only appear if Yes was selected for either Marital Information or Paternity Information on the Marital Status Screen.
[Note: If Mother was married or in an Oregon Registered Domestic Partnership but second Parent information will not be entered, click the Next button to save and proceed to the Place of Delivery page, Clear to clear all entries, or Save to save changes without leaving this page. The Return button will take you out of the record without saving your entries. Clicking the Validate Page button will check the entire record for errors.] In the Father’s Name tab, enter the father or second parent’s First, Middle, and Last name. If the second Parent uses a Suffix such as Jr. or Sr., include it in the Suffix box.
Date of Birth - enter the father/second parent’s date of birth manually or use the
Calendar icon ( ) to launch the Calendar Control. (See Chapter 1, Basic Navigation for details on using a calendar control.)
After entering the Date of Birth, click the auto-populate ( ) button to auto fill the age in the Age control. The Father’s Birthplace control is used to capture the father/second parent’s Birthplace State and Birthplace Country. Click the Next button to save and proceed to the Father Attributes page, Clear to clear all entries, or Save to save changes without leaving this page. The Return button will take you out of the record without saving your entries. Clicking the Validate Page button will check the entire record for errors.
OVERS User Guide Facility & Midwife Edition
Chapter 3: Completing a Fetal Death Record 88
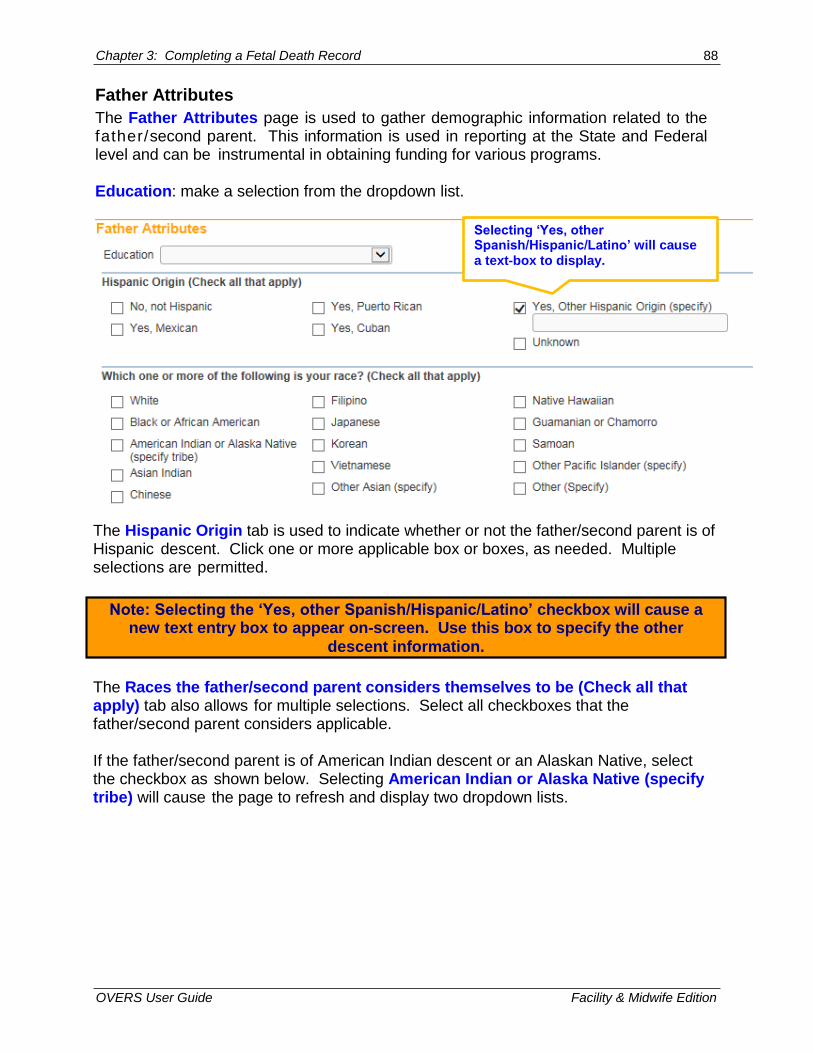
Father Attributes
The Father Attributes page is used to gather demographic information related to the father/second parent. This information is used in reporting at the State and Federal level and can be instrumental in obtaining funding for various programs. Education: make a selection from the dropdown list.
The Hispanic Origin tab is used to indicate whether or not the father/second parent is of Hispanic descent. Click one or more applicable box or boxes, as needed. Multiple selections are permitted.
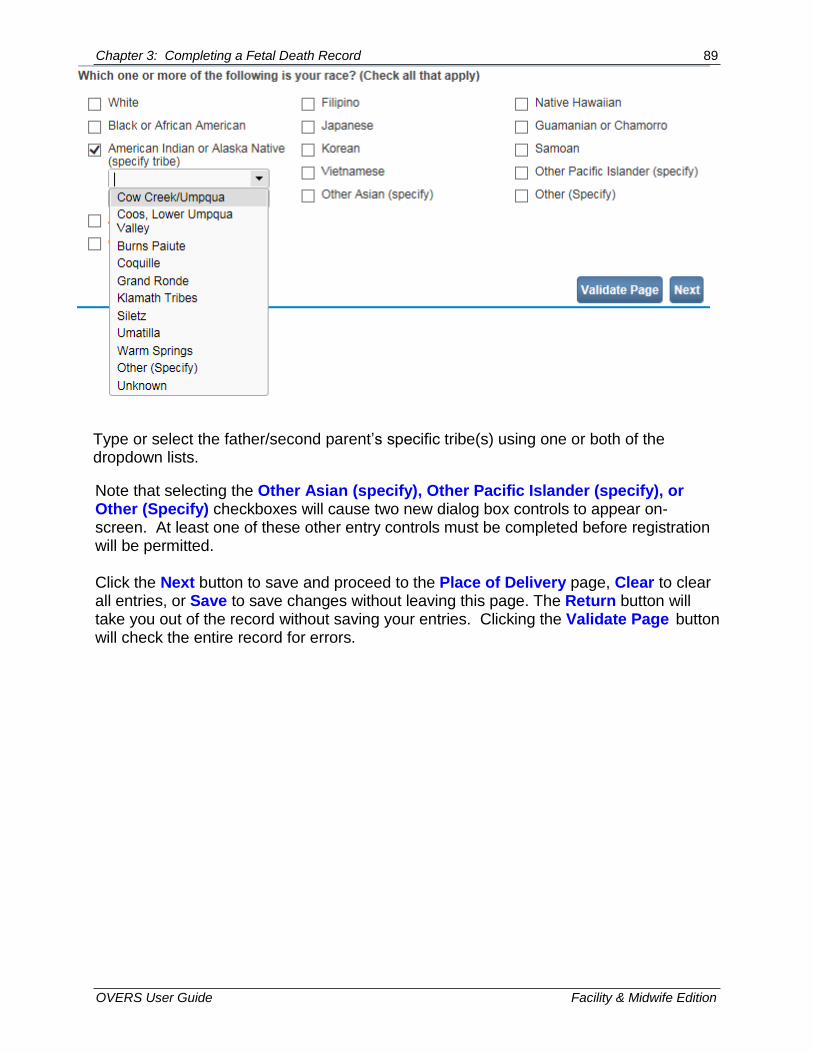
The Races the father/second parent considers themselves to be (Check all that apply) tab also allows for multiple selections. Select all checkboxes that the father/second parent considers applicable.
If the father/second parent is of American Indian descent or an Alaskan Native, select the checkbox as shown below. Selecting American Indian or Alaska Native (specify tribe) will cause the page to refresh and display two dropdown lists.
Note: Selecting the ‘Yes, other Spanish/Hispanic/Latino’ checkbox will cause a new text entry box to appear on-screen. Use this box to specify the other
descent information.
Selecting ‘Yes, other Spanish/Hispanic/Latino’ will cause a text-box to display.
OVERS User Guide Facility & Midwife Edition
Chapter 3: Completing a Fetal Death Record 89
Type or select the father/second parent’s specific tribe(s) using one or both of the dropdown lists.
Note that selecting the Other Asian (specify), Other Pacific Islander (specify), or Other (Specify) checkboxes will cause two new dialog box controls to appear on- screen. At least one of these other entry controls must be completed before registration will be permitted.
Click the Next button to save and proceed to the Place of Delivery page, Clear to clear all entries, or Save to save changes without leaving this page. The Return button will take you out of the record without saving your entries. Clicking the Validate Page button will check the entire record for errors.
OVERS User Guide Facility & Midwife Edition
Chapter 3: Completing a Fetal Death Record 90
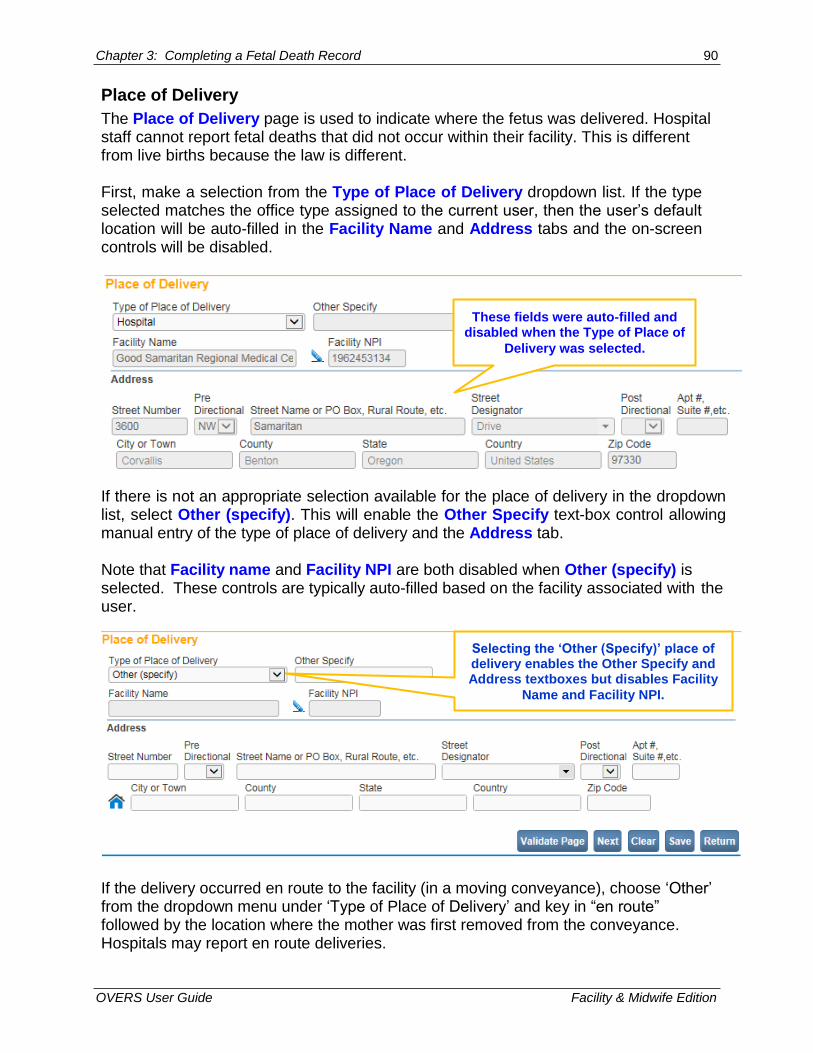
Place of Delivery
The Place of Delivery page is used to indicate where the fetus was delivered. Hospital staff cannot report fetal deaths that did not occur within their facility. This is different from live births because the law is different. First, make a selection from the Type of Place of Delivery dropdown list. If the type selected matches the office type assigned to the current user, then the user’s default location will be auto-filled in the Facility Name and Address tabs and the on-screen controls will be disabled.
If there is not an appropriate selection available for the place of delivery in the dropdown list, select Other (specify). This will enable the Other Specify text-box control allowing manual entry of the type of place of delivery and the Address tab. Note that Facility name and Facility NPI are both disabled when Other (specify) is selected. These controls are typically auto-filled based on the facility associated with the user.
If the delivery occurred en route to the facility (in a moving conveyance), choose ‘Other’ from the dropdown menu under ‘Type of Place of Delivery’ and key in “en route” followed by the location where the mother was first removed from the conveyance. Hospitals may report en route deliveries.
These fields were auto-filled and disabled when the Type of Place of
Delivery was selected.
Selecting the ‘Other (Specify)’ place of delivery enables the Other Specify and Address textboxes but disables Facility
Name and Facility NPI.
OVERS User Guide Facility & Midwife Edition
Chapter 3: Completing a Fetal Death Record 91
Click the Next button to save and proceed to the Reporter page (the last page of the Personal Information submenu), Clear to clear all entries, or Save to save changes without leaving this page. The Return button will take you out of the record without saving your entries. Clicking the Validate Page button will check the entire record for errors.
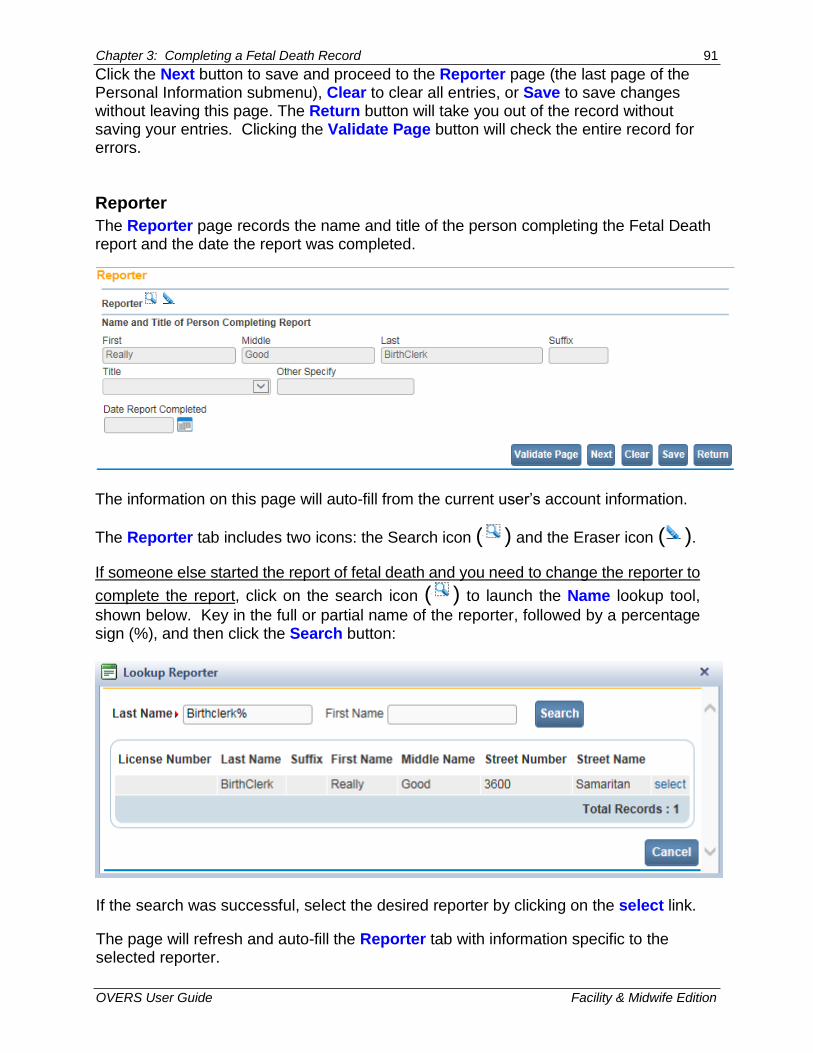
Reporter
The Reporter page records the name and title of the person completing the Fetal Death report and the date the report was completed.
The information on this page will auto-fill from the current user’s account information.
The Reporter tab includes two icons: the Search icon ( ) and the Eraser icon ( ).
If someone else started the report of fetal death and you need to change the reporter to
complete the report, click on the search icon ( ) to launch the Name lookup tool,
shown below. Key in the full or partial name of the reporter, followed by a percentage sign (%), and then click the Search button:
If the search was successful, select the desired reporter by clicking on the select link.
The page will refresh and auto-fill the Reporter tab with information specific to the selected reporter.
OVERS User Guide Facility & Midwife Edition
Chapter 3: Completing a Fetal Death Record 92
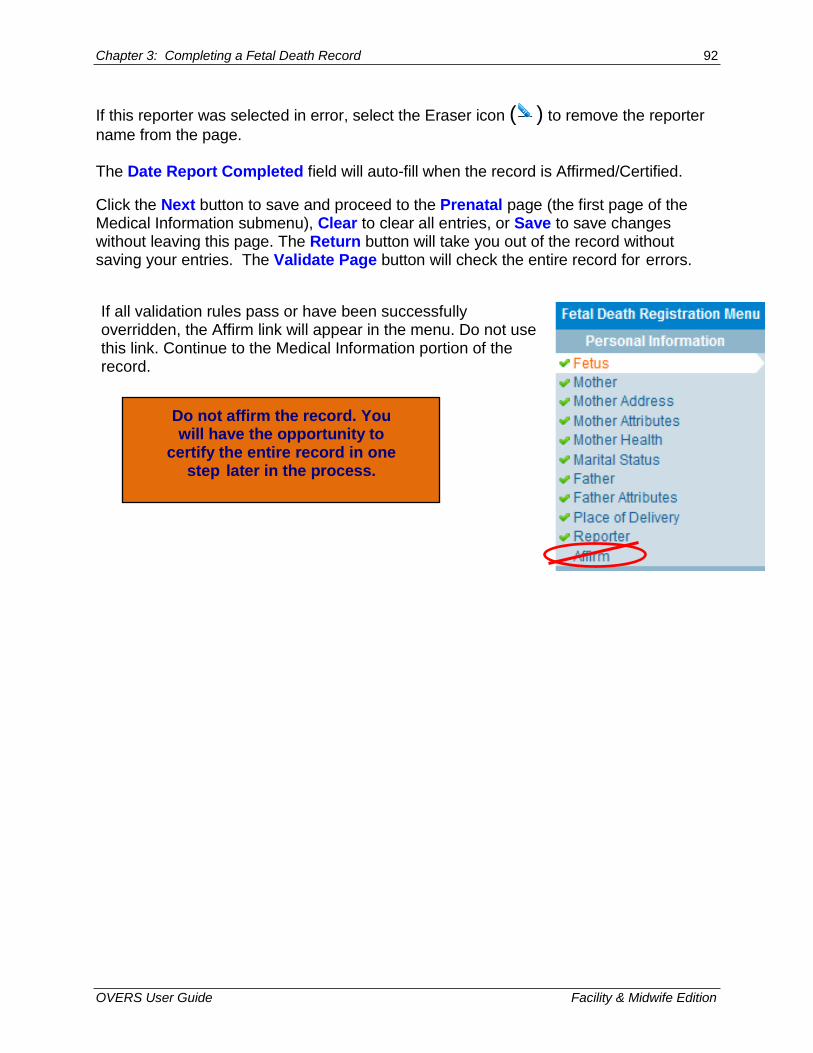
If this reporter was selected in error, select the Eraser icon ( ) to remove the reporter
name from the page. The Date Report Completed field will auto-fill when the record is Affirmed/Certified.
Click the Next button to save and proceed to the Prenatal page (the first page of the Medical Information submenu), Clear to clear all entries, or Save to save changes without leaving this page. The Return button will take you out of the record without saving your entries. The Validate Page button will check the entire record for errors.
If all validation rules pass or have been successfully overridden, the Affirm link will appear in the menu. Do not use this link. Continue to the Medical Information portion of the record.
Do not affirm the record. You will have the opportunity to
certify the entire record in one step later in the process.

OVERS User Guide Facility & Midwife Edition
Chapter 3: Completing a Fetal Death Record 93
Medical Information
The second sub-menu of the Fetal Death Registration menu, Medical Information, contains the pages necessary to gather confidential, medical information about the fetal death and parents that is collected for statistical purposes.
Prenatal
The Prenatal page is used to capture information relative to the type and frequency of prenatal care administered to the mother. If applicable, enter the Mother Medical Record # in the appropriate on-screen controls.
Enter the mother’s Date of Last Menses using a valid date format (mmddyyyy) or by clicking on the Calendar Control.
The Previous Live Births Tab On the Previous Live Births tab, make a selection from the Number Now Living dropdown list. If this is the mother’s first pregnancy, select None from the list. A selection must also be made from the Number Now Dead dropdown list. Again, if this is the mother’s first pregnancy, select None.
OVERS User Guide Facility & Midwife Edition
Chapter 3: Completing a Fetal Death Record 94
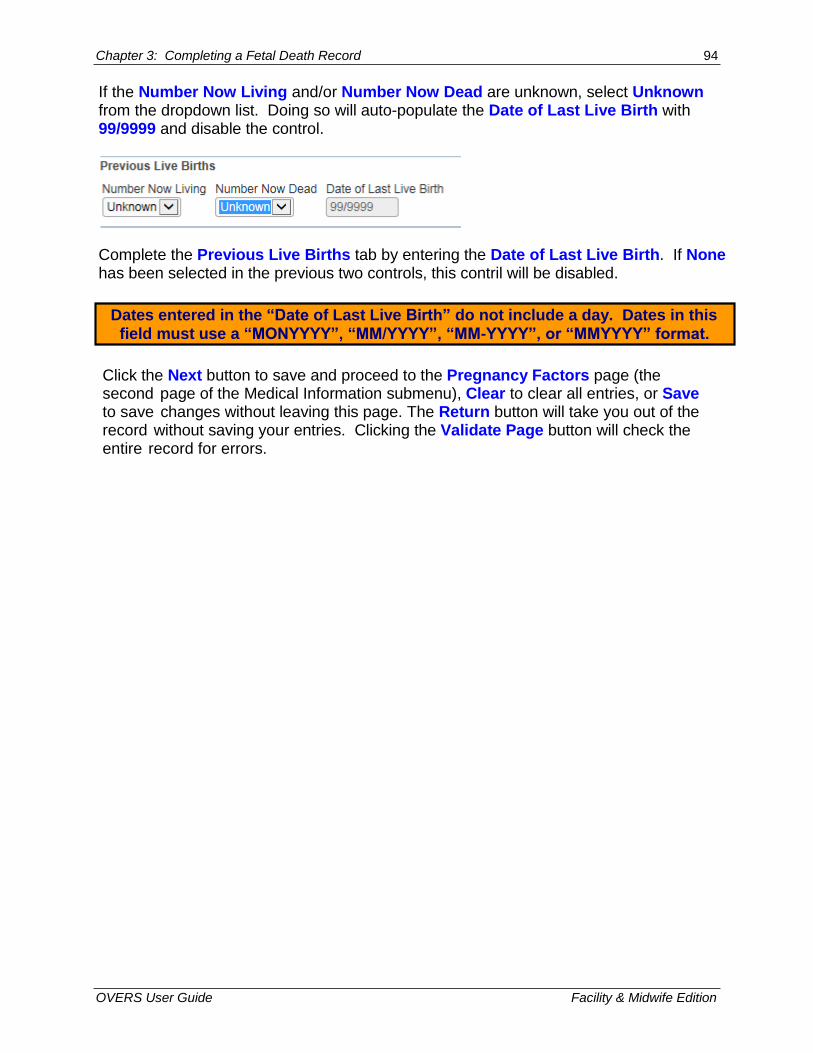
If the Number Now Living and/or Number Now Dead are unknown, select Unknown from the dropdown list. Doing so will auto-populate the Date of Last Live Birth with 99/9999 and disable the control.
Complete the Previous Live Births tab by entering the Date of Last Live Birth. If None has been selected in the previous two controls, this contril will be disabled.
Click the Next button to save and proceed to the Pregnancy Factors page (the second page of the Medical Information submenu), Clear to clear all entries, or Save to save changes without leaving this page. The Return button will take you out of the record without saving your entries. Clicking the Validate Page button will check the entire record for errors.
Dates entered in the “Date of Last Live Birth” do not include a day. Dates in this field must use a “MONYYYY”, “MM/YYYY”, “MM-YYYY”, or “MMYYYY” format.

OVERS User Guide Facility & Midwife Edition
Chapter 3: Completing a Fetal Death Record 95
Pregnancy Factors
The Pregnancy Factors page attempts to gather information related to conditions suffered or experienced by the mother which could have resulted in complications during pregnancy.
This page is comprised of two tabs: Risk Factors for this Pregnancy
Each tab allows for multiple entries, meaning that the user can select one or more conditions for each tab control on the page; however, at least one selection must be made for each set of conditions. In the example above, we have selected None Of The Above on each tab. Click the Next button to save and proceed to the Delivery page (the third page of the Medical Information submenu), Clear to clear all entries, or Save to save changes without leaving this page. The Return button will take you out of the record without saving your entries. Clicking the Validate Page button will check the entire record for errors.
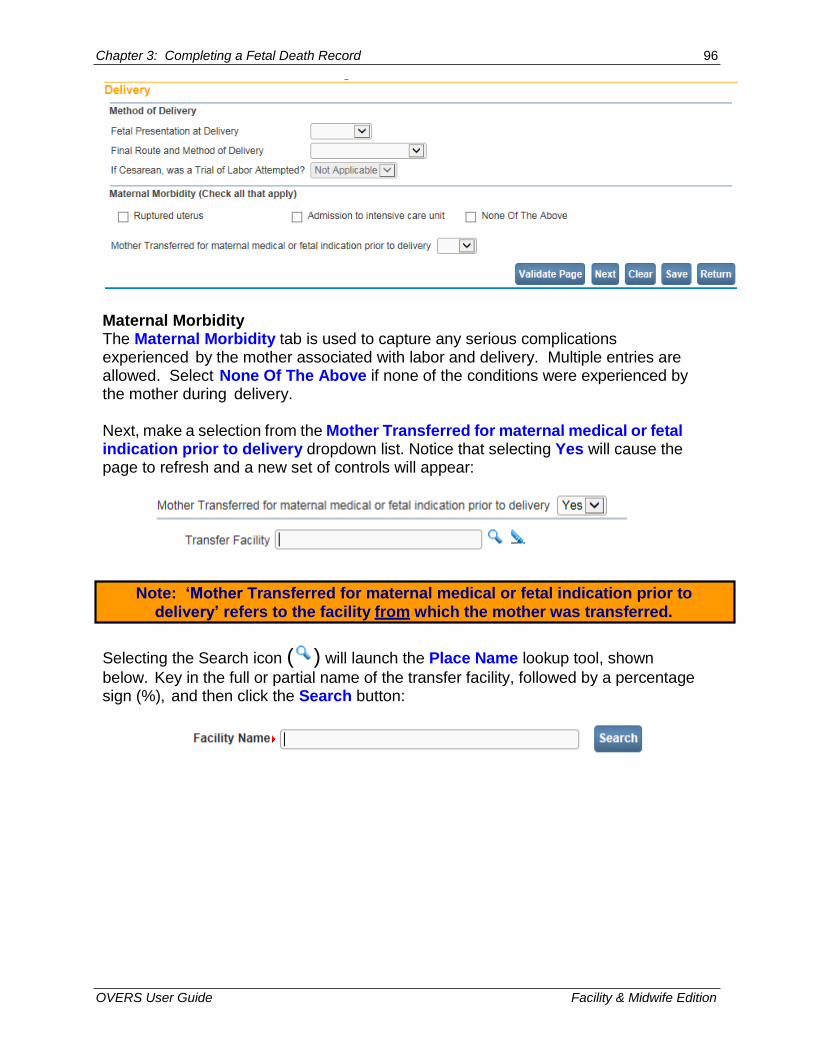
Delivery
The Delivery page is used to gather information related to conditions suffered or experienced during labor which may have health implications for the mother and/or fetus. This page is comprised of two tab controls: Method of Delivery and Maternal Morbidity. Method of Delivery The Method of Delivery tab is used to describe how the fetus was delivered or expelled. First, make a selection from the Fetal Presentation at Delivery and Final Route and Method of Delivery dropdown lists. If Cesarean, was a Trial of Labor Attempted? will only be active and selectable if Cesarean was selected from the Final Route and Method of Delivery control above. Not Applicable is not acceptable as a response to Trial of Labor Attempted when the Method of Delivery is Cesarean.
OVERS User Guide Facility & Midwife Edition
Chapter 3: Completing a Fetal Death Record 96
Maternal Morbidity The Maternal Morbidity tab is used to capture any serious complications experienced by the mother associated with labor and delivery. Multiple entries are allowed. Select None Of The Above if none of the conditions were experienced by the mother during delivery.
Next, make a selection from the Mother Transferred for maternal medical or fetal indication prior to delivery dropdown list. Notice that selecting Yes will cause the page to refresh and a new set of controls will appear:
Selecting the Search icon ( ) will launch the Place Name lookup tool, shown
below. Key in the full or partial name of the transfer facility, followed by a percentage sign (%), and then click the Search button:
Note: ‘Mother Transferred for maternal medical or fetal indication prior to delivery’ refers to the facility from which the mother was transferred.
OVERS User Guide Facility & Midwife Edition
Chapter 3: Completing a Fetal Death Record 97
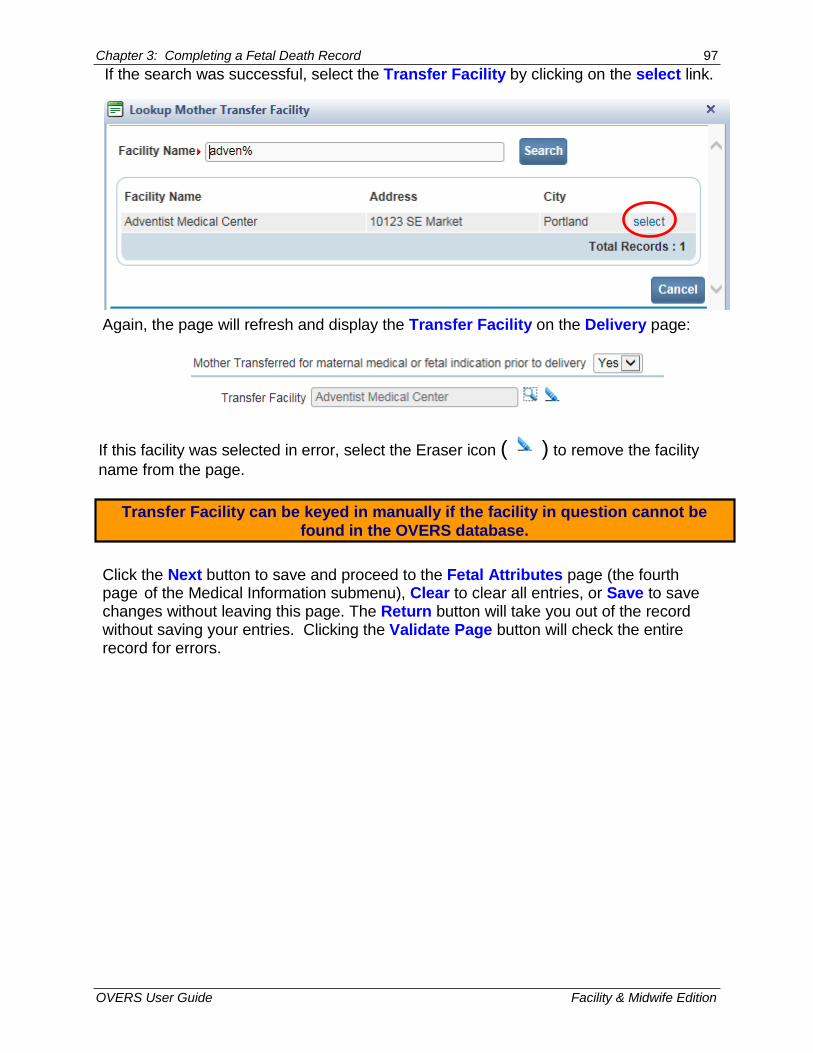
If the search was successful, select the Transfer Facility by clicking on the select link.
Again, the page will refresh and display the Transfer Facility on the Delivery page:
If this facility was selected in error, select the Eraser icon ( ) to remove the facility
name from the page.
Click the Next button to save and proceed to the Fetal Attributes page (the fourth page of the Medical Information submenu), Clear to clear all entries, or Save to save changes without leaving this page. The Return button will take you out of the record without saving your entries. Clicking the Validate Page button will check the entire record for errors.
Transfer Facility can be keyed in manually if the facility in question cannot be found in the OVERS database.

OVERS User Guide Facility & Midwife Edition
Chapter 3: Completing a Fetal Death Record 98
Fetal Attributes
This page is used to capture data relevant to the fetus at the time of delivery.
Weight of Fetus should be entered in either Pounds / Ounces or Grams. Grams is preferred. Both weight measurements cannot be used simultaneously. If Pounds / Ounces is used, enter the weight in pounds in the first entry box and the remainder ounces in the second entry box.
Enter the medically-estimated term of the mother’s pregnancy in the Obstetric Estimate of Gestation (weeks) field.
Make a valid selection from the Plurality dropdown list. If only one fetus was delivered, select Single. If more than one fetus or child was delivered – even if one or more children were stillborn or died shortly after birth – select the appropriate plurality from the list - twin, triplet, etc.
Delivery Order will be disabled if Single was selected from the Plurality list. Otherwise, if more than one child was delivered – even if one or more children were stillborn or died shortly after birth – select the current child’s birth order from this dropdown list. [Note: When plural deliveries are linked, much of the information from the first record will carry over to other linked records. However, if the second delivery is a live birth, some of the screens will contain different information. For example, social security numbers must be collected from the parents in the case of a live birth.] Click the Next button to save and proceed to the Cause/Conditions Contributing to fetal death page (the fifth page of the Medical Information submenu).
If more than one child was delivered, a new link called ‘Link Plural Delivery' will appear on the ‘Fetal Death Registration Menu’ > ‘Other Links’ submenu. To link
the fetal death record to another fetal death or live birth record for plural deliveries, see the section on Linking Plural Delivery in Section 4 of the User
Guide, starting on page 109.
Weight can be entered in pounds
and ounces or grams, but not both.
OVERS User Guide Facility & Midwife Edition
Chapter 3: Completing a Fetal Death Record 99
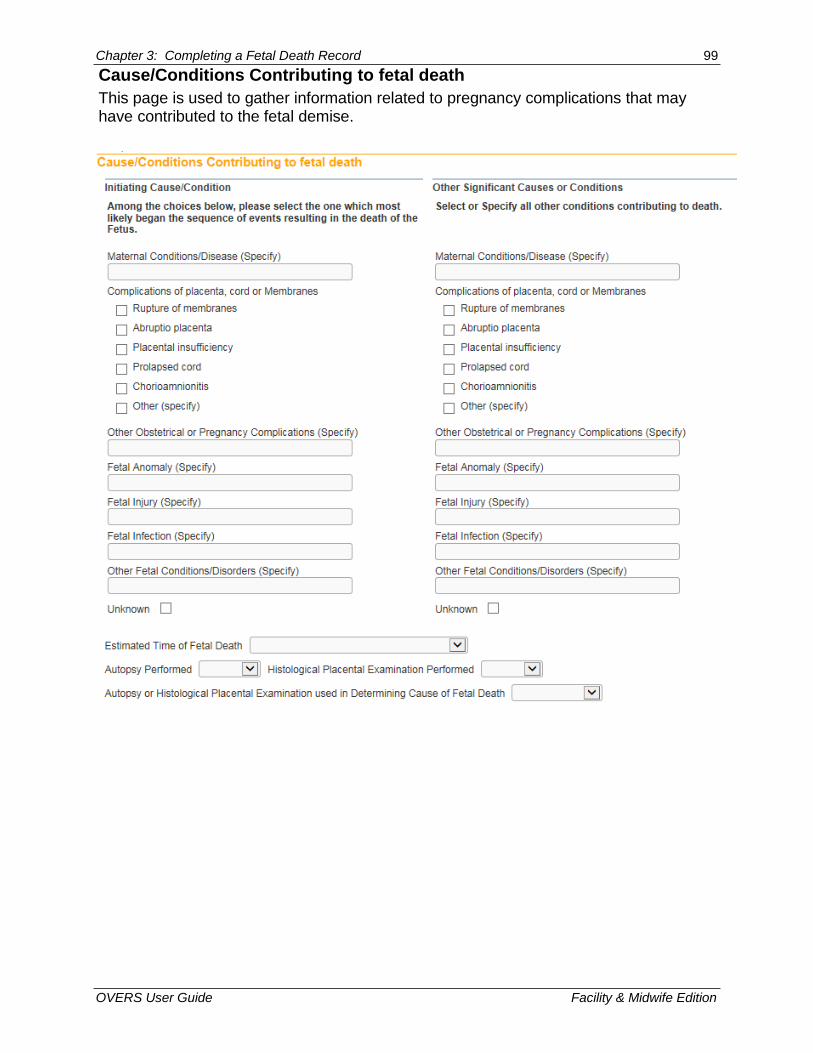
Cause/Conditions Contributing to fetal death
This page is used to gather information related to pregnancy complications that may have contributed to the fetal demise.
OVERS User Guide Facility & Midwife Edition
Chapter 3: Completing a Fetal Death Record 100
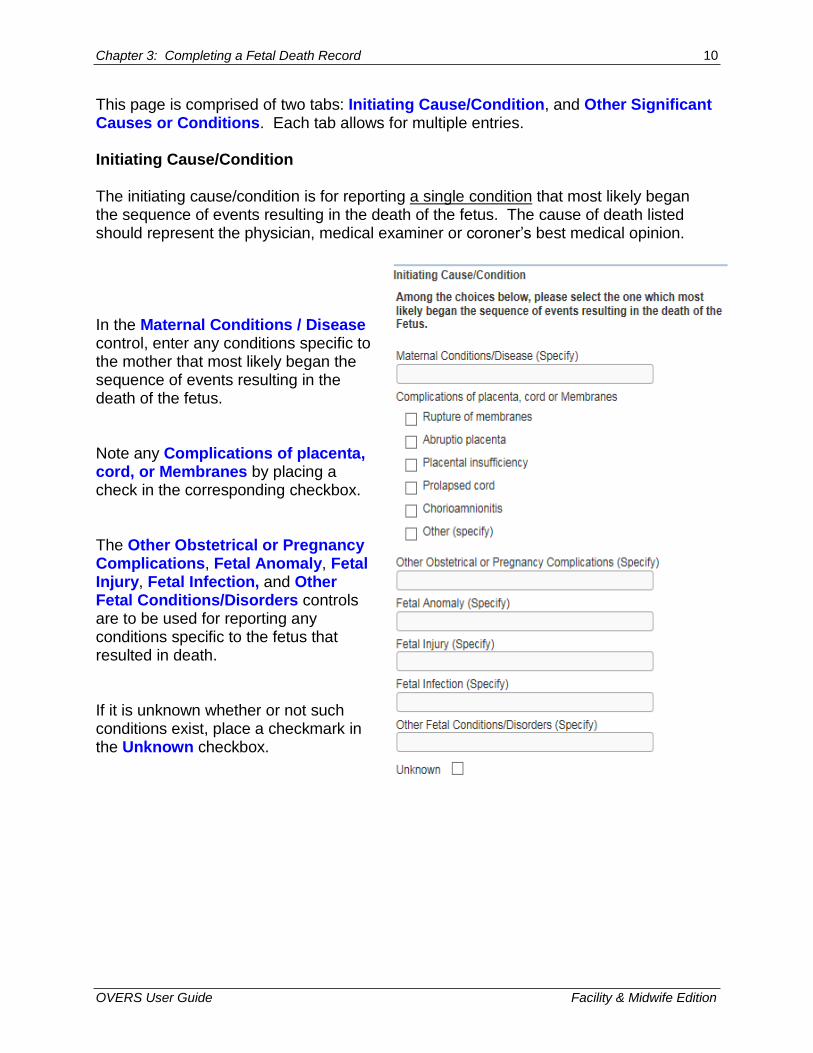
This page is comprised of two tabs: Initiating Cause/Condition, and Other Significant Causes or Conditions. Each tab allows for multiple entries.
Initiating Cause/Condition The initiating cause/condition is for reporting a single condition that most likely began the sequence of events resulting in the death of the fetus. The cause of death listed should represent the physician, medical examiner or coroner’s best medical opinion.
In the Maternal Conditions / Disease control, enter any conditions specific to the mother that most likely began the sequence of events resulting in the death of the fetus.
Note any Complications of placenta, cord, or Membranes by placing a check in the corresponding checkbox.
The Other Obstetrical or Pregnancy Complications, Fetal Anomaly, Fetal Injury, Fetal Infection, and Other Fetal Conditions/Disorders controls are to be used for reporting any conditions specific to the fetus that resulted in death.
If it is unknown whether or not such conditions exist, place a checkmark in the Unknown checkbox.
OVERS User Guide Facility & Midwife Edition
Chapter 3: Completing a Fetal Death Record 101
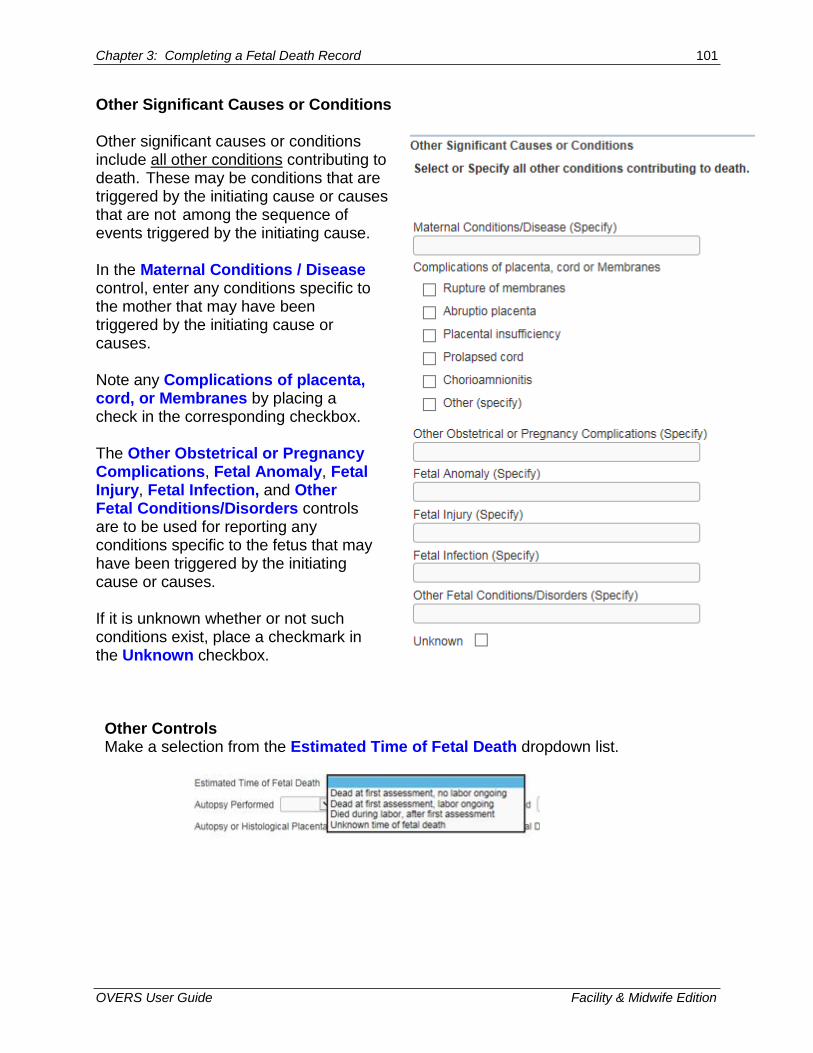
Other Significant Causes or Conditions Other significant causes or conditions include all other conditions contributing to death. These may be conditions that are triggered by the initiating cause or causes that are not among the sequence of events triggered by the initiating cause.
In the Maternal Conditions / Disease control, enter any conditions specific to the mother that may have been triggered by the initiating cause or causes.
Note any Complications of placenta, cord, or Membranes by placing a check in the corresponding checkbox.
The Other Obstetrical or Pregnancy Complications, Fetal Anomaly, Fetal Injury, Fetal Infection, and Other Fetal Conditions/Disorders controls are to be used for reporting any conditions specific to the fetus that may have been triggered by the initiating cause or causes.
If it is unknown whether or not such conditions exist, place a checkmark in the Unknown checkbox.
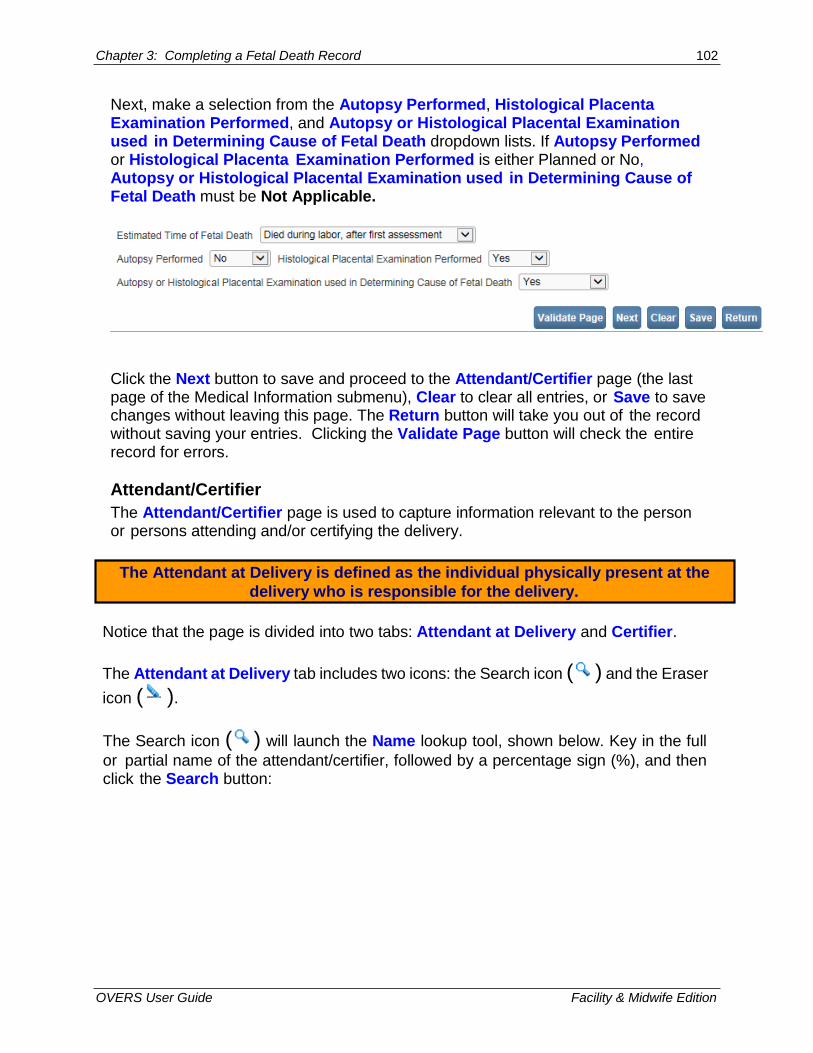
Other Controls Make a selection from the Estimated Time of Fetal Death dropdown list.
OVERS User Guide Facility & Midwife Edition
Chapter 3: Completing a Fetal Death Record 102
Next, make a selection from the Autopsy Performed, Histological Placenta Examination Performed, and Autopsy or Histological Placental Examination used in Determining Cause of Fetal Death dropdown lists. If Autopsy Performed or Histological Placenta Examination Performed is either Planned or No, Autopsy or Histological Placental Examination used in Determining Cause of Fetal Death must be Not Applicable.
Click the Next button to save and proceed to the Attendant/Certifier page (the last page of the Medical Information submenu), Clear to clear all entries, or Save to save changes without leaving this page. The Return button will take you out of the record without saving your entries. Clicking the Validate Page button will check the entire record for errors.
Attendant/Certifier
The Attendant/Certifier page is used to capture information relevant to the person or persons attending and/or certifying the delivery.
Notice that the page is divided into two tabs: Attendant at Delivery and Certifier.
The Attendant at Delivery tab includes two icons: the Search icon ( ) and the Eraser
icon ( ).
The Search icon ( ) will launch the Name lookup tool, shown below. Key in the full
or partial name of the attendant/certifier, followed by a percentage sign (%), and then click the Search button:
The Attendant at Delivery is defined as the individual physically present at the
delivery who is responsible for the delivery.

OVERS User Guide Facility & Midwife Edition
Chapter 3: Completing a Fetal Death Record 103
If the search was successful, select the desired attendant by clicking on the select link.
Again, the page will refresh and auto-fill the Attendant at Delivery tab with information specific to the selected attendant:
If this attendant was selected in error, select the Eraser icon ( ) to remove the facility
name from the page. If the attendant is not included in the search results, then enter the information manually.
The Certifier tab also includes the Search icon ( ) and the Eraser icon ( ),
meaning that the same set of steps detailed above can be used to auto-fill this control as well. This section auto-fills based on the user and should only be changed if you are certifying a fetal death report started by another user.
If the certifier and the attendant are the same person click the Same As Attendant checkbox and the Certifier tab will auto-fill with the attendant information from the Attendant tab.

OVERS User Guide Facility & Midwife Edition
Chapter 3: Completing a Fetal Death Record 104
Certifier NPI will auto-fill based on data stored in the OVERS database if the certifier is a licensed medical professional.
Date Certified will be auto-filled once the fetal death record has been certified using the biometric device.
Fetal death registration data entry is now complete. Click the Validate Page or Validate Registration button to check this page for errors. If no errors are found, then the page will refresh and two new menu items will appear: Certify and Affirm/Certify.
Certify
Once all pages in the Medical Information section of the report are complete, the Medical Information section can be validated.
Affirm/Certify Once all the pages in both the Personal Information and the Medical Information have been completed, validate the record. Click on the Affirm/Certify selection in the left menu.
Select “Same As Attendant” to copy the
attendant’s data to the certifier controls.
Do not certify the record. You will have the opportunity to
Affirm/Certify the entire record in the next step.

OVERS User Guide Facility & Midwife Edition
Chapter 3: Completing a Fetal Death Record 105
Affirm/Certify Affirmations An affirmation is used to record the fact that the certifier is accepting legal responsibility for the accuracy of the information provided. In Oregon, an affirmation is a legally binding statement made under the penalty of perjury.
Once all Fetal Death registration pages have been completed, validated, and all errors corrected, the Fetal Death Registration Menu will refresh and display the Affirm/Certify link.
To affirm the fetal death record, place a checkmark in the Affirm the following: checkbox, place a registered finger on the fingerprint scanning device, and click the Affirm button. OVERS will use biometric authentication to complete the affirmation process.
Upon successful biometric authentication, the record will be officially signed/affirmed and an Authentication Successful message displayed:
Click the Return button to return to the Fetal Death Registration Menu.
Uncertify
Once the record is affirmed you can still access it and view it for 6 months, although you will not be able to edit the record without either uncertifying it (if it has not yet been registered at the State level) or requesting an amendment (if it has already been registered at the State level). To learn more about requesting an amendment see the amendment section.
OVERS User Guide Facility & Midwife Edition
Chapter 3: Completing a Fetal Death Record 106
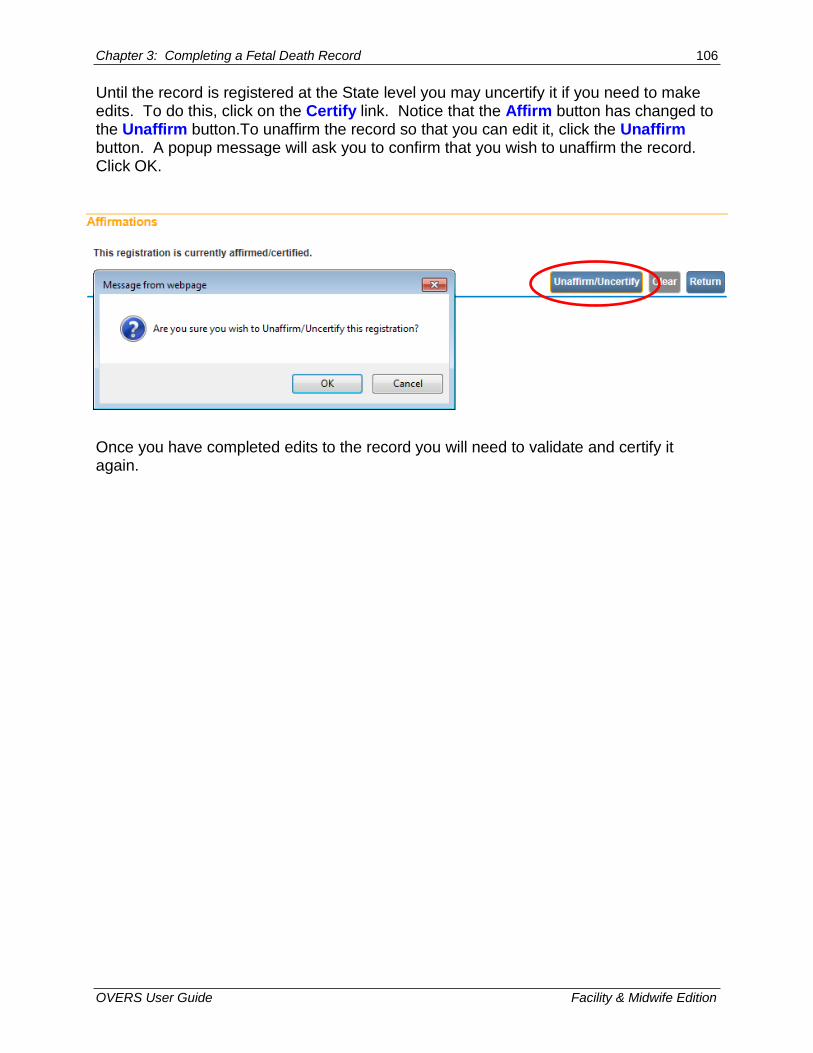
Until the record is registered at the State level you may uncertify it if you need to make edits. To do this, click on the Certify link. Notice that the Affirm button has changed to the Unaffirm button.To unaffirm the record so that you can edit it, click the Unaffirm button. A popup message will ask you to confirm that you wish to unaffirm the record. Click OK.
Once you have completed edits to the record you will need to validate and certify it again.