asn1ve users guide
TRANSCRIPT

ASN1VE Users Guide
The software described in this document is furnished under a license agreement and may be used only inaccordance with the terms of this agreement. This document may be distributed in any form, electronic orotherwise, provided that it is distributed in its entirety with the copyright and this notice intact. Comments,suggestions, and inquiries may be sent by electronic mail to <[email protected]>.
Copyright © 2019 Objective Systems, Inc.

ii
Table of Contents1. Introduction ................................................................................................................................... 12. Installation ..................................................................................................................................... 2
Windows Installation ................................................................................................................... 2Linux Installation ....................................................................................................................... 7Mac OSX Installation .................................................................................................................. 8Setting the License Key ............................................................................................................. 15Setting the License Key on Mac OSX .......................................................................................... 18
3. Interface ...................................................................................................................................... 21Tree View ............................................................................................................................... 22
Tag View ........................................................................................................................ 22Element View .................................................................................................................. 25Schema View ................................................................................................................... 29
Document View ....................................................................................................................... 29Hex Tab .......................................................................................................................... 30Bit Tab ........................................................................................................................... 31XML Tab ........................................................................................................................ 31Text Tab ......................................................................................................................... 32JSON Tab ....................................................................................................................... 33ASN.1 Browser Tab .......................................................................................................... 34ASN.1 Editor Tab ............................................................................................................. 35
Detail View/Editor .................................................................................................................... 35Project View ............................................................................................................................ 36Error Log ................................................................................................................................ 36Menus ..................................................................................................................................... 37
File Menu ........................................................................................................................ 37Edit Menu ....................................................................................................................... 38Assign Menu .................................................................................................................... 39Tools Menu ..................................................................................................................... 39Encode Menu ................................................................................................................... 40Project Menu ................................................................................................................... 40View Menu ...................................................................................................................... 41
4. Using ASN1VE ............................................................................................................................ 42Open an Existing Message File ................................................................................................... 42Open an ASN.1 schema ............................................................................................................. 47Assign an ASN.1 schema ........................................................................................................... 48Create a New Message or ASN.1 Schema ..................................................................................... 50
Creating a New ASN.1 Schema File .................................................................................... 50Creating a New ASN.1 Data File ........................................................................................ 51
Find an element in a message ..................................................................................................... 56Edit a message ......................................................................................................................... 58
Element editors ................................................................................................................ 58Edit a project ........................................................................................................................... 62Export a Message as XML, Text, or JSON .................................................................................... 66Import an XML or JSON file ..................................................................................................... 66Set ASN1VE options ................................................................................................................. 69Edit custom headers .................................................................................................................. 72Configuration Files ................................................................................................................... 74
5. Technical Support ......................................................................................................................... 77

1
Chapter 1. IntroductionASN1VE is a graphical editor for ASN.1-encoded data and schemas. Features include:
• Dynamic tree views for quickly navigating encoded data and schemas
• Search tool to find specific items in decoded data
• Type-specific editors to make changing individual data elements easy
• Import/Export data in binary, hexadecimal or Base64 text, and XML formats
• ASN.1 schema editor with syntax highlighting
• Hex editor for low-level manipulation of encoded data
ASN1VE works with a number of different encoding rules:
• Binary encoding rules BER (including DER and CER subsets), PER, UPER, and OER.
Import and Export to XML (XER) and JSON (JER) textual formats.
It can display any valid message that uses these encoding rules. Some well-known message types that can be viewed/edited include the following:
• 3GPP / LTE protocol messages including NBAP, RANAP, RNSAP, RRC, S1AP, and X2AP
• V2X protocol messages in UPER and OER binary formats such as DSRC Basic Safety Messages (BSM) and MAP/SPAT
• OMA Secure User Plane Location (SUPL) messages
• H.323 protocol signaling messages
• Security-related messages including X.509/PKIX certificates and Cryptographic Message Syntax (CMS). The in-clude messages in Base64 and PEM formatted files.
• Transferred Account Procedure (TAP3) batch files
• Various vendor-specific CDR formats including 3GPP standard CDR files with 32.297 headers
A limited version of ASN1VE can be used for free. This includes the hex editor and a basic data tree view for BER-encoded data. To access advanced features, such as loading and editing schemas, PER, OER, and XML capabilities,and per-element data editing, a license must be purchased.

2
Chapter 2. Installation
Windows Installation
Minimum Resource Requirements
• Windows 7, 8, or 10 operating system.
• Write access to the Windows Registry, the installation directory, the ProgramData directory, and the Documentsdirectory.
Running the Installation Wizard Program
This section explains how to run the Windows installation wizard setup program.
A distribution setup file containing the complete ASN1VE application should have been provided. This would be anexecutable file with a name in the following format:
asn1vev***x64.exe or
asn1vev***w32.exe
where *** would be replaced with the current version number (for example, 280).
Double-click this file to launch the Wizard. Depending on the version of Windows that is insalled, the first windowthat appears may be a window asking the user if he wants to allow the application to make changes to the system. Ifthis window appears, Yes should be the response.
The next window that appears is a welcome screen:

Installation
3
Click Next > to move to the next window.
The next window that should appear is the License Agreement screen:

Installation
4
The user should carefully read and understand the license terms. Once this is done, click the "I accept the agreement"radio button to enable the Next > button. Click Next > to specify where ASN1VE will be installed:
By default, the product is installed in C:\Program Files \Objective Systems\ASN1VE (64-bit version) or C:\ProgramFiles (x86)\Objective Systems\ASN1VE, (32-bit version) but some users may prefer to install elsewhere. For example,the path could be changed to C:\Program Files\Objective Systems\ASN1VE_v*** to allow multiple versions to beinstalled.

Installation
5
In general, it is not a good idea to install a new major release on top of an existing release. The older release shouldfirst be uninstalled. For minor patch releases, it should be OK to do this.
The samples that accompany the product will be installed into the user's Documents\ASN1VE folder.
Note that this window also shows the actual amount of disk space required for the product.
Once a location has been selected, click Next > to continue. The following screen will be displayed:
This dialog allows the user to define the folder in which ASN1VE is found on the Windows Start menu (accessiblewhen the user clicks the Windows Start button). The user can leave this as the default setting or select a differentfolder. Click Next > to continue.

Installation
6
This allows a user to specify creation of a desktop icon as well as file extension associations. Of these associations,the .avproj file association will cause ASN1VE to be launched into project mode to read in all details of the selectedproject. All other associated files are assumed to be binary files containing ASN.1-encoded data to be loaded. ASN1VEwill launch into the Open File dialog upon activation of files with these extensions. Additional associations may beadded through the Windows Explorer file extension association feature.
Click Next > to continue. The final setup screen provides a summary of all data that has been entered:

Installation
7
Click Install to complete the setup procedure. The < Back button can be used to go back and modify installationsettings.
Linux Installation
Minimum Resource Requirements
• A reasonably current distribution (Ubuntu, Fedora, SUSE, RHEL, et c.)
• Greater than 60 MB of disk space
Installing the Distribution File
ASN1VE is distributed as a platform-independent .tar.gz archive: asn1ve***lnx.tar.gz, where *** would be replacedwith the current version number (for example, 270).
Installation may be accomplished simply by unpacking the archive; a global installation in /opt is recommended formulti-user settings. Otherwise a local installation in the user's home directory should be sufficient.
To unpack the archive, run tar xzf asn1ve***lnx.tar.gz, noting that *** would be replaced with the current versionnumber. Global installations in /opt will require super user privileges.
The archive will be unpacked in asn1ve_v***. The executables and dependent libraries are stored in asn1ve_v***/bin.

Installation
8
Mac OSX Installation
Minimum Resource Requirements
• Mac OSX 10.10 or greater
• Write access to the installation directory
Running the Installation Wizard Program
This section explains how to run the Mac OSX installation wizard setup program.
A distribution setup file containing the complete ASN1VE application should have been provided. This would be adisk image file with a name in the following format:
asn1ve_v***.dmg
where *** would be replaced with the current version number (for example, 280).
Double-click this file. The first window that should appear is this screen:
This screen displays a README.html and two package files: asn1ve_core.pkgand asn1ve_samples.pkg. Double-clickthe asn1ve_core.pkg file first to install the core ASN1VE software.
The first screen of the core installation is the Welcome screen:

Installation
9
Click Continue. The next screen shows a brief synopsis of changes in the current version of the software.

Installation
10
Click Continue. The License screen displays the Software License Agreement:

Installation
11
The user should carefully read and understand the license terms. Once this is done, click Continue, and then click Agree.

Installation
12
This page, if presented, allows the user to select where to install the software. Select one of the options and clickContinue.

Installation
13
Click Install to complete the setup procedure. The Go Back button can be used to return to a previous page and changesettings before completing installation.
The following page is displayed when the installation is complete.
The ASN1VE core application bundle asn1ve.app is installed in the Applications folder.
After the asn1ve_core.pkg is installed, the asn1ve_samples.pkg can be installed. The install will create a directorynamed ASN1VE under the user's home directory and place the samples there. Double-click the asn1ve_samples.pkgicon to start the installation of the samples. The first screen is a welcome screen:

Installation
14
Click Continue to advance.
The next screen displays how much disk space will be required:
Click Install to begin the installation of the samples.
When the installation is complete, this screen will be displayed:

Installation
15
Setting the License KeyTo enable advanced functionality within ASN1VE, a license key value must be set. This license key is normally sentby e-mail after a license is purchased (permanent key) or when the user requests an evaluation version (evaluation key).
To enter the key value, the Edit -> Configure command is used:
This will cause the Configuration Options window to be displayed. The License tab should be displayed. If not, clickon it to display the license key entry screen:

Installation
16
The key value can now be either typed in or copied and pasted into the data entry field:

Installation
17
Press Activate to activate the license. If you wish to deactivate an existing license to move it to another machine, theDeactivate button can be used.
The "Check-in license on exit" check box is used to indicate that the license should be immediately returned to thelicense pool upon exit making it available for other users on different machines. If not checked, the machine on whichit is being used will continue to hold it until it times out (typically in 24 hours). If you will only be using ASN1VE ona single machine most of the time, it is better to keep it unchecked as it will lead to faster startups since the Internetcheck will not need to be done each time.
The HTTP PROXY box can be used if you are using ASN1VE on a machine that requires Internet requests go througha proxy server.
If you have an existing osyslic.txt or RLM license file, the license information can be imported by clicking the Fileradio button and either dragging and dropping the file into the dialog box or using the Select file dialog:

Installation
18
Setting the License Key on Mac OSXTo enable advanced functionality within ASN1VE, a license key value must be set. This license key is normally sentby e-mail after a license is purchased (permanent key) or when the user requests an evaluation version (evaluation key).
To enter the key value, the asn1ve -> Preferences command is used:

Installation
19
This will cause the Configuration Options window to be displayed. Click on the License tab at the top of this windowto display the license key entry screen:

Installation
20
The key value can now be either typed in or copied and pasted into the data entry field. Press Activate to activatethe license.
If the license is a type that can be deactivated, the Deactivate button will be enabled. Pressing this will revoke thislicense from this machine thus freeing it up for use on a different machine.

21
Chapter 3. InterfaceThe ASN1VE main window is divided into several parts, each with a different function.
1. Tree View
The Tree View lets the user explore a decoded message file or schema. Clicking on a node in the tree will highlightthe data it represents in other views.
2. Document View
This view contains several tabs that show the current message file or schema in various forms.
3. Detail View/Editor
When a node is selected in the Tree View, this view shows detailed information about the element. If an ASN.1 schemais used, an editor is also shown here for some elements.
4. Project View
This view shows information about settings currently being used, such as schema file names and encoding rules.
5. Error Log
The Error Log shows details about encoding and decoding data and parsing schemas. If a problem occurs in one ofthese, an error message will be shown here.

Interface
22
6. Menus
Tree ViewThe Tree View has three tabs, the Message tab, which displays the current message in Element View, which uses aschema; the Tag View tab, which displays the tags and raw data of a BER-encoded message without schema informa-tion, and the ASN.1 Schema tab, which displays the current schema.
• Tag View
• Element View
• Schema View
Tag View
This is the default view for BER/DER/CER messages and is shown when no ASN.1 schema is loaded. This viewdisplays a tree of the tags in the encoded message. (Note: Tag View is not available for messages using other encodingrules such as PER, OER, or UPER because they cannot be decoded without an ASN.1 schema.)

Interface
23
The Tag View will also show decoded values for elements that have UNIVERSAL tags (for example, if an item istagged with the UNIVERSAL INTEGER tag, then its contents can be decoded as an integer).
When the Tag View is selected, other portions of the interface will change as well.

Interface
24
Hex Tab
When an item is selected in the Tag View, its encoded value will be highlighted in the Hex tab. The highlighting usesthree different colors to indicate the encoded tag, length, and value (yellow, green, and blue, respectively).
XML Tab
The XML tab will display the decoded message as XML, using the decoded tags as XML element names and thedecoded values as the XML element values. If the element does not have a UNIVERSAL tag, the value will be shownas undecoded hexadecimal.

Interface
25
Text Tab
The Text tab will display the message as "brace-text", using the decoded tags as names.
JSON Tab
The JSON tab will display the message in JSON form, using the decoded tags as names.
Any of these tabs can be removed from the display by clicking the 'x' next to the name or through the 'View' menu.The tab can be restored using the 'View' menu.
Element View
The Element View is displayed for messages after an appropriate schema is assigned. In this view, each element of themessage is displayed with its name as given in the schema.

Interface
26
If the message does not match a PDU type within the schema or if decoding otherwise fails, an error message willbe displayed in the Error Log window.
When the Element View is selected, other portions of the interface will change as well.
Hex Tab
Selecting an element in the Element View will cause its encoded value to be highlighted in the Hex tab as usual.However, if the element is not byte-aligned, then partial bytes will be highlighted in green.

Interface
27
In the case of a PER or UPER message, the Bit tab is also made available and shows a more granular view of theencoded data.
XML Tab
The XML tab will display the decoded message as XML, with ASN.1 element names corresponding to XML elementnames. Values will be displayed in decoded form inside the XML tags.
Text Tab

Interface
28
The Text tab will display the decoded message as "brace-text", using element names from the ASN.1 schema.
JSON Tab
The JSON tab will display the decoded message in JSON format, using element names from the ASN.1 schema.
Edit Window/Detail View
When an element is selected in the Element View, an editor for that element is displayed in the Edit window. The typeof editor shown will depend on the type of the element.
In the Detail View, the definition of the type of the element will also be shown. If the definition depends on othertypes defined in the loaded schema, then clicking on the names of these types will cause the ASN.1 Browser tab to bedisplayed above with the corresponding definition in view.

Interface
29
Schema View
When an ASN.1 schema is loaded in ASN1VE, the Schema View will show a list of the productions defined in theschema, organized into a tree. Productions are grouped by module. Productions of constructed types can also be ex-panded to reveal a list of their elements. Clicking any object in the tree will cause the ASN.1 Browser to display thecorresponding definition.
Document ViewThe Document View provides a number of tabs with various textual representations of currently loaded data. Two ofthese tabs, Hex and Editor, allow editing of the data as well.
• Hex Tab
• Bit Tab
• XML Tab
• Text Tab
• JSON Tab
• ASN.1 Browser Tab

Interface
30
• Editor Tab
Hex Tab
The Hex tab is a hex editor for the current message file.
The leftmost column shows the offset of each line within the message. Clicking the column header toggles the repre-sentation between Address, which shows the offset in hexadecimal, and Offset, which shows the value in decimal.
The group of columns in the middle (labeled 0 through F) shows the encoded message data in hexadecimal, one byteper column. This also functions as a hex editor.
The rightmost column (labeled Text) shows an ASCII representation of the data whenever possible, otherwise showinga "." for each non-ASCII byte.
Editing
The simplest way to edit a message is to use the Element Editor, but the Hex tab also provides advanced users severalways of editing an encoded message directly.
Clicking on a byte will highlight it (drag to highlight multiple bytes). Highlighted portions can be cut or copied.Hexadecimal can also be pasted from the system clipboard. These three functions can be accessed via the Edit menu,the context menu (by right-clicking after highlighting), or via keyboard shortcuts Ctrl-X to cut, Ctrl-C to copy, Ctrl-Vto paste (Ctrl is replaced by Command on Mac OSX). ASN1VE also provides a Paste Base64 function, which allowsa Base64 formatted string to be pasted from the clipboard as hexadecimal.
Hexadecimal can also be entered directly. Typing a hexadecimal character (0-9A-F, case-insensitive) will insert thatvalue before the most recently selected byte (in Insert mode) or will replace the most recently selected byte (in Over-write mode). Insert/Overwrite modes can be toggled via the Edit menu, Insert key on the keyboard, or by clicking theindicator in the lower-right corner.
Whenever the Hex tab has been edited, an OK button is shown at the bottom.

Interface
31
Clicking this button will cause the edited message to be decoded in the Tree View.
Bit TabThe Bit tab shows a binary view of the current message. (Note: This tab is only available for PER or UPER messages).
The leftmost column (labeled Address) shows the offset of each line within the message.
The group of columns in the middle (labeled 0-7 through 56-63) shows the encoded message data in binary, one byteper column.
The rightmost column (labeled Text) shows an ASCII representation of the data whenever possible, otherwise showinga "." for each non-ASCII byte.
XML TabThe XML tab shows the current message in an XML encoding. The XML encoding will be in Objective Systemsstandard XML form (or "OSys-XER" as referred to in the ASN1C Compiler User's Manual).
The encoding will differ depending on the Tree View. If the Tag View is currently active, then XML element nameswill be decoded tags (such as "CONTEXT_14"), except for UNIVERSAL tags, which are named for the type (suchas "SEQUENCE"). The value of primitive elements will be a hexadecimal string of the encoded value.

Interface
32
If the Element View is active, then XML element names will be the same as shown in the Element View. XML valueswill be the decoded value of the element.
When a node is clicked in the Tree View, the corresponding line will be highlighted in the XML tab.
Text Tab
The Text tab shows the current message in a "brace-text" encoding. In brace-text, constructed elements (i.e., elementsthat contain other elements) are represented by a name followed by a pair of curly braces containing the representationsof its constituent elements. Primitive elements are represented as a name followed by '=', then the decoded value.
The encoding will differ depending on the Tree View. If the Tag View is currently active, then brace-text elementnames will be decoded tags (such as "CONTEXT_14"), except for UNIVERSAL tags, which are named for the type(such as "SEQUENCE"). The value of primitive elements will be a hexadecimal string of the encoded value.

Interface
33
If the Element View is active, then brace-text element names will be the same as shown in the Element View. Brace-text values will be the decoded value of the element.
When a node is clicked in the Tree View, the corresponding line will be highlighted in the Text tab.
JSON Tab
The JSON tab shows the current message in a "brace-text" encoding. In brace-text, constructed elements (i.e., elementsthat contain other elements) are represented by a name followed by a pair of curly braces containing the representationsof its constituent elements. Primitive elements are represented as a name followed by '=', then the decoded value.
The encoding will differ depending on the Tree View. If the Tag View is currently active, then brace-text elementnames will be decoded tags (such as "CONTEXT_14"), except for UNIVERSAL tags, which are named for the type(such as "SEQUENCE"). The value of primitive elements will be a hexadecimal string of the encoded value.

Interface
34
If the Element View is active, then brace-text element names will be the same as shown in the Element View. Brace-text values will be the decoded value of the element.
When a node is clicked in the Tree View, the corresponding line will be highlighted in the JSON tab.
ASN.1 Browser Tab
The ASN.1 Browser tab provides a hyperlinked view of the loaded ASN.1 schema. Wherever a defined type is referredto by another defined type, clicking its name will cause its definition to be shown in the tab.

Interface
35
Clicking an element in the Schema View will also cause the corresponding definition to be shown in the ASN.1 Browsertab.
ASN.1 Editor TabThe ASN.1 Editor tab can be used to edit an ASN.1 schema.
The tab itself can contain multiple tabs, one for each schema file being edited. To edit a schema file, either a newschema file must be created (via New -> Schema... in the File menu), an existing schema file must be opened for editing(via Open Schema... in the File menu), or by double-clicking a previously loaded schema file in the Project View.
Once the schema file has been edited as desired, it can be saved through the File menu. In order to use the schemawith an ASN.1 data file, it must be validated (using the Validate schema option in the Tools menu).
Detail View/EditorThis view shows extra details about the element selected in the tree view. This can include the encoded message offsetand length. If the Element Viewis active, the ASN.1 definition and an editor for the element will also be shown.
Depending on the type of the selected element, the editor (shown at the top of the view) will change. When editing anelement's value is finished, clicking the OK button will commit the edit and re-encode the data.

Interface
36
When the Element View is active (as shown), the Detail View will include the definition of the selected element's type.If the type depends on other types defined in the ASN.1 schema, the type names will be shown as hyperlinks. Clickingone of these links will open the definition of that type in the ASN.1 Browser tab.
Project ViewThe Project View shows project details, including the currently loaded schema file, protocol data unit (PDU) type, andencoding rules. Some options for editing project settings are also provided in the context menu.
The Project View can be hidden by clicking the X in the upper-right corner, or by unchecking Show project informationin the View menu. The hidden project information can be shown again by checking this option again.
Many of the project settings can be edited directly by right-clicking on them. Project settings can also be edited throughthe Edit project... option in the Project menu.
It should be noted that header-specific settings will be shown under Header Type depending on its setting. For example,when Header Type is set to Skip, settings for Skip Fixed Header (file header) and Skip Repeating Header (messageheader) will determine the size (in bytes) of each.
Dragging and dropping a project file onto the Project View will open the project in ASN1VE.
Error LogThe Error Log shows messages related to processing data or schema files in ASN1VE.

Interface
37
Four types of messages may be shown: Error, Warning, Informational, or Debug. Errors indicate a problem that pre-vents ASN1VE from fully decoding the data or schema file, such as an incorrect encoding. Warnings indicate that thefile could be decoded, but suffers from some other issue, such as a constraint violation. Informational messages do notindicate any problems, but rather provide additional details about the decoding process. Debug messages provide ahigh degree of details regarding the encode or decode process and are normally only used to debug internal problemswithin the application.
The level of detail shown in the Error Log can be adjusted to show Errors only, Errors and Warnings, Errors andWarnings and Informational messages, or all message types. This is done through the Configure... item in the Editmenu (the option is found under the Other tab there).
The Error Log can be hidden by clicking the X in the upper-right corner or by unchecking the Show error log windowoption in the View menu. Messages can be cleared by clicking the Clear button.
Menus• File Menu
• Edit Menu
• Assign Menu
• Tools Menu
• Encode Menu
• Project Menu
• View Menu
File Menu
The File menu contains file-related actions, such as creating a new message or schema file or importing an XML file.

Interface
38
New... Create a new file. This may be used to create a new ASN.1 schema or data file or a CDR datafile. Depending on the file type selected, ASN1VE will prompt the user for other settings, asrequired.
Open... Open an existing message file. This may be used to open a data file or a CDR data file forediting. Depending on the file type selected, ASN1VE will prompt the user for other settings,as required.
Open Schema... Open an existing ASN.1 schema file for editing.
Save Save the current file. If the file has not been saved before, ASN1VE will prompt the user fora new filename.
Save as... Save the current file with a different filename. The original file will remain unchanged. Saveas... also allows the newly created file to be saved in a different format. For example, a bina-ry-formatted file can be saved as a new hexadecimal text-formatted file.
Import... Open an existing XML or JSON encoded data file and transform its contents to create a new,binary-encoded file.
Export... Save the current file as an an XML, brace-text, or JSON file.
Close ASN.1 Unassign ASN.1 schema files from the current message data. file.
Close Message Close the current message data file.
Exit Close ASN1VE.
Edit Menu
The Edit menu provides cut, copy, and paste functionality, search, and application settings.

Interface
39
Undo/Redo Move backward or forward in the history of edits to the current file.
Cut/Copy/Paste/Paste Base64 The usual cut, copy, and paste actions for the currently selected text. PasteBase64 provides the ability to paste base64-formatted data into the Hex tab.
Overwrite Toggle the edit mode between Insert (typing pushes back existing content) andOverwrite (typing replaces existing content). The current mode is Overwritewhen this item is checked.
Find... Open the Search window for the current message file.
Configure... Open the Configuration dialog to adjust application settings.
Assign MenuThe Assign menu provides the functionality to assign an ASN.1 schema, configuration file, or encoding rules.
Encoding Rules Set the encoding rules to use for encoding and decoding message data files.
Built-in ASN.1 schema(s) Choose from the schemas built in to ASN1VE to assign to the current messagefile.
ASN.1 schema file(s) Select schema files to use for the current message file.
Configuration file Select an Objective Systems configuration file to use with the current schema.See Configuration Files for more information.
Tools Menu

Interface
40
Validate schema When an ASN.1 schema file has been edited, this will verify that the file can be used todecode an ASN.1 data file. If the schema file has not been saved since being edited, thefile will be saved.
Obfuscate message This option attempts to change the value of every data element in the current message fileto a random value while preserving certain characteristics, such as string lengths, CHOICEvalues, and presence or absence of OPTIONAL elements.
Encode MenuThe Encode menu provides options for re-encoding a message using different encoding rules.
If none of the items in the Encode menu is checked, selecting one will assign those encoding rules to the current datafile. If an item in this menu is already checked, then selecting a different item will attempt to re-encode the data inthe selected encoding rules.
Project MenuThe Project menu provides functionality for working with project files and for editing project settings.
New Project Create a new project. If an existing project is open, it will be closed and project settings willbe cleared.
Edit Project... Display a dialog to edit an existing project or create a new one. Details on the dialog areavailable at the following link:
Project Settings
Project details can also be edited directly in the project window by right-clicking the itemto be edited.
Open Project Open an existing project file.
Save Project Save the current project settings. If the project has been saved before, ASN1VE will promptthe user for a filename.
Save Project As Save the current project settings in a new file. The current project file, if one exists, willremain unchanged.

Interface
41
Close Project Close the current project and clear the project settings.
At the end of the Project menu are shown a number of recently used project files. These provide a shortcut for selectingOpen Project and navigating to one of these files.
View MenuThe View menu contains user interface-related options.
Show project information Toggle whether to show or hide the Project View in the interface.
Show error log window Toggle whether to show or hide the Error Log in the interface.
XML Toggle whether to show or hide the XML Tab in the Document View window.
Text Toggle whether to show or hide the Text Tab in the Document View window.
JSON Toggle whether to show or hide the JSON Tab in the Document View window.
Word Wrap Toggle wrapping long lines in XML and Text tabs in the Document View.
Refresh Re-decode the current message data from the encoded data in the Hex tab.
Expand/Expand All Expand the currently selected node (or all nodes) in the Tree View.

42
Chapter 4. Using ASN1VE
Open an Existing Message FileTo open an existing message data file in ASN1VE, select the Open... option from the File menu (or use keyboardshortcut Ctrl-O). This will bring up a dialog box for selecting the file.
Note the dropdown file-type menu at the bottom right. This can be used to filter files by some standard extensions. Bydefault, this is set to All Files, meaning all files within a given directory will be displayed as candidates to be opened.Changing this to one of the other options will limit the list of files available for selection.
The current file types that can be filtered are as follows:
Binary Data Binary data files are message files with no headers and which require no trans-formation of input data to binary format upon loading. These files may havegeneric extensions '.dat' or '.bin' or can have specific encoding rules extensions'.ber', '.der', '.per', or '.uper'. If a file with a specific encoding rule type is select-ed, the step in the wizard that selects encoding rules is skipped.
Call Detail Records Call Detail Records are defined to be ASN.1 BER-encoded data files with in-ternal non-ASN.1 headers or block formats.
Certificates Certificates are binary DER-encoded data files conforming to the X.509 orPKIX standards. Selecting a file using this filter will cause the file to be loadedand the PKIX built-in schema to be automatically assigned. Note that this shouldnot be confused with PEM files (specified below) as these are also commonlyused for Certificates but have a different input format (base-64 with a specialheader and trailer).
Hexadecimal Text Hexadecimal Text are files containing a textual representation of binary data inhexadecimal form. Message dump files are commonly in this format.
Base64 Text Like hexadecimal text, this filter describes a textual format that is transformedinto binary data when teh message is loaded. This format is common used for

Using ASN1VE
43
security-related files, although these files may also be in the PEM format de-scribed below.
Privacy Enhanced Email (PEM) This format is commonly used to represent certificates and other security-re-lated formats. It attempts to create self-contained messages that identify theASN.1 type in a header line prior to the start of the content. For example, aPEM file that describes an X.509 or PKIX certificate would begin with the line'-----BEGIN CERTIFICATE-----' and end with '-----END CERTIFICATE-----'.Other types may be specified as well. ASN1VE currently supports automaticloading of Certificate and Certification Request (PKCS10) PEM files. Othersrequire the ASN.1 schema be explicitly assigned.
The remainder of this section will assume the user opened the file using the 'All Files' filter and therefore all additionalinformation needs to be specified using the ensuing wizard. Using a filter option will cause some or all of the followingitems to be skipped.
If existing project information is in place when the message file is opened, the user will be asked if they would like touse the existing project. Clicking 'Yes' will cause existing information to be used and the dialog is terminated. Clicking'No' will launch the file information wizard.
The first screen in the wizard is the 'Select file type' window:
The file types are the same as previously documented under the file filter options. Select one of the options presentedand click Next.
If "asn" is chosen, a dialog is first presented to allow the user to specify include directories that may be needed to resolveimports in the newly created schema. The user is then placed in the editor where the schema file is opened for editing.
If the 'cdr' option is selected, the user is prompted to enter header and other file format related information in thefollowing window:

Using ASN1VE
44
The various options are as follows:
None No headers will be added to the encoded data. This is the same as having selected"ber" in the file type window.
Block Data will be encoded into blocks of a certain size. If a message would normally beencoded across a block boundary (for a block size of 2048 bytes, this boundary is atoffsets 2048, 4096, 8192, ...), the rest of the current block is instead padded out andthe message is encoded, starting at the beginning of the next block. Padding bytesare also used to determine whether a block contains more data or is padded out.
3GPP TS 32.297 Headers Data will be encoded according to the TS 32.297 standard. This includes file andmessage headers of the standard format.
Custom Headers Custom headers are fixed-length headers that allow data fields within the headersto be specified. Selecting this option will cause an additional dialog to be openedthat allows headers and header fields to be declared:
See the section on editing custom headers for details on editing the header format.
After header options are specified for CDR's and for all other message types, the window to enter ASN.1 schemainformation is presented:

Using ASN1VE
45
At the top, three options are available, None, User schema files, and Built-in schema files. The None option is onlyavailable for BER and allows a user to open a message without schema. The User schema files option allows the userto select their own ASN.1 schema files. Built-in schema files presents a list of available schemas built into ASN1VE.
Below the selection options, the wizard shows lists for schema files and include directories. ASN.1 schema files shouldbe added to the list of schema files that define the type of message being created. Include directories are directories tosearch to resolve import statements within the selected schema files.
Clicking Add... next to either list will bring up a file dialog. Navigate to the directory or file(s) to add, highlight them,and click Open.
To remove a listed file or directory, highlight it in the list and click the Remove button next to the list.
Below the schema files and include directories, Configuration File allows the user to apply settings from an ObjectiveSystems configuration file. To select a configuration file, click the Browse... button.
If Built-in schema files is selected at the top, the wizard will show a list of all the available built-in schemas in ASN1VEas shown in the following image.

Using ASN1VE
46
Click on a schema entry to select a schema to use.
Once a schema has been selected, click Next. The wizard will show a list of types that can be used as the protocoldata unit (PDU) for the message.

Using ASN1VE
47
Click a node to select a PDU type. If the type desired is not shown, clicking Display all types at the top of the windowwill display a list of all the types defined in the selected schema. Once a PDU type is selected, click Finish.
If opening the file is successful, the Tree View will show the top-level data unit in the file, and the Hex tab will containthe encoded file data.
Open an ASN.1 schemaTo open an ASN.1 schema file for editing, select the Open Schema... option from the File menu. This will bring upa dialog box for selecting the file.

Using ASN1VE
48
In the file-type dropdown, select "ASN.1 Schemas (*.asn *.asn1)" and select a file. If the file to be opened has anonstandard file extension, selecting "All files (*)" will allow the file type (ASN.1 schema, in this case) to be chosenmanually.
Once the schema file is opened, it is displayed in the Editor Tab in the Document View window. From there, it canbe viewed or edited. The schema can also be validated by using the Validate schema option in the Tools menu. TheValidate Schema toolbar button can also be used to do this:
If validation is successful, the schema will be displayed in the ASN.1 Browser Tab as well as the Editor. It will also beshown in the Tree View under the ASN.1 Schema Tab thus allowing for easy navigation to all items within the schema.
Assign an ASN.1 schemaTo assign an ASN.1 schema from a file, select ASN.1 schema file(s) from the Assign menu. To assign one of ASN1VE'sbuilt-in schemas, select Built-in ASN.1 schema(s) from the menu.
If assigning from a file, a file dialog will be shown:
Using ASN1VE
49
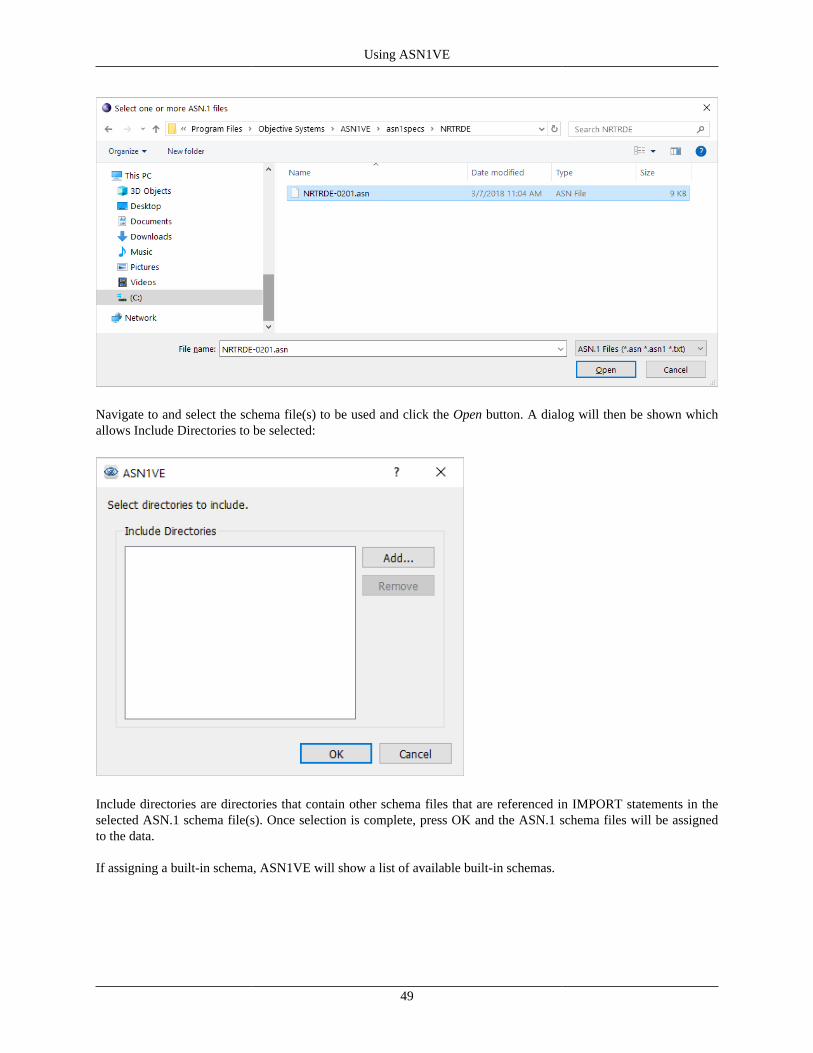
Navigate to and select the schema file(s) to be used and click the Open button. A dialog will then be shown whichallows Include Directories to be selected:
Include directories are directories that contain other schema files that are referenced in IMPORT statements in theselected ASN.1 schema file(s). Once selection is complete, press OK and the ASN.1 schema files will be assignedto the data.
If assigning a built-in schema, ASN1VE will show a list of available built-in schemas.

Using ASN1VE
50
Select a schema from the list and click the OK button.
Built-in schemas are schema sets from common standards that use ASN.1. These schemas can sometimes span mul-tiple specifications in import statements. The built-in schemas are configured to automatically resolve these importsby looking in other common directories. The schema files themselves reside in the 'asn1specs' directory within theinstallation. Each directory normally contains an 'acconfig.xml' file that is automatically read by ASN1VE to find im-port files or determine the PDU type for the data. A user may add their own schema files to this collection by creatinga directory in this space and adding their ASN.1 files. They can also create an acconfig.xml file for specification ofconfiguration items such as import directories or PDU type. ASN1VE will automatically display these newly addedschema sets when the Assign Built-in Schemas menu item is selected.
Create a New Message or ASN.1 SchemaSelect File -> New... and select either Message or Schema.
Creating a New ASN.1 Schema File
To create a new ASN.1 schema file, select File -> New -> Schema from the File menu. This action opens a new ASN.1schema in the Editor tab:.

Using ASN1VE
51
ASN.1 definitions can then be added tothe body of the schema. As keywords are recognized, they are highlighted inbold font as follows:
In this example, the SEQUENCE keyword is highlighted.
Additional schema files can be created by executing the New Schema command multiple times. Each invocation willresult in a new tab being opened.
The schema files can be saved using the File Save commands. The schema files can be validated using the Tools ->Validate Schema menu item, or by pressing the Validate tool button.
Creating a New ASN.1 Data File
To create a new message file, select File -> New -> Message from the File menu. This will launch the New File Wizard.

Using ASN1VE
52
Select one of the options presented and click Next.
The "ber," "oer", "per," and "uper" options allow a user to create a new ASN.1 data file using one of these encodingrule sets. The "cdr" option is for creating a Call Detail Record (CDR) file that contains additional non-ASN.1 headers.
If "cdr" is chosen, proceed to the next section on specification of CDR headers. Otherwise, jump to the next sectionon assigning ASN.1 schema information.
Specification of CDR Header Data
After "cdr" is chosen, the "Header Format" dialog is presented:

Using ASN1VE
53
None No headers will be added to the encoded data. This is the same as having selected"ber" in the previous window.
Block Data will be encoded into blocks of a certain size. If a message would normally beencoded across a block boundary (for a block size of 2048 bytes, this boundary is atoffsets 2048, 4096, 8192, ...), the rest of the current block is instead padded out andthe message is encoded, starting at the beginning of the next block. Padding bytesare also used to determine whether a block contains more data or is padded out.
3GPP TS 32.297 Headers Data will be encoded according to the TS 32.297 standard. This includes file andmessage headers of the standard format.
Custom Headers Custom headers are fixed-length headers that allow data fields within the headersto be specified. Selecting this option will cause an additional dialog to be openedthat allows headers and header fields to be declared.
See the section on editing custom headers for details on editing the header format.
Once the header type has been selected, click Next.

Using ASN1VE
54
Assignment of ASN.1 Schema Files
The next page of the wizard prompts for a schema to use. This would be the first page displayed after "ber", "oer","per", or "uper" file type is selected.
At the top, three options are available, None, User schema files, and Built-in schema files. The None option is onlyavailable for BER and allows a user to define a message without schema using hex data. The User schema files optionallows the user to select their own ASN.1 schema files. Built-in schema files presents a list of available schemas builtin to ASN1VE.

Using ASN1VE
55
Below the selection options, the wizard shows lists for schema files and include directories. ASN.1 schema files shouldbe added to the list of schema files that define the type of message being created. Include directories are directories tosearch to resolve import statements within the selected schema files.
Clicking Add... next to either list will bring up a file dialog. Navigate to the directory or file(s) to add, highlight them,and click Open.
To remove a listed file or directory, highlight it in the list and click the Remove button next to the list.
Below the schema files and include directories, Configuration File allows the user to apply settings from an ObjectiveSystems configuration file. To select a configuration file, click the Browse... button. See the Configuration Files sectionfor more information.
If Built-in schema files is selected at the top, the wizard will show a list of all the available built-in schemas in ASN1VE.Click to select a schema to use.
Once a schema has been selected, click Next. The wizard will show a list of types that can be used as the protocoldata unit (PDU) for the message.

Using ASN1VE
56
Click a node to select a PDU type. If the type desired is not shown, clicking Display all types at the top of the windowwill display a list of all the types defined in the selected schema. Once a PDU type is selected, click Finish.
If on the first page "cdr" was chosen, ASN1VE will prompt the user for a number of records to generate. Otherwise(or after choosing how many records to create), the newly-created message will be shown in the Element View andencoded in the Hex tab.
Find an element in a messageTo find a specific data item in a message file, the Find command can be used. When enabled by selecting Find... inthe Edit menu, the Find widget is shown in the lower left-hand corner, below the Project View. (It can also be shown
or hidden using the button in the toolbar or the keyboard shortcut Ctrl+F.)
It is also possible to search a specific branch in the tree for an item by right-clicking on a node and selecting the FindIn option.
If a schema is assigned to the message, the find dialog is as follows:

Using ASN1VE
57
If no schema is assigned, the Find dialog looks like this:
The first field is Find Element (or Find Tag when the Tag View is active), and can be used to search for an element ortag by its name. In both cases, a dropdown menu for the field provides a list of tag or element names within the currentcontext (children of the currently selected element, or the entire file if no element is selected). Selecting from the listor entering a name manually and clicking Next or Previous will search the current context for elements with that name.
Find Value allows searching the current context for elements with the given value, across all types. For example,entering "123" in the Find Value field would match an INTEGER element with a value of 123, and it would match aBMPString with value "123." (Note that values should be entered in decoded form, rather than as encoded in ASN.1.)
Level allows searching for the element name and/or value combination or tag at a given level in the message. Thechoices for this field are 'Any' which will search the entire message of 'Current' which will search within the currentlyselected block in the tree view. In the case of 'Tag', it is also possible to select a specific level by number to search.
If search criteria are entered in both the Find Element and Find Value fields, then only elements matching both nameand value are returned as search results. In the case of Find Tag, it is only possible to seach for the tag, not the value.
Besides the Nextand Previous buttons, clicking the Highlight All button will highlight every element in the currentcontext that matches the search criteria.
The Find tool provides several options for matching values, as well.
The following additional options are available for the message with assigned schema case:
• Case Sensitive makes Find Value search terms case-sensitive (this is off, by default).
• The Whole Words Only option matches search terms as complete words. For example, a search for "moose" withWhole Words Only unchecked would match the phrases "I saw a moose over there" and "These moosetracks arefresh," but with Whole Words Only checked, only the phrase "I saw a moose over there" would match.
• Regular Expression indicates that the text in the value field is a regular expression.
The search starts from the last item that was selected in a message. To ensure a search starts from the top, the usershould select the root item in the Tree View.

Using ASN1VE
58
Edit a messageOnce a data file is open in ASN1VE, it can be edited in various ways.
Tree ViewTo edit a particular element, first the Tree View must be showing the Element View. For this, an ASN.1 schema mustbe assigned. Expand the tree to expose the element to be edited. Right-clicking on the element will bring up a contextmenu with varying options for the selected element. For repeating elements (such as elements of a SEQUENCE OF)and top-level nodes (representing a complete message or record), options Insert before and Insert after will create anew, empty element of the same type before or after the selected element. The Delete option will delete the currentlyselected element. For Open (ANY) type elements, the Decode as... option allows a type to be selected for the currentelement. Once a type is selected, the element will be re-decoded as if it were the selected type. Note that this does notactually change the encoded message. To replace an Open type element with another, see the type-specific elementeditor for Open type elements.
Detail ViewClicking on an element in the Tree View will cause the Detail View to show a type-specific editor for the element. Fordetails about specific type editors, see Element editors.
Hex TabMessage data can also be edited directly via the Hex tab in the Document View. Clicking on a byte highlights it, andentering hexadecimal characters, two for each byte, inserts the new byte before the selected one. To overwrite the
current byte instead of inserting before it, click the button in the lower right-hand corner to change it to .Once editing is complete, clicking the OK button in the Hex tab will reload the message in the Tree View.
Encode MenuFinally, message data can also be re-encoded using a different set of ASN.1 encoding rules. To do this, select fromthe Encode menu the encoding rule set to re-encode as.
Element editors
INTEGER
To edit an INTEGER type, change the number in the box and click Update. If any named values are present in theschema, they can be selected from the dropdown menu.
BOOLEAN
Selecting an element with a BOOLEAN type will show radio buttons True and False in the editor. Selecting eitherone will change the element's value accordingly.

Using ASN1VE
59
BIT STRING
This type of value can be edited using the following dialog displayed in the edit window. It will accept only 1 or 0bits values. Other values will be marked as invalid values.
Clicking the Hex Edit... button will toggle the editor to hexadecimal mode.
Clicking the Binary Edit... button will subsequently toggle the editor back to binary mode. Click OK to change theelement's value to that of the edited string.
OCTET STRING
Similarly, OCTET STRING types are edited using the editor shown above. Each pair of hexadecimal characters rep-resents a single byte. Click the OK button to set the element's value.
REAL
In the editor for elements of type REAL, values can be entered in typical floating-point format. Clicking Update setsthe value of the element.

Using ASN1VE
60
OBJECT IDENTIFIER
This type of value is edited as a string. When present in the schema, Defined values can show the current value relativeto a named value, and Name/number arcs shows each branch number in parentheses following the branch name.
CHARACTER STRING
CHARACTER STRING types, including restricted string types such as BMPString and UTF8String, use the aboveeditor. Selecting Windows style (CR/LF) or Unix style (LF only) will determine how newlines are represented in theencoded string. Checking Include null-terminator will make sure the encoded string ends with a zero byte.
ENUMERATED
ENUMERATED types are edited by selecting from the choices available in the dropdown menu. Clicking Updatewill set the value of the element.
UTCTime and GeneralizedTime
UTCTime and GeneralizedTime values are edited as shown above. The Raw Value field can be edited directly with avalid UTCTime or GeneralizedTime string. Alternatively, the time can be set in human-readable format from the boxat the top. To do this, highlight a portion of the time (such as the month) and use the up and down arrows on the rightto change the value of that portion. The fractional seconds (GeneralizedTime only) setting allows for editing fractionsof seconds to arbitrary precision. Time Zone allows the time zone to be set as its difference from UTC.
Once the time has been adjusted, clicking Update will set the time in the current element.
For convenience, the Set Current button is provided as a shortcut to set the current time.

Using ASN1VE
61
SEQUENCE and SET
The editor for elements of types SEQUENCE and SET provides a list of elements of the selected SEQUENCE orSET which are OPTIONAL in the schema. If an OPTIONAL element is checked, it will be present in the resultingSEQUENCE or SET, whereas if it is unchecked, it will be removed. Once changes have been made, clicking theUpdate button will cause only the OPTIONAL elements that are checked to be enabled.
SEQUENCE OF and SET OF
The editor for elements of types SEQUENCE OF and SET OF is similar to the INTEGER editor. Changing the valueshown and clicking Update will cause the specified number of elements to be encoded. If this number is greater thanthe previous number, new elements will be created; if it is less than the previous number, elements will be removedfrom the end.
CHOICE
CHOICE elements can be edited similarly to ENUMERATED elements. A dropdown menu provides a list of possibil-ities. Select one from the list and click Update to replace the existing CHOICE element with one of the selected type.
Open
The editor for Open (ANY) type elements shows a box at the left denoting the type used to decode the element. If notype could be determined, or if Open type decoding is disabled, the box will be empty. To set or change the type ofvalue the element contains, click the Change Type button. Note that this is an editing operation and will almost certainlychange the encoded value. To attempt to decode the existing element as a different type, the right-click context menuin the Element View provides a Decode as... option.

Using ASN1VE
62
The window also provides a list of UNIVERSAL types to choose from, accessible by clicking UNIVERSAL types. Tochange the type of the element, select a type from the list and click OK.
Edit a projectASN1VE provides two different methods of editing project settings. First a project may be edited via the Project Viewby right-clicking on the various settings.
The second method can be accessed by selecting Edit project... from the Project menu.

Using ASN1VE
63
The resulting window has two tabs, Schema and Message The Schema tab allows for adjusting schema-related settings,while the Message tab manages settings specific to the data file.
At the top of the Schema tab, two options are available, User schema files and Built-in schema files. User schemafiles allows the user to select their own ASN.1 schema files. Built-in schema files presents a list of available schemasbuilt in to ASN1VE.

Using ASN1VE
64
If User schema files is selected, the window shows lists for schema files and include directories. ASN.1 schema filesshould be added to the list of schema files that define the type of message being created or opened. Include directoriesare directories that the parser will look in for additional schema files needed to resolve import statements.
Clicking Add... next to either list will bring up a file dialog. Navigate to the directory or file(s) to add, highlight them,and click Open.
To remove a listed file or directory, highlight it in the list and click the Remove button next to the list.
Below the schema files and include directories, Configuration File allows the user to apply settings from an ObjectiveSystems configuration file. To select a configuration file, click the Browse... button.

Using ASN1VE
65
At the bottom, PDU Type allows the user to specify a PDU type for the message data. Clicking Select... will open aPDU selection window.
If Built-in schema files is selected at the top, the window will show a list of all the available built-in schemas inASN1VE. Click to select a schema to use.
The Built-in schema files option also includes a section for selecting the PDU type at the bottom.
The Message tab shows message-related settings:
At the top, Message File is the name of the message data file. Clicking Browse... opens a file dialog to select a messagefile.

Using ASN1VE
66
ASN.1 Encoding Rules determines the encoding rules used to decode the message file.
File Type selects whether the message file being used is encoded as a binary file or as either hexadecimal or base64text. The Privacy Enhanced Mail (PEM) setting provides special handling for PEM files (a special, base64 text format).
Header Type describes the type of headers used by the encoded message. In standard ASN.1 encodings where noheader is encoded, None should be checked.
For block-encoded data files (i.e., messages are encoded within blocks of a certain size and do not cross boundariesbetween blocks), Block should be checked. In this case, both the size of the blocks and the padding bytes (used as abuffer between the last message in a block and the end of the block) can be set. Padding bytes should be comma-sep-arated, hexadecimal values. If no padding bytes are given, zero is assumed.
For data files using headers of fixed length, Fixed-length Headers should be selected, and the sizes for file and messageheaders should be set. The file header occurs only once at the beginning of the file, and the message header occurs atthe beginning of each record or message in the file.
3GPP TS 32.297 Headers provides handling for files encoded using the TS 32.297 standard.
Once project editing is complete, click OK to apply the chosen settings and exit the window. Clicking Apply will applythe chosen settings without exiting the project settings window.
Export a Message as XML, Text, or JSONTo export a loaded message data file as XML, JSON, or brace-text, select Export... from the File menu. The followingdialog will be displayed:
Choose XML, Text, or JSON in the dialog box and click OK. ASN1VE will then show a file dialog. Navigate to thedirectory in which the resulting file will be saved and enter a name for the new file. Click Save to complete the exportprocedure.
Import an XML or JSON fileTo import an XML or JSON file and convert it to a binary encoding, select the Import... option from the File menu.A file dialog will be shown. The file import filter in the lower right corner will allow either an XML or JSON fileto be chosen based on extension:

Using ASN1VE
67
Navigate to and select an XML or JSON file to import and click Open. If an existing project is currently in use,ASN1VE will ask the user if they want to use existing project information. If yes, the import is done and the dialogis complete. If no, or no project is active at the time, ASN1VE will prompt for encoding rules. These determine thebinary encoding that the imported file will be converted to. Choose an option and click OK. ASN1VE will then providea wizard for selecting an ASN.1 schema to use.
At the top, two options are available, User schema files and Built-in schema files. User schema files allows the user toselect their own ASN.1 schema files. Built-in schema files presents a list of available schemas built in to ASN1VE.

Using ASN1VE
68
If User schema files is selected, the wizard shows lists for schema files and include directories. ASN.1 schema filesshould be added to the list of schema files that define the type of message being created. Include directories can containadditional schema files that define types used by the schema.
Clicking Add... next to either list will bring up a file dialog. Navigate to the directory or file(s) to add, highlight them,and click Open.
To remove a listed file or directory, highlight it in the list and click the Remove button next to the list.
Below the schema files and include directories, Configuration File allows the user to apply settings from an ObjectiveSystems configuration file. To select a configuration file, click the Browse... button. See the Configuration Files sectionfor more information.

Using ASN1VE
69
If Built-in schema files is selected at the top, the wizard will show a list of all the available built-in schemas in ASN1VE.Click to select a schema to use.
Set ASN1VE optionsOptions for ASN1VE itself can be found in the Configure... item in the Edit menu. Selecting this will bring up awindow with several tabs.
The Decoding tab contains a number of options for default settings during message data decoding. Many of thesesettings are overridden by session-specific or project-specific settings and would only come into effect when no projectsettings are defined.
The Header Type set of options describe the header format that may apply to certain file types. This is mostly applicableto Call Detail Record (CDR) types, but may apply to others as well.
The None option is used to indicate the file contains no extra headers.

Using ASN1VE
70
The Block option is for selecting a file with fixed-sized blocks and padding bytes to fill out the block. Size of Blockdetermines the number of bytes expected in each block. The Padding Bytes (hex) section specifies the hex code of bytesused to fill out the block. Padding bytes are specified using hexadecimal notation (0xnn) and separated by commas.
The 3GPP TS 32.297 option specifies use of the standard header format referenced in the 3GPP TS 32.297 specification.
The Custom option allows custom header fields to be added. These are a set of fixed-length fields that can be specifiedto contain data corresponding to a few simple types (binary, integer, or character). Both a fixed-header (one that occursonce at the beginning of the file) and one that repeats (one that occurs before every record) may be specified.
At the bottom are several miscellaneous options. By default, ASN1VE detects OCTET STRING types named"BCDString" and displays them as such, rather than as hexadecimal. Disable BCD (Binary Coded Decimal) conversiondisables this feature. If this is unchecked, then the options below it allow the user to force all OCTET STRING typesto be decoded as either BCD or TBCD (Telephony Binary Coded Decimal).
Disable automatic Open Type decoding prevents ASN1VE from attempting to determine the types of Open Typeelements and to decode them.
The last option, when checked, limits the number of repeating records that ASN1VE will decode at a time. This limitaffects top-level messages as well as elements of SEQUENCE OF and SET OF types. When the limit is reached, theTree View will show a node at the end with the text "More...". Clicking on this node will cause ASN1VE to decodethe next number of records.

Using ASN1VE
71
The Other tab has two sections; XML Options allows for XML output (i.e., the XML tab in the Document View andXML export) to be configured, while Other options provides miscellaneous settings for ASN1VE.
XML data format allows the user to select between ASN.1 XER and a simplified XML representation of message data.
When Disable root element for single message file is checked, a message data file with only one message will produceXML without an extra tag surrounding it. When unchecked and for files containing multiple messages, the contentsof the file will be surrounded by a single, top-level tag to produce a valid XML encoding. The tag used will be thevalue of Root element name.
Try to encode hex values as ASCII (export only) causes the application to scan through elements of type OCTETSTRING that would normally contain binary data and examine each byte to determine if it falls within the range ofan ASCII character. If all bytes are found to do so, the contents will be presented as an ASCII string rather than ashex bytes.
Insert empty XML elements in place of missing optional elements and Insert XML elements with default values in placeof missing elements with default values will cause elements missing in the original message to be encoded in the XMLas empty elements if they are optional or as their default value where one is provided, respectively.

Using ASN1VE
72
When Remove all whitespace between elements is checked, XML will be produced without any extraneous formatting,such as indentation or newlines.
BIT STRING content output format determines whether elements of type BIT STRING will be encoded in XML asbinary or hexadecimal.
In Other options, XML/Text view mode determines the contents of the XML and Text tabs in the Document View. IfAll records is selected, the entire file will be shown. If Selected record is selected, then only the message currentlyselected in the Tree View will be shown.
Validate UTCTime and GeneralizedTime value format will cause validation of the format of the time values containedwithin elements of these types to be done. In most observed cases, the time values do not strictly adhere to the specifiedformats, so this is off by default to prevent annoying errors from popping up. It can be turned on to have values ofthese types strictly checked for conformance.
Log trace level determines the level of detail provided in the Error Log.
Check for updates on start up will cause ASN1VE to do a check with the Internet host to determine if a newer version ofASN1VE is available for download. This is the same as manually selecting the 'Help -> Check for updates...' command.
Edit custom headersIn the New Message Dialog and in the Project View Window, the option exists to create or modify custom headers.Invoking this option brings up a dialog similar to the following:

Using ASN1VE
73
When creating a new message, the dialog expands to allow the initial header to be created. The cursor can be placedwithin the header field definition area and then the field items edited. The following items can be specified for a headerfield:
Name Name of the header.
Units Units of the field (bits or bytes).
Size Size field of the field in Units.
Type Type of the field. The types currently supported are binary, integer (big-endian), and character (UTF-8).
Additional fields can be appended by clicking on the green + control next to the fields header line. Fields can beinserted by right-clicking either on the fields header or a field entry. This will cause a new field definition entry tobe inserted immediately after the entry.
Additional headers can be added by either clicking on the green + control next to the header entry or by right-clickingon the header and selecting the 'Add Header' option. Headers can be removed by either clicking the red x control nextto the header or by right-clicking on the header and selecting 'Remove Header.'
A header can be declared to either be 'fixed' or 'repeating.' A 'fixed' header appears only once at the start of a message.A 'repeating' header would appear before each record in a repeating collection of records.

Using ASN1VE
74
Configuration FilesConfiguration files are XML files that can be used to apply specific options to specific items within a schema. Theseoptions can be applied to specific modules, productions, and elements as well as globally.
A configuration file would target an item to which a directive is to be applied by specifying module, production, andelement in an XML hierarchy. An example that targets an element to be displayed in an alternate format is as follows:
<asn1config> <module name=”MEDIA-GATEWAY-CONTROL”> <production name=”IP4Address”> <element name=”address”> <displayFormat>ipv4</displayFormat> </element> </production> </module> </asn1config>
This indicates the element 'address' in the production 'IP4Address' in the module 'MEDIA-GATEWAY-CONTROL'should be displayed in the form of an IP version 4 address rather than in the default format for the type (which forOCTET STRING is hex bytes).
At the outer level of the markup is the <asn1config> </asn1config> tag pair. Within this tag pair, the spec-ification of global items and modules can be made. Global items are applied to all items in all modules. An examplewould be the <includedir> qualifier. This specifies an include directory to search for modules specified in importstatements. It is not something that is associated with an individual module or production.
The specification of a module is done using the <module></module> tag pair. This tag pair can only be nestedwithin the top-level <asn1config> section. The module is identified by using the required <name></name>tag pair or by specifying the name as an attribute (for example, <module name="MyModule">). Other attributesspecified within the <module> section apply only to that module and not to other modules specified within thespecification. A complete list of all module attributes is provided in the table at the end of this section.
The specification of an individual production is done using the <production></production> tag pair. Thistag pair can only be nested within a <module> section. The production is identified by using the required <name></name> tag pair or by specifying the name as an attribute (for example, <production name="MyProd">). Otherattributes within the production section apply only to the referenced production and nothing else. A complete list ofattributes that can be applied to individual productions is provided in the table at the end of this section.
The following tables specify the list of attributes that can be applied at all of the different levels: global, module, andindividual production. Only the attributes applicable to ASN1VE are shown.
Global Level
These attributes can be applied at the global level by including them within the <asn1config> section:
Name Values Description
<includedir></includedir> <Include directory> This configuration item is used to specify a directory thatwill be searched for IMPORT files.
Module Level
These attributes can be applied at the module level by including them within a <module> section:

Using ASN1VE
75
Name Values Description
<name> </name> module name This attribute identifies the module to which this sectionapplies. Either this or the <oid> element/attribute is re-quired.
<oid> module OID (object identi-fier)
This attribute provides for an alternate form of mod-ule identification for the case when module name is notunique. For example, a given ASN.1 module may havemultiple versions. A unique version of the module can beidentified using the OID value.
<include types="names"values="names"/>
ASN.1 type or value namesare specified as an attributelist
By default, all types and values within a specification areincluded for display within ASN1VE. This item allowsASN.1 types and/or values to be explicitly specified forinclusion in the set of items to be displayed. This allowsthe size of what is loaded to be reduced. This can be use-ful in the case of large schemas which import items frommany different schemas to reduce the number of schemafiles that need to be imported.
<exclude types="names"values="names"/>
ASN.1 type or values namesare specified as an attributelist
This item allows a list of ASN.1 types and/or values to beexcluded from the set of schema items to be displayed. Bydefault, all types and values from within a specification areincluded. If an attempt is made to exclude a type or valuereferenced by another item, the directive will be ignored.
<noPDU/> n/a Indicates that this module contains no PDU definitions.This is normally true in modules that are imported to getcommon type definitions. This will prevent any types frombeing displayed from this module as possible PDU types.
Production Level
These attributes can be applied at the production level by including them within a <production> section:
Name Values Description
<name> </name>
production name This attribute identifies the production (type) to which thissection applies. It is required.
<displayFormat> lower, upper, ipv4, ipv6,imei, imsi, tbcd
This is used to specify an alternate stringified represen-tation for binary data. It is only applicable to OCTETSTRING types. By default, OCTET STRING data is dis-played in hexadecimal text format. The lower and upperqualifiers also result in hexadecimal text format, but forcelower or upper case characters to be used. The ipv4 andipv6 qualifiers cause the date to be formatted as an IP ad-dress. The imei, imsi, and tbcd qualifiers treat the data asbeing encoded in TBCD format with slight differences ineach format type.
<isPDU/> n/a This item is used to indicate that this production repre-sents a Protocol Data Unit (PDU). This indicates that thisproduction should be included in the list of possible PDUtypes when the schema is assigned.
<isTBCDString/> n/a This item is used to indicate that this production is to beencoded and decoded as a telephony binary coded string(TBCD). This is type is not part of the ASN.1 standards

Using ASN1VE
76
Name Values Description
but is a widely used encoding format in telephony appli-cations.
Element Level
These attributes can be applied at the element level by including them within an <element> section:
Name Values Description
<name> </name>
element name This attribute identifies the element within a SEQUENCE,SET, or CHOICE construct to which this section applies.It is required.
<displayFormat> lower, upper, ipv4, ipv6,imei, imsi, tbcd
This is used to specify an alternate stringified represen-tation for binary data. It is only applicable to OCTETSTRING types. By default, OCTET STRING data is dis-played in hexadecimal text format. The lower and upperqualifiers also result in hexadecimal text format, but forcelower or upper case characters to be used. The ipv4 andipv6 qualifiers cause the date to be formatted as an IP ad-dress. The imei, imsi, and tbcd qualifiers treat the data asbeing encoded in TBCD format with slight differences ineach format type.

77
Chapter 5. Technical SupportReport problems you encounter by sending E-mail to [email protected] [mailto:[email protected]]. Pleaseprovide a project file and all related message and ASN.1 schema files required to reproduce the issue.
If you have any further questions or comments on what you would like to see in the product or what is difficult to useor understand, please communicate them to us. Your feedback is important to us.