asme strawbridge design · pdf filebaltimore asme section paul borthwick, ... of individual...
TRANSCRIPT

Strawbridge Design Guide Page 1
Strawbridge Challenge Design Guide
2018 Competition
Prepared by Baltimore ASME Section
Paul Borthwick, Sheila Glesmann, Neil Leon
Edited by Bei Wu and Steve Vayda
Baltimore Section
Strawbridge Design Guide Page 2

Strawbridge Design Guide Page 3
1. Purpose: The purpose of this design guide is to give Straw Bridge Challenge mentors and students guidance on how to design their bridges, and insight into the philosophy of both the challenge and the rules. This guide is also used to clarify the rules. 2. Challenge Philosophy The main purpose of this challenge is to encourage students to look at the technology that surrounds them and to encourage them to gain an understanding of the underlying principles. For bridge building, some of the most important principles are: strength of materials, forces and moments in equilibrium, moment of inertia and how to use them to our advantage for bridges and other building structures. The mathematics and science may be beyond a new student’s complete understanding, but a basic introduction to the principles is not, and can be used as an introduction to engineering and physical sciences and to capture their intellectual curiosity. We encourage teachers and mentors to use this challenge to inject supplementary educational material that will help students understand the principles. In past years the most successful bridges have been built done by students who understood what the design constraints of the materials involved, and used them successfully. Encourage your students to test the sub-components of their design before they actually build a bridge. Have them investigate different joint and structural sub-systems before taking on a complete structure. The organizers of this contest feel that every student group that successfully meets the design criteria of this challenge has successfully met the challenge and will be awarded a certificate of completion. At the same time we would like to stimulate creativity. This is why we are awarding prizes for designs that exemplify other important aspects of engineering, such as greatest strength-to-weight ratio, best construction and most innovative. The presentations (oral questions and reports and written reports) will be used to evaluate the challengers understanding of the development process of their bridge as well as their understanding of the underlying fundamentals of bridge design. Winning of individual prizes will be based on the criteria provided in the contest rules separate from this guide. 3. Interpretation of Rules: The rules were designed to maximize creativity by the students. The process of engineering is a matter of understanding constraints to a problem or challenge and

Strawbridge Design Guide Page 4
using available materials to overcome them. In many cases this means taking advantage of physical laws or mechanical principles to solve a unique problem. Just as in the real world, the competing teams will be asked to present and defend their designs. This gives them the opportunity to: show that they have met the design criteria, discuss the design principles used, explain why the design is optimal, and give examples of what did or did not work. The straws are to be the primary structural component. They should be used to build the structures that support the bridge. The other materials (glue, plastic tabs and the cardboard roadway) are only there to help the straws do their job.
4. Rule Clarifications: As questions come up clarifications to the rules will be distributed to all competitors where appropriate but not if they would give away the competitive advantage of the students asking the question. 4.1 Truck
The truck to be used for the load on competition day is an approximate 1/64th scale Hot Wheels® 18 wheeler. There are number of these trucks for the various NASCAR racing teams. The truck will be loaded with lead so its total weight is approximately 6.5 pounds. The lead is placed in the semi-trailer and not in the tractor. The truck is approximately 14 inches long, 1.625 inches wide and 2.625 inches tall. Maximum wheelbase is 11.5 inches and wheel tread is 1.625 inches. For testing purposes consider a single “standard” brick used for house and building construction. This will be close to the size and weight of the truck.
4.2 Shirt cardboard or Posterboard
The purpose for this posterboard is to allow the truck to roll onto the bridge. The posterboard is to be used for the road surface only and cannot provide, nor should it be assumed to provide any structural strength to the bridge. The thickness of the posterboard material is approximately 1/32”. The road deck must not be permanently attached to the bridge. Information regarding the roadbed is provided only so you may test your bridges similarly to the way they will be tested at the competition. At the competition the judges will supply a road surface for the bridge.
Strawbridge Design Guide Page 5
4.3 Straws The straws for the competition are manufactured by Solo Cup Company. The straws are described as Solo “JUMBO” straws. These straws are 0.231” (approximately 15/64”) diameter and 7.25” to 10” long. The Solo item number is 722TX-0075 for the 7.25 inch long straws. These would commonly be described as a regular drinking straw. Every effort will be made to ensure that an adequate supply of Solo straws is available to all challengers. If you have any shortages or questions please contact a contest coordinator. Although straws from other sources are permitted you should make a reasonable effort to ensure that they are the same specifications as those provided by BMI and contest coordinators. Under no circumstances will “coffee stirrer”, “mini” straws or drinking straws in considerable excess of ¼ inch diameter be accepted as construction material. As a caution, it has been observed many “supermarket” straws often are weaker in both bending and buckling than the regulation straws so it is usually to your advantage to obtain the regulation straws. Additional and Bulk Quantity Straws For schools or school systems that are having several dozen groups build bridges and recognize that ASME cannot reasonably provide that many straws, there are at least two avenues for purchasing bulk straws: Very often a school’s cafeteria/foodservice department can obtain bulk quantities of straws through their regular supplier/distributor network. If you are forced to order bulk straws directly, one very reliable source has been Grainger Inc. Search for Grainger Item Number 6AJN4. This is a case quantity of 12,500 straws. Clearly there are vendors on the internet that claim to carry this product. In the experience of ASME some of these companies have not been able to deliver once the product has been ordered.
4.4 Span
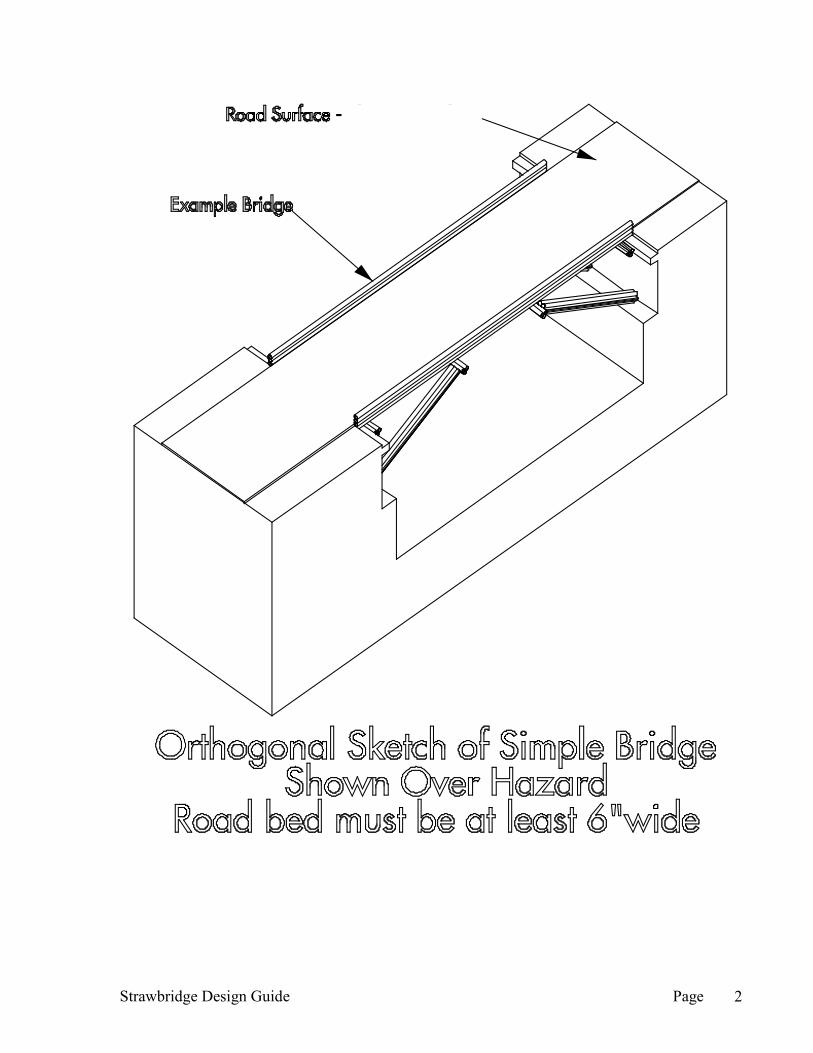
The bridge must span the entire width of the gap with no interim supports. The span is 20” at the roadway surface. The ledges and vertical surface between the ledges may be used for support. This basic support scheme is depicted on the orthogonal sketch at the beginning of this guide.
4.5 Materials
Straws as discussed in section 4.3 are available through BMI and challenge coordinators.
Hot-melt glue. (low temperature recommended available from coordinators or craft stores)
Plastic sheet (for joints only) such as cut-up plastic milk jug or soda bottle.

Strawbridge Design Guide Page 6
These are the only materials that are allowed in the bridge.
5. Joints:
Joints are critical to the proper construction. While glue is necessary to the construction of the joints, excess glue does not add strength but does add weight. This is where small tabs of plastic (as noted in section 4.5) can be used to significant advantage.
The design and structure of joints are up to the imagination of the students.
REMEMBER: A key metric in the judging of the bridges is the strength to weight ratio! It is a good idea for students to experiment with a number of shapes and ideas in the effort to determine an optimal design... just as a real engineering firm would in its design process.
6. Design & Construction Techniques to Consider
- What is the strongest basic structural unit? Why is it the strongest? - Can any strength advantage be achieved by preloading the beams in the bridge? If so how should they be preloaded and by how much? - How much stronger is a pillar as compared to a single straw? Does the design and construction of the pillar affect the strength? -What joints can be used with the three basic materials given? -Why are joints so important in the design of the bridge?
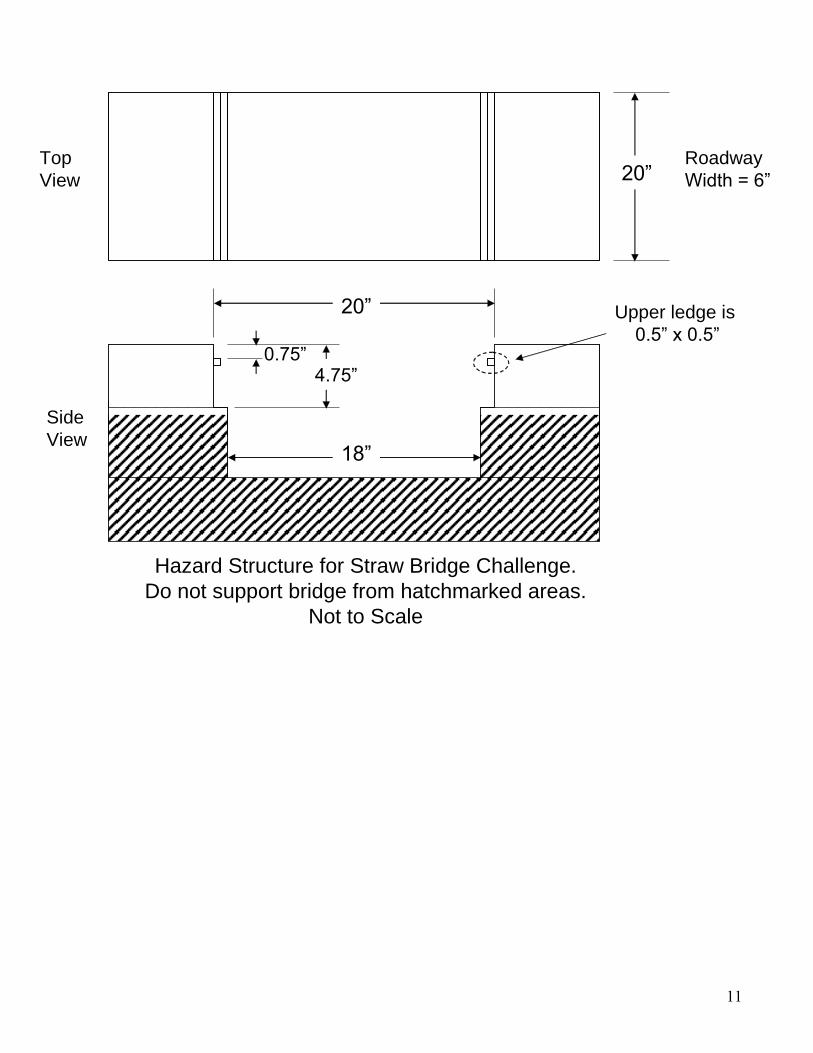
7. Hazard construction:
The hazard for this year’s competition is identical to the one used in previous years. If your organization competed previously and built a hazard for testing you can use the same hazard for this year. Additionally, the Challenge sponsors have a limited number of hazards available for rental. Contact the Baltimore Museum of Industry for details on hazard rental. For dimensional details see appendix A. Testing: Before your students actually build a bridge they should test individual components: Trusses Joints/Connections
Strawbridge Design Guide Page 7
Beams By doing this, your students will better understand the properties of structures. They may need to design their own test equipment. Here are some of the questions the test equipment will provide answers to:
1. What is the best way to join two straws end to end? 2 How much extra bending strength is achieved with 3, 4, 6, 7 or more
straws combined into a single beam? What is the best configuration of that beam and how should it be constructed? Is more bending strength gained by stacking straws or by laying them side to side?
3. Are equilateral trusses stronger than other truss styles? What about
rectangular trusses. 4. How do joints affect the strength of your trusses and beams?
8. Test Fixture To improve the understanding of the students and teachers the testing tool described in appendix A is proposed. There are other tests and testing fixtures that can be devised. Each school is responsible for fabricating its own test fixtures. These fixtures such as these can be used to test small structures built for destructive testing, followed by an evaluation of the failure mode of the structure. This can be educational on structural principles and can be used for classroom competitions. 9. Written Report
A written report is required. Its design and structure should be as a technical or engineering report. See the Maryland Engineering Challenges’ Middle School Guide to Entry at www.thebmi.org. Straw Bridge Challenge Reports will be due at BMI on Friday, April 13, 2018 by 4:00 p.m. Please note that reports must be submitted in hard copy, electronic submissions WILL NOT be accepted. As this is a challenge for performance of the bridge, the report should be concise but informative. Approximately ten double spaced typewritten pages in length is a guide but not a requirement, greater or fewer pages can be perfectly acceptable. It is recommended that reports that are prepared on a word processor utilize a double spaced, 12 point “Times Roman”, “Palatino”, “Courier” or similar typeface. Handwritten reports are also perfectly acceptable. They should be single spaced on regular 8-1/2 X 11 lined loose-leaf notebook

Strawbridge Design Guide Page 8
paper. Please see the Written Report Guide for further information on report format and content. Students who do not have or are not comfortable with the equipment or techniques to embed pictures directly into their report are encouraged to take regular snapshots, and include them by taping them into the appropriate place in the report. As a short guide, Challengers should consider breaking their written report into the following or similar sections.
Introduction: What is the paper about and why is this bridge being built. What are the basic rules, objectives and restrictions?
Literature Review and Academic Research: What are some common bridge types and designs and how do they apply to the Straw Bridge Challenge. How do elements of the science of bridge building relate to the Straw Bridge Challenge?
Experimental Research: Did you form any ideas of what might or might not work for your bridge design? How did you test them? What worked? What did not work? What were the conclusions from your tests?
Conclusions and final bridge design: Why did you choose your design? Why do you believe your choice is the best choice for the challenge presented?
Drawings and Sketches: Drawings of your proposed and entered bridge design. Drawings should include more than one view of the bridge if possible and include a scale so the reader knows how many inches on the paper is equal to one inch of the real bridge. Example: ½” = 1”. This would tell the reader that one half of an inch on the paper is equal on one inch on the real bridge.
Bibliography: List all published materials, websites, software and other sources of information used in the research for your bridge design and report. It is also expected that more than just one type of reference material will be consulted. Regardless of the format or style used, reports that include ONLY websites or software as references
will be marked down. For ideas on some bound reference material, a short list of possible bound references is included in the appendix.
Presentation of the report is evaluated on care and neatness and not fanciness. A stack of 8-1/2 X 11 inch papers neatly aligned with oversized drawing carefully folded and placed with a staple in the top left corner will receive high marks for

Strawbridge Design Guide Page 9
presentation. A colorful report folder or three ring binder with separate pocket for the cover sheet that has sheets in haphazard order, sections unclearly marked or oversized sheets randomly folded and placed within the report will receive low marks. The preceding points are a guide, reports are evaluated on content, and other formats can be equally valid. As noted earlier, please see the Written Report Guide in the under the Straw Bridge section of Middle School Challenges on the Engineering Challenges page for more detailed information. 10. Engineering Software Bridge Design Software: There is free bridge design software available at http://www.bridgebuilder-game.com/. There are a number of packages here, typically associated with virtual bridge design contests. The applicability of any bridge design software package to the Strawbridge Challenge and quality of the software are up to the user to evaluate. These packages can be a tool for visualizing some of the principles of bridge design modeled in a computational environment. This software is not a replacement for your own experiments! While research based on knowledge gained by the use of bridge building software is accepted as part of a broader scope of research, reports and designs that use it as the major or sole source of information will be marked down. Historically the observation has been that teams that rely on bridge building software do not fare well against teams who stepped back from the computer and simply experimented with straws and glue. 11. Oral Screening and Reports Oral evaluation takes place in two stages. The first stage is a screening where each team of Challengers is asked a series of questions by a panel of judges. Following the oral screening, static judging and performance testing the front running teams will be called back for a ten minute oral presentation. For the oral presentation by the four top teams, students will be required to present the engineering behind their bridges then answer any questions that the judges may have. Challengers will improve their scores by providing visual presentation materials for use during the oral report. As an additional hint, if challengers cannot answer a question, they will do better by stating they do not know an answer and following up with information on where they would expect to find that answer rather waffling an answer or simply saying they do not know.

Strawbridge Design Guide Page 10
Appendix A
Hazard Drawing
Test Fixture Drawing
11
Hazard Structure for Straw Bridge Challenge.
Do not support bridge from hatchmarked areas.
Not to Scale
18”
20”
0.75”4.75”
Upper ledge is
0.5” x 0.5”
20”Roadway
Width = 6”
Top
View
Side
View

12

13
Appendix B
Short List of Bound References
14
Adams, Richard C. and Peter H. Goodwin. Engineering Project for Young Scientists. New York, New York: Franklin Watts Publishing, 2001 Adkins, Jan. Bridges: From My Side to Yours. Connecticut: Roaring Book Press, 2002 Bennett, David. The Creation of Bridges. Edison, New Jersey: Chartwell Books, division of Book Sales, Inc., 1999 Brown, David. Bridges. New York, New York: MacMillan Publishing Company, 1993 Dunn, Andrew. Bridges. New York, New York: Wayland Publishers, Ltd., 1993 Glover, David. Make it Work! Building. New York, New York: Thomson Learning, 1994 Good, Keith. Build It! Activities for Setting Up Super Structures. Minneapolis, Minnesota: Lerner Publications Company, 1999 Graf, Bernhard. Bridges that Changed the World. Munich, Germany: Prestral Verlag, 2002 Johmann, Carol; Rieth, Elizabeth. Bridges! Amazing Structures to Design, Build and Test. Charlotte, VT: Williamson Publishing Co, 1999 Oxlade, Chris. Superstructures: Bridges. Austin: Raintree Steck Vaughn Publishers, 1997 Salvadori, Mario. The Art of Construction. Chicago: Chicago Review Press Incorporated, 1990 Sturges, Philemon. Bridges Are to Cross. New York, New York: G.P. Putnam’s Sons, 1998