artwork consists of fifty-two (52) 8½ x 11 inch pages.cians with general fluoroscopic visualization...
TRANSCRIPT
Form ENG-0034-T03, Rev. 001
Osteoporosis Assessment LORAD© Breast Cancer Detection DirectRay© Digital Imaging FLUOROSCAN© C-arm Imaging
TITLE DOCUMENT NUMBER REV
INSIGHT 2 USER GUIDE, V3.X
AW-04100 001
ARTWORK SIZE A SHEET 1 OF 1
REV AUTHORED BY DATE G CORRIDORI 7/22/09 REV DRAFTED BY DATE G CORRIDORI 8/19/09 PROPRIETARY: This document contains proprietary data of Hologic, Inc. No disclosure, reproduction or use of any part thereof may be made except by written permission from Hologic. REV. RELEASE DATE: 09/02/09
Artwork consists of fifty-two (52) 8½ x 11 inch pages.

InSightMini C-arm Imaging System
User Guide
Caution: Federal (U.S.A.) law restricts this device to sale by oron the order of a physician (or properly licensed practitioner).
MAN-01567 Revision 001
August 2009
The information contained in this Manual is confidential and proprietary to Hologic, Inc. This information is provided only to authorized representatives of Hologic’s customers solely for the purpose of facilitating the use of Hologic’s products. No information contained herein may be disclosed to any unauthorized person for any purpose whatsoever without the prior written consent of Hologic, Inc.
The information in this document is subject to change without notice.
© 2005-2009 by Hologic, Inc. All rights reserved.
InSight™ and Fluoroscan™ are trademarks of Hologic, Inc.
Hologic and the Hologic logo are registered trademarks of Hologic, Inc.
All other trademarks, registered trademarks, and product names used within this document are the property of their respective owners.
The Hologic products described in this Manual are protected by at least some of the following U.S. Patents and foreign counterparts: 6,234,672; 6,236,712; PCT Intl. Application US98/25281
This manual originally drafted in the English language.
Printed in the U.S.A.
Hologic, Inc.35 Crosby Drive
Bedford, MA 01730USA
Tel: (781) 999-7300Fax: (781) 280-0669
Service: (800) 321-HOLX (321-4659)User Support: (800) 321-HOLX (321-4659
Hologic EuropeHologic N.V.
Leuvensesteenweg 250A1800 Vilvoorde
BelgiumTel: 32.2.711.4680Fax: 32.2.725.2087
0044

Contents
Indications for Use ............................................................................................. 1Radiation Safety ................................................................................................. 1
General........................................................................................................... 1Radiation Dose and Dose Rate ...................................................................... 2X-ray Shielding.............................................................................................. 2
Regulations for X-Ray Equipment................................................................... 2United States Federal and State Regulations ................................................. 2IEC Regulations ............................................................................................. 2Canadian Regulations .................................................................................... 3
EMI ..................................................................................................................... 3Accessories .......................................................................................................... 3Labels .................................................................................................................. 3Symbols ............................................................................................................... 4Safety Hazards ................................................................................................... 5System Components........................................................................................... 8Controls and Indicators..................................................................................... 9
X-ray Head Control Panel.............................................................................. 9Foot Switch Controls ..................................................................................... 9Keyboard Controls ....................................................................................... 10
Using the System .............................................................................................. 11Moving the System ...................................................................................... 11Adjusting the C-arm..................................................................................... 12The Sterile C-arm Drape.............................................................................. 12Powering Up the System.............................................................................. 13Powering Down the System......................................................................... 13
Using the InSight Application......................................................................... 14Main Screen ................................................................................................. 14Image Acquisition Session........................................................................... 17
Select or Enter Patient Window............................................................. 17Image Acquisition Screen...................................................................... 18Select Reference Images Window ......................................................... 22
Review Images Session ............................................................................... 23Select Study for Review Window.......................................................... 23Review Screen ....................................................................................... 24Enhanced Displayed Image Screen........................................................ 26
Maintaining Patient Study Records ............................................................. 27Update Patient Study Information Window........................................... 27Export Images Window ......................................................................... 28Import Images Window ......................................................................... 30Delete Images Window.......................................................................... 32View DICOM Queue Window .............................................................. 33
Configuring the Application ........................................................................ 34
i

Table of Contents
System Configuration User Interface .................................................... 34System Page........................................................................................... 34DICOM Send Options Page................................................................... 35DICOM Print Options Page................................................................... 36Worklist Configuration Page ................................................................. 38Users / Passwords Page.......................................................................... 39Physician Preferences Page ................................................................... 40Physician Preferences Page - Image Acquisition Tab ........................... 41Physician Preferences Page - Image Processing Tab............................. 42Physician Preferences Page - Image Management Tab ......................... 43Administrative Settings Page................................................................. 44
System Maintenance ........................................................................................ 45System Backup ............................................................................................ 45System Recover ........................................................................................... 45Cleaning ....................................................................................................... 45
ii

Tables
Table 1 System Configuration Menu............................................................................................15Table 2 Tools Menu......................................................................................................................16Table 3 Select or Enter Patient Window, Section/Field Descriptions ..........................................17Table 4 Select or Enter Patient Window, Button Functions .........................................................17Table 5 Image Effects Menu.........................................................................................................19Table 6 Configure Image Area Menu ...........................................................................................19Table 7 Image Acquisition Screen, Button Functions ..................................................................20Table 8 Tool Set............................................................................................................................21Table 9 Select Reference Images Window, Section Descriptions................................................22Table 10 Select Reference Images Window, Button Functions ...................................................22Table 11 Select Study for Review Window, Section/Field Descriptions .....................................23Table 12 Select Study for Review Window, Button Functions ....................................................23Table 13 Review Screen, Button Functions..................................................................................24Table 14 Detailed Image Viewing Screen, Button Functions ......................................................26Table 15 Update Patient/Study Information Window, Section Descriptions ...............................27Table 16 Update Patient/Study Information Window, Button Functions.....................................27Table 17 Export Window, Section Descriptions ..........................................................................28Table 18 Export Window, Button Functions ................................................................................29Table 19 Import Window, Section Descriptions ..........................................................................30Table 20 Import Window, Button Function..................................................................................31Table 21 Delete Images Window, Section Descriptions ..............................................................32Table 22 Delete Images Window, Button Functions ....................................................................32Table 23 Queue Window, Section Description and Button Functions .........................................33Table 24 System Page, Section/Field Descriptions ......................................................................34Table 25 DICOM Send Options Page, Section Descriptions .......................................................35Table 26 DICOM Send Options Page, Button Functions .............................................................36Table 27 DICOM Print Options Page, Section/Field Descriptions ..............................................36Table 28 DICOM Print Options Page, Button Functions .............................................................37Table 29 Worklist Configuration Page, Section Descriptions ......................................................38Table 30 Worklist Configuration Page, Button Functions ...........................................................38Table 31 Users / Passwords Page, Section/Field Descriptions .....................................................39Table 32 Users / Passwords Page, Button Functions.....................................................................39Table 33 Physician Preferences Page, Section/Field Descriptions...............................................40Table 34 Physician Preferences Page, Button Functions..............................................................40Table 35 Physician Preferences Page - Image Acquisition Tab, Section/Field Descriptions.......41Table 36 Physician Preferences Page - Image Processing Tab, Section/Field Descriptions ........42Table 37 Physician Preferences Page - Image Management Tab, Section/Field Descriptions ....43Table 38 Administrative Settings Page, Section Descriptions .....................................................44Table 39 Administrative Settings Page, Button Functions ............................................................44
iii

iv

Fluoroscan InSight User Guide
Indications for UseThe Fluoroscan InSight is a Mini C-Arm Fluoroscopic Imaging System designed to provide physi-cians with general fluoroscopic visualization of a patient, including, but not limited to surgical ortho-pedic and podiatry use, critical and emergency care procedures, and light anatomy imaging situations.
Radiation SafetyImproper imaging procedures, or the failure to observe radiation safety and technique factor recommendations could result in increased exposure. It is the operator's responsibility to observe all safety procedures and to keep radiation exposures As Low As Reasonably Achievable (ALARA) and to comply with all national, state and local regulatory requirements.
Hologic recommends that all members of the operating staff wear a radiation monitoring device. This is usually a film badge or TLD (thermoluminescent dosimetry) dosimeter which will record any radiation dose over a specific period of time. The physician should wear a ring badge to record any exposure to his/her hands.
GeneralA fluoroscopic device emits a continuous beam of X-rays in order to view an object in real-time.
Primary radiation is present in the space between the X-ray source and the detector screen. The operator should never place his/her own hands in the beam.
Secondary radiation, or X-ray scatter is caused by the X-rays which do not fully penetrate the object placed in the primary beam. X-ray scatter has considerably less energy than the primary beam and is absorbed by other objects in the immediate area. The amount of scatter is greatly dependent upon the power setting used and the density and proximity of the body part to the beam, and the length of exposure time.
1

Fluoroscan InSight User Guide
Radiation Dose and Dose RateRadiation received by each kilogram of a patient’s body is called “dose.” Dose rate refers to the dose received per unit time.
Distance from the x-ray source plays a major role in reducing dose to both the patient and the operator. For example, at maximum output the dose is 2.6 mGy/minute at the image receptor and 45 mGy/minute at the Tube Housing exit port, or 17 times greater. This higher value is known as the maximum Entrance Exposure Rate (EER).
Scattered radiation decreases with the square of the distance in exactly the same way as noted above for X-rays in the primary beam; however, as the dose rate is much less, scatter is usually expressed in mR/hour (1 mR = 0.01 mGy).
Dose and scatter data for InSight is available from Hologic upon request.
X-ray ShieldingThe scattered radiation from the InSight system is low compared to many other radiological devices, and the requirement to wear protective lead aprons and/or attenuating gloves is governed by applicable facility policy. It should also be noted that many states, provinces, countries and individual institutions may require the use of lead aprons by persons in the same room with any operating fluoroscopic device. The strict observation of safe operating practices and the use of minimal fluoroscopic times is the key to reducing user exposure.
Regulations for X-Ray Equipment
United States Federal and State RegulationsFluoroscan InSight Mini C-arm Imaging Systems conform to the United States Code of Federal Reg-ulations, 21 CFR 1020.32 “Performance Standards for Ionizing Radiation Emitting Products: Fluoro-scopic Equipment.” However, additional state regulations may apply for X-ray products. This may require notifying your state regulatory agency about your installation and/or operator training and certification.
It is the responsibility of the user to contact the applicable state radiation control agency to verify that your installation is in compliance with regulations in your state governing installation and use of X-ray equipment.
The InSight Mini C-arm Imaging System complies with 21CFR Subchapter J.
The InSight Mini C-arm Imaging System is intended for special surgical applications that would be prohibited at the source to skin distances specified in 21CFR 1020.32 (g) but are permitted under 21CFR 1020.32 (g) (2). The SSD is 10 cm minimum.
IEC RegulationsFluoroscan InSight Mini C-arm Imaging Systems comply with the requirements of IEC 60601-1. The classification of the InSight Mini C-arm Imaging Systems under this specification is Class 1, Type B.
The InSight Mini C-arm Imaging Systems comply with the following IEC standards:
2

Fluoroscan InSight User Guide
IEC/EN 60601-1 IEC/EN 60601-1-3IEC/EN 60601-1-1 IEC/EN 60601-1-4IEC/EN 60601-1-2 IEC/EN 60825-1
Canadian RegulationsThe InSight Mini C-arm Imaging Systems comply with CSA C22.2 No. 601.1
EMIThis instrument is designed to be compatible with the electromagnetic environments specified in IEC60601-1-2 and will operate satisfactorily when placed in an environment that includes other equipment complying with that standard. If equipment that is not electromagnetically compatible is placed into the environment where the InSight Mini C-arm Imaging System is used, the InSight Mini C-arm Imaging System or the non-compliant equipment may malfunction or exhibit other anomalous behavior. Consult the appropriate field service engineer.
AccessoriesThis instrument is supplied to the user together with those hardware and software accessories that are needed for its safe and reliable operation. Additional accessories may be used to perform optional procedures. Do not use any accessories in conjunction with this instrument other than those approved by Hologic for use with the instrument.
Labels
The serial number label includes:ModelManufacturer name and addressDate of manufactureSerial numberElectrical ratingDuty cycleThis product complies with DHHS rules 21 CFR Subchapter J applicable on date of manufacture.IEC standards
LBL-00377 Rev. 001
System Model: InSight 2Manufactured by:Hologic, Inc.35 Crosby DriveBedford, MA 01730USA
0044
Electrical rating:100/120/220/240V 50/60 Hz, 750VA
50% Max Duty Cycle at 75kVp, 100uA
R
3

Fluoroscan InSight User Guide
Symbols
WARNING: This X-Ray unit may be dangerous to patient and operator unless safe exposure factors, operating instructions and maintenance schedules are observed.
Class 1 Laser ProductComplies with FDA performance standards for laser products except for deviations pursuant to Laser Notice number 50 dated July 26, 2001.
CSA listed device CE marked device
Dangerous voltage Attention - Read the Caution or Warning statement that follows
Type B equipment X-ray filtration
Time delay fuse Protective ground
Functional ground Equipotential ground
USB connector Electrostatic sensitive device
Dispose of electrical/electronic equipment properly
Computer On/Standby switch
Rear wheels free to move in all directions Rear wheels move forward and back only
Rear wheels locked
WARNING: This X-Ray unitmay be dangerous to patientand operator unless safe exposurefactors, operating instructions andmaintenance schedules areobserved. 110365 REV 002
LBL-00228 REV 002
Class 1 Laser ProductComplies with FDA performancestandards for laser products except fordeviations pursuant to Laser Noticenumber 50 dated July 26, 2001.
R
0044
LBL-00270 Rev 001
4

Fluoroscan InSight User Guide
Safety HazardsThe following table itemizes various safety hazards. Each hazard is cross referenced with the respective cause and proper course of action.
SAFETY HAZARD CAUSE COURSE OF ACTION
Radiation Safety
This system produces ionizing radiation and may be dangerous to patients and operators unless the safety and operating instructions in this manual are followed.
Although operating this system can result in low scatter radiation levels, it is recommended that protective X-ray clothing be worn and radiation safety precautions be observed when operating the system.
Operators should avoid placing their hands or any part of their bodies in the path of the X-ray beam.
When making X-ray exposures, place the anatomy close to the image intensifier for the best image quality and to reduce exposure to radiation.
An alarm sounds after every five minutes of accumulated exposure time.
Electrical Safety
Electrical circuits inside the system can cause serious injury or death.
This system operates on high voltages. High voltages are at the following locations:
X-ray tube: 75,000 Volts.
Safety covers have been designed for this system to mitigate the hazards caused by electrical circuits and high voltages. Never remove the covers or operate the system while the covers are off. If any cover is off, request service before using the system.
Unplugging the power cord from the wall is the only way to disconnect main power from this system.
Tipping Hazard Placing too much weight on the C-arm Image Intensifier may cause the system to tip over. The amount of weight that can be supported by the Image Intensifier is highly variable, depending on the position of the flex-arm, c-arm, and other factors. This hazard is greatest when the flex-arm is extended and moved to the far left or right of the system.
If weight is to be applied to the C-Arm Image Intensifier, caution must be used to prevent the device from becoming unstable.
Placing the full weight of the lower extremity directly on the Image Intensifier is NOT recommended.
5

Fluoroscan InSight User Guide
Unauthorized Modifications to X-ray Tube
Never remove the housing around the X-ray tube or make any changes to the X-ray tube.
When the product leaves the manufacturing plant and at the time of installation, the X-ray source and assembly meet the requirements of 21 CFR 1020.30-32. Any unapproved change to the system could cause death, injury or expensive damage to the equipment, and could void the service agreement.
Do not make any changes to the X-ray tube. Contact a Hologic Representative to replace the X-ray tube.
Electrical Fire Fire from any source. If there is a fire in the area, and it is safe to do so, turn the system off and unplug the power cord from the wall outlet.
If the system is on fire, do not touch it. Leave the area. If you use a fire extinguisher, only use one approved for electrical fires.
Explosion Hazard Flammable and explosive anesthetics, liquids, vapors and gases can cause an explosion when used around electrical equipment
If any of these products are near the system, DO NOT TURN THE SYSTEM ON.
If any of these products are discovered near the system while it is on, DO NOT TOUCH ANY CONTROL OR TURN THE SYSTEM OFF. Evacuate the facility immediately. Have the facility specialist remove the substances and ventilate the area before allowing patients and personnel to return to the facility.
Foot Switch safety The foot switch can be damaged by falling objects, being rolled over by the wheels, and in other ways.
Remain aware of the foot switch at all times during operation and transport to avoid these hazards.
If the foot switch is tipped, turn it face up immediately.
Before moving the system, always unplug the system power cord, and store the cord on the handle.
SAFETY HAZARD CAUSE COURSE OF ACTION
6

Fluoroscan InSight User Guide
Collision Hazard If improperly moved or if the wheel brakes are not used correctly, the system could roll out of control.
If the articulating flex arm is not locked in place during transport, the C-arm could swing out of control and cause injury to the patient or medical personnel.
Use caution when moving the system on an incline.
Do not move the system on an incline greater than ten degrees.
One person should be able to move the system easily on a level surface.
Always lock the wheel brakes before procedures. Never leave the system unattended on an incline greater than five degrees.
Always lock the flex arm after changing the position of the C-arm.
Cleaning Safety Almost any liquid spilled into electronic equipment automatically becomes a conductor of electricity.
This system is not water proof. It must be turned off immediately if liquid is spilled on it. Do not turn the system on until the liquid has dried completely. Do not splash or spray cleaning solution on the system.
Clean exterior surfaces of the Fluoroscan InSight Console, the flex-arm and the C-arm with a soft cloth or disposable lint-free tissue moistened with water, isopropanol or methanol. Wipe surfaces, do not scrub.
Device Safety
Injury could result if unapproved devices are connected to the system.
Certain devices were tested for use with the Fluoroscan System, and only these or compatible devices should be used.
Do not connect any devices to the system other than those described in this manual.
Internally connected devices should be installed only by persons trained in the servicing of this system.
Electrosurgical Device This system is shielded from electrical discharges. However, there is still a possibility that an electrosurgical device discharged directly into the system could adversely affect system operation. In addition, shielding might not always protect the system from the amount of energy produced by a spark-gap type device.
If there is a strong electrosurgical surge into the system and it malfunctions, turn the system off, wait five seconds, then turn it back on.
If the problem persists after resetting the system twice, request service.
SAFETY HAZARD CAUSE COURSE OF ACTION
7

Fluoroscan InSight User Guide
System Components
A Touch screen monitor H DVD RW recorder
B Keyboard with integrated pointing device I Foot switch
C Flex-arm J Foot switch shelf
D C-arm K Image printer shelf
E X-ray head L X-ray ON light
F Image intensifier M C-arm retainer (not shown)
G Computer On/Standby switch N USB port
A
B
CD
E
FGH
I
J
K
L
M
N
8

Fluoroscan InSight User Guide
Controls and Indicators
X-ray Head Control Panel
Foot Switch Controls
Symbol Label Function
Rotate Rotates the image 10 degrees clockwise or counterclockwise.
B/C Allows adjustment of image brightness and contrast.
X-ray Acquires an X-ray exposure. Press switch twice to actuate X-rays.
A yellow indicator light located on top of the monitor shows that X-rays are being produced.
Laser Turns on the Positional Laser.
Noise Suppression
Cycles through the Noise suppression settings during image acquisition.
kV/mA Increases or decreases technique factors based on selected mode (see Table 7 on page 20).Note: Pressing both the up and down power buttons at the same time returns the system to Auto Power mode.
Switch Position Symbol Name Function
Left X-ray Acquires an X-ray exposure.
A yellow indicator light located on top of the monitor shows that X-rays are being produced.
Center Print Prints the current image on the local printer.
Right Save To mark the image as a reference image, press and release the foot switch once.
To save the image and unmark as a reference, press and release the foot switch a second time.
To save the image and mark as a reference, press and release the foot switch a third time.
9

Fluoroscan InSight User Guide
Keyboard Controls
Icon Function Key Function
F1 Displays help window.
F2 In Image Acquisition session, displays the Patient Information window.
In Review session, displays the Select Study fir Review window.
F3 Flips image horizontally.
F4 Rotates image 10 degrees clockwise.
Shift-F4 Rotates image 10 degrees counterclockwise.
F5 Decreases kV/mA if simultaneous is on, or decreases kV if simultaneous is off.
Pressing this key puts the system into manual mode.
Shift-F5 Decreases mA if simultaneous is off.
Pressing this key puts the system into manual mode.
F6 Increases kV/mA if simultaneous is on, or increases kV if simultaneous is off.
Pressing this key puts the system into manual mode.
Shift-F6 Increases mA if simultaneous is off.
Pressing this key puts the system into manual mode.
F7 Resets fluoro alarm timer.
F8 Saves the current image to the patient’s record.
F9 Prints the current image to the local printer.
F10 Toggles Play back of a recorded cine loop on/off.
F11 Restores physician’s defaults.
Shift-F11 Returns the system to Auto Power mode.
F12 Cycles through the Noise suppression settings during image acquisition.
10

Fluoroscan InSight User Guide
Using the SystemNote: InSight operators should read the Radiation Safety section before operating the system.
Moving the System
1. Ensure that the system is powered off. (See “Shutting Down the InSight System” for details.)2. Unplug the power cord and wrap it around the cord guides on the back of the cabinet.3. Store the foot switch in the foot switch shelf.4. Flip the monitor forward and down.5. Place the flex-arm and C-arm in the locked position (see below) using the Transport Position
Knob on the side of the C-arm housing.
6. Once the system is in position, lock the rear casters down to prevent the system from moving. The swiveling angle of the rear casters can be locked to prevent lateral movement of the system or unlocked to allow lateral movement.
Warning: Before moving the system, the flex-arm and C-arm must be in the locked storage position to prevent tipping.
TransportPosition Knob
Rear wheels locked Rear wheels move forward Rear wheels free to moveand back only in all directions
11

Fluoroscan InSight User Guide
Adjusting the C-armTurn the flex-arm lock counterclockwise to loosen; then adjust the flex-arm height. To reposition the C-arm, turn the C-arm lock to loosen. Roll the arm to the desired position, then turn to lock the arm in place. The locking lever can also be positioned between open and locked to provide various levels of resistance to arm roll.
The Sterile C-arm DrapeBefore using InSight in the operating room, the C-arm should be fitted with a sterile drape. Small labels on the drape indicate how to fit the drape to the X-ray head and to the intensifier.
Note: After use, dispose of sterile C-arm drape properly (in a biohazard container).
Flex-arm lock
C-arm lock
X-ray Head
Intensifier
12
Fluoroscan InSight User Guide
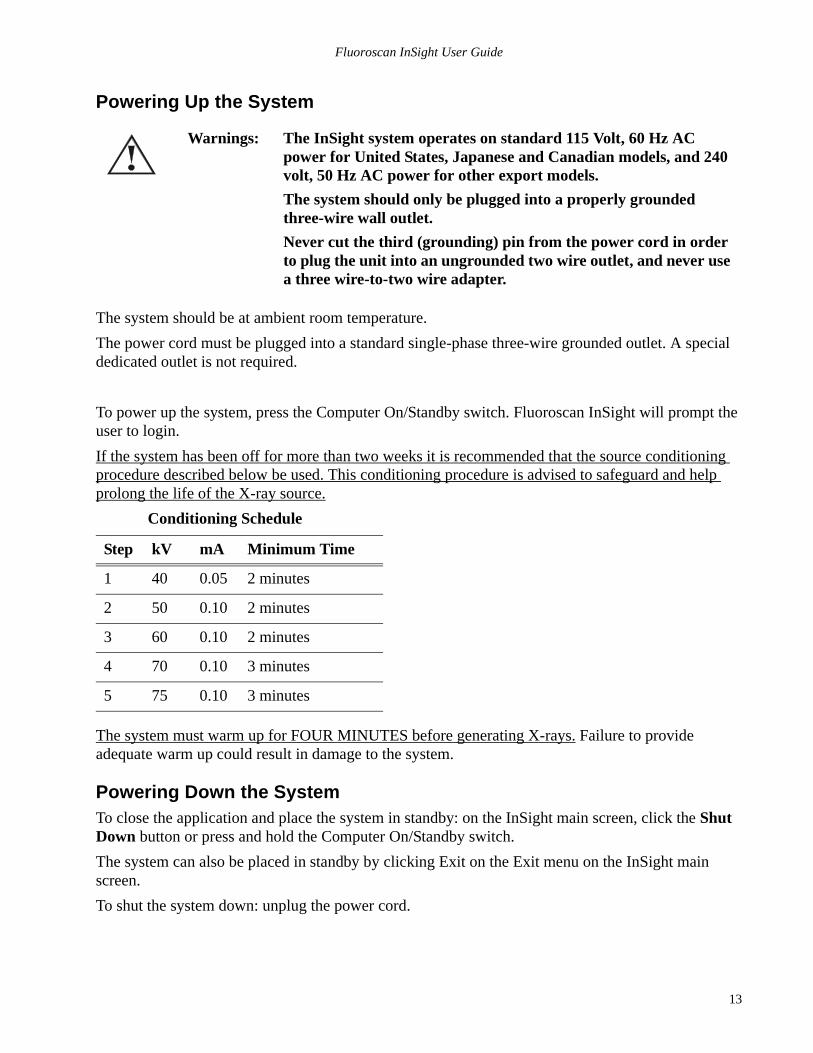
Powering Up the System
The system should be at ambient room temperature.
The power cord must be plugged into a standard single-phase three-wire grounded outlet. A special dedicated outlet is not required.
To power up the system, press the Computer On/Standby switch. Fluoroscan InSight will prompt the user to login.
If the system has been off for more than two weeks it is recommended that the source conditioning procedure described below be used. This conditioning procedure is advised to safeguard and help prolong the life of the X-ray source.
Conditioning Schedule
The system must warm up for FOUR MINUTES before generating X-rays. Failure to provide adequate warm up could result in damage to the system.
Powering Down the SystemTo close the application and place the system in standby: on the InSight main screen, click the Shut Down button or press and hold the Computer On/Standby switch.
The system can also be placed in standby by clicking Exit on the Exit menu on the InSight main screen.
To shut the system down: unplug the power cord.
Warnings: The InSight system operates on standard 115 Volt, 60 Hz AC power for United States, Japanese and Canadian models, and 240 volt, 50 Hz AC power for other export models.
The system should only be plugged into a properly grounded three-wire wall outlet.
Never cut the third (grounding) pin from the power cord in order to plug the unit into an ungrounded two wire outlet, and never use a three wire-to-two wire adapter.
Step kV mA Minimum Time
1 40 0.05 2 minutes
2 50 0.10 2 minutes
3 60 0.10 2 minutes
4 70 0.10 3 minutes
5 75 0.10 3 minutes
13

Fluoroscan InSight User Guide
Using the InSight ApplicationNote: In the InSight application, users can select buttons, menus, menu functions, icons, and
position the insertion cursor in fields by 1.) positioning the cursor on the respective item and clicking the left mouse button or 2.) touching the item on the touch screen (if enabled). Throughout this manual, “click” will be used to indicate both ways.
Once the user is logged into the application, the main screen appears if Audit Mode is on. If Audit mode is off, the user is taken directly to the Image Acquisition screen.
Main Screen
A Starts an image acquisition session. See “Image Acquisition Session” on page 17.
B Starts an image review session. See “Review Images Session” on page 23.
C Exits application and shuts down the system.
D System Configuration menu. see Table 1 on page 15
E Tools menu. see Table 2 on page 16
F About - Displays InSight application’s version number, serial number and copyright data.
G Exit menu. Allows the user to logout or exit the application.
H Help - Displays help for using the screen.
B
C
D
E
A
FG
H
14
Fluoroscan InSight User Guide
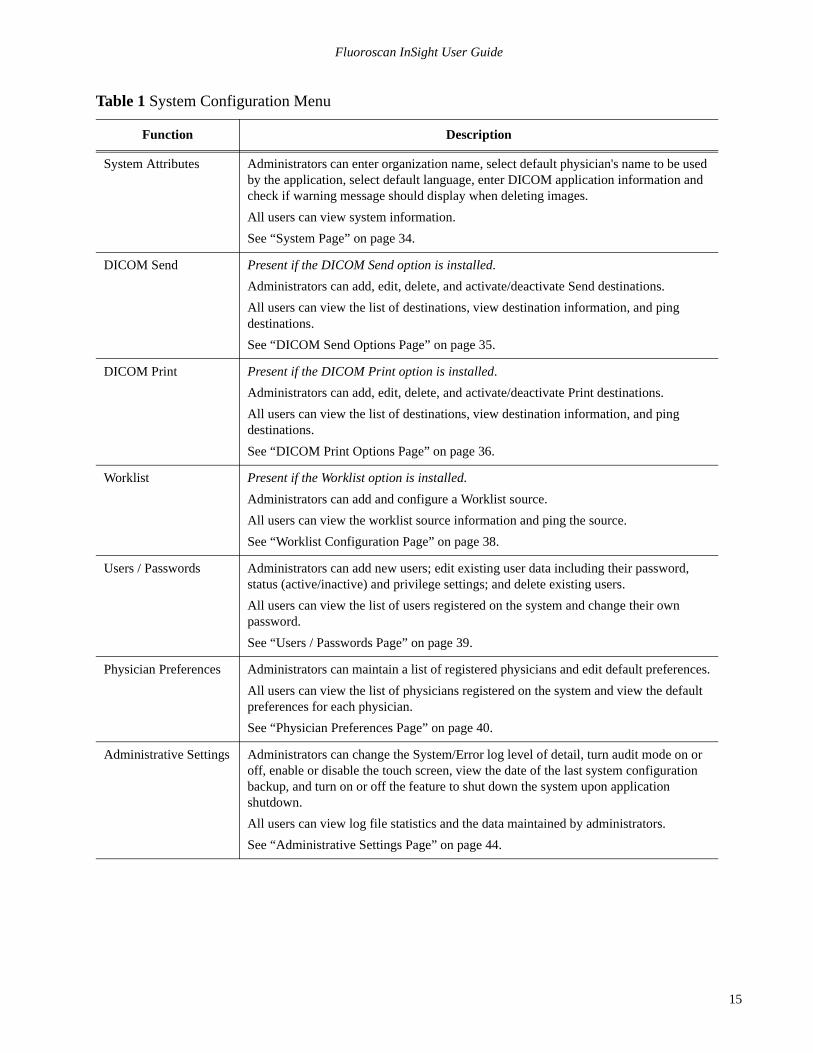
Table 1 System Configuration Menu
Function Description
System Attributes Administrators can enter organization name, select default physician's name to be used by the application, select default language, enter DICOM application information and check if warning message should display when deleting images.
All users can view system information.
See “System Page” on page 34.
DICOM Send Present if the DICOM Send option is installed.
Administrators can add, edit, delete, and activate/deactivate Send destinations.
All users can view the list of destinations, view destination information, and ping destinations.
See “DICOM Send Options Page” on page 35.
DICOM Print Present if the DICOM Print option is installed.
Administrators can add, edit, delete, and activate/deactivate Print destinations.
All users can view the list of destinations, view destination information, and ping destinations.
See “DICOM Print Options Page” on page 36.
Worklist Present if the Worklist option is installed.
Administrators can add and configure a Worklist source.
All users can view the worklist source information and ping the source.
See “Worklist Configuration Page” on page 38.
Users / Passwords Administrators can add new users; edit existing user data including their password, status (active/inactive) and privilege settings; and delete existing users.
All users can view the list of users registered on the system and change their own password.
See “Users / Passwords Page” on page 39.
Physician Preferences Administrators can maintain a list of registered physicians and edit default preferences.
All users can view the list of physicians registered on the system and view the default preferences for each physician.
See “Physician Preferences Page” on page 40.
Administrative Settings Administrators can change the System/Error log level of detail, turn audit mode on or off, enable or disable the touch screen, view the date of the last system configuration backup, and turn on or off the feature to shut down the system upon application shutdown.
All users can view log file statistics and the data maintained by administrators.
See “Administrative Settings Page” on page 44.
15

Fluoroscan InSight User Guide
Table 2 Tools Menu
Function Description
View Logs View, print, export and in some cases edit various log files the application maintains.
View DICOM Queue Present if the DICOM Send option is installed.
View status of DICOM Send requests, and retry or delete selected requests.
See “View DICOM Queue Window” on page 33.
Print DAP Report Display and print the Dose Area Product report.
Update Patient Information
Administrators can update patient information for a selected patient study.
See “Update Patient Study Information Window” on page 27.
Delete Images Administrators can delete selected images from the system.
See “Delete Images Window” on page 32.
Import Import selected images into the system from removable media.
See “Import Images Window” on page 30.
Export Export selected images from the system to removable media.
See “Export Images Window” on page 28.
System Backup Backup system configuration and calibration data to external media.
System Recover Administrators can restore system configuration and calibration data from external media.
Install Options Administrators can install application software options.
16
Fluoroscan InSight User Guide
Image Acquisition Session
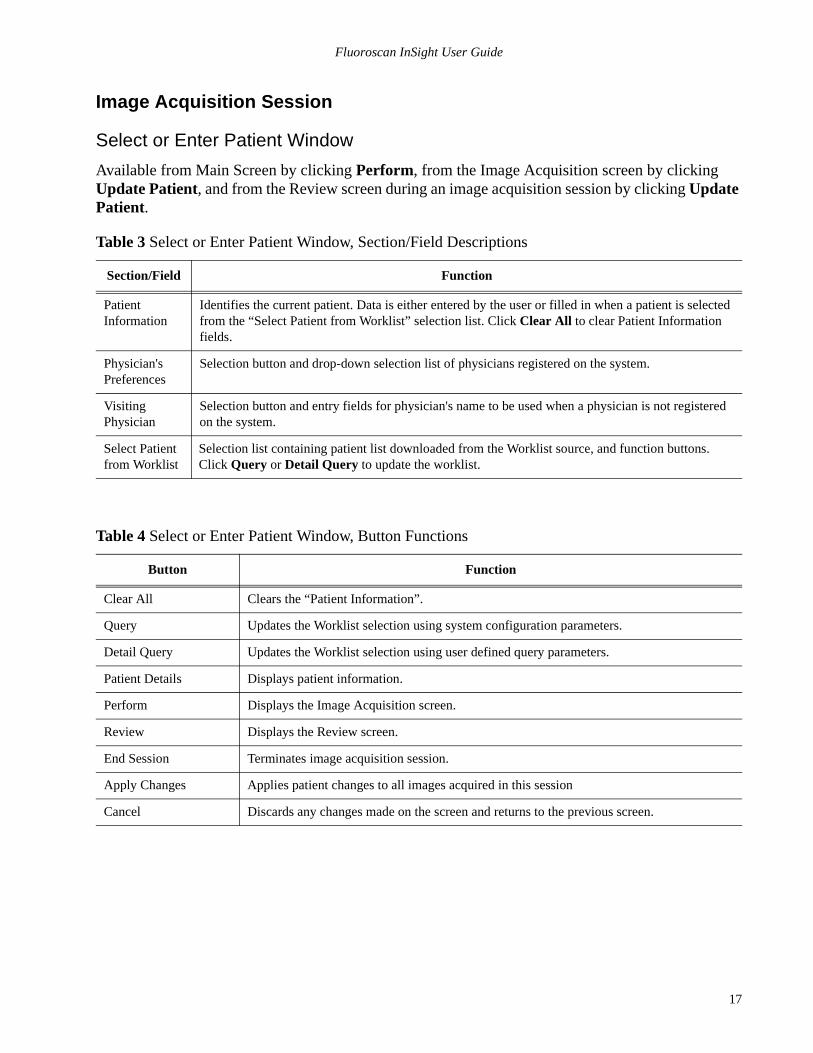
Select or Enter Patient Window
Available from Main Screen by clicking Perform, from the Image Acquisition screen by clicking Update Patient, and from the Review screen during an image acquisition session by clicking Update Patient.
Table 3 Select or Enter Patient Window, Section/Field Descriptions
Table 4 Select or Enter Patient Window, Button Functions
Section/Field Function
Patient Information
Identifies the current patient. Data is either entered by the user or filled in when a patient is selected from the “Select Patient from Worklist” selection list. Click Clear All to clear Patient Information fields.
Physician's Preferences
Selection button and drop-down selection list of physicians registered on the system.
Visiting Physician
Selection button and entry fields for physician's name to be used when a physician is not registered on the system.
Select Patient from Worklist
Selection list containing patient list downloaded from the Worklist source, and function buttons. Click Query or Detail Query to update the worklist.
Button Function
Clear All Clears the “Patient Information”.
Query Updates the Worklist selection using system configuration parameters.
Detail Query Updates the Worklist selection using user defined query parameters.
Patient Details Displays patient information.
Perform Displays the Image Acquisition screen.
Review Displays the Review screen.
End Session Terminates image acquisition session.
Apply Changes Applies patient changes to all images acquired in this session
Cancel Discards any changes made on the screen and returns to the previous screen.
17

Fluoroscan InSight User Guide
Image Acquisition Screen
Available from the Select or Enter Patient window by clicking Perform, and from the Review screen by clicking Update Patient.
A Image Effects Menu. see Table 5 on page 19.
B Configure Image Area Menu. see Table 6 on page 19.
C Function Buttons. see Table 7 on page 20.
D Displays AKR and cumulative air kerma while the x-ray tube is active. Air kerma is measured at the entrance to the Image Intensifier.
E Displays current power settings.
F Image Area.
G Filmstrip/Tools Area. see Table 8 on page 21 for Tool Set description.
AB
D
G
C
E
F
18

Fluoroscan InSight User Guide
Table 5 Image Effects Menu
* May be disabled or initially checked or unchecked. (Refer to “Physician Preferences Page” on page 40)
Table 6 Configure Image Area Menu
Function Description
Edge Enhancement * Images have their contrast expanded to provide a more detailed view of edges.
Flip * Images are flipped before being viewed by the user.
Dark Fluoro * Images have their white image pixels changed to black.
Reverse Video * Images are changed to a negative (blacks go to white; whites go to black).
Noise Suppression Selects noise suppression level to give a clear picture free of random video noise. Selections are Auto, High, Medium, Low and Off.
Refer to “Physician Preferences Page” on page 40 for default setting.
Reset Defaults Resets the edge enhancements, flip, dark fluoro, reverse video, and noise suppression settings to the default settings specified by the current physician’s preferences settings, or the system default preferences settings in the event of a visiting physician.
Save Current Enhancements as Defaults
Enabled if the selected physician is registered on the system.
Saves the current image effect settings as the selected physician’s preference settings.
Function Description
View Reference Images Only
Only images tagged as reference images are displayed in the filmstrip. This includes images tagged as reference during the current session and/or reference images selected from previous studies for the current patient.
View Reference Images Always
Images tagged as reference always display at the top of the filmstrip followed by reference images selected from previous studies for the current patient, followed by non-reference images acquired in the current session in reverse order.
View Study Images Only
Only images (reference and non-reference) acquired in the current session are displayed in the filmstrip.
Display Annotations Displays annotations on the image displaying in the live image area.
Select Reference Images
Displays the Select Reference Images widow allowing users to select images from any current patient study residing on the system.
Selected images are put into the filmstrip following any reference images acquired during the current session unless View Study Images Only is checked.
19

Fluoroscan InSight User Guide
Table 7 Image Acquisition Screen, Button Functions
Button Function
Acquisition Mode Selection
Toggles among:
Continuous – Displays continuous images when X-rays are actuated.
Snapshot – Captures and displays one image when X-rays are actuated.
Cine Record – Gathers all images acquired into a cine loop.
Continuous and/or Snapshot mode may be disabled. (Refer to “Physician Preferences Page” on page 40)
NS (Noise Suppression) Toggles among: Auto, High, Medium, Low and Off.
Tag as Ref Marks the image as a reference image for the current session or unmarks a marked image.
Up Increases the kV and/or mA incrementally by one.
X-ray Power Adjustment Selection
Toggles among:
Auto kV / mA - Automatically adjusts kV / mA.
Manual kV / mA (simultaneous kV/mA enabled) - Allow the user to manually increase or decrease kV / mA.
Manual kV (simultaneous kV/mA disabled) - Allow the user to manually increase or decrease the kV.
Manual mA (simultaneous kV/mA disabled) - Allow the user to manually increase or decrease the mA.
Refer to “Physician Preferences Page” on page 40 for setting simultaneous kV/mA.
Down Decreases the kV and/or mA incrementally by one.
Reset Timer Resets the X-ray warning timer to zero and turns off the audible alarm.
Image Tools Shows or hides the tool set in the Filmstrip/Tools area.
Format Toggle Selects current image size and number of thumbnail images that display in the filmstrip area.
one filmstrip image.
two filmstrip images.
three filmstrip images.
four filmstrip images.
Update Patient Returns to the Select or Enter Patient window.
Review Displays the Review Images screen.
End Session Ends the current patient’s acquisition session. Returns to the main screen.
20
Fluoroscan InSight User Guide
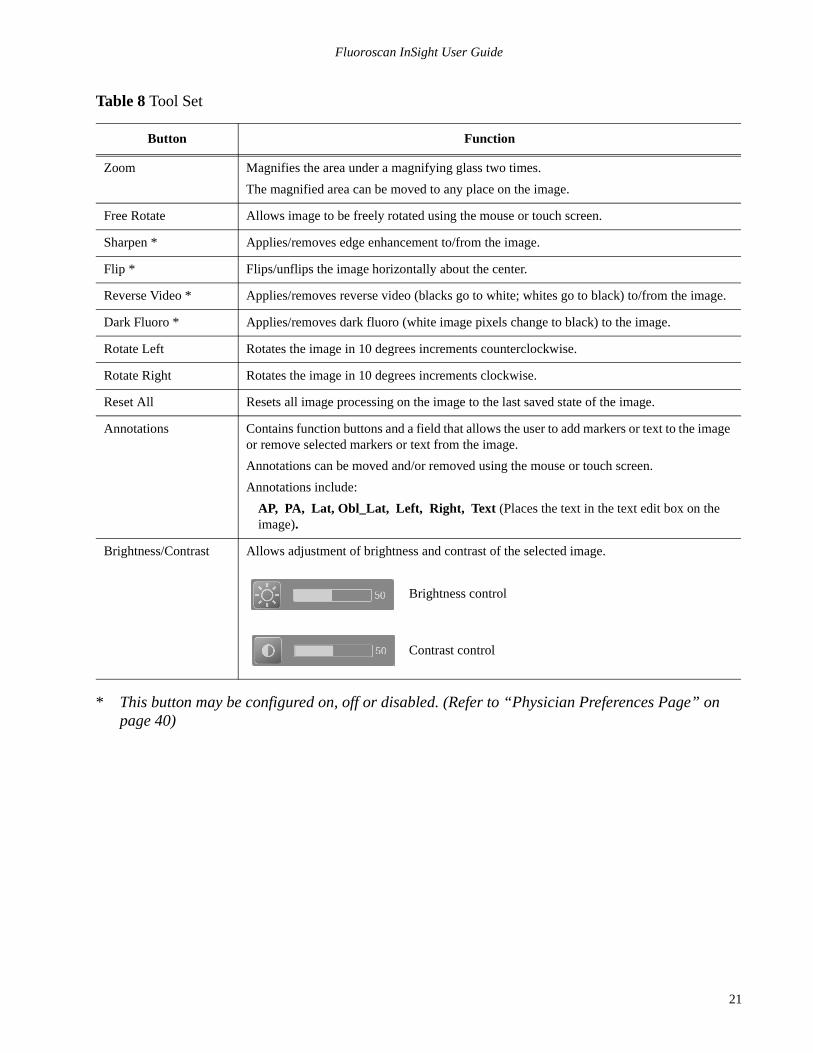
Table 8 Tool Set
* This button may be configured on, off or disabled. (Refer to “Physician Preferences Page” on page 40)
Button Function
Zoom Magnifies the area under a magnifying glass two times.
The magnified area can be moved to any place on the image.
Free Rotate Allows image to be freely rotated using the mouse or touch screen.
Sharpen * Applies/removes edge enhancement to/from the image.
Flip * Flips/unflips the image horizontally about the center.
Reverse Video * Applies/removes reverse video (blacks go to white; whites go to black) to/from the image.
Dark Fluoro * Applies/removes dark fluoro (white image pixels change to black) to the image.
Rotate Left Rotates the image in 10 degrees increments counterclockwise.
Rotate Right Rotates the image in 10 degrees increments clockwise.
Reset All Resets all image processing on the image to the last saved state of the image.
Annotations Contains function buttons and a field that allows the user to add markers or text to the image or remove selected markers or text from the image.
Annotations can be moved and/or removed using the mouse or touch screen.
Annotations include:
AP, PA, Lat, Obl_Lat, Left, Right, Text (Places the text in the text edit box on the image).
Brightness/Contrast Allows adjustment of brightness and contrast of the selected image.
Brightness control
Contrast control
21

Fluoroscan InSight User Guide
Select Reference Images Window
Available from the Image Acquisition screen by selecting Select Reference Images from the Config-ure Image Area menu.
Table 9 Select Reference Images Window, Section Descriptions
Table 10 Select Reference Images Window, Button Functions
Section Description
Select Patient Study
Selection list of prior studies for the current patient stored on the system
The selection list can be sorted on any column by clicking in the respective column label. The entry field label in the Find section changes to correspond to the selected sort column.
Select Image(s) A selection list of thumbnail images contained in the selected patient/study file.
A white box surrounds selected images. Multiple images can be selected. All images can be selected/unselected by clicking Select All or Deselect All.
Button Function
Select All/Deselect All Selects or deselects all images in the image selection list.
OK Returns all selected images to the Image Acquisition screen’s filmstrip unless View Study Images Only is checked in the Configure Image Area Menu.
Cancel Closes the window without returning any images to the Image Acquisition screen.
22

Fluoroscan InSight User Guide
Review Images Session
Select Study for Review Window
Available from Main Screen by clicking Review and from the Review screen during a review session by clicking Select Patient.
Table 11 Select Study for Review Window, Section/Field Descriptions
Table 12 Select Study for Review Window, Button Functions
Section/Field Description
Search For Search criteria entry fields.
To use Start Study and/or End Study Date(s) as a search criteria, the checkbox must be checked. The respective checkbox can be checked by clicking in the box, typing a date in the date field, or selecting a date from the calendar page that appears when clicking the down arrow.
Select Physician Selection button and drop-down selection list of physicians registered on the system.
Enter Physician Selection button and two entry fields for physician's name. Use when a physician’s name is not registered on the system.
Select patient studies for Review
Selection list of all patient/study records on the system.
Selection list can be filtered by completing one or more fields in the “Search For” section and clicking Update List.
The selection list can be sorted on any column by clicking in the respective column label.
One or more studies can be selected.
Button Function
Clear All Clears all entries in the Search For section.
Update List Updates the Select Patient Studies for Review selection list using criteria contained in the Search For section to limit the list. If all Search For parameters are empty, a list of all studies on the system is retrieved.
DAP Report Displays the DAP report for the selected patient.
Patient Details Enabled when only one study is selected.
Displays patient information.
Review Displays the Review screen. At least one study must be selected to enable the Review button.
End Session Terminates the review session.
23

Fluoroscan InSight User Guide
Review Screen
Available from the Select Study for Review window, and from the Image Acquisition screen by click-ing Review.
Table 13 Review Screen, Button Functions
Button Function
Display Mode Selection Determine how images are displayed.
Displays one row of two images.
Displays two rows of four images.
Displays three rows of six images.
Select/Deselect All Toggles between:
Select All - Selects all unselected images.
Deselect All - Unselects all selected images.
Full View Brings up the selected image in the Enhanced Displayed Image screen. See “Enhanced Displayed Image Screen” on page 26.
Save Saves selected image(s) or cine loop to the patient’s record.
If the number of stored images or minutes of cine loop exceeds the storage limit, a message displays.
24

Fluoroscan InSight User Guide
Delete Deletes the selected image(s). If the system setting Query on Delete is enabled, the user is asked to confirm the deletion. Click Yes to confirm; No to cancel the deletion.
Export Copies the selected image(s) or cine loop to removable media.
Patient information will be removed from images when De-Identify Patient Information is checked.
Print Prints the selected image(s) to the local printer
Images will be printed with annotations when Display/Print Annotations is checked. Patient information will be removed from images when De-Identify Patient Information is checked.
DICOM Print Sends the selected image(s) to a DICOM node printer for printing. Image(s) will be printed with annotations when Display/Print Annotations is checked. Patient information will be removed from images when De-Identify Patient Information is checked.
DICOM Send Sends the selected image(s) to a DICOM Send node. Patient information will be removed from images when De-Identify Patient Information is checked.
View Queue Displays the status of all DICOM Send requests. See “View DICOM Queue Window” on page 33.
Patient Details Displays patient information.
DAP Report Displays the DAP report for the selected patient.
Update Patient / Select Study
In an acquisition session, returns to the Select or Enter Patient window to view or update patient information
In a review session, returns to the Select Patient for Review window to select a different patient study.
Perform Visible only in an acquisition session.
Returns to the image acquisition screen.
End Session Terminates the current session.
Button Function
25
Fluoroscan InSight User Guide
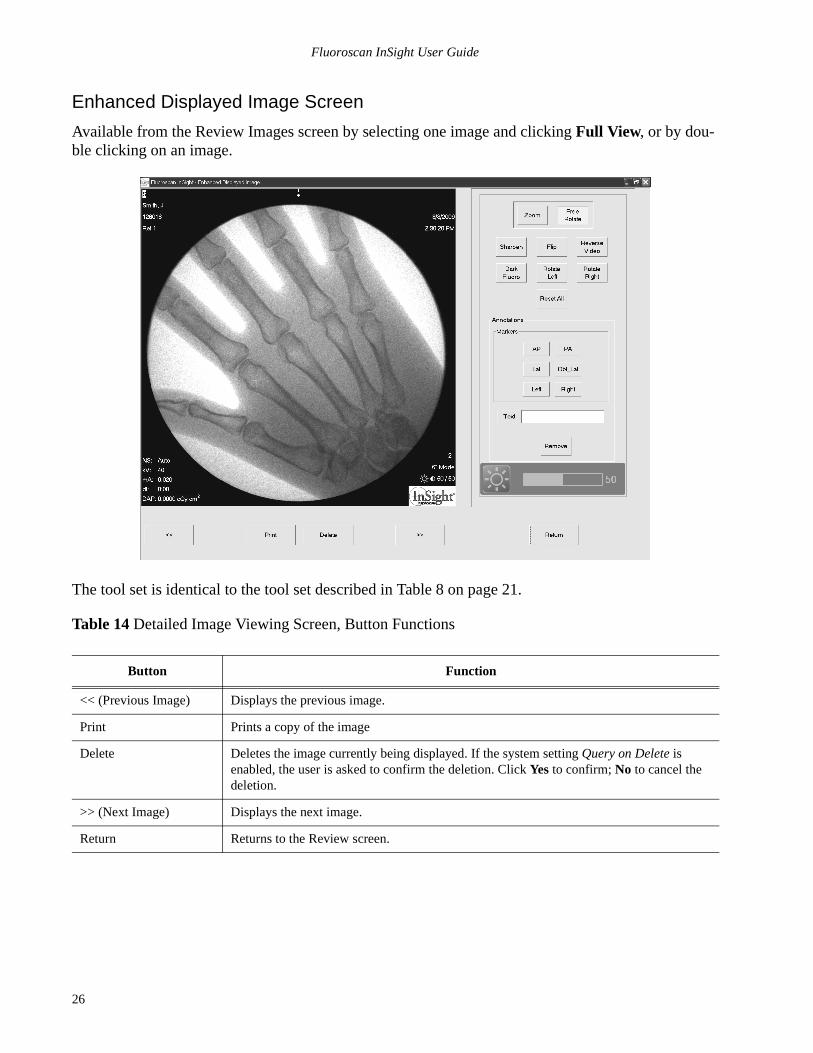
Enhanced Displayed Image Screen
Available from the Review Images screen by selecting one image and clicking Full View, or by dou-ble clicking on an image.
The tool set is identical to the tool set described in Table 8 on page 21.
Table 14 Detailed Image Viewing Screen, Button Functions
Button Function
<< (Previous Image) Displays the previous image.
Print Prints a copy of the image
Delete Deletes the image currently being displayed. If the system setting Query on Delete is enabled, the user is asked to confirm the deletion. Click Yes to confirm; No to cancel the deletion.
>> (Next Image) Displays the next image.
Return Returns to the Review screen.
26

Fluoroscan InSight User Guide
Maintaining Patient Study Records
Update Patient Study Information Window
Available to administrators from the tools menu on the Main Screen.
Table 15 Update Patient/Study Information Window, Section Descriptions
Table 16 Update Patient/Study Information Window, Button Functions
Section Description
Select Patient Study Selection list of all patient/study records on the system and a search criteria section (Find).
The selection list can be sorted on any column by clicking in the respective column label.
The entry field label in the Find section changes to correspond to the selected sort column.
Find Use to quickly locate a patient/study.
Update Patient Information
Displays information from the selected patient/study record.
Button Function
Update Updates the patient information on all images in the selected study.
Cancel Closes the window without updating and returns to the main screen.
27

Fluoroscan InSight User Guide
Export Images Window
Available from the Tools menu on the Main Screen.
Table 17 Export Window, Section Descriptions
Section Description
Export Images to Selection list of removable media devices currently available to the system. Other Locations allows the user to browse for a folder on the system or network.
File Type File format selection.
Select Patient Study Selection list of all patient/study records on the system and a search criteria section (Find).
The selection list can be sorted on any column by clicking in the respective column label. The entry field label in the Find section changes to correspond to the selected sort column.
One or more studies can be selected. When one study is selected, all images in the study display in the Select Image(s) section. When multiple studies are selected, images are not displayed.
Find Use to quickly locate a patient/study.
Select Image(s) Images are displayed when one patient/study is selected. Images are not displayed when multiple studies are selected.
A selection list of thumbnail images contained in the selected patient/study file.
A white box surrounds selected images. Multiple images can be selected. All images can be selected/unselected by clicking Select All or Deselect All.
De-Identify Patient Information
Removes patient identification data from images being exported when checked.
28

Fluoroscan InSight User Guide
Table 18 Export Window, Button Functions
Include Annotations When checked, includes annotations with exported images. Method of inclusion choices are:
Embedded - Annotations are embedded into the bitmap image.
As Overlay -Annotations are included as a DICOM overlay.
As annotation files - Annotations are included as a separate file.
Button Function
Patient Details Enabled when only one image is selected.
Displays patient information.
Select All/Deselect All Selects or deselects all images in the image selection list.
Export Exports the selected images to the selected media device in the selected format. When more than one study is selected, copies all images in each study. Images are not deleted from the system.
Cancel Closes the window without exporting images and returns to the main screen.
Section Description
29

Fluoroscan InSight User Guide
Import Images Window
Available from Tools menu on the Main Screen.
Table 19 Import Window, Section Descriptions
Section Description
Import Images from Selection list of removable media devices currently available to the system. Other Locations allows the user to browse for a folder on the system or network.
Select Patient Study Selection list of all patient/study records on the selected media and a search criteria section (Find).
The selection list can be sorted on any column by clicking in the respective column label. The entry field label in the Find section changes to correspond to the selected sort column.
One or more studies can be selected. When one study is selected, all images in the study display in the Select Image(s) section. When multiple studies are selected, images are not displayed.
Find Use to quickly locate a patient/study.
Select Image(s) Images are displayed when one patient/study is selected. Images are not displayed when multiple studies are selected.
A selection list of thumbnail images contained in the selected patient/study file.
A white box surrounds selected images. Multiple images can be selected. All images can be selected/unselected by clicking Select All or Deselect All.
30
Fluoroscan InSight User Guide
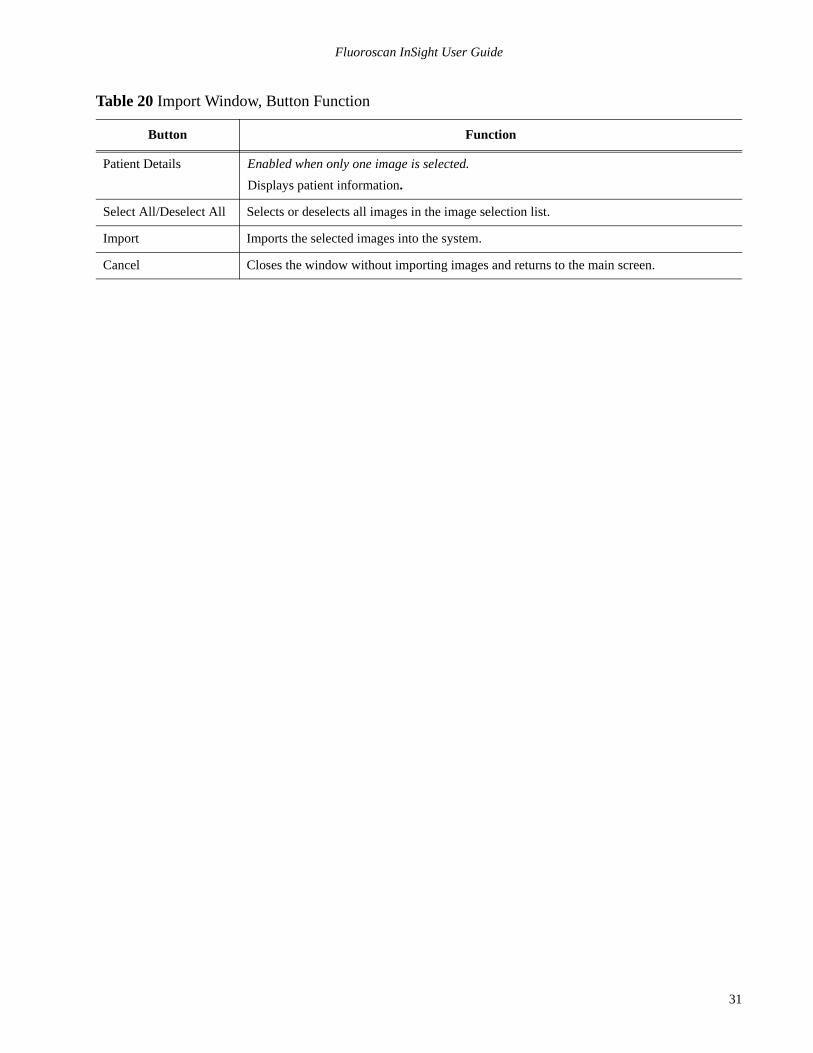
Table 20 Import Window, Button Function
Button Function
Patient Details Enabled when only one image is selected.
Displays patient information.
Select All/Deselect All Selects or deselects all images in the image selection list.
Import Imports the selected images into the system.
Cancel Closes the window without importing images and returns to the main screen.
31

Fluoroscan InSight User Guide
Delete Images Window
Available to administrators from the tools menu on the Main Screen.
Table 21 Delete Images Window, Section Descriptions
Table 22 Delete Images Window, Button Functions
Section Description
Select Patient Study Selection list of all patient/study records on the system and a search criteria section (Find).
The selection list can be sorted on any column by clicking in the respective column label. The entry field label in the Find section changes to correspond to the selected sort column.
One or more studies can be selected. When one study is selected, all images in the study display in the Select Image(s) section. When multiple studies are selected, images are not displayed.
Find Use to quickly locate a patient/study.
Select Image(s) Images are displayed when one patient/study is selected. Images are not displayed when multiple studies are selected.
A selection list of thumbnail images contained in the selected patient/study file.
A white box surrounds selected images. Multiple images can be selected. All images can be selected/unselected by clicking Select All or Deselect All.
Button Function
Patient Details Enabled when only one image is selected.
Displays patient information.
Select All/Deselect All Selects or deselects all images in the image selection list.
Delete Deletes the images selected in the image selection list from the Fluoroscan InSight system. When more than one study is selected, deletes all images in each study. If the system setting Query on Delete is enabled, the user is asked to confirm the deletion. Click Yes to confirm; No to cancel the deletion.
Cancel Closes the window without deleting images and returns to the main screen.
32

Fluoroscan InSight User Guide
View DICOM Queue Window
Available from the Tools menu and from the Review Images screen.
Table 23 Queue Window, Section Description and Button Functions
Section/Button Description/Function
DICOM Queue List Selection list of queue request information that can be filtered.
Display Filters the selection list depending on the selected radio button.
Select All/Deselect All Selects or deselects all DICOM requests listed in the Queue List.
Delete Deletes the selected DICOM request(s).
Retry System tries to send the selected DICOM request(s) again.
OK Closes the Queue window and returns to the previous screen (Main Screen or Review Images screen).
33

Fluoroscan InSight User Guide
Configuring the Application
System Configuration User Interface
System configuration user interface consists of a multiple-page tab-selected window. Each tab displays a page of configuration data.
Four buttons display at the bottom of the window that are independent of the selected page:
System Page
Available from System Configuration menu on the Main Screen.
Table 24 System Page, Section/Field Descriptions
Button Function
OK Saves data for all System Configuration pages and closes the window.
Apply Saves data for the currently selected System Configuration page.
Cancel Closes the window without saving any data.
Help Displays help for the selected page.
Section/Field Description
Fluoroscan Insight Software
Serial Number
Software
InSight system's serial number.
Drop-down list to display installed software and version.
Status Displays the following current settings:
Date of Last System Recover
Date application settings and configuration data were recovered from backup media.
Touch Screen Enabled/Disabled
Audit Mode On/Off.
Number of Active Users Number of active registered users allowed to log into the system.
Image Storage (number of images)
Maximum number of images that can be stored on the system and the number currently stored.
Cine Loop Storage (minutes of recording)
Maximum minutes of recording that can be stored on the system and the minutes currently stored.
Organization Name Administrator can enter name.
Default Physician's Name Select default physician to be used by the application.
Selected Language Select language to be used by the application.
Query on Delete Administrator can select to display warning message when deleting images.
34
Fluoroscan InSight User Guide
DICOM Send Options Page
Available from System Configuration menu on the Main Screen.
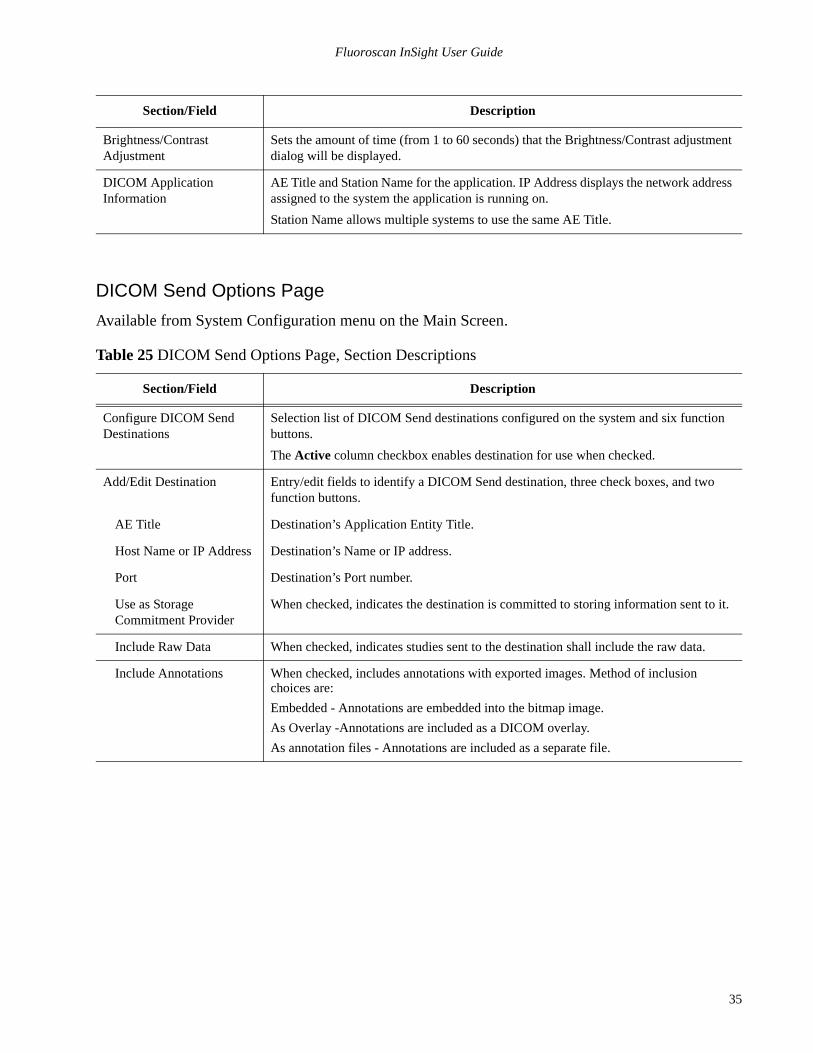
Table 25 DICOM Send Options Page, Section Descriptions
Brightness/Contrast Adjustment
Sets the amount of time (from 1 to 60 seconds) that the Brightness/Contrast adjustment dialog will be displayed.
DICOM Application Information
AE Title and Station Name for the application. IP Address displays the network address assigned to the system the application is running on.
Station Name allows multiple systems to use the same AE Title.
Section/Field Description
Configure DICOM Send Destinations
Selection list of DICOM Send destinations configured on the system and six function buttons.
The Active column checkbox enables destination for use when checked.
Add/Edit Destination Entry/edit fields to identify a DICOM Send destination, three check boxes, and two function buttons.
AE Title Destination’s Application Entity Title.
Host Name or IP Address Destination’s Name or IP address.
Port Destination’s Port number.
Use as Storage Commitment Provider
When checked, indicates the destination is committed to storing information sent to it.
Include Raw Data When checked, indicates studies sent to the destination shall include the raw data.
Include Annotations When checked, includes annotations with exported images. Method of inclusion choices are:
Embedded - Annotations are embedded into the bitmap image.
As Overlay -Annotations are included as a DICOM overlay.
As annotation files - Annotations are included as a separate file.
Section/Field Description
35

Fluoroscan InSight User Guide
Table 26 DICOM Send Options Page, Button Functions
DICOM Print Options Page
Available from System Configuration menu on the Main Screen.
Table 27 DICOM Print Options Page, Section/Field Descriptions
Button Function
Add Destination Add a DICOM Send destination to the system.
Edit Destination Edit selected destination information.
Delete Destination Delete selected destination(s) from the system.
Local Ping Confirms connection to the local network.
Remote Ping Confirms network connection to the selected destination.
C-ECHO Confirms network connection to PACS.
OK Updates the selection list with new or updated information and checks the destination’s Active check box.
Cancel Ignores all edits and hides the Add/Edit Destination section.
Section/Field Description
Configure DICOM Print Destinations
Selection list of DICOM Print destinations configured on the system and six function buttons.
The Active column checkbox enables destination for use when checked.
Add/Edit Destination Entry/edit fields to identify a DICOM Print destination, a section for entering and selecting print parameters, and two function buttons.
AE Title Destination’s Application Entity title.
Host Name or IP Address Destination’s Name or IP address.
Port Destination’s Port number.
Destination Name Name for destination (allows a single destination to be configured in multiple ways).
Print Parameters
Number of Copies Enter number of copies to print.
Image Display Format Select (row and column) from drop-down list.
Orientation Select image layout (Portrait or Landscape).
Film Size Select from drop-down list.
Medium Type Select from drop-down list.
36
Fluoroscan InSight User Guide
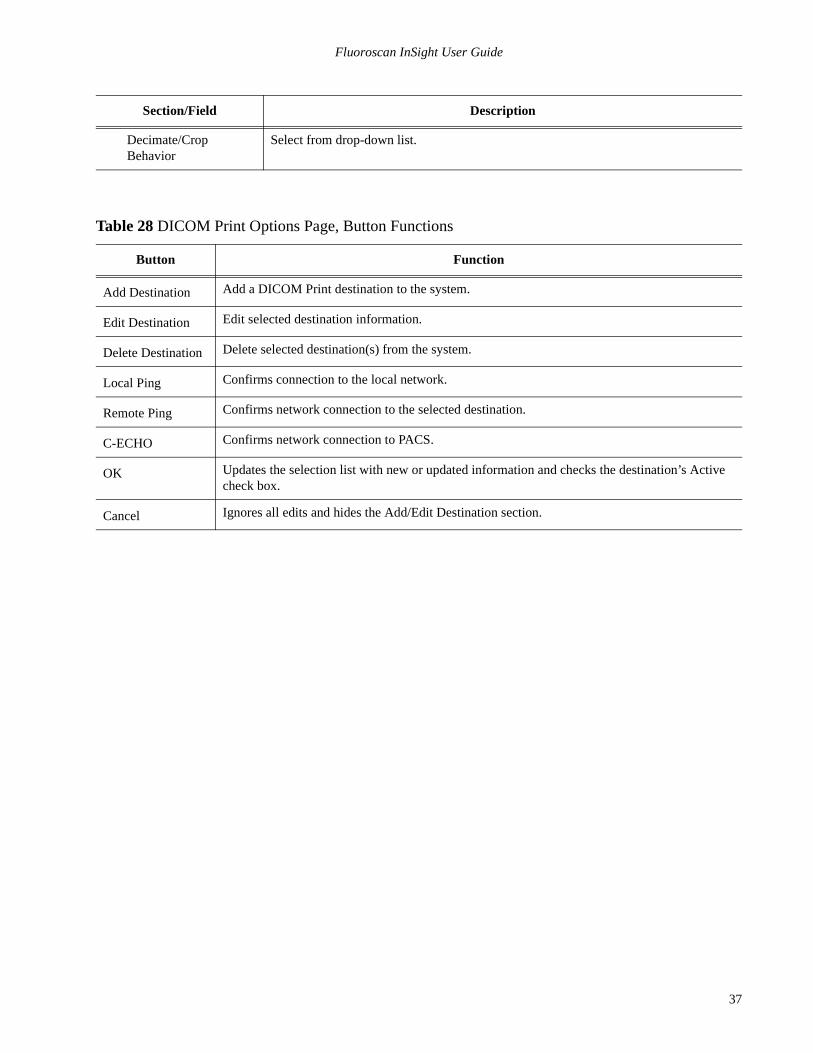
Table 28 DICOM Print Options Page, Button Functions
Decimate/Crop Behavior
Select from drop-down list.
Button Function
Add Destination Add a DICOM Print destination to the system.
Edit Destination Edit selected destination information.
Delete Destination Delete selected destination(s) from the system.
Local Ping Confirms connection to the local network.
Remote Ping Confirms network connection to the selected destination.
C-ECHO Confirms network connection to PACS.
OK Updates the selection list with new or updated information and checks the destination’s Active check box.
Cancel Ignores all edits and hides the Add/Edit Destination section.
Section/Field Description
37

Fluoroscan InSight User Guide
Worklist Configuration Page
Available from System Configuration menu on the Main Screen.
Table 29 Worklist Configuration Page, Section Descriptions
Table 30 Worklist Configuration Page, Button Functions
Section/Field Description
Worklist Provider Identifies the system to access for the Worklist by providing entry fields for the provider's AE Title, Host Name or IP Address, and Port.
Query Parameters Provides entry fields to identify:
• Requesting system (AE Title)• Type of worklist being requested (Modality)• Range of days to query• Maximum number of scheduled patient examinations to include in the worklist
Auto Query Interval Specifies if automatic queries are to be performed and how often.
Query Retry Parameters Specifies if queries are to time out after a specific time (Query Timeout check box and Min selection), and number of times to retry and time intervals.
Use Performed Procedure Step
When checked, the Worklist Provider module will be notified as each Worklist procedure is completed.
Worklist sets Modality When checked, Modality is set by the Worklist.
Button Function
Map Worklist Fields Displays Map Worklist Keys window. Administrators can map Fluoroscan InSight data fields to Worklist provider data fields.
Local Ping Confirms connection to the local network and display the results.
Remote Ping Confirms network connection to the Worklist Provider system.
C-ECHO Confirms network connection to the PACS.
38

Fluoroscan InSight User Guide
Users / Passwords Page
Available from System Configuration menu on the Main Screen.
Table 31 Users / Passwords Page, Section/Field Descriptions
Table 32Users / Passwords Page, Button Functions
Section/Field Description
All Users Displays selection list of registered system users.
The Active column checkbox allows user to log into the system when checked.
Add/Edit User Administrator entry/edit fields for user's actual name, login user name, login password, and privilege.
Change Password Entry fields that allow current user to change their own password.
Button Function
New Add new users to the system.
Edit Edit selected user information.
Change Password Allows current user to change their own password. Current password cannot be used as the new password.
Delete Delete the selected user from the system.
OK Updates the user list.
Cancel Ignores all edits and removes the Add/Edit User or Change Password section.
39

Fluoroscan InSight User Guide
Physician Preferences Page
Available from System Configuration menu on the Main Screen.
Table 33 Physician Preferences Page, Section/Field Descriptions
Table 34 Physician Preferences Page, Button Functions
Section/Field Description
Set System Defaults or Physician Defaults
Select system defaults to be used for visiting physician.
Select physician defaults to set defaults for a selected physician.
Select Physician to set details for
Selection list of all physicians registered on the system, entry fields for physician's name, and two buttons (Add Physician and Delete Physician).
Button Function
Add Physician Adds the physician’s name and default preferences to the system.
Delete Physician Deletes the selected physician from the system.
Reset Defaults Resets all the preference settings to the factory defaults if editing system defaults, or to the system defaults if editing physician preferences. If system defaults have not yet been saved, all settings are reset to the factory defaults.
Save Saves the preference settings for the System Defaults or for the selected physician.
40
Fluoroscan InSight User Guide
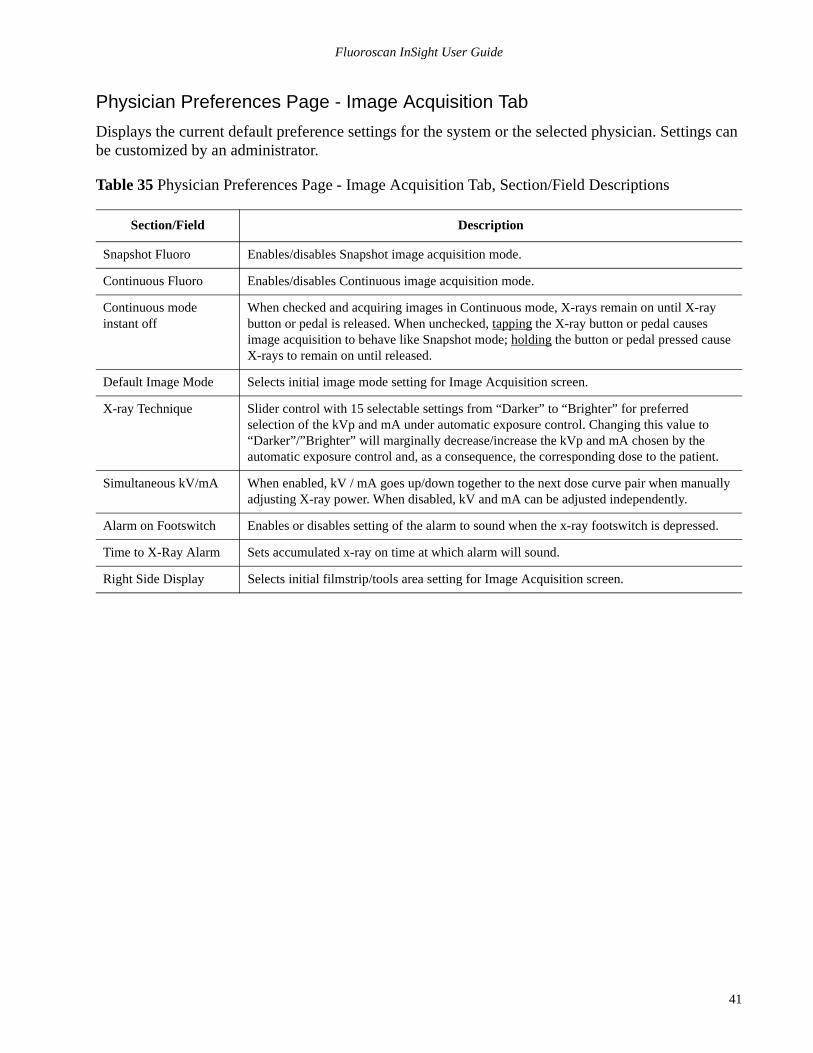
Physician Preferences Page - Image Acquisition Tab
Displays the current default preference settings for the system or the selected physician. Settings can be customized by an administrator.
Table 35 Physician Preferences Page - Image Acquisition Tab, Section/Field Descriptions
Section/Field Description
Snapshot Fluoro Enables/disables Snapshot image acquisition mode.
Continuous Fluoro Enables/disables Continuous image acquisition mode.
Continuous mode instant off
When checked and acquiring images in Continuous mode, X-rays remain on until X-ray button or pedal is released. When unchecked, tapping the X-ray button or pedal causes image acquisition to behave like Snapshot mode; holding the button or pedal pressed cause X-rays to remain on until released.
Default Image Mode Selects initial image mode setting for Image Acquisition screen.
X-ray Technique Slider control with 15 selectable settings from “Darker” to “Brighter” for preferred selection of the kVp and mA under automatic exposure control. Changing this value to “Darker”/”Brighter” will marginally decrease/increase the kVp and mA chosen by the automatic exposure control and, as a consequence, the corresponding dose to the patient.
Simultaneous kV/mA When enabled, kV / mA goes up/down together to the next dose curve pair when manually adjusting X-ray power. When disabled, kV and mA can be adjusted independently.
Alarm on Footswitch Enables or disables setting of the alarm to sound when the x-ray footswitch is depressed.
Time to X-Ray Alarm Sets accumulated x-ray on time at which alarm will sound.
Right Side Display Selects initial filmstrip/tools area setting for Image Acquisition screen.
41

Fluoroscan InSight User Guide
Physician Preferences Page - Image Processing Tab
Displays the current default preference settings for the system or the selected physician. Settings can be customized by an administrator.
Table 36 Physician Preferences Page - Image Processing Tab, Section/Field Descriptions
Section/Field Description
Noise Suppression Selects default noise suppression for Image Acquisition screen (Auto, High, Medium, Low or Off).
Disable during cine record - When checked, disables noise suppression when cine recording.
Auto edge enhancement on high only - When checked, sharping occurs only when noise suppression is set to high.
Edge Enhancement Selects On/Off or Disables image effects settings in the Image Acquisition screen.
Reverse Video Selects On/Off or Disables image effects settings in the Image Acquisition screen.
Image Flip Selects On/Off or Disables image effects settings in the Image Acquisition screen.
Dark Fluoro Selects On/Off or Disables image effects settings in the Image Acquisition screen.
Initial Image Rotation Enter number of degrees to automatically rotate an image while it is being acquired. Enter a negative number for counterclockwise rotation.
Brightness/Contrast Adjustment
Remember settings between sessions - When checked, maintains Brightness/Contrast settings for subsequent images.
Apply Auto Equalization after acquisition - When checked, applies Auto Equalization to the image to optimize contrast.
42
Fluoroscan InSight User Guide
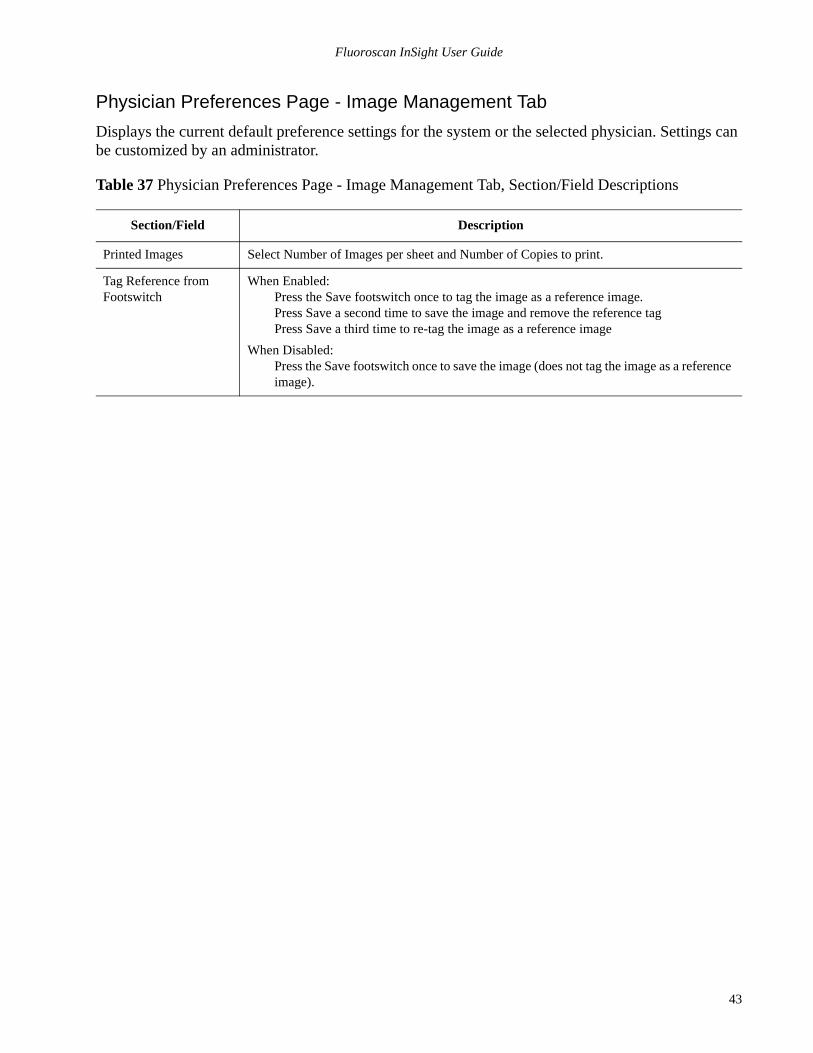
Physician Preferences Page - Image Management Tab
Displays the current default preference settings for the system or the selected physician. Settings can be customized by an administrator.
Table 37 Physician Preferences Page - Image Management Tab, Section/Field Descriptions
Section/Field Description
Printed Images Select Number of Images per sheet and Number of Copies to print.
Tag Reference from Footswitch
When Enabled:Press the Save footswitch once to tag the image as a reference image. Press Save a second time to save the image and remove the reference tagPress Save a third time to re-tag the image as a reference image
When Disabled:Press the Save footswitch once to save the image (does not tag the image as a reference image).
43

Fluoroscan InSight User Guide
Administrative Settings Page
Available from System Configuration menu on the Main Screen.
Table 38 Administrative Settings Page, Section Descriptions
Table 39Administrative Settings Page, Button Functions
Section/Field Description
Log Files Selection list of all log files.
Set Level of Detail Administrators can set System Error log level of detail to Error Only or Error and Operations.
Audit Mode Administrators can set on or off.
Enable Touch Screen Administrators can enable or disable.
Automatic Image Deletion
Check Prompt for deletion at the following limits to:Establish the number of images at which a deletion prompt is displayed and the number of images to be deletedandestablish the number of cine minutes at which a deletion prompt is displayed and the number of cine minutes to be deleted.
Prior to deletion, the system displays the number of studies required to achieve the desired number of image, or cine minute, deletions.
Last System Backup Displays date of last system configuration and calibration backup.
Display warning if last backup is older than __ days - When checked, upon starting the application the system will display a warning message when the last backup is older than the given number of days.
System Shutdown Administrators can check/uncheck. System shuts down when checked.
Default setting is always checked when restarting the application.
Button Function
Configure Displays Level of Detail section.
Accept Change Changes detail level for System Error log to that selected by Error Only or Error and Operations button. Hides the Set Level of Detail section.
44

Fluoroscan InSight User Guide
System Maintenance
System BackupAny user can backup system configuration and calibration data to a selected removable media device by selecting System Backup from the Tools menu on the Main Screen.
System RecoverAdministrators can restore system configuration and calibration data from a selected removable media device by selecting System Recover from the Tools menu on the Main Screen.
CleaningExterior surfaces of the Fluoroscan InSight Imaging System should be cleaned once a week and any-time after a surface has become soiled. Clean exterior surfaces of the cabinet, the flex-arm and the C-arm with a soft cloth or disposable lint-free tissue moistened with water, isopropanol or methanol. Disinfect using a 10% bleach solution. Wipe surfaces, do not scrub.
A commercial glass cleaner may be used to clean the monitor’s touch screen.
45

Fluoroscan InSight User Guide
46