armario secadero de embutidos seasoning refrigerador
TRANSCRIPT
Armario secadero de embutidos Seasoning refrigerador
Empleo del controlador digital
Instructions of the digital controller
Controlador digital DIXELL XH360L DIXELL XH360L Digital controller
AN501SC AN1002SC
Página: 1 /7 Fecha: 06/04/16 Revisión: 01
Empleo del controlador del AN501SC / AN1002SC
INDICE
1. EL CICLO DE SECADO……………………..…………………………………………………….. 2
1.1. DRIPPING…………………………………………………………………………………………… 2
1.2. ON (SECADO) ………………………………………………………………………….…..…….… 2
1.3. OFF (REPOSO) ………………………………………………………………………….…..……. 3
2. USO DEL CONTROLADOR……………………..………………………………………………… 4
2.1. COMO FIJAR LA DURACIÓN DE LAS DIFERENTES FASES………………………………… 4
2.2. COMO FIJAR EL SET DE HUMEDAD EN LA FASE DE SECADO…………………………… 4
2.3. COMO FIJAR EL SET DE TEMPERATURA EN LA FASE DE DRIPPING Y EN LA DE
SECADO…………………………………………………………………………………………………………… 5
2.4. COMO COMENZAR EL CICLO DE SECADO…………………………………………………. 5
2.5. COMO FINALIZAR EL CICLO DE SECADO (SIN REPETICON DE CICLOS)……………… 5
2.6. COMO FINALIZAR EL CICLO DE SECADO MANUALMENTE (CICLOS REPETIDOS
INDEFINIDAMENTE)……………………………………………………………………………………………… 5
2.7. COMO MODIFICAR LOS SET POINTS LA FASE QUE ESTA EN ESE MOMENTO………. 6
3. MODIFICACION DE LOS PARAMETROS PARA USARLO COMO ARMARIO DE
REFRIGERACIÓN………………………………………………….…………………………………. 6
3.1. FIJAR LA DURACIÓN DE LA FASE DRIPPING EN 23 HORAS Y LAS DE LAS
FASES ON Y OFF A 0 HORAS………………………………………………………………….. 6
3.2. FIJAR LA TEMPERATURA DE CONSIGNA PARA EL FUNCIONAMIENTO
COMO REFRIGERACIÓN………………………………………………………………………….. 7
3.3. COMENZAR A FUNCIONAR SOLO EN REFRIGERACIÓN…………………………………… 7
Página: 2 /7 Fecha: 06/04/16 Revisión: 01
1. EL CICLO DE SECADO
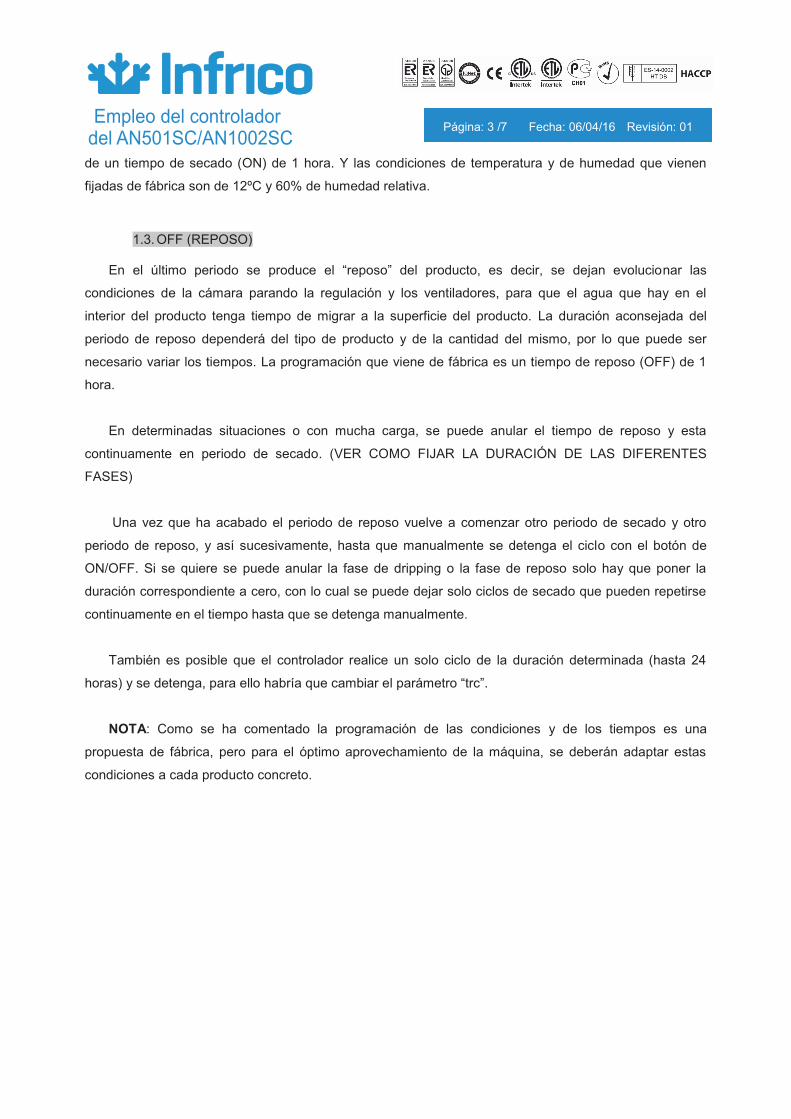
El armario AN501SC and AN1002SC se ha dotado de un controlador DIXELL XH360L para regular el
funcionamiento del aparato. El funcionamiento previsto es la realización de un ciclo de secado
discontinuo, compuesta por tres periodos de funcionamiento, de los cuales los dos últimos se van
repitiendo sucesivamente. En la siguiente grafica se pueden apreciar los parámetros del ciclo.
1.1. DRIPPING El primer periodo se llama DRIPPING, en su aplicación al curado y secado de embutidos, se puede
emplear como fase de fermentación (Tª cámara aprox 22ºC). Solo se realiza la primera vez que se inicia
la rutina de secado. Y en el solo se controla la temperatura de la cámara y no se controla la humedad
relativa.
En la programación que nosotros realizamos de la maquina la duración de este periodo la ponemos
a cero por lo que no se realiza. Si bien si se deja programada una temperatura para este periodo de
22ºC, en caso de querer realizar esta fase del proceso solo habría que poner una duración en los
parámetros como veremos posteriormente y cambiar si se quiere la Tª de consigna.
1.2. ON (SECADO) Este segundo periodo se realiza el secado del producto, para ello se controla la temperatura y la
humedad relativa del producto, así como el funcionamiento de los ventiladores. En este periodo la
humedad de la superficie del producto es recogida por el aire de la cámara, y se deposita en la superficie
del evaporador y se evacua en los desescarches. La duración de este periodo de secado dependerá del
tipo de producto que se quiera secar, ya que un periodo excesivo de secado nos puede llevar a un
resecamiento excesivo de la superficie con el consiguiente “encostramiento”. La programación inicial es
Página: 3 /7 Fecha: 06/04/16 Revisión: 01
de un tiempo de secado (ON) de 1 hora. Y las condiciones de temperatura y de humedad que vienen
fijadas de fábrica son de 12ºC y 60% de humedad relativa.
1.3. OFF (REPOSO) En el último periodo se produce el “reposo” del producto, es decir, se dejan evolucionar las
condiciones de la cámara parando la regulación y los ventiladores, para que el agua que hay en el
interior del producto tenga tiempo de migrar a la superficie del producto. La duración aconsejada del
periodo de reposo dependerá del tipo de producto y de la cantidad del mismo, por lo que puede ser
necesario variar los tiempos. La programación que viene de fábrica es un tiempo de reposo (OFF) de 1
hora.
En determinadas situaciones o con mucha carga, se puede anular el tiempo de reposo y esta
continuamente en periodo de secado. (VER COMO FIJAR LA DURACIÓN DE LAS DIFERENTES
FASES)
Una vez que ha acabado el periodo de reposo vuelve a comenzar otro periodo de secado y otro
periodo de reposo, y así sucesivamente, hasta que manualmente se detenga el ciclo con el botón de
ON/OFF. Si se quiere se puede anular la fase de dripping o la fase de reposo solo hay que poner la
duración correspondiente a cero, con lo cual se puede dejar solo ciclos de secado que pueden repetirse
continuamente en el tiempo hasta que se detenga manualmente.
También es posible que el controlador realice un solo ciclo de la duración determinada (hasta 24
horas) y se detenga, para ello habría que cambiar el parámetro “trc”.
NOTA: Como se ha comentado la programación de las condiciones y de los tiempos es una
propuesta de fábrica, pero para el óptimo aprovechamiento de la máquina, se deberán adaptar estas
condiciones a cada producto concreto.
Página: 4 /7 Fecha: 06/04/16 Revisión: 01
2. USO DEL CONTROLADOR
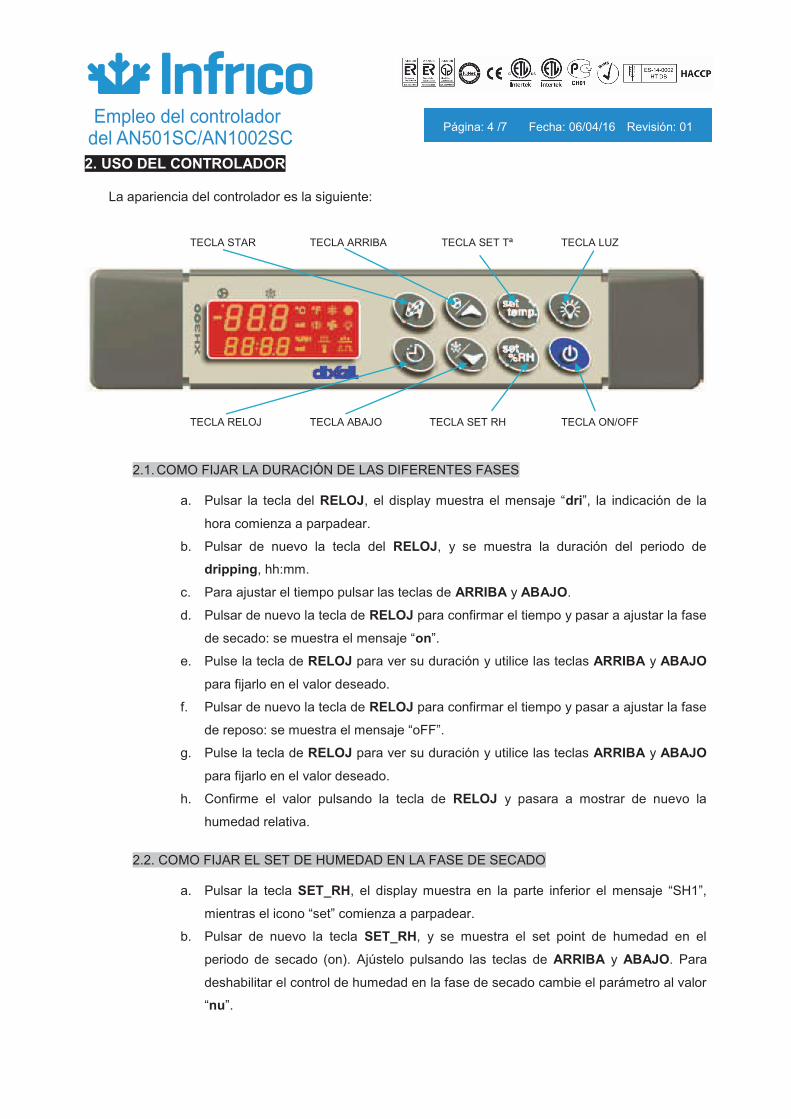
La apariencia del controlador es la siguiente:
2.1. COMO FIJAR LA DURACIÓN DE LAS DIFERENTES FASES
a. Pulsar la tecla del RELOJ, el display muestra el mensaje “dri”, la indicación de la
hora comienza a parpadear.
b. Pulsar de nuevo la tecla del RELOJ, y se muestra la duración del periodo de
dripping, hh:mm.
c. Para ajustar el tiempo pulsar las teclas de ARRIBA y ABAJO.
d. Pulsar de nuevo la tecla de RELOJ para confirmar el tiempo y pasar a ajustar la fase
de secado: se muestra el mensaje “on”.
e. Pulse la tecla de RELOJ para ver su duración y utilice las teclas ARRIBA y ABAJO
para fijarlo en el valor deseado.
f. Pulsar de nuevo la tecla de RELOJ para confirmar el tiempo y pasar a ajustar la fase
de reposo: se muestra el mensaje “oFF”.
g. Pulse la tecla de RELOJ para ver su duración y utilice las teclas ARRIBA y ABAJO
para fijarlo en el valor deseado.
h. Confirme el valor pulsando la tecla de RELOJ y pasara a mostrar de nuevo la
humedad relativa.
2.2. COMO FIJAR EL SET DE HUMEDAD EN LA FASE DE SECADO
a. Pulsar la tecla SET_RH, el display muestra en la parte inferior el mensaje “SH1”,
mientras el icono “set” comienza a parpadear.
b. Pulsar de nuevo la tecla SET_RH, y se muestra el set point de humedad en el
periodo de secado (on). Ajústelo pulsando las teclas de ARRIBA y ABAJO. Para
deshabilitar el control de humedad en la fase de secado cambie el parámetro al valor
“nu”.
TECLA STAR TECLA ARRIBA TECLA SET Tª TECLA LUZ
TECLA RELOJ TECLA ABAJO TECLA SET RH TECLA ON/OFF
Página: 5 /7 Fecha: 06/04/16 Revisión: 01
c. Confirme el valor pulsando la tecla SET_RH y pasara a mostrar de nuevo la
humedad relativa.
2.3. COMO FIJAR EL SET DE TEMPERATURA EN LA FASE DE DRIPPING Y EN LA DE SECADO
a. Pulsar la tecla SET_T, el display muestra en la parte superior el mensaje
“STG”, mientras el icono “set” comienza a parpadear.
b. Pulsar de nuevo la tecla SET_T, y se muestra el set point de temperatura en
el periodo de dripping. Ajústelo pulsando las teclas de ARRIBA y ABAJO.
c. Pulsar de nuevo la tecla SET_T para confirmar el set point y pasar a ajustar
el valor de set point en el periodo de secado (on): se muestra el mensaje
“St1”.
d. Pulsar de nuevo la tecla SET_T para ver el valor y ajústelo pulsando las
teclas de ARRIBA y ABAJO.
2.4. COMO COMENZAR EL CICLO DE SECADO Pulsar la tecla STAR para comenzar el ciclo de secado.
En el display el led se encenderá. Durante los periodos de dripping y de reposo (off)
este led parpadeara. Y durante la fase de secado (se controla temperatura y humedad) el led
permanecerá encendido.
2.5. COMO FINALIZAR EL CICLO DE SECADO (SIN REPETICON DE CICLOS) Cuando el tiempo ha pasado, el zumbador comienza a sonar y en display inferior se muestra el
mensaje “end”.
Para apagar el zumbador pulsar una tecla, el display inferior vuelve a mostrar la humedad y el led
se apaga.
2.6. COMO FINALIZAR EL CICLO DE SECADO MANUALMENTE (CICLOS REPETIDOS INDEFINIDAMENTE)
Cuando los ciclos se repiten indefinidamente como viene programado el controlador de fabrica, el
ciclo de secado se para manualmente.
Para ello pulsar la tecla de ON/OFF de el tiempo ha pasado, el zumbador comienza a sonar y en
display inferior se muestra el mensaje “end”.
Página: 6 /7 Fecha: 06/04/16 Revisión: 01
2.7. COMO MODIFICAR LOS SET POINTS LA FASE QUE ESTA EN ESE MOMENTO Para modificar el ajuste de temperatura (SET_T), humedad (SET_RH) o el tiempo que queda para
que finalice el periodo (RELOJ):
a. Pulsar dos veces la tecla correspondiente, el valor correspondiente a esa fase
(dripping o secado) se mostrara.
b. Ajústelo pulsando las teclas de ARRIBA y ABAJO.
c. Confirme el valor pulsando la tecla correspondiente: temperatura (SET_T), humedad
(SET_RH) o el tiempo (RELOJ).
NOTA: Los cambios que se hagan se memorizan y las próximas vez que se realice esa fase se hará
con los nuevos valores.
3. MODIFICACION DE LOS PARAMETROS PARA USARLO COMO ARMARIO DE REFRIGERACIÓN
En la fase dripping el controlador trabaja controlando solo temperatura, por lo tanto, lo que haremos
será dar a la fase dripping una duración de 23 horas dejar fijada la temperatura de consigna y establecer
la duración de las otras dos fases a cero.
Para ello seguiremos el siguiente procedimiento:
3.1. FIJAR LA DURACIÓN DE LA FASE DRIPPING EN 23 HORAS Y LAS DE LAS FASES ON Y
OFF A 0 HORAS.
a. Pulsar la tecla del RELOJ, el display muestra el mensaje “dri”, la indicación de la
hora comienza a parpadear.
b. Pulsar de nuevo la tecla del RELOJ, y se muestra la duración del periodo de
dripping, ajustar el tiempo pulsando las teclas de ARRIBA y ABAJO hasta que
aparezca “23:00”.
c. Pulsar de nuevo la tecla de RELOJ para confirmar el tiempo y pasar a ajustar la fase
de secado: se muestra el mensaje “on”.
d. Pulse la tecla de RELOJ para ver su duración y utilice las teclas ARRIBA y ABAJO
para fijarlo en el valor “00:00”.
e. Pulsar de nuevo la tecla de RELOJ para confirmar el tiempo y pasar a ajustar la fase
de reposo: se muestra el mensaje “oFF”.
f. Pulse la tecla de RELOJ para ver su duración y utilice las teclas ARRIBA y ABAJO
para fijarlo en el valor “00:00”.
Página: 7 /7 Fecha: 06/04/16 Revisión: 01
g. Confirme el valor pulsando la tecla de RELOJ y pasara a mostrar de nuevo la
humedad relativa.
3.2. FIJAR LA TEMPERATURA DE CONSIGNA PARA EL FUNCIONAMIENTO COMO REFRIGERACIÓN.
a. Pulsar la tecla SET_T, el display muestra en la parte superior el mensaje “STG”,
mientras el icono “set” comienza a parpadear.
b. Pulsar de nuevo la tecla SET_T, y se muestra el set point de temperatura en el
periodo de secado (on). Dejar como este.
c. Pulsar de nuevo la tecla SET_T para confirmar el set point y pasar a ajustar el valor
de set point en el periodo de dripping: se muestra el mensaje “St1”.
d. Pulsar de nuevo la tecla SET_T para ver el valor y ajústelo pulsando las teclas de
ARRIBA y ABAJO al valor de 4ºC.
3.3. COMENZAR A FUNCIONAR SOLO EN REFRIGERACIÓN. Pulsar la tecla STAR para comenzar a funcionar en refrigeración.
En el display el led se encenderá. Si este led no esta encedido en este modo el aparato no
esta funcionando, pulsar la tecla STAR.
Para volver a programarlo para la fase de secado solo habrá que seguir el paso 1 a la inversa y fijar
el tiempo de la fase drippin “dri” en 00:00, y los de la fase ON y OFF en los valores que utilice
normalmente para el secado.
Page: 1 /6 Date: 06/04/16 Review: 01
Instructions of the controller for AN501SC / AN1002SC
INDEX
1. DRYING CYCLE…………………………………………………………………………………… 2
1.1. OFF (STOPPING)………………………………………………………………………………… 2
1.2. ON (RUNNING)…………………………………………………………………………………… 2
1.3. DRIPPING…………………………………………………………………………………………. 3
2. CONTROLLER USE………………………………………………………………………………. 3
2.1. HOW TO SET THE DURATION OF THE DRIPPING, RUNNING AND STOPPING
PHASES……………………………………………………………………………………………. 4
2.2. HOW TO SET THE TARGET HUMIDITY OF THE RUNNING CYCLE……………………… 4
2.3. HOW TO SET THE TARGET TEMPERATURE OF THE DRIPPING AND RUNNING
PHASES……………………………………………………………………………………………. 4
2.4. HOW TO START THE CYCLE…………………………………………………………………… 4
2.5. END OF THE CYCLE …………………………………………………………………………….. 5
2.6. HOW TO STOP THE CYCLE MANUALLY ……………………………………………………… 5
2.7. HOW TO MODIFY THE SETTING OF THE CURRENT CYCLE WHILE IT’S RUNNING….. 5
3. MODIFICATION OF PARAMETERS FOR USE AS REACH-INS…………………………….. 5
3.1. SET THE DURATION OF THE DRIPPING PHASE IN 23 HOURS AND THE
ON AND OFF PHASES AT 0 HOURS …………………………………………………………… 5
3.2. SET THE SETPOINT TEMPERATURE FOR REFRIGERATION OPERATIONS…………… 6
3.3. HOW TO START ONLY REFRIGERATION……………………………………………………… 6
Page: 2 /6 Date: 06/04/16 Review: 01
1. DRYING CYCLE
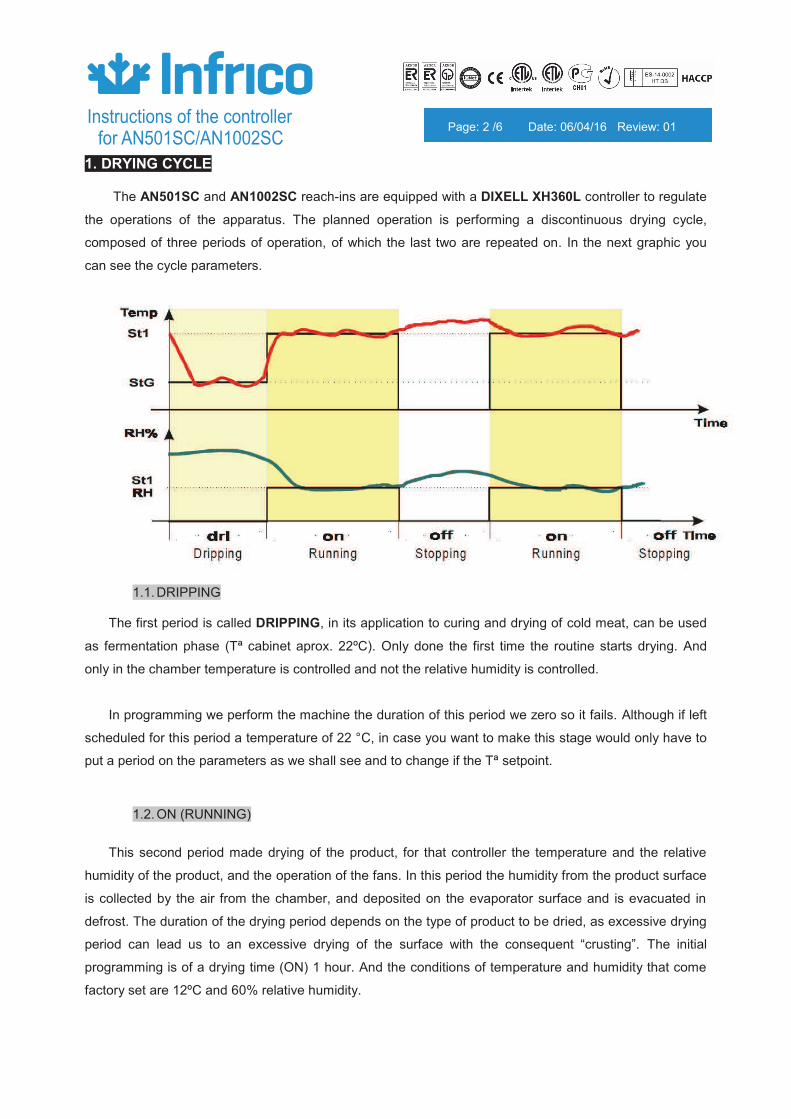
The AN501SC and AN1002SC reach-ins are equipped with a DIXELL XH360L controller to regulate
the operations of the apparatus. The planned operation is performing a discontinuous drying cycle,
composed of three periods of operation, of which the last two are repeated on. In the next graphic you
can see the cycle parameters.
1.1. DRIPPING The first period is called DRIPPING, in its application to curing and drying of cold meat, can be used
as fermentation phase (Tª cabinet aprox. 22ºC). Only done the first time the routine starts drying. And
only in the chamber temperature is controlled and not the relative humidity is controlled.
In programming we perform the machine the duration of this period we zero so it fails. Although if left
scheduled for this period a temperature of 22 °C, in case you want to make this stage would only have to
put a period on the parameters as we shall see and to change if the Tª setpoint.
1.2. ON (RUNNING)
This second period made drying of the product, for that controller the temperature and the relative
humidity of the product, and the operation of the fans. In this period the humidity from the product surface
is collected by the air from the chamber, and deposited on the evaporator surface and is evacuated in
defrost. The duration of the drying period depends on the type of product to be dried, as excessive drying
period can lead us to an excessive drying of the surface with the consequent “crusting”. The initial
programming is of a drying time (ON) 1 hour. And the conditions of temperature and humidity that come
factory set are 12ºC and 60% relative humidity.

Page: 3 /6 Date: 06/04/16 Review: 01
1.3. OFF (STOPPING) In the last period occurs the “repose” of the product, i.e., are left evolve chamber conditions stopping
regulation and fans, so that the water in the interior of the product has time to migrate to the surface of
product. The recommended duration of the repose period will depends on the type of product and the
quantity thereof, which may be necessary to vary the times. Programming that come the factory is a time
of repose (OFF) 1 hour.
In certain situations or with a lot loaded, you can cancel the repose time and is continuously drying
period. (SEE HOW TO SET THE DURATION OF DIFFERENT PHASES).
Once you have finished the repose period begins again another dry period and another repose
period, and so on, until you manually stop the cycle with the button ON/OFF. If you want, you can cancel
the dripping phase or repose phase just put the corresponding zero duration, which can be left alone
drying cycles that can continuously repeated over until manually stopped.
It is also possible that the controller perform a single cycle of the determined duration (up to 24
hours) and stop, this would require changing the “trc” parameter.
NOTE: As discussed the conditions programming and times is a proposal factory, but for the optimal
use of the machine, these conditions must be adapted to each specific product.
2. CONTROLLER USE
The appearance of the controller is the next:
2.1. HOW TO SET THE DURATION OF THE DRIPPING, RUNNING AND STOPPING PHASES
START KEY UP KEY SET Tª KEY LIGHT KEY
CLOCK KEY DOWN KEY SET RH KEY ON/OFF KEY
Page: 4 /6 Date: 06/04/16 Review: 01
a. Push the CLOCK key, the display shows on the bottom display the “dri” message,
while the “hourglass” start flashing,
b. Push again CLOCK the duration of the dipping phase is shown, hh:mm,
c. To set the duration push the UP and DOWN keys,
d. Push again the CLOCK to confirm the time and pass to the setting of the sunning
phase: the “on” message is displayed,
e. Push the CLOCK key to see its duration and use the UP and DOWN keys to set it,
f. Push again the CLOCK to confirm the time and pass to the setting of the stopping
phase: the “oFF” message is displayed,
g. Push the CLOCK key to see its duration and use the UP and DOWN keys to set it,
h. Confirm the value by pushing again the CLOCK key and pass to the humidity
display.
2.2. HOW TO SET THE TARGET HUMIDITY OF THE RUNNING CYCLE.
a. Push the SET_RH key, the display shows on the bottom display the “SH1” message,
while the “set” icon starts flashing,
b. Push again the SET_RH the humidity set point of the running phase is shown. Set it
using the UP and DOWN keys. To disable the humidity control during the freezing
phase set it to “nu”,
c. Push again the SET_RH to confirm the value and pass to the humidity display.
2.3. HOW TO SET THE TARGET TEMPERATURE OF THE DRIPPING AND RUNNING PHASES
a. Push the SET_T key, the display shows on the upper display the “StG” message,
while the “set” icon starts flashing,
b. Push again the SET_T the temperature set point of the running phase is shown. Set
it using the UP and DOWN keys,
c. Push again the SET_T to confirm the value and pass to the setting of the dripping
phase: the “St1” message is displayed,
d. Push the SET_T key to see its value and use the UP and DOWN keys to set it.
2.4. HOW TO START THE CYCLE
Push and release START key: the led will be turned ON.
The led flashes during the proving phase. During dripping periods and repose (off) this
led flashes. And during running phase (to be control temperature and humidity) the led stay on.
2.5. END OF THE CYCLE
Page: 5 /6 Date: 06/04/16 Review: 01
When the timer has expired, the buzzer starts sounding and the bottom display shows the “End”
message.
To mute the buzzer pus a key: The display come back to show the humidity and the LED of the
START key is turned off.
2.6. HOW TO STOP THE CYCLE MANUALLY
When the cycles are repeated indefinitely as the controller is programmed factory, the drying cycle
stopped manually.
To stop the cycle manually push the ON/OFF key.
2.7. HOW TO MODIFY THE SETTING OF THE CURRENT CYCLE WHILE IT’S RUNNING
To modify the setting of the running cycle temperature (SET_T), humidity (SET_RH) or remaining
time (CLOCK):
a. Push twice the correspondent key: the setting value of the current phase (dripping or running)
will be displayed,
b. Modify it using the UP and DOWN keys,
c. Confirm the value using the correspondent key: temperature (SET_T), humidity (SET_RH) or
remaining time (CLOCK).
NOTE: the changes made will be memorised. So the next cycle will start with the new values.
3. MODIFICATION OF PARAMETERS FOR USE AS REACH-INS
In dripping phase the controller works controlling only temperature, therefore, what we will give the
dripping phase lasting 23 hours to leave the set point temperature and set the duration of the other two
phases to zero.
To do this follows the following procedure:
3.1. SET THE DURATION OF THE DRIPPING PHASE IN 23 HOURS AND THE ON AND OFF
PHASES AT 0 HOURS
a. Push the CLOCK key, the display shows on the bottom display the “dri” message,
while the “hourglass” start flashing,
b. Push again CLOCK the duration of the dipping phase is shown, adjust the time using
the keys UP and DOWN until appear “23:00”,
Page: 6 /6 Date: 06/04/16 Review: 01
c. Push again the CLOCK to confirm the time and pass to the setting of the sunning
phase: the “on” message is displayed,
d. Push again CLOCK to see your duration and using the keys UP and DOWN to set
point in valour “00:00”,
e. Push again the CLOCK to confirm the time and pass to the setting of the stopping
phase: the “oFF” message is displayed,
f. Push again CLOCK to see your duration and using the keys UP and DOWN to set
point in valour “00:00”,
g. Confirm the value by pushing again the CLOCK key and pass to the humidity display.
3.2. SET THE SETPOINT TEMPERATURE FOR REFRIGERATION OPERATIONS
a. Push the SET_T key, the display shows on the upper display the “StG” message,
while the “set” icon starts flashing,
b. Push again the SET_T and show the set point temperature in the dripping phase
(on).
c. Push again the SET_T to confirm the value and pass to the setting of the dripping
phase: the “St1” message is displayed,
d. Push the SET_T key to see its value and use the UP and DOWN keys to set 4ºC.
3.3. HOW TO START ONLY REFRIGERATION
Push and release START key to start in refrigeration operation: the led will be turned ON.
The led flashes during the proving phase. If this led is not turn-on in this mode, the
apparatus is not working, push START key.
To come back to program it to the drying phase just have to follow step 1 to the inverse and set the
time of dripping phase “dri” in 00:00, and the ON and OFF in the values that normally used for drying.