arcvault 12 loader user guide - overland storage · 10400179-101 07/2008 ©2006-2008 overland...
TRANSCRIPT

OverlandStorage
ARCvault® 12 LoaderUser Guide
July 200810400179-101

ARCvault 12 User Guide
©2006-2008 Overland Storage, Inc. All rights reserved.
Overland®, Overland Data®, Overland Storage®, ARCvault®, LibraryPro®, LoaderXpress®, Multi-SitePAC®, NEO SERIES®, PowerLoader®, Protection OS®, REO®, REO 4000®, REO SERIES®, ULTAMUS®, VR2®, WebTLC®, and XchangeNOW® are registered trademarks of Overland Storage, Inc. NEO™, Simply Protected™, Simply Protected Storage™, SnapWrite™, and ULTAMUS SERIES™ are trademarks of Overland Storage, Inc.All other brand names or trademarks are the property of their respective owners.The names of companies and individuals used in examples are fictitious and intended to illustrate the use of the software. Any resemblance to actual companies or individuals, whether past or present, is coincidental.PROPRIETARY NOTICEAll information contained in or disclosed by this document is considered proprietary by Overland Storage. By accepting this material the recipient agrees that this material and the information contained therein are held in confidence and in trust and will not be used, reproduced in whole or in part, nor its contents revealed to others, except to meet the purpose for which it was delivered. It is understood that no right is conveyed to reproduce or have reproduced any item herein disclosed without express permission from Overland Storage.Overland Storage provides this manual as is, without warranty of any kind, either expressed or implied, including, but not limited to, the implied warranties of merchantability and fitness for a particular purpose. Overland Storage may make improvements or changes in the product(s) or programs described in this manual at any time. These changes will be incorporated in new editions of this publication.Overland Storage assumes no responsibility for the accuracy, completeness, sufficiency, or usefulness of this manual, nor for any problem that might arise from the use of the information in this manual.
Overland Storage, Inc.4820 Overland AvenueSan Diego, CA 92123U.S.A.
Tel: 1.800.729.8725 (toll-free U.S.)Tel: +1.858.571.5555 Option 5 (International)Fax: +1.858.571.0982 (general)Fax: +1.858.571.3664 (sales)www.overlandstorage.com
10400179-101 07/2008 ©2006-2008 Overland Storage, Inc. ii

10400179-101
Preface
This guide provides installation instructions and operational information necessary for using the Overland Storage ARCvault 12 Loader. It assumes you are familiar with basic functions of your computer and networks. It also assumes you are knowledgeable about the Storage Area Network (SAN) to which the ARCvault unit is being connected.
ConventionsThis user guide exercises several typographical conventions to help explain how to use your ARCvault 12 loader.
Convention Description & Usage
Boldface Words in boldface indicate items to select such as menu items or command buttons.
Ctrl-Alt-r This type of format details the keys you press simultaneously. In this example, hold down the Ctrl and Alt keys and press the r key.
NOTE A Note indicates information that emphasizes or supplements important points of the main text.
IMPORTANT An Important note is a type of note that provides information essential to the completion of a task or that can impact the product and its function.
CAUTION A Caution contains information that the user needs to know to avoid damaging or permanently deleting data or causing physical damage to the hardware or system.
WARNING A Warning contains information essential to people’s safety. It advises users that failure to take or avoid a specific action could result in physical harm to the user or hardware.
Flow Indicator (>) Words in boldface with a greater than sign between them indicate the flow of actions to accomplish a task. For example, Setup > Passwords > User indicates that you should press the Setup button, then the Passwords button, and finally the User button to accomplish a task.
07/2008 ©2006-2008 Overland Storage, Inc. iii

ARCvault 12 User Guide Preface
Firmware UpdatesThe latest release of the ARCvault firmware can be obtained from the Overland Storage FTP site.
1. Point your browser to ftp://ftp.overlandstorage.com/Firmware/ARCvault/.
2. Open the appropriate ARCvault folder.
3. Download the latest firmware file labeled ARCvault_nnnn.bin (where “nnnn” represents the latest version number).
For additional assistance, search at http://support.overlandstorage.com/.
Product DocumentationARCvault® Series product documentation and literature are available online at:
http://www.overlandstorage.com.
Overland Technical SupportFor assistance configuring and using your ARCvault, search for help at:
http://support.overlandstorage.com/
Our Overland Storage Technical Support staff is also available to assist you by phone at:
1 (877) 654-3429 (Toll-free and active only in US and Canada)+1 (858) 571-5555 Option 5 (Worldwide)
They are available on normal business days, 6 AM through 5 PM (PST), excluding Overland holidays. At all other times we will respond to technical support calls within 4 hours.
Technical support for our EMEA customers is available as well from our United Kingdom office at:
+44 (0) 118-98980508:00 AM to 5:00 PM (GMT)Monday through Friday
You can e-mail our technical support staff at [email protected].
Electrostatic Discharge InformationA discharge of static electricity can damage micro-circuitry or static-sensitive devices. To help prevent Electrostatic Discharge (ESD) damage, observe these and other standard ESD precautions:
• Transport and store items in static-safe containers.• Make sure you are always properly grounded.• Avoid touching pins, leads, or circuitry.
10400179-101 07/2008 ©2006-2008 Overland Storage, Inc. iv

10400179-101
Contents
Preface
Chapter 1 - ARCvault 12 OverviewFeatures ....................................................................................................................................................... 1-1Design and Layout ..................................................................................................................................... 1-2
Operator Interfaces .............................................................................................................................. 1-4Media Magazines ................................................................................................................................. 1-5
Interface Security Levels ............................................................................................................................ 1-5
Chapter 2 - Installation and SetupActivating the Warranty ............................................................................................................................ 2-1Configuring the Unit for Everyday Use ...................................................................................................... 2-2
Power On the Loader ........................................................................................................................... 2-2Reset the SCSI ID ................................................................................................................................... 2-2IP Address Configuration ..................................................................................................................... 2-2
DHCP Addressing ............................................................................................................................ 2-3Different Static IP Address .............................................................................................................. 2-3
Configure E-Mail Communications ..................................................................................................... 2-4Loading the Tape Media ........................................................................................................................... 2-5
Chapter 3 - Daily OperationPower Controls ............................................................................................................................................ 3-1OCP Touch Screen ..................................................................................................................................... 3-2Status Check ............................................................................................................................................... 3-2Tape Cartridges .......................................................................................................................................... 3-3
Bar Code Labels .................................................................................................................................... 3-4Media Magazines ....................................................................................................................................... 3-4
Slot Numbering ...................................................................................................................................... 3-4Media Handling .......................................................................................................................................... 3-5
Moving Media Inside the Loader ........................................................................................................ 3-5Using the Magazine for Bulk Media Exchanges ................................................................................ 3-6
Tape Drive Cleaning .................................................................................................................................. 3-6Running a Cleaning Cartridge Using the OCP .................................................................................. 3-6
Chapter 4 - Operator Control PanelOverview ..................................................................................................................................................... 4-1
Startup Screen ....................................................................................................................................... 4-2Default Screen ...................................................................................................................................... 4-2Going Offline ......................................................................................................................................... 4-2
OCP Software Map .................................................................................................................................... 4-3
07/2008 ©2006-2008 Overland Storage, Inc. v

ARCvault 12 User Guide Contents
Default Screen Options .............................................................................................................................. 4-4Power Button ............................................................................................................................................... 4-4Help Button .................................................................................................................................................. 4-5Media Menu ................................................................................................................................................ 4-6
Mag Access Button .............................................................................................................................. 4-6Move Media Button .............................................................................................................................. 4-7Move a Tape Cartridge ....................................................................................................................... 4-8
Status Menu ................................................................................................................................................. 4-8Cart Map Button ................................................................................................................................... 4-9
Drive Data Field ............................................................................................................................... 4-9Magazine Data Field ...................................................................................................................... 4-9
Library Button ....................................................................................................................................... 4-10Drive Button ......................................................................................................................................... 4-11
Setup Menu ............................................................................................................................................... 4-12View Opts Button ................................................................................................................................ 4-13
Library Button (View-Only) ........................................................................................................... 4-13Network Button (View-Only) ........................................................................................................ 4-14SCSI/FC Button (View-Only) ......................................................................................................... 4-15
Edit Opts Button .................................................................................................................................. 4-16Library Button (Editable) ............................................................................................................... 4-16Network Button (Editable) ............................................................................................................ 4-17SCSI/FC Button (Editable) ............................................................................................................. 4-20
Passwords Button ................................................................................................................................ 4-21Creating or Changing Passwords ............................................................................................... 4-22Disabling Password Verification ................................................................................................... 4-22Password Usage ............................................................................................................................ 4-22
Utilities Menu .............................................................................................................................................. 4-23Service Button ..................................................................................................................................... 4-23Diagnostics Button .............................................................................................................................. 4-24Security Button .................................................................................................................................... 4-26
Validate a Password and Determine Its Level ........................................................................... 4-26
Chapter 5 - Remote Management UtilityRMU Usage .................................................................................................................................................. 5-1Accessing RMU ........................................................................................................................................... 5-2RMU Navigation .......................................................................................................................................... 5-3
General Procedure for Changing RMU Settings ............................................................................... 5-4RMU Software Map ..................................................................................................................................... 5-5Status Tab .................................................................................................................................................... 5-6
Status Page Media Map ...................................................................................................................... 5-7Library Status Information ..................................................................................................................... 5-8Detailed Reports ................................................................................................................................... 5-8Drive Status Summary Table .............................................................................................................. 5-10
Media Tab ................................................................................................................................................. 5-11Using the Move Media Option .......................................................................................................... 5-12Clean a Drive ...................................................................................................................................... 5-12Inventory Library .................................................................................................................................. 5-13
Setup Tab ................................................................................................................................................... 5-13OCP Security Passwords ..................................................................................................................... 5-15RMU Security Passwords ..................................................................................................................... 5-15Network ................................................................................................................................................ 5-16
10400179-101 07/2008 ©2006-2008 Overland Storage, Inc. vi

ARCvault 12 User Guide Contents
Remote FTP Server .............................................................................................................................. 5-18Library Configuration .......................................................................................................................... 5-18SCSI Configuration .............................................................................................................................. 5-20Drive Configuration ............................................................................................................................ 5-23
SCSI Drives ...................................................................................................................................... 5-23SAS Drives ....................................................................................................................................... 5-23
Notification Registration ..................................................................................................................... 5-25Reset to Defaults ................................................................................................................................. 5-28
Functions Tab ............................................................................................................................................ 5-28Update Firmware Using HTTP ............................................................................................................. 5-31Update Firmware Using FTP ................................................................................................................ 5-32
Local FTP Server Update ............................................................................................................... 5-32Remote FTP Server Update .......................................................................................................... 5-32
Check Firmware Revision Level ......................................................................................................... 5-33Send a Test E-Mail ............................................................................................................................... 5-33Run a Library Diagnostic .................................................................................................................... 5-33Reboot the Library .............................................................................................................................. 5-34Reconfigure the Library ...................................................................................................................... 5-34Unlock Library ...................................................................................................................................... 5-34
History Tab ................................................................................................................................................. 5-35Display a Trace Log ............................................................................................................................ 5-35Download a Trace Log File ................................................................................................................ 5-37Send a Support Ticket ........................................................................................................................ 5-37
Help Link ..................................................................................................................................................... 5-38Logout Link ................................................................................................................................................ 5-38
Chapter 6 - Troubleshooting and FSCsPossible Problems ........................................................................................................................................ 6-1
Sample Screens ..................................................................................................................................... 6-1Error Recovery ............................................................................................................................................. 6-2
FSC/ERP Cross-Reference Table .......................................................................................................... 6-2Error Recovery Procedures .................................................................................................................. 6-8
Magazine Release .................................................................................................................................... 6-20Touch Screen Overrides ........................................................................................................................... 6-21
Touch Screen Forced Recalibration ................................................................................................. 6-21Touch Screen Contrast Reset ............................................................................................................ 6-21
Appendix A - ARCvault SpecificationsPhysical Specifications ...............................................................................................................................A-1Technical Information ................................................................................................................................A-2Reliability and Safety ..................................................................................................................................A-3Temperature, Humidity and Altitude ........................................................................................................A-3Shock ............................................................................................................................................................A-4Vibration ......................................................................................................................................................A-5Electromagnetic Emissions ........................................................................................................................A-5
Appendix B - Updating the FirmwareUsing a Local FTP Server ............................................................................................................................. B-1Using a Remote FTP Server ......................................................................................................................... B-2
10400179-101 07/2008 ©2006-2008 Overland Storage, Inc. vii

ARCvault 12 User Guide Contents
Appendix C - Available Commands
Appendix D - Sequential ModeSequential Overview ..................................................................................................................................D-1Sequential Setup .........................................................................................................................................D-1
OCP Configuration ...............................................................................................................................D-2RMU configuration ................................................................................................................................D-2Visible Changes ....................................................................................................................................D-3
Sequential Mode Operation .....................................................................................................................D-3Possible Error Conditions .......................................................................................................................D-4
Cleaning ......................................................................................................................................................D-4Other Considerations .................................................................................................................................D-5
Appendix E - ARCvault 12 to 24 Upgrade
Glossary and Acronym List
Index
10400179-101 07/2008 ©2006-2008 Overland Storage, Inc. viii

CHAPTER
1
10400179-101
ARCvault 12 Overview
The ARCvault 12 is a cost-effective tape backup and archive solution designed for small and medium businesses with big-business demands. It incorporates affordability and capacity into a simple, compact solution that minimizes the impact on scarce IT budgets. ARCvault 12 is designed to integrate easily with most backup and archive applications and occupies just 2U of rack space (Figure 1-1).
Figure 1-1: ARCvault 12 Loader
FeaturesThe ARCvault 12 Loader features:
• A compact 2U form factor (3.475 inches or 8.6cm)• A bar code reader for easy media management• A removable 12-cartridge media magazine that internally latches to prevent
unauthorized access and provides easy off-site storage• A graphical touch screen on the front panel for manual operation
07/2008 ©2006-2008 Overland Storage, Inc. 1-1

ARCvault 12 User Guide ARCvault 12 Overview
• A remote management utility for convenient set up, control, and troubleshooting
• Customer-replaceable components for easy, cost-effective support, service, and upgrades
The following table details the features of the loader:
Design and LayoutMost everyday backup and archive operations can be easily accomplished from the front of the ARCvault unit (Figure 1-2) using the LCD touch screen that functions as the Operator Control Panel (OCP). Additional features, functions, and settings are available by accessing the unit’s Remote Management Utility (RMU) via a web browser on a PC connected either directly to the unit or through the host network.
Figure 1-2. ARCvault 12 Front Panel
Tape cartridges are loaded using a removable magazine located behind the door on the right side of the front panel. A pressure catch holds the door shut and, as a safety feature, the door must be closed before the internal robotics will function.
Table 1-1: ARCvault 12 Features
Feature Details
Form Factor 2U
Classification Loader
Available Drives One LTO drive, SCSI or SAS
Maximum Number of Slots 12
Magazines One 12-slot
Bar Code Reader Industry Standard Code 3 of 9
Power Supply Single, not customer-replaceable
Manual Interface 2.5” x 1.25” (6.4 x 3.2cm) LCD touch screen, 128 x 64 pixels
Remote Management Built-in web GUI
Customer Replaceable Units Tape drive, drive cover assembly, chassis, and magazines
ARC
-002
3
Retaining Screw
Center Bezel Door (Open)
LCD Touch Screen
Tape Cartridge Magazine Door Handle
Ventilation Slots Door Catch
10400179-101 07/2008 ©2006-2008 Overland Storage, Inc. 1-2

ARCvault 12 User Guide ARCvault 12 Overview
CAUTION: If a door is opened while the loader is powered up, the robotics stop immediately and a general alert message is displayed on the OCP.
All cabling and power connections, along with the unit’s main power switch, are located on the rear panel (Figure 1-3).
Figure 1-3. ARCvault 12 Rear Panel (SCSI Drives)
When the power is on, the switch is illuminated. Access to the tape drive is available through the drive cover by loosening just two thumbscrews, allowing easy upgrading or replacement of the drive. Connections are available for Ethernet and tape drive cabling (SCSI, or SAS). The fan on the drive cover handles the cooling exhaust.
Figure 1-4: Drive Covers for Different Drive Types
The loader remembers its power state when power is removed from the unit. When power is returned, the library returns to its previous state. For example, if power is lost when the library was in an operational state, when power is returned the library reboots and goes back to a ready state.
ARC
-017
6
SCSI Ports
AC ReceptaclePower SwitchThumbscrews
System FanDrive Cover EthernetUSB (Not Implemented)
Serial
ARC
-018
4
SCSI 2-Port
ARC
-018
6
SAS
10400179-101 07/2008 ©2006-2008 Overland Storage, Inc. 1-3

ARCvault 12 User Guide ARCvault 12 Overview
Operator InterfacesThere are two ways to interface with an ARCvault unit—using the OCP touch screen on the front panel (Figure 1-5) or by accessing the unit’s RMU via a web browser on a connected PC. The default IP address of the RMU is http://10.0.0.1/.
The OCP is a 2.5" x 1.25" (6.4 x 3.2cm) touch screen with a 51 dpi (20 dpcm) resolution. It features virtual buttons to access the menus and change the settings. It provides an easy way to directly communicate with the unit and make changes that are related to the use and movement of physical media. Refer to Chapter 4, “Operator Control Panel,” for details.
Figure 1-5: ARCvault 12 OCP Default Screen
The RMU uses HTML and Java to create an interactive interface (Figure 1-6) that addresses the majority of the loader’s settings. A series of tabs along the top provide access to different configuration and device management screens. Refer to Chapter 5, “Remote Management Utility,” for details.
Figure 1-6. ARCvault 12 RMU Interface
10400179-101 07/2008 ©2006-2008 Overland Storage, Inc. 1-4

ARCvault 12 User Guide ARCvault 12 Overview
Media MagazinesEach ARCvault media magazine (Figure 1-7) holds up to 12 LTO tapes. The ARCvault 12 has one magazine located on the right side. The numbering of the magazine slots is bottom to top, from the front of the magazine to the rear.
Figure 1-7: ARCvault 12 Media Magazine
.
Interface Security LevelsThere are two levels of security available with an ARCvault loader:
• User-Level security—Controls access to the power, media magazine, and the movement of the media inside the unit.
• Administrator-Level security—Controls access to most of the utilities and the configuration editing.
For added protection, ARCvault lets you assign different passwords to each level based on the type of access:
• The OCP touch screen provides User and Administrator security using 4-digit hexadecimal passwords. These are disabled by default.
• The RMU offers User and Administrator security using 12-digit alphanumeric characters that are case sensitive. The default Administrator password is “2” while the default User password is “1.”
NOTE: When entering a RMU password from the OCP, you are limited to only hexadecimal characters (0-F). To take advantage of the full alphabet, you must use the RMU Password change option on the Setup tab.
ARC
-000
6
Right Magazine
10400179-101 07/2008 ©2006-2008 Overland Storage, Inc. 1-5

ARCvault 12 User Guide ARCvault 12 Overview
Table 1-2 shows the different OCP security levels, the OCP access point that prompts for a password, and the scope of access.
NOTE: Each security type controls a specific group of OCP options. For example, adding a User password does NOT protect Admin-level options. However, a higher level of security permits access to all lower-level functions, such as Admin-level security allows access to all User-level functions.
Table 1-3 shows the different RMU security levels, the RMU tabs that can be accessed based on the password, and the scope of access.
Table 1-2: ARCvault OCP Security Levels
Level Controls this Access Description
User • Power > Reboot Library• Power > Power Off Library• Mag Access• Move Media
Controls access to the power, media magazine, and the movement of the media inside the unit.
Admin All User access options plus these:• Setup > Passwords• Setup > Edit Opts > Library• Setup > Edit Opts > Network• Setup > Edit Opts > SCSI/FC• Utilities > Service• Utilities > Diagnostics
Controls access to most of the utilities and the editing of configuration options.
Table 1-3: ARCvault RMU Security Levels
Level Controls Access to This Tab Description
User • Status• History
Limits access to read-only features.
Admin All tabs Allows full access to all configuration and diagnostic features.
10400179-101 07/2008 ©2006-2008 Overland Storage, Inc. 1-6

CHAPTER
2
10400179-101
Installation and Setup
This section covers the basic setup of your ARCvault 12 loader.
IMPORTANT: For installation information about your ARCvault 12 loader, refer to the ARCvault 12 & 24 Quick Start Guide. A printed copy is located inside the Accessory
Kit and a PDF version is located on the Documentation CD.
Activating the WarrantyBefore installing your new unit, it is essential that you activate your ARCvault warranty by registering your loader. Technical and warranty support, including automatic firmware version checking, is not available until this is accomplished.
Use these steps to register your unit at the Overland Storage website:
1. Go to the Overland Technical Support website at:http://support.overlandstorage.com/
2. Using the MEMBER LOGIN (Figure 2-1), log in to the site.
NOTE: If you are not yet a member, click the New member? link and follow the instructions. It’s free and easy!
Figure 2-1: Member Login and New Member Link
3. From the menu on the left, select My Products > Add or Register a Product. Follow the on-screen instructions to complete the process.
NOTE: To set category watches or receive update notifications, you must include an e-mail address with your registration.
(E-Mail) (Password)
07/2008 ©2006-2008 Overland Storage, Inc. 2-1

ARCvault 12 User Guide Installation and Setup
Configuring the Unit for Everyday UseFollow these basic steps to initially configure your loader to your network.
Power On the LoaderAt the front of the unit, tap the OCP touch screen to power on the unit. The Startup screen is displayed (Figure 2-2). The inventory status and IP address alternate at the bottom of the screen.
Figure 2-2: OCP Startup Screen
Wait approximately 2 minutes for Power-On Self-Test (POST) to be completed and the Default screen menu to be displayed (Figure 2-3).
Figure 2-3: OCP Default Screen Menu
Reset the SCSI IDIf necessary, change the unit’s SCSI ID (only if it needs to be different than the default setting of “1”):
1. Press Setup > Edit Opts > SCSI/FC (pressing OK at the going offline message).
2. Press the Drv 1 Bus ID data field on the right.
3. Press the New data field.
4. Using the pop-up keyboard, enter the new SCSI ID number and press OK.
5. Press Save and then press OK to confirm.
6. Repeat Steps Steps 1–5 for the other drive.
7. When the screen resets, press Back three times.
IP Address ConfigurationThe ARCvault 12 Loader comes configured with a static IP address of 10.0.0.1. To access the unit remotely for additional configuration, open your browser to this address.
10400179-101 07/2008 ©2006-2008 Overland Storage, Inc. 2-2

ARCvault 12 User Guide Installation and Setup
NOTE: Refer to Chapter 5, “Remote Management Utility,” for complete details on remote configuration options and settings.
If the default remote access IP Address needs to be changed to a different static or dynamic IP address, use one of the following procedures to change it.
DHCP Addressing
Use this procedure to have a DHCP Server automatically assign an IP address to the ARCvault loader:
1. At the OCP Default screen, press Setup > Edit Opts > Network > OK (at the going offline message).The IP Addr Assignment option is shown (Figure 2-4).
Figure 2-4: OCP Network Configuration Screens
2. Change the IP Address Assignment to DHCP:
a. Press the IP Addr Assignment data field.
b. Press DHCP.
c. Press OK.
3. Press Save > OK (at the reboot message).
4. Press Back twice to return to the Default screen.
5. Press Power > Reboot Library > OK (at the going offline message) > OK (at the reboot message).Wait while the loader reboots.
Different Static IP Address
Use these steps to change the static IP address of the ARCvault loader:
1. At the OCP Default screen, press Setup > Edit Opts > Network > OK (at the going offline message).The IP Addr Assignment option screen is shown.
2. Change the static IP address:
a. Scroll down one screen to the Library IP Addr option.
b. Press the data field on the right.
c. Press the New data field.
d. Using the keypad, enter a unique IP address (www.xxx.yyy.zzz) assigned by your network administrator, and press OK.
e. Verify the address is correct and press OK.
DataField
(Displays)
Scroll Button
10400179-101 07/2008 ©2006-2008 Overland Storage, Inc. 2-3

ARCvault 12 User Guide Installation and Setup
3. Enter an IP mask:
a. Scroll down one more screen and press the IP Mask data field on the right.
b. Press the New data field.
c. Using the keypad, enter an IP mask (www.xxx.yyy.zzz) assigned by your network administrator, and press OK.
d. Verify the address is correct and press OK.
4. Enter an IP gateway address:
a. Scroll down another screen and press the IP Gateway data field on the right.
b. Press the New data field.
c. Using the keypad, enter an IP gateway (www.xxx.yyy.zzz) assigned by your network administrator, and press OK.
d. Verify the address is correct and press OK.
5. Enter a DNS Server address:
a. Scroll down one final screen and press the DNS Server data field on the right.
b. Press the New data field.
c. Using the keypad, enter an IP gateway (www.xxx.yyy.zzz) assigned by your network administrator, and press OK.
d. Verify the address is correct and press OK.
6. Press Save > OK (at the reboot message).
7. Press Back twice to return to the Default screen.
8. Press Power > Reboot Library > OK (at the going offline message) > OK (at the reboot message).Wait while the loader reboots.
Configure E-Mail CommunicationsBefore the Send a Support Ticket, Check Firmware Revision Level, and Send a Test E-Mail options in the RMU can be used, the SMTP Server address must be entered using the RMU:
1. From a computer connected to the same network as the ARCvault loader, open a browser, connect to the default address of http://10.0.0.1/ (or the newly configured remote IP address), and login as Administrator (see “Interface Security Levels” on page 1-5).
2. In the top frame of the RMU, click the Setup tab (Figure 2-5).
Figure 2-5: RMU Tabs
10400179-101 07/2008 ©2006-2008 Overland Storage, Inc. 2-4

ARCvault 12 User Guide Installation and Setup
3. Click the Notifications button (clicking Confirm at the going offline message).
Figure 2-6: Setup Screen Notifications Button
4. Complete the Configuration section (Figure 2-7):• Enter either the IP Address or Hostname for the E-Mail Server.• Select the Warning Level desired.
Figure 2-7: Notifications Configuration Options
5. In the E-Mail Addresses section, enter data for your network:
a. Enter up to four addresses to receive e-mail event messages.
b. Change the e-mail address that will be used as the return address (From Address) for the event messages to a real address.The From Address is used to receive e-mail responses from Overland Support.
c. Click the check box to add a trace file to Critical event e-mails.
6. Click Submit.The information is updated immediately.
7. To test the configuration, click the Functions tab and, under Send a Test E-Mail, click Send E-Mail.
Loading the Tape MediaYou are now ready to insert your tape cartridges into the loader. The removable media magazine provides an easy means of loading the media.
CAUTION: Keep a loaded magazine level. Tilting the magazine can result in the tapes falling out and possibly being damaged. Also, do not hold a magazine by only the handle; use both hands to support it.
1. At the OCP Default screen, press Media > Mag Access (pressing OK at the going offline message) > Unlock All.The magazine locked symbol changes to an unlocked symbol.
2. Open the right door and remove the magazine by pulling the handle.
3. Insert the tape cartridges.
10400179-101 07/2008 ©2006-2008 Overland Storage, Inc. 2-5

ARCvault 12 User Guide Installation and Setup
4. Reinsert the magazine.The magazine relocks automatically.
5. Press Back once.Wait while the unit automatically inventories the magazine.
6. Press Back again to return to the Default screen.
Your system is now ready for use.
10400179-101 07/2008 ©2006-2008 Overland Storage, Inc. 2-6

CHAPTER
3
10400179-101
Daily Operation
This chapter covers some of the common functions and changes that might be performed on the ARCvault 12 Loader during daily use.
NOTE: Many of the these procedures require the use of either the OCP touch screen or the Remote Management Utility (RMU). For detailed information on those two features, refer to Chapter 4, “Operator Control Panel,” and Chapter 5, “Remote Management Utility.”
IMPORTANT: A Full Trace log (see “History Tab” on page 5-35) should be saved every time changes are made to the configuration in the event that the information
is needed should the chassis or controller card be swapped out.
Power ControlsTo power on the unit, tap the OCP touch screen or press the rear Power switch. This begins the POST process and displays the Startup screen (Figure 3-1). This screen alternates between showing the current POST status and the default IP address for the loader.
Figure 3-1: POST Startup Logo Screen
After approximately 3 minutes, when the unit has completed its POST process (including an inventory of cartridges), the unit automatically displays the Default menu screen (Figure 3-2) and is ready for use.
07/2008 ©2006-2008 Overland Storage, Inc. 3-1

ARCvault 12 User Guide Daily Operation
Figure 3-2: OCP Default Screen
To power down the unit, first press the Power button on the OCP touch screen, then press Power Off Library, and finally confirm the choice. The unit performs a controlled shutdown, including parking the shuttle and robotics inside. For an uncontrolled shutdown, press and hold the rear power switch for approximately 4 seconds to power down the unit.
NOTE: The loader remembers its power state when power is removed from the unit. When power is returned, the library returns to its previous state. For example, if power is lost when the library was in an operational state, when power is returned the library reboots and goes back to a ready state.
OCP Touch ScreenThe OCP touch screen provides an easy way to make common configuration changes and control access to the media. The following is a basic list of operational procedures and general instructions for using the OCP touch screen.
• Virtual buttons are represented on the screen as rectangles with labels such as “Status.” Press inside the rectangle to activate the button’s feature or submenu.
• A keyboard or set of option buttons is automatically displayed when numbers need to be entered or specific selections are required.
• If more options are available than can fit on the screen, arrow buttons are displayed on the bottom so you can scroll through the options. Only one arrow is shown when you reach the end or beginning of the list.
NOTE: The Status screen, Help screen, and all message screens use a scroll bar with arrows on the right side in place of the Up/Down arrows. Drag your finger up or down the scroll bar, or press and hold an arrow key to scroll.
• A Back button is always available on the bottom right of all secondary or lower menu screens to return you to the previous screen.
• A Cancel button is available on all data entry screens to return you to the previous menu screen without making changes.
• When the loader is powered off but still plugged in, the OCP glows blue. Tapping the OCP starts the power on cycle.
Status CheckTo quickly check the current status of the loader, use the Status button on the Default menu screen. The Status screens are read-only so a password is not required to view the data.
10400179-101 07/2008 ©2006-2008 Overland Storage, Inc. 3-2

ARCvault 12 User Guide Daily Operation
1. At the OCP Default screen (Figure 3-3), press the Status button.
Figure 3-3: Status Button Location
2. At the Status Menu (Figure 3-4), press Cart Map.
Figure 3-4: Status Menu Screen
3. On the Cart Map screen (Figure 3-5), press a data field to see a detailed status for a drive (Drv) and magazine (Mag).
Figure 3-5: Cart Map Screen
• Drv 1—Drive 1 operational and tape status.• Right Mag—Right media magazine slot and cartridge status.• Bottom left area—Shows the unit operational status (such as Library
Idle).
4. Press Back to return to the Status Menu screen.
5. If necessary, press either the Library or Drive n button to see additional information.
NOTE: Refer to “Status Menu” on page 4-8 for more details and information about the symbols used.
Tape CartridgesWhile the ARCvault loaders are available with different LTO tape drives using different tape formats, the general handling of the tape media is the same throughout the ARCvault family. Before you can use the loader, you must first load the tape cartridges. If bar code labels are being used, they must be installed before you load the cartridges.
10400179-101 07/2008 ©2006-2008 Overland Storage, Inc. 3-3

ARCvault 12 User Guide Daily Operation
Bar Code LabelsThe ARCvault 12 comes with a bar code reader to help manage cartridges by reading industry standard bar codes 3 of 9. The graphic below (Figure 3-6) shows how to install a bar code label on an LTO tape cartridge.
Figure 3-6: Bar Code Label Installation
The following are important tips to ensure maximum media performance and life:
• Place labels only in the recessed area, next to the write protection switch.Never place labels on the top, bottom, sides, or rear of the cartridge—they can cause loader faults and interfere with normal operations. Also, labels placed in such locations can come off inside the equipment causing damage.
• Always inspect cartridges before use for incorrect or improperly attached labels.
• Never reuse a cartridge label—always replace it with a new one.
Media MagazinesThe media magazines are used to store the tape cartridges inside the loader when they are not in use. They provide an easy means to add, remove, or exchange cartridges as needed. They are also a convenient way to store cartridges once they are full of data. As a security measure, access to the magazines can be password protected.
Slot NumberingTo help with the management of tape cartridges, the individual slots of the magazines are numbered. The sequence of the numbering is by magazine, from the bottom to the top, front to back.
ARC
-018
9
Bar Code Label
10400179-101 07/2008 ©2006-2008 Overland Storage, Inc. 3-4

ARCvault 12 User Guide Daily Operation
The ARCvault 12 has one magazine located on the right side. Figure 3-7 shows the slot numbering sequence for the magazine.
Figure 3-7. Normal Magazine Slot Numbering
Media Handling Most of the normal daily operations of an ARCvault loader center around the handling of tape media. The ARCvault 12 manages up to 12 tape cartridges.
Moving Media Inside the Loader
NOTE: This is the same as the Move a Tape Cartridge option on the Media tab of the RMU.
The OCP Move Media command (Figure 3-8) provides the means to move cartridges inside the loader without physically touching them.
Figure 3-8: Move Media OCP Screen
NOTE: If the location type has no available openings, a dash (—) is shown for the location number. If only one option is available for the location type, the location number doesn’t change.
1. At the OCP Default screen, press Media > Move Media > OK (at the going offline message).
2. At the Move Media screen, select the source location:
a. With the default From (Fr) field selected, use the left and arrows to choose the source location type.
b. Use the right and arrows to select the source location number.
3. Select the destination:
a. Press the To field between the lower arrows.
b. Use the left and arrows to select the destination type.
c. Use the right and arrows to select the destination number.
ARC
-002
0Right Magazine
Handle10 7 4 1
11 8 5 2
6 312 9
10400179-101 07/2008 ©2006-2008 Overland Storage, Inc. 3-5

ARCvault 12 User Guide Daily Operation
4. Press Execute.Wait for the tape to be moved. You are automatically returned to the Media menu when done.
5. Press Back to return to the Default screen.
Using the Magazine for Bulk Media ExchangesIf you need to add, remove, or exchange a large number of tape cartridges, you can take the loader offline and use the media magazine to exchange cartridges. The magazine holds up to 12 LTO cartridges.
CAUTION: Keep a loaded magazine level. Tilting the magazine can result in the tapes falling out and possibly being damaged. Also, do not hold a magazine by only the handle; use both hands to support it.
1. At the OCP Default screen, press Media > Mag Access > OK (at the going offline message).Wait for the robotics to come to a complete stop.
2. Press Unlock All and open the right door.
3. Carefully remove the magazine.
4. Add, remove, or exchange any tape cartridges.
5. Carefully slide the magazine back into the loader until it relocks.
6. Close the door.
7. Press Back.Wait while the loader is automatically inventoried.
8. Press Back again to return to the Default screen.
Tape Drive CleaningThe ARCvault loader provides an option to clean a tape drive manually. When needed, the cleaning cartridge can be loaded using the magazine. To permanently keep a cleaning cartridge in the loader, it is recommended that it be stored in a Reserved slot. See “Reserved Slots” on page 5-19.
CAUTION: Due to the abrasiveness of a cleaning cartridge, only perform a cleaning when the loader displays a message informing you to do so. Excessive cleaning can shorten the life of a drive.
NOTE: If the cleaning cartridge has expired, an expiration message is shown and the expired cartridge is returned to its slot. It must be replaced before the drive can be cleaned.
Running a Cleaning Cartridge Using the OCPUsually, when a cleaning is required, the cleaning cartridge is loaded at that time so the OCP is used to complete the cleaning. However, cleaning can also be handled remotely (see “Clean a Drive” on page 5-12).
10400179-101 07/2008 ©2006-2008 Overland Storage, Inc. 3-6

ARCvault 12 User Guide Daily Operation
1. Verify that a cleaning cartridge is loaded in the loader and the drive to be cleaned is empty.
2. From the OCP Default screen, select Utilities > Service > Clean Drive > OK (at the going offline message).
Figure 3-9: Clean Drive Option Screen
3. Select the slot where the cleaning tape is located (usually a Reserved slot):
a. With the From (Fr) field selected by default, use the left and arrows to select the source location type.
b. Use the right and arrows to select the source location number.
NOTE: If only one number is available for a type, the display doesn’t change. If no options are available for this location type, a dash (–) is displayed.
4. Press Execute to start the cleaning (or Back to cancel).A cleaning message is displayed (Figure 3-10). When the cleaning cycle completes, the loader returns the cleaning cartridge back to the same slot and the display returns to the Service options screen.
Figure 3-10: Cleaning Message
NOTE: If the tape selected is expired or not a cleaning tape, it is returned to the slot and an error message is displayed (Figure 3-11).
Figure 3-11: Sample Cleaning Tape Error Message
5. Press Back twice to return to the Default screen.
6. If desired, remove the cleaning cartridge.
10400179-101 07/2008 ©2006-2008 Overland Storage, Inc. 3-7

CHAPTER
4
10400179-101
Operator Control Panel
The Operator Control Panel (OCP) touch screen on the front of the ARCvault 12 (Figure 4-1) provides an easy way to directly communicate with the unit. By gently pressing the virtual buttons, you select menus and options to view or change settings.
Figure 4-1: OCP Touch Screen Location
NOTE: Some procedures are not available from the OCP touch screen and can only be accessed using the RMU (see Chapter 5, “Remote Management Utility”).
OverviewThe OCP touch screen is a 2.5” x 1.25” (6.4cm x 3.2cm) pressure-sensitive blue and light-gray screen. It provides text and graphic messages and, through the use of virtual buttons and sliders, allows users to make changes to current settings.
Some features are comprised of multiple screens. To move between these screens, use the and arrows. For status, help, and message screens that are larger than the OCP, use the scroll bar arrows on the right side to move up and down. Holding down the scroll arrow keys results in continuous scrolling. The Back button returns you to the previous screen.
Configurable items consist of a label on the left and a data field on the right. Pressing the data field opens a configuration screen. Changes are entered in the New data box using either the arrow buttons or a keypad. Press Save to apply the data or Cancel to return unchanged to the previous screen.
For most applications, the factory default settings are sufficient. If changes are needed, use the instructions provided in the following sections to adjust the settings to meet your specific needs.
ARC
-002
2
OCP Touch Screen
07/2008 ©2006-2008 Overland Storage, Inc. 4-1

ARCvault 12 User Guide Operator Control Panel
Startup ScreenThe Startup screen (Figure 4-2) appears when the unit is first powered on and POST begins. If a valid IP address is assigned, it alternates with the POST inventory status at the bottom of the screen. The default IP address is 10.0.0.1.
Figure 4-2: POST Screen
Default ScreenAfter approximately 2 minutes, when the loader has completed its POST process (including an inventory), the unit displays the Default menu screen (Figure 4-3) and is ready for use.
Figure 4-3: Default Screen
This screen provides the basic menu from which you can access most options, functions, and status screens of the ARCvault. You can also initiate a controlled shutdown or reboot of the unit from here.
Going OfflineMany of the following OCP operations require that the loader be taken offline. Any such operation is preceded by a warning message (Figure 4-4) with OK and Cancel response buttons. When the operation is complete and you return to the previous OCP screen, the loader automatically goes back online.
Figure 4-4: Going Offline Warning
10400179-101 07/2008 ©2006-2008 Overland Storage, Inc. 4-2

ARCvault 12 User Guide Operator Control Panel
OCP Software Map The following is a map (Figure 4-5) of the OCP screens and their organization:
Figure 4-5. OCP Menu Outline
Right (unlock/relock)Unlock/Relock All
Move Media[User]From (Fr)To
View Opts1
Library
SCSI/FC
Network
Edit Opts
Passwords [Admin]
Library [Admin]
1. View Opts settings are read -only .
Network [Admin]
Diagnostics [Admin]
Service [Admin]
Security (pwd validation)
Status
Reserved Slots
LCD Contrast
AdminUser
Init Elem StatusDev Capbl’s Page Len
Bar Code Reader Tries
Library Mode
Secure Web Login
Post Recvr’d ErrorsTapeAlert Mode
Report Elem TypeAbort Move Status
IP Addr AssignmentLibrary IP AddrIP MaskIP GatewayDNS ServerUser & FTP LoginAdmin Login
Admin RMU Access OK
Other Help
Help
Drive CycleCart Cycle
Screen CalibInventory
Error Log
Factory
ARC
-017
7
Right Mag
(Interactive cartridge map)
Admin (if set)User (if set)
Power Off Library[User]Reboot Library[User]
Power
Reserved Slots
LCD ContrastBar Code LabelBar Code AlignmentBar Code Check Digit
Setup
IP Addr AssignmentLibrary IP Addr2
IP Mask2
IP Gateway2
DNS Server2
Admin RMU Access OK
Mag Access[User]
2. Only visible if using Static IP addressing .
User = Security Level 1 protection available
Admin = Security Level 2 protection available
SCSI/FC [Admin]
Media
Rpt Bin ID for FC Drvs
Utilities
Cart Map
Library (info)Drive 1 (drive info)
Dr 1 (Drive 1 media info)
Drv 1 Bus ID
Drv 1 Bus ID
Reset User Defaults
Force Reconfig
Clean DriveAccess All Mags
Override Host Lock
Library Mode
Secure Web Login
10400179-101 07/2008 ©2006-2008 Overland Storage, Inc. 4-3

ARCvault 12 User Guide Operator Control Panel
Default Screen OptionsThe Default screen (Figure 4-6) consists of six buttons below a logo.
Figure 4-6: Default Screen
The buttons provide links to the most commonly used functions and options of the ARCvault unit (Table 4-1).
Power ButtonPressing the Power button displays the Power Menu that consists of a reboot option and a controlled power-down sequence (Figure 4-7). The power-down sequence provides enough time to park the shuttle and robotics assembly before shutting off the power. During either process, you are prompted to either confirm or cancel the option.
NOTE: The Reboot Library and Power Off Library options can be password protected at the User level. Note that the default User security setting for the unit is disabled. See “Passwords Button” on page 4-21 to activate a password.
Table 4-1: Options Available from the Default Screen
Virtual Button Result
Power Button Provides a reboot option and controlled power-down sequence.
Help Button Displays the Technical Support contact screens.
Media Menu Provides options for the physical handling of media. From this screen, you can release the media magazines or move media within the loader.
Status Menu Displays options to view the loader status screens. This includes the firmware version, serial number, drive status, and cartridge maps.
Setup Menu Shows the Setup screen with links to configure most of the settings for the loader.
Utilities Menu Provides access to service and diagnostic utilities.
10400179-101 07/2008 ©2006-2008 Overland Storage, Inc. 4-4

ARCvault 12 User Guide Operator Control Panel
Figure 4-7: ARCvault Power Options
Help ButtonPressing the Help button on the Default screen displays Overland-specific technical support information (Figure 4-8). To view all the information, press the arrow buttons.
Figure 4-8: Technical Support Help Screen (Complete Screen)
Press the Other Help button for additional contact information.
10400179-101 07/2008 ©2006-2008 Overland Storage, Inc. 4-5

ARCvault 12 User Guide Operator Control Panel
If you are having difficulty contacting your local service provider, contact Overland Storage directly. For further assistance, access Overland’s Technical Support website at http://support.overlandstorage.com. You can also access Overland’s general website at http://www.overlandstorage.com.
Media MenuThe Media Menu screen (Figure 4-9) provides ways to control the movement of tape media into, out of, and inside the ARCvault loader.
Figure 4-9: Media Menu Screen
Mag Access Button
IMPORTANT: Pressing this button takes the loader offline. To continue, press OK. When you exit the menu, the loader automatically goes back online.
NOTE: This screen can be password protected at the User-level security. The default User security setting is disabled. Refer to “Passwords Button” on page 4-21 to change it.
Pressing the Mag Access button displays the screen (Figure 4-10) controlling the lock that secures the right media magazine. Access to this magazine is gained by pressing either the specific magazine button or the Unlock All button.
Figure 4-10: Mag Access Screen
The ARCvault robotics and the Back button are disabled until the magazine is locked back in place. The removed magazine relocks automatically when it is reinserted into the unit. To relock the magazine if it was not removed, press the specific magazine button or the Relock All button (Figure 4-11).
10400179-101 07/2008 ©2006-2008 Overland Storage, Inc. 4-6

ARCvault 12 User Guide Operator Control Panel
Figure 4-11: Magazines Unlocked with Back Button Disabled
NOTE: If a magazine was removed from the library and not reinserted before relocking, a message is displayed indicating that magazine’s removal. Press OK to continue.
Pressing the Back button returns you to the Media screen and, if the Right magazine was removed, causes the loader to perform an inventory. Pressing Back again returns you to the Default screen.
Move Media Button
IMPORTANT: Pressing this button takes the loader offline. To continue, press OK. When you exit the menu, the loader automatically goes back online.
NOTE: This screen can be password protected at the User-level security. The default User security setting is disabled. Refer to “Passwords Button” on page 4-21 to change it.
The Move Media button displays the Move Media screen (Figure 4-12) used to move media to or from a tape drive or between magazine slots. The screen consists of To and From (Fr) data fields, up and down arrows, and Execute and Back buttons.
Figure 4-12: Move Media Screen Choices
As shown in Figure 4-12, the arrows on the left are used for changing the location type in the left side of the data fields, and the arrows on the right are used for changing the location number in the right side of the data fields.
These Arrows...
...Change The
These Arrows...
...Change TheLocation Type Location Number
“From” “To”Data Field Data Field
10400179-101 07/2008 ©2006-2008 Overland Storage, Inc. 4-7

ARCvault 12 User Guide Operator Control Panel
NOTE: If the location type has no available openings, a dash (—) is shown for the location number. If only one option is available for the location type, the location number doesn’t change. The location numbers start at the smallest number and wrap around at the top so, from the default starting number, press the down arrow to reach the higher numbers more quickly.
Move a Tape Cartridge1. At the OCP Default screen, press Media > Move Media > OK (at the going
offline message).
2. At the Move Media screen, select the source location:
a. With the default From (Fr) field selected, use the left and arrows to choose the source location type.
b. Use the right and arrows to select the source location number.
3. Select the destination:
a. Press the To field between the lower arrows.
b. Use the left and arrows to select the destination type.
c. Use the right and arrows to select the destination number.
4. Press Execute.Wait for the tape to be moved. You are automatically returned to the Media menu when done.
5. Press Back to return to the Default screen.
Status MenuWhen you press the Status button on the Default screen, the Status Menu is displayed (Figure 4-13). This screen provides buttons that let you view the general operational information about the loader. No security password is required to access these informational screens.
Figure 4-13: Status Menu Screen
There are three options offered on this screen:
Table 4-2: Move Media Location Type Options
Option Component Described
Drive Active tape drives
Slot Normal magazine slots
Rsrvd Reserved slots
10400179-101 07/2008 ©2006-2008 Overland Storage, Inc. 4-8

ARCvault 12 User Guide Operator Control Panel
Cart Map ButtonThe Cart Map screen (Figure 4-14) displays drive (Drv) buttons on the left and magazine (Mag) buttons on the right. Pressing one of these buttons provides access to media locations and information.
Figure 4-14: Cart Map Screen
Drive Data Field
If a tape is in the drive, either a striped blue box is shown indicating a tape with a bar code or a solid blue box is shown indicating a tape without a bar code. Pressing the tape drive button displays information concerning its loaded status. Figure 4-15 shows the possible messages:
Figure 4-15: Pressing Drive Screen Shows Tape Details
Magazine Data Field
Pressing a magazine button displays a map of the magazine slots (Figure 4-16) with blue boxes representing the tape media.
Table 4-3: Status Menu Options
Option Description
Cart Map Button Allows all users to view the current media information.
Library Button Displays the current status of key loader settings.
Drive Button Shows the current operational status of a drive.
(Displays)
(Displays)
(Displays)
10400179-101 07/2008 ©2006-2008 Overland Storage, Inc. 4-9

ARCvault 12 User Guide Operator Control Panel
Figure 4-16: Magazine Map
Pressing a slot with a striped blue box displays the bar code information of the media (Figure 4-17). Pressing a slot with a solid blue box displays “No bar code.” Pressing the bar code information box removes it from the screen.
Figure 4-17: Pressing Magazine Slot Shows Tape Details
If one or more reserved slots are configured, they are marked with an "r" followed by the reserved slot number.
Library ButtonThe Library button provides read-only access to general information (Figure 4-18) about the ARCvault unit. Use the and arrows to shift between screens.
Figure 4-18: Library Info Screen (Complete Screen)
(Displays)
(Displays)
10400179-101 07/2008 ©2006-2008 Overland Storage, Inc. 4-10

ARCvault 12 User Guide Operator Control Panel
The following table lists the items shown and provides a key to the abbreviations:
Drive ButtonThe Drive 1 button provides read-only access to information about several key items of that tape drive (Figure 4-19).
Figure 4-19: Sample Drive Info Screen (Complete Screen)
The following table lists the items shown and provides a key to the abbreviations:
Table 4-4: Library Info Screen Data
Option Meaning Description
FW Firmware Shows the current version number of the firmware.
SN Serial Number Displays the serial number for this unit.
Mode Library Mode Shows whether random or sequential mode is selected.
IP IP Address Provides the IP address assigned to the unit. This is the IP address used to access the RMU configuration software.
Addr Addressing Mode Displays if the IP address is static or dynamic.
Boot Boot Firmware Shows the revision level of the boot code.
HW Hardware Displays the revision level of the Controller card hardware.
MAC MAC Address Gives the MAC address for this unit.
Hrs Hours On Displays the total number of powered-on hours.
Table 4-5: Drive Info Screen Data
Option Description
Drive Mfg Displays the name of the drive’s manufacturer.
Drive Type Shows the tape technology used by the drive.
F/W Rev Provides the revision number of the drive firmware.
SCSI ID Gives the SCSI bus number assigned to the drive.
NOTE: Only visible if a SCSI drive is installed.
SCSI Drive SAS Drive
10400179-101 07/2008 ©2006-2008 Overland Storage, Inc. 4-11

ARCvault 12 User Guide Operator Control Panel
Setup MenuWhen you press the Setup button on the Default screen, the Setup Menu is displayed (Figure 4-20). This screen provides buttons that link you to all the OCP-configurable items. Anyone can view the settings but Admin-level security is required to make any changes to these items.
Figure 4-20: Setup Menu Screen
There are three options offered on this screen:
Drive State Shows the current drive state. Possible states are:• Idle• Cleaning• Loading• Unload'g (Unloading)• Active• Reading• Writing• Locating• Rewind'g (Rewinding)• Erasing• Format'g (Formatting)• Calibr'g (Calibrating)• Unknown
Cleaning Displays the current cleaning status of the drive:• OK—Normal operation• Requested—Will require cleaning soon but can still operate• Required—Requires cleaning but can still operate
H/W Comp Shows if hardware compression is Enabled or Disabled.
Error Status Provides the current drive functional status—OK, Warning, or Critical. Pressing the Error Status button provides more information about a Critical error condition.
Table 4-5: Drive Info Screen Data(Continued)
Option Description
10400179-101 07/2008 ©2006-2008 Overland Storage, Inc. 4-12

ARCvault 12 User Guide Operator Control Panel
View Opts ButtonPressing the View Opts button displays the View Options menu screen (Figure 4-21). This screen has three buttons for viewing the current settings for different sets of options as configured for your ARCvault loader. The displayed options are read-only and cannot be changed. No security password is required to access these screens.
Figure 4-21: View Options Screen
Library Button (View-Only)
The Library button provides read-only access to the ARCvault 12 primary settings and displays several screens of information in read-only format (Figure 4-22). Use the and arrows to shift between option screens.
Figure 4-22: View Library Options Screen
NOTE: To edit these options, refer to the Library button under Edit Opts (page 4-16).
Table 4-7 lists the items shown and provides brief descriptions:
Table 4-6: Setup Menu Options
Option Description
View Opts Button Allows all users to view the current configuration options in read-only mode.
Edit Opts Button Permits users with Administrator-level security to view and change many of the unit’s options.
Passwords Button Manages security access to different OCP options by using hexadecimal passwords.
10400179-101 07/2008 ©2006-2008 Overland Storage, Inc. 4-13

ARCvault 12 User Guide Operator Control Panel
Network Button (View-Only)
The Network button (Figure 4-23) provides read-only access to IP network settings and security. Use the and arrows to shift between screens.
Figure 4-23: View Network Options Screen
NOTE: To edit these options, refer to the Network button under Edit Opts (page 4-17).
Table 4-8 lists the items shown and provides brief descriptions.
Table 4-7: Viewable Loader Options
Option Description
Reserved Slots Shows the slots reserved to either store cleaning cartridges or to reduce the number of active slots to meet host software requirements.
Library Mode Indicates if the unit uses random or sequential tape selection mode.
LCD Contrast Shows the contrast setting between 0 and 63 for the LCD display.
Bar Code Label Size
Exhibits the maximum number of bar code characters (1–8) reported to both the host and the Cartridge Map.
Bar Code Alignment
Displays either Left or Right for the end of the bar code used when the specified number of characters reported (Bar Code Label setting) is less than the actual number of characters in the bar code.
Bar Code Check Digit
Shows whether or not the verification of a check digit character in the bar code label is enabled.
Bar Code Reader Denotes if the bar code reader has retries enabled or disabled.
Table 4-8: Viewable Network Options
Option Description
IP Addr Assignment
Displays the method used for setting the IP address of the loader’s protected RMU website.
Library IP Addr
Shows the static IP address used to access RMU.
NOTE: Only visible if the IP address assignment is set to Static.
IP Mask Displays the Subnet Mask address used to access RMU.
NOTE: Only visible if the IP address assignment is set to Static.
IP Gateway Specifies the Gateway IP address used to access RMU.
NOTE: Only visible if the IP address assignment is set to Static.
10400179-101 07/2008 ©2006-2008 Overland Storage, Inc. 4-14

ARCvault 12 User Guide Operator Control Panel
SCSI/FC Button (View-Only)
The SCSI/FC button provides read-only access to the SCSI or SAS settings. Pressing this button displays several read-only screens showing the different options currently used in the loader (Figure 4-24). Use the and arrows to shift between screens.
Figure 4-24: View SCSI Options Screen
NOTE: To edit the Drv n Bus ID option, refer to the SCSI/FC button under Edit Opts (page 4-20). All other options are only editable using the RMU.
Table 4-9 lists the items shown and provides brief descriptions.
DNS Server Lists the DNS server address used with a static IP address.
NOTE: Only visible if the IP address assignment is set to Static.
Secure Web Login
Shows whether the secure Java (Yes) or standard HTML (No) login screen is being used to access the RMU.
Admin RMUAccess OK
Denotes if Administrator security access to the RMU is allowed.
Table 4-9: Viewable SCSI/FC Options
Definition Option and Default Description
Drv 1 Bus ID Allows you to view the SCSI address of the drive.
NOTE:
Init ElemStatus
Displays the loader’s response to the SCSI Initialize Element Status command.
Dev Capbl’sPage Len
Shows if the unit uses Short or Long lengths of the Mode Sense/Select Device Capabilities Page.
Post Recvr’dErrors
Specifies the setting for a TapeAlert informational exception.
TapeAlert Mode
Details the conditions for logging and reporting a TapeAlert data options.
Abort Move Status
Displays the loader’s response if it receives a SCSI Reset or Abort command while a Move Medium command is in progress.
Table 4-8: Viewable Network Options(Continued)
Option Description
10400179-101 07/2008 ©2006-2008 Overland Storage, Inc. 4-15
ARCvault 12 User Guide Operator Control Panel
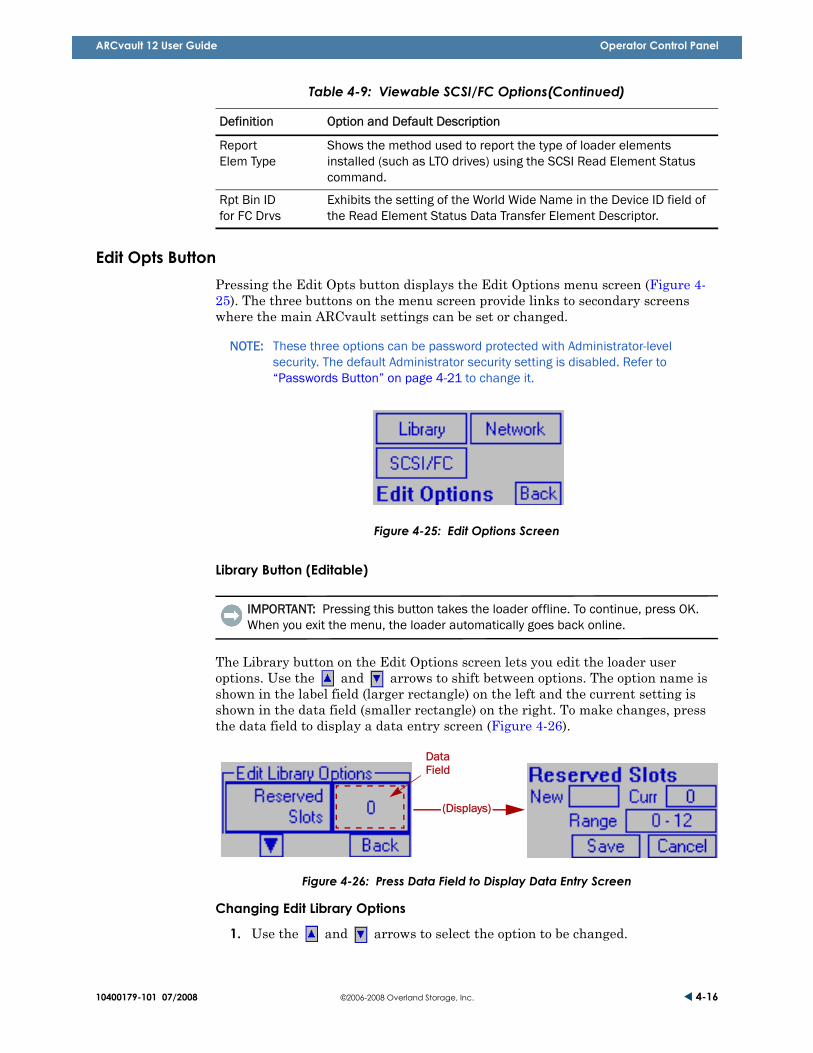
Edit Opts ButtonPressing the Edit Opts button displays the Edit Options menu screen (Figure 4-25). The three buttons on the menu screen provide links to secondary screens where the main ARCvault settings can be set or changed.
NOTE: These three options can be password protected with Administrator-level security. The default Administrator security setting is disabled. Refer to “Passwords Button” on page 4-21 to change it.
Figure 4-25: Edit Options Screen
Library Button (Editable)
IMPORTANT: Pressing this button takes the loader offline. To continue, press OK. When you exit the menu, the loader automatically goes back online.
The Library button on the Edit Options screen lets you edit the loader user options. Use the and arrows to shift between options. The option name is shown in the label field (larger rectangle) on the left and the current setting is shown in the data field (smaller rectangle) on the right. To make changes, press the data field to display a data entry screen (Figure 4-26).
Figure 4-26: Press Data Field to Display Data Entry Screen
Changing Edit Library Options
1. Use the and arrows to select the option to be changed.
Report Elem Type
Shows the method used to report the type of loader elements installed (such as LTO drives) using the SCSI Read Element Status command.
Rpt Bin ID for FC Drvs
Exhibits the setting of the World Wide Name in the Device ID field of the Read Element Status Data Transfer Element Descriptor.
Table 4-9: Viewable SCSI/FC Options(Continued)
Definition Option and Default Description
DataField
(Displays)
10400179-101 07/2008 ©2006-2008 Overland Storage, Inc. 4-16

ARCvault 12 User Guide Operator Control Panel
2. Press the option’s data field.
3. Press the New data field.
4. Using the pop-up keypad, enter the new data (see Table 4-10) and press OK.The keypad closes and the data is shown in the New field.
5. Press Save to execute (or Cancel to return to the menu).
6. At the confirmation message, press OK.The change goes into effect immediately unless you are changing the number of Reserved slots which requires an immediate reboot.
Table 4-10 shows the different Edit Library Options available:
Network Button (Editable)
IMPORTANT: Pressing this button takes the loader offline. To continue, press OK. When you exit the menu, the loader automatically goes back online.
The Network button on the Edit Options screen lets you edit the network user options. The current option setting is shown in the data field (rectangle) to the right of the option label. To make changes, press the data field to display a data entry screen (Figure 4-27).
Table 4-10: Editable Loader Options
Option Description
Reserved Slots Lets you reserve up to 11 slots. The slots are reserved from the last slot forward, and are numbered with an “r” prefix on the Cartridge Map and Status screens.
The reserved slots can be used to either store cleaning cartridges or reduce the number of active slots to meet host software requirements.
Edit: Press the New data field. At the pop-up keyboard, enter a number between 0 and 12, and press OK. Press Save.
Default: 0.
Library Mode Lets you change the tape access mode from random to sequential to emulate an autoloader. Requires an immediate reboot.
Edit: Press either Rand (random) or Seq (sequential), and press OK.
Default: Rand.
LCD Contrast Lets you increase or decrease the contrast of the LCD display. The incremental steps range from 0 (darkest) to 63 (lightest).
Pressing the arrow increases the number in the New field and lightens the screen. Pressing the arrow decreases the number and darkens the screen.
Edit: Press the New data field, use the and arrows to change the number in the New data field, and then press Save.
Default: 32.
10400179-101 07/2008 ©2006-2008 Overland Storage, Inc. 4-17

ARCvault 12 User Guide Operator Control Panel
Figure 4-27: Press Data Field to Display Network Data Entry Screen
IMPORTANT: To activate all the Static IP address options, you must first change the IP Addr Assignment setting from DHCP to Static. Only then can the four static IP
address settings (Library IP, IP Mask, IP Gateway, and DNS Server) be edited. The Static address changes do not take effect until the unit is rebooted.
Changing Edit Network Options
1. Use the and arrows to select the option to be changed.
2. Press the option’s data field.
3. Press the New data field.
NOTE: The two exceptions are IP Addr Assignment and Disable Admin Web Access. For either of those options, just press an option button located below the New field, and then continue with Step 5.
4. Using the pop-up keypad, enter the new data (see Table 4-11) and press OK.The keypad closes and the new data is shown in the New field.
5. Press OK to return to the Edit Network Options.
6. Repeat Steps 1–5 for any other Network changes.
7. When ALL changes to Network options are made, press Save (or Cancel).
8. At the reboot message, press OK.
9. At the Edit Options screen, press Back twice to return to Default screen.
10. Press Power > Reboot Library > OK (at the reboot message).
Table 4-11 shows the different Edit Network Options available.
DataField
(Displays)
10400179-101 07/2008 ©2006-2008 Overland Storage, Inc. 4-18
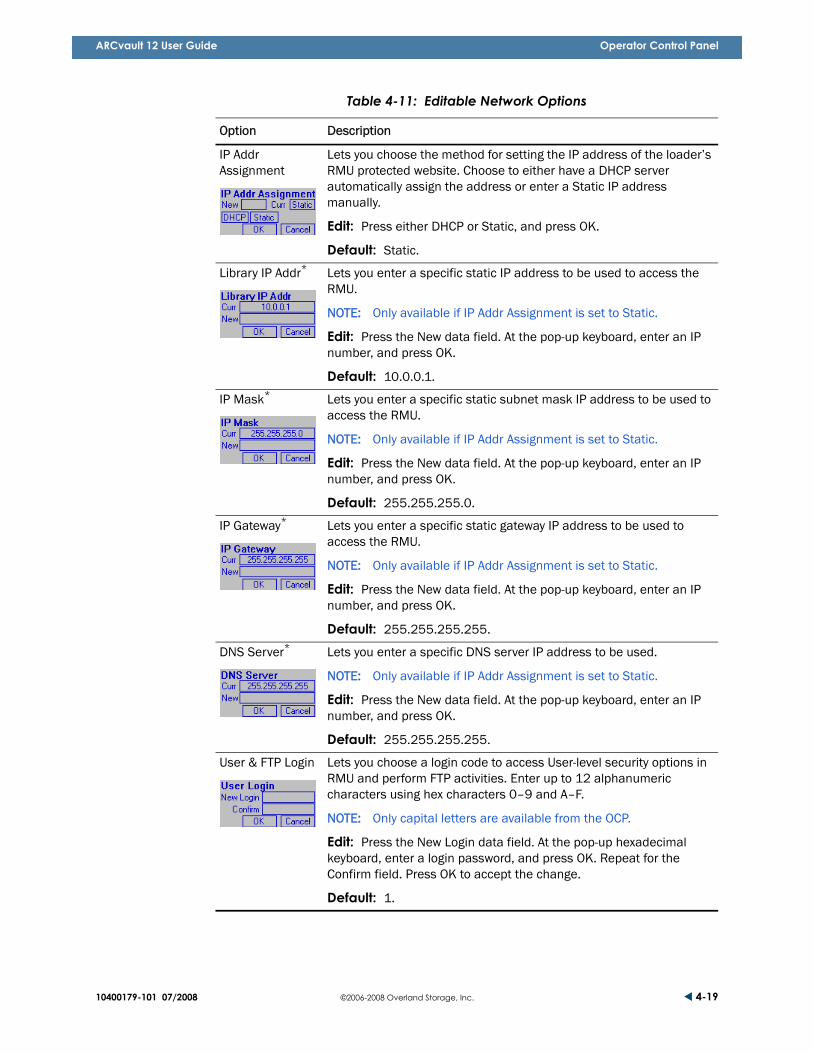
ARCvault 12 User Guide Operator Control Panel
Table 4-11: Editable Network Options
Option Description
IP Addr Assignment
Lets you choose the method for setting the IP address of the loader’s RMU protected website. Choose to either have a DHCP server automatically assign the address or enter a Static IP address manually.
Edit: Press either DHCP or Static, and press OK.
Default: Static.
Library IP Addr* Lets you enter a specific static IP address to be used to access the RMU.
NOTE: Only available if IP Addr Assignment is set to Static.
Edit: Press the New data field. At the pop-up keyboard, enter an IP number, and press OK.
Default: 10.0.0.1.
IP Mask* Lets you enter a specific static subnet mask IP address to be used to access the RMU.
NOTE: Only available if IP Addr Assignment is set to Static.
Edit: Press the New data field. At the pop-up keyboard, enter an IP number, and press OK.
Default: 255.255.255.0.
IP Gateway* Lets you enter a specific static gateway IP address to be used to access the RMU.
NOTE: Only available if IP Addr Assignment is set to Static.
Edit: Press the New data field. At the pop-up keyboard, enter an IP number, and press OK.
Default: 255.255.255.255.
DNS Server* Lets you enter a specific DNS server IP address to be used.
NOTE: Only available if IP Addr Assignment is set to Static.
Edit: Press the New data field. At the pop-up keyboard, enter an IP number, and press OK.
Default: 255.255.255.255.
User & FTP Login Lets you choose a login code to access User-level security options in RMU and perform FTP activities. Enter up to 12 alphanumeric characters using hex characters 0–9 and A–F.
NOTE: Only capital letters are available from the OCP.
Edit: Press the New Login data field. At the pop-up hexadecimal keyboard, enter a login password, and press OK. Repeat for the Confirm field. Press OK to accept the change.
Default: 1.
10400179-101 07/2008 ©2006-2008 Overland Storage, Inc. 4-19

ARCvault 12 User Guide Operator Control Panel
SCSI/FC Button (Editable)
IMPORTANT: Pressing this button takes the loader offline. To continue, press OK. When you exit the menu, the loader automatically goes back online.
The SCSI/FC button on the Edit Options screen lets you edit the SCSI or SAS drive bus ID. The current option setting is shown in the data field (rectangle) to the right of the option label. To make changes, press the data field to display a data entry screen (Figure 4-28).
Figure 4-28: Press Data Field to Display SCSI/FC Data Entry Screen
AdministratorLogin
Lets you choose a login code to access Administrator-level security options in RMU. Enter up to 12 alphanumeric characters using hex characters 0–9 and A–F.
NOTE: Only capital letters are available from the OCP.
Edit: Press the New Login data field. At the pop-up hexadecimal keyboard, enter a login password, and press OK. Repeat for the Confirm field. Press OK to accept the change.
Default: 2.
SecureWeb Login
Lets you set whether a secure Java login screen or standard HTML login screen is used to access the RMU. The options are Yes or No.
Selecting Yes turns on the Java screen. Selecting No results in the HTML screen being used.
Edit: Press either Yes or No, and press OK.
Default: Yes.
Admin RMUAccess OK
Lets you prevent others from accessing the loader remotely with Administrator level security. The options are Yes or No.
NOTE: This can be used to prevent configuration changes from being made remotely.
Selecting No prevents Administrator security access of the RMU. Only User security is allowed thus limiting remote access to only the Status and History screens.
Edit: Press either Yes or No, and press OK.
Default: Yes.
*These options are only valid if the IP Addr Assignment option is Static. Otherwise, they read "DHCP" and are inactive.
Table 4-11: Editable Network Options(Continued)
Option Description
DataField
(Displays)
10400179-101 07/2008 ©2006-2008 Overland Storage, Inc. 4-20

ARCvault 12 User Guide Operator Control Panel
Changing SCSI/FC Options for a SCSI or SAS Drive
If a SCSI or SAS drive is installed, use this procedure to configure the Bus ID for that drive.
1. Press the data field to the right of the option label to open the data entry screen.
2. Press the data field to the right of the option label to open the data entry screen.
3. Press the New data field.
4. Using the pop-up keypad, enter the new data (see Table 4-12) and press OK.The keypad closes and the data is shown in the New field.
5. Press Save to execute (or Cancel to return to the menu).
6. At the confirmation message, press OK.The change goes into effect immediately.
Table 4-12 shows the different Edit SCSI/FC Options available.
Passwords ButtonThe Password button lets you to control access to most of the loader OCP functions by creating and managing hexadecimal passwords. Two pre-defined levels of user security exist—User and Administrator (Admin) security levels (Figure 4-29).
IMPORTANT: By default, the passwords for User and Admin OCP security levels are disabled.
Figure 4-29: Edit Passwords Screen
You can create, change, or delete passwords at this screen. Each password is a number from 1 to 9999 that is stored in non-volatile memory.
You can use a higher level password to gain access to lower level functions. For example, you can use an Admin password to access the User-level Move Media operation. However, if the higher Admin-level password is not set, Admin functions can be accessed without a password even when the User password is set.
Table 4-12: Editable SCSI Options
Definition Option and Default DescriptionDrv n Bus ID Lets you set the SCSI bus address of the drive.
Edit: Press the New data field. At the pop-up keyboard, enter a number between 0 and 15, and press OK.
Default: The default address is Drive 1 = ID 1.
10400179-101 07/2008 ©2006-2008 Overland Storage, Inc. 4-21

ARCvault 12 User Guide Operator Control Panel
Creating or Changing Passwords
1. At the Password screen, press either User or Admin.
2. Press the NewPwd data field to open the Numeric Keypad.
Figure 4-30: Numeric Keypad for Passwords
3. Enter 1 to 4 digits and press OK.The passwords are limited to only four digits and leading zeros are ignored (0011 is the same as 11). Entering a string of one or more zeros clears any existing password. Use the less than sign (<) to delete the last number, X to clear the data field, and the return symbol ( ) to cancel.
4. Touch the Confirm data field to reopen the Numeric Keypad.
5. Reenter the same 1–4 digits and press OK.
6. Press Save to set the password (or Back to cancel).Wait while the setting is changed. The asterisks will blink once when done.
7. At the confirmation dialog box, press OK.
Disabling Password Verification
1. At the Password screen, press either User or Admin.
2. Press the NewPwd data field to open the Numeric Keypad.
3. Enter 0 and press OK.
4. Touch the Confirm data field to reopen the Numeric Keypad.
5. Reenter 0 and press OK.
6. Press Save (or Back to cancel).Wait while the setting is changed. The asterisks will blink once when done.
7. At the confirmation dialog box, press OK.
Password Usage
Whenever you try to access a password-protected button, a password entry screen appears (Figure 4-31).
Figure 4-31: Password Entry Screen for an Admin Password
(Displays)
PressHere
10400179-101 07/2008 ©2006-2008 Overland Storage, Inc. 4-22

ARCvault 12 User Guide Operator Control Panel
The level of password required for the OCP screen being accessed shows on the left side. Press the Enter Pwd data field, enter the password using the pop-up keyboard, press OK, and press Validate to continue.
NOTE: Whenever you return to the top level Default screen, all levels of password access are cleared. You must reenter the passwords to re-access the protected features.
Utilities MenuNOTE: Service and Diagnostics options can be password protected with Admin security.
The default Admin security setting is disabled. Refer to “Passwords Button” on page 4-21 to change it.
The three buttons on the Utilities menu provide special maintenance and diagnostics for managing the loader (Figure 4-32).
Figure 4-32: Utilities Options Screen
Service Button
IMPORTANT: Pressing any button on either submenu screen takes the loader offline. Press OK at the going offline message to continue. When you exit the menu,
the loader automatically goes back online.
The Service button displays a submenu of buttons to address the general loader service functions (Figure 4-33). Use the and arrows to shift between screens. Press a function button to access that option.
Figure 4-33. Service Screens
10400179-101 07/2008 ©2006-2008 Overland Storage, Inc. 4-23

ARCvault 12 User Guide Operator Control Panel
Table 4-13 shows the different Utilities Service options available.
Diagnostics Button
IMPORTANT: Pressing this button takes the loader offline. To continue, press OK. When you exit the menu, the loader automatically goes back online.
The Diagnostics button displays a submenu of buttons that pertain to checking loader performance (Figure 4-34). Use the and arrows to shift between screens. Press a function button to access that option.
Table 4-13: Service Submenu Button Functions
Option Description
Clean Drive When Execute is pressed, the unit moves the selected cleaning cartridge to the selected drive. When the cleaning cycle is finished, the cleaning cartridge is moved back to the original slot.
NOTE: If the cleaning cartridge is expired or the tape is not a cleaning cartridge, it is immediately returned to the original slot and an error message is displayed.
Edit: Verify the From (Fr) slot is a slot with a cleaning cartridge, the To slot is the drive being cleaned, and press Execute.
Default: The first Reserved slot, the first I/E Element slot, or the first slot with media (in that order) as the From default and the Drive as the To default.
Access All Mags Displays the screen controlling the lock that secures the right media magazine. Access is the same as using the “Mag Access Button” on page 4-6.
NOTE:
Force Reconfig Forces an immediate reconfiguration of the loader to match the current physical configuration. For use when permanently removing a drive so that the elements are renumbered.
Override Host Lock(no secondary screen)
Overrides a Host Prevent Media Removal lockout state preventing magazine access when the host is not available.
NOTE: After accessing the magazines, cycle the library power to restore normal operation.
Set User Defaults Resets user options stored in non-volatile memory back to the factory default values. The loader immediately reboots upon completion.
NOTE: Network settings are not changed so communications to the loader are not affected.
10400179-101 07/2008 ©2006-2008 Overland Storage, Inc. 4-24

ARCvault 12 User Guide Operator Control Panel
Figure 4-34. Diagnostics Screens
NOTE: After running either a Cart Cycle or Drive Cycle diagnostics, the host software should perform an inventory to update its cartridge map.
The following table details the diagnostic functions that can be accessed using the Diagnostics submenu:
Table 4-14: Diagnostics Submenu Button Functions
Option Description
Cart Cycle When Start is pressed, the unit randomly moves cartridges between active slots within the loader. This process continues until the Stop button is pressed.
Drive Cycle When Start is pressed, the unit loads a cartridge into the drive and then randomly moves a cartridge within the loader.
It then removes the cartridge from the drive and randomly moves another cartridge within the loader.
The entire cycle repeats until the Stop button is pressed.
NOTE: Reserved slots are ignored for this diagnostic.
Inventory
(no secondary screen)
Forces an immediate inventory of the loader. The message “Inventory in progress...” is displayed during this process.
Screen Calib Provides two screens to calibrate the touch screen of the loader. Press Screen Calib, press the boxed X at the lower left of the screen, and press the boxed X at the upper right.
Error Log Shows a list of Fault Symptom Codes and the powered-on time at which they occurred. Use the arrows buttons to scroll through the list.
10400179-101 07/2008 ©2006-2008 Overland Storage, Inc. 4-25

ARCvault 12 User Guide Operator Control Panel
Security ButtonUse the Security button (Figure 4-35) to set the security access level for the loader by validating a password. This provides access to different menu items based on their security level. The current validated level is shown on the upper right.
Figure 4-35: Security Screen
NOTE: If a password does not exist for a security level, that level is not shown on the left.
Once a password is validated and the security level is set, it remains in effect until the Default screen is reaccessed. User- and Admin-security levels are then cleared and, if active, must be reentered before protected menu screens can be re-accessed.
Validate a Password and Determine Its Level
1. Press one of the security level buttons on the left.
2. Press the Pwd data field to open the Decimal Keypad.
3. Enter the 1–4 digit password for that security level, and press OK.
4. Press Validate to check the password (or Back to cancel).
5. Do one of the following:• If the password is correct, make a note of the security level flashing
on-screen.• If the password is wrong, at the error dialog box, press OK.
6. Press Back to exit the Password screen.
IMPORTANT: For information about the different security levels and access points, refer to “Interface Security Levels” on page 1-5.
CurrentValidatedLevel forHighlightedPassword
10400179-101 07/2008 ©2006-2008 Overland Storage, Inc. 4-26

CHAPTER
5
10400179-101
Remote Management Utility
The ARCvault Remote Management Utility (RMU) is an interface built into the ARCvault 12 that provides remote access to and configuration of the loader through an Ethernet port. It hosts a dedicated, protected web site that can be accessed by a web browser using the IP address assigned to the ARCvault unit. The default IP address is 10.0.0.1.
Access is available either from a PC connected to your network or via the World Wide Web using the default HTTP port 80.
NOTE: If connecting a laptop directly to the unit to access the RMU site, use either a auto-MDIX port or crossover Ethernet cable plugged into the Ethernet port at the rear of the unit.
The RMU default Login page uses Java-based encrypted HTTP authentication that encrypts the password sent to the unit. The RMU firmware uses standard HTML-based pages that are served to a web browser. The password used to log in determines the level of access permitted.
NOTE: Physical options, such as tape removal, can only be accessed using the OCP touch screen.
RMU UsageThe RMU interface uses interactive tabs to access different web pages for configuring the loader. In order to use RMU, you must have the following available:
• 10/100BASE-T Ethernet network• ARCvault IP address (Default = 10.0.0.1)• Host computer with Ethernet port• Internet Explorer (3.0 or higher), Firefox (1.0 or higher), or Netscape (3.0 or
higher) browser with Java and FTP configured
07/2008 ©2006-2008 Overland Storage, Inc. 5-1
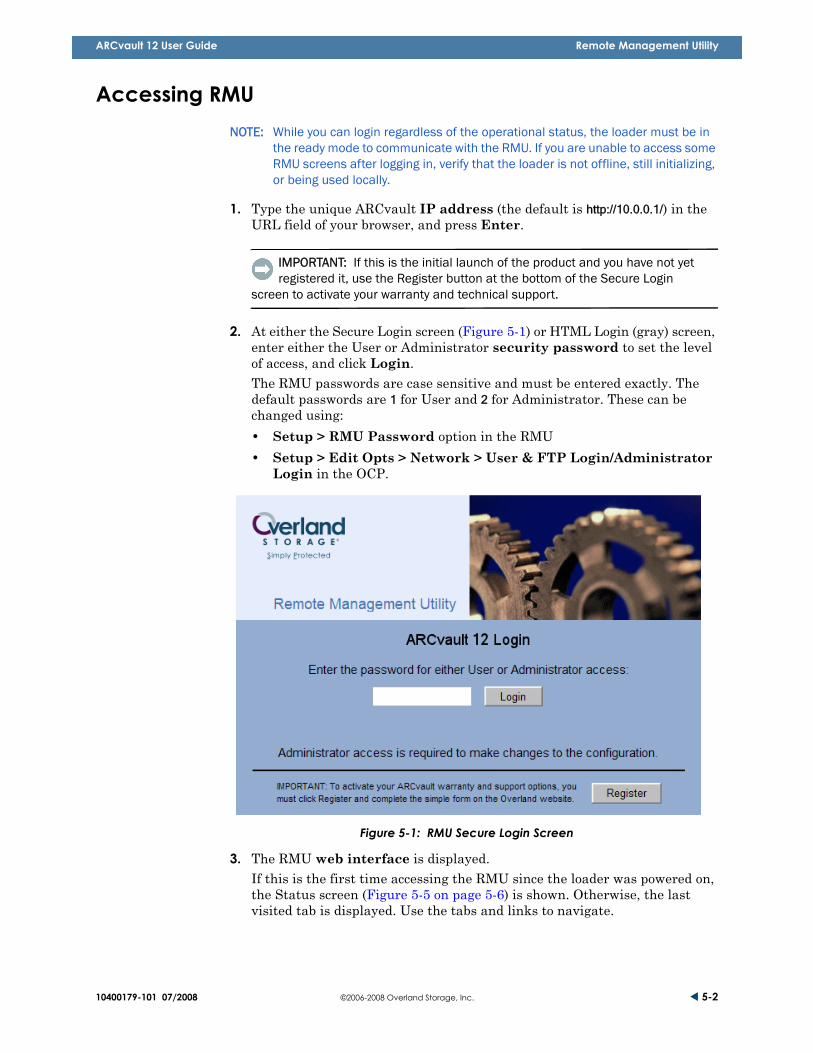
ARCvault 12 User Guide Remote Management Utility
Accessing RMUNOTE: While you can login regardless of the operational status, the loader must be in
the ready mode to communicate with the RMU. If you are unable to access some RMU screens after logging in, verify that the loader is not offline, still initializing, or being used locally.
1. Type the unique ARCvault IP address (the default is http://10.0.0.1/) in the URL field of your browser, and press Enter.
IMPORTANT: If this is the initial launch of the product and you have not yet registered it, use the Register button at the bottom of the Secure Login
screen to activate your warranty and technical support.
2. At either the Secure Login screen (Figure 5-1) or HTML Login (gray) screen, enter either the User or Administrator security password to set the level of access, and click Login.The RMU passwords are case sensitive and must be entered exactly. The default passwords are 1 for User and 2 for Administrator. These can be changed using:• Setup > RMU Password option in the RMU• Setup > Edit Opts > Network > User & FTP Login/Administrator
Login in the OCP.
Figure 5-1: RMU Secure Login Screen
3. The RMU web interface is displayed.If this is the first time accessing the RMU since the loader was powered on, the Status screen (Figure 5-5 on page 5-6) is shown. Otherwise, the last visited tab is displayed. Use the tabs and links to navigate.
10400179-101 07/2008 ©2006-2008 Overland Storage, Inc. 5-2

ARCvault 12 User Guide Remote Management Utility
NOTE: After 15 minutes of inactivity, the web session is automatically logged out and the security level is reset to off. However, if the Status page has auto-refresh turned on, it will continue to stay active until you either log out or view a different page for more than 15 minutes without activity.
RMU NavigationEach RMU page consists of two frames—a top navigational frame and a lower data frame. The RMU tabs and links in the top frame (Figure 5-2) provide easy access to different web pages for viewing information and configuring options. The loader name is displayed above the tabs on all pages (see the section “Library Configuration” on page 5-18 on changing the name).
Figure 5-2. RMU Top Frame
IMPORTANT: Do not use the browser’s Back button to return to a previous screen. Always use the tabs to ensure the dynamic data is refreshed and displayed
correctly.
NOTE: If the loader is busy, a message is displayed instead of the tab options.
Access to the various RMU web pages is controlled by the level of security set when initially logging into the RMU:
• User-level access – view Status and History tabs only.• Administrator-level access – view, configure, and use all RMU functions,
move media, and set or change the User-level password.
Use Table 5-1 to determine what options are available and the security levels required for accessing them.
Table 5-1: RMU Navigation Tab Descriptions & Security Levels
Tab/Link Functionality or Access Security
Status Tab Displays visual representations of the drive and magazine, loader status chart, and drive status chart. Holding the mouse over a media icon temporarily displays the bar code information. A drop-down list provides access to detailed drive and loader data.
All Levels
Media Tab Lets you load or remove media from a tape drive, or move media to different slots within the loader.
Administratoronly
Setup Tab Provides access to most loader configuration parameters.
Administratoronly
Functions Tab Offers maintenance and diagnostic options for the loader. A Reboot button is also available on this screen.
Administratoronly
10400179-101 07/2008 ©2006-2008 Overland Storage, Inc. 5-3

ARCvault 12 User Guide Remote Management Utility
General Procedure for Changing RMU Settings1. Click the appropriate navigation tab to display the functionality to be
configured.
CAUTION: Clicking a button may cause the loader to go offline possibly interrupting host requests. Once you exit the menu item, the loader automatically goes back online.
2. If the Library to go Offline message screen (Figure 5-3) is displayed, do the following:
Figure 5-3: RMU Confirmation Screen
a. If desired, check one or both of the following options.• If you no longer want this message prompt to appear, check the first
box.• If you want the function to be executed even if the loader is busy,
check the second box.
b. Click Confirm to continue (or Cancel to terminate the process).
3. Follow the on-screen instructions. In most cases, when you are done, click Submit.If necessary, click a button on the main page to access a subpage of options.
4. To return to a main menu page, click the same navigational tab again.
History Tab Gives you access to view or download loader trace logs and provides an automated service ticket process.
All Levels
Help Link Provides access to a PDF version of this user guide. All Levels
Logout Link Disconnects from RMU and resets the security level to off.
All Levels
Table 5-1: RMU Navigation Tab Descriptions & Security Levels (Continued)
Tab/Link Functionality or Access Security
10400179-101 07/2008 ©2006-2008 Overland Storage, Inc. 5-4

ARCvault 12 User Guide Remote Management Utility
RMU Software Map This is a map (Figure 5-4) of the RMU screens:
Figure 5-4. RMU Software Map
Setup [Admin]
Status (User)
Operation Status
Detailed Reports
OCP Security PasswordsOCP User PasswordOCP Admin Password
Network
Dynamic IP Address
IP AddressSubnet MaskDefault GatewayDNS Server
RMU Security Passwords
Library Configuration
Notification Registration
Static IP Address
Drive Configuration
SCSI Configuration
Library Name
Reserved Slots
Bar Code Label SizeBar Code Label AlignmentBar Code Label Check Digit
Auto Clean Mode
Update Library FW - HTTP
Run a Library Diagnostic
Reboot Library
Trap Version
Functions[Admin]
Initialize Element StatusAbort Move StatusReport Element Type
Vendor Identification
Product Identification
Device Cap. Page Length
Post Recovered ErrorsTapeAlert Mode
Drive Number
E-Mail Addresses
SNMP Notification
Trap Community NameGet Community NameSet Community Name
Trap Address 3Trap Address 4
Trap Address 1Trap Address 2
Display a Lib. Trace Log
Download Lib. Trace Log File
SCSI ID
E-Mail Addr. 4From Address
E-Mail Addr. 2E-Mail Addr. 3
E-Mail Addr. 1
Attach Trace File to E-mail
Number of Enabled Slots
History (User)
DiagnosticTime to Run
Full TraceDiagnostic Trace
Full TraceDiagnostic Trace
ARC
-018
0
Reset to Defaults
Update Drive FW - HTTP
Select DriveUpdate Library FW - FTP
Retrieve File FromUpdate Drive FW - FTP
Select Drive
Retrieve File From
Custom Vendor ID
Custom Product ID
(Drive Status)(Interactive Cart Map)
Check Firmware Rev. LevelSend a Test E-Mail
Send a Support Ticket
Auto-Refresh
Library Health
Library StatusDrive 1 Status
(Library Status)
Browse (for File)
Browse (for File)
Reconfigure Library
Clean a Drive
SourceDestination
Cleaning Tape LocationDrive to Clean
(Interactive Cart Map)
Media [Admin]
Move a Tape Cartridge
Inventory Library
Remote FTP ServerAddress (Server)User ID
Initial DirectoryUse Passive Mode
Password
Unlock LibraryConfiguration
E-Mail ServerWarning Level
RMU Administrator PwdRMU User Password
Disable RMU Admin. Access
Bar Code Reader Tries
Library Mode
Inventory Method
10400179-101 07/2008 ©2006-2008 Overland Storage, Inc. 5-5

ARCvault 12 User Guide Remote Management Utility
Status TabThe Status tab displays visual representations of components (Figure 5-5), general information, statuses, and reports about the loader. If necessary, scroll to see all the information on the page.
Figure 5-5. RMU Status Screen
Table 5-2 provides details on the information presented on the Status screen:
Table 5-2: RMU Status Screen Features
Item Description
Operational Status Shows the current operational state.• Normal – Fully functional with no operational issues.• Warning – Errors detected but unit still operational.• Critical – Unit no longer functions due to a critical error.
Clicking the underlined status state displays the Detailed Library Health screen.
Library Status Shows general information about the loader and its firmware.
See “Library Status Information” for more information.
10400179-101 07/2008 ©2006-2008 Overland Storage, Inc. 5-6

ARCvault 12 User Guide Remote Management Utility
Status Page Media MapThe media map shows a graphic representation of the magazines and drives installed in the loader. It also shows if a tape cartridge is in a drive or slot. When the mouse is positioned over a tape icon with a bar code, the actual bar code is temporarily displayed.
Detailed Reports Use the drop-down menu to select one of the following detailed reports:• Library Health• Library Status• Drive 1 Status
See “Detailed Reports” for more information.
Slot and Drive Media Map
Visual display of the magazines and drives showing the locations of the tape media. Holding the mouse over the tape icon temporarily displays the actual bar code.
See “Status Page Media Map” for more information.
Drive Status Summary
Displays a summary of key drive information for each drive.
See “Drive Status Summary Table” for more information.
Refresh Options You can configure an automatic refresh setting for the Status screen. Options of 1-, 2-, or 5-minute refreshes are available.
Default: Off
Table 5-2: RMU Status Screen Features(Continued)
Item Description
Table 5-3: Graphics Used on Media Map
Graphic Description
Drive bay configured for a single half-height tape drive.
The tape drive shows that it does not contain a tape cartridge. Mouse-over temporarily displays “No Tape Loaded.”
The drive number is shown on the right. Since the bottom half of the drive bay is not configured, it is blank.
Represents a slot containing a tape cartridge with a bar code label. Mouse-over temporarily displays the actual bar code.
Represents a slot containing a tape cartridge with no label. Mouse-over temporarily displays the “No Bar Code.”
Represents an empty slot. Mouse-over temporarily displays the “Empty Slot.”
10400179-101 07/2008 ©2006-2008 Overland Storage, Inc. 5-7

ARCvault 12 User Guide Remote Management Utility
Library Status InformationThe Library Status table shown on the Status page includes the current loader state.
Figure 5-6: Library Status Table Showing Current Library Status
Detailed ReportsLocated in the upper right corner of the Status screen is the Detailed Reports option (Figure 5-7).
Represents a reserved slot that is being used either for cleaning cartridges or for slot reduction to facilitate the host software. Mouse-over works the same as regular slots.
When a media magazine is completely removed from the loader, “Removed” is displayed in every slot of the magazine.
Table 5-3: Graphics Used on Media Map(Continued)
Graphic Description
Table 5-4: Library Status Table’s Library Status Field Details
Displayed Status Description
Library Initialization Performing POST and startup inventory.
Library Idle Ready mode.
Cartridge Fetch Moving a tape cartridge to a drive.
Moving Cartridge Returning a tape cartridge to a storage slot.
Taking Inventory Performing an inventory of tape cartridges in the unit.
Shuttle Parked During Power Off, the shuttle is moved to the Home position.
Checking Drives Initializing the drives.
Orphaned Cartridge Found a tape cartridge where none was suppose to exist.
10400179-101 07/2008 ©2006-2008 Overland Storage, Inc. 5-8

ARCvault 12 User Guide Remote Management Utility
Figure 5-7: Selecting a Detailed Report
Use the drop-down menu to select which report you want to view. The detailed report is shown on its own screen. There are three report options:
• Detailed Library Health report (Figure 5-8)• Detailed Library Status report (Figure 5-9)• Detailed Drive Status report (Figure 5-10)
NOTE: The Detailed Drive Status displays five additional tape-related items only when a tape is loaded in the drive (Figure 5-11 and Figure 5-11).
Figure 5-8: Detailed Library Health Report
Figure 5-9: Detailed Library Status Report
Figure 5-10: Detailed Drive Status Report for SCSI Drive (With No Tape)
10400179-101 07/2008 ©2006-2008 Overland Storage, Inc. 5-9
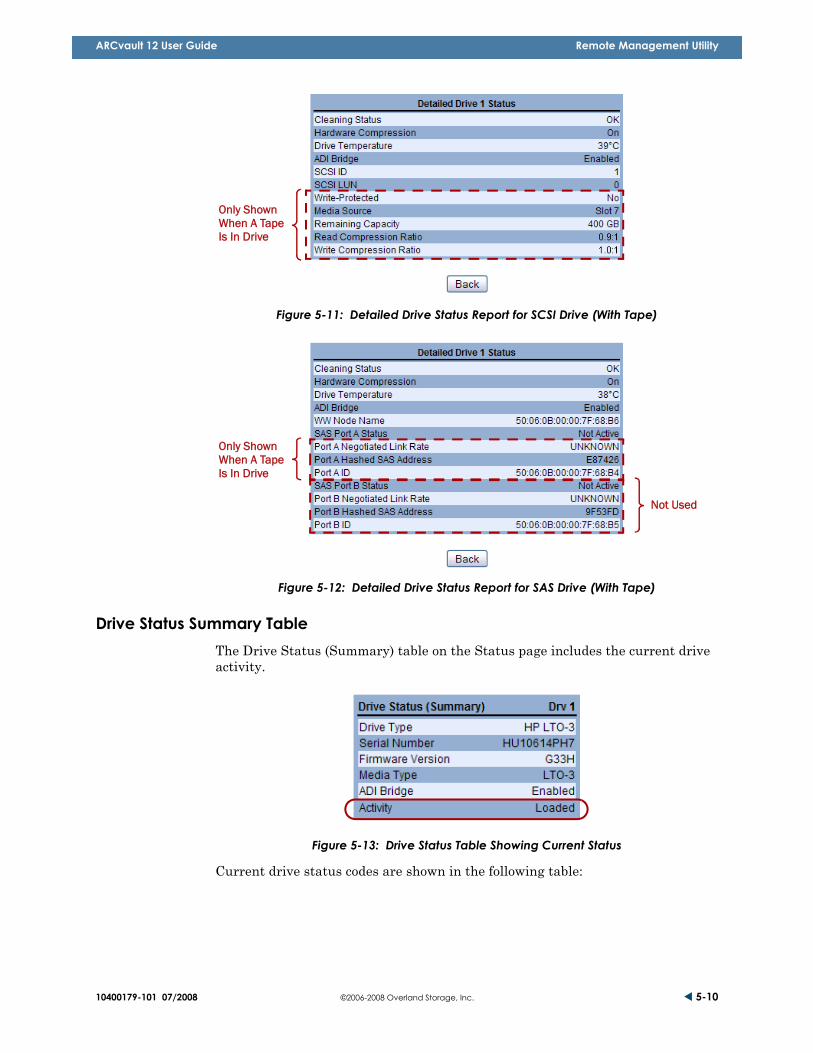
ARCvault 12 User Guide Remote Management Utility
Figure 5-11: Detailed Drive Status Report for SCSI Drive (With Tape)
Figure 5-12: Detailed Drive Status Report for SAS Drive (With Tape)
Drive Status Summary TableThe Drive Status (Summary) table on the Status page includes the current drive activity.
Figure 5-13: Drive Status Table Showing Current Status
Current drive status codes are shown in the following table:
Only Shown When A TapeIs In Drive
Only Shown When A TapeIs In Drive
Not Used
10400179-101 07/2008 ©2006-2008 Overland Storage, Inc. 5-10

ARCvault 12 User Guide Remote Management Utility
Media Tab
IMPORTANT: Administrator-level security is required to access this screen.
The Media tab lets you manage three media-related functions:
• Move a selected cartridge to a target drive or cartridge slot using drop-down lists showing available sources and destinations (Figure 5-14).
• Clean a drive manually.• Inventory the entire library.
Table 5-5: Tape Drive Activity
Displayed Text Description
Idle No drive activity
Cleaning Cleaning operation in progress
Loading Medium is being loaded into the drive
Unloading Medium is being unloaded from the drive
Active Other medium activity
Reading Reading from medium
Writing Writing to medium
Locating Locating medium
Rewinding Rewinding medium
Erasing Erasing medium
Formatting Formatting medium
Calibrating Calibrating medium
Active Other drive activity
FW Updating Microcode update in progress
Unknown Undefined Drive Activity
10400179-101 07/2008 ©2006-2008 Overland Storage, Inc. 5-11

ARCvault 12 User Guide Remote Management Utility
Figure 5-14. RMU Move Media Screen
Using the Move Media Option1. Using the Source drop-down list, choose the slot or drive of the source tape
cartridge. Using the Destination drop-down list, choose the destination slot or drive.
2. Click Execute the Move (click Confirm at the going offline message).During the move, updates are displayed every few seconds. After the move is completed, a final status message is shown.
3. Click the Status tab to view the change.
Clean a DriveA cleaning cartridge can be stored in a reserved slot. If no reserved slots are configured, it can be stored in a regular slot.
NOTE: The drive being cleaned must be empty before selecting this cleaning option.
1. Verify that a cleaning cartridge is loaded in the loader.
10400179-101 07/2008 ©2006-2008 Overland Storage, Inc. 5-12

ARCvault 12 User Guide Remote Management Utility
2. Using the drive cleaning menu option, select the source and destination.• From the Cleaning Tape Location drop-down list, select the slot where
the cleaning tape is located.• From the Drive to Clean drop-down list, select the drive to be cleaned.
3. Press Execute the Clean (click Confirm at the going offline message).When the cleaning cycle completes, the loader returns the cleaning cartridge back to the original slot.
Inventory Library1. Click Inventory (click Confirm at the going offline message).
Wait while the loader is automatically inventoried.
2. At the successful inventory message, click the Media tab to view the results.
Setup Tab
IMPORTANT: Administrator-level security is required to access this screen.
The Setup tab provides submenu links that let you configure these nonvolatile loader options:
• OCP Security Passwords• RMU Security Passwords• Network• Remote FTP Server• Library Configuration• SCSI Configuration• Drive Configuration• Notification Registration• Reset to Defaults
Click one of the configuration buttons on the menu (Figure 5-15) to open a subpage to view or change parameters.
NOTE: If you have not disabled the Offline Confirmation prompt, it will appear the first time you access any of the configuration options under Setup. Click OK to continue.
10400179-101 07/2008 ©2006-2008 Overland Storage, Inc. 5-13

ARCvault 12 User Guide Remote Management Utility
Figure 5-15. RMU Setup Screen
10400179-101 07/2008 ©2006-2008 Overland Storage, Inc. 5-14

ARCvault 12 User Guide Remote Management Utility
OCP Security PasswordsClicking the OCP Passwords button in the Setup menu displays a subscreen (Figure 5-16) that allows the User or Administrator security passwords for the OCP to be changed. These passwords consist of 1-4 numeric digits and are used to access different menu options on the OCP touch screen.
Figure 5-16. Setup Security Passwords Screen
NOTE: A password of 0 (zero) is not allowed. It is reserved to delete existing passwords.
There are several functions available from this screen:
• To change a password, enter it in both the New and Confirm fields, and click Submit.
• To clear the fields without changing the password, click Reset.• To clear an existing password, enter zero (0) into both fields and click
Submit.• To validate a password, enter a password in both fields and click Submit.
• If the password is the same, a message appears stating, “No OCP password changes performed; the password is currently being used for this security level.”
• If it is different than the current one, the password is changed to the newly entered password.
RMU Security PasswordsClicking the RMU Passwords button in the Setup menu displays a subscreen (Figure 5-17) used to change the security passwords needed to access the RMU. You can choose login codes of up to 12 alphanumeric characters to access the User-level or Administrator-level options.
10400179-101 07/2008 ©2006-2008 Overland Storage, Inc. 5-15

ARCvault 12 User Guide Remote Management Utility
IMPORTANT: The RMU passwords are case-sensitive. Spaces or symbols are not allowed. If any changes are made, clicking the Submit button causes the unit to
reboot.
Figure 5-17. Setup RMU Passwords Screen
The RMU passwords cannot be cleared, only changed. The default passwords are “1” for User-level security and “2” for Administrator-level security.
The Disable RMU Administrator Access option prevents any others from accessing the loader remotely with Administrator-level security. When this box is checked, only User-level RMU access is permitted.
NOTE: To re-enable Administrator access, use the OCP commands Setup > Edit Opts > Network > Disable Admin RMU Access > No.
NetworkClicking the Network button in the Setup menu displays a subscreen (Figure 5-18) for selecting the IP address selection method used to identify the loader to the host server. You can choose either dynamic (DHCP) or static IP addressing.
The default settings are Static IP Address selected with IP Address of 10.0.0.1, Subnet Mask of 255.255.255.0, Default Gateway of 255.255.255.255, and DNS Server of 255.255.255.255.
IMPORTANT: If any changes are made, clicking the Submit button causes the unit to reboot.
10400179-101 07/2008 ©2006-2008 Overland Storage, Inc. 5-16

ARCvault 12 User Guide Remote Management Utility
Figure 5-18. Setup Network Screen
• To automatically obtain an IP address from a DHCP server, click the radio button next to Dynamic IP Address, and click Submit.
• To enter a specific Static IP address, click the button next to Static IP Address, and click Submit. A secondary subscreen is displayed (Figure 5-19) where you enter the static address, subnet mask, default gateway, and DNS server address in the appropriate fields. Click Submit on this subscreen to activate the options (or Reset to clear and start over).
Figure 5-19. Static IP Address Options Screen
10400179-101 07/2008 ©2006-2008 Overland Storage, Inc. 5-17

ARCvault 12 User Guide Remote Management Utility
Remote FTP ServerClicking the Remote FTP button in the Setup menu displays a subscreen (Figure 5-20) used to set the FTP server parameters needed to download either drive or loader firmware. The following information is managed on this screen:
• FTP server address (IP address or URL)• Login user ID• Login password• Initial directory access on the FTP server• Active/Passive mode (Passive is default)
NOTE: The default settings are configured for the Overland Technical Support FTP web site.
Figure 5-20. Setup Remote FTP Server Screen
Click Submit to activate the options (or Reset to clear the fields). See “Functions Tab” on page 5-28 for more details on using the FTP option.
Library ConfigurationClicking the Library button in the Setup menu displays a subscreen (Figure 5-21) for setting the basic loader parameters.
IMPORTANT: If any changes are made (other than changing the Library Name), clicking the Submit button causes the unit to reboot. Changing the Library Name
does not require a reboot.
10400179-101 07/2008 ©2006-2008 Overland Storage, Inc. 5-18

ARCvault 12 User Guide Remote Management Utility
Figure 5-21. Library Configuration Screen
Use Table 5-6 to review the options available on this web page and their functionality.
Table 5-6: Library Configuration Options
Component Options
Library Name Enter an alphanumeric name of up to 31 characters. This name appears at the top of all RMU pages. Spaces are allowed.
Default: ARCvault 12.
Library Mode Choose either Random or Sequential. In Sequential mode, the ARCvault acts like an autoloader and doesn’t respond to host commands.
See Appendix D, “Sequential Mode,” for more information.
Default: Random.
Reserved Slots Lets you reserve up to 11 slots. The slots are reserved from the last slot forward, and are numbered with an “r” prefix on the Cartridge Map and Status screens.
The reserved slots can be used to either store cleaning cartridges, use the Auto-Clean feature, or reduce the number of active slots to meet host software requirements.
Default: 0.
Auto Clean Mode Select either Enabled or Disabled from the drop-down list to activate this feature.
A cleaning tape must be in a reserved slot for this feature to function.
Default: Disabled.
10400179-101 07/2008 ©2006-2008 Overland Storage, Inc. 5-19

ARCvault 12 User Guide Remote Management Utility
SCSI ConfigurationClicking the SCSI button in the Setup menu displays a subscreen (Figure 5-22) used to modify SCSI mode and TapeAlert parameters.
NOTE: Most items on this menu refer to standard SCSI reporting functions. Refer to the SCSI standards documents available on the Internet for information about each function and its configuration options.
Bar Code Label Size
Choose number of characters from the bar code labels actually used by the loader. The range is 1–12 characters.
Default: 8 Chars.
Bar Code Label Alignment
If there are more characters in the bar code than configured as the maximum number, then only the specified number of characters are reported taken from either the Left or Right end of the code based on this setting.
Default: Left Align.
Bar Code Label Check Digit
Choose one of these settings for the bar code check digit:• Disabled• Enable Check, Send• Enable Check, Don’t Send
Default: Disabled.
Bar CodeReader
Select either Retries Enabled or Retries Disabled from the drop-down list. With Retries Enabled, the bar code reader makes several attempts to read a bar code label before moving to the next one.
NOTE: Disabling this option speeds up the inventory process when unlabeled tapes are used.
Default: Retries Enabled.
Number of Enabled Slots
This option is used in conjunction with an add-on left magazine with special I/E Element tray to upgrade an ARCvault 12 loader into an ARCvault 24 library. It can also be used to downgrade an ARCvault 24 library into an ARCvault 12 loader disabling the left magazine and other features.
Default: 12.
Table 5-6: Library Configuration Options(Continued)
Component Options
10400179-101 07/2008 ©2006-2008 Overland Storage, Inc. 5-20

ARCvault 12 User Guide Remote Management Utility
Figure 5-22. Setup SCSI Configuration Screen
Use Table 5-7 to determine the options available on this web page and their functionality.
Table 5-7: Setup SCSI Configuration Options
Component Options
Vendor Identification
Specifies the response to the Vendor ID field of the SCSI Inquiry command. The choices are OVERLAND or a custom ID (Vendor Unique). The custom ID is entered in the bottom field. The ID must be exactly eight characters long so blank characters are appended to the end of a shorter ID to bring the total up to eight.
Default: OVERLAND.
Product Identification
Specifies the response to the Product ID field of the SCSI Inquiry command. The choices are NEO Series, ARCvault, or a custom ID (Vendor Unique). The custom ID is entered in the bottom field. The ID must be exactly 16 characters long so blank characters are appended to the end of a shorter ID to bring the total up to 16.
Default: NEO Series.
Device Capability Page Length
Choose between Short (14 bytes) and Long (18 bytes) lengths of the Mode Sense/Select Device Capabilities Page (SCSI page 1Fh) to accommodate different SCSI device implementations.
Default: Short (14 bytes).
10400179-101 07/2008 ©2006-2008 Overland Storage, Inc. 5-21

ARCvault 12 User Guide Remote Management Utility
Initialize Element Status
Specifies the loader’s response to the SCSI Initialize Element Status command. The possible settings are No Inventory, Force Inventory, and Force Label Scan.
Default: No Inventory.
Abort Move Status
Select the response to a SCSI Reset or Abort command while a Move Medium command is in progress. The options are Busy or Not Ready.
Default: Busy.
Report Element Type
Determine the method to report the type of loader elements installed (LTO drives) using the SCSI Read Element Status command. The options are Disabled or Enabled.
Select Disabled for the standard method that uses the DVCID CDB field. Select Enabled to use the vendor-specific field in the Element Descriptor.
Default: Disabled.
Post Recovered Errors
Enable or disable the reporting of TapeAlert informational exception conditions with a Recovered Error sense key, when the Method of Reporting Information Exceptions (MRIE) field is set to a value of 0x3 in Mode Page 1Ch, or if the TapeAlert Mode option is set to Rec. Error (cnd).
Default: Disabled.
TapeAlert Mode Specifies conditions for logging and reporting the following TapeAlert data options:• Logging Disabled—Inhibits the logging feature.• No Exceptions—Information exceptions are not reported.• Generate Unit Attention—Reports information exceptions with a Unit
Attention sense key and an ASC/ASCQ of 5D/00.• Conditionally Generate Recovered Error—If Post Recovered Errors is
enabled, reports information exceptions with a Recovered Error sense key and an ASC/ASCQ of 5D/00.
• Unconditionally Generate Recovered Error—Unconditionally reports information exceptions with a Recovered Error sense key and an ASC/ASCQ of 5D/00.
• Generate No Sense—Reports information exceptions with a No Sense sense key and an ASC/ASCQ of 5D/00.
• Report on Unsolicited Request Sense—Reports information exceptions with a No Sense sense key and an ASC/ASCQ of 5D/00 only in response to an unsolicited Request Sense command.
Default: Logging Disabled.
Table 5-7: Setup SCSI Configuration Options(Continued)
Component Options
10400179-101 07/2008 ©2006-2008 Overland Storage, Inc. 5-22

ARCvault 12 User Guide Remote Management Utility
Drive ConfigurationThe ARCvault 12 supports SCSI and SAS drives. Different tape drive setup screens are displayed depending on the type of drive installed.
SCSI Drives
For SCSI drives, clicking the Drives button in the Setup menu displays a subscreen (Figure 5-23) used to start the process to set the SCSI ID for a drive. At the drive selection screen, verify the number of the drive being configured and click Select Drive.
Figure 5-23. SCSI Drive Configuration Selection Screen
At the ID settings screen for the selected drive (Figure 5-24), choose the SCSI ID from the drop-down menu and click Submit.
Figure 5-24. SCSI Drive Configuration ID Settings Screen
The change takes place immediately.
SAS Drives
For SAS drives, clicking the Drives button in the Setup menu displays a subscreen (Figure 5-25) used to select the drive for configuration. At the drive selection screen, verify the number of the drive being configured and click Select Drive.
10400179-101 07/2008 ©2006-2008 Overland Storage, Inc. 5-23

ARCvault 12 User Guide Remote Management Utility
Figure 5-25. SCSI Drive Configuration Selection Screen
At the configuration screen for the selected drive (Figure 5-26), configure the ports and world wide addressing for the drive and click Submit.
Figure 5-26. SAS Drive Configuration Screen
10400179-101 07/2008 ©2006-2008 Overland Storage, Inc. 5-24

ARCvault 12 User Guide Remote Management Utility
Use Table 5-8 to review the options available on these web pages and their functionality:
Notification Registration
IMPORTANT: Simple Network Management Protocol (SNMP) trap addresses and e-mail settings are network specific. Contact your network system administrator for
the appropriate values.
Clicking the Notifications button in the Setup menu displays a subscreen (Figure 5-27) to configure the loader for sending out e-mail messages and sending significant system event notifications to the network management system (NMS). You can control the SNMP protocol used and the scope of the events that trigger the messages. Changes take place immediately.
Table 5-8: SAS Drive Configuration Options
Component Options
Port X Control NOTE: On a two-port drive, this option exists for ports A and B.
Specifies whether the port is disabled or enabled.
Default: Disable.
Port X ID NOTE: On a two-port drive, this option exists for ports A and B.
Select Default or Custom to set the World Wide Port ID. The Default setting uses the factory-configured ID while Custom allows you to create a unique ID for Port X using the Custom WW Port X Name option.
Default: Default.
Custom WW Port X ID
NOTE: On a two-port drive, this option exists for ports A and B.
Create a unique World Wide Port ID for Port X in the standard 8 pair number format. To use this option, Port X ID must be set to Custom.
NOTE: If Port X ID is set to Custom, leaving the ID set to the default 00:00:00:00:00:00:00:00 results in an error.
Default: 00:00:00:00:00:00:00:00.
World Wide Node Name
Select Default or Custom to set the World Wide Node Name (WWNN). The Default setting uses the factory-configured WWNN while Custom allows you to create a unique name for the drive.
Default: Default.
Custom WW Node Name
Create a unique World Wide Node Name for Port X. To use this option, World Wide Node Name must be set to Custom.
Default: 00:00:00:00:00:00:00:00.
10400179-101 07/2008 ©2006-2008 Overland Storage, Inc. 5-25

ARCvault 12 User Guide Remote Management Utility
CAUTION: Before you can use the Send a Support Ticket (History screen), Check Firmware Revision Level (Function screen), and Send a Test E-Mail (Function screen) options, the e-mail configuration settings must be entered on this screen and the network settings must be correctly configured. Be sure to set the loader name since it is included in all e-mails.
Figure 5-27. Notification Registration Screen
10400179-101 07/2008 ©2006-2008 Overland Storage, Inc. 5-26

ARCvault 12 User Guide Remote Management Utility
Use Table 5-9 to determine the options available on this web page and their functionality.
Table 5-9: Notification Registration Options
Component Options
Configuration
E-Mail Server Enter the address of the SMTP mail server either as a hostname or IP address.
Default: <blank>.
Warning Level Select the level of severity filter for the notifications from the drop-down list. The options are:• Informational, Warning and Critical• Warning and Critical• Critical Only
Default: Informational, Warning and Critical.
E-Mail Addresses
E-mail Addr. n(n=1 to 4)
Enter up to four addresses to receive e-mail event messages.
Default: <blank>.
From Address Enter the e-mail address that will be used as the return address for the event messages and e-mails to Overland Support.
NOTE: The loader must be registered to receive replies from Overland Support. See “Activating the Warranty” on page 2-1 for details.
Default: rmu@arcvault.
Attach Trace File to E-Mail Message
By checking this box, a binary copy of the trace file is attached to all Critical-level event messages sent out.
Default: <unchecked>.
SNMP Notification
Trap Address n(n=1 to 4)
Enter the IP addresses of up to four hosts that can receive SNMP traps.
Default: 255.255.255.255.
Trap Version Select the trap protocol of either SNMPv1 or SNMPv2c from the drop-down list.
Default: SNMPv1.
Trap Community Name
Enter the authentication for using Trap commands.
Default: private-traps.
Get Community Name
Enter the authentication for using Get commands.
Default: public.
Set Community Name
Enter the authentication for using Set commands.
Default: private.
10400179-101 07/2008 ©2006-2008 Overland Storage, Inc. 5-27

ARCvault 12 User Guide Remote Management Utility
To test the warning level and e-mail settings, with the Warning Level set to Informational, Warning and Critical, open and close a door on the loader. E-mails are generated and should appear in the In box of the address configured to receive notices and event messages.
Reset to DefaultsWhen the Set Default button in the Setup menu is clicked, a confirmation screen (Figure 5-28) is displayed warning that all the configuration settings are about to be reset back to the default factory values stored in NOVRAM (excluding network settings). Click Confirm to reset the loader configuration to the default values (or Cancel to terminate the process).
IMPORTANT: Clicking the Reset to Defaults button causes the unit to reboot (after confirmation).
Figure 5-28: Reset Loader to Default Values Confirmation Screen
Functions Tab
IMPORTANT: Administrator-level security is required to access this screen.
The Functions screen (Figure 5-29 on page 5-29) provides menu options that let you execute these loader functions:
• Update Firmware Using HTTP• Update the loader firmware• Update the drive firmware
• Update Firmware Using FTP• Update the loader firmware• Update the drive firmware
• Check Firmware Revision Level • Send a Test E-Mail• Run a Library Diagnostic• Reboot the Library• Reconfigure the Library• Unlock Library
For information about downloading firmware, see “Firmware Updates” on page iv.
10400179-101 07/2008 ©2006-2008 Overland Storage, Inc. 5-28

ARCvault 12 User Guide Remote Management Utility
CAUTION: Before the Check Firmware Revision Level and Send a Test E-Mail options can be used, the e-mail settings must be configured using Setup > Notification Registration. Refer to the section “Notification Registration” on page 5-25 for details.
Figure 5-29. RMU Functions Option (Upper Half of Screen)
10400179-101 07/2008 ©2006-2008 Overland Storage, Inc. 5-29

ARCvault 12 User Guide Remote Management Utility
Figure 5-30. RMU Functions Option (Lower Half of Screen)
10400179-101 07/2008 ©2006-2008 Overland Storage, Inc. 5-30

ARCvault 12 User Guide Remote Management Utility
Update Firmware Using HTTPThe first two menu options on the Functions screen enable new firmware for either the loader or a drive to be uploaded and installed from a network-connected workstation using HTTP.
CAUTION: Use only firmware tested and certified by Overland Storage for the ARCvault products. Do not use drive firmware from the drive manufacturer’s site unless told to do so by Overland Technical Support. The latest versions of library and drive firmware are available on the Overland Support web site and the Overland FTP site.
1. Locate the menu option for the type of update being done—Library or Drive.
2. Click the Browse button, navigate to select the firmware BIN file being uploaded, and click OK.
3. Click the Start the Update button to upload the file.Wait 10-15 seconds while the bin file is uploaded to the unit.
4. Once the file is uploaded, a validation message (Figure 5-31) is displayed. Click Confirm to continue.
Figure 5-31: HTTP Firmware Update Validation Message
Once the update is confirmed, a progress screen shows updates every five seconds. It takes about two minutes for the CRC to be verified, the BIN file to be installed, and the CRC to be reverified.
NOTE: For drive firmware updates, the progress screen is only shown until the drive begins flashing the firmware.
5. For loader firmware updates, upon completion of the update, the loader automatically reboots. Wait until the POST process completes before relogging onto the system.
NOTE: If the update fails, an error message is displayed. Refer to Chapter 6, “Troubleshooting and FSCs,” for information on the error.
10400179-101 07/2008 ©2006-2008 Overland Storage, Inc. 5-31

ARCvault 12 User Guide Remote Management Utility
Update Firmware Using FTPThe second two menu options on the Functions screen enable new firmware for the loader or a drive to be uploaded and installed using FTP either locally or remotely.
CAUTION: Use only firmware tested and certified by Overland Storage for the ARCvault products. Do not use drive firmware from the drive manufacturer’s site unless told to do so by Overland Technical Support. The latest versions of library and drive firmware are available on the Overland Support web site and the Overland FTP site.
Local FTP Server Update
1. Verify that the latest firmware has been uploaded to the loader.See Appendix B, “Updating the Firmware,” for the procedure.
2. Locate the menu option for the type of update being done—Library or Drive.
3. Verify that the default Local FTP Server is selected.
4. Click Start The Update.
5. At the Maintenance Post Data screen, click the firmware file name.Both the web page and front touch screen show the progress of the upgrade. It takes about two minutes for the CRC to be verified, the BIN file to be installed, and the CRC to be reverified.
NOTE: For drive firmware updates, the progress screen is only shown until the drive begins flashing the firmware.
6. For loader firmware updates, upon completion of the update, the loader automatically reboots. Wait until the POST process completes before relogging onto the system.
NOTE: If the update fails, an error message is displayed. Refer to Chapter 6, “Troubleshooting and FSCs,” for information about the error.
Remote FTP Server Update
1. Verify that the Remote FTP Server has been configured for the loader.If necessary, use Setup > Remote FTP Server to change those settings.
2. Locate the menu option for the type of update being done—Library or Drive.
3. Verify that the Remote FTP Server is selected and click Start The Update.Both the web page and front touch screen show the progress of the upgrade. It takes about two minutes for the CRC to be verified, the BIN file to be installed, and the CRC to be reverified.
NOTE: For drive firmware updates, the progress screen is only shown until the drive begins flashing the firmware.
10400179-101 07/2008 ©2006-2008 Overland Storage, Inc. 5-32

ARCvault 12 User Guide Remote Management Utility
4. For loader firmware updates, upon completion of the update, the loader automatically reboots. Wait until the POST process completes before relogging onto the system.
NOTE: If the update fails, an error message is displayed. Refer to Chapter 6, “Troubleshooting and FSCs,” for information about the error.
Check Firmware Revision Level
IMPORTANT: The loader must be registered with Overland and the e-mail function configured (“Configure E-Mail Communications” on page 2-4) before this option will
work.
Click the Check Firmware button to send an e-mail to [email protected] that includes the current firmware version. An automated agent intercepts that e-mail, parses the firmware version, checks it against the current released version, and e-mails back to the registered user whether their loader firmware is current or if they need to get an upgrade.
If the loader is not registered, the return e-mail reminds the user to register so that this option can function correctly.
Send a Test E-MailClick the Send E-Mail button to send a test e-mail to Overland Technical Support to determine if the e-mail settings (located at Setup > Notifications) are correctly configured. An automated response is sent to the return (From) e-mail address configured there.
Run a Library Diagnostic1. Using the diagnostic menu option, select the type of test and length.
Table 5-10 lists the diagnostic tests that can be performed and the preset lengths of time for them to run.
2. Press Start the Diagnostic.
NOTE: After starting a diagnostic test, clicking any RMU tab aborts the diagnostic. Also, a message is displayed in the OCP with an Abort button. Pressing Abort stops the diagnostic.
10400179-101 07/2008 ©2006-2008 Overland Storage, Inc. 5-33

ARCvault 12 User Guide Remote Management Utility
Reboot the LibraryThis option forces a reboot of the loader.
Reconfigure the LibraryThis option forces the loader to reset numbering to adjust for a permanently removed drive.
Unlock LibraryThis option overrides a Host Prevent Media Removal state preventing magazine access when the host is not available. Click the Unlock button to access the magazines and resume normal operation.
Table 5-10: Diagnostic Options
Option Description
Diagnostic to Run Choose from six different tests:• Cartridge Cycle—randomly fetches from and stows to slots.• Drive Cycle—randomly fetches from and stows between slots and a
drive.• Exercise Shuttle (Motor)—runs the shuttle around the track,
stopping at random positions.• Exercise Picker (Motor)—runs the picker all the way in and back out
to the inventory touch position.• Exercise Vertical (Motor)—repeatedly raises and lowers the shuttle
track.• Static Bar Code Test—repeatedly performs an inventory to check
bar code reader accuracy.
NOTE: After running either a Cartridge Cycle or Drive Cycle diagnostics, the host software should perform an inventory to update its cartridge map.
Default: Cartridge Cycle.
Time to Run Use the drop-down list to select the length of time the test should run. Options include:• 1 minute• 5 minutes• 10 minutes• 30 minutes• 1 hour• 2 hours• 6 hours• No Time Limit
Default: 1 minute.
10400179-101 07/2008 ©2006-2008 Overland Storage, Inc. 5-34

ARCvault 12 User Guide Remote Management Utility
History TabThe History button provides access to service-related options such as viewing the loader trace logs (Figure 5-32).
The trace log options let you either view a trace log on-screen or download it as a file. When you select a file for downloading, a Save As window appears allowing you to select a network destination for the download.
IMPORTANT: A Full Trace log (see “History Tab” on page 5-35) should be saved every time changes are made to the configuration in the event that the information
is needed should the chassis or controller card be swapped out.
The Send a Support Ticket option lets you send an automatic service request to Overland Technical Support. The e-mail also includes a copy of a Diagnostic Trace file.
CAUTION: Before the Send a Support Ticket option can be used, the e-mail configuration settings must be entered. Refer to “Notification Registration” on page 5-25 for details.
Figure 5-32. RMU History Screen
Display a Trace LogFrom the drop-down list, select either a full or diagnostic trace. The diagnostic trace is a subset of the full trace showing only higher-level information.
10400179-101 07/2008 ©2006-2008 Overland Storage, Inc. 5-35

ARCvault 12 User Guide Remote Management Utility
IMPORTANT: Whenever configuration changes are made, print out the Full Trace Log to capture the new settings.
By clicking the Display Trace button, a processed Full Trace (Figure 5-33) or Diagnostic Trace (Figure 5-33) file is created and displayed in the web browser. Scroll down to see all the information. Since a log can be around 200 pages long, it is recommended that the file be saved and viewed electronically.
Figure 5-33. Full Trace Log (Partial Sample)
10400179-101 07/2008 ©2006-2008 Overland Storage, Inc. 5-36

ARCvault 12 User Guide Remote Management Utility
Figure 5-34. Diagnostic Trace Log (Partial Sample)
Download a Trace Log FileYou can download the full or diagnostic binary trace log using the download option. Right-click the appropriate link and save the file.
Send a Support Ticket
IMPORTANT: The loader must be registered with Overland and the e-mail function configured (“Configure E-Mail Communications” on page 2-4) before this option will
work.
10400179-101 07/2008 ©2006-2008 Overland Storage, Inc. 5-37
ARCvault 12 User Guide Remote Management Utility
When Send Ticket is clicked, an e-mail is sent to [email protected] with the loader serial number and latest Diagnostic Trace log attached. An automated agent e-mails back a confirmation message with a service ticket number. Technical Support uses the original e-mail to look up the registered user information and contact them to help troubleshoot the problem.
If the loader is not registered, the return e-mail reminds the user to register so that Technical Support can know how to contact them.
Help LinkThe Help link on the right side of the top bar opens a PDF version of this user guide.
Logout LinkThe Logout link on the right side of the top bar provides an easy exit from RMU by shutting down the web link. It is also recommended that you close your browser to clear all temporary caches.
10400179-101 07/2008 ©2006-2008 Overland Storage, Inc. 5-38

CHAPTER
6
10400179-101
Troubleshooting and FSCs
This section provides some troubleshooting information and a list of Fault Symptom Codes (FSC) for the ARCvault loader that may be displayed when there is a possible malfunction. A descriptive message and instructions for clearing the fault accompany each FSC.
Possible ProblemsAn incorrect installation or configuration can cause platform problems. In such a case, the loader appears to be operating normally, but data and commands can not be interchanged correctly. An error code may or may not be displayed on the OCP touch screen. To resolve an error caused by this type of problem, check your installation and configuration setup. Refer to this user guide or the Overland Support web site for information on how to correctly install and configure the loader.
General drive errors usually result from a miscommunication between the loader and tape drive, or a mechanical malfunction. Media issues or read/write problems usually do not cause an FSC to be displayed.
Both platform problems and general drive errors may display an FSC and an error message on the OCP touch screen and the RMU Library Health Status table. Use the FSC to determine a recovery procedure or report errors to your service provider. If no FSC is displayed, try a different piece of media.
Sample ScreensWhen a malfunction occurs, an error message is displayed on the OCP touch screen:
Figure 6-1: Sample OCP Error Message Screen
Use the arrow buttons on the right to scroll down to see all the message.
07/2008 ©2006-2008 Overland Storage, Inc. 6-1

ARCvault 12 User Guide Troubleshooting and FSCs
The same information is available in the RMU. Click the Status tab and choose the Library Health option to view the following table:
Figure 6-2: Sample RMU Error Message in Library Health Table
Error RecoveryTo simplify the Error Recovery Process (ERP), begin by using the Start/General ERP to determine which Decision Tree flowcharts to use. If an FSC is shown, use the cross-reference table to determine which ERP to use.
FSC/ERP Cross-Reference Table
NOTE: If an FSC number is not listed in the table below, contact Overland Technical Support.
Table 6-1 lists the possible FSCs and accompanying messages and descriptions. Use the listed ERP number to determine the correct procedure to use for resolving the problem:
0501
Table 6-1: FSC/ERP Cross-Reference
FSC Message ERP Description
0101 “Serial Port Initialization Error” 1 The serial port controller on the loader controller card failed to initialize during POST.
0306 “NvRAM Update Error” 1 The non-volatile RAM did not update during POST.
0402 “Non-Volatile Configuration Save Error”
1 The non-volatile RAM configuration did not save correctly during POST.
0404 “Drive Configuration Error: Full-height drive is incorrectly cabled.”
2 The loader detected that the wrong serial cable is connected to the full height drive.
0405 “Drive Initialization Error” 2 The tape drive did not initialize correctly during POST.
0420 “Invalid Physical Drive Number” 2 The loader detected an invalid drive number during initialization.
0421 “Invalid Logical Drive Number” 2 The loader detected an invalid drive number during initialization.
0501 “Bar Code Reader Not Detected” 1 The bar code reader was not detected during POST.
10400179-101 07/2008 ©2006-2008 Overland Storage, Inc. 6-2

ARCvault 12 User Guide Troubleshooting and FSCs
0901 “OS Critical Error” 1 The loader firmware encountered a critical internal error.
0902 “Network Critical Error” 1 The RMU firmware encountered a critical internal error during network initialization.
0A01 “Invalid Ethernet (MAC) Address.Program a valid Ethernet address then reboot the unit.”
1 An invalid MAC address was encountered when the loader was initializing the RMU ethernet port.
0A02 “Invalid IP Subnet Mask (255.255.255.255):The library will use 255.255.255.0 until a valid IP Subnet Mask is programmed and library rebooted.”
3 An invalid IP subnet was detected when initializing the RMU ethernet configuration.
0C01 “Firmware Exception” 1 The loader firmware encountered a critical internal error.
1001 “SCSI Firmware Error” 1 The loader SCSI firmware encountered a critical internal error.
1007 “SCSI Invalid Element” 1 The loader firmware detected an invalid element address during initialization.
1011 “SCSI Initialization Error: None of the attached drives have ADI bridging enabled.”
2 The loader SCSI firmware was not able to initialize because an ADI-enabled drive was not detected.
2001 ”Invalid Control Command” 1 The loader control firmware detected an invalid internal command.
2004 “Loader Not Ready” 1 The loader control firmware detected that the loader hardware was not ready.
2007 “WARNING - Door open; I/E move in progress. Do NOT access I/E slot. Close door to continue.”
4 The operator opened the left door during an I/E Element slot operation.
2008 “Illegal Move” 1 The loader control firmware detected an illegal move attempted by an internal process.
2009 “Door open; library motion halted. Close door to continue.”
4 The loader door/switch is open and all robotics operations are suspended until this condition is cleared.
200E “No Magazine” 4,1 The door was closed and no magazine was detected.
200F “Drive Media Removal Prevented: Allow media removal using the software application or reboot the library.”
5 A host move medium command was attempted but the loader detected that the drive is in a prevent media removal state from the host.
2010 “Control Firmware Error” 1 The loader control firmware detected a critical internal error.
20B0 “Unknown exchange for the async message.”
1 The loader interprocess communications firmware detected a critical internal error.
Table 6-1: FSC/ERP Cross-Reference(Continued)
FSC Message ERP Description
10400179-101 07/2008 ©2006-2008 Overland Storage, Inc. 6-3

ARCvault 12 User Guide Troubleshooting and FSCs
3000 “Motor Fault Condition; see trace for details.”
1 A motor fault condition was detected and the loader trace file is required for additional error detail.
3002 “Picker Tach Errors” 1 The loader picker motor has reported excessive tach errors.
3011 “Bin Fetch Failure” 6 The loader failed to fetch a cartridge from a slot and all retries were exhausted.
3012 “Bin Stow Failure” 6 The loader failed to stow a cartridge to a slot and all retries were exhausted.
3013 “Drive Fetch Failure” 7 The loader failed to fetch a cartridge from a drive and all retries were exhausted.
3014 “Drive Stow Failure” 7 The loader failed to stow a cartridge to a drive and all retries were exhausted.
3016 “Drive Status Failure” 2 The loader was not able to get status from the drive serial (ADI) interface during the normal status check.
301B “Drive Communication Error” 2 The loader was not able to communicate with the drive ADI.
301C “Drive Get General Status Fail” 2 The drive did not return the general status packet over the ADI.
301E “Drive Unload Fail” 8 The drive did not successfully unload a cartridge when the loader issued the eject command over the ADI.
3020 “Undefined Config” 2 The loader firmware detected an invalid configuration during a diagnostic operation. This error usually indicates an internal hardware problem.
3030 “Orphan cartridge not stowed. Empty I/E slot to proceed.”
4 The loader was unable to stow an orphan cartridge because the I/E slot is full.
3031 “Chassis S/N mismatch. New S/N stored.”
1 The serial number of the chassis did not match the serial number stored in the loader controller card.
3032 “Chassis S/N character count is not correct. New S/N stored.”
1 The serial number of the chassis did not match the serial number stored in the loader controller card.
3033 “Chassis S/N did not scan.” 1 The loader could not scan the chassis serial number.
3034 “Chassis S/N save operation failed.“
1 The loader could not save the chassis serial number to the NvRAM.
3041 “Loader Received Invalid Cmd” 1 The loader firmware process detected an invalid internal command.
3045 “Loader Invalid Drive Number” 1 The loader firmware process detected an invalid drive number in an internal command.
Table 6-1: FSC/ERP Cross-Reference(Continued)
FSC Message ERP Description
10400179-101 07/2008 ©2006-2008 Overland Storage, Inc. 6-4

ARCvault 12 User Guide Troubleshooting and FSCs
3051 “No Cartridges In Library” 4 A cartridge cycle diagnostic was attempted with no media in the loader.
3052 “Too Many Cartridges” 4 A cartridge cycle diagnostic was attempted with no empty slots in the loader.
3053 “Need 3 Cartridges Minimum” 4 A drive cycle diagnostic was attempted with too few cartridges in the loader.
3054 “Need 1 Drive Minimum” 4 A drive cycle diagnostic was attempted but no drives were detected.
3055 “Memory Allocation Error” 1 The loader firmware detected an internal memory allocation error.
305F “Invalid Bin Number” 1 During cartridge cycle or drive cycle diagnostics, the loader firmware detected an invalid slot selection. This condition indicates a diagnostic firmware error.
3060 “Cart blocking vertical” 6 The loader detected an unexpected cartridge ejected from the drive when the shuttle is not in front of the drive. This condition prevents the vertical robotics movement and requires manual intervention.
3061 “Unable to Complete Homing Algorithm”
6 The loader could not complete the vertical homing algorithm. This usually indicates an obstruction (such as, a cartridge in the bottom of the chassis or other impediment).
3078 “Diag get drive status failed.” 2 The loader diagnostic firmware failed to get ADI status from drive 1.
3082 “Drive Stow Fail; Media Returned to Source”
7 The loader was unable to successfully stow a cartridge to the drive so the cartridge was returned to the originating slot.
3083 “Drive Stow Fail; Media Remains in Drive”
7 The loader was unable to successfully stow a cartridge to the drive but the cartridge was left in the drive.
3084 “Unsupported Drive for Requested Operation”
2 The loader detected an unsupported drive (usually a hardware error).
308F “No Retry Fault on Fetch/Stow” 1 A robotics fetch stow operation failed and no retry was possible.
30B0 “I/E Slot Load/Unload Error” 6 The loader was unable to fetch/stow the import/export slot.
3100 “Picker Jammed” 7 The loader detected a jam condition with the picker motor.
3101 “Picker Overtraveled Stall” 7 The loader detected an unexpected overtravel condition when moving the picker motor to a position (stall was expected).
3102 “Flex Cable Failure” 1 The loader detected a defective shuttle cable assembly.
Table 6-1: FSC/ERP Cross-Reference(Continued)
FSC Message ERP Description
10400179-101 07/2008 ©2006-2008 Overland Storage, Inc. 6-5

ARCvault 12 User Guide Troubleshooting and FSCs
3103 “12 Volt Fuse Opened” 1 The loader detected a blown fuse in shuttle assembly.
310F “Picker Jammed on Stow” 7 The loader detected a picker motor jam while stowing a cartridge.
3200 “Shuttle Jammed” 7 The loader shuttle motor was stalled/jammed during a shuttle move operation.
3305 “Cart sense switch failed.” 6 The loader did not detect the cartridge sense switch in the shuttle assembly.
3306 “Cart stuck halfway in shuttle.” 4,6 The loader firmware detected a cartridge stuck halfway in the shuttle or the shuttle shipping tie-down wire was not removed – an unrecoverable hardware condition.
3400 “Unacceptable Cart Map“ 4 When attempting a servo training diagnostic, the wrong cartridge locations were detected (service issue only).
3401 “High Picker Friction“ 1 Error during servo training diagnostic (service use only).
3402 “Picker Missed Cart“ 1 Error during servo training diagnostic (service use only).
3403 “Upward Search Failed“ 1 Error during servo training diagnostic (service use only).
3404 “Downward Search Failed“ 1 Error during servo training diagnostic (service use only).
3405 “Shuttle Search Failed“ 1 Error during servo training diagnostic (service use only).
3406 “Shuttle Probe Failed“ 1 Error during servo training diagnostic (service use only).
3407 “Vertical Too High“ 1 Error during servo training diagnostic (service use only).
3408 “Excess Table Tilt“ 1 Error during servo training diagnostic (service use only).
3409 “Excess Shuttle Offset“ 1 Error during servo training diagnostic (service use only).
3500 “Vertical Elevator Jammed” 6 The loader vertical motor was stalled/jammed during a vertical move operation.
5015 “Expired Cleaning Cart” 4,8 The loader detected an expired cleaning cartridge as reported by a drive.
5016 “Not a Cleaning Cart” 4,8 A clean operation was attempted through the loader menu but the drive reported that it was not a cleaning cartridge.
503B “Move Command Fail” 4,8 A loader (menu mode) cartridge move operation failed.
503C “Clean Operation Time-out” 8 A loader (menu mode) clean operation failed.
Table 6-1: FSC/ERP Cross-Reference(Continued)
FSC Message ERP Description
10400179-101 07/2008 ©2006-2008 Overland Storage, Inc. 6-6

ARCvault 12 User Guide Troubleshooting and FSCs
70nn “OCP Control errors” 1 All of these fault codes (7001-70FF) should be considered loader internal firmware errors related to OCP firmware errors.
8001 “Cartridge load recovery failed.” 8 The drive failed to successfully load the cartridge at the completion of a loader stow-to-drive operation.
8003 “Drive Load Time-out: Use Move Media menu to remove the media from the Tape Drive.”
8 The loader stowed a cartridge to the drive but the drive did not successfully complete the load operation in the time-out period.
8009 “Drive Load Error: Use Move Media menu to remove the media from the Tape Drive.”
8 The drive reported a cartridge load error through the ADI.
800A “Expired Cleaning Media” 4,8 The drive reported an expired cleaning cartridge error through the ADI.
800B “Unsupported Media Format: Use Move Media menu to remove the media from the Tape Drive.”
4,8 The drive reported through the ADI a media format that is not supported by the drive.
800C “Invalid Cleaning Media” 4,8 The drive reported an invalid cleaning cartridge error through the ADI.
800D “Defective Media: Use Move Media menu to remove the media from the Tape Drive.”
4,8 The media in the tape drive cannot be used.
8020 “Drive Firmware Update Error” 4,2 Drive firmware update using RMU failed.
A001 “SMX Send Error” 1
All of these fault codes (A001-A0nn) should be considered loader internal firmware problems related to interprocess task communication errors.
A002 “SMX Receive Error” 1
A003 “Comm Free List Empty“ 1
A004 “Invalid Comm Put Attempt“ 1
A005 “Invalid Comm Get Attempt“ 1
A006 “Comm Initialization Error“ 1
A007 “Put of a NULL Comm“ 1
A008 “Msg contains no Comm.“ 1
A009 “Comm return addr is unknown.“ 1
C001 “Gateway initialization failed.” 1All of these fault codes (C001-C0nn) should be considered loader internal firmware problems related to RMU firmware failures.
C002 “Gateway Terminate Time-out” 1
C010 “Error attempting to exit menu mode.”
1
Table 6-1: FSC/ERP Cross-Reference(Continued)
FSC Message ERP Description
10400179-101 07/2008 ©2006-2008 Overland Storage, Inc. 6-7

ARCvault 12 User Guide Troubleshooting and FSCs
Error Recovery ProceduresUse these following Decision Tree flowcharts to diagnose the problem that caused the FSC.
Figure 6-3: Start/General ERP Decision Tree
FSC listed in Fault Code Table?
Note fault code and error message. Retrieve library trace.
NoYesUsing the Fault Code Table, note number of the Error Recovery
Procedure (ERP).
Attempt to run standalone cartridge-cycle and drive-cycle
diagnostics on library.
Passed?
Attempt to run read/write tests to tape drive with known good
media.
Passed?
Drive R&R
Verify system and application is at appropriate revision levels and has no defective hardware or
cabling.
END(Resume normal operation)
Problem Resolved?
Level 3 Escalation
ERP = 1?
Yes
Yes
Yes
No
No
ERP = 2?Yes
No
Yes
ERP=2
ERP = 3?Yes
No
ERP = 4?Yes
No
ERP = 5?Yes
No
ERP = 6?Yes
No
ERP = 7?Yes
No
No
ERP=3
ERP=4
ERP=5
ERP=6
ERP=7
ERP=8
FSC listed in Fault Code Table?
Yes
No
New FSC Found
ERP = 1
No
STARTProblem operating the
Library
Library reports either a backup application failure or a Fault
Symptom Code (FSC) is being displayed.
Does the unit power on?
Power ERP
No
Yes
10400179-101 07/2008 ©2006-2008 Overland Storage, Inc. 6-8

ARCvault 12 User Guide Troubleshooting and FSCs
Figure 6-4: ERP 1 Decision Tree
ERP = 1
Reboot the library and retry the operation that produced the FSC.
FSCdisplayed?
Same FSC
ChassisR&R
No FSC
New FSC Found
New FSC
Error Recovery Procedure 1 is used for FSCs that indicates the chassis FRU as the most likely problem
1. Turn off power to the library.2. Wait 5 seconds.3. Power up the library.4. Retry the operation that produced the fault code.
FSCdisplayed?
Same FSC
No FSCNew FSC
END(Resume normal operation)
10400179-101 07/2008 ©2006-2008 Overland Storage, Inc. 6-9

ARCvault 12 User Guide Troubleshooting and FSCs
Figure 6-5: ERP 2 Decision Tree
ERP=2
Error Recovery Procedure 2 is used for FSCs that indicate the chassis or drive FRU as the most likely problem.
Chassis/Drive R&R
Reboot the library and retry the operation that produced the FSC.
FSCdisplayed?
1. Turn off power to the library.2. Wait 5 seconds.3. Power up the library.4. Retry the operation that produced the fault code.
FSCdisplayed?
Same FSC
No FSC
New FSC Found
New FSC
END(Resume normal operation)
Same FSC
No FSCNew FSC
10400179-101 07/2008 ©2006-2008 Overland Storage, Inc. 6-10

ARCvault 12 User Guide Troubleshooting and FSCs
Figure 6-6: ERP 3 Decision Tree
Figure 6-7: ERP 4 Decision Tree
ERP=3
Error Recovery Procedure 3 is used for FSCs that usually indicate a user error when configuring the library.
Instruct the customer on the correct value to enter for their
library configuration.
FSCdisplayed?
Chassis R&R
END(Resume normal operation)
Yes
No
ERP=4
Error Recovery Procedure 4 is used for FSCs that usually indicate a user error when operating the library .
Correct the condition indicated by the fault code and retry the
operation.
FSCdisplayed?
Chassis R&R
END(Resume normal operation)
Yes
No
10400179-101 07/2008 ©2006-2008 Overland Storage, Inc. 6-11

ARCvault 12 User Guide Troubleshooting and FSCs
Figure 6-8: ERP 5 Decision Tree
ERP=5
Error Recovery Procedure 5 is used for FSCs that usually indicate a system or application operational error.
Verify that the system, drivers, and backup application are
supported configurations running at the current version, then retry
the operation.
Level 3 Escalation
FSCdisplayed?
END(Resume normal operation)
Yes
No
10400179-101 07/2008 ©2006-2008 Overland Storage, Inc. 6-12

ARCvault 12 User Guide Troubleshooting and FSCs
Figure 6-9: ERP 6 Decision Tree
ERP=6
Error Recovery Procedure 6 is used for FSCs that indicate either defective media or chassis problem when moving media to or from a slot .
Reboot the library to attempt to clear the fault condition.
Select a different piece of media and retry the move operation.
FSCdisplayed?
Same FSC
ChassisR&R
No FSC
New FSC Found
New FSC
END(Resume normal operation)
Same FSC
No FSC
New FSC
FSCdisplayed?
Remove the defective media from the library.
10400179-101 07/2008 ©2006-2008 Overland Storage, Inc. 6-13

ARCvault 12 User Guide Troubleshooting and FSCs
Figure 6-10: ERP 7 Decision Tree
ERP=7
Error Recovery Procedure 7 is used for FSCs that indicate either defective media, drive, or chassis problem when
moving between a slot and a drive.
Reboot the library to attempt to clear the fault condition.
Chassis/Drive R&R
• For a single-drive library, retry using a different slot.• For a multi-drive library, retry using a different drive.
Was the operation successful ?
Drive R&R
Chassis R&R
Select a different piece of media and retry the fetch/stow
operation.
FSCdisplayed?
Same FSC
No FSC
New FSC Found
New FSC
END(Resume normal operation)
Same FSC
No FSC
New FSC
FSCdisplayed?
Remove the defective media from the library.
YesNo
10400179-101 07/2008 ©2006-2008 Overland Storage, Inc. 6-14

ARCvault 12 User Guide Troubleshooting and FSCs
Figure 6-11: ERP 8 Decision Tree
ERP=8
Error Recovery Procedure 8 is used for FSCs that indicate either defective media or drive problem when stowing/
fetching a cartridge to /from a drive.
Reboot the library to attempt to clear the fault condition.
Drive R&R
Retry the drive fetch/stow operation with a different
piece of media.
FSCdisplayed?
Same FSC
No FSC
New FSC Found
New FSC
END(Resume normal operation)
Same FSC
No FSC
New FSC
FSCdisplayed?
Remove the defective media from the library.
10400179-101 07/2008 ©2006-2008 Overland Storage, Inc. 6-15

ARCvault 12 User Guide Troubleshooting and FSCs
Figure 6-12: Power ERP Decision Tree
Is the OCP illuminated?
Touch the OCP to power on the library
Does the display
initialize ?
Verify that the power cord is connected
between the AC outlet and the library. Verify
that AC power is functional. Unplug and replug the the power cord to the library and
then press the rear power switch for 2
seconds (maximum).
Is the rear power switch illuminated?
Does the display
initialize ?
Power Supply R&R
No
No
Yes
Yes
No
Yes
Does the display
initialize ?
No
Yes Chassis R&R
Touch the OCP to power on the library
Yes
No
Press the rear power switch and release
when the light goes out. Then press the rear power switch for 2
seconds (maximum) until the switch
illuminates.
Touch the OCP to power on the library
Does the display
initialize ?
No
Yes Chassis R&R
Unplug and replug the the power cord to the
library. If the rear power switch automatically
illuminates , proceed to the next step. If not, press the rear power switch for 2 seconds (maximum) until the switch illuminates .
Touch the OCP to power on the library
Power ERP
END(Resume normal operation)
10400179-101 07/2008 ©2006-2008 Overland Storage, Inc. 6-16

ARCvault 12 User Guide Troubleshooting and FSCs
Figure 6-13: Chassis vs. Drive ERP Decision Tree
Chassis/Drive R&R
Remove the suspected tape drive assembly from the library. Inspect tape drive assembly for damage.
No
YesDamaged? Replace tape drive
assembly.
No
YesDual Drives?
Swap drives to check drive vs. position.
Retry the operation.
No
Problemwith same physical
drive?
Inspect the chassis assembly interconnect cabling for visible
damage.
END(Resume normal
operation)
YesDamaged? Replace chassis
assembly.
No
Yes
Replace both chassis assembly and tape drive assembly.
Problemwith other drive in same position?
No
Yes
10400179-101 07/2008 ©2006-2008 Overland Storage, Inc. 6-17

ARCvault 12 User Guide Troubleshooting and FSCs
Figure 6-14: Chassis R&R
Figure 6-15: Drive R&R
Figure 6-16: Power Supply R&R
ChassisR&R
Replace the Chassis FRU.
END(Resume normal operation)
Drive R&R
Replace the Drive FRU
ENDResume Normal Operation
Replace the Power Supply Module
ENDResume Normal Operation
Power Supply R&R
10400179-101 07/2008 ©2006-2008 Overland Storage, Inc. 6-18

ARCvault 12 User Guide Troubleshooting and FSCs
Figure 6-17: Level 3 Escalation
Level 3 Escalation
Level 3 escalations are for system or application issues with currently supported library configurations.
Save a Library Trace at the point of failure. Save all system information, version
information, system logs , and application logs.
Notify technical support and wait for patch.
Problem resolved?
Apply library or system patch.
Yes
No
END(Resume normal operation)
10400179-101 07/2008 ©2006-2008 Overland Storage, Inc. 6-19

ARCvault 12 User Guide Troubleshooting and FSCs
Magazine ReleaseShould there be a loss of power, you can still access the magazines in an ARCvault loader using the Magazine Release Tool (MRT) that came in the Accessory Kit.
1. Slide the MRT into the manual release hole (Figure 6-18) under the magazine handle.
Figure 6-18: Location of Magazine Release Holes
2. While pressing firmly with the tool, pull the magazine out about one inch (2.5cm).
3. Remove the MRT.
4. Slide the magazine all the way out.
ARC
-014
0
Insert MRT Here
Media Magazine Door
10400179-101 07/2008 ©2006-2008 Overland Storage, Inc. 6-20

ARCvault 12 User Guide Troubleshooting and FSCs
Touch Screen OverridesIf calibration or contrast problems exist with the OCP touch screen, it may not be possible to make changes using the OCP. However, there are overrides that can address these issues.
Touch Screen Forced Recalibration1. Cycle the unit’s power.
2. At the startup screen, press the following sequence:
a. Upper right quadrant
b. Lower left quadrant
c. Upper left quadrant
d. Lower right quadrant
3. Following the on-screen instructions, press the boxed X at the lower left of the screen, and then press the boxed X at the upper right.
The screen should now be recalibrated and ready to use.
Touch Screen Contrast Reset1. Cycle the unit’s power.
2. At the startup screen, press the following sequence:
a. Upper right quadrant
b. Lower right quadrant
c. Upper right quadrant
d. Upper left quadrant
The screen is returned to the default setting of 32. Use Utilities > Diagnostics > Screen Calib to make any changes.
c a
db
d a/c
b
10400179-101 07/2008 ©2006-2008 Overland Storage, Inc. 6-21

APPENDIX
A
10400179-101
ARCvault Specifications
Physical SpecificationsLibrary Configuration
Maximum Number of Tape Cartridges 12
Number of Media Magazines 1
Slots per Magazine 12
Number of LTO Drives, Default Configuration 1 half-height SCSI drive or 1 half-height SAS drive
Number of Possible Reserved Slots Up to 11
Capacity
Native capacity in TB (LTO-4 / LTO-3 / LTO-2) 9.6 / 4.8 / 2.4
Max. compressed* storage in TB (LTO-4 / LTO-3 / LTO-2)
19.2 / 9.6 / 4.8
Interface Connectors
SCSI HD 68
SAS SFF-8470 (iPass)
Ethernet RJ-45
Serial RJ-11
LCD Touch Screen
Dimensions 2.5” x 1.25” (6.4cm x 3.2cm)
Type Pressure-sensitive blue and light-gray screen
Resolution 128 x 64 pixels @ 50 dpi
*Assumes compression ratio of 2:1. Actual performance may vary with the application.
07/2008 ©2006-2008 Overland Storage, Inc. A-1

ARCvault 12 User Guide ARCvault Specifications
Technical Information
Physical Dimensions
Dimensions (H x W x D) 3.475 x 18.9 x 34.25 in. (8.6 x 48.3 x 87.0 cm)
Weight Empty 32 lbs (14.5kg)
Base Weight, Single Half-Height Drive 35 lbs (16kg)
Base Weight, Single Full-Height Drive 38 lbs (17kg)
Shipping Weight, Single Half-Height Drive 50 lbs (22.5kg)
Shipping Weight, Single Full-Height Drive 53 lbs (24kg)
Fully Configured Weight with Maximum Number of Magazines, Tapes, and Drives
40.5 lbs. (18.5kg)
Operational Specifications
Mount Time Less than 60 seconds, estimated
Dismount Time (excluding rewinding) Less than 60 seconds, estimated
Inventory Time (full including tape drives) Less than 2 minutes with bar codes; less than 3 minutes without bar codes
Rewind Time (maximum/average) 98/49 seconds
Air Flow 38 CFM
Noise (maximum at 1m) 63.2 dB
Power Consumption
Idle State / Average Running State 52 Watts
Peak Power 97 Watts
Voltage
Input Voltage, Low* 100-120 VAC ±10%
Input Voltage, High* 200-240 VAC ±10%
Input Frequency 50-60 Hz
AC Power Input One IEC320–C14 style rear-panel receptacle
BTU Heat Load†
Idle State / Average Running State 177 BTU/hour (187 kJ/hour)
Peak Power 331 BTU/hour (349 kJ/hour)
*The low voltage nominal will be 110 VAC and the high voltage nominal will be 220 VAC.
†Based on 3.412142 BTU/watt.
10400179-101 07/2008 ©2006-2008 Overland Storage, Inc. A-2

ARCvault 12 User Guide ARCvault Specifications
Reliability and Safety
Temperature, Humidity and Altitude
Reliability
Mean Time Between Failure (MTBF) More than 250,000 hours
Maximum Swaps Between Failures (MSBF) More than 1,000,000 cartridge swaps
Mean Cycles Between Failures (MCBF) More than 2,000,000 cycles
Design life 7 years
Mean Time To Repair (MTTR) Less than 30 minutes
Safety Standards
NRTL - US IEC60950-1, Standard for Safety of Information Technology Equipment
NRTL - Canada CAN/CSA-C22.2 No. 950, Standard for Safety of Information Technology Equipment
CE Marking (European Union) Low Voltage Directive, 72/23/EEC, European Union
Operating
Dry Bulb Temperature 10°C to 40°C
Temperature Gradient 1°C / min. (across the range)
Temperature Shock 15°C (over 2 min.)
Wet Bulb Temperature 26°C
Relative Humidity 15% to 85% (noncondensing)
Humidity Gradient 10% / hr.
Power On—No Tape Loaded (Unpacked—72 hours)
Dry Bulb Temperature 0°C to 50°C
Temperature Gradient 15°C / hr. (across the range)
Temperature Shock 15°C (over 2 min.)
Wet Bulb Temperature 30°C
Relative Humidity 10% to 95% (noncondensing)
Humidity Gradient 10% / hr.
Non-Operating—Long Term (Packed or Unpacked)
Dry Bulb Temperature -40°C to 60°C
Temperature Gradient 20°C / hr. (across the range)
Temperature Shock 15°C (over 2 min.)
Wet Bulb Temperature 30°C
Relative Humidity 5% to 95% (noncondensing)
Humidity Gradient 10% / hr.
Transit—Short Term (Packed 7 Days)
10400179-101 07/2008 ©2006-2008 Overland Storage, Inc. A-3

ARCvault 12 User Guide ARCvault Specifications
Shock
Dry Bulb Temperature -40°C to 60°C
Temperature Gradient 25°C / hr. (across the range)
Temperature Shock 15°C (over 2 min.)
Wet Bulb Temperature 30°C
Relative Humidity 5% to 95% (noncondensing)
Humidity Gradient 10% / hr.
Operating (Within Spec—No Damage)
Peak Acceleration 31 Gs
Duration 2.6ms
Wave Shape 1/2 sine pulses
Application X,Y,Z axes, repeat 3 times
Non-Operating, with Tape Cartridges Removed (Unpacked—No Damage)
Peak Acceleration 71 Gs
Duration 2ms
Wave Shape 1/2 sine pulses
Application X,Y,Z axes, repeat 3 times
Transit/Storage (Packed—No Damage)
Peak Acceleration 30 Gs
Duration 30ms
Wave Shape 1/2 sine pulses
Application X,Y,Z axes, repeat 3 times
Physical Drop Test (Packed—No Damage)
Drop Test Distance 30 inches
Application Per ISTA (1 time)
10400179-101 07/2008 ©2006-2008 Overland Storage, Inc. A-4

ARCvault 12 User Guide ARCvault Specifications
Vibration
Electromagnetic Emissions
Operating (Within Spec—No Damage)
Frequency Range 5–500–5Hz
Peak Acceleration 0.25 G
Wave shape Sinusoidal, 1 octave/min.
Application X,Y,Z axes 2 sweeps per axis
Non-Operating (Unpacked—No Damage)
Frequency Range 5–500–5Hz
Peak Acceleration 1.0 G
Wave shape Sinusoidal, 1 octave/min.
Application X,Y,Z axes 2 sweeps per axis
Transit/Storage (Packed—No Damage)
Random Vibration Test ASTM D4728-95
Considerations Air and Truck only
Agency Standards
FCC US Std. 47 CFR, Part 15 Rules, Class A. Notation on Product
Industry Canada (ICES) Industry Canada Rules, ICES-003, Class A. Notation on product
CE Marking (European Union) EMC Directive, 89/336/EEC Laws, relating to electromagnetic compatibility, European Union EN55022, Standard, RFI limits, Information Technology Equipment, Class A EN55024, Information Technology Equipment, Immunity.
VCCI (Japan) Class A per CISPR 22, Japan. VCCI statement on product
BSMI (Taiwan) CNS: 13438, Taiwan. Class A
10400179-101 07/2008 ©2006-2008 Overland Storage, Inc. A-5

APPENDIX
B
10400179-101
Updating the Firmware
As new features and functionality are made available, it is recommended to update the ARCvault firmware. When using FTP instead of HTTP to update the firmware, use one of the following two procedures.
Using a Local FTP Server1. Download the latest firmware from the Overland website to a local
computer:
a. Point your browser to ftp://ftp.overlandstorage.com/Firmware/ARCvault/.
b. Open the ARCvault folder.
c. Download the latest firmware file labeled ARCvault_nnnn.bin (where “nnnn” represents the latest version number).
2. Using either an FTP software program or a web browser, access the Upload folder located at the IP address of the ARCvault unit.For example, in Internet Explorer, type “ftp://www.xxx.yyy.zzz/upload/” for the URL.
NOTE: Currently, only Internet Explorer is able to be used with ARCvault since Mozilla-based browsers can only download from FTP sites, not upload.
3. At the login screen, enter “x” for the User Name and “1” for the Password.
NOTE: If you have already changed the User password, enter the new password.
4. Copy the firmware BIN file to the Upload folder.This can also be accomplished in IE by dragging and dropping the file icon onto the Upload browser page.
5. Launch and log into RMU as Administrator.
6. Click the Function button on the Tool Bar.
7. In the Update Library Firmware Using FTP area, verify that the default Local FTP Server is selected and click Start The Update.
07/2008 ©2006-2008 Overland Storage, Inc. B-1

ARCvault 12 User Guide Updating the Firmware
8. At the MaintenancePostData screen, click the firmware file name.Both the web page and front touch screen show the progress of the upgrade. Wait approximately 2 minutes while the CRC is verified, the BIN file is installed, and the CRC ID reverified.
9. Upon completion of the update, the loader automatically reboots. Wait until the POST process completes before relogging onto the system.
NOTE: If the update fails, an error message is displayed. Refer to Chapter 6, “Troubleshooting and FSCs,” for information about the error.
Using a Remote FTP Server1. Launch RMU by typing “http://” followed by the IP address of the ARCvault
unit in a browser.
2. At the login screen, enter “2” for the Administrator password.
NOTE: If you have already changed the Administrator password, enter the new password here.
3. Click the Setup button.
4. Click the Remote FTP Config button.
5. Verify that these remote server settings are correct:• Remote FTP Server Address• Remote FTP Server User ID• Remote FTP Server Password• Remote FTP Server Initial Directory
6. Verify that RMU has access through the network firewall.
7. Click the Function button.
8. In the Update Library Firmware Using FTP area, verify that the Remote FTP Server is selected and click Start The Update.Both the web page and front touch screen show the progress of the upgrade. Wait approximately 2 minutes while the CRC is verified, the BIN file is installed, and the CRC is reverified.
9. Upon completion of the update, the loader automatically reboots. Wait until the POST process completes before relogging onto the system.
NOTE: If the update fails, an error message is displayed. Refer to Chapter 6, “Troubleshooting and FSCs,” for information about the error.
10400179-101 07/2008 ©2006-2008 Overland Storage, Inc. B-2

APPENDIX
C
10400179-101
Available Commands
The following table is an alphabetized list of the commands and configuration options available for the ARCvault 12 Loader. It shows the interfaces from which the option can be accessed.
A “na” is shown when the item is not available in the particular interface. Items divided by a vertical bar (|) indicate different options available at that level.
Table C-1: Commands & Configuration Option Interface Locations
Command/Option Remote Management Utility OCP Touch Screen
Bar code label, alignment Setup > Library > Bar Code Label Alignment
na
Bar code label, check digit options Setup > Library > Bar Code Label Check Digit
na
Bar code label, number of characters
Setup > Library > Bar Code Label Size
na
Bar code reader, number of retries Setup > Library > Bar Code Reader Retries
na
Calibrate the OCP touch screen na Utilities > Diagnostics >Screen Calib
Clean a drive, automatically Setup > Library > Auto Clean Mode na
Clean a drive, manually Media > Clean a Drive Utilities > Service > Clean Drive
Configure FTP to run in passive mode
Setup > Remote FTP > Use Passive Mode
na
Contrast level setting for the OCP na Setup > Edit Opts > Library > LCD Contrast
Determine if bar code label used on tape cartridge
Status (mouse-over media image) Status > Cart Map > Right Mag > {slot n}
Diagnostics performed on bar code labels
Functions > Run a Library Diagnostic > Static Bar Code Test
na
Diagnostics performed on cartridge picker
Functions > Run a Library Diagnostic > Exercise Picker
na
Diagnostics performed on drive Functions > Run a Library Diagnostic > Drive Cycle
Utilities > Diagnostics >Drive Cycle
07/2008 ©2006-2008 Overland Storage, Inc. C-1

ARCvault 12 User Guide Available Commands
Diagnostics performed on shuttle Functions > Run a Library Diagnostic > Exercise Shuttle
na
Diagnostics performed on tape cartridges
Functions > Run a Library Diagnostic > Cartridge Cycle
Utilities > Diagnostics >Cart Cycle
Diagnostics performed on vertical track assembly
Functions > Run a Library Diagnostic > Exercise Vertical
na
Drive Firmware update using FTP Functions > Update Drive Firmware Using FTP
na
Drive Firmware update using HTTP Functions > Update Drive Firmware Using HTTP
na
Drive n information, detailed Status > Detailed Reports > Drive 1
Status > Drive 1
Drive n information, tape status Status (mouse-over drive image) Status > Cart Map > Drv 1
E-mail event notices, address to be notified
Setup > Notifications > E-Mail Addresses > E-mail Address n
na
E-mail event notices, attaching trace file
Setup > Notifications > E-Mail Addresses > Attach Trace File to E-Mail Message
na
E-mail event notices, setting e-mail return address
Setup > Notifications > E-Mail Addresses > From Address
na
E-mail event notices, SMTP server address
Setup > Notifications > Configuration > E-Mail Server
na
E-mail test Functions > Send a Test E-Mail na
Error list by operational hour na Utilities > Diagnostics >Error Log
Firmware version, check for latest Functions > Check Firmware Revision Level
na
Help Help link (top-right) to FTP web site and embedded help on each page
• Help• Help > Other Help
Interactive magazine tape cartridge map
Status or Media Status > Cart Map > Right Mag
Inventory the magazines Media > Inventory Library Utilities > Diagnostics >Inventory
Inventory, method used Setup > Library > Inventory Method na
IP address selection method (Static or DHCP) for RMU access
Setup > Network Setup > Edit Opts > Network >IP Addr Assignment
Library Firmware update using FTP Functions > Update Library Firmware Using FTP
na
Library Firmware update using HTTP
Functions > Update Library Firmware Using HTTP
na
Library mode, setting random or sequential
Setup > Library > Library Mode Setup > Edit Opts > Library > Library Mode
Table C-1: Commands & Configuration Option Interface Locations
Command/Option Remote Management Utility OCP Touch Screen
10400179-101 07/2008 ©2006-2008 Overland Storage, Inc. C-2
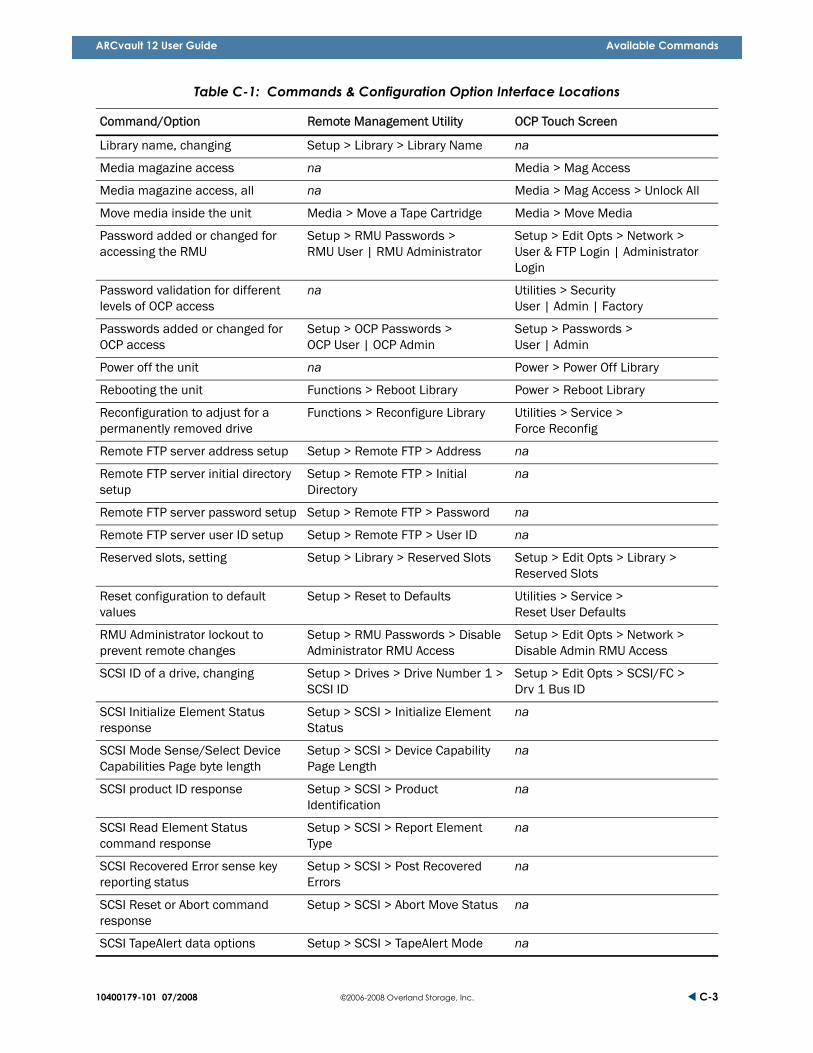
ARCvault 12 User Guide Available Commands
Library name, changing Setup > Library > Library Name na
Media magazine access na Media > Mag Access
Media magazine access, all na Media > Mag Access > Unlock All
Move media inside the unit Media > Move a Tape Cartridge Media > Move Media
Password added or changed for accessing the RMU
Setup > RMU Passwords > RMU User | RMU Administrator
Setup > Edit Opts > Network >User & FTP Login | Administrator Login
Password validation for different levels of OCP access
na Utilities > Security User | Admin | Factory
Passwords added or changed for OCP access
Setup > OCP Passwords > OCP User | OCP Admin
Setup > Passwords > User | Admin
Power off the unit na Power > Power Off Library
Rebooting the unit Functions > Reboot Library Power > Reboot Library
Reconfiguration to adjust for a permanently removed drive
Functions > Reconfigure Library Utilities > Service > Force Reconfig
Remote FTP server address setup Setup > Remote FTP > Address na
Remote FTP server initial directory setup
Setup > Remote FTP > Initial Directory
na
Remote FTP server password setup Setup > Remote FTP > Password na
Remote FTP server user ID setup Setup > Remote FTP > User ID na
Reserved slots, setting Setup > Library > Reserved Slots Setup > Edit Opts > Library >Reserved Slots
Reset configuration to default values
Setup > Reset to Defaults Utilities > Service > Reset User Defaults
RMU Administrator lockout to prevent remote changes
Setup > RMU Passwords > Disable Administrator RMU Access
Setup > Edit Opts > Network >Disable Admin RMU Access
SCSI ID of a drive, changing Setup > Drives > Drive Number 1 > SCSI ID
Setup > Edit Opts > SCSI/FC >Drv 1 Bus ID
SCSI Initialize Element Status response
Setup > SCSI > Initialize Element Status
na
SCSI Mode Sense/Select Device Capabilities Page byte length
Setup > SCSI > Device Capability Page Length
na
SCSI product ID response Setup > SCSI > Product Identification
na
SCSI Read Element Status command response
Setup > SCSI > Report Element Type
na
SCSI Recovered Error sense key reporting status
Setup > SCSI > Post Recovered Errors
na
SCSI Reset or Abort command response
Setup > SCSI > Abort Move Status na
SCSI TapeAlert data options Setup > SCSI > TapeAlert Mode na
Table C-1: Commands & Configuration Option Interface Locations
Command/Option Remote Management Utility OCP Touch Screen
10400179-101 07/2008 ©2006-2008 Overland Storage, Inc. C-3

ARCvault 12 User Guide Available Commands
SCSI vendor ID response Setup > SCSI > Vendor Identification
na
Set warning level to generate SNMP traps and e-mails
Setup > Notifications > Configuration > Warning Level
na
Slot activation Setup > Library > Number of Enabled Slots
na
SNMP traps authentication for Get commands
Setup > Notifications > SNMP Notification > Get Community Name
na
SNMP traps authentication for Set commands
Setup > Notifications > SNMP Notification > Set Community Name
na
SNMP traps authentication for Trap commands
Setup > Notifications > SNMP Notification > Trap Community Name
na
SNMP traps host addresses Setup > Notifications > SNMP Notification > Trap Address n
na
SNMP traps protocol used Setup > Notifications > SNMP Notification > Trap Version
na
Static IP address setup for RMU access
Setup > Network > Static IP Address > IP Address
Setup > Edit Opts > Network >Library IP Addr
Static IP default gateway setup for RMU access
Setup > Network > Static IP Address > Default Gateway
Setup > Edit Opts > Network >IP Gateway
Static IP DNS server setup for RMU access
Setup > Network > Static IP Address > DNS Server
Setup > Edit Opts > Network >DNS Server
Static IP subnet mask setup for RMU access
Setup > Network > Static IP Address > Subnet Mask
Setup > Edit Opts > Network >IP Mask
Status of loader health, detailed Status > Detailed Reports > Library Health
na
Status of loader network settings, detailed
Status > Detailed Reports > Library Status
na
Status of loader, operational Status (Library Status table) Status > Library
Support ticket sent to Overland History > Send a Support Ticket na
Trace logs, downloading History > Download a Library Trace Log File > Full Trace | Diagnostic Trace
na
Trace logs, viewing online History > Display a Library Trace Log > Full Trace | Diagnostic Trace
na
Unlock from a Host Prevent Media Removal lockout
Functions > Unlock Library Utilities > Service > Override Host Lock
View cartridge map of magazine Media Status > Cart Map > [mag name]
Table C-1: Commands & Configuration Option Interface Locations
Command/Option Remote Management Utility OCP Touch Screen
10400179-101 07/2008 ©2006-2008 Overland Storage, Inc. C-4

ARCvault 12 User Guide Available Commands
View options without editing na Setup > View Opts > Library | SCSI/FC | Network
Web login security na Setup > Edit Opts > Network >Secure Web Login
Table C-1: Commands & Configuration Option Interface Locations
Command/Option Remote Management Utility OCP Touch Screen
10400179-101 07/2008 ©2006-2008 Overland Storage, Inc. C-5

APPENDIX
D
10400179-101
Sequential Mode
The ARCvault 12 loader comes configured for random mode tape usage. In this random mode, the library is accessed through LUN 1 using the port located on Drive 1.
If there is a need to emulate an autoloader, sequential mode is also available on the ARCvault 12. In sequential mode, only Drive 1 can be used for the operation. Sequential mode can be activated from either the OCP or RMU. The current mode setting is displayed in the OCP Library Status view (Figure 4-18 on page 4-10) and the RMU Detailed Library Status table (Figure 5-9 on page 5-9).
Certain limitations apply in sequential mode:
• There is no host access to the loader itself (only Drive 1).• Media access through RMU is not available.• Reserved slots are not allowed.• Auto Clean is not allowed.• SCSI ID / SAS WWNID and LUN are not shown.
Sequential OverviewWith the ARCvault in sequential mode, a tape is moved into Drive 1 using the OCP Move Media option. The host then accesses the tape with reads, writes, or whatever operation the backup application requires. When full, the host issues a UNLOAD command to the drive. The ARCvault automatically moves the tape back to the slot it originally came from and loads the tape from the next slot into the drive. This process continues until the library either encounters an empty slot or all tapes have been processed. When done, a completion message is posted to the OCP. The sequential operation can be terminated at any time by using the OCP to remove the tape from the drive.
Sequential SetupSequential mode can be setup using either the OCP or RMU.
07/2008 ©2006-2008 Overland Storage, Inc. D-1

ARCvault 12 User Guide Sequential Mode
OCP Configuration
IMPORTANT: If Reserved slots are configured, you cannot switch to sequential mode. A message about setting Reserved slots to zero is displayed if any attempt to
set sequential mode is made with Reserved slots still configured.
NOTE: When the library is configured for sequential mode from the OCP, the Auto Clean feature is automatically disabled.
To configure sequential mode using the OCP:
1. At the Default menu, press Setup > Edit Opts > Library > OK (at the going offline message).
2. Press the down arrow once to display Library Mode.
3. Press the data field (Rand) to display the option screen (Figure D-1).
Figure D-1: Press Data Field to Display Data Entry Screen
4. Press the Seq option. “Seq” appears in the New box.
5. Press Save.
6. At the "This change causes an immediate reboot…" message, press OK. The Library Mode screen displays briefly with Seq flashing in the New box, followed by a "Library rebooting” message. The library then reboots in sequential mode.
RMU configuration
CAUTION: Clicking the Library button causes the loader to go offline possibly interrupting host requests. Once you exit the menu item, the loader automatically goes back online.
To configure the library to operate in sequential mode using the RMU do the following:
1. Click Setup > Library > Confirm (at the going offline message).
2. Using the Library Mode drop-down menu, select Sequential.
3. Verify these settings:• Reserved Slots is set to zero• Auto Clean Mode is disabled
4. Click Submit.A screen appears informing the user that the update was successful and that the library is rebooting.
DataField
(Displays)
10400179-101 07/2008 ©2006-2008 Overland Storage, Inc. D-2

ARCvault 12 User Guide Sequential Mode
IMPORTANT: If Reserved Slots is not set to zero or Auto Clean Mode is set to Enabled, when the Submit button is clicked, an error message appears at
the top of the frame and the configuration is not updated.
Visible ChangesThe following table denotes changes that are visible based on the mode setting:
Sequential Mode Operation
IMPORTANT: A sequential operation can only be executed from the OCP. The Media tab in the RMU is disabled. There should be no gaps between tapes.
1. From the OCP, press Media > Move Media > OK (at the going offline message).
2. Using the From (Fr) data fields, select the slot with the first tape to be used in the sequential operation (Figure D-2).
Table D-1: Random versus Sequential Mode Settings
Item Impacted Random Mode Sequential Mode
RMU Settings That Change
Status > Bridging Drive Status (Summary) ADI Bridge = Enabled ADI Bridge = (blank)
Status > Detailed Library Status Report Library Mode = Random Library Mode = Sequential
SCSI ID/SAS WWNID shown SCSI ID/SAS WWNID not shown
SCSI/SAS/FC LUN shown SCSI/SAS LUN not shown
Status > Detailed Drive n Report (for bridging drive)
ADI Bridge = Enabled ADI Bridge = Disabled
Full Library Trace > Library Info Library Mode = Random Library Mode = Sequential Drive 1
Full Library Trace > Nonvol Config >Library Area Mode = Random Mode = Sequential Drive 1
Full Library Trace > Nonvol Config >Drives Area Drive configured for bridging = Bridging Enabled
Drive configured for bridging = Bridging Disabled
OCP Settings That Change
Status > Library Mode = Random Mode = Sequential
Setup > View Opts > Library Library Mode = Rand Library Mode = Seq
10400179-101 07/2008 ©2006-2008 Overland Storage, Inc. D-3

ARCvault 12 User Guide Sequential Mode
Figure D-2: Move Media Screen
3. Select Drive 1 as the destination.
4. Press Execute. The selected tape is moved to Drive 1. The host detects the tape and performs the operations, swapping tapes when full.
5. The process continues until one of the following occurs:• All the tapes in the library have been cycled through the drive and
restored to a slot. • An empty slot is encountered when the library is looking for the next
tape to move to the drive.• Using the OCP, a tape is removed from the drive.At this time the OCP displays the message "Sequential mode completed" (unless it was stopped by removing a tape from the drive).
Possible Error Conditions
NOTE: Opening a door displays a message on the OCP, but it is not an error and does not end the sequential process. Sequential processing continues when the door is closed.
If certain actions or conditions occur, the sequential process may fail:
• Moving a tape into the slot which the tape in Drive 1 was retrieved due to the sequential process (Fault Code: 2008 (Soft), Illegal Move).
• Accessing a magazine.• Various fault conditions occurring.• Rebooting or cycling the power.
These conditions will not post a message indicating the sequential process was ended. If a tape remains in Drive 1, it must be removed manually using the OCP.
CleaningWhen cleaning is requested by a drive, the cleaning is done with the normal manual cleaning method using the OCP. A cleaning tape can be left in a magazine before the first data tape or after an empty slot prior to starting sequential mode. Reserved slots are not allowed in sequential mode.
Cleaning is requested by the drive. No read or write operations are allowed on the drive until the cleaning is completed. If a sequential operation is in progress, it is terminated and cleaning must be done before proceeding.
10400179-101 07/2008 ©2006-2008 Overland Storage, Inc. D-4

ARCvault 12 User Guide Sequential Mode
Clean the drive as follows:
1. If a sequential operation is in progress and cleaning is required, the sequential operation is terminated.
2. Using the OCP, move the cartridge from Drive 1 back to its slot.
3. Follow the normal cleaning procedure (see “Tape Drive Cleaning” on page 3-6).
IMPORTANT: If the cleaning tape is expired, a soft fault (800A Expired Cleaning Media) is posted and the tape is automatically returned to its slot.
4. After the cleaning is complete, restart the sequential operation.
Other ConsiderationsRMU Functionality
The Media tab and Diagnostics options are not available with the library configured for sequential mode. All other RMU access is available and can be used.
OCP Tape Management
IMPORTANT: It is not recommended that cartridge moves or magazine access be done while a sequential operation is in progress.
Prior to starting sequential mode, cartridges can be moved from slot to slot. A cartridge move to Drive 1 begins the sequential operation. After starting the sequential operation, any other cartridge move or attempt to access the magazine may end the operation with no error message posted to the OCP.
If a tape is loaded into a slot left vacant by the tape currently in Drive 1 due to the sequential operation, the loader will post a soft fault and terminate the sequential operation when it attempts to return the tape to the slot. After the fault message is cleared, the extra tape must be removed from the slot and the full tape in Drive 1 must be moved back to its slot using the OCP Media commands. The sequential operation can then be resumed by moving the next tape in sequence into Drive 1.
Configuration and status are available while the loader is configured for sequential mode.
10400179-101 07/2008 ©2006-2008 Overland Storage, Inc. D-5

APPENDIX
E
10400179-101
ARCvault 12 to 24 Upgrade
Using an ARCvault Upgrade kit (available separately), you can convert an ARCvault 12 Loader into an ARCvault 24 Library.
IMPORTANT: You must have Level 2 security access or higher to make this change.
1. Open the left door, insert the new left media magazine, and close the door.
Figure E-1: Inserting the Left Media Magazine
2. Launch RMU from a remote PC or attached laptop.
3. Click Setup > Library.
ARC
-000
5
07/2008 ©2006-2008 Overland Storage, Inc. E-1

ARCvault 12 User Guide ARCvault 12 to 24 Upgrade
Figure E-2. ARCvault 12 RMU Library Options
4. Change Number of Enabled Slots from 12 to 24.
5. Click Submit.Wait while the library automatically reboots.
6. Log back on and verify that both media magazines are visible on the Status page.
7. Make any other configuration changes such as activating an I/E Element slot.
10400179-101 07/2008 ©2006-2008 Overland Storage, Inc. E-2

10400179-101
Glossary and Acronym List
NOTE: This is a general Overland Storage glossary and acronym list. Not all items may be found in this document or be used by this product.
1000BASE-T
1000BASE-T (also known as IEEE 802.3ab) is a standard for gigabit Ethernet over copper wiring. It requires, at a minimum, Category 5 cable (the same as 100BASE-TX), but Category 5e ("Category 5 enhanced") and Category 6 cable may also be used and are often recommended. 1000BASE-T requires all four pairs to be present and is far less tolerant of poorly installed wiring than 100BASE-TX.
Address
An address is a data structure or logical convention used to identify a unique entity, such as a particular process or network device.
Auto Balance
A feature that automatically balances preferred paths evenly among all available host ports and controller ports. Auto balancing spreads I/O load by utilizing as many host ports and controller ports as possible.
Back-end
Front-end and back-end are terms used to characterize program interfaces and services relative to the initial user, human or program, of these interfaces and services. A "front-end" application is one that application users interact with directly. A "back-end" application or program serves indirectly in support of the front-end services, usually by being closer to the required resource or having the capability to communicate with the required resource. The back-end application may interact directly with the front-end or, perhaps more typically, is a program called from an intermediate program that mediates front-end and back-end activities.
Bar Code
The machine-readable representation of a product code. Bar codes are read by a scanner that passes over the code and registers the product code. The width of black lines and white spaces between varies. Combinations of lines and spaces represent characters. Overland uses 3-of-9 code (Code 39) where each character is represented by 9 bars, 3 of which are wide.
07/2008 ©2006-2008 Overland Storage, Inc. GL-1

ARCvault 12 User Guide Glossary and Acronym List
Bridging
Devices that connect and pass packets between two network segments that use different communications protocol.
Bus or Channel
A common physical path composed of wires or other media, across which signals are sent from one part of a computer to another. A channel is a means of transferring data between modules and adapters, or between an adapter and SCSI devices. A channel topology network consists of a single cable trunk that connects one workstation to the next in a daisy-chain configuration. All nodes share the same medium, and only one node can broadcast messages at a time.
Cat 5 Cable
Short for Category 5, it is network cabling that consists of four twisted pairs of copper wire terminated by RJ-45 connectors. CAT 5 cabling supports frequencies up to 100 MHz and speeds up to 100 Mbps. It can be used for ATM, token ring, 100BASE-T, and 10BASE-T networking.
Cat 5 is based on the EIA/TIA 568 Commercial Building Telecommunications Wiring Standard developed by the Electronics Industries Association as requested by the Computer Communications Industry Association in 1985.
Cat 6 Cable
Short for Category 6, it is network cabling that consists of four twisted pairs of copper wire terminated by 8P8C modular connectors made to higher standards that help reduce noise caused by crosstalk and system noise. The ANSI/TIA-568-B.2-1 specification states the cable may be made with 22 to 24 AWG gauge wire, so long as the cable meets the specified testing standards.
It is designed for Gigabit Ethernet that is backward compatible with the Category 5/5e and Category 3 cable standards. Cat 6 features more stringent specifications for crosstalk and system noise. The cable standard provides performance of up to 250 MHz and is suitable for 10BASE-T / 100BASE-TX and 1000BASE-T (Gigabit Ethernet).
DSM
Short for Device Specific Module, it is a software module that allows the ULTAMUS RAID storage array hardware to use Microsoft's MPIO.
Expansion Slot
Area in a computer that accepts additional input/output boards to increase the capability of the computer.
F_port
A Fabric port within a Fibre Channel switch that provides a point-to-point link attachment to a single N_Port. F_Ports are intermediate ports in virtual point-to-point links between end ports, for example N_Port to F_Port to F_Port to N_Port using a single Fibre Channel fabric switch.
FL_port
A Fabric Loop port within a Fibre Channel switch that is capable of Fibre Channel Arbitrated Loop operations and is connected to one or more NL_Ports via a Fibre Channel Arbitrated Loop. An FL_Port becomes a shared entry point for public
10400179-101 07/2008 ©2006-2008 Overland Storage, Inc. GL-2

ARCvault 12 User Guide Glossary and Acronym List
NL_Port devices to a Fibre Channel fabric. FL_Ports are intermediate ports in virtual point-to-point links between end ports that do not reside on the same loop, for example NL_Port to FL_Port to F_Port to N_Port through a single Fibre Channel fabric switch.
Failback
Failback occurs when a path with a higher priority than the currently active path is restored. In this case, I/O will “fail back” to the higher priority path once it is available again.
Failover
The ability to automatically substitute a working system or path for one which has failed.
Failover/Failback
A combination of Failover and Failback. When a preferred path becomes unavailable, another path is used to route I/O until the preferred path is restored. In this case I/O will "fail back" to the preferred path once it is available again.
FC-AL
Short for Fibre Channel Arbitrated Loop. An FC-AL is a Fibre Channel network in which up to 126 systems and devices are connected in a loop topology, with each transmitter connecting to the receiver of the device on its logical right. The Fibre Channel Arbitrated Loop protocol used for transmission is different from Fibre Channel switched and point-to-point protocols. Multiple FC-AL loops can be connected via a fabric switch to extend the network.
Firmware
Software stored in read-only memory (ROM) or programmable ROM (PROM). Firmware is often responsible for the behavior of a system when it is first switched on.
Front-end
See Back-end.
Gigabit Ethernet
Also known as GigE or GbE, this Ethernet standard uses a one Gigahertz (1000 Hz) clock rate to move data.
HBA
Short for Host Bus Adapter. An HBA is an I/O adapter that sits between the host computer's bus and the Fibre Channel loop and manages the transfer of information between the two channels. In order to minimize the impact on host processor performance, the HBA performs many low-level interface functions automatically or with minimal processor involvement.
Hot Swap
The action of components being removed and replaced while the unit is running, with power to either the component or a device still connected to the unit. Not all components are hot swappable. Please read installation and maintenance instructions carefully.
10400179-101 07/2008 ©2006-2008 Overland Storage, Inc. GL-3

ARCvault 12 User Guide Glossary and Acronym List
Internet
A global network of networks used to exchange information using the TCP/IP protocol. It allows for electronic mail and the accessing ad retrieval of information from remote sources.
Initiator Device
A system component that originates an I/O command over an I/O bus or network. An initiator issues the commands; a target receives them.
IP
Short for Internet Protocol. IP specifies the format of packets and the addressing scheme.
iSCSI
Short for Internet SCSI. iSCSI is an IP-based storage networking standard for linking data storage facilities, developed by the Internet Engineering Task Force (IETF). By carrying SCSI commands over IP networks, iSCSI is used to facilitate data transfers over intranets and to manage storage over long distances. The iSCSI protocol is among the key technologies expected to help bring about rapid development of the storage area network (SAN) market, by increasing the capabilities and performance of storage data transmission. Because of the ubiquity of IP networks, iSCSI can be used to transmit data over local area networks (LANs), wide area networks (WANs), or the Internet and can enable location-independent data storage and retrieval.
iSNS Server
Short for Internet Storage Name Service Server. This is a server on an iSCSI SAN providing name registration service and query capability to other iSCSI clients per the IETF draft iSNS specification.
LAN
Short for Local Area Network. A network connecting computers in a relatively small area such as a building.
LED
Short for Light-Emitting Diode. An LED is a type of diode that emits light when current passes through it. Visible LEDs are used as indicator lights on electronic devices.
LUN
Short for Logical Unit Number. A SCSI or Fibre Channel device identifier. LUN is a subdivision of a SCSI target.
MAC Address
Short for Media Access Control address, a hardware address that uniquely identifies each node of a network.
Mapping table
A table indexed by sequential LUN values, indicating the selected BUS:TARGET:LUN devices. Mapping tables are used by routers and bridges like the GEOi to perform Ethernet-to-SCSI pathing.
10400179-101 07/2008 ©2006-2008 Overland Storage, Inc. GL-4

ARCvault 12 User Guide Glossary and Acronym List
MD5 Algorithm
MD5 is a way to verify data integrity, and is much more reliable than checksum and many other commonly used methods.
MPIO
Short for Multipath Input/Output. A multipath solution built into Microsoft server-grade operating systems. It requires the DSM to work with the ULTAMUS RAID storage array hardware.
MTU
Short for Maximum Transfer Unit. It is the largest size packet or frame, specified in octets (eight-bit bytes), that can be sent in a packet- or frame-based network.
N_port
A Node port connects via a point-to-point link to either a single N_Port or a single F_Port. N_Ports handle creation, detection, and flow of message units to and from the connected systems. N_Ports are end ports in virtual point-to-point links through a fabric, for example N_Port to F_Port to F_Port to N_Port using a single Fibre Channel fabric switch.
Network Interface Card (NIC)
A board that provides network communication capabilities to and from a computer.
NDMP
Short for Network Data Management Protocol. A protocol standard used by some Network Attached Storage systems to provide an industry standard means to do backup and restores of the NAS system without the need for 3rd party agents to be installed on the NAS device. Also see NDMP.org for further details.
NL_port
A Node Loop port is capable of arbitrated loop functions and protocols. An NL_Port connects via an arbitrated loop to other NL_Port and at most a single FL_Port. NL_Ports handle creation, detection, and flow of message units to and from the connected systems. NL_Ports are end ports in virtual point-to-point links through a fabric, for example NL_Port to F_Port to F_Port to N_Port using a single Fibre Channel fabric switch. In the absence of a fabric switch FL_Port, NL_Ports can communicate with other NL_Ports in virtual point-to-point links through a FC-AL open loop circuit often through FC-AL (Arbitrated Loop) hub or loop switch devices.
Node Name
This is an eight-byte, 16-character hexadecimal number, uniquely identifying a single fibre device. It incorporates the World Wide Name and two additional bytes that are used to specify the format. In a host system with multiple FC ports, all adapters typically use the same Node Name, but unique Port Names.
NVRAM
Abbreviation of Non-Volatile Random Access Memory, a type of memory that retains its contents when power is turned off.
10400179-101 07/2008 ©2006-2008 Overland Storage, Inc. GL-5

ARCvault 12 User Guide Glossary and Acronym List
Port Name
This is an eight-byte hexadecimal number, uniquely identifying a single host HBA port. It incorporates the World Wide Name and two additional bytes that are used to specify the format and indicate the port number.
Preferred Path
The preferred path is the default path. When the path selection policy is set to Failover/Failback, the preferred path is always used if it is available. If the preferred path fails, I/O switches to another path. If it is later restored, I/O switches back to the preferred path.
PTP
Short for Point-to-Point. PTP is the common mode of attachment to a single host. PTP is sometimes used to attach to a Fibre Channel switch for SAN connectivity.
RETMA
Short for Radio-Electronics-Television Manufacturers' Association. It is the common name given for a 19-inch distribution frame rack for mounting components.
Round Robin
The Round Robin path selection policy causes all healthy paths to be used for I/O. Paths are used in a round-robin order.
Router
A router is a device that enables connectivity between Ethernet network segments.
SAN
Short for Storage Area Network. A shared storage architecture connecting computers and storage devices for online data access. Each connected system can directly access any attached storage device. Usually refers to the network behind servers that links one or more servers to one or more storage systems.
SAS
Short for Serial Attached SCSI. It is a point-to-point serial protocol that replaces parallel SCSI bus technology and uses the standard SCSI command set. At present it is slightly slower than the final parallel SCSI implementation, but in 2009 it will double its present speed to 6 Gbit/s, allowing for much higher speed data transfers than previously available, and is "downwards" compatible with second generation SATA drives.
SCSI
Short for Small Computer System Interface. SCSI is an industry standard for connecting peripheral devices and their controllers to an initiator. Storage devices are daisy-chained together and connected to a host adapter. The host adapter provides a shared bus that attached peripherals use to pass data to and from the host system. Examples of devices attached to the adapter include disk drives, CD-ROM discs, optical disks, and tape drives. In theory, any SCSI device can be plugged into any SCSI controller.
10400179-101 07/2008 ©2006-2008 Overland Storage, Inc. GL-6

ARCvault 12 User Guide Glossary and Acronym List
SCSI addressing
Each device supported by a SCSI adapter has its own unique SCSI address, which dictates the device’s priority when arbitrating for access to the SCSI bus. A SCSI address of 7 has the highest priority. For a fast/wide SCSI adapter that supports up to 16 devices, the next highest priority address is 6, then 5, 4, 3, 2, 1, 0, 15, 14, 13, 12, 11, 10, 9, and 8. The narrow SCSI adapter supports up to eight devices, including itself. The SCSI address 7 has the highest priority, followed by 6, 5, 4, 3, 2, 1, and 0.
SCSI bus
A SCSI bus provides a means of transferring data between SCSI devices. A SCSI bus is either an 8- or 16-bit bus that supports up to 8 or 16 devices, including itself. The bus can consist of any mix of initiators and targets, with the requirement that at least one initiator and one target must be present.
SCSI device
A SCSI device is a single unit on a SCSI bus that originates or services SCSI commands. A SCSI device is identified by a unique SCSI address. SCSI devices can act as initiators or targets.
SCSI port
A SCSI port is an opening at the back of a router that provides connection between the SCSI adapter and SCSI bus.
Storage Area Network
See SAN.
Target
A target is a device (peripheral) that responds to an operation requested by an initiator (host system). Although peripherals are generally targets, a peripheral may be required to act temporarily as an initiator for some commands (for example, SCSI COPY command).
Telnet
A terminal emulation program for TCP/IP networks such as the Internet. The Telnet program runs on a computer and connects it to a server on the network. You enter commands through the Telnet program and they will be executed as if you were entering them directly on the server console. This enables you to control the server and communicate with other servers on the network. To start a Telnet session, you must log in to a server by entering a valid user name and password. Telnet is a common way to remotely control Web servers.
Terminator
A terminator refers to the electrical connection at each end of a SCSI bus. The terminator is composed of a set of resisters, or possibly other components. The function of a terminator is to provide a pull-up for open collector drivers on the bus, and also impedance matching to prevent signal reflections at the ends of the cable. SCSI buses require that a terminator be placed on the SCSI connector on the last SCSI peripheral. Data errors may occur in a SCSI bus that is not terminated.
10400179-101 07/2008 ©2006-2008 Overland Storage, Inc. GL-7

ARCvault 12 User Guide Glossary and Acronym List
Topology
Logical layout of the parts of a computer system or network and their interconnections. There are two types of topology: physical and logical. The physical topology of a network refers to the configuration of cables, computers, and other peripherals. Logical topology is the method used to pass the information between workstations.
USB (Universal Serial Bus) Port
A hardware interface for low-speed peripherals such as the keyboard, mouse, joystick, scanner, printer, and telephony devices.
VLAN
Short for Virtual LAN. It consists of a network of computers that behave as if they are connected to the same wire - even though they may actually be physically connected to different segments of a LAN.
10400179-101 07/2008 ©2006-2008 Overland Storage, Inc. GL-8

10400179-101
Index
Symbols> (Flow Indicator) .................................. Preface-iii
Numerics2U dimensions ..................................................... 1-1
Aabort move status ............................................. 4-21
Bbar code labels
displayed ........................................................ 5-7installing........................................................ 3-4
CCart Map screen .................................................. 3-3clean a tape drive ................................................ 3-6cleaning a drive ................................................... 3-6configuration settings, saving .......................... 3-1configuring for e-mails ....................................... 2-4controlled shutdown ........................................... 3-2Conventions............................................. Preface-iiicreating passwords .................................. 4-21, 4-22current library status......................................... 3-2customer support .................................... Preface-iv
Ddecision trees........................................................ 6-8default IP address 10.0.0.1 ...................... 2-2, 5-16default RMU passwords .................................... 1-5Default screen, OCP .................................... 4-2,4-4
Help button ................................................... 4-5Media button................................................. 4-6Power button................................................. 4-4Setup button ............................................... 4-12
Status button................................................. 4-8Utilities button............................................ 4-23
disabling passwords .......................................... 4-22door opened ........................................................... 1-3drive covers ........................................................... 1-3drive status ........................................................... 4-9
EEdit Opts screen, OCP...................................... 4-16
Library button ............................................. 4-16Network button ........................................... 4-17SCSI/FC button........................................... 4-20
editing passwords .............................................. 4-21e-mail configuration .................................. 2-4, 5-26ERP flowcharts..................................................... 6-8Error Recovery Process (ERP) .......................... 6-2
FFault Symptom Codes (FSC)............................. 6-1features .................................................................. 1-2front panel layout ................................................ 1-2FSC/ERP table ..................................................... 6-2Full Trace log........................................................ 3-1Functions tab, RMU.......................................... 5-28
Check Firmware Revision Level option 5-33Firmware Updates-FTP options ............. 5-32Firmware Updates-HTTP options .......... 5-31Reboot Library option................................ 5-34Reconfigure Library option ...................... 5-34Run a Library Diagnostic option............. 5-33Send a Test E-Mail option ........................ 5-33Unlock Library option ............................... 5-34
Ggeneral library information ..................... 4-10,5-6
07/2008 ©2006-2008 Overland Storage, Inc. IX-1

ARCvault 12 User Guide Index
HHelp link, RMU ................................................. 5-38Help screen, OCP ................................................ 4-5History tab, RMU ............................................. 5-35
Display a Library Trace Log option....... 5-35Download a Library Trace File option .. 5-37Send a Support Ticket option ................. 5-38
LLCD touch screen................................................ 1-2loading a drive ..................................................... 4-7loading the media ............................................... 2-5Logout link, RMU ............................................. 5-38
MMagazine Release Tool (MRT) ....................... 6-20media magazines................................................. 3-4
accessing ............................................... 4-6, 4-24loading ............................................................ 2-5manual release ........................................... 6-20overview ......................................................... 1-5status (OCP).................................................. 4-9status (RMU) ................................................ 5-6unlocking .............................................. 4-6, 4-24
Media screen, OCP ............................................. 4-6Mag Access button....................................... 4-6Move Media button...................................... 4-7
Media tab, RMU ................................................ 5-11Clean a Drive option ................................. 5-12Inventory Library option ......................... 5-13Move a Tape Cartridge option ................ 5-12
Move Media screen details................................ 4-7moving media................................................ 3-5,4-7
Nnetwork configuration...................................... 5-16network management system ........................ 5-25Node Name ........................................................ GL-5
OOCP main screen
Help button ................................................... 4-5Media button................................................. 4-6Power button................................................. 4-4Setup button ............................................... 4-12Status button ................................................ 4-8Utilities button ........................................... 4-23
OCP touch screendisplaying errors .......................................... 6-1
location.................................................... 1-4,4-1overview .......................................................... 3-2power on option ............................................. 2-2software map ................................................. 4-3specifications ................................................. 4-1
open door warning ............................................... 1-3Operator Control Panel (OCP).......................... 1-4Overland Technical Support ................ Preface-ivOverland website ................................................. 4-6
Ppassword release ................................................ 4-23passwords
creating ......................................................... 4-22disabling ....................................................... 4-22levels...................................................... 1-5, 4-21
Port Name ......................................................... GL-6Power screen, OCP .............................................. 4-4Power-On Self-Test (POST)............................... 2-2
Rrear panel connections........................................ 1-3Remote Management Utility (RMU) ............... 1-4reserved slot
configure ....................................................... 5-19display ............................................................. 5-8
RMUdefault IP address ........................................ 2-2default passwords......................................... 1-5interface .................................................. 1-4,5-1login ......................................................... 2-2,5-2software map ................................................. 5-5tab bar ............................................................. 5-3
RMU media map symbology ............................. 5-7RMU navigation tabs
Functions tab............................................... 5-28History tab ................................................... 5-35Media tab...................................................... 5-11Setup tab ...................................................... 5-13Status tab ....................................................... 5-6
Ssaving configuration settings ............................ 3-1SCSI configuration options.................... 4-15, 4-21SCSI drive configuration.................................. 4-20security levels ................................... 1-5,4-21, 5-15sequential mode .................................................. C-2Setup screen, OCP ............................................. 4-12
Edit Opts button ......................................... 4-16Password button ......................................... 4-21
10400179-101 07/2008 ©2006-2008 Overland Storage, Inc. IX-2

ARCvault 12 User Guide Index
View Opts button ....................................... 4-13Setup tab, RMU................................................. 5-13
Drive Configuration option...................... 5-23Library Configuration option .................. 5-18Network option........................................... 5-16Notification Registration option ............. 5-25OCP Security Passwords option ............. 5-15Remote FTP Server option ...................... 5-18Reset to Defaults option ........................... 5-28RMU Security Passwords option............ 5-15SCSI Configuration option ...................... 5-20
slot numbering.............................................. 1-5,3-4SMTP mail server ............................................. 5-27SNMP trap addresses ...................................... 5-25Startup screen ..................................................... 4-2static IP address setup .................................... 5-16Status screen, OCP............................................. 4-8
Cart Map button .......................................... 4-9Drive n button ............................................ 4-11Library button ............................................ 4-10
Status tab, RMU ................................................. 5-6Detailed Reports menu............................... 5-8Drive Status Summary table .................. 5-10Library Status table.................................... 5-6media map ..................................................... 5-7Operational Status box............................... 5-6refresh options.............................................. 5-7
Ttechnical support
contacting .......................................... Preface-ivinformation.................................................... 4-5
test notifications................................................ 5-28troubleshooting
flowcharts ...................................................... 6-8FSC/ERP table ............................................. 6-2overview ......................................................... 6-1
Typographic Conventions..................... Preface-iii
UUtilities screen, OCP........................................ 4-23
Diagnostics button..................................... 4-24Security button........................................... 4-26Service button............................................. 4-23
Vvalidating a password ...................................... 4-26View Opts screen, OCP.................................... 4-13
Library button ............................................ 4-13Network button .......................................... 4-14SCSI/FC button .......................................... 4-15
Wwarranty activation............................................. 2-1
10400179-101 07/2008 ©2006-2008 Overland Storage, Inc. IX-3