archery anatomy, warm-up, and physical … anatomy, warm-up, and physical conditioning 3 the...
TRANSCRIPT
IntermediateLevel
ARCHERY ANATOMY, WARM-UP, and PHYSICAL CONDITIONINGModule
FITACoach’sManual
ModuleARCHERY ANATOMY,
WARM-UP, and PHYSICAL CONDITIONING
Contents
FITA Coaching ManualIntermediate Level
I. Archery Anatomy1. General anatomyTo get a clear picture of what is actually happening in our body, what anatomical structures are involved and how they cooperate during the performance of a shot we first need to know some basic anatomical knowledge from which we may derive special exercises to improve scores, to prevent injury or even to treat minor problems.
Basis of the human body is the skeleton with bones, articulating in joints, surrounded by more or less special-ized soft tissue (ligaments, capsules) and muscles, and finally covered by the skin. Running in between and in-side these tissues and finally penetrating into them we find nerves, arteries and veins. Organs are located in three cavities: skull, chest cavity, and abdomen. For archery anatomy we may concentrate on bones, joints and mus-cles and leave out the other structures mentioned, they are of more interest in sports physiology.
There are a few names used for describing the different positions in anatomy which are helpful for a better under-standing of the following and should be known; they are: – proximal = closer to the centre of the body; example:
the shoulder joint is proximal to the wrist joint;– distal = further away from the body centre; example:
opposite of the above;– lateral = more to the outer side; example: the shoulder
joint is lateral to the neck;– Medial = more to the inner side; example: opposite of
the above.– posterior = further back; example: the spine is poste-
rior to the navel– anterior = further to the front; example: the opposite
of the aboveAs bones and joints are “passive” structures we need
muscles to get them moving. Muscles can only pull and bring two points (origin and insertion) through which they are attached to the bone closer together. Muscles cannot push, although an archer is often told to “push the bow arm towards the butt.” Origin as well as inser-tion need not be limited to a small spot; it can be a line or any larger area. We refer to the origin as the fixed point and to the insertion as the moveable point. For example, contraction of the biceps muscle of the upper arm moves the hand upwards towards the shoulder; the origin of the biceps muscle is fixed through two tendons at a front part of the shoulder blade, it inserts with one tendon at the forearm close to the elbow joint.
Archery Anatomy, Warm-Up, and Physical Conditioning 3
The position of the whole muscle in relation to the joint it moves gives a good understanding of what the muscle in fact does. Same example, the biceps muscle is located on the front side of the elbow joint, thus it will bend this joint to the front.
Obviously, there must be muscles on the opposite side of that joint to bring the bones back to their original posi-tion or move bones to the opposite side. In our example this would be the triceps muscle which is located on the posterior side of the upper limb, thus it will stretch out the bent elbow (bending to the back side is not possible due to the shape of the elbow joint).
Muscles which perform movement in opposite direc-tions of another muscle are called antagonists, whereas muscles that help together for a certain movement are called synergists. If a single muscle (agonist) is contracted the antagonist has to relax and vice versa. If that does not work properly it will result in cramps where (almost) no intended movement can be achieved.
To be able to stand straight or to keep our body in a bal-anced posture, no matter if standing or lying down, mus-cles have a certain basic tension which can consciously be influenced and altered. If, through exercises, one muscle is well trained the antagonist will become relatively too weak; such an imbalance is then followed by a change in the usual joint posture. Knowing this, we should always recommend strengthening not only the agonist but also the antagonist, as well as symmetrically both sides of the body, to keep the balance.
For archery, our main concern points towards bones, joints and muscles of the shoulder girdle. Although a lot of different anatomical structures are listed and described below they do not work isolated but cooperate in several ways, depending on different joint positions.
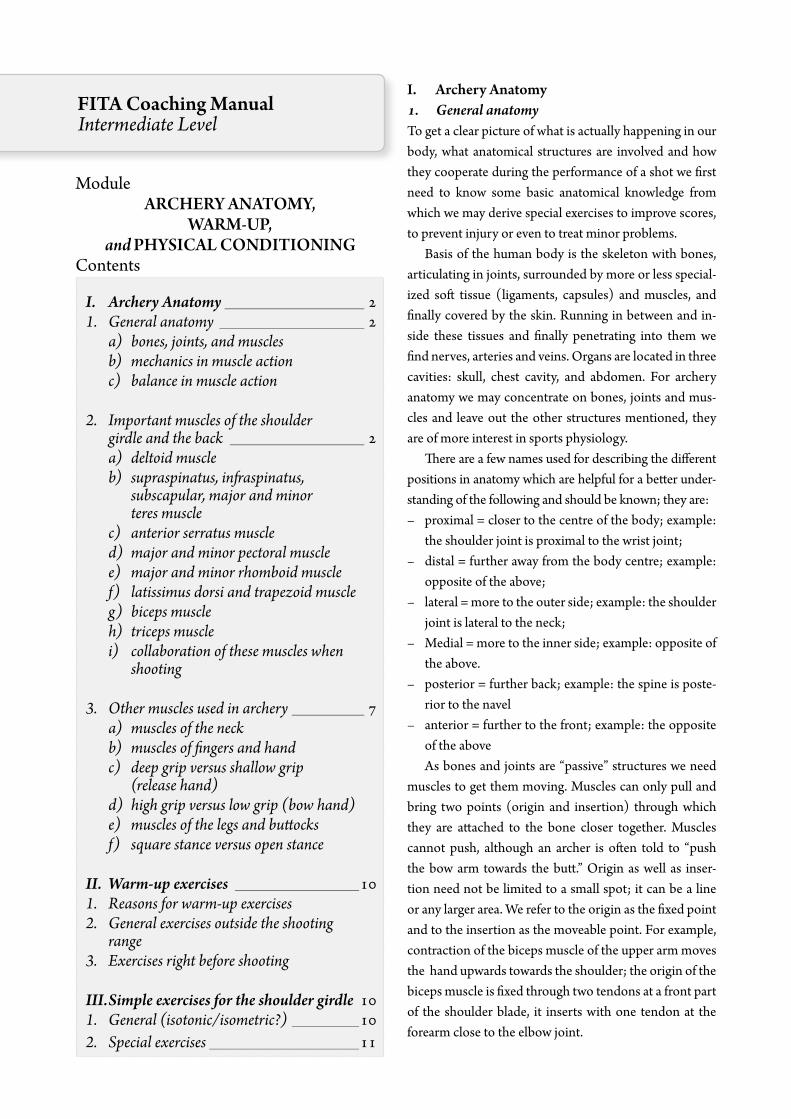
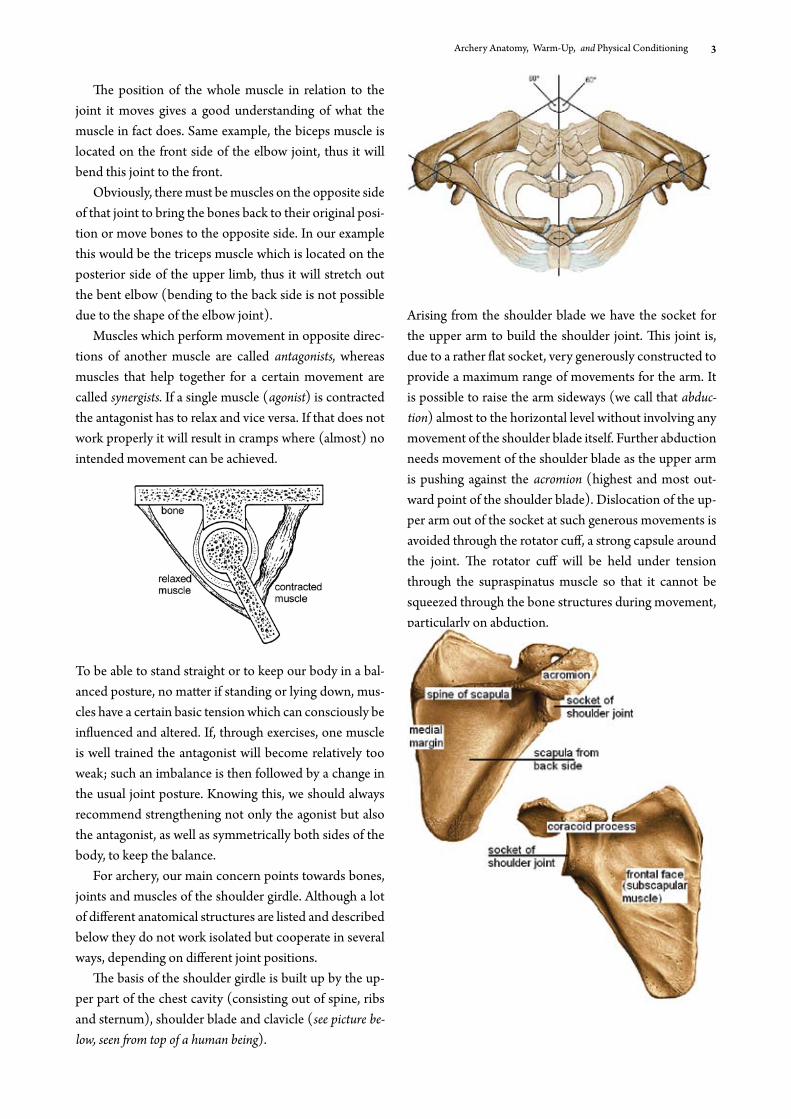
The basis of the shoulder girdle is built up by the up-per part of the chest cavity (consisting out of spine, ribs and sternum), shoulder blade and clavicle (see picture be-low, seen from top of a human being).
Arising from the shoulder blade we have the socket for the upper arm to build the shoulder joint. This joint is, due to a rather flat socket, very generously constructed to provide a maximum range of movements for the arm. It is possible to raise the arm sideways (we call that abduc-tion) almost to the horizontal level without involving any movement of the shoulder blade itself. Further abduction needs movement of the shoulder blade as the upper arm is pushing against the acromion (highest and most out-ward point of the shoulder blade). Dislocation of the up-per arm out of the socket at such generous movements is avoided through the rotator cuff, a strong capsule around the joint. The rotator cuff will be held under tension through the supraspinatus muscle so that it cannot be squeezed through the bone structures during movement, particularly on abduction.
FITA Coaching Manual Intermediate Level4
2. Important muscles of the shoulder girdle and the back
We distinguish several muscle layers between skin and rib cage where the bigger and larger ones more or less cover the smaller ones; it should also be kept in mind that mus-cles very rarely work on their own, a movement mostly involves several muscles at the same time, sometimes they achieve different movements when a joint between two bones has changed its position.
Like describing different positions with special names we also have special names for describing certain move-ments in anatomy; they are:– Abduction: away from the body to the side; example,
raising the bow arm to the side; – Adduction: towards the body, coming from the side;
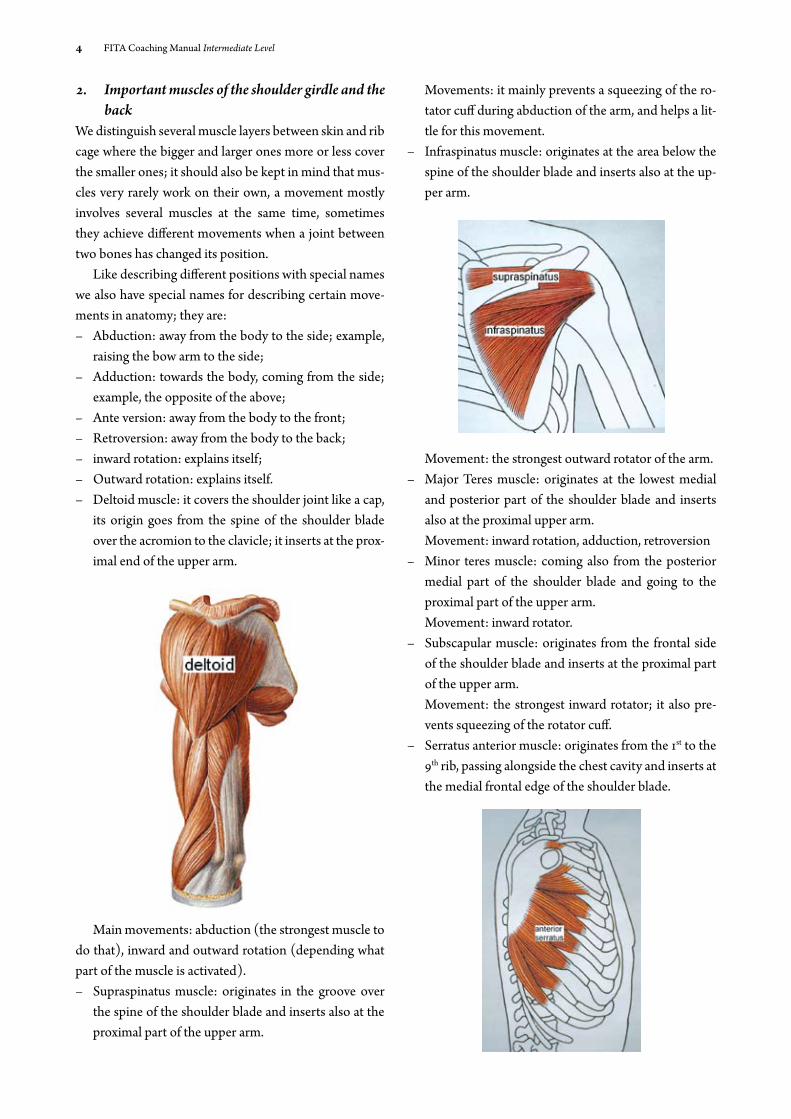
example, the opposite of the above;– Ante version: away from the body to the front; – Retroversion: away from the body to the back;– inward rotation: explains itself;– Outward rotation: explains itself.– Deltoid muscle: it covers the shoulder joint like a cap,
its origin goes from the spine of the shoulder blade over the acromion to the clavicle; it inserts at the prox-imal end of the upper arm.
Main movements: abduction (the strongest muscle to do that), inward and outward rotation (depending what part of the muscle is activated).– Supraspinatus muscle: originates in the groove over
the spine of the shoulder blade and inserts also at the proximal part of the upper arm.
Movements: it mainly prevents a squeezing of the ro-tator cuff during abduction of the arm, and helps a lit-tle for this movement.
– Infraspinatus muscle: originates at the area below the spine of the shoulder blade and inserts also at the up-per arm.
Movement: the strongest outward rotator of the arm. – Major Teres muscle: originates at the lowest medial
and posterior part of the shoulder blade and inserts also at the proximal upper arm.Movement: inward rotation, adduction, retroversion
– Minor teres muscle: coming also from the posterior medial part of the shoulder blade and going to the proximal part of the upper arm.Movement: inward rotator.
– Subscapular muscle: originates from the frontal side of the shoulder blade and inserts at the proximal part of the upper arm.
Movement: the strongest inward rotator; it also pre-vents squeezing of the rotator cuff.
– Serratus anterior muscle: originates from the 1st to the 9th rib, passing alongside the chest cavity and inserts at the medial frontal edge of the shoulder blade.
Archery Anatomy, Warm-Up, and Physical Conditioning 5
Movement: pulls the shoulder blade forward, lowers and rotates it; the only muscle which can actually pull the bow arm towards the target.– Major pectoral muscle: coming from the clavicle and
sternum (1st to 5th rib), going to the proximal part of the upper arm.
Movement: mainly adduction of the arm and inward rotation.
– Minor pectoral muscle: originates at the 3rd to 5th rib and inserts at the coracoid process of the shoulder blade.
Movement: moves the shoulder girdle more to the front.
– Major and minor rhomboid muscles: they originate from the spine (from the 6th cervical down to the 4th dorsal vertebra) and insert at the medial edge of the shoulder blade. They are situated in the layer below the trapezoid muscle.
Movement: they pull the shoulder blade a little up-wards and towards the spine. They are actually respon-sible for “squeezing the shoulder blades”.
– Biceps muscle: it originates at the front part of the shoulder blade with two tendons, one at the socket of the shoulder blade, the other one at the coracoid proc-ess; it inserts at the forearm (ulna and radius) near the elbow.
Movement: it is the strongest muscle to bend and out-ward rotate the elbow joint. It also does the ante ver-sion of the arm.
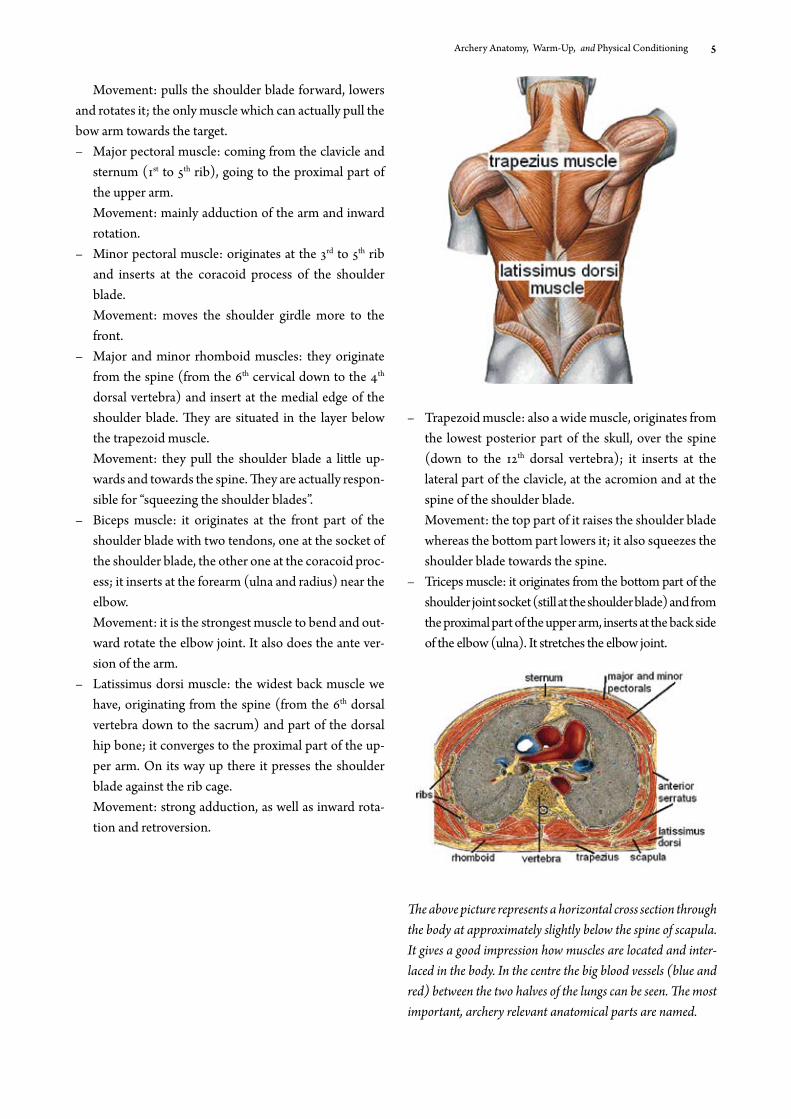
– Latissimus dorsi muscle: the widest back muscle we have, originating from the spine (from the 6th dorsal vertebra down to the sacrum) and part of the dorsal hip bone; it converges to the proximal part of the up-per arm. On its way up there it presses the shoulder blade against the rib cage.
Movement: strong adduction, as well as inward rota-tion and retroversion.
– Trapezoid muscle: also a wide muscle, originates from the lowest posterior part of the skull, over the spine (down to the 12th dorsal vertebra); it inserts at the lateral part of the clavicle, at the acromion and at the spine of the shoulder blade.
Movement: the top part of it raises the shoulder blade whereas the bottom part lowers it; it also squeezes the shoulder blade towards the spine.
– Triceps muscle: it originates from the bottom part of the shoulder joint socket (still at the shoulder blade) and from the proximal part of the upper arm, inserts at the back side of the elbow (ulna). It stretches the elbow joint.
The above picture represents a horizontal cross section through the body at approximately slightly below the spine of scapula. It gives a good impression how muscles are located and inter-laced in the body. In the centre the big blood vessels (blue and red) between the two halves of the lungs can be seen. The most important, archery relevant anatomical parts are named.
FITA Coaching Manual Intermediate Level6
Collaboration (in general) of these muscles when per-forming a shot:a) The bow arm side: Raising the bow arm is mainly
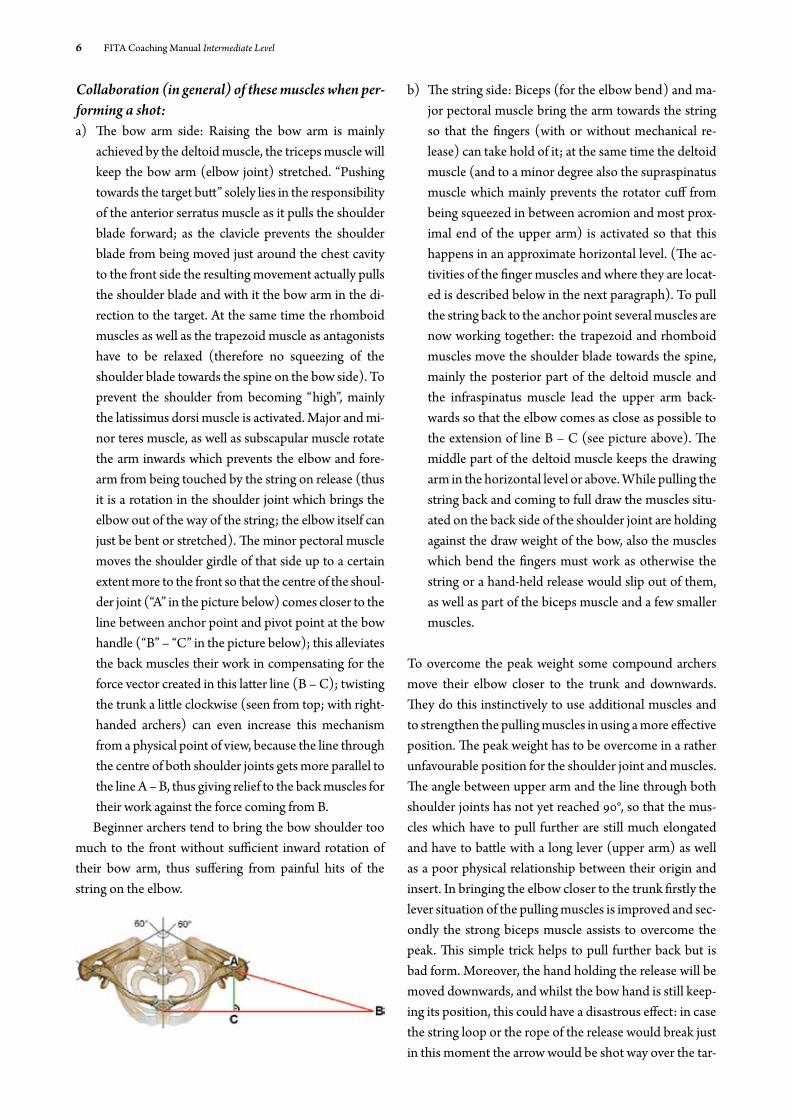
achieved by the deltoid muscle, the triceps muscle will keep the bow arm (elbow joint) stretched. “Pushing towards the target butt” solely lies in the responsibility of the anterior serratus muscle as it pulls the shoulder blade forward; as the clavicle prevents the shoulder blade from being moved just around the chest cavity to the front side the resulting movement actually pulls the shoulder blade and with it the bow arm in the di-rection to the target. At the same time the rhomboid muscles as well as the trapezoid muscle as antagonists have to be relaxed (therefore no squeezing of the shoulder blade towards the spine on the bow side). To prevent the shoulder from becoming “high”, mainly the latissimus dorsi muscle is activated. Major and mi-nor teres muscle, as well as subscapular muscle rotate the arm inwards which prevents the elbow and fore-arm from being touched by the string on release (thus it is a rotation in the shoulder joint which brings the elbow out of the way of the string; the elbow itself can just be bent or stretched). The minor pectoral muscle moves the shoulder girdle of that side up to a certain extent more to the front so that the centre of the shoul-der joint (“A” in the picture below) comes closer to the line between anchor point and pivot point at the bow handle (“B” – “C” in the picture below); this alleviates the back muscles their work in compensating for the force vector created in this latter line (B – C); twisting the trunk a little clockwise (seen from top; with right-handed archers) can even increase this mechanism from a physical point of view, because the line through the centre of both shoulder joints gets more parallel to the line A – B, thus giving relief to the back muscles for their work against the force coming from B.
Beginner archers tend to bring the bow shoulder too much to the front without sufficient inward rotation of their bow arm, thus suffering from painful hits of the string on the elbow.
b) The string side: Biceps (for the elbow bend) and ma-jor pectoral muscle bring the arm towards the string so that the fingers (with or without mechanical re-lease) can take hold of it; at the same time the deltoid muscle (and to a minor degree also the supraspinatus muscle which mainly prevents the rotator cuff from being squeezed in between acromion and most prox-imal end of the upper arm) is activated so that this happens in an approximate horizontal level. (The ac-tivities of the finger muscles and where they are locat-ed is described below in the next paragraph). To pull the string back to the anchor point several muscles are now working together: the trapezoid and rhomboid muscles move the shoulder blade towards the spine, mainly the posterior part of the deltoid muscle and the infraspinatus muscle lead the upper arm back-wards so that the elbow comes as close as possible to the extension of line B – C (see picture above). The middle part of the deltoid muscle keeps the drawing arm in the horizontal level or above. While pulling the string back and coming to full draw the muscles situ-ated on the back side of the shoulder joint are holding against the draw weight of the bow, also the muscles which bend the fingers must work as otherwise the string or a hand-held release would slip out of them, as well as part of the biceps muscle and a few smaller muscles.
To overcome the peak weight some compound archers move their elbow closer to the trunk and downwards. They do this instinctively to use additional muscles and to strengthen the pulling muscles in using a more effective position. The peak weight has to be overcome in a rather unfavourable position for the shoulder joint and muscles. The angle between upper arm and the line through both shoulder joints has not yet reached 90°, so that the mus-cles which have to pull further are still much elongated and have to battle with a long lever (upper arm) as well as a poor physical relationship between their origin and insert. In bringing the elbow closer to the trunk firstly the lever situation of the pulling muscles is improved and sec-ondly the strong biceps muscle assists to overcome the peak. This simple trick helps to pull further back but is bad form. Moreover, the hand holding the release will be moved downwards, and whilst the bow hand is still keep-ing its position, this could have a disastrous effect: in case the string loop or the rope of the release would break just in this moment the arrow would be shot way over the tar-
Archery Anatomy, Warm-Up, and Physical Conditioning 7
get and might cause an accident. So, not to run any risk, we should either teach such archers to do special muscle exercises to become capable of pulling the string back in a horizontal level or we should convince them of reducing their draw weight.
Differences between recurve and compound archers at full draw:When just simulating the position at full draw the back of the hand normally would point upwards. – With recurve archers the hand has to be twisted out-
ward (so-called supination) which is achieved by a small muscle called supinator muscle (situated at the two bones of the forearm near the elbow joint) which is assisted by the biceps muscle.
– When shooting a wrist-strap release these muscles are relaxed as the back of the hand is in its natural posi-tion.
– When shooting a hand-held release normally the hand is rotated inwards (so-called pronation) to bring the back of the hand with its knuckles towards the jaw bone. This action is done by two small muscles namely pronator teres and pronator quadratus muscle. Obvi-ously, the biceps muscle has to be relaxed to make this inward rotation possible. The above said shall serve as just a rough description
what happens with arm and shoulder muscles when per-forming a shot. Also other muscles of the trunk come into play but don‘t have such a big role in that game.
3. Other muscles used in archerya) Muscles of the neck: in the neck area we have a
lot of small muscles which provide for turning the face towards the target, but (to keep it as simple as possible) the main rotator muscle of the head shall be mentioned, this is the sternocleidomastoid mus-cle; it originates at the sternum and medial part of the clavicle, its insertion is at the lower back side of the head, the so-called occiput. Tension of the right sternocleidomastoid muscle turns the head to the left and vice versa.
b) Muscles of fingers and hand: There is a whole bundle of muscles coming from the elbow and con-verges towards the hand and fingers. These are the major muscles for moving fingers and wrist joint. Of course, there are several others more, smaller mus-cles which originate at the proximal end of the fin-
gers and metacarpus, and insert at their most distal end. In general, all muscles located on the palm-side of the hand bend the fingers; those situated on the back-side of the hand will stretch them.
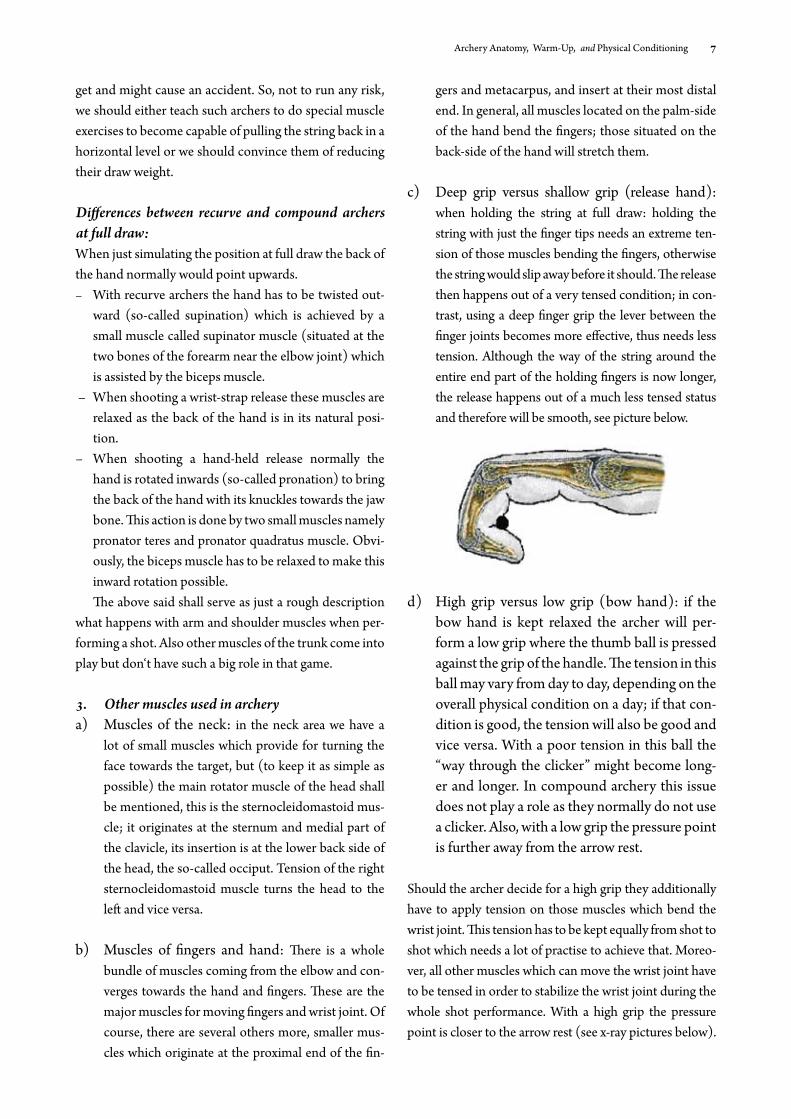
c) Deep grip versus shallow grip (release hand): when holding the string at full draw: holding the string with just the finger tips needs an extreme ten-sion of those muscles bending the fingers, otherwise the string would slip away before it should. The release then happens out of a very tensed condition; in con-trast, using a deep finger grip the lever between the finger joints becomes more effective, thus needs less tension. Although the way of the string around the entire end part of the holding fingers is now longer, the release happens out of a much less tensed status and therefore will be smooth, see picture below.
d) High grip versus low grip (bow hand): if the bow hand is kept relaxed the archer will per-form a low grip where the thumb ball is pressed against the grip of the handle. The tension in this ball may vary from day to day, depending on the overall physical condition on a day; if that con-dition is good, the tension will also be good and vice versa. With a poor tension in this ball the “way through the clicker” might become long-er and longer. In compound archery this issue does not play a role as they normally do not use a clicker. Also, with a low grip the pressure point is further away from the arrow rest.
Should the archer decide for a high grip they additionally have to apply tension on those muscles which bend the wrist joint. This tension has to be kept equally from shot to shot which needs a lot of practise to achieve that. Moreo-ver, all other muscles which can move the wrist joint have to be tensed in order to stabilize the wrist joint during the whole shot performance. With a high grip the pressure point is closer to the arrow rest (see x-ray pictures below).
FITA Coaching Manual Intermediate Level8
Low grip
High grip
Differences between recurve and compound archers with their release hand:– The recurve archer is supposed to relax the tensed fin-
gers to let the string go. The fingers open passively, this is not an active opening of fingers; it is as if a bucket full of water or sand is just incidentally slipping out of the tensed fingers. Super slow motion pictures have shown that the fingers are almost immediately slightly bent again when the string has moved forward just a few centimetres.
– Compound archers may use two ways of getting the trigger going:
I. They keep a certain tension in their trigger finger to form it like a stiff hook; then they increase back ten-sion and pull more and more against the wall until the trigger goes; if a wrist-strap release is used the strap will squeeze the skin and slide slightly towards the wrist joint; thus the stiff trigger finger is moved to-wards the trigger of the mechanical release and finally gets it going. With a hand-held release, for example a thumb release, most probably the fingers holding the mechanical release will open slightly or, also thinka-ble, the capsule (soft tissue) around the wrist joint and
the capsule around the joints between holding fingers and metacarpus will be elongated a little to enable the stiff trigger finger to move towards the trigger of the mechanical release. Most top archers prefer this way of using a mechanical release. What really happens (is there a subconscious movement of the trigger finger or not?) is still to be examined and sorted out by neu-rological research.
II. Another way to use a mechanical release is to keep up back tension and use the trigger finger, no matter if wrist-strap release or hand-held release is used, like a rifle shooter, shall mean consciously bend this trigger finger on purpose when everything is done right and the archer feels ready to let go.
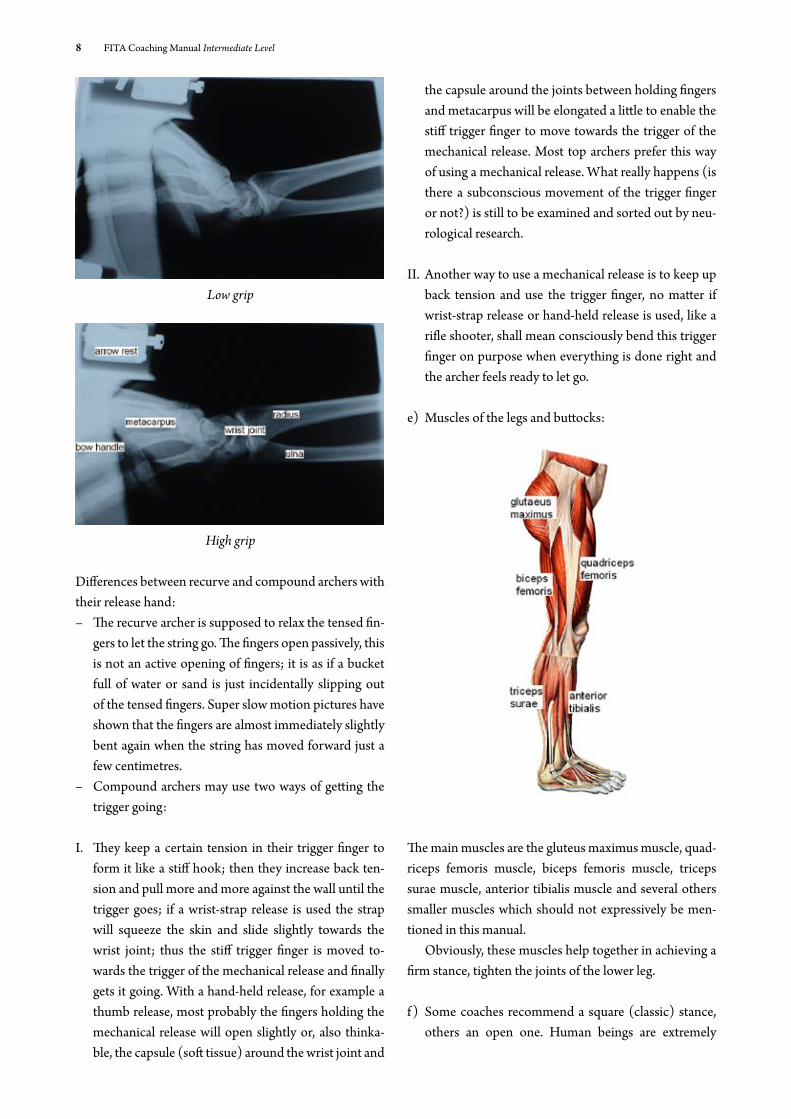
e) Muscles of the legs and buttocks:
The main muscles are the gluteus maximus muscle, quad-riceps femoris muscle, biceps femoris muscle, triceps surae muscle, anterior tibialis muscle and several others smaller muscles which should not expressively be men-tioned in this manual.
Obviously, these muscles help together in achieving a firm stance, tighten the joints of the lower leg.
f ) Some coaches recommend a square (classic) stance, others an open one. Human beings are extremely
Archery Anatomy, Warm-Up, and Physical Conditioning 9
logically and economically built up. The square stance needs the least effort in muscle activities. Let’s imagine a person standing relaxed in upright po-
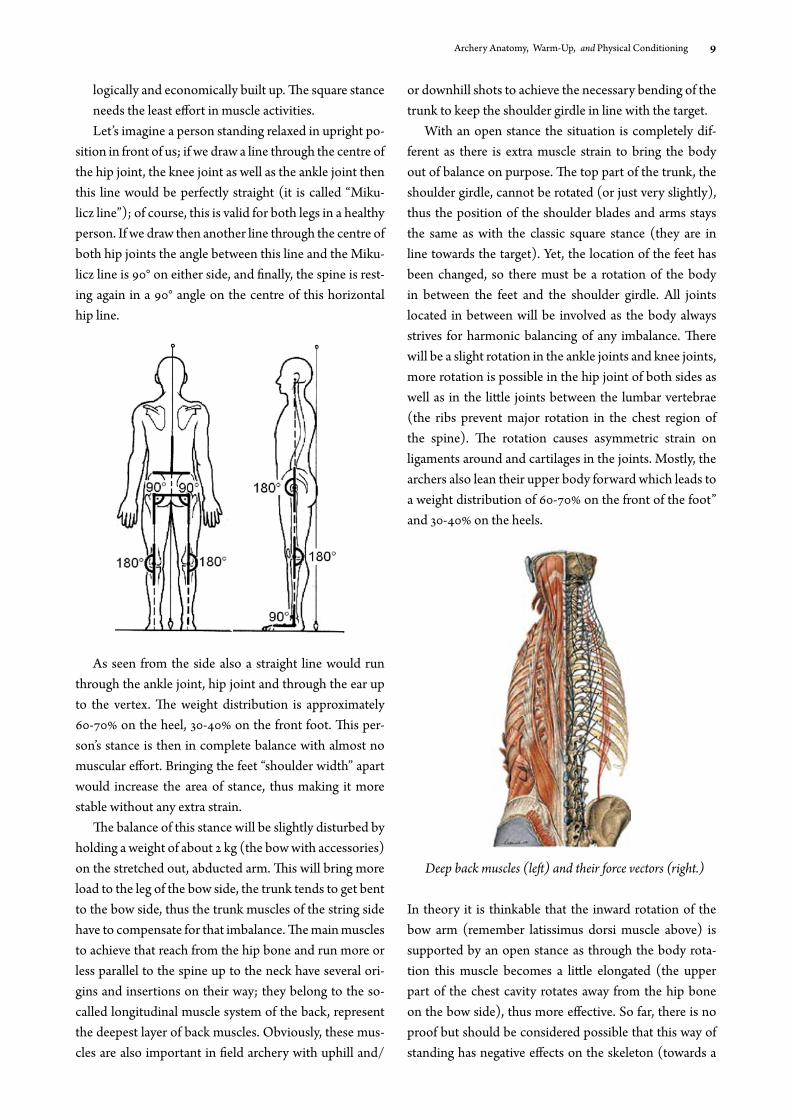
sition in front of us; if we draw a line through the centre of the hip joint, the knee joint as well as the ankle joint then this line would be perfectly straight (it is called “Miku-licz line”); of course, this is valid for both legs in a healthy person. If we draw then another line through the centre of both hip joints the angle between this line and the Miku-licz line is 90° on either side, and finally, the spine is rest-ing again in a 90° angle on the centre of this horizontal hip line.
As seen from the side also a straight line would run through the ankle joint, hip joint and through the ear up to the vertex. The weight distribution is approximately 60-70% on the heel, 30-40% on the front foot. This per-son’s stance is then in complete balance with almost no muscular effort. Bringing the feet “shoulder width” apart would increase the area of stance, thus making it more stable without any extra strain.
The balance of this stance will be slightly disturbed by holding a weight of about 2 kg (the bow with accessories) on the stretched out, abducted arm. This will bring more load to the leg of the bow side, the trunk tends to get bent to the bow side, thus the trunk muscles of the string side have to compensate for that imbalance. The main muscles to achieve that reach from the hip bone and run more or less parallel to the spine up to the neck have several ori-gins and insertions on their way; they belong to the so-called longitudinal muscle system of the back, represent the deepest layer of back muscles. Obviously, these mus-cles are also important in field archery with uphill and/
or downhill shots to achieve the necessary bending of the trunk to keep the shoulder girdle in line with the target.
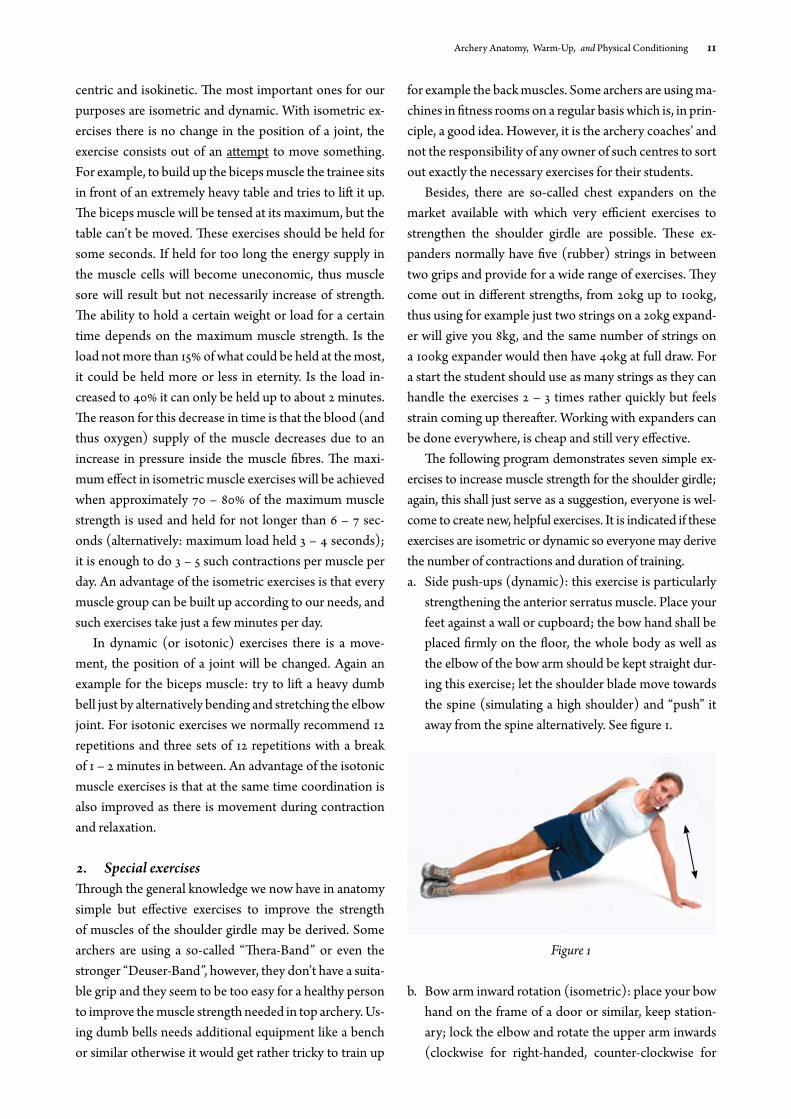
With an open stance the situation is completely dif-ferent as there is extra muscle strain to bring the body out of balance on purpose. The top part of the trunk, the shoulder girdle, cannot be rotated (or just very slightly), thus the position of the shoulder blades and arms stays the same as with the classic square stance (they are in line towards the target). Yet, the location of the feet has been changed, so there must be a rotation of the body in between the feet and the shoulder girdle. All joints located in between will be involved as the body always strives for harmonic balancing of any imbalance. There will be a slight rotation in the ankle joints and knee joints, more rotation is possible in the hip joint of both sides as well as in the little joints between the lumbar vertebrae (the ribs prevent major rotation in the chest region of the spine). The rotation causes asymmetric strain on ligaments around and cartilages in the joints. Mostly, the archers also lean their upper body forward which leads to a weight distribution of 60-70% on the front of the foot” and 30-40% on the heels.
Deep back muscles (left) and their force vectors (right.)
In theory it is thinkable that the inward rotation of the bow arm (remember latissimus dorsi muscle above) is supported by an open stance as through the body rota-tion this muscle becomes a little elongated (the upper part of the chest cavity rotates away from the hip bone on the bow side), thus more effective. So far, there is no proof but should be considered possible that this way of standing has negative effects on the skeleton (towards a
FITA Coaching Manual Intermediate Level10
scoliosis) when shooting 300 – 500 or more shots per day over a period of several years.
II. Warm-up exercisesIn archery we usually don’t have a lot of movement dur-ing a competition. Our sport is considered to be static. Therefore it is recommendable to do warm-up exercises to compensate at least partly for the side effects of long lasting standing.
Effective warm-up exercises increase the body’s ca-pabilities, performance in training and competition will become better. Through warm-up exercises the circula-tory system, bones and joints, as well as the muscles are prepared for the coming stress, not to forget the positive effect on the psyche in reducing anxiety and possible lack of self-confidence ahead of a coming event.
Moving larger muscle groups in warming-up exercises increases the body temperature, blood will be drawn out of the digestive system (that’s why you should not prac-tise or compete right after a meal), the blood vessels will be widened, thus the circulatory situation in the muscles as well as in the brain will improve thus more oxygen is available. Improving the circulation is particularly neces-sary to prevent trouble with the veins as the blood flow normally slows down during long lasting standing.
With increased body temperature resistances within the different tissues will be decreased, the archer will be able to stretch better, to tense their muscles better, and to get more stamina. Stretching exercises will increase the range of mo-tions. Outside the shooting range jogging, swimming, cy-cling, dancing, stepping or cross walking are recommend-able exercises. On the shooting range the facilities for us-ing machines are limited; therefore warming-up should be kept as simple but also as effective as possible.
The following exercises shall be considered a sugges-tion; everyone may change them or include different ex-ercises in their own program; where possible all following exercises should be done on both sides:– Jogging on the spot, alternating slowly and quick; side
jumps with both legs to the right and left.– Take a long step forward with one foot, bend the knee
of the front leg, and stretch the back leg out straight behind you as far as possible, keeping the heel on the ground.
– Standing in upright stance, arms stretched out above the head, holding on to one thumb and stretching over the other side.
– standing on both legs, keeping your thighs together, bend one leg in the knee, take hold of the foot in front of the ankle, hand and foot pulling against each other; feeling the stretch in the thigh
– standing in upright stance; arms stretched out to your side shoulder level, alternating palms facing down and palms facing up (shoulder rotation)
– Stand with your legs fairly wide apart, feet parallel, twisting in the hips bringing the upper body over one leg to reach the calf or the ankle with the hands.
– Standing in upright stance; left arm stretched out to-wards the ceiling, right arm is bent in the elbow, right hand holds on to the left elbow, gently pulling the left arm behind the head.
– Standing with the legs fairly wide apart, feet paral-lel, reach down with the hands to the floor, making sweeping motions in front of you from side to side.
– Standing in upright stance; keeping arms loose at your sides, rolling the shoulders forward and backwards.
– standing in upright stance; turn the head to the right, then to the left, then bring the chin towards the chest, lift the chin up until you see the ceiling; then bring the right ear towards the right shoulder and then left ear towards the left shoulder. Never combine these three separate motions into one uncontrolled circulation to avoid harm for the cervical spine.
– Standing in upright stance; arms stretched out in front of you shoulder level, alternating a fist and a stretch in the fingers.
– Standing in upright stance; hands in front of your chest, fingers interlaced, bending and stretching both wrist joints alternatively.
– Standing in upright stance, firmly on only one leg; cir-culate the foot of the other leg in the ankle joint, start with clockwise and change then to counter-clockwise motion.
– Close with a final jogging on the spot.
III. Simple exercises for the shoulder girdle1. GeneralMuscle exercises will increase the basic strength of mus-cles, improve the speed of contraction, and also increase the local and dynamic endurance. After a certain period of exercises the amount of contractile proteins (Actin, Myosin) will be increased so that the maximum strength per cm² will also increase.
Basically, there are four ways of building up muscle strength, either isometric or dynamic (or isotonic), ec-
Archery Anatomy, Warm-Up, and Physical Conditioning 11
centric and isokinetic. The most important ones for our purposes are isometric and dynamic. With isometric ex-ercises there is no change in the position of a joint, the exercise consists out of an attempt to move something. For example, to build up the biceps muscle the trainee sits in front of an extremely heavy table and tries to lift it up. The biceps muscle will be tensed at its maximum, but the table can’t be moved. These exercises should be held for some seconds. If held for too long the energy supply in the muscle cells will become uneconomic, thus muscle sore will result but not necessarily increase of strength. The ability to hold a certain weight or load for a certain time depends on the maximum muscle strength. Is the load not more than 15% of what could be held at the most, it could be held more or less in eternity. Is the load in-creased to 40% it can only be held up to about 2 minutes. The reason for this decrease in time is that the blood (and thus oxygen) supply of the muscle decreases due to an increase in pressure inside the muscle fibres. The maxi-mum effect in isometric muscle exercises will be achieved when approximately 70 – 80% of the maximum muscle strength is used and held for not longer than 6 – 7 sec-onds (alternatively: maximum load held 3 – 4 seconds); it is enough to do 3 – 5 such contractions per muscle per day. An advantage of the isometric exercises is that every muscle group can be built up according to our needs, and such exercises take just a few minutes per day.
In dynamic (or isotonic) exercises there is a move-ment, the position of a joint will be changed. Again an example for the biceps muscle: try to lift a heavy dumb bell just by alternatively bending and stretching the elbow joint. For isotonic exercises we normally recommend 12 repetitions and three sets of 12 repetitions with a break of 1 – 2 minutes in between. An advantage of the isotonic muscle exercises is that at the same time coordination is also improved as there is movement during contraction and relaxation.
2. Special exercisesThrough the general knowledge we now have in anatomy simple but effective exercises to improve the strength of muscles of the shoulder girdle may be derived. Some archers are using a so-called “Thera-Band” or even the stronger “Deuser-Band”, however, they don’t have a suita-ble grip and they seem to be too easy for a healthy person to improve the muscle strength needed in top archery. Us-ing dumb bells needs additional equipment like a bench or similar otherwise it would get rather tricky to train up
for example the back muscles. Some archers are using ma-chines in fitness rooms on a regular basis which is, in prin-ciple, a good idea. However, it is the archery coaches’ and not the responsibility of any owner of such centres to sort out exactly the necessary exercises for their students.
Besides, there are so-called chest expanders on the market available with which very efficient exercises to strengthen the shoulder girdle are possible. These ex-panders normally have five (rubber) strings in between two grips and provide for a wide range of exercises. They come out in different strengths, from 20kg up to 100kg, thus using for example just two strings on a 20kg expand-er will give you 8kg, and the same number of strings on a 100kg expander would then have 40kg at full draw. For a start the student should use as many strings as they can handle the exercises 2 – 3 times rather quickly but feels strain coming up thereafter. Working with expanders can be done everywhere, is cheap and still very effective.
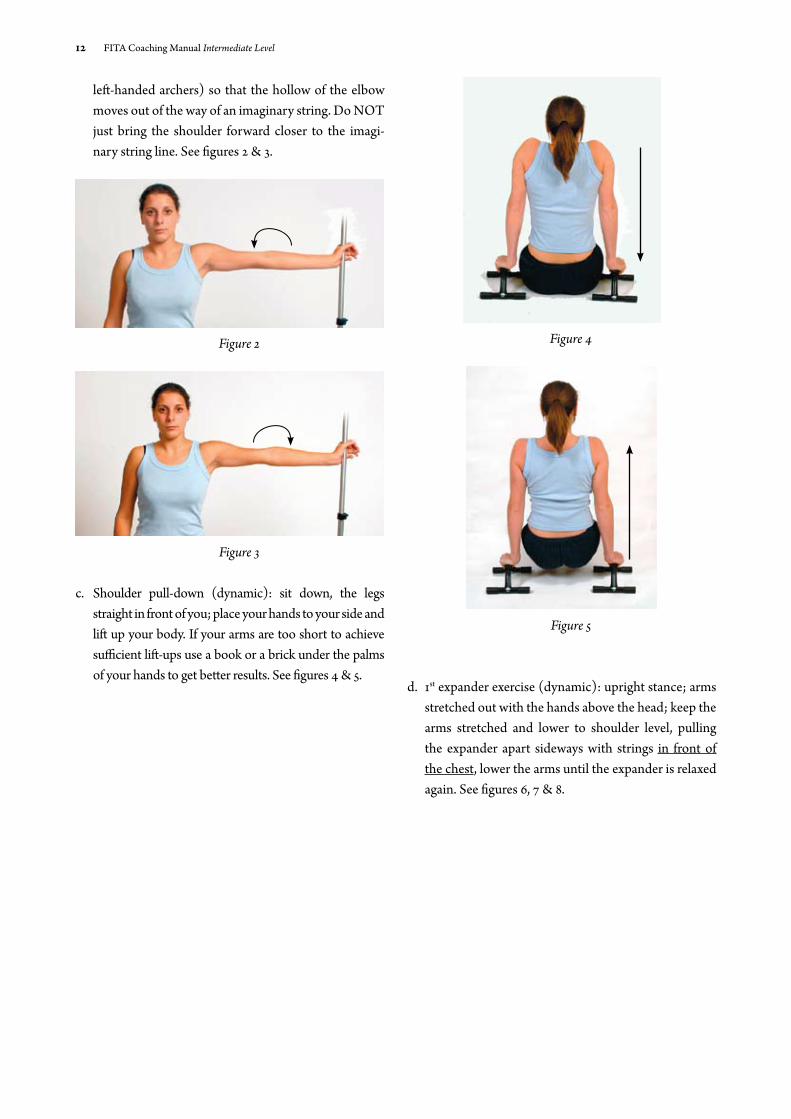
The following program demonstrates seven simple ex-ercises to increase muscle strength for the shoulder girdle; again, this shall just serve as a suggestion, everyone is wel-come to create new, helpful exercises. It is indicated if these exercises are isometric or dynamic so everyone may derive the number of contractions and duration of training.a. Side push-ups (dynamic): this exercise is particularly
strengthening the anterior serratus muscle. Place your feet against a wall or cupboard; the bow hand shall be placed firmly on the floor, the whole body as well as the elbow of the bow arm should be kept straight dur-ing this exercise; let the shoulder blade move towards the spine (simulating a high shoulder) and “push” it away from the spine alternatively. See figure 1.
Figure 1
b. Bow arm inward rotation (isometric): place your bow hand on the frame of a door or similar, keep station-ary; lock the elbow and rotate the upper arm inwards (clockwise for right-handed, counter-clockwise for
FITA Coaching Manual Intermediate Level12
left-handed archers) so that the hollow of the elbow moves out of the way of an imaginary string. Do NOT just bring the shoulder forward closer to the imagi-nary string line. See figures 2 & 3.
Figure 2
Figure 3
c. Shoulder pull-down (dynamic): sit down, the legs straight in front of you; place your hands to your side and lift up your body. If your arms are too short to achieve sufficient lift-ups use a book or a brick under the palms of your hands to get better results. See figures 4 & 5.
Figure 4
Figure 5
d. 1st expander exercise (dynamic): upright stance; arms stretched out with the hands above the head; keep the arms stretched and lower to shoulder level, pulling the expander apart sideways with strings in front of the chest, lower the arms until the expander is relaxed again. See figures 6, 7 & 8.
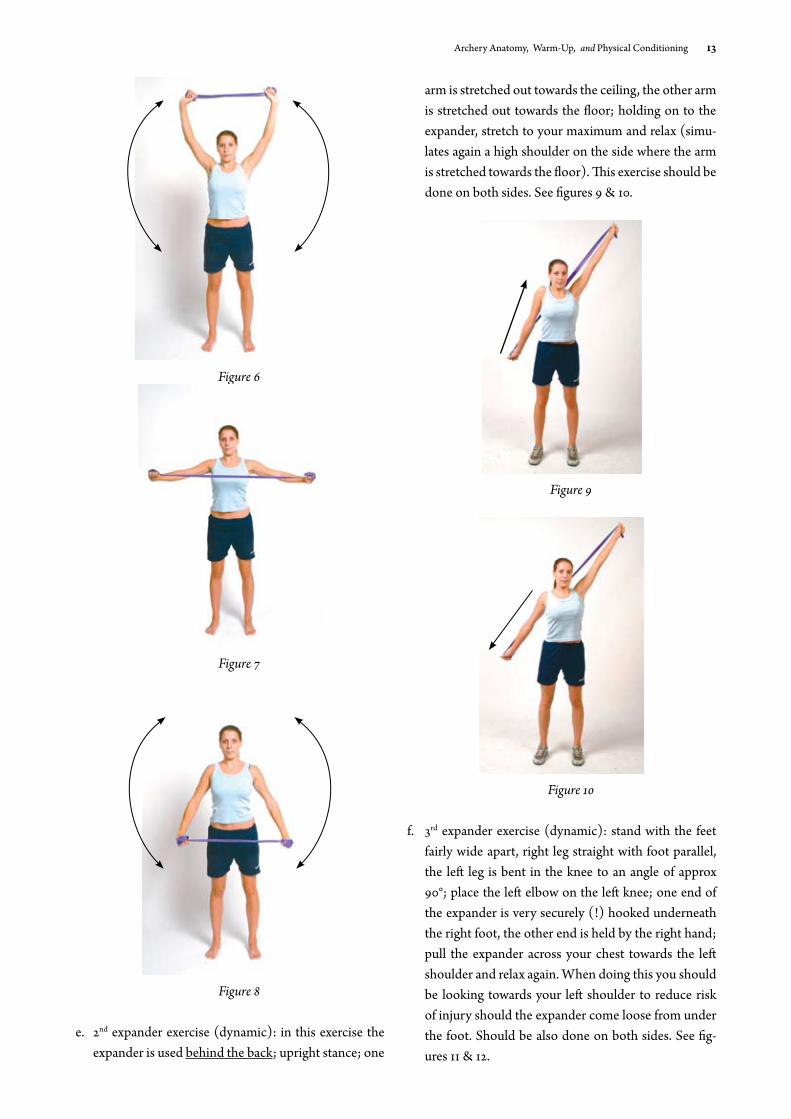
Archery Anatomy, Warm-Up, and Physical Conditioning 13
Figure 6
Figure 7
Figure 8
e. 2nd expander exercise (dynamic): in this exercise the expander is used behind the back; upright stance; one
arm is stretched out towards the ceiling, the other arm is stretched out towards the floor; holding on to the expander, stretch to your maximum and relax (simu-lates again a high shoulder on the side where the arm is stretched towards the floor). This exercise should be done on both sides. See figures 9 & 10.
Figure 9
Figure 10
f. 3rd expander exercise (dynamic): stand with the feet fairly wide apart, right leg straight with foot parallel, the left leg is bent in the knee to an angle of approx 90°; place the left elbow on the left knee; one end of the expander is very securely (!) hooked underneath the right foot, the other end is held by the right hand; pull the expander across your chest towards the left shoulder and relax again. When doing this you should be looking towards your left shoulder to reduce risk of injury should the expander come loose from under the foot. Should be also done on both sides. See fig-ures 11 & 12.
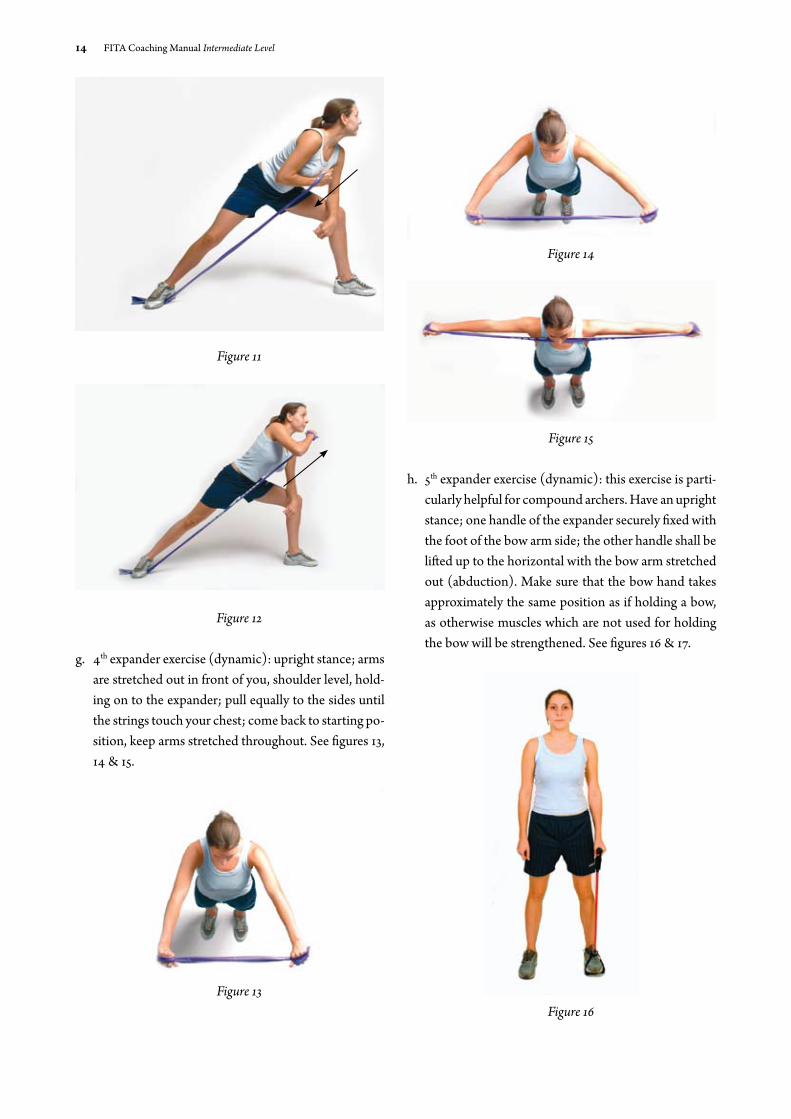
FITA Coaching Manual Intermediate Level14
Figure 11
Figure 12
g. 4th expander exercise (dynamic): upright stance; arms are stretched out in front of you, shoulder level, hold-ing on to the expander; pull equally to the sides until the strings touch your chest; come back to starting po-sition, keep arms stretched throughout. See figures 13, 14 & 15.
Figure 13
Figure 14
Figure 15
h. 5th expander exercise (dynamic): this exercise is parti-cularly helpful for compound archers. Have an upright stance; one handle of the expander securely fixed with the foot of the bow arm side; the other handle shall be lifted up to the horizontal with the bow arm stretched out (abduction). Make sure that the bow hand takes approximately the same position as if holding a bow, as otherwise muscles which are not used for holding the bow will be strengthened. See figures 16 & 17.
Figure 16
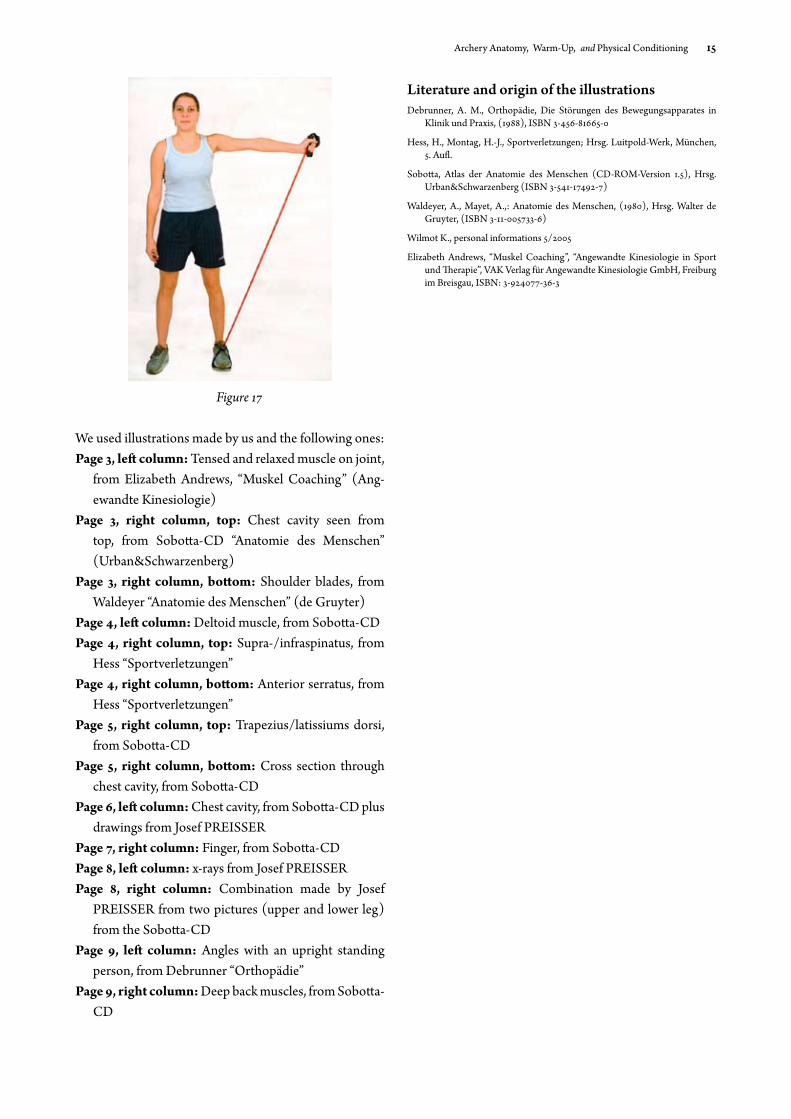
Archery Anatomy, Warm-Up, and Physical Conditioning 15
Figure 17
We used illustrations made by us and the following ones:Page 3, left column: Tensed and relaxed muscle on joint,
from Elizabeth Andrews, “Muskel Coaching” (Ang-ewandte Kinesiologie)
Page 3, right column, top: Chest cavity seen from top, from Sobotta-CD “Anatomie des Menschen” (Urban&Schwarzenberg)
Page 3, right column, bottom: Shoulder blades, from Waldeyer “Anatomie des Menschen” (de Gruyter)
Page 4, left column: Deltoid muscle, from Sobotta-CDPage 4, right column, top: Supra-/infraspinatus, from
Hess “Sportverletzungen”Page 4, right column, bottom: Anterior serratus, from
Hess “Sportverletzungen”Page 5, right column, top: Trapezius/latissiums dorsi,
from Sobotta-CDPage 5, right column, bottom: Cross section through
chest cavity, from Sobotta-CDPage 6, left column: Chest cavity, from Sobotta-CD plus
drawings from Josef PREISSERPage 7, right column: Finger, from Sobotta-CDPage 8, left column: x-rays from Josef PREISSERPage 8, right column: Combination made by Josef
PREISSER from two pictures (upper and lower leg) from the Sobotta-CD
Page 9, left column: Angles with an upright standing person, from Debrunner “Orthopädie”
Page 9, right column: Deep back muscles, from Sobotta-CD
Literature and origin of the illustrationsDebrunner, A. M., Orthopädie, Die Störungen des Bewegungsapparates in
Klinik und Praxis, (1988), ISBN 3-456-81665-0
Hess, H., Montag, H.-J., Sportverletzungen; Hrsg. Luitpold-Werk, München, 5. Aufl.
Sobotta, Atlas der Anatomie des Menschen (CD-ROM-Version 1.5), Hrsg. Urban&Schwarzenberg (ISBN 3-541-17492-7)
Waldeyer, A., Mayet, A.,: Anatomie des Menschen, (1980), Hrsg. Walter de Gruyter, (ISBN 3-11-005733-6)
Wilmot K., personal informations 5/2005
Elizabeth Andrews, “Muskel Coaching”, “Angewandte Kinesiologie in Sport und Therapie”, VAK Verlag für Angewandte Kinesiologie GmbH, Freiburg im Breisgau, ISBN: 3-924077-36-3