arcgis - esriwebhelp.esri.com/arcgisdesktop/9.2/pdf/streetmap_tutorial.pdf · 2 a rc gis s treet m...
TRANSCRIPT

ArcGIS®
9ArcGIS® StreetMap™ Tutorial

Copyright © 2001–2006 ESRI.
All Rights Reserved.
Printed in the United States of America.
The information contained in this document is the exclusive property of ESRI. This work is protected under United States copyright law and the copyright laws
of the given countries of origin and applicable international laws, treaties, and/or conventions. No part of this work may be reproduced or transmitted in any
form or by any means, electronic or mechanical, including photocopying or recording, or by any information storage or retrieval system, except as expressly
permitted in writing by ESRI. All requests should be sent to Attention: Contracts Manager, ESRI, 380 New York Street, Redlands, CA 92373-8100, USA. The
information contained in this document is subject to change without notice.
CONTRIBUTING WRITERS
Kyle Watson, Mark Berry, Paul Tsushima, Jeff Rogers
U.S. GOVERNMENT RESTRICTED/LIMITED RIGHTS
Any software, documentation, and/or data delivered hereunder is subject to the terms of the License Agreement. In no event shall the U.S. Government acquire
greater than RESTRICTED/LIMITED RIGHTS. At a minimum, use, duplication, or disclosure by the U.S. Government is subject to restrictions as set forth in
FAR §52.227-14 Alternates I, II, and III (JUN 1987); FAR §52.227-19 (JUN 1987) and/or FAR §12.211/12.212 (Commercial Technical Data/Computer
Software); and DFARS §252.227-7015 (NOV 1995) (Technical Data) and/or DFARS §227.7202 (Computer Software), as applicable. Contractor/Manufacturer
is ESRI, 380 New York Street, Redlands, CA 92373-8100, USA.
ESRI, ArcView, StreetMap, ArcGIS, ArcMap, ArcCatalog, ArcInfo, ArcEditor, and ArcSDE are trademarks, registered trademarks, or service marks of ESRI inthe United States, the European Community, or certain other jurisdictions.
Other companies and products mentioned herein are trademarks or registered trademarks of their respective trademark owners.
Attribution.pmd 9/25/2006, 2:04 PM1

1
IN THIS TUTORIAL
• Exercise 1: Getting started withStreetMap
• Exercise 2: Exporting StreetMapdata
• Exercise 3: Finding a route
This tutorial introduces you to ESRI® ArcGIS® StreetMap™. It willintroduce you to the basic techniques for viewing StreetMap USA data,found on the Data and Maps DVD, using the StreetMap address locatorand finding a route. Exercise 2 shows how you can convert thecompressed StreetMap data to a shapefile or geodatabase feature class.Exercise 3 shows how to use the Find Route function in StreetMap.
This tutorial assumes that you are already familiar with using ArcCatalog™and ArcMap™. You should know how to copy data to a new location andadd data to a map. If you’re not familiar with geocoding, first complete theGeocoding tutorial. If you’re new to GIS or feel you need to refresh yourknowledge, please take some time to read Getting Started with ArcGIS.You might also work through the quick-start tutorials in Using ArcCatalogand Using ArcMap.
StreetMap tutorialArcGIS StreetMap Tutorial
StreetMap_tutorial.pmd 9/25/2006, 2:10 PM1

2 ARCGIS STREETMAP TUTORIAL
Exercise 1: Getting started with StreetMap
The StreetMap USA data and map document will beaccessed from the Data & Maps/StreetMap USA DVD.You have the option to put the Data & Maps/StreetMapUSA data DVD in your computer, copy the StreetMapUSA data to your local hard drive, or find where the datafrom this DVD is located on your network.
Starting StreetMap
StreetMap is automatically installed with ArcGIS. Theinstall loads StreetMap but not the StreetMap USA data,which can be accessed from the DVD or copied with itsMXD to a local or network drive.
1. Start ArcMap, click a new empty map, then click OK.
2. On the Main menu, click View, Toolbars and makecertain the StreetMap Toolbar is checked on. This will
make the StreetMap Find Route icon visible .
Opening the map for this tutorial
1. In ArcMap, click File, click Open, then navigate toStreetMap USA.mxd on the Data &Maps/StreetMapUSA DVD in the USA folder. If the contents of theStreetMap USA folder were copied to your local harddrive or a drive on your network, you can also find theStreetMap USA.mxd there.
2. Double-click the StreetMap USA map document.
The map opens in ArcMap. You can use the maptemplate or group layer to create your own map at alater time.
StreetMap_tutorial.pmd 9/25/2006, 2:10 PM2

ARCGIS STREETMAP TUTORIAL 3
The map contains a group layer named StreetMap USAData. This layer provides different levels of detail atdifferent map scales. Each of the layers appear when themap’s scale falls within the appropriate range for that layer.For example, the Local Streets layer in the Streets andHighways category appears on the map when the map’sscale is 1:200,000 or larger.
Try zooming in and out or setting the map to differentscales. Click the plus sign next to a layer category to seethe individual layers it contains. Layers that aren’t currentlydrawn on the map have gray check boxes. Look at alayer’s properties to see the map scale at which it appearsand the data that it references. If you zoom to an area witha map scale of 1:20,000 or larger, the detail streets aredrawn in thick double lines. If you’re an advanced user, youcan alter the cartographic appearance by using the dataframe-based Advanced Drawing option. It can be accessed
by right-clicking the data frame or by clicking Layers in thetable of contents.
Finding an address interactively
You can use the StreetMap USA address locator to locateaddresses with the StreetMap data.
1. Click the Find button on the Tools toolbar in ArcMap.
2. In the Find dialog box, click the Addresses tab. If youhave not previously selected an address locator, you willneed to click the folder icon and browse for one. TheStreetMap USA data set provides a StreetMap USAaddress locator for geocoding addresses in the UnitedStates. It can be found on the ESRI Data & Maps/StreetMap USA DVD in the usa/streetmap_usa/streetsfolder. The name of the file is StreetMap USA.loc.Double-click on it and the following dialog box willappear.
Find
StreetMap_tutorial.pmd 9/25/2006, 2:10 PM3
4 ARCGIS STREETMAP TUTORIAL
3. Type a valid U.S. street or intersection address contain-ing the street, city, state abbreviation, and a 5-digit ZIPCode.
4. Click Find.
The candidates appear in the list below the Find dialogbox.
5. Right-click the top candidate in the list and click AddLabeled Point.
A graphic point representing the address’s locationappears on the map. Your map’s scale will remain thesame. If a large area is displayed on the map, right-clickthe top candidate again and click Zoom To. The map willzoom to the Local level; this gives you a better look atwhere the address is located.
6. Click Cancel on the Find dialog box.
Geocoding addresses in a table
If you have a table that contains address information, youcan geocode all of its addresses at once.
1. In ArcMap, click Tools, point to Geocoding, then clickGeocode Addresses.
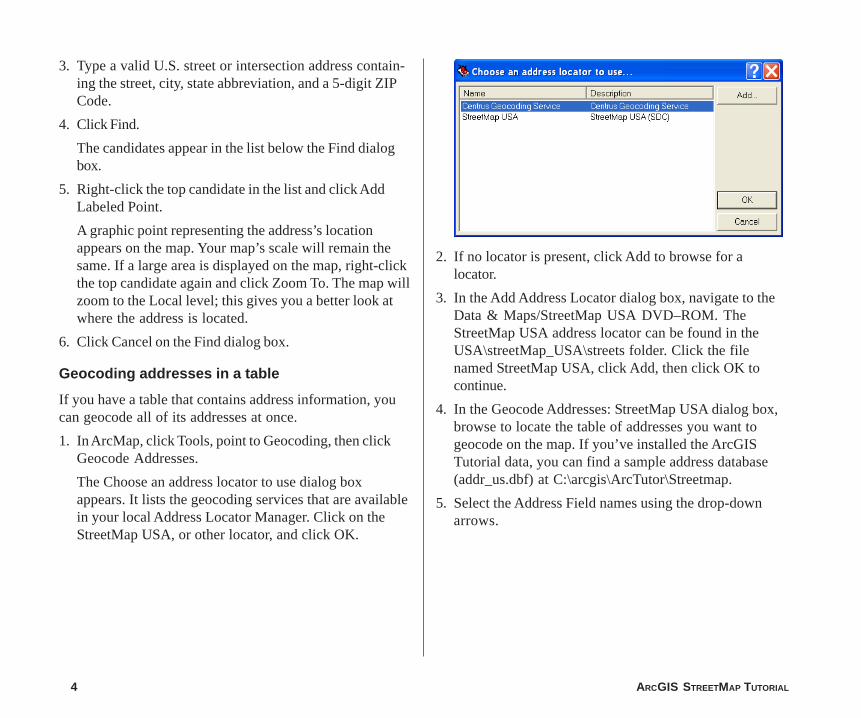
The Choose an address locator to use dialog boxappears. It lists the geocoding services that are availablein your local Address Locator Manager. Click on theStreetMap USA, or other locator, and click OK.
2. If no locator is present, click Add to browse for alocator.
3. In the Add Address Locator dialog box, navigate to theData & Maps/StreetMap USA DVD–ROM. TheStreetMap USA address locator can be found in theUSA\streetMap_USA\streets folder. Click the filenamed StreetMap USA, click Add, then click OK tocontinue.
4. In the Geocode Addresses: StreetMap USA dialog box,browse to locate the table of addresses you want togeocode on the map. If you’ve installed the ArcGISTutorial data, you can find a sample address database(addr_us.dbf) at C:\arcgis\ArcTutor\Streetmap.
5. Select the Address Field names using the drop-downarrows.
StreetMap_tutorial.pmd 9/25/2006, 2:10 PM4

ARCGIS STREETMAP TUTORIAL 5
6. Click the Browse button to define the Output shapefileor feature class.
7. In the Saving Data dialog box, navigate to your copy ofthe StreetMap folder. In the Name text box, type“US_Result”. Click Save.
A new point shapefile named US_Result will be createdin the StreetMap folder. The point features generated bythe geocoding process will be saved in that shapefile. Ifyou prefer, the geocoding results can be saved in a newgeodatabase feature class.
8. Click OK to geocode the table of addresses.
When the table finishes geocoding, the Review/RematchAddresses dialog will appear. You can rematch theresulting features later if you wish.
9. Click Done.
The geocoded points are added as a layer in your tableof contents and to your map.
When the table finishes geocoding, the Review/RematchAddresses dialog box will appear. You can rematch theresulting features later if you wish.
6
StreetMap_tutorial.pmd 9/25/2006, 2:10 PM5

6 ARCGIS STREETMAP TUTORIAL
While you can use the street data directly from the CD, youmay prefer to convert some of the compressed street datato a local shapefile or geodatabase feature class on yourcomputer. You can export the StreetMap data usingArcMap.
Converting compressed street data using ArcMap
1. In ArcMap, zoom to a local area on the map or set themap’s scale to 50,000 or larger in the scale box on theStandard toolbar.
2. Right-click the Streets (Local) in the Streets and High-ways layer in the map’s table of contents, point to Data,then click Export Data.
The Export Data dialog box appears.
3. Click the Export dropdown arrow, then click All featuresIn View Extent.
If you chose to export All features instead, all streetfeatures in the United States would be exported.
4. Click the Browse button to define the Output shapefileor feature class. Navigate to your copy of the StreetMapfolder. In the Name text box, type a name such as“exported_streets” for the new shapefile that will becreated. Click Save.
If you prefer, the exported data can be saved to a newgeodatabase feature class. If the exported data will besaved to disk, make sure there is enough space availableto store the results. For example, if the map scale is1:50,000 or larger, 5 to 10 MB of space should besufficient.
5. Click OK to export the data.
Exercise 2: Exporting StreetMap data
StreetMap_tutorial.pmd 9/25/2006, 2:10 PM6

ARCGIS STREETMAP TUTORIAL 7
Be aware that even if you are not viewing the contents ofthe streets, possibly because you are zoomed out to a pointwhere they are not visible on the map, all featuresassociated with this layer that fall within the view’s extentwill be exported.
When a very large number of features are exported, it willrequire a long period of time to convert the data, andunexpected system errors may occur due to insufficientdisk space. If this happens, click Cancel in the ExportProgress dialog box to halt the process.
StreetMap_tutorial.pmd 9/25/2006, 2:10 PM7

8 ARCGIS STREETMAP TUTORIAL
Exercise 3: Finding a route
The Find Route wizard lets you find routes between pointsusing a variety of methods. You can find an optimized route,which is the most efficient travel route between the pointsyou select, or you can find a route from point to point basedon an order you select. You can set the points, or stops, byclicking the map with your mouse, by adding them from alayer, or by geocoding them. In this exercise, you will learnhow to use the Find Route wizard.
1. In ArcMap, open StreetMap USA.mxd and zoom toSouthern California.
2. Click the StreetMap Find Route button .
3. Click the Options tab and then click the Routing Servicebrowse folder. The StreetMap USA dataset includes arouting service. It can be found on the ESRI Data &Maps/StreetMap USA DVD in theusa\streetmap_usa\streets folder. Browse to find theStreetMap routing service file (streets.rs) and double-click on it.
4. Click the Define Stops tab and click the Add Stopbutton.
The ArcMap Find dialog box appears.
5. Click the Addresses tab and click the StreetMap USAaddress locator. This address locator is found in the\ArcGIS\streetmap_usa\streets folder.
6. Type 380 New York Street in the Street or Intersectionfield.
7 Type Redlands in the City text box.
8. Type CA in the State Abbreviation text box.
StreetMap_tutorial.pmd 9/25/2006, 2:10 PM8
ARCGIS STREETMAP TUTORIAL 9
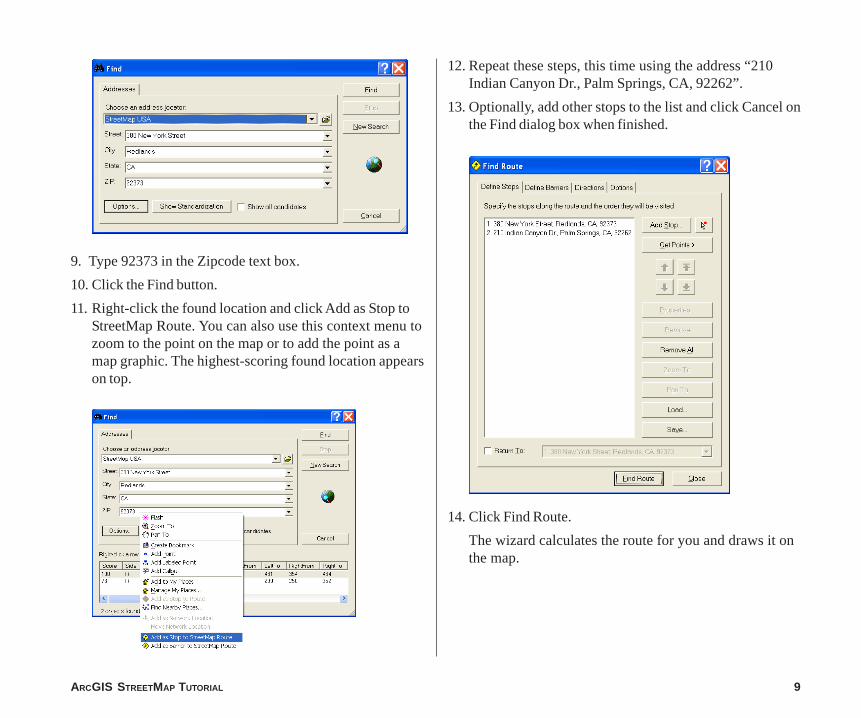
9. Type 92373 in the Zipcode text box.
10. Click the Find button.
11. Right-click the found location and click Add as Stop toStreetMap Route. You can also use this context menu tozoom to the point on the map or to add the point as amap graphic. The highest-scoring found location appearson top.
12. Repeat these steps, this time using the address “210Indian Canyon Dr., Palm Springs, CA, 92262”.
13. Optionally, add other stops to the list and click Cancel onthe Find dialog box when finished.
14. Click Find Route.
The wizard calculates the route for you and draws it onthe map.
StreetMap_tutorial.pmd 9/25/2006, 2:10 PM9

10 ARCGIS STREETMAP TUTORIAL
15. Click the View Directions tab to see detailed directionsfor your route that includes distance in miles.
StreetMap_tutorial.pmd 9/25/2006, 2:10 PM10