appscaler administrator user guide - xpoint network · add header rewriting ... waf policy ......
TRANSCRIPT

AppScaler
Administrator User Guide
Version: 1.0.5
Update: June 2018
XPoint Network

AppScaler Administrator User Guide
Notice To Users
Information in this guide is subject to change without notice. Companies, names, and data
used in examples herein are fictitious unless otherwise noted. No part of this guide may be
reproduced or transmitted in any form or by any means, electronic or mechanical, for any
purpose, without the express written permission of XPoint Network.
Copyright, Trademark
Copyright © 2017 XPoint Network. All rights reserved. All trademarks or trade names
mentioned herein, if any, are the property of their respective owners.
XPoint Network. reserves all ownership rights for the AppScaler product line including
software and documentation.
XPoint, the XPoint logo, AppScaler, and any other mark listed as a trademark in the “Terms of
Use” portion of the XPoint Web site that is used herein are either registered trademarks or
trademarks of XPoint Network. And/or its subsidiaries in the Hong Kong and/or other
countries.
Microsoft®, Internet Explorer®, Windows® 95, Windows® 98, Windows NT®, Windows®
2000, Windows® XP, and Windows® Vista are either registered trademarks or trademarks of
Microsoft Corporation in the United States and/or other countries.
Limitations
This document is provided “asis”. XPoint Network has made efforts to ensure that the
information presented herein are correct but make no explicit guarantee or warranty as to the
accuracy of the information contained herein. XPoint Network claims no responsibility,
implied or otherwise, to anyone wishing to act of follow the content of this document.

AppScaler Administrator User Guide
Table of Contents
INTRODUCTION ....................................................... 10
Target Audience ...................................................................................................... 10
Conventions used in this publication ...................................................................... 10
LOGON MANAGEMENT INTERFACE .................................... 11
SYSTEM ............................................................... 12
Dashboard ............................................................................................................... 12 System Information ........................................................................................................... 12 System Resources .............................................................................................................. 13 Top 5 VS Summary ............................................................................................................ 13 Top 5 RS Summary ............................................................................................................ 14
Settings ................................................................................................................... 14 Host Name ........................................................................................................................ 14 Time .................................................................................................................................. 15
Administrator .......................................................................................................... 16 Users ................................................................................................................................. 16 Add User ........................................................................................................................... 17 Edit User ........................................................................................................................... 18 Disable User ..................................................................................................................... 18 Enable User ...................................................................................................................... 19 Delete User ....................................................................................................................... 19 Change Password ............................................................................................................. 19 Groups .............................................................................................................................. 20 Add Group ......................................................................................................................... 21 Edit Group ........................................................................................................................ 22 Delete Group ..................................................................................................................... 22
High Availability (Active-Passive) ......................................................................... 23 Cluster [Active-Passive] ................................................................................................... 23 Local and Cluster Management ........................................................................................ 25 Cluster Port Listener ........................................................................................................ 25 Cluster Status .................................................................................................................... 26 Cluster Properties ............................................................................................................. 27 Cluster Mirror ................................................................................................................... 28 Manual Synchronization ................................................................................................... 29
Cluster (Active-Active) .......................................................................................... 30 Cluster [Active-Active] ..................................................................................................... 30 Local and Cluster Management ........................................................................................ 31 Global Settings .................................................................................................................. 32 Cluster Node ..................................................................................................................... 33 Cluster Port Listener ........................................................................................................ 34
Notification ............................................................................................................. 34 SMTP Server Configuration ............................................................................................. 35 Email Test.......................................................................................................................... 36 Add Notification Recipients .............................................................................................. 37 Edit Notification Recipient ................................................................................................ 39 Disable Notification Recipient .......................................................................................... 40 Enable Notification Recipient ........................................................................................... 40 Delete Notification Recipient ............................................................................................ 40 Notify Now ........................................................................................................................ 41
API .......................................................................................................................... 41
AppScaler Administrator User Guide
API Engine ........................................................................................................................ 41 Add API User .................................................................................................................... 42 Edit API User .................................................................................................................... 43 Disable API User .............................................................................................................. 44 Enable API User ............................................................................................................... 44 Delete API User ................................................................................................................ 45 Regen Token ...................................................................................................................... 45
Maintenance ............................................................................................................ 45 License Request File ......................................................................................................... 46 Register License ................................................................................................................ 46 License Details .................................................................................................................. 47 Cluster Firmware Upgrade ............................................................................................... 48 Firmware Upgrade ........................................................................................................... 48 Firmware Backup.............................................................................................................. 49 Firmware Revert ............................................................................................................... 50 Upload signature .............................................................................................................. 50 Signature Details .............................................................................................................. 51 Configuration Backup ....................................................................................................... 52 Configuration Restore ....................................................................................................... 52 Factory Reset .................................................................................................................... 53 Reboot ............................................................................................................................... 53 Shutdown........................................................................................................................... 53
NETWORK ............................................................. 55
Interface .................................................................................................................. 55 Modify Physical Port ........................................................................................................ 55 Add VLAN Port ................................................................................................................. 56 Modify VLAN Port ............................................................................................................ 57 Delete VLAN Port ............................................................................................................. 58 Add VXLAN Port ............................................................................................................... 58 Modify VXLAN Port .......................................................................................................... 59 Delete VXLAN Port ........................................................................................................... 60 Add Aggregated Port ........................................................................................................ 61 Modify aggregated Port .................................................................................................... 61 Delete Aggregated Port .................................................................................................... 62 Add Secondary IP ............................................................................................................. 63 Modify Secondary IP ........................................................................................................ 63 Delete Secondary IP ......................................................................................................... 64
Routing ................................................................................................................... 64 Manage Gateway .............................................................................................................. 65 Add Static Route ................................................................................................................ 65 Edit Static Route ............................................................................................................... 66 Disable Static Route .......................................................................................................... 67 Enable Static Route ........................................................................................................... 67 Delete Static Route ............................................................................................................ 68 Add Access List ................................................................................................................. 68 Edit Access List ................................................................................................................. 69 Disable Access List ........................................................................................................... 70 Enable Access List ............................................................................................................ 70 Delete Access List ............................................................................................................. 71 Add DNS ........................................................................................................................... 71 Edit DNS ........................................................................................................................... 72 Disable DNS ..................................................................................................................... 73 Enable DNS ...................................................................................................................... 73 Delete DNS ....................................................................................................................... 73 Add Local Record ............................................................................................................. 74 Edit Local Record ............................................................................................................. 74
AppScaler Administrator User Guide
Disable Local Record ....................................................................................................... 75 Enable Local Record ......................................................................................................... 75 Delete Local Record ......................................................................................................... 76 Add Search Domain .......................................................................................................... 76 Edit Search Domain .......................................................................................................... 77 Disable Search Domain .................................................................................................... 77 Enable Search Domain ..................................................................................................... 78 Delete Search Domain ...................................................................................................... 78
Packet Capture ........................................................................................................ 78 Add Packet Capture .......................................................................................................... 79 Edit Packet Capture .......................................................................................................... 80 Delete Packet Capture ...................................................................................................... 80 Run Packet Capture .......................................................................................................... 81 Stop Packet Capture .......................................................................................................... 81 Download Packet Capture ................................................................................................ 82 Advanced Options ............................................................................................................. 82
SLB ................................................................... 84
Overview................................................................................................................. 84 Server Loading Balancer .................................................................................................. 84 SSL Offloading .................................................................................................................. 84 Single Sign On .................................................................................................................. 84 Content Switching ............................................................................................................. 84 Web Application Firewall ................................................................................................. 84 Optimized Application Delivery ........................................................................................ 85 Flexible Network Integration ............................................................................................ 85
Virtual Server .......................................................................................................... 85 Add Virtual Server............................................................................................................. 85 Disable Virtual Server ....................................................................................................... 86 Enable Virtual Server ........................................................................................................ 86 Delete Virtual Server ......................................................................................................... 86 Change Virtual Server IP .................................................................................................. 87 Edit Virtual Server ............................................................................................................ 87
Add Real Server ............................................................................................................ 88 Edit Real Server ............................................................................................................ 89 Disable Real Server ...................................................................................................... 90 Enable Real Server........................................................................................................ 90 Delete Real Server ........................................................................................................ 91 Load Balancing Policy .................................................................................................. 91 Persistence Policy ......................................................................................................... 92 Real Server Monitor...................................................................................................... 94 Advanced Network ....................................................................................................... 95 Fallback Server ............................................................................................................. 96 SSL Acceleration .......................................................................................................... 97 Single Sign On .............................................................................................................. 99 WAN Optimization ..................................................................................................... 100 X-Forwarded-For ........................................................................................................ 101 Web Application Firewall ........................................................................................... 102 Add Response Rewriting ............................................................................................ 103 Edit Response Writing ................................................................................................ 104 Delete Response Writing ............................................................................................ 105 Set Priority of Response Writing ................................................................................ 106 Add Header Rewriting ................................................................................................ 106 Edit Header Writing .................................................................................................... 107 Delete Header Writing ................................................................................................ 108 Set Priority of Header Writing .................................................................................... 109 Add Content Rule ....................................................................................................... 109
AppScaler Administrator User Guide
Edit Content Rule ....................................................................................................... 111 Delete Content Rule .................................................................................................... 111 Set Priority of Content Rule ........................................................................................ 112
Virtual Server Group............................................................................................. 112 Add Virtual Server Group ............................................................................................... 112 Disable Virtual Server Group ......................................................................................... 113 Enable Virtual Server Group .......................................................................................... 113 Delete Virtual Server Group ........................................................................................... 114 Change Virtual Server Group IP ..................................................................................... 114 Add Virtual Server Member to Virtual Server Group ...................................................... 115 Edit Virtual Server Member in Virtual Server Group ..................................................... 115
Profiles .................................................................................................................. 116 SSL Certificate ................................................................................................................ 117
Add Local Certificate Group ...................................................................................... 117 Edit Local Certificate Group ....................................................................................... 118 Delete Local Certificate Group ................................................................................... 119 View Local Certificate Group ..................................................................................... 120 Add Local Certificate.................................................................................................. 120 Edit Local Certificate .................................................................................................. 121 Delete Local Certificate .............................................................................................. 122 View Local Certificate ................................................................................................ 123 Download Local Certificate ........................................................................................ 124 Add Intermediate Certificate ...................................................................................... 124 Edit Intermediate Certificate ....................................................................................... 125 Delete Intermediate Certificate ................................................................................... 126 View Intermediate Certificate ..................................................................................... 127 Download Intermediate Certificate ............................................................................. 128 Add OCSP Node ......................................................................................................... 128 Disable OCSP Node .................................................................................................... 129 Enable OCSP Node ..................................................................................................... 130 Edit OCSP Node ......................................................................................................... 131 Delete OCSP Node ..................................................................................................... 132 Certificate Backup ...................................................................................................... 132 Certificate Restore ...................................................................................................... 133 SSL Global Settings .................................................................................................... 134
HTTP Redirection ........................................................................................................... 134 Add HTTP Redirection ............................................................................................... 134 Edit HTTP Redirection ............................................................................................... 135 Delete HTTP Redirection ........................................................................................... 136
LDAP Node ..................................................................................................................... 137 Add LDAP Node......................................................................................................... 137 Edit LDAP Node ......................................................................................................... 138 Disable LDAP Node ................................................................................................... 139 Enable LDAP Node .................................................................................................... 140 Delete LDAP Node ..................................................................................................... 140
WAF Policy ..................................................................................................................... 141 Add WAF Policy ......................................................................................................... 141 Edit WAF Policy ......................................................................................................... 142 Disable WAF Policy .................................................................................................... 143 Enable WAF Policy ..................................................................................................... 144 View WAF Policy ....................................................................................................... 145 Delete WAF Policy ..................................................................................................... 145
Access Policy .................................................................................................................. 146 Add Access Policy ...................................................................................................... 146 Edit Access Policy ...................................................................................................... 147 Delete Access Policy ................................................................................................... 148 Add AAA Server ......................................................................................................... 148 Edit AAA Server ......................................................................................................... 150

AppScaler Administrator User Guide
Delete AAA Server ..................................................................................................... 151 Add SSO Profile ......................................................................................................... 152 Edit SSO Profile ......................................................................................................... 153 Delete SSO Profile ...................................................................................................... 153 Add SSO Profile Group .............................................................................................. 154 Edit SSO Profile Group .............................................................................................. 155 Delete SSO Profile Group ........................................................................................... 156 Add Login Form ......................................................................................................... 157 Edit Login Form ......................................................................................................... 158 View Login Form ........................................................................................................ 159 Delete Login Form ...................................................................................................... 160 Add Post Form ............................................................................................................ 161 Edit Post Form ............................................................................................................ 162 Delete Post Form ........................................................................................................ 163 Authentication Settings ............................................................................................... 163
Global Settings...................................................................................................... 164 Compression ................................................................................................................... 164
Add Compression ....................................................................................................... 164 Edit Compression ........................................................................................................ 165 Disable Compression .................................................................................................. 166 Enable Compression ................................................................................................... 166 Delete Compression .................................................................................................... 167
Caching ........................................................................................................................... 167 Add Caching ............................................................................................................... 167 Edit Caching ............................................................................................................... 168 Disable Caching .......................................................................................................... 169 Enable Caching ........................................................................................................... 169 Delete Caching ............................................................................................................ 169
GSLB ................................................................. 171
Overview............................................................................................................... 171 Global Server Loading Balancer .................................................................................... 171 Datacenter Failover ........................................................................................................ 171 Intelligent Distribution Methods ..................................................................................... 171 Health Monitor ............................................................................................................... 171
Virtual Server ........................................................................................................ 172 Add Virtual Server........................................................................................................... 172 Change Virtual Server Settings ....................................................................................... 172 Delete Virtual Server ....................................................................................................... 173 Edit Virtual Server .......................................................................................................... 173
Add Virtual Service .................................................................................................... 173 Edit Virtual Service ..................................................................................................... 174 Disable Virtual Service ............................................................................................... 175 Enable Virtual Service ................................................................................................ 175 Persistence Policy ....................................................................................................... 176 Virtual Server Backup ................................................................................................. 177 Advanced Routing ...................................................................................................... 177
Profiles .................................................................................................................. 178 Probe ............................................................................................................................... 178
Add Probe ................................................................................................................... 178 Edit Probe ................................................................................................................... 179 Disable Probe .............................................................................................................. 180 Enable Probe ............................................................................................................... 181 Delete Probe ................................................................................................................ 181
Datacenter ...................................................................................................................... 182 Add Datacenter ........................................................................................................... 182
AppScaler Administrator User Guide
Edit DataCenter .......................................................................................................... 183 Delete DataCenter ....................................................................................................... 183
Location .......................................................................................................................... 184 Add Location .............................................................................................................. 184 Edit Location .............................................................................................................. 185 Delete Location ........................................................................................................... 186
IP Mapping ..................................................................................................................... 186 Add IP Mapping .......................................................................................................... 186 Edit IP Mapping .......................................................................................................... 187 Delete IP Mapping ...................................................................................................... 188
Global Settings...................................................................................................... 189 GSLB Engine .................................................................................................................. 189
Edit GSLB Engine ...................................................................................................... 189 ADNS Listener ................................................................................................................ 190
Enable ANDS Listener................................................................................................ 190 Disable ADNS Interface ............................................................................................. 191
DNS SOA ........................................................................................................................ 191 Edit DNS SOA ............................................................................................................ 191
GSLB Site ........................................................................................................................ 192 Add GSLB Site ........................................................................................................... 192 Edit GSLB Site ........................................................................................................... 193 Disable GSLB Site ...................................................................................................... 194 Enable GSLB Site ....................................................................................................... 195 Delete GSLB Site ....................................................................................................... 195
GSLB Site Access ............................................................................................................ 196 Add GSLB Site Access ............................................................................................... 196 Edit GSLB Site Access ............................................................................................... 197 Disable GSLB Site Access .......................................................................................... 198 Enable GSLB Site Access ........................................................................................... 198 Delete GSLB Site Access ........................................................................................... 199
DNS Security ................................................................................................................... 200 GSLB DNS Security ................................................................................................... 200 Create DNS Key ......................................................................................................... 201 Import DNS Key ......................................................................................................... 202 Delete DNS Key ......................................................................................................... 202 View DNS Key ........................................................................................................... 203
GSLB ACL ...................................................................................................................... 204 Add GSLB ACL ......................................................................................................... 204 Edit GSLB ACL .......................................................................................................... 205 Disable GSLB ACL .................................................................................................... 206 Enable GSLB ACL ..................................................................................................... 206 Delete GSLB ACL ...................................................................................................... 207
LOG & REPORT ....................................................... 208
Overview............................................................................................................... 208 VS Report ........................................................................................................................ 208 Throughput Report .......................................................................................................... 208 System Report ................................................................................................................. 208 Activity Report ................................................................................................................ 208
VS Report ............................................................................................................. 208 View Real Server ............................................................................................................. 208 View VS Real Time .......................................................................................................... 209 View VS History .............................................................................................................. 210
Throughput Report................................................................................................ 211 View Real Time ................................................................................................................ 211 View History .................................................................................................................... 212

AppScaler Administrator User Guide
System Report ....................................................................................................... 212 TPS Connections ............................................................................................................. 213 SSL Connections ............................................................................................................. 213 CPU Usage ..................................................................................................................... 214 Memory Usage ................................................................................................................ 214
SSO Report ........................................................................................................... 214 SSO User Login .............................................................................................................. 215
GSLB Report ........................................................................................................ 215 GSLB Virtual Server Real Time Report ........................................................................... 215
Activity Report ..................................................................................................... 215 AppScaler Report ............................................................................................................ 216 Activity Report ................................................................................................................ 216 Logon Report .................................................................................................................. 217 API Report ...................................................................................................................... 217

AppScaler Administrator User Guide
Introduction
Welcome to the AppScaler Administrator User Guide – your reference guide to high
performance and flexible solution for application delivery to all of your applications.
Target Audience
This User Guide covers all aspects of AppScaler Administrator and is intended for both
administrators and system integrators.
Conventions used in this publication
This publication uses various conventions to present information. Words that require special
treatment appear in specific fonts or font styles.

AppScaler Administrator User Guide
Logon Management Interface
To access AppScaler Management Interface, please open browser to access
https://[ Management IP Address]
Settings Defaults Description Protocols HTTPS
IP Address 192.168.0.168 The ip address of
management interface can be
changed in console, the
details please refer to console
section.
User Name admin
Password password

AppScaler Administrator User Guide
System
Dashboard
The dashboard provides an effective and efficient interface to visually monitor your system in
real time, providing effective statistics and flow charts of real time data. With the Dashboard,
you can efficiently view real-time system and virtual server/real server data including:
System Information
System Resources
Top 5 VS Summary
Top 5 RS Summary
Navigate to System -> Dashboard
System Information
The System information provides detailed data on the system, to access System Information,
navigate to System -> Dashboard and check System Information widget:
Settings Description Host Name The host name of this unit, which can be configured in
System -> System, Host Name Tab
Current Time The current time of the unit
AppScaler Administrator User Guide
Boot Time The time of the last unit boot
Firmware The firmware version of AppScaler
Serial No. The serial No. of the unit license
License Type The license type of the unit, either Demo or Formal
Support Until The support expiration date
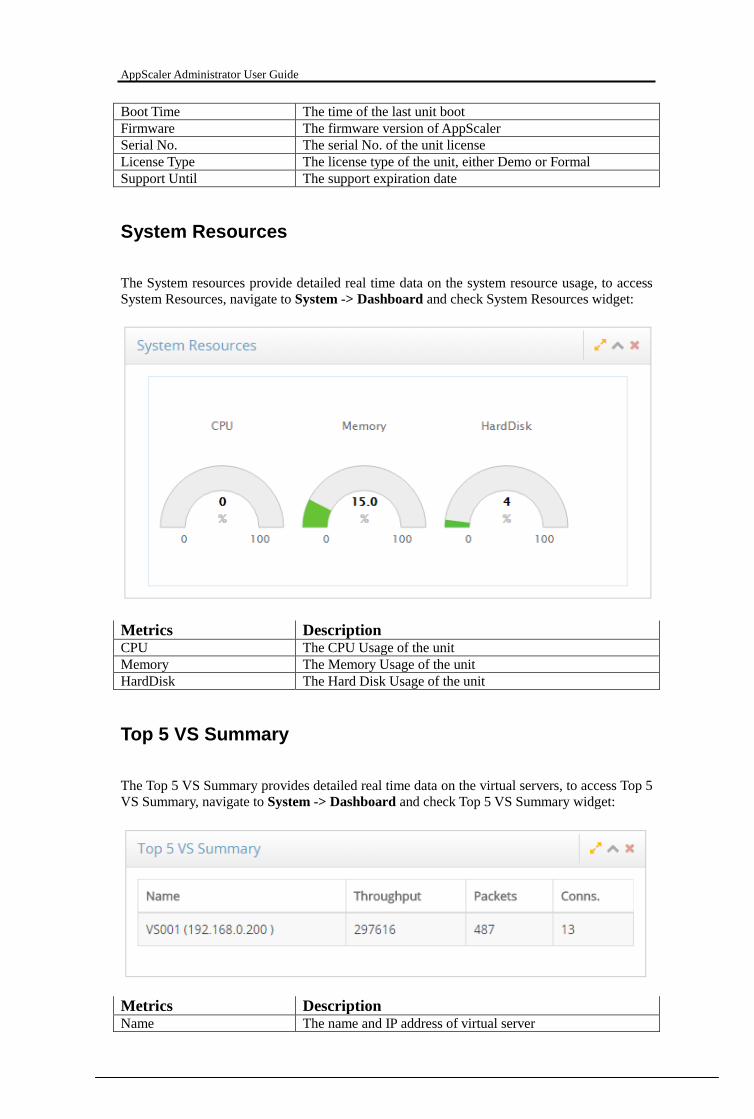
System Resources
The System resources provide detailed real time data on the system resource usage, to access
System Resources, navigate to System -> Dashboard and check System Resources widget:
Metrics Description CPU The CPU Usage of the unit
Memory The Memory Usage of the unit
HardDisk The Hard Disk Usage of the unit
Top 5 VS Summary
The Top 5 VS Summary provides detailed real time data on the virtual servers, to access Top 5
VS Summary, navigate to System -> Dashboard and check Top 5 VS Summary widget:
Metrics Description Name The name and IP address of virtual server

AppScaler Administrator User Guide
Throughput The bytes passing through this virtual server
Packets The packets passing through this virtual server
Conns The total connections received by this virtual server
Top 5 RS Summary
The Top 5 RS Summary provides detailed real time data on the real servers, to access Top 5
RS Summary, navigate to System -> Dashboard and check Top 5 RS Summary widget:
Metrics Description IP The IP address of real server
Throughput The bytes passing through this real server
Packets The packets passing through this real server
Conns The total connections received by this real server
Settings
The Settings provides the system-wise configuration including:
Host Name
Time
Navigate to System -> Settings
Host Name
To access Host Name, navigate to System -> Settings and check Host Name Tab:

AppScaler Administrator User Guide
Settings Description Host Name The host name of the unit
Time
To access Time, navigate to System -> Settings and check Time Tab:
Settings Description System Time The current time of the unit, read-only
Time Zone Choose the appropriate time zone from dropdown list
NTP Server Set the NTP Server, optional
Date Set the date
Time Set the time
Tips: Use Date Plug-in to set the Date

AppScaler Administrator User Guide
Administrator
Administrator includes how to manage passwords, user accounts and user groups.
Navigate to System -> Administrator
Users
Use the WebUI to manage user accounts. You can:
Add users to your system.
Edit the user.
Delete the user.
Disable/Enable the user.
Change the password of the user.
The user admin is created by default and cannot be deleted, and this user has full capabilities
for all the modules.
To access Time, navigate to System -> Administrator and check User Tab:

AppScaler Administrator User Guide
Add User
To add a user:
navigate to System -> Administrator and check User Tab
Click Add
In the Add User page, enter the following
Click Save
Settings Description Logon Name The name for the user to login, 5–25 characters
Group The user group for this user
First Name First name of this user
Last Name The last name of this user

AppScaler Administrator User Guide
Email The email address of this user
Password
Password Again
Edit User
To edit a user:
navigate to System -> Administrator and check User Tab
Go to the row of the user, Click icon in Action column
In the Edit User page, change the settings
Click Save
Disable User
To disable a user:
navigate to System -> Administrator and check User Tab
Go to the row of the user, Click icon in Action column
The warning message will pop up

AppScaler Administrator User Guide
Click Yes
Enable User
To enable a user:
navigate to System -> Administrator and check User Tab
Go to the row of the user, Click icon in Action column
The warning message will pop up
Click Yes
Delete User
To delete a user:
navigate to System -> Administrator and check User Tab
Go to the row of the user, Click icon in Action column
The warning message will pop up
Click Yes
Notes: All the operation log of this user will be deleted if one user deleted.
Change Password
To change user password:
navigate to System -> Administrator and check User Tab

AppScaler Administrator User Guide
Go to the row of the user, Click icon in Action column
In the Change Password page, change the settings
Click Save
Tips: For login user, s/he can always change his/her own password in top menu
Groups
Module-based group lets you specify the roles to access modules. Each group can include a
combination of administrative (read/write) access to some modules, read‑only access to other
modules, and no access to other modules.
Use the WebUI to manage user group. You can:
Add group to your system.
Edit the group.
Delete the group.
The system includes these predefined groups:
Admin: Gives the user read/write access to all modules.
Read-only: Gives the user read-only access to all modules.
You cannot delete or change the predefined roles.
To access Time, navigate to System -> Administrator and check Group Tab:

AppScaler Administrator User Guide
Add Group
To add a group:
navigate to System -> Administrator and check Group Tab
Click Add
In the Add Group page, enter the following
Click Save
Settings Description Group Name The name for the group, 5–25 characters
Modules The modules

AppScaler Administrator User Guide
Tips:
Login module should be set otherwise the user cannot login the system
Read-only should be set combined with other modules, for example, to set read-only
privilege for module SLB,both SLB and Read-only should be selected.
Edit Group
To edit a group:
navigate to System -> Administrator and check Group Tab
Go to the row of the group, Click icon in Action column
In the Edit Group page, change the settings
Click Save
Delete Group
To delete a group:
navigate to System -> Administrator and check Group Tab
Go to the row of the group, Click icon in Action column

AppScaler Administrator User Guide
The warning message will pop up
Click Yes
Notes: When one user group deleted, all the users pertaining to this group will be reset to
group admin.
High Availability (Active-Passive)
The ability of any system to continue providing services after a failure is called failover.
AppScaler provides both active-passive (AKA high availability failover) and active-active
cluster.
Active-passive allows you to set up a hot standby system in case the primary system fails.
Navigate to System -> High Availability
Notes: The valid license with the high availability enabled is required to use this feature.
Cluster [Active-Passive]
To setup cluster[Active-Passive]:
navigate to System -> High Availability
In the Operation Mode dropdown list, select option ‘Cluster [Active-Passive]’
Enter the following

AppScaler Administrator User Guide
Click Save
The warning message will pop up
Click Yes
The system will now be rebooting
Settings Description Operation Mode Either Standalone and Cluster [Active-Passive]
Unit Mode Either Master Node or Slave Node.
Master Node is the primary system in the Cluster
[Active-Passive] while Slave Node is standby system in
cluster setup which takes over operations if the master fails.
Unit IP The local IP address of this unit.
Cluster IP The cluster IP when Cluster is setup.
Partner IP The IP address of other node in Cluster
AppScaler Administrator User Guide
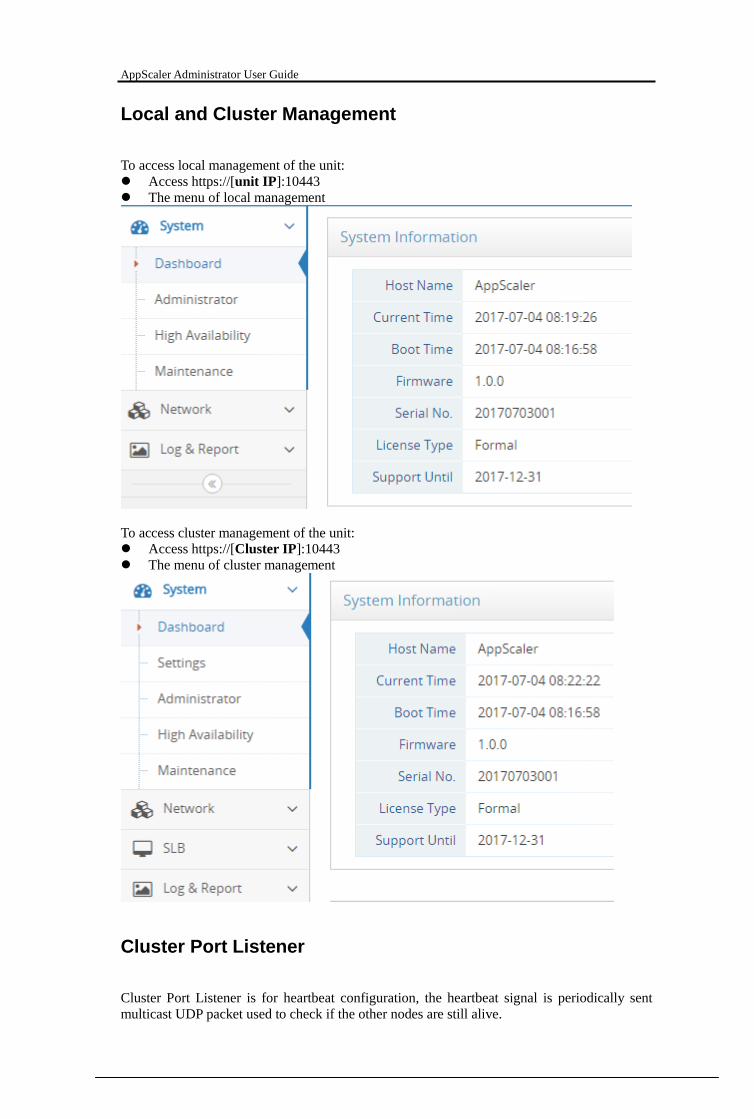
Local and Cluster Management
To access local management of the unit:
Access https://[unit IP]:10443
The menu of local management
To access cluster management of the unit:
Access https://[Cluster IP]:10443
The menu of cluster management
Cluster Port Listener
Cluster Port Listener is for heartbeat configuration, the heartbeat signal is periodically sent
multicast UDP packet used to check if the other nodes are still alive.
AppScaler Administrator User Guide
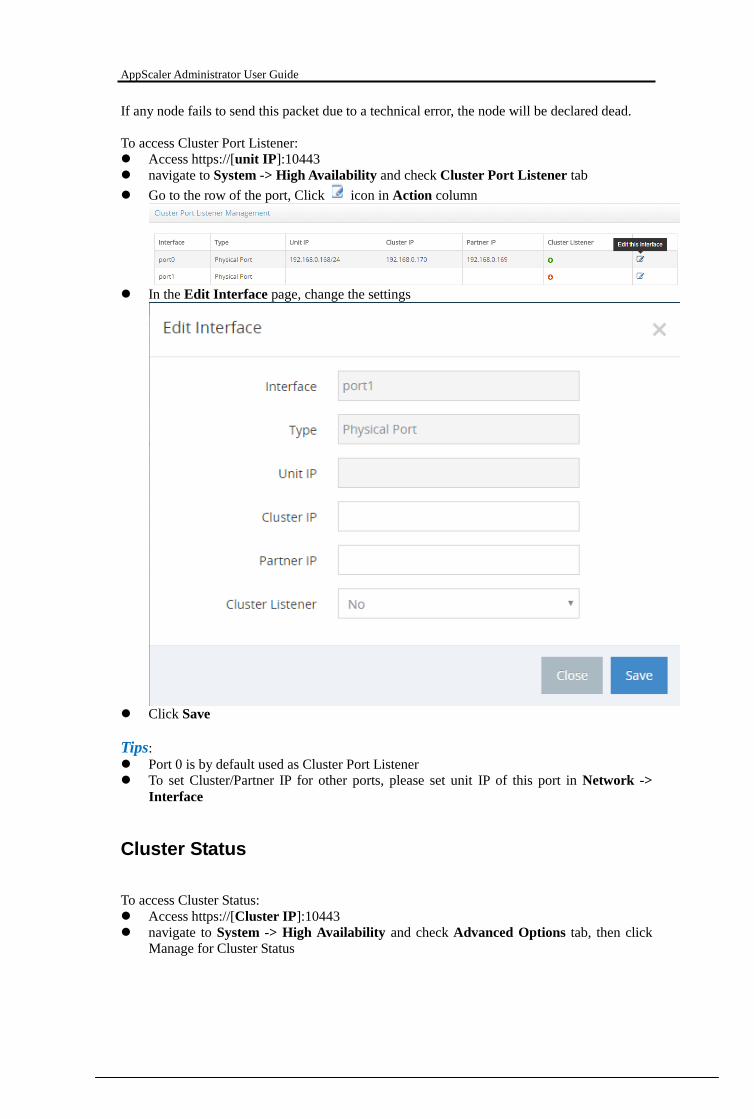
If any node fails to send this packet due to a technical error, the node will be declared dead.
To access Cluster Port Listener:
Access https://[unit IP]:10443
navigate to System -> High Availability and check Cluster Port Listener tab
Go to the row of the port, Click icon in Action column
In the Edit Interface page, change the settings
Click Save
Tips:
Port 0 is by default used as Cluster Port Listener
To set Cluster/Partner IP for other ports, please set unit IP of this port in Network ->
Interface
Cluster Status
To access Cluster Status:
Access https://[Cluster IP]:10443
navigate to System -> High Availability and check Advanced Options tab, then click
Manage for Cluster Status

AppScaler Administrator User Guide
In the Cluster Status page, Cluster status information displayed
Cluster Properties
To access Cluster Properties:
Access https://[Cluster IP]:10443
navigate to System -> High Availability and check Advanced Options tab, then click
Manage for Cluster Properties
In the Edit Cluster Properties Configuration page, enter the following

AppScaler Administrator User Guide
Click Save
Settings Description Cluster Group ID The group ID for the cluster, it should be unique and both
master node and slave node should share the same group ID
Heartbeat Interval The interval (in seconds) to send heartbeat signal
Heartbeat Threshold The threshold times for heartbeat signal
Failover Mode Here you can define a designated master node by selecting a
node from the drop-down list. In case of a failover, the
selected node will not stay in Slave mode after the link
recovers but instead will switch back to Master mode.
Cluster Mirror
To access Cluster Mirror:
Access https://[Cluster IP]
navigate to System -> High Availability and check Advanced Options tab, then click
Manage for Cluster Mirror
In the Edit Cluster Mirror Configuration page, enter the following

AppScaler Administrator User Guide
Click Save
Settings Description L7 Session Sync. Enable/Disable layer 7 session synchronization between
master node and slave node
L4 Connection Sync. Enable/Disable layer 4 connection synchronization between
master node and slave node
Cluster Mirror Port The mirroring port
Manual Synchronization
To access Manual Synchronization
Access https://[Cluster IP]:10443
navigate to System -> High Availability and check Advanced Options tab, then click
Manage for Manual Synchronization
In the Cluster Manual Synchronization page, it shows cluster status
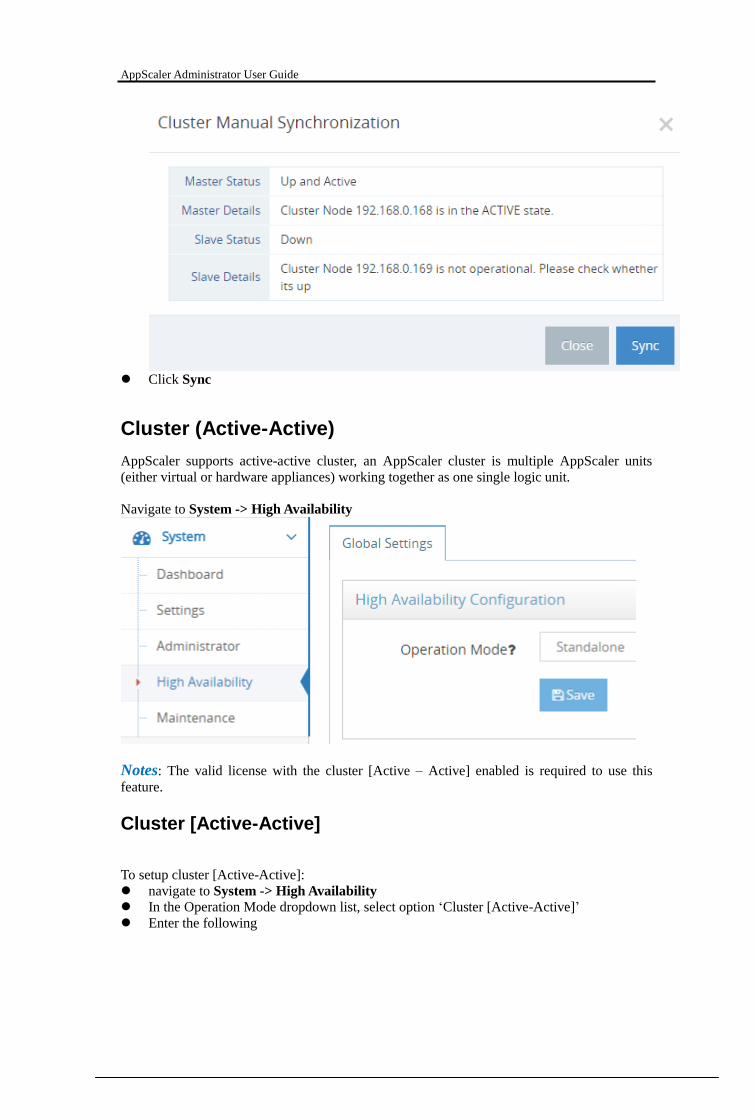
AppScaler Administrator User Guide
Click Sync
Cluster (Active-Active)
AppScaler supports active-active cluster, an AppScaler cluster is multiple AppScaler units
(either virtual or hardware appliances) working together as one single logic unit.
Navigate to System -> High Availability
Notes: The valid license with the cluster [Active – Active] enabled is required to use this
feature.
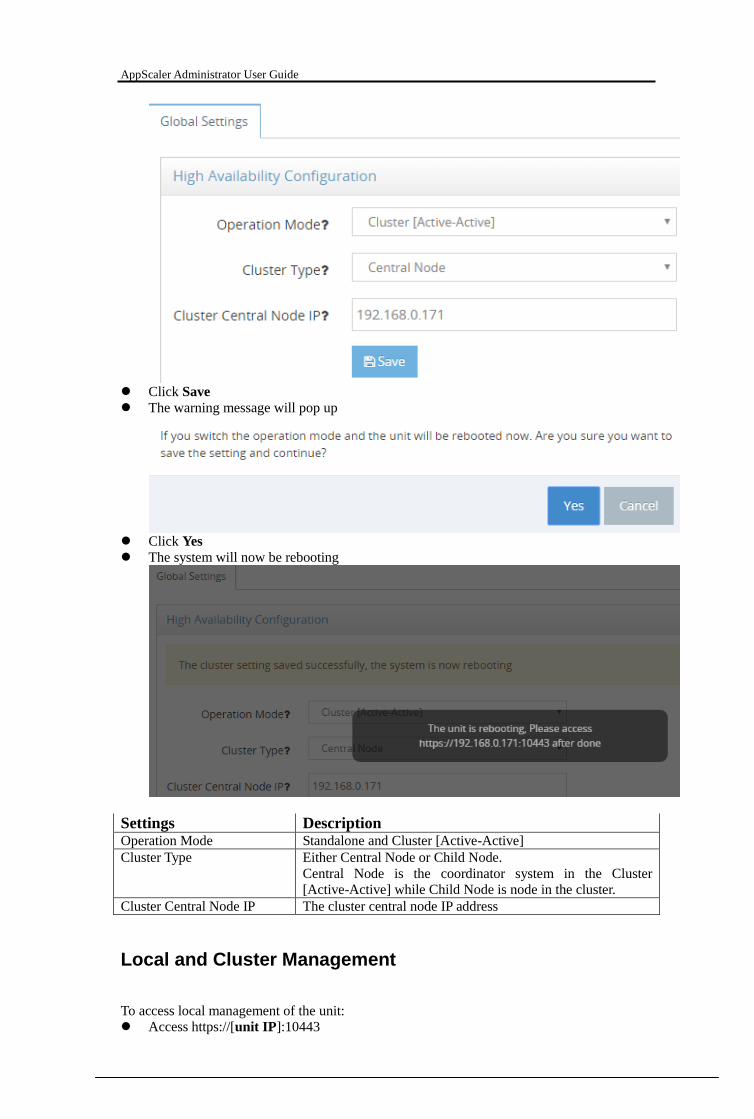
Cluster [Active-Active]
To setup cluster [Active-Active]:
navigate to System -> High Availability
In the Operation Mode dropdown list, select option ‘Cluster [Active-Active]’
Enter the following
AppScaler Administrator User Guide
Click Save
The warning message will pop up
Click Yes
The system will now be rebooting
Settings Description Operation Mode Standalone and Cluster [Active-Active]
Cluster Type Either Central Node or Child Node.
Central Node is the coordinator system in the Cluster
[Active-Active] while Child Node is node in the cluster.
Cluster Central Node IP The cluster central node IP address
Local and Cluster Management
To access local management of the unit:
Access https://[unit IP]:10443

AppScaler Administrator User Guide
The menu of local management
To access cluster management of the unit:
Access https://[ Cluster Central Node IP]:10443
The menu of cluster management
Global Settings
To access Global Settings:
Access https://[ Cluster Central Node IP]:10443
navigate to System -> High Availability and check Global Settings tab

AppScaler Administrator User Guide
Settings Description Operation Mode Standalone and Cluster [Active-Active]
Cluster Central Node IP The cluster central node IP address
Cluster Group ID The unique group ID for cluster
Node drain time The node drain time
Cluster Node
You can perform cluster tasks including:
Add a cluster node
Delete a cluster node
Disable a cluster node
Enable a cluster node
Reboot a cluster node
To access Cluster Node:
Access https://[ Cluster Central Node IP]:10443
navigate to System -> High Availability and check Cluster Node tab
AppScaler Administrator User Guide
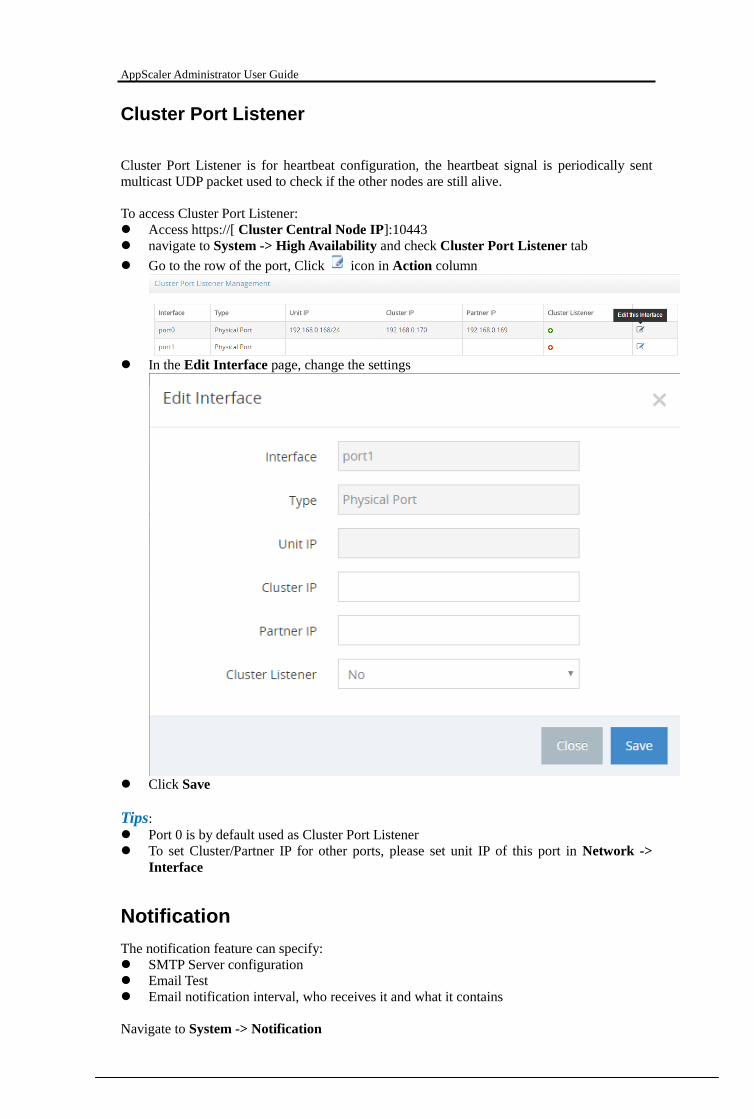
Cluster Port Listener
Cluster Port Listener is for heartbeat configuration, the heartbeat signal is periodically sent
multicast UDP packet used to check if the other nodes are still alive.
To access Cluster Port Listener:
Access https://[ Cluster Central Node IP]:10443
navigate to System -> High Availability and check Cluster Port Listener tab
Go to the row of the port, Click icon in Action column
In the Edit Interface page, change the settings
Click Save
Tips:
Port 0 is by default used as Cluster Port Listener
To set Cluster/Partner IP for other ports, please set unit IP of this port in Network ->
Interface
Notification
The notification feature can specify:
SMTP Server configuration
Email Test
Email notification interval, who receives it and what it contains
Navigate to System -> Notification

AppScaler Administrator User Guide
SMTP Server Configuration
To configure SMTP server:
navigate to System -> Notification, check SMTP Tab and click Manage
The SMTP server configuration page will pop up
Choose Enable SMTP

AppScaler Administrator User Guide
Input the SMTP settings and click Save
Settings Description SMTP Configuration Enable or disable SMTP. If SMTP is disabled, the notification
feature will be disabled as well.
SMTP Server Either IP address or FQDN of smtp server
SMTP Port The port of SMTP server
Connection Security Either None or SSL/TLS
Authentication Enable or disable authentication for SMTP server
Email The email address for this SMTP server
Email Password If authentication is enabled, input the password of email for
authentication
Re-enter Password Re-enter the password to verify the password is correct
Email Test
To test mail delivery:
navigate to System -> Notification, check SMTP Tab and click Email Test

AppScaler Administrator User Guide
The SMTP Email Test page will pop up
Input the email address and click Save
The test mail will be sent
Add Notification Recipients
To add notification recipients:
navigate to System -> Notification, check Notification Recipients Tab and click Add
Add Notification Recipients page will pop up

AppScaler Administrator User Guide
Input the settings and click Save
The notification recipient will be shown
Settings Description
AppScaler Administrator User Guide
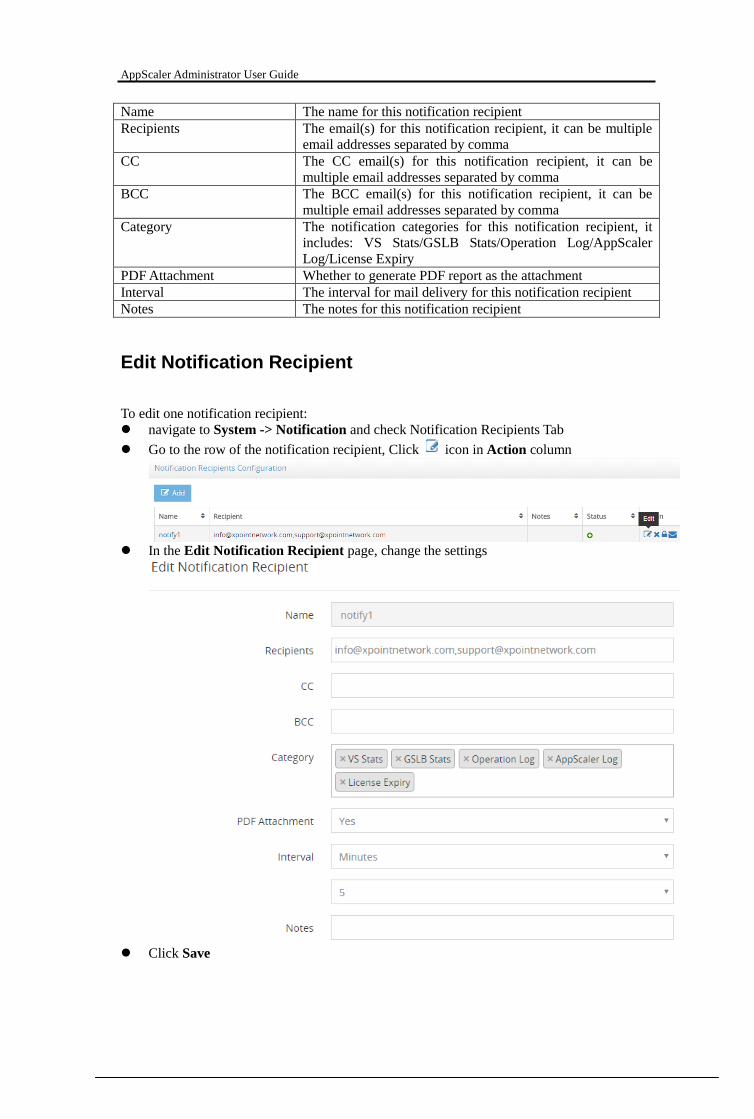
Name The name for this notification recipient
Recipients The email(s) for this notification recipient, it can be multiple
email addresses separated by comma
CC The CC email(s) for this notification recipient, it can be
multiple email addresses separated by comma
BCC The BCC email(s) for this notification recipient, it can be
multiple email addresses separated by comma
Category The notification categories for this notification recipient, it
includes: VS Stats/GSLB Stats/Operation Log/AppScaler
Log/License Expiry
PDF Attachment Whether to generate PDF report as the attachment
Interval The interval for mail delivery for this notification recipient
Notes The notes for this notification recipient
Edit Notification Recipient
To edit one notification recipient:
navigate to System -> Notification and check Notification Recipients Tab
Go to the row of the notification recipient, Click icon in Action column
In the Edit Notification Recipient page, change the settings
Click Save

AppScaler Administrator User Guide
Disable Notification Recipient
To disable one notification recipient:
navigate to System -> Notification and check Notification Recipients Tab
Go to the row of the notification recipient, Click icon in Action column
The warning message will pop up
Click Yes
Please note: The mail notification will not be delivered if notification recipient disabled.
Enable Notification Recipient
To enable one notification recipient:
navigate to System -> Notification and check Notification Recipients Tab
Go to the row of the notification recipient, Click icon in Action column
The warning message will pop up
Click Yes
Delete Notification Recipient
To delete one notification recipient:
navigate to System -> Notification and check Notification Recipients Tab
Go to the row of the notification recipient, Click icon in Action column
The warning message will pop up
Click Yes

AppScaler Administrator User Guide
Notify Now
This is the feature to send mail to the notification recipient immediately:
navigate to System -> Notification and check Notification Recipients Tab
Go to the row of the notification recipient, Click icon in Action column
The warning message will pop up
Click Yes
API
The API feature can specify:
Enable/Disable API Engine
Manage API users
Navigate to System -> API
API Engine
To configure API Engine:
navigate to System -> API, check API Engine Tab and click Manage

AppScaler Administrator User Guide
The API Engine configuration page will pop up
Choose Enable API Engine or Disable API Engine and click Save
Settings Description API Engine Enable or disable API Engine. If API Engine is disabled, the
api feature will be disabled as well.
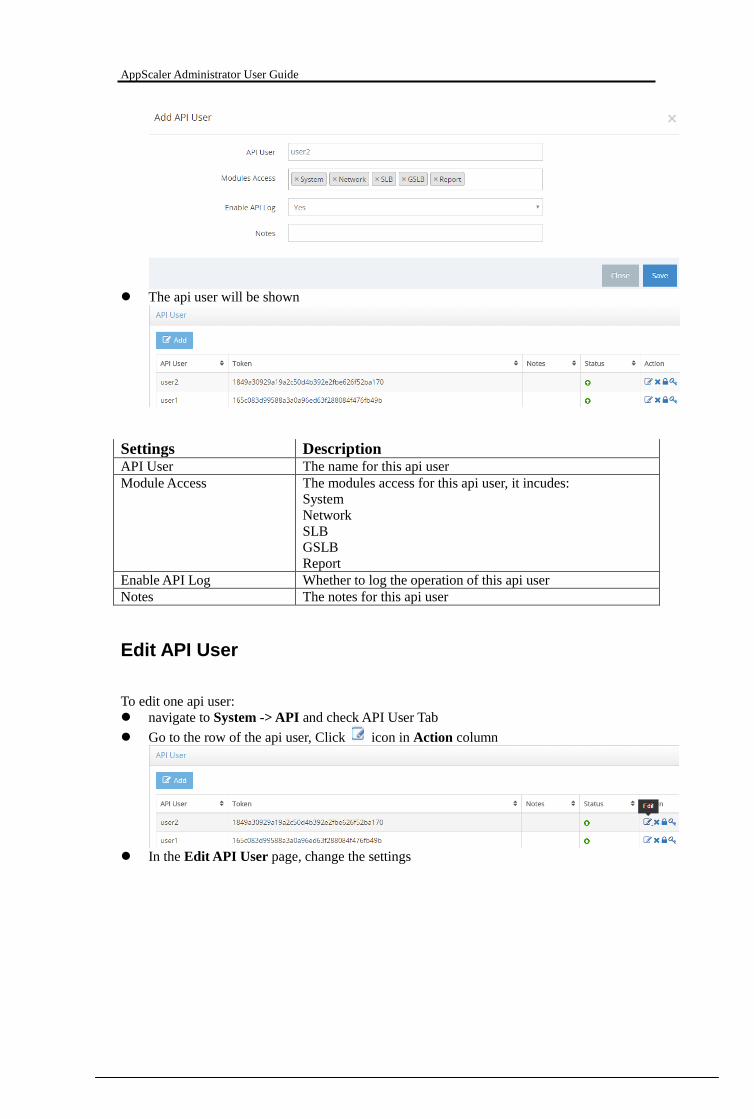
Add API User
To add one api user:
navigate to System -> API, check API User Tab and click Add
Add API User page will pop up
Input the settings and click Save
AppScaler Administrator User Guide
The api user will be shown
Settings Description API User The name for this api user
Module Access The modules access for this api user, it incudes:
System
Network
SLB
GSLB
Report
Enable API Log Whether to log the operation of this api user
Notes The notes for this api user
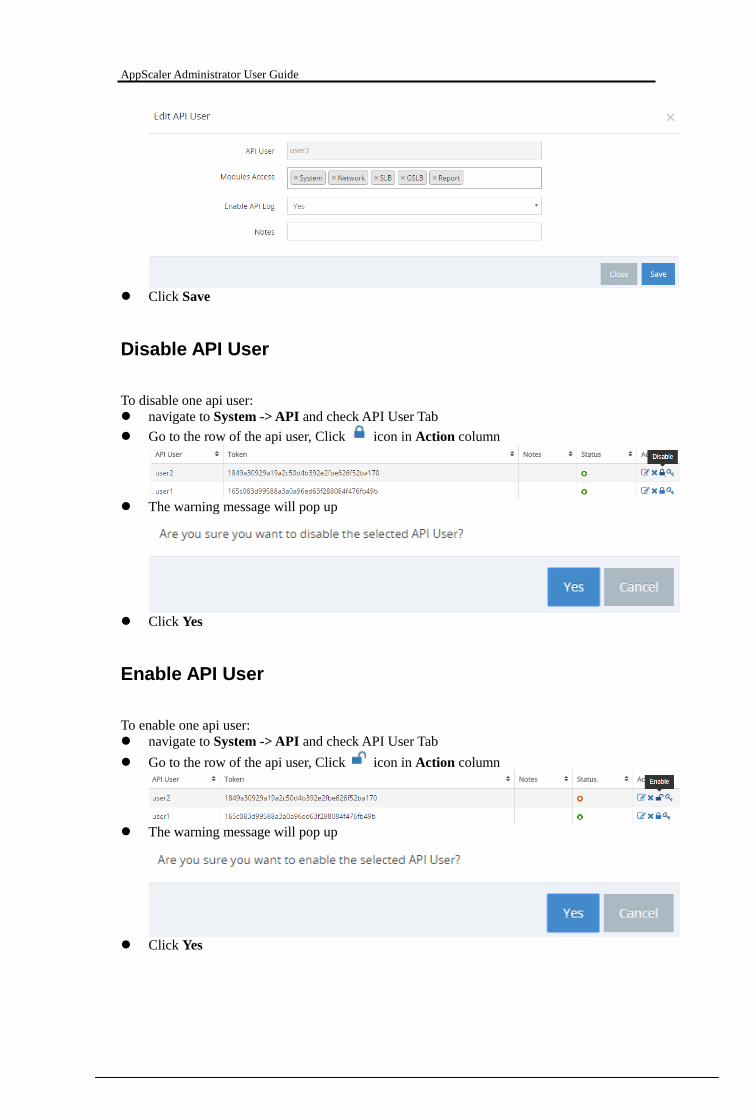
Edit API User
To edit one api user:
navigate to System -> API and check API User Tab
Go to the row of the api user, Click icon in Action column
In the Edit API User page, change the settings
AppScaler Administrator User Guide
Click Save
Disable API User
To disable one api user:
navigate to System -> API and check API User Tab
Go to the row of the api user, Click icon in Action column
The warning message will pop up
Click Yes
Enable API User
To enable one api user:
navigate to System -> API and check API User Tab
Go to the row of the api user, Click icon in Action column
The warning message will pop up
Click Yes

AppScaler Administrator User Guide
Delete API User
To delete one api user:
navigate to System -> API and check API User Tab
Go to the row of the api user, Click icon in Action column
The warning message will pop up
Click Yes
Please note the deletion of one api user will also have all its api logs deleted.
Regen Token
This is the feature to regenerate the token for one api user:
navigate to System -> API and check API User Tab
Go to the row of the api user, Click icon in Action column
The warning message will pop up
Click Yes
Maintenance
Use the WebUI to perform maintenance tasks. You can:
Generate license request file.
Register License.
View License details.
Firmware upgrade.
Firmware Backup.
Firmware Revert.
Upload signature.
View signature details.
Backup unit configuration.
Restore unit configuration.
Factory reset. Reboot the unit.
Shutdown the unit.

AppScaler Administrator User Guide
Navigate to System -> Maintenance
License Request File
To generate license request file:
navigate to System -> Maintenance, check License Tab and click Commit for License
Request
The warning message will pop up
Click Yes
The license request file will be generated and automatically downloaded
Notes: Please send this file to XPoint Network support to obtain valid demo/formal license.
Register License
To register license:
navigate to System -> Maintenance, check License Tab and click Commit for License
Registration
In the License Registration page, click Upload or drag the license file to upload window

AppScaler Administrator User Guide
Click Save
If the license is valid, the license will be registered successfully and unit will be rebooting
License Details
To view license details:
navigate to System -> Maintenance, check License Tab and click Commit for License
Details
In the View License Details page, all the license details will be displayed

AppScaler Administrator User Guide
Cluster Firmware Upgrade
To upgrade firmware for cluster:
navigate to System -> Maintenance, check Firmware Upgrade Tab and click Commit for
Cluster Firmware Upgrade
In the Firmware Upgrade page, click Upload or drag the firmware file to upload
window
Click Upgrade
Access https://[ Cluster Central Node IP]:10443
Go to High Availability and click Cluster Node
Reboot the cluster node one by one
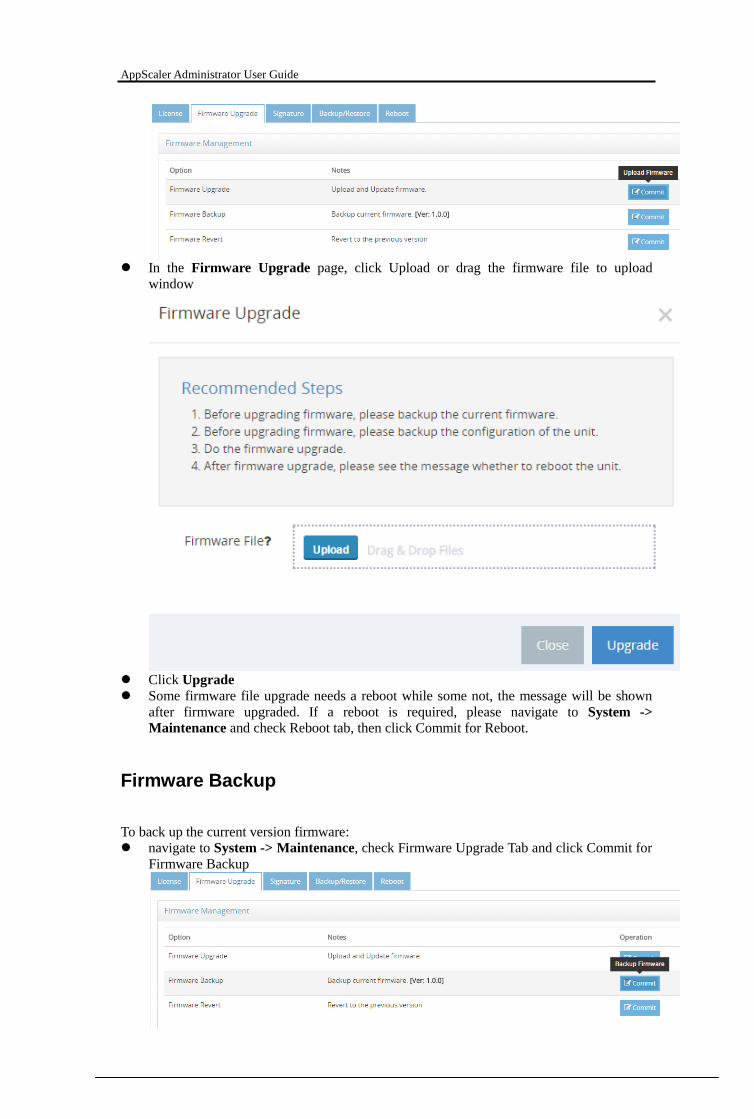
Firmware Upgrade
To upgrade firmware:
navigate to System -> Maintenance, check Firmware Upgrade Tab and click Commit for
Firmware Upgrade
AppScaler Administrator User Guide
In the Firmware Upgrade page, click Upload or drag the firmware file to upload
window
Click Upgrade
Some firmware file upgrade needs a reboot while some not, the message will be shown
after firmware upgraded. If a reboot is required, please navigate to System ->
Maintenance and check Reboot tab, then click Commit for Reboot.
Firmware Backup
To back up the current version firmware:
navigate to System -> Maintenance, check Firmware Upgrade Tab and click Commit for
Firmware Backup

AppScaler Administrator User Guide
The warning message will pop up
Click Yes
Firmware Revert
To revert to backed up version of firmware:
navigate to System -> Maintenance, check Firmware Upgrade Tab and click Commit for
Firmware Revert
The warning message will pop up
Click Yes
The unit will be rebooting
Upload signature
You could upload the following signatures:
WAF Signature
IPS Signature
GSLB Location Database
GSLB Blacklist Database
To upload signature:
navigate to System -> Maintenance, check Signature Tab and click Commit for
Signature to be installed

AppScaler Administrator User Guide
In the IPS Signature page, click Upload or drag the IPS signature file to upload window
Click Save
Signature Details
To view signature details:
navigate to System -> Maintenance, check Signature Tab and click Commit for
Signature Details
In the View Signature Details page, all the Signature details will be displayed
AppScaler Administrator User Guide
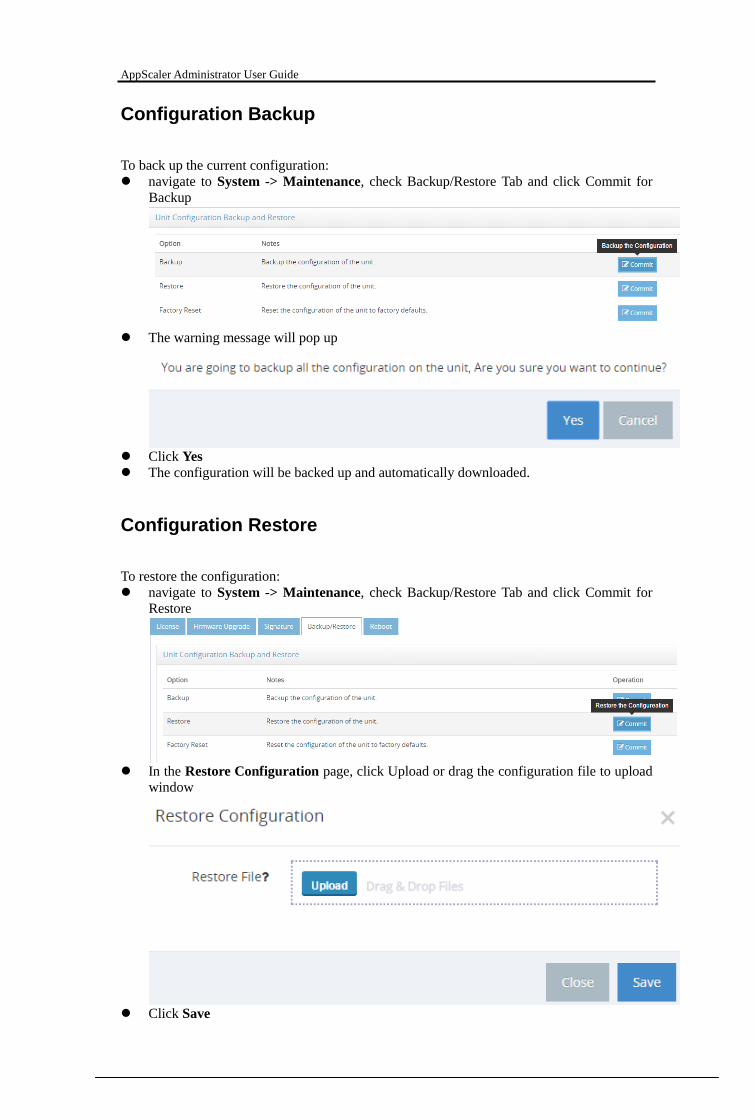
Configuration Backup
To back up the current configuration:
navigate to System -> Maintenance, check Backup/Restore Tab and click Commit for
Backup
The warning message will pop up
Click Yes
The configuration will be backed up and automatically downloaded.
Configuration Restore
To restore the configuration:
navigate to System -> Maintenance, check Backup/Restore Tab and click Commit for
Restore
In the Restore Configuration page, click Upload or drag the configuration file to upload
window
Click Save

AppScaler Administrator User Guide
Factory Reset
To reset factory details:
navigate to System -> Maintenance, check Backup/Restore Tab and click Commit for
Factory Reset
The warning message will pop up
Click Yes
The unit will be rebooting.
Reboot
To reboot the unit:
navigate to System -> Maintenance, check Reboot Tab and click Commit for Reboot
The warning message will pop up
Click Yes
After reboot, it will be redirected to logon page.
Shutdown
To shut down the unit:
navigate to System -> Maintenance, check Reboot Tab and click Commit for Shutdown

AppScaler Administrator User Guide
The warning message will pop up
Click Yes

AppScaler Administrator User Guide
Network
Interface
AppScaler supports the following types of interface:
Physical Port
VLAN Port
VXLAN Port
Aggregated Port
The interface provides the tools to manage ports on the system:
Modify Physical Interface
Add/Modify/Delete VLAN Interface
Add/Modify/Delete VXLAN interface
Add/Modify/Delete aggregated interface
Add/Modify secondary IP on one interface
Navigate to System -> Interface
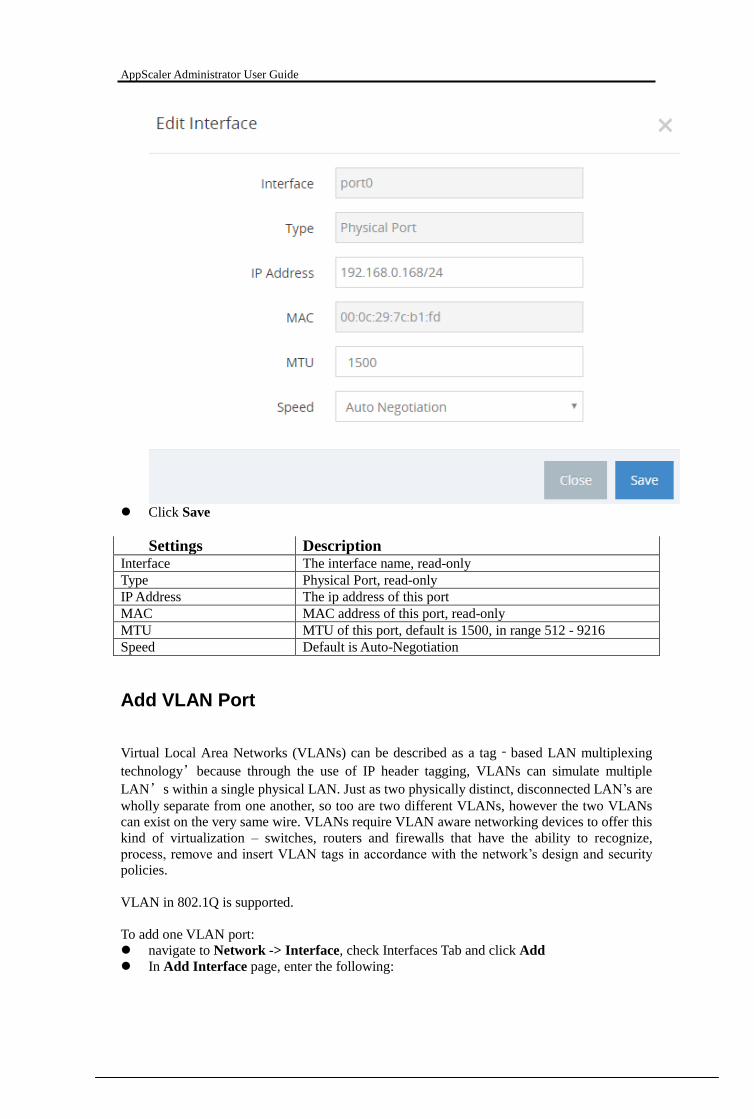
Modify Physical Port
A physical port, as opposed to a virtual or logical port is an interface on the unit into which
you can insert a connector for a device.
To modify one physical port:
navigate to Network -> Interface, check Interfaces Tab
Go to the row of the physical port, Click icon in Action column
In the Edit Interface page, enter the following:
AppScaler Administrator User Guide
Click Save
Settings Description Interface The interface name, read-only
Type Physical Port, read-only
IP Address The ip address of this port
MAC MAC address of this port, read-only
MTU MTU of this port, default is 1500, in range 512 - 9216
Speed Default is Auto-Negotiation
Add VLAN Port
Virtual Local Area Networks (VLANs) can be described as a tag‐based LAN multiplexing
technology’because through the use of IP header tagging, VLANs can simulate multiple
LAN’s within a single physical LAN. Just as two physically distinct, disconnected LAN’s are
wholly separate from one another, so too are two different VLANs, however the two VLANs
can exist on the very same wire. VLANs require VLAN aware networking devices to offer this
kind of virtualization – switches, routers and firewalls that have the ability to recognize,
process, remove and insert VLAN tags in accordance with the network’s design and security
policies.
VLAN in 802.1Q is supported.
To add one VLAN port:
navigate to Network -> Interface, check Interfaces Tab and click Add
In Add Interface page, enter the following:
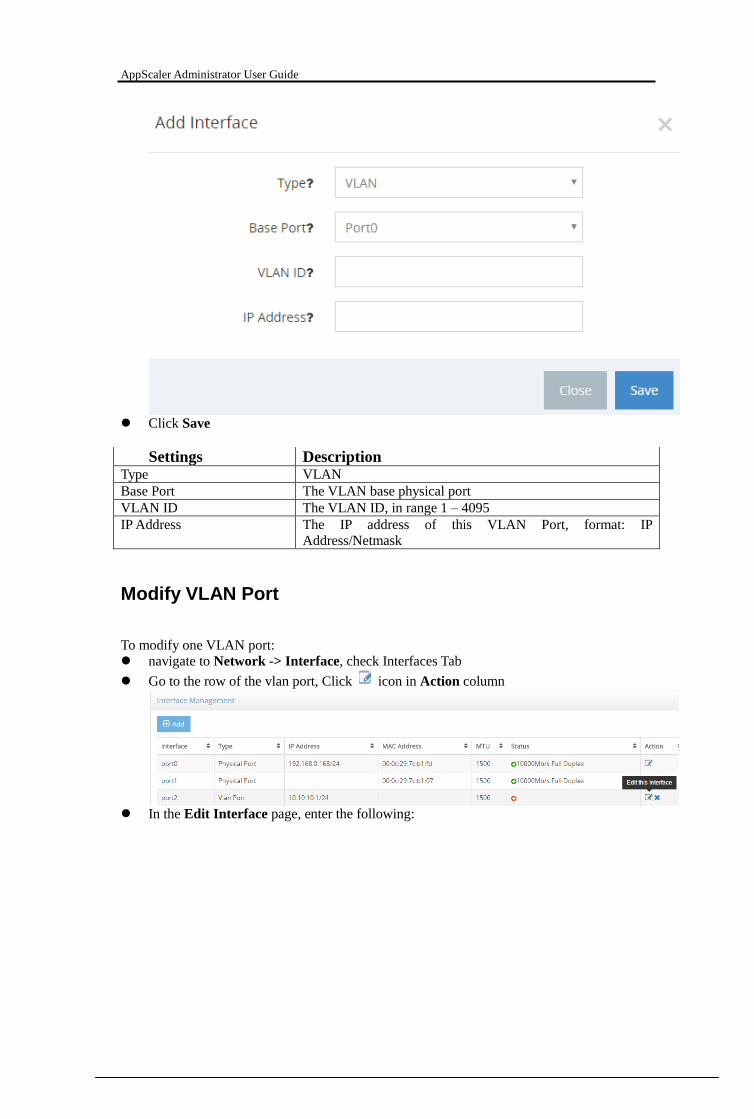
AppScaler Administrator User Guide
Click Save
Settings Description Type VLAN
Base Port The VLAN base physical port
VLAN ID The VLAN ID, in range 1 – 4095
IP Address The IP address of this VLAN Port, format: IP
Address/Netmask
Modify VLAN Port
To modify one VLAN port:
navigate to Network -> Interface, check Interfaces Tab
Go to the row of the vlan port, Click icon in Action column
In the Edit Interface page, enter the following:

AppScaler Administrator User Guide
Click Save
Delete VLAN Port
To delete one VLAN port:
navigate to Network -> Interface, check Interfaces Tab
Go to the row of the vlan port, Click icon in Action column
The warning message will pop up
Click Yes
Add VXLAN Port
Virtual eXtensible Local Area Network (VXLAN) is used to address the need for overlay
networks within virtualized data centers accommodating multiple tenants.
To add one VXLAN port:
navigate to Network -> Interface, check Interfaces Tab and click Add

AppScaler Administrator User Guide
In Add Interface page, enter the following:
Click Save
Settings Description Type VXLAN
Base Port The VXLAN base physical port
VXLAN VNI The VXLAN VNI ID, in range 1 – 16777214
IP Type Either MultiCast IP or VTEP
MultiCast If IP Type is set to MultiCast IP, this field will be shown
VTEP If IP Type is set to VTEP, this field will be shown
IP Address The IP address of this VXLAN Port, format: IP
Address/Netmask
Modify VXLAN Port
To modify one VXLAN port:
navigate to Network -> Interface, check Interfaces Tab
Go to the row of the vxlan port, Click icon in Action column
In the Edit Interface page, enter the following:
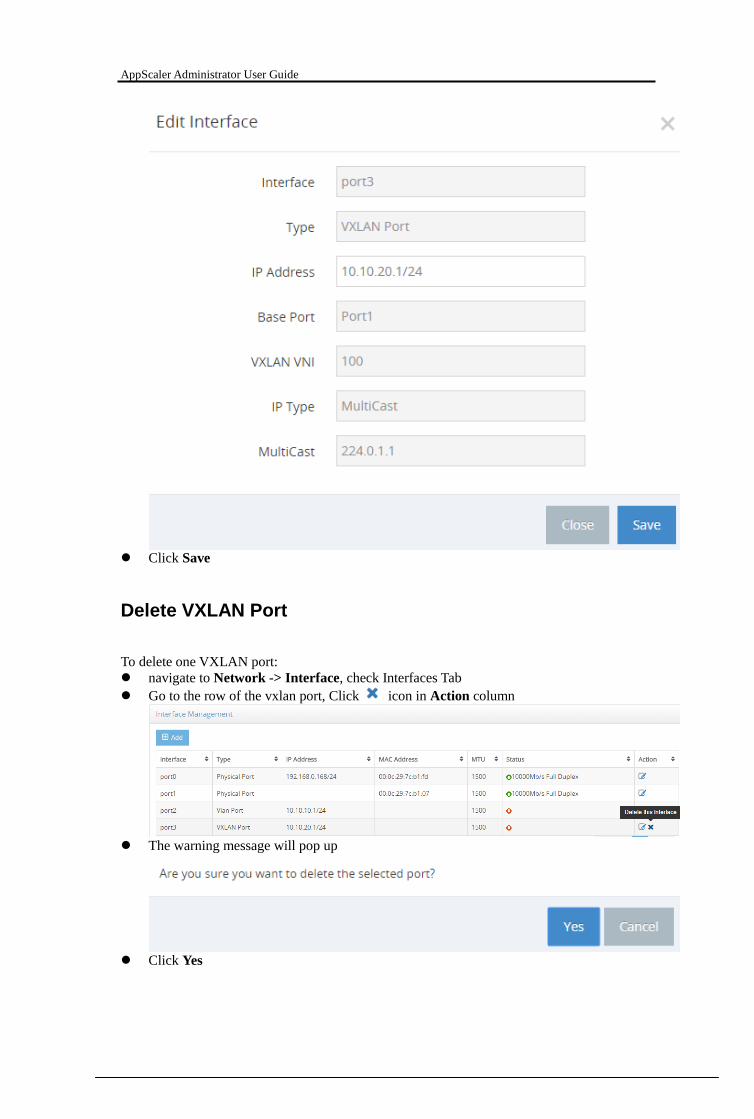
AppScaler Administrator User Guide
Click Save
Delete VXLAN Port
To delete one VXLAN port:
navigate to Network -> Interface, check Interfaces Tab
Go to the row of the vxlan port, Click icon in Action column
The warning message will pop up
Click Yes

AppScaler Administrator User Guide
Add Aggregated Port
Aggregated port applies to various methods of combining (aggregating) multiple network
connections in parallel in order to increase throughput beyond what a single connection could
sustain, and to provide redundancy in case one of the links should fail.
To add one aggregated port:
navigate to Network -> Interface, check Interfaces Tab and click Add
In Add Interface page, enter the following:
Click Save
Settings Description Type Aggregate
Mode Aggregated protocol, either 802.3ad or Link Backup
Base Port The Aggregated base physical port
Child Port The child port(s) for this aggregated port
Speed Default is Auto-Negotiation
IP Address The IP address of this VXLAN Port, format: IP
Address/Netmask
Modify aggregated Port
To modify one VXLAN port:
navigate to Network -> Interface, check Interfaces Tab
Go to the row of the aggregated port, Click icon in Action column

AppScaler Administrator User Guide
In the Edit Interface page, enter the following:
Click Save
Delete Aggregated Port
To delete one aggregated port:
navigate to Network -> Interface, check Interfaces Tab
Go to the row of the aggregated port, Click icon in Action column
The warning message will pop up

AppScaler Administrator User Guide
Click Yes
Add Secondary IP
To add secondary IP on port:
navigate to Network -> Interface, check Secondary IPs Tab and click Add
In Add Secondary IP page, enter the following:
Click Save
Settings Description Port The port to set secondary IP
IP Address The secondary IP address of this port
Notes: The secondary IP can only be configured after IP address on this port in Edit Interface
page set.
Modify Secondary IP
To modify secondary ip on port:
navigate to Network -> Interface, check Secondary IPs Tab
Go to the row of the secondary ip, Click icon in Action column
In the Edit Secondary IP page, enter the following:

AppScaler Administrator User Guide
Click Save
Delete Secondary IP
To delete secondary ip on port:
navigate to Network -> Interface, check Secondary IPs Tab
Go to the row of the secondary ip, Click icon in Action column
The warning message will pop up
Click Yes
Routing
The routing provides the tools to manage routing settings on the system:
Manage gateway
Static Route Policy
Access List
Navigate to System -> Routing
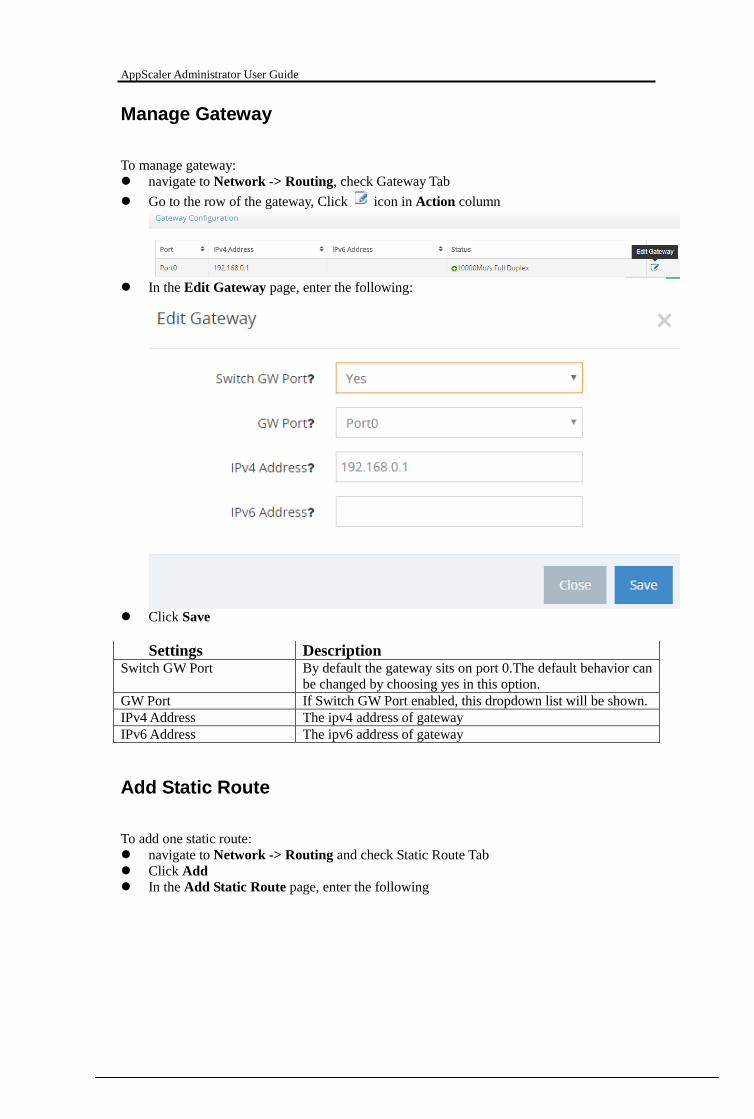
AppScaler Administrator User Guide
Manage Gateway
To manage gateway:
navigate to Network -> Routing, check Gateway Tab
Go to the row of the gateway, Click icon in Action column
In the Edit Gateway page, enter the following:
Click Save
Settings Description Switch GW Port By default the gateway sits on port 0.The default behavior can
be changed by choosing yes in this option.
GW Port If Switch GW Port enabled, this dropdown list will be shown.
IPv4 Address The ipv4 address of gateway
IPv6 Address The ipv6 address of gateway
Add Static Route
To add one static route:
navigate to Network -> Routing and check Static Route Tab
Click Add
In the Add Static Route page, enter the following

AppScaler Administrator User Guide
Click Save
Settings Description IP Type Either IPv4 or IPv6
Name The name of this static route policy
Destination The destination network
Gateway The IP address of gateway
Notes The notes for this static route
Edit Static Route
To edit one static route:
navigate to Network -> Routing and check Static Route Tab
Go to the row of the static route, Click icon in Action column
In the Edit Static Route page, change the settings

AppScaler Administrator User Guide
Click Save
Disable Static Route
To disable one static route:
navigate to Network -> Routing and check Static Route Tab
Go to the row of the static route, Click icon in Action column
The warning message will pop up
Click Yes
Enable Static Route
To enable one static route:
navigate to Network -> Routing and check Static Route Tab
Go to the row of the static route, Click icon in Action column
The warning message will pop up

AppScaler Administrator User Guide
Click Yes
Delete Static Route
To delete one static route:
navigate to Network -> Routing and check Static Route Tab
Go to the row of the static route, Click icon in Action column
The warning message will pop up
Click Yes
Add Access List
To add one access list:
navigate to Network -> Routing and check Access List Tab
Click Add
In the Add Access List page, enter the following
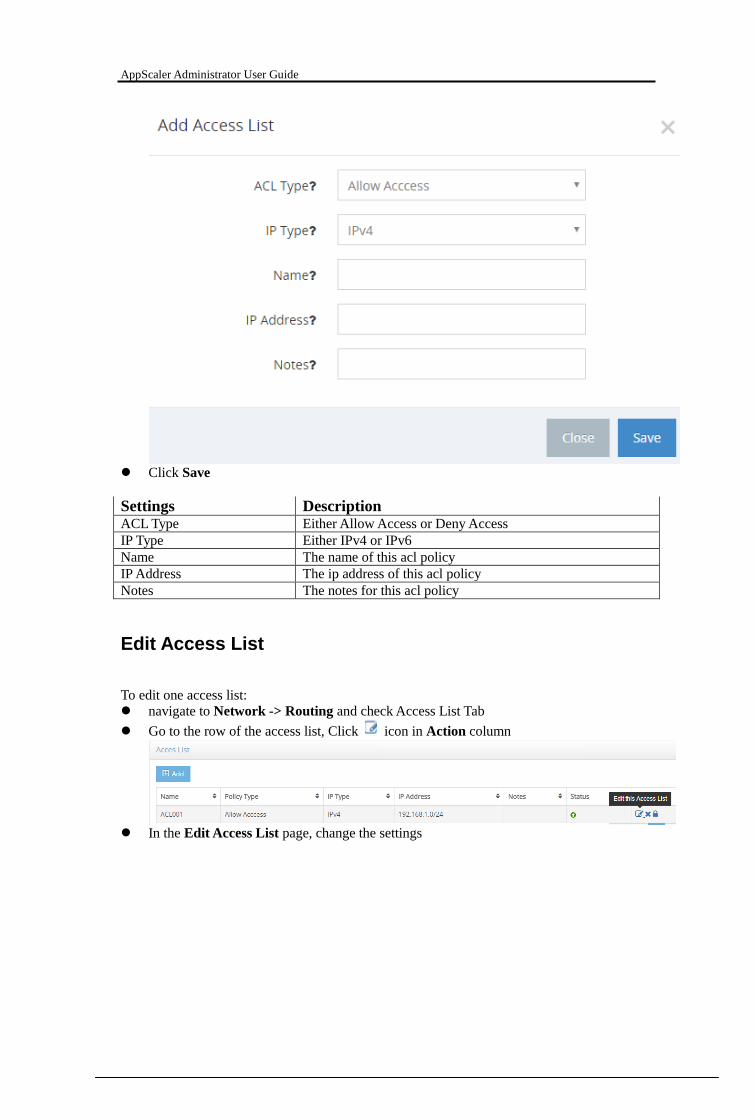
AppScaler Administrator User Guide
Click Save
Settings Description ACL Type Either Allow Access or Deny Access
IP Type Either IPv4 or IPv6
Name The name of this acl policy
IP Address The ip address of this acl policy
Notes The notes for this acl policy
Edit Access List
To edit one access list:
navigate to Network -> Routing and check Access List Tab
Go to the row of the access list, Click icon in Action column
In the Edit Access List page, change the settings

AppScaler Administrator User Guide
Click Save
Disable Access List
To disable one access list:
navigate to Network -> Routing and check Access List Tab
Go to the row of the access list, Click icon in Action column
The warning message will pop up
Click Yes
Enable Access List
To enable one access list:
navigate to Network -> Routing and check Access List Tab
Go to the row of the access list, Click icon in Action column

AppScaler Administrator User Guide
The warning message will pop up
Click Yes
Delete Access List
To delete one access list:
navigate to Network -> Routing and check Access List Tab
Go to the row of the access list, Click icon in Action column
The warning message will pop up
Click Yes
Add DNS
To add a DNS server:
navigate to Network -> DNS and check DNS Server Tab
Click Add
In the Add DNS Record page, enter the following

AppScaler Administrator User Guide
Click Save
Settings Description DNS Name The DNS server name
IP Address The ip address of this DNS server
Notes The notes for this DNS server
Edit DNS
To edit one DNS server:
navigate to Network -> DNS and check DNS Server Tab
Go to the row of the DNS Server, Click icon in Action column
In the Edit DNS page, change the settings
Click Save

AppScaler Administrator User Guide
Disable DNS
To disable one DNS server:
navigate to Network -> DNS and check DNS Server Tab
Go to the row of the DNS server, Click icon in Action column
The warning message will pop up
Click Yes
Enable DNS
To enable one DNS server:
navigate to Network -> DNS and check DNS Server Tab
Go to the row of the DNS server, Click icon in Action column
The warning message will pop up
Click Yes
Delete DNS
To delete one DNS server:
navigate to Network -> DNS and check DNS Server Tab
Go to the row of the DNS server, Click icon in Action column
The warning message will pop up
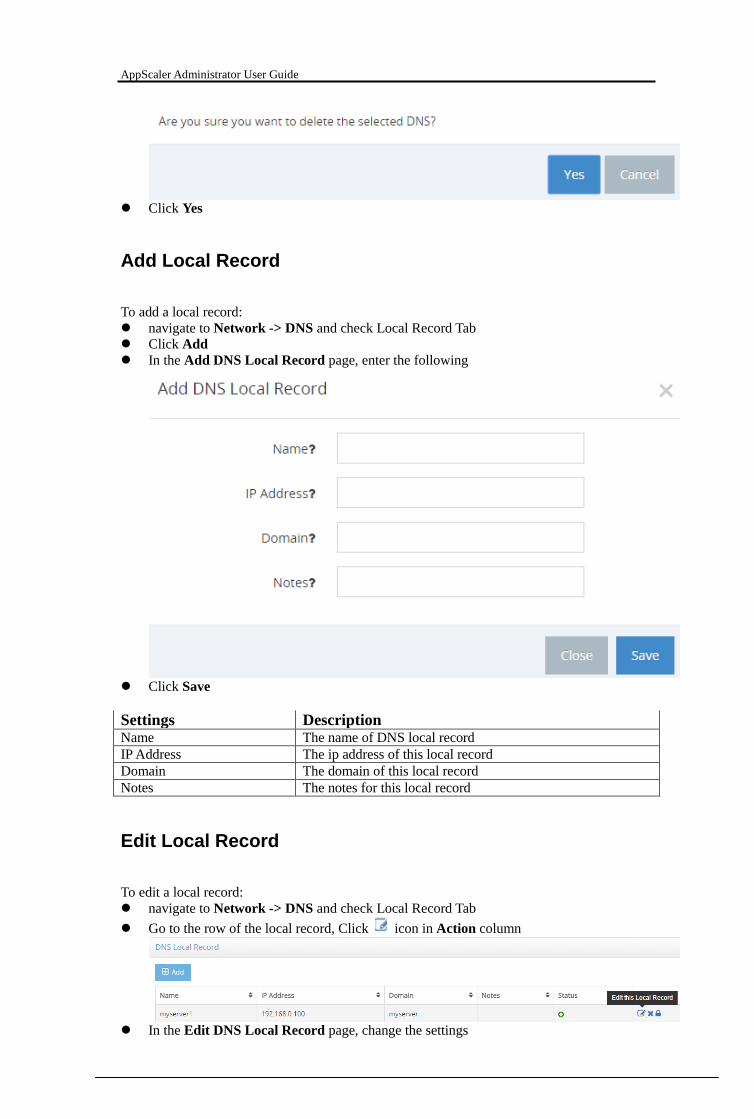
AppScaler Administrator User Guide
Click Yes
Add Local Record
To add a local record:
navigate to Network -> DNS and check Local Record Tab
Click Add
In the Add DNS Local Record page, enter the following
Click Save
Settings Description Name The name of DNS local record
IP Address The ip address of this local record
Domain The domain of this local record
Notes The notes for this local record
Edit Local Record
To edit a local record:
navigate to Network -> DNS and check Local Record Tab
Go to the row of the local record, Click icon in Action column
In the Edit DNS Local Record page, change the settings
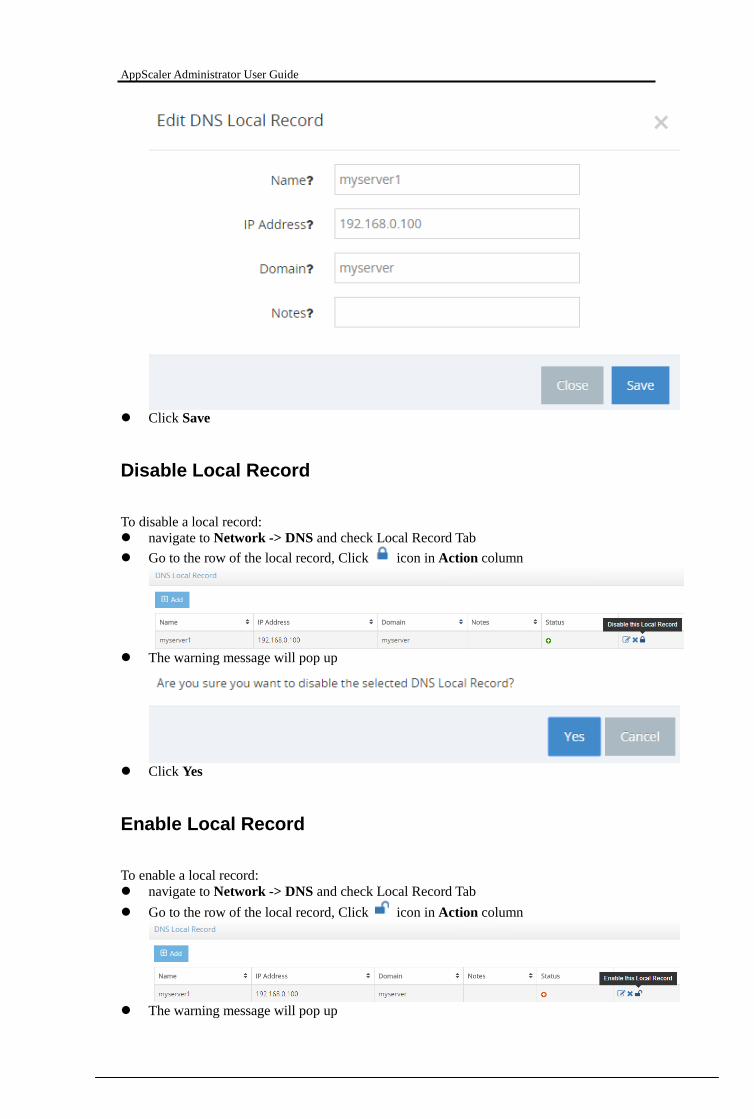
AppScaler Administrator User Guide
Click Save
Disable Local Record
To disable a local record:
navigate to Network -> DNS and check Local Record Tab
Go to the row of the local record, Click icon in Action column
The warning message will pop up
Click Yes
Enable Local Record
To enable a local record:
navigate to Network -> DNS and check Local Record Tab
Go to the row of the local record, Click icon in Action column
The warning message will pop up

AppScaler Administrator User Guide
Click Yes
Delete Local Record
To delete a local record:
navigate to Network -> DNS and check Local Record Tab
Go to the row of the local record, Click icon in Action column
The warning message will pop up
Click Yes
Add Search Domain
To add a local record:
navigate to Network -> DNS and check Search Domain Tab
Click Add
In the Add Search Domain page, enter the following
Click Save
Settings Description

AppScaler Administrator User Guide
Name The name of DNS search domain
Search Domain The domain of this DNS search domain
Notes The notes for this DNS search domain
Edit Search Domain
To edit a search domain:
navigate to Network -> DNS and check Search Domain Tab
Go to the row of the search domain, Click icon in Action column
In the Edit DNS Search Domain page, change the settings
Click Save
Disable Search Domain
To disable a search domain:
navigate to Network -> DNS and check Search Domain Tab
Go to the row of the search domain, Click icon in Action column
The warning message will pop up
Click Yes

AppScaler Administrator User Guide
Enable Search Domain
To enable a search domain:
navigate to Network -> DNS and check Search Domain Tab
Go to the row of the search domain, Click icon in Action column
The warning message will pop up
Click Yes
Delete Search Domain
To delete a search domain:
navigate to Network -> DNS and check Search Domain Tab
Go to the row of the search domain, Click icon in Action column
The warning message will pop up
Click Yes
Packet Capture
Packet capture records some or all of the packets seen by a network interface. By doing so,
you can trace connection states to the exact point at which they fail, which may help you to
diagnose some types of problems that are otherwise difficult to detect.
Navigate to System -> Packet Capture
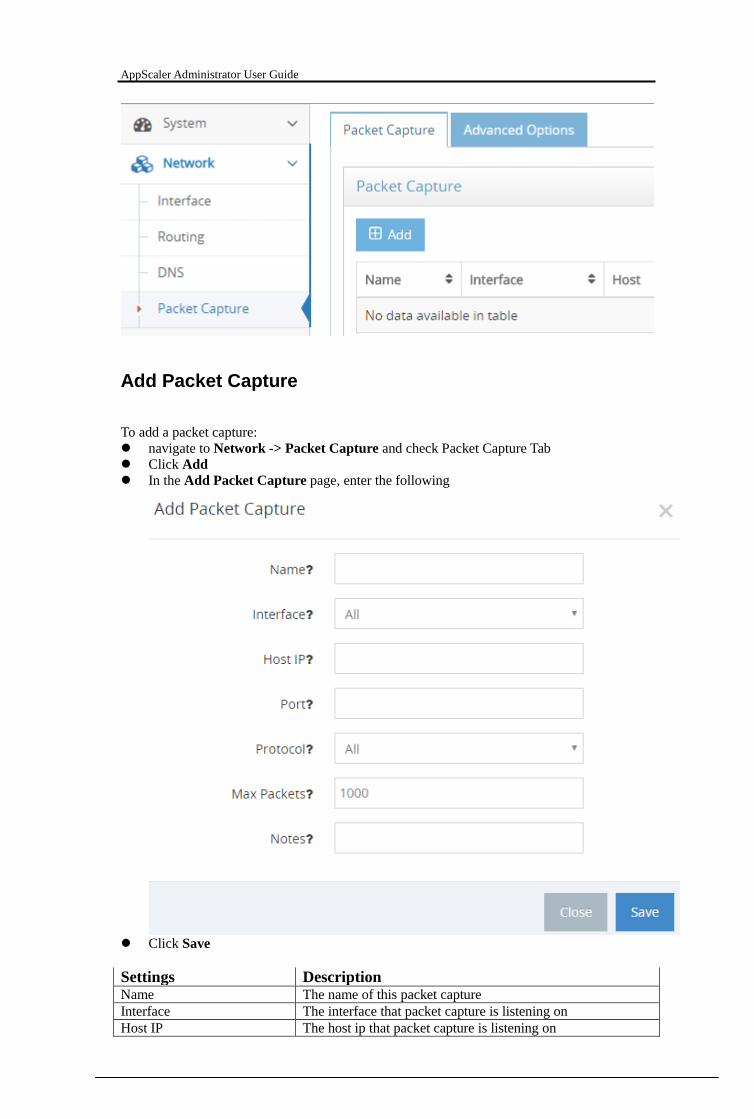
AppScaler Administrator User Guide
Add Packet Capture
To add a packet capture:
navigate to Network -> Packet Capture and check Packet Capture Tab
Click Add
In the Add Packet Capture page, enter the following
Click Save
Settings Description Name The name of this packet capture
Interface The interface that packet capture is listening on
Host IP The host ip that packet capture is listening on

AppScaler Administrator User Guide
Port The port that packet capture is listening on
Protocol The protocol that packet capture is listening on
Max. Packets The max. packets that packet capture is capturing
Notes The notes for this DNS search domain
Edit Packet Capture
To edit a packet capture:
navigate to Network -> Packet Capture and check Packet Capture Tab
Go to the row of the packet capture, Click icon in Action column
In the Edit Packet Capture page, change the settings
Click Save
Delete Packet Capture
To delete a packet capture: navigate to Network -> Packet Capture and check Packet Capture Tab
Go to the row of the packet capture, Click icon in Action column

AppScaler Administrator User Guide
The warning message will pop up
Click Yes
Run Packet Capture
To run a packet capture:
navigate to Network -> Packet Capture and check Packet Capture Tab
Go to the row of the packet capture, Click icon in Action column
The warning message will pop up
Click Yes
Stop Packet Capture
To stop a packet capture:
navigate to Network -> Packet Capture and check Packet Capture Tab
Go to the row of the packet capture, Click icon in Action column
The warning message will pop up
Click Yes

AppScaler Administrator User Guide
Download Packet Capture
To download a packet capture:
navigate to Network -> Packet Capture and check Packet Capture Tab
Go to the row of the packet capture, Click icon in Action column
The warning message will pop up
Click Yes
The packet capture file will be downloaded automatically
Advanced Options
To edit advanced options:
navigate to Network -> Packet Capture and check Advanced Options Tab
In the Advanced Options, change the settings
Click Save
Settings Description Enable SNAT Translate the source IP address within a connection to defined
system IP address
Subnet Request Enable or disable subnet request
TimeStamp Flag Enable or disable TCP timestamp response. The TCP
timestamp response can be used to approximate the remote
host's uptime, potentially aiding in further attacks
KeepAlive Flag Enable or disable TCP KeepAlive.
IP Routing Enable or disable static IP routing
Default Route Enable or disable default route.
Reset on Close Enable or disable reset on close for connections.
Generic Upload Enable or disable generic upload.
Conn Diagnostics Enable or disable connection diagnostics

AppScaler Administrator User Guide
Connection Timeout Set the connection timeout in seconds.

AppScaler Administrator User Guide
SLB
Server load balancing (SLB) features are designed to give you flexible options to maximizing
performance of your applications.
Overview
The XPoint series of application delivery, load balancing and DDoS protection solutions
accelerate, optimize and secure global applications.
Server Loading Balancer
Complete solution for server load balancing. Monitoring the health status of servers to ensure
high availability by automatically distributing application requests to servers with optimal
performance.
SSL Offloading
SSL offloading takes all the processing of SSL encryption and decryption off the main Web
server and moves it to XPoint AppScaler system which allows the performance of the main
Web server to increase and it handles the SSL certificate efficiently. SSL Offloading is
CPU-intensive, in our hardware models with specialized ASIC chip SSL accelerator you don't
need to worry about the performance.
Single Sign On
Provide credential proxying for the end users to enter their credential once to access their
secured web applications. Upon successful completion of the access policy, the user identity is
saved. The SSO feature can eliminates the need for users to enter their credentials multiple
times.
Content Switching
Provide the advanced content switching to requests sent to the same Web host to different
servers with different content.
Web Application Firewall
Provide protection against a broad range of threats – including known malware signatures,
advanced persistent threats, intrusion attempts, zero-day attacks and more..
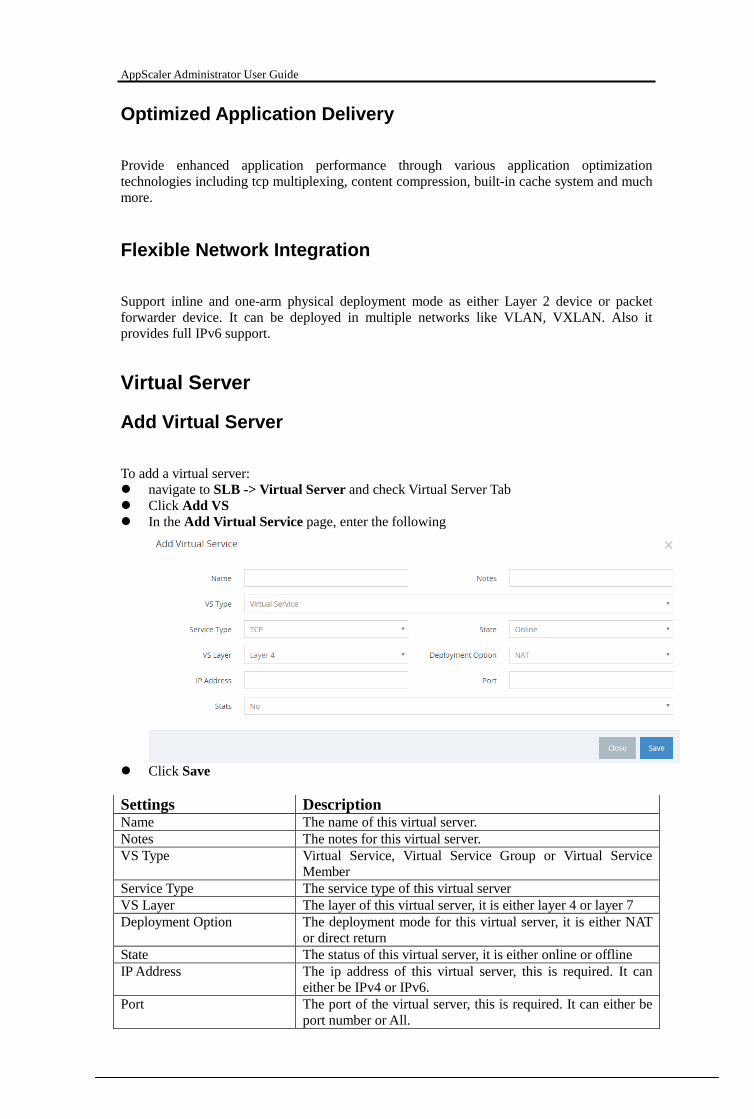
AppScaler Administrator User Guide
Optimized Application Delivery
Provide enhanced application performance through various application optimization
technologies including tcp multiplexing, content compression, built-in cache system and much
more.
Flexible Network Integration
Support inline and one-arm physical deployment mode as either Layer 2 device or packet
forwarder device. It can be deployed in multiple networks like VLAN, VXLAN. Also it
provides full IPv6 support.
Virtual Server
Add Virtual Server
To add a virtual server:
navigate to SLB -> Virtual Server and check Virtual Server Tab
Click Add VS
In the Add Virtual Service page, enter the following
Click Save
Settings Description Name The name of this virtual server.
Notes The notes for this virtual server.
VS Type Virtual Service, Virtual Service Group or Virtual Service
Member
Service Type The service type of this virtual server
VS Layer The layer of this virtual server, it is either layer 4 or layer 7
Deployment Option The deployment mode for this virtual server, it is either NAT
or direct return
State The status of this virtual server, it is either online or offline
IP Address The ip address of this virtual server, this is required. It can either be IPv4 or IPv6.
Port The port of the virtual server, this is required. It can either be
port number or All.

AppScaler Administrator User Guide
Stats Enable or disable stats for this virtual server.
Disable Virtual Server
To disable a virtual server:
navigate to SLB -> Virtual Server and check Virtual Server Tab
Go to the row of the virtual server, Click icon in Action column
The warning message will pop up
Click Yes
Enable Virtual Server
To enable a virtual server:
navigate to SLB -> Virtual Server and check Virtual Server Tab
Go to the row of the virtual server, Click icon in Action column
The warning message will pop up
Click Yes
Delete Virtual Server
To delete a virtual server:
navigate to SLB -> Virtual Server and check Virtual Server Tab
Go to the row of the virtual server, Click icon in Action column
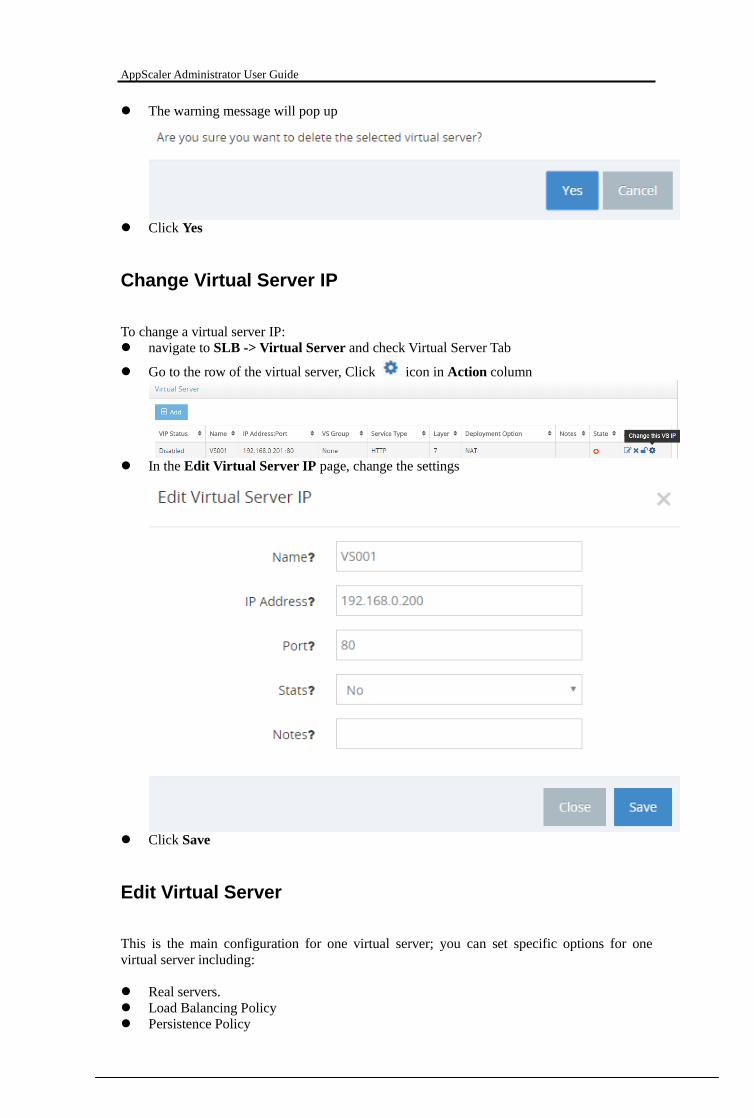
AppScaler Administrator User Guide
The warning message will pop up
Click Yes
Change Virtual Server IP
To change a virtual server IP:
navigate to SLB -> Virtual Server and check Virtual Server Tab
Go to the row of the virtual server, Click icon in Action column
In the Edit Virtual Server IP page, change the settings
Click Save
Edit Virtual Server
This is the main configuration for one virtual server; you can set specific options for one
virtual server including:
Real servers.
Load Balancing Policy
Persistence Policy
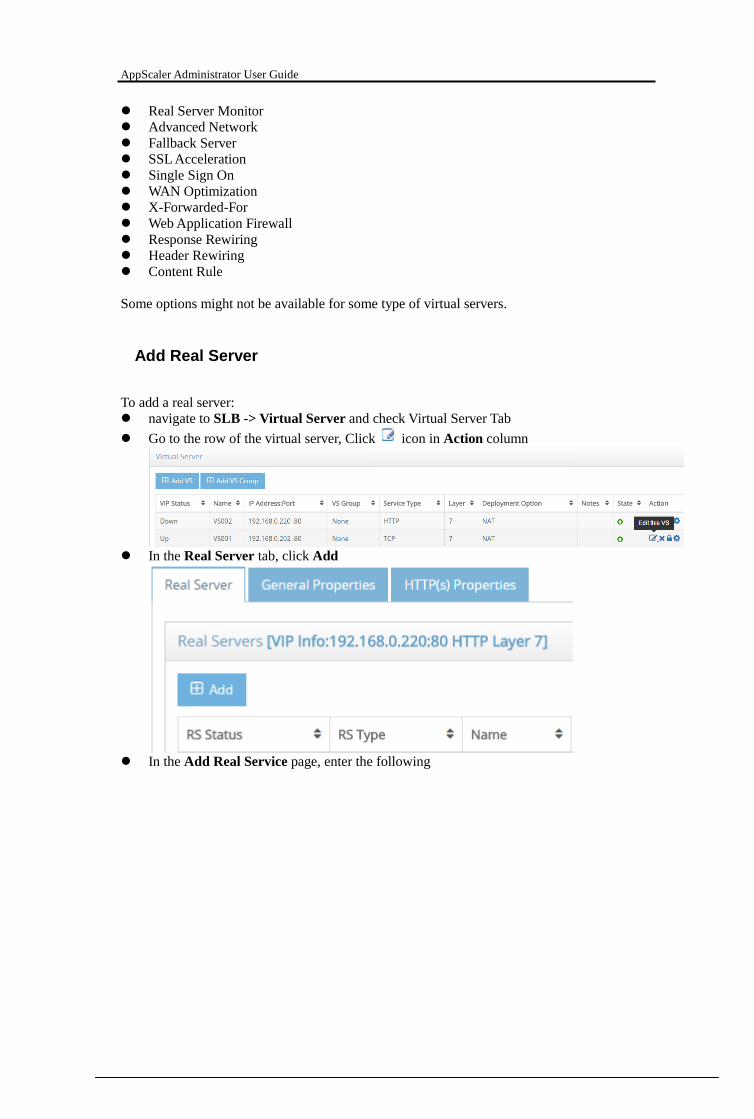
AppScaler Administrator User Guide
Real Server Monitor
Advanced Network
Fallback Server
SSL Acceleration
Single Sign On
WAN Optimization
X-Forwarded-For
Web Application Firewall
Response Rewiring
Header Rewiring
Content Rule
Some options might not be available for some type of virtual servers.
Add Real Server
To add a real server:
navigate to SLB -> Virtual Server and check Virtual Server Tab
Go to the row of the virtual server, Click icon in Action column
In the Real Server tab, click Add
In the Add Real Service page, enter the following

AppScaler Administrator User Guide
Click Save
Settings Description RS Type Either local or remote real server
RS Name The name of this Real Server
IP/FQDN The ip address or FQDN of this Real Server, either IPv4/IPv6
or FQDN
Port The port of this Real Server
Connection The connection of this Real Server.
This option is only for layer 7 virtual services.
Weight The weight of this Real Server
Notes The notes of this Real Server
Edit Real Server
To edit a real server:
navigate to SLB -> Virtual Server and check Virtual Server Tab
In Real Server tab, go to the row of the real server Click icon in Action column
In the Edit Real Server page, change the settings
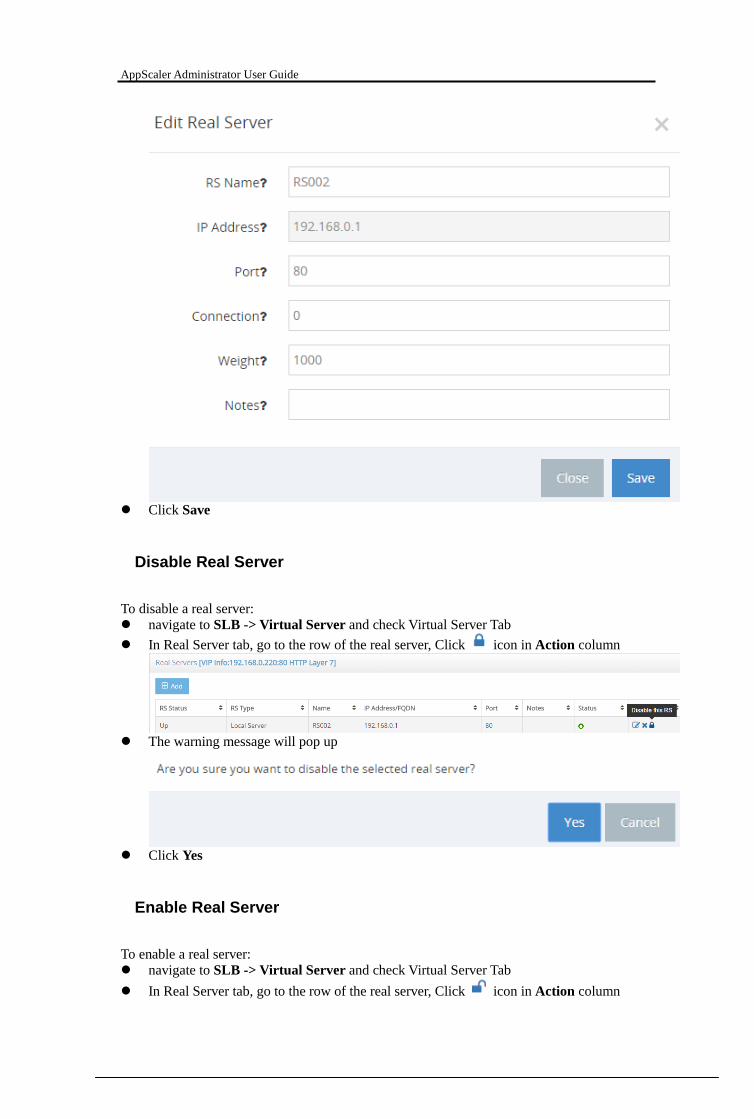
AppScaler Administrator User Guide
Click Save
Disable Real Server
To disable a real server:
navigate to SLB -> Virtual Server and check Virtual Server Tab
In Real Server tab, go to the row of the real server, Click icon in Action column
The warning message will pop up
Click Yes
Enable Real Server
To enable a real server:
navigate to SLB -> Virtual Server and check Virtual Server Tab
In Real Server tab, go to the row of the real server, Click icon in Action column

AppScaler Administrator User Guide
The warning message will pop up
Click Yes
Delete Real Server
To delete a real server:
navigate to SLB -> Virtual Server and check Virtual Server Tab
In Real Server tab, go to the row of the real server, Click icon in Action column
The warning message will pop up
Click Yes
Load Balancing Policy
To edit load balancing policy:
navigate to SLB -> Virtual Server and check Virtual Server Tab
In Real Server tab, go to the row of the real server Click icon in Action column
In General Properties Tab, Click Edit for Load Balancing Policy

AppScaler Administrator User Guide
In Edit Loading Balancing Policy page, enter the following
Click Save
Load Balance Policy Description Round Robin This algorithm directs the network connection to the next
server, and treats all servers as equals, regardless of the
number of connections or response time.
Ratio Round Robin This algorithm allows you to assign a performance weight to
each server for Round Robin.
Least Connection This algorithm directs network connections to the server with
the fewest connections.
Ratio Least Connection This algorithm allows you to assign a performance weight to
each server for Least Connection.
Predictive This algorithm ranks server performance over time and
prefers real servers that have high performance weight.
Ratio Response Time This algorithm ranks server performance over time and
prefers real servers that have high response time weight.
Source IP Hash This algorithm allows connections to be distributed to real
servers based on the source IP address.
Persistence Policy
To edit persistence policy:
navigate to SLB -> Virtual Server and check Virtual Server Tab
In Real Server tab, go to the row of the real server Click icon in Action column

AppScaler Administrator User Guide
In General Properties Tab, Click Edit for Persistence Policy
In Edit Persistence Policy page, enter the following
Click Save
Persistence Policy Description Recommended This algorithm is for HTTP(s) persistence only. It uses
specific client header to set up session persistence.
Recommended IP Bind It appends source IP to specific client header to set up session
persistence. This algorithm is for HTTP(s) persistence only.
HTTP Cookie This algorithm uses an HTTP cookie stored on a client’s
computer to allow the client to reconnect to the same server
previously visited at a web site. This algorithm is for HTTP(s)
persistence only.
HTTP Cookie Fallback It appends source IP to HTTP Cookie to set up session
persistence. This algorithm is for HTTP(s) persistence only.
Application Cookie This algorithm uses an HTTP cookie stored on AppScaler
System to allow the client to reconnect to the same server
previously visited at a web site. This algorithm is for HTTP(s)
persistence only.
Application Cookie Fallback It appends source IP to Application Cookie to set up session
persistence. This algorithm is for HTTP(s) persistence only.
Cookie Hash This algorithm allows you to create a persistence hash based
on cookies. This algorithm is for HTTP(s) persistence only.
Cookie Hash Fallback It appends source IP to Cookie Hash to set up session
persistence. This algorithm is for HTTP(s) persistence only.
URL Hash This algorithm allows you to create a persistence hash based
on URL. This algorithm is for HTTP(s) persistence only.
HTTP Host Header This algorithm allows you to create a persistence hash based
on host header. This algorithm is for HTTP(s) persistence

AppScaler Administrator User Guide
only.
HTTP Query Hash This algorithm allows you to create a persistence hash based
on query string. This algorithm is for HTTP(s) persistence
only.
Selected Header This algorithm allows you to create a persistence hash based
on custom header string. This algorithm is for HTTP(s)
persistence only.
Source Address This algorithm allows you to create a persistence hash based
on source ip address.
SSL Session ID This algorithm is a type of persistence that tracks SSL
sessions, using the SSL session ID. Even when the client’s IP
address changes, Local Traffic Manager still recognizes the
connection as being persistent based on the session ID.
UDP SIP This algorithm is a type of persistence used for servers that
receive Session Initiation Protocol (SIP) messages sent
through UDP.
None No persistence policy
Real Server Monitor
To edit real server monitor:
navigate to SLB -> Virtual Server and check Virtual Server Tab
In Real Server tab, go to the row of the real server Click icon in Action column
In General Properties Tab, Click Edit for Real Server Monitor
In Edit RS Monitor page, enter the following
Click Save

AppScaler Administrator User Guide
RS Monitor Description Ping Host Ping the server
TCP Echo Sends a TCP echo to server port and expects the server to
respond with the corresponding TCP echo.
Telnet Telnet to the server and expects the server to respond.
HTTP Sends a HEAD request to the server http port and expects the
server to return an HTTP 200.
HTTPS Sends a HEAD request to the server https port and expects the
server to return an HTTP 200.
SMTP Sends request to SMTP server
POP3 Sends request to POP3 server
IMAP Sends request to IMAP server
DNS Sends request to DNS server
NNTP Sends request to NNTP server
LDAP Sends request to LDAP server
None No real server health monitor
Advanced Network
To edit advanced network:
navigate to SLB -> Virtual Server and check Virtual Server Tab
In Real Server tab, go to the row of the real server Click icon in Action column
In General Properties Tab, Click Edit for Advanced Network
In Edit Network Configuration page, enter the following
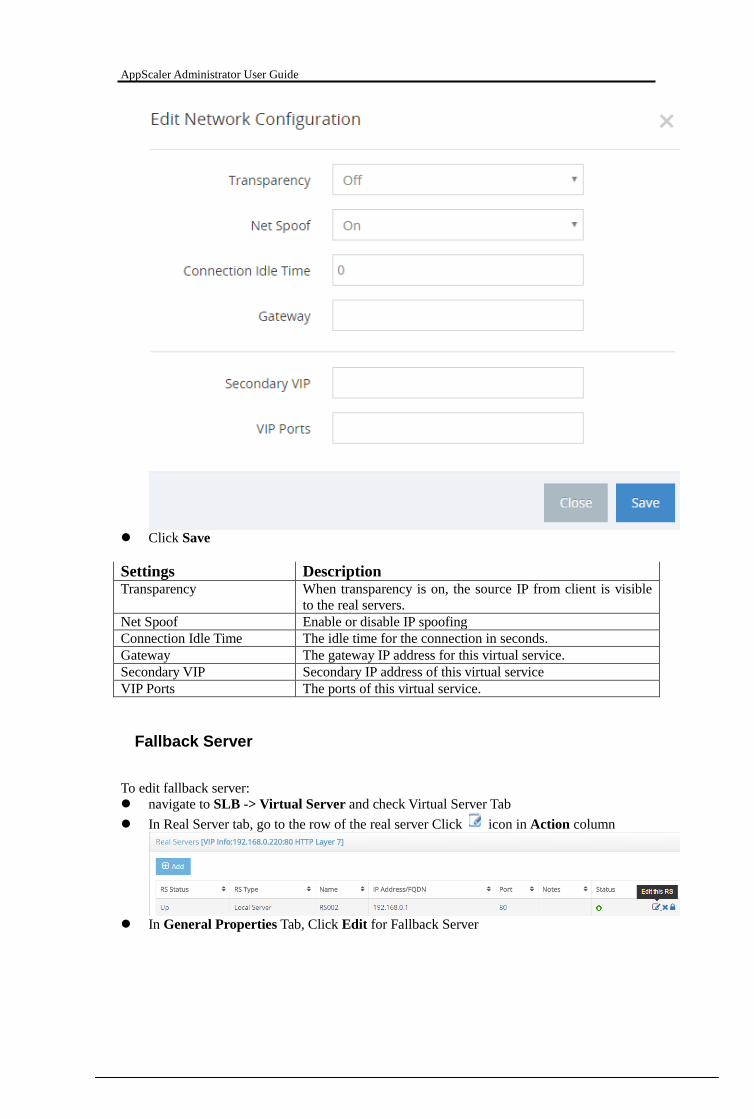
AppScaler Administrator User Guide
Click Save
Settings Description Transparency When transparency is on, the source IP from client is visible
to the real servers.
Net Spoof Enable or disable IP spoofing
Connection Idle Time The idle time for the connection in seconds.
Gateway The gateway IP address for this virtual service.
Secondary VIP Secondary IP address of this virtual service
VIP Ports The ports of this virtual service.
Fallback Server
To edit fallback server:
navigate to SLB -> Virtual Server and check Virtual Server Tab
In Real Server tab, go to the row of the real server Click icon in Action column
In General Properties Tab, Click Edit for Fallback Server
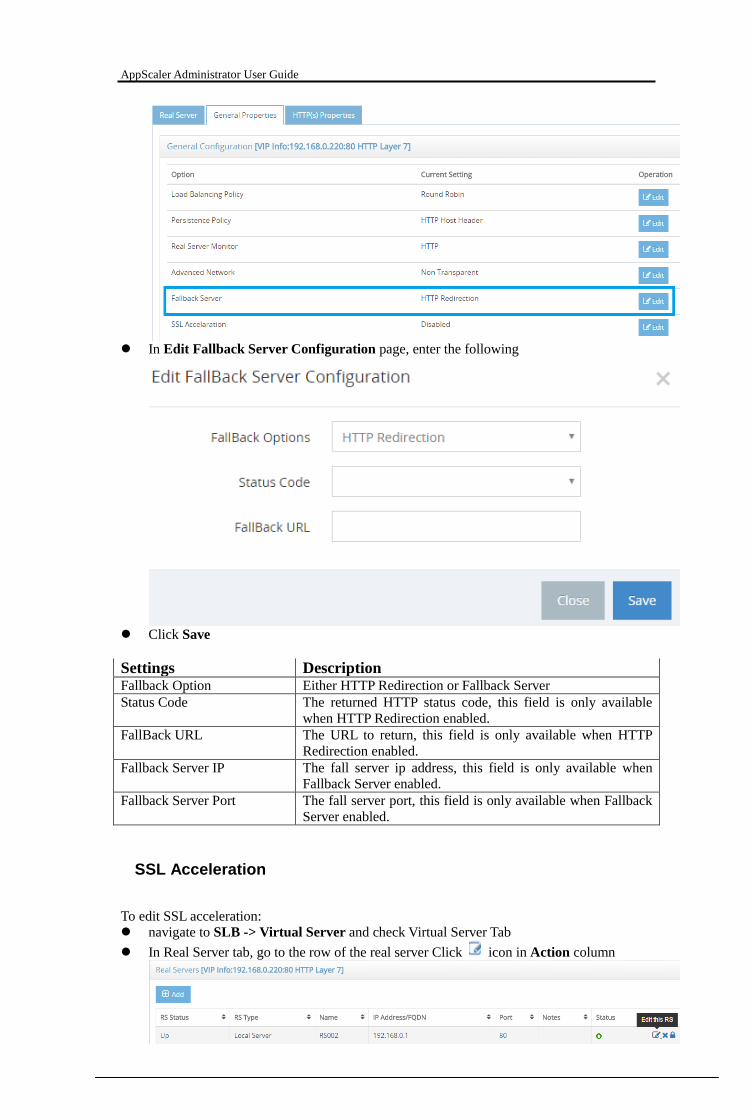
AppScaler Administrator User Guide
In Edit Fallback Server Configuration page, enter the following
Click Save
Settings Description Fallback Option Either HTTP Redirection or Fallback Server
Status Code The returned HTTP status code, this field is only available
when HTTP Redirection enabled.
FallBack URL The URL to return, this field is only available when HTTP
Redirection enabled.
Fallback Server IP The fall server ip address, this field is only available when
Fallback Server enabled.
Fallback Server Port The fall server port, this field is only available when Fallback
Server enabled.
SSL Acceleration
To edit SSL acceleration:
navigate to SLB -> Virtual Server and check Virtual Server Tab
In Real Server tab, go to the row of the real server Click icon in Action column

AppScaler Administrator User Guide
In General Properties Tab, Click Edit for SSL Acceleration
In Edit SSL Offloading Configuration page, enter the following
Click Save
Settings Description Virtual Server SSL Group Set the SSL Group for this virtual server. If No SSL selected,
the SSL Offloading is disabled.
SSL/TLS Protocols Choose the SSL/TLS protocols for
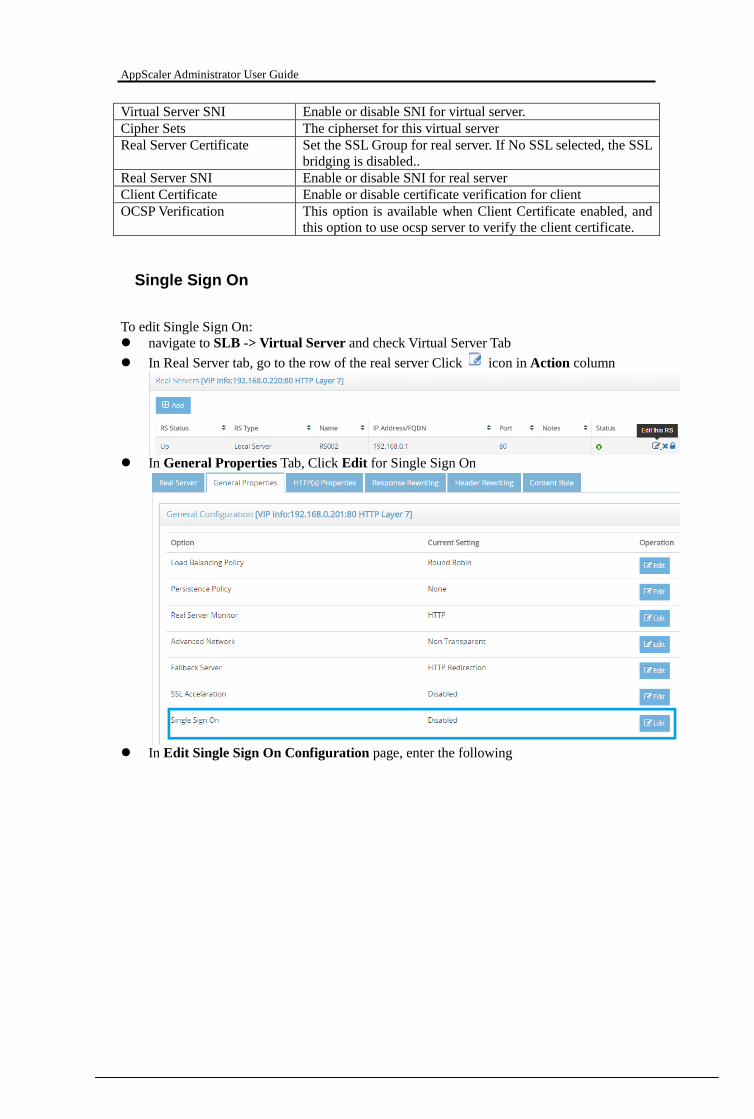
AppScaler Administrator User Guide
Virtual Server SNI Enable or disable SNI for virtual server.
Cipher Sets The cipherset for this virtual server
Real Server Certificate Set the SSL Group for real server. If No SSL selected, the SSL
bridging is disabled..
Real Server SNI Enable or disable SNI for real server
Client Certificate Enable or disable certificate verification for client
OCSP Verification This option is available when Client Certificate enabled, and
this option to use ocsp server to verify the client certificate.
Single Sign On
To edit Single Sign On:
navigate to SLB -> Virtual Server and check Virtual Server Tab
In Real Server tab, go to the row of the real server Click icon in Action column
In General Properties Tab, Click Edit for Single Sign On
In Edit Single Sign On Configuration page, enter the following
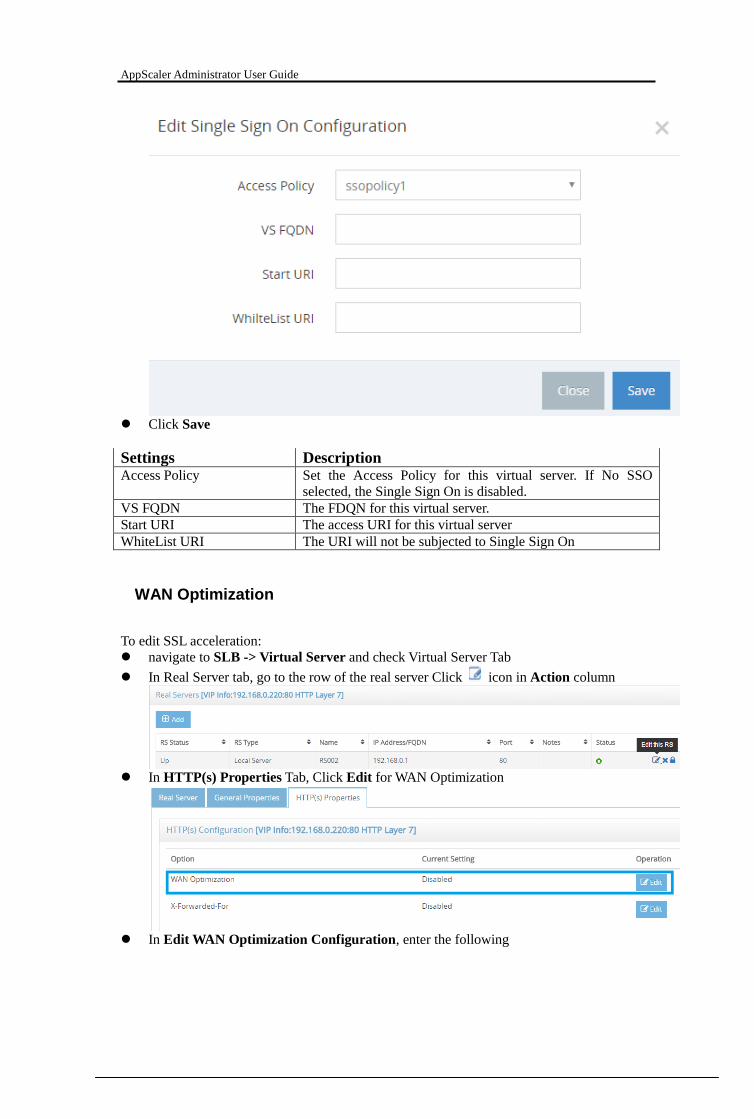
AppScaler Administrator User Guide
Click Save
Settings Description Access Policy Set the Access Policy for this virtual server. If No SSO
selected, the Single Sign On is disabled.
VS FQDN The FDQN for this virtual server.
Start URI The access URI for this virtual server
WhiteList URI The URI will not be subjected to Single Sign On
WAN Optimization
To edit SSL acceleration:
navigate to SLB -> Virtual Server and check Virtual Server Tab
In Real Server tab, go to the row of the real server Click icon in Action column
In HTTP(s) Properties Tab, Click Edit for WAN Optimization
In Edit WAN Optimization Configuration, enter the following

AppScaler Administrator User Guide
Click Save
Settings Description IPS Enable or disable IPS
HTTP RAM Cache Enable or disable Web Cache
HTTP Data Compression Enable or disable data compression
TCP Multiplexing Enable or disable TCP Multiplexing
X-Forwarded-For
To edit X-Forwarded-For:
navigate to SLB -> Virtual Server and check Virtual Server Tab
In Real Server tab, go to the row of the real server Click icon in Action column
In HTTP(s) Properties Tab, Click Edit for X-Forwarded-For
In Edit X-Forwarded-For Configuration, enter the following

AppScaler Administrator User Guide
Click Save
Settings Description X-Forward-For Enable or disable X-Forward-For
Insert HTTP Header The header name to be inserted
Insert Header Value The header value to be inserted
Copy HTTP Header The header to be copied
Copy To Header The header copied to
Web Application Firewall
To edit Web Application Firewall:
navigate to SLB -> Virtual Server and check Virtual Server Tab
In Real Server tab, go to the row of the real server Click icon in Action column
In HTTP(s) Properties Tab, Click Edit for Web Application Firewall
In Edit WAF Configuration, enter the following

AppScaler Administrator User Guide
Click Save
Settings Description WAF Policy Set the WAF Policy for this virtual server. If No WAF
selected, the Web Application Firewall is disabled.
Add Response Rewriting
To add a response rewriting policy:
navigate to SLB -> Virtual Server and check Virtual Server Tab
Go to the row of the virtual server, Click icon in Action column
In the Response Rewriting tab, click Add
In the Add Response Writing Policy page, enter the following

AppScaler Administrator User Guide
Click Save
Settings Description Policy Name The name of this response rewriting policy
Content The content of the response body to be matched
Rewrite The content to rewrite in response body
Case Sensitive Whether the case sensitive option is enabled
Execute Condition The condition level to execute this policy
Notes The notes of this policy
Edit Response Writing
To edit a Response Writing:
navigate to SLB -> Virtual Server and check Virtual Server Tab
In Real Server tab, go to the row of the real server Click icon in Action column
In the Response Rewriting tab, go to the row of the response rewriting policy Click
icon in Action column
In the Edit Response Writing Policy page, change the settings

AppScaler Administrator User Guide
Click Save
Delete Response Writing
To delete a Response Writing:
navigate to SLB -> Virtual Server and check Virtual Server Tab
In Real Server tab, go to the row of the real server Click icon in Action column
In the Response Rewriting tab, go to the row of the response rewriting policy Click
icon in Action column
The warning message will pop up
Click Yes

AppScaler Administrator User Guide
Set Priority of Response Writing
To set priority of response writing:
navigate to SLB -> Virtual Server and check Virtual Server Tab
In Real Server tab, go to the row of the real server Click icon in Action column
In the Response Rewriting tab, go to the row of the response rewriting policy Click
icon in Action column
The warning message will pop up
Click Yes
Add Header Rewriting
To add a header rewriting policy:
navigate to SLB -> Virtual Server and check Virtual Server Tab
Go to the row of the virtual server, Click icon in Action column
In the Header Rewriting tab, click Add
In the Add Header Writing Policy page, enter the following
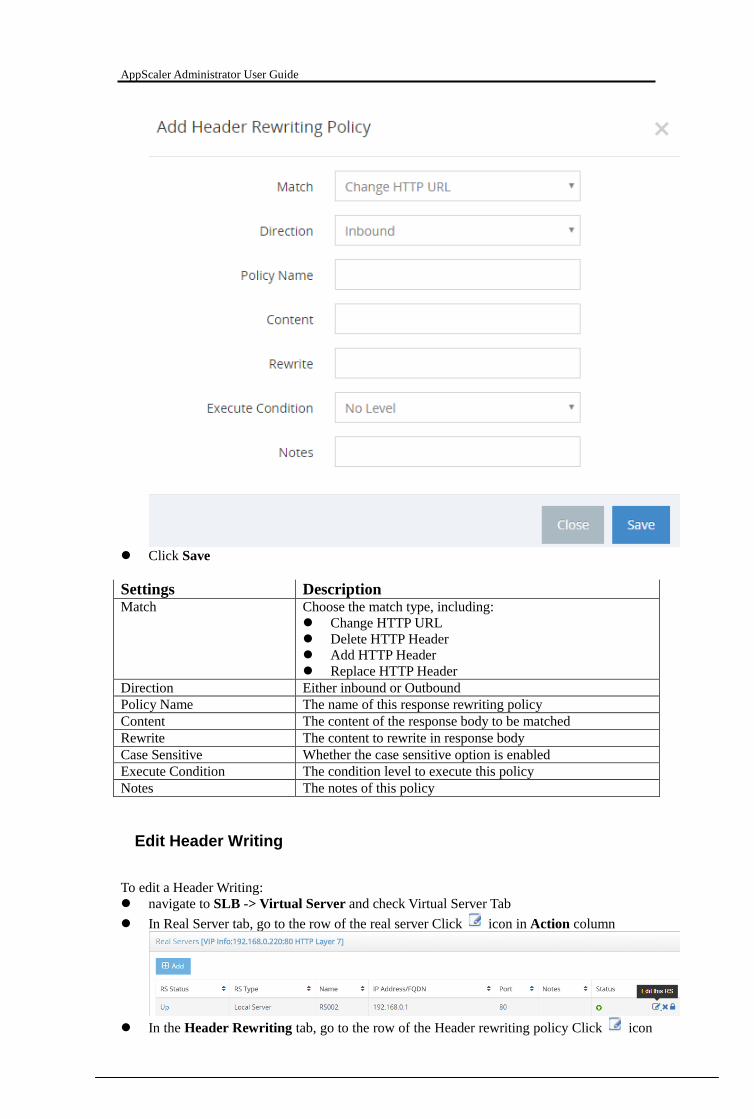
AppScaler Administrator User Guide
Click Save
Settings Description Match Choose the match type, including:
Change HTTP URL
Delete HTTP Header
Add HTTP Header
Replace HTTP Header
Direction Either inbound or Outbound
Policy Name The name of this response rewriting policy
Content The content of the response body to be matched
Rewrite The content to rewrite in response body
Case Sensitive Whether the case sensitive option is enabled
Execute Condition The condition level to execute this policy
Notes The notes of this policy
Edit Header Writing
To edit a Header Writing:
navigate to SLB -> Virtual Server and check Virtual Server Tab
In Real Server tab, go to the row of the real server Click icon in Action column
In the Header Rewriting tab, go to the row of the Header rewriting policy Click icon
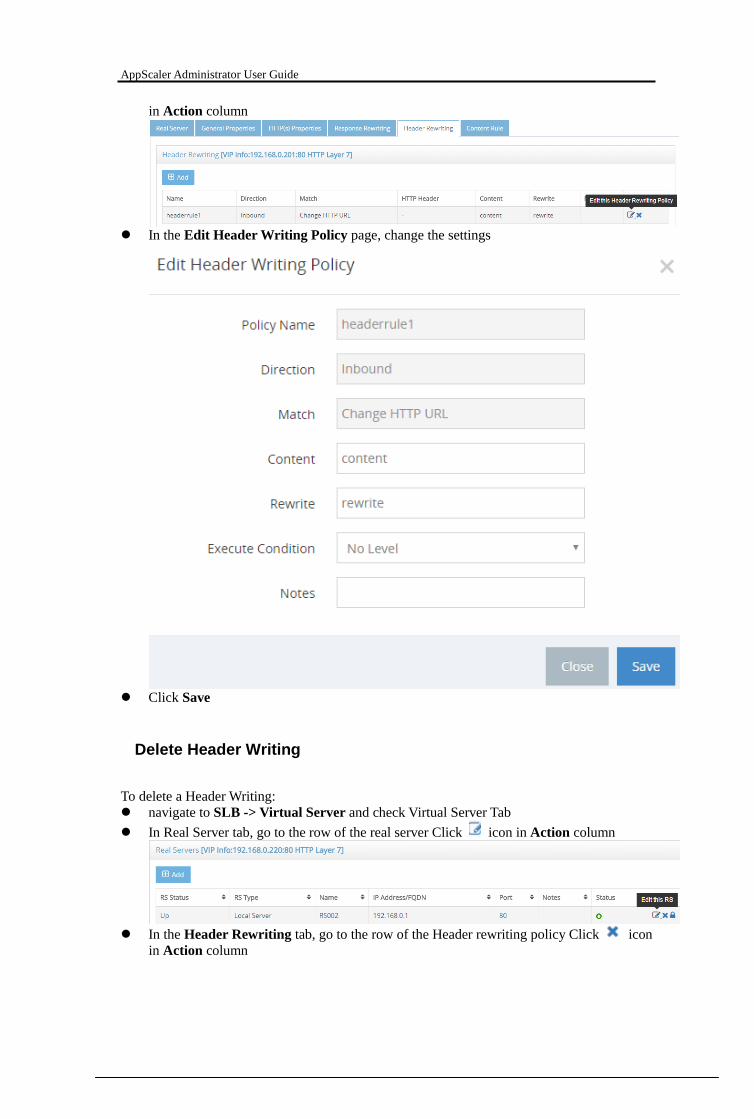
AppScaler Administrator User Guide
in Action column
In the Edit Header Writing Policy page, change the settings
Click Save
Delete Header Writing
To delete a Header Writing:
navigate to SLB -> Virtual Server and check Virtual Server Tab
In Real Server tab, go to the row of the real server Click icon in Action column
In the Header Rewriting tab, go to the row of the Header rewriting policy Click icon
in Action column
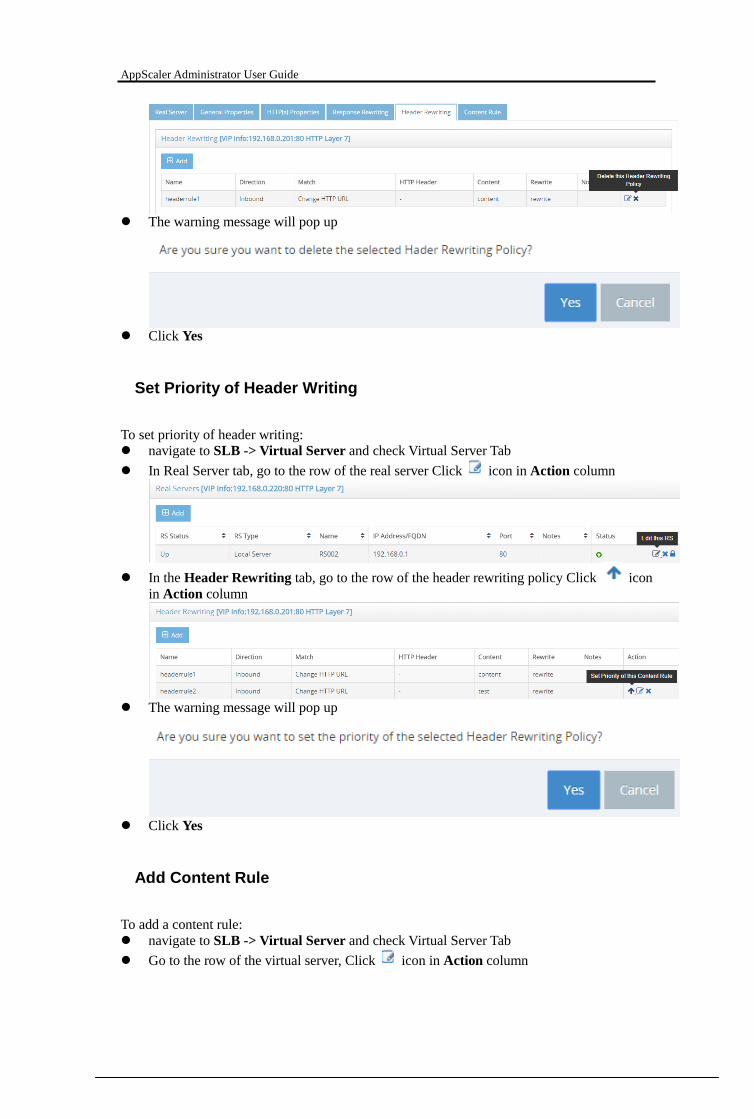
AppScaler Administrator User Guide
The warning message will pop up
Click Yes
Set Priority of Header Writing
To set priority of header writing:
navigate to SLB -> Virtual Server and check Virtual Server Tab
In Real Server tab, go to the row of the real server Click icon in Action column
In the Header Rewriting tab, go to the row of the header rewriting policy Click icon
in Action column
The warning message will pop up
Click Yes
Add Content Rule
To add a content rule:
navigate to SLB -> Virtual Server and check Virtual Server Tab
Go to the row of the virtual server, Click icon in Action column
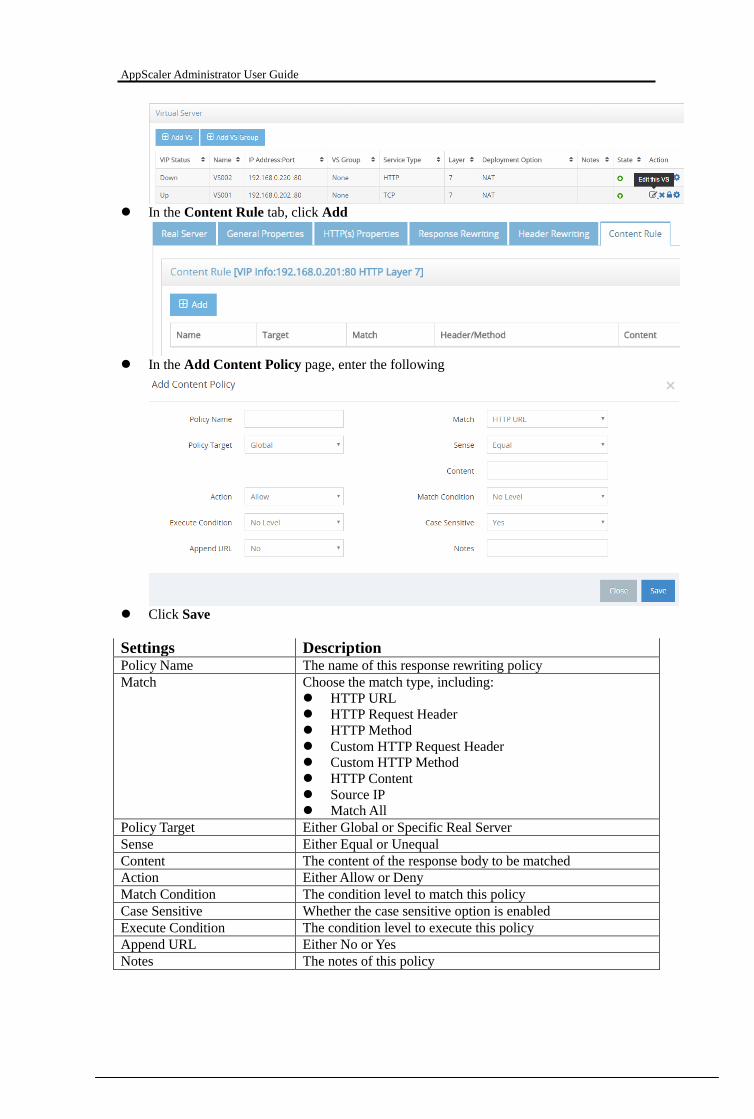
AppScaler Administrator User Guide
In the Content Rule tab, click Add
In the Add Content Policy page, enter the following
Click Save
Settings Description Policy Name The name of this response rewriting policy
Match Choose the match type, including:
HTTP URL
HTTP Request Header
HTTP Method
Custom HTTP Request Header
Custom HTTP Method
HTTP Content
Source IP
Match All
Policy Target Either Global or Specific Real Server
Sense Either Equal or Unequal
Content The content of the response body to be matched
Action Either Allow or Deny
Match Condition The condition level to match this policy
Case Sensitive Whether the case sensitive option is enabled
Execute Condition The condition level to execute this policy
Append URL Either No or Yes
Notes The notes of this policy

AppScaler Administrator User Guide
Edit Content Rule
To edit a content rule:
navigate to SLB -> Virtual Server and check Virtual Server Tab
In Real Server tab, go to the row of the real server Click icon in Action column
In the Content Rule tab, go to the row of the content rule Click icon in Action
column
In the Edit Content Rule page, change the settings
Click Save
Delete Content Rule
To delete a Content Rule:
navigate to SLB -> Virtual Server and check Virtual Server Tab
In Real Server tab, go to the row of the real server Click icon in Action column
In the Content Rule tab, go to the row of the content rule Click icon in Action
column
The warning message will pop up

AppScaler Administrator User Guide
Click Yes
Set Priority of Content Rule
To set priority of content rule:
navigate to SLB -> Virtual Server and check Virtual Server Tab
In Real Server tab, go to the row of the real server Click icon in Action column
In the Content Rule tab, go to the row of the content rule Click icon in Action
column
The warning message will pop up
Click Yes
Virtual Server Group
Add Virtual Server Group
To add a virtual server group:
navigate to SLB -> Virtual Server and check Virtual Server Tab
Click Add
In the Add Virtual Service page, enter the following

AppScaler Administrator User Guide
Click Save
Settings Description VS Type Choose Virtual Service Group
Service Type The service type of this virtual server group
State The status of this virtual server group, it is either online or
offline
Name The name of this virtual server group.
IP Address The ip address of this virtual server group, this is required. It
can either be IPv4 or IPv6.
Port The port of the virtual server group, this is required. It can
either be port number or All.
Stats Enable or disable stats for this virtual server group.
Notes The notes for this virtual server group.
Disable Virtual Server Group
To disable a virtual server group:
navigate to SLB -> Virtual Server and check Virtual Server Tab
Go to the row of the virtual server group, Click icon in Action column
The warning message will pop up
Click Yes
Enable Virtual Server Group
To enable a virtual server group:
navigate to SLB -> Virtual Server and check Virtual Server Tab
Go to the row of the virtual server group, Click icon in Action column
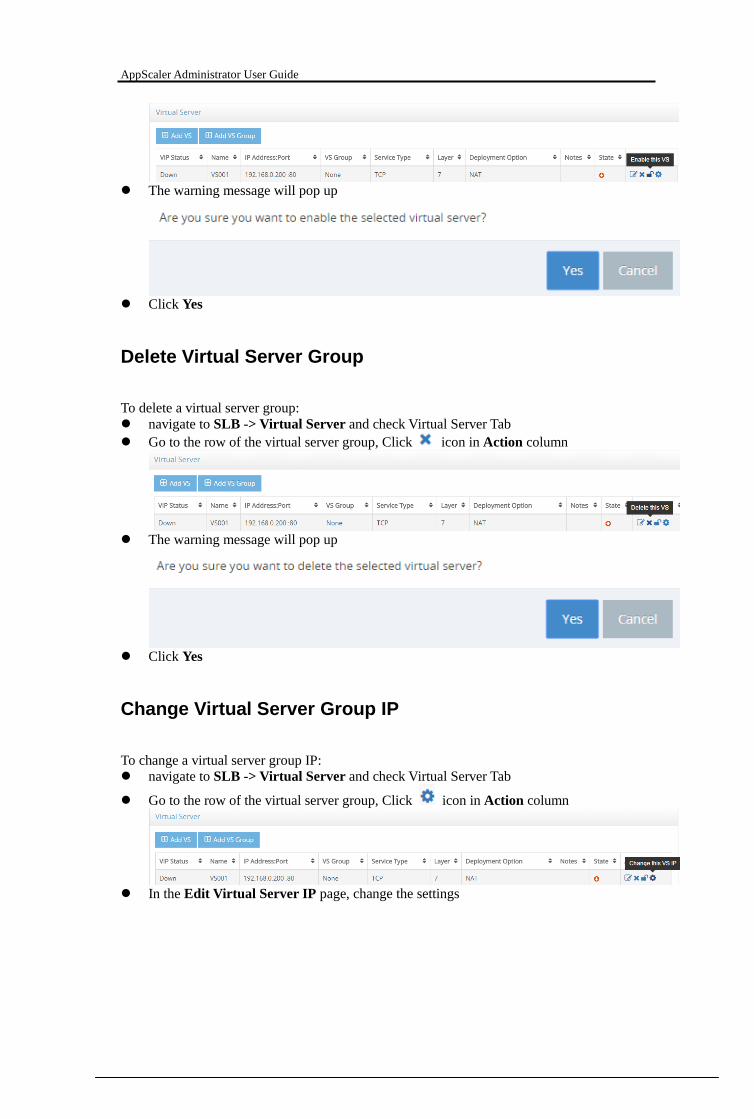
AppScaler Administrator User Guide
The warning message will pop up
Click Yes
Delete Virtual Server Group
To delete a virtual server group:
navigate to SLB -> Virtual Server and check Virtual Server Tab
Go to the row of the virtual server group, Click icon in Action column
The warning message will pop up
Click Yes
Change Virtual Server Group IP
To change a virtual server group IP:
navigate to SLB -> Virtual Server and check Virtual Server Tab
Go to the row of the virtual server group, Click icon in Action column
In the Edit Virtual Server IP page, change the settings

AppScaler Administrator User Guide
Click Save
Add Virtual Server Member to Virtual Server Group
To add a virtual server to virtual server group:
navigate to SLB -> Virtual Server and check Virtual Server Tab
Click Add VS
In the Add Virtual Service page, enter the following
Choose Virtual Service Member from VS Type dropdown list
Choose one VS group from the VS Group dropdown list
Click Save
Edit Virtual Server Member in Virtual Server Group
To edit a virtual server in virtual server group:
navigate to SLB -> Virtual Server and check Virtual Server Tab
Go to the row of the virtual server group server Click icon in VS Group column
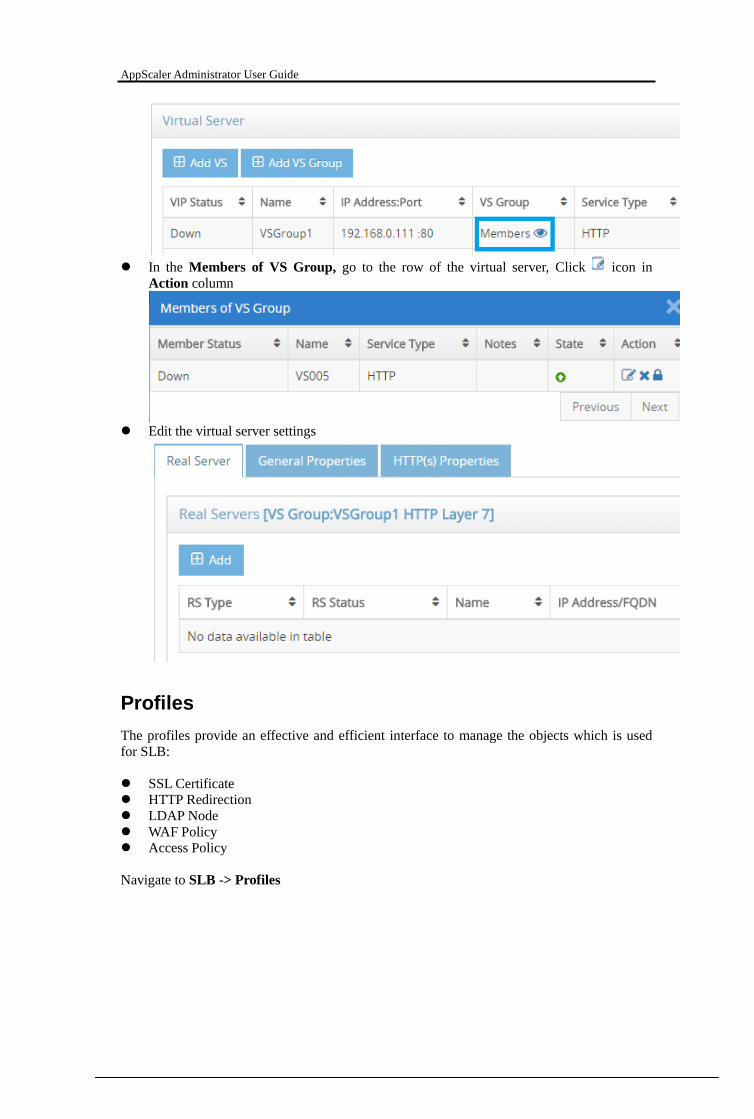
AppScaler Administrator User Guide
In the Members of VS Group, go to the row of the virtual server, Click icon in
Action column
Edit the virtual server settings
Profiles
The profiles provide an effective and efficient interface to manage the objects which is used
for SLB:
SSL Certificate
HTTP Redirection
LDAP Node
WAF Policy
Access Policy
Navigate to SLB -> Profiles
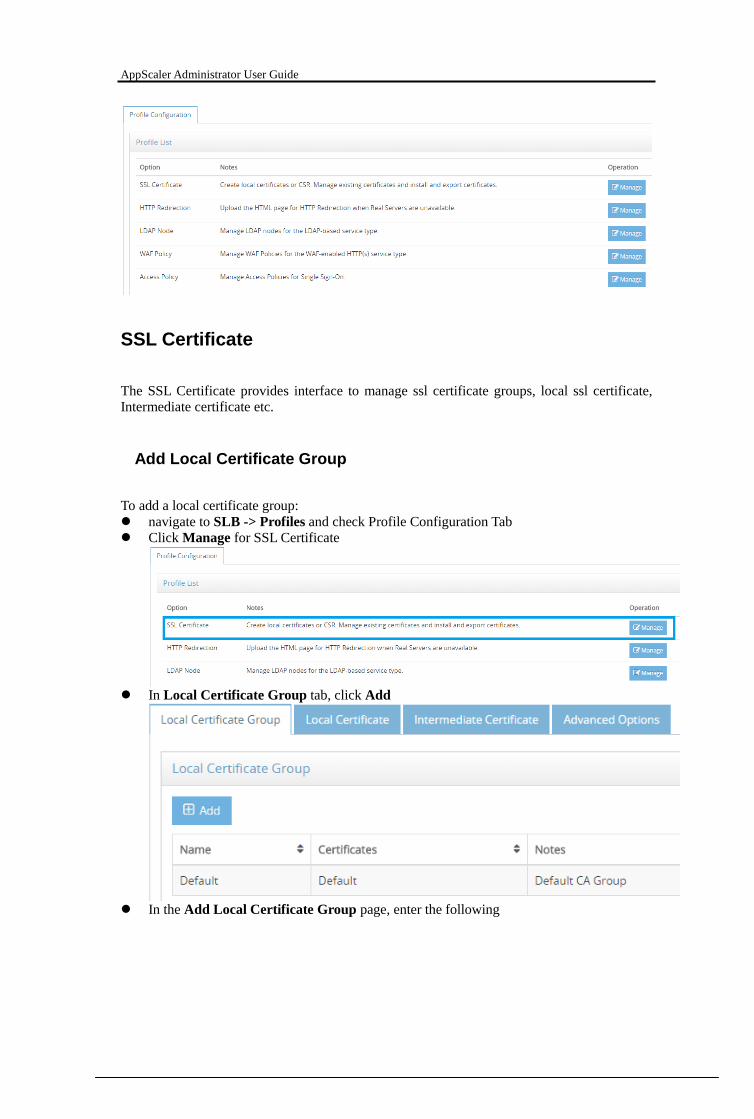
AppScaler Administrator User Guide
SSL Certificate
The SSL Certificate provides interface to manage ssl certificate groups, local ssl certificate,
Intermediate certificate etc.
Add Local Certificate Group
To add a local certificate group:
navigate to SLB -> Profiles and check Profile Configuration Tab
Click Manage for SSL Certificate
In Local Certificate Group tab, click Add
In the Add Local Certificate Group page, enter the following

AppScaler Administrator User Guide
Click Save
Settings Description Group Name The name of this local certificate group
Certificates Choose the certificates for this group
Notes The notes of this local certificate group
Edit Local Certificate Group
To edit a local certificate group:
navigate to SLB -> Profiles and check Profile Configuration Tab
Click Manage for SSL Certificate
In Local Certificate Group tab, go to the row of the local certificate, Click icon in
Action column
In the Edit Local Certificate Group page, change the settings

AppScaler Administrator User Guide
Click Save
Delete Local Certificate Group
To delete a local certificate group:
navigate to SLB -> Profiles and check Profile Configuration Tab
Click Manage for SSL Certificate
In Local Certificate Group tab, go to the row of the local certificate, Click icon in
Action column
The warning message will pop up
Click Yes
Notes:
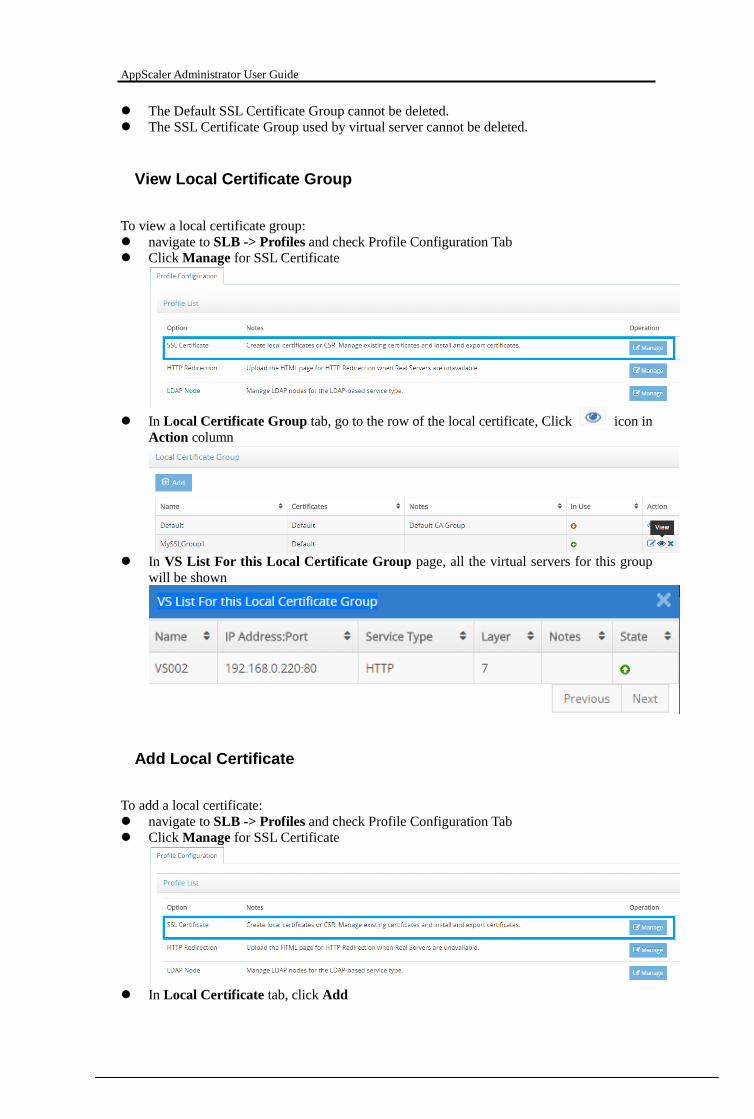
AppScaler Administrator User Guide
The Default SSL Certificate Group cannot be deleted.
The SSL Certificate Group used by virtual server cannot be deleted.
View Local Certificate Group
To view a local certificate group:
navigate to SLB -> Profiles and check Profile Configuration Tab
Click Manage for SSL Certificate
In Local Certificate Group tab, go to the row of the local certificate, Click icon in
Action column
In VS List For this Local Certificate Group page, all the virtual servers for this group
will be shown
Add Local Certificate
To add a local certificate:
navigate to SLB -> Profiles and check Profile Configuration Tab
Click Manage for SSL Certificate
In Local Certificate tab, click Add
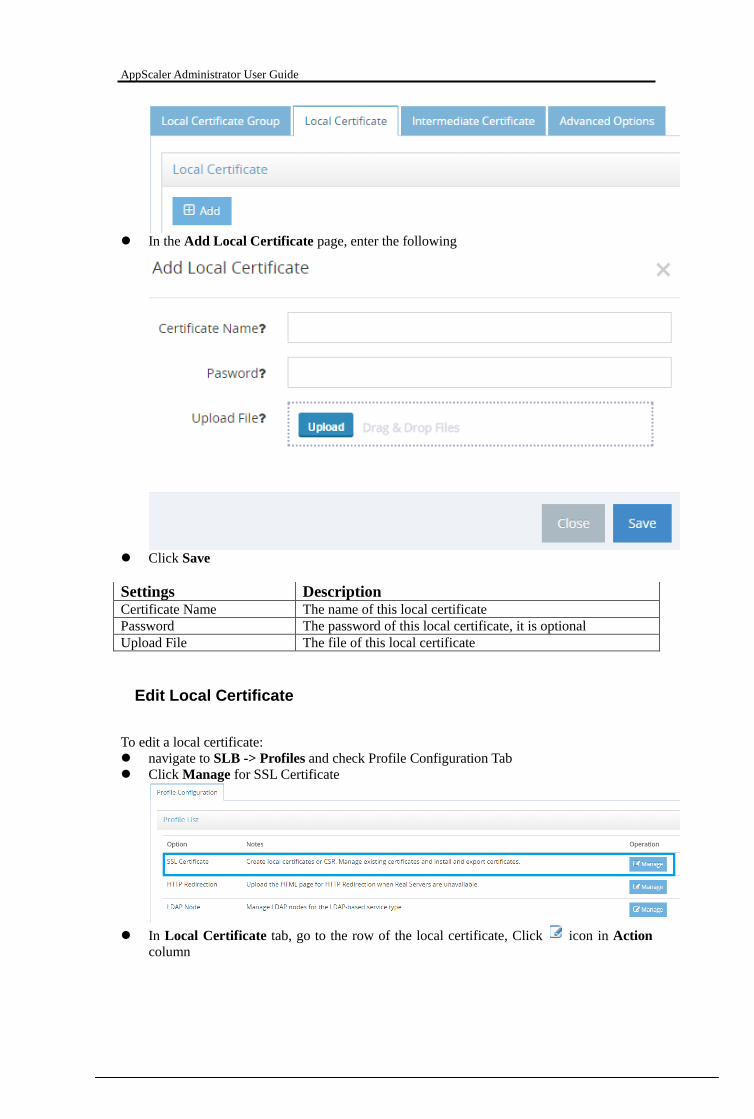
AppScaler Administrator User Guide
In the Add Local Certificate page, enter the following
Click Save
Settings Description Certificate Name The name of this local certificate
Password The password of this local certificate, it is optional
Upload File The file of this local certificate
Edit Local Certificate
To edit a local certificate:
navigate to SLB -> Profiles and check Profile Configuration Tab
Click Manage for SSL Certificate
In Local Certificate tab, go to the row of the local certificate, Click icon in Action
column
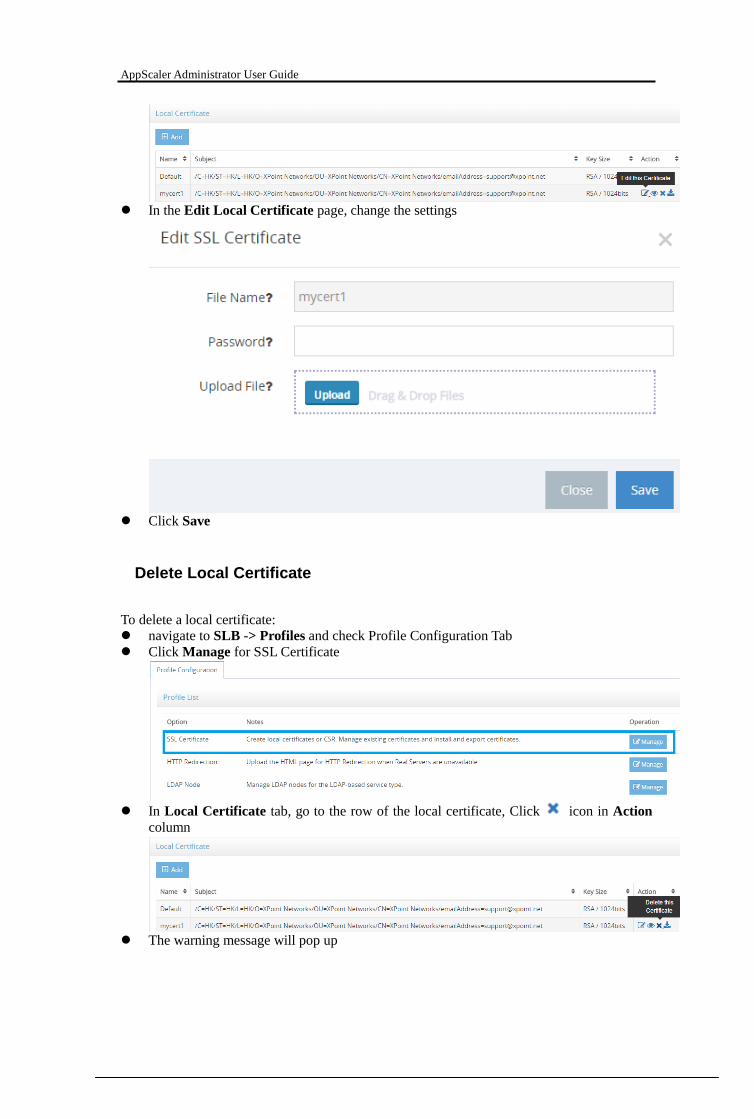
AppScaler Administrator User Guide
In the Edit Local Certificate page, change the settings
Click Save
Delete Local Certificate
To delete a local certificate:
navigate to SLB -> Profiles and check Profile Configuration Tab
Click Manage for SSL Certificate
In Local Certificate tab, go to the row of the local certificate, Click icon in Action
column
The warning message will pop up

AppScaler Administrator User Guide
Click Yes
Notes:
The Default SSL Certificate cannot be deleted.
The SSL Certificate cannot be deleted if it is used by SSL Certificate Group.
View Local Certificate
To view a local certificate:
navigate to SLB -> Profiles and check Profile Configuration Tab
Click Manage for SSL Certificate
In Local Certificate tab, go to the row of the local certificate, Click icon in Action
column
In View SSL Certificate page, all the ssl certificate details will be shown
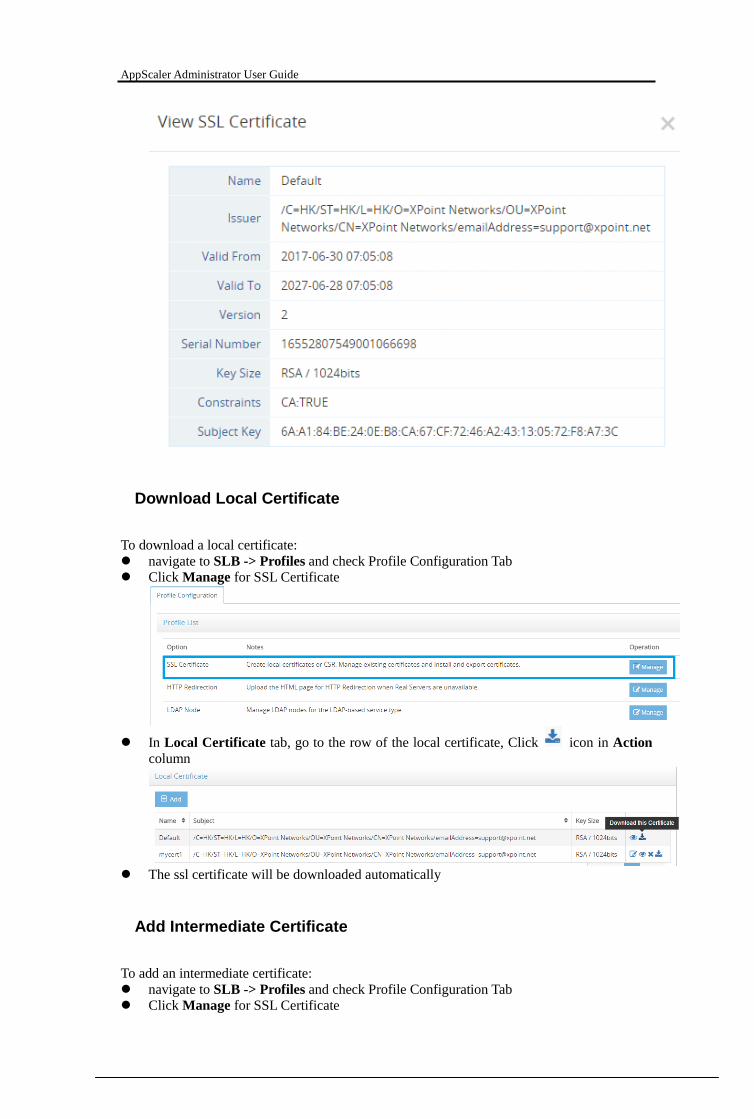
AppScaler Administrator User Guide
Download Local Certificate
To download a local certificate:
navigate to SLB -> Profiles and check Profile Configuration Tab
Click Manage for SSL Certificate
In Local Certificate tab, go to the row of the local certificate, Click icon in Action
column
The ssl certificate will be downloaded automatically
Add Intermediate Certificate
To add an intermediate certificate:
navigate to SLB -> Profiles and check Profile Configuration Tab
Click Manage for SSL Certificate
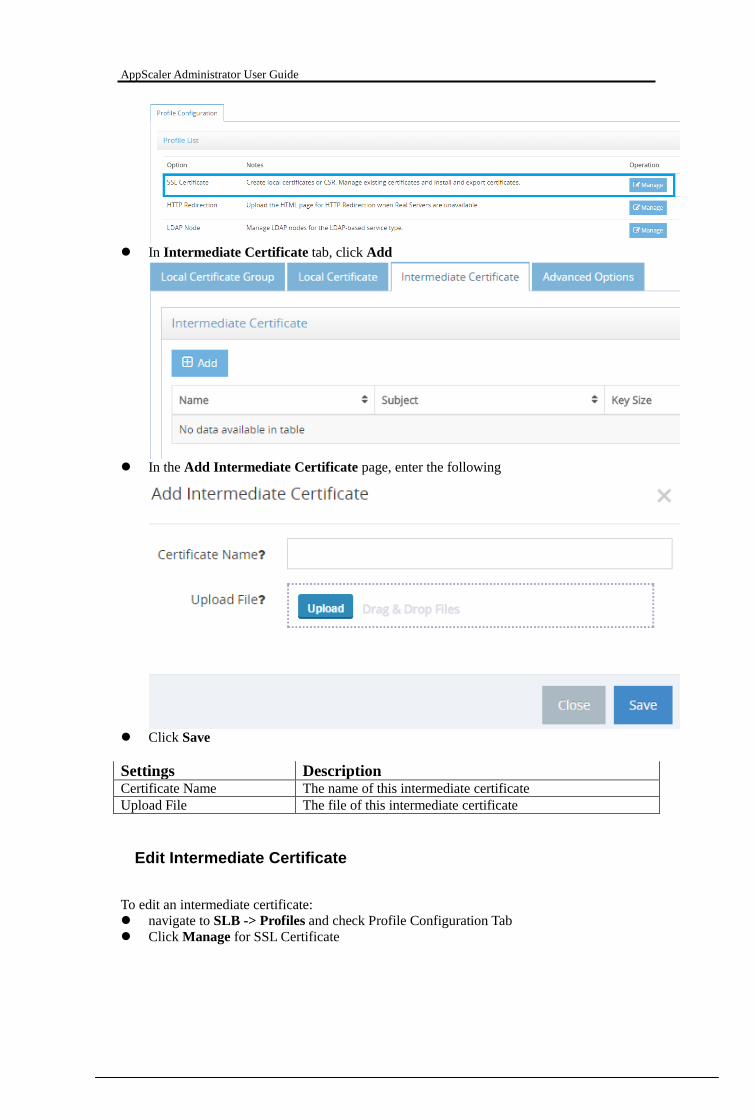
AppScaler Administrator User Guide
In Intermediate Certificate tab, click Add
In the Add Intermediate Certificate page, enter the following
Click Save
Settings Description Certificate Name The name of this intermediate certificate
Upload File The file of this intermediate certificate
Edit Intermediate Certificate
To edit an intermediate certificate:
navigate to SLB -> Profiles and check Profile Configuration Tab
Click Manage for SSL Certificate

AppScaler Administrator User Guide
In Intermediate Certificate tab, go to the row of the intermediate certificate, Click
icon in Action column
In the Edit Intermediate Certificate page, change the settings
Click Save
Delete Intermediate Certificate
To delete an intermediate certificate:
navigate to SLB -> Profiles and check Profile Configuration Tab
Click Manage for SSL Certificate
In Intermediate Certificate tab, go to the row of the intermediate certificate, Click
icon in Action column

AppScaler Administrator User Guide
The warning message will pop up
Click Yes
View Intermediate Certificate
To view an intermediate certificate:
navigate to SLB -> Profiles and check Profile Configuration Tab
Click Manage for SSL Certificate
In Intermediate Certificate tab, go to the row of the intermediate certificate, Click
icon in Action column
In View Intermediate Certificate page, all the ssl certificate details will be shown

AppScaler Administrator User Guide
Download Intermediate Certificate
To download an intermediate certificate:
navigate to SLB -> Profiles and check Profile Configuration Tab
Click Manage for SSL Certificate
In Intermediate Certificate tab, go to the row of the intermediate certificate, Click
icon in Action column
The intermediate certificate will be downloaded automatically
Add OCSP Node
To add an ocsp node:
navigate to SLB -> Profiles and check Profile Configuration Tab
Click Manage for SSL Certificate
In OCSP tab, click Add
In the Add OCSP Node page, enter the following

AppScaler Administrator User Guide
Click Save
Settings Description Name The name of this ocsp node
IP Address The ip address of this ocsp node
Port The port of this ocsp node
URL The url of this ocsp node
Enable SSL Whether to enable SSL for this ocsp node
Allow Failure Whether to allow failure if this ocsp node failed
Stapling Whether to enable ocsp stapling
Notes The notes of this ocsp node
Disable OCSP Node
To disable one ocsp node:
navigate to SLB -> Profiles and check Profile Configuration Tab
Click Manage for SSL Certificate

AppScaler Administrator User Guide
In OCSP tab, go to the row of the ocsp node, Click icon in Action column
The warning message will pop up
Click Yes
Enable OCSP Node
To enable one ocsp node:
navigate to SLB -> Profiles and check Profile Configuration Tab
Click Manage for SSL Certificate
In OCSP tab, go to the row of the ocsp node, Click icon in Action column
The warning message will pop up
Click Yes

AppScaler Administrator User Guide
Edit OCSP Node
To edit an ocsp node:
navigate to SLB -> Profiles and check Profile Configuration Tab
Click Manage for SSL Certificate
In OCSP tab, go to the row of the ocsp node, Click icon in Action column
In the Edit OCSP Node page, change the settings
Click Save
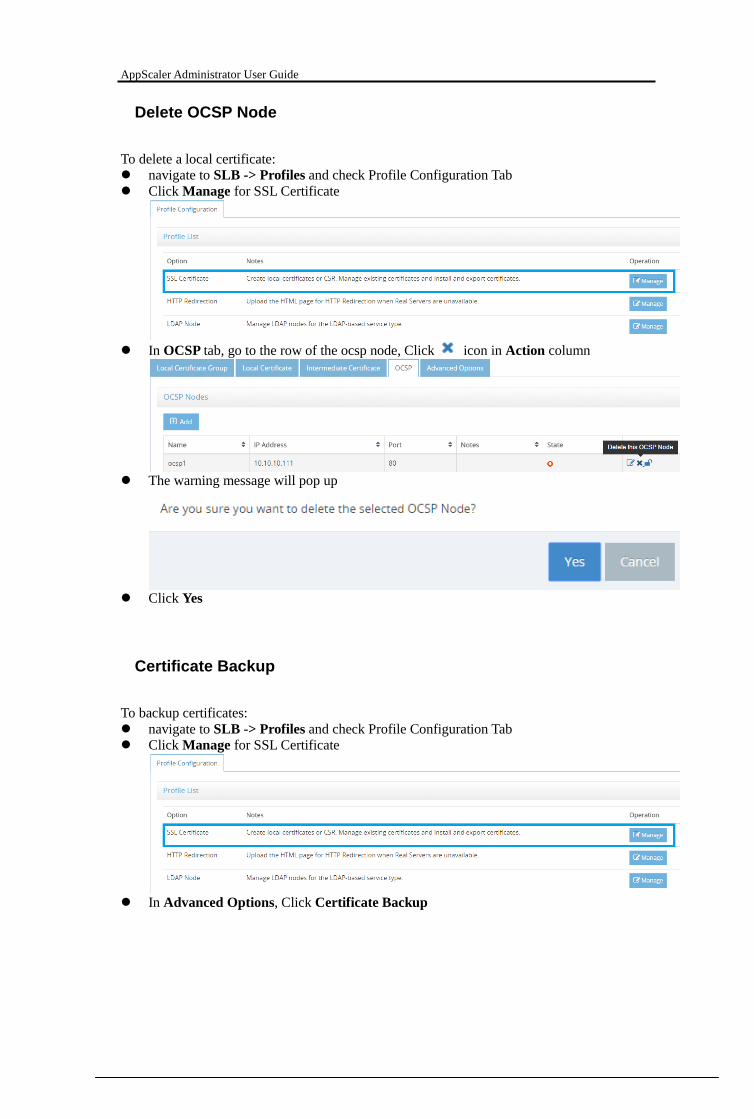
AppScaler Administrator User Guide
Delete OCSP Node
To delete a local certificate:
navigate to SLB -> Profiles and check Profile Configuration Tab
Click Manage for SSL Certificate
In OCSP tab, go to the row of the ocsp node, Click icon in Action column
The warning message will pop up
Click Yes
Certificate Backup
To backup certificates:
navigate to SLB -> Profiles and check Profile Configuration Tab
Click Manage for SSL Certificate
In Advanced Options, Click Certificate Backup
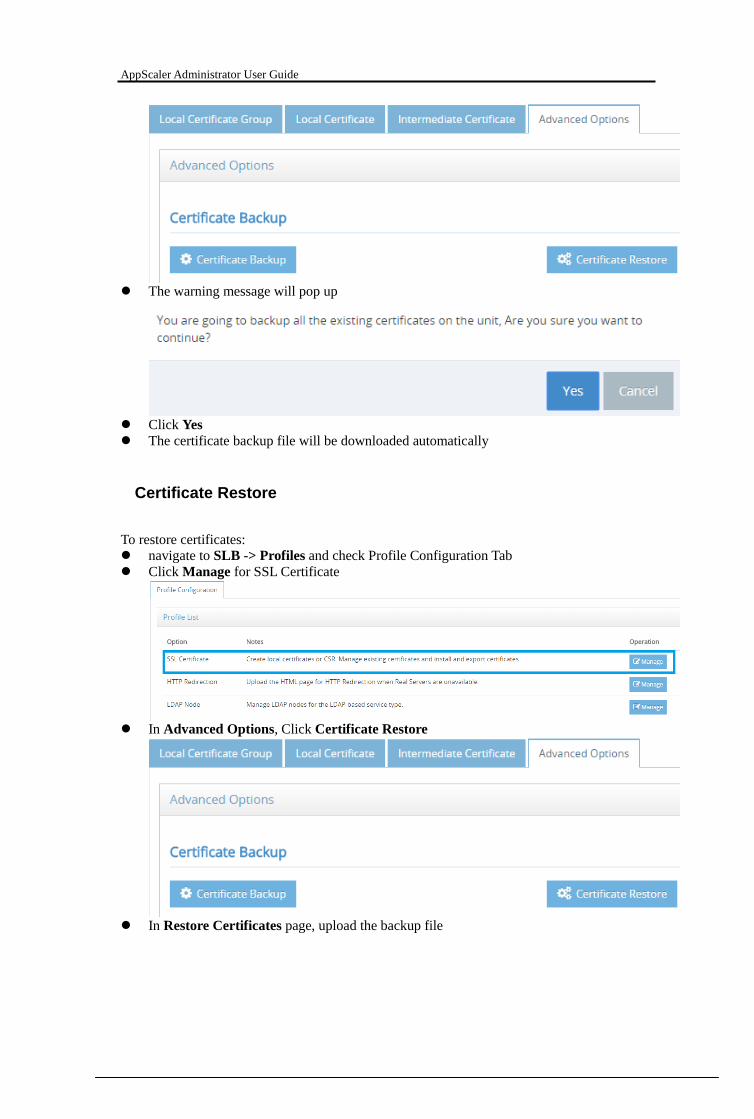
AppScaler Administrator User Guide
The warning message will pop up
Click Yes
The certificate backup file will be downloaded automatically
Certificate Restore
To restore certificates:
navigate to SLB -> Profiles and check Profile Configuration Tab
Click Manage for SSL Certificate
In Advanced Options, Click Certificate Restore
In Restore Certificates page, upload the backup file

AppScaler Administrator User Guide
Click Save
SSL Global Settings
To edit SSL global settings:
navigate to SLB -> Profiles and check Profile Configuration Tab
Click Manage for SSL Certificate
In Advanced Options, enter the following
Click Save
Settings Description SSL Renegotiation Enable or disable SSL Renegotiation
Diffie-Hellman Key Set key size of Diffie-Hellman Key
HTTP Redirection
Add HTTP Redirection
To add one http redirection:
navigate to SLB -> Profiles and check Profile Configuration Tab
Click Manage for HTTP Redirection

AppScaler Administrator User Guide
In HTTP Redirection tab, click Add
In the Add HTTP Redirection page, enter the following
Click Save
Settings Description File Name The name of http redirection
Notes The notes for this http redirection
Upload File upload the http redirection file
Edit HTTP Redirection
To edit one HTTP redirection:
navigate to SLB -> Profiles and check Profile Configuration Tab
Click Manage for HTTP Redirection
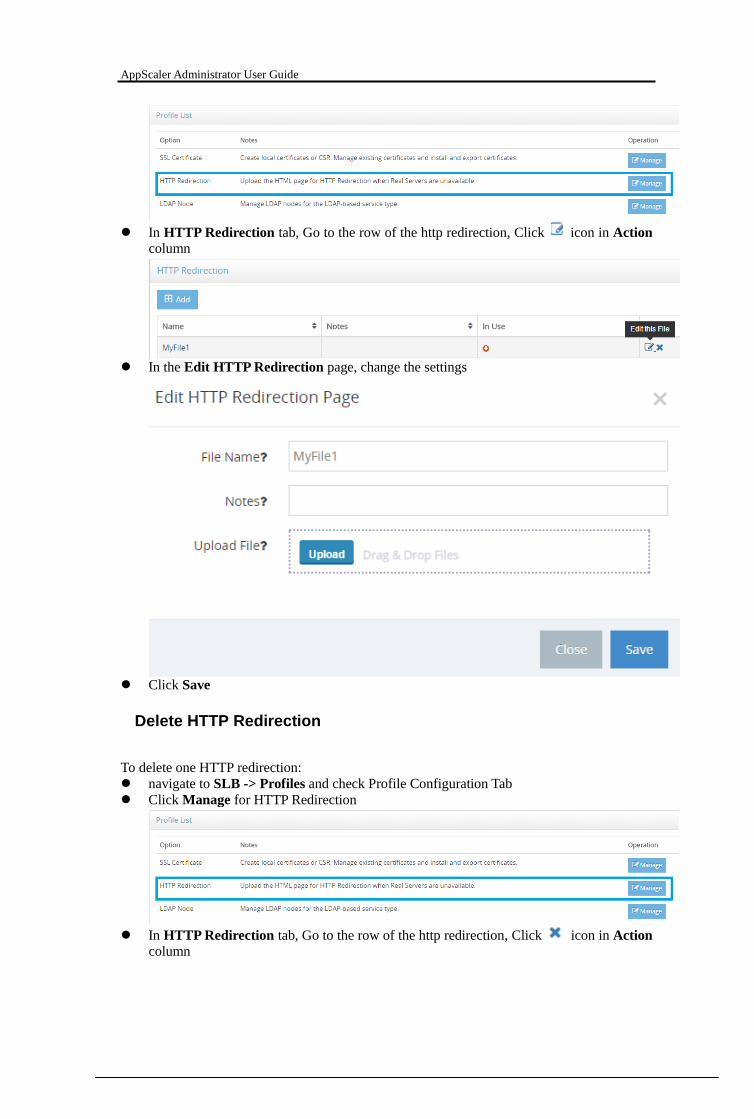
AppScaler Administrator User Guide
In HTTP Redirection tab, Go to the row of the http redirection, Click icon in Action
column
In the Edit HTTP Redirection page, change the settings
Click Save
Delete HTTP Redirection
To delete one HTTP redirection:
navigate to SLB -> Profiles and check Profile Configuration Tab
Click Manage for HTTP Redirection
In HTTP Redirection tab, Go to the row of the http redirection, Click icon in Action
column

AppScaler Administrator User Guide
The warning message will pop up
Click Yes
LDAP Node
Add LDAP Node
To add one ldap node:
navigate to SLB -> Profiles and check Profile Configuration Tab
Click Manage for LDAP Node
In LDAP Node tab, click Add
In the Add LDAP Node page, enter the following

AppScaler Administrator User Guide
Click Save
Settings Description Name The name of this LDAP node
IP Address The ip address of this LDAP node
Protocol The protocol of this LDAP node
User The user name to authenticate LDAP node
Password The password to authenticate LDAP node
Notes The notes for this LDAP node
Edit LDAP Node
To edit one LDAP node:
navigate to SLB -> Profiles and check Profile Configuration Tab
Click Manage for LDAP Node
In LDAP Node tab, Go to the row of the LDAP node, Click icon in Action column
In the Edit LDAP Node page, change the settings

AppScaler Administrator User Guide
Click Save
Disable LDAP Node
To disable one LDAP node:
navigate to SLB -> Profiles and check Profile Configuration Tab
Click Manage for LDAP Node
In LDAP Node tab, Go to the row of the LDAP node, Click icon in Action column
The warning message will pop up
Click Yes
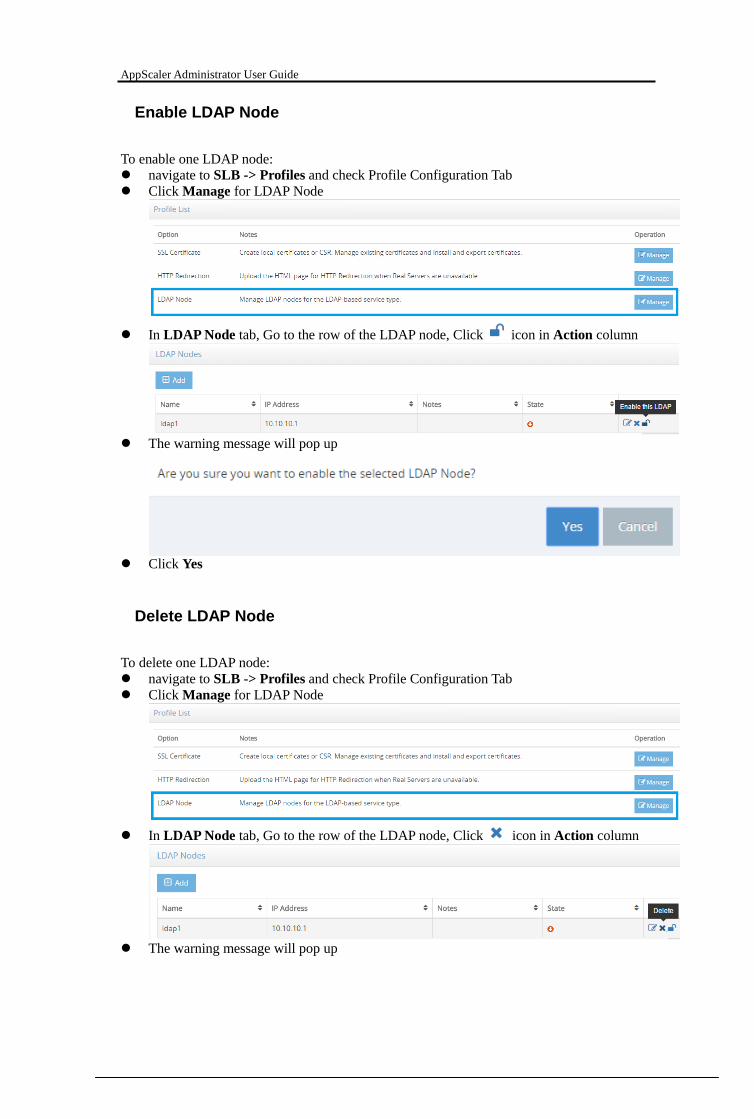
AppScaler Administrator User Guide
Enable LDAP Node
To enable one LDAP node:
navigate to SLB -> Profiles and check Profile Configuration Tab
Click Manage for LDAP Node
In LDAP Node tab, Go to the row of the LDAP node, Click icon in Action column
The warning message will pop up
Click Yes
Delete LDAP Node
To delete one LDAP node:
navigate to SLB -> Profiles and check Profile Configuration Tab
Click Manage for LDAP Node
In LDAP Node tab, Go to the row of the LDAP node, Click icon in Action column
The warning message will pop up

AppScaler Administrator User Guide
Click Yes
WAF Policy
Add WAF Policy
To add one waf policy:
navigate to SLB -> Profiles and check Profile Configuration Tab
Click Manage for WAF Policy
In WAF Policy tab, click Add
In the Add WAF Policy page, enter the following

AppScaler Administrator User Guide
Click Save
Settings Description Name The name of this WAF Policy
Web Attack Signature Choose Web Attack Signature
Action Either Alert Mode or Deny Mode
Log The log level of this waf policy
HTTP Request Body Whether to inspect the http request body
HTTP Response Body Whether to inspect the http response body
Notes The notes for this waf policy
Edit WAF Policy
To edit one waf policy:
navigate to SLB -> Profiles and check Profile Configuration Tab
Click Manage for WAF Policy
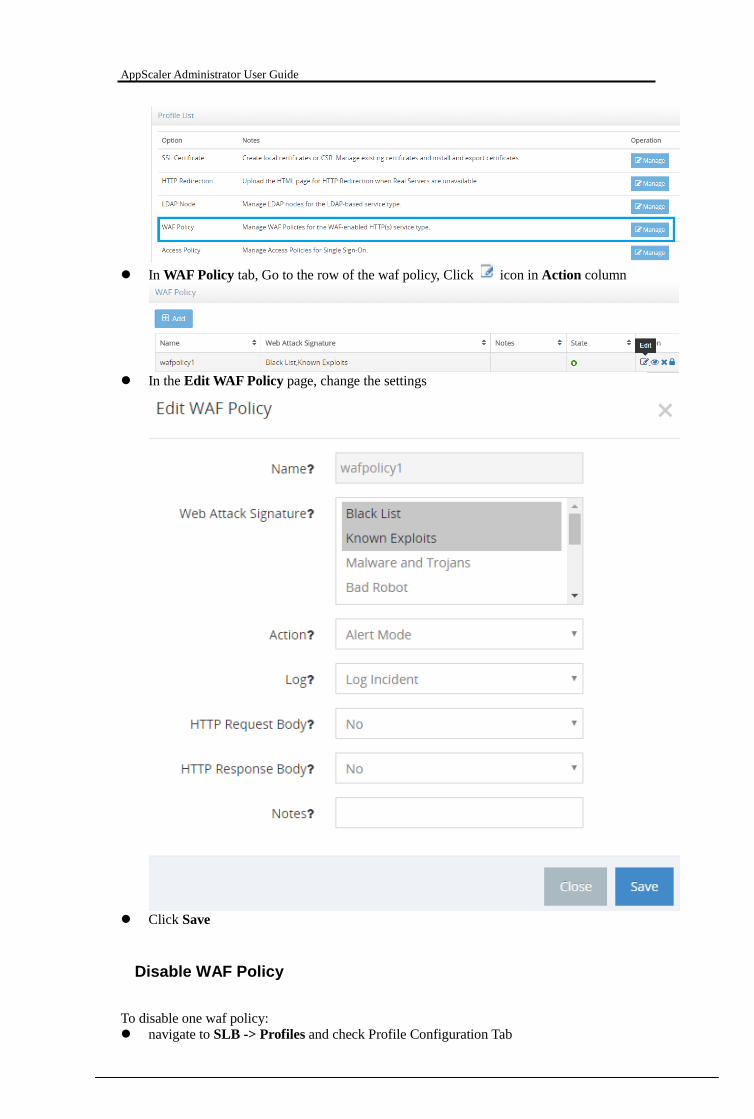
AppScaler Administrator User Guide
In WAF Policy tab, Go to the row of the waf policy, Click icon in Action column
In the Edit WAF Policy page, change the settings
Click Save
Disable WAF Policy
To disable one waf policy:
navigate to SLB -> Profiles and check Profile Configuration Tab

AppScaler Administrator User Guide
Click Manage for WAF Policy
In WAF Policy tab, Go to the row of the waf policy, Click icon in Action column
The warning message will pop up
Click Yes
Enable WAF Policy
To enable one waf policy:
navigate to SLB -> Profiles and check Profile Configuration Tab
Click Manage for WAF Policy
In WAF Policy tab, Go to the row of the waf policy, Click icon in Action column
The warning message will pop up
Click Yes

AppScaler Administrator User Guide
View WAF Policy
To view one waf policy:
navigate to SLB -> Profiles and check Profile Configuration Tab
Click Manage for WAF Policy
In WAF Policy tab, Go to the row of the waf policy, Click icon in Action column
The view modal will pop up
Click Yes
Delete WAF Policy
To delete one waf policy:
navigate to SLB -> Profiles and check Profile Configuration Tab
Click Manage for WAF Policy
In WAF Policy tab, Go to the row of the waf policy, Click icon in Action column
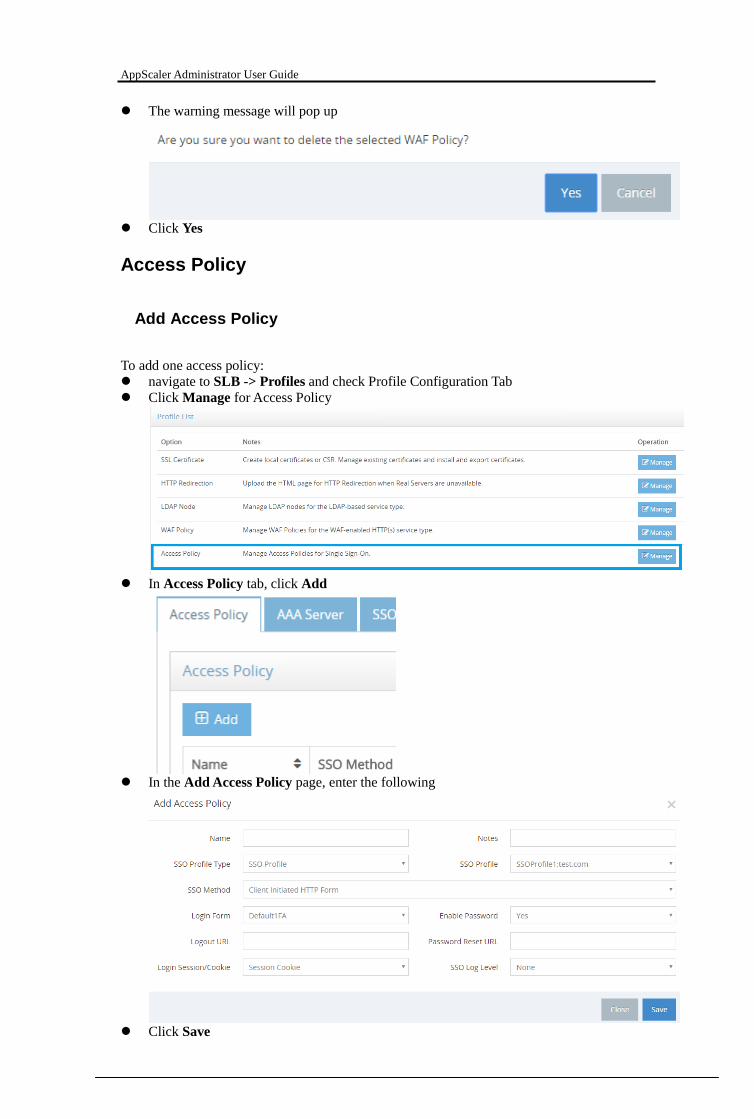
AppScaler Administrator User Guide
The warning message will pop up
Click Yes
Access Policy
Add Access Policy
To add one access policy:
navigate to SLB -> Profiles and check Profile Configuration Tab
Click Manage for Access Policy
In Access Policy tab, click Add
In the Add Access Policy page, enter the following
Click Save

AppScaler Administrator User Guide
Settings Description Name The name of this Access Policy
Notes The notes for this access policy
SSO Profile Type Either SSO Profile or SSO Profile Group
SSO Profile Choose one SSO Profile
SSO Method The SSO Method for this access policy, including:
Client Initiated HTTP Form
Client Initiated HTTP Form + RS HTTP Basic Auth
Client Initiated HTTP Form + RS HTTP Form
Client Initiated HTTP Form + RS Kerberos
Client HTTP NTLM Auth
Client HTTP NTLM Auth + RS Kerberos
Client HTTP Basic Auth
Client Auth Pass Through
Client SAML
Client SAML + RS Kerberos
Login Form Choose one login form
Enable Password Enable or disable password field in login form
Logout URL The logout url string
Password Reset URL The password reset url string
Login Session/Cookie The login cache option
SSO Log Level The option for SSL Log
Edit Access Policy
To edit one access policy:
navigate to SLB -> Profiles and check Profile Configuration Tab
Click Manage for Access Policy
In Access Policy tab, Go to the row of the access policy, Click icon in Action column
In the Edit Access Policy page, change the settings

AppScaler Administrator User Guide
Click Save
Delete Access Policy
To delete one access policy:
navigate to SLB -> Profiles and check Profile Configuration Tab
Click Manage for Access Policy
In Access Policy tab, Go to the row of the access policy, Click icon in Action
column
The warning message will pop up
Click Yes
Add AAA Server
To add one AAA Server:
navigate to SLB -> Profiles and check Profile Configuration Tab
Click Manage for Access Policy

AppScaler Administrator User Guide
In AAA Server tab, click Add
In the Add AAA Server page, enter the following
Click Save
Settings Description Type The type for this AAA Server, including:
LDAP
Radius

AppScaler Administrator User Guide
SecurID
Kerberos
SAML
Name The name of this AAA Server
IP Address:Port The IP Address and Port of this AAA Server
Account Name The user name for this AAA Server authentication
Account Password The password for this AAA Server authentication
Notes The notes for this AAA Server
Edit AAA Server
To edit one AAA Server:
navigate to SLB -> Profiles and check Profile Configuration Tab
Click Manage for Access Policy
In AAA Server tab, Go to the row of the AAA Server, Click icon in Action column
In the Edit AAA Server page, change the settings

AppScaler Administrator User Guide
Click Save
Delete AAA Server
To delete one AAA Server:
navigate to SLB -> Profiles and check Profile Configuration Tab
Click Manage for Access Policy
In AAA Server tab, Go to the row of the AAA Server, Click icon in Action column
The warning message will pop up

AppScaler Administrator User Guide
Click Yes
Add SSO Profile
To add one SSO Profile:
navigate to SLB -> Profiles and check Profile Configuration Tab
Click Manage for Access Policy
In SSO Profile tab, click Add
In the Add SSO Profile page, enter the following
Click Save
Settings Description Name The name of this SSO Profile

AppScaler Administrator User Guide
SSO Ident The SSO Ident for this SSO Profile
Root domain The root domain for this SSO Profile
Notes The notes for this AAA Server
Type Either Single Authentication or Dual Authentication
AAA Server Choose the AAA Server for this SSO Profile
Session Timeout The session time out for this SSO Profile
Login Format The login format for this SSO Profile
Max Login Tries The max login attempts
Lockout Timeout The locked time for failed login
Edit SSO Profile
To edit one SSO Profile:
navigate to SLB -> Profiles and check Profile Configuration Tab
Click Manage for Access Policy
In SSO Profile tab, Go to the row of the SSO Profile, Click icon in Action column
In the Edit SSO Profile page, change the settings
Click Save
Delete SSO Profile
To delete one SSO Profile:
navigate to SLB -> Profiles and check Profile Configuration Tab

AppScaler Administrator User Guide
Click Manage for Access Policy
In SSO Profile tab, Go to the row of the SSO Profile, Click icon in Action column
The warning message will pop up
Click Yes
Add SSO Profile Group
To add one SSO Profile Group:
navigate to SLB -> Profiles and check Profile Configuration Tab
Click Manage for Access Policy
In SSO Profile Group tab, click Add
In the Add SSO Profile Group page, enter the following

AppScaler Administrator User Guide
Click Save
Settings Description Name The name of this SSO Profile Group
Primary SSO Profile Choose the primary SSO Profile
Secondary SSO Profile Choose the secondary SSO Profile
User Group The Active Directory User Groups
Notes The notes for this SSO Profile Group
Edit SSO Profile Group
To edit one SSO Profile Group:
navigate to SLB -> Profiles and check Profile Configuration Tab
Click Manage for Access Policy
In SSO Profile Group tab, Go to the row of the SSO Profile Group, Click icon in Action column
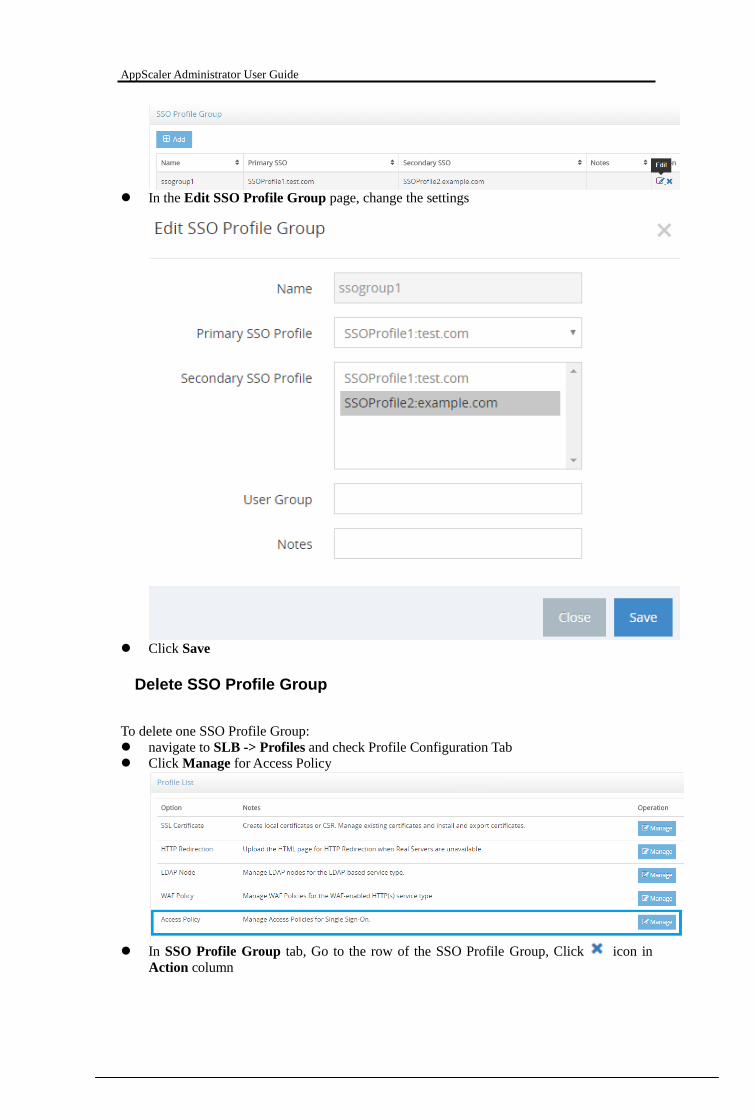
AppScaler Administrator User Guide
In the Edit SSO Profile Group page, change the settings
Click Save
Delete SSO Profile Group
To delete one SSO Profile Group:
navigate to SLB -> Profiles and check Profile Configuration Tab
Click Manage for Access Policy
In SSO Profile Group tab, Go to the row of the SSO Profile Group, Click icon in
Action column

AppScaler Administrator User Guide
The warning message will pop up
Click Yes
Add Login Form
To add one login form:
navigate to SLB -> Profiles and check Profile Configuration Tab
Click Manage for Access Policy
In Login Form tab, click Add
In the Add Login Form page, enter the following
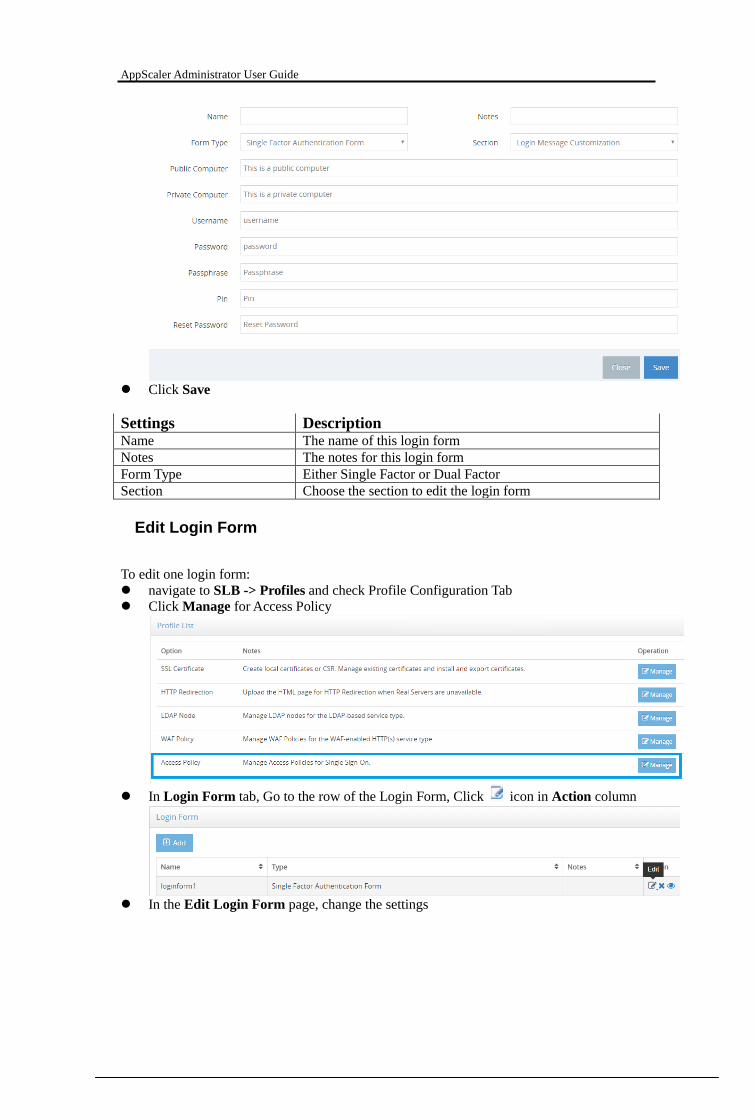
AppScaler Administrator User Guide
Click Save
Settings Description Name The name of this login form
Notes The notes for this login form
Form Type Either Single Factor or Dual Factor
Section Choose the section to edit the login form
Edit Login Form
To edit one login form:
navigate to SLB -> Profiles and check Profile Configuration Tab
Click Manage for Access Policy
In Login Form tab, Go to the row of the Login Form, Click icon in Action column
In the Edit Login Form page, change the settings

AppScaler Administrator User Guide
Click Save
View Login Form
To view one login form:
navigate to SLB -> Profiles and check Profile Configuration Tab
Click Manage for Access Policy
In Login Form tab, Go to the row of the login form, Click icon in Action column
The view modal will pop up
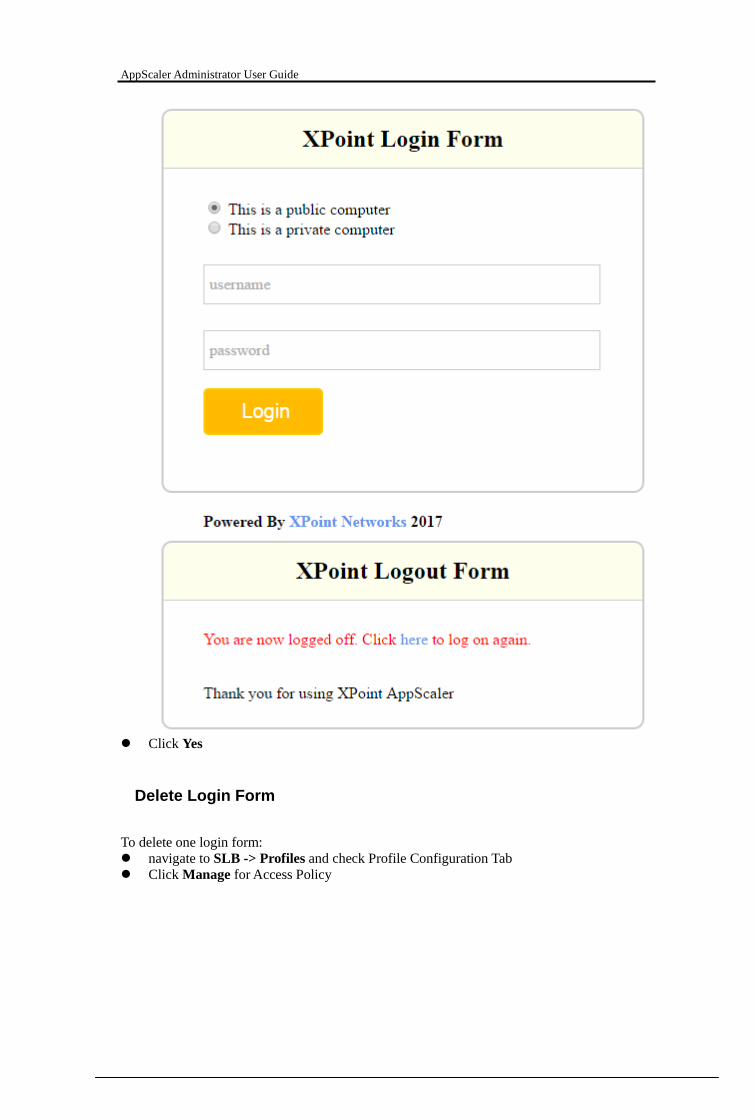
AppScaler Administrator User Guide
Click Yes
Delete Login Form
To delete one login form:
navigate to SLB -> Profiles and check Profile Configuration Tab
Click Manage for Access Policy

AppScaler Administrator User Guide
In Login Form tab, Go to the row of the login form, Click icon in Action column
The warning message will pop up
Click Yes
Add Post Form
To add one post form:
navigate to SLB -> Profiles and check Profile Configuration Tab
Click Manage for Access Policy
In Post Form tab, click Add
In the Add Post Form page, enter the following

AppScaler Administrator User Guide
Click Save
Settings Description Name The name of this Post Form
Post Path The post path string
Attribute Quantity The number of attributes
Notes The notes for this post form
Edit Post Form
To edit one post form:
navigate to SLB -> Profiles and check Profile Configuration Tab
Click Manage for Access Policy
In Post Form tab, Go to the row of the post form, Click icon in Action column
In the Edit Post Form page, change the settings
Click Save

AppScaler Administrator User Guide
Delete Post Form
To delete one post form:
navigate to SLB -> Profiles and check Profile Configuration Tab
Click Manage for Access Policy
In Post Form tab, Go to the row of the post form, Click icon in Action column
The warning message will pop up
Click Yes
Authentication Settings
To edit authentication settings:
navigate to SLB -> Profiles and check Profile Configuration Tab
Click Manage for Access Policy
In Authentication Settings tab, click Manage
In the Edit Authentication Settings page, enter the following

AppScaler Administrator User Guide
Click Save
Settings Description Authentication Timeout The authentication time out setting for the access policy
Token Timeout The token time out setting for the access policy
Global Settings
The profiles provide an effective and efficient interface to manage global settings of SLB:
Compression Exclusive File Lists
Caching Exclusive File Lists
Navigate to SLB -> Global Settings
Compression
Add Compression
To add one compression:
navigate to SLB -> Global Settings and check Compression Tab
Click Add

AppScaler Administrator User Guide
In the Add Compression Exclusive File List page, enter the following
Click Save
Settings Description Name The name of this compression exclusive file
File Extension The file extension of this compression exclusive file
Notes The notes for this compression exclusive file
Edit Compression
To edit one compression:
navigate to SLB -> Global Settings and check Compression Tab
Go to the row of the compression, Click icon in Action column
In the Edit Compression Exclusive File List page, change the settings

AppScaler Administrator User Guide
Click Save
Disable Compression
To disable one compression:
navigate to SLB -> Global Settings and check Compression Tab
Go to the row of the compression, Click icon in Action column
The warning message will pop up
Click Yes
Enable Compression
To enable one compression:
navigate to SLB -> Global Settings and check Compression Tab
Go to the row of the compression, Click icon in Action column
The warning message will pop up

AppScaler Administrator User Guide
Click Yes
Delete Compression
To delete one compression:
navigate to SLB -> Global Settings and check Compression Tab
Go to the row of the compression, Click icon in Action column
The warning message will pop up
Click Yes
Caching
Add Caching
To add one caching:
navigate to SLB -> Global Settings and check Caching Tab
Click Add
In the Add Caching Exclusive File List page, enter the following

AppScaler Administrator User Guide
Click Save
Settings Description Name The name of this caching exclusive file
File Extension The file extension of this caching exclusive file
Notes The notes for this caching exclusive file
Edit Caching
To edit one caching:
navigate to SLB -> Global Settings and check Caching Tab
Go to the row of the caching, Click icon in Action column
In the Edit Compression Exclusive File List page, change the settings
Click Save

AppScaler Administrator User Guide
Disable Caching
To disable one caching:
navigate to SLB -> Global Settings and check Caching Tab
Go to the row of the caching, Click icon in Action column
The warning message will pop up
Click Yes
Enable Caching
To enable one caching:
navigate to SLB -> Global Settings and check Caching Tab
Go to the row of the caching, Click icon in Action column
The warning message will pop up
Click Yes
Delete Caching
To delete one caching:
navigate to SLB -> Global Settings and check Caching Tab
Go to the row of the caching, Click icon in Action column
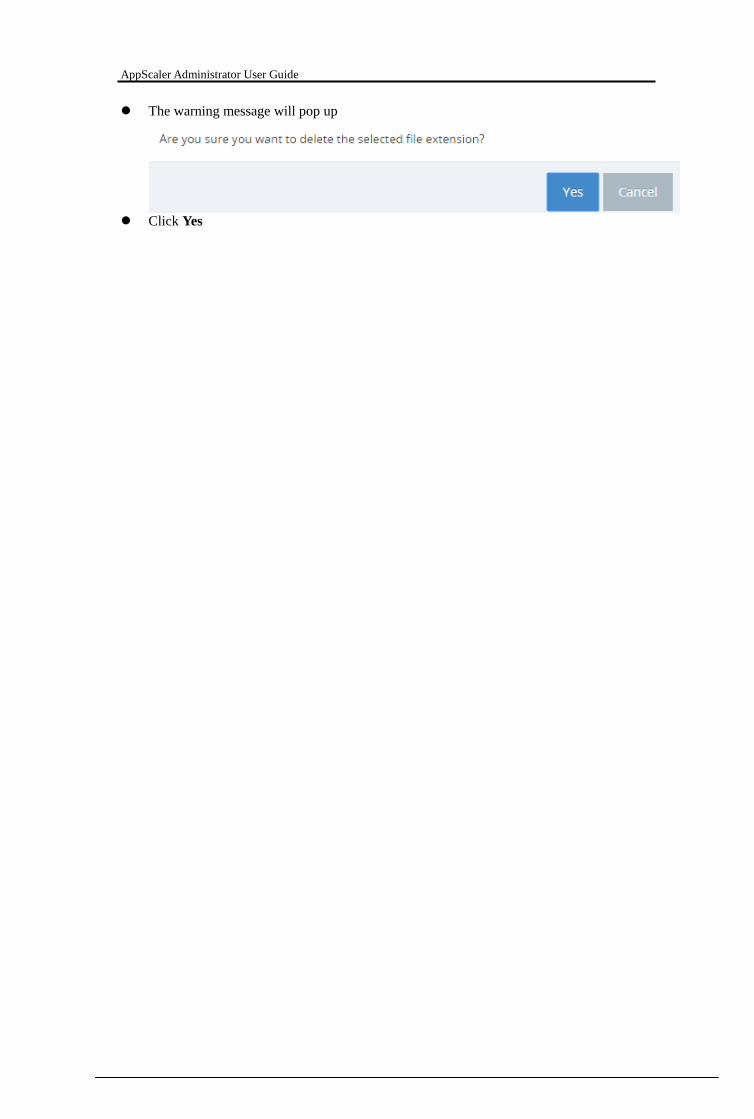
AppScaler Administrator User Guide
The warning message will pop up
Click Yes

AppScaler Administrator User Guide
GSLB
Global Server load balancing (GSLB) features are designed to distribute internet traffic among
different data-centers located at different locations of the planet.
Overview
The XPoint series of application delivery, load balancing and DDoS protection solutions
accelerate, optimize and secure global applications.
Global Server Loading Balancer
Allows traffic to be distributed in the best way across application servers that are located in
different geographic locations.
Datacenter Failover
It is working as authoritative nameserver for the desired domain, it can:
Redirect client requests to the surviving site when an outage occurs at the primary site
Direct client requests to the site that is geographically closest to them
Redirect clients to another site when traffic or performance thresholds are exceeded at the
primary site.
Optimizes multi-site deployments.
Intelligent Distribution Methods
The built-in GSLB supports comprehensive and advanced distribution methods.
Active-Active or Active-Passive Mode
Round Robin
Static Proximity
Location
Ratio Round Robin
Custom Load
Dynamic Metrics
Health Monitor
Health monitoring is performed using the following mechanisms:
ICPM
TCP Echo
Layer 7 Metrics
Remote Site Performance Metrics
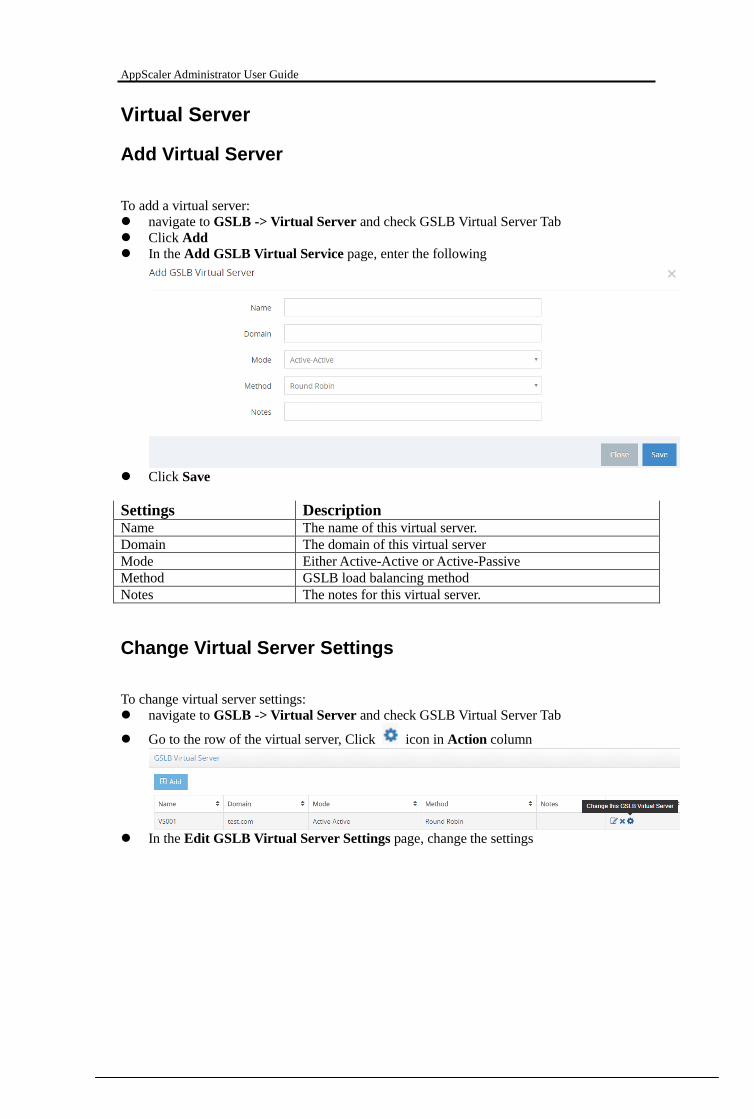
AppScaler Administrator User Guide
Virtual Server
Add Virtual Server
To add a virtual server:
navigate to GSLB -> Virtual Server and check GSLB Virtual Server Tab
Click Add
In the Add GSLB Virtual Service page, enter the following
Click Save
Settings Description Name The name of this virtual server.
Domain The domain of this virtual server
Mode Either Active-Active or Active-Passive
Method GSLB load balancing method
Notes The notes for this virtual server.
Change Virtual Server Settings
To change virtual server settings:
navigate to GSLB -> Virtual Server and check GSLB Virtual Server Tab
Go to the row of the virtual server, Click icon in Action column
In the Edit GSLB Virtual Server Settings page, change the settings

AppScaler Administrator User Guide
Click Save
Delete Virtual Server
To delete a virtual server:
navigate to GSLB -> Virtual Server and check GSLB Virtual Server Tab
Go to the row of the virtual server, Click icon in Action column
The warning message will pop up
Click Yes
Edit Virtual Server
This is the main configuration for one virtual server; you can set specific options for one
virtual server including:
Virtual Service
Persistence Settings
Virtual Server Backup
Advanced Routing
Add Virtual Service
To add a virtual service:
navigate to GSLB -> Virtual Server and check GSLB Virtual Server Tab
Go to the row of the virtual server, Click icon in Action column

AppScaler Administrator User Guide
In the GSLB Virtual Service tab, click Add
In the Add GSLB Virtual Service page, enter the following
Click Save
Settings Description Name The name of this virtual service
Datacenter Choose the datacenter that this virtual service is in
IP Address The ip address of this virtual service
Notes The notes of this virtual service
Edit Virtual Service
To edit one virtual service:
navigate to GSLB -> Virtual Server and check GSLB Virtual Server Tab
Go to the row of the virtual server, Click icon in Action column
In the GSLB Virtual Service tab, go to the row of the virtual service, Click icon in
Action column
In the Edit GSLB Virtual Service page, change the settings
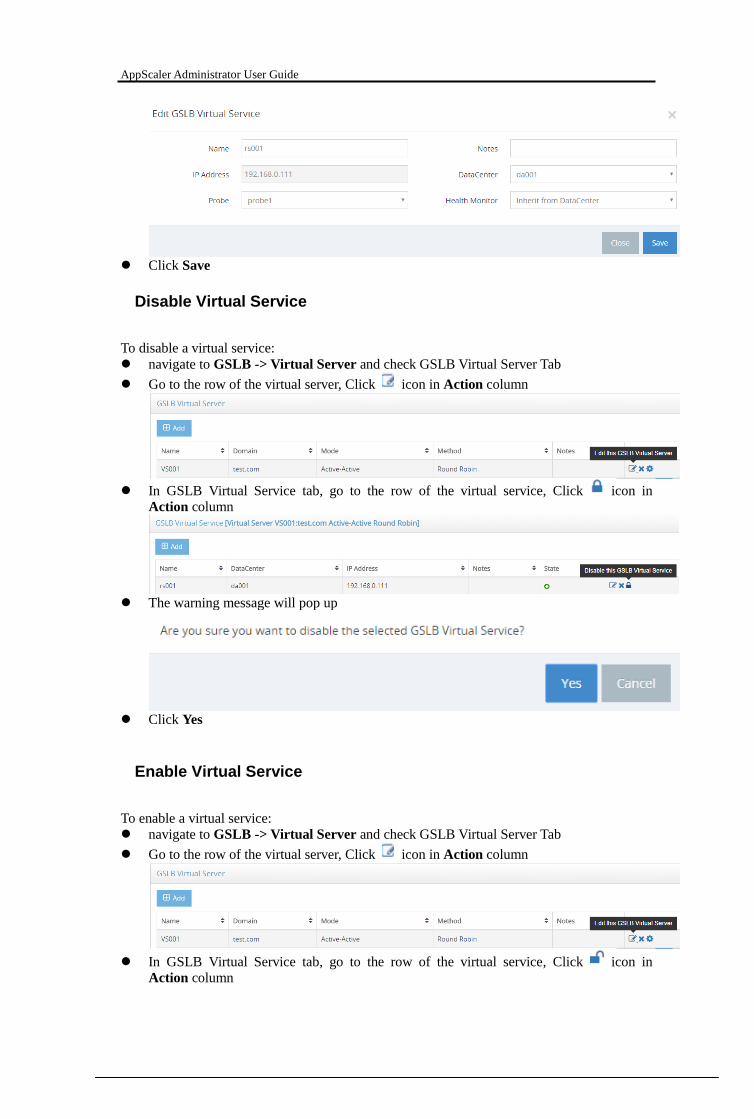
AppScaler Administrator User Guide
Click Save
Disable Virtual Service
To disable a virtual service:
navigate to GSLB -> Virtual Server and check GSLB Virtual Server Tab
Go to the row of the virtual server, Click icon in Action column
In GSLB Virtual Service tab, go to the row of the virtual service, Click icon in
Action column
The warning message will pop up
Click Yes
Enable Virtual Service
To enable a virtual service:
navigate to GSLB -> Virtual Server and check GSLB Virtual Server Tab
Go to the row of the virtual server, Click icon in Action column
In GSLB Virtual Service tab, go to the row of the virtual service, Click icon in
Action column
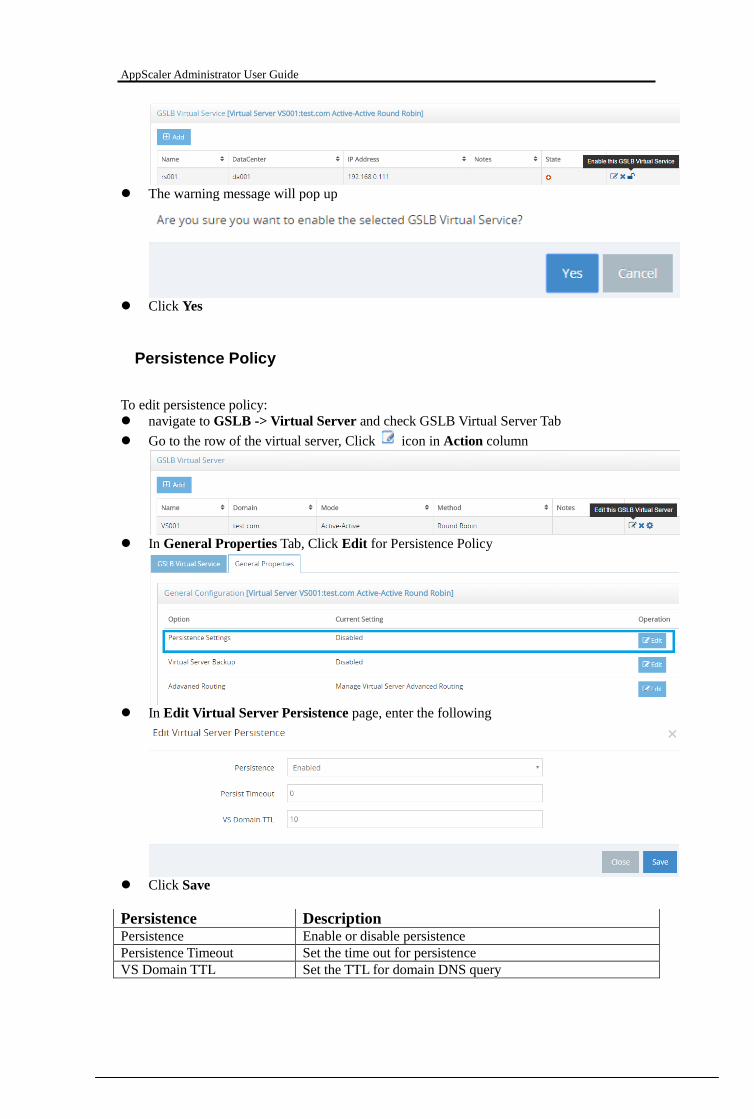
AppScaler Administrator User Guide
The warning message will pop up
Click Yes
Persistence Policy
To edit persistence policy:
navigate to GSLB -> Virtual Server and check GSLB Virtual Server Tab
Go to the row of the virtual server, Click icon in Action column
In General Properties Tab, Click Edit for Persistence Policy
In Edit Virtual Server Persistence page, enter the following
Click Save
Persistence Description Persistence Enable or disable persistence
Persistence Timeout Set the time out for persistence
VS Domain TTL Set the TTL for domain DNS query

AppScaler Administrator User Guide
Virtual Server Backup
To edit virtual server backup:
navigate to GSLB -> Virtual Server and check GSLB Virtual Server Tab
Go to the row of the virtual server, Click icon in Action column
In General Properties Tab, Click Edit for Virtual Server Backup
In Edit Virtual Server Backup page, enter the following
Click Save
Virtual Server Backup Description Backup Enable or disable backup
Backup Timeout Set the time out for backup
Backup Mode Set the mode for backup
Advanced Routing
To edit virtual server backup:
navigate to GSLB -> Virtual Server and check GSLB Virtual Server Tab
Go to the row of the virtual server, Click icon in Action column
In General Properties Tab, Click Edit for Advanced Routing

AppScaler Administrator User Guide
In Edit Virtual Server Advanced Routing page, enter the following
Click Save
Advanced Routing Description External DNS Query Set the option for external dns query
Internal DNS Query Set the option for internal dns query
Profiles
The profiles provide an effective and efficient interface to manage the objects which is used
for GSLB:
Probe
Datacenter
Location
IP Mapping
Navigate to GSLB -> Profiles
Probe
The probe is the health monitor for datacenters.
Add Probe
To add a probe:
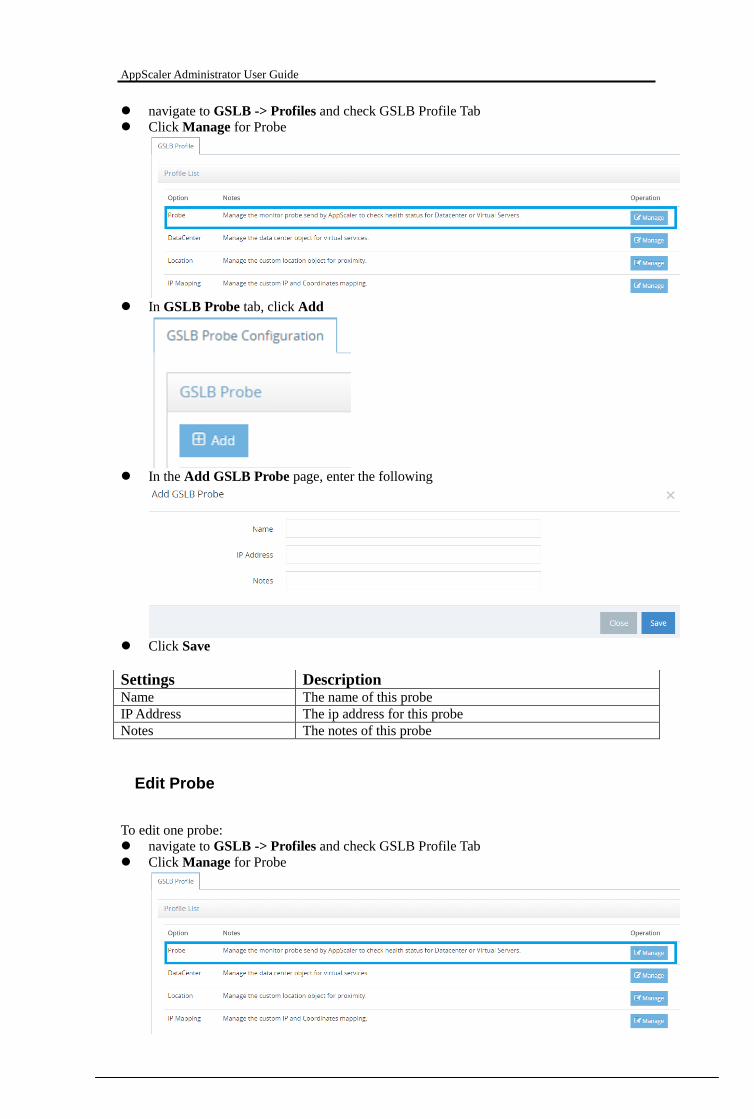
AppScaler Administrator User Guide
navigate to GSLB -> Profiles and check GSLB Profile Tab
Click Manage for Probe
In GSLB Probe tab, click Add
In the Add GSLB Probe page, enter the following
Click Save
Settings Description Name The name of this probe
IP Address The ip address for this probe
Notes The notes of this probe
Edit Probe
To edit one probe:
navigate to GSLB -> Profiles and check GSLB Profile Tab
Click Manage for Probe
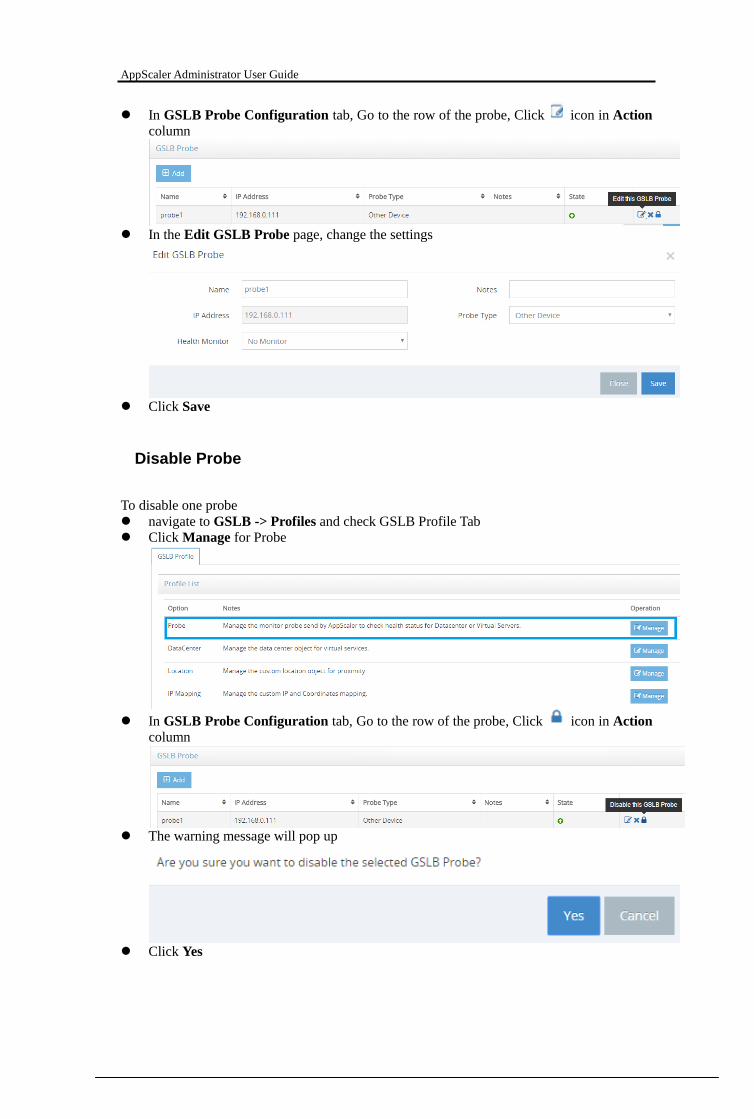
AppScaler Administrator User Guide
In GSLB Probe Configuration tab, Go to the row of the probe, Click icon in Action
column
In the Edit GSLB Probe page, change the settings
Click Save
Disable Probe
To disable one probe
navigate to GSLB -> Profiles and check GSLB Profile Tab
Click Manage for Probe
In GSLB Probe Configuration tab, Go to the row of the probe, Click icon in Action
column
The warning message will pop up
Click Yes
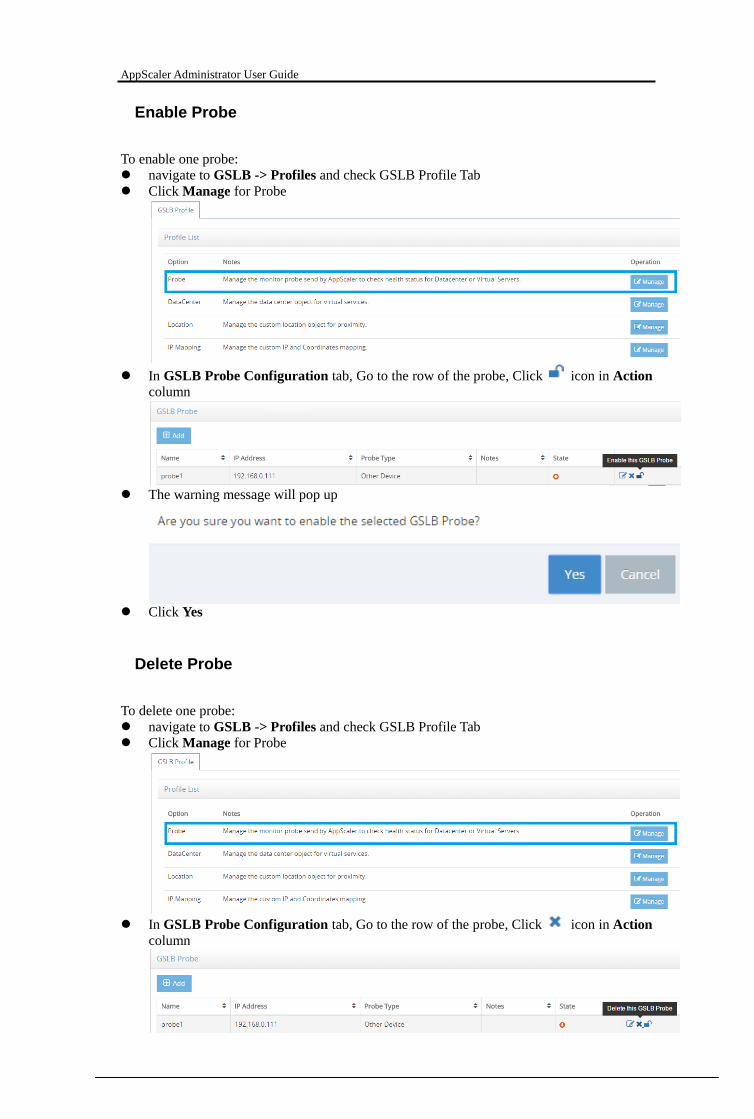
AppScaler Administrator User Guide
Enable Probe
To enable one probe:
navigate to GSLB -> Profiles and check GSLB Profile Tab
Click Manage for Probe
In GSLB Probe Configuration tab, Go to the row of the probe, Click icon in Action
column
The warning message will pop up
Click Yes
Delete Probe
To delete one probe:
navigate to GSLB -> Profiles and check GSLB Profile Tab
Click Manage for Probe
In GSLB Probe Configuration tab, Go to the row of the probe, Click icon in Action
column

AppScaler Administrator User Guide
The warning message will pop up
Click Yes
Datacenter
Add Datacenter
To add a datacenter:
navigate to GSLB -> Profiles and check GSLB Profile Tab
Click Manage for Datacenter
In GSLB Datacenter Configuration tab, click Add
In the Add GSLB DataCenter page, enter the following
Click Save
Settings Description Name The name of this datacenter

AppScaler Administrator User Guide
Probe The probe(s) for this datacenter
Notes The notes of this datacenter
Edit DataCenter
To edit one datacenter:
navigate to GSLB -> Profiles and check GSLB Profile Tab
Click Manage for DataCenter
In GSLB DataCenter Configuration tab, Go to the row of the datacenter, Click icon
in Action column
In the Edit GSLB DataCenter page, change the settings
Click Save
Delete DataCenter
To delete one datacenter:
navigate to GSLB -> Profiles and check GSLB Profile Tab
Click Manage for DataCenter

AppScaler Administrator User Guide
In GSLB DataCenter Configuration tab, Go to the row of the datacenter, Click
icon in Action column
The warning message will pop up
Click Yes
Location
Add Location
To add a location:
navigate to GSLB -> Profiles and check GSLB Profile Tab
Click Manage for Location
In GSLB Location Configuration tab, click Add

AppScaler Administrator User Guide
In the Add GSLB Location page, enter the following
Click Save
Settings Description Name The name of this location
Notes The notes of this location
Edit Location
To edit one location:
navigate to GSLB -> Profiles and check GSLB Profile Tab
Click Manage for Location
In GSLB Location Configuration tab, Go to the row of the location, Click icon in
Action column
In the Edit GSLB Location page, change the settings
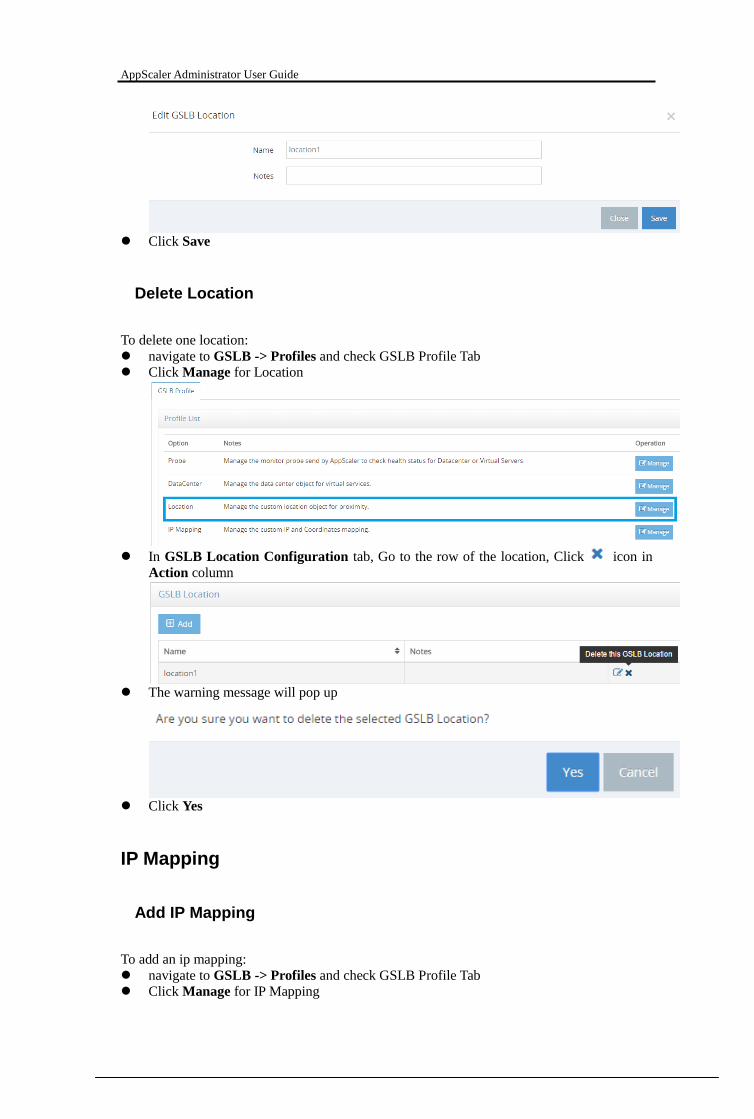
AppScaler Administrator User Guide
Click Save
Delete Location
To delete one location:
navigate to GSLB -> Profiles and check GSLB Profile Tab
Click Manage for Location
In GSLB Location Configuration tab, Go to the row of the location, Click icon in
Action column
The warning message will pop up
Click Yes
IP Mapping
Add IP Mapping
To add an ip mapping:
navigate to GSLB -> Profiles and check GSLB Profile Tab Click Manage for IP Mapping

AppScaler Administrator User Guide
In GSLB IP Mapping Configuration tab, click Add
In the Add GSLB IP Mapping page, enter the following
Click Save
Settings Description Name The name of this ip mapping
IP Address The ip address of this ip mapping
Notes The notes of this ip mapping
Edit IP Mapping
To edit one ip mapping:
navigate to GSLB -> Profiles and check GSLB Profile Tab
Click Manage for IP Mapping
In GSLB IP Mapping Configuration tab, Go to the row of the ip mapping, Click
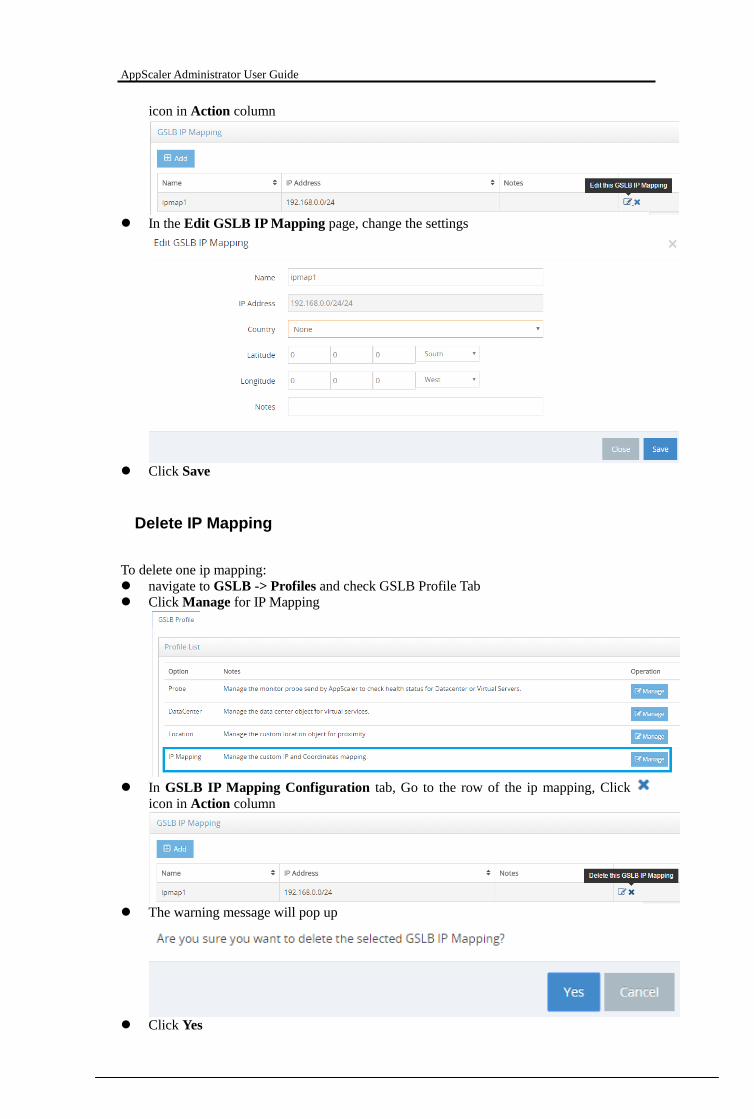
AppScaler Administrator User Guide
icon in Action column
In the Edit GSLB IP Mapping page, change the settings
Click Save
Delete IP Mapping
To delete one ip mapping:
navigate to GSLB -> Profiles and check GSLB Profile Tab
Click Manage for IP Mapping
In GSLB IP Mapping Configuration tab, Go to the row of the ip mapping, Click
icon in Action column
The warning message will pop up
Click Yes

AppScaler Administrator User Guide
Global Settings
The profiles provide an effective and efficient interface to manage global settings of GSLB:
GSLB Engine
ADNS Listener
DNS SOA
GSLB Site
GSLB Site Access
DNS Security
GSLB ACL
Navigate to GSLB -> Global Settings
GSLB Engine
Edit GSLB Engine
To edit GSLB Engine:
navigate to GSLB -> Global Settings
Click Manage for GSLB Engine
In GSLB Engine Configuration tab, click Manage

AppScaler Administrator User Guide
In GSLB Engine Global Configuration page, enter the following
Click Save
Settings Description GSLB Engine Enable or disable GSLB engine
Interval The interval time to check the GSLB virtual server
Retries The retry time to check the GSLB virtual server
FailureRetries The failure retry time to the GSLB virtual server
AppScaler Exchange Listener The interface to communicate with other AppScaler
ADNS Listener
Enable ANDS Listener
To enable an adns listener:
navigate to GSLB -> Global Settings
Click Manage for ADNS Listener
In ADNS Listener tab, Go to the row of the interface, Click icon in Action column

AppScaler Administrator User Guide
The warning message will pop up
Click Yes
Disable ADNS Interface
To disable one ADNS Interface:
navigate to GSLB -> Global Settings
Click Manage for ADNS Listener
In ADNS Listener tab, Go to the row of the interface, Click icon in Action column
The warning message will pop up
Click Yes
DNS SOA
Edit DNS SOA
To edit DNS SOA:
navigate to GSLB -> Global Settings
Click Manage for DNS SOA

AppScaler Administrator User Guide
In GSLB SOA Configuration tab, click Manage
In GSLB SOA Configuration page, enter the following
Click Save
Settings Description DNS Zone The DNS Zone
SOA The SOA
Original DNS Server The original dns server
SOA Account The contact of SOA
TTL The TTL
GSLB Site
Add GSLB Site
To add a GSLB Site:
navigate to GSLB -> Global Settings
Click Manage for GSLB Site
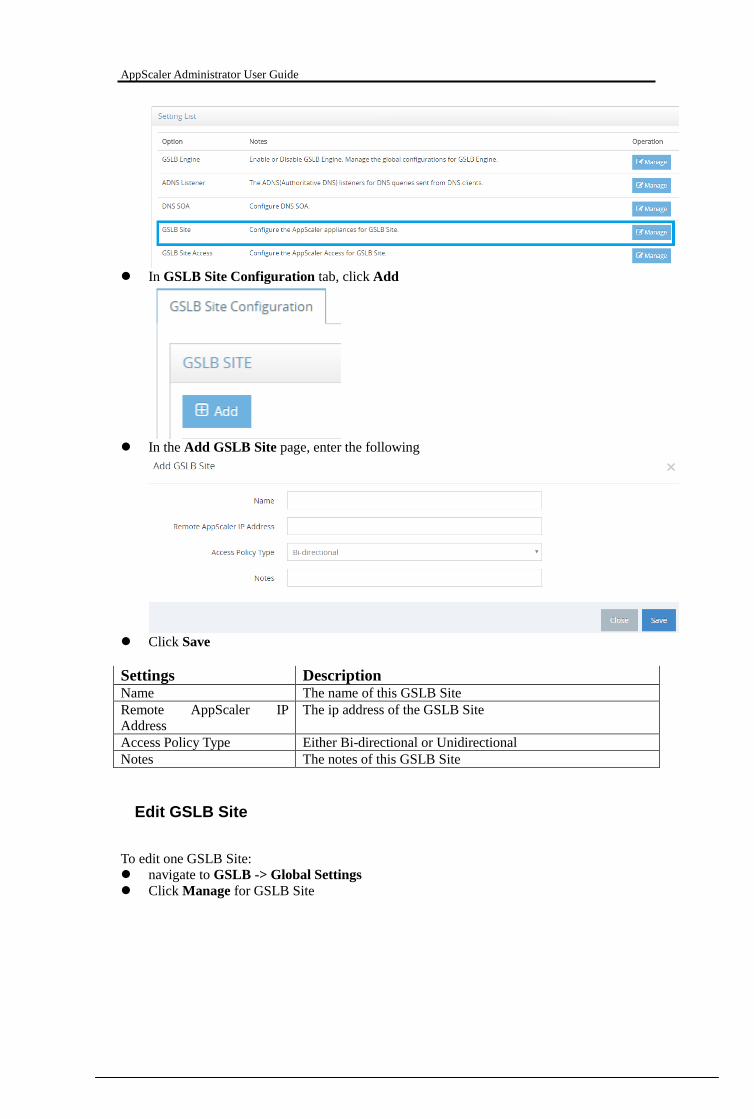
AppScaler Administrator User Guide
In GSLB Site Configuration tab, click Add
In the Add GSLB Site page, enter the following
Click Save
Settings Description Name The name of this GSLB Site
Remote AppScaler IP
Address
The ip address of the GSLB Site
Access Policy Type Either Bi-directional or Unidirectional
Notes The notes of this GSLB Site
Edit GSLB Site
To edit one GSLB Site:
navigate to GSLB -> Global Settings
Click Manage for GSLB Site
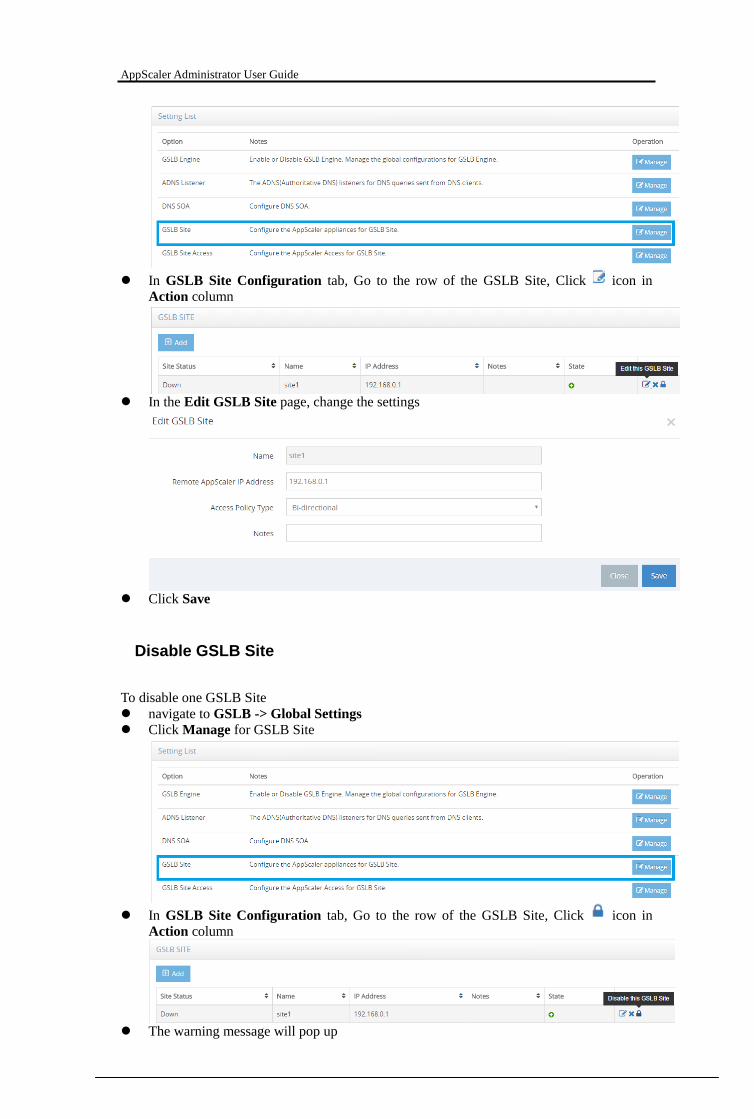
AppScaler Administrator User Guide
In GSLB Site Configuration tab, Go to the row of the GSLB Site, Click icon in
Action column
In the Edit GSLB Site page, change the settings
Click Save
Disable GSLB Site
To disable one GSLB Site
navigate to GSLB -> Global Settings
Click Manage for GSLB Site
In GSLB Site Configuration tab, Go to the row of the GSLB Site, Click icon in
Action column
The warning message will pop up

AppScaler Administrator User Guide
Click Yes
Enable GSLB Site
To enable one GSLB Site:
navigate to GSLB -> Global Settings
Click Manage for GSLB Site
In GSLB Site Configuration tab, Go to the row of the GSLB Site, Click icon in
Action column
The warning message will pop up
Click Yes
Delete GSLB Site
To delete one GSLB Site:
navigate to GSLB -> Global Settings
Click Manage for GSLB Site

AppScaler Administrator User Guide
In GSLB Site Configuration tab, Go to the row of the GSLB Site, Click icon in
Action column
The warning message will pop up
Click Yes
GSLB Site Access
Add GSLB Site Access
To add a GSLB Site Access:
navigate to GSLB -> Global Settings
Click Manage for GSLB Site Access
In GSLB Site Access Configuration tab, click Add

AppScaler Administrator User Guide
In the Add GSLB Site Access page, enter the following
Click Save
Settings Description Name The name of this GSLB Site Access
Remote AppScaler IP
Address
The ip address of the GSLB Site Access
Access Policy Type Either Bi-directional or Unidirectional
Notes The notes of this GSLB Site Access
Edit GSLB Site Access
To edit one GSLB Site Access:
navigate to GSLB -> Global Settings
Click Manage for GSLB Site Access
In GSLB Site Access Configuration tab, Go to the row of the GSLB Site Access, Click
icon in Action column
In the Edit GSLB Site Access page, change the settings

AppScaler Administrator User Guide
Click Save
Disable GSLB Site Access
To disable one GSLB Site Access
navigate to GSLB -> Global Settings
Click Manage for GSLB Site Access
In GSLB Site Access Configuration tab, Go to the row of the GSLB Site Access, Click
icon in Action column
The warning message will pop up
Click Yes
Enable GSLB Site Access
To enable one GSLB Site Access:
navigate to GSLB -> Global Settings
Click Manage for GSLB Site Access

AppScaler Administrator User Guide
In GSLB Site Access Configuration tab, Go to the row of the GSLB Site Access, Click
icon in Action column
The warning message will pop up
Click Yes
Delete GSLB Site Access
To delete one GSLB Site Access:
navigate to GSLB -> Global Settings
Click Manage for GSLB Site Access
In GSLB Site Access Configuration tab, Go to the row of the GSLB Site Access, Click
icon in Action column
The warning message will pop up

AppScaler Administrator User Guide
Click Yes
DNS Security
DNSSEC is a technology that was developed to, among other things, protect against DNS
attacks by digitally 'signing' data so you can be assured it is valid.
GSLB DNS Security
To enable or disable GSLB DNS Security:
navigate to GSLB -> Global Settings
Click Manage for DNS Security
In GSLB DNS Security tab, click Manage
In GSLB DNS Security Configuration page, choose Disable DNSSec or Enable
DNSSec
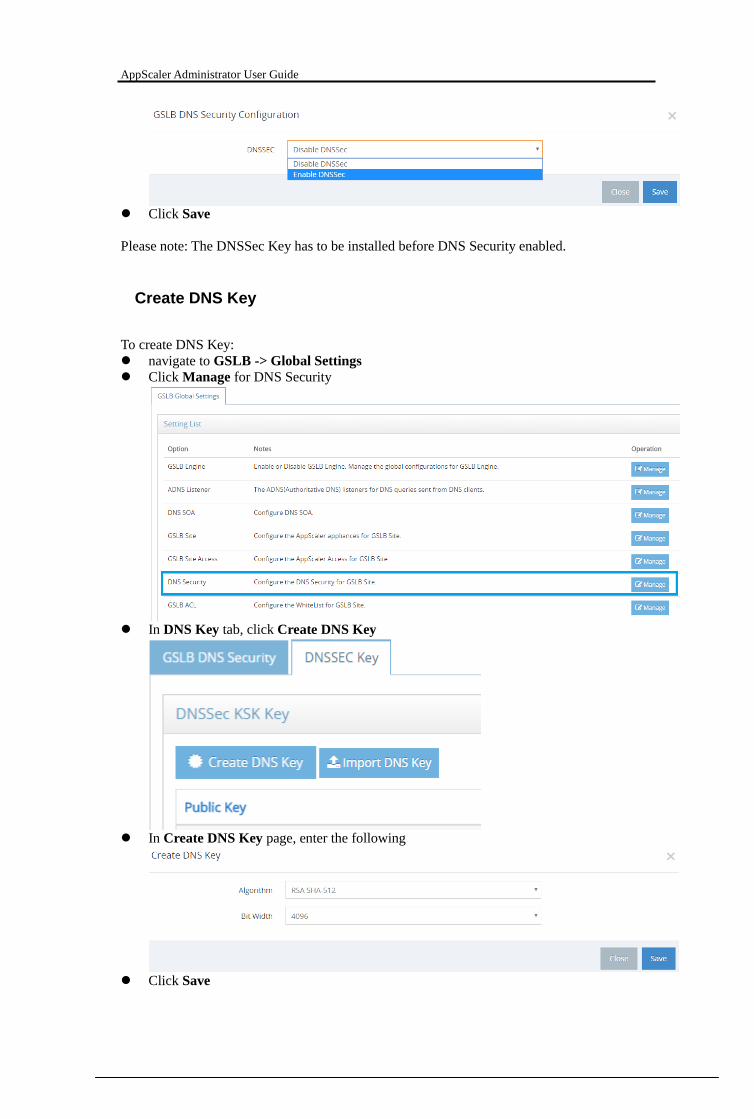
AppScaler Administrator User Guide
Click Save
Please note: The DNSSec Key has to be installed before DNS Security enabled.
Create DNS Key
To create DNS Key:
navigate to GSLB -> Global Settings
Click Manage for DNS Security
In DNS Key tab, click Create DNS Key
In Create DNS Key page, enter the following
Click Save

AppScaler Administrator User Guide
Import DNS Key
To import DNS Key:
navigate to GSLB -> Global Settings
Click Manage for DNS Security
In DNS Key tab, click Import DNS Key
In Import DNS Key page, upload both KSK public key and KSK private key
Click Save
Delete DNS Key
To delete DNS Key:
navigate to GSLB -> Global Settings
Click Manage for DNS Security

AppScaler Administrator User Guide
In DNS Key tab, Go to the row of the DNS Key, Click icon in Action column
The warning message will pop up
Click Yes
View DNS Key
To view DNS Key:
navigate to GSLB -> Global Settings
Click Manage for DNS Security
In DNS Key tab, Go to the row of the DNS Key, Click icon in Action column

AppScaler Administrator User Guide
The DNS Key Details page will pop up
GSLB ACL
Add GSLB ACL
To add a GSLB ACL:
navigate to GSLB -> Global Settings
Click Manage for GSLB ACL
In GSLB ACL Configuration tab, click Add
In the Add GSLB Whitelist page, enter the following
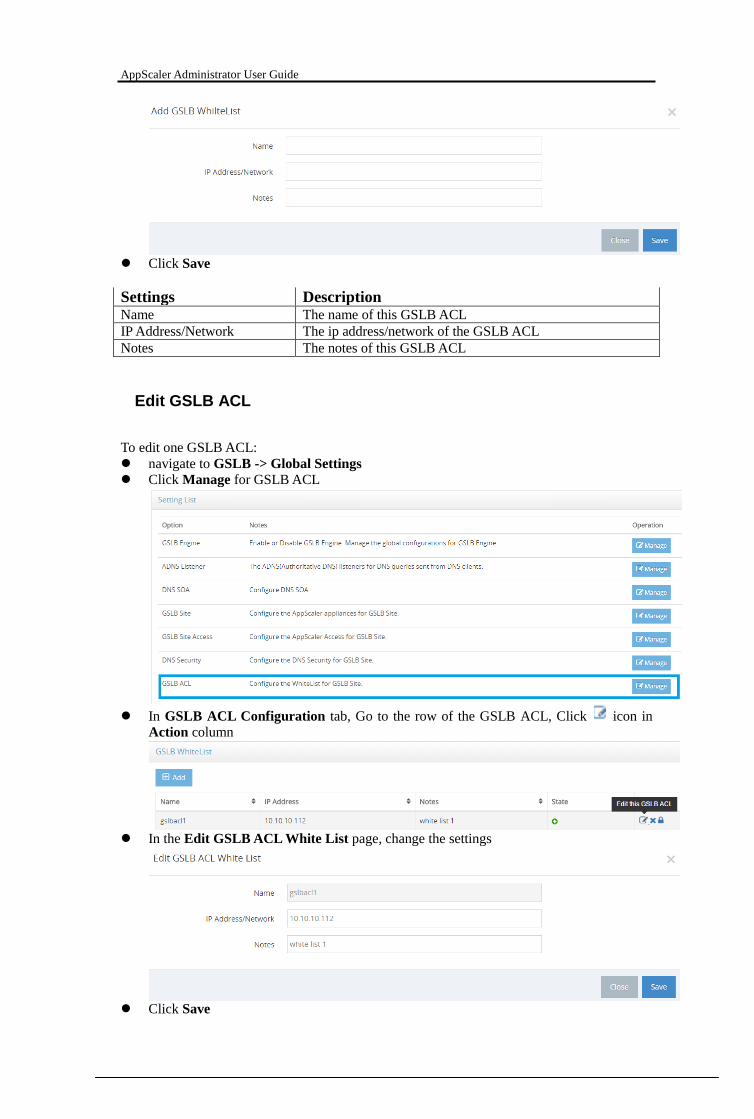
AppScaler Administrator User Guide
Click Save
Settings Description Name The name of this GSLB ACL
IP Address/Network The ip address/network of the GSLB ACL
Notes The notes of this GSLB ACL
Edit GSLB ACL
To edit one GSLB ACL:
navigate to GSLB -> Global Settings
Click Manage for GSLB ACL
In GSLB ACL Configuration tab, Go to the row of the GSLB ACL, Click icon in
Action column
In the Edit GSLB ACL White List page, change the settings
Click Save
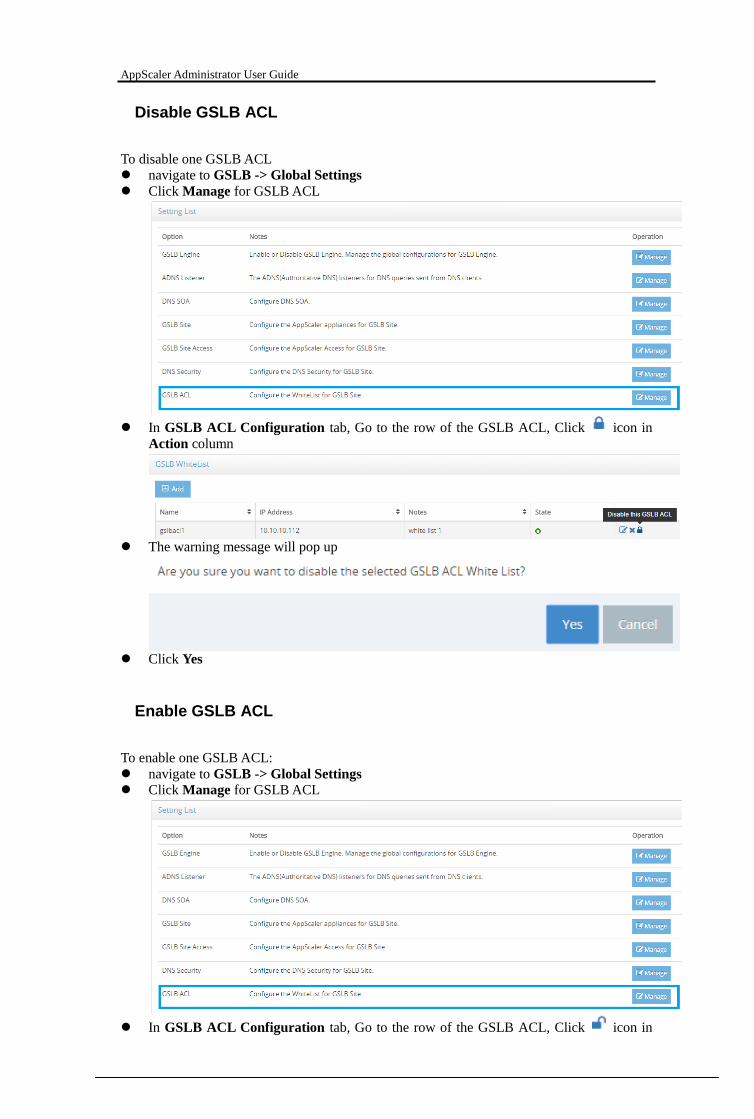
AppScaler Administrator User Guide
Disable GSLB ACL
To disable one GSLB ACL
navigate to GSLB -> Global Settings
Click Manage for GSLB ACL
In GSLB ACL Configuration tab, Go to the row of the GSLB ACL, Click icon in
Action column
The warning message will pop up
Click Yes
Enable GSLB ACL
To enable one GSLB ACL:
navigate to GSLB -> Global Settings
Click Manage for GSLB ACL
In GSLB ACL Configuration tab, Go to the row of the GSLB ACL, Click icon in
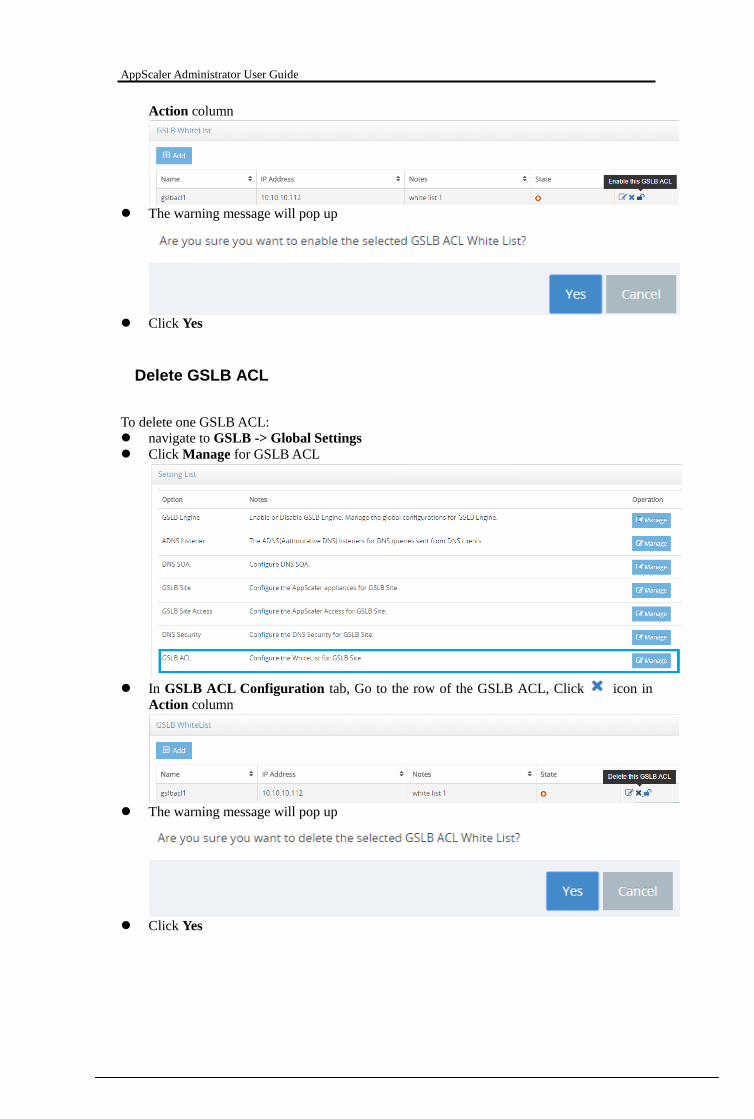
AppScaler Administrator User Guide
Action column
The warning message will pop up
Click Yes
Delete GSLB ACL
To delete one GSLB ACL:
navigate to GSLB -> Global Settings
Click Manage for GSLB ACL
In GSLB ACL Configuration tab, Go to the row of the GSLB ACL, Click icon in
Action column
The warning message will pop up
Click Yes

AppScaler Administrator User Guide
Log & Report
Overview
AppScaler provides extensive logging capabilities by continuously recording various system
and network events.
The reporting function of AppScaler provides real- time information of its managed virtual
services by collecting current statistics data and presenting it in a graphical format.
VS Report
VS report shows information about the virtual servers in server load-balancing operations,
including availability, health check status and real-time/historical statistics.
Throughput Report
Throughput report shows information about the ports, including availability and
real-time/historical statistics.
System Report
System report shows system-wise information, including TPS connections, SSL connections,
CPU usage and memory usage in real time..
Activity Report
Activity report includes operator audit report and logon report.
VS Report
Navigate to Log & Report -> VS Report
View Real Server
To view real server:
navigate to Log & Report -> VS Report
Go to the row of virtual server, Click icon in Real Server column

AppScaler Administrator User Guide
In the Real Server Lists page, all the real servers in this virtual server will be shown
View VS Real Time
To view VS real time statistics:
navigate to Log & Report -> VS Report
Go to the row of virtual server, Click icon in Real Time column
By default the real time connections graph will be shown
Alternatively you could choose Bytes from Metric dropdown list and click Run Chart
The real time bytes graph will be shown
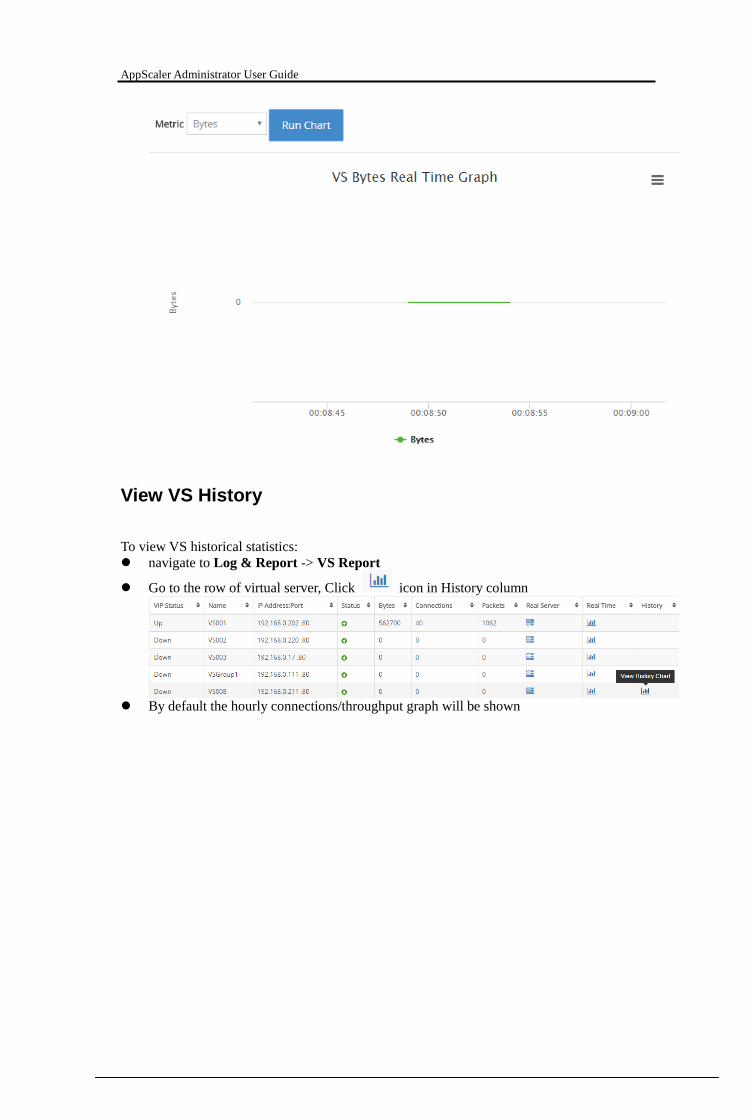
AppScaler Administrator User Guide
View VS History
To view VS historical statistics:
navigate to Log & Report -> VS Report
Go to the row of virtual server, Click icon in History column
By default the hourly connections/throughput graph will be shown

AppScaler Administrator User Guide
Alternatively you could choose Last Day/Month/Quarter/Year from dropdown list
Throughput Report
Navigate to Log & Report -> Throughput Report
View Real Time
To view real time statistics:
navigate to Log & Report -> Throughput Report
Go to the row of interface, Click icon in Real Time column
The real time throughput graph will be shown

AppScaler Administrator User Guide
View History
To view historical statistics:
navigate to Log & Report -> Throughput Report
Go to the row of interface, Click icon in History column
The Hourly Port packet and Port byte graph will be shown
Alternatively you could choose Last Day/Month/Quarter/Year from dropdown list
System Report
Navigate to Log & Report -> System Report

AppScaler Administrator User Guide
TPS Connections
To view TPS connections:
navigate to Log & Report -> System Report
The real time TPS connections graph will be shown
SSL Connections
To view SSL connections:
navigate to Log & Report -> System Report
In Reports dropdown list, choose SSL Connections and click Run Chart
The real time SSL connections graph will be shown

AppScaler Administrator User Guide
CPU Usage
To view CPU Usage:
navigate to Log & Report -> System Report
In Reports dropdown list, choose CPU Usage and click Run Chart
The real time CPU Usage graph will be shown
Memory Usage
To view Memory Usage:
navigate to Log & Report -> System Report
In Reports dropdown list, choose Memory Usage and click Run Chart
The real time Memory Usage graph will be shown
SSO Report
Navigate to Log & Report -> SSO Report

AppScaler Administrator User Guide
SSO User Login
To view SSO User Login:
navigate to Log & Report -> SSO Report
Choose the SSO Profile and click View
GSLB Report
Navigate to Log & Report -> GSLB Report
GSLB Virtual Server Real Time Report
To view GSLB Virtual Server Real Time Report:
navigate to Log & Report -> GSLB Report
Choose the GSLB Virtual Server and click icon in Real Time
Activity Report
Navigate to Log & Report -> Activity Report

AppScaler Administrator User Guide
AppScaler Report
To view activity report:
navigate to Log & Report -> Activity Report
Check AppScaler Report tab
You could specify Start and End date to see the AppScaler Report
Activity Report
To view activity report:
navigate to Log & Report -> Activity Report
Check Activity Report tab

AppScaler Administrator User Guide
Logon Report
To view logon report:
navigate to Log & Report -> Activity Report
Check Logon Report tab
API Report
To view API report:
navigate to Log & Report -> Activity Report
Check API Report tab
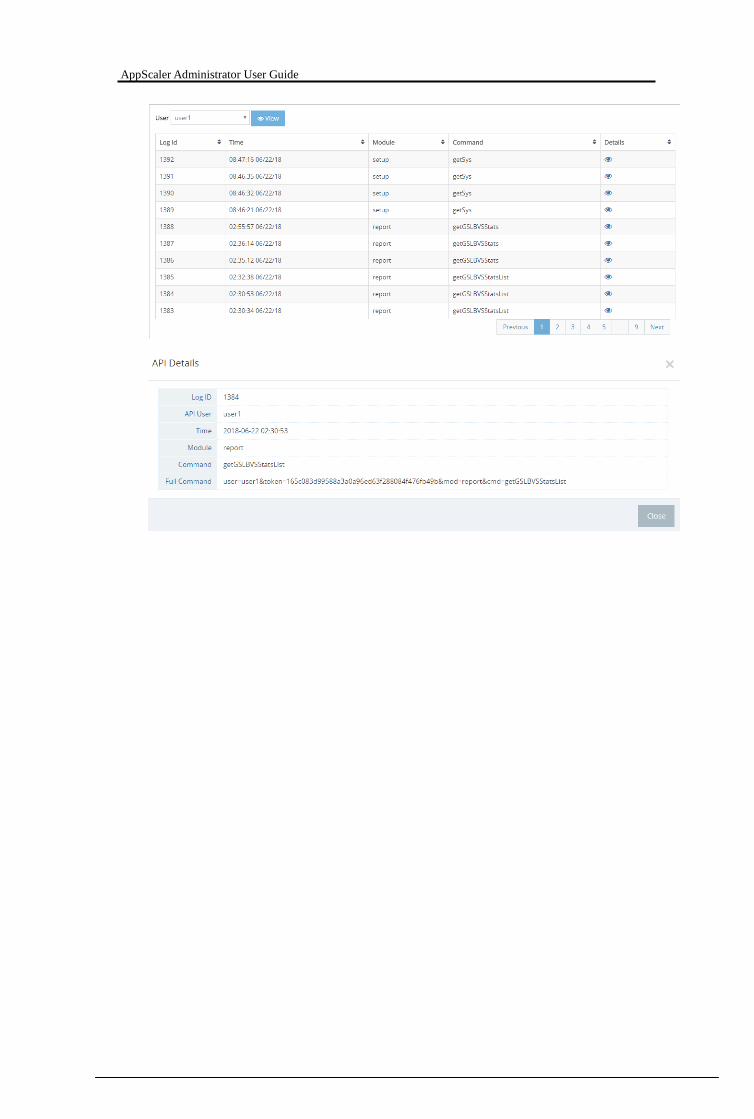
AppScaler Administrator User Guide