apps setup and freemium · this chapter describes product requirements and ... • windows server...
TRANSCRIPT
ThingWorx ManufacturingApps Setup and
Configuration Guide forFreemium
8.2
Copyright © 2018 PTC Inc. and/or Its Subsidiary Companies. All Rights Reserved.
User and training guides and related documentation from PTC Inc. and its subsidiary companies (collectively"PTC") are subject to the copyright laws of the United States and other countries and are provided under alicense agreement that restricts copying, disclosure, and use of such documentation. PTC hereby grants to thelicensed software user the right to make copies in printed form of this documentation if provided on softwaremedia, but only for internal/personal use and in accordance with the license agreement under which theapplicable software is licensed. Any copy made shall include the PTC copyright notice and any otherproprietary notice provided by PTC. Training materials may not be copied without the express written consentof PTC. This documentation may not be disclosed, transferred, modified, or reduced to any form, includingelectronic media, or transmitted or made publicly available by any means without the prior written consent ofPTC and no authorization is granted to make copies for such purposes. Information described herein isfurnished for general information only, is subject to change without notice, and should not be construed as awarranty or commitment by PTC. PTC assumes no responsibility or liability for any errors or inaccuraciesthat may appear in this document.
The software described in this document is provided under written license agreement, contains valuable tradesecrets and proprietary information, and is protected by the copyright laws of the United States and othercountries. It may not be copied or distributed in any form or medium, disclosed to third parties, or used in anymanner not provided for in the software licenses agreement except with written prior approval from PTC.
UNAUTHORIZED USE OF SOFTWARE OR ITS DOCUMENTATION CAN RESULT IN CIVILDAMAGES AND CRIMINAL PROSECUTION.
PTC regards software piracy as the crime it is, and we view offenders accordingly. We do not tolerate thepiracy of PTC software products, and we pursue (both civilly and criminally) those who do so using all legalmeans available, including public and private surveillance resources. As part of these efforts, PTC uses datamonitoring and scouring technologies to obtain and transmit data on users of illegal copies of our software.This data collection is not performed on users of legally licensed software from PTC and its authorizeddistributors. If you are using an illegal copy of our software and do not consent to the collection andtransmission of such data (including to the United States), cease using the illegal version, and contact PTC toobtain a legally licensed copy.
Important Copyright, Trademark, Patent, and Licensing Information: See the About Box, or copyrightnotice, of your PTC software.
UNITED STATES GOVERNMENT RIGHTS
PTC software products and software documentation are “commercial items” as that term is defined at 48 C.F.R. 2.101. Pursuant to Federal Acquisition Regulation (FAR) 12.212 (a)-(b) (Computer Software) (MAY 2014)for civilian agencies or the Defense Federal Acquisition Regulation Supplement (DFARS) at 227.7202-1(a)(Policy) and 227.7202-3 (a) (Rights in commercial computer software or commercial computer softwaredocumentation) (FEB 2014) for the Department of Defense, PTC software products and softwaredocumentation are provided to the U.S. Government under the PTC commercial license agreement. Use,duplication or disclosure by the U.S. Government is subject solely to the terms and conditions set forth in theapplicable PTC software license agreement.
PTC Inc., 140 Kendrick Street, Needham, MA 02494 USA
Contents
About This Guide ........................................................................................................4
Installing ThingWorx Manufacturing Apps......................................................................5Product Requirements ..........................................................................................6Understanding Your Express or Developer Edition License ......................................7Using the Installer .................................................................................................9Configure Communication with KEPServerEX ......................................................12Configure Java for Tomcat...................................................................................15
Configuration and Setup ............................................................................................16Setting Up Your Equipment..................................................................................17Configuring Alerts ...............................................................................................29Configuring Notification Delivery ..........................................................................32Configuring Users...............................................................................................34
Apps Overview..........................................................................................................36Asset Advisor .....................................................................................................37Controls Advisor .................................................................................................42Production Advisor..............................................................................................53Alert Monitoring ..................................................................................................56Trending and Troubleshooting .............................................................................58
Advanced Configurations...........................................................................................60Remote Access and Control ................................................................................61
Frequently Asked Questions ......................................................................................64
3
About This Guide
This ThingWorx Manufacturing Apps Setup and Configuration Guide forFreemium guide describes the following:• Installation of ThingWorx Manufacturing Apps using the Express Installer.• Initial setup and configuration steps to get started with ThingWorx
Manufacturing Apps .This guide assumes that the prequisite products on page 6 are installed andconfigured, including a KEPServerEX with connected devices.
CommentsPTC welcomes your suggestions and comments on its documentation. To submityour feedback, you can send an email to [email protected]. To help usmore quickly address your concern, include the name of the PTC product and itsrelease number with your comments. If your comments are about this book,include the ThingWorx Manufacturing Apps Setup and Configuration Guide forFreemium book title.
4 ThingWorx Manufacturing Apps Setup and Configuration Guide for Freemium

1Installing ThingWorxManufacturing Apps
Product Requirements .................................................................................................6Understanding Your Express or Developer Edition License.............................................7Using the Installer........................................................................................................9Configure Communication with KEPServerEX .............................................................12Configure Java for Tomcat .........................................................................................15
This chapter describes product requirements and installation for ThingWorxManufacturing Apps.
5

Product RequirementsThis product works in connection with ThingWorx servers and Kepware servers.To use ThingWorx Manufacturing Apps, you must have the support identifiedbelow.
Prerequisites• Kepware KEPServerEX 6.2 or higher must already be downloaded and
installed.
○ If you need to connect ThingWorx Manufacturing Apps to KEPServerEXv6.1 or older, or to a different OPC Server, use the OPC aggregator toconnect these OPC Servers to ThingWorx Manufacturing Apps. You candownload the OPC aggregator from the Download Developer Kit page ofthe ThingWorx Manufacturing Apps Portal:https://www.ptc.com/en/thingworx/manufacturing-apps/Dashboard/Download-Developer-Kit
○ If you do not already have KEPServerEX, you can download the demosoftware from the following URL:https://www.kepware.com/en-us/products/kepserverex/
Kepware product downloads run for 2 hours at a time under a free demolicense. The demo period can be repeated at any time by stopping andstarting the application. To reset the KEPServerEX Runtime Service, right-click the KEPServerEX Administration tool icon in the Windowssystem tray, and select Stop Runtime Service. If the service does notautomatically reconnect, right-click the icon again, and select StartRuntime Service.
• If you are going to install on a virtual machine, ensure that you have the latestVM tools installed. You need at least 2GB of disk space, 4 cores, and 8GB ofRAM. The traditional 1 core, 2GB configuration is not sufficient.
• PostgreSQL must not already be installed. If it is, you must uninstall it beforeproceeding.
PostgreSQL is the only database supported with the free editions ofThingWorx Manufacturing Apps and is installed and configured as part of theinstallation.
6 ThingWorx Manufacturing Apps Setup and Configuration Guide for Freemium

NoteKEPServerEX and ThingWorx can be installed on the same machine.However, for production we recommend separate machines.
For more information, see KEPServerEX Version 6 Install Guide.
Supported Platforms
Servers:• Windows Server 2012 R2• Windows Server 2008 R2 SP1
Browsers• Internet Explorer IE 11 and later.• Firefox 35 and later.• Chrome 44
Clients Platform (PC only)• Windows 7• Windows 8.1• Windows 10
Minimum Screen Resolution: 1280x1024
Understanding Your Express orDeveloper Edition LicenseIf you have an Express or Developer Edition license, note the followinginformation on the use of ThingWorx Manufacturing Apps.
License: Express Developer EditionAccess 30 days 30 daysRenewable? Yes No
The ThingWorx serverautomatically shuts down after 30days of usage.
Number of users 100 users 5 users
Installing ThingWorx Manufacturing Apps 7
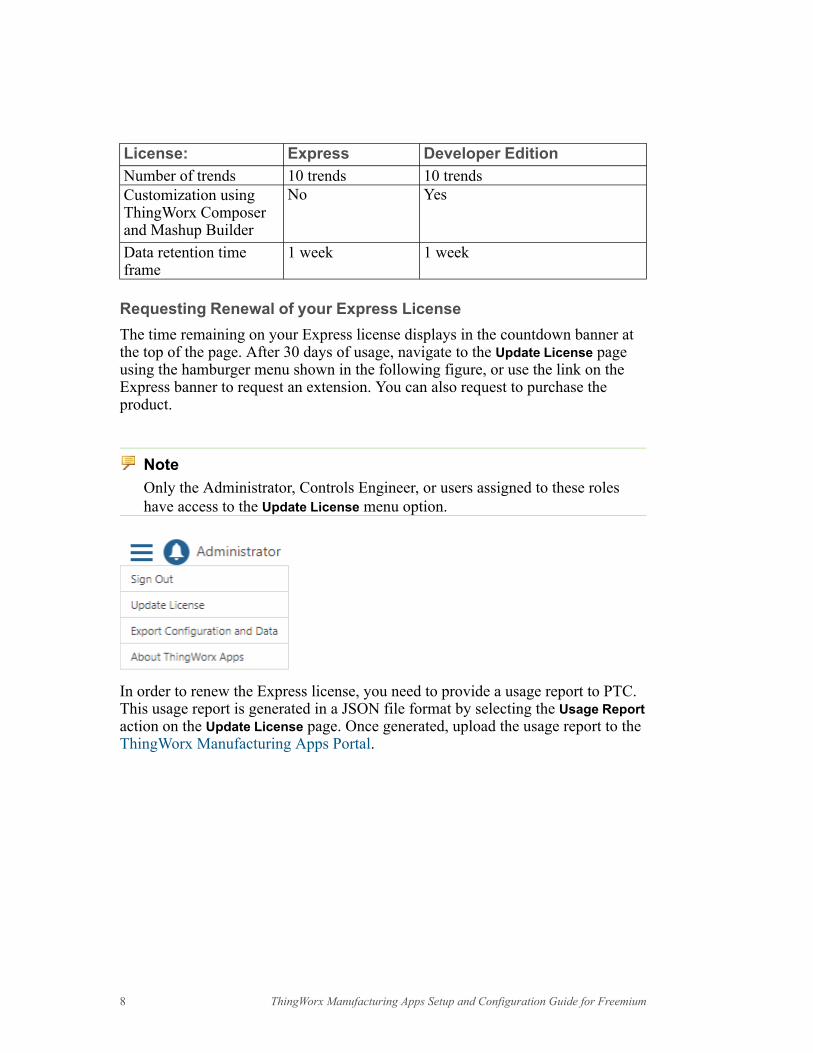
License: Express Developer EditionNumber of trends 10 trends 10 trendsCustomization usingThingWorx Composerand Mashup Builder
No Yes
Data retention timeframe
1 week 1 week
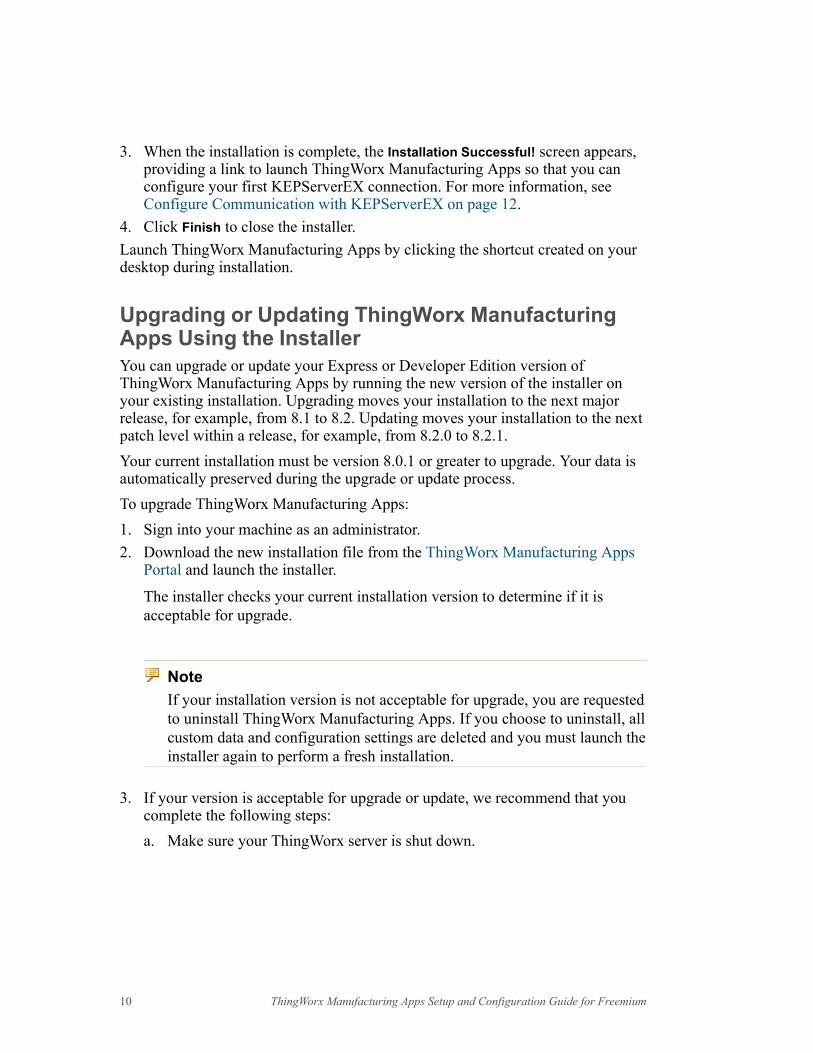
Requesting Renewal of your Express LicenseThe time remaining on your Express license displays in the countdown banner atthe top of the page. After 30 days of usage, navigate to the Update License pageusing the hamburger menu shown in the following figure, or use the link on theExpress banner to request an extension. You can also request to purchase theproduct.
NoteOnly the Administrator, Controls Engineer, or users assigned to these roleshave access to the Update License menu option.
In order to renew the Express license, you need to provide a usage report to PTC.This usage report is generated in a JSON file format by selecting the Usage Reportaction on the Update License page. Once generated, upload the usage report to theThingWorx Manufacturing Apps Portal.
8 ThingWorx Manufacturing Apps Setup and Configuration Guide for Freemium

Using the InstallerThe installer bundles the ThingWorx Manufacturing Apps, ThingWorx Server, andthe PostgreSQL database.
NoteKEPServerEX must be installed and running before launching the installer.KEPServerEX can be installed on the same machine as the ThingWorxManufacturing Apps, or on a different machine.
Installing ThingWorx Manufacturing Apps with theInstallerTo install ThingWorx Manufacturing Apps:1. Download one of the following installation files from the ThingWorx
Manufacturing Apps Portal and launch the installer.
LicenseVersion
PortalLocation
Filename
Express Download Appspage
Thingworx-Manufacturing-Apps-<version>-Express.exe
DeveloperEdition Kit
Get Started page Thingworx-Manufacturing-Apps-<version>-DevKit.exe
Tip• Both license versions are free and run on a 30 day trial license.• The remote access features and customization capabilities are available
only with the Developer Edition Kit.
2. Follow the prompts in the installer to enter the necessary information. Theinstaller checks hardware, operating system, and software compatibility, aswell as validating that the specified ports are available for use.
NoteIf a Windows alert indicates that a firewall has blocked the setup, allowaccess to all networks.
Installing ThingWorx Manufacturing Apps 9
3. When the installation is complete, the Installation Successful! screen appears,providing a link to launch ThingWorx Manufacturing Apps so that you canconfigure your first KEPServerEX connection. For more information, seeConfigure Communication with KEPServerEX on page 12.
4. Click Finish to close the installer.Launch ThingWorx Manufacturing Apps by clicking the shortcut created on yourdesktop during installation.
Upgrading or Updating ThingWorx ManufacturingApps Using the InstallerYou can upgrade or update your Express or Developer Edition version ofThingWorx Manufacturing Apps by running the new version of the installer onyour existing installation. Upgrading moves your installation to the next majorrelease, for example, from 8.1 to 8.2. Updating moves your installation to the nextpatch level within a release, for example, from 8.2.0 to 8.2.1.Your current installation must be version 8.0.1 or greater to upgrade. Your data isautomatically preserved during the upgrade or update process.To upgrade ThingWorx Manufacturing Apps:1. Sign into your machine as an administrator.2. Download the new installation file from the ThingWorx Manufacturing Apps
Portal and launch the installer.
The installer checks your current installation version to determine if it isacceptable for upgrade.
NoteIf your installation version is not acceptable for upgrade, you are requestedto uninstall ThingWorx Manufacturing Apps. If you choose to uninstall, allcustom data and configuration settings are deleted and you must launch theinstaller again to perform a fresh installation.
3. If your version is acceptable for upgrade or update, we recommend that youcomplete the following steps:a. Make sure your ThingWorx server is shut down.
10 ThingWorx Manufacturing Apps Setup and Configuration Guide for Freemium
b. Backup the following folders:• <ThingWorx Manufacturing Apps installation path>\
PTC_Servlet_Engine\webapps\ThingWorx
• <ThingWorx Manufacturing Apps installation path>\ThingWorxStorage
• <ThingWorx Manufacturing Apps installation path>\ThingWorxBackupStorage
c. Backup your Postgres database data.i. Open a terminal.ii. From the <app installation directory>\PostGresSQL\
bin directory, execute the following command:pg_dump -f dumpfile.sql -U postgres thingworx
4. Make sure your ThingWorx server is running.5. Close all other applications.6. On the installer screen, click Next to launch the upgrade process.7. Accept the license agreement and click Next.8. Enter the ThingWorx administrator password. Click Next.
Once the upgrade completes, the Upgrade Successful! screen appears.
NoteClear your browser cache before proceeding to the next step.
9. Click the ThingWorx Manufacturing Apps link to access ThingWorxManufacturing Apps so that you can configure your first KEPServerEXconnection. For more information, see Configure Communication withKEPServerEX on page 12.
Installing ThingWorx Manufacturing Apps 11
Configure Communication withKEPServerEXThe connection with KEPServerEX provides the data needed by ThingWorxManufacturing Apps. One or more KEPServerEX servers can be connected.KEPServerEX can be on the same server or a different server than ThingWorx.
To configure communication with KEPServerEX:1. When you open ThingWorx Manufacturing Apps for the first time using the
link provided on the last page of the installer, or one of the shortcuts createdduring the installation, you are guided to create your first connection to yourKEPServerEX server. You are prompted to enter a server or thing name.Ensure that the name is one you can use to identify this KEPServerEXinstance. A list of configuration parameters is generated automatically. Print orcopy that information before launching ThingWorx Manufacturing Apps.
2. Input the configuration parameters under the ThingWorx tab of your instanceof KEPServerEX. Right-click Project, select Properties, and then click theThingWorx tab.
12 ThingWorx Manufacturing Apps Setup and Configuration Guide for Freemium
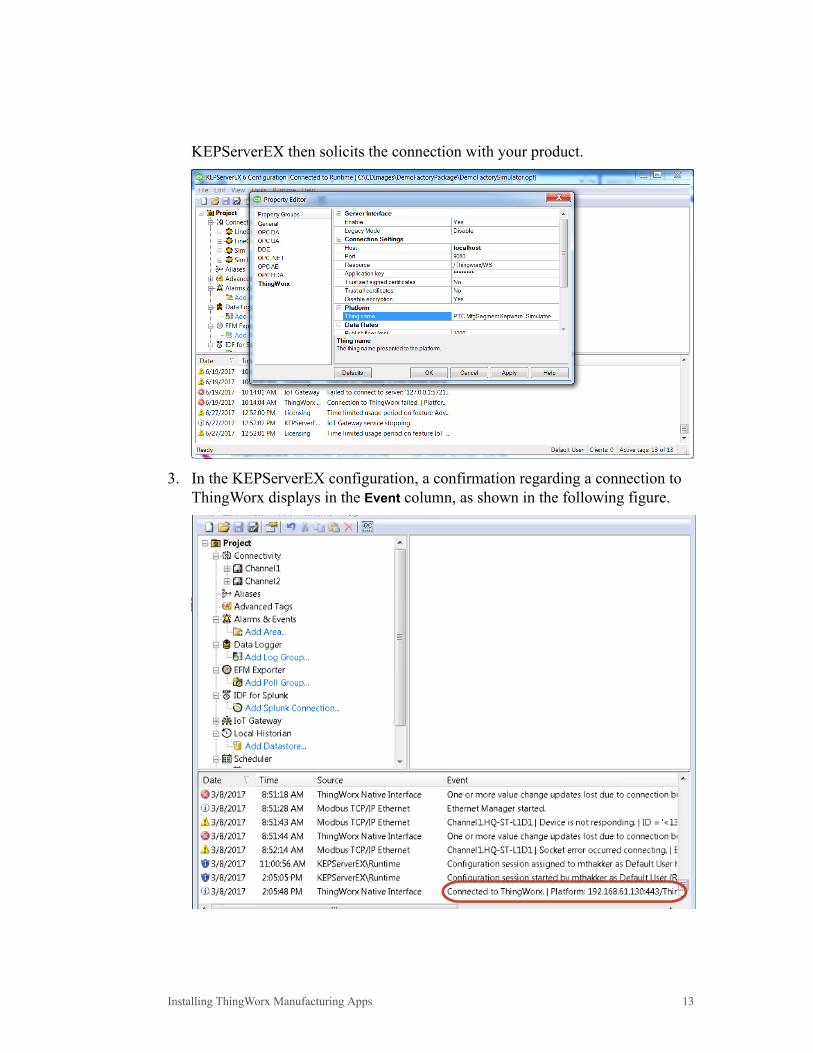
KEPServerEX then solicits the connection with your product.
3. In the KEPServerEX configuration, a confirmation regarding a connection toThingWorx displays in the Event column, as shown in the following figure.
Installing ThingWorx Manufacturing Apps 13

If you receive an error message indicating that the connection to theThingWorx platform failed and could not initialize a secure socket connection,follow these steps:
• Verify that the host, port, resource, application key, and thing name arevalid and correct.
• Verify that the host of KEPServerEX can reach the machine on which yourproduct is installed. To do so, ping the hostname or IP address of theThingWorx Manufacturing Apps host.
• Verify that the proper certificate settings are enabled.4. Launch ThingWorx Manufacturing Apps.
5. Later, you can click Controls Advisor from the main console to create andmanage additional server connections.
For more information, see Controls Advisor on page 42.
14 ThingWorx Manufacturing Apps Setup and Configuration Guide for Freemium

Configure Java for TomcatTo ensure that ThingWorx Manufacturing Apps runs properly, you must make thefollowing changes to your Java for Tomcat configuration.
To change your Tomcat configuration:1. From the Start menu, launch the Configure ThingWorx Server program.2. On the Java tab, enter values in the Initial memory pool and Maximum memory
pool fields.
The recommended value is 5120.3. Increase the default cache settings that affect static file caching. To do so, add
the following line within the tags in the $TOMCAT_HOME\conf\context.xml file:
<Resources cacheMaxSize="501200" cacheObjectMaxSize="2048" cacheTtl="60000"/>
Installing ThingWorx Manufacturing Apps 15
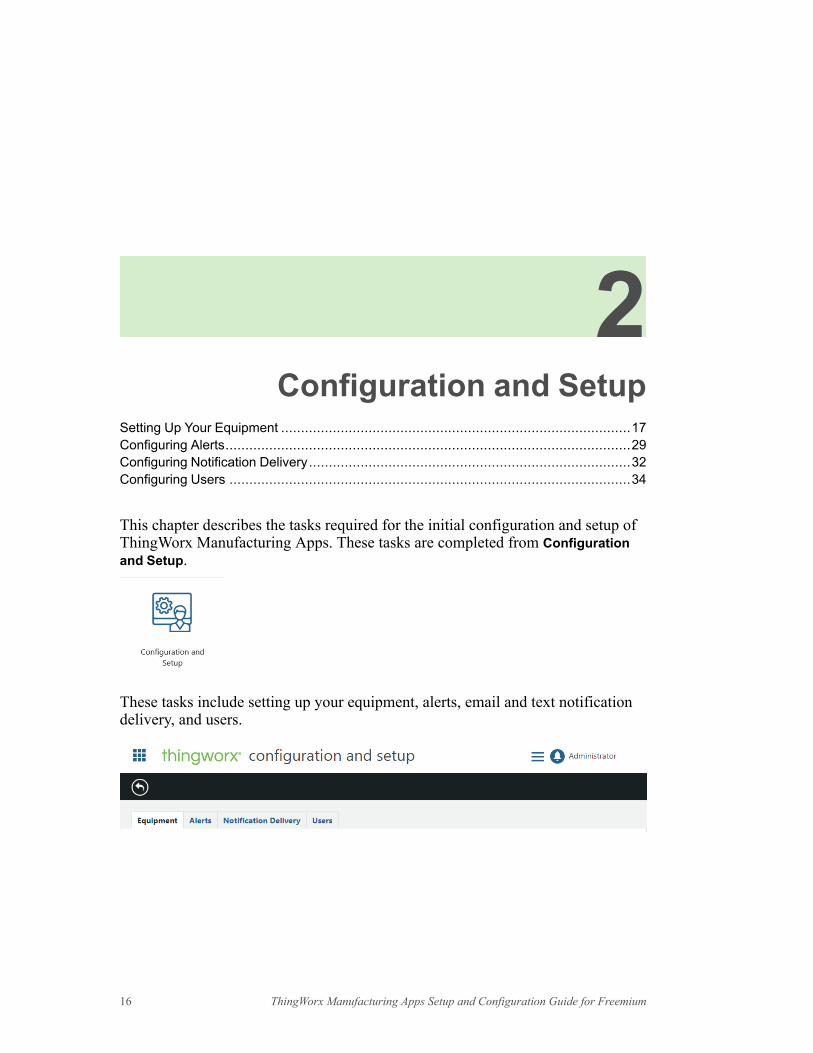
2Configuration and Setup
Setting Up Your Equipment ........................................................................................17Configuring Alerts......................................................................................................29Configuring Notification Delivery.................................................................................32Configuring Users .....................................................................................................34
This chapter describes the tasks required for the initial configuration and setup ofThingWorx Manufacturing Apps. These tasks are completed from Configurationand Setup.
These tasks include setting up your equipment, alerts, email and text notificationdelivery, and users.
16 ThingWorx Manufacturing Apps Setup and Configuration Guide for Freemium
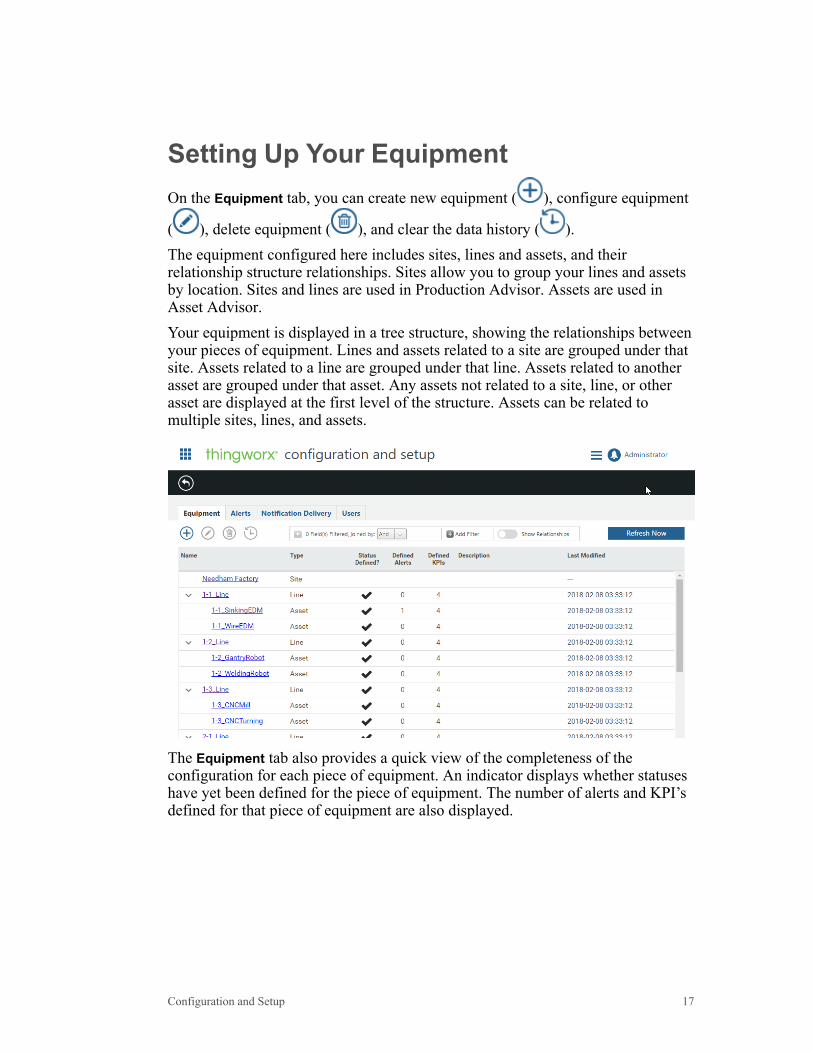
Setting Up Your EquipmentOn the Equipment tab, you can create new equipment ( ), configure equipment
( ), delete equipment ( ), and clear the data history ( ).The equipment configured here includes sites, lines and assets, and theirrelationship structure relationships. Sites allow you to group your lines and assetsby location. Sites and lines are used in Production Advisor. Assets are used inAsset Advisor.Your equipment is displayed in a tree structure, showing the relationships betweenyour pieces of equipment. Lines and assets related to a site are grouped under thatsite. Assets related to a line are grouped under that line. Assets related to anotherasset are grouped under that asset. Any assets not related to a site, line, or otherasset are displayed at the first level of the structure. Assets can be related tomultiple sites, lines, and assets.
The Equipment tab also provides a quick view of the completeness of theconfiguration for each piece of equipment. An indicator displays whether statuseshave yet been defined for the piece of equipment. The number of alerts and KPI’sdefined for that piece of equipment are also displayed.
Configuration and Setup 17

Create New EquipmentTo create a new piece of equipment:
1. From the Equipment tab, click . If you select an existing piece of
equipment in the table before clicking , the new piece of equipment isautomatically created as a child of the selected equipment.
TipUse CTRL + click to deselect a selected row.
2. Select a type, either Asset, Line, or Site. If you are creating a child of anexisting piece of equipment, only allowable child types are displayed. Forexample, if you are creating a child of a line, only assets can be selected. Ifcustom subtypes have been defined for your system, they are also available forselection.
3. Enter a name and optional description. Once the equipment has been created,Name is not editable.
The configuration page for the new piece of equipment displays.
Configure EquipmentThe configuration page displays automatically after a new piece of equipment iscreated. You can also view this page by selecting a piece of equipment on the
Equipment tab, and clicking .From the configuration page, you can add general information about the piece ofequipment, and establish its relationships within the equipment structure. For linesand assets, you can also define their available statuses, additional properties,performance metrics, and alerts. You can delete the piece of equipment you are
viewing by clicking .
18 ThingWorx Manufacturing Apps Setup and Configuration Guide for Freemium
General InformationOn the General Information screen, you can do the following:• Upload an image to depict the piece of equipment.
1. Click Choose File, then select an image file.2. Click Upload to display the image, then click Save.
NoteThe uploaded image is used in the Asset Advisor, where the image sizeshown is 180 x 180 pixels, and in the Production Advisor, where the imagesize shown is 330 x 330 pixels. If the image uploaded is larger than theimage size shown, it is scaled down in locked aspect ratio based on thelarger dimension, resulting in a margin on the lesser dimension. If theimage uploaded is smaller than the image size shown, it is not scaled up,resulting in margins on the appropriate dimensions.
• Enter a description, the equipment’s model and serial number, and location.The Name field is not editable.
• Enter the Planned Operation Time for the equipment by providing values forthe Start Time and Duration. These values are used to calculate the plannedtime when the equipment is available for use. Enter time as HH:MM.
• Enter the KPI Calculation Period. This is the time range over which a keyperformance indicator is calculated to display to others. It is defined inminutes and cannot be set to less than one minute.
Configuration and Setup 19
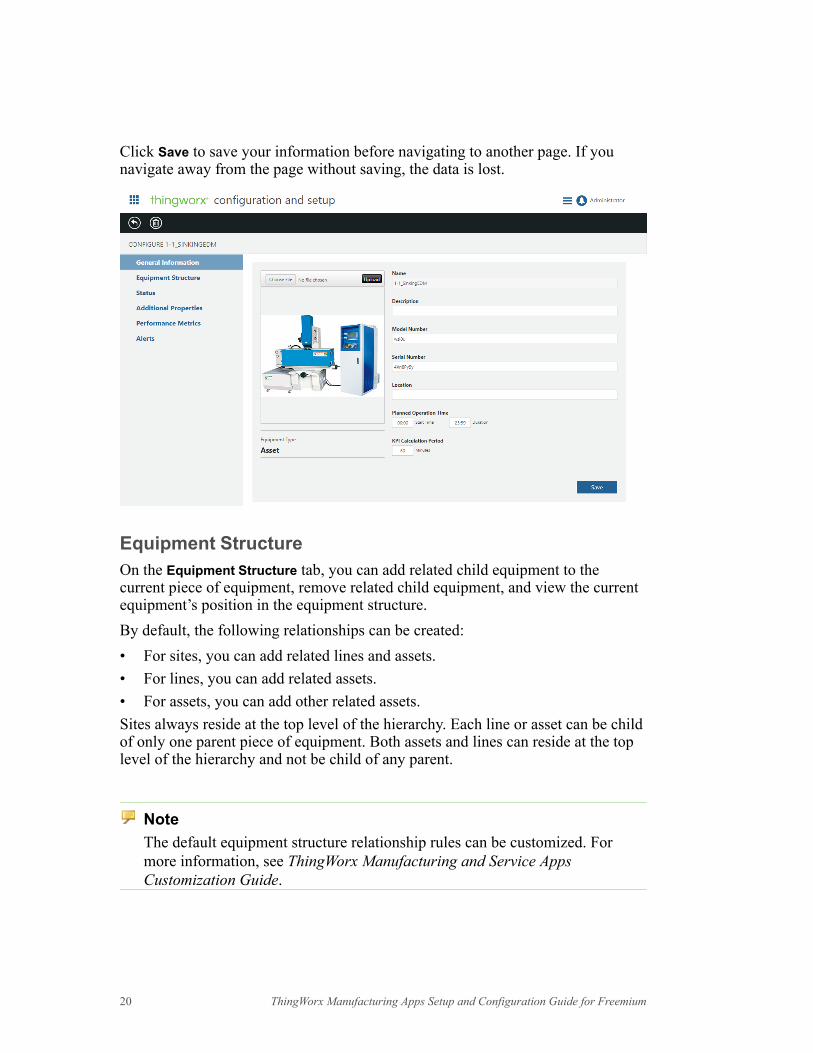
Click Save to save your information before navigating to another page. If younavigate away from the page without saving, the data is lost.
Equipment StructureOn the Equipment Structure tab, you can add related child equipment to thecurrent piece of equipment, remove related child equipment, and view the currentequipment’s position in the equipment structure.By default, the following relationships can be created:• For sites, you can add related lines and assets.• For lines, you can add related assets.• For assets, you can add other related assets.Sites always reside at the top level of the hierarchy. Each line or asset can be childof only one parent piece of equipment. Both assets and lines can reside at the toplevel of the hierarchy and not be child of any parent.
NoteThe default equipment structure relationship rules can be customized. Formore information, see ThingWorx Manufacturing and Service AppsCustomization Guide.
20 ThingWorx Manufacturing Apps Setup and Configuration Guide for Freemium

If the current piece of equipment is already related to other equipment in theequipment structure, the Equipment Structure Position displays the related parentequipment.
To add related child equipment:
1. From the Related Child Equipment table, click .2. The Add Related Child Equipment table lists all available equipment based on
the relationships allowed. Select one or more pieces of equipment.3. Click Add.To remove a relationship:1. Select the related child equipment to be removed.
2. Click .3. On the confirmation window, click OK.
Configuration and Setup 21
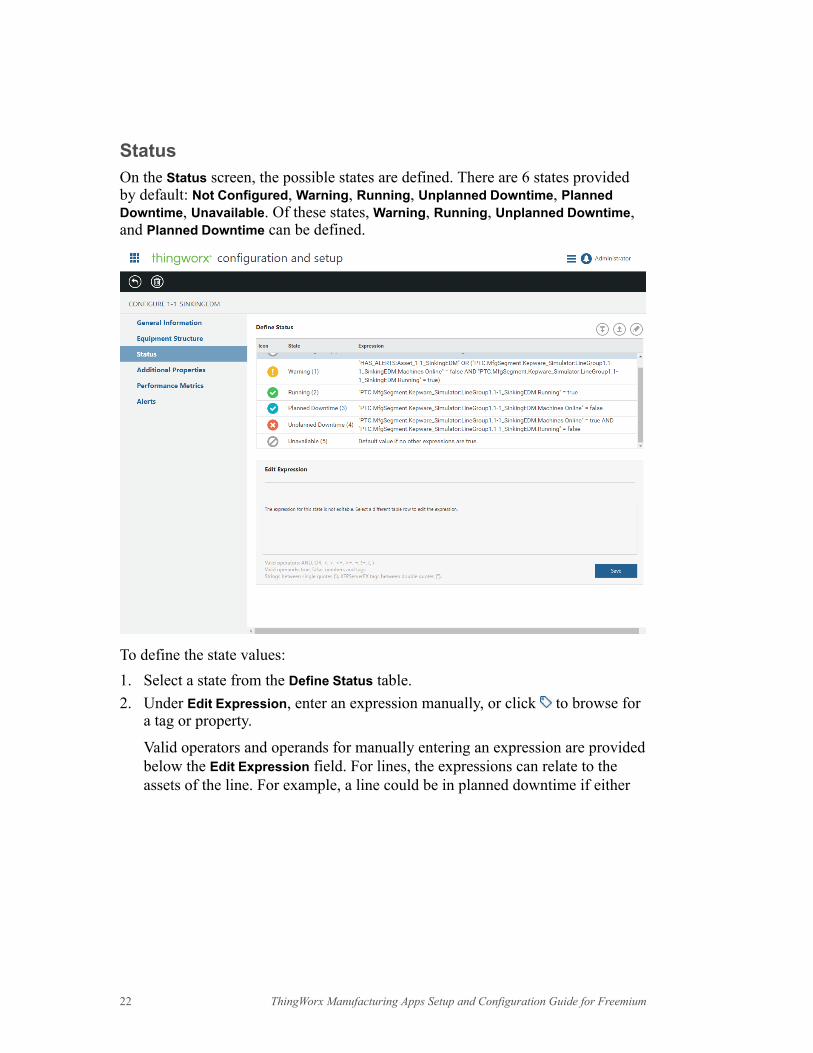
StatusOn the Status screen, the possible states are defined. There are 6 states providedby default: Not Configured, Warning, Running, Unplanned Downtime, PlannedDowntime, Unavailable. Of these states, Warning, Running, Unplanned Downtime,and Planned Downtime can be defined.
To define the state values:1. Select a state from the Define Status table.2. Under Edit Expression, enter an expression manually, or click to browse for
a tag or property.
Valid operators and operands for manually entering an expression are providedbelow the Edit Expression field. For lines, the expressions can relate to theassets of the line. For example, a line could be in planned downtime if either
22 ThingWorx Manufacturing Apps Setup and Configuration Guide for Freemium
of the two assets in the line are in planned downtime. Copy the planned downtime expressions for each appropriate asset, and paste them into the planneddowntime expression for the line.
NoteBy default, Warning is defined to appear when an asset or line has activealerts. A line is set to Running if all of its children are running. Thesedefaults can be changed.
3. Click Save.
To clear the expression defined for a state, select that state, and click .The expressions appear in the table in the order that they are evaluated. After youdefine the states, ensure that they are in the table in the correct order. You can
change that order using the and actions. (The Not Configured andUnavailable states cannot be moved.)If none of the expressions can be evaluated, then the status of the piece ofequipment is Unavailable. If the status does not have an expression defined, it isignored.
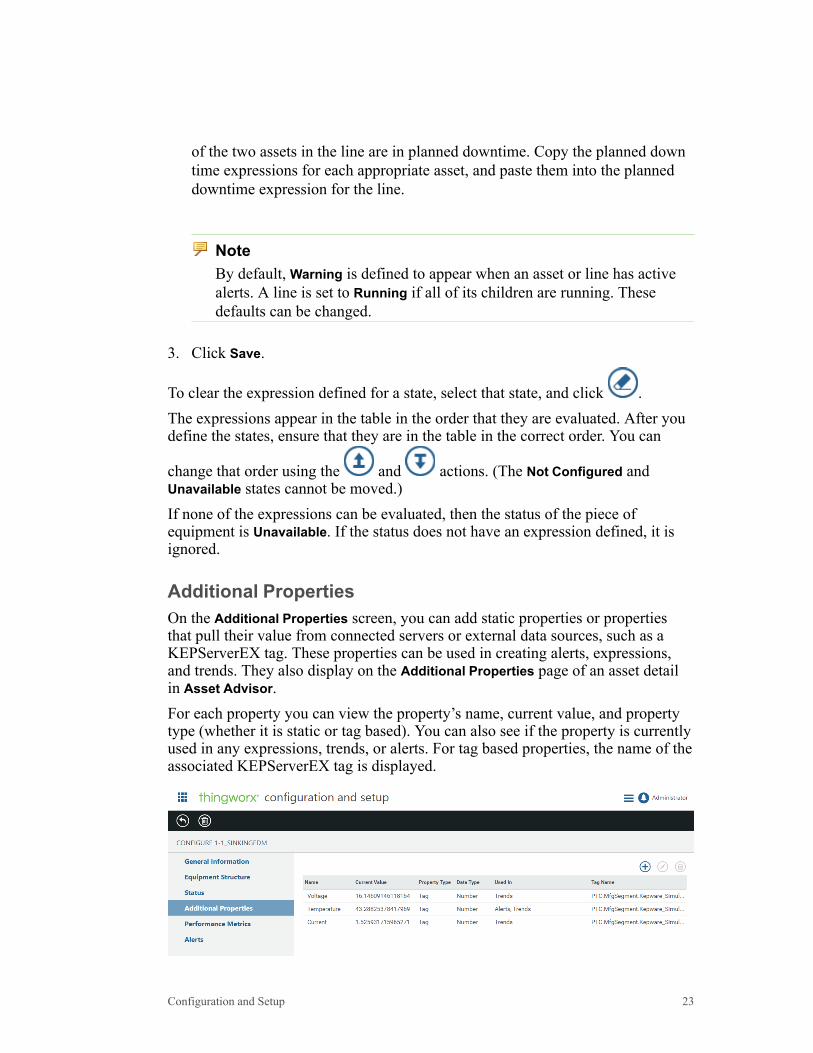
Additional PropertiesOn the Additional Properties screen, you can add static properties or propertiesthat pull their value from connected servers or external data sources, such as aKEPServerEX tag. These properties can be used in creating alerts, expressions,and trends. They also display on the Additional Properties page of an asset detailin Asset Advisor.For each property you can view the property’s name, current value, and propertytype (whether it is static or tag based). You can also see if the property is currentlyused in any expressions, trends, or alerts. For tag based properties, the name of theassociated KEPServerEX tag is displayed.
Configuration and Setup 23

To add a property with a static value:
1. From Additional Properties, click .2. Click Static Values.3. Enter the property name, value, and select the type.4. Click OK.
To add properties based on KEPServerEX tags:
1. From the Additional Properties table, click .2. Click Tag Values.
24 ThingWorx Manufacturing Apps Setup and Configuration Guide for Freemium

3. Select the Equipment Type and Equipment to display the available tags for thatpiece of equipment.• To add a single property, select the tag from the Tags list. The Property
Name defaults to the name of the tag. You can accept the default, or editthe name as desired.
• To add multiple properties, select the tags from the Tags list. The tag nameis used as the property name by default when adding multiple properties.
• Tags already in use by other properties on this equipment are removedfrom the list.
4. Click OK.
Configuration and Setup 25
To edit a property:
1. Select the property in the Additional Properties table and click . A propertythat is used in an expression, alert, or trend cannot be edited. To edit theproperty, those usages must first be removed.
2. Only certain fields can be edited.• The Property Name can be edited only if the property is not used in an
alert, expression, or trend.• The Type of a static property cannot be edited.
• To change the Value of a tag based property, click to remove thecurrent tag value. Select the Equipment Type and Equipment, then selectthe new tag.
3. Click OK. If you select a different property in the table before clicking OK, anyedits you have made are lost.
To delete properties:1. From the Additional Properties table, select one or more properties.
2. Click , then click OK on the confirmation message.
If the properties were used in alerts, those alerts are deleted. If the propertieswere used in expressions or trends, the expressions and trends are not deleted,but will no longer function.
26 ThingWorx Manufacturing Apps Setup and Configuration Guide for Freemium

Performance MetricsOn the Performance Metrics screen, you can define indicator thresholds for keyperformance indicators (KPIs), and parameters for performance calculations.Production Advisor and Asset Advisor display the performance metrics definedfor lines and assets.
The default calculation for each metric can be viewed by clicking next to eachindicator.To configure custom performance metrics for your equipment, enter informationfor your performance thresholds and calculations as described in the examplebelow, and detail the required equations.
TipQuality and Performance can be overridden by clicking and selecting aKEPServerEX tag directly.
Configuration and Setup 27
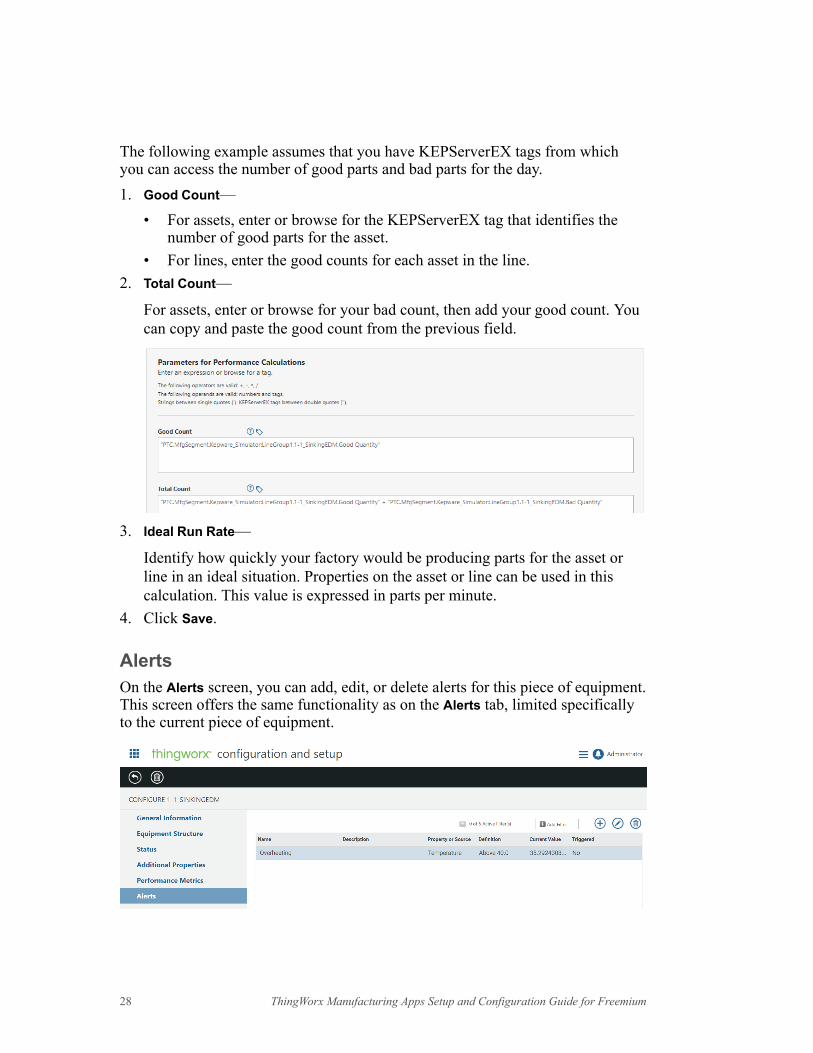
The following example assumes that you have KEPServerEX tags from whichyou can access the number of good parts and bad parts for the day.1. Good Count—
• For assets, enter or browse for the KEPServerEX tag that identifies thenumber of good parts for the asset.
• For lines, enter the good counts for each asset in the line.2. Total Count—
For assets, enter or browse for your bad count, then add your good count. Youcan copy and paste the good count from the previous field.
3. Ideal Run Rate—
Identify how quickly your factory would be producing parts for the asset orline in an ideal situation. Properties on the asset or line can be used in thiscalculation. This value is expressed in parts per minute.
4. Click Save.
AlertsOn the Alerts screen, you can add, edit, or delete alerts for this piece of equipment.This screen offers the same functionality as on the Alerts tab, limited specificallyto the current piece of equipment.
28 ThingWorx Manufacturing Apps Setup and Configuration Guide for Freemium
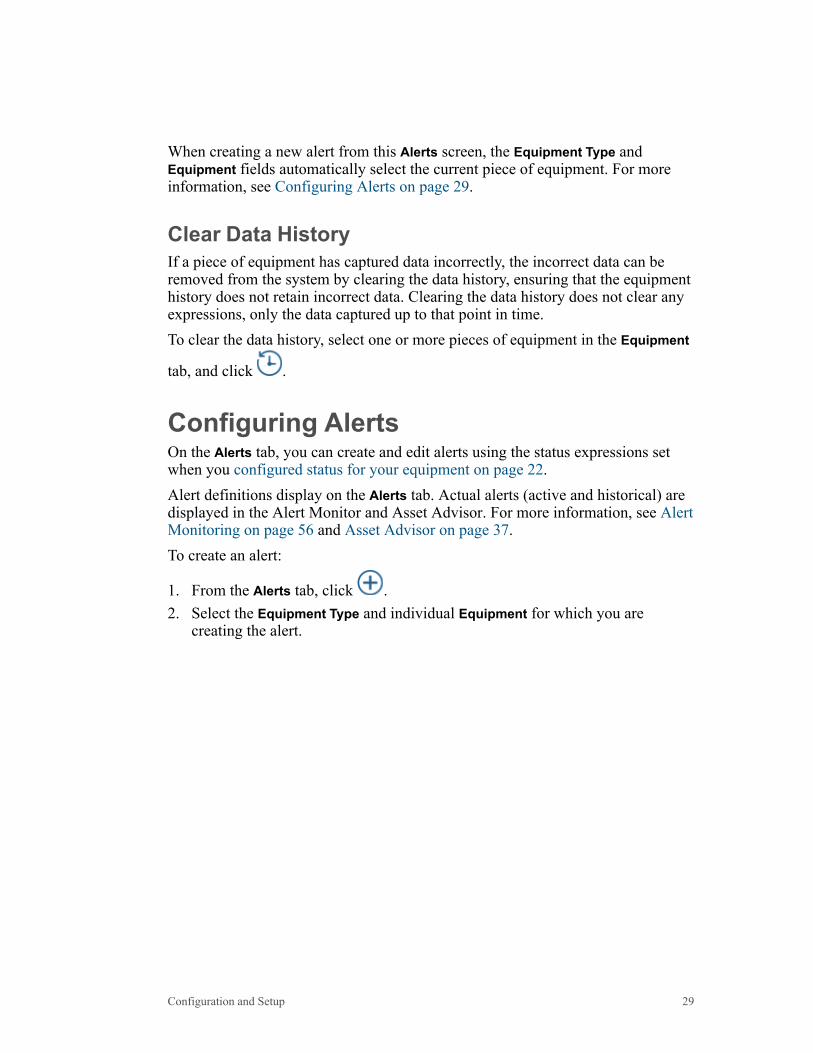
When creating a new alert from this Alerts screen, the Equipment Type andEquipment fields automatically select the current piece of equipment. For moreinformation, see Configuring Alerts on page 29.
Clear Data HistoryIf a piece of equipment has captured data incorrectly, the incorrect data can beremoved from the system by clearing the data history, ensuring that the equipmenthistory does not retain incorrect data. Clearing the data history does not clear anyexpressions, only the data captured up to that point in time.To clear the data history, select one or more pieces of equipment in the Equipment
tab, and click .
Configuring AlertsOn the Alerts tab, you can create and edit alerts using the status expressions setwhen you configured status for your equipment on page 22.Alert definitions display on the Alerts tab. Actual alerts (active and historical) aredisplayed in the Alert Monitor and Asset Advisor. For more information, see AlertMonitoring on page 56 and Asset Advisor on page 37.To create an alert:
1. From the Alerts tab, click .2. Select the Equipment Type and individual Equipment for which you are
creating the alert.
Configuration and Setup 29
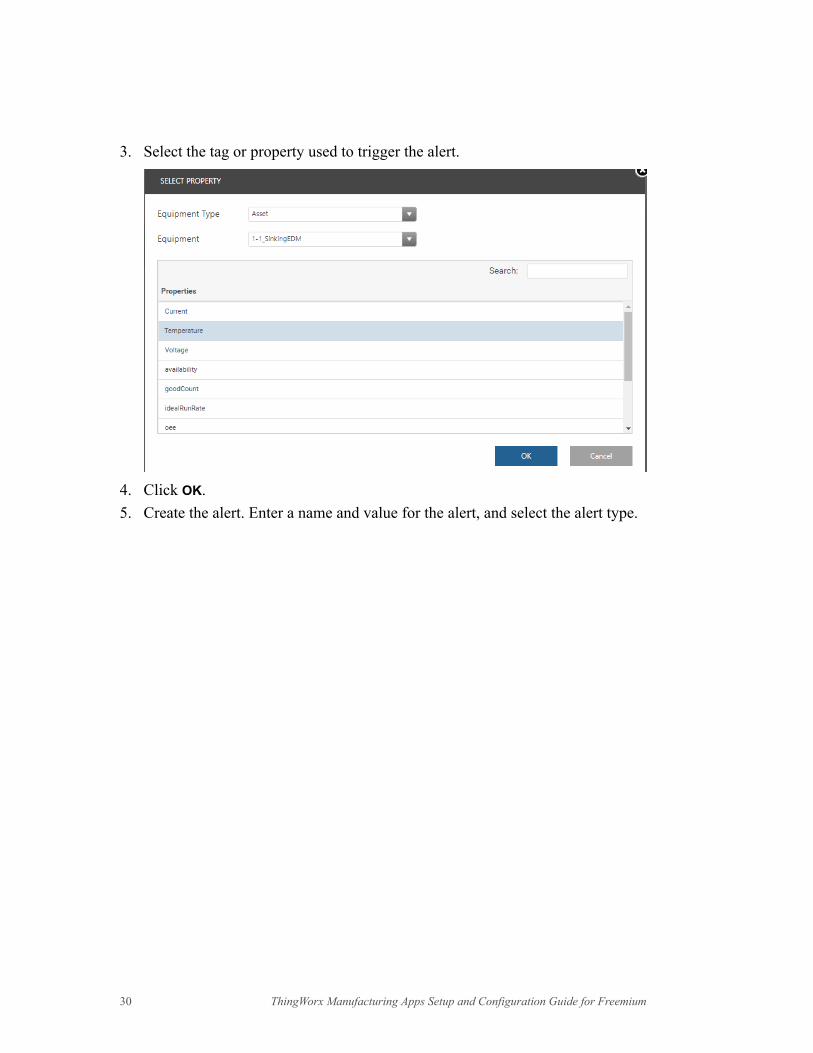
3. Select the tag or property used to trigger the alert.
4. Click OK.5. Create the alert. Enter a name and value for the alert, and select the alert type.
30 ThingWorx Manufacturing Apps Setup and Configuration Guide for Freemium
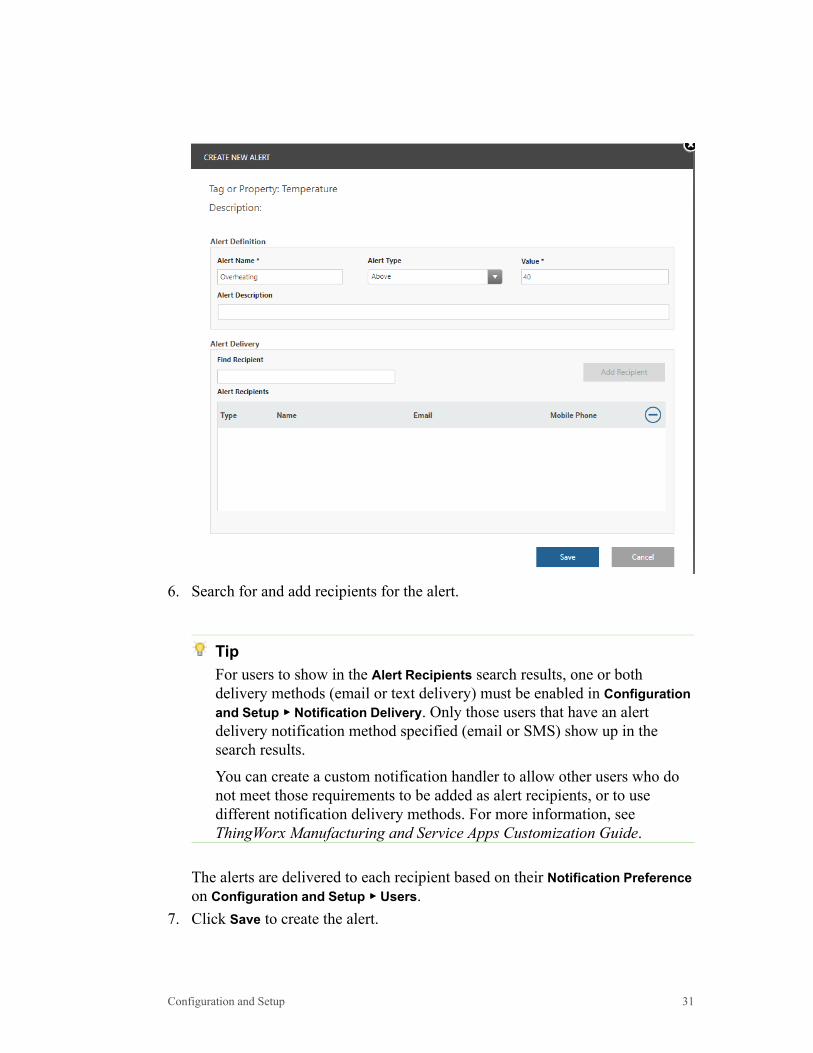
6. Search for and add recipients for the alert.
TipFor users to show in the Alert Recipients search results, one or bothdelivery methods (email or text delivery) must be enabled in Configurationand Setup ▶▶ Notification Delivery. Only those users that have an alertdelivery notification method specified (email or SMS) show up in thesearch results.
You can create a custom notification handler to allow other users who donot meet those requirements to be added as alert recipients, or to usedifferent notification delivery methods. For more information, seeThingWorx Manufacturing and Service Apps Customization Guide.
The alerts are delivered to each recipient based on their Notification Preferenceon Configuration and Setup ▶▶ Users.
7. Click Save to create the alert.
Configuration and Setup 31
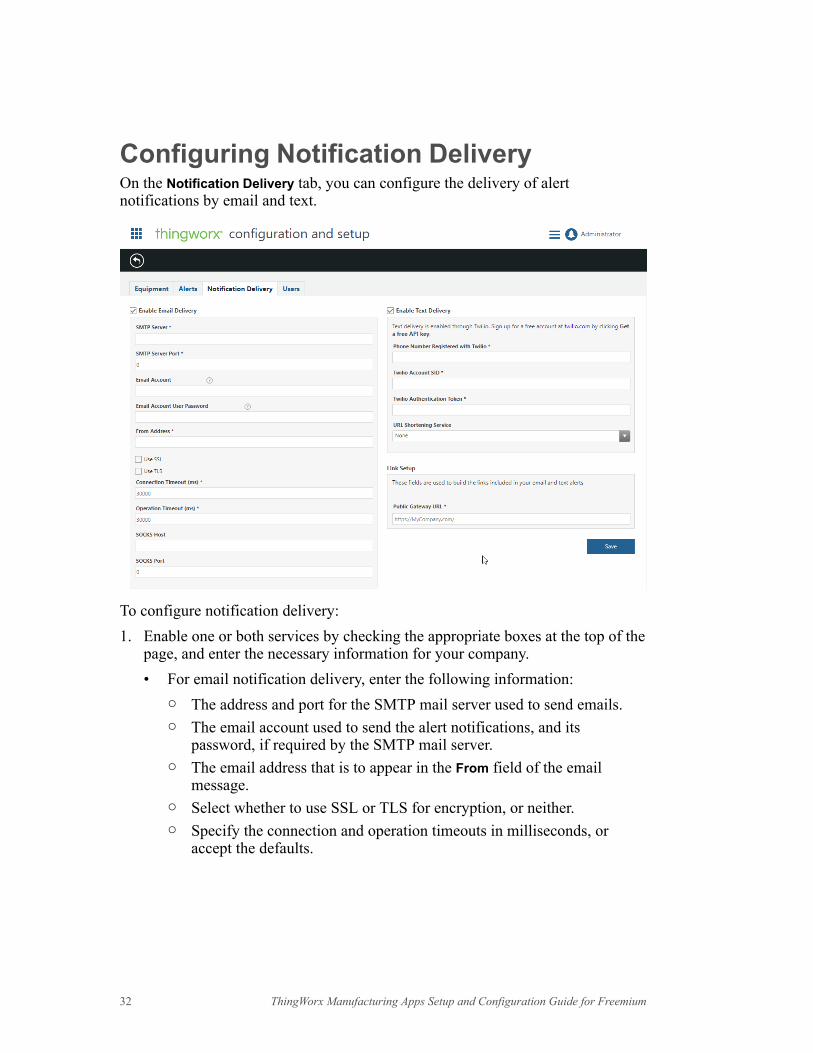
Configuring Notification DeliveryOn the Notification Delivery tab, you can configure the delivery of alertnotifications by email and text.
To configure notification delivery:1. Enable one or both services by checking the appropriate boxes at the top of the
page, and enter the necessary information for your company.• For email notification delivery, enter the following information:
○ The address and port for the SMTP mail server used to send emails.○ The email account used to send the alert notifications, and its
password, if required by the SMTP mail server.○ The email address that is to appear in the From field of the email
message.○ Select whether to use SSL or TLS for encryption, or neither.○ Specify the connection and operation timeouts in milliseconds, or
accept the defaults.
32 ThingWorx Manufacturing Apps Setup and Configuration Guide for Freemium
○ Specify the SOCKS proxy server host name and the port for theSOCKS proxy server, if one is used with the SMTP mail server.
• For text notification delivery:○ To use texts to send email notifications, sign up for a free account at
twilio.com. The fields here should match the fields that appear afteryou complete your sign up with Twilio.
2. In the Link Setup section, specify the public gateway portion (basic http:address to the server) of the URL for links to your system.
For example, if the Public Gateway URL value is specified as https://acme.com/, then this URL:
http://10.155.20.100:8080/Thingworx/Runtime/index.html#master=PTC.Factory.AlertMonitoring.Master&mashup=PTC.Factory.AlertManager.AlertMonitor&selectHistory=false&sourceProperty=sensor1&source=Asset_Pump1&selectSummary=true
appears as a hyperlink in the email message as:
https://acme.com/Thingworx/Runtime/index.html#master=PTC.Factory.AlertMonitoring.Master&mashup=PTC.Factory.AlertManager.AlertMonitor&selectHistory=false&sourceProperty=sensor1&source=Asset_Pump1&selectSummary=true
3. Click Save.
Configuration and Setup 33

Configuring UsersOn the Users tab, you can configure the users of your system and their assignedroles. The assigned role determines the areas of the apps which are accessible tothe user.
To create a user:
1. From the Users tab, click .
2. Enter profile information for the user. Keep the following in mind:• User—
○ The User Name must be unique.
34 ThingWorx Manufacturing Apps Setup and Configuration Guide for Freemium
○ The Language selected determines the display language for the user.• Contact Information—
○ The Notification Preference selections for each user determine if andhow alerts are delivered to that user. The Email and Mobile Phonevalues entered are used for the Email and SMS notification methods,respectively.
○ The Mobile Phone number is required if SMS is selected for the user’sNotification Preference. Use the format: +<number withinternational code>
• Security—Passwords are case sensitive and must contain at least 15characters.
• Role Assignment—○ You can assign multiple roles for a user. The roles determine which
areas of the apps are accessible by the user. If a user is assigned tomultiple roles, the result is permissions common to all roles – not theunion of the role permissions.
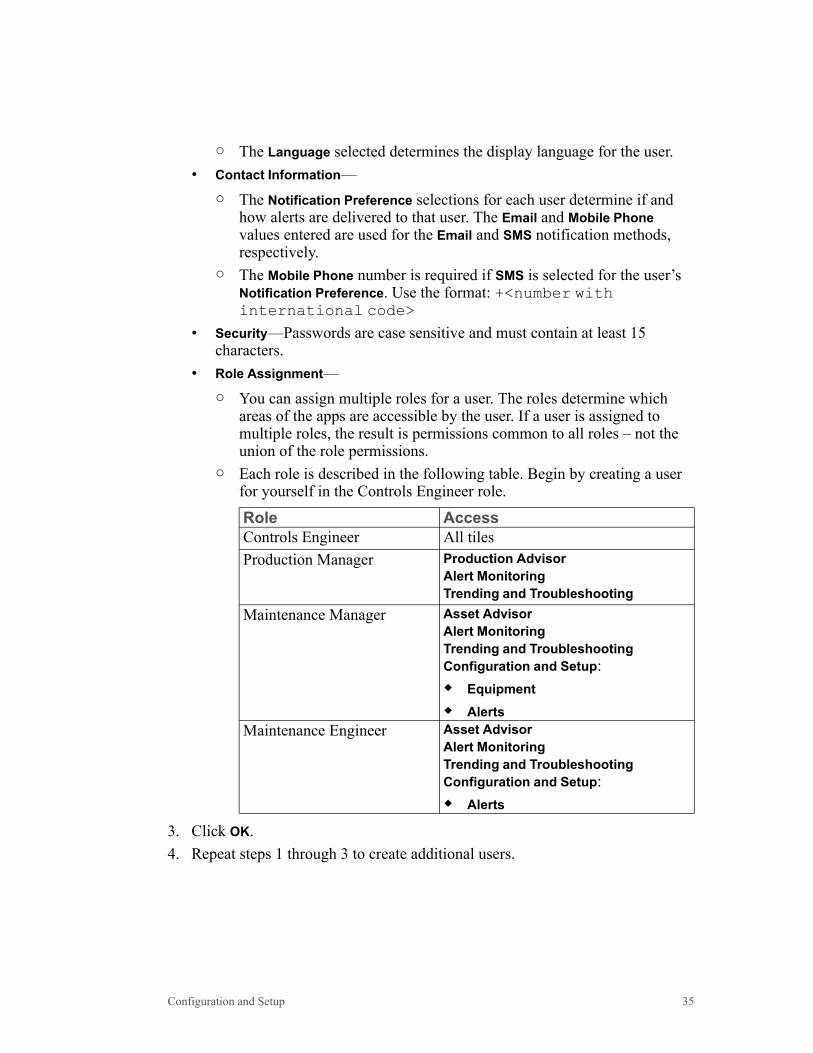
○ Each role is described in the following table. Begin by creating a userfor yourself in the Controls Engineer role.
Role AccessControls Engineer All tilesProduction Manager Production Advisor
Alert MonitoringTrending and Troubleshooting
Maintenance Manager Asset AdvisorAlert MonitoringTrending and TroubleshootingConfiguration and Setup:◆ Equipment◆ Alerts
Maintenance Engineer Asset AdvisorAlert MonitoringTrending and TroubleshootingConfiguration and Setup:◆ Alerts
3. Click OK.4. Repeat steps 1 through 3 to create additional users.
Configuration and Setup 35

3Apps Overview
Asset Advisor............................................................................................................37Controls Advisor........................................................................................................42Production Advisor ....................................................................................................53Alert Monitoring.........................................................................................................56Trending and Troubleshooting ....................................................................................58
The ThingWorx Manufacturing Apps console can include one or more of thefollowing tiles. The tiles you see depend upon your user role, as well as yourcompany’s license and implementation of the product.• Asset Advisor• Controls Advisor• Production Advisor• Alert Monitoring• Trending and Troubleshooting• Configuration and Setup
The following sections provide information on each of the tiles, except forConfiguration and Setup, which was covered in the previous chapter.
36 ThingWorx Manufacturing Apps Setup and Configuration Guide for Freemium
Asset Advisor
Asset Advisor monitors the health and status of your equipment, and providesreal-time feedback of sensor details, and alerts. This allows you to understand howyour equipment is being utilized, how it performs, and ultimately improves theefficiency of that equipment.The following sections highlight features of Asset Advisor.
Asset List• The asset list page provides a summary view of all assets in the system,
including their status and any automatically detected threshold alerts.• Filter the list to show only those assets in certain states, or by model number,
related site, or related line.• Assets can be sorted by Name, Model Number, Serial Number, or Criticality.• At a glance, view the asset status and threshold alerts for the asset. Weekly
totals are also displayed, including both active and historical alerts. If there are
currently active threshold alerts, the alert icon displays a red dot ( ).
Apps Overview 37

• Click the Alerts link in the status message to open the alert monitor pagedisplaying detailed information for the alerts.
• Click on the asset name or image to view the asset in more detail.
Asset DetailYou can further investigate asset issues on the detail page of the asset.
• Switch between viewing Performance, Monitored Properties, or AdditionalProperties.
• Optionally, perform actions on assets remotely using Remote Access and FileTransfer, and view File Transfer History (Developer Edition license only). Formore information, see Remote Access and Control on page 61.
• View general asset profile information such as model and serial numbers.
• View asset alerts. Click to open Alert Monitoring for additional details.
38 ThingWorx Manufacturing Apps Setup and Configuration Guide for Freemium
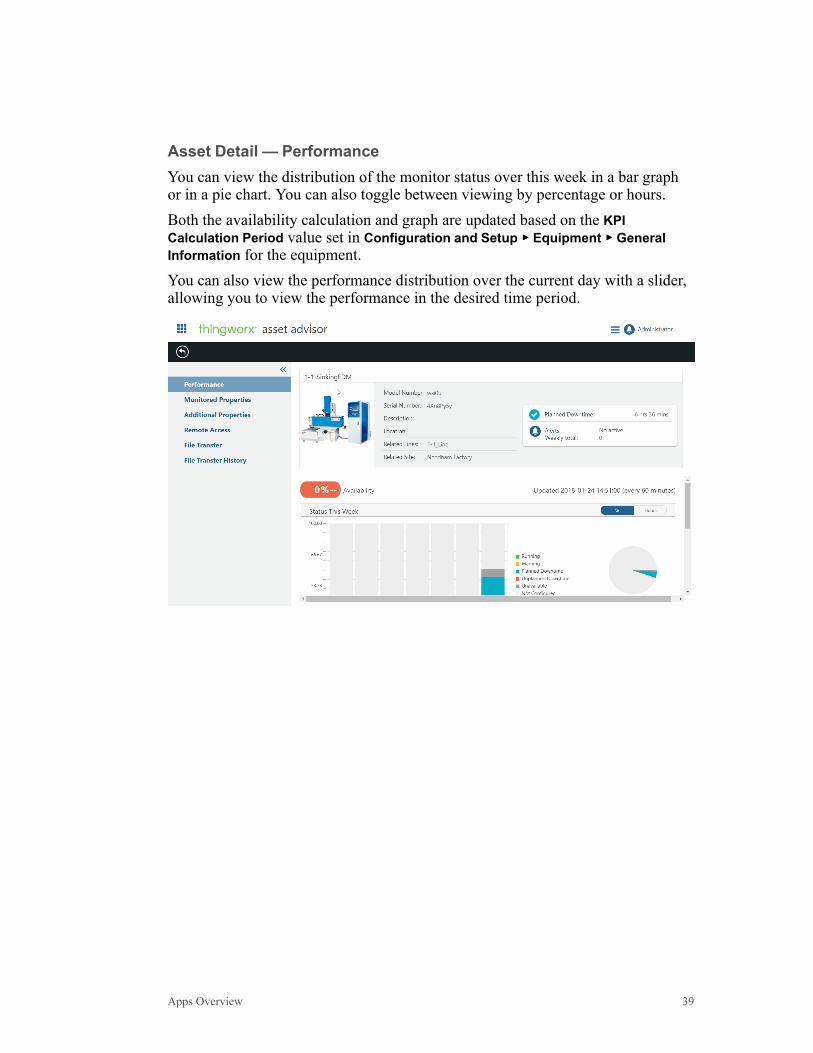
Asset Detail — PerformanceYou can view the distribution of the monitor status over this week in a bar graphor in a pie chart. You can also toggle between viewing by percentage or hours.Both the availability calculation and graph are updated based on the KPICalculation Period value set in Configuration and Setup ▶▶ Equipment ▶▶ GeneralInformation for the equipment.You can also view the performance distribution over the current day with a slider,allowing you to view the performance in the desired time period.
Apps Overview 39

Asset Detail — Monitored PropertiesView real-time data from all sensors configured on the asset and their currentreadings. All numerical properties defined on the asset display in MonitoredProperties.
40 ThingWorx Manufacturing Apps Setup and Configuration Guide for Freemium

Asset Detail — Additional PropertiesAdditional properties configured on the asset display here. These properties areconfigured in Configuration and Setup ▶▶ Equipment.
Apps Overview 41
Controls Advisor
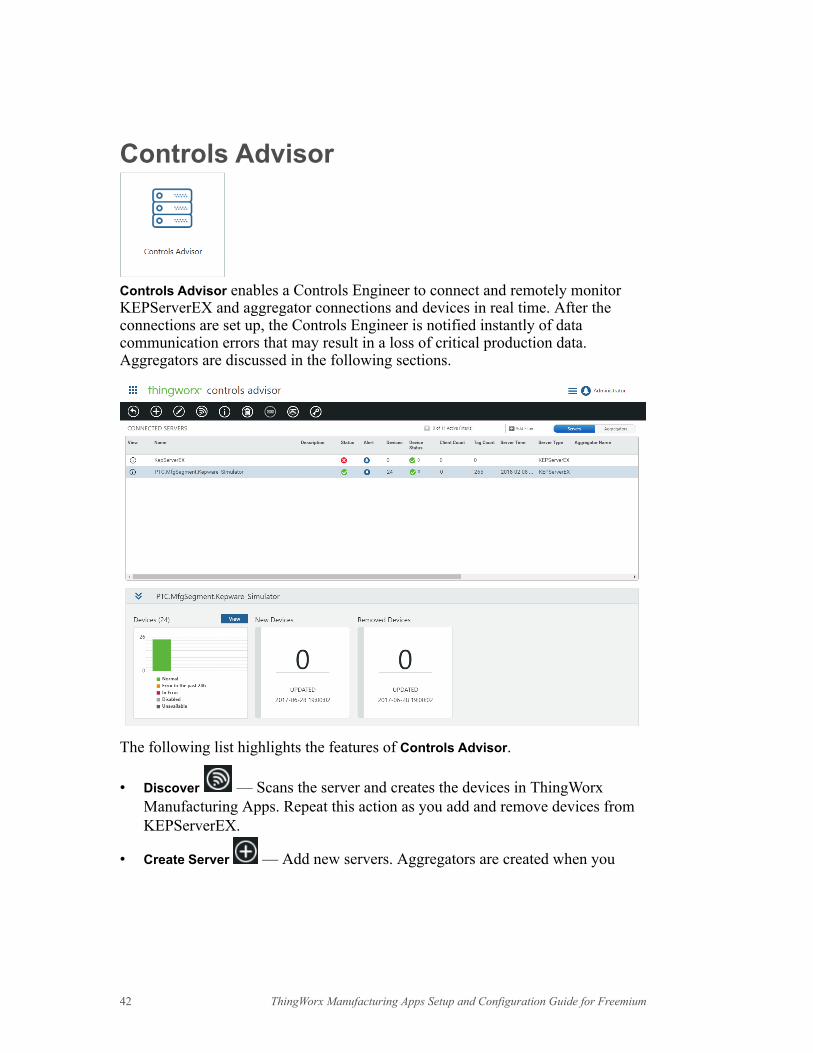
Controls Advisor enables a Controls Engineer to connect and remotely monitorKEPServerEX and aggregator connections and devices in real time. After theconnections are set up, the Controls Engineer is notified instantly of datacommunication errors that may result in a loss of critical production data.Aggregators are discussed in the following sections.
The following list highlights the features of Controls Advisor.
• Discover — Scans the server and creates the devices in ThingWorxManufacturing Apps. Repeat this action as you add and remove devices fromKEPServerEX.
• Create Server —Add new servers. Aggregators are created when you
42 ThingWorx Manufacturing Apps Setup and Configuration Guide for Freemium
select Legacy and Non-Kepware OPC servers from the Server Type drop-downlist on the Create Server window.
• Switch the CONNECTED SERVERS table view between Servers andAggregators using the toggle button in the upper right corner of the page. Formore information on aggregators, see the following sections.
Connecting KEPServerEX to ThingWorx
Creating a Server ConnectionKEPServerEX can be used to directly connect to devices (direct connection), or asan aggregator to connect to legacy KEPServerEX and 3rd party OPC Server. TheControls Advisor provides the capability to monitor all KEPServerEX and 3rdparty OPC servers connected directly or using an aggregator to the ThingWorxinstance in a single page.In order to make a connection between KEPServerEX and ThingWorx, anindustrial gateway must be created in ThingWorx. The industrial gateway is aThingWorx thing that is used to establish the connection information betweenThingWorx and KEPServerEX as it holds some of the connection information.In addition to the industrial gateway thing, a remote thing is created. The remotething represents the server (KEPServerEX or 3rd party OPC server) beingmonitored within Controls Advisor. This remote thing holds the propertiesmapped to a tag. Both things are automatically created when creating a connectionfrom the app.Finally, the project property on the KEPServerEX server connecting toThingWorx must then be configured to establish the connection to the remotething using the industrial gateway.The first time the Controls Engineer logs into the app, a check is made todetermine whether or not a server connection already exists.
• If a server does not exist, the Controls Engineer is guided to create his firstconnection to a KEPServerEX.
• If a server does exist, the Controls Engineer is taken directly to the consolepage.
During the initial flow, the Controls Engineer is asked for a server name, the typeof connection (aggregator or direct connection to devices), and informationrequired to configure its KEPServerEX project properties. The Controls Engineeris then automatically directed to the server list page where he can monitor theserver.
Apps Overview 43

To connect to additional KEPServerEX servers, a Create Server action is availablein the action toolbar of the server list page. This enables the Controls Engineer tocreate a remote thing in ThingWorx representing the connection to a specificKEPServerEX server. Selecting this action opens a window where the followinginformation can be specified.
• Server Name— This corresponds to the remote thing name that is displayed inControls Advisor.
• Description— Enter an optional description.• Server Type— Select the type of server being created, KEPServerEX or Legacy
and Non-Kepware OPC servers.
The Controls Engineer is then presented with instructions on how to configure theproject properties on the KEPServerEX server. These instructions can be printedfor future reference.
NoteControls Advisor does not support cases where KEPServerEX is connecteddirectly to devices and used as an aggregator simultaneously.
44 ThingWorx Manufacturing Apps Setup and Configuration Guide for Freemium

Displaying Connected ServersWhen accessing Controls Advisor, the Controls Engineer is presented with a pagethat displays server information.There are two views in this page.
• Server—Displays servers connected to devices (directly connected or thru anaggregator).
• Aggregators—Displays Servers that are used as aggregators.
Note• The first server in the list is selected by default when accessing the page.• It is not possible to deselect items in the list.
Understanding AggregatorsAn aggregator server is required for non-Kepware servers and KEPServerEXservers prior to version 6.2. The graphic below describes the relationships amongthe server and devices.
Apps Overview 45
Working with AggregatorsDiscovering Remote ServersWhen creating a server connection and selecting Legacy and Non-Kepware OPCservers from the Server Type drop-down list in the Create Server window, thesystem assumes that the KEPServerEX has remote OPC or legacy KEPServerEXservers connected as OPC devices.The action Discover Legacy KEPServerEX and OPC Servers is available in theAggregators view of Controls Advisor. Selecting a KEPServerEX aggregator andinvoking this action, produces the following result.The list of remote servers associated to the selected aggregate server is scannedand compared to the list of remote servers already discovered.
• If a remote server of the same name is already in the list it is kept.• If a remote server is not in the list, but on the aggregate, it is added.• If a remote server is in the list, but not on the aggregate, it is deleted from
ThingWorx.
NoteA server name must be unique in ThingWorx. If there is a uniqueness conflict,the server is ignored and the next remote server is created. At the end of thediscovery, a system message displays the path of the ignored remote serversand explains why they were not created. You must then rename the servers inKepware and re-discover them.
Editing a 3rd party OPC Remote Server3rd party OPC vendors have their own tag structure that can be different from theKEPServerEX tag structure. When a remote server is connected via an aggregator,KEPServerEX, system tags cannot be bound automatically. In the Edit Serverwindow, the Controls Engineer is able to manually map the following system tagsto any data point of the selected remote server. The following system tags can bemapped.
• Client Count (integer)• Tag Count (integer)• Current Server Time (date)When browsing the remote server, the tag picker automatically selects the remoteserver, the tags with improper types are automatically filtered out.
46 ThingWorx Manufacturing Apps Setup and Configuration Guide for Freemium
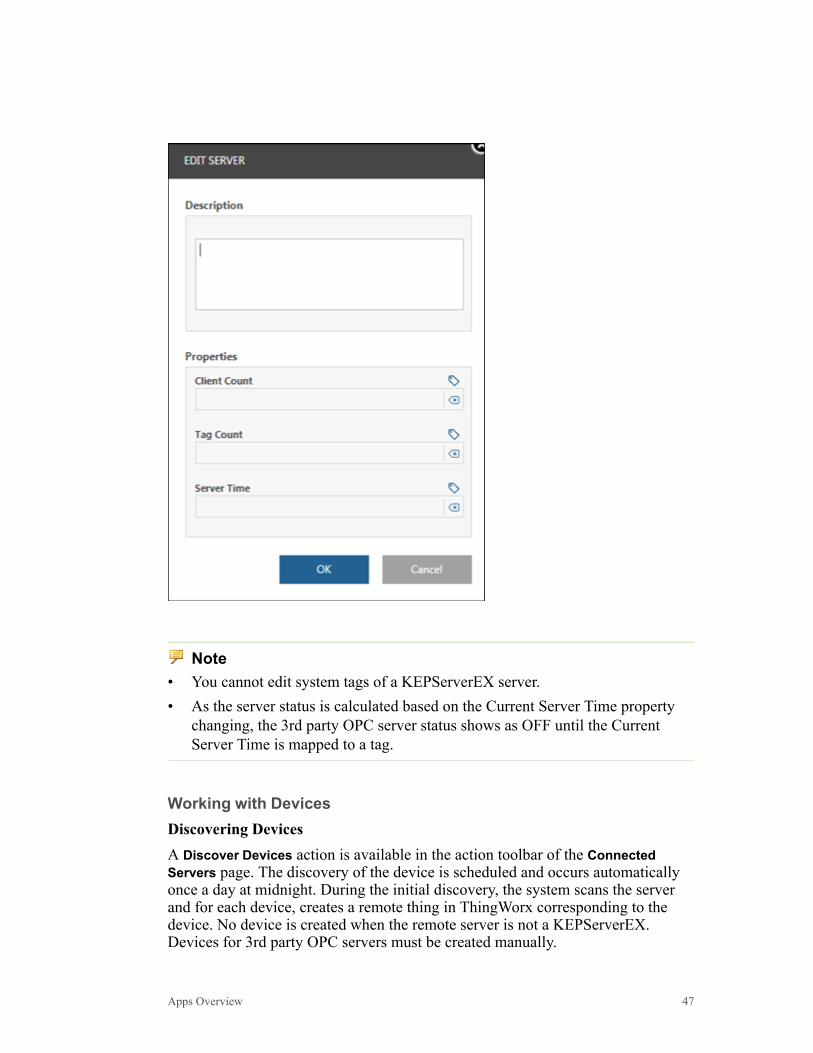
Note• You cannot edit system tags of a KEPServerEX server.• As the server status is calculated based on the Current Server Time property
changing, the 3rd party OPC server status shows as OFF until the CurrentServer Time is mapped to a tag.
Working with DevicesDiscovering DevicesA Discover Devices action is available in the action toolbar of the ConnectedServers page. The discovery of the device is scheduled and occurs automaticallyonce a day at midnight. During the initial discovery, the system scans the serverand for each device, creates a remote thing in ThingWorx corresponding to thedevice. No device is created when the remote server is not a KEPServerEX.Devices for 3rd party OPC servers must be created manually.
Apps Overview 47

Discoveries scan the list of devices on the server and compare it to the list ofdevices already discovered.
• If the device of the same Device Name is already in the list, it is kept.• If a device is not in the list but on the server, it is added.• If a device is in the list, but not on the server, it is deleted from ThingWorx.When a device is deleted, the device is deleted in ThingWorx and all dataassociated to the thing properties are deleted as well. The binding is removed andtags are unsubscribed. After discovery is complete, a warning indicator isdisplayed in the Devices column of the servers list indicating that a changeoccurred (some devices were added or removed during last discovery).You are notified in two widgets about the number of devices added or removed.
• The number of New Devices corresponds to the total number of devices addedduring the discovery. This value is persisted until the next discovery.
• The number of Removed Devices corresponds to the total number of devicesremoved during the discovery. This value is persisted until the next discovery.
• The date is the date of the last discovery.
TipThe widgets are not refreshed until you select another row/server.
The devices that have been discovered on the server are displayed in the Deviceswidget shown in the following figure. Each bar represents the number of deviceswithin a specific status for the devices connected (already discovered) to theserver.
• Normal• Errors in the past 24h• In Error• Disabled• Unavailable
48 ThingWorx Manufacturing Apps Setup and Configuration Guide for Freemium

After each discovery, the Devices widget is updated along with the New Devicesand the Removed Devices widgets. A View button is available in the Deviceswidget to access the device list page.
NoteWhen a device is renamed in KEPServerEX, it is not automatically renamed inthe app. Upon next discovery, the device is removed and a new device with thenew name is added.
Creating Devices
A Create Device action is available in both the server view page and thedevice list page. This action is only valid when the selected server is a remote 3rdparty OPC Server. You can only create devices manually by selecting the CreateDevice action.
Tip• The Create Device action is disabled when selecting a KEPServerEX server
(remote or not).• The Discover Devices action is disabled when selecting a remote 3rd party
OPC Server.
Apps Overview 49

When creating a device, you can specify or map pre-defined properties to tags bybrowsing the remote server using the tag picker (only the selected remote servercan be browsed).
NoteIf a value is entered manually, it becomes a static value for the property. Noautomatic binding occurs if a path to a tag is entered.
You cannot edit the fields. A Clear action is available to clear the tag name. Afterselecting OK, the binding is done, the table is refreshed, and the values appear inthe table. Unless there is a mapping for those tags, the values appear blank in theserver list page and in the device list page.Editing DevicesDevices can be edited from the device list page. When selecting a device and theEdit Device action, the window displays all the properties associated to thedevices. Any device can be edited, and the tag mapping of the device propertieschanged. However, the name of the device cannot be edited.
50 ThingWorx Manufacturing Apps Setup and Configuration Guide for Freemium

Deleting a Server ConnectionThe Controls Engineer can delete a server from the server list. A pop-up appearsto confirm the action. When deleting a server, all ThingWorx artifacts with respectto the server are deleted, including devices. All local bindings from the remoteserver thing properties to any asset, line, or trend properties are also deleted.When you delete a remote server connected to an aggregator, the followingoccurs.
• All devices that are associated to the remote server are deleted.• All local bindings from the remote servers thing properties to any asset, line,
or trend properties are also deleted.When you delete an aggregator, the following occurs.
Apps Overview 51
• All remote servers related to the aggregator are deleted.• All devices that are associated to each remote server are deleted.• All local bindings from the remote servers thing properties to any asset, line,
or trend properties are also deleted.
NoteData associated to the server properties that are stored in the ThingWorxdatabase are not deleted and are re-used in trends if a new remote thing iscreated with the same name.
52 ThingWorx Manufacturing Apps Setup and Configuration Guide for Freemium

Production Advisor
With Production Advisor, plant managers have the ability to view real-timeoperational performance data that is unified from disparate sources. This enablesfast-informed decisions with contextual information, as well as the ability to drilldown for root cause analysis. Sample pages are shown in the following figures.
Production Advisor Features• Use the filter options at the top of the page to create filters for the lines and
assets that display.
○ Add multiple filters.○ Determine the logical operator between created filters.○ Display related lines or assets with the Show Relationships option.
• Click the view production history data icon for detailed information onthe equipment, such as performance and status history.
Apps Overview 53
○ On the KPI Trends and Status History graphs, click and drag to zoom inand double-click to zoom out. Synchronize Zoom means when you zoom inon one graph, the other graph zooms to the same time frame.
○ Navigate back in time using preset time ranges to show up to a week ofdata.
○ Refresh data on the graphs manually or automatically using the RefreshNow option.
• On the KPI Trends graph, show and hide change events using the Displaychange events check box. These events are flagged on the graph and listedbelow the check box.
TipThe system can display the following types of change in the KPI Trendsgraph.
○ Change to the ideal run rate value○ Change to KPI calculation period value○ Change to KPI parameter expressions (good count, total count, ideal
run rate, quality, and performance)
54 ThingWorx Manufacturing Apps Setup and Configuration Guide for Freemium
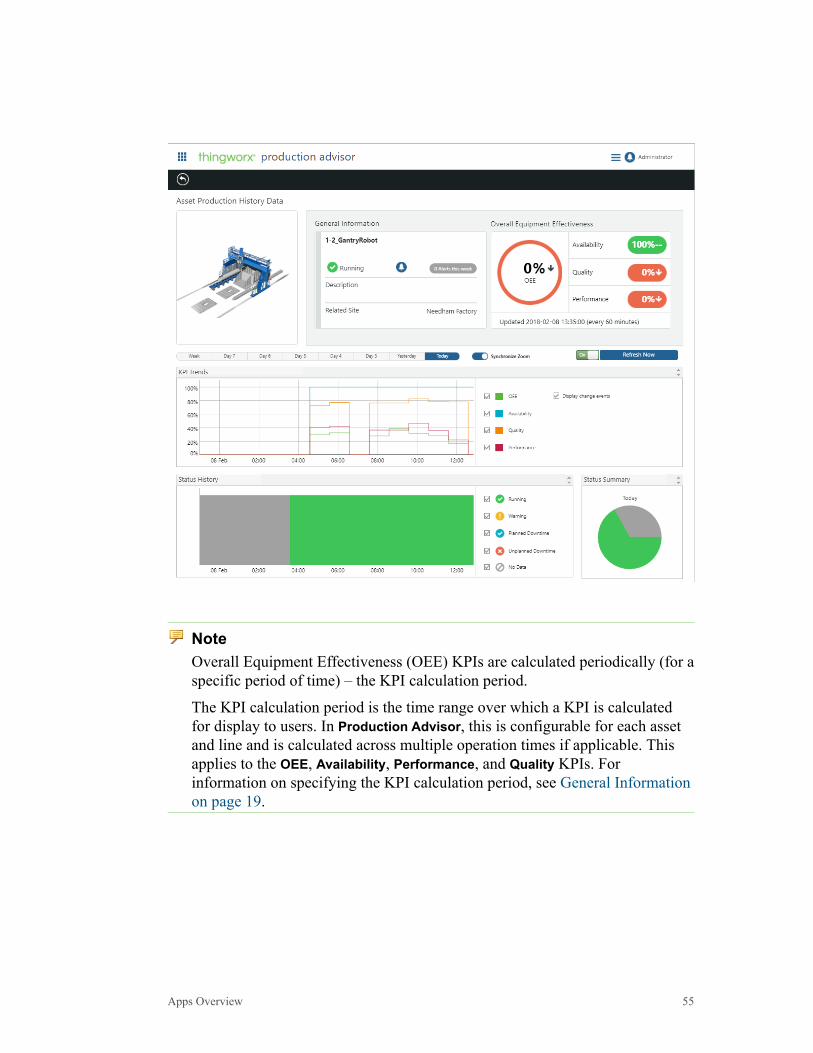
NoteOverall Equipment Effectiveness (OEE) KPIs are calculated periodically (for aspecific period of time) – the KPI calculation period.
The KPI calculation period is the time range over which a KPI is calculatedfor display to users. In Production Advisor, this is configurable for each assetand line and is calculated across multiple operation times if applicable. Thisapplies to the OEE, Availability, Performance, and Quality KPIs. Forinformation on specifying the KPI calculation period, see General Informationon page 19.
Apps Overview 55
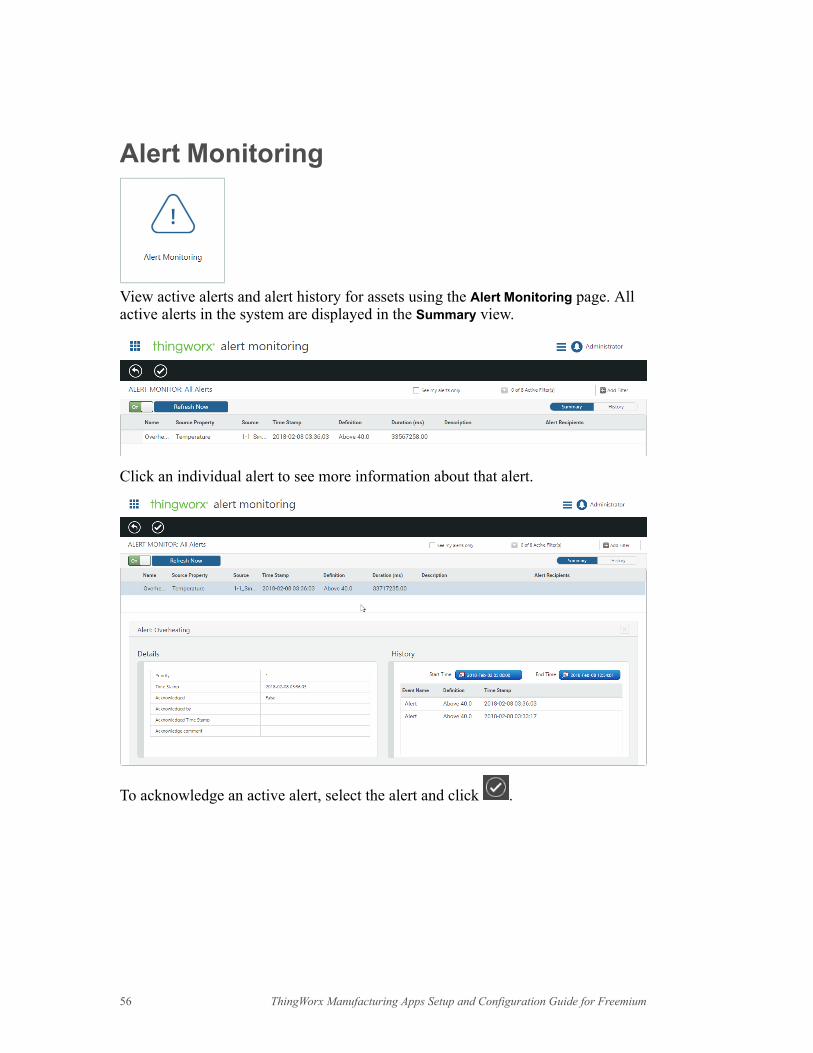
Alert Monitoring
View active alerts and alert history for assets using the Alert Monitoring page. Allactive alerts in the system are displayed in the Summary view.
Click an individual alert to see more information about that alert.
To acknowledge an active alert, select the alert and click .
56 ThingWorx Manufacturing Apps Setup and Configuration Guide for Freemium

Once an alert has been acknowledged, a checkmark appears in the table and it nolonger sends out notification messages.
Switch to the History view to see alert history for a selected time frame.
You can access threshold alerts in Alert Monitoring by clicking on the alert monitor
icon.
Apps Overview 57
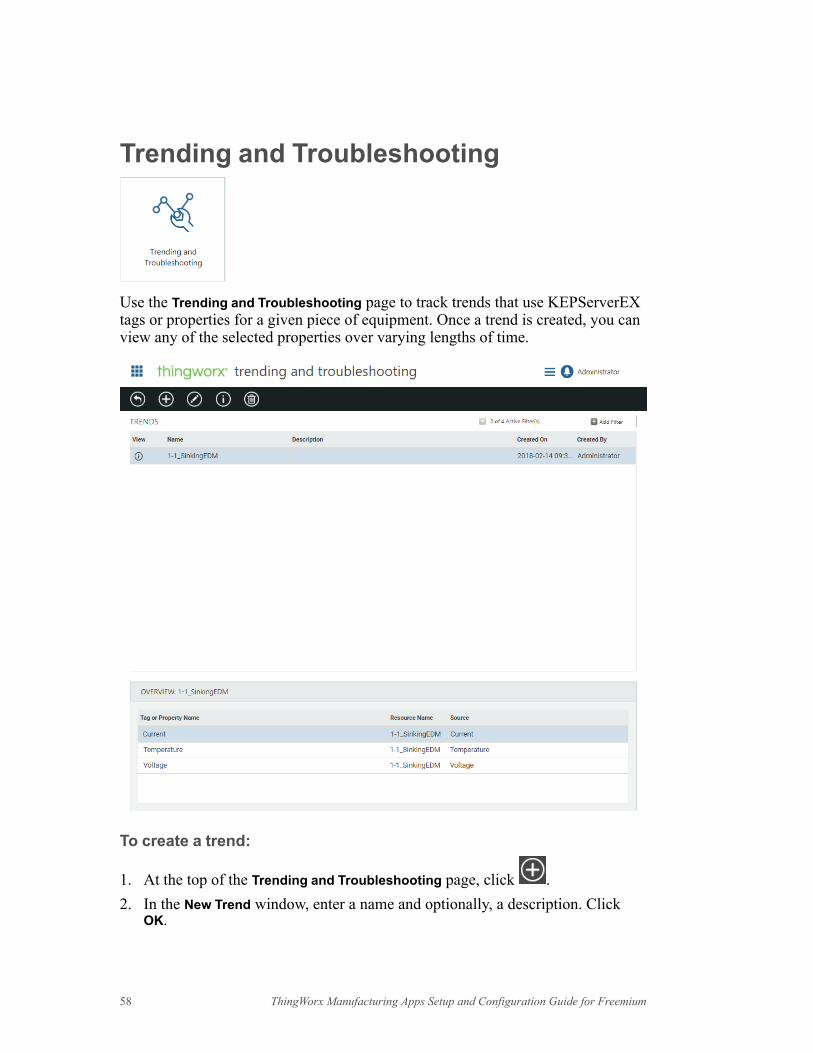
Trending and Troubleshooting
Use the Trending and Troubleshooting page to track trends that use KEPServerEXtags or properties for a given piece of equipment. Once a trend is created, you canview any of the selected properties over varying lengths of time.
To create a trend:
1. At the top of the Trending and Troubleshooting page, click .2. In the New Trend window, enter a name and optionally, a description. Click
OK.
58 ThingWorx Manufacturing Apps Setup and Configuration Guide for Freemium

3. On the details page of the trend, click .4. On the Add Tags or Properties To Trend window, select the equipment type and
piece of equipment.5. Select up to five properties or tags to trend for the selected equipment.6. View any of the selected properties over varying lengths of time to track the
trend.
Apps Overview 59
4Advanced Configurations
Remote Access and Control .......................................................................................61
If you are using a Developer Edition license, certain configurations can becompleted using ThingWorx Composer.For information about customizing the ThingWorx Manufacturing Appsextension, refer to the ThingWorx Manufacturing and Service Apps CustomizationGuide located on the PTC Reference Documents website.
60 ThingWorx Manufacturing Apps Setup and Configuration Guide for Freemium
Remote Access and ControlThe remote access and control extension enables you to upload and download filesand access an asset remotely to interact directly with its software system. Forexample, you could modify asset configuration settings, install software andfirmware patches, or launch the latest software release update.The remote access and control extension includes the following optional AssetAdvisor features:
• Remote Access
• File Transfer
• File Transfer History
NoteRemote Access only supports VNC. It does not support SSH and MicrosoftRDP.
Prerequisites• Remote access features require the use of either ThingWorx Edge MicroServer
or ThingWorx Edge SDK. Refer to the ThingWorx 8.2 System Requirementsfor supported product versions.
To meet this prerequisite, do one of the following.
○ Install ThingWorx Edge MicroServer. For more information, see theThingWorx WebSocket-based Edge MicroServer Developer’s Guide locatedat the PTC Reference Documents website under the product categoryThingWorx Edge MicroServer.
○ Use ThingWorx Edge SDK. For more information see the ThingWorx JavaSDK Developer’s Guide located at the PTC Reference Documents websiteunder the product category ThingWorx Edge SDK
To configure an asset for file transfer :1. Connect your Edge device using the Edge MicroServer or Edge SDK. For
more information, refer to the guides listed in Prerequisites on page 61.2. Verify that the ApplicationKey entity exists on the ThingWorx server so that
the Edge MicroServer or Edge SDK you are using can authenticate with theplatform.
3. From ThingWorx Composer, navigate to the Things ▶▶ Asset_<asset_name> ▶▶General Information.
Advanced Configurations 61

4. Set the Identifier.5. Click Save.
NoteThe File Transfer action enables you to copy files from the local systemrepository, TW.RSM.Thing.FileRepositor to a remote location (anasset). For more information, see the ThingWorx documentation on how tocustomize a file repository.
To configure an asset for remote access and control:1. Configure the asset for file transfer, as shown in the previous section.2. From ThingWorx Composer navigate to the Things ▶▶ Asset_<asset_name> ▶▶
General Information page.3. From the Override? drop-down list for the Enable Tunneling field, select
Override – Enabled.4. Navigate to the Configuration section and click on the Add My Tunnel button.
a. The Tunnel Name is used to identify what tunnel to use. Enter any name.b. Configure the Host and Port from the point of view of the edge device
where the server component of the client/server application is running, notthe ThingWorx Core. For example, when you want to access the edgedevice from the VNC Viewer, you would type the IP address of the device,and then the port number.
c. The Port value should be the port that the VNC server is listening on. Thisis typically 5900.
d. The App URI should be left as the default, as you are going to rely onThingWorx built in VNC client.
e. The # Connections and Protocol can remain their default values, unlessyou have a reason to change them.
f. Click Save.g. From ThingWorx Composer, navigate to Things ▶▶ Asset_<asset_name> ▶▶
Properties.h. Set your VNC password on the property: vncPassword.
Configuring Recommended Subsystem SettingsThese recommended configuration settings for the WSCommunicationsSubsystemand FileTransferSubsystem can improve performance when performing filetransfers.• WSCommunicationsSubsystem—
62 ThingWorx Manufacturing Apps Setup and Configuration Guide for Freemium
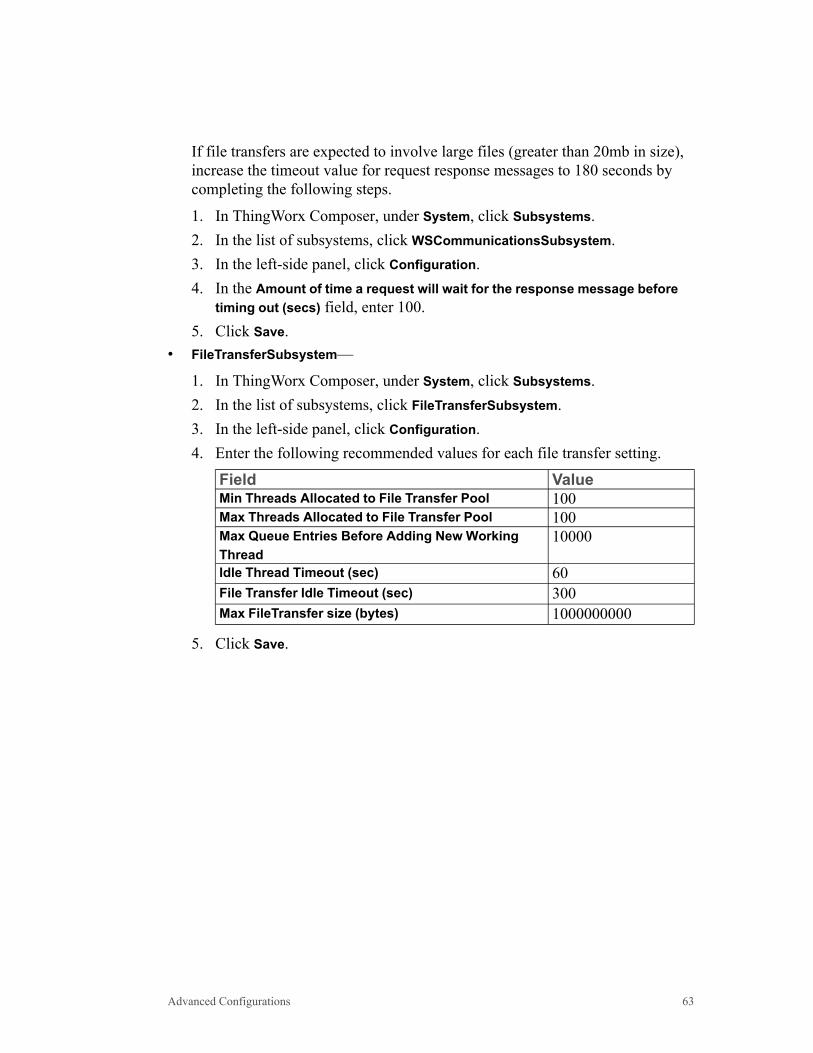
If file transfers are expected to involve large files (greater than 20mb in size),increase the timeout value for request response messages to 180 seconds bycompleting the following steps.
1. In ThingWorx Composer, under System, click Subsystems.2. In the list of subsystems, click WSCommunicationsSubsystem.3. In the left-side panel, click Configuration.4. In the Amount of time a request will wait for the response message before
timing out (secs) field, enter 100.5. Click Save.
• FileTransferSubsystem—
1. In ThingWorx Composer, under System, click Subsystems.2. In the list of subsystems, click FileTransferSubsystem.3. In the left-side panel, click Configuration.4. Enter the following recommended values for each file transfer setting.
Field ValueMin Threads Allocated to File Transfer Pool 100Max Threads Allocated to File Transfer Pool 100Max Queue Entries Before Adding New WorkingThread
10000
Idle Thread Timeout (sec) 60File Transfer Idle Timeout (sec) 300Max FileTransfer size (bytes) 1000000000
5. Click Save.
Advanced Configurations 63
5Frequently Asked Questions
Terminology• What does the term “line” mean?
The term (production) line refers to a work center that is a collection ofequipment dedicated to the manufacture of a specific number of products orproduct families.
• What does the term “site” mean?
A site is a component of a manufacturing enterprise that is identified byphysical, geographical, or logical segmentation.
• What does the term “enterprise” mean?
An enterprise is one or more organizations that share a mission, goals, andobjectives to offer an output such as a product or service.
Performance and Scalability• How many devices are supported for each server?
A maximum of 250 devices per server are supported. Note that with a largenumber of devices, discovering devices for a specific server may take severalminutes.
KEPServerEX• Can non-system tags be monitored?
Update of KEPServerEX system tags only occurs when non-system tagsassociated to the server are monitored. To monitor a non-system tag, create atrend in Trending and Troubleshooting and add any tag from any devices.
64 ThingWorx Manufacturing Apps Setup and Configuration Guide for Freemium

System tags are found in the _System and _Statistics tag groups inKEPServerEX.
Alert Notifications• Why am I not receiving email alert notifications using gmail.com?
If you are not receiving email alert notifications on domains such as gmail.com or yahoo.com, ensure that the option to allow less secure apps is enabledfor those email services. For more information, see https://support.google.com/a/answer/6260879?hl=en.
• How do I set up mobile alert notifications?
For mobile alert notifications, add any mobile numbers with different countrycodes to the Twilio account before using those mobile numbers.
Frequently Asked Questions 65