appendix 4.4.1: imaging facility checklist, by jeremy
TRANSCRIPT

APPENDIX 4.4.1: IMAGING FACILITY CHECKLIST, BY JEREMY SANDERSON The checklist below was developed for biomedical research core light microscopy facilities (LMF) and we believe it is also useful for cytogenetics, pathology, and other laboratories (and is used here with permission). A few additional suggestions: (1) uninterruptible power supplies (UPS) for each microscope, (2) HEPA filters in the air ducts, (3) locate the facility away from elevators, heavy equipment (building chillers), away from −80oC freezer farms, loading docks, and streets. Recent core facility reviews include Ferrando-May et al. (2016), Meder et al. (2016), Sanchez et al. (2011), Sanderson (2010a, 2010b), Wallace et al. (2015). An efficient way to serve many microscope stations with one laser stack can be found in Clarke et al. (2011).
List of Things to Think About with an Imaging Facility Jeremy Sanderson, Bioimaging Facility Manager
MRC Harwell, Mammalian Genetics Unit, Harwell Campus, Oxfordshire, OX11 0RD, UK. www.har.mrc.ac.uk
See also complete references at the end of Appendix 4.4.1:
Helm et al. (2001); Murphy (2002), Microscopy Today Nov 2002 pp 36-39 with checklist; White & Errington (2001) Bio-Rad Technical Application Note 12
Imaging Facility Checklist Five main points:
1. Vibration isolation
• compressed air piped into room, or miniature (Clarke, Condor) compressors
• isolation of computers and monitor worktables from the microscope
• isolation of heating ducts
2. Temperature and humidity stability
• ensure rooms are small, and sufficient tolerance (±1°C) to give meaningful stage stability
• see Kong, Ko, Lee, & Lui, 1999; Lee, Kong, Fung, Lui, & Lee, 1996; Adler & Pagakis, 2003
3. Local lighting
• large, rheostat-controlled white light; low level light: dim? Red lighting, also? anglepoise
4. Data networking
• have sufficient hard disk space and dual-partition to save data first to local machine, upon acquisition, then transfer via network
• buying in central file storage space backup/recovery or stand-alone; troubleshooting advice
• you always need more electrical outlets and networking sockets than you think
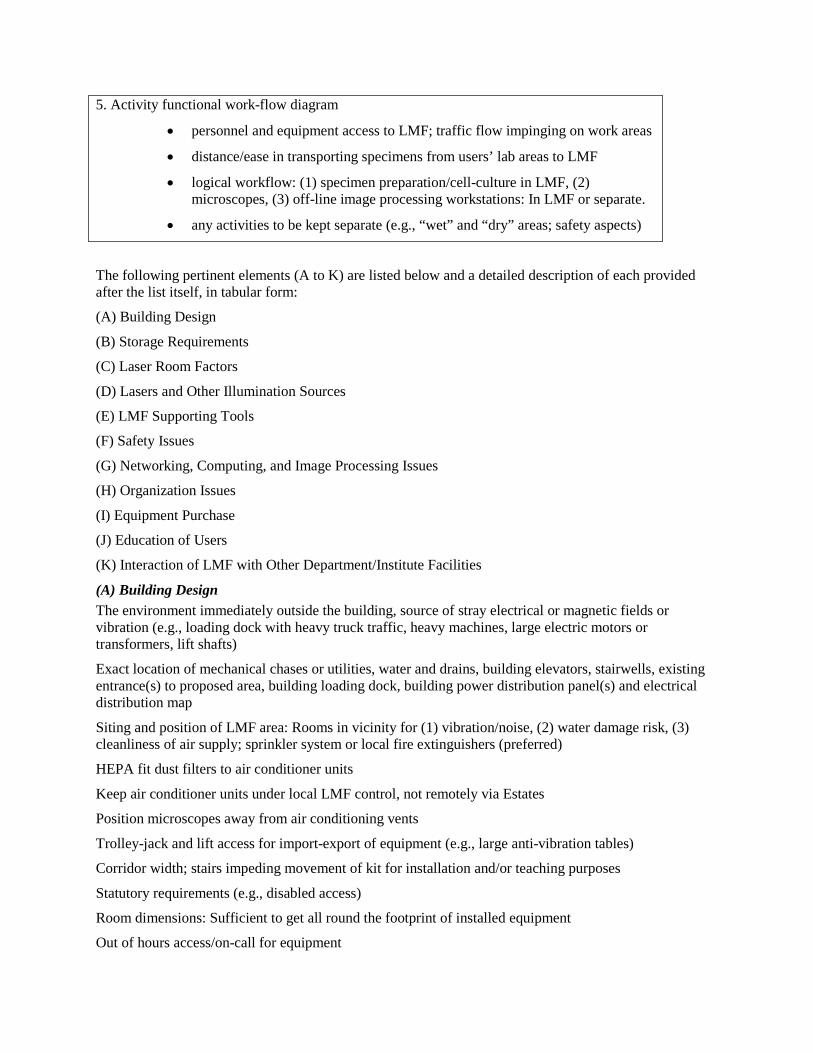
5. Activity functional work-flow diagram
• personnel and equipment access to LMF; traffic flow impinging on work areas
• distance/ease in transporting specimens from users’ lab areas to LMF
• logical workflow: (1) specimen preparation/cell-culture in LMF, (2) microscopes, (3) off-line image processing workstations: In LMF or separate.
• any activities to be kept separate (e.g., “wet” and “dry” areas; safety aspects)
The following pertinent elements (A to K) are listed below and a detailed description of each provided after the list itself, in tabular form:
(A) Building Design
(B) Storage Requirements
(C) Laser Room Factors
(D) Lasers and Other Illumination Sources
(E) LMF Supporting Tools
(F) Safety Issues
(G) Networking, Computing, and Image Processing Issues
(H) Organization Issues
(I) Equipment Purchase
(J) Education of Users
(K) Interaction of LMF with Other Department/Institute Facilities
(A) Building Design The environment immediately outside the building, source of stray electrical or magnetic fields or vibration (e.g., loading dock with heavy truck traffic, heavy machines, large electric motors or transformers, lift shafts)
Exact location of mechanical chases or utilities, water and drains, building elevators, stairwells, existing entrance(s) to proposed area, building loading dock, building power distribution panel(s) and electrical distribution map
Siting and position of LMF area: Rooms in vicinity for (1) vibration/noise, (2) water damage risk, (3) cleanliness of air supply; sprinkler system or local fire extinguishers (preferred)
HEPA fit dust filters to air conditioner units
Keep air conditioner units under local LMF control, not remotely via Estates
Position microscopes away from air conditioning vents
Trolley-jack and lift access for import-export of equipment (e.g., large anti-vibration tables)
Corridor width; stairs impeding movement of kit for installation and/or teaching purposes
Statutory requirements (e.g., disabled access)
Room dimensions: Sufficient to get all round the footprint of installed equipment
Out of hours access/on-call for equipment

Door dictated by the size of equipment to be moved through the door? Split door
Doors swinging in affecting positive/negative pressure of air conditioner or inducing vibration and air currents
Any light-trap (e.g., circular) entrances required?
Sliding or swinging doors: Microscope bays to be individual rooms or curtained bays?
Draught-causing potential; effect on stage movement (e.g., with ultramicrotomes in EM)
Curtains: Blackout material: Stray light over runner area at top; ease of flow/obstruction over floor
Window blinds or black-out capability
Matte light paint finish (e.g., photographic darkrooms) to control lighting and prevent stray reflections, or blacked-out matte black walls for complete light exclusion
Card access details for registered users (entry on trust, or “lock-down” until after training approaches)
Teaching space for students (if possible); how to integrate teaching role with research role
Floor loading capability
Floor coverings should be cleanable, impervious to oil and chemicals, non-flammable and anti-static
Integral floor and skirting
Typical maximum floor vibrations are 3 micrometers at 5 Hz, and 6 micrometers at 10 and at 20 Hz. (Murphy)
Electrical power different phases: 1 phase and 3 phase
Three-phase power supplies (e.g., Zeiss LSM 510 confocal); others use mains switches
Which circuits (R,B,Y) 1 phase situated on; does load require >1 phase circuit? Statutory requirement: Different phases should not be mixed within room
Does any LM equipment require attention to stray magnetic field: Horizontal and vertical directions, as for EMs?
Electrical interference on circuitry and physiological test-rigs; radio frequency interference
Regulation, conditioning, or voltage stabilization of illumination sources, computers and monitors?
Electrical noise interference: Avoid for CCDs and PMTs
Sufficient electrical outlets in LMF to prevent use of 4-gang extension leads
Conduit tracking for electrical cables; electrical wiring trays: Room for expansion
Some LMFs advocate electrical services on central posts within bench islands to avoid trailing leads
Networking cables: Standard copper cable or fiber optic; cost versus speed
Back-up power generators: Any back-up power required for sensitive instruments (as for EMs)?
Slide preparation bench
Access to lab fume hood
Access to cell culture hood: Where is cell culture?
Preparation area: Water and power points
Plumbing required (e.g., sinks, drains, safety showers, eye washes)

Lab bench area: Minimum for sinks and related items; sufficient for “dry” and “wet” areas
Keep “wet” area away from microscopes
Area for refrigerator: Can normally put shelf, then small CO2-fed incubator above
Refrigerator freezer space
Need CO2 and supply to small cell incubator: Short-term culture storage
Gas cylinders: Remote or local to the room; securing points; storage and cylinder access to LMF
• if remote use warning strobes (fit an off switch over-ride)
• routing of CO2 lines to microscopes and incubators
• gas taps accessible (for short people)
Any other gas services required (e.g., filtered helium supply for drying/purging Ti-S IR lasers for 2-photon systems)
Some kit (e.g., Zeiss LSM with PeCon CO2 control mixes the CO2 in a percentage; others, e.g., 5% unmixed into Leica inverted system) does not; have space for 100% and 5% CO2 bottles
Statutory safety design requirements: Hand-basin, fire-blanket, fire extinguisher cylinders
Water supply: Tap water, cooling water, deionized water
Is deionized and/or distilled water (location) piped into rooms or required for specimen preparation?
Any water circulators required? Provision for future installation and use?
Refrigeration: Liquid nitrogen (also ventilation) or propane
Storage for cryo-section stubs/cells
Location of fixed landline phones (also have cordless phone for work around microscopes with service and applications personnel)
Location of clocks (any stray reflections from clock face?)
Temperature stability: Exhaust of generated heat; Heat removal: Adequate ventilation to remove heat from kW output of lamp sources, computers, hotboxes in individual microscope areas; allow 0.5 to 1 kW for users
Adequate ventilation in laser room
Adequate ventilation and air conditioning in microscope rooms or curtained bays
(B) Storage Requirements Storage space for spare Hg bulbs, spare objectives, e.g., DIC accessories (? lockable cabinets)
Small workshop area to clean objectives, change filters in filter cubes
Space for files and papers/specification sheets/operating instructions
Storage space for made-up filter blocks or box to store individual filters and spare cubes
Refrigerator and/or freezer space
Wall space in microscope room/bay for individual storage space or central storage facility
Shelving behind each instrument for manuals or live-cell heating and CO2 controllers
Tables, desks, chairs, stools

Teaching space: Microscopes for basic principles to students
Photocopier/printer access
(Administration/teaching material)
Think of future needs and expansion potential
(C) Laser Room Factors Central laser room or separate?
Lasers: Safety: Ideally the lasers should be kept in an isolated room. (Liverpool facility has a separate laser room because they use the LSM for luciferase.)
Siting and position of laser room: 3 to 5 meter limit for fiber optic cable to confocal
Dexion Laser racks in a central room with branches off: Safety access only to LMF staff
Override to laser interlocks
Separate air conditioning in laser room; estimation of heat output
Separate water feed in laser room
Sufficient electrical and network sockets
Dedicated 3-phase in laser room
Dedicated laser unit and surge-protected electrical circuit
Controlled humidity within ±3°C of 23°C.
Installation of computerized measurement of temperature in LMF laser room
Over-run protection if UV laser water-cooling left on: Protection circuits
Laser power meter to adjust launch into fibers: Dedicated second monitor in laser room
(D) Lasers and Other Illumination Sources
Pulsed laser for ablation (e.g., 405 nm on Olympus FV-1000; FLIM)
PicoQuant 405 nm laser add-on for laser ablation
Try to avoid water-cooled lasers: Condensation problems if power supply/water pressure fails
Back-up power for out-of-hours failure
Xenon lambda Sutter light sources for stability
Heat extraction from lasers (ducting in reflective foil, as in Sir William Dunn School Pathology, wall-mounted air conditioning units or air conditioning unit in ceiling void with ducts above microscope bays)
Incandescent fixtures should be used to minimize possible magnetic field interference from the ballast in fluorescent fixtures; consider effects of after-glow from fluorescent lights
Continuously adjustable level adjustment is convenient: Rheostat
Think of access under and behind microscopes to, e.g., fix lamps
Overhead lights
Individual desk lights: Subdued
Window blinds or black-out capability
Track-mounted incandescent lights, controlled by dimmer controls on independent circuits

Separate lighting overhead and individual
Try to house low-light instruments in a separate room (e.g., luciferase requirements)
(E) LMF Supporting Tools Laser power meter to adjust launch into fibers
Multi-meter
Electronic thermometer with fine probe
Cordless phones to enable hands-free talking to service engineers (NB mobile reception)
Access to spectrophotometer to generate filter spectral curves (Brad recommends hand-held spectrophotometer with tungsten lamp for, e.g., barrier filters with O.D. >2)
Access to Trolley-jack and lifting equipment
Use Lascar USB temperature and humidity data loggers
Separate small tools: Various screwdrivers (flat, Phillips, and hexagonal heads), spanner, and socket sets with a good selection of small sizes, razor knife, flashlights, wrenches, wire strippers
Hexagon spanners; Metric and Imperial Allen keys for servicing, gas regulator spanner
Molecular Probes/Invitrogen/Thermo Fisher Scientific test samples, e.g., Molecular Probes Beads
• FluoCells prepared slide #1 (cat. no. F36924) BPAE cells with MitoTracker Red CMXRos, Alexa Fluor 488 Phalloidin, and DAPI
• FluoCells prepared slide #2 (cat. no. F14781) BPAE cells with Mouse Anti-α-tubulin, BODIPY™ FL Goat Anti-Mouse IgG, Texas Red-X Phalloidin, and DAPI
• FluoCells prepared slide #3 (cat. no. F24630) mouse kidney section mouse kidney section with Alexa Fluor 488 WGA, Alexa Fluor 568 Phalloidin, and DAPI
• FocalCheck thin ring fluorescent microspheres kit 1.0 µm, three suspensions (cat. no. F14791)
• FocalCheck fluorescent microspheres kit 6 µm, mounted on slides (cat. no. F24633)
• FocalCheck DoubleGreen microspheres 6 µm (cat. no. F36905; for Spectral detection)
• TetraSpeck fluorescent microspheres kit blue, green, orange 0.1 µm, 0.5 µm, 4 µm, suspension (cat. no. T7284)
• TetraSpeck Fluorescent microspheres size kit, blue, green, orange, dark red 0.1µm, 0.2 µm, 0.5 um, 1 um, 4 um, mounted on slide (cat. no. T14792)
• PS-Speck™ Microscope Point Source Kit (blue, green, orange, and deep-red fluorescent beads), 0.175 +/- 0.005 µm microspheres, suspension (cat. no. P7220)
ArgoLight Argo slides, to test and monitor fluorescence microscopes, http://argolight.com/products
GE Healthcare / Applied Precision - DeltaVision Calibration Kit Part No. # 52-502740-000
• Fluorescent calibration slides
• DeltaVision 100-nm bead slide in glycerol Part No. # 52-503040-001
SGI-Pyser stage measurement micrometers (for checking/setting up digital calibration)
• England Finder: Part No. S7 02A00403

• 20-mm stage micrometer for stereo microscopes/large FOV
• Stage micrometer 100 µm (100 × 2 µm) Part No. S12 02A00408
• Stage micrometer 1 mm (100 × 10 µm) Part No. S16 02A00429
• Stage micrometer 10 mm (100 × 100 µm) Part No. S1 02A00400
Zeiss Service components
• AOTF remote control Part No. 862999-0000-964
• Laser Power Meter gigahertz Part No. 862999-0000-972
• Test slide mirror with 0.17-mm coverslip Part No. 000000-1158-109
• Pinhole alignment mirror Part No. 453001-9062-000
• LSM square test grid Part No. 000000-1110-203
• LSM Test specimen scan speed Part No. 000000-1105-820hibbs
Longer 3-mm Allen key (e.g., changing camera emission filter wheel set on DV)
Head torch, hand-held torches
Stereo microscope, or watch-makers inspection lamp, to inspect and clean objectives
Dissecting microscope for, e.g., tissue explants, zebrafish
Dust busters
Heater-stirrer
pH meter (for fixative/immunostaining buffers if done on LMF site)
Waste pots
Fume-tight solvent bottles; use petroleum ether for cleaning objectives
Booklet for equipment to loan out
Standard transmission and fluorescence microscope to assess specimens
Inverted phase and/or fluorescence microscope to assess cells
Cell heating equipment
Perfusion chambers (e.g., Bioptechs DeltaT dish; Intracel, Warner, Dvorak Stotler)
Objective heaters
(Bioptechs, 20-20 Tech, Bioscience tools)
Objective water-cooling jacket (Okolabs)
Pecon Bachhoffer chambers, Petri dish stage warmers (e.g., Instec)
CO2 monitor for stage coverplate (e.g., see http://www.cellmc.com/ref/ctcsOct07.htm)
Galvo Z-stage
Piezo objectives
Dipping objectives
(F) Safety Issues
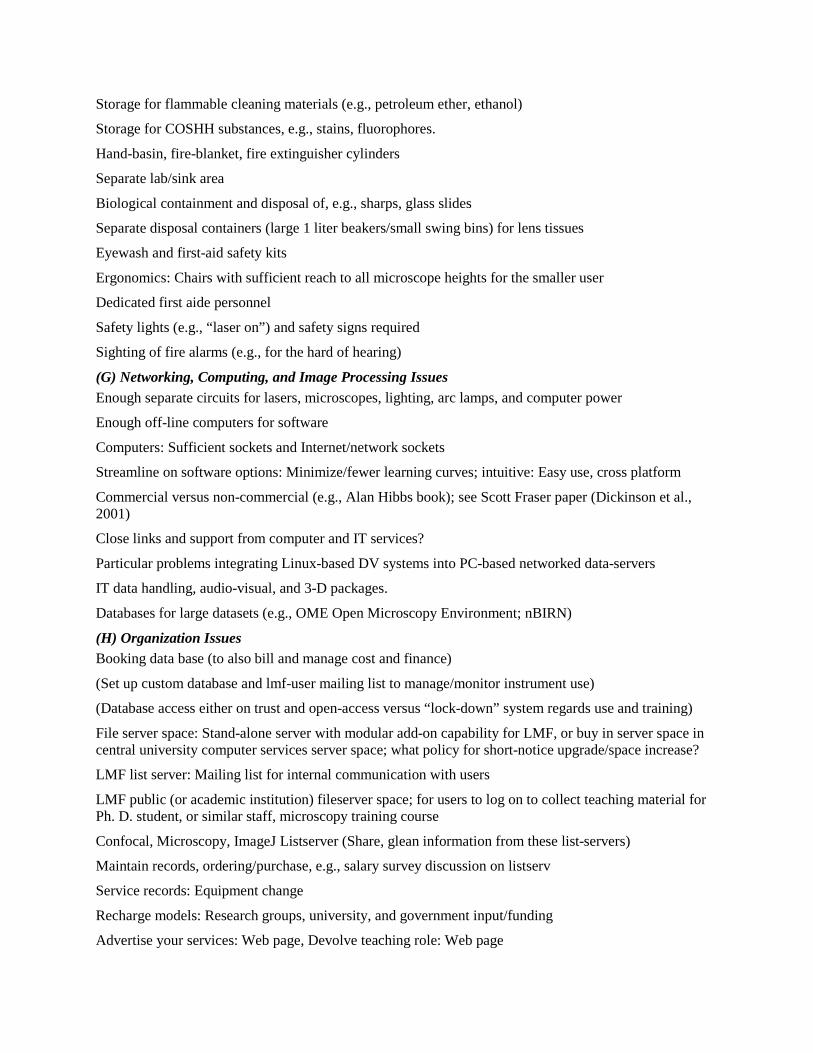
Storage for flammable cleaning materials (e.g., petroleum ether, ethanol)
Storage for COSHH substances, e.g., stains, fluorophores.
Hand-basin, fire-blanket, fire extinguisher cylinders
Separate lab/sink area
Biological containment and disposal of, e.g., sharps, glass slides
Separate disposal containers (large 1 liter beakers/small swing bins) for lens tissues
Eyewash and first-aid safety kits
Ergonomics: Chairs with sufficient reach to all microscope heights for the smaller user
Dedicated first aide personnel
Safety lights (e.g., “laser on”) and safety signs required
Sighting of fire alarms (e.g., for the hard of hearing)
(G) Networking, Computing, and Image Processing Issues Enough separate circuits for lasers, microscopes, lighting, arc lamps, and computer power
Enough off-line computers for software
Computers: Sufficient sockets and Internet/network sockets
Streamline on software options: Minimize/fewer learning curves; intuitive: Easy use, cross platform
Commercial versus non-commercial (e.g., Alan Hibbs book); see Scott Fraser paper (Dickinson et al., 2001)
Close links and support from computer and IT services?
Particular problems integrating Linux-based DV systems into PC-based networked data-servers
IT data handling, audio-visual, and 3-D packages.
Databases for large datasets (e.g., OME Open Microscopy Environment; nBIRN)
(H) Organization Issues Booking data base (to also bill and manage cost and finance)
(Set up custom database and lmf-user mailing list to manage/monitor instrument use)
(Database access either on trust and open-access versus “lock-down” system regards use and training)
File server space: Stand-alone server with modular add-on capability for LMF, or buy in server space in central university computer services server space; what policy for short-notice upgrade/space increase?
LMF list server: Mailing list for internal communication with users
LMF public (or academic institution) fileserver space; for users to log on to collect teaching material for Ph. D. student, or similar staff, microscopy training course
Confocal, Microscopy, ImageJ Listserver (Share, glean information from these list-servers)
Maintain records, ordering/purchase, e.g., salary survey discussion on listserv
Service records: Equipment change
Recharge models: Research groups, university, and government input/funding
Advertise your services: Web page, Devolve teaching role: Web page

(I) Equipment Purchase Service contracts: 4 or 5 year full service warranties built into purchase price
Recharge systems: Cost matrix budget amounts
Policy on depreciation and/or inflation calculation
Full economic costs or partial cost recovery
Updates, upgrades, and gradual replacement of hardware of all imaging systems
Updates, upgrades, and gradual replacement of all computers
Updates, upgrades of current imaging, and image processing software
Repair and replacement of broken or damaged objectives
(J) Education of Users Good practice advisory service
Safety aspects for Good Lab Practice; lamp and laser safety; ergonomics; avoiding eye-strain
Practical teaching courses: Principles of microscopy, instrument operation
Intra- and Internet Web material
PC laptop and LCD projector for teaching preparation
Separate room for training (with lectures/microscopes) independent of research activity?
Availability of standard brightfield/phase/DIC/fluorescence microscopes
In-house teaching (e.g., lmf-public fileserver space)
External courses: e.g., worldwide, Pawley (Vancouver), FEBS, RMS, MBL, CSHL, MDI Biological Laboratory, Montreal Light Microscopy Course, see https://hcbi.fas.harvard.edu/external-microscopy-courses
Internet resources: https://micro.magnet.fsu.edu/primer/
Manufacturers Internet information: see Table 4.4.4 in UNIT 4.4.
(K) Interaction of LMF with Other Department/Institute Facilities Lockable room for Beta-testing new equipment: Commercial/industrial development policy
Optical Technology: Development and evaluation of new equipment (separate or within LMF)
Electronics and mechanical workshops
Computer services: Software support, networking, Internet access, data storage/retrieval
• image processing, analysis, deconvolution
• high throughput screening
Administration: Finance/book keeping, purchasing, secretarial support
Photolab: Printing, video editing, posters, teaching materials
Library: Literature, teaching resources
Central glass washing, Media kitchen/solutions

Despite the profusion of core imaging facilities, there is a dearth of literature giving any guidance on how to design, set up, and manage these, and that written before the turn of the century tends to cover electron microscopy (e.g., Alderson, 1975). Judy Murphy has written on facility design, primarily for EM (Murphy, 1993, 2002) and on database selection (Murphy, 2001). The most recent article specifically on setting up and running a confocal microscope facility is DeMaggio (2002). Another by Helm et al. (2001) is available on the World Wide Web at http://folk.uio.no/atlej/LOV/files/HelmetalProcSPIE4262.pdf, and deals with installing three multi-modal microscopes capable of single and multi-photon operation onto one optical table. There is a usefully illustrated Bio-Rad Technical Note 12 (2001), by Nick White at the Sir William Dunn School of Pathology, Oxford, on setting up a laser scanning microscopy resource.
The microscopy and confocal listerservers both offer a dynamic forum where microscopy-managers exchange views and solutions to the practical challenges of running a core imaging facility. The issue of cost management is most often aired. Two recent articles (Humphrey, 2004; Sherman, 2003) cover policy aspects of managing a core facility, as does the paper by Angeletti et al. (1999), similar to the issues described here.
An example from the Confocal Listserv (Oct 3, 2016, Kathy Spencer), is the recommendation of DuctSox Fabric Duct and Diffuser Systems, http://www.ductsox.com/why-fabric, instead of metal ducts for building (or at least room) HVAC.
References Cited in Appendix 4.4.1 Adler, J., Pagakis, S. N., (2003). Reducing image distortions due to temperature-related microscope stage drift. Journal of Microscopy, 210, 131-137.
Alderson, R. H. (1975). Design of the electron microscope laboratory. In A. M. Glauert (Ed.), Practical methods in electron microscopy, Vol. 4. New York: Elsevier.
Angeletti, R. N., Bonewald, L.F., de Jongh, K., Niece, R., Rush, J., & Stults, J. (1999). Research technologies: Fulfilling the promise. The FASEB Journal, 13, 595-601.
Clarke, D. T., Botchway, S. W., Coles, B. C., Needham, S. R., Roberts, S. K., Rolfe, D. J., … Martin-Fernandez, M. (2011). Optics clustered to output unique solutions: A multi-laser facility for combined single molecule and ensemble microscopy. The Review of scientific instruments, 82, 093705.
DeMaggio, S. (2002). Running and setting up a confocal microscope core facility. In B. Matsumoto (Ed.) Methods in cell biology, Vol. 70, (pp. 475-485). San Diego: Academic Press.
Ferrando-May, E., Hartmann, H., Reymann, J., Ansari, N., Utz, N., … German BioImaging network. (2016). Advanced light microscopy core facilities: Balancing service, science and career. Microscopy Research and Technique, 79, 463-479. doi: 10.1002/jemt.22648.
Helm, J. P., Haug, F.-M. S., Storm, J. F., & Ottersen, O.-P. (2001). Design and installation of a multimode microscopy system. Proceedings of SPIE, 4262, 396-406. Retrieved at http://folk.uio.no/atlej/LOV/files/HelmetalProcSPIE4262.pdf
Hogan, F. (2006). Getting to the core: Core microscope facilities face a variety of challenges. Biophotonics International, August 2006, 34-39.
Humphrey, E. (2004). How to promote a facility in order to increase use, acquire new equipment and, as a result, increase revenue. Microscopy Today, 12, 32-36.
Kong, S. Y., Ko, S., Lee, C. Y., & Lui, P. Y., (1999). Practical considerations in acquiring biological signals from the confocal microscope. Methods in Enzymology, Part II, 307, 20-26.
Lee, M. F., Kong, S. K., Fung, K. P., Lui, C. P., & Lee, C. Y., (1996). Practical considerations in acquiring biological signals from the confocal microscope: solvent effect and temperature effect. Biological Signals, 5, 291-300.

Meder, D., Morales, M., Pepperkok, R., Schlapbach, R., Tiran, A., & Van Minnebruggen, G. (2016). Institutional core facilities: prerequisite for breakthroughs in the life sciences. EMBO Reports, 17, 1088-1093. doi: 10.15252/embr.201642857.
Murphy, J. A. (1993). Designing a microscopy facility: Step by step procedure. In A. W. Robards & A. J. Wilson (Eds.), Procedures in electron microscopy, Vol. 7, (pp. 1:1.1-1:1.23; 1:2.1-1:2.2). Chichester, UK: John Wiley & Sons.
Murphy, J. A. (2001). Image management for a multi-instrument, multi-platform Microscopy facility. Scanning, May 2001.
Murphy, J. A. (2002). Designing a microscopy/analytical instrumentation facility: step by step procedure. Microscopy Today, 10, 36-39.
Sanchez, C., Munoz, M. A., Villalba, M., Labrador, V., & Diez-Guerra, F. J. (2011). Setting up and running an advanced light microscopy and imaging facility. Current Protocols in Cytometry, 57, 12.22.1–12.22.21. doi: 10.1002/0471142956.cy1222s57.
Sanderson, J. (2010a). Light microscopy imaging facilities. In Encyclopedia of life sciences (eLS). Chichester, UK: John Wiley & Sons. doi: 10.1002/9780470015902.a0022189.
Sanderson, J. (2010b) List of things to think about with an Imaging facility. Retrieved from http://www.microscopist.co.uk/wp-content/uploads/2017/04/List-of-things-to-think-about-with-an-Imaging-facility.pdf
Sherman, D. (2003). Core facility management session: Maintaining major equipment in the core microscopy facility. Microscopy Today, 11, 40-45.
Wallace, C. T., St. Croix, C. M., & Watkins, S. C. (2015). Data management and archiving in a large microscopy-and-imaging, multi-user facility: Problems and solutions. Molecular Reproduction and Development, 82, 630-634. doi: 10.1002/mrd.22538.
White, N. & Errington, R. (2001). Setting up and managing a biological laser scanning microscope resource (Bio-Rad Technical Note 12, Reference No. 9MRC50TN26). Retrieved from http://www.science.marshall.edu/dneff/confocal/tech%20bulletins/facil%20setup.pdf
APPENDIX 4.4.2 TOTAL INTERNAL REFLECTION FLUORESCENCE (TIRF) MICROSCOPY The most interesting part of some specimens is located at the coverglass. For example, “fiber FISH,” also known as DNA combing, or the underside of cells, especially focal adhesions and close contacts. Standard TIRF microscopes use a very expensive objective lens ($15,000 or more, depending on vendor), with 1.42 to 1.47 NA. The key is that only the illumination from the ring of light at the periphery of the illuminator is used, that is, only the light in the 1.42 to 1.47 NA is used (modern TIRF illuminators condense the light to the periphery, and lasers with power to spare are usually used). TIRF excitation enables fluorescence excitation to be limited to the axial (Z) distance of ~200 nm (0.2 µm; for brevity, we will not discuss the details of the exponential decay of intensity of the evanescent wave—there are now plenty of TIRF reviews and www.TIRF-Labs.com, where Figure 1 is from, explains TIRF). This is much thinner than a typical cell (4 to 20 µm thickness at the nucleus) or tissue section (nominally 4 µm thick), so if the features of interest are in the ~200 nm axial distance from the coverglass-aqueous interface, signal to noise is greatly improved (e.g., 0.2 µm versus 2 or 20 µm autofluorescence). High performance objective lens TIRF images with single fluorescence molecules are now routine—in those labs with all the proper microscope components. Originally, TIRF was developed using a glass cube or prism optically coupled (with immersion oil) to the microscope slide or coverglass The prism could be either on the
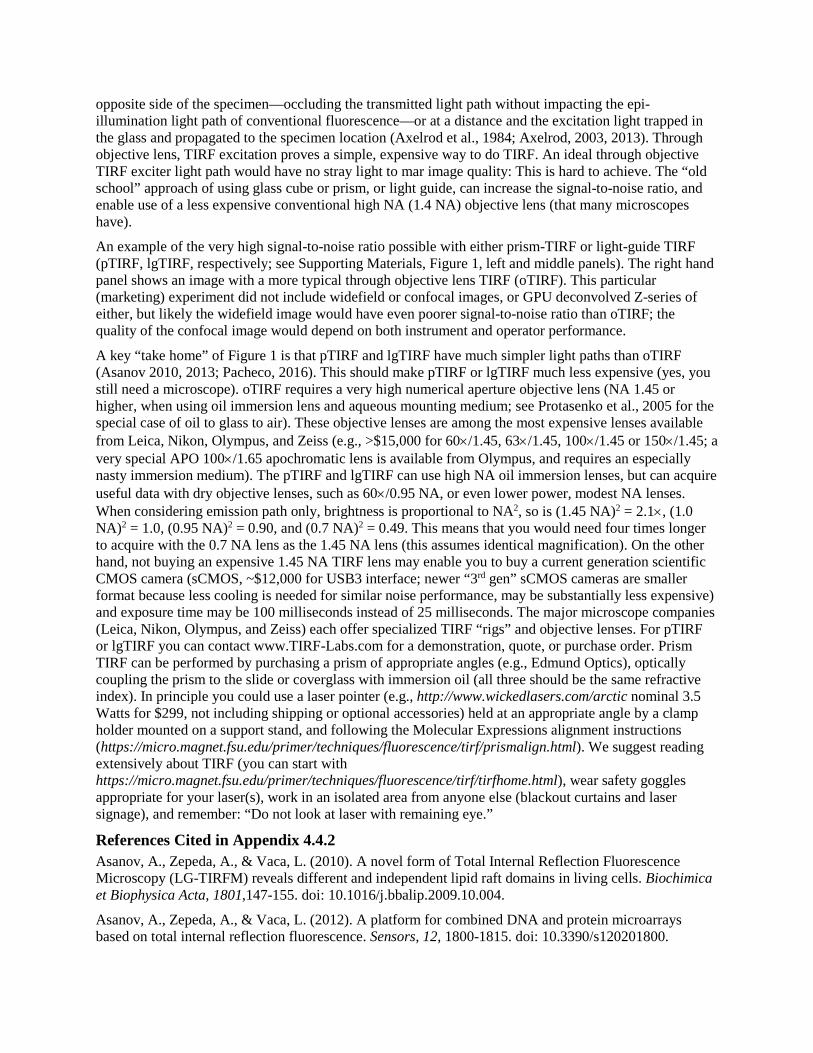
opposite side of the specimen—occluding the transmitted light path without impacting the epi-illumination light path of conventional fluorescence—or at a distance and the excitation light trapped in the glass and propagated to the specimen location (Axelrod et al., 1984; Axelrod, 2003, 2013). Through objective lens, TIRF excitation proves a simple, expensive way to do TIRF. An ideal through objective TIRF exciter light path would have no stray light to mar image quality: This is hard to achieve. The “old school” approach of using glass cube or prism, or light guide, can increase the signal-to-noise ratio, and enable use of a less expensive conventional high NA (1.4 NA) objective lens (that many microscopes have).
An example of the very high signal-to-noise ratio possible with either prism-TIRF or light-guide TIRF (pTIRF, lgTIRF, respectively; see Supporting Materials, Figure 1, left and middle panels). The right hand panel shows an image with a more typical through objective lens TIRF (oTIRF). This particular (marketing) experiment did not include widefield or confocal images, or GPU deconvolved Z-series of either, but likely the widefield image would have even poorer signal-to-noise ratio than oTIRF; the quality of the confocal image would depend on both instrument and operator performance.
A key “take home” of Figure 1 is that pTIRF and lgTIRF have much simpler light paths than oTIRF (Asanov 2010, 2013; Pacheco, 2016). This should make pTIRF or lgTIRF much less expensive (yes, you still need a microscope). oTIRF requires a very high numerical aperture objective lens (NA 1.45 or higher, when using oil immersion lens and aqueous mounting medium; see Protasenko et al., 2005 for the special case of oil to glass to air). These objective lenses are among the most expensive lenses available from Leica, Nikon, Olympus, and Zeiss (e.g., >$15,000 for 60×/1.45, 63×/1.45, 100×/1.45 or 150×/1.45; a very special APO 100×/1.65 apochromatic lens is available from Olympus, and requires an especially nasty immersion medium). The pTIRF and lgTIRF can use high NA oil immersion lenses, but can acquire useful data with dry objective lenses, such as 60×/0.95 NA, or even lower power, modest NA lenses. When considering emission path only, brightness is proportional to NA2, so is (1.45 NA)2 = 2.1×, (1.0 NA)2 = 1.0, (0.95 NA)2 = 0.90, and (0.7 NA)2 = 0.49. This means that you would need four times longer to acquire with the 0.7 NA lens as the 1.45 NA lens (this assumes identical magnification). On the other hand, not buying an expensive 1.45 NA TIRF lens may enable you to buy a current generation scientific CMOS camera (sCMOS, ~$12,000 for USB3 interface; newer “3rd gen” sCMOS cameras are smaller format because less cooling is needed for similar noise performance, may be substantially less expensive) and exposure time may be 100 milliseconds instead of 25 milliseconds. The major microscope companies (Leica, Nikon, Olympus, and Zeiss) each offer specialized TIRF “rigs” and objective lenses. For pTIRF or lgTIRF you can contact www.TIRF-Labs.com for a demonstration, quote, or purchase order. Prism TIRF can be performed by purchasing a prism of appropriate angles (e.g., Edmund Optics), optically coupling the prism to the slide or coverglass with immersion oil (all three should be the same refractive index). In principle you could use a laser pointer (e.g., http://www.wickedlasers.com/arctic nominal 3.5 Watts for $299, not including shipping or optional accessories) held at an appropriate angle by a clamp holder mounted on a support stand, and following the Molecular Expressions alignment instructions (https://micro.magnet.fsu.edu/primer/techniques/fluorescence/tirf/prismalign.html). We suggest reading extensively about TIRF (you can start with https://micro.magnet.fsu.edu/primer/techniques/fluorescence/tirf/tirfhome.html), wear safety goggles appropriate for your laser(s), work in an isolated area from anyone else (blackout curtains and laser signage), and remember: “Do not look at laser with remaining eye.”
References Cited in Appendix 4.4.2 Asanov, A., Zepeda, A., & Vaca, L. (2010). A novel form of Total Internal Reflection Fluorescence Microscopy (LG-TIRFM) reveals different and independent lipid raft domains in living cells. Biochimica et Biophysica Acta, 1801,147-155. doi: 10.1016/j.bbalip.2009.10.004.
Asanov, A., Zepeda, A., & Vaca, L. (2012). A platform for combined DNA and protein microarrays based on total internal reflection fluorescence. Sensors, 12, 1800-1815. doi: 10.3390/s120201800.

Axelrod, D. (2003). Total internal reflection fluorescence microscopy in cell biology. Methods in Enzymology, 361, 1–33. doi: 10.1016/S0076-6879(03)61003-7. Axelrod, D. (2013). Evanescent excitation and emission in fluorescence microscopy. Biophysical Journal, 104, 1401–1409. doi: 10.1016/j.bpj.2013.02.044.
Axelrod, D., Burghardt, T. P., & Thompson, N. L. (1984). Total internal reflection fluorescence. Annual Review of Biophysics and Bioengineering, 13, 247–268. doi: 10.1146/annurev.bb.13.060184.001335.
Pacheco, J., Dominguez, L., Bohórquez-Hernández, A., Asanov, A., & Vaca, L. (2016). A cholesterol-binding domain in STIM1 modulates STIM1-Orai1 physical and functional interactions. Science Reports, 6, 29634. doi: 10.1038/srep29634.
Protasenko, V., Hull, K.L., & Kuno, M. (2005). Demonstration of a Low-Cost, single-molecule capable, multimode optical microscope. The Chemical Educator, 10, 269–282, and Supporting Materials zip file retrieved at http://chemeducator.org/bibs/0010004/1040269mk.htm.
Figure 1. Comparison of TIRF images obtained with prism-, lightguide-, and objective-based TIRF microscopy geometries. Reproduced with permission from Alex Asanov of TIRF-Labs (http://www.tirf-labs.com/contact.html).

APPENDIX 4.4.3 SPATIAL DECONVOLUTION Spatial deconvolution can be thought of computationally as “sucking the photons back to where they belong.” This is a huge oversimplification, but as a matter of brevity, “if a picture is worth a thousand words,” then the post-deconvolution image is worth several times that. Below are raw and deconvolved 2D projections of osteosarcoma cells (see Fig. 2), acquired by Jared Mortus and George McNamara (specimen details below). The data were acquired as 2048 × 2048 pixel, 32 planes each, Alexa Fluor 594 (Texas Red filter set, ~100 ms per plane, 3.2 sec), Alexa Fluor 488 (GFP filter set, ~100 msec per plane; 3.2 sec), and Hoechst 33342 (DAPI filter set, ~10 msec per plane, 320 msec) using a Leica DMI6000 inverted fluorescence microscope, Lumencor SOLA 6-LED lamp (operated in single LED modes by MetaMorph), ASI Imaging excitation filter wheel, Semrock exciter filters, Leica or Semrock filter cubes, Hamamatsu ORCA Flash 4.2 megapixel sCMOS cameras, Dell PC (RAID data storage array, dual 2 K monitors), MetaMorph 7.7 Imaging System software. The spatial deconvolution was done in 17 sec by Marc Bruce, CEO, Microvolution (NVidia first generation GTX TITAN GPU card, 4.5 teraflops —the generation before the 2016 release of Pascal architecture GTX 1080 or TITAN X cards, or mid-2017 release of TITAN Xp, 11 teraflops), and the 2D projections images are available at http://microvolution.com/gallery (Dr. George McNamara is no longer employed at MD Anderson Cancer Center and lacks access to the original 3D datasets). Seventeen seconds to deconvolve three channel images is orders of magnitude faster than any of the free Fiji ImageJ deconvolution plugins, see http://imagej.net/Fiji/Downloads.
George McNamara has posted online at https://works.bepress.com/gmcnamara/57 a comparison of several deconvolution software that Ms. Vinita Popat made as an undergraduate summer student in the laboratory of Laurence J. N. Cooper, MD Anderson Cancer Center (Popat, 2013). The comparison includes the pre-Microvolution “pre-release/prototype” deconvolver by Bruce & Butte (2013) and several other deconvolvers. The prototype software worked well; the Microvolution release software on faster hardware is much better and faster (Scientific Volume Imaging, https://svi.nl/HuygensGPU, and AutoQuant, http://www.mediacy.com/autoquantx3/modules, also now have GPU enabled deconvolution). Additional examples of before-and-after deconvolution can be found on George McNamara’s Web site, https://works.bepress.com/gmcnamara (mostly LGC Biosearch Stellaris single molecule mRNA FISH data. https://www.microvolution.com/gallery includes a TOP1 single molecule RNA FISH widefield and deconvoluted example).
References Cited in Appendix 4.4.3 Bruce, M. A. & Butte, M. J. (2013). Real-time GPU-based 3D deconvolution. Optics Express, 21, 4766–4773. doi: 10.1364/OE.21.004766.
Popat, V. (2013, August). Fluorescence microscopy digital deconvolution comparison. Reducing image degradation through deconvolution. MD Anderson Cancer Center. Houston, TX. Available at https://works.bepress.com/gmcnamara/57 (If you are using Google Chrome, you may need to look with another Web browser to see this site.)


Figure 2. (top), (bottom) The human osteosarcoma cell line SaOS2 was subjected to differentiation conditions and stained to observe the regulation of an osteoblast transcription factor, RUNX2 (red), and a secreted protein, osteocalcin (green). Nuclei were counterstained with Hoechst 33342 (blue). A single osteocyte-like cell can be observed, characterized by a small nucleus and numerous, far-reaching cellular processes.
Figure 2 acquired on Leica DM6000 fluorescence microscope (63x/1.4NA oil immersion objective lens), Hamamatsu FLASH4.0 sCMOS camera, using MetaMorph 7.8.8 image acquisition software (Dell PC workstation). Maximum intensity projection of 2048x2048x32 image, 3 channels, panels matched for brghtness. Top: raw (16 seconds to acquire); Bottom: Microvolution deconvolution on NVidia Titan GPU graphics card in 17 seconds (www.microvolution.com). This same image pair is online at https://www.microvolution.com/gallery Image courtesy of: Prof. D. Hughes; Jared Mortus, Lead Researcher; Prof. Laurence Cooper, MD, PhD, PI; George McNamara, PhD, Sr Research Scientist; The Children’s Cancer Hospital, MD Anderson Cancer Center, Houston, TX.