ap step by step training
TRANSCRIPT

8/3/2019 AP Step by Step Training
http://slidepdf.com/reader/full/ap-step-by-step-training 1/93
Table of Contents
1 Document Control
1.1 Revision History and Approval
2 Accounts Payable
2.1 Overview
2.2 High Level Process flow diagram
3 Supplier Creation and maintenance
3.1 Creation of Supplier
3.2 Merging of supplier
4 Invoice Entry
4.1 Overview
4.2 Entering Standard Invoice
4.3 Entering PO default Invoices
4.4 Entering Debit and Credit Memo
4.4.1 Overview
4.4.2 Enter Credit Memo
4.4.3 Matching credit memo to invoice/PO
4.5 Entering prepayment invoices
4.5.1 Overview
4.5.2 Create Prepayment Invoice
5 Creation of Recurring Invoice
5.1 Overview
5.2 Setup Special Calendar
5.3 Define recurring invoice template
5.4 Generate recurring Invoice

8/3/2019 AP Step by Step Training
http://slidepdf.com/reader/full/ap-step-by-step-training 2/93
5.5 Invoice validation
5.5.1 Canceling a Prepayment invoice
5.5.2 Paying a prepayment
5.5.3 Applying a Prepayment
5.5.4 Un-applying a Prepayment
6 Invoice Validation
6.1 Introduction
6.2 Online Validation
6.3 Submitting payable approval program
7 Holds
8 Payable accounting process
9 Payment
9.1 Overview
10 Manual Payment
10.1 Overview
10.2 Pay an Invoice manually
10.3 Printing a Payment
11 Batch Payment
11.1 Batch Payment Process
This payment format contains one credit line and multiple credit lines.
11.2 Initiating Payment Batches
11.3 Selecting invoice / Verify Payment Register is correct
11.4 Modify Payment
11.4.1 Adding an invoice to a payment batch
11.4.2 Removing an Invoice from Payment Batch
11.4.3 Removing all Invoices for a Particular supplier site from a payment batch
11.4.4 Changing payment or discount amounts for a selected invoice
11.5 Formatting Payments

8/3/2019 AP Step by Step Training
http://slidepdf.com/reader/full/ap-step-by-step-training 3/93
11.6 Confirm Payment Batch
11.7 Payment Batch sets
12 Stop Payments
12.1 Stopping a Payment
12.2 Releasing a Stop Payment
12.3 Voiding a Payment
13 Payables Transfer to General Ledger
14 Open and Close Period
14.1 Period control status
14.2 Open a Period
14.3 Close Period
End user Manual for Account Payable
1 Accounts Payable
1.1 Overview
Accounts Payable designed is designed for
Supplier creation and maintenance
Recording invoices from suppliers
Payment to vendors
Creation of banks
Transfer of accounting information to GL
Oracle Payables is one of the sub-ledgers of General Ledger and provides a means to gather
information pertinent to the Payables and tracks the status of payments to the suppliers

8/3/2019 AP Step by Step Training
http://slidepdf.com/reader/full/ap-step-by-step-training 4/93
1.2 High Level Process flow diagram
Purchasing
Accounting of
Invoices
Pay invoices
Reconcile
Payments
General
Ledger
Enter invoices
Enter supplier
8/3/2019 AP Step by Step Training
http://slidepdf.com/reader/full/ap-step-by-step-training 5/93
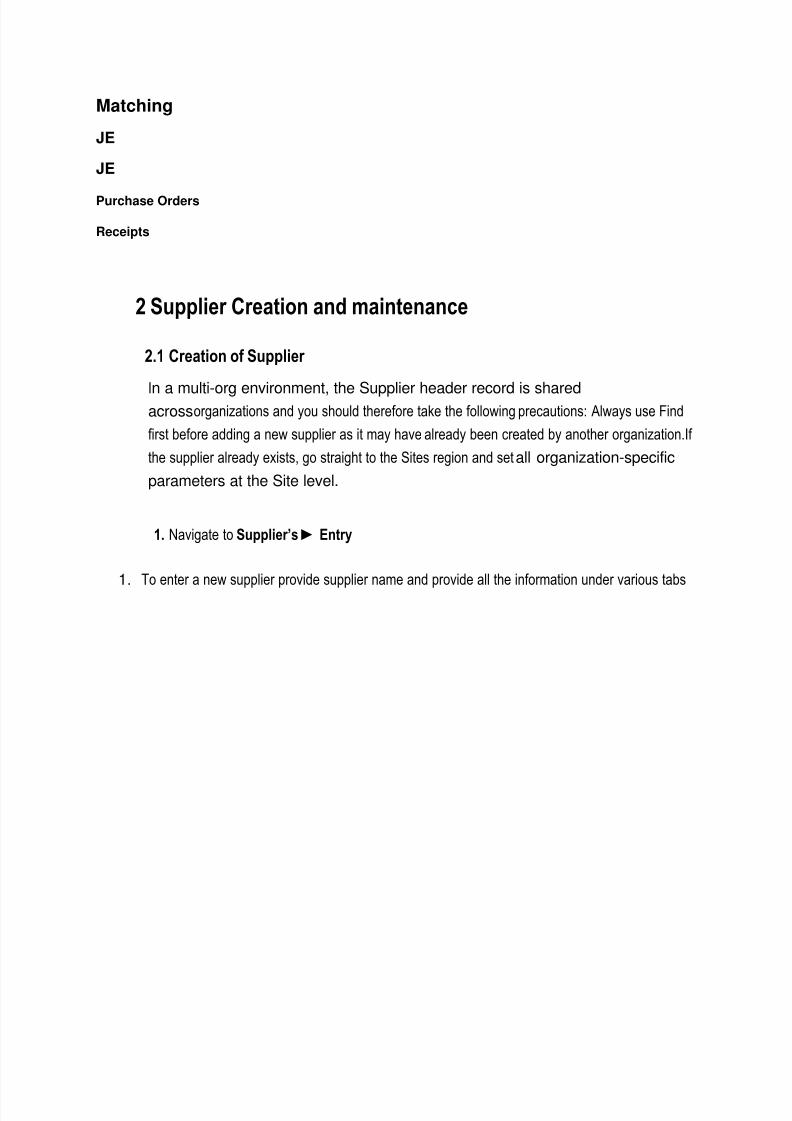
Matching
JE
JE
Purchase Orders
Receipts
2 Supplier Creation and maintenance
2.1 Creation of Supplier
In a multi-org environment, the Supplier header record is sharedacrossorganizations and you should therefore take the following precautions: Always use Find
first before adding a new supplier as it may have already been created by another organization.If
the supplier already exists, go straight to the Sites region and set all organization-specific
parameters at the Site level.
1. Navigate to Supplier’s ► Entry
1. To enter a new supplier provide supplier name and provide all the information under various tabs

8/3/2019 AP Step by Step Training
http://slidepdf.com/reader/full/ap-step-by-step-training 6/93
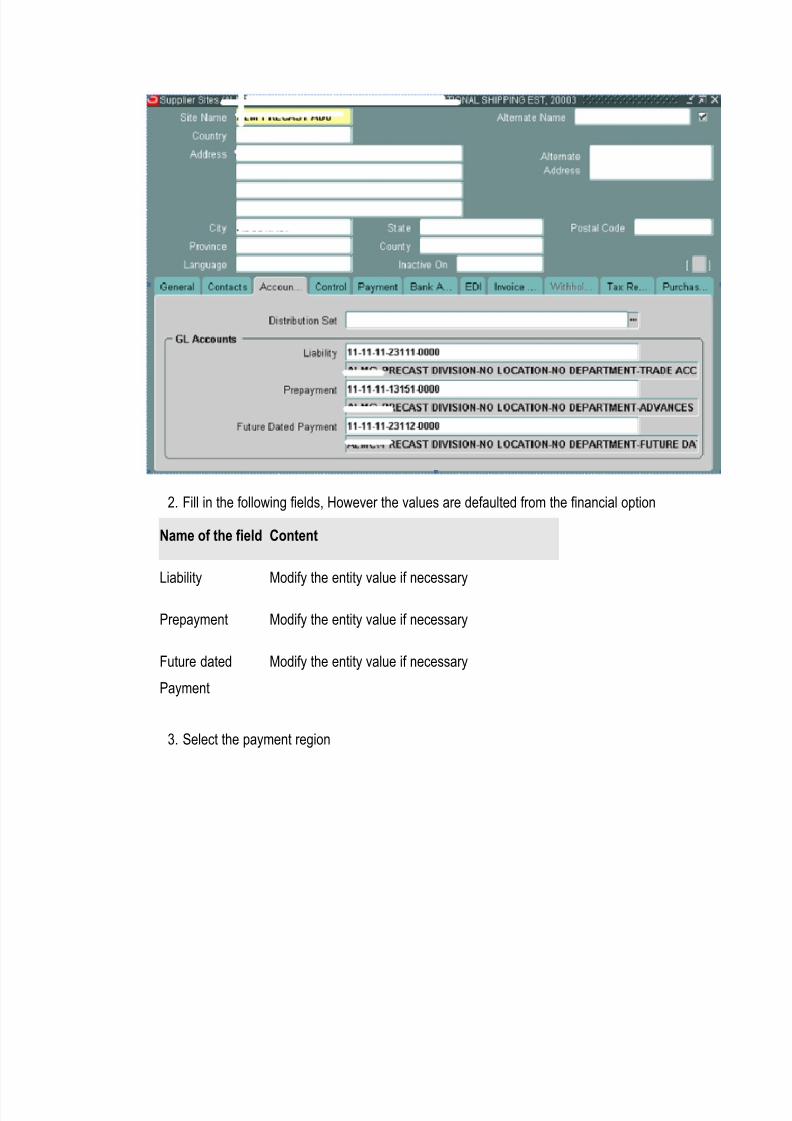
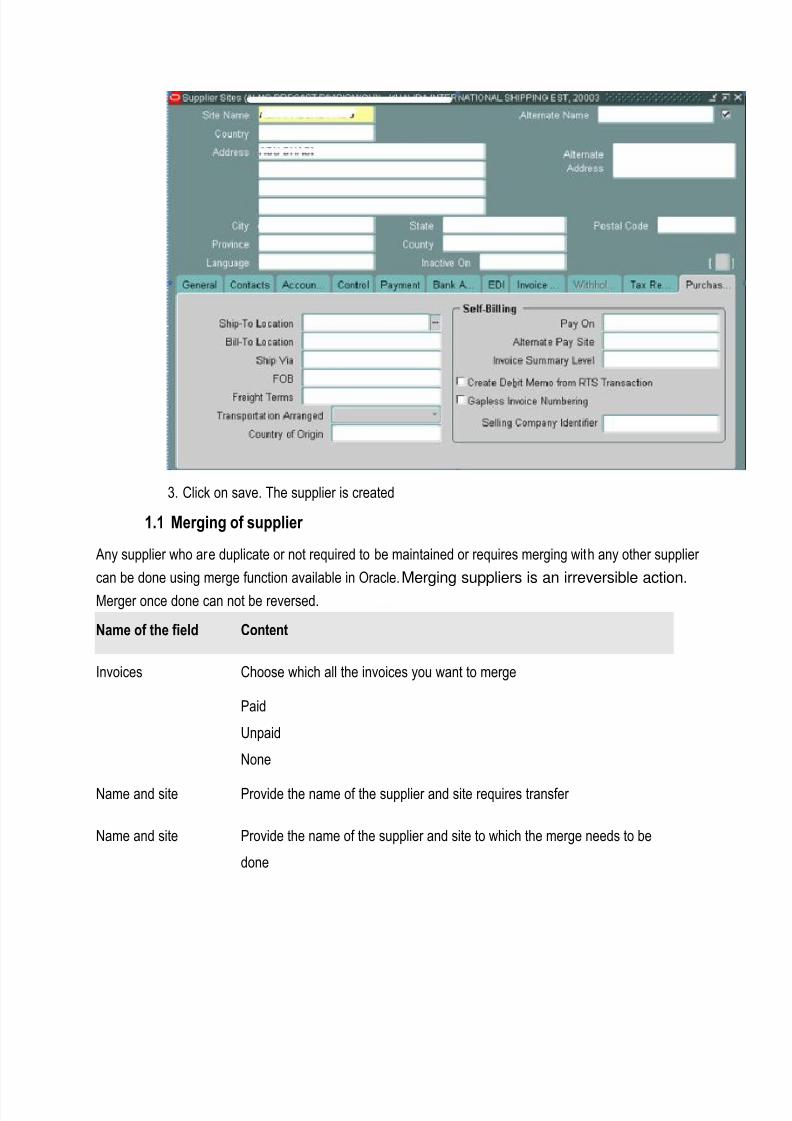
3. Select the Sites button. To update a site, use the PgUp / PgDn buttons to find the required
site. Provide the following information against various tabs

8/3/2019 AP Step by Step Training
http://slidepdf.com/reader/full/ap-step-by-step-training 7/93
1. Fill in the following fields
Name of the
field
Content
Site Name Enter a Name for the site
Address Enter the Address and other details of the site
Site Uses Define what this site is used for - Payment, Purchasing, Procurement Card or
RFQ only. The supplier must have a Pay Site to enter invoices, and a
Purchasing Site to enter Pos
Region
communications
If you have the site phone numbers, specify them in the appropriate fields

8/3/2019 AP Step by Step Training
http://slidepdf.com/reader/full/ap-step-by-step-training 8/93
1. Select the Contacts region
End user Manual for Account Payable
Optionally add information on site contacts as required.
1. Select the accounting region
8/3/2019 AP Step by Step Training
http://slidepdf.com/reader/full/ap-step-by-step-training 9/93

8/3/2019 AP Step by Step Training
http://slidepdf.com/reader/full/ap-step-by-step-training 10/93
4. Select the bank account region
Use this region to record the supplier bank accounts that your suppliers and supplier sites use
for electronic payment transactions. Information you enter in this region of the Supplier
and Supplier Sites windows will appear in the supplier assignments region of the
Bank Account window. Before filling in this region it is necessary to have created
the account in the AP Bank Account form.

8/3/2019 AP Step by Step Training
http://slidepdf.com/reader/full/ap-step-by-step-training 11/93
Page 4 of 4
End user Manual for Account Payable
1. Select the invoice tax region

8/3/2019 AP Step by Step Training
http://slidepdf.com/reader/full/ap-step-by-step-training 12/93
2. Select the Purchasing region
All the options are derived from the system defaults defined in the purchasing and AP setups
8/3/2019 AP Step by Step Training
http://slidepdf.com/reader/full/ap-step-by-step-training 13/93
3. Click on save. The supplier is created
1.1 Merging of supplier
Any supplier who are duplicate or not required to be maintained or requires merging with any other supplier
can be done using merge function available in Oracle. Merging suppliers is an irreversible action.
Merger once done can not be reversed.
Name of the field Content
Invoices Choose which all the invoices you want to merge
Paid
Unpaid
None
Name and site Provide the name of the supplier and site requires transfer
Name and site Provide the name of the supplier and site to which the merge needs to be
done
8/3/2019 AP Step by Step Training
http://slidepdf.com/reader/full/ap-step-by-step-training 14/93
Merger Run the merge to execute the merge program
2 Invoice Entry
2.1 Overview
Every transaction that needs to be paid would be recorded as invoice. This is required even for advance
payment, petty payment etc. Payable gives the option to enter invoices in single or in batches. In batches
the value such as payment terms, currency, GL date can be given that will default to individual invoices to
make data entry faster.
The following are various type of invoices used to record transactions
Standard. A trade invoice you receive from a supplier.
PO Default. A trade invoice you want to automatically match to a specified purchase order
and then manually match to the individual shipments on the purchase order.
Credit Memo. A negative amount invoice you receive from a supplier representing a credit for goods or
services purchased.
Debit Memo. A negative amount invoice you send to notify a supplier of a credit you
recorded for goods or services purchased.
Prepayment. An advance payment you make to a supplier or employee
Expense Report. An invoice you enter to record business-related employee expenses
Page 4 of 4
End user Manual for Account Payable
1.1 Entering Standard Invoice
These invoices are entered in payables not matched against purchase orders.
1. Navigate to Invoices ► Entry ► Invoices
The following window will open:

8/3/2019 AP Step by Step Training
http://slidepdf.com/reader/full/ap-step-by-step-training 15/93
1. Fill in the following fields
Name of the
filed
Content
Voucher Automatically defined by Oracle
Type Choose Standard
Supplier or
Supplier Number
Enter the Supplier or Supplier Number
Site Enter the Supplier Site to which you will send payment of the invoice. AP
will print the address for this site on the payment.
Invoice Date Enter the Invoice Date or accept the Payables default (today's date)
bychoosing If you enter a date in a future period. AP will put the invoice
on Future Period hold during Approval

8/3/2019 AP Step by Step Training
http://slidepdf.com/reader/full/ap-step-by-step-training 16/93
Invoice Number Enter the Invoice Number from the invoice your supplier sent you or accept
the Payables default (today's date) by choosing [Tab]. AP will not
allow you to enter duplicate invoice numbers for the same supplier.
Invoice Amount Enter the full Invoice Amount including tax
Description Enter the Description of your invoice. This will appear on your
paymentdocument and may appear in your general ledger.
G L Date Enter the GL Date
Withholding tax
group
Not applicable
1. AP automatically schedules payment of the invoice using the Invoice Amount, Payment Terms,
and Terms Date. Enter or review the defaults for these fields by Clicking on Payments
4. Enter distributions manually or automatically by entering a Distribution Set,
Entering Distribution Manually
8/3/2019 AP Step by Step Training
http://slidepdf.com/reader/full/ap-step-by-step-training 17/93
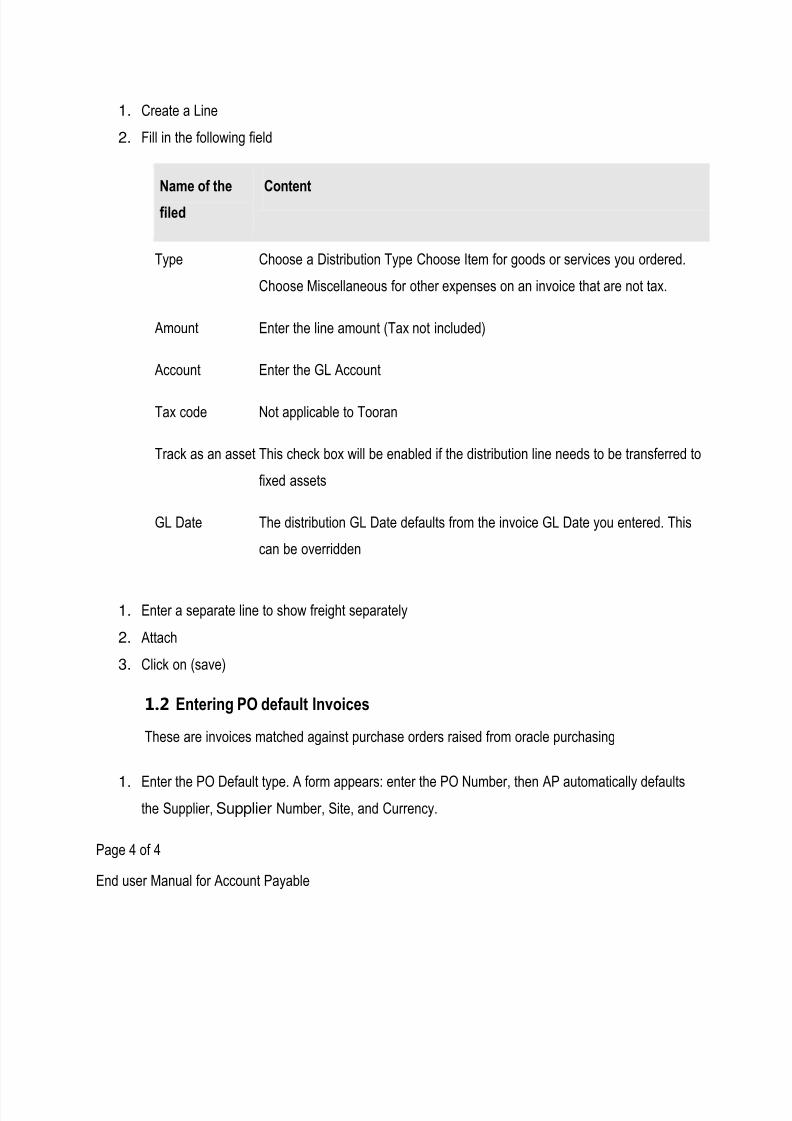
1. Create a Line
2. Fill in the following field
Name of the
filed
Content
Type Choose a Distribution Type Choose Item for goods or services you ordered.
Choose Miscellaneous for other expenses on an invoice that are not tax.
Amount Enter the line amount (Tax not included)
Account Enter the GL Account
Tax code Not applicable to Tooran
Track as an asset This check box will be enabled if the distribution line needs to be transferred to
fixed assets
GL Date The distribution GL Date defaults from the invoice GL Date you entered. This
can be overridden
1. Enter a separate line to show freight separately
2. Attach
3. Click on (save)
1.2 Entering PO default Invoices
These are invoices matched against purchase orders raised from oracle purchasing
1. Enter the PO Default type. A form appears: enter the PO Number, then AP automatically defaultsthe Supplier, Supplier Number, Site, and Currency.
Page 4 of 4
End user Manual for Account Payable

8/3/2019 AP Step by Step Training
http://slidepdf.com/reader/full/ap-step-by-step-training 18/93
1. Enter all basic invoice information (see: Entering Basic Invoices), but do not manually enter the
distributions.
2. Select the appropriate withholding tax group in the tax field
3. Choose the Match button. The following window will open:

8/3/2019 AP Step by Step Training
http://slidepdf.com/reader/full/ap-step-by-step-training 19/93
1. The order number is already specified. Optionally change the invoice payment term.
1. For each shipment you want to match, select the shipment by clicking the Match check box and
enter the invoiced quantity. When you enter one field, Payables automatically calculates the
remaining field (Quantity Invoiced x Unit Price = Match Amount). It can be changed.
If you want further details to match, you can match to purchase
orderdistributions by choosing the Distribute button. For each purchase order
distribution you want to match to, select the purchase order distributions and enter either the
Quantity Invoiced or Match Amount.
1. Choose Match to save your match
Page 3 of 3
End user Manual for Account Payable
1. Review the invoice distributions AP created by choosing the Distribution button from either
the Invoices Summary or Invoices detail window.
The following window with matched distribution line(s) will open:

8/3/2019 AP Step by Step Training
http://slidepdf.com/reader/full/ap-step-by-step-training 20/93
Final matching a Purchase order
When you are entering a purchase order matched invoice or a credit/debit memo, you can check
Final Match in the Match to PO or Match to Invoice Distribution window to have AP
permanently close the purchase order during invoice Approval. When you approve a final-
matched invoice, Approval permanently closes the matched purchase order. You cannot
reopen a permanently-closed purchase order or perform any further matching to thepurchase order.

8/3/2019 AP Step by Step Training
http://slidepdf.com/reader/full/ap-step-by-step-training 21/93
Attention: Check Final Match only if you are certain this is a final match against therelated
purchase order and you want Approval to permanently close the purchase order.
1.1 Entering Debit and Credit Memo
1.1.1 Overview
In oracle Credit and debit memos are used when you receive credit for items you
returned to a supplier. Credit/debit memos are netted with basic invoices at payment time.Thedifference between credit and debit memos is:
Credit Memo - Negative amount invoice created by a supplier and sent to youto notify
you of a credit.
Debit Memo - Negative amount invoice created by you and sent to a supplierto notify the
supplier of a credit you are recording.
1.1.2 Enter Credit Memo
In the Invoices Summary form enter the Credit Memo Invoice Type. Enter
anegative invoice amount and all basic invoice information as in standard Invoices.

8/3/2019 AP Step by Step Training
http://slidepdf.com/reader/full/ap-step-by-step-training 22/93
1. Enter the distribution automatically in one of the following ways:
Manually
Or by matching to the original invoice you entered
1. Click on save
Page 3 of 3
End user Manual for Account Payable
1.1.1 Matching credit memo to invoice/PO
1.1.1.1 MATCHING OPTIONS WHEN THE ORIGINAL INVOICE IS NOT PURCHASE ORDER MATCHED In this case you can choose one of the following:
Match to an invoice: Payables prorate your credit amount based on theinvoice
distribution amounts of the original invoice. Payable automatically creates invoice
distributions for the credit memo based on the distributions ofthe original invoice.

8/3/2019 AP Step by Step Training
http://slidepdf.com/reader/full/ap-step-by-step-training 23/93
Match to specific invoice distributions: You can allocate the credit amount to
specific invoice distributions of the original invoice. Payables automaticallycreate
invoice distributions for the credit memo based on the original invoicedistribution that
you select. For example, you may order three chairs for threedifferent departments
and return one. You can match a credit invoice to theoriginal distribution for that
department to ensure that the credit matches thecharge.
Follow the steps below
1. Enter a Credit Memo type invoice.
2. Enter a negative invoice amount and all basic invoice information but do not manually enter the
distributions
3. At the pop-up list to the right of the Match button, choose Invoice, and then choose the Match
button.
8/3/2019 AP Step by Step Training
http://slidepdf.com/reader/full/ap-step-by-step-training 24/93
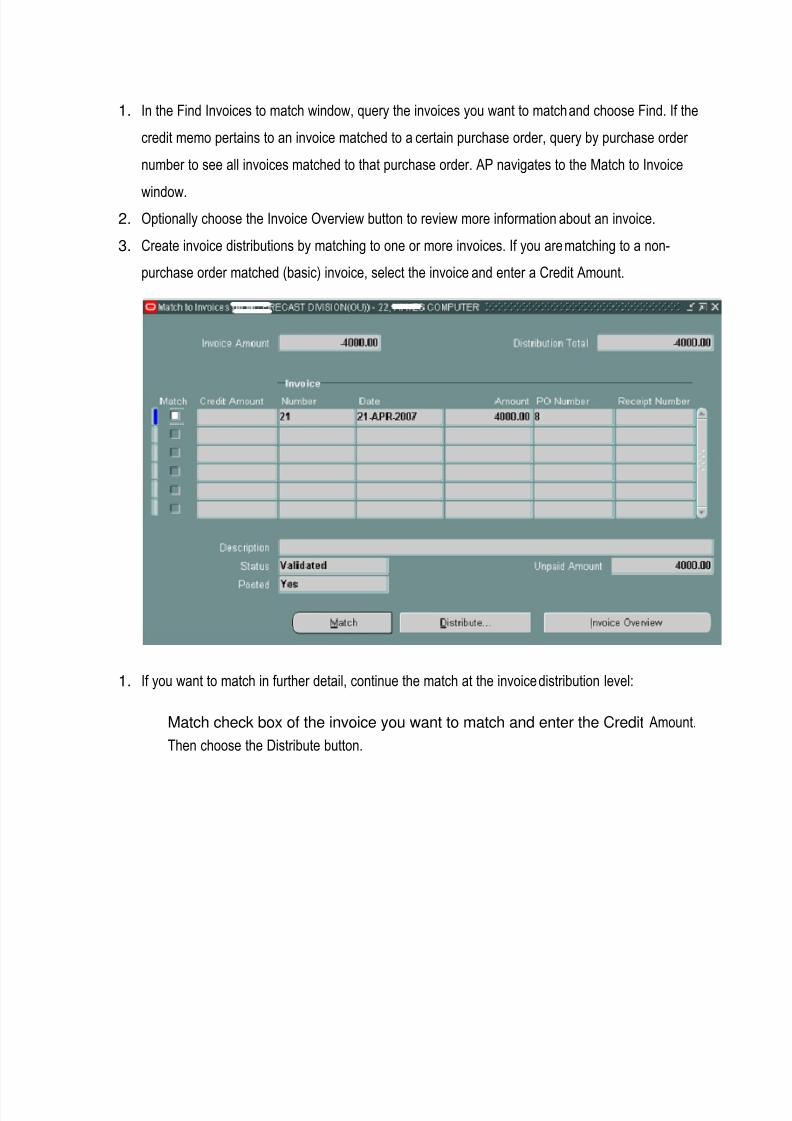
1. In the Find Invoices to match window, query the invoices you want to match and choose Find. If the
credit memo pertains to an invoice matched to a certain purchase order, query by purchase order
number to see all invoices matched to that purchase order. AP navigates to the Match to Invoice
window. 2. Optionally choose the Invoice Overview button to review more information about an invoice.
3. Create invoice distributions by matching to one or more invoices. If you are matching to a non-
purchase order matched (basic) invoice, select the invoice and enter a Credit Amount.
1. If you want to match in further detail, continue the match at the invoice distribution level:
Match check box of the invoice you want to match and enter the Credit Amount.
Then choose the Distribute button.

8/3/2019 AP Step by Step Training
http://slidepdf.com/reader/full/ap-step-by-step-training 25/93
1. For each invoice distribution you want to match to, select the distribution and enter a Credit
Amount.
2. Choose the Match button to create invoice distributions for the credit memo based on the matches
you made.
3. To review the new invoice distributions, choose the Distributions button from the InvoicesSummary.
1.1.1.2 MATCHING OPTIONS WHEN THE ORIGINAL INVOICE IS PURCHASE ORDER MATCHED
In this case you can choose one of the following:
Match to specific invoice distributions: You can allocate the credit amount
to specific invoice distributions of the original invoice. Payables
automatically create invoice distributions for the credit memo based on the original
invoice distributions that you select. Match to purchase order receipts: Payables prorates, based on the
quantity billed, your credit amount across all purchase order distributions
associated with the purchase order receipt to which you match the credit memo.
Payables automatically create invoice distributions for the credit memo based on the
purchase order distributions associated with the purchase order receipt you match to.

8/3/2019 AP Step by Step Training
http://slidepdf.com/reader/full/ap-step-by-step-training 26/93
Follow the steps below to create a credit memo to match against PO
1. Enter a Credit Memo type invoice.
1. Enter a negative invoice amount and all basic invoice information but do not manually enter the
distributions.
1. At the pop-up list to the right of the Match button, choose Purchase Order or Receipt, and then
choose the Match button.
1. In the Find screen, enter the search criteria to find the purchase order
1. Click on the Find button:
Page 5 of 5
End user Manual for Account Payable
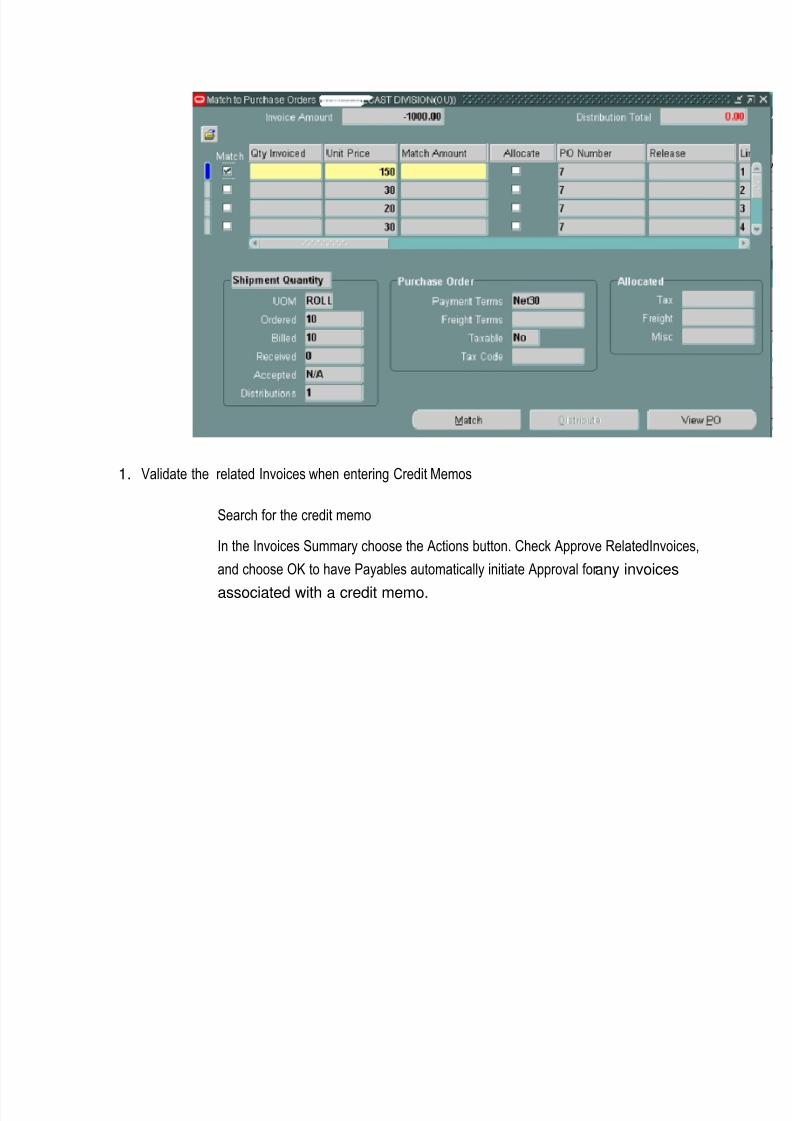
1. For each line you want to match to, select the line by checking the Match checkbox and enter
either a Quantity Invoiced or Match Amount. AP automatically calculates the remaining field
(Quantity Invoiced x Unit Price = Match Amount). You can optionally change the Unit Price, which
defaults from the purchase order.
8/3/2019 AP Step by Step Training
http://slidepdf.com/reader/full/ap-step-by-step-training 27/93
1. Validate the related Invoices when entering Credit Memos
Search for the credit memo
In the Invoices Summary choose the Actions button. Check Approve RelatedInvoices,
and choose OK to have Payables automatically initiate Approval for any invoices
associated with a credit memo.

8/3/2019 AP Step by Step Training
http://slidepdf.com/reader/full/ap-step-by-step-training 28/93
1.1 Entering prepayment invoices
1.1.1 Overview
A prepayment is a type of invoice you enter to pay an advance payment to a supplier or an
employee. Create a prepayment in much the same way as you create a regular invoice. Review
the Prepayment Status report to review unapplied payments or unpaid or partially paid invoices for
suppliers/employees.
1.1.2 Create Prepayment Invoice
1. Choose the following path:
Invoices ► Entry ► Invoice Batches.
Cllick on the button Invoices

8/3/2019 AP Step by Step Training
http://slidepdf.com/reader/full/ap-step-by-step-training 29/93
2. Select the prepayment as invoice type
3. Enter all the other field as you do for a standard invoice, expect for the following special
field
Name of the field Content

8/3/2019 AP Step by Step Training
http://slidepdf.com/reader/full/ap-step-by-step-training 30/93
Prepayment Type Select Temporary or Permanent as the Prepayment Type. Specify the
Prepayment Type as Temporary if you want to apply the prepayment to an
invoice or the advance to an employee expense report. You specify the
Prepayment Type as permanent if you do not want to apply the
prepayment to an invoice.
ettlement Date Accept the Default or change. Payables use the Settlement Date to
prevent you from applying a temporary prepayment to an invoice until on or
after the Settlement Date of the prepayment.
You can establish a Purchase Order association for your prepayment when you enter the
prepayment. If you associate a prepayment with a purchase order, Payables allows you to
apply the prepayment only to the invoices matched to the associated purchase order.
If you are using multiple currencies, you can enter a prepayment inanycurrency you have defined. You can only apply a prepayment to an
invoice inthe same currency as the invoice.
1. Click on Distribution.
AP creates a prepayment distribution line automatically when you enter a prepayment.Oracle
Payables debits the Prepayment Accounting Flex-field from the suppliersite, but you
should fill the Amount field. If you enter a tax name on a prepayment, Payables also creates a
tax distribution line
End user Manual for Account Payable
8/3/2019 AP Step by Step Training
http://slidepdf.com/reader/full/ap-step-by-step-training 31/93
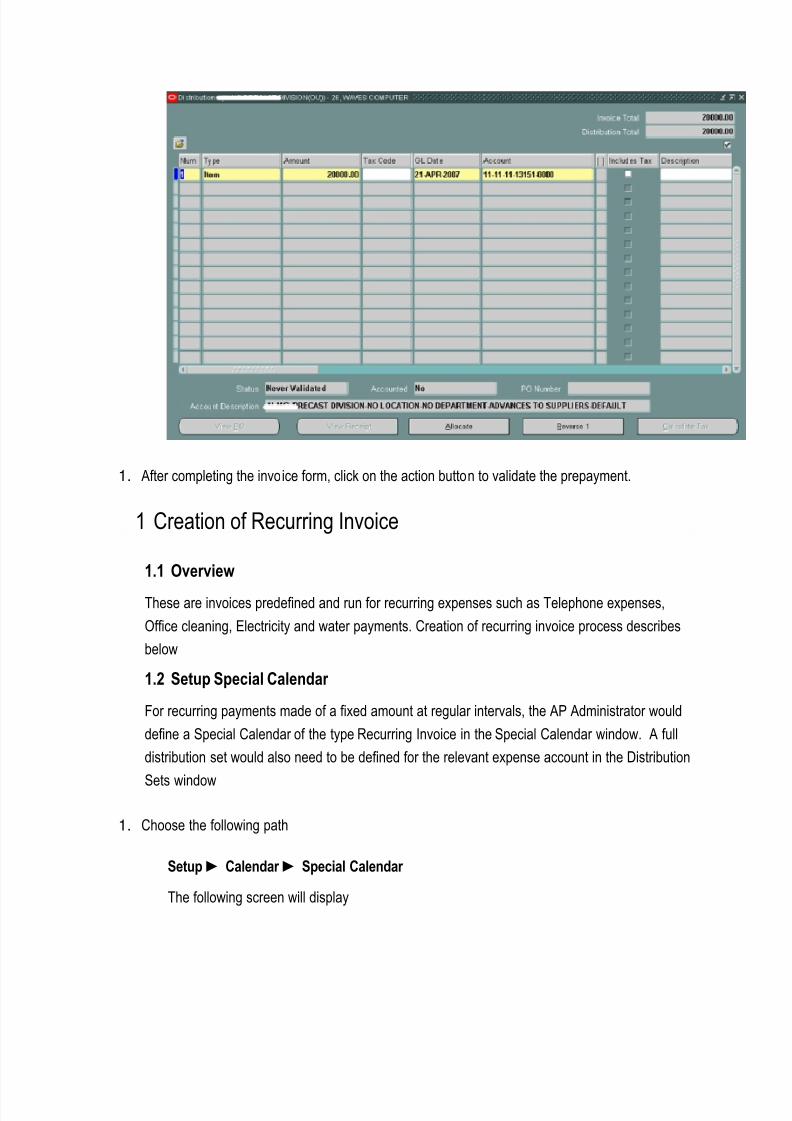
1. After completing the invoice form, click on the action button to validate the prepayment.
1 Creation of Recurring Invoice
1.1 Overview
These are invoices predefined and run for recurring expenses such as Telephone expenses,
Office cleaning, Electricity and water payments. Creation of recurring invoice process describes
below
1.2 Setup Special Calendar
For recurring payments made of a fixed amount at regular intervals, the AP Administrator would
define a Special Calendar of the type Recurring Invoice in the Special Calendar window. A full
distribution set would also need to be defined for the relevant expense account in the Distribution
Sets window
1. Choose the following path
Setup ► Calendar ► Special Calendar
The following screen will display
8/3/2019 AP Step by Step Training
http://slidepdf.com/reader/full/ap-step-by-step-training 32/93
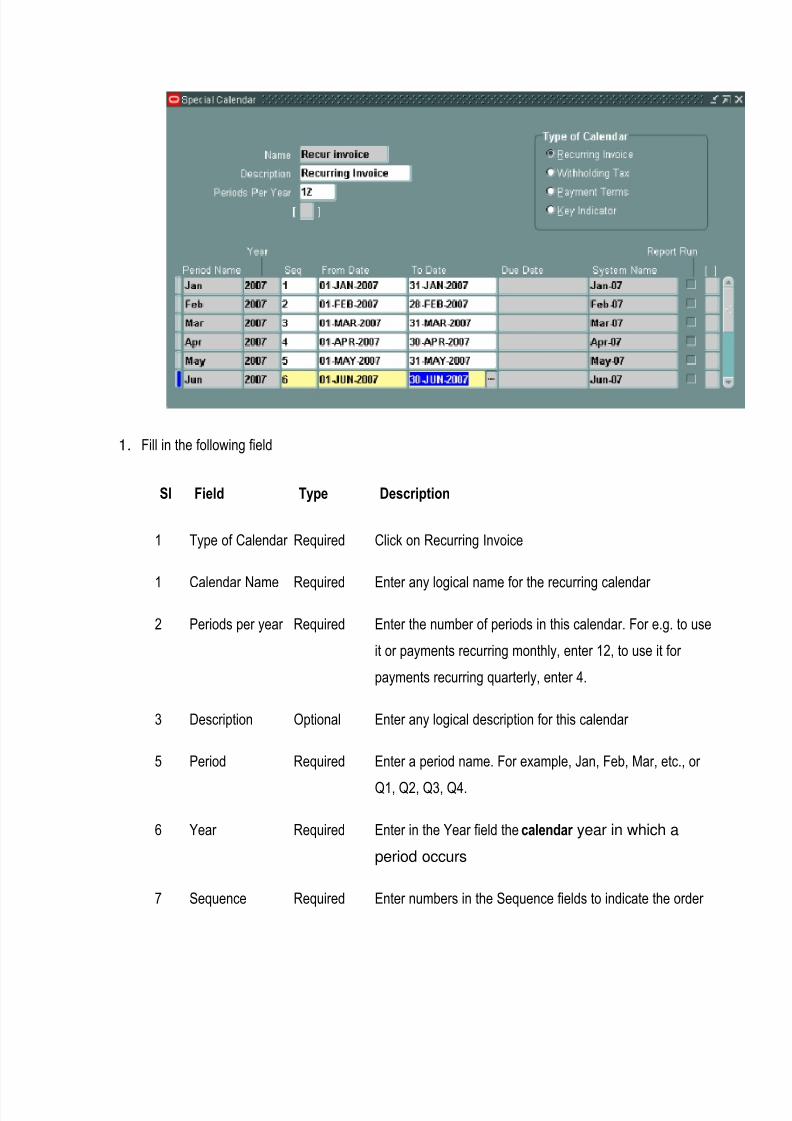
1. Fill in the following field
Sl Field Type Description
1 Type of Calendar Required Click on Recurring Invoice
1 Calendar Name Required Enter any logical name for the recurring calendar
2 Periods per year Required Enter the number of periods in this calendar. For e.g. to use
it or payments recurring monthly, enter 12, to use it for
payments recurring quarterly, enter 4.
3 Description Optional Enter any logical description for this calendar
5 Period Required Enter a period name. For example, Jan, Feb, Mar, etc., or
Q1, Q2, Q3, Q4.
6 Year Required Enter in the Year field the calendar year in which a
period occurs
7 Sequence Required Enter numbers in the Sequence fields to indicate the order

8/3/2019 AP Step by Step Training
http://slidepdf.com/reader/full/ap-step-by-step-training 33/93
in which the periods occur. The sequence numbers of a
period should represent the sequence of the period in a
regular calendar. E.g. May - December 1995 should be
sequenced 5-12, and January 1996 should be sequenced
1.
8 Start Date Required Enter the Start Date for this period
9 End Date Required Enter the End Date for this period
10 System Name Required,
Defaults
The System Name will automatically default by taking the
combination of Period name and the last two digits of a
year.
1. Save the Recurring calendar
1.3 Define recurring invoice template
1. Choose the following path:
Invoice ► Entry ► Recurring Invoice
The following screen will display

8/3/2019 AP Step by Step Training
http://slidepdf.com/reader/full/ap-step-by-step-training 34/93
2. Fill the following fields
Sl No Field Type Description
1 Supplier Name Required, LOV Enter the Supplier name for which you want to create the
recurring invoice.
2 Supplier Number Required,
Defaults
The Supplier Number will default
3 Supplier Site Required, LOV Enter the Supplier Site for which you want to create the
recurring invoice. (Choose the site relevant to the entity,
identifiable by the prefixes)
4 Supplier Pay
Group
Required,
Defaults
The Pay Group will default from the supplier site setup.
Accept the default.
5 Calendar Name Required, LOV Select the appropriate special calendar.
6 Periods Required Enter the number of periods for which you want to pay this
8/3/2019 AP Step by Step Training
http://slidepdf.com/reader/full/ap-step-by-step-training 35/93
vendor. You will get a message if the numbers of periods
you enter are more than the periods defined for the
calendar you have chosen.
7 First Required Enter the first period name for which you want to pay this
vendor.
8 Next Display Only The next period name will default depending upon the first
period name entered. Once the invoices are generated, this
will be updated to the next period for which the invoice
should be created.
9 Remaining Display Only The remaining periods for which the invoices remain to becreated will default.
10 Number Required Enter any identifiable number; this with a suffix of the period
name will be assigned to the invoice created as the invoice
number.
11 Description Optional Enter any logical description for this invoice
12 Currency Required,
Defaults
The functional currency defaults, unless the supplier site
invoice currency is different. Accept the default.
13 Liability Account Required,
Defaults
This defaults from the supplier site setup. Accept default.
14 GL Date Optional GL Date for the liability will be assigned in any of these
ways:
1) If you enter a GL Date, it will default to every invoice
you create from this template and will be the date the
liability will take effect in GL.
2) If you leave it blank, and create the invoice in period
where system period and special calendar period are
8/3/2019 AP Step by Step Training
http://slidepdf.com/reader/full/ap-step-by-step-training 36/93
the same, the beginning date of the recurring invoice's
period defaults.
3) If you leave it blank, and create the invoice in period
where system period and special calendar period are
not the same (in sense of the period in which the
system date falls), the system date on which you create
the invoice defaults.
Generally you will follow the second case.
15 Payment Method Required,
Defaults
This defaults from the supplier site Setup. Accept default.
16 Payment Terms Required,
Defaults
This defaults from the supplier site Setup. Accept default or
change if required.
17 Distribution Set Required, LOV Choose a distribution set for the accounts to be debited.
Only a full type distribution set is allowed for recurring
invoices.
3. Click on the Amount tab
Page 6 of 6
End user Manual for Account Payable

8/3/2019 AP Step by Step Training
http://slidepdf.com/reader/full/ap-step-by-step-training 37/93

8/3/2019 AP Step by Step Training
http://slidepdf.com/reader/full/ap-step-by-step-training 38/93
6 mounts
Remaining
Defaults The Amount remaining will default depending upon the
amount paid against this invoice template periodically.
1.1 Generate recurring Invoice
Vendor submits bills for the recurring expense incurred, if required. Designated authority would
approve on the bill (the physical hard copy), if any, which would then be submitted to the accounts
department. Against it, you would generate in Payables. If no bill has to be submitted, generate the
recurring invoice at periodic intervals defined in the recurring invoice calendar, in the Recurring
Invoices window.
1. Choose the following path:
Invoice ► Entry ► Recurring Invoice
In this screen, query, on any criterion you know, the recurring invoice template from which you
want to create an invoice. Once it is found, click on the button Generate Recurring Invoices on
the Recurring Invoice Template. The following form will open up:
1. Fields have the following impact in recurring invoice
Sl No Field Type Description
1 Invoice
Number
Display Only This is the number suffixed with the special calendar period
name and will be the number given to the invoice.
8/3/2019 AP Step by Step Training
http://slidepdf.com/reader/full/ap-step-by-step-training 39/93
2 GL Date Required,
Defaults
This is the date on which the account debited will take
effect in GL, it defaults as the first date of the special
calendar period for which you are creating the recurring
invoice, and you can change it if required.
3 Amount Display Only This defaults from the amount assigned to the period.
4 Exchange
Rate – Type
Conditionally
Required,
LOV
For foreign currency invoices, choose User type
5 Rate Conditionally
Required
For foreign currency invoices, enter the exchange rate.
3. After reviewing the displayed information click OK
1.2 Invoice validation
For more details please refer Prepayment
1.2.1 Canceling a Prepayment invoice
If the prepayment status is Unapproved or Unpaid, you can cancel the prepayment. If you
choose to cancel a prepayment in Unapproved or Unpaid status, the statusisupdated to Cancelled and Payables automatically reduces the prepayment amount to zero. You
cannot apply a cancelled prepayment to an invoice or expense report.
1.2.2 Paying a prepayment
You must fully pay a prepayment before you can apply the prepayment to an invoice. Once the
prepayment has been paid you can re-query the Invoices form to see the updatedAmount Paid
field and the updated Status field. When you pay the prepayment the status is updated to
Available. The prepayment is now available to be applied to invoice(s).
1. Click on the actions button to pay the prepayment
2. Check the pay in full box
3. Click on OK
1.2.3 Applying a Prepayment

8/3/2019 AP Step by Step Training
http://slidepdf.com/reader/full/ap-step-by-step-training 40/93
1. Choose the following path
Invoices ► Entry ► Invoice Batches.
2. Click on Invoice button
As you enter an invoice for a supplier with outstanding prepayments, AP notifies you of the
existence of any prepayments with the message: “Prepayments exist for thissupplier”. AP lets
you know if the prepayment is available to apply for an invoice or if an advance is
available to apply to an employee expense report.
1. Apply the prepayment by entering or selecting one or more invoices that you want to apply the
prepayment to.
2. Complete the entry of the invoice to which the prepayment(s) will be applied, approve the invoice(s)
and/or select the completed approved invoice(s).
3. Click on Actions
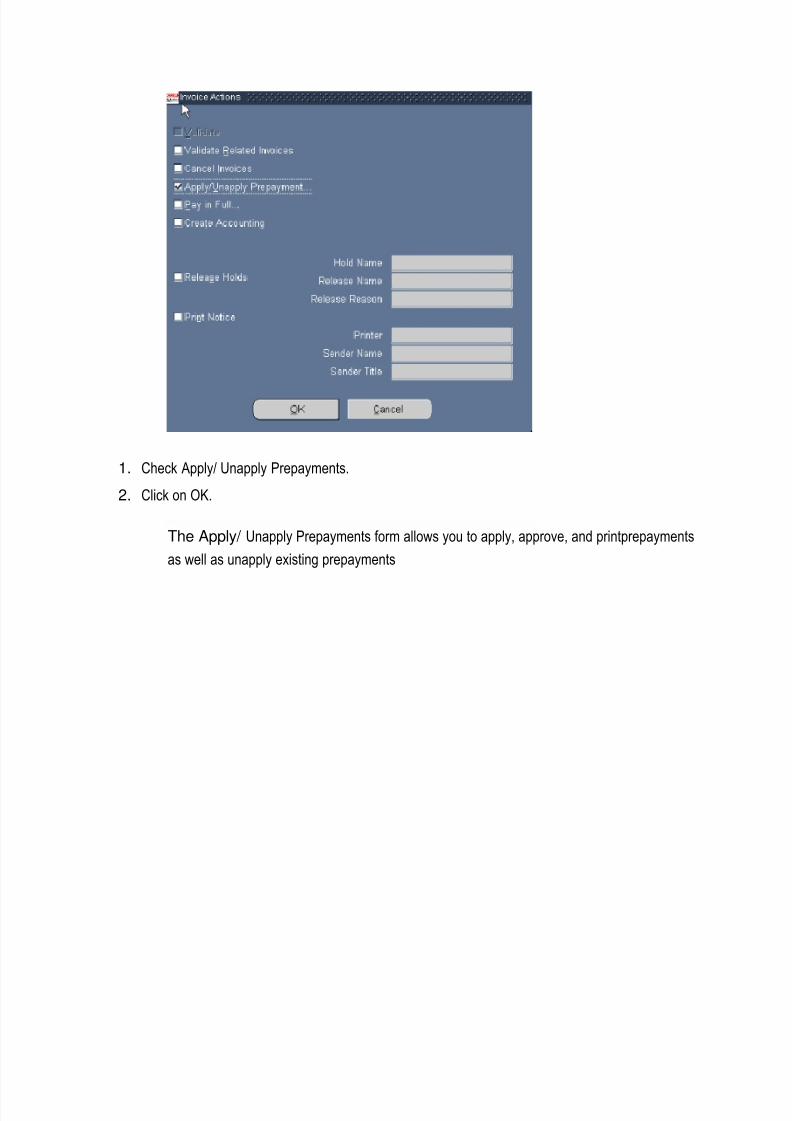
8/3/2019 AP Step by Step Training
http://slidepdf.com/reader/full/ap-step-by-step-training 41/93
1. Check Apply/ Unapply Prepayments.
2. Click on OK.
The Apply/ Unapply Prepayments form allows you to apply, approve, and printprepayments
as well as unapply existing prepayments
8/3/2019 AP Step by Step Training
http://slidepdf.com/reader/full/ap-step-by-step-training 42/93
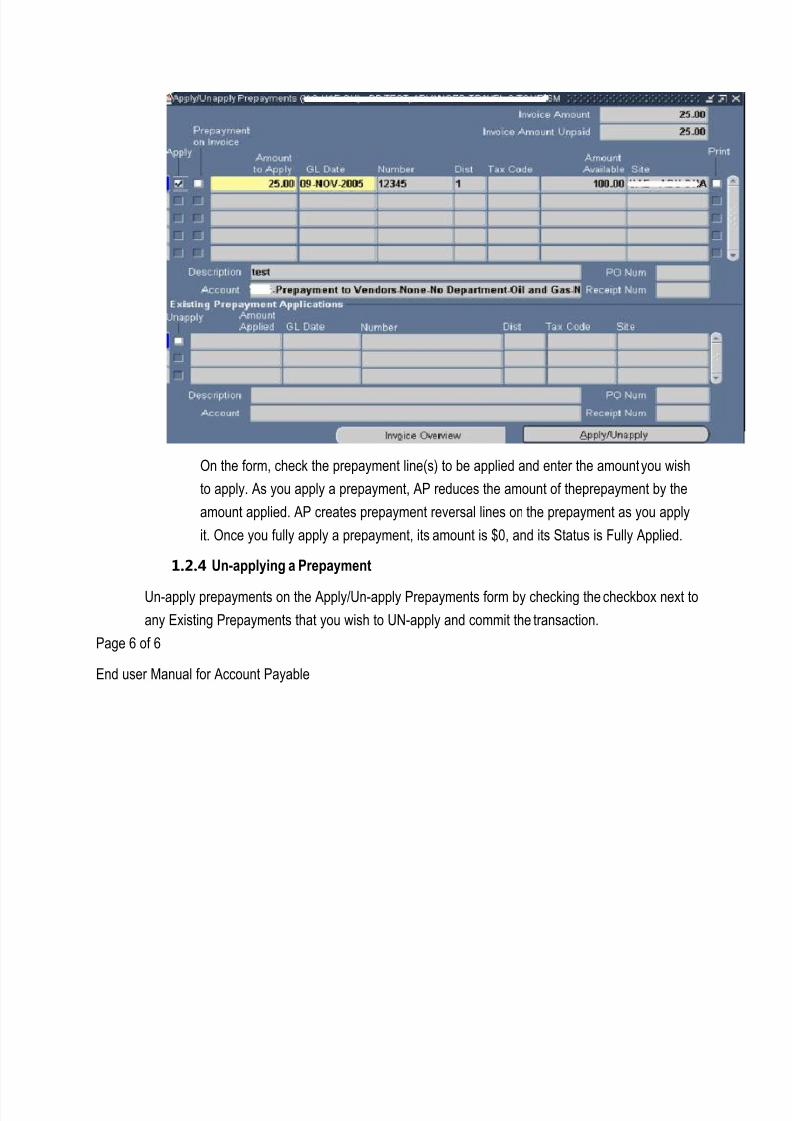
On the form, check the prepayment line(s) to be applied and enter the amount you wish
to apply. As you apply a prepayment, AP reduces the amount of theprepayment by the
amount applied. AP creates prepayment reversal lines on the prepayment as you apply
it. Once you fully apply a prepayment, its amount is $0, and its Status is Fully Applied.
1.2.4 Un-applying a Prepayment
Un-apply prepayments on the Apply/Un-apply Prepayments form by checking the checkbox next to
any Existing Prepayments that you wish to UN-apply and commit the transaction.
Page 6 of 6
End user Manual for Account Payable

8/3/2019 AP Step by Step Training
http://slidepdf.com/reader/full/ap-step-by-step-training 43/93
1 Invoice Validation
1.1 Introduction
Every invoice entered as above needs to be validated for account creation and for making
payment. The validation validates the matching, tax, period status, exchange rate, and distribution
information for invoices you enter and automatically applies holds to exceptioninvoices
Validation is done in one of the following ways
Online by using the validation button in the Invoice action button
Batch by submitting the Payables Approval program from the Submit Requests window.
.
1.2 Online Validation
Navigate to Invoices Entry ► Invoice Batches ► Invoices
In the Invoices window, find the invoice(s) for which you want to submit Approval. To select
individual invoices, hold down the Ctrl key and mouse click on each line; note that the number
shown on the Actions button represents the number of lines chosen.
8/3/2019 AP Step by Step Training
http://slidepdf.com/reader/full/ap-step-by-step-training 44/93
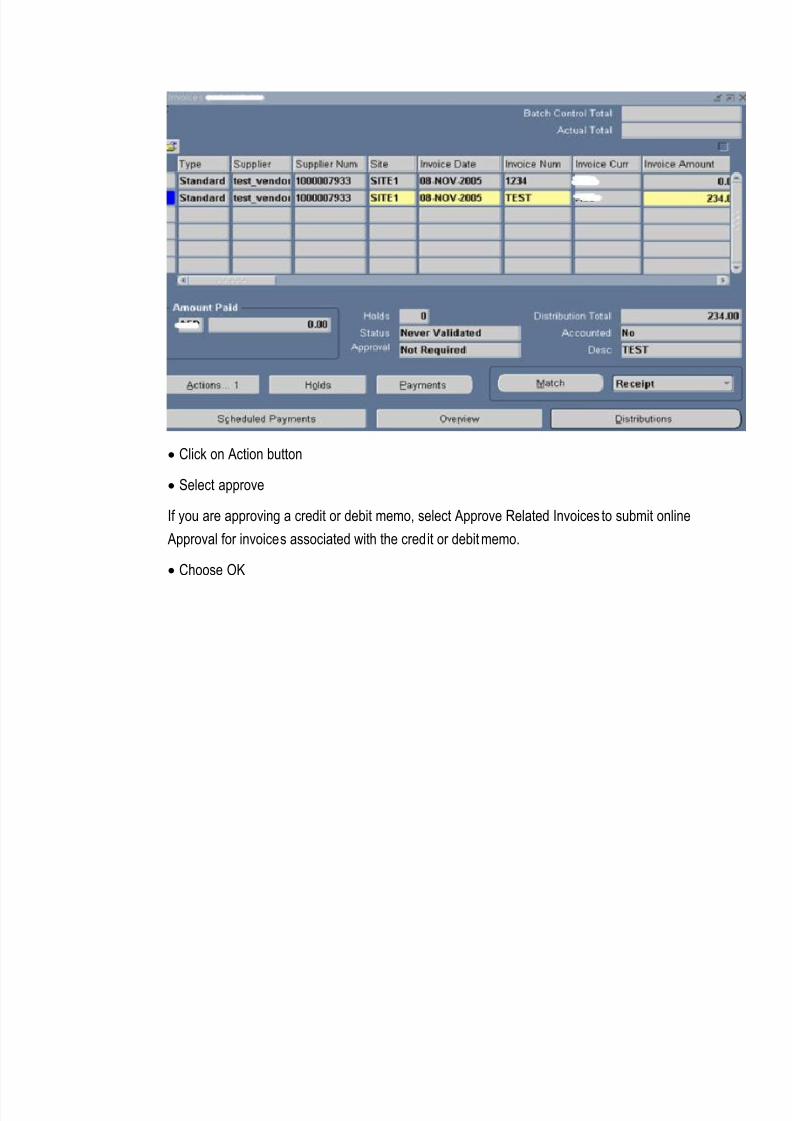
Click on Action button
Select approve
If you are approving a credit or debit memo, select Approve Related Invoices to submit online
Approval for invoices associated with the credit or debit memo.
Choose OK

8/3/2019 AP Step by Step Training
http://slidepdf.com/reader/full/ap-step-by-step-training 45/93
AP displays messages about the number of holds applied and released during
this cycle of Approval.
1.3 Submitting payable approval program
The validation under this method can be done for batch of invoices. You can identify all invoices thatPayables has not yet reviewed with Approval by submitting the Invoice Register for Unapproved
Invoices Only. You can check the Approval status of an invoice online in theInvoices window, or
the Invoices Batches window
Navigate to Request ►other ►Run.
Choose program Payable approval and submit
2 Holds
Holds are restriction placed on invoices so that these invoices can not be accounted and
prevented from payment
Holds are of two types
Manual holds
System holds

8/3/2019 AP Step by Step Training
http://slidepdf.com/reader/full/ap-step-by-step-training 46/93
A) Manual Holds There are three types of holds you can use to prevent payment of an invoice.
The hold can not be applied if the invoices are already selected for payment .These holds can be
released manually. The following are the type of the manual holds
Invoice Hold. You can manually apply one or more Invoice Hold Names ("holds") to an invoice
using the Invoice Holds window of the Invoice Workbench.
Scheduled Payment Hold. You can hold payment on part of an invoice by placing one or more of
the scheduled payments on hold in the Scheduled Payments window of the Invoice Workbench.
Supplier Hold. In the Supplier Sites window, you can enable the Hold All Payments, Hold
Unvalidated Invoices, or Hold Unmatched Invoices options. You also have the option of specifying
an Invoice Amount Limit for a supplier site.
B) Manual Holds.
These holds are created by system during invoice validation when ever an exception is
encountered by the system. These can be released only when the exception is corrected.Youmust fix the problem that caused Invoice Validation to place the hold on the invoice then resubmit
Invoice Validation to release the holds. You cannot release the following holds: The examples of
some of the holds are as below.
Dist Variance. Invoice amount does not equal the sum of the invoice distribution amounts.
No Rate. Foreign currency invoice does not have an exchange rate assigned to it.
Can't Funds Check. Budget does not exist for the invoice accounting period, or the invoice
distribution account does not equal the purchase order distribution account. This hold is used by
Payables only if you use encumbrance accounting and the absolute or advisory method of
budgetary control.
Final Matching. Invoice has one or more distributions final matched to a purchase order.
Can't Try PO Close. Invoice is final matched to purchase order, but Invoice Validation placed
one or more holds on invoice during validation.
Dist Acct Invalid. Invoice distribution has an invalid account. An invalid account prevents you
from creating accounting entries for an invoice or payment.
ERV Acct Invalid. Invoice Validation created an invalid Exchange Rate Variance account for
an invoice distribution. Payables only apply this hold if you enable Automatic Offsets.
No AWT Period. Invoice Validation did not find the period in the withholding tax special
calendar. Create the period in the special calendar and resubmit Invoice Validation.
3 Payable accounting process

8/3/2019 AP Step by Step Training
http://slidepdf.com/reader/full/ap-step-by-step-training 47/93
The accounting process enables to view the new accounting entries in the payables . This can be
created in two ways
By choosing the create accounting process button in invoice and payment window
By running a program
Perform the following steps to run the program
1. Navigate to Other ► Request ► Run
2. Choose the program Payable accounting process
3. Provide the following parameters and submit
Name of the field Content
From date to date Provide the accounting event dates for which you want to transfer accounting
entries These dates are not required to run the accounting process. If you do
not specify dates, then the program will account for all of your unaccounted
transactions.
Document class Invoices Includes the following accounting events:
invoice entry
invoice adjustment
invoice cancellation
prepayment application
prepayment unapplication
Payments. Includes the following accounting events:
payment entry
(future dated) payment maturity
payment adjustment
payment cancellation
payment clearing
payment unclearing
All. Create accounting entries for all eligible unaccounted invoice and payment
events

8/3/2019 AP Step by Step Training
http://slidepdf.com/reader/full/ap-step-by-step-training 48/93
Submit transfer to GL Yes
No
Submit journal import Yes
No
Validate accounts Yes
No
Summarize report Yes
No
Run accounting report Yes.
No.
4 Payment
4.1 Overview The following are various methods used to make payment to suppliers
Manual : check: this is the check manually written or typed. This will be used occasionally, when the
check printing as above can not be done.
Quick : You can use this process to create single computer generated payments,
rather than an entire payment batch, to speed up the process of generating a single
payment for a vendor’s invoice
Batch : These are payment selected and checks are printed in batch for more than one supplier on the
basis of prescribed criteria
Page 8 of 8
End user Manual for Account Payable

8/3/2019 AP Step by Step Training
http://slidepdf.com/reader/full/ap-step-by-step-training 49/93
1 Manual Payment
1.1 Overview
Manual checks and prepayments check to employees and supplier basis if the payment is released
immediately.
1.2 Pay an Invoice manually
1. Choose the following path:
Payments ► Entry ► Payments
The following window will open

8/3/2019 AP Step by Step Training
http://slidepdf.com/reader/full/ap-step-by-step-training 50/93
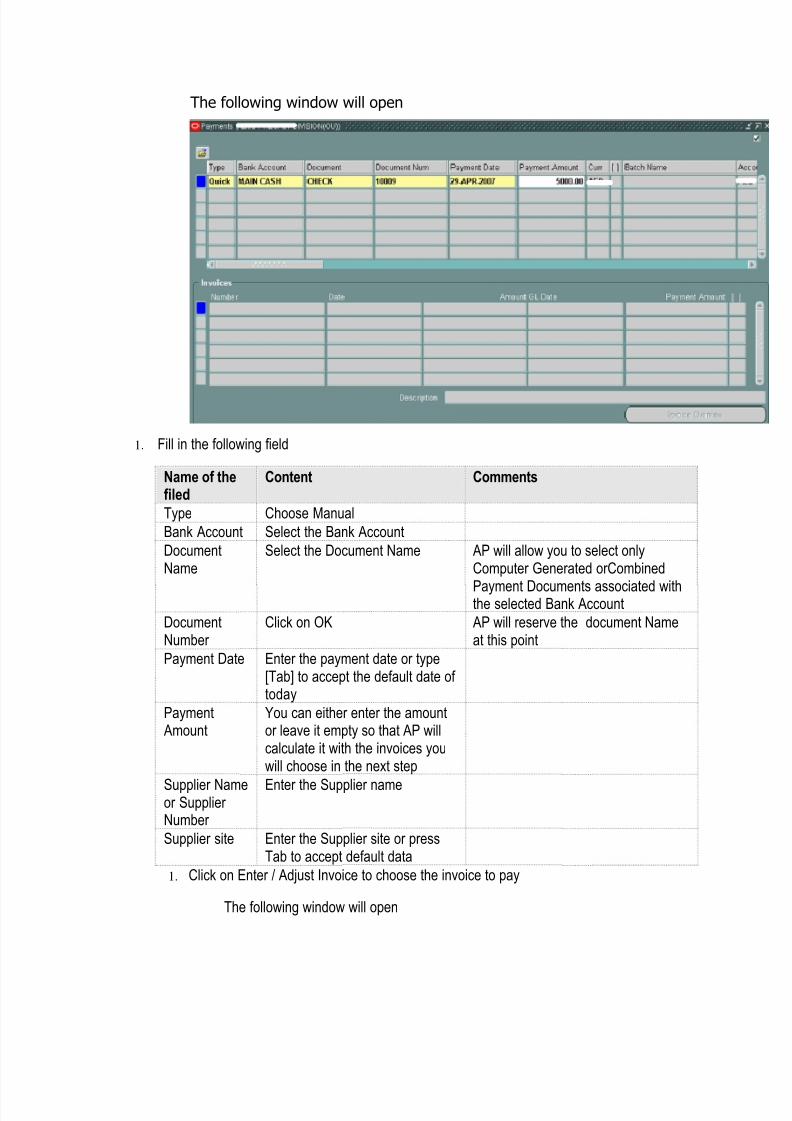
1. Fill in the following field
Name of the
filed
Content Comments
Type Choose Manual
Bank Account Select the Bank Account
Document
Name
Select the Document Name AP will allow you to select only
Computer Generated orCombined
Payment Documents associated
with the selected Bank Account
Document
Number
Click on OK AP will reserve the document
Name at this point
Payment Date Enter the payment date or type [Tab] to
accept the default date of today
Payment You can either enter the amount or leave
8/3/2019 AP Step by Step Training
http://slidepdf.com/reader/full/ap-step-by-step-training 51/93
Amount it empty so that AP will calculate it with
the invoices you will choose in the next
step
Supplier Name
or Supplier
Number
Enter the Supplier name
Supplier site Enter the Supplier site or press Tab to
accept default data
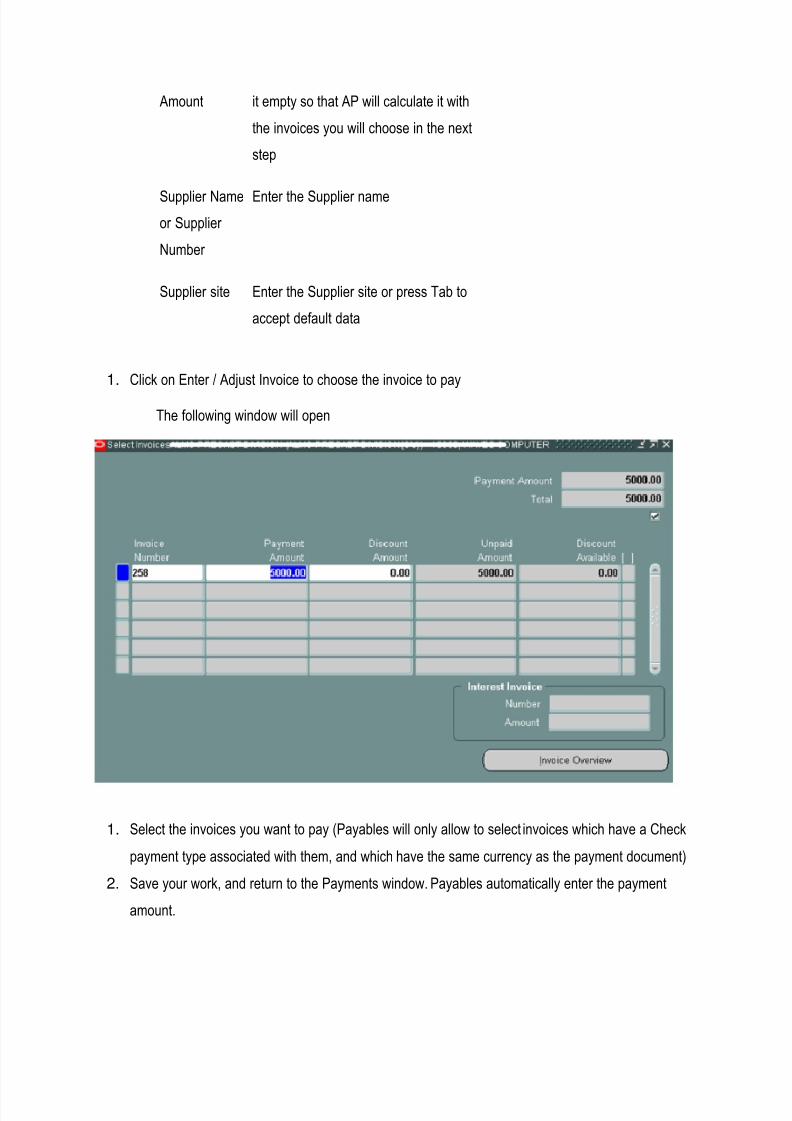
1. Click on Enter / Adjust Invoice to choose the invoice to pay
The following window will open
1. Select the invoices you want to pay (Payables will only allow to select invoices which have a Check
payment type associated with them, and which have the same currency as the payment document)
2. Save your work, and return to the Payments window. Payables automatically enter the payment
amount.

8/3/2019 AP Step by Step Training
http://slidepdf.com/reader/full/ap-step-by-step-training 52/93
1.3 Printing a Payment
1. Click on the action, the following window will open
2. Check
the boxes Format, Print Now and Print Remittance advice.Click OK.
2 Batch Payment
2.1 Batch Payment Process
This payment format contains one credit line and multiple credit lines.
This format requires one debit line for every credit line.
Payment batches are used to generate checks for batch of invoices from many vendors. There is a
series of steps to follow to print checks with a Payment Batch. Most steps are initiated from the
Payment Batch Actions window. The steps are:

8/3/2019 AP Step by Step Training
http://slidepdf.com/reader/full/ap-step-by-step-training 53/93
Initiate Payment Batch
Select Invoices/Verify Payment Register
Modify Payments
Format Payments
Print Checks
Confirm Payment Batch
2.2 Initiating Payment Batches
1. Choose the following path
Payments ► Entry ► Payment Batches,
The following window will open
2. Fill in the following field
8/3/2019 AP Step by Step Training
http://slidepdf.com/reader/full/ap-step-by-step-training 54/93
Name of the field Content
Batch Name Enter the Payment Batch Name. This name will appear
on your reports and will help you locate the batch online.
Ex: User Initial / Date – year
Payment Method Verify the Payment Date.
Pay group Optionally select Pay Group. AP will select
invoices with this Pay Group.
Bank account Optionally change the Bank Account.
Payment Document Select the Payment Document.
Pay through Date Verify the Pay Through Date. AP will select invoices with
a discount or due date on or before this date. Payment Limit Optionally review or adjust the payment limits.
2.3 Selecting invoice / Verify Payment Register is correct
1. Click on Actions Button.
1. Select Invoices & Build Payment & Print Preliminary Register.
Page 7 of 7
End user Manual for Account Payable
1. Click on the button OK:

8/3/2019 AP Step by Step Training
http://slidepdf.com/reader/full/ap-step-by-step-training 55/93
Payables will initiate three concurrent processes, Auto Select, Build Payments and
Preliminary Payment Register.
The Preliminary Payment Register is printed when the invoices are selected and the
payments are built. It should be used to review the payments Payables will create when
you format payments for the invoices in a Payment Batch.
You should review the Preliminary Payment Register to see which invoices and vendors
will be paid, the discounts taken, and the total amount paid to each vendor. Payables group the invoices by vendor site and print the total for each payment for a
site.
Payables prints asterisks and a non-payment reason for the invoicesselected for
payment in the payment batch, but that do not meet payment requirements.
8/3/2019 AP Step by Step Training
http://slidepdf.com/reader/full/ap-step-by-step-training 56/93
Payables does not create payments for a vendor site's invoices if the total of the
selected invoice(s) exceeds the maximum payment amount or is less than the minimum
payment amount that you specified for the payment batch, or the total payment amount
for a vendor site is less than or equals zero.
1. Check the Preliminary Payment Register to ensure that all the invoices needing payment are
included on the register. You should also check to ensure that no payments will be generated for
invoices that should not be paid.
1. After the concurrent request are finished you need to requery the Payment Batch form, when the
Status field changes to Built and the Payments button becomes active you may proceed to the next
step.
1. To requery the form you may use one of the following methods:
Select Tools, Refresh Status.
Click on the button ‘Refresh’ (available on the latest Oracle versions).
1.1 Modify Payment
Then after reviewing the Preliminary Register you can modify the Payment Batch by:
Changing the payment amount of an invoice
8/3/2019 AP Step by Step Training
http://slidepdf.com/reader/full/ap-step-by-step-training 57/93
Preventing payment to a supplier
Preventing payment of a particular invoice
Adding an invoice that Payables did not select.
In order to modify a Payment Batch the status must be built. (i.e. The Payment
Batch must be initiated but cannot have formatted payments)
1. Choose the following path:
Payments ► Entry ► Payment Batches
1. Choose View, Find (or F11)
2. Select the appropriate Payment Batch.
1. Click on Payments Button.
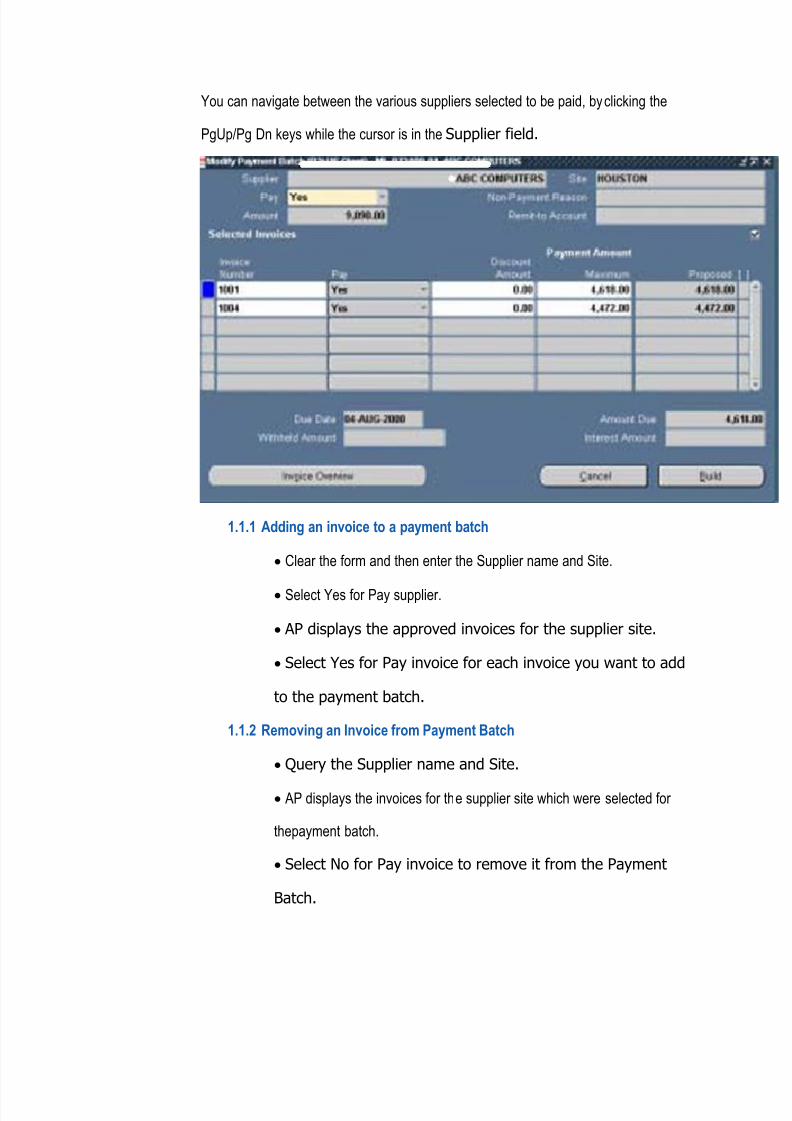
You can navigate between the various suppliers selected to be paid, by clicking the PgUp/Pg Dn
keys while the cursor is in the Supplier field.
1.1.1 Adding an invoice to a payment batch
Clear the form and then enter the Supplier name and Site.
8/3/2019 AP Step by Step Training
http://slidepdf.com/reader/full/ap-step-by-step-training 58/93
Select Yes for Pay supplier.
AP displays the approved invoices for the supplier site.
Select Yes for Pay invoice for each invoice you want to add to the
payment batch.
1.1.2 Removing an Invoice from Payment Batch
Query the Supplier name and Site.
AP displays the invoices for the supplier site which were selected for thepayment
batch.
Select No for Pay invoice to remove it from the Payment Batch.
1.1.3 Removing all Invoices for a Particular supplier site from a payment batch
Query the Supplier name and Site.
Select a Non-Payment Reason for your records (Optional).
Select No for Pay supplier.
1.1.4 Changing payment or discount amounts for a selected invoice
Query the Supplier name and Site.
AP displays the invoice(s) for the supplier site, which were selected for the batch.
Alter the payment or discount amounts for the invoice.
1. Click on Build Button to save your work.
AP will initiate the Build Payments concurrent process.
Once the Build Payments process is complete you should review your changes by printing a
new Preliminary Payment Register
To print the Preliminary Payment register:
1. Choose the following path:
Payments ► Entry ► Payments.
1. Choose View, Find.

8/3/2019 AP Step by Step Training
http://slidepdf.com/reader/full/ap-step-by-step-training 59/93

8/3/2019 AP Step by Step Training
http://slidepdf.com/reader/full/ap-step-by-step-training 60/93
After the Formatting and Printing are finished you need to requery the Payment Batch form, when
the Status field changes to Formatted you may proceed to the next step. Now you need to confirm
whether all the checks were printed correctly, or is there any skipped or spoiled stock paper:
1. Click on the button Actions.
1. Confirm Payment Batch.
1. Click on the button OK.
In the Confirm Payment Batch window enter the range of Checks:
Printed
Skipped (Not applicable as Honeywell uses bespoke)
Spoiled (Not applicable as Honeywell uses bespoke)

8/3/2019 AP Step by Step Training
http://slidepdf.com/reader/full/ap-step-by-step-training 61/93
1. Click on Confirm.
AP initiates two concurrent processes, Confirm Payment Batch and Final Payment Register.
Now your Payment Batch process is completed
1.4 Payment Batch sets
There is a new R11i functionality that allows the user to initiate more than one payment batches
with a single payment batch submission. You set up a payment batch set which groups
several payment batches together so you can simultaneously submit the selection, build, or format
process for each payment batch in the set. This streamlines the process of submitting multiple
payment batches for your bank accounts. This feature also supports the multi currency payment
needs.
NOTE: For each payment batch set, define a separate payment document in
thePayment Documents window. Each payment batch in the set must use a
unique payment document.
2 Stop Payments
2.1 Stopping a Payment
Choose the following path:
Payments ► Entry ► Payments

8/3/2019 AP Step by Step Training
http://slidepdf.com/reader/full/ap-step-by-step-training 62/93
Select from the menu bar:
View ► Find,
The following window will open
Enter search Criteria
Page 8 of 8
End user Manual for Account Payable
Click on save
The following window will open

8/3/2019 AP Step by Step Training
http://slidepdf.com/reader/full/ap-step-by-step-training 63/93
Select the stop payment for stop payment
To select multiple records, hold down the Ctrl key and click on each desired record.
To select a range of records, click on the first record of the desired range then hold
the Shift key down and click on the last record of the desired range with your mouse to
highlight the selected range.
To select all records, select Edit from the bar menu and choose Select
All.
To deselect all records, choose Edit from the bar menu and chooseDeselect
Click on Action button
The following window will open

8/3/2019 AP Step by Step Training
http://slidepdf.com/reader/full/ap-step-by-step-training 64/93
Check Initiate stop to stop payment
Payables will record and display the date and time of the Initiate Stop
action.Payables will then ask you if are sure that you want to stop payment on the number of
requests you have submitted.
Click on OK
The Status field for this payment in the Payments form will change to: Stop Initiated. After
stopping a payment you can either release the stop or void it.
1.1 Releasing a Stop Payment
1. Choose the following path:
Payments ►Entry ► Payments.
2. Select from the menu bar
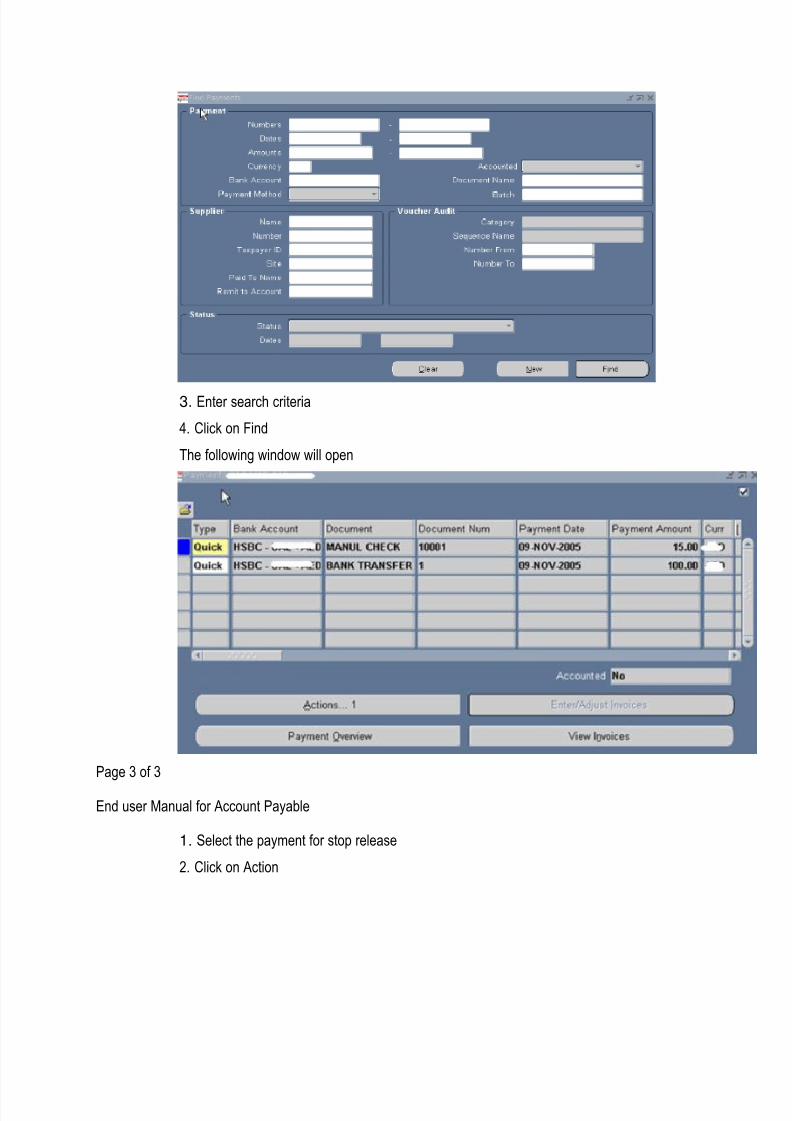
View ► Find,
The following window will open
8/3/2019 AP Step by Step Training
http://slidepdf.com/reader/full/ap-step-by-step-training 65/93
3. Enter search criteria
4. Click on Find
The following window will open
Page 3 of 3
End user Manual for Account Payable
1. Select the payment for stop release
2. Click on Action
8/3/2019 AP Step by Step Training
http://slidepdf.com/reader/full/ap-step-by-step-training 66/93
1. In the Payment Actions window check the Release Stop checkbox. AP displays and records the date
and time of the release stop activity. AP will ask you to confirm the release stop request for the
number of requests that you have submitted.
1. Click on OK
Note: There is a Stop Payments Report available to review all stopped payments.
1.1 Voiding a Payment
This can be done either for a Negotiable or a Stopped payment.
1. Choose the following path:
Payments ► Entry ► Payments.
1. From the Menu bar, choose the following path:
View ► Find,
8/3/2019 AP Step by Step Training
http://slidepdf.com/reader/full/ap-step-by-step-training 67/93
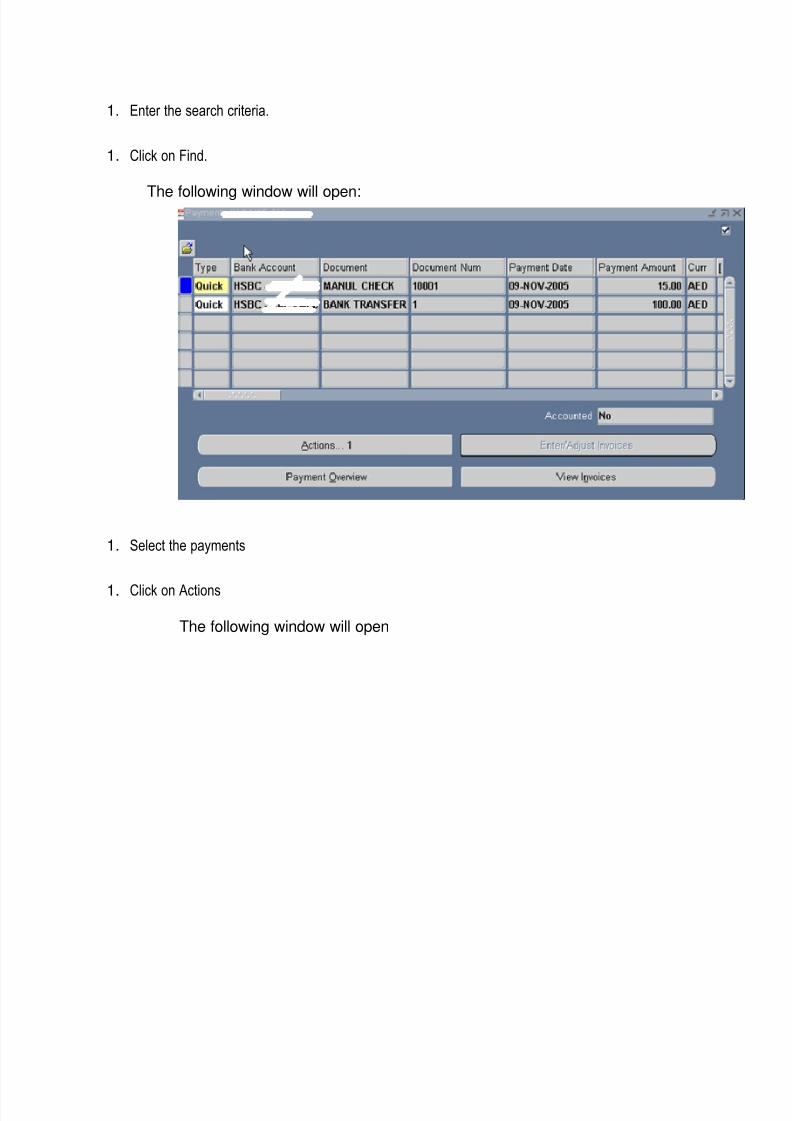
1. Enter the search criteria.
1. Click on Find.
The following window will open:
1. Select the payments
1. Click on Actions
The following window will open

8/3/2019 AP Step by Step Training
http://slidepdf.com/reader/full/ap-step-by-step-training 68/93
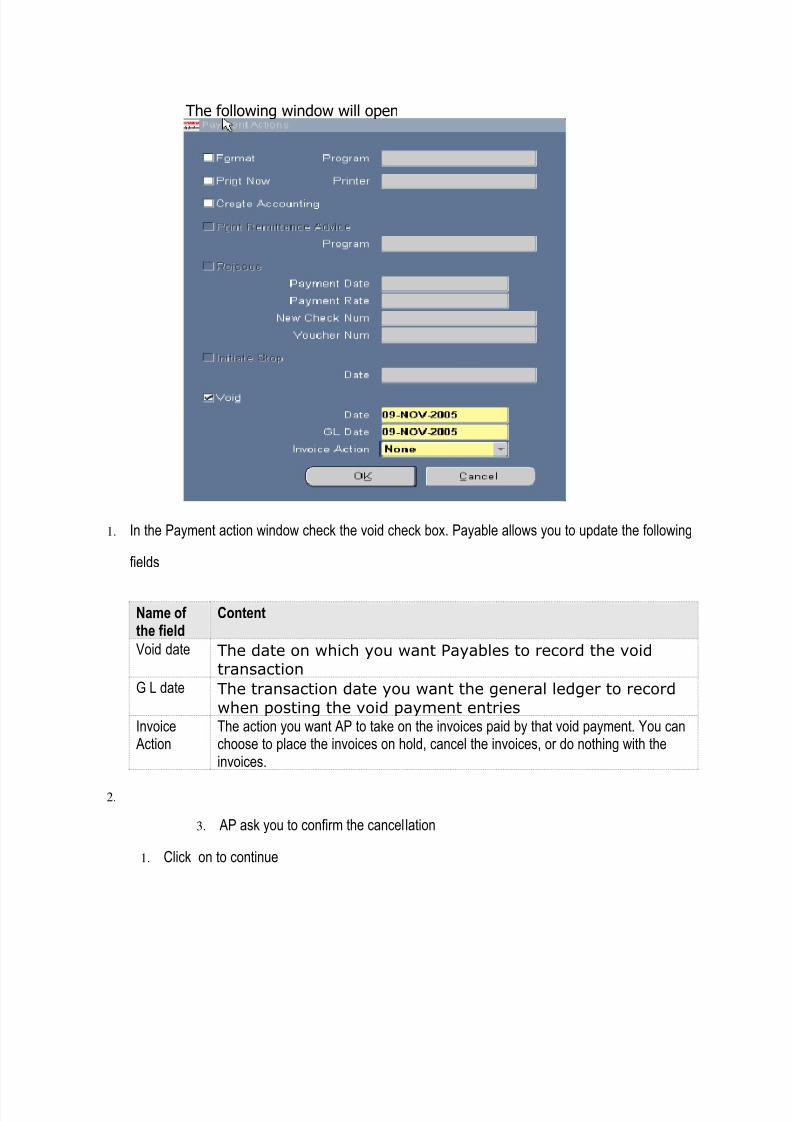
1. In the Payment action window check the void check box. Payable allows you to update
the following fields
Name of thefield
Content
Void date The date on which you want Payables to
record the void transaction
G L date The transaction date you want the general
ledger to record when posting the void
payment entries
Invoice Action The action you want AP to take on the invoices paid by
that void payment. You can choose to place the invoices
on hold, cancel the invoices, or do nothing with the
invoices.
AP ask you to confirm the cancellation

8/3/2019 AP Step by Step Training
http://slidepdf.com/reader/full/ap-step-by-step-training 69/93
1. Click on to continue
You can not reverse the void on a void payment. Remember to have the payment you want
to void in your possession or have proof that it has been destroyed before you record it as
void. There is a Void Payments Register available to review voided payments.
2 Payables Transfer to General Ledger
This program is run to transfers all accounting entries from payable to GL. This data is then posted to
General ledger
Navigate to Other ► Request ► Run
Choose the program Payable Transfer to General ledger
Provide the following parameters and submit
Name of the field Content
Set of Books Name The set of books for which you want to transfer accounting information
Transfer Reporting
Book(s)
Enter the reporting set of books to which it is also needed to be reported
Batch name Name used to identify the batch in your general ledger. Journal Import creates
a journal entry batch for each set of books and accounting period .
From date to date Provide the accounting event dates for which you want to transfer accounting
entries
Journal Category Provide the category source
Purchase Invoices
Payments.
Reconciled Payments..
All: all journal categories. I

8/3/2019 AP Step by Step Training
http://slidepdf.com/reader/full/ap-step-by-step-training 70/93
Validate accounts Yes
No
Transfer to GL
Interface
Select the level of detail in which you want to create journal entries
In Detail. Do not summarize the entries. Transfer one accounting
entry for each accounting entry.
Summarize by Accounting Date. Summarize the
accounting lines by account and date.
Summarize by Accounting Period. Summarize the accounting
lines by account and accounting period
Submit Journal Import Yes. Submit Journal Import, which will automatically create journal
entry batches, headers, and lines from the accounting entries in the GL
interface..
No. Submit Journal Import later, through in General Ledger.
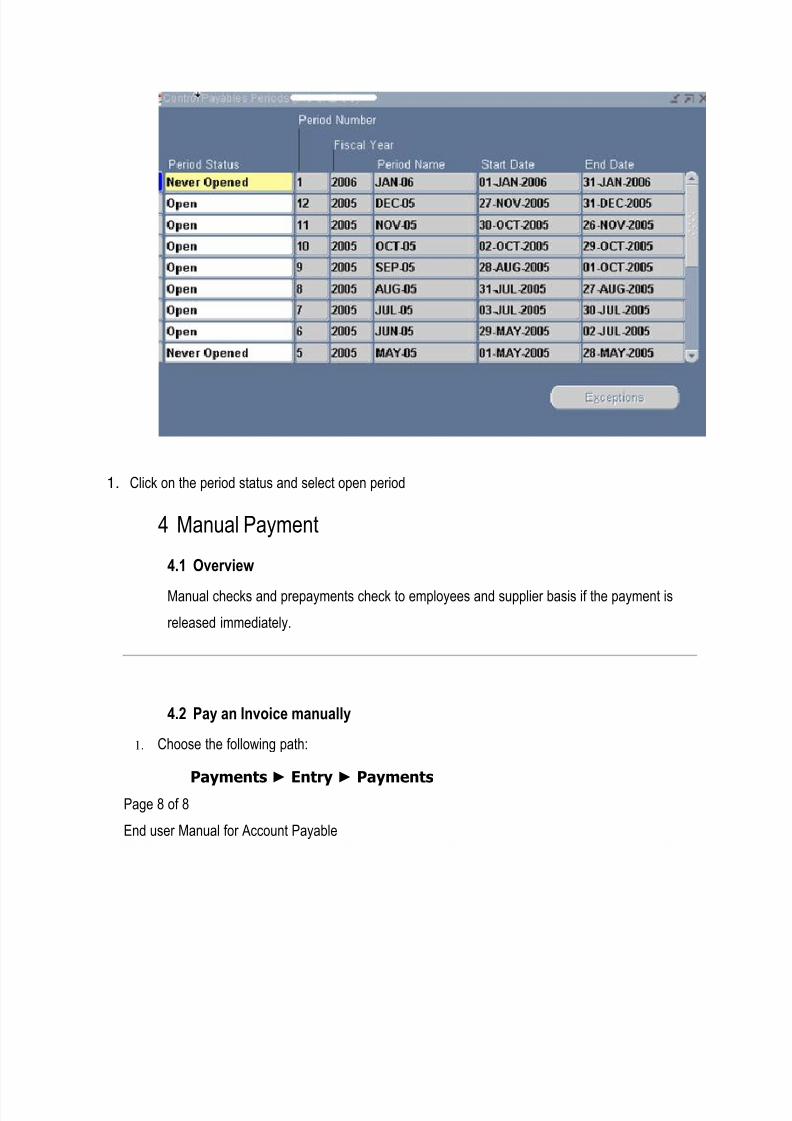
3 Open and Close Period
3.1 Period control status
Status Control
Future Payables allow invoice entry and
accounting in a Future period. Payables
do not allow payment entry or payment
voiding in a Future period.
Open You can record transactions and account
for them in an Open period.
Closed Payables do not allow transaction
processing in a Closed period. You can
reopen a Closed period if the
corresponding general ledger and

8/3/2019 AP Step by Step Training
http://slidepdf.com/reader/full/ap-step-by-step-training 71/93
purchasing periods are also Open. You
cannot close a period in which any of the
following conditions exist
Outstanding payment batches.
Future dated payments for which
the Maturity Date is within the period
but that still have a status of Issued.
Unaccounted transactions.
Accounted transactions that have
not been transferred to general
ledger
Permanently Closed Payables do not allow transaction
processing in a Permanently Closed
period. You cannot reopen a
Permanently Closed period.
3.2 Open a Period
1. Navigate to Accounting ►Control Payables period

8/3/2019 AP Step by Step Training
http://slidepdf.com/reader/full/ap-step-by-step-training 72/93
8/3/2019 AP Step by Step Training
http://slidepdf.com/reader/full/ap-step-by-step-training 73/93
8/3/2019 AP Step by Step Training
http://slidepdf.com/reader/full/ap-step-by-step-training 74/93
The following window will open
1. Fill in the following field
Name of thefiled
Content Comments
Type Choose Manual Bank Account Select the Bank Account DocumentName
Select the Document Name AP will allow you to select onlyComputer Generated orCombined
Payment Documents associated withthe selected Bank Account DocumentNumber
Click on OK AP will reserve the document Nameat this point
Payment Date Enter the payment date or type[Tab] to accept the default date of today
Payment Amount
You can either enter the amountor leave it empty so that AP willcalculate it with the invoices youwill choose in the next step
Supplier Nameor Supplier Number
Enter the Supplier name
Supplier site Enter the Supplier site or pressTab to accept default data
1. Click on Enter / Adjust Invoice to choose the invoice to pay
The following window will open

8/3/2019 AP Step by Step Training
http://slidepdf.com/reader/full/ap-step-by-step-training 75/93

8/3/2019 AP Step by Step Training
http://slidepdf.com/reader/full/ap-step-by-step-training 76/93
5. Choose the following path
Payments ► Entry ► Payment Batches,
The following window will open
2. Fill in the following field
Name of thefield
Content
Batch Name Enter the Payment Batch Name. This name will appear on your reports and
will help you locate the batch online.
Ex: User Initial / Date – year PaymentMethod
Verify the Payment Date.
Pay group Optionally select Pay Group. AP will select invoices
with this Pay Group. Bank account Optionally change the Bank Account. PaymentDocument
Select the Payment Document.
Pay throughDate
Verify the Pay Through Date. AP will select invoices with a discount or duedate on or before this date.
Payment Limit Optionally review or adjust the payment limits.
2.3 Selecting invoice / Verify Payment Register is correct
6. Click on Actions Button.
7. Select Invoices & Build Payment & Print Preliminary Register.
8. Click on the button OK:
Payables will initiate three concurrent processes, Auto Select, Build
Payments and Preliminary Payment Register.
Page 4 of 4
End user Manual for Account Payable

8/3/2019 AP Step by Step Training
http://slidepdf.com/reader/full/ap-step-by-step-training 77/93
The Preliminary Payment Register is printed when the invoices are
selected and the payments are built. It should be used to review the payments
Payableswill create when you format payments for the invoices in
a Payment Batch.
You should review the Preliminary Payment Register to see
which invoices and vendors will be paid, the discounts taken, and the total
amount paid to each vendor.
Payables group the invoices by vendor site and print the total for each
payment for a site.
Payables prints asterisks and a non-payment reason for the
invoicesselected for payment in the payment batch, but that do not
meet payment requirements.
Payables does not create payments for a vendor site's invoices if the total
of the selected invoice(s) exceeds the maximum payment amount or is less
than the minimum payment amount that you specified for the payment
batch, or the total payment amount for a vendor site is less than or equals
zero.
9. Check the Preliminary Payment Register to ensure that all the invoices needing payment
are included on the register. You should also check to ensure that no payments will be
generated for invoices that should not be paid.
10. After the concurrent request are finished you need to requery the Payment Batch form,
when the Status field changes to Built and the Payments button becomes active you may
proceed to the next step.
11. To requery the form you may use one of the following methods:

8/3/2019 AP Step by Step Training
http://slidepdf.com/reader/full/ap-step-by-step-training 78/93
8/3/2019 AP Step by Step Training
http://slidepdf.com/reader/full/ap-step-by-step-training 79/93
You can navigate between the various suppliers selected to be paid, by clicking the
PgUp/Pg Dn keys while the cursor is in the Supplier field.
1.1.1 Adding an invoice to a payment batch
Clear the form and then enter the Supplier name and Site.
Select Yes for Pay supplier.
AP displays the approved invoices for the supplier site.
Select Yes for Pay invoice for each invoice you want to add
to the payment batch.
1.1.2 Removing an Invoice from Payment Batch
Query the Supplier name and Site.
AP displays the invoices for the supplier site which were selected for
thepayment batch.
Select No for Pay invoice to remove it from the Payment
Batch.

8/3/2019 AP Step by Step Training
http://slidepdf.com/reader/full/ap-step-by-step-training 80/93
1.1.3 Removing all Invoices for a Particular supplier site from a payment
batch
Query the Supplier name and Site.
Select a Non-Payment Reason for your records (Optional).
Select No for Pay supplier.
1.1.4 Changing payment or discount amounts for a selected invoice
Query the Supplier name and Site.
AP displays the invoice(s) for the supplier site, which were selected for
the batch.
Alter the payment or discount amounts for the invoice.
1. Click on Build Button to save your work.
AP will initiate the Build Payments concurrent process.
Once the Build Payments process is complete you should review your changes by printing a
new Preliminary Payment Register
To print the Preliminary Payment register:
1. Choose the following path:
Payments ► Entry ► Payments.
1. Choose View, Find.
8/3/2019 AP Step by Step Training
http://slidepdf.com/reader/full/ap-step-by-step-training 81/93

8/3/2019 AP Step by Step Training
http://slidepdf.com/reader/full/ap-step-by-step-training 82/93
.
1.3 Confirm Payment Batch
After the Formatting and Printing are finished you need to requery the Payment Batch form, whenthe Status field changes to Formatted you may proceed to the next step. Now you need to confirm
whether all the checks were printed correctly, or is there any skipped or spoiled stock paper:
1. Click on the button Actions.
1. Confirm Payment Batch.
1. Click on the button OK.
In the Confirm Payment Batch window enter the range of Checks:
Printed
8/3/2019 AP Step by Step Training
http://slidepdf.com/reader/full/ap-step-by-step-training 83/93
Skipped (Not applicable as Honeywell uses bespoke)
Spoiled (Not applicable as Honeywell uses bespoke)
1. Click on Confirm.
AP initiates two concurrent processes, Confirm Payment Batch and Final Payment
Register. Now your Payment Batch process is completed
1.4 Payment Batch sets
There is a new R11i functionality that allows the user to initiate more than one payment batches
with a single payment batch submission. You set up a payment batch set which
groups several payment batches together so you can simultaneously submit the selection, build, or
format process for each payment batch in the set. This streamlines the process of submitting
multiple payment batches for your bank accounts. This feature also supports the multi currency
payment needs.
NOTE: For each payment batch set, define a separate payment document in
thePayment Documents window. Each payment batch in the set must use
a unique payment document.
2 Stop Payments
2.1 Stopping a Payment
Choose the following path:
Payments ► Entry ► Payments
Select from the menu bar:
View ► Find,

8/3/2019 AP Step by Step Training
http://slidepdf.com/reader/full/ap-step-by-step-training 84/93
The following window will open
Enter search Criteria
Page 8 of 8
End user Manual for Account Payable
Click on save
The following window will open
Select the stop payment for stop payment

8/3/2019 AP Step by Step Training
http://slidepdf.com/reader/full/ap-step-by-step-training 85/93
To select multiple records, hold down the Ctrl key and click on each desired record.
To select a range of records, click on the first record of the desired range then hold
the Shift key down and click on the last record of the desired range with your mouse to
highlight the selected range. To select all records, select Edit from the bar menu and choose Select
All.
To deselect all records, choose Edit from the bar menu and choose
Deselect
Click on Action button
The following window will open
Check Initiate stop to stop payment
Payables will record and display the date and time of the Initiate Stop
action.Payables will then ask you if are sure that you want to stop payment on the number of
requests you have submitted.
Click on OK
The Status field for this payment in the Payments form will change to: Stop Initiated. After
stopping a payment you can either release the stop or void it.
1.1 Releasing a Stop Payment 1. Choose the following path:
Payments ►Entry ► Payments.
2. Select from the menu bar
View ► Find,

8/3/2019 AP Step by Step Training
http://slidepdf.com/reader/full/ap-step-by-step-training 86/93
The following window will open
3. Enter search criteria
4. Click on Find
The following window will open
5. Select the payment for stop release
6. Click on Action

8/3/2019 AP Step by Step Training
http://slidepdf.com/reader/full/ap-step-by-step-training 87/93
1. In the Payment Actions window check the Release Stop checkbox. AP displays and records the date
and time of the release stop activity. AP will ask you to confirm the release stop request for the
number of requests that you have submitted.
1. Click on OK
Note: There is a Stop Payments Report available to review all stopped payments.
1.2 Voiding a Payment
This can be done either for a Negotiable or a Stopped payment.
1. Choose the following path:
Payments ► Entry ► Payments.
1. From the Menu bar, choose the following path:
View ► Find,
1. Enter the search criteria.
1. Click on Find.

8/3/2019 AP Step by Step Training
http://slidepdf.com/reader/full/ap-step-by-step-training 88/93
The following window will open:
1. Select the payments
1. Click on Actions
8/3/2019 AP Step by Step Training
http://slidepdf.com/reader/full/ap-step-by-step-training 89/93
8/3/2019 AP Step by Step Training
http://slidepdf.com/reader/full/ap-step-by-step-training 90/93
You can not reverse the void on a void payment. Remember to have the payment
you want to void in your possession or have proof that it has been destroyed before
you record it as void. There is a Void Payments Register available to review voided
payments.
2 Payables Transfer to General Ledger
This program is run to transfers all accounting entries from payable to GL. This data is then posted
to General ledger
Navigate to Other ► Request ► Run
Choose the program Payable Transfer to General ledger
Provide the following parameters and submit
Name of thefield
Content
Set of BooksName
The set of books for which you want to transfer accounting information
Transfer ReportingBook(s)
Enter the reporting set of books to which it is also needed to be reported
Batch name Name used to identify the batch in your general ledger. Journal Import creates a
journal entry batch for each set of books and accounting period.From date todate
Provide the accounting event dates for which you want to transfer accountingentries
JournalCategory
Provide the category source
Purchase Invoices
Payments.
Reconciled Payments..
All: all journal categories. I
Validateaccounts Yes No
Transfer to GLInterface
Select the level of detail in which you want to create journal entries
In Detail. Do not summarize the entries. Transfer one accounting
entry for each accounting entry.

8/3/2019 AP Step by Step Training
http://slidepdf.com/reader/full/ap-step-by-step-training 91/93

8/3/2019 AP Step by Step Training
http://slidepdf.com/reader/full/ap-step-by-step-training 92/93
3.2 Open a Period
1. Navigate to Accounting ►Control Payables period
2. Click on the period status and select open period
Page 9 of 9
End user Manual for Account Payable
1.1 Close Period

8/3/2019 AP Step by Step Training
http://slidepdf.com/reader/full/ap-step-by-step-training 93/93