ancient egypt at key stage 2 - british · pdf fileancient egypt at key stage 2 ... then record...
TRANSCRIPT

A
ANCIENT EGYPT AT KEY STAGE 2 Activities and Teachers’ notes
Galleries 62 and 63
Department of Education and Information Great Russell Street Telephone +44 (0)20 7323 8851/8850 London WC1B 3DG Facsimile +44 (0)20 7323 8855 Switchboard +44 (0)20 7323 8000 [email protected] www.thebritishmuseum.ac.uk

2
Contents
Introduction
Compare an ancient Egyptian and a modern object
Ancient Egypt enquiry
Counting with the Egyptians
What is it?
Hieroglyphs
Make a mummy come alive!
A time line of ancient Egypt
Highlights of the galleries
Beliefs about death
Materials and tools:
• Ancient Egyptian object detective
• Materials add up
• Which material lasts longest?
• Tool box
What does a label tell you?
Please note:

3
1. The mummies are the most popular exhibits in the Museum and attract large crowds.
Please encourage your pupils to behave calmly and to respect the needs and interests of
other visitors. Please remind them not to sit or lie in the main routes through the
galleries and that they should never run.
2. Before the visit it is advisable to discuss with your class the issue of the display of
human remains. In addition to the wrapped mummies, the pupils will see skeletal and
other human remains during the course of their visit. The ethical arguments concerning
such displays are an important subject for discussion, but you may also want to take
into account the personal circumstances of the pupils.
Introduction
We have designed the activities in the pack so that pupils do not follow a fixed route around
the objects and do not congregate any more than is natural around particular objects. This
will help the pupils in the crowded galleries.
The activities encourage pupils to scan the displays for relevant objects, to select the objects
and then to look at them in detail. This means that pupils are distributed across the space.
Museum trails tend to cause severe overcrowding in particular places.
We think that this approach to visiting will help you use the galleries to their best effect,
but it does require preparation before the visit and perhaps some changes to the way in
which you might use the helpers who come with you. Each activity is accompanied by notes
with advice, suggestions for setting up the activity before your visit and in some cases for
how to follow it up afterwards. Please read the notes carefully before deciding to use the
activity. We strongly recommend that you come on a preliminary visit to check the
activities on site.
We recommend structuring a visit around a number of smaller activities rather than one
long trail. The following page gives some examples of how you might do this. In all cases, it
is important to show the materials to the pupils and to explain the tasks at school before
the visit, as briefing pupils in a noisy gallery is very difficult.

4
Example 1
• Ancient Egyptian Object Detective 1
& 2 (20 minutes)
• Ancient Egypt Enquiry (2o minutes)
• Hieroglyphs (10 minutes)
• Highlights (10 minutes)
Example 2
• Choose a mummy (20 minutes)
• Tool Box (10-15 minutes)
• Compare ancient and modern tools
(10 minutes)
• Beliefs about Death (15 minutes)
Example 3
• Ancient Egyptian Object Detective 1
& 2 (20 minutes)
• Materials add up (10 minutes)
• Which material lasts longest? (10
minutes)
• Highlights (10 minutes)
Example 4
• Compare ancient and modern (15
minutes)
• Funeral of a Priestess (25 minutes)
• What is it? (15 minutes)
Several of the activities involve thinking about the materials from which ancient objects
were made. Any of these activities could form a good starting point for discussing the
preservation of the past and the reasons why people should not touch objects in the
Museum. The pupils can then take pride in the fact that they know more than the many
adult visitors who they will see touching objects.
The only exceptions to this are blind and partially-sighted people who may touch some of
the objects. If you have pupils with visual impairments or particular access needs, please
contact the Education Department on 0207-323-8511/8854.
The main focus for the activities is Ancient Egypt in Key Stage 2 History, but they also lend
themselves to use for science, art, language and design and technology. Several of the
activities fit precisely with the scheme of work on Ancient Egypt issued by QCA.
Activities

5
Compare an ancient Egyptian and a modern object - 1 sheet
Before the visit
Get the pupils to prepare the recording sheets by cutting pictures from magazines and
catalogues and sticking them in place.
Focus on topics and objects which are useful to compare. These are some possible
examples:
• Woodworking tools: chisels, saws, drills
• Boats
• Footwear
• Hairstyles
• Clothes
• Modern charms and amulets such as crucifixes, St. Christopher medallions, the
Khoumessa, yin-yang discs, etc.
Identify focuses for comparison with the pupils. They only have five spaces, so make the
focuses significant: not just one is red and one is blue, but look at design, material, value,
etc. You could issue the focuses to helpers in the form of questions.
During the visit
Encourage the pupils to discuss the similarities and differences and select which ones are
important before they write them down.
Encourage pupils to use the modern picture to prompt things to write about.
After the visit
Groups or the whole class can make a display using the pictures they cut out, their drawings
and their notes to generate continuous writing. Individuals can use their notes to help draft
reports on their enquiries.
Ancient Egypt Enquiry – 3 alternative sheets

6
We recommend that part of every visit includes some research for an ongoing enquiry.
Successful enquiry activities depend entirely on good preparation before the visit.
Before
Discuss and identify topics for the enquiry.
Decide how to group the pupils: in fixed groups for particular topics or in ‘expert’ groups
which will eventually report back to the rest of the class.
Encourage the pupils to focus their enquiry by using specific questions not topic titles.
Discuss the sorts of evidence they might look for.
Discuss and practise ways of recording: different sorts of writing, drawings, photos,
dictaphones. Emphasise the importance of the records being usable when brought back.
Explain that the pupils can move freely around the gallery scanning and should not choose
the first relevant object they come across. Emphasise selectivity.
Think about the role of helpers. Pupils may be moving in groups, pairs, or as individuals, so
the usual model of helper with a fixed group may not work. Some helpers could supervise
exits between rooms to prevent straying while others supported pupils’ work.
During
Encourage pupils to record carefully, spending time observing and discussing.
Encourage them to talk about what they want to record before making the final decision to
record it – this focuses their attention on the relevance of the record.
Emphasise to helpers that pupils should not all be recording the same objects.
After
Encourage pupils to rework their recorded data into final reports, descriptions, etc. Writing
frames may be useful at this stage.
Counting with the Egyptians – 2 sheets

7
A very straightforward scan and search activity. Go through the counting system and
practise it before the visit. Encourage the pupils to record their totals in Egyptian numbers.
Choose a mummy - 1 sheet
Before
Discuss with the pupils what they will need to look for to find out what a typical person
might have looked like: dress, hair, facial features, make-up, adornments, footwear, etc.
Think of the objects themselves and also representations of people in pictures and on
papyruses.
Discuss how they will record the evidence they find.
Consider social status and how that affects what the person looked like.
Stress that the point is not to try to reproduce what that particular person looked like so
that the pupils range widely.
During
A simple data collecting task – encourage pupils to scan and gather information from a
range of sources.
Remind them to write down the name of the person they choose and what they did or who
they were.
After
Display work of different characters would be a good outcome. Discuss the types of
evidence the pupils used.
What is it? - 1 sheet

8
An enjoyable activity which encourages close observation, use of language for description
and scanning.
Before
Practise observation and description in class. You can do this as a written task or orally: sit
pupils in pairs back to back: one pupil holds a common object and describes it without
saying what it is; the other pupil has to guess.
Stress that the point is not to trick your partner, but not simply to say what the things are
that they have to find.
During
Collect the descriptions for discussion back at school.
After
Discuss at school how the pupils set about finding the objects. Which descriptions were
helpful ? What hierarchies of information seem to appear from the descriptions ?
There are alternative versions to the sheet included in the pack. For example, the class can
be divided into two and sent into different galleries. Having chosen an object, they would
then record five observations about it on file cards. The class then meets up, swaps file
cards and galleries, and the pupils try and identify a classmate's object.
Another would include a sketch for the answer so that pupils could make interactive
displays in class with clues given on a flap which can be lifted up to reveal the object
underneath.
Hieroglyphs - 1 sheet
A simple data gathering activity.
Make a mummy come alive! - 1 sheet

9
A variation on "Choose a mummy."
Pupils can draw a light pencil outline of an Egyptian's head and body before the visit and
add the details at the Museum. Encourage them to use notes to record materials and
colours.
A time line of Ancient Egypt - no activity sheet needed
Three of the upper Egyptian galleries follow a broadly chronological sequence. Room 64 has
the earliest material, then room 63 and then room 62
Before the visit
Give each pupil three blank cards, about the size of large file cards.
Show the pupils how to use the gallery labels using the example sheet given in this pack.
You may enlarge this or transfer to OHP for use in Literacy Hour!
Brief the pupils on the activity: they are to choose one object in each of the three Egyptian
rooms; they then draw the object carefully on the card, noting colours on the back and copy
from the label what the object is and its date.
During the visit
Encourage the pupils to choose different objects from each other and not to group around
one object. Encourage care in the record keeping.
Collect the cards as they are finished.
After the visit
Neaten up the drawings and colour them where necessary.
Discuss the way the Museum shows dates. Notice precise dates and ranges: notice use of
dynasties. Round up and down as necessary then sequence the drawings by date. Create a
timeline of Ancient Egypt using the drawings and notes. Encourage pupils to work out
periods and intervals between objects.
Highlights of the galleries - 1 sheet

10
This activity is intended as a pleasant way of closing a visit, ensuring that the pupils have
seen all the most important sections of the Funerary Galleries. Please do not hand out the
whole sheet so as to avoid crowding round certain objects.
Before the visit
Photocopy the sheet onto card and cut up.
Assign pupils into pairs.
Keep the cards your self or distribute sets to helpers.
During the visit
Begin the activity about ten or fifteen minutes before the end of your time in the galleries.
Issue each pair with a card and send them off to find the object or section of the galleries.
When each pair returns, retrieve the card and issue another.
Pupils can get excited in this sort of "treasure hunt." Please encourage them to walk calmly.
If you need to help the pupils:
• animal mummies: room 62
• shabtis room63
• mummification room 63
• Books of the Dead room 62
• science room 63
• amulets and charms room 62
• Roman paintings room 62
• food and models room 63
• named tomb groups room 63
Beliefs about Death - 1 sheet

11
This activity fits exactly with the QCA scheme of work. It is intended to help pupils use
material objects to think about abstract beliefs.
Before the visit
Cover the general nature of Egyptian funerary practices, familiarising the pupils with the
different sorts of objects which were put in tombs. Postpone detailed discussion of
significance of the objects until after the visit.
During the visit
Encourage the pupils to scan the galleries before selecting the objects which provide
evidence for the statements.
After the visit
A number of different discussions and presentations are possible.
Discuss the range of evidence the pupils have found and the different sorts of insights it
provides.
Consider the relationship between the decipherment of script and access to the belief
systems of the Egyptians.
Materials and Tools

12
The next four activities cluster round the issue of the materials used in ancient Egypt, how
they were worked and how they have survived. They address directly the questions posed
in the QCA scheme of work: What objects survive from the time of the ancient Egyptians?
and What do objects that have survived tell us about ancient Egypt?
The Egyptians used a wide range of materials and were well equipped with tools that
allowed them to use these materials to their fullest. In the galleries you will find a range of
materials that have survived much longer than comparable items in other cultures. This is
particularly true of organic materials. The dry, hot climate of Egypt and the burial
conditions mean that decomposition has been extremely limited and we have objects, such
as preserved bodies, that have survived thousands of years. We also have records of other
materials that were used by Ancient Egyptians recorded in decoration and pictures on the
objects themselves.
Preparation
It is important that pupils can identify the materials they will encounter in the galleries,
particularly since they will not be able to touch the materials at the Museum. Try to bring
in examples of as many materials as possible: bronze, gold, pottery, beads, wood, linen,
cotton, paints and stone. Have samples of some materials before and after processing (e.g.
wooden branch, plank of wood, clay and a fired pot)
Familiarize pupils with the properties of these materials by getting them to describe them
using words such as rough, soft, shiny, brittle, bendy, magnetic and synthetic. Have pupils
close their eyes and identify materials by touch. They will need to identify materials by
sight within the museums and as an aid you could bring along small samples of each
material.
Here are two classroom activities to help with this familiarisation:
The materials game

13
Objective: to help pupils make links between the properties and uses of materials.
What to do: write the names of some materials (such as stone, pottery/ceramic, gold) on
sticky labels and put a label on the back of each child. Pupils have guess the name of the
material on their back by asking each other questions about the properties of the material
(is it natural, is it bendy, is it strong, is it waterproof) and its uses ( is it used in the kitchen,
is it used in clothes, is it used for jewellery). Pupils are only allowed to answer yes or no to
the questions asked. When they think they know what material is on their label ask them to
tell you. If correct you can list the properties and uses against the name of the material.
Having more than one pupil wearing the same label may well bring out different properties
and uses forming the basis for group discussion.
Alive or Never Alive
Objective: to help pupils to distinguish between organic and non-organic materials.
Materials: examples from classroom or home of materials that are organic (i.e. once alive)
and non-organic.
What to do: using a range of objects consider some of the following questions
• Where does the material come from?
• Was this material once alive?
Ask the pupils to separate alive and never alive materials, creating a list of each.
Can they think of other examples. Explore the similarities and differences of each category.
Many non-organic materials we use now have replaced formerly natural materials doing the
same job. Ask the pupils to think about their clothing - can they think of organic and non-
organic equivalents ?
Ancient Egyptian object detective - 2 sheets

14
Pupils will learn about the range of objects and types of materials which have survived from
ancient Egypt and make inferences from objects about the way of life in ancient Egypt.
They will also understand how the passage of time affects different materials.
There are two stages to the activity:
First, ask the pupils to scan the objects in the gallery and record information under the
headings on the first recording sheet.
The pupils then repeat this procedure with the second sheet examining the decoration and
pictures on the objects rather than the objects themselves. You will need to explain this
difference clearly before they come to the Museum. They can especially look for pictures of
plants and animals. The evidence collected can then be used for investigative purposes back
in the classroom.
Before the visit
The pupils need to see the recording sheets and have the task explained to them.
Prepare them for identifying the range of materials they will see in the gallery.
The pupils also need to think about what information an object can give them e.g. about
clothes, transport etc. and how objects may very well tell us about more than just one area.
Brainstorming ideas and adding them to the top of the recording sheet may be helpful. This
is a funerary gallery, so all of the objects are linked to death, but there is plenty of other
information which can be gathered.
During the visit
The pupils could do this task in pairs.
Encourage the pupils to find unusual materials and to be very precise in identifying the
material.
Back at school
The survey of materials that objects were made from can be represented in pie charts, bar
charts, etc. to show which materials have survived. Looking at which materials are depicted
in decorative form will show that some materials existed in Egypt even if they have not
actually survived.
Explore the reasons for survival of the materials they have found. They could also consider
why some materials or objects more likely to be displayed in a museum than others?

15
Explore whether the objects themselves tell us more about rich or poor. What about the
pictures on the objects?
An object can answer a variety of questions about the past, but there are still questions
which we will never know the answer to. Try to identify questions which will always be a
mystery to us? E.g. Did the person who made this object enjoy making it?
Materials add up – 1 sheet

16
Before the visit
Prepare pupils for the type of objects they will see (mummy cases, shabtis, mummies,
canopic jars, etc) and discuss some of the materials used in these objects.
• shabtis were made from ceramics, wood or stone
• mummy cases and rectangular coffins were made predominately from wood and
also cartonnage (which is similar to papier mache, but uses linen and plaster)
• mummy wrappings (bandages) were linen
• canopic jars were made of a variety of materials including stone, marble, pottery and
wood
During the visit
Encourage pupils to move around the gallery examining a number of objects and then pick
what they consider to be representative examples of each item.
Drawings should be accurate and should show decoration and materials.
Back at school
Did the pupils find that many items were decorated? Were there many different materials
used in individual items? You could prepare bar charts of the number of materials using the
data collected.
Use results from the whole class to compare the number of organic and inorganic materials
used, perhaps extending to pie charts or bar charts.
Compare the results from two contrasting galleries exploring reasons why there are so few
organic materials present in, say, Greek artefacts (climate, burial practices).
Pupils could consider the technologies required to produce these objects. This could lead
into further research in woodworking, metal working, textile weaving and pottery-making.
Which material lasts longest? - 1 sheet
The pupils will be able to compare the changes that occur to different materials over time.

17
Before the visit
Brainstorm with the pupils about decay: What do specific materials (e.g. food stuffs, metals,
pottery, textiles) look like as they age? What causes decay? What materials does it affect?
How can it be stopped? Can they think of items that improve with age? Explore
particularly the contrast between organic materials and non-organic materials.
Ask the pupils to predict what will happen to various materials if buried in the garden.
During the visit
Encourage the pupils to look carefully at the objects and observe their condition.
There is a further example of a preserved body in gallery 64, for related activities see the
notes for that gallery.
Back at school
Explore the changes in these materials over time with the pupils.
In discussing each of the materials you might wish to consider the following information:
Skin and flesh buried without treatment will generally decompose. It was important to the
ancient Egyptians that their bodies survived for the Afterlife and they developed
sophisticated methods to minimise decomposition. Changes such as darkening of the skin
and shrinking of the flesh and skin still occurred.
Gold will not significantly change (corrode) in any way when buried. Because of gold’s
tremendous stability the pupils will see shiny, uncorroded gold everywhere in the Museum.
Other metals do corrode (for iron and steel we call corrosion rust) and there are examples
of corroded bronze, copper and brass in galleries 62-64.
Bandages, made from organic textiles, will decompose when buried in the ground.
Bury samples of bread, aluminium foil and non-synthetic cloth in the soil within a flower pot
and return to the sample after 12 weeks. Significant changes to the bread, limited changes
to the cloth and no change to the foil should be seen.
Tool box – three different sheets (use all or some)

18
Before the visit
You may wish to use this task with the next activity, or it can stand alone. Introduce it by
placing the pupils in Ancient Egypt and asking them to equip themselves for the funeral of a
great priestess. They need to collect tools to use in preparing for the funeral and the six
items we have suggested are representative of tools that would have been used.
In the Museum pupils will find the tools themselves and images of tools on objects. It is
important to prepare them to collect indirect evidence of tool work. For example, the
presence of a plank implies a tool for cutting the tree. The wooden pegs used to hold planks
together in the coffins, imply hammers. Help them to prepare for this by exploring items
within your classroom and brainstorming the tools that would have been needed to produce
these items.
Show the pupils examples or pictures of modern tools such a s saws, drills, chisels, hammers,
etc. You may want to use the comparison activity in this pack to develop the work further.
Explore the illustrations on the record sheets to ensure the pupils understand what is being
done with each tool.
During the visit
Pupils will have to look carefully for the tools, but there are many examples around the
galleries.
Some tomb models show people using tools and may help pupils put the tools in context
Back at school
Get the pupils to compare the tools with modern equivalents. It is interesting to note that
in many cases the tool has not significantly changed over the last 6,000 years. A saw from
ancient Egypt is instantly recognisable because it is perfectly designed to carry out the work
required of it.
The only major changes that have occurred in most tools since ancient times is a change in
the material from which the items are made and in the powering of the item. Electric drills
have replaced bow drills and the drill bit is now made from metal rather than wood. Pupils
could complete a comparison exercise that included these changes as well as discussion of

19
how easy the tool was to use, who would have used these tools in ancient Egypt and who
uses tools today?
Ancient Egyptians did not have money, they worked on a bartering system. Ask the pupils
to imagine setting up a home. How would they get furniture, food, clothes? What skills
and items could they barter? This could develop into a role play activity based on their
research in the gallery.
Enquiry Question:

20
• Find two objects which provide evidence for your enquiry.
• For each object, use the box to record the information you need to take back to
school.
Enquiry Question:

21
• Find three objects which provide evidence for your enquiry.
• For each object, use the box to record the information you need to take back to
school.

Compare an ancient Egyptian and a modern object
Stick a picture of a modern object in this
box.
Use these boxes to make notes of
similarities and differences.
Carefully draw the ancient Egyptian
object in this box.

23
Enquiry Question:
• Choose two objects which provide you with evidence for your enquiry.
• Use the boxes to record your information by drawing and writing.
…………………………………………………………………..
…………………………………………………….…………….
……………………………………………………….………….
……………………………………………………………………
…………………………………………………………………..
……………………………………………………………………
………………………………………………………….……….
…………………………………………………………………..
……………………………………………………………………
…………………………………………………………………..
……………………………………………………………………
……………………………………………………………………
…………………………………………………………………….
……………………………………………………………………

24
Choose someone whose mummy or coffin is in the gallery.
What was this person like?
• Find objects which provide you with evidence for what the person looked like, or
how they lived.
• Sketch or make notes on four objects/pieces of evidence in the boxes below.

25
What is it?
• Choose a partner.
• Now you must each choose an object in the gallery that tells you something about
daily life in ancient Egypt (but don't tell your partner which one it is!)
• Write five sentences about your chosen object, for example, what it's made of, what
it was used for
1)________________________________________________________________________________
2)________________________________________________________________________________
3)________________________________________________________________________________
4)________________________________________________________________________________
5)________________________________________________________________________________
Swop this paper with your friend and try and guess what the object is!
Write the answer in below.
It is a ___________________________________________________
Were they right?
Now you might like to play the game again.
26
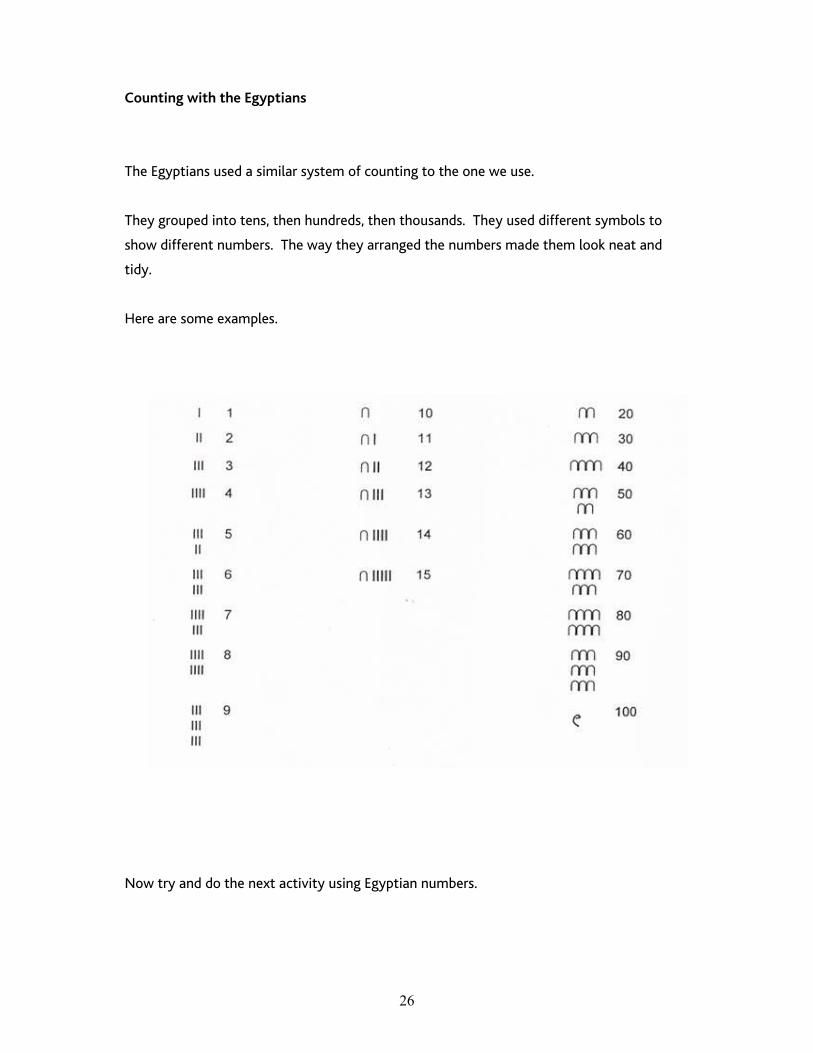
Counting with the Egyptians
The Egyptians used a similar system of counting to the one we use.
They grouped into tens, then hundreds, then thousands. They used different symbols to
show different numbers. The way they arranged the numbers made them look neat and
tidy.
Here are some examples.
Now try and do the next activity using Egyptian numbers.

27
Eye of Horus Activity
There are lots of examples of the eye of Horus in the gallery.
Many of them are made of different materials and are different colours.
For this activity you must list the different colours and materials you can find, then count
the number of examples.
Material/colour Number
What is the total number of objects you have found ? ____________
On another piece of paper, draw and colour your favourite example.

28
Hieroglyphs
• There are lots of examples of Egyptian hieroglyphs in these galleries.
• Record the objects you can see that have writing on them.
• What sorts of information can we get from hieroglyphs?
• Look around the galleries and see if you can find out what any of the hieroglyphs
might be telling us.
• List your findings below.
How was the writing put on the objects ? Yes No
With a reed pen and ink
With brushes and paints
With a word processor
With a hammer and chisel
With felt-tip pens

29
Make a mummy come alive!
• Choose one of the people whose mummy or coffin is in the gallery.
• In the space below, draw how this person looked when they were alive.
• Use examples from the gallery to make sure you give the person the right sort of
clothes, footwear, jewellery and hairstyle.

30
Highlights of the Galleries
• Find the animal mummies.
• You will find a cat, an ibis and a
crocodile.
• Nearby you will find mummies of
sacred bulls.
• Find the shabti figures.
• These did the work for the dead
person in the afterlife.
• They were put in the tombs in boxes.
• Find the Books of the Dead made of
papyrus.
• These contained spells to protect the
dead person.
• Notice paintings of the Weighing of
the Heart and of people doing their
daily job.
• Find the preserved bodies and the
case explaining how the mummies
were wrapped.
• You can see sets of four jars in which
the insides of the dead person were
put.
• Find what scientists can tell us about
ancient Egypt.
• You will see a leg that was broken,
teeth which were worn down and a
backbone of a person with arthritis.
• Find where on the mummy the
charms were put.
• Notice all the different types of
charms around the other side of the
case.
• Find the very lifelike paintings from
mummies.
• These used to cover the face of the
mummies.
• They were painted when the Romans
ruled Egypt.
• Find the food that has been
preserved.
• You will find bread, duck and
pomegranates.
• You will also see models showing
how the Egyptians got their food.
• Look at the burial goods of the Lady
Henutmehyt.
• You will see her two coffins and her
inner covering and a large box of
food.
• Look at the burial goods of
Sebekhetepi.
• Notice his 2 coffins, 2 boats, a cloth,
sandals, a headrest, and two other
models.

31
Beliefs about Death
Describe or draw an object which provides evidence for the statements on the right.
A person’s spirit still needed a body in
the tomb.
Food and drink were needed for the
afterlife in the tomb.
Charms were needed to protect the
body from harmful forces.
The underworld was full of dangers.
The dead person needed written
instructions about how to avoid them.
There was still hard work to be done in
the underworld. If you could, you tried
to avoid this.
Your spirit needed a body to live in
even if your real body did not survive.

32
Ancient Egyptian Object Detective 1
How many clues can you gather by investigating objects?
Name of object What material or
materials is it
made from ?
Is the material animal,
vegetable or mineral ?
What parts of Egyptian life does it
give us clues about ?
Does the object tell us
about rich or poor people ?
rich poor
Boat Wood
cloth
V (vegetable)
V (vegetable)
Transport – sailing
clothes
poor

33
Ancient Egyptian Object Detective 2
How many clues can you gather by investigating the decorations and pictures on objects ?
Description of the
decoration or picture on the
object
What material or materials
are shown on the
decoration?
Is the material animal,
vegetable or mineral?
What part or parts of Egyptian life does it give
us clues about ?
Wing of a sky goddess
Feather
Animal
Gods, birds
34
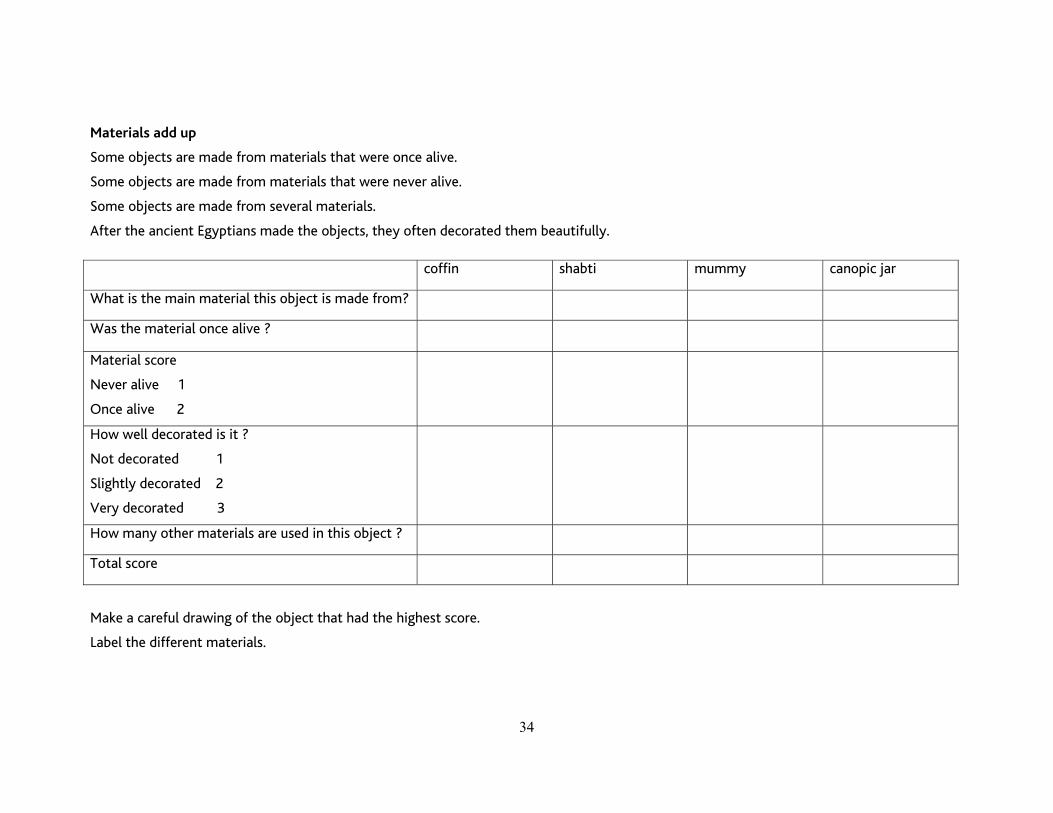
Materials add up
Some objects are made from materials that were once alive.
Some objects are made from materials that were never alive.
Some objects are made from several materials.
After the ancient Egyptians made the objects, they often decorated them beautifully.
Make a careful drawing of the object that had the highest score.
Label the different materials.
coffin shabti mummy canopic jar
What is the main material this object is made from?
Was the material once alive ?
Material score
Never alive 1
Once alive 2
How well decorated is it ?
Not decorated 1
Slightly decorated 2
Very decorated 3
How many other materials are used in this object ?
Total score

35
Which material lasts longest?
The objects in these galleries are very old. Sometimes the materials do not last very well.
Let’s compare three materials that were important to ancient Egyptians.
gold
skin
bandage
Sketch an object
showing where the
material can be
found.
Was this material
once alive ?
Has this material
changed since
Ancient Egyptian
times ?
Describe how it has
changed.
Put the gold, skin and bandages in order of change.
______________________has changed the least.
______________________hasn’t changed much.
______________________has changed the most

36

37

38

39