an sql server dba’s guide to actifio copy data...
TRANSCRIPT

Actifio CDS and Sky 7.0
An SQL Server DBA’s Guide to Actifio Copy Data Management

ii | actifio.com |An SQL Server DBA’s Guide to Actifio Copy Data Management
Copyright, Trademarks, and other Legal Matter
Copyright © 2010 — 2016 Actifio, Inc. All rights reserved.
Actifio® is a registered trademark of Actifio, Inc. AnyIT™, Dedup Async™, Manage Data Simply™, Virtual Data Pipeline™, VDP™, Protection and Availability Storage Platform™, PAS™, Copy Data Storage Platform™, CDS™, Actifio Sky™ and Actifio One™ are trademarks of Actifio, Inc. All other brands, product names, goods and/or services mentioned herein are trademarks or property of their respective owners.
Actifio, Inc., is a provider of data protection and availability products. Actifio’s technology is used in products sold by the company and products and services sold and offered by its commercial partners. The current list of Actifio patents is available online at: http://www.actifio.com/patents/
Actifio believes the information in this publication is accurate as of its publication date. Actifio reserves the right to make changes to information published in this document, including without limitation specifications and product descriptions, at any time and without notice. This document supersedes and replaces all information supplied prior to the publication hereof.
THE INFORMATION IN THIS PUBLICATION IS PROVIDED “AS IS.” ACTIFIO, INC. MAKES NO REPRESENTATIONS OR WARRANTIES OF ANY KIND WITH RESPECT TO THE INFORMATION IN THIS PUBLICATION, AND SPECIFICALLY DISCLAIMS IMPLIED WARRANTIES OF MERCHANTABILITY OR FITNESS FOR A PARTICULAR PURPOSE.
This software and the associated documentation are proprietary and confidential to Actifio. Use, copying, and distribution of any Actifio software described in this publication requires an applicable software license. Any unauthorized use or reproduction of this software and the documentation may be subject to civil and/or criminal liability.
Actifio strives to produce quality documentation and welcomes your feedback. Please send comments and suggestions to [email protected].

| actifio.com | An SQL Server DBA’s Guide to Actifio Copy Data Management iii
Contents
Preface.......................................................................................................................................... v
The Actifio Now Customer Portal.....................................................................................................................v
Actifio Support Centers ....................................................................................................................................v
Chapter 1 - Introduction ............................................................................................................. 1
Actifio Data Virtualization .................................................................................................................................1
Capturing SQL Server Data ..............................................................................................................................2
Capture Mechanisms ........................................................................................................................................2
VMware API Calls ...............................................................................................................................................................2
The Actifio Connector ........................................................................................................................................................3
Capturing Microsoft® SQL Server Data ..........................................................................................................4
SQL Server Data Capture Options ...................................................................................................................5
Capturing Individual and Groups of Databases ..............................................................................................................5
Capturing Consistency Groups.........................................................................................................................................5
Capturing a VM’s Databases and Boot Volume ...............................................................................................................5
Capturing Entire VMware and Hyper-V VMs ....................................................................................................................6
Replicating SQL Server Data ............................................................................................................................7
Production to Mirror Policy Replication ...........................................................................................................................8
Dedup Backup to Dedup DR Policy Replication...............................................................................................................9
Snapshot to Vault Policy Replication ................................................................................................................................9
Accessing SQL Server Data............................................................................................................................10
Role-based Access Control..............................................................................................................................................10
Mounts..............................................................................................................................................................................10
LiveClones ........................................................................................................................................................................10
Restores ............................................................................................................................................................................ 11
Workflows to Automate Access to SQL Server Data ....................................................................................12
Chapter 2 - Required SQL Server Roles for the Windows User ............................................ 13
Windows Local Admin User ...........................................................................................................................14
Required SQL Roles for the Windows User...................................................................................................14
Credentials for Capturing SQL Server Database Logs .................................................................................15
Credentials for Restoring a Microsoft SQL Server Database.......................................................................16
Credentials for Mounting an SQL Server Database as a Virtual Application..............................................17

iv | actifio.com |An SQL Server DBA’s Guide to Actifio Copy Data Management
Chapter 3 - Protecting Microsoft SQL Server Databases ...................................................... 19
Protecting SQL Server Databases..................................................................................................................20
Application Advanced Settings for Microsoft SQL Servers .........................................................................21
Protecting Clustered SQL Server Databases with a Consistency Group....................................................22
Protecting SQL Server Databases In-Band....................................................................................................22
Protecting SharePoint® Data on a Microsoft® SQL Server.........................................................................22
Chapter 4 - Mounting a Microsoft SQL Server Database ...................................................... 23
Mounting an SQL Server Database ...............................................................................................................23
Mounting an SQL Server Database as a Virtual Application .......................................................................24
Chapter 5 - Mounting Encrypted SQL Data ............................................................................ 27
Determining if SQL TDE is Enabled................................................................................................................27
Manual Query to Determine if Encryption is Enable....................................................................................28
Troubleshooting SQL Server Encryption.......................................................................................................29
SQL Server Master Key, Encryption Certificate, and Password Procedures ..............................................30
Chapter 6 - Restoring SQL Server Databases ......................................................................... 33
Restoring a Standalone Microsoft SQL Server Database ............................................................................34
Restoring All SQL Server Databases in a Consistency Group.....................................................................36
Chapter 7 - Using VSSRESTORE for Database Recovery ...................................................... 37
Mounting and Recovering a Microsoft SQL Server Database.....................................................................37
Using VSSRESTORE........................................................................................................................................38
Chapter 8 - Minimizing Downtime When Restoring SQL Server Databases ....................... 41
Step-By-Step Instructions For Minimizing SQL Server Downtime .............................................................42
Chapter 9 - Restoring Members of an SQL AlwaysOn Availability Group .......................... 49
Error Messages................................................................................................................................................58
Chapter 10 - Using Mounts to Create SQL AlwaysOn Availability Groups ......................... 59
Create an SQL Server AAG in An Actifio Snapshot Pool..............................................................................59
Create an SQL Server AAG Outside of An Actifio Snapshot Pool ...............................................................61
Create the New SQL Server AlwaysOn Availability Group..........................................................................63
Chapter 11 - Restoring SQL System Databases ..................................................................... 65
Restoring SQL System Databases .................................................................................................................65
| actifio.com | An SQL Server DBA’s Guide to Actifio Copy Data Management v
Preface
The information presented in this guide is intended for users who are familiar with basic Actifio processes and procedures as described in Getting Started with Actifio Copy Data Management and are qualified to administer Microsoft® SQL Server databases.
Caution! Only those users qualified to administer Microsoft SQL Server databases should attempt the processes and procedures presented here. Procedures attempted by unqualified personnel can result in data loss.
Your Actifio appliance’s Documentation Library contains detailed, step-by-step, on how to protect and access your data. Each guide is in PDF format and may be viewed online, downloaded, or printed on demand.
The Actifio Now Customer PortalDuring the configuration and initialization of your Actifio appliance your Actifio representative provided you with a user name and password for the Actifio Now customer portal.
From the customer portal you can obtain detailed reports about your Actifio appliance as well as search the portal’s knowledge base for answers to specific questions.
To log into the Actifio Now customer portal:
1. Go to: https://now.actifio.com
2. When prompted, enter the user name and password provided by your Actifio representative.
Actifio Support CentersTo contact an Actifio support representative, you can:
• Send email to: [email protected]
• Call:
From anywhere: +1.315.261.7501
US Toll-Free: +1.855.392.6810
Australia: 0011 800-16165656
Germany: 00 800-16165656
New Zealand: 00 800-16165656
UK: 0 800-0155019

vi | actifio.com |An SQL Server DBA’s Guide to Actifio Copy Data Management

1
| actifio.com | An SQL Server DBA’s Guide to Actifio Copy Data Management 1
Introduction
This chapter provides a high-level overview of basic Actifio concepts and procedures used to capture and access Microsoft® SQL Server databases.
Actifio Data VirtualizationAn Actifio appliance is a highly scalable copy data management platform that virtualizes application data to improve the resiliency, agility, and cloud mobility of your business.
It works by virtualizing data in much the same way other technologies have virtualized servers and networks.
Actifio Enterprise enables users to capture data from production systems, manage it in the most efficient way possible, and use virtual or physical copies of the data whenever and wherever they are needed.
Capture, Manage, and Access Application Data
Application data is captured at the block level, in application native format, according to a specified SLA. A Golden copy of that data is created and stored once, and is then updated incrementally with only the changed blocks of data in an “incremental forever” model. Unlimited virtual copies of the data can then be made available instantly for use, without proliferating physical copies and taking up additional storage infrastructure.
Exchange
APPLICATIONAPIs
+ACTIFIO
CONNECTOR
SLA-Based capture and manage
initialcapture
+
incrementalmerge
CAPTURE MANAGE ACCESS
APP/DATA PROTECTION
Unlimited virtual copiesfor instant access,
management and protection
ANALYTICS
BUSINESSCONTINUITY
DEV &TEST
APPRETIREMENT
DATA MOBILITY
FORENSICS COMPLIANCE

2 | actifio.com |An SQL Server DBA’s Guide to Actifio Copy Data Management
Capturing SQL Server DataWhen capturing Microsoft® SQL Server data, production data is typically controlled by a non-Actifio storage controller on your existing storage arrays. The Actifio appliance moves and manages the Microsoft SQL Server data separately from where Microsoft SQL Server writes its primary storage.
As shown in the following figure, an Actifio appliance stores application data on a staging disk. Snapshots on the staging disk allow the Actifio appliance to maintain a golden copy of the application’s historical data.
Actifio Data Capture
When capturing data:
• A staging disk is automatically created and mounted on a server via Fibre Channel or iSCSI.
• An initial full copy is made to the staging disk. Subsequent copies consist only of incremental change blocks.
• The staging disk is unmounted from the server.
• A snapshot of the staging disk is made on the Actifio appliance.
Actifio offers an alternate configuration where production data storage is controlled by an Actifio appliance. With this approach snapshots and changed-block tracking are native to the Actifio appliance and the Actifio appliance is placed in the data path between the SAN and the application host. This approach to data management is known as “In-Band.”
Capture MechanismsAn Actifio appliance captures data by making an initial full copy of the data, then making copies of incremental changes. This capability requires the ability to track and capture the changes that occur between capture operations. To track those changes the Actifio appliance uses either VMware API calls or the Actifio Connector.
VMware API Calls
An Actifio appliance can take advantage of VMware API for data protection (VADP) calls to capture an entire virtual server. Specifically, the API calls can:
Perform change block tracking - Makes an initial full snapshot of the entire VM, then going forward only snapshots the changes to the database thereby enabling Actifio’s incremental forever capture strategy.
Quiesce applications - Ensures application consistency during capture.
When an entire virtual server is managed, a fully functional virtual server (operating system, applications, and their data) is captured. Having a copy of the entire virtual server guarantees that the data can be accessed fast and without issues. Because the image presented is a fully functional virtual server, if needed, it can be started and run from an Actifio appliance directly and then optionally migrated to a new, permanent location.
Virtual machines and their applications can be grouped and captured with a single SLA Template Policy.
HOST SERVER
DAS, CIFS, NFS STORAGE ARRAY
STAGING DISK
SNAPSHOT POOL
HOSTBASEDCOPY
FC/iSCSI
DEDUP POOL

| actifio.com | An SQL Server DBA’s Guide to Actifio Copy Data Management 3
The Actifio Connector
The Actifio Connector is used to capture selected Microsoft® SQL Server databases. The Actifio Connector is a small-footprint, lightweight service that can be installed on either virtual or physical servers. The Actifio Connector makes use of Microsoft SQL Server VSS Writer (SqlServerWriter) for discovery, capture, and access operations. SqlServerWriter is installed by default on most Microsoft SQL Servers.
The Actifio Connector provides a more granular capability than what is provided by VMware API calls. It allows you to: capture selected Microsoft SQL Server databases, capture databases that cannot be snapped by VMware, and capture Microsoft SQL Server clusters. It offers more options for handling individual Microsoft SQL Server database transaction logs.
Specifically, the Actifio Connector:
• Discovers SQL Server databases.
• Quiesces SQL Server databases.
• Identifies changes to database data for Actifio’s incremental forever capture strategy.
• Captures databases in clustered Microsoft SQL Server deployments.
• Captures and manages transaction logs:
o Captures Microsoft SQL Server database(s) and logs with one SLA
o Truncates Microsoft SQL Server database transaction logs
o Rolls Microsoft SQL Server database transaction logs forward for point-in-time recovery when accessing virtual copies.
• If multiple databases are resident on a server, they can be captured as a consistency group using a single SLA Template Policy for a point in time capture of the databases.
• For VMware VMs, the Actifio Connector captures databases that are on pRDMs and vRDMs and avoids virtual server “stun” issues.
• For Hyper-V Servers, the Actifio Connector enables capture of entire Hyper-V VMs.

4 | actifio.com |An SQL Server DBA’s Guide to Actifio Copy Data Management
Capturing Microsoft® SQL Server DataCapturing Microsoft SQL Server data consists of four simple steps:
1. Add servers that host Microsoft SQL Server databases.
2. Discover VMs and Microsoft SQL Server databases.
For Microsoft SQL Server failover instances, use the active node for the Microsoft SQL Server failover instance to discover all the databases in that instance.
3. Define Actifio Policy Templates and Resource Profiles according to your RPOs and RTOs.
Databases that use the Microsoft SQL Server Full Recovery Model can take advantage of Actifio’s database and log capture technology. This technology allows you to define a single policy to capture both the database and its logs. Because a single policy captures both the database and its logs, a captured database can be recovered to a point in time by rolling its logs forward via the Actifio appliance’s user interface.
4. Assign Actifio Policy Templates and Resource Profiles to Microsoft SQL Server databases.

| actifio.com | An SQL Server DBA’s Guide to Actifio Copy Data Management 5
SQL Server Data Capture OptionsWhen capturing Microsoft® SQL Server data, you can capture:
• Individual and groups of databases on physical or virtual servers
• Consistency groups
• Microsoft SQL Server databases on a VM along with the VM’s boot volume
• Entire VMs
Capturing Individual and Groups of Databases
The Actifio Connector is used to capture individual and groups of databases on physical and virtual servers.
Capturing Individual or Groups of Databases
Installing the Actifio Connector on a physical server or VM allows you to create a single policy to capture all databases on the server or several policies to capture groups of databases.
Capturing Consistency Groups
A consistency group is a group of databases that are quiesced and captured together via a single policy. As the name implies, consistency groups ensure consistent point-in-time capture and recovery across multiple databases. If Actifio’s database and log capture technology is enabled on the policy, then all databases in that group can be recovered to the same point-in-time. Recovery and rolling forward of the logs for all databases in the group is performed via the Actifio user interface with a single action.
In addition to making capture and recovery operations easy and fast, consistency groups consume fewer system resources.
Capturing a VM’s Databases and Boot Volume
When capturing databases on VMs you have the option of also capturing the VM’s boot volume.
When a VM’s boot volume is captured along with its databases, if needed, an image can be presented that is a fully functional database and VM. The image can then be migrated to a new, permanent location.
Production Data
DISK ARRAY
Copy Data
Physical Host
DISK ARRAY
Actifio Appliance
TCP/IP Connection
Production Data
DISK ARRAY
Copy Data
ESX or Hyper-V Server
VM Connectors
DISK ARRAY
Actifio Appliance
TCP/IP Connection

6 | actifio.com |An SQL Server DBA’s Guide to Actifio Copy Data Management
Capturing Entire VMware and Hyper-V VMs
To capture entire VMware VMs, the Actifio appliance takes advantage of VMware APIs. To capture entire Hyper-V VMs, the Actifio appliance uses an Actifio Connector installed on the Hyper-V server.
Capturing Entire VMs
Note: An Actifio Sky appliance is a VMware VM and can be on the same ESX server as the VMs it captures.
When an entire virtual server is captured, a fully functional virtual server (operating system, applications and their data) is captured. Having a copy of the entire virtual server guarantees that the data can be accessed fast and without issues. Because the image presented is a fully functional virtual server, if needed, it can be migrated to a new, permanent location.
Capturing whole virtual servers allows groups of virtual servers and their applications to be protected with a single SLA.
Production Data
DISK ARRAY
Copy Data
ESX Server
VMs
DISK ARRAY
Actifio Appliance
TCP/IP Connection
Production Data
DISK ARRAY
Copy Data
DISK ARRAY
Actifio Appliance
TCP/IP Connection
Hyper-V Server
VMs

| actifio.com | An SQL Server DBA’s Guide to Actifio Copy Data Management 7
Replicating SQL Server DataData can be replicated to a second Actifio appliance or to the cloud for recovery, disaster recovery, or test/development purposes.
Data replication has traditionally been an inhibitor to efficient data management in a geographically distributed environment. Actifio replication addresses these issues with a global deduplication and compression approach that:
• Drives down overall network usage.
• Eliminates the need for a dedicated WAN accelerator/optimizer.
• Does not require storage array vendor licenses as data is sent from one Actifio appliance to another.
• Is heterogeneous from any supported array to any supported array: Tier 1 to Tier 2 and/or Vendor A to Vendor B.
• Preserves write-order, even across multiple LUNs in a consistency group.
• Is fully integrated with VMware Site Recovery Manager (SRM) and Actifio Resiliency Director.
• Encrypts data using the AES-256 encryption standard. Authentication between Actifio appliances is performed using 1024-bit certificates.
Replication is controlled by Actifio Policy Template policies:
• Production to Mirror policies have several options to replicate data to a second Actifio appliance. For details see Production to Mirror Policy Replication on page 8.
• Dedup Backup to Dedup DR policies use a fixed, Actifio proprietary replication engine to replicate data to a second Actifio appliance. In addition Dedup Backup to Dedup DR policies allow you to replicate data to two locations. For details see Dedup Backup to Dedup DR Policy Replication on page 9.
• Production to Vault policies use a fixed, Actifio proprietary engine to transfer data to remote storage. For details see Snapshot to Vault Policy Replication on page 9.

8 | actifio.com |An SQL Server DBA’s Guide to Actifio Copy Data Management
Production to Mirror Policy Replication
Production to Mirror policies can use one of the following options to replicate data to a second Actifio appliance
• StreamSnap
• Dedup Async (DAR)
• Sync and Async
When data is replicated via a Production to Mirror policy, it lands in a Snapshot Pool managed by another Actifio appliance. The Snapshot Pool on which that replicated data lands must be sized accordingly.
StreamSnap
StreamSnap facilitates high-availability by allowing you to keep a remote copy of an application's storage and configuration up-to-date and ready for a failover scenario. When a StreamSnap-managed application fails, you mount a failover image of the application from the remote site. When the problem has been resolved, then you can restore the syncback image to the local site with the latest changes and then failback the application to the production site.
StreamSnap replicates data snapshots that are not deduplicated to a remote Actifio appliance over a high quality bandwidth IP network, which can provide RPOs as low as one hour.
• For VMware VMs, snapshot replication is streamed to the second Actifio appliance in parallel. Streaming of a VMware VM is performed to avoid waiting until the local snapshot job completes before initiating replication.
• For non-VMware VM applications, snapshot replication occurs after the local snapshot job is completed.
Note: StreamSnap replication and local snapshots are integrated to avoid the creation of double snapshots. The Actifio appliance allows you to maintain multiple local snapshots and store local images in the Dedup pool for long-term retention.
Production to Mirror policies that use StreamSnap replication are tied to a specific Production to Snapshot policy. They use the schedule and frequency settings of their associated Production to Snapshot policy.
StreamSnap replication requires a reliable network connection to replicate data snapshots to the remote Actifio appliance. The bandwidth required on the network connection is directly related to the application size (initial copy) and amount of change (for incremental updates).
Dedup Async (DAR)
Dedup-Async Replication (DAR) is an Actifio-proprietary form of replication where initially a full copy of data is replicated to another Actifio appliance, then going forward, the copy is updated with incremental changes. This reduces the amount of data that must be sent over the network and ensures that an up-to-date copy of production data is always present and ready for a recovery operation.
Note: Production to Mirror policies that use DAR make snapshots of their own. They do not use a snapshot created by another Production to Snapshot policy.
Because the data is deduplicated before it is replicated, less network bandwidth is required. DAR is use to:
• Achieve typical Recovery Point Objectives (RPOs) of 24 hours with 12 and 8 hour RPOs possible.
• Replicate data that is can be efficiently deduplicated.
Actifio’s Dedup-Async replication:
• Uses existing IP network to replicate data.
• Replicates repeatedly at intervals determined by policy.
• Makes disk management transparent.
• Replicates VMware VMs to a datastore (optional).

| actifio.com | An SQL Server DBA’s Guide to Actifio Copy Data Management 9
• Makes fail-over to a host on the remote site simple.
• Makes syncback to the local Actifio appliance simple and non-interruptive to the application's I/O activities.
• Cleans up all remote images created after the application fails back to the local Actifio appliance.
Sync and Async Replication Options
Sync and Async replication is used by Actifio CDS appliances to protect generic applications. Sync and Async replication require a Fibre Channel connection and are not used by Actifio Sky appliances. Data that is replicated via Sync and Async is not deduplicated.
• Sync Replication is slower than Async Replication, but it has no risk of data loss. Synchronous replication supports Actifio appliances that are up to 300KM apart.
• Async Replication is much faster than Sync Replication, but it has some risk of data loss. Async Replication has no distance limitation; it sends data over the WAN as fast as network bandwidth allows.
Dedup Backup to Dedup DR Policy Replication
Dedup Backup to Dedup DR replication provides for efficient long-term storage of deduplicated captured data. Dedup Backup to Dedup DR replication is scheduled IP-based replication. Dedup DR is designed for long-term storage of deduped data on a remote Actifio appliance. When data is replicated via a Dedup Backup to Dedup DR policy, it lands in a Dedup Pool managed by another Actifio appliance. The Dedup Pool on which that replicated data lands, must be sized accordingly.
The Dedup Backup to Dedup DR replication process begins after the deduplication process completes. A proprietary deduplication-aware replication protocol enables the transmission of only the globally unique blocks.
This approach minimizes the bandwidth required to move data between Actifio appliances.
Finally, Dedup Backup to Dedup DR replication provides the added benefit of allowing data to be replicated to a remote site, then from that remote site to a second remote site. This feature is referred to as multi-hop.
Snapshot to Vault Policy Replication
The Snapshot to Vault policy allows you to transfer data to remote storage. The transfer of data is scheduled within the policy and the most recent snapshot taken by the Policy Template will be transferred. An HTTPS connection is used to ensure data security and to minimize network traffic.

10 | actifio.com |An SQL Server DBA’s Guide to Actifio Copy Data Management
Accessing SQL Server DataFor Microsoft® SQL Server databases that use the Full Recovery Model, the Actifio appliance can instantly present a copy of the database rolled forward to a specific point of time. The roll forward operation is performed from the Actifio appliance’s user interface.
For Microsoft SQL Server databases that use the Simple Recovery Model, the Actifio appliance can instantly present the most recent backup of the database.
Regardless of the Microsoft SQL Server recovery model used, Microsoft SQL Server data can be accessed via a Fibre Channel or iSCSI interface, just as if accessing a traditional storage system.
Role-based Access Control
Actifio administrators can control which users have access to data, Actifio features, processes, and resources. In addition, captured data can be defined as sensitive or non-sensitive. Actifio users can be granted permission to access sensitive or non-sensitive data.
Mounts
The Actifio mount function provides instant access to data without moving data. Captured copies of databases can be rolled forward via the Actifio user interface and mounted on any database server.
An Actifio appliance provides two ways to mount an Microsoft SQL Server database:
• The standard mount presents and makes the captured Microsoft SQL Server data available to a target server as a file system, not as a database. This is useful if a database is corrupt, lost, or if a database server is being replaced. In such cases you cannot use a restore operation to recover the database. Instead, you can mount an image and copy the database files from the mounted image to their original location on the database server.
• The Application Aware mount presents and makes the captured Microsoft SQL Server data available to a target server as an Microsoft SQL Server database. This allows you to address the unique challenges associated with creating and managing copies of production databases for non-production use. Application Aware mounts are performed from the Actifio appliance and do not require manual intervention by database, server, or storage administrators. Application Aware mounts can be used for such things as database reporting, analytics, integrity testing, and test and development.
LiveClones
The LiveClone is an independent copy of Microsoft SQL Server data that can be refreshed when the source data changes. The advantage of LiveClones is that they are independent copies of data that can be incrementally refreshed and masked before being made available to users. This allows teams such as development and test to ensure they are working on the latest set of data without having to manually manage the data and not access or interfere with the production environment.
| actifio.com | An SQL Server DBA’s Guide to Actifio Copy Data Management 11
Restores
The restore function reverts the production data to a specified point in time. Restore operations actually move data. Typically restore operations are performed to restore a database to a valid state after a massive data corruption or storage array failure. The amount of time required to complete a restore operation depends on the amount of data involved.
Note: Actifio provides the flexibility to restore Microsoft® SQL Server databases to the original Microsoft SQL Server or to an alternate server. To restore to an alternate server, the Actifio Connector must be installed on the alternate server before initiating the restore operation.
To restore a database and then apply logs, the restored database must be in Restoring Mode. Actifio’s LogSmart functionality allows you to, from the Actifio user interface, restore the database in Restoring Mode and then roll the logs forward to a specific point in time.
If you restore the database through the Actifio user interface without specifying Restore with no Recovery, the database will be restored and brought on line without applying logs.

12 | actifio.com |An SQL Server DBA’s Guide to Actifio Copy Data Management
Workflows to Automate Access to SQL Server DataWhile SLAs govern the automated capture of production Microsoft® SQL Server data. Workflows automate access to the captured Microsoft SQL Server data.
Workflows are built with captured Microsoft SQL Server data. Workflows can present data as either a direct mount or LiveClone:
• Direct mounts (standard or application aware) work well for Microsoft SQL Server data that does not need to be masked prior to being presented. A mounted copy of data can be refreshed manually or on automatically on a schedule. Direct mounts allow you to instantly access captured Microsoft SQL Server data without actually moving the data.
• A LiveClone is a copy of your production Microsoft SQL Server data that can be updated manually or on a scheduled basis. You can mask sensitive Microsoft SQL Server data in a LiveClone prior to making it available to users.
Combining Actifio’s automated Microsoft SQL Server data capture, access control, with Workflows and their optional data masking capabilities allows you to create self-provisioning environments. Now, instead of having to wait weeks for DBAs to update test and development environments, users can provision their own environments almost instantly.
For example, an Actifio administrator can create an SLA Template Policy that captures Microsoft SQL Server data according to a specified schedule. Optionally, the administrator can mark the captured production Microsoft SQL Server data as sensitive and only accessible by users with the proper access rights.
After access rights have been defined and data has been captured, the administrator can create a Workflow that:
• Makes the captured Microsoft SQL Server data available as a LiveClone or a direct mount
• Updates the LiveClone or mountable Microsoft SQL Server data on a scheduled or on demand basis
• Optionally automatically applies scripts to the LiveClone’s Microsoft SQL Server data after each update. This is useful for masking sensitive Microsoft SQL Server data.
Once the Workflow completes, users with proper access can, via the Actifio user interface, provision their environments with the LiveClone or mountable Microsoft SQL Server data.
Workflow With Masked Social Security Data
SLA BASED INGEST
PHYSICAL COPYVIRTUAL COPY
PREP MOUNT
Modify a LiveClone, e.g. for data masking or subsetting
Powered by Foresight
PROD
JOHN
SALLY
MARY
012-34-5678
912-34-6464
812-34-2345
To
SNAP LIVECLONE
LIVECLONE LAYERwith MASKED DATA
NAME SSN
JOHN
SALLY
MARY
012-34-5678
912-34-6464
812-34-2345
NAME SSN
JOHN
SALLY
MARY
012-34-5678
912-34-6464
812-34-2345
NAME SSN
JOHN
SALLY
MARY
XXX-XX-XXX
XXX-XX-XXX
XXX-XX-XXX
NAME SSN
JOHN
SALLY
MARY
XXX-XX-XXX
XXX-XX-XXX
XXX-XX-XXX
NAME SSN

2
| actifio.com | An SQL Server DBA’s Guide to Actifio Copy Data Management 13
Required SQL Server Roles for the Windows User
Microsoft® SQL requires specific user roles to perform specific operations.
To perform Actifio capture, restore, unmount, delete, and Application Aware mount operations on an SQL Server database, you must provide the Actifio appliance with credentials for a Windows user (a local user or a domain user) who has been assigned a role with sufficient SQL privileges to perform the operation.
This chapter calls out the user roles required to perform capture, restore, unmount, delete, and Application Aware mount operations from an Actifio appliance. The recommended roles presented in this chapter are based on Microsoft’s best practices for accessing SQL Server databases.
Caution: Creating users and assigning roles MUST be done by qualified system and database administrators. If users are improperly defined, and/or roles are improperly applied, the result can lead to Actifio job failure, security violations, and possible data loss.
This document contains information on:
• Windows Local Admin User on page 14
• Required SQL Roles for the Windows User on page 14
• Credentials for Capturing SQL Server Database Logs on page 15
• Credentials for Restoring a Microsoft SQL Server Database on page 16
• Credentials for Mounting an SQL Server Database as a Virtual Application on page 17
14 | actifio.com |An SQL Server DBA’s Guide to Actifio Copy Data Management
Windows Local Admin UserTo perform capture, restore, unmount delete, and Application Aware Mounts you must enter the credentials of a Microsoft® Windows user who has sufficient privileges in the SQL environment. The Windows user must be assigned a specific role or roles. The Microsoft Windows user can be a newly created or existing user.
Required SQL Roles for the Windows UserA Windows Local Admin user assigned to the sysadmin server role will have all necessary permissions to perform Actifio capture, restore and Application Aware mounts.
If the sysadmin server role is deemed to be too liberal, then assign a Windows user the following roles and securables:
• dbcreator server role
• db_backupoperator database role
• db_owner database role
In addition, such users must also be assigned the following Securables:
• View any database
• Create any database
• Alter any database
• Connect SQL
The following sections detail where to enter the Windows Local Admin’s username and password to perform specific Actifio SQL related operations.
Note: In the following procedures, when entering user names, in most cases the domain name and user name (domain\username) format will be sufficient. In rare cases, entering the domainname\username will return the error: Logon failure: unknown user name or bad password [1326] In such cases, use the fully qualified domain name format: (username@fqdn) to address the problem.

| actifio.com | An SQL Server DBA’s Guide to Actifio Copy Data Management 15
Credentials for Capturing SQL Server Database LogsWhen applying an Actifio SLA Policy Template to an SQL Server database, if the template contains a policy that captures database logs you must, in the Application manager’s Advanced Settings dialog box, enter credentials of a Windows user assigned the proper role(s):
Note: Credentials are not required if only the database(s) are being captured.

16 | actifio.com |An SQL Server DBA’s Guide to Actifio Copy Data Management
Credentials for Restoring a Microsoft SQL Server DatabaseTo restore an SQL Server database from the Actifio Desktop, you must provide the Actifio appliance credentials that are equal to those credentials recommended by Microsoft to restore an SQL Server database:
When restoring SQL Server databases from an Actifio appliance’s Application Manager, in the Restore dialog box, enter credentials of a Windows user assigned the proper role(s):

| actifio.com | An SQL Server DBA’s Guide to Actifio Copy Data Management 17
Credentials for Mounting an SQL Server Database as a Virtual ApplicationAn application aware mount, mounts an SQL Server database as a virtual application. When performing an Application Aware mount of an SQL Server database from an Actifio appliance, the user must be assigned a role that allows both the ability to mount and unmount (detach) the SQL Server database.
When performing an Application Aware mount, in the Mount dialog box, enter the credentials of a Windows user assigned the proper role(s):

18 | actifio.com |An SQL Server DBA’s Guide to Actifio Copy Data Management

3
| actifio.com | An SQL Server DBA’s Guide to Actifio Copy Data Management 19
Protecting Microsoft SQL Server Databases
The Actifio appliance offers several option to protect Microsoft SQL® Server databases. This chapter describes:
Protecting SQL Server Databases on page 20
Application Advanced Settings for Microsoft SQL Servers on page 21
Protecting Clustered SQL Server Databases with a Consistency Group on page 22
Protecting SharePoint® Data on a Microsoft® SQL Server on page 22
SQL servers are protected differently depending on whether they are in-band, out-of-band, or as part of an entire VM. The following table details those differences.
As an Application, In-Band As an Application, Out-of-Band As part of a VM
Actifio appliances protect the entire volume(s) that the database resides on. Restore operation restores the entire volume.
Note: Use caution when restoring an in-band SQL Server database as it can overwrite data used by other applications. For details, see Protecting SQL Server Databases In-Band on page 22.
Actifio appliances protect only the database files.
Entire VMware VMs are protected using VMware APIs; entire Hyper-V VMs are protected using the Actifio Connector.
Actifio Connector coordinates the VSS snapshot and does log truncation.
The Actifio Connector coordinates the VSS snapshot and does log truncation.
The VMware API or the Actifio Connector coordinates the VSS snapshot. The Actifio Connector must be installed on the VM for log truncation.
Placing the LUN in-band gives Actifio CBT.
The Actifio Connector uses block tracking on named files (very efficient for large database files).
The VMware API provides CBT. For Hyper-V, the Actifio Connector provides CBT.
Transaction log backed up according to the defined frequency and retained for a specified period if Enable
Database Log Backup is selected in the Snapshot policy’s advanced settings.
Transaction log backed up according to the defined frequency and retained for a specified period if Enable
Database Log Backup is selected in the Snapshot policy’s advanced settings.
The transaction log is not captured.
Client can roll forward with logs. Client can roll forward with logs. Roll forward not supported.

20 | actifio.com |An SQL Server DBA’s Guide to Actifio Copy Data Management
Protecting SQL Server DatabasesTo protect an SQL Server database:
1. Open the Actifio Desktop to the Application Manager.
2. Select the SQL Server database from the navigation pane under Local > SQL SERVER.
3. Select the Protect tab.
4. Click the blue Advanced Settings link in the upper right corner. The Advanced Settings page appears. Fill in advanced settings as needed for this database. Advanced settings are detailed in Application Advanced Settings for Microsoft SQL Servers on page 21.
5. Select an SLA template from the Template drop-down list. This is the template that defines the snapshot/deduplication, replication, and retention of the application data.
6. Select a resource profile from Profile drop-down list. This defines the resources used to store the data of the application images.
7. Click Protect. The application status becomes Protection-Initialization; it is not Protected until the scheduled job runs according to the hours of operations defined in the template. For example, today at noon you can assign a template that has hours of operation of 2:00am to 5:00am to an application and the first job will not start before 2:00am tomorrow. The first Snapshot or Direct to Dedup job should start when the Actifio appliance has its next available slot. Check the System Monitor to find the running job.
Note: A Warning screen appears if the selected SLA template policy will result in a potential impact to system resources based on the policy settings.
Protecting an SQL Server Database

| actifio.com | An SQL Server DBA’s Guide to Actifio Copy Data Management 21
Application Advanced Settings for Microsoft SQL ServersAn SLA Policy Template has advanced settings. An SLA Policy Template can be applied to multiple applications. If the SLA Policy Template has been configured to allow overrides, then, on a application by application basis, you can use the following Application Advanced Settings to override the advanced setting in an SLA Policy Template.
To configure advanced protection settings for a Microsoft® SQL server:
1. Open the Application Manager to the Protect tab.
2. Select APP. Under Local > SQL Server, select the SQL server from the navigation pane.
3. Click the blue Advanced Settings link in the upper right corner. The Advanced Settings page appears.
o Enter the Username/Password credentials needed for backing up or truncating database transaction logs. This account must have backup privileges. Credentials are required only if you select the Truncate Log or Backup database transaction log options and the "Local System" does not have permissions to the SQL Server database.
o Enter the staging disk size in the Staging Disk Size (GB) field. The Actifio appliance calculates the maximum size of the database and adds 20%. The Staging Disk Size option allows you to override the Actifio appliance’s default settings.
o Enter a Staging Disk Mount Point if you need the staging disk mounted to a particular location.
o Choose Do Not Unmap if you want the temporary staging disks mapped to the host and used during data movement to remain mapped to the host. LUNs are mapped during the first job and all the subsequent jobs reuse the same mapped LUN. By default, this option is selected.
o Select whether you want to Truncate Logs after every backup. When this option is selected, transaction logs are truncated until the recent or current backup. If you truncate logs, you must also back up the transaction log (next step) to enable a roll forward recovery. Actifio Log Truncation does not shrink SQL logs. It removes data from within the file to minimize growth.
o Map staging disk to all ESX hosts in a cluster: Select either Do not map staging disk to all ESX
hosts or Map staging disk to all ESX hosts or Map staging disk to 2 ESX hosts in cluster. Mapping staging disks to more than one ESX host in cluster ensures that VM can fail over to another ESX host in the event of an ESX host failure.
o Enter a Service Access Point IP Address to back up from a passive node in SQL Server Availability Group. Specify the IP address of the cluster node you want the database to be backed up from. This option is not required if you want the database to be backed up from the active node and it is not required for a failover cluster.
o Leave Connector Options blank unless you are working with Actifio Support.
o Check Force Out of Band Backup to force in-band backups in to an out-of-band mode.
o Enter an Estimated Change Rate percentage to allow the Actifio appliance to predict how it should automatically resize the database’s log staging VDisk.
o Check Compress Database Log Backup to instruct the Microsoft SQL Server database to compress log data before it is captured.
4. Click Save to update the changes.

22 | actifio.com |An SQL Server DBA’s Guide to Actifio Copy Data Management
Protecting Clustered SQL Server Databases with a Consistency GroupIf you have multiple databases sharing an in-band or out-of-band LUN, then protect them with a consistency group. Protecting individual SQL Server databases and their drives in a consistency group permits them to be mounted and recovered individually later and it consumes fewer VDisks.
Databases in a clustered failover instance must be discovered from the active node. Once discovered, the databases can be protected from any node in the cluster. Once protected, the Actifio appliance follows the active SQL node in a cluster. Protection jobs continue to run even in a failover condition.
Validate the integrity of database backup periodically by mounting a backup image to a server and running database consistency check. You can use the Workflow feature to automate the validation process.
Note: Databases that use the Microsoft SQL Server Full Recovery Model can capture both the database and its logs. A managed database can be recovered to a point in time by rolling its logs forward via the Actifio Desktop.
Protecting SQL Server Databases In-Band If Microsoft SQL Server databases are on in-band volumes, put all system databases (model, master, msdb, and tempdb) on a different volume used for storing databases. This prevents them from being overwritten when databases on the in-band volume are restored.
Note: In-band protection is provided only by Actifio CDS appliances. Actifio Sky appliances do not provide in-band protection.
Protecting SharePoint® Data on a Microsoft® SQL ServerSharePoint data is protected by capturing its SQL Server database. When capturing a SharePoint SQL Server database, Advanced settings specific to SharePoint will be available.
To configure advanced protection settings for a SharePoint application residing on a SQL server:
1. Open the Application Manager to the Protect tab.
2. Select APP. Under Local > SharePoint, select the SharePoint server from the navigation pane.
3. Click the blue Advanced Settings link in the upper right corner. The Advanced Settings page appears.
4. Do Not Unmap: Select an unmapping option. Temporary staging disks are mapped to the host and used during data movement. Select whether you want them to remain mapped to the host. By default, LUNs are mapped during the first job and all the subsequent jobs reuse the same mapped LUN.
5. Select whether you want to Truncate Logs after every backup. When this option is selected, application related logs are truncated to the current or most recent backup.
6. Service Access Point IP Address: Service Access Point is relevant only for SQL server availability groups. Enter a value here to back up from a SQL availability cluster. Specify the IP address of the cluster node you want the database to be backed up from. This option is not required if you want the database to be backed up from the active node and it is not required for a failover cluster.
7. Leave Connector Options blank unless you are working with Actifio Support.
8. Click Save to update your changes.

4
| actifio.com | An SQL Server DBA’s Guide to Actifio Copy Data Management 23
Mounting a Microsoft SQL Server Database
This chapter describes how to mount captured Microsoft® SQL Server database data and how to mount a captured Microsoft® SQL Server database as a virtual application.
• Mounting an SQL Server Database on page 23
• Mounting an SQL Server Database as a Virtual Application on page 24
Note: Before mounting an image, ensure that the WWPN/iSCSI port of the host where the images will be mounted is accessible to the Actifio appliance.
Mounting an SQL Server DatabaseTo mount an SQL Server database:
1. Open the Application Manager to the Restore tab.
2. Select the database from the navigation pane.
3. Select the time period for images using the calendar icons to filter the list of images as needed.
4. Select the image type by clicking on the corresponding Snapshot, Dedup, Remote, or LiveClone buttons.
Note: Actifio Sky appliances have the option of mounting Vault images.
5. Select the image to mount from the list on the right. The selected image icon turns green and detailed information about it is displayed in the image box at the center of the display.
6. Click the pull-down menu from the bottom right of the image information display and select Mount and the Mount Job window appears.

24 | actifio.com |An SQL Server DBA’s Guide to Actifio Copy Data Management
The Mount Window for a SQL Server Database
7. If necessary, change the default storage pool from the Select default storage pool drop-down list.
8. From the Select Host(s) drop-down list, select the target database server. To recover a lost database, select the original host or a replacement host at the same IP address. To mount the database to another host for data access, select the new host.
9. Select whether to Mount to all Cluster Servers.
10. Specify mount drive or mount point if you want to mount backup image at specific location.
11. At Select Volumes to mount, check Select All.
Note: Ensure you selected all volumes for the mount. Data on all volumes is needed to restore the database correctly.
12. Click Submit. A job is submitted to mount the image to the selected host.
13. Once the mount operation is successful, log on to the database server and verify that the mounted image is available.
Mounting an SQL Server Database as a Virtual ApplicationAn Application Aware Mount operation mounts a captured application as a virtual application. It allows you to quickly bring a database on line without having to actually move the data and without having to manually configure a new instance of the database.
An Application Aware Mount addresses the challenges of creating and managing copies of production databases without manual intervention by database, server, and storage administrators.
| actifio.com | An SQL Server DBA’s Guide to Actifio Copy Data Management 25
Note: When performing an Application Aware mount of SQL Server database to a SQL Server Failover Instance, if you are specifying a custom mount point for the mount, make sure the custom mount point resides on a volume that is a cluster resource. This is required to allow SQL Server Instance to move to other cluster nodes in case of failover.
Application Aware mounts are described in detail in Application Aware Mounts on page 18.
Note: SQL Server databases captured in Actifio Vault storage can not be mounted as virtual applications.
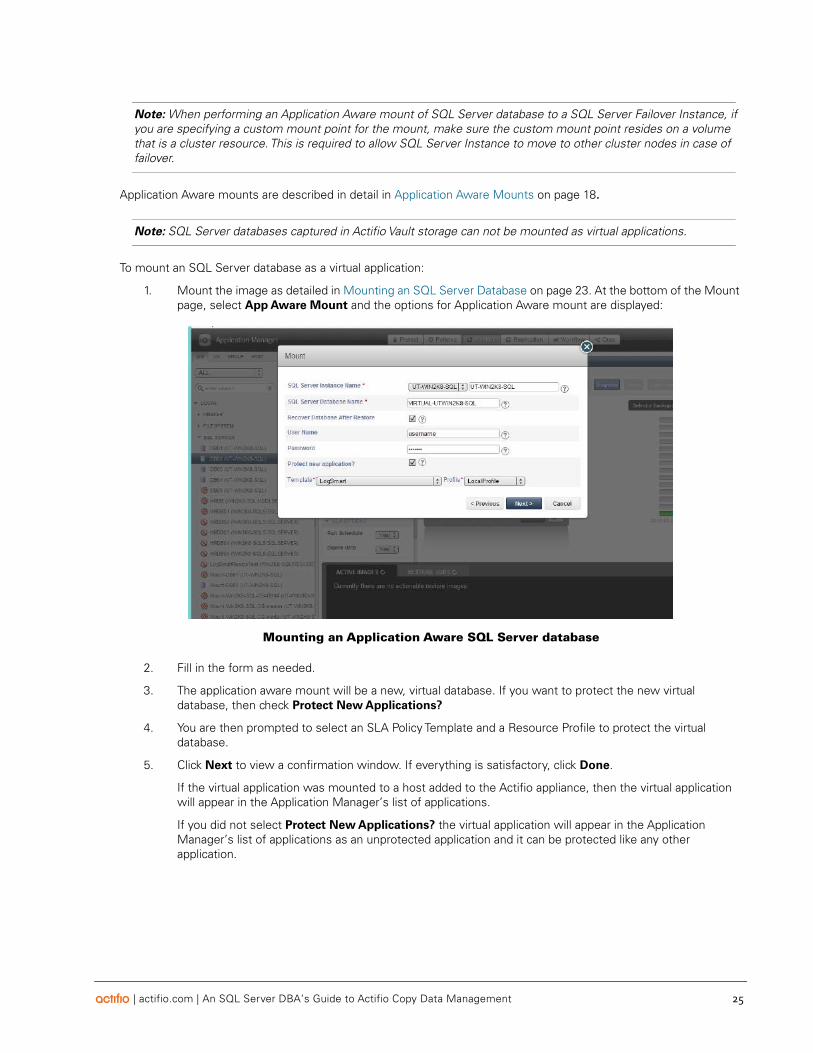
To mount an SQL Server database as a virtual application:
1. Mount the image as detailed in Mounting an SQL Server Database on page 23. At the bottom of the Mount page, select App Aware Mount and the options for Application Aware mount are displayed:
Mounting an Application Aware SQL Server database
2. Fill in the form as needed.
3. The application aware mount will be a new, virtual database. If you want to protect the new virtual database, then check Protect New Applications?
4. You are then prompted to select an SLA Policy Template and a Resource Profile to protect the virtual database.
5. Click Next to view a confirmation window. If everything is satisfactory, click Done.
If the virtual application was mounted to a host added to the Actifio appliance, then the virtual application will appear in the Application Manager’s list of applications.
If you did not select Protect New Applications? the virtual application will appear in the Application Manager’s list of applications as an unprotected application and it can be protected like any other application.

26 | actifio.com |An SQL Server DBA’s Guide to Actifio Copy Data Management

5
| actifio.com | An SQL Server DBA’s Guide to Actifio Copy Data Management 27
Mounting Encrypted SQL Data
Actifio appliances capture encrypted SQL Server databases but do not capture their private keys, encryption certificates, or passwords.
This chapter describes:
• Determining if SQL TDE is Enabled on page 27
• Manual Query to Determine if Encryption is Enable on page 28
• Troubleshooting SQL Server Encryption on page 29
• SQL Server Master Key, Encryption Certificate, and Password Procedures on page 30
If you are restoring an encrypted SQL Server database over an existing SQL Server database, the private key, encryption certificate, and password are already present on the SQL Instance and once the restore operation finishes, the SQL Server database will work as expected.
If you are performing an application aware mount of an encrypted database, or a mount of just the encrypted SQL data, the SQL instance on which the encrypted database or data will be mounted must have:
• Transparent Data Encryption (TDE) enabled
• A copy of the Private Key from the source SQL Server database
• A copy of the encryption certificate from the source SQL Server database
• Provide the password of the source SQL Server database
Note: If you are not mounting the database back to the source SQL instance, then the private key and encryption certificate must be manually copied from the source SQL instance to the new SQL instance.
Determining if SQL TDE is EnabledTo determine if TDE is enabled on an SQL instance, you can use either Microsoft’s SQL Server Management Studio’s (SSMS) user interface or manually query the database:
SSMS
To use SSMS to determine if encryption is enabled on a database:
1. From SSMS right click on the database name:

28 | actifio.com |An SQL Server DBA’s Guide to Actifio Copy Data Management
2. From the drop down menu select Properties and the database’s properties are displayed:
3. On the left-hand side of the Properties page, under Select a Page, click Options and the options for the database are displayed.
4. Under State, ensure that Encryption Enabled is set to True.
Manual Query to Determine if Encryption is EnableYou can use a query to determine if encryption is enabled on a database. For example:
SELECT
DB_NAME(database_id)AS dbname,
encryption_state,
case encryption_state
WHEN 0 THEN 'Unencrypted (no database encryption key present)'
WHEN 1 THEN 'Unencrypted'
WHEN 2 THEN 'Encryption in Progress'
WHEN 3 THEN 'Encrypted'
WHEN 4 THEN 'Key Change in Progress'
WHEN 5 THEN 'Decryption in Progress'
ELSE CAST(encryption_state AS varchar(20))
END AS encryption_state,
key_algorithm,
key_length
FROM sys.dm_database_encryption_keys

| actifio.com | An SQL Server DBA’s Guide to Actifio Copy Data Management 29
Troubleshooting SQL Server EncryptionThe following SQL error indicates that you are trying to perform a mount to an SQL instance that does not have the encryption certificate of the source SQL instance:
The following SQL error indicates that you are trying to perform a mount of an encrypted SQL Server database to an SQL instance that does not have Transparent Data Encryption enabled:
30 | actifio.com |An SQL Server DBA’s Guide to Actifio Copy Data Management
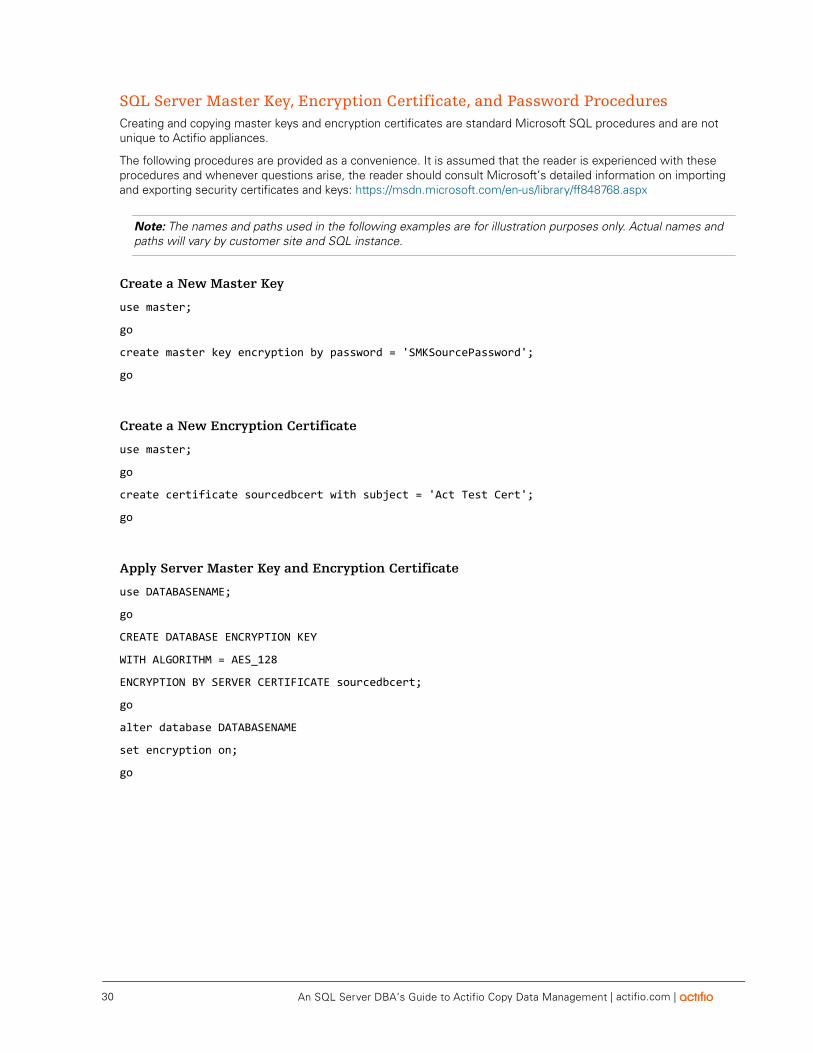
SQL Server Master Key, Encryption Certificate, and Password ProceduresCreating and copying master keys and encryption certificates are standard Microsoft SQL procedures and are not unique to Actifio appliances.
The following procedures are provided as a convenience. It is assumed that the reader is experienced with these procedures and whenever questions arise, the reader should consult Microsoft’s detailed information on importing and exporting security certificates and keys: https://msdn.microsoft.com/en-us/library/ff848768.aspx
Note: The names and paths used in the following examples are for illustration purposes only. Actual names and paths will vary by customer site and SQL instance.
Create a New Master Key
use master;
go
create master key encryption by password = 'SMKSourcePassword';
go
Create a New Encryption Certificate
use master;
go
create certificate sourcedbcert with subject = 'Act Test Cert';
go
Apply Server Master Key and Encryption Certificate
use DATABASENAME;
go
CREATE DATABASE ENCRYPTION KEY
WITH ALGORITHM = AES_128
ENCRYPTION BY SERVER CERTIFICATE sourcedbcert;
go
alter database DATABASENAME
set encryption on;
go

| actifio.com | An SQL Server DBA’s Guide to Actifio Copy Data Management 31
Create Copy of Server Master Key, Encryption Certificate, and Provide a Source Password
If an SQL Server database on one SQL instance will be mounted to another SQL instance, you must manually make a copy of the to be mounted database’s Server Master Key, encryption certificate, and password.
Once the copy is made, you can then copy the Server Master Key, encryption certificate, and password to the other SQL instance.
To make a copy of a Server Master Key, Encryption Certification, and password:
use master;
go
backup certificate sourcedbcert to file = 'E:\Enc\Sourcecert'
with PRIVATE KEY (file='E:\Enc\Privatekey',
ENCRYPTION BY PASSWORD='SecurePassword');
go
Copy Encryption Certificate, Private Key and Provide Source Password
If an encryption enabled SQL Server database or data will be mounted to a new SQL instance, the new instance must have a copy of the source SQL instance’s Server Master Key, encryption certificate, and password.
Manually copy the encryption certificate, and password copies you made on the source SQL instance in the previous section to a location on the new SQL instance.
From the new SQL instance:
create certificate destinationdbcert
FROM file = 'C:\Program Files\Actifio\sqlenc\Sourcecert'
with private key (file = 'C:\Program Files\Actifio\sqlenc\Privatekey',
decryption by password = 'SecurePassword')
go

32 | actifio.com |An SQL Server DBA’s Guide to Actifio Copy Data Management

5
| actifio.com | Restoring Copy Data with the Application Manager 15
Restoring SQL Server Databases
This chapter describes:
Restoring a Standalone Microsoft SQL Server Database on page 16
Restoring All SQL Server Databases in a Consistency Group on page 18
Note: Do not use the procedures in this chapter if you have copies of multiple SQL Server databases on a single in-band volume. This may result in unintentional data loss as the contents of the entire volume get overwritten during restore of the in-band volume. If the original database has been lost, you can mount an image back to the database server, copy files from the backup image to their original location, and then attach the database. Once the database is attached, you can rerun the restore operation if you want to roll forward the database logs. For this situation, see An SQL Server DBA’s Guide to Actifio Copy Data Management.
Databases that use the Microsoft® SQL Server Full Recovery Model can use a single policy to capture both the data-base and its logs. Such a database can be recovered to any point in time by rolling its logs forward via the Actifio Desk-top.
To Run the Procedures in This Chapter
• The database must be online. If the database is not online, the restore operation will fail during database validation.
• The Restore operation cannot be performed from a remote Actifio appliance. However, you can restore with a remote-dedup image on the source Actifio appliance.
• Turn off the SLA options: Run Schedule and Expire Data for the application’s policy template.
• Wait for running jobs to finish.

16 | actifio.com |Restoring Copy Data with the Application Manager
Restoring a Standalone Microsoft SQL Server DatabaseTo restore a standalone SQL Server database:
1. Open the Actifio Desktop to the Application Manager.
2. In the navigation pane, select APP and set the filter to Protected.
3. Select the database to restore and click the Restore tab. If the database that you are restoring is in a consistency group, see Restoring All SQL Server Databases in a Consistency Group on page 18 first.
4. In the application details under SLA Options, set Run Schedule to No. This is to prevent a new protection job from starting.
5. Select the image type by clicking on the corresponding Snapshot or Dedup button.
6. Select the backup image to restore from the Select a backup on the right. When selected, an icon turns green and its detailed information it is displayed.
7. From the backup instance’s pull-down menu, select Restore and the Restore Job window appears.
If the selected database does not currently have logs, the Restore Job window is displayed without roll forward options:
Restore Job Window When Logs Are Not Available
If logs are available, then you have the option to recover them.

| actifio.com | Restoring Copy Data with the Application Manager 17
Restore Job Window When Logs Are Available
8. Check Restore with recovery if you want the database to be brought online after the restore operation. Once the database is brought online, the database cannot be rolled forward by applying transaction log backup.
If logs are available and database log backup was enabled in the policy used to protect the database:
o Ignore User time or Host time and the calendar tool for SQL Server databases.
o From the slider tool select a specific point in time to restore the database to. Slide the slider tool all the way to the left to restore just the database.
o Enter the user name and password for user that has privilege to restore the database. See An SQL
Server DBA’s Guide to Actifio Copy Data Management for details of permissions needed.
9. Check the Select All checkbox.
10. Click Submit. A warning dialog appears. Read it and then enter DATA LOSS to confirm.
11. A second warning appears. Enter OVERWRITE OTHER APPS to confirm the restore operation.
12. Click Start Restore. The image is restored.

18 | actifio.com |Restoring Copy Data with the Application Manager
Restoring All SQL Server Databases in a Consistency GroupBe very careful when restoring SQL Server databases in a consistency group. When you restore SQL Server databases that are in a consistency group, ALL databases in the consistency group are overwritten. If you do not want to overwrite all databases in the consistency group, first mount a single database, then use the manual VSSRESTORE command to copy the database files to the required location. VSSRESTORE is detailed in An SQL Server DBA’s
Guide to Actifio Copy Data Management.
Left: Database is in a Consistency Group --- Right: Consistency Group includes the Database
Recovering Multiple In-Band SQL Server Databases
If you have copies of multiple SQL Server databases on a single in-band volume and you want to restore one or a few of them, then do not use this procedure. This may result in unintentional data loss as the contents of the entire volume get overwritten during restore of in-band volume. Follow the procedure in An SQL Server DBA’s Guide to
Actifio Copy Data Management.
Restoring to an SQL Server Cluster
For an SQL Server Failover instance, the database is always restored to the active node. The Actifio appliance mounts the backup image to the active node and performs the restore operation on the node.
For SQL Server Availability Groups, the restore is also performed on the active node.

7
| actifio.com | An SQL Server DBA’s Guide to Actifio Copy Data Management 37
Using VSSRESTORE for Database Recovery
If a database has been removed from a database server because of corruption or if the old database server is being replaced with a new server, then you cannot use an Actifio restore operation to recover the database from an image. Instead, you must mount an image and copy the database files to their original or new location. Once the image is mounted you must then attach the image to the SQL Server instance. The entire process consists of:
• Mounting and Recovering a Microsoft SQL Server Database on page 37
• Using VSSRESTORE on page 38
Mounting and Recovering a Microsoft SQL Server DatabaseIf you want to recover a database to its original or to a new location:
1. Mount the captured database image to the Microsoft SQL Server. The standard mount operation is described in Accessing and Recovering Copy Data with the Application Manager.
2. Once the mount operation is successful, log on to the database server and verify that the mounted image is available.
3. Copy the database files from the mounted image to their original or location on the database server. See Using VSSRESTORE on page 38 for details.
Note: The mounted image has the same folder structure as the source database. You just need to pick the correct volume or mount point. If you are not sure about the original location of the database, check the Catalog.xml file under the <Actifio Connector Install Directory>\tmpdata\<Mount Job ID> directory. The file contains list of files used by the database and their location.
4. Attach the database to the SQL Server instance using T-SQL commands or Microsoft SQL Server Management Studio. If no mount drive or mount point is specified, the image is mounted to:C:\Windows\act\Jobname_jobid on Windowsor to: /mnt/act/Jobname_jobid on Linux.

38 | actifio.com |An SQL Server DBA’s Guide to Actifio Copy Data Management
Using VSSRESTORE This section provides an overview of using VSSRESTORE and its options.
Syntax
VSSRESTORE uses the following syntax:
C:\Program Files\Actifio>UDSAgent.exe vssrestore [options] -appname <application name>
--appname <application name> The name of application to be restored
Note: The VSSRESTORE command is a CLI function supplied by the Actifio Connector. The Actifio Connector must be installed on the host before you can use VSSRESTORE.
The following table details the various options that can be used with the VSSRESTORE command.
VSSRESTORE Parameters
Parameter Notes
--help simple command help
--recover Recover the database and bring it online at the end of restore. Once the database is recovered, it is ready for use by applications. However, once the database is recovered it cannot be rolled forward. Default behavior for VSSRESTORE tool is to leave database in restoring mode. This allows users to roll forward database using transaction logs. If no roll forward is desired, specify this parameter on command line.
--appname arg This is the name of the database to be restored. This is a required parameter. VSSRESTORE command line tool can restore only one database at a time. Do not repeat this parameter for multiple databases. If there are multiple databases with the same name on a database server, specify the full name of the database in the format <Instance name>\<database name>.
--mount-path arg Mount drive / mount point for mounted image. This is a required parameter. If the image contains multiple volumes, this parameter can be repeated on the command line. Make sure all volumes for an image are specified using the —mount-path parameter.
--debug Puts detailed output into the log file
--dry-run The option is not supported.
--username arg Name of the user with privileges to create a database and backup a database on target SQL Instance. This needs to be specified on the command line only if the logged on user doesn’t have the requisite privileges. This is an optional parameter.
--password arg Password for the user specified with —username. This parameter can be omitted from the command line. If this parameter is not passed on the command line, the user will be prompted for password when the command executes. This is an optional parameter.

| actifio.com | An SQL Server DBA’s Guide to Actifio Copy Data Management 39
Example VSSRESTORE Command
In this example, the captured files for a database named AAAA used volumes E: and F: and the Actifio Connector assigned Z:\ and Y:\ to the mounted volumes.
To restore the database named AAAA from the mounted image/volume to the SQL Server instance "BB01\BB01db", use:
C:\Program Files\Actifio>UDSAgent.exe vssrestore --mount-path Z: --mount-path Y: --sql-instance "BB01\BB01db" --username "UserA" --password "passW" --writer-metadata "C:\Program Files\Actifio\tmpdata\Job_0654914\SQLServer" --backup-metadata "C:\Program Files\Actifio\tmpdata\Job_0654914\vss_config_file -sqlauthentication --appname AAAA
• The path passed as the --writer-metadata parameter is created by the mount job (Job id 0654914 in this case) that mounted the image to the target server.
• The --mount-path parameter can be repeated as needed to list all volumes mounted by an image. You can also pass a list of files from the mounted image instead of mount paths using --file.
• If the user running the command doesn't have privileges to create a new database and backup privileges, then you must pass a valid username and password as well.
• The job ID Job_0654914 is the mount job’s ID obtained from the Actifio System Monitor.
--writer-metadata arg Full path to the SQL Server VSS writer metadata file. This is a required parameter. The mount job copies the writer metadata file to <Connector Install Dir>\tmpdata\<Job Name>\SQLServer.
--backup-metadata arg Full path to VSS backup metadata file. This parameter is required for restore operation. It can be omitted when —attach parameter is specified. Mount job copies VSS backup metadata to <Connector Install Dir>\tmpdata\<Job Name>\vss_config_file
--sql-instance arg Name of the target SQL Server instance. This could be a default instance or a named SQLserver instance. This required parameter must be specified.
--sqlauthentication This flag indicates that the user credentials specified with —username/—password pair belong to a SQL user instead of a windows user. This is an uncommon scenario. This parameter is optional.
--copy-files This flag causes the VSSRESTORE command line tool to copy files from mounted volumes to the target location. The target location could be original location of data files or the new location specified by the —new-location parameter. This is an optional parameter. When this parameter is not specified, the database is restored from mounted volumes. (see Using --copy-files to Restore a SQL Server Database to Another Database Server, below)
--new-name arg Attach the database with the new name. This is an optional parameter.
--new-location arg Attach a database from a single new location. This is an optional parameter. If you want to copy files to separate locations, then you run up against a limitation of VSSRESTORE. You can use the workaround in To Copy Files and Logs to Separate Locations on page 40.
VSSRESTORE Parameters
Parameter Notes

40 | actifio.com |An SQL Server DBA’s Guide to Actifio Copy Data Management
• The --sqlauthentication parameter indicates that the username/password pair belongs to a SQL user, not a Windows user.
• For security reasons, you may wish to not pass the --password parameter from the command line. In this case, the user will be prompted for a password.
•
The --recover Parameter
Database recovery brings the database back online after the restore operation is finished. Use the --recover parameter when you want to recover the database after the restore operation is complete.
Do not use --recover until after you roll forward the database. Leave the database in Restoring mode if database roll forward is desired. If the database is recovered at the end of restore, it cannot be put back in Restoring mode. You will need to run the restore operation again.
Using --copy-files to Restore a SQL Server Database to Another Database Server
To restore a backup copy of a database to another server, use the steps in Using VSSRESTORE on page 38, but use the --copy-files parameter in the VSSRESTORE command.
The --copy-files parameter is not normally passed on the command line. This ensures that the database is restored from the mounted Actifio image. When you use --copy-files, the files are copied from a mounted image. If you specify --new-location then the files are copied to the --new-location.
The VSSRESTORE operation creates the same directory structure on the new server as the original database structure and then copies the database files to their original locations.
C:\Program Files\Actifio>UDSAgent.exe vssrestore --copy-files --mount-path Z: --mount-path Y: --sql-instance "BB01\BB01db" --writer-metadata "C:\Program Files\Actifio\tmpdata\Job_0654914\SQLServer" --appname AAAA
Note the --copy-files parameter passed to the command line.
Note: Make sure mount points that contained database files on the original server are also available on the target server. If the mount points are not available, the restore operation will fail.
To Copy Files and Logs to Separate Locations
If you want to place all data (mdf and ndf's) in one location and the logs on a separate drive, then you come up against a limitation of VSSRESTORE. VSSRESTORE accepts only one path as the new location and copies all the data files into that location. It doesn’t have the capability to map each of the source paths to a different target path.
To work around this, you can manually copy files to whatever location you want (or script the copy operation). Once the files are copied to the desired location, then use VSSRESTORE to perform the restore from the new location.
Without --copy-files: With --copy-files:
The database is restored to the place where the image is mounted.
Files are copied from a mounted image to an identical database structure on the new server, orto a location specified by the --new-location parameter.

8
| actifio.com | An SQL Server DBA’s Guide to Actifio Copy Data Management 41
Minimizing Downtime When Restoring SQL Server Databases
The following procedure details how to use an Application Aware Mount of the last known good version of a corrupted SQL Server database. This allows users and applications to resume work as soon as possible while a new version of the database is rebuilt.
Note: This document assumes that the reader is proficient in the use and management of Microsoft SQL Server databases. In addition, the reader must be familiar with the Actifio basic concepts found in Actifio’s Getting
Started with Actifio Copy Data Management guide.
High-Level Description
Note: In the following procedures, the database name AdventureWorks2008 is used as an example.
1. Delete the corrupted database.
2. Perform an Application Aware Mount of the last known good version of the corrupt, deleted, database. Mount it to the same production server that hosted the corrupt, deleted database. Use the same name as the corrupt, deleted database (For example, AdventureWorks2008.).
The Application Aware mount makes the database instantly available to users and applications and is used while the corrupted database is restored from the last known good version.
3. Via the Actifio Desktop, protect the Application Aware version of the database (AdventureWorks2008).
4. Perform a Standard Mount of the latest protected version of the Application Aware mounted database to the same server that hosts the Application Aware version.
5. Restore the mounted database (AdventureWorks2008_Temp) and leave it in restoring mode. Use a unique name for the restored database. (For example, AdventureWorks2008_Temp.)
6. Apply transaction logs from Application Aware Mounted database to the restored database (For example, AdventureWorks2008 to AdventureWorks2008 _Temp).
7. Shut down the Application Aware Mounted database (AdventureWorks2008)
8. Apply the last of the Application Aware Mounted database (AdventureWorks2008) transaction logs to the restored database (AdventureWorks2008 _Temp).
9. Unmount the Application Aware mounted database (AdventureWorks2008).
10. Rename the restored database to the same name as the database that was lost (For example, AdventureWorks2008 _Temp to AdventureWorks2008).
11. From the Actifio Desktop, delete, then rediscover and re-protect the renamed database (AdventureWorks2008).

42 | actifio.com |An SQL Server DBA’s Guide to Actifio Copy Data Management
Step-By-Step Instructions For Minimizing SQL Server Downtime
Note: The following procedure requires an Actifio SLA Template with a policy that captures both the database and its logs.
1. From Microsoft SQL Server, delete the corrupt SQL Server database.
2. From the Actifio Desktop Application Manager, select the database.
3. Under SLA Options set Run Schedule and Expire Data to No:
4. Once the database’s capture schedule is stopped and the Actifio appliance is prevented from expiring existing captured images, then on the Microsoft SQL Server database, delete the corrupt (AdventureWorks2008) database.
Renaming the database will not be enough. You must delete the corrupt database or else the restore operation will fail. For example, if you renamed AdventureWorks2008 to AdventureWorks2008_Corrupt, a restore would fail with the following error:
5. In the Actifio Application Manager, click the Restore tab and select the last known good image of the (AdventureWorks2008) database you deleted.

| actifio.com | An SQL Server DBA’s Guide to Actifio Copy Data Management 43
6. From the Gear drop down menu next to Backup, select Mount and the Mount dialog box is displayed:
7. Select the production server on which the corrupted database resided.
8. Click App Aware Mount... and the Application Aware portion of the Mount dialog box is displayed:

44 | actifio.com |An SQL Server DBA’s Guide to Actifio Copy Data Management
9. Give the database the same name as the corrupted (AdventureWorks2008) database.
10. Select (Check) Protect New Application.
11. Select a Template and Resource Profile to apply to the application aware version of the database. Typically, you will use the same Template and Resource Profile that was used by the corrupted/deleted database.
Note: The selected Template MUST use a policy that captures both the database and its logs.
12. Click Next and you will be given an opportunity to review your settings and go back to previous pages to make changes as needed.
13. Click Done and the Application Aware Mount job will run according to the schedule defined in the applied SLA Template. If necessary, you can run the SLA Template’s policy on demand.
Note: Database performance for the Application Aware Mount copy will depend on the storage infrastructure hosting the Actifio captured copy. The storage infrastructure should be sized per your performance needs.
14. Once the Application Aware mounted version has been captured, via the Actifio Desktop, perform a standard mount (NOT Application Aware Mount) of the captured Application Aware mounted database and mount the data to the same server as the Application Aware mounted database.

| actifio.com | An SQL Server DBA’s Guide to Actifio Copy Data Management 45
15. Record the job number for the standard mount; it will be used in a subsequent command. The job number can be obtained from the Restore Job tab of the mounted database instance:
16. Via the Actifio CLI, use vssrestore to restore the mounted (NOT the AppAware Mounted) database on the server that also hosts the Application Aware database.
When restoring the mounted data, use a unique name (AdventureWorks2008_Temp), and leave the database in restoring mode.
For example:
UDSAgent.exe vssrestore --copy-files --appname "AdventureWorks2008" --new-name "AdventureWorks2008_temp" --mount-path X: --sql-instance "W2K8R2-4104" --writer-metadata "C:\Program Files\Actifio\tmpdata\Job_4056934\SQLServer" --backup-metadata "C:\Program Files\Actifio\tmpdata\Job_4056934\vss_config_file" --verbose –debug
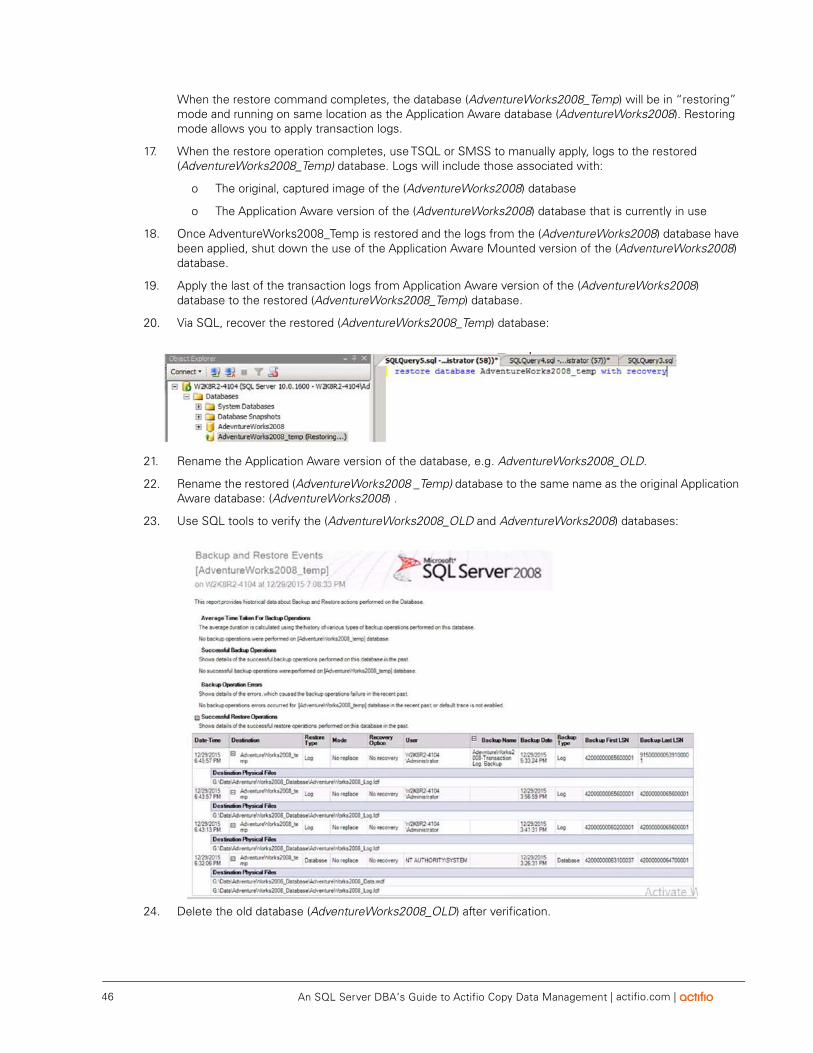
46 | actifio.com |An SQL Server DBA’s Guide to Actifio Copy Data Management
When the restore command completes, the database (AdventureWorks2008_Temp) will be in “restoring” mode and running on same location as the Application Aware database (AdventureWorks2008). Restoring mode allows you to apply transaction logs.
17. When the restore operation completes, use TSQL or SMSS to manually apply, logs to the restored (AdventureWorks2008_Temp) database. Logs will include those associated with:
o The original, captured image of the (AdventureWorks2008) database
o The Application Aware version of the (AdventureWorks2008) database that is currently in use
18. Once AdventureWorks2008_Temp is restored and the logs from the (AdventureWorks2008) database have been applied, shut down the use of the Application Aware Mounted version of the (AdventureWorks2008) database.
19. Apply the last of the transaction logs from Application Aware version of the (AdventureWorks2008) database to the restored (AdventureWorks2008_Temp) database.
20. Via SQL, recover the restored (AdventureWorks2008_Temp) database:
21. Rename the Application Aware version of the database, e.g. AdventureWorks2008_OLD.
22. Rename the restored (AdventureWorks2008 _Temp) database to the same name as the original Application Aware database: (AdventureWorks2008) .
23. Use SQL tools to verify the (AdventureWorks2008_OLD and AdventureWorks2008) databases:
24. Delete the old database (AdventureWorks2008_OLD) after verification.

| actifio.com | An SQL Server DBA’s Guide to Actifio Copy Data Management 47
25. From the Actifio Desktop, unmount and delete both the Application Aware and standard mount (AdventureWorks2008) images.
26. From the Actifio Desktop, select and delete the previously discovered the (AdventureWorks2008) database.
27. From the Actifio Desktop, begin capturing the restored (AdventureWorks2008) database. For capturing SQL Server data see Protecting SQL Server Databases on page 20.

48 | actifio.com |An SQL Server DBA’s Guide to Actifio Copy Data Management

9
| actifio.com | An SQL Server DBA’s Guide to Actifio Copy Data Management 49
Restoring Members of an SQL AlwaysOn Availability Group
This chapter is intended for Actifio users who are familiar with the basic concepts and procedures found in Actifio’s Getting Started with Actifio Copy Data Management guide. In addition, it assumes that the user has detailed knowledge of Microsoft SQL Server and SQL Server AlwaysOn Availability Groups (AAG).
Caution! Only those users qualified to administer Microsoft SQL Server databases should attempt the processes and procedures presented here. Procedures attempted by unqualified personnel can result in data loss.
This chapter details how to restore both the primary and secondary members of an AAG to a specific point in time. During the restore process, the primary SQL Server database is overwritten with a previously captured image and the secondary copies are restored to the same point in time as the restored primary copy.
The restoration process consists of:
1 Mounting the Last Known Good Image of the SQL Server Database on page 49
2 Restoring the Primary Microsoft SQL Server Database on page 49
3 Then either:
o Recovering the Primary From a non-corrupt Local Secondary on page 50
o Restore a Secondary SQL Server Database From an Actifio Dedup DR Copy on page 54
4 Rebuilding the SQL AlwaysOn Availability Group on page 57
In addition, this chapter also provides information on error messages you can encounter during this process. See Error Messages on page 58 for details.
1 Mounting the Last Known Good Image of the SQL Server Database
The first step in restoring an AAG is to, via the Actifio Desktop, mount the last known good version of the primary database. Mounting the last known good version of the database will give you access to its logs.
You need the logs to bring both the primary and secondary databases up to the same point in time.
Note: You must mount the last known good version of the database prior to restoring it. Once the restoration process begins, you will not be able to mount the database until the restoration process completes.
2 Restoring the Primary Microsoft SQL Server Database
Note: The Actifio Restore process will overwrite the existing, corrupt version of the database.
After you have mounted the last known good version of the primary database, via the Actifio Desktop, restore the primary database to its last know good version. When performing the restore, ensure that Restore with recovery is UNCHECKED:

50 | actifio.com |An SQL Server DBA’s Guide to Actifio Copy Data Management
The time required to restore the database depends on its size and the capabilities of your environment.
Caution! DO NOT perform log backups on the primary database after restore. Doing so will prevent you from applying logs to the secondary database(s) and will prevent the secondary databases from joining the AAG.
3 After the primary database has been restored:
• If the secondary database is the local primary database, not corrupt, and not captured by an Actifio appliance, see Recovering the Primary From a non-corrupt Local Secondary on page 50.
• If the secondary databases are captured by an Actifio Production to Mirror policy and resides on a remote Actifio appliance, then see Restoring Replicated Copies of Primary Databases on page 50.
Recovering the Primary From a non-corrupt Local Secondary
If both the AAG primary and secondary databases reside locally and the secondary database is intact, you can recover the primary database from the secondary. To perform A recovery of the primary SQL Server database from a non-corrupt local secondary SQL Server Database.
• After the primary’s restore operation has finished, via SQL, remove the database from the AAG:
use master
go
alter availability group [AAG-Name] remove database [DATABASENAME];
• Drop the secondary databases:
drop database [DATABASENAME];
• Join the replica database to AAG in Full synchronization. See 4 Rebuilding the SQL AlwaysOn Availability Group on page 57 for details.
Restoring Replicated Copies of Primary Databases
If copies of an AAG’s primary database are replicated to a second Actifio appliance, you can restore those copies as secondary databases and then rebuild the AAG:
• Restore a Secondary SQL server Database From an Actifio Mirror Copy on page 51

| actifio.com | An SQL Server DBA’s Guide to Actifio Copy Data Management 51
• Restore a Secondary SQL Server Database From an Actifio Dedup DR Copy on page 54
Once the secondary database is restored, you can rebuild the AAG as described in 4 Rebuilding the SQL AlwaysOn Availability Group on page 57.
Restore a Secondary SQL server Database From an Actifio Mirror Copy
This approach to restoring a secondary database can be used if the primary database is captured by an Actifio appliance and then replicated to another Actifio appliance via a Production to Mirror policy.
You can restore a primary database that has been replicated to a second Actifio appliance via a Production to Mirror policy if:
• The replicated Mirror copy does not contain the same issue(s) as the corrupt primary version.
• The date time stamp of the Mirrored version falls within the range of the log files for the restored primary. For example, if the logs for the restored Primary range from 27 February 2016 to 02 March 2016 and the Mirror copy has a date time stamp of 01 March 2016 02:00 then you can apply the logs to both databases in such a way as they can be brought up to the same point in time.
If neither of these conditions can be met, then you must restore the database from a Dedup DR version. See Restore a Secondary SQL Server Database From an Actifio Dedup DR Copy on page 54 for details.
To restore a secondary database from an Actifio Mirror copy:
1. Log in to the Actifio appliance that manages the Mirror copy of the database.
2. Via the Actifio Application Manager, view the date time stamp of the Mirror copy:
Because Mirror policy snapshots are separate from Production Snapshots, the date time stamp for the Mirror copy will differ from that of the restored primary copy at the other Actifio site.
3. Ensure that the date/time stamp falls within the range of the known good versions for the database and falls within the range of logs available to the primary copy of the database.
4. If the date/time stamp is determined to be good, mount the Mirror copy.
5. Once the Mirror copy is mounted, perform a VSSRESTORE on the mounted Mirror copy and leave it in restoring mode. To perform a VSSRESTORE, you need the drive letter to which the Mirror copy is mounted and the Actifio Job ID.
o To obtain the drive letter for the mount path, select the mounted Mirror image and mouse over details...

52 | actifio.com |An SQL Server DBA’s Guide to Actifio Copy Data Management
o To obtain the Job ID, go to the Actifio System Monitor and filter by SUCCEED and MOUNT:
6. Once you have the drive letter and Job ID you can use them along with the database name and instance name to form the VSSRESTORE command. For example:

| actifio.com | An SQL Server DBA’s Guide to Actifio Copy Data Management 53
UDSAgent.exe vssrestore --appname "DATABASENAME" --copy-files --mount-path Y: --mount-path Z: --sql-instance "INSTANCE-NAME" --writer-metadata "C:\Program Files\Actifio\tmpdata\Job_XXXXXX\SQLServer" --backup-metadata "C:\Program Files\Actifio\tmpdata\Job_XXXXXX\vss_config_file" --verbose –debug
This operation will restore database in-place and leave it in “restoring” mode.
Note: The Actifio CLI vssrestore command assumes the same directory structure on all AAG nodes as recommended by Microsoft: “On stand-alone instances of SQL Server, we recommend that, if possible, the file path (including the drive letter) of a given secondary database be identical to the path of the corresponding primary database. This is because if you move the database files when creating a secondary database, a later add-file operation might fail on the secondary database and cause the secondary database to be suspended.”
7. After the VSSRESTORE operation is complete, manually copy the logs used to update the primary database to the site that hosts the restored secondary copy.
8. Use SQL Studio or T-SQL to apply the copied logs to bring the restored secondary database up to the same point in time as the recovered primary database copy.
9. Leave the database in a non-operational state:
Caution: Do not recover the secondary database.
10. When both the primary and secondary databases have been restored and the appropriate logs applied, use SQL Studio to recover the primary database. See 4 Rebuilding the SQL AlwaysOn Availability Group on page 57.

54 | actifio.com |An SQL Server DBA’s Guide to Actifio Copy Data Management
Restore a Secondary SQL Server Database From an Actifio Dedup DR Copy
This approach to restoring a secondary database can be used if the primary database is captured by an Actifio appliance and then replicated to another Actifio appliance via a Dedup DR policy.
Using a Dedup DR copy of the primary database to restore an AAG secondary is best suited for AAGs where:
• An Actifio Mirror copy of the primary database is not available
• Dedup DR versions of the database reside on a second Actifio appliance
Note: Mounting dedup images requires re-hydration of the image into Snapshot Pool. The size of the image will determine the time required to re-hydrate and the space consumed.
To restore a secondary database from an Actifio Dedup DR copy:
1. Log in to the Actifio appliance that manages the Dedup DR copy of the database.
2. Select the Dedup DR version of the database that has the same point in time as the last known good version you mounted in: 1 Mounting the Last Known Good Image of the SQL Server Database on page 49.
3. Mount the Dedup DR version to the server that hosts the secondary database.
4. Once the Dedup DR copy is mounted, perform a VSSRESTORE on the mounted Dedup DR copy and leave it in restoring mode. To perform a VSSRESTORE, you need the drive letter to which the Dedup DR copy is mounted and the Actifio Job ID.
o To obtain the drive letter for the mount path, select the mounted Dedup DR image and mouse over details...
o To obtain the Job ID, go to the Actifio System Monitor and filter by SUCCEED and MOUNT:

| actifio.com | An SQL Server DBA’s Guide to Actifio Copy Data Management 55
5. Once you have the drive letter and Job ID you can use them along with the database name and instance name to form the VSSRESTORE command. For example:
UDSAgent.exe vssrestore --appname "DATABASENAME" --copy-files --mount-path Y: --mount-path Z: --sql-instance "INSTANCE-NAME" --writer-metadata "C:\Program Files\Actifio\tmpdata\Job_XXXXXX\SQLServer" --backup-metadata "C:\Program Files\Actifio\tmpdata\Job_XXXXXX\vss_config_file" --verbose –debug
This operation will restore the database in-place and leave it in “restoring” mode.
Note: The Actifio CLI vssrestore command assumes the same directory structure on all AAG nodes as recommended by Microsoft: “On stand-alone instances of SQL Server, we recommend that, if possible, the file path (including the drive letter) of a given secondary database be identical to the path of the corresponding primary database. This is because if you move the database files when creating a secondary database, a later add-file operation might fail on the secondary database and cause the secondary database to be suspended.”
6. If logs were used to roll the primary database forward to a specific point in time, then you must use the same logs to roll the restored secondary database forward to the same point in time.
You must manually copy the logs to the server that hosts the secondary database. Once the logs have been copied, Use SQL Studio or T-SQL to roll the same logs forward on the secondary database. DO NOT
recover the replica database.

56 | actifio.com |An SQL Server DBA’s Guide to Actifio Copy Data Management
7. Leave the database in a non-operational state:
Caution: Do not recover the secondary database.
8. When both the primary and secondary databases have been restored and the appropriate logs applied, use SQL Studio to recover the primary database. See 4 Rebuilding the SQL AlwaysOn Availability Group on page 57.

| actifio.com | An SQL Server DBA’s Guide to Actifio Copy Data Management 57
4 Rebuilding the SQL AlwaysOn Availability Group
The restore operation removes databases from an AAG. How the database was restored will determine how you will recover the primary database and rebuild the AAG.
1. From SQL Studio select the AAG from which the primary database was removed:
2. When prompted, select the primary database and click Next. You will be prompted to select a synchronization method:
3. Select:
o Full: If the secondary copy of the database was intact and local to the primary database.
o Join only if you used method: Restore a Secondary SQL server Database From an Actifio Mirror Copy on page 51 or Restore a Secondary SQL Server Database From an Actifio Dedup DR Copy on page 54. The Join only operation will form the primary and secondary databases back into an AAG.
4. Monitor the progress of the operation:
5. Once the operation is complete and both the primary and secondary databases are in sync, re-enable the Actifio capture jobs for the AAG.

58 | actifio.com |An SQL Server DBA’s Guide to Actifio Copy Data Management
Error MessagesIf you attempt to rebuild an AAG from an Actifio Mirror copy that does not fall within the required range as specified in Restore a Secondary SQL server Database From an Actifio Mirror Copy on page 51, you will encounter one or more of the following errors:
If logs have been backed up on the primary database after restore, you will not be able to apply the log backup to the secondary and the secondary cannot be joined to the AAG. In such cases, restores and Join AAG operations will fail with the following.

10
| actifio.com | An SQL Server DBA’s Guide to Actifio Copy Data Management 59
Using Mounts to Create SQL AlwaysOn Availability Groups
This chapter is intended for Actifio users who are familiar with the basic concepts and procedures found in Actifio’s Getting Started with Actifio Copy Data Management guide. In addition, it assumes that the user has detailed knowledge of Microsoft SQL Server and SQL Server Always on Availability Groups (AAG).
Caution! Only those users qualified to administer Microsoft SQL Server databases should attempt the processes and procedures presented here. Procedures attempted by unqualified personnel can result in data loss.
This document details how to:
• Create an SQL Server AAG in An Actifio Snapshot Pool on page 59
• Create an SQL Server AAG Outside of An Actifio Snapshot Pool on page 61
• Create the New SQL Server AlwaysOn Availability Group on page 63
Create an SQL Server AAG in An Actifio Snapshot PoolThis approach is the fastest way to create a new SQL Server ALwaysOn Availability Group. Because the mounted application will run in the Actifio Snapshot Pool, it will also achieve the same performance as data captured in the Snapshot Pool.
Caution! Ensure that there is enough space in the Snapshot Pool to accommodate the AAG and regular snapshots.
1. One at a time, perform an Application Aware mount of the AAG database images.

60 | actifio.com |An SQL Server DBA’s Guide to Actifio Copy Data Management
2. Select the required host.
3. Select the SQL instance.
4. Enter a database name. Use the same name for each mounted image.
5. Repeat the process for each AAG member.
6. Once the Application Aware mounts for each of the AAG members has finished, via SQL select the SQL instance that will be the primary database and recover it:
recover database <name> with recovery.
7. Keep the secondary database copies in “restoring” state.
8. Once the primary database has been restored, via SQL, create the new AAG and join the primary and secondary databases. Create the New SQL Server AlwaysOn Availability Group on page 63

| actifio.com | An SQL Server DBA’s Guide to Actifio Copy Data Management 61
Create an SQL Server AAG Outside of An Actifio Snapshot PoolTo create an AAG that resides outside of an Actifio Snapshot pool:
1. One at a time, perform an Standard Mount of the database images:
2. Once the mount operations are complete, obtain the Job ID for the mount operations:
Go to the Actifio System Monitor and filter by SUCCEED and MOUNT:
3. Identify the drive letter to which the images are mounted:

62 | actifio.com |An SQL Server DBA’s Guide to Actifio Copy Data Management
From the Actifio Desktop, select a mounted image and mouse over details... and the drive letter is displayed:
o If the database is to be restored on a server that uses the same volume letters as the source production server, then see Target Server’s Volume Letters Match Source Production Server’s Volume Letters on page 62.
o If the database is to be restored on a server that uses volume letters that differ from the database’s source server’s volume letters, then see Target Server’s Volume Letters DO NOT Match Source Production Server’s Volume Letters on page 62.
Target Server’s Volume Letters Match Source Production Server’s Volume Letters
If the target server’s volume letters match the source production server’s volume letters, you can use the VSS RESTORE command to restore the database directly to the target server:
UDSAgent.exe vssrestore --appname "DATABASENAME" --copy-files --mount-path Y: --mount-path Z: --sql-instance "INSTANCE-NAME" --writer-metadata "C:\Program Files\Actifio\tmpdata\Job_XXXXXX\SQLServer" --backup-metadata "C:\Program Files\Actifio\tmpdata\Job_XXXXXX\vss_config_file" --verbose –debug
The copy-files command copies from the sources volume letter to the same volume letter on the target server.
After the command runs, the restored database is left in restoring mode. You can then copy and apply logs to the database as needed.
Target Server’s Volume Letters DO NOT Match Source Production Server’s Volume Letters
If the target server’s volume letters DO NOT match the source production server’s volume letters, you must manually copy the mounted image into the target server.
Once you have copied the files to the target server, use the VSS RESTORE command to restore the database. For example:

| actifio.com | An SQL Server DBA’s Guide to Actifio Copy Data Management 63
UDSAgent.exe vssrestore --appname "DATABASENAME" --mount-path D: --mount-path L: --sql-instance "INSTANCE-NAME" --writer-metadata "C:\Program Files\Actifio\tmpdata\Job_XXXXXX\SQLServer" --backup-metadata "C:\Program Files\Actifio\tmpdata\Job_XXXXXX\vss_config_file" --verbose –debug
Where path D and path L represent the volume letters for the target server.
After the command runs, the restored database is left in restoring mode. You can then copy and apply logs to the database as needed.
Create the New SQL Server AlwaysOn Availability GroupAfter all databases for the new AAG have been recovered, use SQL Studio or T-SQL to create the new AAG:
1. From SQL Studio create a new AAG.
2. Add the primary and secondary databases to the AAG.
3. Click Next. You will be prompted to select a synchronization method:
4. Select Join only: The Join only operation will form the primary and secondary databases into an AAG.
5. Monitor the progress of the operation:

64 | actifio.com |An SQL Server DBA’s Guide to Actifio Copy Data Management
6. Once the operation is complete and both the primary and secondary databases are in sync, enable Actifio capture jobs for the AAG.

11
| actifio.com | An SQL Server DBA’s Guide to Actifio Copy Data Management 65
Restoring SQL System Databases
An Actifio appliance can discover and capture SQL system databases just like SQL Server user databases as described in Protecting SQL Server Databases on page 20.
As a best practice, Actifio recommends capturing SQL system databases separate from their associated SQL user databases. This is because SQL system databases are updated less frequently than their associated SQL user databases and can be captured with a much less aggressive schedule.
To protect the SQL system databases associated with an SQL user database, use a single SLA Policy Template and Resource Profile to capture them in an Actifio Consistency Group. Doing so minimizes the consumption of system resources (VDidks) and reduces the number of jobs required to capture data.
For example, a single consistency group can capture the SQL system databases:
• master
• msdb
• model
• resource
• tempdb
Restoring SQL System DatabasesTo restore an SQL system database, you must first mount the last known good version of the SQL system database consistency group, then use a copy operation to copy the good SQL Server database .mdf and .ldf files to the source SQL server that hosts the corrupt SQL system database.
1. From the Actifio Desktop’s Application Manager, select and mount the last known good image of the consistency group.

66 | actifio.com |An SQL Server DBA’s Guide to Actifio Copy Data Management
2. From the SQL instance, use either the SQL Server Configuration Manager or the Services MMC to stop the source SQL Server database:
3. Via Windows Explorer or some other means, navigate to the mounted SQL system database consistency group:
4. Copy the mounted .mdf and .ldf files for the database being restored.
5. Via Windows Explorer or some other means, navigate to the source SQL Server database:
6. Paste the .mdf and .ldf files into the source SQL Server database.
Note: Use the following sample query to show file locations for databases: SELECT name, physical_name AS current_file_location FROM sys.master_files
7. From the SQL instance, use either the SQL Server Configuration Manager or the Services MMC to Restart the source SQL Server database.