an introduction to using a flatbed scanner “the computer as an educational tool: productivity and...
TRANSCRIPT

An Introduction to Using An Introduction to Using a a
Flatbed ScannerFlatbed Scanner
““The Computer as anThe Computer as an Educational Tool: Educational Tool: Productivity and Problem Productivity and Problem Solving” Solving” ©Richard C. Forcier and ©Richard C. Forcier and Don E. DescyDon E. Descy

Turn the scanner on first…Turn the scanner on first… Wait a minute… Wait a minute…

Now turn on the computer…Now turn on the computer…
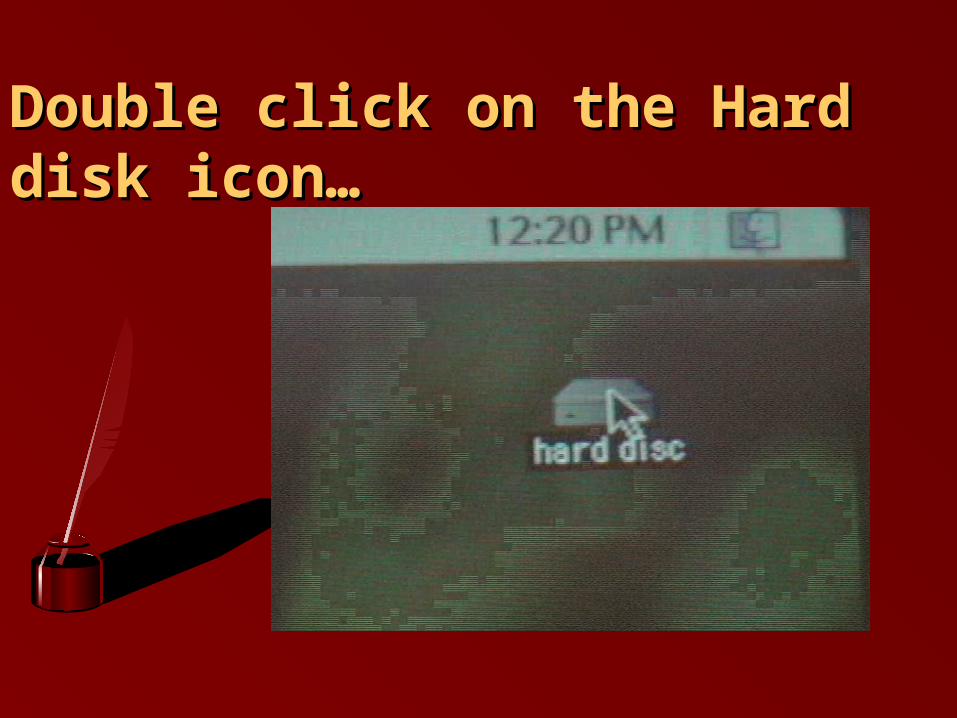
Double click on the Hard disk Double click on the Hard disk icon…icon…

When you open the Hard disk, When you open the Hard disk, double click on the double click on the “Scanner Folder”..“Scanner Folder”..

Double click on the “Scanner Software” Double click on the “Scanner Software” icon. icon. ““OFOTO”* application will open.OFOTO”* application will open.
*Your software may be different.

Place the object to be scanned under the Place the object to be scanned under the upper right corner of the scanner cover.upper right corner of the scanner cover.

Click the “Preview” or “Prescan” button Click the “Preview” or “Prescan” button on the “Scan Controls” panel. (NOTE: If on the “Scan Controls” panel. (NOTE: If this panel is not visible, go to this panel is not visible, go to “Windows” on the top menu bar and “Windows” on the top menu bar and choose “Show Scan Controls”.)choose “Show Scan Controls”.)

Click on the white part of the scanner Click on the white part of the scanner window (the one that has the scanned window (the one that has the scanned picture on it) to stop the “ants” from picture on it) to stop the “ants” from walking around the scanned item.walking around the scanned item.

Select the “Box” icon at the top of the “Tool Select the “Box” icon at the top of the “Tool Bar” which should be located to the left on Bar” which should be located to the left on the scanner window. (NOTE: If this is not the scanner window. (NOTE: If this is not visible, go to “Windows” on top menu bar and visible, go to “Windows” on top menu bar and choose “Show Tools.”)choose “Show Tools.”)

Place a box around the section that you Place a box around the section that you want to scan. Remember that scanned want to scan. Remember that scanned images take a lot of memory so you may images take a lot of memory so you may want to choose just a small section for want to choose just a small section for this exercise.this exercise.

Press the “Scan” button on Press the “Scan” button on the “Scan Control” panel.the “Scan Control” panel.

Go to “File” and choose “Save As.” MAKE Go to “File” and choose “Save As.” MAKE SURE YOU SAVE YOUR FILE ON YOUR SURE YOU SAVE YOUR FILE ON YOUR DISK. Save the picture to your disk in “File DISK. Save the picture to your disk in “File Format: PICT” and “Compression: Apple Format: PICT” and “Compression: Apple Photo - JPEG”.Photo - JPEG”.

Take your picture off the scanner and shut Take your picture off the scanner and shut off the scanner. Shut off the computer and off the scanner. Shut off the computer and monitor.monitor.

