an introduction to unix - university of manitoba introduction to unix unix survival workshop for...
TRANSCRIPT

An Introduction to UNIX
UNIX Survival Workshop
for Administrative Systems
Programmers at the U of M

Agenda
• 1. UNIX Background and Concepts Day 1
• 2. Working in the Korn Shell Day 1
• 3. The UNIX File System Day 1
• 4. Basic Commands and Filters Day 2
• 5. Learning to be a Plumber Day 2
• 6. Midnight Commander Day 2
• 7. Scripting and Job Control Day 3+4
• 8. Job Scheduling and Monitoring Day 5
• 9. Workshop Summary and Review Day 5

Section 1UNIX Background and Concepts

What is UNIX ?
• An operating system.
• Basis for most present
day operating systems
• Guided by Open
Standards
• Many variants: SUN
Solaris, HP-UX, IBM
AIX, FreeBSD, Linux
• Linux becoming the most
predominant standard

Why would we use it ?
• Available on nearly every make and model of computer.
• Strong scalability.
• Strong programming
tools environment.
• Preferred choice of
enterprise-scale
vendors.

How do you connect to UNIX ?
• TCP/IP Services
• Telnet
• Secure Shell – SSH
• FTP
• Secure Shell FTP
• HTTP – Web
• Email – SMTP IMAP
• Other Services

Telnet
• Classic terminal interface
• Based on TTY Teletype
• Character at a time
• Many clients: MS-Telnet,
TeraTerm, Host Explorer,
Kermit, HyperTerm, etc
• VT100 VT220 VT320
• Clear text traffic
• Insecure for Internet

Secure Shell - SSH
• Relatively new
• Encrypts all traffic
• Several clients: PuTTY, TTSSH, SSH, etc
• Safe for internet communications
• We consider this to be manditory for home-office terminal communications.
• We require vendors to use SSH for access. now.

FTP – File Transfer Protocol
• Defacto method of File Transfer today.
• Can also perform some
rudimentary commands.
• Data and passwords are
sent in clear text.
• No longer secure for
Internet use.
• Considered safe only
between trusted servers.

Secure Shell FTP
• SSH FTP or SFTP
• Encrypted transfer.
• Requires SSH on
receiving computer.
• Limited commands
compared to FTP.
• PuTTY provides us
with PSFTP client.

SCP – Secure File Copy
• SSH equivalent to RCP -Remote CoPy
• Encrypts transfer
• No passphrase required
between trusted
servers.
• Requires SSH on both
ends.
• PuTTY provides PSCP
for Windows.

HTTP – Web
• HTTP and HTTPS can exchange files as well as web pages.
• Mature technology.
• HTTPS provides
excellent encryption
• Not typically used as
an adhoc solution
• wget is used for non-
interactive downloads.

Email – SMTP, IMAP, POP
• Mandatory for today's workplace.
• Can use encryption,
but not typically.
• Store and Forward
guaranteed delivery.
• Not typically used
for real-time transfer

Other Services
• Capable of extending to 65,536 different services.
• SQL Services such
as Sybase Open
Client, Oracle
Net*9i, etc.
• See /etc/services for
typical standard list

Assignment 1
Install and Configure
PuTTY Secure Shell
Client on your PC

1.1 – Install PuTTY
• For the rest of this workshop we will focus on using the PuTTY SSH client.
• To install PuTTY:
– Launch Internet Explorer.
– Connect to the following URL:
http://www.chiark.greenend.org.uk/~sgtatham/putty
– Click Download PuTTY!
– Move down the page to “A Windows-style installer”
– Now click on putty-0.58-installer.exe
– Click Open when the Open, Save, Cancel box appears.

1.2 – Configure PuTTY Session
• Launch PuTTY and the Settings screen will appear.
• Set the following:– Host Name: chara
– Protocol: SSH
– Saved Sessions: chara
– Click Save

1.3 – Configure PuTTY's Keyboard Behavour
• Click on Keyboard
• Set the following:– Backspace: Control-H
– Function keys: Linux
– or Xterm R6 works also.
– The rest as shown

1.4 – Save Configuration
• Click Session again
• Click Save
• You now have a
reasonable setup for the
University's UNIX
systems.
• Feel free to explore and
try other settings.
• Double-Click on chara
to start a session.

Section 2Working in the KORN Shell

History of the Shell
• The “Shell” is the UNIX command interpreter.
• The original “Bourne” shell was created in the 1960's and is
considered to be standard for writing batch shell scripts.
• The “C” shell was created in the 1970s based on the C
programming language. Due to its inefficiency and very
different syntax, it is no longer recommended.
• The “Korn” shell was created by AT&T as a superset of the
Bourne shell in the 1980s and is considered the standard for
interactive use in most present day UNIX systems.
• The “BASH” shell was created as another superset of the Bourne
shell by the Free Software Foundation and is commonly used as
the preferred shell for Linux systems.

Features of the Shell
• You enter commands into the shell with any corresponding arguments.
• It maintains a history of your commands.
• The shell manages how input and output to the
console is directed or redirected.
• It interprets any “meta” characters such as file
selection wild card characters.
• It manages objects in your environment such as
functions and variables.

Assignment 2
Some practical examples
of using the Shell to learn
how it operates.

2.1 Enter commands and using the Command History and Editing• Login to UNIX.
• Type the command: set -o emacs
• Type the command: whoami
• Type the command: echo “Hello World”
• Type the command: date
• Now try the following and try to explain what happened:
• Type the command: history
• Press Ctrl-P Press Ctrl-N Press Ctrl-C
• Press Ctrl-P Press Ctrl-E Press Ctrl-A
• Press Ctrl-F Press Ctrl-B Press Ctrl-D
• Using what you have discovered, recall the echo “Hello World”
command and change it to say echo “Goodbye Cruel World”

2.2 Input and Output Redirection
• Execute the following commands and try to explain what happened:
• (Remember case matters, so be careful when typing commands)
• date +%Y%m%d
• echo `date +%Y%m%d` -- note ` is a backtick above the Tab Key
• YMD=”date +%Y%m%d” ; export YMD
• echo “$YMD : `$YMD`”
• TODAY=`$YMD` ; export TODAY
• echo $TODAY > testdata.txt
• cat < testdata.txt
• whoami >> testdata.txt
• cat testdata.txt

2.3 Environment Variables
• Environment variables provide a temporary memory area to store information. The login process sets many variables when you login.
• Type the command: env | less -- note space=next screen q=quit
• Environment variables are set using VAR=”value”
• It is considered good style to use uppercase names for variables.
• If they are to be used by other commands they must be exported.
• To use their value in a command you put a “$” ahead of the variable.
• Using what you have learned so far and seen above, write an echo
command which displays: your userid, the machine you are on, the
shell you are using, your time zone, and the location of your home
directory.
• (Optional) Write an echo command that displays the current time of
day in 24 hour format. (Hint use the “man date” command)

2.4 Using Meta Characters
• Meta characters are generally used as “wild card” characters to represent one or many characters in file names.
• “*” represents “zero or more” characters
• “?” represents “exactly one” character
• “[a-z]” represents a “exactly one character within a range”
• “[a-zA-Z0-9\-\*]” represents a list values for “exactly one character”
• To treat meta characters as normal characters prefix them with “\”
• Try the following commands:
• ls /etc/*.conf ls /etc/????.conf ls /etc/p*.conf
• ls /etc/[p-s]*.co?? ls /etc/[ps]*.* ls /etc/[ps]*.c*
• cd /ex* ; pwd cd /e?? ; pwd cd /et* ; pwd
• cd ~ ; pwd cd $HOME ; pwd cd ; pwd

Section 3The UNIX File System

File System Structure
• All devices, directories, files, etc are part of a single hierarchy of directories.
• Local devices are considered
the “local” file system.
• Devices on other machines
are “remote” file systems.
• Remote file systems can be
“mounted” into the local file
system using NFS – the
Network File System.

File System Security
• Every file and directory has Owner (u), Group (g) and Others (o) permissions.
• Read, Write and Execute
Permissions are stored as a
bit pattern generally
represented in octal.
• 0777 = rwxrwxrwx
• 0644 = rw-r--r--
• 0700 = rwx------
• 4-read 2-write 1-execute

Default Security Settings
• When creating a file its default security is based on:
– The user's “umask”.
– The user's default group.
– Whether inheritance has
been set on the directory.
• In some cases, such as
Dreamweaver, FTP, etc the
program will overide the default
settings.
• You should always review
permissions and change them to
approriate values !!!

Changing Security Settings
• “chgrp” will change a file or directory's group ownership.
• “chmod” will change a file or directory's permissions.
• “chown” will change a file or directory's ownership, but
only if you have root access or special administrator rights.
• Setting “umask” before the file is created will ensure it gets
the right permissions.
• Setting the SGID “g+s” on the directory where the file is
created will ensure it inherits the correct group.
• Programs such as Dreamweaver will still overide umask
and group inheritance. Always check to make sure.

Using the chgrp Command
• Syntax: chgrp group file file ...
• Eg. chgrp cservap /priv/tmp/xx/logs
• Common groups to be aware of:
– employee – default group for staff userids
– guest – default group for sponsored userids
– student – default group for student userids
– cservap – Administrative Systems Staff ONLY
– adpcat – Application Technologies Group ONLY
– uniface – Uniface developers ONLY
– asextern – EDI vendors and Financial Systems programmers
– dlgl – DLGL Human Resources group and vendor
– banner – SCT/Banner Resources group and vendor

Using the chmod Command
• Syntax: chmod permissions file file ...
• Permissions can be expressed numerically, for example:
– chmod 0755 sample.pl
– Result: u=rwx(400+200+100) g=rx(40+10) o=rx(4+1)
• Permissions can be expressed symbolically, for example:
– chmod u=rwx,g=rx,o=rx sample.pl
• Symbolic permissions can be added or taken away, for example:
– chmod u=rwx,g+rx,o-rwx sample.pl
• Other symbolic permissions:
– l–lock s-SetID (u+s SUID g+s SGID) t-Sticky
– X-execute if the owner permission is also execute

Using the chown Command
• Major security risk.
• Available only to
system admins.
• If required, see any
member of the
Application
Technologies group.

Using the umask Command
• umask sets default file creation permissions using “xor”.
• IE. If a bit is set in umask, that permission will NOT be set.
• Typical default umask is 077 for shell sessions and 022 for
FTP. This will result in u=rw,g=--, o=-- for file created
under shell and u=rw,g=r,o=r for files created by FTP.
• Note. Most FTPs support umask as an FTP command.
• Note for safety reasons, the execute permission must be
manually added to files. Directories will be created with
execute set if umask states it.
• If your group inheritance is set properly on your
directories, consider setting your default umask to 007.

Securing Production Userids
• All production operations must be done using a “Functional” Userid issued for the application system.
• In general all files that belong to an application system will
be owned by this production userid and group owned by
group “cservap”. More sensitive files may be restricted to
the application team. Review exceptions with AT.
• These production userids follow the convention “adpcxx”,
where xx is the two character system identifier assigned by
the Project Review Committee.
• When team members need to use this userid, they must use
the “su” command to login to it rather than logging in
directly. In this way, access is logged and identified.

Assignment 3
File Security and Permissions

3.1 Creating Directories and Files
• Position yourself to your “home” directory using: “cd ~”.
• Create a work directory for this course using the mkdir command.
“mkdir unix-course”
• Using the “ls -ld unix-course” command inspect the ownership and
permissions of the new directory. Use chgrp and chmod to set them so
you have a secure directory that allows people in Admin Systems to
read files and makes sure that nobody else can gain access. Also set
group inheritance so that any new files will inherit the group.
• Set umask to allow others in Admin Systems to have full access to
files. Now create some files in the new directory to test that your
security is set correctly. An easy way to do this is the send the output of
a command to the file. For example: date > testfile
• Try to access your neighbour's directory.
EG. “ls -l ~userid/unix-course”. Why does this work ?

Section 4Basic Commands and Filters

Access to the UNIX Manuals
• The most important command in UNIX is “man”.
• Eg. man chmod
• You can also search
based on keywords.
• Eg. man -k files

File Operation Commands
• Basic commands that operate on files are:– ls – list directory cp – copy files and directories
– mv – move/rename files and directories
– rm – remove files ln – create links to files
• Commands that operate on directories are:– cd – change directory pwd – print working directory
– mkdir – make directory rmdir – remove directory
• Some words of caution: – UNIX cannot undelete or salvage a file.
– mv will rename a file even if a file of the new name exists.

Filter Commands
• Filters are used to select records and/or reformat records in some way.
• Some common selection commands:
– grep – (g)eneralized (r)egular (e)xpression (p)rocessor.
– uniq – list only (uniq)ue records.
– cat – con(cat)enate files together into a single file.
– diff – show the (diff)erences between two files.
– head – show records at the beginning of the file.
– tail – show records at the end of the file.
– more, less, pg – list a file page by page.

Selection Filter Examples
• List services that are defined for FTP
– grep -i ftp /etc/services
• Browse through the TCP/IP services file
– less /etc/services
• List the first 30 records of services
– head -30 /etc/services
• List the last 15 records of services
– tail -15 /etc/services

Common UNIX Editors
• Two editors are common to all UNIX systems: vi and emacs.
• You need to know the
basics of these editors in
case you find yourself
with a basic UNIX
system someday.
• ... and trust me you will.Here there be dragons !!!

The Visual Editor – vi
• Created by Bill Joy as the first UNIX full screen editor.
• Two Modes: Command and Input/Edit mode.
• When in command mode:
– Navigation: The arrow keys, otherwise: Left “h”, Right “l”,
Down “j”, Up “k” (Note Teletypes did not have arrow keys)
– Editing: i – input mode, dd – delete line, x – delete character,
X – backspace, A – append EOL, u - undo change, etc.
– Commands: :q - quit, :q! - quit no save, zz - exit and save,
:w – write, :w filename - write to file specified.
• When in Input/Edit Mode: (position cursor and press “i”)
– Esc – return to command mode, Backspace – erase previous
character and move left, anything else gets inserted as text.

The Swiss Army Knife – Emacs
• Created by the GNU Project to be an “Editing Environment”.
• Many feel it is too complicated with too many commands
• Commands all start with Ctrl or Meta (Esc) key followed by
other characters, often in pairs.
• Navigation: Arrow keys as well as Ctrl-P – previous line, Ctrl-N
– next line, Ctrl-B – (back) previous character, Ctrl-F –
(forward) next character, Esc-V – previous page, Ctrl-V – next
page, Ctrl-A – start of line (anchor), Ctrl-E – end of line, Esc-< -
start of file, Esc-> - end of file.
• Basic Commands: Ctrl-X Ctrl-C – quit, Ctrl-G – cancel
command, Ctrl-X U – undo, Ctrl-X Ctrl-S – save file,

Assignment 4
Using Basic UNIX Commands

4.1 Working With Files
1. Copy the sample course files into your unix-coursedirectory. These can be found in course directory “/priv/adminsys/courses/introduction-to-unix” under sample-files.
2. Rename the file services to services.org.
3. Create a symbolic link to the file called myservices.
(Hint do “man ln” to see how.)
4. Do an “ls -l” on your unix-course directory and notice
the characteristics of the two files services.org and
myservices.

4.2 Working With Filters
1. Using grep, create a file based on myserviceswhich only contains “tcp” services. Call the file tcp-services.
2. Using grep, create a file containing everything
except “tcp” services. Call the file other-services.
3. Compare the original file, myservices with the two
files above using diff.
4. Using diff compare your unix-course directory to
the original ”/priv/adminsys/courses/introduction-to-unix” directory.

4.3 Editing Files
1. Using the vi editor against myservices, find and delete the line containing “telnet”. (Hint / does search)
2. Find the line containing 25/tcp. Append the comment “# Simple
Mail Transfer Protocol” to the line.
3. At the end of the file, add a new service called myservice on port
12345/tcp. Use the comment “# My personal service”.
4. In numerical sequence, add a new service called microsoft-ds on
port 445/tcp. Use the comment “# MS Data Services protocol”.
5. Save the file as “services.vi” and then quit without saving.
6. Repeat questions 1-5 using the emacs editor. Save the file as
“services.emacs” and then quit without saving.

Section 5Learning to be a Plumber

Command Input and Output
• All commands open three standard files:
– STDIN – Standard Input – file handle 0
– STDOUT – Standard Output – file handle 1
– STDERR – Standard Error – file handle 2
• These files can be redirected away from
their normal source and target, the console
using command redirection.
• This is done by joining commands together
using pipes, tees, sources and sinks.

Joining Commands using Pipes
• A “pipe” is a special file in which one command pours its output into one end and another command processes the flow as it comes out the other. “|” represents a pipe.
• Eg. cat /etc/services | grep -i tcp | less
• A “tee” is a program that copies the contents
of the pipe to a file as it passes through it.
• Eg. cat /etc/services | tee my-copy | less

Sinks – A Place to Put the Output
• > will create or overwrite a file.
• >> will create or append to a file, if it already exists.
• 2> and 2>> will do the same as above for the STDERR
file.
• 2>&1 will merge STDERR on to the same sink as
STDOUT.
• Eg. perl -nwc sample.pl > sample.msgs 2>&1
• Eg. grep -i tcp /etc/services | sort > sorted-tcp-services
• Eg. dp_usage.pl > dp_usage.rpt 2> dp_usage.msgs
• Eg. echo “Step 5 completed successfully” >> $LOG
• Eg. tar cvf - /etc | gzip -9 > etc.tar.gz 2>> $LOG

Sources – Where Input Comes From
• < file – read STDIN from this file.
• <<string – read STDIN from the data following this command line
until you encounter the character string “string”
• Eg. grep -i tcp < /etc/services > tcp-services
• Eg. sqlplus <<EOF >> $LOG 2>&1
$ORAUID/$ORAPSWD@$ORACLE_SID
set pagesize 24 linesize 132 serveroutput on;
exec dbms_output.put_line('Clearing mytable ...');
delete from mytable where 1 = 1;
EOF
NB. Raw userids and password must never be coded in any script.
They must be extracted from a secure file and substituted. We will see
how to do this later in the course.

Saving Command Output to a Variable
• There is one more special case of a sink, directing STDOUT to a shell variable. This is called “Command Substitution”.
• This is done by enclosing the command in graves “`” (key
above Tab)
• Eg. TODAY=`date +%Y%m%d`
• “echo $TODAY” will output the current date.

Assignment 5
Time to Connect
Sources and Sinks
with Pipes and Tees.

5.1 Protecting Passwords
• As we all know, it is very bad practice to expose userids and passwords in commands. Therefore, for this assignment, the userid and password are kept in a file called secure.pswd. Create secure.pswd with your sybase userid on the first line and your password on the second line using only the “echo” command. Ensure that your userid has the only access to this file.
• Assign shell variables SYBUID and SYBPSWD with the userid and password found in the secure.pswd file or by using dc_generate_parms which we will discuss later.
• Using Sybase's isql and the “STDIN Follows” source, “securely” signon to sybase, “use pubs2”, “select count(*) from authors” and put the command output in isql.out.

5.2 Maintaining Log Files
• Later when we discuss shell scripts, we will want to keep the output of a series of commands in a single file to show what hashappened within a job. IE. A log file.
• Using command substitution, create a log file called
“mylog.[date as YYYYMMDD].[time as hhmmss].log”
• Initialize your log with “Started “, the present date and time and
machine name (hint “uname -n”).
• Use grep to find string “udp” in /etc/services. Sink STDOUT to
file udp-services and log any errors.
• Complete your log with “Completed on”, the present date and
time and machine name.
• Email the log to yourself using “mailx”.

5.3 Creating Program Listings
• Like other programming languages, Perl has the ability to “compile only” and produce error and warning listings using the options “-wnc”. Eg perl -wnc program.pl
• Using only “cat” and “perl -wnc” create in a single file
“perlbug.lst” a source listing with line numbers followed
by a listing of warnings and errors for perl program found
in “/usr/local/adminsys/bin/perlbug”.

5.4 Compound Searching
• Extract from /etc/services all lines that start with the letter “n” (Hint. \^n) that are “tcp” based and say something about “Time”.
• Extract from /etc/services all lines that are “tcp” based and
deal with pop, imap or smtp.

Section 6Midnight Commander

What is Midnight Commander ?
• “Midnight Commander is a directory browser / file manager for UNIX-like environments.”
• Patterned after Norton Commander by John Socha which
was developed for MS-DOS.
• Supports a virtual file system which uses FTP to allow you
to work on file systems of other computers at the same
time.
• Has a “common sense” editor which is much easier to use
than the standard UNIX editors such as vi, emacs or pico.
• Has a sophisticated file viewer that automates viewing of
archives and compressed files.

Components of Midnight Commander
Pulldown Menu
Function Keys
Right Panel
Left PanelCommand Line
ProgressDirectory
Mini-Status

Training Midnight Commander
You may need to “teach” MC your keyboard via F9-Options-Learn Keys
Please Note type s-l-o-w-l-y to avoid problems !!!

Setting MC's Configuration
An example of “good” configuration settings.

Setting up Your Layout
A typical layout. You should adjust to your own preferences.

Setting Confirmation Options
Start with these settings and adjust as you gain experience.
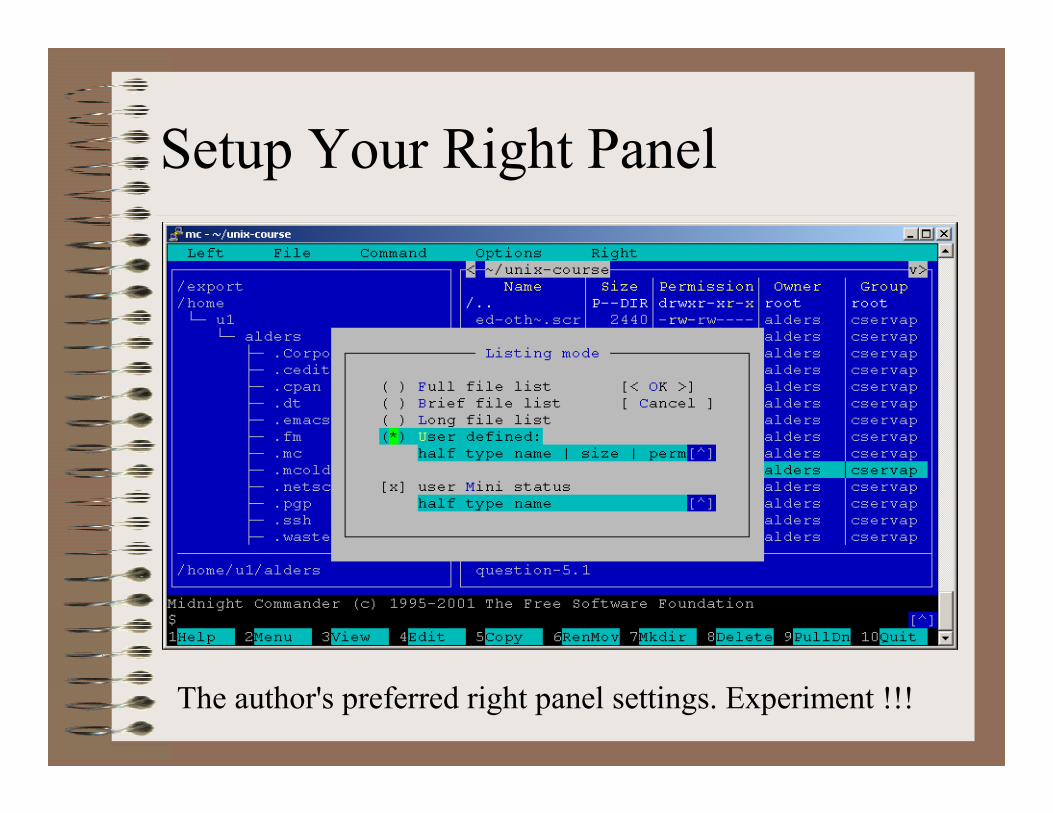
Setup Your Right Panel
The author's preferred right panel settings. Experiment !!!

Setup Your Left Panel
You will likely change this often as you work with MC.

Save Your Configuration !!!

Important Keys to Remember
• F1 – help
• Tab – Switch Between Panels
• Ctrl-U – Swap L/R Panels
• Ctrl-L – Refresh Screen
• Ctrl-O – View Cmd Window
• Ctrl-T – Tag / Untag a File
• Ctrl-S – Start typematic Find file
• Enter – Execute Command
• + - Select Files using a Pattern
• Esc-Enter – Paste Filename
• Esc-Tab – Complete Filename
• Esc-P – Previous Command
• Esc-N – Next Command
• Esc-H – Display Cmd History
• Ctrl-V – Page Down Listing
• Esc-V – Page Up Listing
• Esc-1 - Esc 0 same as F1 – F10
• \ - Unselect Files using a Pattern
Review the help contents to see how other keys can be used.
Note. C-key means Ctrl-key and M-key means Esc-key.

Using MC's File Viewer

Using MC's Editor – MCEDIT
Press F4 on file .profile or type: mcedit .profile

Assignment 6
Using Midnight Commander

6.1 Navigating Panels
• 1. Tab to the left panel and position it to the /etc directory. Tab to the right panel and position it to your unix-coursedirectory.
• 2. Create a new directory under unix-course directory
called myetc and position to it.
• 3. Select all of the “*.conf” files in the /etc directory and
copy them to myetc.
• 4. Change the left panel into “Quick View” mode and
review the files in the right panel.

6.2 Viewing Files
1. In your right panel position to the unix-course directory. Copy /priv/adminsys/weblogs/pasweb/01/index.html into the unix-course directory.
2. Position to the index.html file and view it using F3.
3. Now press the F8 key to see it in “raw” mode.
4. Now view the file in “hex” mode. Note you can edit the file
in a binary mode.
5. Return the normal “ASCII” viewing. Search for “Operating
System Report” using either F6 or F7.
6. Position to line 200. What does it say ?

6.3 Editing Files with MCEdit
1. Using the mcedit editor (F4) against myservices, find and delete the line containing “telnet”. (Hint F7 does search)
2. Find the line containing 25/tcp. Append the comment “#
Simple Mail Transfer Protocol” to the line.
3. At the end of the file, add a new service called myservice
on port 12345/tcp. Use the comment “# My personal
service”.
4. In numerical sequence, add a new service called microsoft-
ds on port 445/tcp. Use the comment “# MS Data Services
protocol”.
5. Save the file as “services.mcedit” and then quit without
saving.

Section 7Basic Scripting and Job Control

What is a Script ?
• A script is a series of commands that are executed by a interpreter.
• Scripts can contain logic,
variables, etc.
• A script can appear to be a
command or a “job”.
• Scripts can be passed
parameters or “arguments”.
• “Shell” scripts are made up
of commands that execute
using a UNIX shell.
#! /bin/sh
TODAY=”`date +%Y%m%d`”
echo “Today's date is $TODAY”
...
...
...

Where are Scripts Kept ?
• System-wide scripts are usually kept in “/usr/local/bin” or “/usr/bin”.
• Admin Systems common use
and system scripts are found in
“/usr/local/adminsys/bin”.
• Production “jobs” should
generally be stored in each
application system's script
directory eg.
“/home/adpc/cservap/xx/script”
Where xx is the system
identifer.

Typical Parts of a Shell Script
“Sh Bang” - the shell interpreter command
Recommended script comments section.
Establish a standard environment.
Initialize environment variables used in script
Script commands and process logic.
End of script marker

Passing Parameters to a Script
• Parameters or “arguments” can be entered on the “command line” either positionally or by using options.
• If any parameter may contain spaces, it must be enclosed in
“quotes” or 'apostrophes'.
• Positional parameters are available to the script using $1, $2, $3
... $9. $0 returns the actual command. $* returns a string of all
the paramaters passed.
– Command parm1 parm2 parm3 “parm4” ... parm9
• The command “getopts” can be used to accept option arguments
from the command line. See “man getopts” or
• for examples of how to use these.
– Command -v -a value -b “value with spaces” etc.

Which Shell Should We Use
• Standard control flow and syntax are used in shell scripts, but they may vary depending upon the shell used.
• Best practices state that we should always use the Bourne Shell
commands and syntax for any shell scripts we develop. In this
way they are generally portable to any standard UNIX system.
As well, they provide a consistent standard that everyone can
work from and understand.
• To enforce Bourne Shell usage, each Shell Script must begin
with the #! (pronounced “sh-bang”) command line:
#! /bin/sh
• The command that follows the #! (Sh)arp Bang(!) in the first line
of a script defines the command to be executed to run this script.
You can also add command line parameters. EG. #! /bin/sh -xv

Control Flow Structures
• test condition or simply [ condition ]
• Command execution order: && and ||
• if command; then ... elif ... else ... fi
• if [ condition ]; then ... elif ... else ... fi
• while command; do ... done
• while [ condition ]; do ... done
• until [ condition ]; do ... done
• for arg in list; do ... done
• case $var in ... regexp) ...;; *) ...;; esac
• trap “function” signal, signal, ...

Using "test" condition
• “test” is used to evaluate a “condition” or logical expression and return a true (non-zero) or false (zero) result.
• Condition types:
– Numeric Evaluation: -lt -le -eq -ne -gt, -ge
– Logical Evaluation: -a (and), -o (or), ! (not),
– String Evaluation:
• Equal = or Not Equal |=
• Empty (Zero-Length) ... -z “string” or Not Empty ... -n “string”
– File Conditions:
• -f “filespec” - does file exist, -d “filespec” - does dir exist
• -r - readable ?, -w - writeable ?, -x – executable ?
• -s – size non-zero ?, -L – symbolic link ?, -u – setuid ?
– Interactive: -t

Examples of "test" Conditions
• test -d “/etc” -a -f “/etc/services”
• [ -d “/etc” -a -f “/etc/services” ]
• [ $? -eq 2 -a -w “$MYLOG” ]
• [ $response = “yes” -o $response = “y” ]
• [ $opt = “r” -a -z “$optarg” ]
• [ -t -a -n “$DISPLAY” ]
• [ ! -t -a $HOSTNAME = “chara” -a $RUN = “prod” ]

Controlling Command Execution
• Remember the two punctuation symbols for controlling command order && and ||:
– “a && b” - if command a succeeds, run command b.
• Using test to control execution, you can:
• [ $? -gt 0 ] && echo “An error has occurred”
• [ -z “$PSWD” ] && PSWD=“secret”
– “a || b” - if command a fails, run command b
• Using test to control execution, you can:
• [ $? -eq 0 ] || echo “An error has occurred”
• [ -s “report.listing” ] || echo “No report was produced”
• xx_update || xx_restore

IF and While
• These two are similar in that they evaluate the success ($? -eq 0) or failure ($? -ne 0) of a command.
• Note [ condition ] is just a special case, the test command's
success (0) or failure (1).
• As a best practice, all commands should terminate using the exit
command. Success is indicated by terminating with “exit 0” or
failure by “exit n” where is n is a non-zero value.
• Unfortunately, everyone does not follow best practices.
• Examples of if and while:
– if grep “555-1212” phonebook.txt > /dev/null; then ... fi
– while read $response; do ... done
– while [ -t -a -z $response ]; do ... done

The for Command
• For will extract values from a string of delimited values until the list is exhausted.
LIST=”apple pear orange cherry peach”
for fruit in $LIST; do
echo “$fruit is in the list”
done
• Note the variable IFS (Internal Field Separator) controls the delimiter.
(Remember to set it back if you change it.)SAVEIFS=$IFS ; IFS=':'
for dir in $PATH; do
if [ -f “$dir/$CMD” ]; then
echo “$CMD was found on the path in directory $dir”
fi
done
IFS=$SAVEIFS

The until Command
• Until will execute a series of commands until the condition is true.
• The test condition is evaluated at the end of the loop, so it will
execute the commands at least once.
• Example:
if [ -f “incomming-ftp.running” ]; then
until [ -f “incomming-ftp.completed” ]; do
sleep 60
done
fi
• Of limited use, generally “while” is preferred.

The case Command
• Case is used to provide selective execution based upon a value. It is preferred over mutiple if's or while statements.
• Each evaluation is based on applying a “regular expression” to
the value of the variable stated in the case statement.
• Example:OPTIND=1
while getopts r:s:c: FLAG; do
case $FLAG in
r) RUN=$OPTARG ;;
s) SYSTEMID=$OPTARG ;;
c) ONCALL=$OPTARG ;;
*) echo “valid options are: -r -s and -c”
exit 8 ;;
esac
done

The set Command
• Shell provides a multi-purpose command “set” which can be used in scripts to perform many useful things.
• It can be used to provide debugging facilities to trace
statements executed “set -x” to to show how the value
of a variable is substituted “set -v”.
• It can be used to control how meta characters are
interpreted. Eg. “set -f” turns off file name expansion
“set +f” turns it back on.
• It can also be used to provide arguments to commands
within a script ...

Using set to Provide Arguments
• In a similar manner to the way scripts are passed parameters, the set command can also set the parameter variables $1 ... $9 using a list or the output f a command.
• Eg. getent passwd alders returns the output
• alders:##alders:121:104:Gary Alderson:/home/u1/alders:/bin/ksh
• Hence after setting IFS=”:” a set `getent passwd
alders` would set $1 .. $7 to the following values:
• $1=”alders”; $2=”##alders”; $3=”121”; $4=”104”;
$5=”Gary Alderson”; $6=”/home/u1/alders”;
$7=”/bin/ksh”

Assignment 7.1
Shell Scripts - Control Flow

7.1 Develop an Update Job
• Using what you have learned up to this point, write a Bourne Shell Script ee_update, which uses as input a file “transactions.data”, which will be transferred in from elsewhere and which will have a semaphore file “transactions.ready”created when the transfer is completed. The file is input on STDIN to program ee_update.pl who will create an update report on STDOUT and any errors will be sent to STDERR. If any errors are encountered, the error report must be emailed to you for the next morning to correct. Be careful to make sure that another instance of this job is not running at the same time. If it is, then exit this job before executing ee_update.pl. Be sure to create an appropriate log for each time this job runs which is properly date and time stamped.

Shell Environments - Current, Parents and Children• Generally each time a command is executed, a new copy or “instance” of the shell is started to run the command. This is called “spawning a child process”.
• Each new child contains a copy of its parent's “exported”
environment variables, but does not have a copy of its
parent's functions, aliases, or local variables.
• When a child process terminates, its environment
terminates with it.
• Also when a child process terminates, it sets it's parent's
environment variables $? and $!, the return code and error
message respectively.

Execution without Children
• It is also possible to run a command inside the parent shell without spawning a new process.
• Sourcing is the most common method and is done by
placing a “. ” in front of the command. Eg. “. /etc/profile”
• Done typically to set environment variables, functions and
aliases in the current environment from a common source
script. Similar to a COBOL copy but much more powerful.
• Let's look at some examples:
– /etc/profile
– /local/adminsys/bin/oraenv_bantest
– /local/adminsys/bin/dc_job_functions

Shell Functions
• Shell functions are defined as a part of your shell's current environment. However, unlike variables, functions cannot be exported to other child instances that are spawned.
• They can have parameters and will return a resulting status
code in $?.
• They in effect define new commands using a combination
of shell statements and commands.
• Functions can typically be used to hide complex logic or to
reduce redundant coding of repetitive shell script code.
• Functions run within your current environment and as such
will modify your environment variables and aliases.
• A function must be defined before it can be used in a script.

Writing a Shell Function
• function_name () {commands and shell script statements
}• YorN () {
_answer = “ ”
while [ “$_answer” != “y” -a “$_answer” != “n” ]; do
printf “Please respond Y or N:”
read _answer
case “$_answer” in
Y|y|YES|Yes|yes) _answer=“y”;;
N|n|NO|No|no) _answer=“n”;;
esac
done
[ “$_answer” = “y” ]
}

Function Best Practices
• Since functions operate inside your current environment, they will have long term effects on your script. So to avoid problems:
• Name functions with meaningful names always prefixing the
function name with your system identifier. Eg. dc_fcnname
• Variables defined inside functions should always start with an
underscore, Eg. _ANSWER, and should never be exported.
• When variables outside the function are modified, their values
should be reset before the function completes.
• Always try to write functions in a generalized manner to
encourage their reuse by others.
• Group functions of a similar nature together into shell scripts
which can be “sourced” into scripts.

Standard Templates
• It is beneficial to design template scripts, which can be copied and modified to develop new shell scripts.
• Some templates that currently exist are:
– In /home/adpc/cservap/common/script
• dc_job_template
• dc_daemon_template (coming soon)
• dc_command_template (coming soon)
• dc_function_template (coming soon)
• You may want to copy these and modify them for your
particular system. Be careful to keep the original
functionality intact as base templates “improve with age”.

Assignment 7.2
Using Standard Job Templates

7.2 – Using Standard Job Templates
• Create a new script file called “ee_update_name” where name is your userid. Eg. ee_update_jones.
• Copy the standard dc_job_template into the file.
• Modify the script file appropriately using system id “ee”
and your email address as the NOTIFYID.
• Use dc_serialize_job to prevent more than one job from
running at a time.
• Redo assignment 7.1 making use of what the template has
now provided you. (IE. Let the template do the work.)
• Run the job using a command line parameter of “test”.
• Find your logs and view them.

Interactive Shell Scripts
• Occasionally you will need to write an script which interacts with a user.
• UNIX uses the TERM environment variable
to determine how to interact with the
terminal. Hence it must be correctly to
work.
• Various commands are used to interact with
the screen, such as:
– clear, tput, echo, printf, read, stty, tset

TPUT - Interacting with the Screen
• The tput command can perform several useful functions, such as: – tput cup {row} {column} - positions to specific row
and column on the screen (relative zero).
– tput clear - clears the screen.
– tput bold or tput smso - turns on bold text
– tput rmso – reset “standout mode sequence”
– tput cols - returns the number of screen columns
– etc. (see man tput for more information)

Displaying Information
• The echo command simply displays information.
• For more fancy displays, use printf.
• printf does not insert a newline by default and can use
formatting on the output. It is also portable.
• Syntax: printf “format pattern” var1, var2, ...
• Examples: – printf “Your parent process # is %6d”, $PPID
– printf “Please enter Y or N:”
– printf “%-40s %40s” “Left justified” “Right justified”
• Formats: s – string, c – character, x – hex, 0 – octal, d –
decimal, i – integer, u – unsigned integer, f – floating point
number, etc. (see man formats for complete details)

Assignment 7.3
Interactive Account Query

7.3 - Interactive Account Query
• Using a Shell Script, write an interactive account query that does the following:
– Using “getent group cservap” list all of the Admin Systems staff
accounts at the top of the screen. (remember to use set -f)
– The first time through, display the detail for the account running
the command. Hint $USER unless the command was invoked with
a parameter, in which case use the parm as the userid.
– Prompt for a userid to provide detailed information on or “quit”.
– Display the account details using “getent passwd userid” (Use
printf to format it nicely.)
– Note if the userid running the command is not a member of the
cservap group, exit with an security violation message before
displaying any information, wait 10 seconds and clear the screen
before exiting. (Hint man sleep)

Setting Common Variables
• So far you have used commands like head and tail to set userid and password variables from the contents of a file.
• This is limited and results in a great many files to cover all of the circumstances needed for a typical system.
• The dc_generate_parms command can allow you to put everything for a typical application system into one simple XML file.
• dc_generate_parms also allows you to define more than just passwords and is limited only by your imagination.
• dc_generate_parms can also generate code for not only shell scripts, but PERL and PHP as well. It can be extended to jus about anything.
• Let’s take a look at a sample parms file found in ~cservap/common/include/dc_generate_parms/sample.xml

Parameter File Layout
<?xml version=“1.0”>
<defines>
<!– comment -->
<environment1>
<variable1>value</variable1>
<variable2>value</variable2>
…
</environment1>
<!– comment -->
<environment2>
<variable1>value</variable1>
<variable2>value</variable2>
…
</environment2>
<!– and so on -->
</defines>

Sample Parm Generation
PARMSFILE=“/home/adpc/cservap/xx/include/example.parms.xml”
VARS=“`dc_generate_parms –r $RUN –f $PARMSFILE`”
if [ $? –eq 0 ]; then
if [ -n “$VARS” ]; then
eval “$VARS”
else
dc_jobfail “Environment variables were returned as null”
fi
else
dc_jobfail “Environment variables set error: $VARS”
fi

Parameter Best Practices
• Environment should reflect the standard environments used by the $RUN variable set in dc_job_template.
• Put the parameter file into your application system’s “include” directory using a name that represents the system or subsystem clearly, for example: hris.parms.xml, banner_finance.parms.xml.
• Make sure to chmod the parms file to allow only the production userid read/write access with optionally group read access to the specific internal group, eg adpchr, adpcat, etc. not cservap nor any general group.
• Make sure to chgrp the file to the specific internal group.
• All userids and passwords used within scripts should be defined using meaningful environment variable names. HRORAUSERID, OS390FTPUSERID, etc.
• Consider defining anything that is common to several jobs so as to avoid hard coding variables in several scripts. EG. FTP Sites, Filenames, etc.
• Always test in your script that dc_generate_parms ran successfully.

Assignment 7.4
Generating Parameters

7.4 - Generating Parameters
• Setup a parameter file for system “ee” as ee.youruserid.xml.
• Setup three environments: prod, test, next.
• Within each environment setup variables for orauserid, orapswd,
sybuserid, sybpswd, os390userid, os390pswd, unixuserid,
unixpswd, ftptype, ftptarget, ftpuserid, ftppswd, basedir, datadir.
• Save your file in the “/home/adpc/cservap/ee/include” directory
as well as your unix-course directory. Make sure it is secured.
• Run dc_generate_parms to test that prod, test and next work.
• Create a script to set the environment variables, making sure to
test that dc_generate_parms worked, and display the
environment variables individually using echo. Note use
dc_job_template.

GDGs - UNIX Style
• Versioning/Archival of files similar to MVS style Generation Data Groups is extremely useful.
• In the UNIX world this is classically done a
number of different ways:
– Date and Time stamping files.
– Using a day or month number to cycle backups.
– Archival rotation using dp_rotate.pl.
– Using cronolog to maintain an archive
directory.

Date and Time Stamping Files
• We have covered this already, but to recap:
DATE=”`date +%Y%m%d`”
TIME=”`date +%H%M%S`”
LOGDIR=”/priv/tmp/xx/logs”
JOB=”`basename $0`”
JOBLOG=”$LOGDIR/$JOB.$DATE.$TIME.log
• Files created in this manner must be kept in a
temporary directory such as /priv/tmp/xx so that
they can be cleaned out every 7 days.

Using a Day or Month Number
• Depending upon your requirements, either daily, weekly, monthly, etc. You can generate the current numeric value of each time period to suffix a backup, address a directory, or substitute a value.
• Using the date command, the following formats:
(see also man strftime):
– %H – hour, %d – day of month, %j – day of
year, %u – weekday (1-7), %U – week of year
(00-53), %m – month number, etc.

Archival using dp_rotate.pl
• This is similar to the method used internal by the UNIX system processes and is very similar to MVS GDGs.
• Within a directory an original file is created and each time
the command is run, it is bumped down through a chain of
version numbered files, generally compressed, and
eventually falls off the end.
• dp_rotate.pl has four possible parameters
-d your archive directory (defaults to the current directory)
-f your file to be archived (default “log”)
-l limit (default 99 – the number of generations to keep)
-z ether none or lib (default lib - for gzip compression)

dp_rotate.pl Example

Using cronolog to Maintain Logs
• Cronolog is a utility that will maintain data on a specific “chronological” cycle.
• If for example, your define it to use a daily cycle, multiple
entries can be added to the log file and it will automatically
rollover at midnight to a new file, while maintaining a
director of files based on date values.
• Classically we use this for web server logging or for long
running daemons that stay up for long periods of time.
• Its use however is up to the imagination.
• See “man cronolog” for instructions. You are also advised
to talk to Application Technologies before using this
facility. It can have complex issues if not setup correctly.

Shell Scripts - Best Practices
• Always use #! /bin/sh to begin your script, hence use Bourne shell.
• Use a predefined template to enhance understanding and consistency.
• Begin the script with a standard comment block.
• Always source /etc/profile to ensure a consistent execution environment.
• Define variables at the top of the script so they are easy to locate.
• Always UPPER CASE variable names so they standout and avoid confusion.
• Use functions to hide repetitive and complex logic. Also use for common code
between scripts to enhance maintainability.
• Variables inside functions should begin with an Underscore “_” to avoid script
variable conflicts. These should never be exported.
• Use getopts style parameters to make the script general purpose between
environments, increase flexibility and to encourage reuse.
• Use comments appropriately to explain the process.
• Always set the return code using exit or return. Do not depend on defaults.
• Always externalize file names, database instances, run types, etc.
• Use dc_generate_parms to set common application environment variables.
• Always anticipate and expect the unexpected. Avoid “failures of imagination”.

Secure Shell and Secure Copy
• ssh-keygen
– Setting up .ssh/id_rsa and id_rsa.pub
– Setting up .ssh/authorized_keys
– Setting up .ssh/known_hosts
• Setting up remote host
• Pass Phrases
• Trusted Hosts

Assignment 7.5
Setup Your Own SSH Keys

7.5 – Setup Your SSH Keys
• ssh-keygen generates, manages and converts SSH public and private authentication keys for SSH.
• There are a number of different options (see man ssh-keygen).
Typically we recommend using “-t rsa” and “-b 1024” as a
reasonable security default. Running the command: “ssh-keygen -t
rsa -b 1024” will create your SSH keys.
• Choose the recommended files “.ssh/id_rsa” and “.ssh/id_rsa.pub”.
• For simplicity, you can enter just press return when asked for a
“passphrase”. ssh-keygen will interpret this as no passphrase.
• Appended your “.ssh/id_rsa.pub” file to “~/.ssh/authorized_keys” file
and also on any other “hosts” you need to use ssh commands.
• Once the files are created, make sure that your userid is the only one
that can access these files and this directory !!!

FTP - Guaranteed Delivery
• When data is being passed between systems, we use “semaphore”s to tell each party that:
– The system is ready to accept data.
– Data is currently being transferred.
– The data transmission has completed.
– The data is being processed.
– The system is not available or having problems.
• This can be accomplished by using multiple “semaphore” files or one
“state semaphore” file or “flag”.
• It is also the responsibility of receiver to clear the data files as they are
processed. The sender must continue to accumulate data and is not
concerned about clearing it. In this way, if the receiver is unable to
process the data for some period, the data will still be available.

Submitting MVS Jobs
• OS390 has a special filetype called “jes”
• Set in FTP “quote site filetype=jes”
• Use ftp put to “submit” the JCL to JES.
• Be careful about:
– Userid/ Password will become the Top Secret
USER of the job and will use its authorization.
– Use OS390 naming conventions.
– Normally use this to initiate a process on
OS390 that is dependant on this environment.

Signals and Traps
• A “signal” is a type of message sent from the system to a process, telling it that some event has occurred.
• These can be anything from 30-Power Failure to 15-
Request to Terminate, etc.
• We will analyze signals in the next section.
• “Traps” are commands that allow you to catch these
incomming signals and react to them.
• Generally a trap will choose to: perform a cleanup and
terminate, ignore the signal or prompt to user to confirm
they want to terminate the script. Often, you have no other
choice except to cleanup and leave.

Common Trap Usage
• The trap command has two arguments:
– An optional function enclosed in quotes, assuming you
are going to react to the signal.
– The signal number(s).
• To perform an action when a signal occurs:
– trap “my_cleanup” 7 15 #cleanup if a kill occurs
• To ignore to signal:
– trap “ “ 2 3 # ignore ctrl-c or quit request
• To reset the trap to normal processing:
– trap 2 3 # honour ctrl-c and quit requests
• For more information, see man trap

Using CVS for Source Management• CVS = “Concurrent Versioning System”
• The most popular source management system current in use.
• Can manage “projects” across multiple platforms: Windows,
MacIntosh, UNIX, etc. using command-line or web-based.
• A project is a group of related objects or components such as
program source, test scripts, test data, etc. You define it.
• CVS will manage versions of each project by saving the base
files and the changes made to them.
• CVS also maintains a “mandatory” history of every change.
• CVS requires a “new” way of thinking about source ...

MVS vs UNIX Environments“The Life of a Modification”
MVS/IMS Environment
1. userid.ee123.project()
2. Restore source
– userid.ee123.cobol
– userid.ee123.cntl
– userid.load(ee123)
3. a0011.dp.t901d(ee123)
4. imsvs.temppgm(ee123)
5. imsvs.pgmlib(ee123)
6. Backup source to PDP008
7. Delete userid.ee123.cobol
UNIX/Web Environment
1. $HOME/sandbox/ee123/
2. cvs checkout ee123
– ee123.c
– ee123.test.sh
– ee123 (executable)
3. /priv/adminsys/wwwdevl/htdocs/weba
pp/ee/ee_app/ee123
4. /priv/adminsys/wwwpromote/htdocs/
webapp/ee/ee_app/ee123
5. /priv/adminsys/wwwprod/htdocs/web
app/ee/ee_app/ee123
6. cvs commit
7. cvs release -d ee123

CVS – Creating a Project
• As an example, let's create a new project consisting of a shell script and a Perl script that announce themselves to the world.
• You first need to create a directory to hold all of the files
required for the project. One idea is to have a directory called
“newproject” inside your sandbox directory.
• Create the two files ee_hello_world and ee_hello_world.pl in the
directory. A quick way to do this is to copy the two example files
from /priv/adminsys/courses/introduction-to-unix/sample-files.
• Edit and modify the files to add your own personal information.
• To avoid clobbering your neighbour, rename the scripts to
ee_xxx_hello_world where xxx is your userid.
• Note the CVS “keywords” $Id, $Source, $Log. CVS will
manage these provided you enter them in a comment area.

CVS - Importing a Project
• Now that you have your files ready, you can import your project into the CVS repository.
• Note there can be as many repositories as we require. At this point,
we define one per System ID. For this course however, you must
use the course repository. You must set the environment variable
CVSROOT=”/priv/adminsys/courses/introduction-to-unix/cvs”
and export it via export CVSROOT.
• Inside the your “newproject” directory, you can now issue the cvs
import command: “cvs import ee_xxx_hello_world V R” again
xxx is your userid. V and R are used by import for release names.
• Provided you did not get any error messages, your project files are
now entered into the CVS repository. You can now delete the files
in your “newproject” directory.

CVS - Import Example
<alders@chara:218>$ pwd
/home/u1/alders/sandbox/newproject
<alders@chara:219>$ ls -l
total 16
-rwxrwx--- 1 alders adpcat 1028 Jul 2 11:17 ee_alders_hello_world
-rwxrwx--- 1 alders adpcat 583 Jul 2 11:17 ee_alders_hello_world.pl
<alders@chara:220>$ CVSROOT="/priv/adminsys/courses/introduction-to-unix/cvs"
<alders@chara:221>$ export CVSROOT
<alders@chara:222>$ cvs import ee_alders_hello_world V R
(You will be asked to enter comments about the changes made.
Enter them and save)
N ee_alders_hello_world/ee_alders_hello_world
N ee_alders_hello_world/ee_alders_hello_world.pl
No conflicts created by this import

CVS - Checking Out a Project
• You are now ready to checkout the project from the repository tomake changes and work on it. This is done via “cvs checkout”
• Change your directory to your ~/sandbox and then run the
command “cvs checkout ee_$USER_hello_world”
• Note the directory ~/sandbox/ee_xxx_hello_world has been
created and it will contain two files that you previously
imported.
• Edit the files and see what CVS has done the the CVS
comments.
• You can now make any changes required, test your changes, etc.

CVS - Checkout Example
<alders@chara:247>$ cd ~/sandbox
<alders@chara:248>$ pwd
/home/u1/alders/sandbox
<alders@chara:249>$ echo $CVSROOT
/priv/adminsys/courses/introduction-to-unix/cvs
<alders@chara:250>$ cvs checkout ee_alders_hello_world
cvs checkout: Updating ee_alders_hello_world
U ee_alders_hello_world/ee_alders_hello_world
U ee_alders_hello_world/ee_alders_hello_world.pl
<alders@chara:251>$ ls -l ee_alders_hello_world
total 24
drwxrws--- 2 alders adpcat 4096 Jul 2 13:23 CVS
-rwxrwxr-x 1 alders adpcat 1279 Jul 2 13:07 ee_alders_hello_world
-rwxrwxr-x 1 alders adpcat 843 Jul 2 13:07 ee_alders_hello_world.pl

CVS - Committing Changes
• Once you have finished making changes to the project and have tested them, you are ready to commit your changes to the repository
• In our example, edit the two files to make some minor changes.
Test them to make sure you are happy that the changes work.
• Ensure that you are located in the project sandbox directory.
• Ensure that CVSROOT points to the correct repository.
• Run “cvs commit” to commit your changes.
• Note, if you have a one-line change comment that is common to
all of your files, you can specify this using the “-m” command
line option. Be sure to enclose the text in “ “.

CVS - Commit Example
<alders@chara:281>$ echo $CVSROOT/priv/adminsys/courses/introduction-to-unix/cvs<alders@chara:282>$ pwd/home/u1/alders/sandbox/ee_alders_hello_world
<alders@chara:283>$ cvs commit -m "Make production ready"cvs commit: Examining .Checking in ee_alders_hello_world;/priv/adminsys/courses/introduction-to-
unix/cvs/ee_alders_hello_world/ee_alders_hello_world,v <--ee_alders_hello_world
new revision: 1.2; previous revision: 1.1doneChecking in ee_alders_hello_world.pl;/priv/adminsys/courses/introduction-to-
unix/cvs/ee_alders_hello_world/ee_alders_hello_world.pl,v <-- ee_alders_hello_world.pl
new revision: 1.2; previous revision: 1.1done

CVS - Add/Remove Files
• Throughout the life of a project, other files will need to be added to the repository such as test data, test scripts, documentation, etc.
• These are added to the project using the “cvs add” command.
• To add a file or directory, locate to the project directory where the
file or directory already exists and run “cvs add file1 file2 ...”
• Conversely, over time files will no longer be required and can be
deleted from the project. This is done with “cvs remove”.
• You must first delete the files or directories physically and then
run the command: “cvs remove file1 file2 ...”
• CVS will schedule addition or removal of file on the next commit.
• Note, files that are removed are actually stored away in the
project's “attic” in case they are ever needed again.

CVS - Add/Remove Example
<alders:286>$ cvs add ee_alders_hello_world.txt \ee_alders_hello_world.20040702.150217.log
cvs add: scheduling file `ee_alders_hello_world.txt' for additioncvs add: scheduling file `ee_alders_hello_world.20040702.150217.log'
for additioncvs add: use 'cvs commit' to add these files permanently<alders:287>$ rm ee_alders_hello_world.20040702.150217.logrm: remove ee_alders_hello_world.20040702.150217.log (yes/no)? y<alders:288>$ cvs remove ee_alders_hello_world.20040702.150217.logcvs remove: removed `ee_alders_hello_world.20040702.150217.log'<alders:289>$ cvs commit -m “Add documentation files to project”cvs commit: Examining .RCS file: /priv/adminsys/courses/introduction-to-
unix/cvs/ee_alders_hello_world/ee_alders_hello_world.txt,vdoneChecking in ee_alders_hello_world.txt;/priv/adminsys/courses/introduction-to-
unix/cvs/ee_alders_hello_world/ee_alders_hello_world.txt,v <--ee_alders_hello_world.txt
initial revision: 1.1done

CVS - Project Deployment
• In today's environment of primarily scripting language, it is tempting to change the component's source where it is run from. It is essential that all changes done to a project's components be done inside the CVS sandbox directories. In order to manage the changes, CVS needs to know that the source code it has is the only set being changed.
• To ease this synchronization, CVS has an export command,
which will export only the project files into a named directory.
This does not export the CVS internal files. It can also deploy
only a specific release or released date.
• To run the command for the most current release committed,
execute “cvs export -d targetdirectory -D now projectname”

CVS - Export Example
<alders@chara:314>$ cvs export -D now \-d /home/adpc/cservap/ee/app/ee_alders_hello_world \ee_alders_hello_worldcvs export: Updating /home/adpc/cservap/ee/app/ee_alders_hello_worldU /home/adpc/cservap/ee/app/ee_alders_hello_world/ee_alders_hello_worldU /home/adpc/cservap/ee/app/ee_alders_hello_world/ee_alders_hello_world.plU /home/adpc/cservap/ee/app/ee_alders_hello_world/ee_alders_hello_world.txt
<alders@chara:315>$ ls -l \/home/adpc/cservap/ee/app/ee_alders_hello_worldtotal 24-rwxrwxr-x 1 alders cservap 1362 Jul 2 15:13 ee_alders_hello_world-rwxrwxr-x 1 alders cservap 933 Jul 2 15:13 ee_alders_hello_world.pl-rw-rw-r-- 1 alders cservap 497 Jul 2 15:31 ee_alders_hello_world.txt

CVS - Cleaning Up
• Of course once you have committed all of your changes and are satisfied that everything is working correctly in production, you should clean up your sandbox.
• This is not mandatory, but always a best practice to make sure
that you do not exceed your disk space quota, as well as to make
sure that you have closed your checkout and have freed up any
locks.
• Make sure to position yourself to your ~/sandbox directory, ie.
One level above the project.
• Run the command “cvs release -d projectname”
• This will delete the files and directories belonging to the project
and remove your userid from checkout status in the repository.

CVS - Release Example
<alders@chara:303>$ lsafauthentication ee_alders_hello_worlddc_generate_parms ee_perl_examplesdc_job hr_umfadd_operational_documentation hr_vipdaemonsdp_check_cronlog newprojectdp_errorlog ordp_rotate rsvalpindp_services xxx
<alders@chara:304>$ pwd/home/u1/alders/sandbox
<alders@chara:305>$ cvs release -d ee_alders_hello_worldYou have [0] altered files in this repository.Are you sure you want to release (and delete) directory
`ee_alders_hello_world': y
<alders@chara:306>$ ls -ld ee_alders_hello_worldee_alders_hello_world: No such file or directory

CVS - Beyond Simple Projects
• CVS is the most commonly used source management tool in the industry. It is commonly used to manage open source projects with developers working on joint projects world-wide.
• CVS can define “modules” which are made up of components
from different projects. Hence a module can share and reuse
components across many projects. Further research needs to be
done locally to establish best practices on how we accomplish
this. Stay tuned.
• CVS will become the basis to production change control and
change management of projects being promoted into various
environments, such as production and training.
• Admin Systems will move System based CVS repositories on to a
remote CVS server to provide better access and security from all
platforms. EG. Windows, UNIX, Linux, MacIntosh, Web, etc.

CVS - Best Practices
• We are still gaining experience with CVS. It is a very powerful product with many options. Expect a great many best practices to come in the near future as people gain experience with it.
• The discipline of making changes only to project components
within a CVS sandbox and then exporting the changes into
executable directories is critical to success. Only use “cvs
export” or “cp” project files into their executable environments.
Never make changes to components in these directories directly.
• CVS is not a substitute for good project management. Project
leads need to actively ensure that project staff get assigned to
projects where overlapping work is avoided or controlled. CVS
will attempt to resolve concurrent changes to project files,
however, good definition and granularity decisions for the
projects is critical.

Section 8Job Scheduling and Monitoring

Methods that Jobs Can Be Run
• Run in Foreground
~adpcat/script/pat200
• Run in Background
~adpcat/script/pat200 &
• Using “batch” or “at now”
batch < ~adpcat/script/pat200
• Using “at” with a time
at 0815am Jan 26 \
-f ~adpcat/script/pat200
• Using “crontab” ...

What is “crontab” ?
• “crontab” is a command which submits a schedule to the “cron”daemon to be run on a regular basis.
• For production, “crontab” is the most useful scheduling method
because:
– Jobs can be repeatedly scheduled.
– Scheduling can be done using complex time patterns.
– Activity logs are kept which document schedule events.
– Schedules can be kept in files relating jobs together and
documenting the schedule particulars.
• Beware ... “crontab” is scheduled to run for the submitting userid
on the machine where the command is run.
• There can be as many “crontab”s schedules as there are users.

Scheduling Jobs using "crontab"
• The crontab file contains either scheduling entries or comments.
• No blank lines allowed !!!
• Comment lines must start with a “#”
• A crontab file consists of lines of six fields each. The fields
are separated by spaces or tabs.
– Minute (0-59), Hour (0-23), Day of the month (1-31),
– Month of the year (1-12), Day of the week (0-6 0=Sunday),
– The command to be executed.
• The first five can either be a single number or range number-
number, a list of numbers or ranges separated by commas, or
“*” meaning “any”.

A Sample "crontab" File

Best Practices for “crontab”
• In general, all “crontab”s are scheduled to run on “chara”.
• All “crontab”s must be run under a production userid, eg. adpchr,
adpcsr, adpcfm, adpcat, etc. (schedule using su)
• Each application system has a file called “crontab” in its home
directory. eg. adpchr's is in /home/adpc/cservap/hr/crontab. This is
considered to be the system's currently active “crontab”.
• Each schedule entry should be preceded with a comment briefly
describing the job and any scheduling particulars.
• Always ensure that crontab file is owned by the production system
userid and group cservap with permissions of ug=rw.
• Make sure that email for the production system userid is forwarded to
group members so they are informed of any scheduling problems that
cron should happen to encounter.

Monitoring Jobs and Processes
• Jobs are made up of a series of processes
• The “ps” command
monitors process
status.
• The “top” command
provides a full
screen monitor of
processes.

Using the ps Command
• “ps” can be used on its own to monitor processes by pid (process id), user, group, terminal connection, etc.
• “ps” by itself will display the processes
running for your current login session.
• Use “ps -ef” with grep to select processes.
• Note “ps -f” will show entire comandline.
• “ps -fu smith” will show userid smith's pids.

Interpreting ps Output

Cancelling a Process

A View to a Kill
• “kill” sends a “SIGNAL” or interupt to a process that your userid owns. (Note only root can send signals to others.)
• For a list of the 30+ different signals, please see
“/usr/include/sys/signal.h”.
• Common signals are:
– 24 – Request to suspend/stop execution.
• Use “bg” or “fg” to continue suspended execution.
– 15 – (Default) Request to terminate process.
– 9 – Kill process immediately and unconditionally.
• Scripts and processes can be written to perform actions or
ignore interupts based upon the signals sent. Eg. the “trap”
command. Note, most signals cannot be ignored.

Continuous Monitoring using top
• “top” is a command that continuously displays the top “n”processes based on various criteria, CPU usage by default.
• For help inside top, type “h”.
• The display shows the system status, resource usage
followed by a list of the top processes running on the
machine.
• You can select processes for all or a specific userid, and
can toggle display of idle tasks.
• This can be useful to see if other processes or users are
delaying your processes or just to see system activity.

A Typical TOP Display

Monitoring Disk Usage
• “ls” will list the files in a directory.
• “du” will give a multi-level
summary of disk usage for
a directory tree.
• “df” will display free
space, usage, mount points
and other statistics on file
systems and directories.

Monitoring Files and Logs
• It is often helpful to view the contents of a file as it gets written during a job.
• You could use the “tee”
command to take snapshots
of pipe between processes.
• Use “tail -f” which lists the
end of a file and any new
records added to it.
• The stop, you must press
interrupt, Ctrl-C.

Assignment 8
Job Scheduling and Monitoring

8.1 Scheduling and Running Jobs
1. Create your own crontab file in your home directory using your favourite editor.
2. Schedule a command “sleep 300” to run every 15 minutes
between 3:00pm and 4:00pm monday, thursday and saturday in
March through May.
3. Schedule a command “sleep 60” to run every minute between 15
through 30 and 45 through 60 minutes of the hour. Only run on
mondays in March, June, September and December.
4. Submit your crontab via “crontab crontab”. Ensure it is working
by listing the submitted file via “crontab -l”
5. Wait until it schedules a job and then view its status using ps, ps
-u youruserid and then ps -fu youruserid. Note the difference.
6. Cancel your crontab schedule using “crontab -r”.

8.2 Monitoring System Processes
1. DASWEB the Development Admin Systems WEB server runs under userid “dasweb”. Each “instance” of the web server is a process called “httpd”. Using ps and grep display the status of all instances of the DASWEB web server.
2. The comand “wc -l” counts lines in a file. Using your previous
solution, how many DASWEB instances are running on Chara ?
3. Process “D4C” is the DLGL VIP spooler daemon. How many
test and production instances are running ? Under which user ?
Hint: vipp is production , vipt is test, vipn is new/training.
4. Daemon process “rsvalpin.pl” will generate or “spawn” child
processes of itself to process its actual requests. This is called
“forking” or “multi-threading”. Using ps -ef and grep, can you
determine which process is the parent or “manager” ?

8.3 Monitoring Using "top"
1. “top” will display the top “n” processes in terms of various selection criteria. By default cpu usage. Expand your PuTTY window by streching it down and set the number of processes to 30. First type “n” then type 30. Note type “h” for help.
2. By default any user's processes will be shown. Change the
display to only display the processes used by your userid.
Change it again to watch the processes run under “dasweb”.
3. Reset the display to display all users (hint u then +) and then set
the display to ignore all idle processes. Sort the display by
“time” to order by total elapsed cpu time.
4. Type “q” to exit top.
5. Compare “top” to the “prstat” command. Note prstat is only
available on Solaris machines.

8.4 Monitoring Log Files
1. The “tail -f” command will allow you to watch records being added the the end of a file in real time. This can be helpful when you are trying to find problems or just need to monitor a process.
2. The DASWEB web server “access_log” is in
“/priv/adminsys/wwwdevl/logs/access_log”. Run “tail -f” against it to
monitor the web server's activity.
3. Now try monitoring /priv/adminsys/wwwdevl/logs/error_log with “tail
-f”. Start you web browser and try to locate to URL
http://dasweb.cc.umanitoba.ca:8080/thiswontwork
4. Open a second PuTTY session using “Duplicate Session” (Click on the
lefthand top icon of the window). Run a second monitor window to
watch /priv/adminsys/wwwdevl/logs/access_log. Now try
http://dasweb.cc.umanitoba.ca:8080/manual

Workshop Summary and Review