an introduction to surface-mount devices
TRANSCRIPT

Yes, you CAN work with surface-mount devices, or SMDs. All it takes are patience, practice and the right tools-including one which KBTM shows you how to build yourself! Once you've learned a few tricks, working with SMDs can even be FUN!
An Introduction t o Surf ace-Mount Devices
BY DEAN F. POETH I!,* K8TM
S urface-mount devices (SMDs) are small! However, they are used in a growing number of
amateur radio products. Fortunately, there are several tricks you can learn that will help you succeed when work- ing with these components.
Why SMDs? SMDs have improved performance over through-hole components due to their smaller size, shorter internal leads, and smaller board layouts. These fac- tors reduce the circuit's parasitic induc- tance and capacitance. SMDs can also be more cost effective than traditional through-hole components due to the smaller board size, fewer board layers, and fewer holes.
SMDs can be easier to replace than through-hole components on multi- layer boards. This is because it is very difficult to heat the long hole on a multi- layer board, but much easier to heat just the pad and component terminal of an SMD on the surface of a board.
Fig. I- SMD work tray. Line the inside with several layers of bright- white copy paper. Glue all edges
lhw and corners so components cannot slip underneath. Base material is the back of a 81/20 x
f I 1 writing tablet.
This article is for those amateurs who would like to experiment with SMDs, yet do not have access to professional SMD rework stations, solder pastes, hot air jets, and illuminated magnifiers. SMDs can be challenging to solder, so it is best to learn general soldering skills on larger components before attempt- ing to work with SMDs.
The methods presented here are not the only ones available. SMD compo- nents can be worked with in many dif- ferent ways (just like through-hole com- ponents). The goal of this article is just
If you know a few tricks, working with SMDs can be fun!
Tools and Equipment The tools and equipment you will need are shown in the sidebar. Self-locking tweezers cost only a few dollars (avail- able from S. LaRose Inc., 1-888-752- 7673, <www.slarose.com>) and work much better than regular tweezers. Select a low-wattage (1 5 or 25 watt) or temperature-controlled (600" F) pencil soldering iron with a pointed tip.
to give a quick introduction to several methods that the amateur and profes-
*218 Gower Rd., Glenville, NY 12302 sional can use to successfully work with e-mail: [email protected]> this technology.
The test hveezsrs ape mait? fmm tvvo piaces of printed- circuit-boatrl material separated by a small hardwaad Mock.
all-diameteisdder 63/37 (eutectic)
gently blow fumes away
neck lamp with 100 watt
36 CQ April 2003 Visit Our Web Site

COMPONENT
Chip resistor
Chip capacitor
Polarized capacitor
Diode
SOT (Small Outline Transistor)
SOIC (Small Outline Integrated Circuit)
SHAPE
[
[
c 1= n rz d rz
5
ra ra
u
Zl Zl z z z z z
MARKINGS
Labeled with value (see Table 3)
Not marked
Plus end marked with band, value marked
Cathode end marked with notch or band
May be unmarked or marked with house numbers
May be marked, unmarked, or house numbered.
Pin one marked with beveled side, dot, band, or notch.
Table I- Shape and markings of some common SMDs.
To clean the circuit board before soldering you will need a nonconductive abrasive pad. Don't use steel wool or a steel-wool scouring pad, since they may leave small (almost microscopic) steel wires behind. A strong magnet is useful for finding dropped components. You will also need a 4X watchmakers loupe or magnifying glass. Use this to read the component markings on chip resistors and electrolytic capacitors.
The Work Area SMDs are very small, so the first thing to do is to make them "look" bigger. The trick is to illuminate the work surface with a very bright light. To illustrate this effect, take some difficult-to-read fine print (like on the back of a credit-card application) and try reading it in a dimly lit room, and then try reading it a few inches from a bright desk lamp. The difference is dramatic.
A swing-arm desk lamp with a 100 watt frosted bulb positioned close to the work surface works very well. The lamp should be adjustable from 6 to 24 inches above the desktop. Regular room lighting or shop lights just are not bright enough. It is also helpful to set up the lamp so it can be swung over the edge of the desk and illuminate the floor. This helps with finding dropped components.
The second trick is to work on an absolutely clean, bright-white surface. The SMD work tray shown in fig. 1 works very well. The white paper gives contrast to the components, and the small sides help prevent the SMDs from getting lost.
To build the SMD work tray, start by removing the cardboard back from an 81/2" x 11" writing tablet. On one side, glue two sheets of bright-white copy paper using rubber cement. Two sheets are necessary because the paper is not completely opaque. When the glue has
Adaptive Digital Signal Processing
Superior Noise Reduction Easy to Add * Easy to Use
Works with most Transceivers
ADSP2 gives a clearer signal than any base station DSP available.
Two levels of noise reduction, three proprietary filters, up to 26 dB improvement in signal-to-noise ratio! Visit our web site to learn more about it.
Hear it for Yourself!
No Compromise Communications Tel: 425-746-6310 Fax: 425-746-6384
[email protected] www.sgcworld.com
The Screwdriver Antenna Made For Hams
By Hams Get the quality that only CNC
machined blueprinted components in either aircraft aluminum or stainless
rsmmmmmm steel can offer. Now a smaller TARHEEL.
LITTLE TARHEEL 6-40 meter
—1$» »•—•
$289.+S/H Specifications
Lower Mast Size- 1 1/2" Lower Mast Length-18"
Whip Length- 30" Total Length of Antenna in 6mt position- 48"
Total Length of Antenna in 40mt position- 54" Freq. Coverage Continuous- 6mt thru 40mt
Power Rating- 400 watts P.E.P. Typical SWR- 1.5 or less
Weight-1.8 lbs.
Model 100, Full Size 10-80 meter
$295 Model 200, Full Size 10-80 + 6 meter
. _ « $325 made in USAf * ^ J l " ~ " ^ Secure website www.tarheelantennas.com
TARHEEL ANTENNAS 919-552-8788 • Fax 919-552-4970
913 Old Honeycutt Road Fuquay-Varina, NC 27526
www.cq-amateur-radio.com April 2003 • CQ • 37

DONATE YOUR RADIO
Turn your excess Ham Radios and related items into a tax break for you
and learning tool for kids.
Donate your radio or related gear to an IRS approved
501 (c)(3) charity. Get the tax credit and help a worthy cause.
Equipment picked up anywhere or shipping
arranged. Radios you can write off - kids you can't.
Call (516) 674-4072 FAX (516) 674-9600
e-maiI:[email protected] w w w. wb2j kj .org
THE RADIO CLUB OF JUNIOR HIGH SCHOOL 22
RO. Box 1052 New York, NY 10002
®tittyi*ey &o*nmu*Ueatio*t to-
Case Size Component Component Length Width
0603 0.063 0.030 0805 0.080 0.050 1206* 0.126 0.063 2010 0.200 0.100 2512 0.250 0.125
* The most common size for SMD resistors and chip capacitors
Table II- Common SMD case sizes.
or Marking
105 820 272 104
Resistor Value (ohms) 1 meg
82 2.7K 100K
Table III- Typical resistor markings and corresponding values.
dried, flip it over and draw a box 1/2 inch in from all four sides. Bend the cardboard at the lines, forming a 71/2"x 10" tray. Fold up each corner. Glue the corners together using white glue. Clamp each corner using a clothespin until the glue dries.
You will be amazed how much of a difference just a bright light and white work surface will make when working with these components.
SMD Safety Precautions Surface-mount components are very small, and therefore special precautions (in addition to those required when working with through-hole components) must be taken.
• Do not eat or drink when working with surface-mount components.
• Do not use cups, plates, or any food-related items to hold or store surface mount components.
• Keep surface-mount components away from children and pets.
• Wear safety goggles. • Work away from the edge of a desk
or workbench to ensure that components will not fall on the floor.
• Keep a strong light and magnet available to search for components that have dropped on the floor
Identifying SMDs The general shapes of some common SMDs are shown in Table I. Note that many components (such as chip capacitors) are not routinely labeled. This is why the test tweezers (described below) are so useful. Typical case sizes for chip resistors and capacitors are list-
SOT-23
(A)
D E
SOT-23
(B)
Fig. 2- (A) Comparison between a traditional bipolar transistor and its surface-mount counterpart. (B) Comparison between a traditional FET and its surface-mount counterpart.
ed in Table II. To find the approximate size, multiply the first two digits by 10 to get the length in mils, and multiply the last two digits by 10 to get the width in mils. The most common size for chip resistors and chip capacitors is 1206.
Resistors frequently are marked with a three-digit number, and some typical values are shown in Table III. The first two numbers are the significant digits of the value, and the last digit is the multiplier (the number of zeros to add to the first two digits). For example, a chip resistor labeled 102 has a value of 1000 ohms, or 1K ohms.
SMD transistors are shown in fig. 2(A) and (B) and are compared to the common TO-92 transistor case style. Notice that the leads for the SOT-23 are totally different than for the TO-92.
Testing and Measuring SMDs Testing SMDs or measuring their values can be a challenge if you use regular test probes. The components will tend to flip or spin out of the probe tips when you apply pressure, which can be very frustrating.
A better way is to make the test tweezers shown in fig. 3(A) and (B). These tweezers grip the component using the copper foil on printed-circuit-board material, which is connected to the input of an autoranging ohmmeter or capacitance meter. The Craftsman autoranging multimeter model 82040 (about $20) works well for this job.
38 • CQ • April 2003 Visit Our Web Site
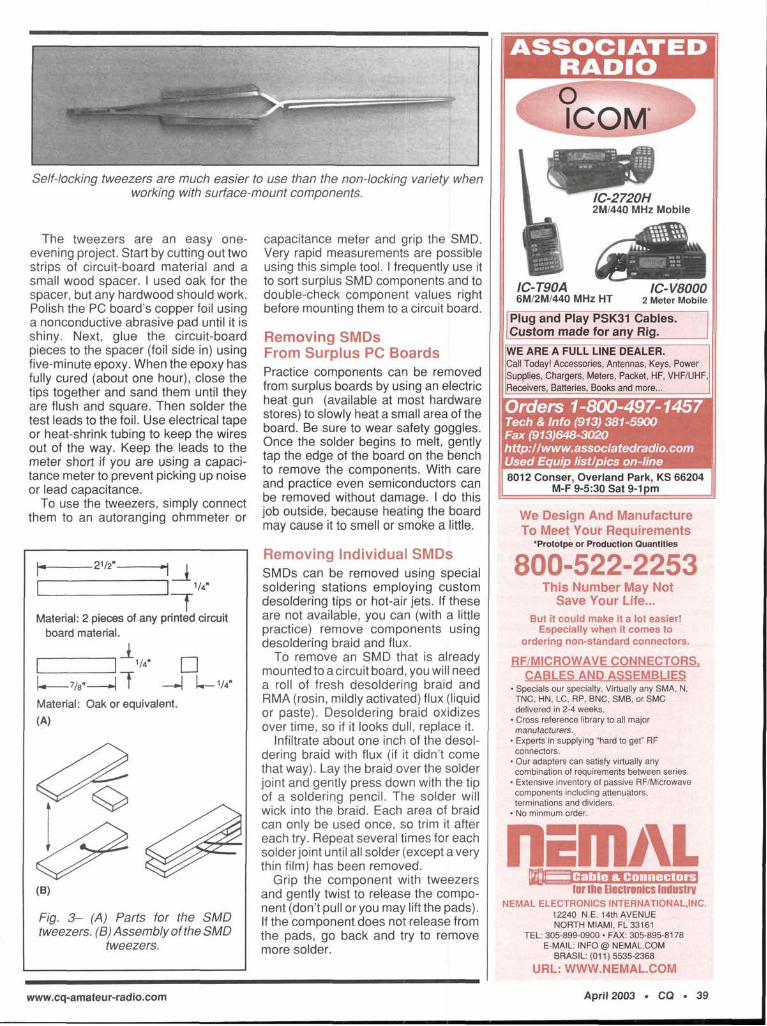
Self-locking tweezers are much easier to use than the non-locking variety when working with surface-mount components.
The tweezers are an easy one-evening project. Start by cutting out two strips of circuit-board material and a small wood spacer. I used oak for the spacer, but any hardwood should work. Polish the PC board's copper foil using a nonconductive abrasive pad until it is shiny. Next, glue the circuit-board pieces to the spacer (foil side in) using five-minute epoxy. When the epoxy has fully cured (about one hour), close the tips together and sand them until they are flush and square. Then solder the test leads to the foil. Use electrical tape or heat-shrink tubing to keep the wires out of the way. Keep the leads to the meter short if you are using a capacitance meter to prevent picking up noise or lead capacitance.
To use the tweezers, simply connect them to an autoranging ohmmeter or
-2V2" :u 1/4-
T Material: 2 pieces of any printed circuit
board material.
U_7/ 8 - 4 t — | L-V4" Material: Oak or equivalent.
(A)
Fig. 3- (A) Parts for the SMD tweezers. (B) Assembly of the SMD
tweezers.
capacitance meter and grip the SMD. Very rapid measurements are possible using this simple tool. I frequently use it to sort surplus SMD components and to double-check component values right before mounting them to a circuit board.
Removing SMDs From Surplus PC Boards Practice components can be removed from surplus boards by using an electric heat gun (available at most hardware stores) to slowly heat a small area of the board. Be sure to wear safety goggles. Once the solder begins to melt, gently tap the edge of the board on the bench to remove the components. With care and practice even semiconductors can be removed without damage. I do this job outside, because heating the board may cause it to smell or smoke a little.
Removing Individual SMDs SMDs can be removed using special soldering stations employing custom desoldering tips or hot-air jets. If these are not available, you can (with a little practice) remove components using desoldering braid and flux.
To remove an SMD that is already mounted to a circuit board, you will need a roll of fresh desoldering braid and RMA (rosin, mildly activated) flux (liquid or paste). Desoldering braid oxidizes over time, so if it looks dull, replace it.
Infiltrate about one inch of the desoldering braid with flux (if it didn't come that way). Lay the braid over the solder joint and gently press down with the tip of a soldering pencil. The solder will wick into the braid. Each area of braid can only be used once, so trim it after each try. Repeat several times for each solder joint until all solder (except a very thin film) has been removed.
Grip the component with tweezers and gently twist to release the component (don't pull or you may lift the pads). If the component does not release from the pads, go back and try to remove more solder.
ICOM
IC-T90A 6M/2M/440 MHz HT
IC-V8000 2 Meter Mobile
Plug and Play PSK31 Cables. Custom made for any Rig.
WE ARE A FULL LINE DEALER. Call Today! Accessories, Antennas, Keys, Power Supplies, Chargers, Meters, Packet, HF, VHF/UHF,| Receivers, Batteries, Books and more...
1-800-497-1457 Tech & Info (913) 381-5900 Fax (913)648-3020 http://www.associatedradio.com Used Equip list/pics on-line 8012 Conser, Overland Park, KS 66204
M-F 9-5:30 Sat 9-1 pm
We Design And Manufacture To Meet Your Requirements
•Prototpe or Production Quantities
800-522-2253 This Number May Not
Save Your Life... But it could make it a lot easier!
Especially when it comes to ordering non-standard connectors.
RF/MICROWAVE CONNECTORS-CABLES AND ASSEMBLIES
• Specials our specialty. Virtually any SMA, N, TNC, HN, LC, RP, BNC, SMB, or SMC delivered in 2-4 weeks.
• Cross reference library to all major manufacturers.
• Experts in supplying "hard to get" RF connectors.
• Our adapters can satisfy virtually any combination of requirements between series.
• Extensive inventory of passive RF/Microwave components including attenuators, terminations and dividers.
• No minmum order.
flcillAL for the Electronics Industry
NEMAL ELECTRONICS INTERNATIONAL.INC. 12240 N.E. 14th AVENUE NORTH MIAMI, FL 33161
TEL: 305-899-0900 • FAX: 305-895-8178 E-MAIL: INFO @ NEMAL.COM
BRASIL: (011)5535-2368
URL: WWW.NEMAL.COM
www.cq-amateur-radio.com April 2003 . CQ • 39

Surface-Mount Device Electronic Component Suppliers
Electronic Goldmine, 800-445-0697, <www.goldmine-elec.com> Surface-mount components, educational kits, circuit boards
Digi-Key Corp., 800-344-4539, <www.digikey.com> Surface-mount components
Mouser Electronics, 800-346-6873, <www.mouser.com> Surface-mount components
Wassco, 800-4wassco, <www.wassco.com> Surface-mount tools and supplies
Newark Electronics, 800-263-9275, <www.newark.com> Surface-mount components, tools, and supplies
Allied Electronics, 800-433-5700, <www.alliedelec.com> Surface-mount components, tools, and supplies
This technique takes practice, so try removing several components from a surplus board before attempting it on an important project.
Soldering SMDs There are several ways to successfully solder SMD components to a circuit board. Some are easier to learn than others, and some require the use of special materials (such as solder paste, which is a mixture of powdered solder and flux) or special equipment (such as SMD solder stations).
The easiest way I have found to solder SMDs is to first glue the components in position on a PC board, then solder the connections. The procedure is:
• Clean the copper side of the board with a nonconductive abrasive pad until it is shiny. Wipe off any residue with a tissue and denatured alcohol.
• Glue the components into position using Duco cement. Apply the cement to the end of a toothpick, then use the toothpick to apply a drop of cement to
Land SMD
Concave solder fillet
U Fig. 4- Side view of an SMD
solder joint.
the circuit board. Do not get any glue on the pads or any place where you want the solder to flow.
• Using self-locking tweezers, position the components on the board. Let the adhesive dry.
• Gently nudge the components sideways with a toothpick. If a component moves, try gluing it again.
• Apply RMA-type paste flux to the component terminals and pads using a toothpick. Apply the flux where you want solder to flow. The function of the flux is to conduct heat from the soldering tip uniformly to the pad and component.
DX4WIN V6 Featuring Integrated PSK31,
and Dual Radio Support DX4WIN now combines the quality
features, flexibilty and customer support it's famous for, with a high
quality INTEGRATED PSK31 interface. No longer do you have to work PSK and then log in separate applications.
It can ALL be done within DX4WIN, using all standard DX4WIN features.
DX4WIN version 6.0 only $89.95 Shipping $6.95 US/$ 11 DX.
Upgrades available for previous versions
To order, or for more information, contact:
Rapidan Data Sys tems PO Box 418, Locust Grove, VA 22508 (540) 785-2669; Fax: (540) 786-0658
Email: [email protected]
Free version 6.0 demo and secure online ordering at
www.dx4win.com
^ C K T H E M W / ^ Use the Mast That Will Last
• American Made, 4130 Chrome Moly Steel Tubing
• Aircraft Grade, Tested to ASTM Standards • Cut to your needs, lengths up to 24' • OD2"to3 1/2", Mill Finish or Galvanized • Competitively priced and shipped to
your location
Don't Take Chances With Water Pipe, Aluminum or "Mystery Metal"!
Force 12 Antennas & Towers www.f orcel 2inc.com Orders 800.248.1985
Tech 805.227.1680 • Fax 805. 227.1684 PO Box 1349 Paso Robles, CA 93447
I! • # C
I m i H AUTO ^ H B
• AUTORANGi ITER
• ujunstto™^^;!.;:- t f H H ^ l L l H R J MSB MfecACKi:r *• w ttoMAS-- ̂ M p y k x j X & W • J$W
A simple multimeter can be used to measure the capacitance of an SMD component using the test tweezers.
The flux also removes surface oxides, which can prevent solder wetting.
• Touch the soldering tip to the pad. Never apply heat directly to the component (it may crack).
• Apply small-diameter solder (0.020 inch works well) to the pad adjacent to the component terminal. The solder will flow to the component and will form a fillet between the component and pad.
• Let the solder cool and remove the flux with denatured alcohol. Inspect with a 4X watchmakers loupe or magnifying glass. The solder joint should be a concave fillet, bright and mirror smooth with no pits, as shown in fig. 4.
Conclusion Working with SMDs can be challenging, but can also be a lot of fun. Like the transition from point-to-point wiring to printed circuit boards, it is similar to traditional through-hole technology but requires some new skills. Mastering SMD takes a little patience and practice, but it is well within the capabilities of most hams. •
40 • CQ • April 2003 Visit Our Web Site